vacuum cleaner aspiradora - c.searspartsdirect.com · read this manual before assembling or using...
TRANSCRIPT

Use & Care Guide
Manuat de uso y cuidado
Vacuum Cleaner
AspiradoraModem, Modelo721.36078
CAUTION: Read and follow aHsafetyand operating instructions before firstuse of this product,
CUIDADO: Lea y sigue todas Uasinstrucciones de operaci6n y seguridadantes deUuso de este producto,
Directions for UseIt is a violation of Federal law to use thisproduct in a manner inconsistent with itslabefing,
Direcciones de useEs una vio/acidn a la ley Federal utilizareste producto de una manera contrariacon su etiquetado.
Sears, Roebuck and Co., Hoffman Estates, IL 60179 U.S.Awww.sears.com
PART No, : 3828FU3840B Printed in China
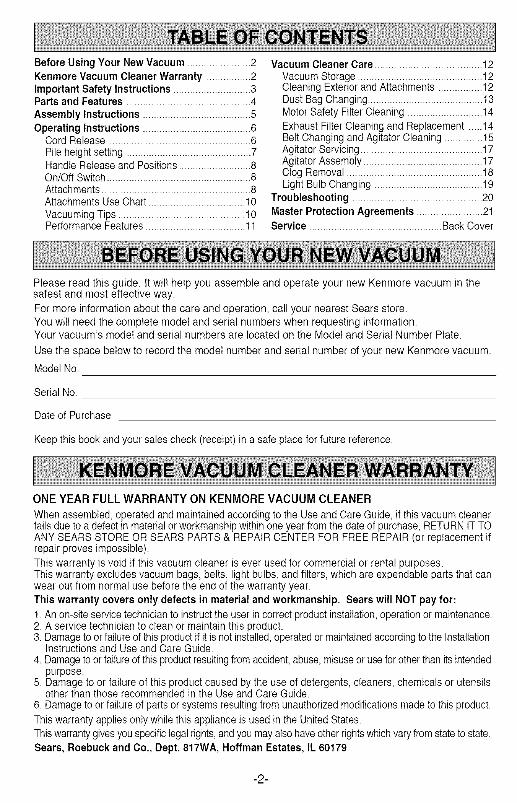
BeforeUsingYourNewVacuum.......................2KenmoreVacuumCleanerWarranty ................2ImportantSafetyInstructions............................3PartsandFeatures.............................................4AssemblyInstructions.......................................5OperatingInstructions.......................................6
CordRelease....................................................6Pileheight setting.............................................7HandleReleaseandPositions..........................8On/Off Switch....................................................8Attachments......................................................8AttachmentsUseChart...................................10VacuumingTips..............................................10PerformanceFeatures....................................11
Vacuum Cleaner Care ....................................... 12Vacuum Storage ............................................. 12Oleaning Exterior and Attachments ................ 12Dust Bag Changing .......................................... 13Motor Safety Filter Cleaning ........................... 14
Exhaust Filter Cleaning and Replacement ..... 14Belt Changing and Agitator Cleaning ............... 15Agitator Servicing ............................................ 17Agitator Assembly ........................................... 17Clog Removal ................................................. 18Light Bulb Changing ....................................... 19
Troubleshooting ............................................... 20
Master Protection Agreements ........................ 21Service ................................................ Back Cover
Please read this guide. It wil! help you assemble and operate your new Kenmore vacuum in thesafest and most effective way.
For more information about the care and operation, call your nearest Sears store.You witt need the complete model and serial numbers when requesting information.Your vacuum's model and serial numbers are located on the Model and Serial Number Plate.
Use the space below to record the model number and serial number of your new Kenmore vacuum.
Model No.
Serial No.
Date of Purchase
Keep this book and your sales check (receipt) in a safe place for future reference.
ONE YEAR FULL WARRANTY ON KENMORE VACUUM CLEANER
When assembled, operated and maintained according to the Use and Care Guide, if this vacuum cleanerfails due to a defect in material or workmanship within one year from the date of purchase, RETURN IT TOANY SEARS STORE OR SEARS PARTS & REPAIR CENTER FOR FREE REPAIR (or replacement ifrepair proves impossible).
This warranty is void if this vacuum cleaner is ever used for commercial or rental purposes.This warranty excludes vacuum bags, belts, light bulbs, and filters, which are expendable parts that canwear out from normal use before the end of the warranty year.This warranty covers only defects in material and workmanship. Sears will NOT pay for:
1. An on-site service technician to instruct the user in correct product installation, operation or maintenance.2. A service technician to clean or maintain this product.3. Damage to or failure of this product if it is not installed, operated or maintained according to the Installation
Instructions and Use and Care Guide.4. Damage to or failure of this product resulting from accident, abuse, misuse or use for other than its intended
purpose.5. Damage to or failure of this product caused by the use of detergents, cleaners, chemicals or utensils
other than those recommended in the Use and Care Guide.6. Damage to or failure of parts or systems resulting from unauthorized modifications made to this product.
This warranty applies only while this appliance is used in the United States.This warranty gives you specific legal rights,and you may also have other rights which vary from state to state.
Sears, Roebuck and Co., Dept. 817WA, Hoffman Estates, IL 60179
-2-

m I_/Al_l_l I I_1/__
U --/'_1_1_11 I_1_1 - To reduce the risk of fire, electric shock, or injury:
Your safety is important to us. To reduce the risk of fire, electric shock, injury topersons or damage when using your vacuum cleaner, follow basic safety precautionsincluding the following:
Read this manual before assembling or using¢our vacuum cleaner.
Use your cleaner only as described in thismanual. Use only with supplied attachments.To reduce the risk of electric shock- Do notuse outdoors or on wet surfaces.
Do not vacuum up water.
Disconnect electrical supply before servicingor cleaning out brush area. Failure to do socould result in electric shock or brush suddenlystarting.
Always turn cleaner off before connecting ordisconnecting the hose.
Always turn cleaner off before unplugging.
Do not unplug by pulling on cord. To unplug,grasp the plug, not the cord.
Hold plug when rewinding onto cord reel.
Do not allow plug to whip when rewinding.
Do not use with damaged cord or plug. Ifcleaner is not working as it should, has beendropped, damaged, left outdoors, or droppedinto water, return it to a Sears Service Center.
Do not pull or carry by cord, use cord as ahandle, close door on cord, or pull cord aroundsharp edges or corners. Do not run cleaner overcord. Keep cord away from heated surfaces.
De not leave cleaner when plugged in. Unplugfrom outlet when not in use and before servicing.
Do not allow to be used as a toy. Close attentionis necessary when used by er near children.
Do not handle plug or cleaner with wet hands.
Do not operate the cleaner with a puncturedhose. Replace if cut or worn. Avoid vacuumingsharp objects.
De not use withany openingblocked; keepfree of dust, lint,hair and anythingthat mayreduceair flow.Keep hair, looseclothing,fingers, and all partsof bodyaway from openingsand moving parts.De not use cleanerwithoutdust bag and/orfilters in place.Alwayschangethe dust bag aftervacuumingcarpetcleanersor freshener,powdersandfinedust.These productsclog the bag, reduceairflowand cancause the bagto burst. Failureto change bagcould cause permanentdamageto the cleaner.Keep the PE bag (withholes) away frombabiesandchildren,donot usein cribs,beds,carriages,or playpens.This thin film maycling to noseandmouthand prevent breathing.De not use the cleanerto pick upsharp hardobjects,small toys, pins,paper, etc.They maydamagethe cleaneror dust bag.Donot pickupanythingthatis burningorsmoking,suchascigarettes,matches,or hotashes.Do not usevacuumcleanerto pick up flammableorcombustibleliquids(gasoline,cleaningfluids,perfumes,etc.), or usein areaswhere theymay bepresent.The fumesfromthese substancescancreatea fire hazardor explosion.Use extra care when cleaningon stairs. Donotput onchairs, tables, etc.Keep on floor.Youare responsiblefor making surethat yourvacuumcleaneris not usedby anyone unableto operate it properly.
SAVE THESE INSTRUCTIONSProper assembly and safe use of your vacuum cleaner are your responsibilities. Your cleaner isintended only for household use. Read this Owner's Manual carefully for important use andsafety information. This guide contains safety statements under warning and caution symbols.Please pay special attention to these boxes and follow any instructions given. WARNINGstatements alert you to such hazards as fire, electric shock, burns and serious personal injury.CAUTION statements alert you to such hazards as moderate personal injury and/or property damage.
-3-

It is important to know your vacuumcleaner's parts andfeatures to assure its properand safeuse, Review these beforeusing your cleaner.
Item Part No.
Dust Bag 50688Belt 5275Filter 86878
Butb 5240
el
Cord Hanger
LowerCord Hanger
ExtensionWand
Dusting Brush/Upholstery Too!
Hose
Handle
Hose Holder
Dust Cover
Exhaust Panel
Height Adjustment
Bumper _..,_
On/Off Switch
/
9/
Light
E-Z Belt Check
Pedal
Crevice Tool
_Floor Nozzle
_Agitator
-4-

Before assembling your vacuum, check thecarton contents against the following list.If any parts are missing or damaged call1-800-4-MY-HOME®.
VacuumHandleWandHoseOreviceTool
Dusting Brush/UpholsteryToolUse & Oare Guide
Parts List
WARNINGElectricShockHazard
Do not plug intothe electrical supply untilthe assemblyis complete,Failureto do so could result inelectric
shockor injury.
HANDLE ASSEMBLYRemove the screw located just below the topedge of the back of the vacuum.
Position the handle as shown below and slide
the handle into the opening at the top of thevacuum.
Insert the screwso it passesthrough the handleinto the vacuum.
Tighten the screw securely witha screwdriver.It may be necessary to adjust the handleslightly.
CAUTIONovertighten,hteningcould stripthe screw holes,operatethe cleanerwithoutthe
n p ace,
-5-

HOSE ASSEMBLYAfter the handle has been assembled, attach thelower hose holder (see below). Insert the upperhose end into the opening on the upright back.Place the hose over the hose holder. Clip thehose into the lower hose holder. Slide and twistthe lower hose end into the hose coupling on thefloor nozzle. Make sure hose is firmly connectedbefore using the vacuum.
HoseHolder
Lower Hose
Holder
Upper
Hose CouplingEnd
CORD ASSEMBLYMake sure the quick release cord hanger is inthe upright position.
Lock the cord into
place by forcing itinto the lockingnotch on the bodyof the upper cordhanger as shown.This helps keep thepower cord out ofthe path of the floornozzle.
LockincNotch
Cord
Wrap thepower cord
_ around thequick releasecord hangerand lower cord
hanger, andclip the plugonto the powercord.
OPERATING tNSTRUCTBONS
1, Turn the quickrelease cord hangerto either side anddown to release thepower cord.
__ uick
ReleaseCord
Hanger
2, Unclip the plug from the power cord and pullthe cord off the quick release cord hanger.Check to be sure the power cord is still lockedinto the locking notch. See CORD ASSEMBLY.
3, Check to see if the cteaner has baginstalled. See DUST BAG CHANGING.
4, Hug the polarized power cord into a 120Volt electrical outlet.
NOTE: To reduce the risk of electric shock, thisvacuum cleaner has a polarized plug, oneblade is wider than the other. This plug will fit ina polarized outlet only one way. It the ptug doesnot fit futly in the outlet, reverse the plug. if itstill does net fit, contact a qualified electrician toinstalt the proper outlet. Do not change the plugin any way.
Persona_ Injury and Product DamageHazard!
DO NOT p_ug in if switch is in ONposition. Persona_ injury or productdamage could result.
DO NOT use outlets above counters.
Damage to items in surrounding areacould occur.

To select a pile height setting:
When it is necessary to raise and lower thenozzle for various carpet pile heights, first turnoff your cleaner. Then tilt the vacuum cleaner __back until the front wheels are slightly off the Ytfloor and slide the height adjustment knob to
the desired setting. _,_.
Recommended pile height settings:High: Shag carpet, long pile, plush, scatter rugs
Med: Medium to long pile
Low: Short to medium pile
Ex Low: Very low pile
WARNING
Personal Injury Hazard!
DO NOT place hands or feet underneath the unit when changing from the
bare floor to the carpet pile height setting.
The agitator revolves rapidly when the vacuum is turned on and is in the
carpet setting.
-7-

Release the handle by pressing down on thehandle release pedal with your foot and pullingback and down on the handle with your hand.
/J /
HandlejRelease Pedal
The vacuumcleaner hasthree positions:
Uprightfor storageandwhenusingcleaningtools.
- Angledfor carpetandfloorcleaning.Lowfor reachingunderfurniture.
The On/Off switch is located on the vacuumcleaner body just below and to the side of thehandle. Push the switch to ON to start thecleaner, and to OFF to stop it.
Cord
Handle
Switch
Wand
Brush
Hose
Hose Connector
TO USE ATTACHMENTS
Remove the lower end of the stretch hose fromthe cleaner by grasping the hose connector,twisting and pulling straight out.
NOTE: The motor protector may open causingpoor pick up, when using attachments or whencleaning new carpet, due to reduced airflowcaused by the attachments themselves, or bynew carpet fuzz filling the bag quickly. SeeCLOG REMOVAL.
WARNINGElectric shock and Personal InjuryHazard
Disconnectelectricalsupplybeforeservicingorcleaningtheunit.Failureto do socouldresultin electricshockorpersonalinjuryfromcleanersuddenlystarting.
-8-

!=/ExtensionWand
Remove the crevice tool from its storageposition.Remove the extension wand from its storageposition in the wand.Remove hose from the floor nozzle and attachthe extension wand. Attach the extensionwand onto the open end of the hose.Add the crevice tool to the end of the wandby inserting and twisting slightly. The crevicetool doubles as a wand extension.The dusting brush/upholstery tool will fit ontoits tip, allowingfor maximum cleaning reach.The dusting brush/upholstery tool may alsobe attached directly to the shorter extensionwand.
Wand
OreviceTool
The dusting brush/upholstery tool has twooptions. When the front brush is removedthe remaining part can be used as anupholstery tool.
Upholstery__
Brush
F.I CAUTIONWhen using attachments, be carefulnot to overextend the stretch hosewhen reaching. Trying to reachbeyond the hose stretch capabilitycould cause the cleaner to tip over.
TO STORE ATTACHMENTS
Remove dusting brush/upholstery tool fromwand. Snap into its storage location.
Remove crevice tool from the wand by twisting.Remove the extension wand from the hose.
Twist the wand and pull from the hose end.
Place the crevice tool down into the extensionwand. Snap wand into its storage location.
Be sure the unit is turned off. Reinsert the hose
fully into hose coupling from which itwasremoved. Press firmly to assure connection.
WARNINGPersonal injury Hazard
DO NOT place hands or feetunderneath the unit when inserting thehose. The agitator revolves rapidlywhen the vacuum is turned on.
-9-

CLEANING AREA
BetweenCushions* Drapes*
X
X
X
ATTACHMENTFurniture* Stairs Walls
DUSTING X X XBRUSH
CREVICE_TOOL X X
UPHOLSTERY_-_TOOL _'_-_S_ X X
* Alwaysclean attachmentsbefore usingon fabrics.
Carpet edges For best cleaning results, keep the airflowGuide either side or the front of the nozzle passage clear.
along a baseboard. The full length brushes helpremove dirt at carpet edges.
Stairs
Put handle in full upright position. Use thecrevice tool or dusting brush/upholstery tool.
WARNINGPersonal Injury Hazard
Use care if vacuumcleaner is placedonstairs, If it falls, personal injury orpropertydamagecould result.
Occasionally, check each of the areas indicatedfor clogs.
Unplug the cleaner from the outlet beforechecking for clogs.
-10-

WARNINGElectric Shock And Personal InjuryHazard
Disconnect electrical supply beforeservicing or cleaning the unit.Failure to do so could result inelectric shock or personal injury fromcleaner suddenly starting.
Press handle release pedal and place handlein low position.
Using a coin, turn the two slots on either sideof the hood as shown.
Rotate hood toward front of cleaner andremove the hood.
MOTOR PROTECTIONSYSTEM
This vacuum has a motor protector by-passvalve which automatically opens to providecooling air to the motor when a clog preventsthe normal flow of air to the motor. If the by-pass valve opens to prevent motor overheatingand possible damage to the vacuum, you willnotice a change of sound as air rushes throughthe valve opening.
To correct problem:Check for and remove clogs.See CLOG REMOVAL.
-11-

VACUUM CLEANER CAREAlways follow alI safety precautions when cleaningand servicing the vacuum cleaner.
Gather the cord and wrap it loosely around the
WARNINGElectric Shock And Personal InjuryHazard
Disconnect electrical supply beforeservicing or cleaning the unit.Failure to do so could result inelectric shock or personal injury fromcleaner suddenly starting.
quick release cord hanger and carry handle.
mStore the cleaner in a
dry, indoor area, on thefloor with the handle
locked in the uprightposition.
WARNINGElectric Shock And Personal InjuryHazard
Wrapping the cord too tightly putsstress on the cord and can causecord damage. A damaged cord is anelectric shock hazard and could
cause personal injury or damage.
Unplug cord from wall outlet. DO NOTdrip water on cleaner.
Clean exterior using a clean, soft cloth that hasbeen dipped ina solutionof mild liquiddetergentand water, then wrung dry. Wipe exterior dryafter cleaning.
Wash attachments in warm soapy water, rinseand air dry. Do not clean in dishwasher.
CAUTIONDo not use attachments if they arewet. Attachments used in dirty areas,such as under a refrigerator, shouldnot be used on other surfaces until
they are washed. They could leavemarks.
-12-

TO REMOVE BAG
WARNING
Always unplug power cord fromelectrical outlet before performingany service on vacuum.
Pull the dust covergrip forward.Remove cover andlay aside.
Cover
Grasp the dust bagcollar and pullgently, carefullyremoving the dustbag.
Throw away the Bagused dust bag.Do not reuse.
CAUTIONNEVER REUSE A DUST BAG. Veryfine materials, such as carpetfreshener, face powder, fine dust,plaster, soot, etc. can clog the bagand cause it to burst before it is full.
Change bag more often whenvacuuming these materials.
BagHolder
BagCavity
MotorSafety iFilter _
Check the bagholder and the
motor safety filter.
If either is blocked,clean them. SeeMOTOR SAFETYFILTERCLEANING.
TO REPLACE BAG
Unfold the new dust bag.
Insert the dust bagonto the bag holdercompletely byholding the bagcollar as shown andsnapping it intoposition.
Be sure bottom of dust bag is completely withindust bag cavity prior to replacing the dustcover.
DustPosition the dust Covercover so its /,positioning tab fits __into the slot on thevacuum body base.
DustCover
Close the dustcover.
You will hear adistinct snap whencover is securelyclosed.
-13-

Check motor safety filter frequently.
If the motor safety filter, located in the bottom ofthe dust bag cavity is dirty, remove it by pullingforward out from under the ribs.
Foam JFilter
Wash the foam filter in warm soapy water.Rinse and dry thoroughly by squeezing the filterin your hand and letting it air dry.
DO NOT wash filter in the dishwasher.
DO NOT install damp filter,
Replace the foam filter by sliding it back intoplace under the ribs in the dust bag cavity.
WARNINGElectric Shock Hazard
Do not operate the cleaner withoutthe motor safety filter. Be sure thefilter is dry and properly installed toprevent motor failure and/or electricshock.
Always unplug power cord fromelectrical outlet before performingany service on vacuum.
noWARNI NGt operate without exhaust filter.
Your vacuum has a HEPA filter to trap fine dustparticles so that they are not exhausted into theroom air. If you use vacuum frequently, youshould replace the HEPA filter every 6 months.
Check the filter frequently. To prolong theuseful life of the filter, remove it and clean bytapping it against a hard surface to remove dirt.You may also brush or vacuum the dirt away.
DO NOT wash the HEPA filter or it willlose its dust trapping ability.
Pull the dust coverforward. Remove
and lay aside.
Cover
Remove the exhaust filter by pulling it out.
Exhau Replace theexhaust filter,carefullypositioning it so
that it fits into theframe with the
blue sidefacingout.
Carefully replace thedust cover by placing li//_tabs in slots and I:_LL../_--_J
pushing in until cover Jt_
snaps into place. _/._/4_.... I I
-14-

WARNINGElectric Shock or Personal InjuryHazard
Disconnect electrical supply beforeservicing or cleaning the unit.Failure to do so could result in
electric shock or personal injuryfrom cleaner suddenly starting.
Frequentlycheckand removehair, string andlint build-up in the brush area. If build-upbecomes excessive, follow the steps below.
TO REMOVE BELT
Disconnectpower cordfrom electricaloutlet
Using a coin toturn the latchesand removenozzle cover.
Latches
JNozzleCover
Position hands on the agitator. If the beltis still attached to the agitator, sever withscissors and remove it. Carefully lift theright end of the agitator and theleft end.
j J"
Agitator
Note: It may be necessary to pull on the edgeof bumper to allow the ends of the agitator tobe removed easily.
CLEAN AGITATOR
To clean the agitator, remove string or hair thatmay be wrapped around it.Note: In order to keep cleaning efficiency highand to prevent damage to your vacuum, cleanthe agitator every time you change the belt.Clean the agitator according to the followingschedule:
Vacuum Use Clean Agitator
HEAVY every week(used daily)
MODERATE every month(used 2-3 times/week)
LIGHT every 2 months(used 1 timetweek)
oO Oy OCAUTIONt disassemble the end cap,
u will damage the agitator.
End Cap\
\,
-15-

TO REPLACE BELTMake sure that the carpet/bare floor selector isin the carpet position and the vacuum body islaid down on the floor.
Loop the new belt on the motor shaft.
....Newj/
Belt_ BeltPulley
Note: See PARTS AND FEATURES for beltnumber.
Loop the other end of the belt on the belt pulleyon the agitator.Insert the left agitator end cap, arrow down, intoits slot inthe nozzle base. Pullthe agitatorforwardand insert the right end cap, arrow down, into itsslot in the nozzle agitator base.
Note: Care must be taken due to the belt
tension during reassembly.
Agitator /__ . Nozzle
//_ Base SlotBumper End Cap
Press firmly, checking to see that each end is
completely inserted.
Agitatdr
Check to see that the belt is centered on thebelt pulley. Turn the agitator with your fingers tosee that it turns freely.
Replace the nozzle cover and secure thelatches.
Latches
J
Nozzle Cover
-16-

_ WARNINGElectric Shock or Personal InjuryHazard
Disconnect electrical supply beforeservicing or cleaning the unit.Failure to do so could result in
electric shock or personal injuryfrom cleaner suddenly starting.
TO CH ECK AGITATORTurn the vacuum over to check for wornbrushes. When brushes are worn to the level of
the base plate belt guard, replace the agitator.
Base Plate Belt Guard
TO REPLACE AGITATORRemove the nozzle cover and agitator. SeeBELT CHANGING AND AGITATORCLEANING.
Replace agitator with a new one.
Reassemble the belt, agitator and nozzle cover.See BELT CHANGING AND AGITATORCLEANING.
-17-

Always follow all safety precautions whencleaning and servicing the vacuum cleaner.
WARNINGElectric Shock Or Personal InjuryHazard
Disconnect electrical supply beforeservicing or cleaning the unit.Failure to do so could result in
electric shock or personal injuryfrom cleaner suddenly starting.
If the cleaner does not seem to have adequatesuction, first check to see if the bag is full or if afilter is clogged. See instructions in DUST BAGCHANGING and MOTOR SAFETY FILTERCLEANING.
If the bag and filter areas are free of clogs,check the hose area. Remove the lower end ofthe stretch hose from the cleaner by graspingthe hose connector, twisting, and pullingstraight out.
Plug in the vacuumand turn it on.
Stretch the hose tomaximum lengthand then allow thehose to return to itsstorage length.
Turn the unit off
and unplug the unit.
Remove any visibleclogs from thehose.
i
HoseConnector
Re-insert the hose into the opening on thelower body from which it was removed. Pressfirmly to assure connection.
If the bag and filter areas and the hose areasare free of clogs, check the floor nozzle area.To check this area, see the sections on BELTCHANGING AND AGITATOR CLEANING.
Return the cleaner to the upright position beforeplugging into an electrical outlet.
For best cleaningresults, keep the airflowpassage open. Youshould check yourvacuum occasionally forclogs. The arrows inthis figure indicate theairflow path whereclogs occur. Unplugvacuum beforechecking for clogs.
WARNINGPersonal Injury Hazard
DO NOT place hands or feetunderneath the unit when insertingthe hose. The agitator revolvesrapidly when the vacuum is turned onand is in the carpet setting.
-18-

WARNINGElectric Shock or Personal InjuryHazard
Disconnect electrical supply beforeservicing or cleaning the unit.Failure to do so could result in
electric shock or personal injuryfrom cleaner suddenly starting.
Disconnect the power cord from the electricaloutlet.
To access the light bulb, first lower handle tolay vacuum body flat and remove dust cover,then remove the screws which secure the
light cover to the vacuum. Remove the cover.
Remove the light bulb by pushing the bulb inwhile turning counterclockwise to release fromthe slot. Pull the light bulb straight out.
To release
%ulbSocket
Bulb
CAUTIONDo not use a bulb rated over 130 V
AC-25W. During extended use, heatfrom the bulb could overheat
surrounding plastic parts.
To replace
To replace the light bulb, carefully insert and
turn clockwise to fit securely into slot.
NOTE: Use Sears replacement bulb.See page 4.
Position the light cover back on the vacuum.
Replace the light cover screws.
CAUTIONDo not plug in or turn on untilcompletely reassembled.
-19-

Review this chart to find do-it-yourself solutions for minor performance problems. Any other serviceneeded, other than those described in this owner's manual, should be performed by a Sears or other
qualified service representative.
WARNING ElectricShockHazard
Disconnect electrical supply before servicing or cleaning the unit.
Failure to do so could result in electric shock or personal injury.
Cleaner won't t. Unplugged at wall 0utiet. 11Plug in iirmly, press the oN/0FF switch to ©Nstart. 2. Tripped circuit breaker/blown 2. Reset circuit breaker or replace fuse
fuse at household servicepanel.
3. ONIOFF switch not turned ON. 3. Push ON/OFF switch to ON.
Poor job of dirtpick-up.
t. Furl or clogged dust bag.2. Wrong pile height setting.3. Worn agitator.4. Clogged nozzle or dirt tube5. Clogged hose.6. Hole in hose.7. Broken/misplaced belt.8. Hose not inserted fully.9. Motor protection system
activated.10. Dirty filters
1. Change dust bag, (page 13).2. Adjust setting, (page 7).3. Replace agitator, (page t7).4. Clean nozzle area, (page t8).5. Check for clogs, (page 18).6. Replace hose.7. Replace/fix belt, (page t5-16).8. Insert hose fully, (page 8-9).9. Check for clogs, (page 18).
10 Clean filters, (page 14).
Cleaner picks up 1. Wrong pile height setting. 1. Adjust setting, (page 7).movable rugs, orpushes too hard.
Light won't work. 1. Burned out light bulb 1. Change light bulb, (page 19).
Agitator does not t. Broken belt. 1. Replace belt, (page 15-16).turn. 2. Belt installed incorrectly 2. Check BELT CHANGING AND AGITATOR
CLEANING, (page 15-16).
Performance t.Fult or clogged dust bag. 1. Change dust bag, (page t3).indicator, some 2. Dirty filters. 2. Clear filters, (page t4).models, is red. 3. Clogged airflow passage-dirt 3. Clear clog from airflow passage, (page 18).
tube, nozzle, hose.4. Certain attachment tools. 4. Should return to normal when tool is removed.
Air flow restricted 1. Attachment use restricts air 1. Check ATTACHMENTS, (page 8-9).with attachment flow.use. Sound 2. New carpet fuzz clogged air 2. Check CLOG REMOVAL and clean hose,changes, path. (page 18).
Excessive noise 1. Belt rubbing on carpet/bare 1. Push selector all the way forward.as vacuum is floor selector shaft.shut off.
-20-

Master Protection AgreementsCongratulations on making a smart purchase.Your new Kenmoree product isdesigned andmanufactured for years of dependable operation.But like all products, it may require preventivemaintenance or repair from time to time.That's when having a Master Protection Agreementcan save you money and aggravation,Purchase a Master Protection Agreement now andprotect yourself from unexpected hassle andexpellee.
The Master Protection Agreement also helps extendthe life of your new product. Here's what's included inthe Agreement:
[] Expert service by our 12,000 professional repairspecialists
[] Unlimited service and no charge for parts andlabor on all covered repairs
[] "No-lemon" guarantee - replacement of yourcovered product if four or more product failuresoccur within twelve months
[] Product replacement if your covered productcan't be fixed
[] Annual Preventive Maintenance Check at yourrequest - no extra charge
[] Fast help by phone - phone support from aSears technician on products requiring in-homerepair, plus convenient repair scheduling
[] Power surge protection against electricaldamage due to power fluctuations
[] Rental reimbursement if repair of your coveredproduct takes longer than promised
Once you purchase the Agreement, a simple phonecall is all that it takes for you to schedule service.You can call anytime day or night, or schedule aservice appointment online.
Sears has over 12,000 professional repair specialists,who have access to over 4.5 million quality parts andaccessories. That's the kind of professionalism youcan count on to help prolong the life of your newpurchase for years to come. Purchase your MasterProtection Agreement today!
Some limitations and exclusions apply.For prices and additional information call1-800-827-6655.
Sears Installation Service
For Sears professional installation of homeappliances, garage door openers, water heaters, andother major home items, in the U.S.A. call1-800-4-MY-HOME _
-21-

Antes de utimizar la nu_va aepiradora ................. 1Garantia Kenmore para la aspiradora ................. 1mnstruccienesimpo_antesacercademaseguridad.........2PJezas y funeienes .............................................. 3lnstruceienes de montaje .................................. 4lnstruceienes de funcionamiente ...................... 5
ExtracciSndel cable.............................................. 6Altura del recogedor .......................................... 6DesNoqueo y posiciones del asa ....................... 7mnterruptorde encendido y apagado ................... 7Accesorios .......................................................... 7Diagrams de utilizaci6n de ruesaccesorios .........9Consejos pars la aspiraci6n ............................... 9Caracteristicas de rendimiento ......................... 10
Mantenimiento de la aspiradora ........................ 11Almacenamiento de Raaspiradora .................... 11Limpieza demexterior y los accesorios .............. 11Cambio de mabolsa pars el polvo ..................... 12Limpieza del filtro de seguridad del motor ......... 13Cambio y sustituciSn del filtro de escape .......... 13Cambio de Racorrea y limpieza del agitador._...t4Mantenimiento del agitador ................................ !5Conjunto del agitador ......................................... 16EliminaciSn de obstrucciones ............................ 17Cambio de mabombiHa ....................................... 18
Resolucion de probmemas ................................... !9Acuerdos Acercs De La Protecci6n .................. 20ReparaciSn .................................... Cubierta trasera
Lea estaguia. Le ayudar_,a realizar el montajey a utilizarla nuevaaspiradoraKenmorede laforma masseguray eficaz.Llame al almac6n Sears m&s cercano si desea obtener mas informaci6n acerca del cuidado y el mantenimiento.Necesitara los nt_merosde serie y de modelo al solicitar la informaciSn.Los nt3merosde serie y de modelo de la aspiradora se encuentran en la placa del nQmerode serie y de modelo.Utilice el siguiente espacio pars anotar estos nt_merosde la nueva aspiradora Kenmore.Node modelo:
No de serie:
Fecha de compra:
Guarde este libro y la prueba de compra (recibo) en lugar seguro para su posterior consulta.
GARANTiA COMPLETA DE UN ANO PARA ASPIRADORAS KENMORE
Siesta aspiradora falla debido aun defecto en material o mane de obra antes de que pase un afio de suadquisici6n, y siempre que haya side montada, operada y se hayan Ilevad,oa cabo tareas de mantenimientode acuerdo con las instrucciones de la Guia de Use y Cu!dado, PODRA DEVOLVERLA A CUALQUIERESTABLECIMIENTO SEARS O CENTRe DE REPARACION Y SUMINISTRO DE PIEZAS SEARS PARAUNA REPARACION GRATIS (o recambio del aparato si no se pudiese reparar).Esta garantia queda anulada si la aspiradora se utilice en instalaciones comerciales o se alquila.Esta garantia excluye las bolsas de aspiraci6n, correas, bombillas y filtros. Estas piezas pueden desgastarsedebido aun use normal antes de que transcurra un afio de la adquisici6n de la garantia.Esta garantia _3nicamente cubre los defectos que oeurran debido al material o a la mane de obra.Sears NO se har_ cargo de :1. los costes en que se incurra al Ilamar aun tecnico para ensefiar al usuario a utilizar correctamente el producto,
a instalarlo o realizar tareas de mantenimiento.2. los costes en que se incurran para que un t6cnico limpie o realice tareas de mantenimiento en este producto.3. los dafios o fallos que sufra este producto si no se instal& opera ni se realiza mantenimiento en ella segQn
se describe en las Instrucciones de Instalaci6n yen la Guia de Use y Cuidado.4. los dafios o fallos que sufra este producto y que sean ocasionados per accidentes, abuses, un mal use o un
use para el cual el aparato no est& indicado.5. los dafios o fallos que sufra este producto y que sean provocados per el use de los detergentes, limpiadores,
productos quimicos o utensilios que no sean los recomendados en la Guia de Use y de Cuidado.6. los dafios o fallos que sufran las piezas o sistemas y que sean el resultado de modificaciones realizadas al
producto.Esta garantia sSIo es aplicable mientras el producto se utilice en los Estados Unidos.Esta garantia no le ofrece derechos legales especificos, y usted puede tener otros derechos que variar_,ndeEstado a Estado.
Sears, Roebuck and Co., Dept. 817WA, Hoffman Estates, IL 60179
-1-
_AT E N CI 0 N - parareducire,riesg0dequesepr0duzcanfueg0s,sacudidase,ectricas0daff0spers0na,es:
Su seguridades importantepara nosotros,parareducirel riesgode que seproduzcanfuegos, sacudidaselectricaso da_os personalesal utilizar la aspiradora,siga estas precauciones de seguridad:
Leaestemanualantesdemontaro utilizarlaaspiradora,
IJtilicelaaspiradoratJnicamentedelaformaenquesedescribeenestemanualUtilice_Jnicamentelosaccesoriossuministrados.
Parareducirelpeligrodequeseproduzcansacudidaselectricas,nolautiliceenelexteriornisobresuperficiesmojadas.Desconecteelsuministroelectricoantesderealizarreparacionesolimpiarlazonadelcepillo,Sinodesconectalaunidad,sepodrianproducirsacudidaselectricasoelencendidorepentinodelcepillo,
Apaguelaaspiradorasiempreantesdeconectarodesconectarlamanguera,Apaguesiemprelaaspiradoraantesdedesconectarla,
Nodesenchufeelaparatotirandodelcable,Sujeteelenchufey noelcableparadesconectarlo,
Sostengaelenchufealenrollarlabobinadelcable,Intentequeelcablenoseenrollebruscamente,Noutiliceelcablenielenchufesi est;_dafiado,Silaaspiradoranofuncionacomedebiera,sehacaido,estadafiada,sehadejadoenelexteriorosehacaidoalagua,devuelvalaalCentredemantenimientodeSears,
Notiredelcable,manejalaaspiradoraperelni Ioutilicecomoasa,nopilleelcableconlapuertani Iopaseperbordesniesquinasafilados,
Notransportelaaspiradoraatravesdelcable,Mantengaelcablealejadodesuperficiescalientes,Nodejelaaspiradorasinsupervisi6nsiest;_enchufada,DesenchtJfeladelatomadelaparedcuandonolautiliceytambienantesdelmantenimiento,
Nodejequeseutilicecomejuguete,Tengaespecialcuidadocuandolautilicennifiososeutilicecercadeellos,
Nomanejeelenchufeni laaspiradoraconlasmanesmojadas,
Noutilicelaaspiradorasilamangueraestaperforada.Sustituyalasiestacortadaodesgastada,Eviteaspirarobjetosafilados,Nolautilicesi lasaperturasest;_nbloqueadas,mantengalassinpolvo,hilas,pelosocualquiercosaqueredujeseelflujodeaire,Mantengalasaperturasy laspiezasmoviblesalejadasdelpelo,ropasuelta,dedosyotraspartesdelcuerpo,Noutilicelaaspiradorasinlabolsaparaelpolvoy/osinlosfiltrosensulugar,Cambiesiemprelabolsaparaelpolvodespuesdeaspirarproductosdelimpieza(polvos,ambientadores,etc,)paraalfombras,Estosproductospuedenobstruirlabolsa,reducirelflujodeairey puededarlugaraquesequemelabolsa.Sinosecambialabolsasepuedenproducirdafiospermanentesenlaaspiradora,Noutilicelaaspiradorapararecogerobjetosafilados,juguetespequefios,papeles,pins,etc,,yaquepodriandafiarlaaspiradoraolabolsaparaelpolvo,Norecojaelementosqueardanohumeen,comecigarrillos,cerillaso cenizas,NoutilicelaaspiradorapararecogerliquidosinflamablesoIiquidoscombustibles(gasolina,fluidosdelimpieza,perfumes,etc,)ni lautiliceenzonascercadeestosproductos,Losemanacionesdeestassustanciaspuedendarlugara peligroso explosiones,
Tengaespecialcuidadoallimpiarescaleras,Nolacoloquesobresillas,mesas,etc,Mantengalasobreelsuelo,
Tendralaresponsabilidaddeasegurarsequelaaspiradoranolautilizanadiequenoestecapacitadoparautilizarlaadecuadamente,
GUARDE ESTAS INSTRUCCIONESSer_.responsabledel montajey deunautilizacionseguraadecuadade laaspiradora.Laaspiradoraesta.disefladaparautilizarlaLinicamenteenel hogar.Leaconatencionel Manualdel propietarioparaobtenerinformacionimportanteacercade la utilizaciony seguridaddel aparato.Estaguiacontieneinformacionrelativaa la seguridadbajolossimbolosdeadvertenciay atencion.Presteatenci6nespacialalas cajasconestossimbolosy sigalasinstruccionesquese dan.La informaciondeADVERTENClAle avisaqueexistenpeligroscome,fuego,sacudidaselectricas,fuegosy dafiospersonalesseries.La informaciondeATENCI()Nleavisaquehaypeligroscome,dafiopersonalmoderadoy/o dafiosen lapropiedad.
-2-

Es importante que conozca las piezas y las funciones de la aspiradora para asegurar unautilizaci6n correcta
EIemento
Bolsa para et polvoOorrea
FiltroBombilla
segura. Revise estas secciones antes de utilizarla aspiradora
N°de pieza50688
5275
868785240
Asa
Soporte de
Cubierta antipolvo
Desbloqueo r@ido
Gancho para el cable
Asa tran_
Oepillo para el
polvo/tapiceria
Cepilloparaelpolvo/tapicefia
Pedal de
desbloqueodelasa
Protector del motor
Manguera alargabb
Panel de escape
Ajuste de altura
Bot6n ____._<
Parachoques
Interruptor de Luzencendido y apagado
Comprobaci6n de la correa E°Z
Pedal
Herramienta para huecos
Boquilla para e! suelo
Agitador
-3-

Antes de montar la aspiradora, verifique loscontenidos de la caja comparandolos con lalistasiguiente.Si falta o se han dai_adoalgunapieza, Ilame al 1-800-4-MY-HOME®.
• Aspiradora• Asa
• Vanlla
• Manguera• Herramienta manual
• Cepilio quitapolvo/herramienta para tapiceria
• Guia de Use y Cuidado
• Lista de piezas
ADVERTENCIAPeligrode sacudida el_ctrica
Noconecte la unidadal suministro el_ctrico
hastaque el montaje se hayacompletado,
Si no desconecta la unidad,se podrianproducirsacudidas el_ctricaso dai_os,
MONTAJE DEL ASAQuite el tornillo del mango Iocalizado justodebajo del borde superior de la parte posteriorde la aspiradora, ver ilustracion de arriba
Coloque el asa tal y como se muestra y desliceel asa hacia la apertura de la parte superior dela aspiradora
Introduzca el tornillo por el asa hasta laaspiradora
Handle
Ajuste el tornillo con firmeza con undestornillador Es posible que sea necesarioajustar un poco el asa
ATENCION
No Io aprietedemasiado.
Losorificio8para los tornillos se puedenestropearsi los aprietademasiado.Noutilicela unidad8i los filtros no estbncolocadosen su lugar,
-4-
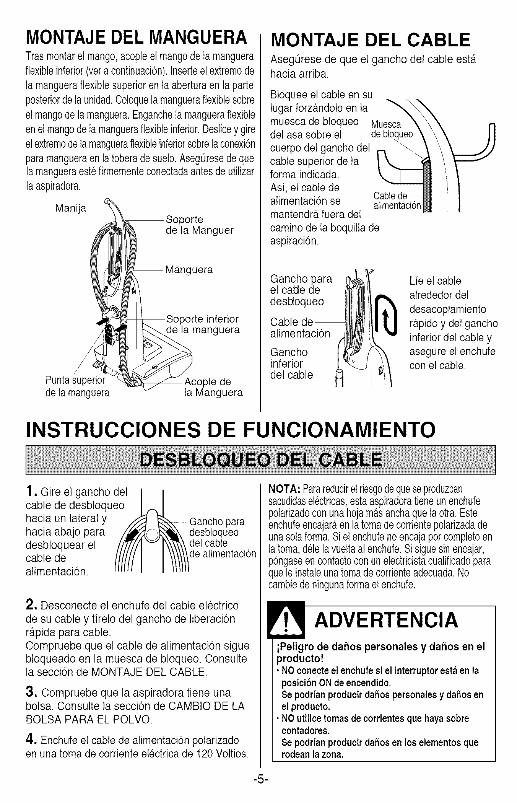
MONTAJE DEL MANGUERATrasmontarel mango,acopleelmangode lamangueraflexibleinferior(veracontinuaoi6n).Inserteel extremodeta mangueraflexiblesuperioren laaberturaen la parteposteriordelaunidad.ColoquelamangueraflexiblesobreeImangode lamanguera.Enganchetamangueraflexibleenetmangode tamangueraflexibleinferior.DesticeygireelextremodeIamangueraflexibleinferiorsobretaconexionparamangueraen latoberadesuelo.AsegOresedequelamangueraestefirmementeconectadaantesdeutilizarlaaspiradora.
Man
de la Manguer
uera
de la manguera
Punta superior Acople dede la manguera Ia Manguera
MONTAJE DEL CABLEAseg_rese de que el gancho del cable est,.hacia arriba.
Btoquee el cable en sutugar forz_.ndolo en ta
muesca de bloqueo Muescadel asa sobre el
cuerpo deI gancho delcable superior de taforma indicada.
Asi, et cable de
alimentaci6n se atimentaci6nmantendr_, fuera det
camino de ta boquitla deaspiraci6n.
des_oqueo
alimentaci6n
inferiordel cable
Lie el cableatrededor del
desacoplamientor&pido y deI gancho
inferior del cable yasegure el enchufecon el cable.
INSTRUCCIONES DE FUNCIONAMIENTO
1. Gire el gancho del I [
cable de desbloqueo L!--,_lhacia un lateral y Gancho ara
......... phaeia abajo para /_ _X desbloqueo
desbloquear el //_//] _ I\\_\\ del cablecable de /[////I I \\/lllde alimentaci6nalimentacion. ,,-i i n,,
2. Desconecte el enchufe del cable electrico
de su cable y tirelo del gancho de liberacionr_.pidapara cable.Compruebe que el cable de alimentacion siguebloqueado en la muesca de bloqueo. Consultela seccion de MONTAJE DEL CABLE.
3. Compruebe que la aspiradora tiene unabolsa. Consulte la seccion de CAMBIO DE LABOLSA PARA EL POLVO.
4. Enchufe et cable de alimentaci6n polarizadoen una toma de corriente etectrica de 120 Voltios.
NOTA: Parareduciretriesgodequeseproduzcansacudidaselectricas,estaaspiradoratieneunenchufepolarizadoconunahojamasanchaquelaotra.Esteenchufeencajaraenlatomadecorrientepolarizadadeunasolaforma.Sielenchufenoencajaporcompletoenlatoma,delelavueltaal enchufe.Sisiguesinencajar,p6ngaseencontactoconunelectricistacualificadoparaqueleinstaleunatomadecorrienteadecuada.Nocambiedeningunaformaelenchufe.
ADVERTENCIAiPeligro dedahos personalesy dahos en el)roducto!NOconecteelenchufesielinterruptorestaenlaposici6nONdeencendido.Sepodrianproducirda_ospersonalesycta_osenelproducto.
• NOutilicetomasdecorrientesquehayasobrecogtadores,$epodrianproducirda_osenloselementosquerodeanlazona.
-5-

Seleccion de altura del recogedor:
Apague primero la aspiradora si fueranecesario elevar o bajar la boquilla paraadaptarse a la altura del recogedor de laalfombra. A continuacion, incline la aspiradorahacia atr_.shasta que las ruedas delanteras sedespeguen un poco del suelo y deslice laperilla de ajuste de altura hacia el valor quedesee.
Valores de la altura del recogedorrecomendados:
High(alta):Alfombrasdetripe, recogedorlargo,almohadones,alfombrillasdefelpa
Med: Recogedor medio a largo
Low (baja): Recogedor corto a medio, comorecogedor muy bajo
F.I ADVERTENCIAi Peligro de daSos personales! NO ponga las manos o los pies debajo dela unidad al cambiar el valor de altura del recogedor para alfombras.El agitador gira rapidamente cuando la aspiradora se enciende y este enel valor para alfombras.
-6-

Desbloquee el asa presionando sobre el pedalde desbloqueo hacia abajo con el pie y tire delasa hacia atr_.sy hacia abajo con las manes.
El interruptor de encendido y apagado se
La aspiradora tienetres posiciones:- Haciaarribapara
guardarlay parautilizarlasherramientasdelimpieza.
- Endiagonalparalimpiaralfombrasy suelos.
- BajaparaIlegarpordebajode losmuebles.
encuentra en el cuerpo de la aspiradora justopor debajo del lateral del asa. Coloque elinterruptor en ON para encender la aspiradorayen OFF para apagarla.
Cable de
Asa
y apagado
Herramientapara huecos
Tubo deExtensi6n
Cepillo parael polvo
MangueraAtargable
Conector de la manguera
UTILIZACION DE LOS ACCESORIOS
Quite el extremo inferior de la mangueraalargable de la aspiradora sujetando elconector de la manguera y girandolo y tirandode el hacia fuera.
NOTA: El protector de! motor se puede abrir ydar lugar a una recogida de polvo deficiente alutilizar los accesorios o al limpiar una alfombranueva. Esto se debe a que el flujo de aire se hareducido per los propios accesorios o por lapelusa de la nueva alfombra que ha Ilenado labolsa r_.pidamente.Consulte la secci6n deELIMINACION DE OBSTRUCClONES.
ADVERTENCIAPeligro de sacudidas electricas y dahospersonales.Desconecte el suministro electricoantes de realizar reparaciones o limpiarla unidad. Si no desconecta la unidad,se podrian producir sacudidaselectricas o dahos personales alencenderse la aspiradora.
-7-

Tubo deextensi6n
Quite la manguera de extension de la posiciOnde almacenamiento.Retire la herramientapara lugaresdificiles de suposici6n de almacenamiento en el mango.Retirela manguerade latobera desuelo y Onalala mangoextraible.Acople lamangueradeextensi.6nen el extremedeaperturade la manguera.Acople tambien la herramienta para huecos alextremo de la manguera introduciendola ygir_.ndolasuavemente.La herramientapara recovecos dobla su Iongitudcome un tubo extensible.El cepillo parael polvo/herramientapara tapiceriaencajar_,enel tope,permitiendoun m_imo alcancede limpieza.El cepillo parael polvo/herramientapara tapiceriatambienpuedeacoplarsedirectamentea laextensionm_.sreducida del tubo.
El cepillo parael polvo/herramientapara tapiceriaofrece dos opciones.Cuando se quita el cepillo delantero, la piezaque queda se puede utilizar como herramientapara tapicerias.
Herramienta para_-_z:__
el polvo
ATENClONTenga cuidado al utilizar los accesorios parano excederse en la extensi6n de la mangueraalargable. La aspiradora se podr_ volcar siintenta Ilegar m_s lejos de Io que la
rnanguera alargable puede extenderse.
ALMACENAMIENTO DE LOS
ACCESORIOS
Quite la herramienta de cepillo / tapicerias deltubo. OolOquelaen su lugar dealmacenamiento.
Quite la herramienta para huecos del tubogir_.ndola.
Quite el tubo de extensi n de la manguera.Gire el tubo y tire del extremo de la manguera.
Coloque la herramienta para huecos en la parteinferior del tubo de extension. Coloque el tuboen su lugar de almacenamiento.
Aseg0rese de que la unidad esta apagada.Vuelva a introducir la manguera por completoen el acople de la manguera del que la quito.Presione con firmeza para asegurar que laconexion es correcta.
ADVERTENCIAPeligro de dafios personales.
NO coloque las manos ni los pies debajode la unidad al introducir la manguera. Elagitador gira rapidamente cuando laaspiradora se enciende.
-8-

ZONA DE LIMPIEZA
ACCESORIO EntreMuebles* cojines* Cortinas* Escaleras Paredes
CEPILLOPARAEL.r_,POLVO _ X X X X
HERRAMIENTAPARA _ X X XHUECOS
HERRAMIENTA___)PARA , _,_/_ X X XTAPICERIAS _'_"
* Limpiesiemprelos accesoriosal utilizarlossobre telas.
Mantenga el paso del flujo de aire libre si deseaobtener rnejores resultados en la limpieza.
Bordes de alfombras
Gufe el lateral o la parte delantera de laboquilla por el rodapie. Los cepillos de alcancecomplete podr_.nquitar la suciedad de losbordes de las alfombras.
Escaleras
Coloque el asa hacia arriba. Utilice laherramienta para huecos o la herramienta decepillo para el polvo / tapicerias.
ADVERTENCIAPeligro de dafios personales.
Tenga cuidado si va a utilizar laaspiradora por las escaleras. Si secayese, se podrian producir daffospersonales o daffos en el producto.
Compruebe de vez en cuando las zonas m_.spropensas a que se obstruyan.
Desconecte la aspiradora de la toma decorriente antes de comprobar si hayobstrucciones.
-9-

ADVERTENCIAPeligro de sacudidas electricas ydaSos personales.
Desconecte el suministro electricoantes de realizar reparaciones o limpiarla unidad. Si no desconecta la unidad,se podrian producir sacudidaselectricas o daSos personales alencenderse la aspiradora.
COMPROBACION DE LACORREA E-Z
En la comprobacion de la correa E-Z ubicadaen la parte superior de la boquilla para el suelo,hay dos cierres para extraer con facilidad lacubierta de la boquilla para cambiar la correa olimpiar el agitador. Ooloque los dedos gordossobre los cierres, deslioelos hacia fuera y elevela cubierta.
Introduzca las pestanas en las ranuras, baje lacubierta de la touila y de slice nue vamente loscienes de forma segura para sustituir la cubiertade la boquila.
SISTEMA DEPROTECCION DEL MOTOR
La aspiradora cuenta con una valvula dederivacion del protector del motor que se abreautomaticamente para que entre aire frio almotor si hay obstrucciones que eviten el flujonormal de aire hacia el motor. Si la v_.lvuladederivacion se abre para que el motor no sesobrecaliente y la aspiradora pueda sufrirdafios, notarY,que el sonido cambia cuando elaire pasa por la apertura de la valvula.
Protectordel motor
Solucion de problemas:Compruebe que no hay obstrucciones oquitelas si las hay.Consulte la secci6n de ELIMINACION DEOBSTRUOOIONES.
-10-

MANTENIMIENTO DE LA ASPIRADORASigasiempretodas las precaucionesde seguridadal limpiar o realizarel mantenimientode laaspiradora.
Recoja el cable y enrollelo alrededor del
ADVERTENCIAPeligrode eacudidaselectricasy dahospersonales.
Desconecteel suminietroelectricoantesde
realizarreparacioneso limpiarla unidad.Sino desconectala unidad,se podrianproducirsacudidaselectricaso da_ospersonalesal encendersela aspiradora.
gancho el cable y el asa de transporte.
IGuarde la aspiradoraen lugar seco en elinterior sobre el suelocon el asa bloqueadaen la posici6n haciaarriba.
ADVERTENCIAPeligro de sacudidas electricas ydahos personales.
Si enrolla el cable demasiado tenso, elcable est_ibajo presi6n y se puede dahar.Si el cable se da_a, se pueden producirsacudidas electricas y posibles dahospersonales o en el producto.
Desconecte el cable de la toma de corrientede la pared. NO vierta agua sobre laaspiradora.
Limpie la parte exterior con un trapo suave ylimpio humedecido con una solucion dedetergente Ifquido neutro y agua y retuerzael trapo. Seque el exterior despues de limpiar.
Lave los accesorios en agua templada conun poco de jab6n, enjuaguelos y dejelossecar al aire. No los limpie en ellavavajillas.
ATENCIONNo utilice los accesorios si estan
mojados. Los accesorios que seutilizan en zonas sucias, como detrasdel frigorifico, no se deberian utilizarsobre otras superficies hasta que sehayan limpios, ya que podrian dejarmarcas.
-11-

EXTRACCION DE LA BOLSA
ADVERTENCIAonecte siempre el cable dentacion de la toma de corrientede realizar operaciones de
enimiento con la aspiradora.
Tire del asidero dela cubierta para elpolvo haciadelante.Quite la cubiertadejela al lado.
paraelpolvo
Sujete la anilla dela bolsa para elpolvo y tire de ellasuavemente,quitando concuidado la bolsa Bolsaparapara el polvo, elpolvo
Tire la bolsa para elpolvo utilizada.No la vuelva utilizar.
ATENClONNO REUTILICE NUNCA UNA BOLSAPARA EL POLVO. Los materiales
muy peque_os como, polvos para lalimpieza de la alfombra, el polvo,yeso, hollin, etc. pueden obstruir labolsa y provocar que se queme antesde que este Ilena. Cambie la bolsacon mas frecuencia si va a aspirareste tipo de materiales.
Sujeci6nde labolsa
Huecode la bolsa J
Filtrode _seguridad J
del m]_ -.
Compruebe lasujeci6n de la bolsay el filtro deseguridad delmotor.
Si est_.n; bloqueados,limpielos. Oonsultela seccion deLIMPIEZA DELFILTRO DESEGURIDAD DELMOTOR.
SUSTITUClON DE LA BOLSA
Desdoble una bolsa nueva para el polvo.
_ Introduzca la bolsa
li para el polvo en la
sujecionsosteniendo la anillade la bolsa como se
indica y bloqueelaen su posicion.
AsegOresede que la bolsa para el polvo est,.introducida completamente en su hueco antesde volver a colocar la cubierta antipolvo.
OubiertaColoque la antipolvocubierta antipolvode forma que laspestahas encajenen la ranura de la
base del cuerpo dela aspiradora.
Oubiertaanttpolvo
1ii
Cierre la cubierta
antipolvo.
Escuchar_.unchasquido diferentecuando la cubiertaeste cerrada porcompleto.
-12-
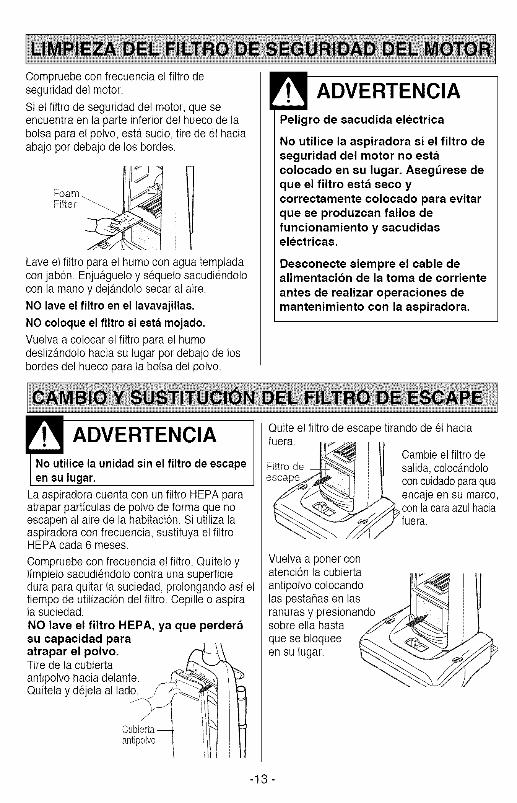
Compruebe con frecuencia el filtro deseguridad del motor.
Si e! filtro de seguridad del motor, que seencuentra en la parte inferior del hueco de labolsa para el polvo, est,. sucio, tire de el haciaabajo por debajo de los bordes.
fiI 1Foam
Filter _
Lave el filtro para el humo con agua templadacon jabon. Enjuaguelo y sequelo sacudiendolocon la mano y dej_.ndolosecar al aire.
NO lave el filtro en el lavavajillae.
NO coloque el filtro ei esta mojado.
Vuelva a colocar el filtro para el humodeslizandolo hacia su iugar por debajo de losbordes del hueco para la bolsa del polvo.
ADVERTENCIAPeligro de sacudida electrica
No utilice la aspiradora si el filtro deseguridad del motor no estacolocado en su lugar. Asegt_rese deque el flltro ester seco ycorrectamente colocado para evitarque se produzcan fallos defuncionamiento y sacudidaselectricas.
Desconecte siempre el cable dealimentacion de la toma de corriente
antes de realizar operaciones demantenimiento con la aspiradora.
ADVERTENCIA
No utilice la unidad sin el filtro de escapeen su lugar.
Laaspiradora cuenta con un filtro HEPA paraatrapar particulas de polvo de forma que noescapen al aire de la habitacion. Si utiliza laaspiradora con frecuencia, sustituya el filtroHEPA cada 6 meses.
Compruebe con frecuencia e! fiitro. Quitelo ylimpielo sacudiendolo contra una superficiedura para quitar la suciedad, prolongando asi eltiempo de utilizacion del filtro. Cepille o aspirala suciedad.
NO lave el filtro HEPA, ya que perderasu capacidad paraatrapar el polvo.Tire de la cubiertaantipolvo hacia delante.Quitela y dejela al lado.
antipolvo
Quite el filtro de esca )etirando de el hacia
fuera
e__
Cambie el filtro desalida, coloc_.ndoloconcuidadoparaqueencaje en su marco,
_con la azul haciacara
fuera.
Vuelva a porter conatenci6n la cubierta jantipolvo colocando
las pesta_as en las J_ranuras y presionando _[_r_ 1]'_sobre ella hasta _'_4_._..__jj
que se bloquee _.. _.._>'_en .,uoar.
-13 -

ADVERTENCIAPeligrode sacudidaselectricaso da_ospersonales.
Desconecteel suministroelectricoantesde
realizarreparacioneso limpiarla unidad.Sino desconecta la unidad,se podrianproducirsacudidaselectricaso dahospersonalesal encendersela aspiradora.
Compruebe con frecuencia esta zona y quitelos pelos, hilas, tiras que se hayan quedado enel cepillo. Si la suciedad es excesiva, sigaestos pasos.
EXTRACCIONDE LA CORREA
Desconecte el cable de alimentacion de latoma de corriente.
Utilice una moneda
paragirarloscierresy retirar la cubiertade la boquilla.
Ci@rros
Cubiertade fa boquilla
Coloque las manos sobre el agitador. Si lacorrea sigue acoplada al agitador, cortela conlas tijeras y quitela. Eleve con suavidad elextremo derecho del agitador y despues, eleveel extremo izquierdo.
Nota: Es posible que sea necesario tirar delborde del parachoques para que los extremosdel agitador se quiten con facilidad.
COMO LIMPIAR ELAGITADORPara limpiar el agitadoL quite hilos o pelos quesean envueltos alrededor.Nota: Para mantener la alta eficacia de
limpieza y evitar que se produzcan da_os en laaspiradora, el agitador se debera limpiar cadavez que cambie la correa.
Limpie el agitador siguiendo estos pasos:
Utilizacion de la Limpieza A FONDOaspiradora del agitador(se utiliza a diario) cada semana
MODERADA cada mes(se utiliza dos o tresveces por semana)
SUAVE cada dos rues(se utiliza una vez a lasemana)
ATENCION
No desmonte el tapon extremo odahara el agitador.
Tapa del extremo
-14 -

SUSTITUCION DE LACORREACompruebe que el selector para suelos /alfombras esta en la posici6n para alfombras yel cuerpo de la aspiradora reposa sobre elsuelo.
Enlace la nueva correa en el eje del motor.
NuevacorreaPolea de la
correa
Nota: Consulte la secci6n de PIEZAS YFUNCIONES para ver el numero de la correa.
Enlace el otro extremo de la correa en la poleapara la correa que se encuentra en el agitador.
Inserte en su ranura latapa izquierdadel extremodel agitador,con la flecha hacia abajo, en la basede la boquilla.Extraigael agitadorhaciadelante e inserte latapaderecha, con la flecha hacia abajo, en su ranurade la base de la boquilla agitador.
Nota: Tenga cuidado al volver a colocar lacorrea debido a la tensi6n que est,. sufre.
Agita/ BoquiNaJ
\Ranura de la base
Parachoques Tapa clefextremo
Presione con firmeza y compruebe que losextremos estan completamente introducidos.
Agitador
/
///
Correa
Compruebe que la correa est,. centrada en lapole& Gire el agitador con los dedos ycompruebe que gira sin obst_.culos.
Vuelva a colocar la cubierta de la boquilla yasegure los cierres.
CieIT@s
Cubierta dela boquilfa
-15-

ADVERTENCIAPeligro de sacudidas electricas odafios personales.
Desconecte el suministro electricoantes de realizar reparaciones o limpiarla unidad. Si no desconecta la unidad,se podrian producir sacudidaselectricas o dafios personales alencenderse la aspiradora.
COMPROBAClON DELAGITADORDele la vuelta a la aspiradora y compruebe silos cepillos estan desgastados. Sustituya elagitador si los cepillos est_.ndesgastadoshasta la proteccion de la correa de la placa
base. _
ProtEciCi6pldcealarcorrea
SUSTITUIR EL MEZCLADORRetire la cubierta de la boquilla y el mezclador.
Consulte SUSTITUClON DE
CORREA Y LIMPIEZA DEL MEZCLADOR.
Cambie el mezclador pot otro nuevo.Vuelva a montar la correa, el
mezclador y la cubierta de la boquilla.Consulte SUSTITUCION DE CORREA
Y LIMPIEZA DEL MEZOLADOR.
Unidad del agitador
Tapa del extrerno
Arandela
Cojinete
Dispositivo de fijaci6n
Dispositivo de fijaci6n
Tapa del extremo
Arandela
-16-

Siga siempre todas las precauciones deseguridad al limpiar o realizar el mantenimientode la aspiradora.
ADVERTENCIAPeligrode sacudidaselectricaso da_ospersonales.
Desconecteel suministroelectricoantesde
realizarreparacioneso limpiarla unidad.$ino desconecta la unidad,se podrianproducirsacudidaselectricaso da_ospersonalesal encendersela aspiradora.
Si parece que la aspiradora no succionaadecuadamente, compruebe si la bolsa est,.Ilena o el filtro esta obstruido. Consulte lasecci6n de CAMBIO DE LA BOLSA PARA ELPOLVO y LIMPIEZA DEL FILTRO DESEGURIDAD DEL MOTOR.
Compruebe la zona de la manguera si la bolsay el filtro no tienen obstrucciones. Quite elextreme inferior de la manguera alargable de laaspiradora sujetando el conector de lamanguera y girandolo y tirando de el haciafuera.
Conecte la
aspiradora yenciendala.
Alargar lamanguera hasta elm_.ximoy deje quevuelva a suposicion para elalmacenamiento.
Apague laaspiradora ydesenchL_fela.
Mangueraalargable
Quite lasobstruccionesvisibles de lamanguera.
Conector de la
manguera
Vuelva a introducir la manguera en la aperturade la parte inferior del cuerpo de donde laquit6. Presione con firmeza para asegurar quela conexi6n es correcta.
Compruebe la zona de la boquilla para el suelosi la bolsa, el filtro y la manguera no tienenobstrucciones. Consulte las secciones deCAMBIO DE LA CORREA Y LIMPIEZA DELAGITADOR para comprobar esa zona.
Vuelva a colocar la aspiradora en posici6nderecha antes de conectarla a la toma decorriente.
Mantenga el paso delflujo de aire libre abiertosi desea obtenermejores resultados allimpiar. Deber_.comprobar laaspiradora devez encuando para ver si hayobstrucciones. Lasfiechas del dibujo leindican la ruta del flujode aire donde seproducen lasobstrucciones.Desconecte laaspiradora antes decomprobar si hayobstrucciones.
ADVERTENCIAPeligro de da_os personales.
NO coloque las manos ni los piesdebajo de la unidad al introducir lamanguera. El agitador girarapidamente cuando la aspiradora seenciende y este en el valor paraalfombras.
-17-

ADVERTENCIAPeligro de sacudidas electricas odahos personales.
Desconecte el suministro electrico
antes de reaiizar reparaciones o limpiarla unidad. Si no desconecta la unidad,se podrian producir sacudidaselectricas o daSos personales alencenderse la aspiradora.
Desconecte el cable de alimentaci6n de latoma de corriente.
Para acceder a la bombilla, baje primero el asaparatumbar taaspiradorasobreel suetoy desmontela cubierta del deposito de polvo. A continuacion,retire los tornillos de fijacion de la cubierta a laaspiradora. Retire la cubierta.
Quite la bombilla presionando sobre ella ygirandola al mismo tiempo en el sentidocontrario al de las agujas del reloj para sacarlade su ranura. Saque hacia fuera la bombilla.
Extracci6n de
Enchufe dela bombilla
ATENClONNo utilice bombillas con una
especificacibn superior a 130 V CA25 W. Si la utilizacibn es
prolongada, el calor que desprendela bombilla podria sobrecalentar laszonas de pl&stico que la rodean.
Para sustituir la bombilla, introduzca concuidado una nueva y girela en el sentido de lasagujas del reloj para encajarla con seguridaden su ranura.
NOTA: Use bombillas Sears.
Consulte la seccion de p_.g4.
Vuelvaa colocar lacubierta para la bombillaenla aspiradora.Vuelva a colocar los tornillos de esta cubierta.
ATENClON
No conecte la unidad ni la encienda
hasta que est_ completamentemontada.
-18-

Revise esta tabla para encontrar las soluciones que usted mismo puede aplicar si surgen pequefiosproblemas en la utilizacion deI producto. Si fuera necesario aplicar soluciones diferentes a la que se
describen en este manual del propietario, pongase en contacto con Sears o con un tecnico dereparaciones cuatificado.
ADVERTENCIA Peligro de sacudida electrica
Desconecte el 8uministro el_ctrico antes de realizar reparacione8 o limpiar la unidad,
Si no desconecta la unidad, 8e podrian producir 8acudidas et_ctrica8 o dai_os personales,
Laaspirsdorsnose 1. Estadesconectadadela tomsde 1. Conectelofirmementey cotoqueelinterruptordeenciende, corriente, encendidoy apagadoen laposici6nONde
2.Seha producidoun cortocircuitoo seha encendido.fundidounfusibledelpanelde lacasa. 2. Restablezcaei cortocircuitosy sustituyael fusible.
3. El ieterruptorde encendidoy apagado 3. Coloqueel interruptorde encendidoy apagadoen lano estaen ON. posicionON deencendido.
Ineficasiaen la Cambiela boisaparael polvo(p&g.13).limpieza,
1. La bolsa pars el polvo est& Ilena uobstruida.
2. Valor de la altura del recogedorinadecuado.
3. Agitador desgastado.4. Boquilla obstruida o tubo sucio.5. Manguera obstruida.
6. Manguera perforada.7. Correa rota o rnal colocada.
8. La manguera no esta introducida potcompleto.
9. Sistema de protecciondel motor activado.10. Filtros sucios.
1.
2. Ajuste los valores (pag. 7).
3. Sustituya el agitador (p&g. 17).4. Limpie la zona de la boquilla (p&g. 18).5. Compruebe si hay obstrucciones (pag. 18).
6. Sustituya la manguera.7. Sustituya / fije la correa (p_tg.15-16).8. tntroduzca la manguera por completo (p&g. 8-9).
9. Compruebe si hay obstrucciones (pag. 18).10. Limpie los filtros (pag. 14).
La aspirsders recoge 1. Valor de la altura del recogedor 1. Ajuste los valores (p&g. 7).las alfombrillas inadecuado.
sueltas o aspira condemaaiada fuerza.
La luz no funciona. 1. La bombilla se ha fundido. 1. Cambie la bombilla (p&g. 19).
Elagitador no 1. Correa rota. 1. Sustituya la correa (p&g. 15-16).funciena, 2. La correa no esta instalada correctamente. 2. Consulte la seccion de CAMBIO DE LA CORREA Y
LtMPIEZA DEL AGtTADOR (pag. 15-18).
El indicsdor de 1.Labotsapara el polvoestaflenau obstruida. 1. Cambie la bolsa para el polvo (p#.g.13).utilizscibn de 2. Filtros sucios. 2. Limpie los fittros (pag. 14).algunoa modelos 3. Paso det flujo de aire obstruido: tubo, 3. Elimine las obstrucciones del paso del flujo de sireest_ en rojo, boquilla, manguera sucios. (pag. 18).
4. Herramientas accesorias. 4. Se normalizar& cuando la herramienta se quite.
Flujode sire 1. El uso det accesorio restringe el flujo de 1. Compruebe la secci6n de ACCESORIOS (pag. 8-9).reatringide al utilizar sire.un accesorio, El 2. Las pelusas de la nueva alfombra han 2. Consulte la seccion de ELIMtNACtON DE
aenido cambia, obstruido la ruts del sire. OBSTRUCCIONES y limpie la manguera (p&g 18).
Ruido exceaivo 1. Roce de la manguera con el eje del 1. Coloque el selector completamente hacia delante.
cuando la aapiradora selector pars alfombra / suelo.est_ apagada,
-19-

Acuerdos acerca de la proteccion
Le felicitamos per su sabia elecci6n al haberadquirido este producto.Este nuevo producto Kenmore_ ha side diseflado yfabricado durante aries de funcionamiento serio yform& Pero, al igual que el resto de productos,necesita un mantenimiento preventive o realizarciertas reparaciones de vez en cuando.Per eso, con estos Acuerdos acerca de la proteccionahorrara,tiempo y dinero y evitara dafios mayores.
Adquiera estos Acuerdos acerca de la protecci6n yprotejase contra gastos y problemas inesperados.
Los Acuerdos acerca de la protecci6n tambien leayudara.na ampliar la duraci6n de este nuevoproducto. En los Acuerdos se incluyen:
[] Servicio experto per mas de 12.000 tecnicos dereparaci6n profesionales
[] Servicio ilimitado sin eostes para las piezas y eltrabajo realizado en todas las reparacionescubiertas
[] Garantia anual: sustitucidn del producto cubiertosi se producen cuatro o mas fallos en doce meses
[] Sustituci6n del producto si el producto cubiertono se puede arreglar
[] Mantenimiento preventivo anual siempre que Iosolicite sin costes extra
[] Atenci6n de ayuda al cliente: ayuda telefdnicapor parte de un tecnico de Sears acerca de losproductos que precisen reparaciones caseras,ademas de una programaci6n sobre reparaciones
[] Protecci6n contra cortes el_ctricos que puedenprovocar daflos electricos debido a lasfluctuaciones de energia
[] Reembolso si la reparaci6n del producto cubiertotarda mas de Io que se estableci6
Si adquiere estos Acuerdos, s61otendra,que haceruna Ilamada telef6nica para activar este servicio.Podra.Ilamar a cualquier hora del dia o conseguir unacita online para el servicio.
En Sears hay mas de 12.000 tecnicos de reparaci6nprofesionales que tienen acceso a unos 4,5 millonesde piezas y accesorios de calidad. Este es el tipo deprofesionalidad con la que puede contar paraprolongar la duraci6n de este producto durante aflos.Adquiera ya su Acuerdo acerca de la protecci6n.
Se aplican algunas limitaciones y excepciones.Llame al 1-800-827-6655 si desea obtener mas
informaeibn acerca de los preeios.
Servicios de Instalaci6n SearsPara solicitar servicios de instalaci6n
profesionales de Sears de electrodomesticos,mandos de apertura de puertas de garajes,calentadores de agua y otros aparatos en losEstados Unidos, puede Ilamar a1-800-4-MY-HOME ®
-20-


iiiiiiiiiiiiiiiiiiiiiii_....iiiiiiiiiiiiiiiiiiii_'
iiiiiiiiiiiiiiii
Your Home
For repair = in your home =of all major brand appliances,lawn and garden equipment, or heating and cooling systems,
no matter who made it, no matter who somdit!
For the replacement parts, accessories andowner's manuals that you need to dozit-yourself.
For Sears professional installation of home appliancesand items like garage door openers and water heaters.
1-800-4-MY-HOME ® Anytime, day or night
(1-800-469-4663) (U.S.A. and Canada)www.sears.com www,sears,ca
Our Home
For repair of carry-in products like vacuums, lawn equipment,and electronics, call or go on-line for the nearest
Sears Parts and Repair Center.
1-800-488-1222 Anytime, day or night (U.S.A. only)
www,sears,com
To purchase a protection agreement (U.S.A.)or maintenance agreement (Canada) on a product serviced by Sears:
1-800o827-6658 (U.S.A.) 1-800-361-6665 (Canada)
Para pedirserviao de reparad6na domicilio, y para ordenar piezas:
1-888-SU-HOGAR®(1-888-784_427)
Au Canada pour service en frangais:1-800-LE-FOYER MC
(1-800-533-6937)www.sears.oa
© Sears Brands, LLC
® Registered Trademark / Trademark / s_l Service Mark of Sears Brands, LLCTI_ SP,_® Marca Registrada / Marca de Fabrica/ Marca de Servfcio de Sears Brands, LLC
_c Marque de commerce / MDMarque d6pos6e de Sears Brands, LLC