vacuum cleaner - c.searspartsdirect.com · owner's manual ® vacuum cleaner model 116.30012...
TRANSCRIPT
Owner's Manual
®
Vacuum Cleaner
Model 116.30012116.30212
CAUTION:Read and foilow all
safety and operatinginstructions before first
use of this product
Sears, Roebuck and Co., Hoffman Estates, IL 60179 U.S.A_www.sears.com
Part Nor C01ZAWROOU00-8175118 Printed in U.S.A.
Before Using Your New Vacuum ........ 2
KenmoreVacuum Cleaner Warranty . 2Important Safety Instructions .............. 3Parts and Features ................... 4
Assembly Instructions .............. 5-6
Operating Instructions .............. 7Pile Height Selection and Setting .......... 7Releasing the Handle .......................... 8ONfOFF Switch ....................... 8
Carpet/Bare Floor Selector ............ 8Attachments ........................... 9Attachment Use Chart ................ 9
Vacuuming Tips ..................... 10
Vacuum Cleaner Care ................. I0Vacuum Storage .................... t0C]eaning Exterior and Attachments ..... 11Dust Bag Changing ............... 11-t2Motor Safety Filter Changing ........... 12Exhaust Filter Changing ............. 13Belt Changing and Agitator Cleaning , o14-16Light Bulb Changing ................ 17Ctog Removal ........................ I8Motor Protector ....................... t8
Troubleshooting .................... I9
Requesting Assistance Or Service , _. 20
ap uelJeA tal ej:lUe_e6 el£
so t ua oue
enb selqelse5 s,
ap lenuew fesese6oqua eJol
Please read this guide+ It will help you assemble and operate your new Kenmore vacuum inthe safest and most effective way.
For more information about the care and operation, call your nearest Sears store. You willneed the complete model and serial numbers when requesting information. Your vacuum'smodel and serial numbers are located on the Model and Serial Number Platen
Use the space below to record the model number and serial number of your new Kenmorevacuum.
Model No
Serial No,.
Date of Purchase
Keep this book and your sales check (receipt) in a safe place for future reference+
LIMITED ONE YEAR WARRANTY ON KENMORE VACUUM CLEANER
This warranty is for one year from the date of purchase, and includes only private householdvacuum cleaner use+ During the warranty year, when this vacuum cleaner is operated andmaintained according to the owner's manual instructions, Sears wilt repair any defects inmaterial or workmanship free of charge.
This warranty excludes vacuum bags, belts, light bulbs, and filters, which are expendable partsand become worn during normal use.
For warranty service, return this vacuum cleaner to the nearest Sears Service Center inthe United States.
This warranty applies only while this product is in use in the United States. This warranty givesyou specific legal rights, and you may also have other rights which vary from state to state.
Sears, Roebuck and Co,, D/817 WA, Hoffman Estates, IL 6017'9
a_otuuaHat
anb eJopeJ!dse'BueoJe3 S£LU SJ
eJauBw eun u_
6L ......... !
8I. ............eJns_
L_ ..........
9I.-H_ .......ta
_1...........It
!._ ' ' soposa:01......... EDI. .........
2
WARNINGYour safety is important to us.To reduce the risk of fire, electrical shock, injury
to persons or damage when using your vacuum cleaner, follow basic safety pre-cautions including the following:
Read this manual before assembling orusing your vacuum cleaner.
Use your cleaner only as described inthis manual. Use only with Sears recom-mended attachments
To reduce the risk of electrical shock -Do not use outdoors or on wet surfaces.
Disconnect electrical supply before anyservicing or cleaning Failure to do socould result in electrical shock or person-al injury.
Always turn cteaner off before unplug-ging.
Do not unplug by pulling on cord. Tounplug, grasp the plug, not the cord.
Do not use with damaged cord or plug.. Ifcleaner is not working as it should, hasbeen dropped, damaged, left outdoors, ordropped into water, return it to a SearsService Center!Department.
Do not pull or carry by cord, use cord asa handle, close door on cord, or pull cordaround sharp edges or corners. Do notrun cleaner over cord. Keep cord awayfrom heated surfaces_
Do not leave cleaner when plugged in.Unplug from outlet when not in use andbefore servicing.
Do not allow to be used as a toy. Closeattention is necessary when used by ornear children..
Do not handle plug or cleaner with wethands.
Do not put any objects into openings,
Do not use with any opening blocked;keep free of dust, lint, hair and anythingthat may reduce air flow_
Keep hair, loose clothing, fingers, and allparts of body away from openings andmoving parts.
Do not use cleaner without dust bagand/or filters in place.
Always change the dust bag after vacu-uming carpet cleaners or freshener, pow-ders and fine dust. These products clogthe bag, reduce airflow and can causethe bag to burst.. Failure to change bagcould cause permanent damage to thecleaner.
Do not use the cleaner to pick up sharphard objects, small toys, pins, paperclips, etc They may damage the cleaneror dust bag_
Do not pick up anything that is burningor smoking, such as cigarettes, matches,or hot ashes.
Do not use cleaner to pick up flammableor combustible liquids (gasoline, cleaningfluids, perfumes, etc.), or use in areaswhere they may be present. The fumesfrom these substances can create a firehazard or explosion_
Use extra care when cleaning on stairs_Do not put on chairs, tables, etco Keepon floor.
You are responsible for making sure thatyour vacuum cleaner is not used by any-one unable to operate it properly
SAVE fHESE NSTRUCTIProper assembly and safe use of your vacuum cleaner are your responsibilities. Yourcleaner is intended only for household use. Read this Owner's Manual carefully forimportant use and safety information. This guide contains safety statements underwarning and caution symbols. Please pay special attention to these boxes and followany instructions given_ WARNING statements alert you to such dangers as fire, electri-cal shock, burns and personal injury. CAUTION statements alert you to such dangersas personal injury and/or property damage.
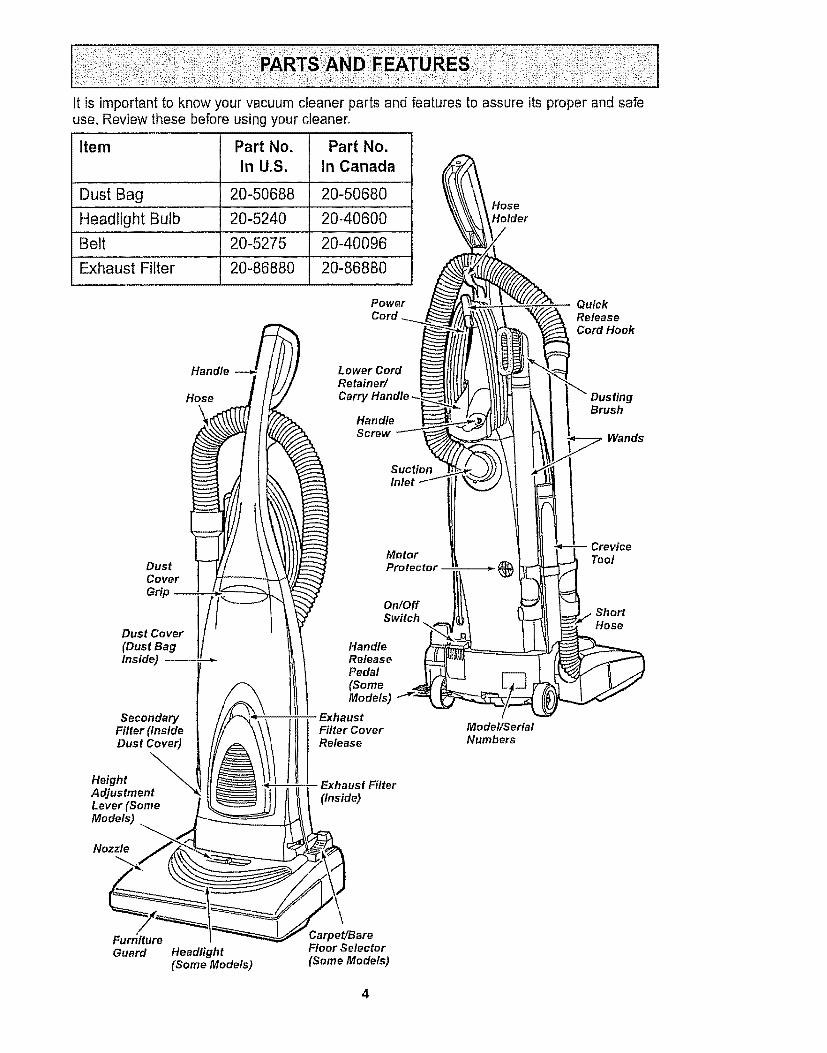
It is importantto knowyourvacuumcleanerpartsandfeaturesto assureits properandsafeuse,Reviewthesebeforeusingyourcleaner.
PowerCord
HoseHolder
QuickReleaseCord Hook
Hose
Lower CordRetainer/Cart}
HandleScrew
DustingBrush
Wands
SuctionInlet
DustCover
Dust Cover(Dust BagInside)
SecondaryFilter (InsideDust Cover)
Motor
On/OffSwitch
HandleReleasePedal(Some
Models)
Filter CoverRelease
Model/SerialNumbers
CreviceTool
ShortHose
HeightAdjustmentLever (SomeModels)
Nozzle
(Inside)Filter
FurnitureGuard Headlight
(Some Models)
Carpet/BareFloor Selector(Some Models)
4

Beforeassemblingvacuum,checkthePACKINGLISTon thecoverof theseparateRepairPartsList.Usethis list to verifythatyouhavereceivedall thecomponentsofyournewKenmorevacuum,
WARNING
Electrical Shock Hazard
Do not plug into the electrical sup-ply until the assembly is complete.Failure to do so could result in elec-
trical shock or injury.
HANDLE ASSEMBLY
Remove the screw located just below thetop edge of the back of the vacuum.
Position the handle as shown in the illustra-tion below.
While holding the power cord out of the way,slide the handle into the opening at the topof the vacuum
Handle
HandleScrewHole
Insert the screw so it passes through thehandle into the vacuum°
Begin to tighten the screw with your fingers°it may be necessary to adjust the handleslightly
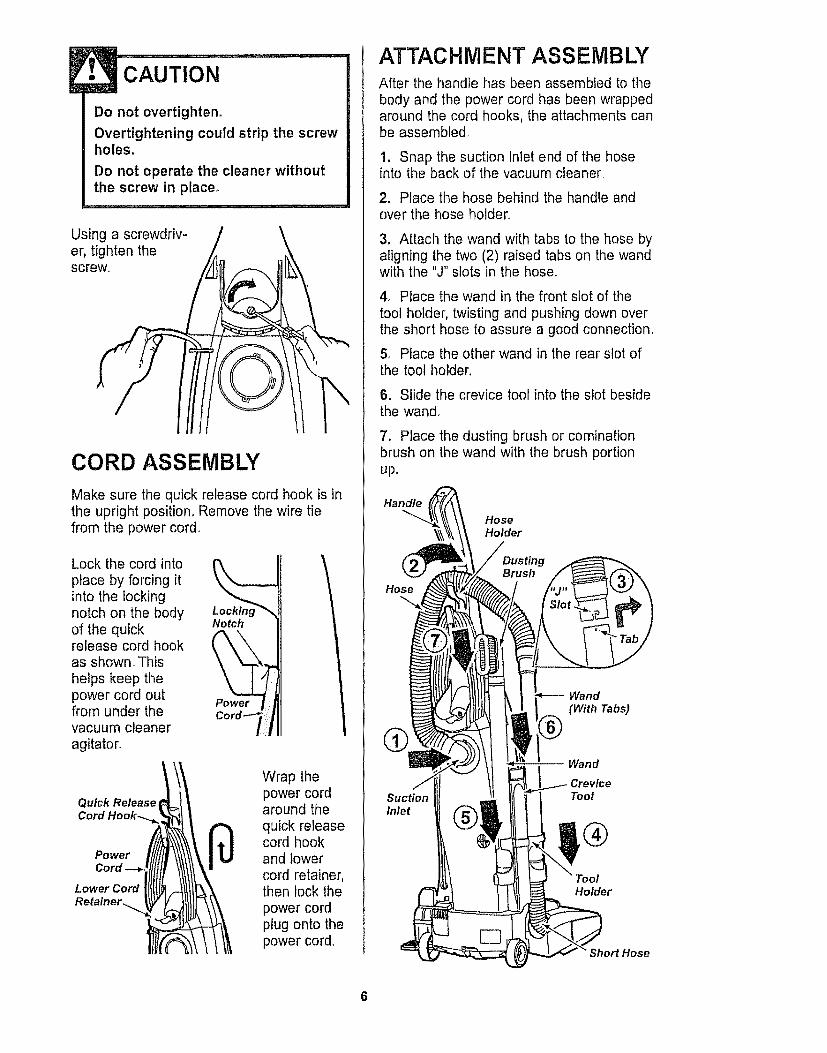
CAUTION
Do not overtighten°
Overtightening could strip the screwholes,
Do not operate the cleaner withoutthe screw in place,
Using a screwdriv-er, tighten thescrew_
iCORD ASSEMBLY
Make sure the quick release cord hook is inthe upright position, Remove the wire tiefrom the power cord,
Lock the cord into _,place by forcing itinto the lockingnotch on the bodyof the quick Notchrelease cord hook (,\\as shown This
helps keep thepower cord out
from under the rd _tvacuum cleaner /agitator_
Quick Release
Cord Hook..._
Power
Lower Cord
Wrap thepower cordaround the
quick releasecord hookand lower
cord retainer,then lock the
power cordplug onto thepower cord,
ATTACHMENT ASSEMBLYAfter the handle has been assembled to the
body and the power cord has been wrappedaround the cord hooks, the attachments canbe assembled,
1. Snap the suction inlet end of the hoseinto the back of the vacuum cleaner
2. Place the hose behind the handle andover the hose holder
3. Attach the wand with tabs to the hose byaligning the two (2) raised tabs on the wandwith the "J" slots in the hose.
4, Place the wand in the front slot of the
tool holder, twisting and pushing down overthe short hose to assure a good connection_
5. Place the other wand in the rear slot ofthe tool holder.
6. Slide the crevice tool into the slot besidethe wand,
7. Place the dusting brush or cominationbrush on the wand with the brush portionup
Handle
Hose
Wand(With Tabs)
SuctionInlet
-- Wand
CreviceTool
ToolHolder
Sho_ Hose
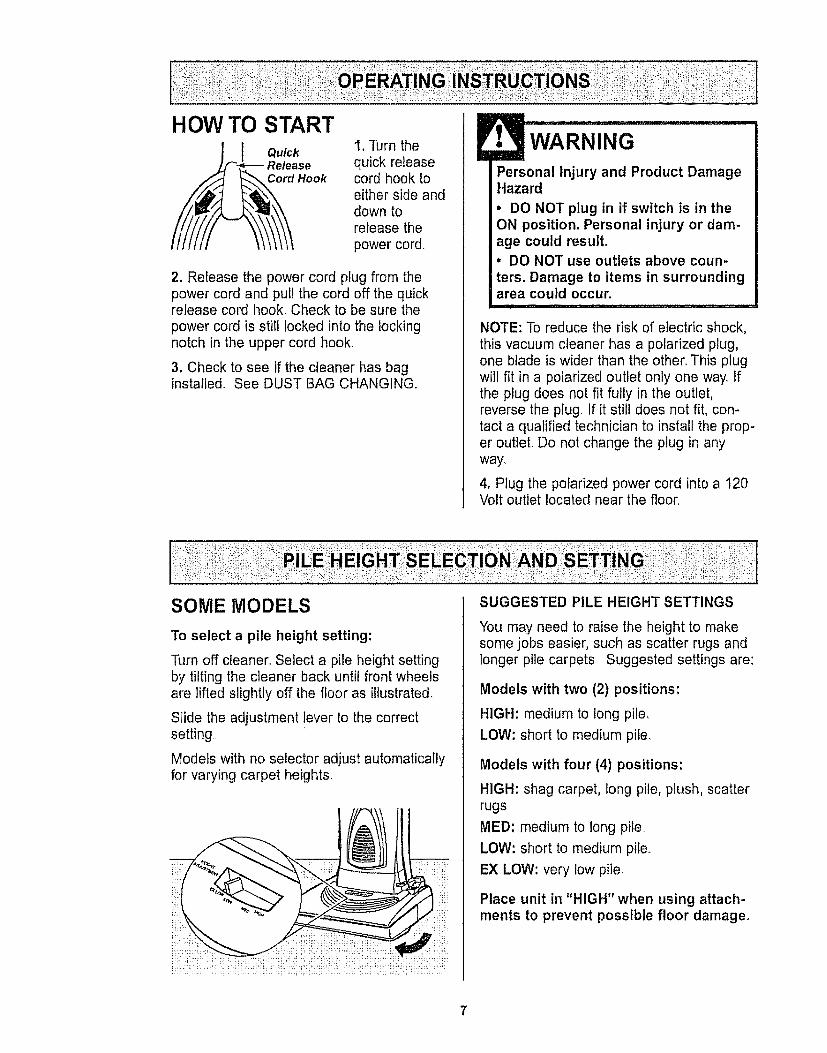
HOW TO START
Release
1. Turn the
quick releasecord hook toeither side anddown torelease the
power cord,
2, Release the power cord plug from thepower cord and pul! the cord off the quickrelease cord hook. Check to be sure the
power cord is still locked into the lockingnotch in the upper cord hook,
3, Check to see if the cleaner has baginstalled. See DUST BAG CHANGING.
WARNING
Personal Injury and Product DamageHazard
• DO NOT plug in if switch is in theON position, Personal injury or dam-age could result.• DO NOT use outlets above coun-ters. Damage to items in surroundingarea could occur.
NOTE: To reduce the risk of electric shock,this vacuum cleaner has a polarized plug,one blade is wider than the other° This plugwill fit in a polarized outlet only one way_ Ifthe plug does not fit fully in the outlet,reverse the plug. If it still does not fit, con-tact a qualified technician to install the prop-er outlet Do not change the plug in anyway.
4, Plug the polarized power cord into a 120Volt outlet located near the floor_
To select a pile height setting:
Turn off cleanen Select a pile height settingby tilting the cleaner back until front wheelsare lifted slightly off the floor as illustrated,
Slide the adjustment lever to the correctsetting
Models with no selector adjust automaticallyfor varying carpet heights.
You may need to raise the height to makesome jobs easier, such as scatter rugs andlonger pile carpets Suggested settings are:
Models with two (2) positions:
HIGH: medium to long pile.
LOW: short to medium pile.
Models with four (4) positions:
HIGH: shag carpet, long pile, plush, scatterrugs
MED: medium to long pile
LOW: short to medium pile.
EX LOW: very low pile
Place unit in "HIGH" when using attach-ments to prevent possible floor damage.
/
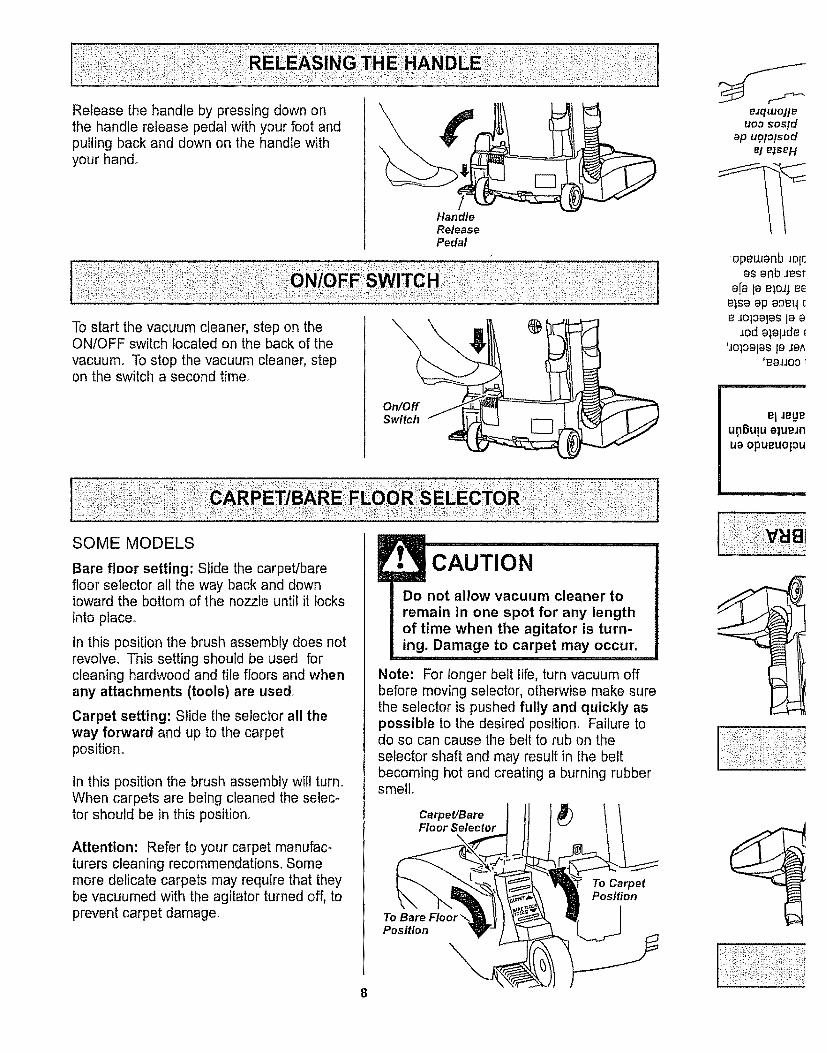
Release the handle by pressing down onthe handle release pedal with your foot andpulling back and down on the handle withyour hand°
To start the vacuum cleaner, step on theON/OFF switch located on the back of the
vacuum. To stop the vacuum cleaner, stepon the switch a second time..
On/OffSwitch
/HandleReleasePedal
eJquJoJleuoo sos!d
ap UOlOtsodel e_seH
opeuJanb .JOlte£ enb JeSt
a[a la e_,oJje_e_,saap ao£q (
Jo_loelesleeJod e!a!JdE_ I
'Jo:loafasla Je^'EtSJJO0 :
eljegeunBu!ua]ueanuaopueuo_ou
Bare floor setting: Slide the carpet/barefloor selector all the way back and downtoward the bottom of the nozzle until it locks
into place.
In this position the brush assembly does notrevolve° This setting should be used forcleaning hardwood and tile floors and whenany attachments (tools) are used
Carpet setting: Slide the selector all theway forward and up to the carpetposition..
In this position the brush assembly will turn°When carpets are being cleaned the selec-tor should be in this position°
Attention: Refer to your carpet manufac-turers cleaning recommendations. Somemore delicate carpets may require that theybe vacuumed with the agitator turned off, toprevent carpet damage.
CAUTION
Do not allow vacuum cleaner to
remain in one spot for any lengthof time when the agitator is turn-ing, Damage to carpet may occur°
Note: For longer belt life, turn vacuum offbefore moving selector, otherwise make surethe selector is pushed fully and quickly aspossible to the desired position_ Failure todo so can cause the belt to rub on the
selector shaft and may result in the beltbecoming hot and creating a burning rubbersmell.
Carpet/BareFloor Selector
To BarePosition
To CarpetPosition
SOlBidw!ia_d_ua!s.
TO USE ATTACHMENTS: SOME MODELS_]IVW'I(]NVH
)IOVNIBINO0Vd Ollld33vEInOION3HN311AIV_EI3H
Vd 03"118-::19
IOSBOOV
JMJnoo ue]Jpu el JodeaopBuaA as eJop
_op!qapOl ep_eJ:L18'sofald aR!suedxa
JeJ!:_se OU apasn opuen O
•eaJJooeIepele],seqaluauJep_bep!no'eJqwojle
qasaJSaJopueno
NOO3EfoJpenofa)Uall anb eJqwojleso!Josaooesol Jode eAanueJqLuojieuesn as SeJluaFuelnAt.eAe7 :V.t.ON
Place the carpet/bare floor selector in barefloor setting by rotating back and down tothe bare floor setting. See CARPET/BAREFLOOR SELECTOR section,
The hose and wand can be pulled off theshort hose by grasping the cuff and twistingwhile pulling up, The attachments will fit thehose or wand_ In addition, the dustingbrush or combination brush will also fit onthe crevice tool
NOTE: The motor protector may open whenusing attachments or when cleaning newcarpet, due to reduced airflow by the attach-ments themselves or by new carpet fuzz fill-ing the bag quickly, See the TROU-BLESHOOTING section,,
When returning the bare floor selector tothe carpet setting, use caution as the selec-tor can move quickly to that setting due totension created by the belt,
CAUTION
When using attachments, be carefulnot to overextend the hose lengthwhen using attachments, This couldcause the cleaner to tip over. Makesure the carpet/bare floor selector isin bare floor position. Damage tofloor surface may occur if the carpetsetting is used, DO NOT pull the vac-uum cleaner around the room by thehose. Property damage may result°
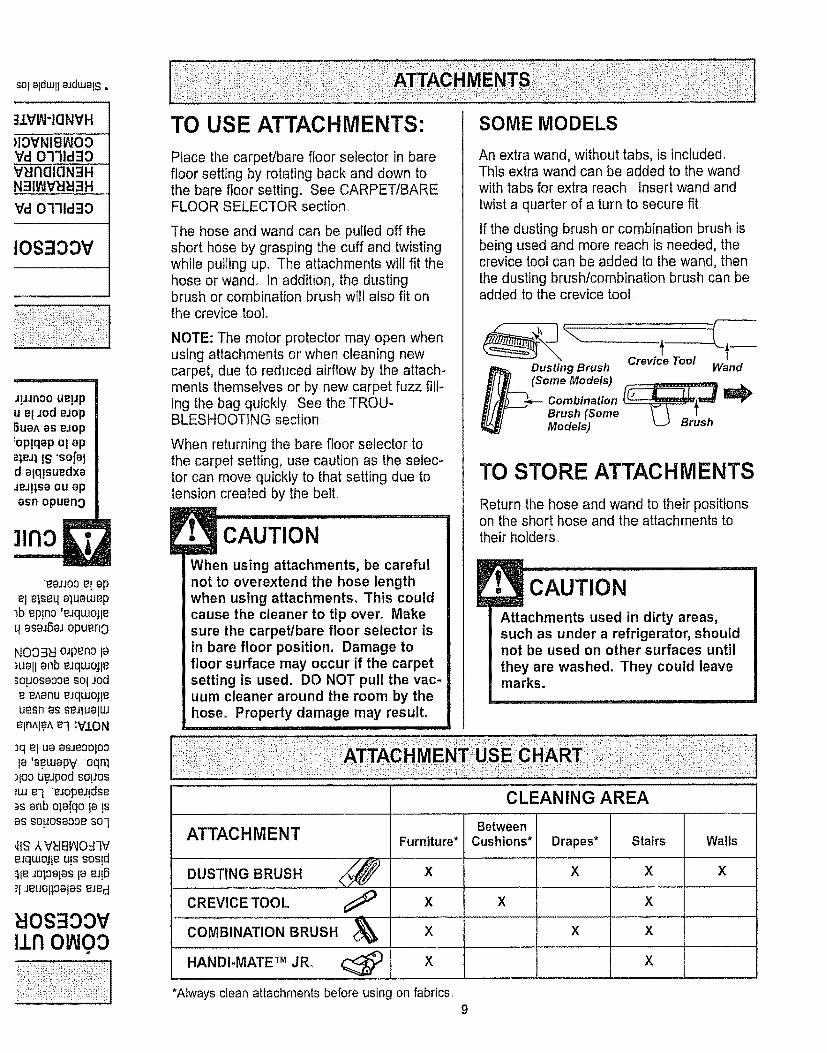
An extra wand, without tabs, is included,This extra wand can be added to the wandwith tabs for extra reach, Insert wand and
twist a quarter of a turn to secure fit°
If the dusting brush or combination brush isbeing used and more reach is needed, thecrevice tool can be added to the wand, thenthe dusting brushtcombination brush can beadded to the crevice tool,
Crevice ToolDusting Brush Wand(Some Models)
Combination _ _Brush (SomeModels)
TO STORE ATTACHMENTS
Return the hose and wand to their positionson the short hose and the attachments totheir holders,,
E cAUTION ............................
Attachments used in dirty areas,such as under a refrigerator, shouldnot be used on other surfaces untilthey are washed. They could leavemarks.
_qeI ua asJeoOlOO1a 's,eLuapv 'oqnl)1ooueJpod so!Jos:Weq "eJopeJ!dse_s anb ole[qo Ia !sas so!Jos8oo8 so 7
•,Jl£A VEJE]_O.47Ve.JquJojleu!ssos!d111e Joloalas1a e!!6-_lJeuo!lost es eJed
ATTACHMENT
CREVICE TOOL
.....coM ,.A .oN .us.
*Always clean attachments before using on fabrics.
Furniture*
X
X
X
X
9
CLEANING AREA
Drapes*
X
Stairs
X
X
BetweenCushions* Walls
X
X X
X
WARNING
Personal Injury Hazard
Use care if vacuum cleaner is
placed on stairs. If it falls, personalinjury or property damage couldresult.
Carpet edges.Guide either side or the front of the nozzte
along a baseboar& The full length brusheshelp remove dirt at carpet edges
Stairs.
Put handle in full upright positiom Place thecarpet/bare floor selector in the bare floorposition. Use the crevice tool or dustingbrush. Set the OntOff switch to ON.
Always follow all safety precautions whencleaning and servicing the vacuumcleaner,
, WARNI.GElectrical Shock And Personal InjuryHazard
Disconnect electrical supply beforeservicing or cleaning the unit.Failure to do so could result in elec-
trical shock or personal injury fromcleaner suddenly starting.
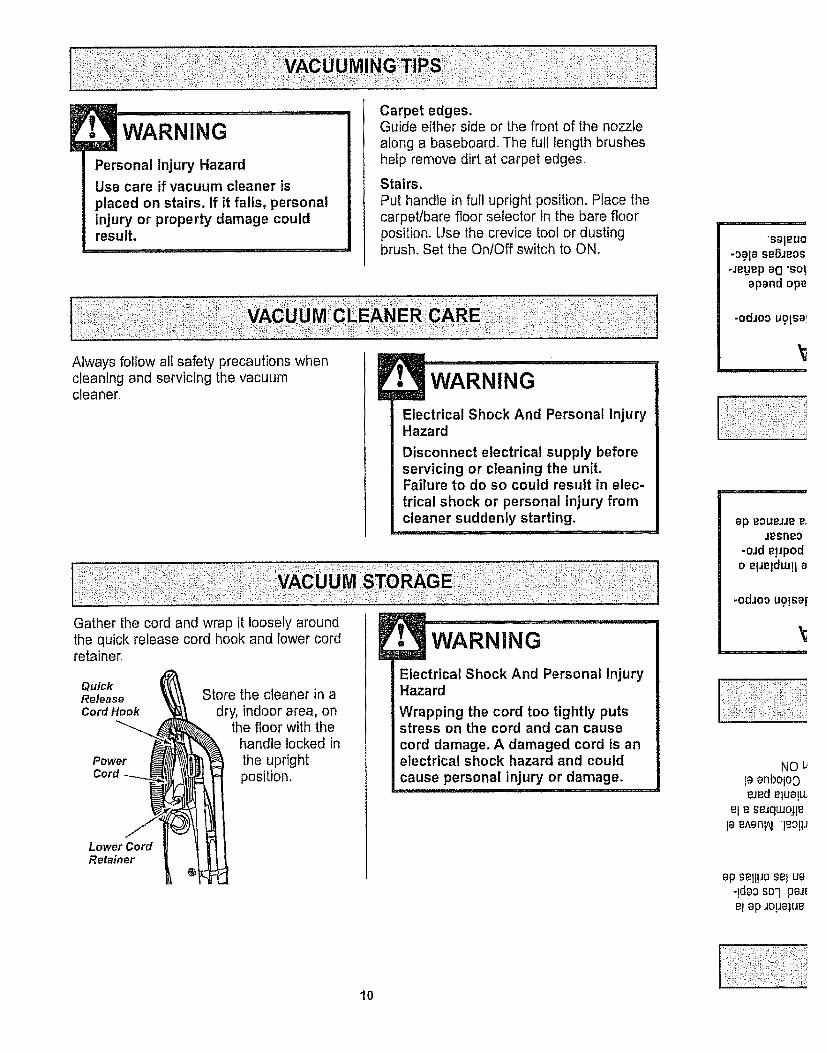
Gather the cord and wrap it loosely aroundthe quick release cord hook and lower cordretainer
Quick _\Release _i_\\\ Store the cleaner in aCordHook _ dry, indoor area, on
_ the floor with the_-_["'-¢_ handle locked in
Power _ r_[_?ft_1_ the upright
Cord _ :_ position.
Lower Cord _ [ 1 I
Retainer _
E• WARNING .............
Electrical Shock And Personal InjuryHazard
Wrapping the cord too tightly putsstress on the cord and can cause
cord damage. A damaged cord is anelectrical shock hazard and could
cause personal injury or damage,,, ,,,,,,,,,,,,,,,,,,,,,...... ,u, .:=
o_al_uo
-Oala seOJeo_-_egep e(] 'sot
apand ope
-od_oouo!sa_
ep 8Du_JJ_ _oj_sr_o
-oJde!_podo ei,mtdmHa
-odaoo u,o]sa[
Y, , ,,,,, ,, ,,
NO bla enbolooejed elua!u.
e[ e £e_quJoJlela eAenBI "leo[_J
ap sei[!.Jose[ ua-!dad so"l peJ_el ap Jopa%ue
10
m e e^lan^ el ONeJedesloq _I _J!J.
opep!no_o3elaljnb/_ JetlOO
ia _odo^!od eJedesfoqel ewo±
'eJOp_J
_deJep salue,sap aJdtaa!s
i!ii!!ii!ii!i!!iiif!iiii!iIsO_eldap eJop
,s a[ap ,_an6en[ua)posaooeSOla^eq
ld ap ugPelnwnoe)JeJedso!Josaose!o_adns el a!duJ!q
8J1 un Uoo JOpe_xa
,,ap_ en6e ep uoF)opFu!Jdxaop!s eq, Jo!Ja_xa tg e!dw!7
aaJeq_ ON-peJed4o0la opauoosaO
Unplug cord from walt outlet DO NOT dripwater on cleaner,
Clean exterior using a clean, soft cloth thathas been dipped in a solution of mild liquiddetergent and water, then wrung dry Wipedry after cleaning.
To reduce static electricity and dust build-up, wipe outer surface of cleaner andattachments_
Wash attachments in warm soapy water,rinse and air dry Do not clean in dish-washer.
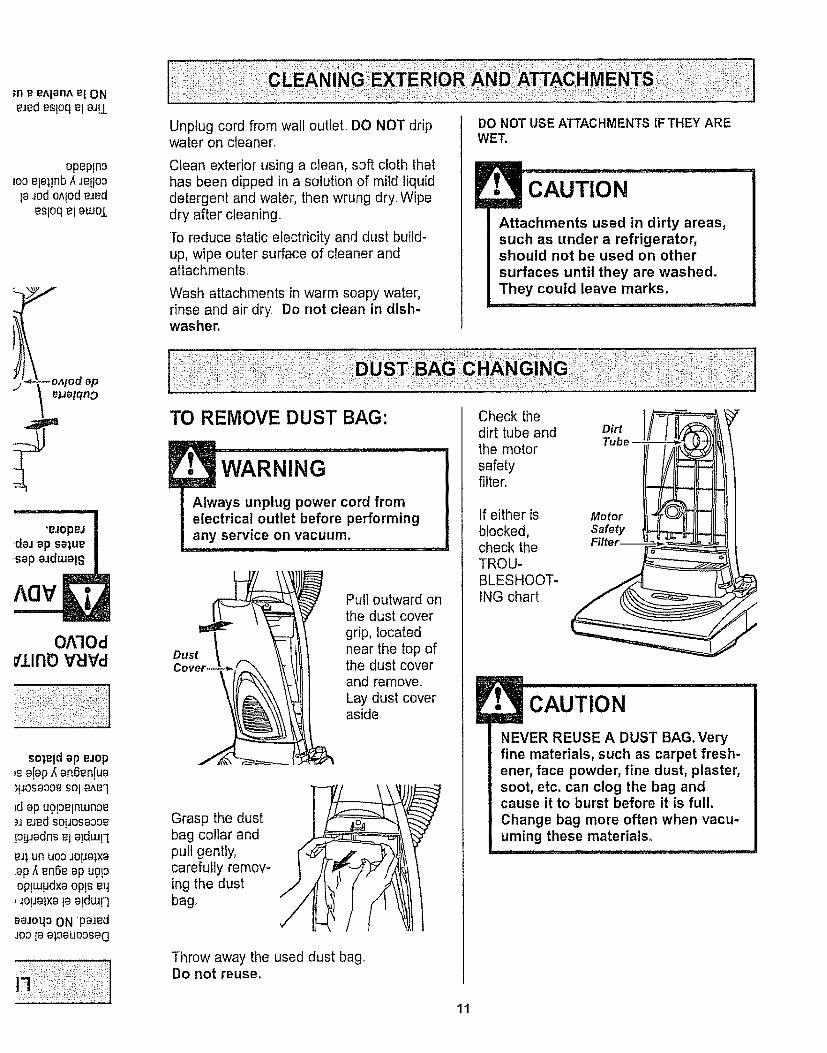
Pull outward onthe dust cover
grip, locatednear the top ofthe dust coverand remove.
Lay dust coveraside
Grasp the dustbag collar andpull gently,carefully remov-ing the dustbag.
/
Throw away the used dust bag.Do not reuse.
DO NOT USE ATTACHMENTS IFTHEY AREWET.
CAUTION
Attachments used in dirty areas,such as under a refrigerator,should not be used on other
surfaces until they are washed.They could leave marks.
Check thedirt tube andthe motorsafetyfilter.
If either isblocked,check theTROU-BLESHOOT-ING chart.
MotorSafety
CAUTION
NEVER REUSE A DUST BAG. Veryfine materials, such as carpet fresh-ener, face powder, fine dust, plaster,soot, etc. can clog the bag andcause it to burst before it is full.
Change bag more often when vacu-uming these materials°
11
TO REPLACE BAG:
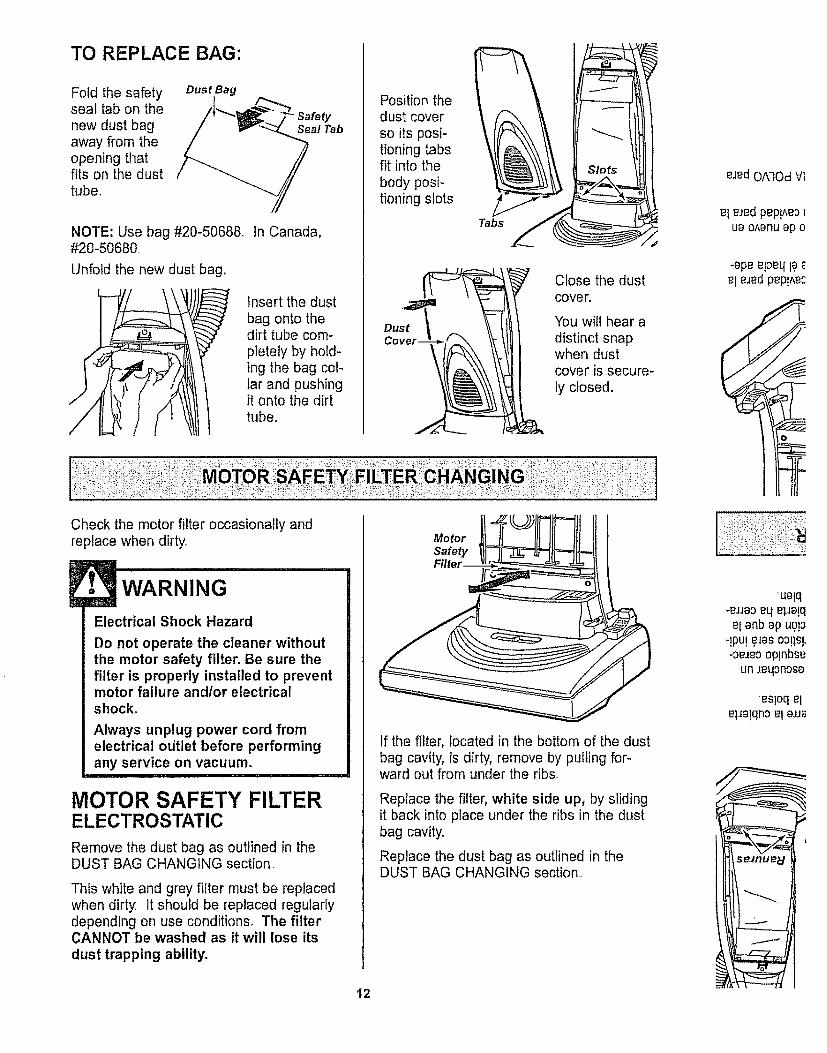
Fold the safetyseal tab on thenew dust bagaway from theopening thatfits on the dusttube.
Dust Bag
NOTE: Use bag #20-5068-50680
[Jnfoid the new dust bag.
Seal Tab
In Canada,
Insert the dust
bag onto thedirt tube com-pletely by hold-ing the bag col-tar and pushingit onto the dirttube.
Position thedust cover
so its posi-tioning tabsfit into the
body posi-tioning slotsr
Tabs
Close the dustcover.
You will hear adistinct snapwhen dustcover is secure-
ly closed.
eled OATOdV_
el e_edpep!Ae3 1
u8 o^Bnu op o
-apeepeq I,aeleJedpep!AeC
Check the motor filter occasionally andreplace when dirty.
E• WARNINGElectrical Shock Hazard
Do not operate the cleaner withoutthe motor safety filter. Be sure thefilter is properly installed to preventmotor failure and/or electricalshock.
Always unplug power cord fromelectrical o,Jtlet before performingany service on vacuum.
MOTOR SAFETY FILTERELECTROSTATIC
Remove the dust bag as outlined in theDUST BAG CHANGING section
This white and grey filter must be replacedwhen dirty It should be replaced regularlydepending on use conditions. The filterCANNOT be washed as it will lose its
dust trapping ability.
MotorSafety
If the filter, located in the bottom of the dustbag cavity, is dirty, remove by pulling for-ward out from under the ribs,
Replace the filter, white side up, by slidingit back into place under the ribs in the dustbag cavity.
Replace the dust bag as outlined in theDUST BAG CHANGING section°
ue!q-eJJaoeq elJa!qeIanb ap uop
-!pu! ?._esoo!lsF-oeJeDop!nbse
un Jeqonose
esloq elelJa!qnoeIa,ua
12
estoq ep
e_*atqn9
esloqeI ap elJa!qno
el Je!!nbe._ed adeosa
ap o4pJlap elJa!qno
lap u.o!oeJaq!Eel alUelapee!oeq a!!1
18JeU[WJa_Op eJ£d
fle]insuo3:VION
"O^lod) ns ?papJd sand_psauo!o!puooSel
eqao "o!ons,alsalap oqonpe3a]s3
W3Ha o 1171:1
lmno
E WARNINGDo not operate without exhaustfilter_
EXHAUST FILTERHEPA
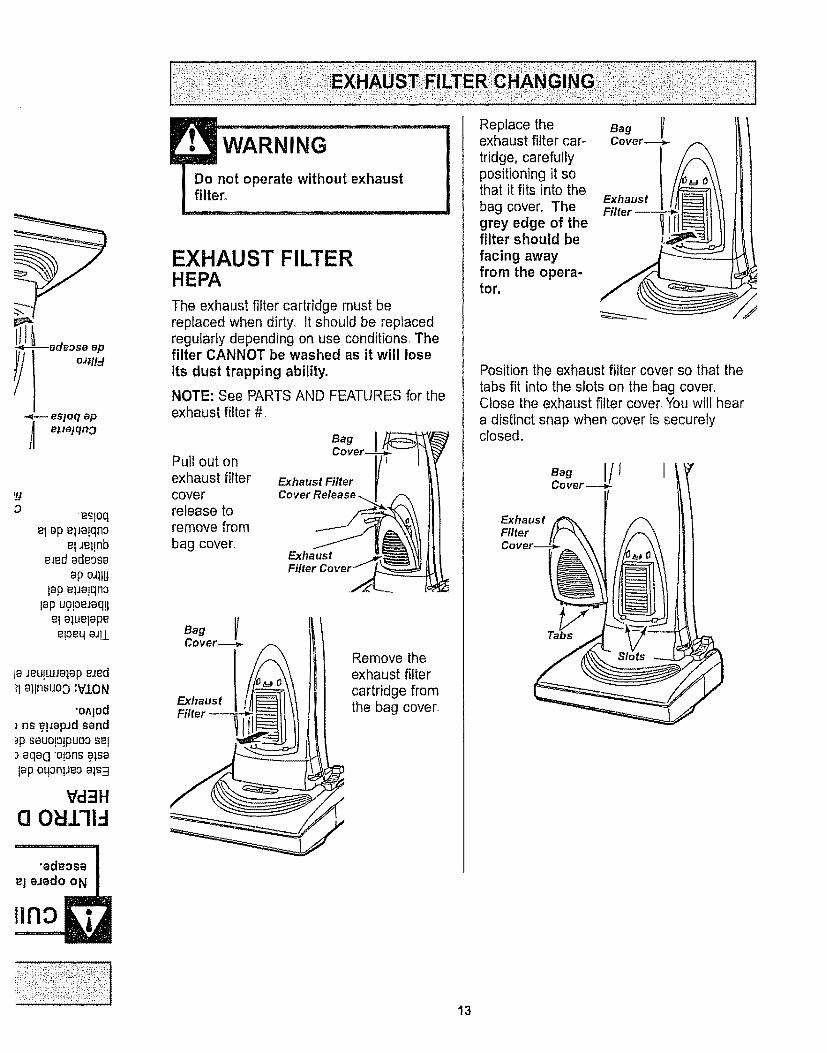
The exhaust filter cartridge must bereplaced when dirty_ It should be replacedregularly depending on use conditions_ Thefilter CANNOT be washed as it will loseits dust trapping ability.
NOTE: See PARTS AND FEATURES for theexhaust filter #
Pull out onexhaust filtercoverrelease toremove from
bag cover,
BagCover--
Exhaust Filter
Cover Release .._
ExhaustFilter Cover /
Exhaust
Remove theexhaust filtercartridge fromthe bag cover
Replace theexhaust filter car-
tridge, carefullypositioning it sothat it fits into the
bag cover, Thegrey edge of thefilter should be
facing awayfrom the opera-tor.
Exhaust
Position the exhaust filter cover so that the
tabs fit into the slots on the bag cover,Close the exhaust filter cover You will heara distinct snap when cover is securelyclosed,
ExhaustFilter
13
WARNING
Electrical Shock Or Personal InjuryHazard
Disconnect electrical supply beforeservicing or cleaning the unit.Failure to do so could result in elec-
trical shock or personal injury fromcleaner suddenly starting.
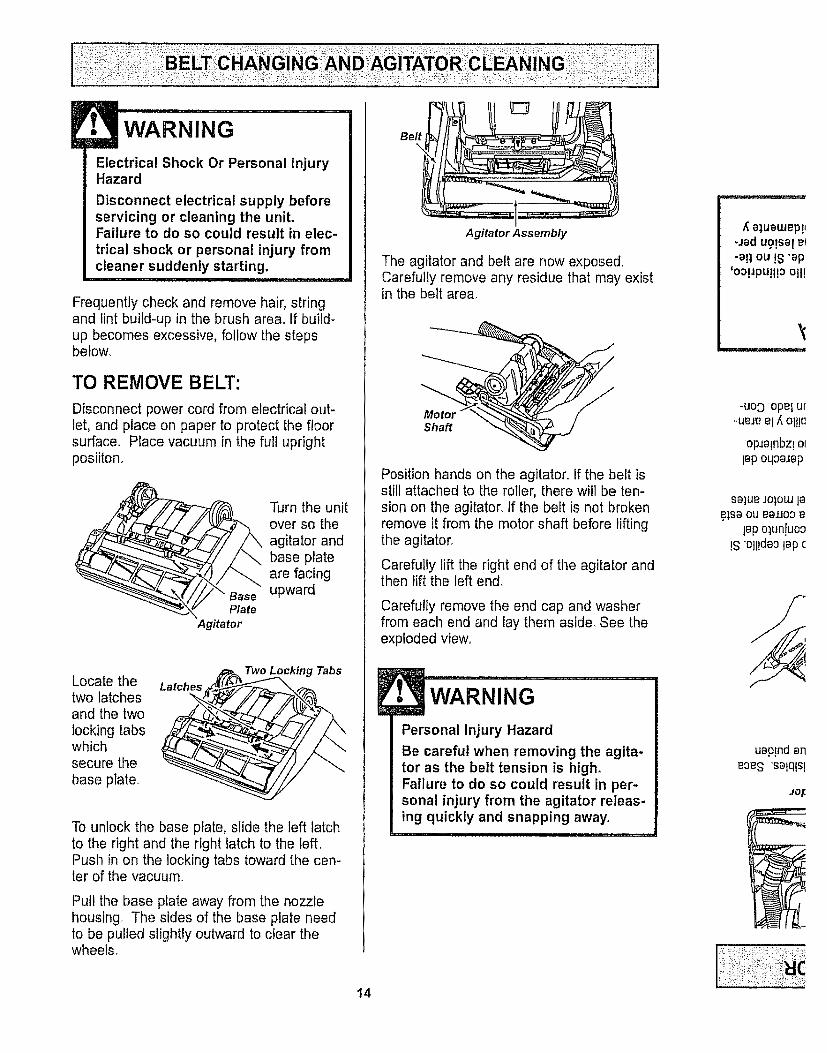
Frequently check and remove hair, stringand lint build-up in the brush area. If build-up becomes excessive, follow the stepsbelow.
TO REMOVE BELT:
Disconnect power cord from electrical out-let, and place on paper to protect the floorsurface. Place vacuum in the fuli uprightposiiton.
Plate
Agffator
• Jrn the unitover so the
agitator andbase plateare facingupward°
Locate thetwo latchesand the twolocking tabswhichsecure the
base plate.,
Latches
Two Locking Tabs
To unlock the base plate, slide the left latchto the right and the right latch to the left.Push in on the locking tabs toward the cen-ter of the vacuum.
Pull the base plate away from the nozzlehousing, The sides of the base plate needto be pulled slightly outward to clear thewheels.
Belt
Agitator Assembly
The agitator and belt are now exposed,Carefully remove any residue that may existin the belt area.
MotorShaft
Position hands on the agitator. If the belt isstill attached to the roller, there wi!l be ten-sion on the agitator. If the beft is not brokenremove it from the motor shaft before liftingthe agitator.,
Carefully lift the right end of the agitator andthen lift the left end.
Carefully remove the end cap and washerfrom each end and lay them aside, See theexploded view°
lPersonal Injury Hazard
Be careful when removing the agita-tor as the belt tension is high.Failure to do so could result in per-sonal injury from the agitator releas-ing quickly and snapping away,
/[ a)uawep!_-Jad ug!saI et-a!] ou !£ "ap
'ooppu]l!O oi1!
opJa!nbz!otlap oq3eJep
sa]ueJO|OUJ]ae_,seOUBeJJObe
lap o:lun[uoo!3 "oll!daolap c
JO/:
14
eootoo ap o]ogJJOOe^p,oedsJed 81eeA
)pueJe se I alqwe O
Vl lOd l
OllldaOfun lap e;uodos
elepueJV t
Luesu3oedsJed
lap ,_ee.uooel epo!o!pu!opm,eJ!_,aN
sodZaAt. epesn)- osafiFl
(_uewgs Jodoa^ £ o _ epesn)
- opeJapolN
gwepe_!pepesn)- aluenoeJ.4
el ep osn 13
:opeJoqelue!I anb/_eq ue!qwE±
g Je],!Ae/_ eza!dw!lqueuJeJed :VION
"selapue.mpeo ap le]ewlaJdsap as oIi_ anb epend
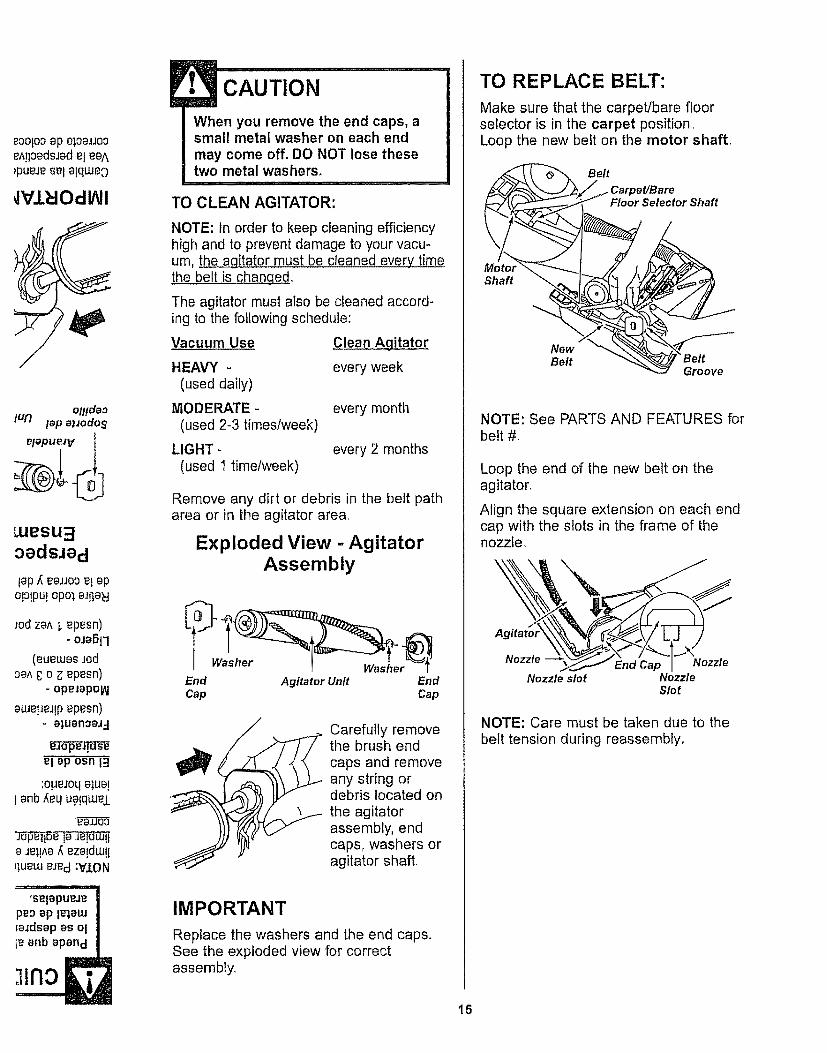
CAUTION
When you remove the end caps, asmall metal washer on each end
may come off. DO NOT lose thesetwo metal washers_
TO CLEAN AGITATOR:
NOTE: In order to keep cleaning efficiencyhigh and to prevent damage to your vacu-um, the agitator must be cleaned every timethe belt is changed.
The agitator must also be cleaned accord-ing to the following schedule:
Vacuum Use
HEAVY -
(used daily)
MODERATE -
(used 2-3 times/week)
LIGHT -
(used 1 time/week)
Clean Agitator
every week
every month
every 2 months
Remove any dirt or debris in the belt patharea or in the agitator area,
Exploded View - AgitatorAssembly
Washer Washer_
End Agitator Unit EndCap Cap
Carefully removethe brush endcaps and removeany string ordebris located onthe agitatorassembly, endcaps, washers oragitator shafL
IMPORTANT
Replace the washers and the end caps.See the exploded view for correctassembly.
15
TO REPLACE BELT:
Make sure that the carpet/bare floorselector is in the carpet position..Loop the new belt on the motor shaft,
Belt
Floor Selector Shaft
Sham
NewBelt
Groove
NOTE: See PARTS AND FEATURES forbelt #.
Loop the end of the new belt on theagitator_
Align the square extension on each endcap with the slots in the frame of thenozzle_
Nozzle --
Nozzle slot NozzleSlot
NOTE: Care must be taken due to thebelt tension during reassembly,
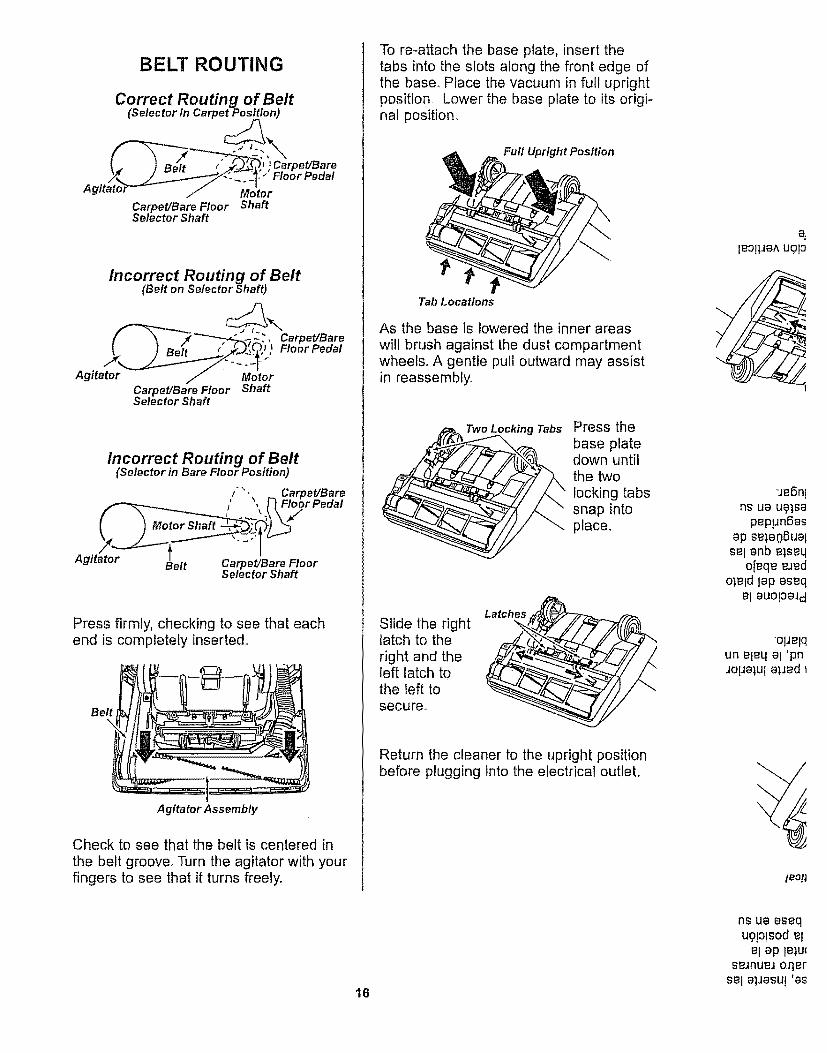
BELT ROUTING
Correct Routing of Belt(Selector in Carpet Position)
Carpet/Bare Floor ShaftSelector Shaft
Agitator
Incorrect Routing of Belt(Belt on Selector Shaft)
Floor Pedal
.,
MotorCarpet/Bare Floor ShaftSelector Shaft
Incorrect Routing of Belt(Selector in Bare Floor Position)
Belt Carpet/Bare FloorSelector Shaft
Press firmly, checking to see that eachend is completely inserted°
Agitator Assembly
Check to see that the belt is centered in
the belt groove,, Turn the agitator with yourfingers to see that it turns freely.
To re-attach the base plate, insert thetabs into the slots along the front edge ofthe base. Place the vacuum in full uprightposition, Lower the base plate to its origi-nal position.
Full Upright Position
Tab Locations
As the base is lowered the inner areas
will brush against the dust compartmentwheels° A gentle pull outward may assistin reassembly.
Two Locking Tabs Press thebase platedown untilthe two
locking tabssnap intoplace,
Slide the rightlatch to the
right and theleft latch tothe left tosecu re.
Latches
Return the cleaner to the upright positionbefore plugging into the electrical outlet.
ue6nIns ua ugl_a
peplJn6asap sBla0gua!
Sel anb elseqo[eqe eJed
o_,eldlap aseqel auo!oaJa
'olJelqun eleq el 'pnJo!Jalu! alJed I
le_!J
16
ns ue asequg!o!sod el
el ap Felu(se.mueJoqerS_ IelJaSU! 'as
lUaleOapandp,ap opoiJadn as opueno] eun asn oN
_s!dla e_,seqs.eJ]e) JO!Jeclr',s e)JBd I_I
p lePedla l_l.u!JdO
lse el e]oauossac]
"e_StAaJdmI-_I!s leJodJoo_oqoun asJ]_,!olAJasalJept aJ,oauooseCl
18J
.Io ap oJBllad
WARNING
Electrical Shock Or Personal InjuryHazard
Disconnect electrical supply beforeservicing or cleaning the unit°Failure to do so could result in elec-
trical shock or personal injury fromcleaner suddenly starting.
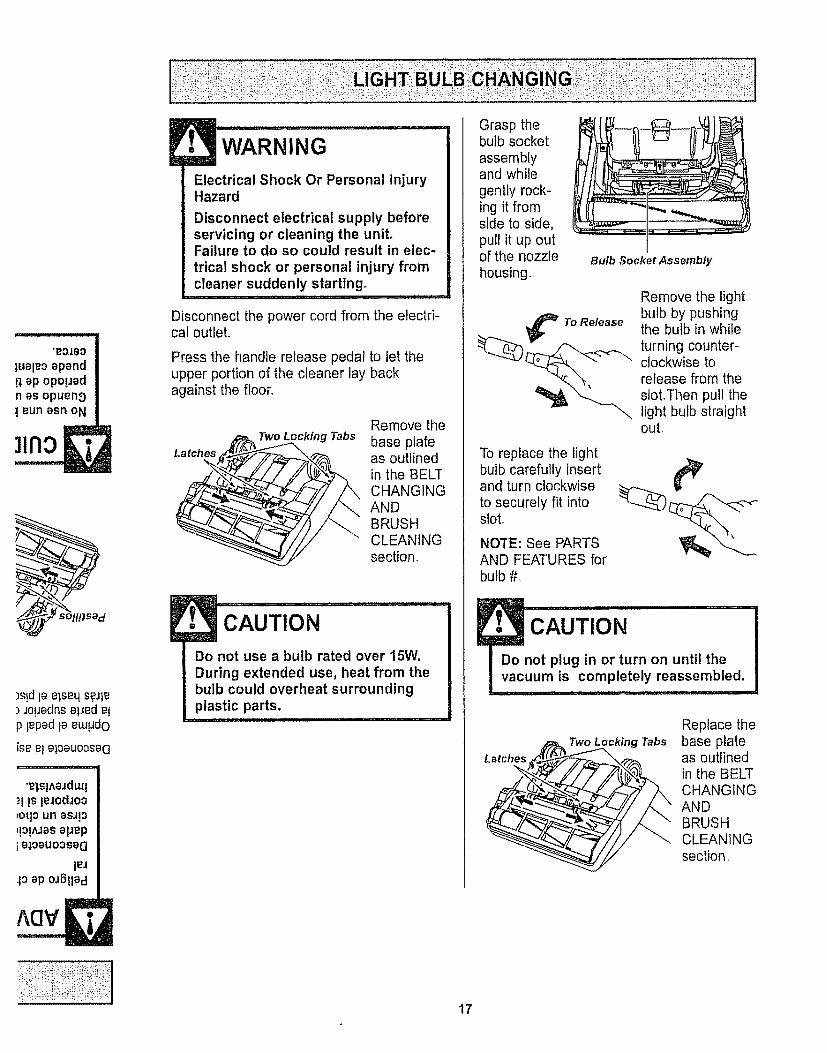
Disconnect the power cord from the electri-cal outlet.
Press the handle release pedal to let theupper portion of the cleaner lay backagainst the floor,
Latches
Two Locking TabsRemove the
base plateas outlinedin the BELTCHANGINGANDBRUSHCLEANINGsection_
!Do not use a bulb rated over 15Wo
During extended use, heat from thebulb could overheat surroundingplastic parts.
................... iiiiiii I'11',11
Grasp thebulb socket
assemblyand while
gently rock-ing it fromside to side,pull it up outof the nozzle Bulb SocketAssemblyhousing.
Remove the light
'_ ToRelease bulb by pushingthe bulb in while
_) _j_, turning counter-
clockwise torelease from theslot,Then pull thelight bulb straightout,
To replace the lightbulb carefully insertand turn clockwise
to securely fit intosloL
NOTE: See PARTSAND FEATURES forbulb #.
. CAUT'ONDo not plug in or turn on until thevacuum is completely reassembled.
Latches
Two Locking Tabs
Replace thebase plateas outlinedin the BELTCHANGINGANDBRUSHCLEANINGsection,
AClV
17
WARNING
Electrical Shock Or Personal InjuryHazard
Disconnect electrical supply beforeservicing or cleaning the unit.Failure to do so could result in elec-
trical shock or personal injury fromcleaner suddenly starting.
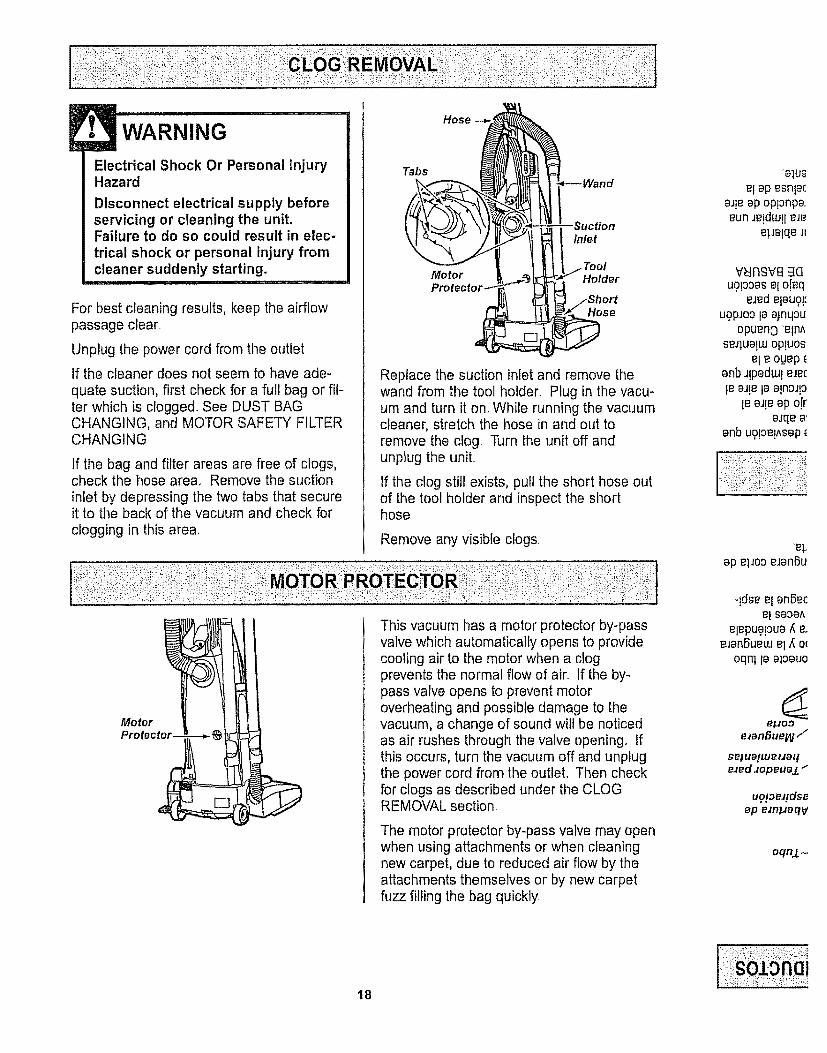
For best cleaning results, keep the airflowpassage clear_
Unplug the power cord from the outlet
if the cleaner does not seem to have ade-
quate suction, first check for a full bag or fil-ter which is clogged. See DUST BAGCHANGING, and MOTOR SAFETY FILTERCHANGING.
If the bag and filter areas are free of clogs,check the hose area° Remove the suction
inlet by depressing the two tabs that secureit to the back of the vacuum and check forclogging in this area
Hose
Tabs
Inlet
Motor HolderProtector---"
Hose
Replace the suction inlet and remove thewand from the tool holder. Plug in the vacu-um and turn it on. While running the vacuumcleaner, stretch the hose in and out toremove the clog Turn the unit off andunplug the unit.
If the clog still exists, pull the short hose outof the tool holder and inspect the shorthose°
Remove any visible clogs,
::::::::::::::::::::::
MotorProtector-
This vacuum has a motor protector by-passvalve which automaticalfy opens to providecooling air to the motor when a clogprevents the normal flow of air.. If the by-pass valve opens to prevent motoroverheating and possible damage to thevacuum, a change of sound will be noticedas air rushes through the valve opening. Ifthis occurs, turn the vacuum off and unplugthe power cord from the outlet. Then checkfor clogs as described under the CLOGREMOVAL section.
The motor protector by-pass valve may openwhen using attachments or when cleaningnew carpet, due to reduced air flow by theattachments themselves or by new carpetfuzz filling the bag quickly
'e:lu_el ep esnloc
aJ!e op oppnpa,eun Je!duJ!l eJe
e|Je!qe Jl
vNnsv_] :::fcIu.opoasel o[eq
eJedelaUO[:ugp_oola ajnqou
opueno 'eln^seJ1ue!uJop!uos
ele ouepanbJ!pedud!eJec
fe aJ!e ia alnoJ!oleoJ[eep o[r
8Jqe a_anb ug!oe!^sep
ep elJobe.en6u
-!dse el enBece! sa3a^
elepugpua _ e_eJanBueuJel ,_o_
oqn_IOalomJo
e/.Jooe_an,6uel/ll /
se_u_luae,zieLleled.iopeual I
ug!oeJ!dseap em_eqV
oqnl-
18
opeJ!dse el eBede"toOAISOOXeoPln_l
_PlUOS op otqme3
_ooe so I ep osn le
_U loP ug!oop_se_I
.'-JIBou JopeilBe I:J
euo!ounj ou znl el
oaelnduaatnoglp se o se;Bdez_eAeIeJop_JIdse Izl
e;uomepoloejs!_eseJIdst_ ON
ieuolounjou eJopeJidse _3
)oJd
un Jod soqoaq JasJ!puaJ8p £eJouew,endelse a_lnsuoo
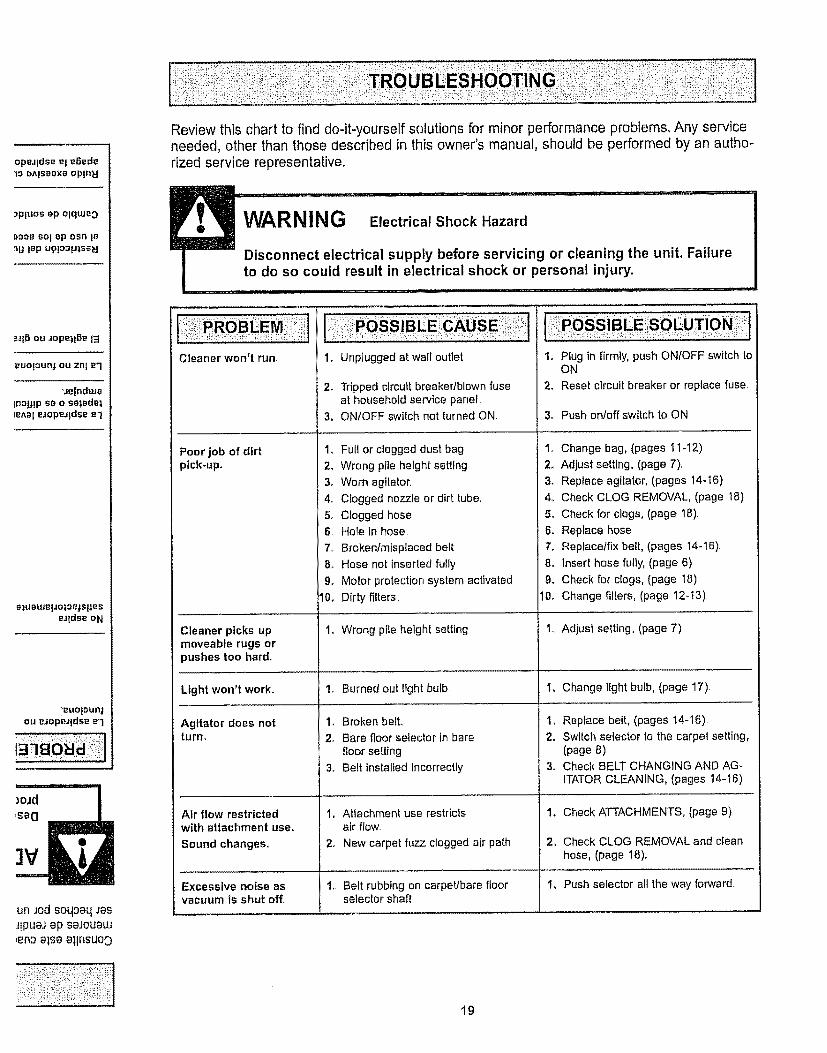
Review this chart to find do-it-yourself solutions for minor performance problems. Any serviceneeded, other than those described in this owner's manual, should be performed by an autho-rized service representative_
Cleaner won't run°
Poor job of dirtpick-up.
Cleaner picks upmoveable rugs orpushes too hard.
Light won't work.
Agitator does notturn.
Air flow restrictedwith attachment use.
Sound changes,,
Excessive noise asvacuum is shut off.
1. Unplugged at walt outlet
' :::POSSIBLE :=SO
1_ Plug in firmly, push ONIOFF switch toON.
2. Reset circuit breaker or replace fuse.2. Tripped circuit breaker/blown fuseat household service panel
3. ONIOFF switch not turned ON.
1. Full or clogged dust bag
2. Wrong pile height setting
3o Worn agitator.
4o Ctogged nozzle or dirt tube. 4.
5. Clogged hose 5.6. Hole in hose. 6o
7o Brokentmisptaced belt, 7.
8. Hose not inserted fully Bo
9. Motor protection system activated 9.
10. Dirty filters 10.
1. Wrong pile height setting 1o
1. Burned out light bulb,
1, Broken belL,
2. Bare floor selector in barefloor setting
3, Belt installed incorrectly
I, Attachment use restrictsair flow.
2.. New carpet fuzz clogged air path
1o Belt rubbing on carpel]bare floorselector shaft
3. Push ontoff switch to ON
1. Change bag, (pages I1-12)
2. Adjust setting, (page 7).
3, Replace agilator, (pages 14-16)
Check CLOG REMOVAL, (page 18)
Check for clogs, (page 18)
Replace hose
Replacetfix belt, (pages t4-16).
Insert hose fully, (page 6)
Check for clogs, (page 18)
Change filters, (page 12-13)
Adjust selling, (page 7)
Io Change light buib, (page 17)-
I ..................
1, Replace belt, (pages t4-t6).
2o Switch selector to the carpet setting,(page 8)
3. Check BELT CHANGING AND AG-ITATOR CLEANING, (pages 14-t6)
1. Check ATTACHMENTS, (page 9)
2., Check CLOG REMOVAL and cleanhose, (page 18).
1_ Push selector all the way forward
............. ,, ,,,.,,,,,,,,,,
19
oo pu_
- ;, <
For repair of major brand appliances in your own home ...no matter who made it, no matter who sold it[
!-800-4-MY-HOME ® Anytime, day or night
(t-800-469-4663) (US.Ao and Canada)
www,sears,com www.sears.ca
For repair of carry-in products like vacuums, lawn equipment, andelectronics, call for the nearest Sears Parts and Repair Center.
1-800-488-1222 Anytime, day or night (U.S.A only)
www.sears.com
For the replacement parts, accessories and owner's manualsthat you need to do-it-yourself, call Sears PartsDirectSM!
1-800-366-PART
(1-800-366-7278)
6 a.m. - 11 p,.m-, 7 days a week(USA only)
k.:
r
,:::::.
www,sears.com/partsdirect
To purchase or inquire about a Sears Service Agreement
or Sears Maintenance Agreement:
1-800-827-6655 (USA,)
7 am.- 5 pm,., CST, Mon.- Sat..
1-800-361-6665 (Canada)
9 a,.m.- 8 pore EST, M - F,4 pro. Sat.
k, •
Para pedir servicio de reparaci6n adomicilio, y para ordenar piezas:
1-888-SU.HOGAR s_
(1-888-784-6427)
Au Canada pour service en frangais:1-800-LE-FOYER Mc
(1-800-533-6937)www.sears ca
Z
HomeCentral
© Sears, Roebuckand Co.
® Registered Trademark / TMTrademark / SMService Mark of Sears, Roebuck and Co,® Marca Registrada ( TMMarca de Fabrica / sMMarca de Servicio de Sears, Roebuck and Co,MCMarque de commerce / MoMarque d_pos_e de Sears, Roebuck and Co,
i_i!;ii,_i:!:!!___:i!ii:ii!ii:;ii
H:i_:::;: -_- ::i
:.:;:!: :S]85
J::ii:i!Zi:!:ii!
!ii,ii i ii!i!i!!i!J:_:
i!!i;?i:ili,;ii:
i! ::= :::
! i,:il:}st1
;i : ,! = :'
"Je:_!
:i.,:: pue: :::i: = :i;: :Z_: !:!i .....
Zii::i:ii?:_fi:i:_,
iiii_!!_!i!,i,ii:ii:i_,i_i,'i:_ii!:!!i::,!!!!ii:,_:
ii!.iii!i!:_ii!ii!,!!iii_i%..
'!i:i:i!i!i!ii::iil;!;!:_:i!!ii!.il;,!i!i;i!i:i!!;
2O
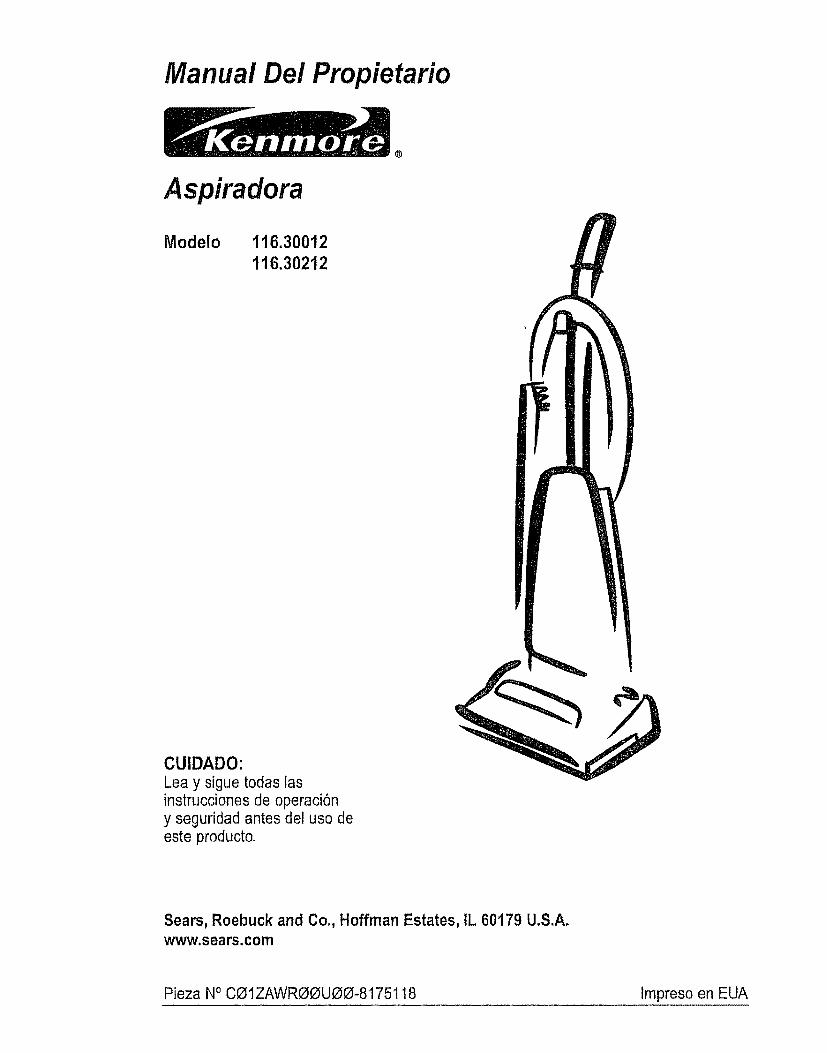
Manual Del Propietario
Aspiradora
Modelo 116.30012116.302t2
CUIDADO:Lea y sigue todas Ias
instrucciones de operaci6ny seguridad antes del uso deeste producto.
Sears, Roebuck and Co., Hoffman Estates, IL 60179 U.S.A.www.sears.com
Pieza NOCOlZAWROOUOO-81751 t 8 lmpreso en EUA
Antes de usar su aspiradora nueva ,., 2
Garantia de la aspiradora de Kenmore .... 2Instrucciones importantes deseguridad ........................... 3
Piezas y caracteristicas ................. 4Instrucciones de ensamblamiento., ,5-6
Instrucciones de operaci6n ............ 7kjuste y selecci6n de nivel de pelo dea atfombra ............................. 7
Desprendimientodel mango ................. 8Interruptor de encendidoiapagado ......... 8Selector de pisos con alfombraysin aifombra ........................ 8Accesorios ..................... 9Cuadro de uso de los accesorios .......... 9Sugerencias para aspirar ............... t0
Cuidado de la aspiradora ............. 10Almacenamientode la aspiradora ........ 10Limpiezadel exterior y de los accesorios ..... 11Cambiode ia bolsa para polvo ........ _1-12Cambio def filtro de seguridad delmotor ......................... 12
Cambio del fiitro de escape ............. 13Cambio de la correa y limpieza delagitador ........................ 14-16Cambio de la bombilia ................ 17C6mo eliminar los residuos de basuraen los conductos .................... 18Protector de moto ................. t8
Reconocimiento de probtemas ............ 19Informacibn de assistanciao servicio ............................. 20
Por favor lea esta guia que le ayudara a assemblar y operar su aspiradora nueva de Kenmore en una maneram_s segura y effectiva
Para mas informaci6n acerca del cuidado y operaci6n de esta aspirador, Ilame a su tienda Sears mas cercana.Cuando prequnte por informaci6n usted necisitar& el n0mero compieto de serie y modelo de la aspiradora queest& locado en la placa de los n6meros de modelo y sefie
Use el espacio de abajo para registrar e! n0mero de modelo y serie para su nueva aspiradora de Kenmore
Numero de Modelo
NOmerode Serie
Fecha de Compra
Matenga este libro y su recibo en u lugar seguro para referencias futuras..
Esta garantia es por un afio desde la fecha de compra, e incluye solamente e! uso de la aspiradora en hogaresprivados..Duranteel a5o de garantia, cuando fa aspiradora es operaday mantenida de acuerdo al manual deinstruccionesdel duefio, Sears reparar&cuatquierdefecto en materiales o fabricaci6n libre de cargo,
Esta garantla excfuyelas botsasde colecci6n,correas, lampafillas, y filtros, las cuales son partes gastables quese detefioran con el uso normal
Para el servicio de garantia, retorne esta asptradoraal Centro de Servicio Sears robs cercano en losEstados Unidos,
Esta garantla se aplica solamente mientras este producto est&en uso en losEstados Unidos,.Esta garantla leda a usted derechos iegales especfficos, y usted puedetener tambi6n otros derechos los cuales varian deestado a estado,
Sears, Roebuckand Co,, D1817WA, Hoffman Estates, IL 60179
ADVERTENCIA
Su segurldad es muy importante para nosotros, Para reducir el desgo de incendto, chequeel_ctrico, lest6n corporal o dafios al utilizar su aspiradora, actOede acuerdocon precaucionesb_sicas de seguridad, entre elias:
Lea este manual antes de armar o utifizar suaspiradora
Use su aspiradora ,Jnicamenteen la formadescrita en este manual, Use Qnicamenteconaccesorios recomendados por SearsPara reducir el riesgo de choque el_ctrico,no usesu aspiradora al aire libre ni sobre superficiesmojadas.Desconecte la fuente de electricdad antes dedar servicio o limpiar. De Io contrario podriacausar un cheque el_clrico o lesi6n corporal,
Siempre debeapagar su aspiradora antesdedesconectarla
No desconecte la aspiradoratirando del cord6nel_ctrico. Paradesconectarla, hale et enchufe,noel cordSn.
No use la aspiradora si e! cord6n o el enchufeest_ dafiado Si la aspiradora no est_funcionando adecuadamente o si se ha dejadocaer, est_ da_ada, se ha dejado expuesta a laintemperie o se ha dejado caer en agua, devu_l-vala a un Centrof Departamento de servicio deSears
No hale ni transporte la aspiradora per el cord6n;no use el cord6n come mango; no cierre puertassobre el cord6n; no hate el cord6n sobre robot-des agudos ni esquinas No pase Ia aspiradorasobre et cordSn.Mantengael cordSnalejado desuperficies calientesNo abandone la aspiradora cuando est_ conec-tada Descon_ctela cuando no ta est_ usando yantes de darle servicio,
No permita que sea utilizada comejuguete Serequiere tenor mayor cuidado cuando seautifizada en la proximidad de nifios o per nifiosNo toque la aspiradora ni el enchufecon lasmanes mojadas
GUARDE ESTAS I
No coloque objetos en las aberturas.
No utilice la aspiradora si alguna abertura est_bfoqueada;mant_ngala libre de polvo,pelusa,cabellos y cualquiera cosa que podria disminuirel flujo de aire
Mantenga el cabello, ropa suelta, dedos y todaslas partes del cuerpo alejados de las aberturas ypiezasmec&nicas.
No use la aspiradora sin tenet instalada la bolsaparapotvoyfo los filtros,
Cambiesiempre la bolsa para polvo despu_s deaspirar limpiadores de alfombras o desodorantes,talcos y pelvesfines Estos productos atascan labolsa, reducen et flujo de aire y pueden causarque _sta se rompa. Si no cambia ta bolsa podriaocasionar dafio permanentea la aspiradora
No use la aspiradora para tevantarobjetos agu-dos, juguetes pequefios,alfiteres,sujetapapeles,etc. Podrtan dafiar la aspiradora o la batsa parapolvo.
No levante ninguna cosa que se est_ quemandoo emitiendohumo, come cigarrillos, ceritlos ocenizas calientes,
No use la aspiradora para aspirar l_quidosinflamabteso combustibles(gasolina, tiquidospara limpieza, perfumes,etc ) ni la use anlugares donde _stes podrian estar presentes Losvapores de est_s sustancias pueden crear unpeligrode incendioo explosi6n.
Tonga cuidado especial al utilizar la aspiradoraen escalones No la coloque sobre sillas, mesas,etc Mant6ngalaen el piso
Ustedes responsablede asegurar que su aspira-dorano sea utilizadapor ningunapersona que nopueda manejarla correctamente.
STRUCClEl armado y use seguro de su aspiradora son su responsabilidad Esta aspiradora ha side disefiadaexclusivamentepara use dom_stico.La aspiradoradeber_ almacenarse en un lugar seco y en el inte-rior, Lea este Manual del propietario detenidamente, pues contiene informaci6n impertante sobre segu-fidad y use.Esta quia contiene informaci6n sobre seguridad debajo de simbolos de advertienciacuidado. Per favor ponga atenci6n especiala estas instruccionesdadas.. Advertencia: EsteinfermactSnte alertar_,con el potigro defuego, cheques electricos, quemadas y lesionesoCuldado:Este informaciSn le alertara a peligros come tesiones y dafios de propiedad.

Esimportanteconcerlaspiezasycaracter[sticasdesuaspiradoraparaasegurarsuusoadecuadoy seguroExamtnelasantesdeusarsuaspiradora.
Objeto Pieza No Pieza NOen EUA en Canad_
Bolsa para polvo 20-50688 20-50680
Bombi!la de farol 20-5240 20-40600
Correa 20-5275 20-40096
Filtro de escape 20-86880 20-86880
Soporte para
Cord6nSujetador deliberaci6n
rapide detcord6n
Cepitlo parasacudir
Tornlllo
de mango
inferior para elcord6n/Mangopara transportar
Abertura de
aspiracf6n
Herramlenta
tapices
Agarraderodelacubiertade polvo
Cubierta depolvo (Botsa
Flltrosecundario(Dentro decubierta de
polvo)
Protectorde
In terruptor deencendido/
apagado _Pedal de
liberaci6n _:_del mango l t.J_(Algunos _ _[
modelos) -_'_
Liberaci6n dela cubierta delfiltro de escape
N_meros de seriesdel modelo
Mangueracorta
Palanca paraajustar laaltura (Algunos
Filtro de
escape(dentro)
Protectorde meubles Luz
(A/gunos modelos)
Controlparaalfombra/sin alfombra(Algunosmodelos)
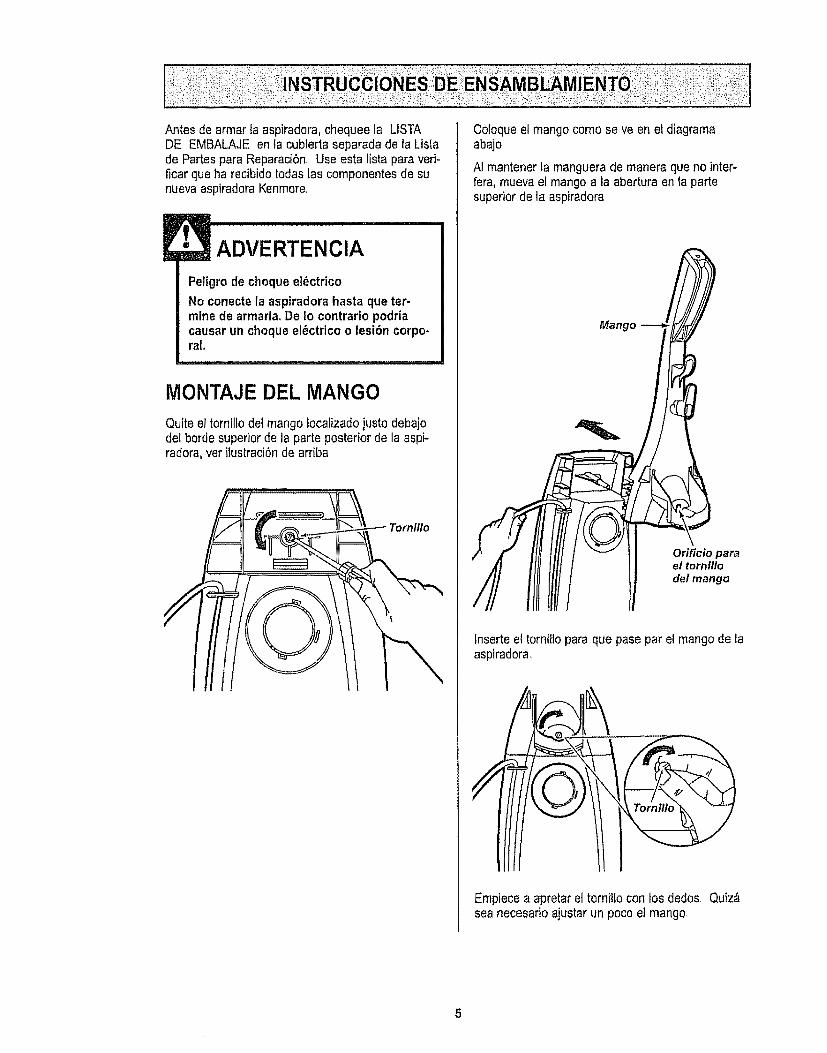
Antes de armar ta aspiradora, chequee ta LISTADE EMBALAJE en la cubierta separada de la Listade Partes para Reparaci6n,,Use esta lista para veri-ficar que ha recibido todas las componentes de sunueva aspiradora Kenmore,
ADVERTENCIA
Peligro de choque el_ctrico
No conecte la aspiradora hasta que ter-mine de armada, De !o contrario podriacausar un choqueel_ctrico o lesi6n corpo-ral
MONTAJE DEL MANGO
Quite el tornilfodot mango Iocalizadojusto debajodel horde superior de la parte posterior de la aspi-radora, ver ilustraci6nde arriba
Coioque el mango corno se ve en el diagramaabajo
Af mantener la manguera de manera que no inter-fera, muevael mango a la abertura en la partesuperior de la aspiradora
Mango
Orificio parael tornitlode/mango
Inserte el torni!lo para que paso par el mango de laaspiradora,
Empiece a apretar el tornilio con los dedos Quiz&sea necesario aiustar un poco el mango,.
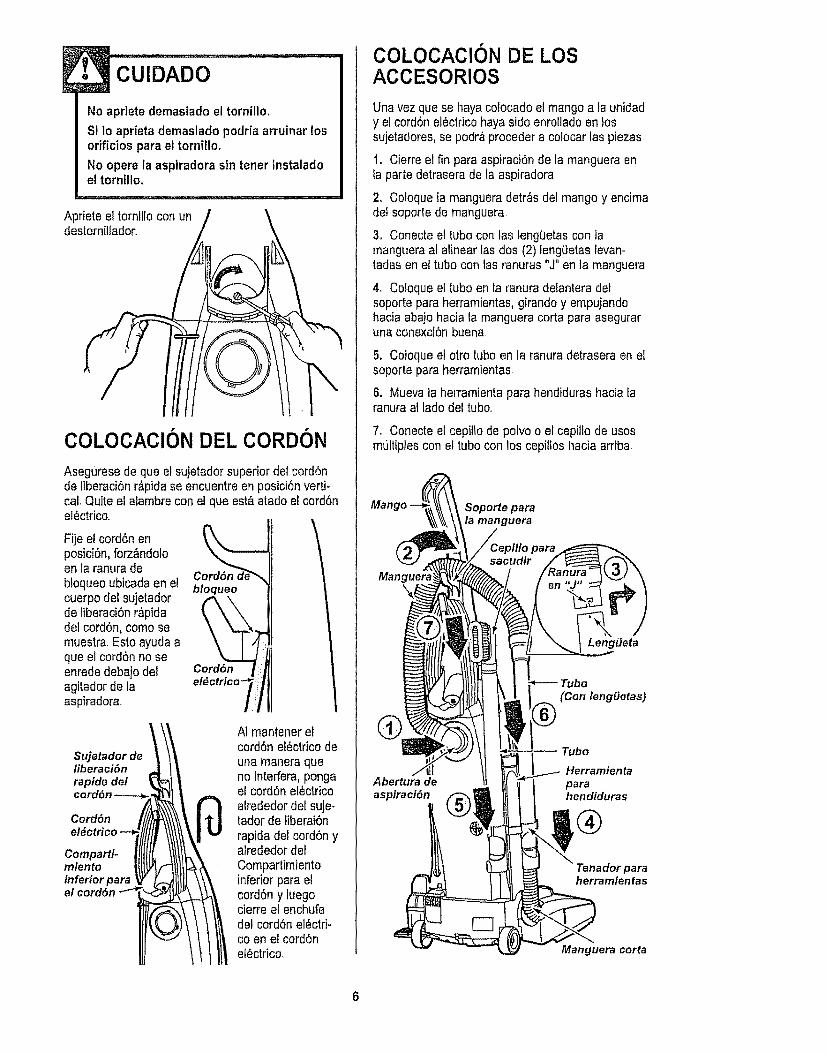
Cu'oAoO................No aprtetedemastado el tornillo.
SI Io aprieta demasiado podria arruinar losofificios para el tornilto.
No opere la aspiradora sin tener instaladoel tornillo.
Apriete el torniflo con undes[ornillador.
COLOCAClON DEL CORDON
Asegurese de que el sujetadorsuperior del cord6nde liberaci6n r_pida se encuentre en posici6n verti-cal. Quite el alambre con el que est_ atado el cord6nel_ctrico..
Fije el cord6n enposici6n, forz_ndoroen la ranuradebloqueo ubicada en elcuerpo del sujetadorde ]iberaci6nr,_pidadel cord6n, come semuestra Esto ayuda aque el cord6n no seenrede debajo delagil.adorde laaspiradora
bloqueo
electrico_ t
Sujetador deliberaci6nrapide del
Cord6nel_ctrico
Comparfhmientoinferior parael cord6n
Ai mantener elcord6n el_ctrico deuna manera queno interfera, pongael cord6n et_ctrlcoalrededor del suje-tador de fiberai6nrapida del cord6n yalrededor delCompartimientoinferior para elcord6n y luegocierre et enchufedel cord6n el6ctri-co en el cord6net6ctrico,
COLOCAClON DE LOSACCESORIOS
Una vezque se haya colocado el mango a ta unidady el cord6n el6ctrico haya side enrollado en lossujetadores,se podr,_preceder a colocar las piezas
t, Cierre el fin para aspiraci6n de la manguera enla parle detrasera de la aspiradora
2, Coloque ta manguera detr&s del mango y encimadel soporte de manguera
3, Conecte el tube con las lengOetascon lamanguera at alinear las dos (2) feng_ietaslevan-tadas en el tube con las ranuras "J" en la manguera
4, Coloque el tube en la ranura delantera delsoporte para herramientas,girando y empujandohacia abajo hacia la manguera corta para aseguraruna conexci6n buena.
5. Coloque et otto tubeen la ranura detrasera en elsoporte para herramientas
6. Muevata herramienta para hendiduras hacia faranura al lade del tube.
7, Conecte el cepUlode polvo o el cepillo de usesmt_ltiplescon e! tube con los cepil!os hacia arriba
Manguera\.
Soporte parala manguera
para
LengQeta
(Con lengiJefas)
Tube
HerramientaAbertura de paraaspiraci6n hendiduras
paraherramientas
Manguera corta
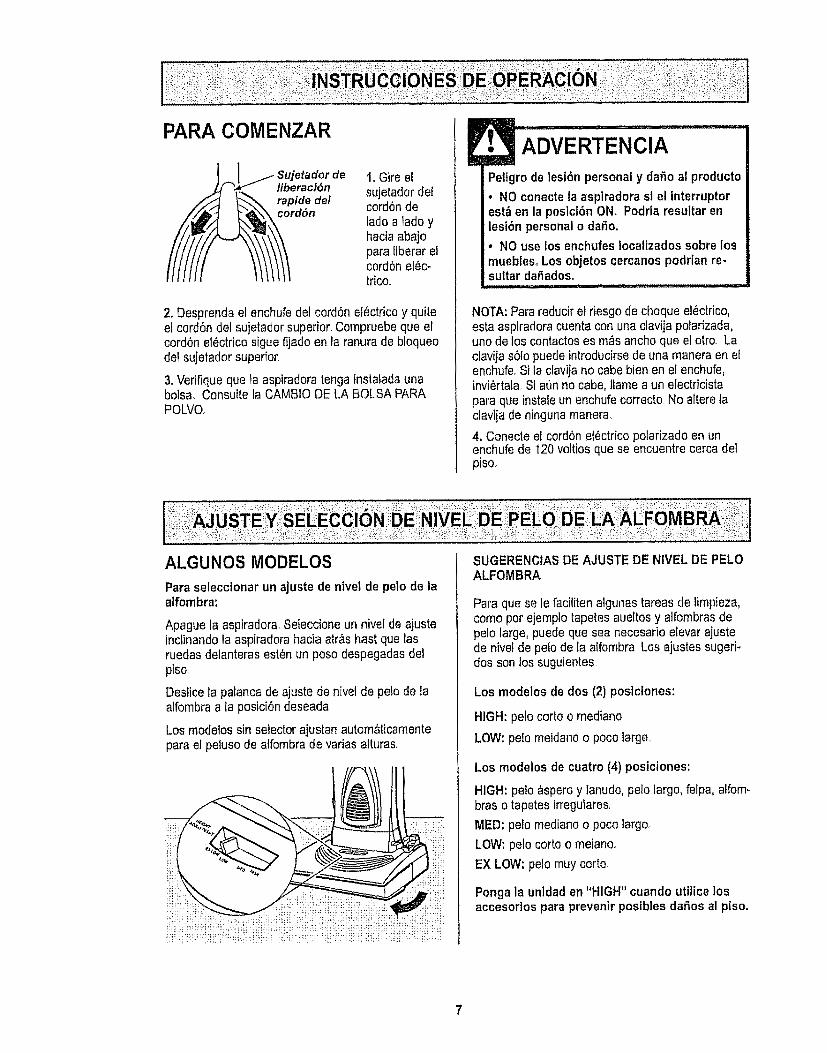
PARA COMENZAR
__ Sujetadorde 1oGire el/iberaci6nrapidedel sujetador dei
lado a tado yhacia abajopara liberar elcord6n el6c*trico°
2. Desprenda el enchufe del cord6n electrico y quiteel cord6n del sujetador superior.Compruebe que elcord6n electrico sigue fijado en la ranura de bloqueodel sujetador superior.
3. Verifique queta aspiradora tenga instalada unabolsa. Consuite la CAMBIO DE LA BOLSA PARAPOLVQ
ADVERTENClA
Peligro de lesi6n personal y dafio al producto
• NO conecte la aspiradorast el tnterruptorest_ en ]a posici6n ON, Podria resultar enlesl6n personal o daSo.
• NO use los enchufes ]ocalizados sobre losmuebles. Los objetos cercanos podrian re-sultar daSadoso
NOTA:Parareducir el riesgo de choque el_ctrico,esta aspiradora cuenta con una clavija polarizada,uno de los contactos es m&sancho que el otro_ Laclavija s6Io puedeintroducirse de una manera en elenchufe. Si la c[avija no cabe bien en el enchufe,invibrtala. Si aunno cabe, llame a un electricistapara que instaleun enchufe correcto No altere laclavija de ninguna manera.
4oConecte el cord6n etbctrico polarizadoen unenchufe de t20 voltiosque se encuentre cerca delpiso.
Para seleccionar un ajuste de nivel de pelo de laatfombra:
Apague la aspiradora Seieccione un nivel de ajusteinclinandola aspiradora hacia arras hast que lasruedas delanteras est_n un poso despegadasdelpiso.
Destice la pa[ancade ajuste de nivel de petode taaifombra a la posici6n deseada.
Los modelos sin selector ajustan autom&ticamentepara et peluso de alfombrade varias alturas,
SUGERENCIAS DE AJUSTE DE NIVEL DE PELOALFOMBRA
Para que sele faciliten algunas tareas de limpieza,como por ejemp!otapetes aueltos y alfombras depolo large, puede que sea necesarJoelevar ajustede nivetde pelo de la aifombra. Los ajustes sugeri-dos son los suguientes.
Los modelos de dos (2) postctones:
HIGH: pelo corto o mediano
LOW: pelo meidano o poco large.
Los modelos de cuatro (4) posiciones:
HIGH: peio _spero y ianudo, pelo largo, felpa, alfom-bras o tapetes irregulares.
MED: pelo mediano o poco largo,
LOW: pelo corto o meiano..
EX LOW: polo rnuy corto.
Ponga la unldad en "HIGH" cuando utilice losaccesorios para prevenir posibles da=5osal piso.
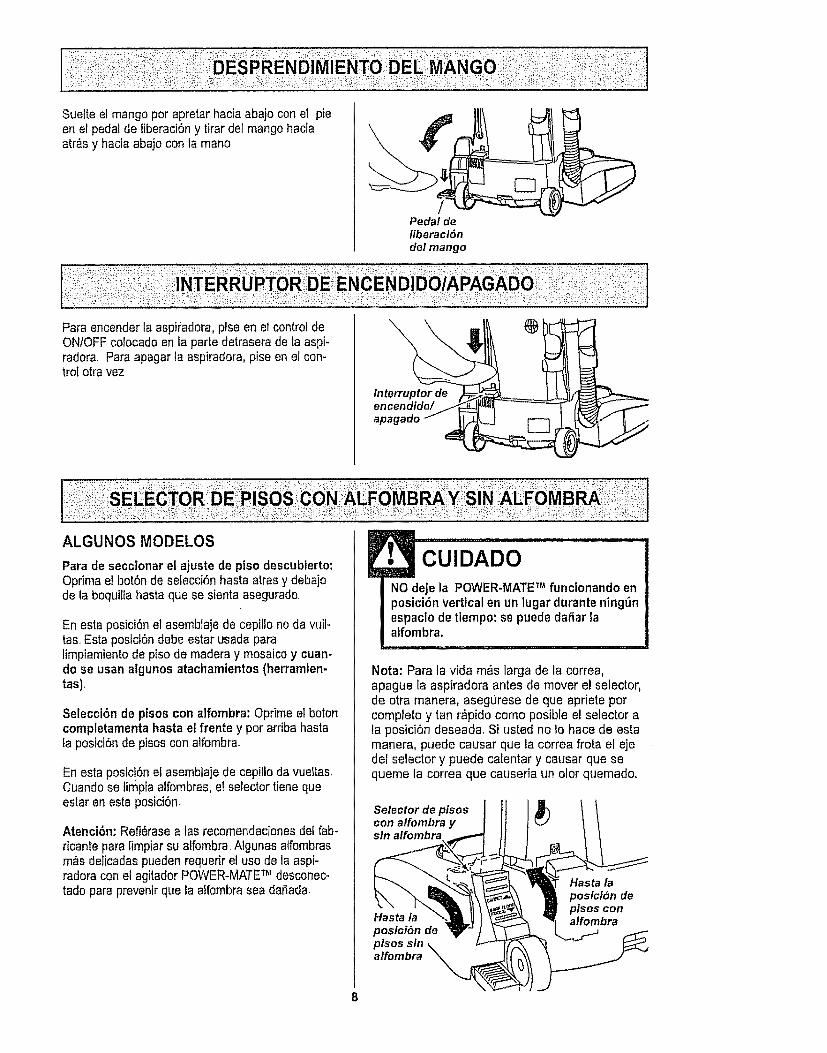
Suetteelmangoparapretarhaciaabajocanel pieenelpedaldeliberaci6nytirardelmangohaciaatr_,syhaciaabajocontamano
/Pedal deliberactSndel mango
Para encender la aspiradora, pise en el controt deONtOFF colocado en la parte detraserade la aspi-radora. Para apagar la aspiradora,pise en el con-trol otra vez
lnterruptor deencendido/
Para de seccionar el ajuste de piso descubierto:Oprima el bot6n de selecci6n hasta arrasy debajode la boquilla hasta qua se sienta asegurado,
En esta posici6n el asemblaje de cepil!o no da vuil-tas. Esta posici6n debe estar usada paralimpiamiento de piso de madera y mosaico y cuan-do se usan algunos ataehamientos (herramien-tas)_
Selecci6n de ptsoscon alfornbra:Optima el batoncompletarnentabasra et frente y par arriba hastata posici6n de pisos con alfombra_
En esta posic!6n el asemblaje de cepillo da vueltas,Cuando se timpia alfombras, el selector tiene queestar en esta posiciOn
Atenci6n: Refi_rase a Ins recomendaciones del fab-ricante para limpiar su alfombra. Aigunas alfombrasm&sdelicadas pueden requerir el usa de la aspi-radora con el agitador POWER-MATETM desconec-tado para prevenir qua la alfornbrasea daSada
• CUIDADO INO deje la POWER-MATETM funclonandoenposici6n vertical en un lugar durante ning_nespaclo de tlempo: se puede dar_arlaatfornbra.
Nota: Para la vida m&s larga de la correa,apague ta aspiradora antes de mover el selector,de otra manera, asegurese de que apriete parcompleto y tan r_pido coma posible el selector ala posici6n deseada, Si _sted no Io hace de estamanera, puede causar que la correa frota el ejedel selector y puede calentar y causar qua sequeme la correa qua causeria un olaf quernado.
Ul
Selectorde pisoscona/fombray _Jsin alfombra
Hasta laposlci6n deplsos sinalfombra
Hasta laposici6n depisos conalfombra
8
4"
ALGUNOS MODELOSCOMO UTILiZAR LOSACCESORIOS
Para selectionar fa selecci6n de p{sossin alfombra,gira el selector altr_s y abajo hasta fa setecci6ndepisos sin alfombra, Ver secci6n de PISOS CONALFOMBRAY SIN ALFOMBRA
Los accesorios se pueden conectar a la manguerasi el objeto que se desea limpiar no est_ lejos de laaspiradera La manguera se expandir& Los acce-sorios podr_ncolocarse en la manguera o en eltubo. Adem&s, el cepiflo para po]vo tambi6n podr&colocarse en ta boquillapara huecos reducidos,
NOTA: La v&lvulade desviaci6n puede estar abiertamientras se usan los accesorios o para limpiar unaalfombra nueva a causa de un flujo reductdo de airepor los accesoriosmismos o por la petusa de laaifombra que Ilene ta bolsa rapidamente. Consutteei cuadro RECONOCIMtENTODE PROBLEMAS.
Cuando regrese hasta la selecci6n de pisos conalfombra, cuida que e! selector puede moverse r_pi-damente hasta Ia selecci6n a causa de la tensi6nde ta correa
! CUIDADO .....
Cuando use los accesorios,tenga cuidadode no estirar demasiado la mangueraexpansible para tratar de atcanzar m&slejos,. S1trata de estirar la manguera m,_sde Io debido, podria causar que la aspira-dora se venga abajo, NO tire de la aspira-dora por la manguera en la habitaci6no Po-drian ocurrir dafios a sus pertenenctaso
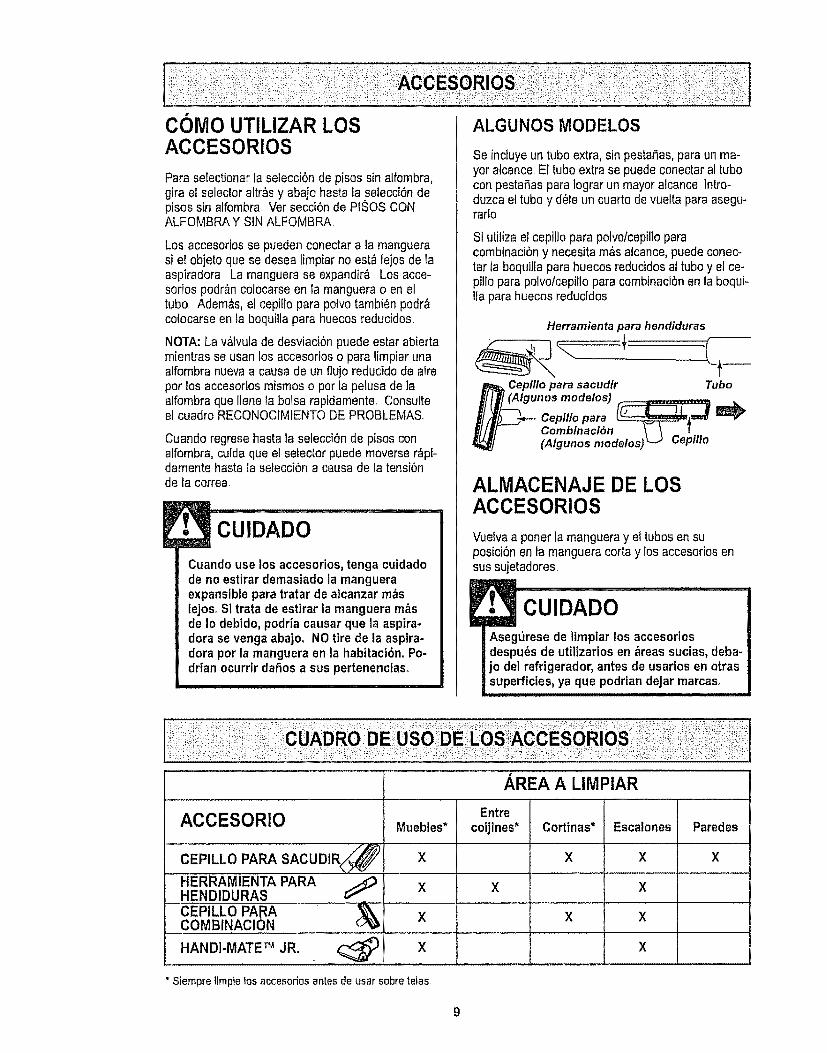
Se incluye un tubo extra, sin pestafias, para un ma-yor alcance. EI tubo extra se puede conectar al tubocon pestaSas para Iograr un mayoralcance lntro-duzca el tube y d61eun cuarto de vueffa paraasegu-ratio
Si utiliza el cepillo para polvo/cepillo paracombinaci6n y necesita m_s alcance, puede conec-tar la boquilla para huecos reducidos al tubo y etce-pillo para polvofcepi!lopara combinaci6n en la boqui-lta para huecos reducidos
Herramienta para hendiduras
tCepi/fopara sacudir Tubo
(Atgunos modelos)Cepll/opara _$=_ "==ffCombinaci6n \ \ I(A/gunosmode/os)LJ Cepi//o
ALMACENAJE DE LOSACCESORIOS
VueIvaa poner la manguera yet tubos en suposici6n en la manguera corta y los accesoriosensus sujetadores.
CUlDADO
! segurese de limpiar los accesoriosdespu6s de utilizarios en _reas sucias, deba-jo del refrigerador, antes de usartos en otras
superficies, ya que podrian dejar marcaso
Entrecoijines*ACCESORtO Muebles*
........ XHERRAMIENTA PARA _ X XHENDIDURASCEPILLO PAP.A X XCOMBINACION
HANDI-MATE TM JR. _ X
AREA A LIMPIAR
EscatonesCortinas*
X X
X
X
X
Paredes
X
• Siempre ttmpie los accesorios antes de usar sobre telas
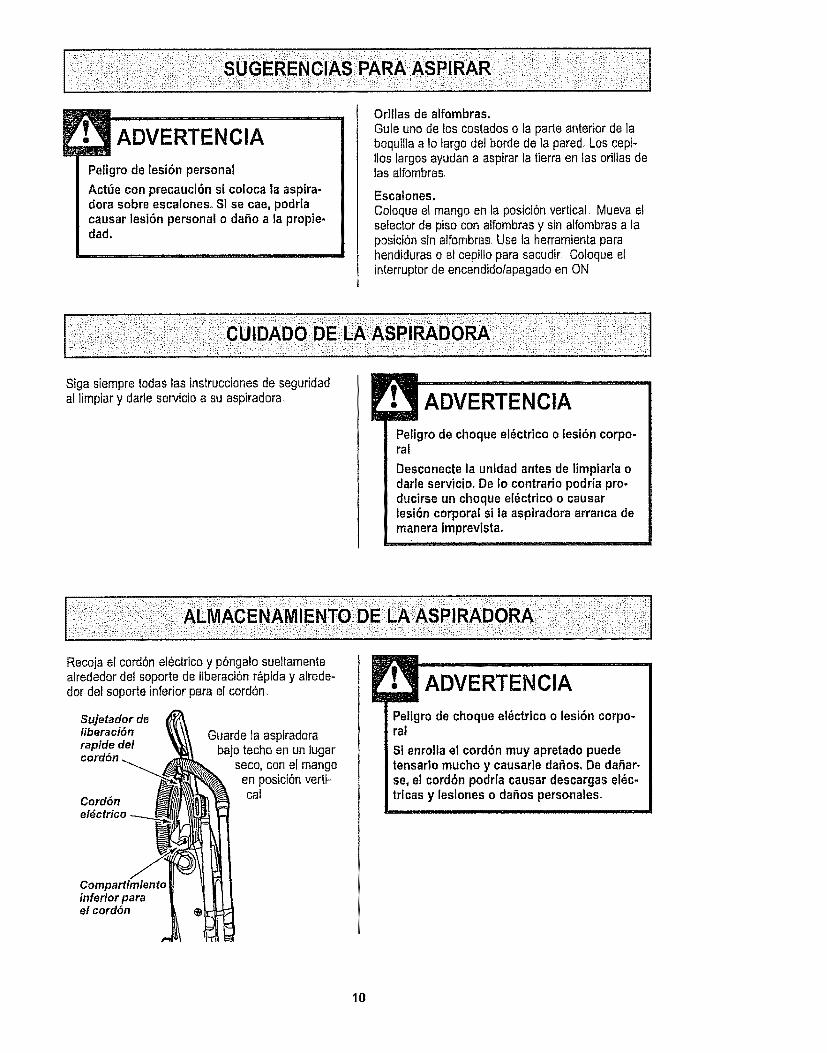
ADVERTENClA
Petigrode lesi6n personal
Act,3e con precauci6n si coloca la aspira-dora sobre escaloneso S1se cae, podr[acausar lesi6n personal o dafio a la propie-dad,
Orillas de alfombras.Gufe uno de los costados o la parte anterior de laboquilla a 1olargo del borde de la pared_Los cepi-llos largos ayudan a aspirar la tierra en las orillas delas alfombras,
Escalones.Coloque el mango en la posici6n vertical, Muevaelselector de piso con alfombras y sin alfombras a laposici6n sin alfombras Use la herramientaparahendiduras o el cepiltopara sacudir Co!oque e[interrupterde encendidofapagadoen ON
Siga s[empre todas las instruccionesde seguridadal limpiar y darle servicio a su aspiradora, ADVERTENCIA
Peligro de cheque el_ctrico o lesi6n corpo-ral
Desconecte la unfdad antes de limpiar[a odarle servicio, De Io contrario podria pro-ducirse un cheque el6ctrtco o causarlesi6n corporal st la aspiradora arranca demanera imprevtstao
Recoja el cord_Snel_ctrico y p6ngalo sueltamentealrededor del soporte de liberaci6nr_pida y alrede-dot dei soporte inferior para el cord6n,
Sujetador deliberacl6nrapide del
Cord6nel#ctrico
ta aspiradorao techo en un lugarseco, con el mangoen posici6n verti-cal
Compartimientoinferior parael cord6n
ADVERTENCIA
Peligm de choque eldctrico o lesibn corpo-ral
SI enrolla el cord6n muy apretado puedetensado mucho y causarle dafios, De dafiar-se, el cord6n podrfa causar descargas el_c-tricas y lesiones o daSos personales,_JL L
10
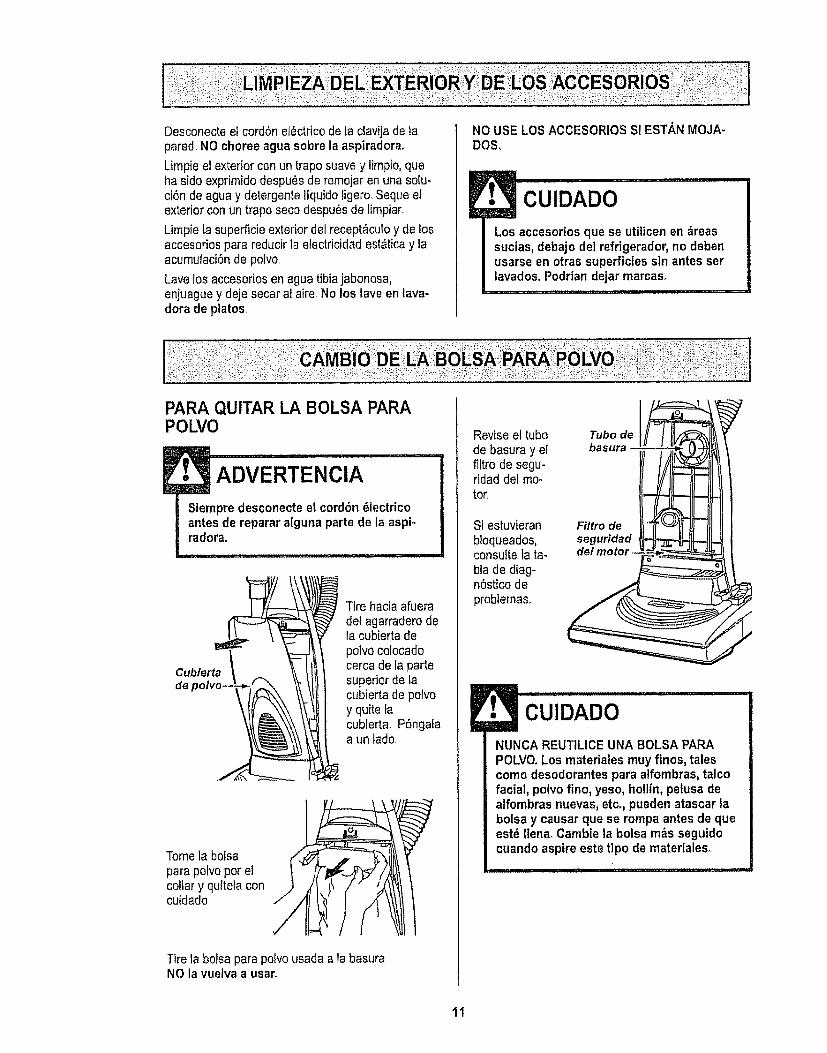
Desconecte el cord6n el_ctrico de la clavija de lapared NO choree agua sobre la aspiradora,
Limpie e! exteriorcon un trapo suavey limpio,queha sido exprimidodespu_s de remojar en una solu-ci6n de agua y detergente Iiquido ligero Seque elexterior con un trapo seco despu_s de limpiar
Limpie la superficie exterior del recept&culoy de losaccesorios para reducir la electricidad esl&ticay laacumulaci6nde polvo.
Lavelos accesorios en agua tibiajabonosa,enjuaguey deje secar at aire. No los lave en lava-dora de platos.
NO USE LOS ACCESORIOS SI EST_,NMOJA-DOS,
CUIDADO
Los accesorios que se utiltcen en _reassucias, debajo del refrigerador, no debenusarse en otras superficies sin antes setlavados. Podrian dejar marcas,
I ,I, ,11 '1111 ' ,,,_,,,_1{I. ,,,i,,
PARA QUlTAR LA BOLSA PARAPOLVO
! • ADVERTENClA
Siempre desconecte el cord6n _lectricoantes de reparar alguna parte de la aspi_radorao
Cubiert_"
de polvo__! _
Tire hacia afueradel agarraderodela cubierta depolvo colocadocerca de la partesuperior de tacubierta de pofvoy quite facubierta. P6ngalaa un lado.
Tome la bolsapara potvoper elcollar y qulteta concuidado
Tire la bolsa para polvo usada a la basuraNO la vuelva a usar.
Revise el tubode basura y elfiftro de segu-ridad del mo-tor.
Si estuvieranbioqueados,consutte la ta-bla de diag-n6stico deprobiemas..
Tubo debasura -
Filtro deseguridadde/motor -
CUIDADO
NUNCA REUTILICE UNA BOLSA PAPAPOLVO.Los materiales muy finos, talescomo desodorantes para atfombras, talcofacial, polvo fino, yeso, hollin, pelusa dealfombras nuevas, etc., pueden atascar labolsa y causar que se rornpa antes de queest_ Ilena° Cambie la bolsa m_s seguidocuando aspire este tipo de materfales.
iii ii ,11i1,1i i,ii, ,11,1ii1,1
11
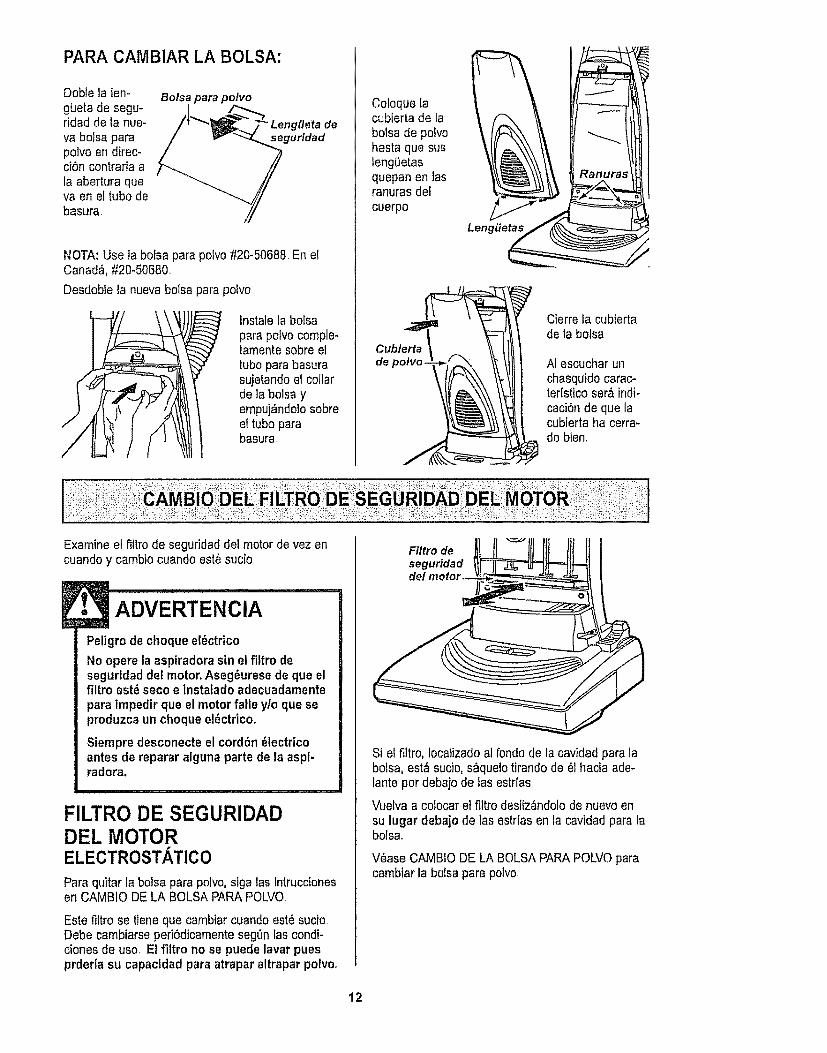
PARA CAMBIAR LA BOLSA:
Dobie la len-gLietade segu-ridad de la nue-va boisa parapolvo en direc-ci6n contraria ala abertura queva en el tubo debasura
Bolsa para polvo
/l___'_" Leng_eta de
gundad
NOTA: Use ia bofsa para poivo #20-50688. En elCanada, #20-50680.
Desdobie la nueva bolsa para poivo
Instale la bolsapara pofvocomple-tamente sobre eltubo parabasurasujetando el collarde ia bolsa yempuj_ndolo sobreel tubo parabasura,
Coloqua lacubierta de labolsa de polvohasta que susleng()etasquepan en lasranuras defcuerpo
Cublerta
de polvo.
LengLtetas
Cierre fa cubiertade la bolsa
AI escuchar unchasquido carac-teristico ser_ indi-caci6n de qua facubierta ha cerra-do bien,
Examine el fiitro de seguridad del motor de vez encuando y cambio cuando est_ sucio
ADVERTENClA
Peligro de choque ei_ctrico
No opere la aspiradora sin el filtro deseguridad del motor.Aseg_uresede que elfiltro est6 seco e instalado adecuadamentepara impedir que el motor falle y/o que seproduzca un choque ei_ctrico.
Siempre desconecte el cordbn _lectricoantes de reparar alguna parte de la aspt-radora.
FILTRODE SEGURIDADDEL MOTORELECTROSTATICO
Para quitar la bolsa para polvo,siga ias intruccionesen CAMBIO DE LA BOLSA PARA POLVO.
Este filtro se tiene que cambiar cuando est_ sucio.Debe cambiarse peri6dicamente segQnlas condi-clones de uso. El flttro no se puede lavar puesprderia su capactdad para atrapar altrapar polvoo
Filtro de
seguridaddel
Si el filtro, Iocatizadoal rondode la cavidad para labolsa, est,_sucio, s_quelo tirando de _1hacia ade-lante por debajo de las estrfas,.
Vuelva a colocar el filtro desliz_ndolo de nuevo ensu lugar debajode las estrias en la cavidad para labolsa.
V_ase CAMB!O DE LA BOLSA PARAPOLVOparacambiar la botsapara polvo
12
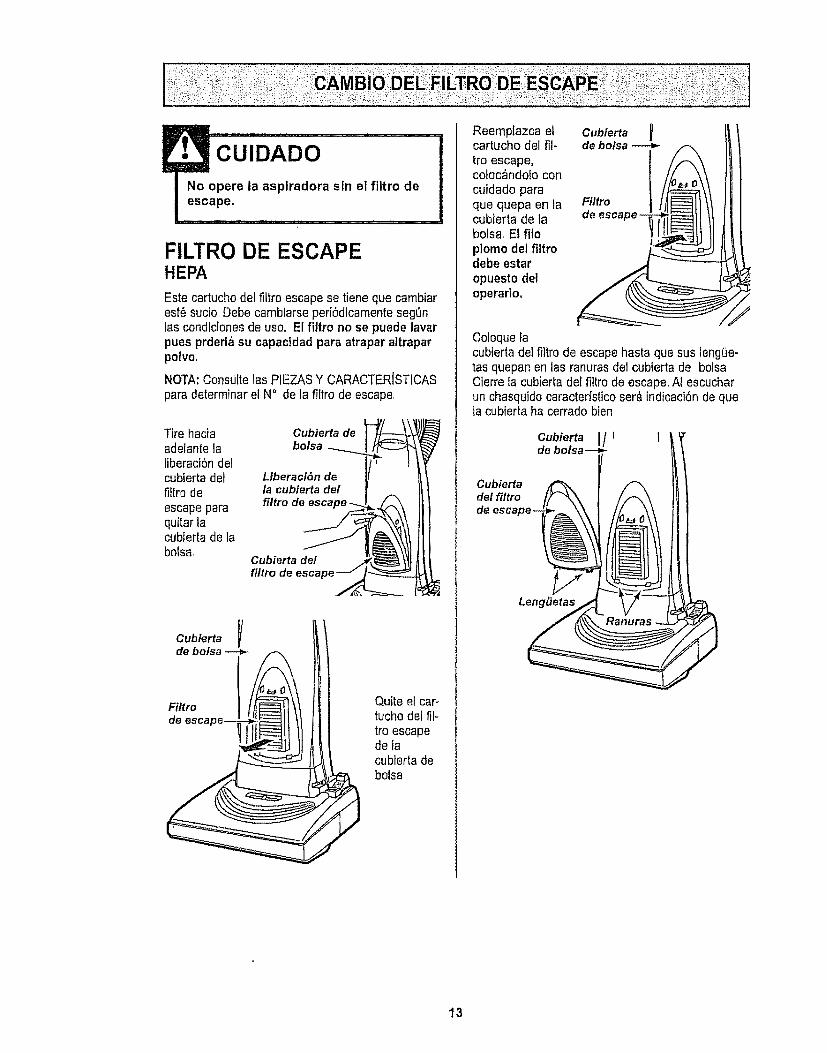
JNo opere ia asptradora sin el filtro deescape.
FILTRO DE ESCAPEHEPA
Este cartucho del fiitro escape se tiene que camb[arest6 sucio Debe cambiarse peri6dicamente seg0n[as cond[cionesde use. El fittro no se puede laverpues prderi_, su capactdad pare atrapar altraparpolvo.
NOTA:Consu[te las PIEZASY CARACTERJSTICASpara determinerel N° de la filtro de escape
Tire haciaadelante lafiberaciOndelcubierta detfiltre deescape paraquitar lacubierta de labolsa,
Cubierta debolsa
LiberaciSn dela cubierta delfittro
Cubierta delfittro de
Filtrode
Quite el car-tucho del ill-tre escapede lacubierta debolsa
Reemplazca elcartucho del fii-tro escape,coloc_ndolo concuidado paraque quepa en lacubierta de tabotsaoEl fileplomo del filtrodebe estaropuesto deloperario,
Cubierta Ide bo/sa
Filtrode
Coloque lacubierta del filtro de escape haste que sus leng0e-tas quepan en las ranuras del cubierta de bolsaCierre la cubierta del filtro de escape AI escucharun chasquidocaractedstico ser& indicaci6n de quala cubierta ha cerrado bien
13
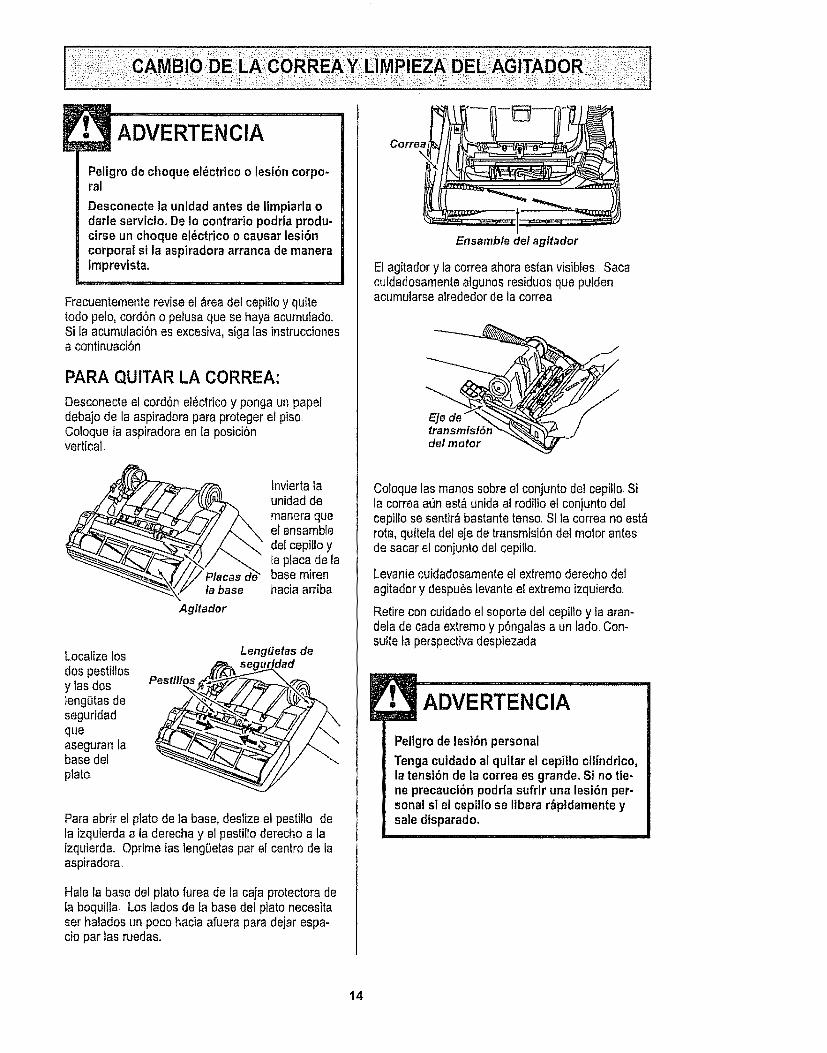
Peligrodechequeel_ctricoo lest6ncorpo-ral
Desconecte la unldad antes de limpiarla odarle serviciooDe Io contrariopodda produ-cirse unchoque el(_ctricoo causar lesi6ncorporal st la aspiradoraarranca de maneraimprevistao
Frecuentementerevise el _readel cepilfoy quitetodo pelo, cord6n o petusaque se haya acumutado.,Si la acumulaci6n es excesiva, siga las instruccionesa continuaci6n.
PARA QUITAR LA CORREA:
Desconecte el cord6n el6ctrico y ponga un papeldebajo de la aspiradora para proteger el pisoColoque la aspiradora en la posici6nvertical.
la base
Agitador
fnvierta launidadde
Ensamble del agltador
El agitador y la correa ahora estan visibles Sacacuidadosamentealgunos residuos que puidenacumularse alrededorde la correa
manera queel ensambledel cepillo yla placa de labase mirenhacia arriba
Localize los Leng_ietasdeuridad
dos pestillosy las dos Pestillosleng_tas deseguridadqueaseguran labase delplato.
Para abfir el plato de la base, deslize el pestillo dela izquierda a la derecha y el pestiftoderecho a laizquierda. Oprime las leng0etas par el centro de laaspiradora,
Hale la base del plato furea de ta caja protectora deta boquitla, Los lados de fa base def plato necesitaser halados un poco hacia afuera para dejar espa-cio par las ruedas,,
transmisi6n_.._'_%de/motor "_
Coloque las manos sobre el conjunto del cepillo Sila correa alJnest#,unida al roditlo e! conjunto delcepillo se sentir_ bastante tenso. Si la correa no est&rota, quftela del eje de transmisi6n del motor antesde sacar el conjunto del cepilto..
Levantecuidadosamenteel extremo derecho delagitador y despu#s levanteel extremo izquierdo.
Retirecon cuidado el soporte del cepillo y la aran-deta de cada extremoy p6ngalas a un lado Con-suite ta perspectivadespiezada
ADVERTENCIA
Peligro de lesi6n personal
Tenga cuidado al quitar el cepillo cilindrico,la tenst6n de la correa es grande° Si no tie-ne precauci6n podria sufrir una tesi6n per-sonal sl el cepiilo se libera r_pidamente ysale disparadoo
14
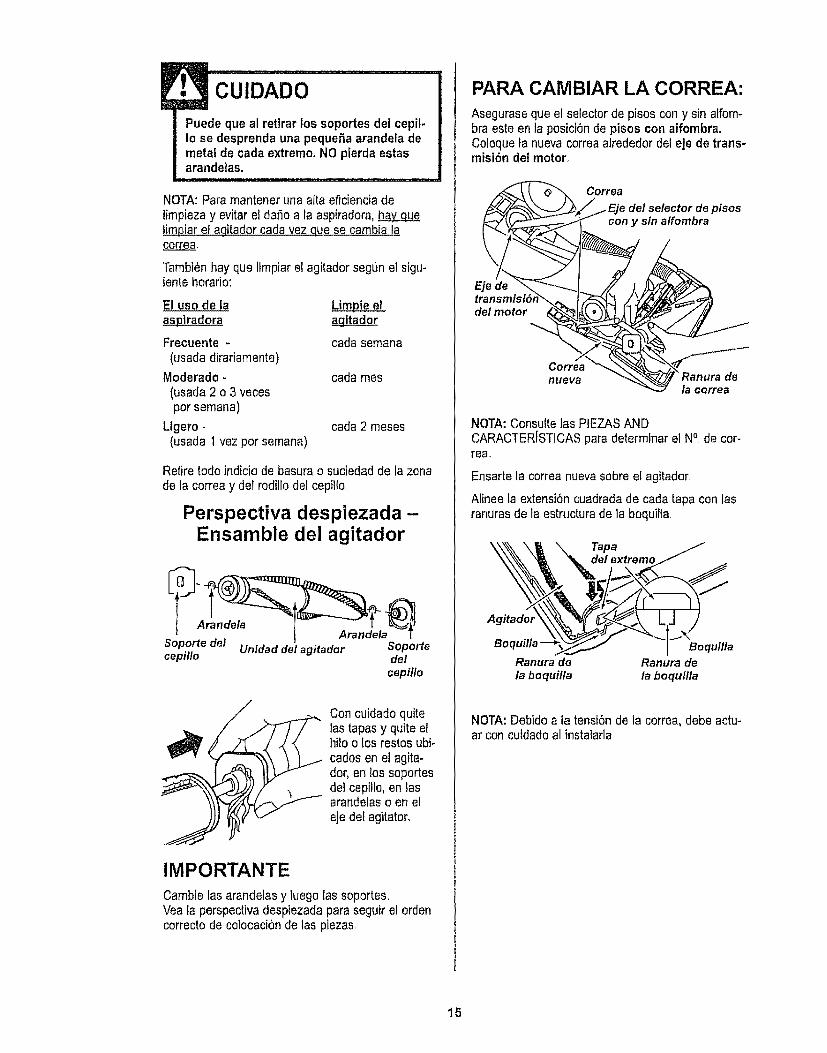
CUIDADO
Puede que al retirar los soportes del cepil-to se desprenda una peque_a arandeta demetal de cada extremo_NO pierda estasarandelas.
NOTA: Para mantener una alta eficiencia delimpieza y evitar el dafio a la aspiradora,limpiar et agitador cada vez que se cambia la
Tambi6nhay que limpiar el agitador segun el sigl_-iente horario:
El use de la Ltmpie elagitador
Frecuente - cada semana(usada dirariamente)
Moderado - cada rues(usada 2 o 3 vecespar semana)
Ltgero - cada 2 meses(usada 1vez par semana)
Retire tode indicia de basura o suciedad de fa zonade la correa y del roditlo de! cepilto
Perspectiva despiezada-Ensamble del agitador
ArandelaArandela
Soporte del Unidad del agitador Soportecepil/o de/
cepil/o
Con cuidado quite
._tas tapas y quite el
hito o los restos ubi-cados en el agita-dot, en los soportesdel cepillo, en las
_ arandelas o en el
eje del agitator,
IMPORTANTECambie las arandeias y ]uegolas soportes,Vea la perspectiva despiezadapara seguir el ardencorrecto de calocaci6n de las piezas,
PAPA CAMBIAR LA CORREA:
Asegurase qua el selector de pisos con y sin alfom-bra este en la posici6n de pisos con atfombraoColoque fa nueva correa alrededor del eje de trans-misi6n del motor.
Correa
de/selector depisoscony sin a/fombra
Eje de
det motor
Ranura dela correa
NOTA: Consulte las PIEZAS ANDCARACTERfSTICASpara determinar el Na,de cor-rea,
Ensarte la correa nueva sabre el agitadoro
Afinee la extensi6n cuadrada de cada tapa con lasranuras de la estructura de la boquirta
"___ Tapa
Ranuradela boqui/fa
Ranura dela boquilfa
NOTA: Debido a ia tensi6nde la correa, debe actu-ar con cuidada al instalarla
15
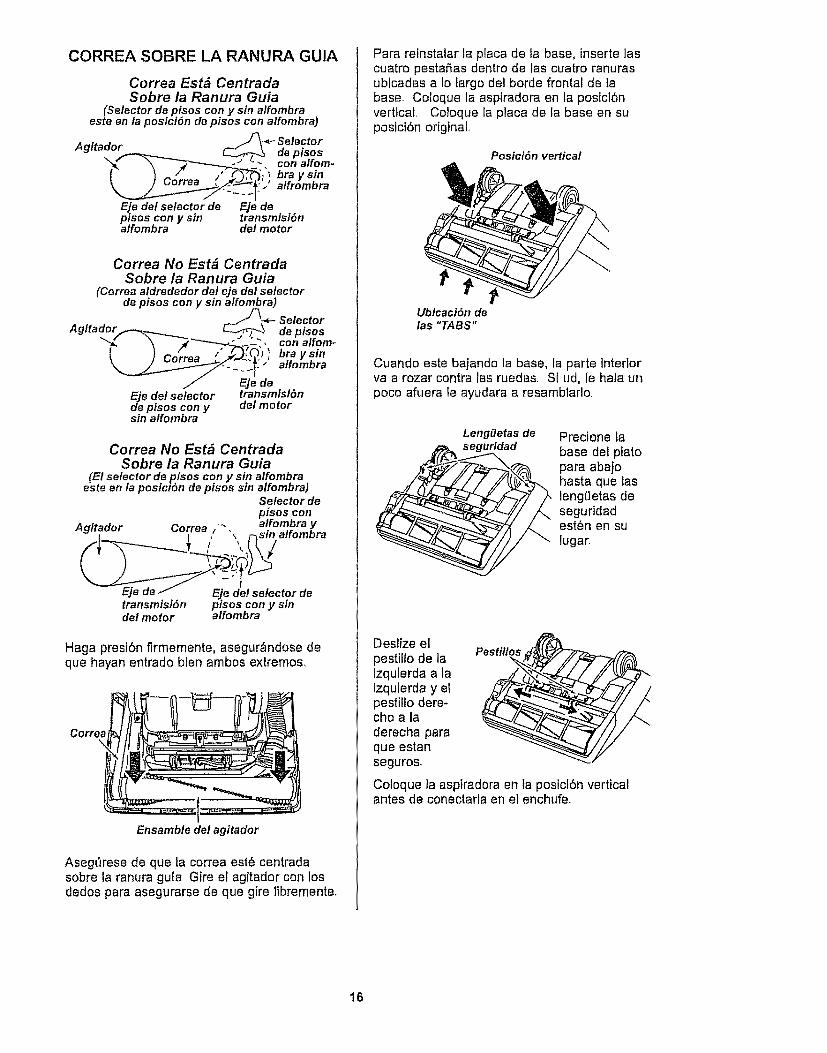
CORREA SOBRE LA RANURA GUIA
Correa Est_ CentradaSobre la Ranura Guia
(Selector de ptsos cony sin alfombraeste enla posict6n de pisos con alfombra)
Eje del selector de Eje depisos con y sin transmisi6nalfombra del motor
Correa No Est_ CentradaSobre la Ranura Guia
(Correa aldrededor del eje del selectorde pisos con y sin alfombra)
A .... /jr__ Selectorg/_aoor_-..,__._ _ de pisos
"_ "\ -"___iL], conalfomo
i f Eje deEie del selector transmisi6n¢[eplsos cony delmotorsin a/fombra
Correa No Est& CentradaSobre la Ranura Guia
(El selector de pisos con y sin alfombraeste en la posici6n de pisos sin alfombra)
Selector depisos con
transmisi6n plsos con y smdel motor alfombra
Haga presiSn firmemente, asegur_,ndose deque hayan entrado bien ambos extremos,
Correa
Ensamble del agitador
Asegt'lrese de que la correa est_ centradasobre la ranura gufa Gire el agitador con losdedos para asegurarse de que gire Ilbremente.
Para retnstalar iaplaca de la base, inserte loscuatro pesta_as dentro de los cuatro ranurasubicadas a fo }argo del horde frontal de ]abase. Coloque la aspiradora en la posicl6nvertical. Coloque la place de la base en suposici6n original.
Posicf6n vertical
UblcaciSn delos "TABS"
Cuando este bajando la base, la parte interiorva a rozar contra las ruedas. Si ud, le hala unpoco afuera le ayudara a resamblarlo.
Leng[tetas deseguridad
Precione fabase del platopara abajohasta que lasleng_Jetas deseguridadest6n en sulugar.
Deslize e!pestillo de la Pestillos _2_(,_1izquierda alaizquierda y elpestillo dere-cho aladerecha pareque estanseguros.
Coloque }a aspiradora en la postci6n verticalantes de conectada en et enchufeo
16
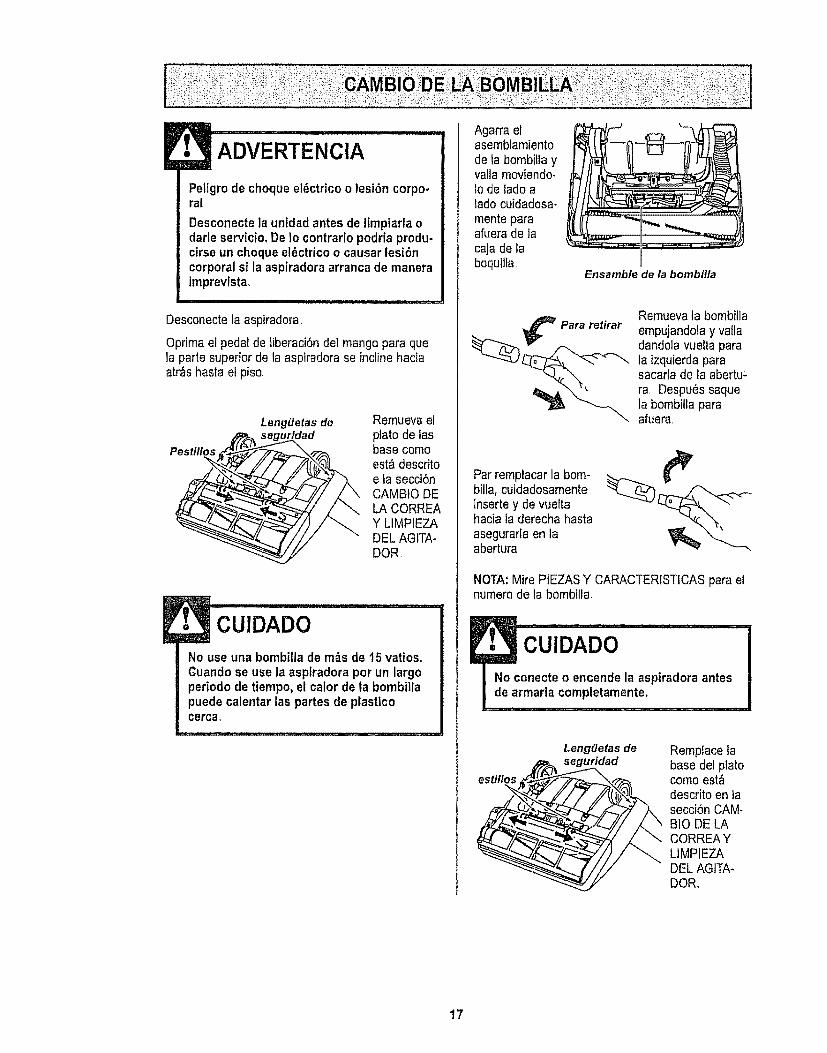
ADVERTENClA
Peligro de choque el_ctricoo lesi6n corpo-ral
Desconecte la unidad antes de iimpiarla odarle servlciooDe Io contrario podria produ-cirse un choqueel_ctrico o causar tesi6ncorporal si la aspiradora arranca de rnaneratmprevistao
Desconecte la aspiradora.
Opdrnael pedal de liberaciSnde] mango para quela parte superior de la aspiradora se incline haciaatr_s hasta el piso
Pestillos
Leng_tetas deruridad
Rernuevaelplato de fasbase cornoest& descritoefa secci6nCAMBtO DELA CORREAY LIMPtEZADEL AGITA-DOR
CUIDADO
No use una bornbillade m&sde !5 vatios,Guando se use la aspiradora por un largoperiodo de tiempo, el calor de ta bombiltapuede calentar las partes de plasticocercao
Agarra elasembfamientode la bornbilla yvalla rnoviendo-Io de tado alado cuidadosa-monte paraafuera de lacaja de iaboquilia.
Ensamblede la bombi/la
RemuevalabombillaPara retirar empujandola y vatla
__ andola vuelta para
la izquierdaparasacafla de Ia abertu,ra, Despu_s saquela bombilia paraafuera
Par rernplacar la born-billa, cuidadosamenteinsertey de vueftahacia la derecha hastaasegurarta en laabertura
NOTA:Mire PtEZASY CARACTERISTICAS para elnumero de ia bornbi[la.
estillos
Leng_etas deseguridad
Rempfacelabase de] platocorno est_descrito en lasecci6n CAM-BIO DE LACORREAYLIMPIEZADEL AGtTA-DOR_
17

ADvERTENciA .....
Peligro de choque el_ctrico o lest6n corpo-ral
Desconecte la unidad antes de limplarla odarle servicio, De Io contrario podria produ-cirse un choque el_ctrico o causar lesi6ncorporal si la asplradora arranca de maneraimprevista.
Paraobtener los mejores resultados de fimpieza,mantenga limpios los conductos de paso del aire
Desenchufeel cord6n de la corriente el_ctrica
Si consideraque la aspiradora no aspira bien, ase-g0rese primero de que la bolsa no este Ilenay deque el filtro no est_ atascado Consulte las CAMBIODE LA BOLSA PAPAPOLVOy CAMBIO DELFILTRODE SEGURIDAD DEL MOTOR
Si las zonas del filtro y ta bolsa no est&n atascadas,examinela zona de la manguera. Quite la aberturade aspiraci6n por apretar las dos tengOetasquetaaseguran a la parte detrasera de fa asplradora yrevise si hay residuos en el firea.
iJetas
Protectorde
de
aspiraciSn
pataherramientas
cor_a
Coloque otra vez la abertura Desconecte el tubode la manguera corta y revise el tubo y la manguerapara residuos. Enchufe la aspiradora y enci_ndala,AI pasar la asptradora, estire varias veces lamanguera para quitar el residuo ApagtJela aspi-radora y desencht]fela.
Si todavfa hay residuos, quite la manguera corta desu soporte y revise la manguera corla
Quite los residuos visibles
Protector
Estaaspiradora tiene una v_fvula de desviaci6nquesirve como protector de motor quese abreautomaticamentepara proveer un fiujo de aire almotor cuando un zueco impida que circule e! aire almotor.Si se abre la v&lvula bypass para impedir quese recalente el motor y que no haga dafio a laaspiradora,se notar&un cambio de sonido mtentraset aire pasa por la abertura de la v_lvula,.Cuandoocurre,apague la aspiradora y desenchufeel cord6nde! tomacorriente.Despu_s, inspecci6nela paraencontrarzuecos como se describe bajo la secci6nCt_MO ELfMINAR LOS RESIDUOS DE BASURAEN LOS CONDUCTOS.
La v_lvula de desviaciSn puede estar abiertamientras se usan los accesorios o para limpiar unaalfombranueva a causa de un flujo reducido de airepor losaccesorios mismos o por la pelusa de taalfombraque llene ta bolsa repidamente
t8
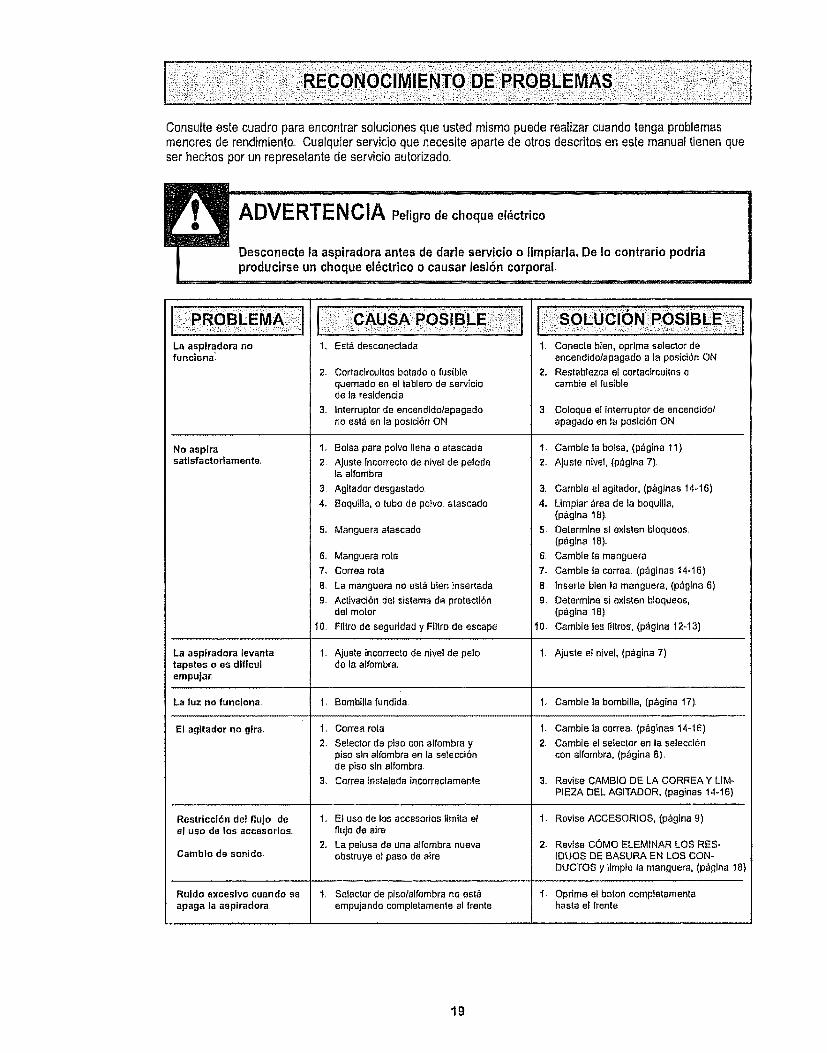
Consulte este cuadro pare encontrarsoluciones qua usted mismo puede realizer cuando tenga prablemasmenores de rendimiento. Cualquier servicio qua necesite aparte de otros descritos en este manuaFtienen queser hechos per un represetante de servicio autorizado
ADVERTENCIA Peligro de cheque el_ctrico
I Desconecte ta aspiradoraantes de darte servicio o limpiarla_De lo contrario podriaproducirse un cheque ei_ctrico o causar lesi6n corporal°
La asptradora nofunciona_
No aspiresatisfactoriamente,.
La aspfradora tevanta
tapetes o es dlficulempuJar,
La luz no funciona_
El ag]tador no g|rao
Restricci6n de! ftujo deel use de los accesorlos,
eatable de sonldo.
Ruido excesivo cuando se
apaga la asplradora,
Est,_ desconectada 1,
Cortactrcuites botado o fusible 2.
quemado en el tablero de serviciode la residencla
Interrupter de encendido/apagado 34
no est_ en la posict6n ON
Boise pare polvo llena o atascada 1,
Ajuste [ncorrecto de nlve_ de pelode 2,la alfombra
Agltador desgastado, 3.
Boquilta, o tube de pone, atascado 4.
Manguera atascado 5,
Manguera rote 6
Correa rote 7_
LB manguera no est_ bien tnsertada B,
Aci_ivaci6n del sis_ema de protec{ibn 9_del motor
Filtro de seguridad y Fi]tro de escape t0
Ajuste incerrecto de nivet de pe]o 1_,de la aifombra
Bombilfa fundida Io
Correa rota 1,,
Selector de ptso con alfombra y 2.ptso sin atfombra en la seieccf6n
de piso sin affombra
Correa instalada incorrectamente 3.,
El use de los accesodos Iimtta el 1.
flujo de aire
La pelusa de una alfombra nueva 2_
obstruye e! paso de aire
2,
2
3
4_
6,
7_
9_
1o.
I,
2,
3.
I.
2,,
Conecte bten, optima selector de
encendidofapagado ale posici6n ON
Restablezca el cortacfrcuitos oeambie el fusible
Coloque el interrupter de encendtdol
apagado en la postci6n ON
Camble la bolsa, (p_gina 11)
AJuste ntvel, (p,_gina 7),
Cambie el agitador, (p_.ginas 14_16)
Limpiar _rea de la boquilla,(p_gfna 18),
Determine si exislen bloqueos.
(p_gtna 18).,
Cambie ta manguera
Camble ta correa. (p_ginas !4-16)
Inserte bien la manguera, (p_gina 6)
Determine si existen bloqueos,
(p_gina 18)
Cambie les fiitros, (p_gina 12-13)
Ajuste et nivel, (p_gina 7)
Cambie la bombilla, (p_gina 17)
Cambie ]a cerrea, (p_ginas 14-I6)
Cambie el selector en ta seleccl6ncon alfombra, (p_gina 8),
Revise CAMBIO DE LA CORREAY LIM-
PIEZA DEL AGITADOR, (pagtnas 14-16)
Revise ACCESORIOS, (p_gina 9)
1. Setector de piso/alfombra no est,_ 1,
empujando cempletamente at frente
Revise C6MO ELEMINAR LOS RES-
IDUES DE BASURA EN LOS CON-
DUCTOS y limp_e ta manguera, (p_gina 18)
Oprtme el baton comp_e_amentahaste el frente
19

Getlt iflxed, at=your=!:home :or:ours i: i::i
For
,j:i :,
repair of major brand appliances in your own home,.,no matter who made it, no matter who sold it!
1-800-4-MY-HOME ® Anytime, day or night
(1-800-469-4663) (US,A. and Canada)
www.sears.oom www.sears.ca
For repair of carry-in products like vacuums, lawn equipment, and
electronics, call for the nearest Sears Parts and Repair Center.
1-800-488-1222 Anytime, day or night (USA. only)
www°sears.com
For the replacement parts, accessories and owner's manualsthat you need to do-it-yourself, call Sears PartsDirectSM!
1-800-366-PART
(1-800-366-7278)6 am. - 1'1pro., 7 days a week
(U S,A, only)
www.sears.com/partsdirect
To purchase or inquire about a Sears Service Agreementor Sears Maintenance Agreement:
1-800-827-6655 (u.sA.) 1-800-361-6665 (Canada)
7 aom.- 5 pom,, CST, Mon. - Sat. 9 &m, - 8 p.m. EST, M - F,4 p.moSat
: Para pedir servicio de reparaciSn a Au Canada pour service en franqais: ' idomicilio, y para ordenar piezas: 1-800-LE-FOYER Mc
! ; :_ 1-Sg8_SU-HOGARsM (1-800-533-6937) -;:_ (1-888-784-6427) wwwsears,ca ........
.;,i',Xi
© Sears, Roebuck and Co
® Registered Trademark 1T_aTrademark / SMService Mark of Sears, Roebuck and Co,® Marca Registrada i'rM Marca de F&brica / sM Marca de Servfcio de Sears, Roebuck and CoMC _DMarque de commerce / Marque d_pos_e de Sears, Roebuck and Co
2O