using lifeport perfusion - sw transplantswtransplant.com/files/lifeport.pdf · using lifeport...
TRANSCRIPT

Using LifePort Perfusion
Kidney Transportersat PHNT This protocol outlines the management & use of LifePort Perfusion Transporters in PHNT.
Do not attempt to use the LifePort Transporters unless you have received formal training.

1
2
3
4
5
6
7
8
9
10
11
12
13
14
15
Contents Preparation of consumables/ perfusates
Ice preparation into non sterile ice container (in theatre)
Preparing to load the perfusion circuit
Loading the cassette and perfusion circuit (non sterile)
Energise the Transporter
In-situ perfusion of the kidneys
Cannulation is the key step to using the transporters
Transferring the kidney into the cradle and cassette
Loading the Cassette and commencing perfusion
Initial perfusion
LifePort pump perfusion transporter storage and monitoring
Download and data analysis
Removing the kidney from the transporter for transplant
Cleaning
Trouble shooting
Using LifePort Perfusion Kidney Transporters The decision to use the LifePort pump perfusion transporter is based on the discussion between transplant co-ordinator and surgeon. This will include factors of how many theatre staff, patients’ blood group and tissue type if known, availability of equipment, training and skill of retrieval team in respect of the LifePort transporters. Packing of the kidney remains the responsibility of the transplant co-ordinator.
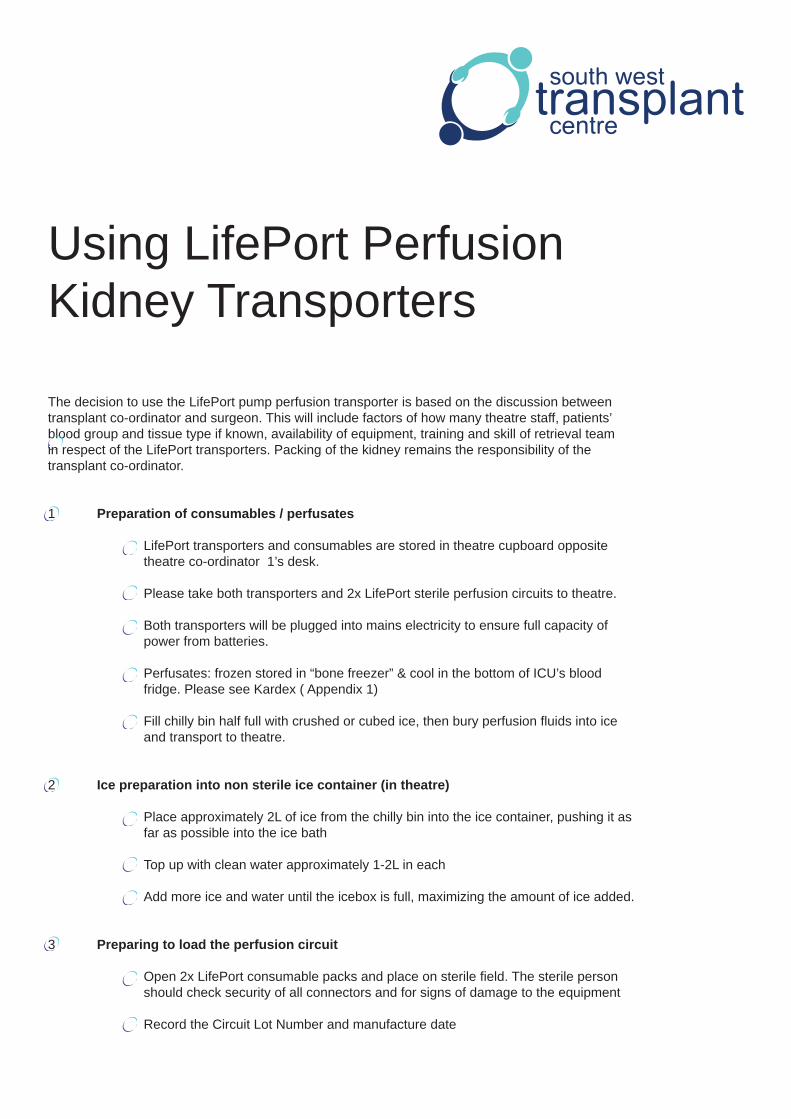
1 Preparation of consumables / perfusates
LifePort transporters and consumables are stored in theatre cupboard opposite theatre co-ordinator 1’s desk. Please take both transporters and 2x LifePort sterile perfusion circuits to theatre. Both transporters will be plugged into mains electricity to ensure full capacity of power from batteries. Perfusates: frozen stored in “bone freezer” & cool in the bottom of ICU’s blood fridge. Please see Kardex ( Appendix 1) Fill chilly bin half full with crushed or cubed ice, then bury perfusion fl uids into ice and transport to theatre.
2 Ice preparation into non sterile ice container (in theatre)
Place approximately 2L of ice from the chilly bin into the ice container, pushing it as far as possible into the ice bath
Top up with clean water approximately 1-2L in each
Add more ice and water until the icebox is full, maximizing the amount of ice added.
3 Preparing to load the perfusion circuit
Open 2x LifePort consumable packs and place on sterile fi eld. The sterile person should check security of all connectors and for signs of damage to the equipment
Record the Circuit Lot Number and manufacture date

Remove the kidney cradle from the box and retain on the back bench/table for later Non-sterile person to decant 1L KPS-1 fl uid into the cassette Record Perfusate Lot Number and expiry date The sterile person must close both lids and pass cassette to non-sterile person or load cassette into the ice container and transporter.
4 Loading the cassette and perfusion circuit (non sterile)
Once the cassette is in the ice container. Place the tube frame upright and perpendicular to allow the hinges to clip in the receivers on the pump deck.
Carefully assemble the tube frame on to the pump deck (see diagrams).
Step One Step Two
Step Three Step Four
Step Five Step Six

5 Energise the Transporter
On the control panel press ‘power on’ wait for a few minutes for the system to initialise and carry out self-diagnosis. If there are no alarm conditions (if alarm sounds see ‘trouble shooting’ section at the end of protocol), press ‘wash’ button to perfuse the wash circuit and allow air to be removed from the line for a few minutes. Monitor for leaks on the whole circuit especially the connections. If required, agitate the tube frame and LifePort to dislodge air locks in the tubing/ sensor areas
Press ‘stop’ and ‘prime’ to perfuse the infusion line of the circuit and remove air. The system should be left in ‘prime’ mode whilst waiting for the kidney to be attached to the perfusion system
Replace the white cover transporter lid to maintain or lower the displayed temperature to less than 8oC.
6 In-situ perfusion of the kidneys
As per protocol for surgical technique, 1st bag of 1L perfusate contains Heparin 5000iu (Appendix 2) Back table perfusion and dissection as per normal.
7 Cannulation is the key step to using the transporters Select a cannula that matches the size and anatomy of the aortic patch. A 7x20 cannula will normally be satisfactory.
If a kidney has more than one renal artery, ensure that all arteries are cannulated and adequately perfused. A coupler may need to be used if > 1 artery away from main aortic patch.
Step Seven
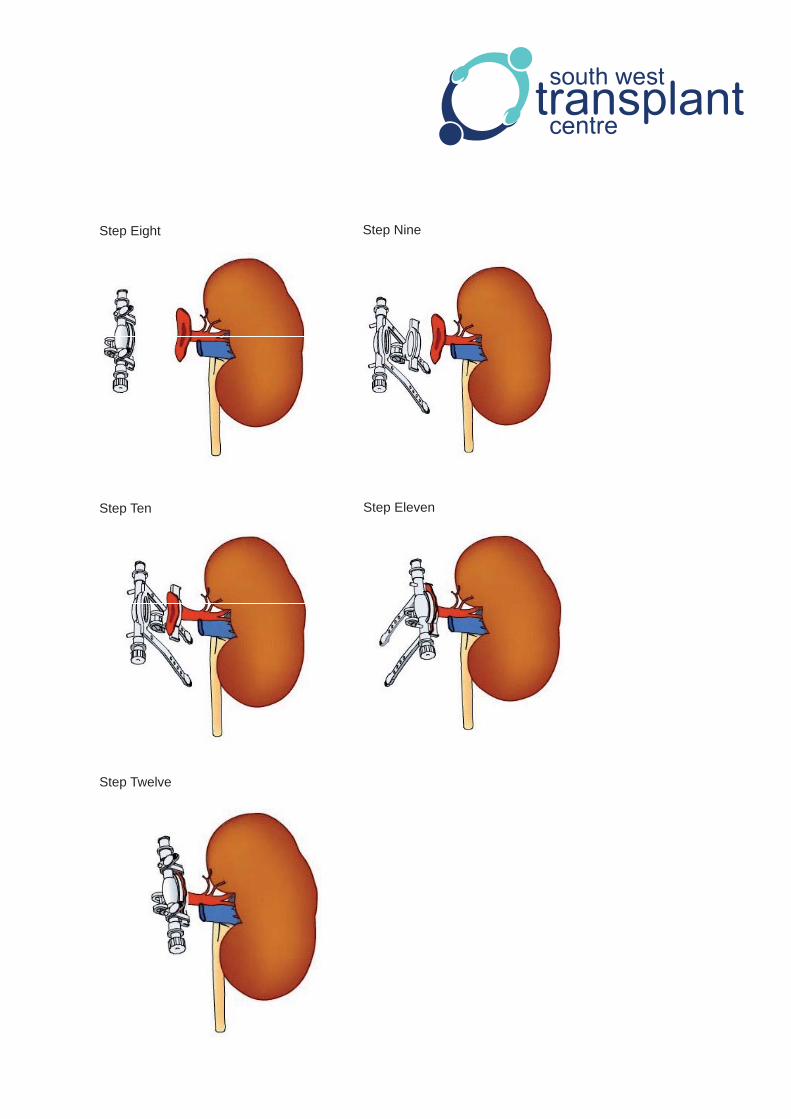
Step Eight Step Nine
Step Ten Step Eleven
Step Twelve

8 Transferring the kidney into the cradle and cassette
Place the cannulated kidney into the organ cradle and snap the cannula into the cannula mount. Cover the kidney with the netting to secure it in place.
Make sure that the Seal Ring cannula is securely closed and attached to the artery so it will remain in place during transportation and perfusion.
Visually inspect the renal artery, ensuring there are no twists, kinks or occlusions or overstretching before getting ready to place the cradle in the cassette.
Ensure the veins are not occluded or trapped by the cassette fi ttings and is draining freely into the reservoir.
9 Loading the Cassette and commence perfusion
Non-sterile person should remove the transporter white lid and then the cassette outer cover and press ‘stop’.
Sterile person to drape the top of the LifePort with sterile drape provided in pack. Remove the inner sterile lid and place on the back-table.
Transfer the cradle into the cassette. Take care to avoid trapping the infusion line between the cradle and the cassette.
Step Thirteen Step Fourteen
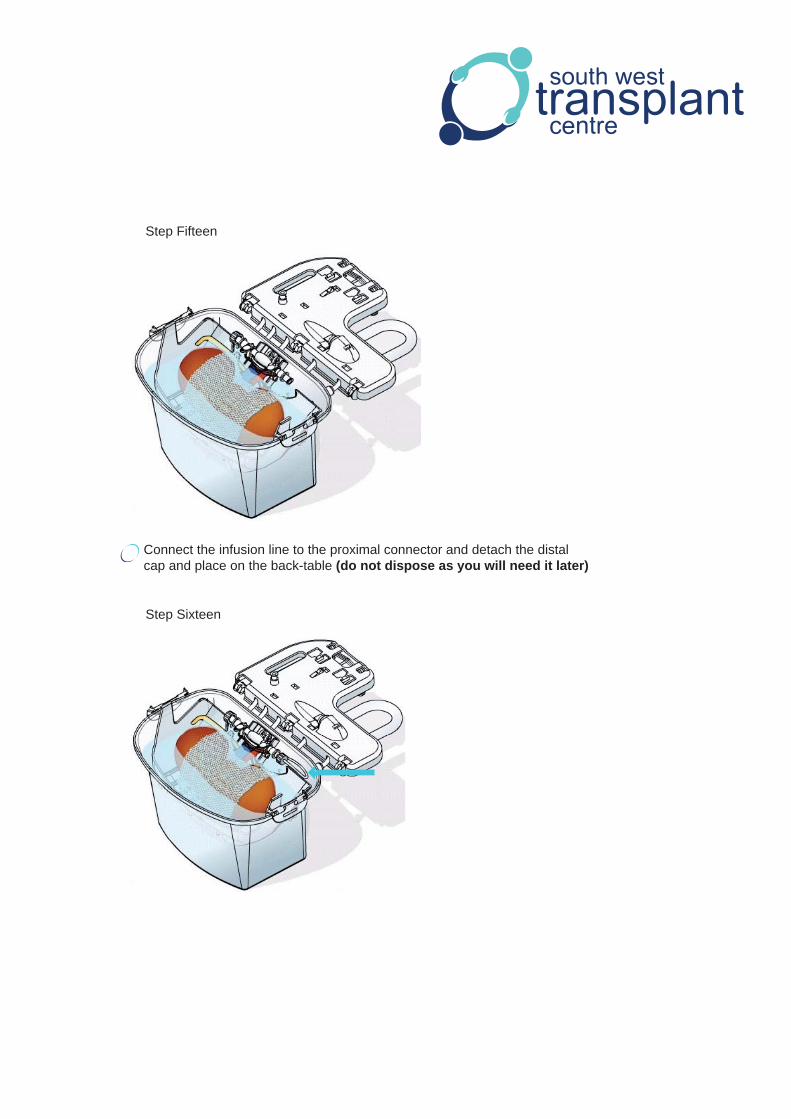
Connect the infusion line to the proximal connector and detach the distal cap and place on the back-table (do not dispose as you will need it later)
Step Fifteen
Step Sixteen

Step Seventeen
Press ‘prime’ to remove air bubbles from the infusion circuit into the reservoir via the distal open end of the Seal Ring cannula. Tap/fl ick the cannula to dislodge air.
Continue under ‘prime’ setting until the air has been vented, and then replace the distal cap.
Step Eighteen
The LifePort will bleep and shut off automatically. If the system does not stop, re-check for air bubbles/ leaks and re-prime. You will not be able to progress unless all air is removed and all leaks are stopped.

10 Initial Perfusion
Set perfusion pressure using + and – keys. Normal pressure 40 mmHg giving a fl ow rate of 40 – 60 ml/min (Pressures can only be set while in ‘wash’ or ‘stop’ mode).
Press ‘infuse’ through the sterile drape and the pump will slowly increase its speed until preset pressure is achieved. Check the outer display for temperature, fl ow, vascular resistance and that the transporter is in ‘infuse’ mode.
Check cannula, tubing, fl ow rate, artery and vein to ensure good fl ow and no leakage.
Record date and time kidney placed into LifePort, Initial Flow, Initial Pressure and Initial temp.
Replace inner lid and leave sterile drape in situ for 5 minutes. If no problems remove sterile drape. Replace the outer cassette lid and replace the outer white lid and lock in place.
11 LifePort pump perfusion transporter storage and monitoring
Both transporters when full will be stored in the main theatre corridor next to the coordinator one’s station, near the photocopier on trolleys/tables or cart. The transporters must be plugged into mains electricity. The pump will function normally with battery power, but will not warn of low battery state and will not charge batteries, each battery will last for 6 hours. Once pump perfusing the ice will last for 24 hours, please do not open the white top cover unless absolutely necessary as this will decrease the cold storage time. If the pump perfusion stops and is deemed unfi xable through the donor co-ordinator and organ recovery engineer the kidney will be safely stored in the transporter for 24hours.
The LifePort transporter will be monitored initially by the Donor Co-ordinator and then observed 2 hourly by theatre staff until transplanted.
A tick box chart will be available to show that lifeport has been checked for alarm conditions
A blinking alarm light means that there is a problem detected, often the machine can remedy itself.
If there is an audible alarm combined with a visual light blinking please contact the ON CALL Donor Co-ordinator on pager #6555 or via switch.

12 Download and Data analysis
If data needs to be reviewed prior to transplant, perfusion will need to be stopped 30 minutes prior to kidney being required on the back table in the recipient theatre for review. This will enable data to be downloaded from the LifePort to the laptop for analysis by donor co-ordinator. The rate of data down load is quite slow (serial port.) and may take up to 5 minutes to transfer to the laptop.
If data is not needed prior to transplant, the data can be downloaded at a later time by the donor co-ordinator. (Storage of 5 cases is possible in transporter computer)
13 Removing the kidney from the transporter for transplant
The transporter should be taken into theatre and put on a table or trolley.
When the surgeon is ready, unlatch the top white cover and remove the outer cas sette lid and place it upside down in a clean area.
Record Final Flow rate, Pressure and Temp.
Press the ‘stop’ button to stop perfusion.
Record time at which the machine is stopped as the time at which the kidney is removed.
A scrubbed member of the team should cover the transporter with a sterile drape and remove the inner cassette lid.
Place an empty sterile bowl onto the draped transporter near the cassette.
Remove secure net from kidney.
Disconnect the cannula from infusion tubing and direct tubing to bowl, press ‘prime’ button to fl ow enough perfusate into bowl to cover kidney, press ‘stop’ button.
Detach cannula from mounts and lift the kidney from cassette and place in ready bowl.
Once the kidney has been removed from the transporter it can be powered off and cleaned.
The perfusion circuit and cassette are single use and should be disposed of as clinical waste.
14 Cleaning
Universal precautions should be used when cleaning the transporter.

CAUTION! Do not clean the transporter whilst mains power is connected.
Do not immerse the transporter.
Do not allow cleaning solutions to enter the rear panel electrical connectors, the ventilation holes, or the battery area.
The transporter surfaces should be kept clean, wipe with 70% Isopropanol solution to clean. Wipe down all exposed surfaces for a minimum of 15 seconds, allow to air dry. Inspect for damage or deterioration of the surfaces, drain clean and air dry the ice container between each use.
Return to storage and plug into mains electricity to recharge.
15 Troubleshooting
Most problems that you encounter in operating the LifePort Kidney Transporter will be easily solved.The fi rst thing to check when troubleshooting the system is to make sure that power is available from either the batteries or through the power cord plugged into a standard electrical outlet. If the power light comes on but the Transporter still does not work, check the following troubles, probable causes, and actions.
Trouble
No power
Beeping or fl ashingLEDs
Probable Cause
Dead batteries and disconnected from mains power
No Power at outlet
Tripped circuit breaker
Errors detected internallyby the Transporter
Action
Replace with fresh batteries or plug into mains. Make surebatteries are fully chargedbefore using.
Make sure outlet has power.
Reset breaker by pressingin the button on the external connections panel. Call service.
Follow the instructions in 16, Fault Message Explanation.

Trouble
Missing or incorrectdisplay elements atpower-on
Leaking perfusate
Leaking coolant
Power on, but buttons are unresponsive
Message Display isblank. (Unit functioningproperly)
Probable Cause
Failure of displays or internal computer
Loose fi tting or defectiveTube set.
Broken container or seal.Lid not tightened
Transporter is internallylocked-up
Electrical shock reset display.
Action
Call service.
Retighten all fi ttings.Replace tube set if defective.
Tighten lid and look for leaks. Call service if leaks cannot be resolved.
Power off then on. Disconnect mains, then remove all batteries and replace them. If problem does not resolve, call service.
Power off then on.If display does not return, call service.
16 Fault Message Explanation
The Transporter has alarms that are sounded when out of range conditions are encountered for bubbles, pressure, fl ow, and temperature. The Transporter can recover from many of these errors and perfusion will automatically resume. The Transporter should enter a failsafe mode if any unrecoverable fault condition is encountered. Scroll the message display to view all of the fault conditions. The error indicators will remain to alert the user. To clear the indicators for errors, which are no longer valid, press the mode button with the blinking LED.
Check the following list of fault messages, possible causes, and recommended actions to determine how to respond if the Transporter happens to alarm. In most cases the audible alarm can be cancelled or temporarily muted by pressing the STOP touch pad.

Fault Message
Power up test failed
Load Perfusion Circuit
Check Ice
Too Cold or Near Freezing
Probable Cause
An error occurred during the Power Up Self Test
The Tubeframe is notproperly located
The Ice ContainerTemperature Sensor is reading above 8 degrees C.
Actions
1 Power off and then on. If problem persists, note the message on the second line and call for service. One exception is the Pressure Sensor Failed message, see below.
1 Make sure that the Tubeframe is properlyinstalled and the Tubeframe Locking Arm is in the correct position.
2 A sensor failure may exist; call service.
1 Replenish ice.
2 Allow up to 15 minutes for the sensor to drop to the proper temperature if the system was warm prior to installing a fi lled Ice Container.
3 Possible Sensor failure; call service.
1 Incorrect coolant; use ice slush made from regular water.
2 Environmental conditions too cold; move transporter into a warmer environment.
3 A sensor failure may exist; call service.

Fault Message
Too Much Pressure
Can’t Reach Pressure
Check Tubing
Probable Cause
Pressure Sensor isseeing higher thanexpected values.
Pump cannot achieve the set arterial pressure.
System is sensingunexpected conditions in the Perfusion Circuit.
Actions
1 High G forces are being created during transit; cushion or reduce impact.
2 A Pump, Valve or Sensor failure may exist;call service.
1 Leaking cannula or artery; visually inspect and correct all leaks under aseptic conditions.
2 Leak in Perfusion Circuit; tighten loose fi ttings,replace circuit if leaking.
3 Low resistance kidney; no action for maximumfl ow or reduce the set pressure.
4 Clogged fi lter; replace circuit or, if available,replace fi lter.
1 Tubeframe not positioned properly;check frame and locking arm position.
2 Kidney not connected; visually inspect kidneyand cannula, correct all leaks under asepticconditions.
3 A pressure greater than 120% of the setpressure is persisting; inspect pressure sensor.
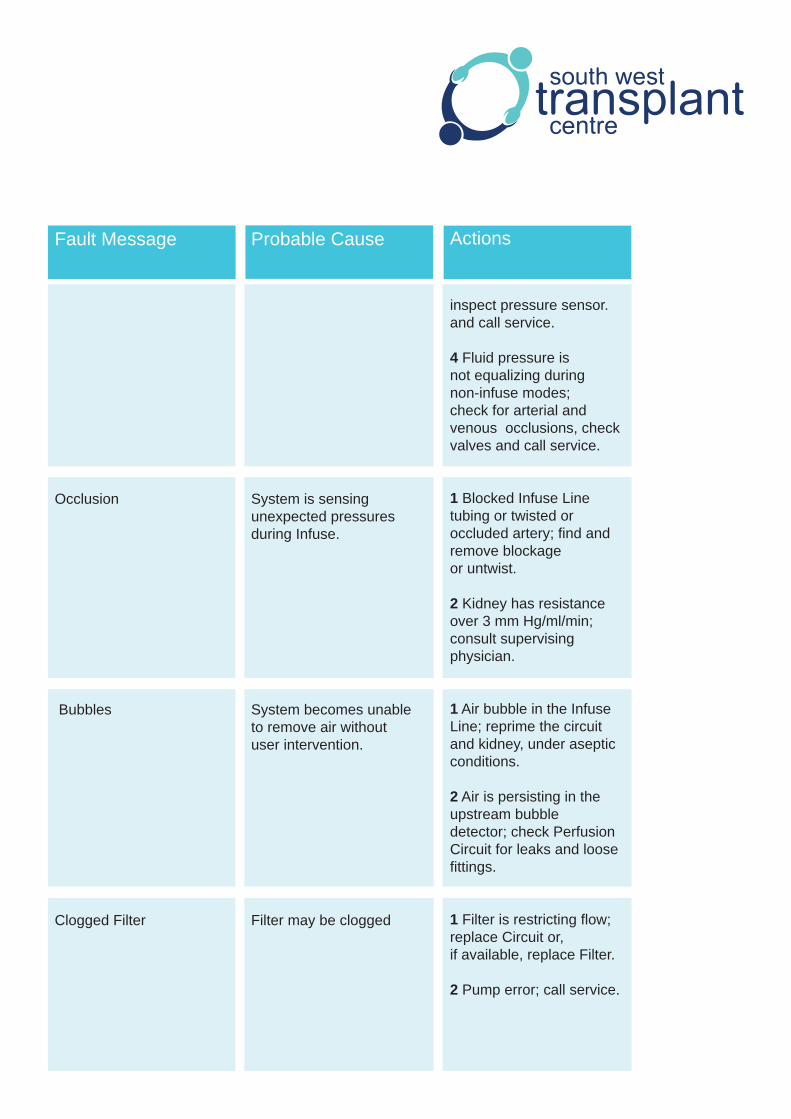
Fault Message
Occlusion
Bubbles
Clogged Filter
Probable Cause
System is sensingunexpected pressuresduring Infuse.
System becomes unableto remove air withoutuser intervention.
Filter may be clogged
Actions
inspect pressure sensor.and call service.
4 Fluid pressure is not equalizing during non-infuse modes; check for arterial and venous occlusions, check valves and call service.
1 Blocked Infuse Line tubing or twisted oroccluded artery; fi nd and remove blockageor untwist.
2 Kidney has resistance over 3 mm Hg/ml/min;consult supervising physician.
1 Air bubble in the Infuse Line; reprime the circuit and kidney, under aseptic conditions.
2 Air is persisting in the upstream bubbledetector; check Perfusion Circuit for leaks and loose fi ttings.
1 Filter is restricting fl ow; replace Circuit or,if available, replace Filter.
2 Pump error; call service.
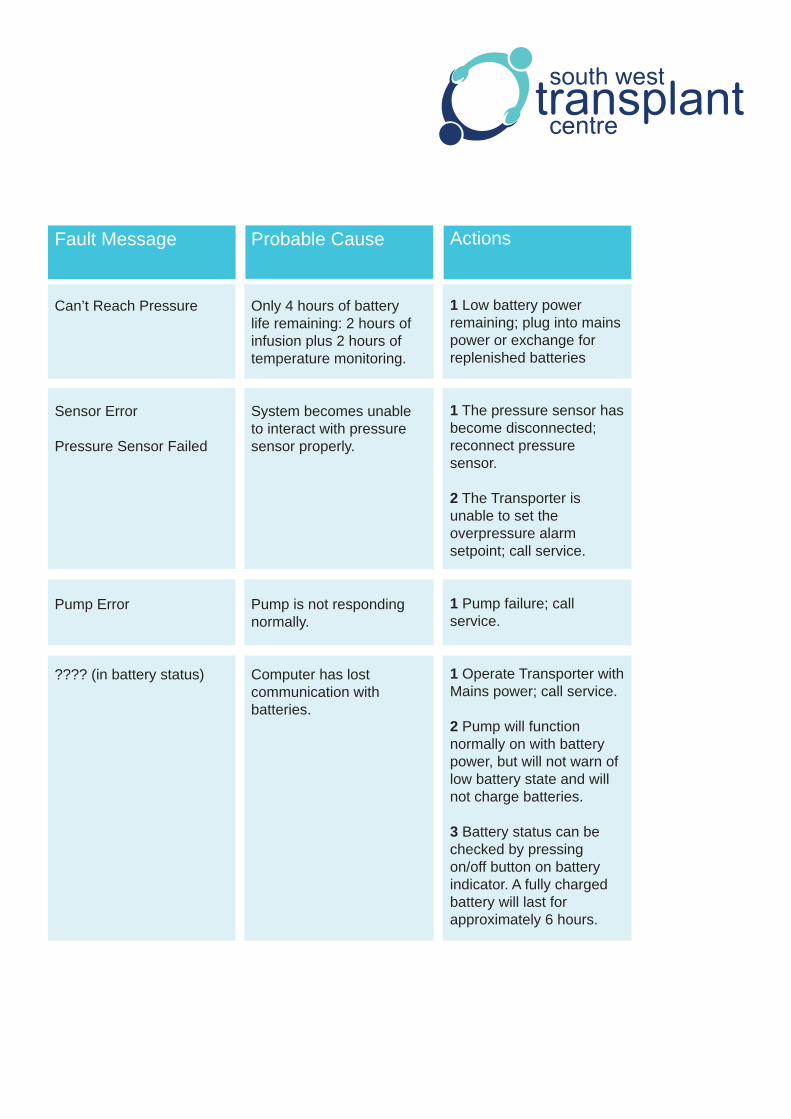
Fault Message
Can’t Reach Pressure
Sensor Error Pressure Sensor Failed
Pump Error
???? (in battery status)
Probable Cause
Only 4 hours of batterylife remaining: 2 hours of infusion plus 2 hours of temperature monitoring.
System becomes unableto interact with pressure sensor properly.
Pump is not respondingnormally.
Computer has lostcommunication withbatteries.
Actions
1 Low battery power remaining; plug into mains power or exchange for replenished batteries
1 The pressure sensor has become disconnected; reconnect pressure sensor.
2 The Transporter is unable to set theoverpressure alarm setpoint; call service.
1 Pump failure; call service.
1 Operate Transporter with Mains power; call service.
2 Pump will function normally on with battery power, but will not warn of low battery state and will not charge batteries.
3 Battery status can be checked by pressingon/off button on battery indicator. A fully charged battery will last for approximately 6 hours.

Appendix 1
Lifeport Kidney Perfusion Transporters Data Chart
Perfusion Equipment
Patients Hospital Number
LifePort Serial Number:Located on rear of machine
Kidney
Perfusate used:
Perfusate lot number:
Perfusate expiration date:
Lot number of circuit used:
Circuit manufacture date:
Initial Data
Date organ placed into Transporter:
Time organ placed into Transporter:
Initial Flow:
Initial Pressure:
Initial Temperature:
Left or Right
Celsius

Ending Data
Date organ removed from Transporter:
Time organ removed from Transporter:
Final Flow:
Final Pressure:
Final Temperature: Celsius
Appendix 2
PROCEDURE Controlled Non-Heart Beating Organ Donation

SETS
Basic Set Large BalfourMajor Set Double Bowl SetArterial Set Kidney Perfusion Tray
PROCEDURE Controlled Non- Heart Beating Organ Donation
BLADES
No 11
LINEN
Major Abdo Linen
PREP
Videne Antiseptic
POSITION
Supine
ON SIDE
Finochetto
EXTRAS
Fingerswitch diathermyGiving setExtension setSloopsSuction tubing x 2Yankuer sucker8” bowls x 2Double balloon Aortic perfusion catheterHeavy Mallet10ml syringe x25ml syringes x2Drawing up needleDilute radiographic contrast medium
TIES / SUTURES
2/0 Poysorb ties LL223
2/0 Ethilon on hand needle W795
OTHER INFORMATION
Operating table: attach extension at bottom end and rotate table 180 degrees (making foot end head end now) if x-ray needed.
LifePort machines & circuits need to be on a trolley in theatre.The packing of the kidney remains the responsibility of the Transplant Co-ordinator weather using standard box storage or Lifeport pump perfusion.
All specialist equipment will be stored in the room opposite the co-ordinators desk.
Fluids
2x 1L Wisconsin (UW) 2x KPS1 perfusion fl uid 4 x 1L N/Saline 4x 1L Marshalls HOC (from blood fridge). 4x 1L of frozen crushed N/Saline.
Please fi ll blue chill box ¾ full with ice found in blue bags in freezer & store all fl uid in this in theatre.
Heparin 5000iu to be added to fi rst litre of perfusion fl uid.