using hyperterminal - fluke cal · 5 of 6 starting hyperterminal 1 check to see if your computer...
TRANSCRIPT

1 of 6
Using HyperTerminal

2 of 6
Table of Contents
1. Connecting the device.…………………….3 2. Starting HyperTerminal…………………….5 3. Configuring RS-232…….…………………….6 4. Configuring TCP/IP……….…………………..7 5. ASCII Setup……………………………………….8 6. Check Communcations…………………….10 7. Capturing text…………………………………..11

3 of 6
Connecting the Device
1 Locate the serial cable or ethernet cable for
your device.
If your computer does not have a serial port,
you will need a USB to serial adapter.
Here are a few examples of cables that can be
used or are issued with the device:
1. RS-232 cable (DB9 F to 3.5 ST/M)
(part # 2410334)
2. RS-232 null modem cable (DB9 F/F)
(part # 2200962)
3. RS-232 USB adapter (USB A to DB9 M)
(part # 2761737)
4. RS-232 USB adapter, null (USB A to DB9 F)
(part # 2675479)
5. USB cable (USB A to USB B)
6. Ethernet cable, standard.
1 2
3 4
5 6
4 of 6
Connecting the Device
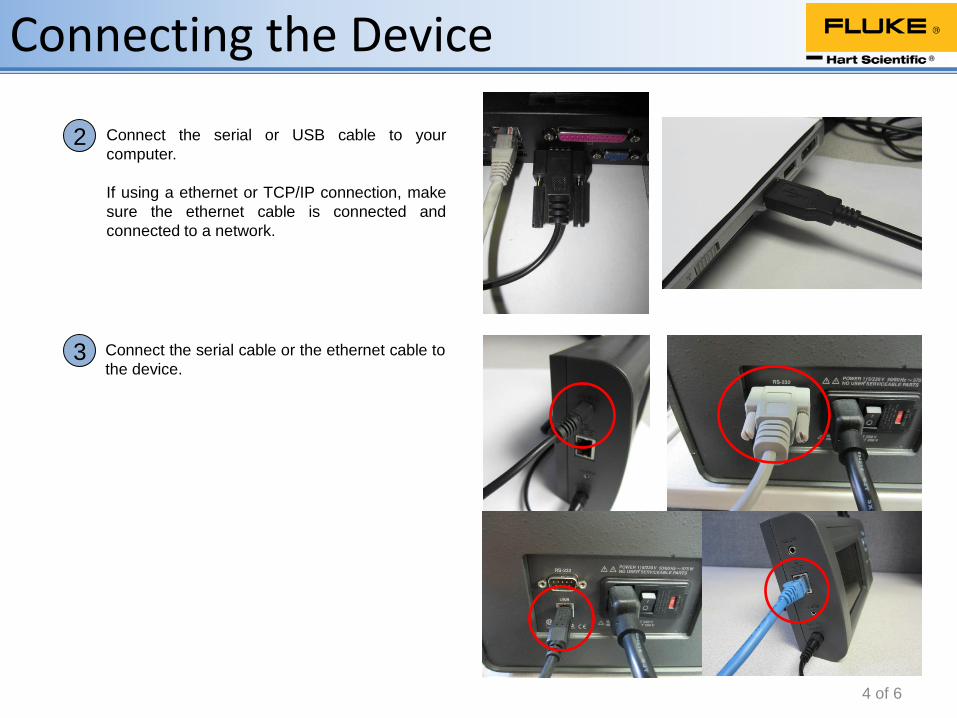
2 Connect the serial or USB cable to your
computer.
If using a ethernet or TCP/IP connection, make
sure the ethernet cable is connected and
connected to a network.
3 Connect the serial cable or the ethernet cable to
the device.

5 of 6
Starting HyperTerminal
1 Check to see if your computer has a program
called Terminal or HyperTerminal.
Windows XP comes with the HyperTerminal.
This is usually located in the Accessories folder
and then the communications folder.
Later versions of Windows, such as 7 or 8, don’t
come with the HyperTerminal and must be
purchased separately.
2 Click on the icon to use HyperTerminal.
3 Name the Connection Description. This can be
anything and has no bearing on the data
collected. For this example, we will use “asdf”.
Click on the OK button.
6 of 6
Configuring RS-232
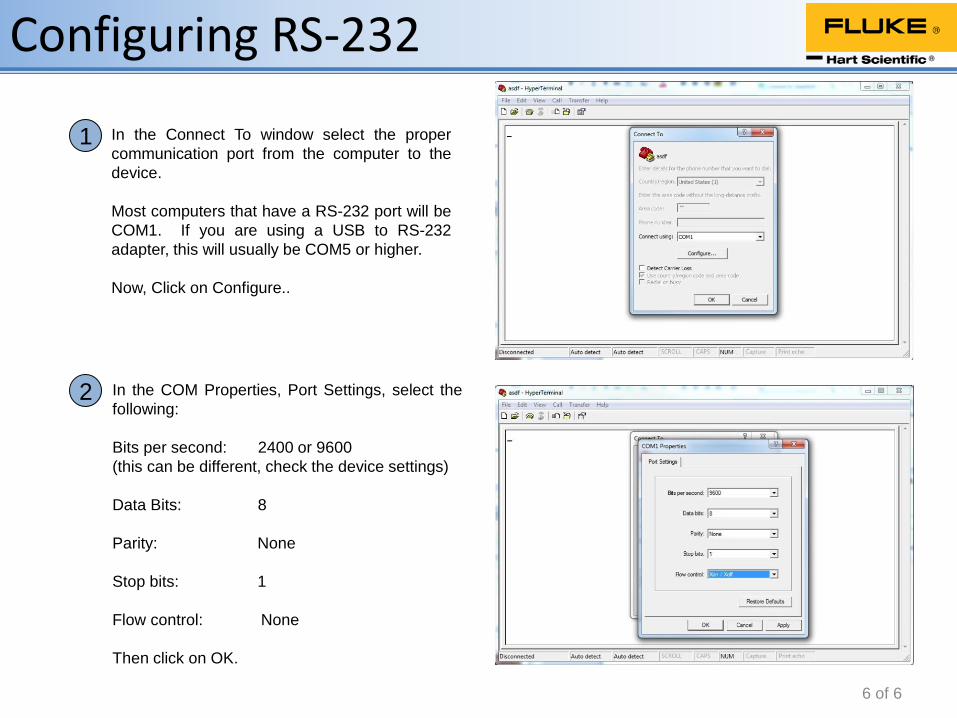
1 In the Connect To window select the proper
communication port from the computer to the
device.
Most computers that have a RS-232 port will be
COM1. If you are using a USB to RS-232
adapter, this will usually be COM5 or higher.
Now, Click on Configure..
2 In the COM Properties, Port Settings, select the
following:
Bits per second: 2400 or 9600
(this can be different, check the device settings)
Data Bits: 8
Parity: None
Stop bits: 1
Flow control: None
Then click on OK.

7 of 6
Configuring TCP/IP (ethernet)
1 In the Connect To window select the proper
communication port from the computer to the
Fluke device.
For an ethernet connection select the TCP/IP
(Winsock) from the drop down menu.
Now, Click on Configure..
2 In the Connect To properties select the following:
Host address: 129.196.204.181
(this will be different for every device, check the
device settings or manual for settings)
Port Number: 10001 or 3490
(this will be different for every device, check the
device settings or manual for settings)
Connect using: TCP/IP (Winsock)
Then click on OK.
8 of 6
ASCII Setup
4 3 2 1 4 3 2 1
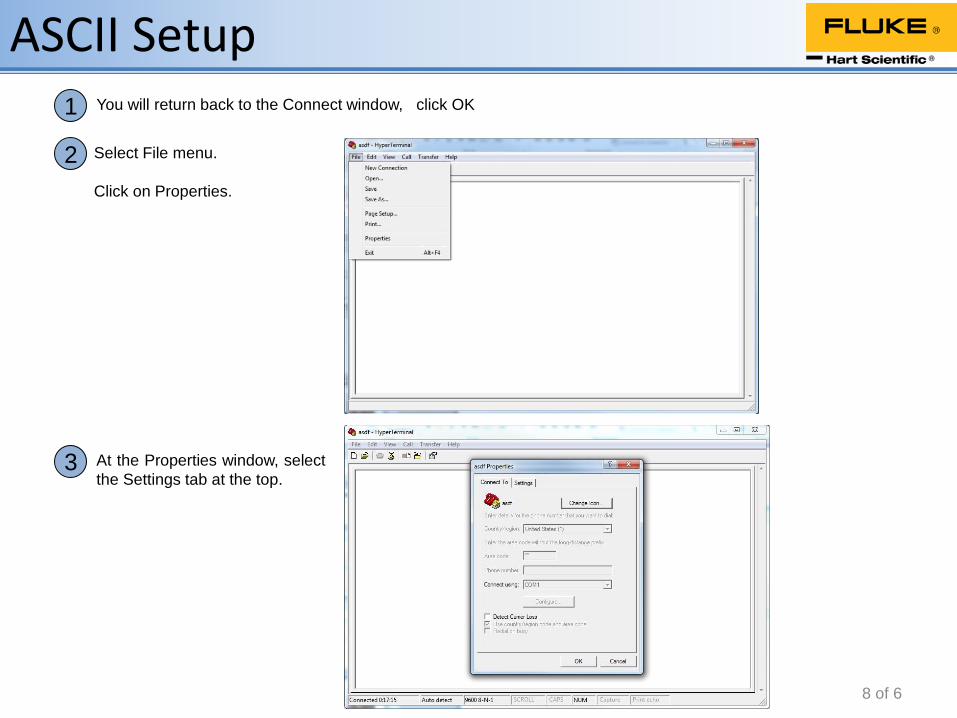
1 You will return back to the Connect window, click OK
2 Select File menu.
Click on Properties.
3 At the Properties window, select
the Settings tab at the top.

9 of 6
ASCII Setup
4 3 2 1
4 Click on the ASCII Setup… button.
5 Select the following features by clicking on the
box on the left next to the line.
Send line ends with line feeds
Echo typed characters locally
Append line feeds to incoming line ends
Now click, OK

10 of 6
Check Communications
1 You will return back to the Properties window,
click OK
2 Check the communications by typing a command.
*idn? or *ver are common commands. These are
not used by every unit
*idn? should return the Manufacturer, Model,
Serial number, and the Firmware version.
*ver should return the Model and the Firmware
version.

11 of 6
Capturing text
1
2
Before streaming or printing the data from the
device, we will need to capture the text that is
coming from the device.
Click on Transfer
Click on Capture Text
In the Capture Text window at the File line, enter
the drive you wish to save to and enter the name
of the file followed by a .TXT extension.
Example: C:\1620A May 2013.txt
Then, click Start
The HyperTerminal will now capture or record the
lines of information and place the data in the file
you chose.

12 of 6
Capturing text
4 3 2 1
3 After the data is done transferring, the capturing
of the data will need to be stopped.
Click on the Transfer menu.
4 Under Capture Text, Click on Stop.
This will stop writing data to the file and conclude
the process.