using google scholar and the dpu library to find sources
TRANSCRIPT

Using Google Scholar and the DPU Library to Find
Sources and Citations. Converting citations for use in automated Word bibliographies.
Clark Elliott, Ph.D.
DePaul University
College of Computing and Digital Media 2021-09-27 Version 3.0
Google Scholar configuration:
Google Scholar is a wonderful tool for finding full references, abstracts, and full text for scholarly articles. The full citations and the abstracts will generally always be available, but
because of copyright restrictions, you may be restricted from retrieving the full text of
articles.
The DePaul library spends a significant amount of its budget to pay for access to many
scholarly journals. As a DePaul student, a portion of your tuition money goes to pay for
these library services. This gives very good access to many articles through the DePaul
Library. However, you have to register your DPU Library account with Google Scholar. I
give you those techniques here.
In your browser, activate the links for the DePaul library for scholar.google.com. For the
Firefox browser this is achieved as:
1. Scholar.Google.com 2. Find the three bars drop-down menu on the left hand upper corner then / Settings /
Library Links. 3. Search for DePaul University. 4. Check each of the [3] boxes (which will configure the results pages in
scholar.google.com) 5. Save your changes.

At this point, in Google Scholar, you should have automatic right-hand-side links giving
DePaul library access to a number of articles that the DePaul Library has paid for. That is—the publisher charges for access to these articles, but DePaul Library has paid the fee on
your behalf. When you follow these links you should generally have access to full-text
versions of the articles. Click on the link labeled "Article" to access the text.
Clicking on the Double Quote icon will take you to various versions of the citation:
Follow it to the Google Scholar list of citation formats:
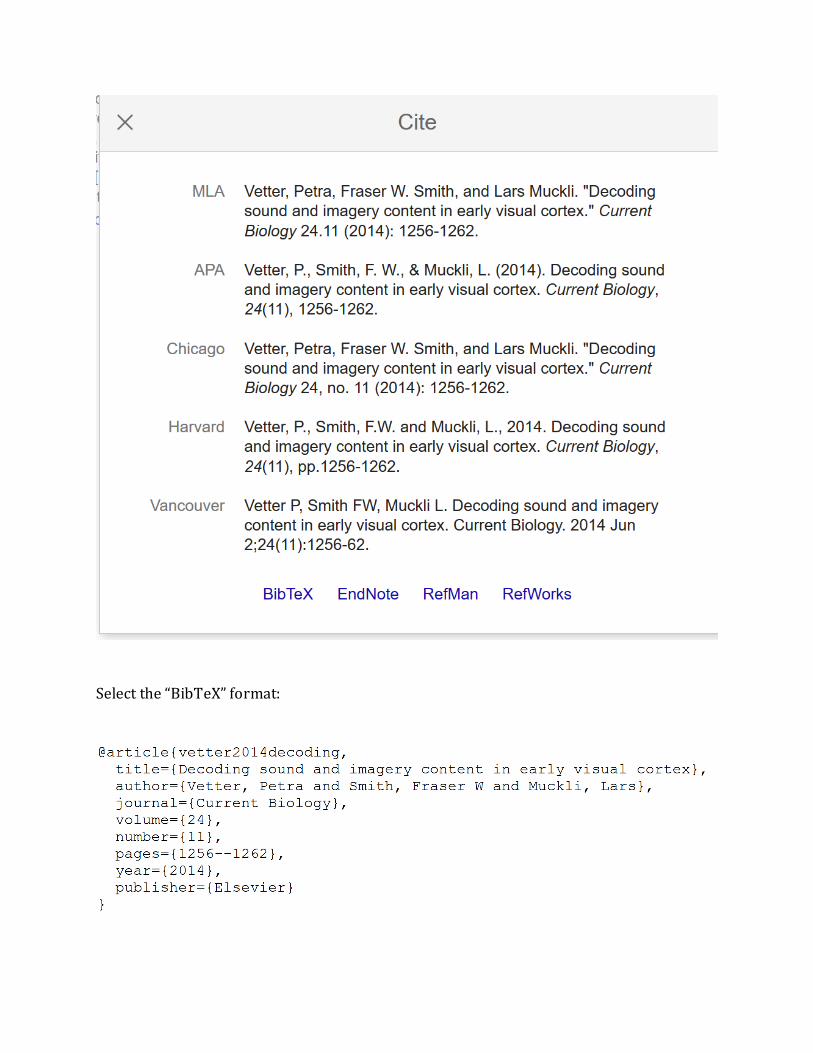
Select the “BibTeX” format:
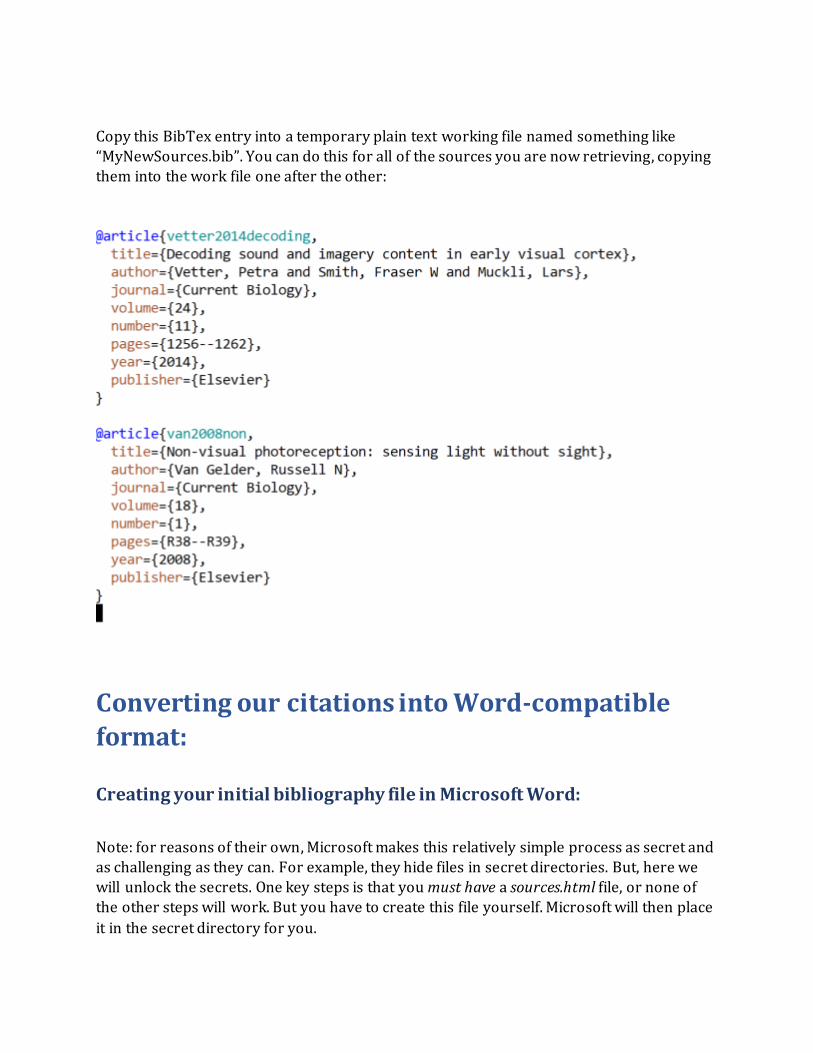
Copy this BibTex entry into a temporary plain text working file named something like
“MyNewSources.bib”. You can do this for all of the sources you are now retrieving, copying them into the work file one after the other:
Converting our citations into Word-compatible
format:
Creating your initial bibliography file in Microsoft Word:
Note: for reasons of their own, Microsoft makes this relatively simple process as secret and
as challenging as they can. For example, they hide files in secret directories. But, here we
will unlock the secrets. One key steps is that you must have a sources.html file, or none of
the other steps will work. But you have to create this file yourself. Microsoft will then place
it in the secret directory for you.

Before you can integrate new references into your own, persistent, Microsoft Word
bibliography file, you need to create it. What you are after is to create SOME bibliography file, however small, that Word currently names Sources.xml. To do this, you will manually
enter the most trivial first bibliography entry into Microsoft Word. Using Word, edit a file Junk.docx. Under the References tab, select Insert Citation, then Add New Source.
Then, fill in the most rudimentary placeholder entry into the Create Source input box:
From time to time you may still have to use this manual entry mechanism, so it is good to
know about anyway. But we strongly prefer to get full references from online sources directly: it will save a boatload of time, and it will be more accurate and consistent.

Save the entry. This SHOULD create the all-important Sources.xml file on your disk.
Note: For some reason Microsoft is acting in bad faith here, in an obstructionist way, in my opinion. I cannot imagine why they make so exceedingly difficult for users to use modern
bibliographies with their Office product in native mode. This should simply be a matter of
loading an XML file into Word as needed. But, I have tracked down all the resources necessary to complete the process.
It is very important for you to locate (your new, or existing) Sources.xml file on disk. For
example, in my Windows system it is located here:
Sources.xml
c:/Users/E/AppData/Roaming/Microsoft/Bibliography/Sources.xml
On your Mac system it will be located somewhere similar, such as
~/Library/Containers/com.microsoft.Word/Data/Library/Application
Support/Microsoft/Office/Sources.xml
Note:
1) You MUST first create the file, to find the directory, by making at least one entry and
saving it to disk (as above). Sources.xml does not exist by default. See above. 2) Microsoft goes out of their way to hide this file from you. If you attempt to find the
“Roaming” directory through File Explorer, for example, it will probably be hidden . For example, when I view the C:\Users\E directory, AppData is hidden. If you type in
the full name of the hidden directory, File Explorer will display it for you. 3) You might need to search your disk for *.xml or Sources.xml to locate the directory
that Microsoft Word uses. (You can search with File Explorer on Windows and find
on the Mac.
4) If you have an existing file, and play with making a new one, be sure to make a
copy of the old file so you don’t lose any of your old references:
➢ Copy Sources.xml MyOldSources.xml (or cp on Unix / Mac)
A note on Zotero:
Zotero is a fine, free bibliographic reference manager that is integrated with both web
browsers and Microsoft Word, as well as Google Docs. If you are very careful you can use it effectively to manage your bibliographic sources. However, I cannot, myself recommend it
at this time. Zotero is maintained as open-source software by George Mason University. The problem is that (as near as I can tell) for browser integration Zotero requires that you
turn over full browser-scraping capabilities in the browser extension. This means that you
give permission to open-source Zotero to read (and process) everything you type into a
browser input box (including passwords, credit card numbers and etc.). I am not willing to
do this or to recommend that you do so either.
To safely use such a browser extension you would need to start a new browser session, clear your cache, turn ON the Zotero browser extension (which is OFF at all other times)
search for bibliographic materials and NEVER use the browser for anything else during that
session. Then turn OFF the browser extension. The hacking risks are too great, and the
worst consequences extreme, in my opinion, to give Zotero access all the time.
In addition, Zotero does not import or export XML files (the industry standard for this kind of thing), making it much less portable than the solution that follows.
https://en.wikipedia.org/wiki/Zotero
Using JabRef (and Google Scholar) to create and merge your XML source files:
Note: We will go through a few different screens, and some dialog, but the only thing you
really need JabRef for is to import a BibTex format file and export an XML format file, plus, possibly to merge two different libraries together and export the collection as an XML file.
After downloading and installing the free opensource bibliographic reference manager
JabRef from https://www.jabref.org/ , open JabRef. (Note that most bibliographic software
will be similar. JabRef has high marks, is open source and was an easy install. Interpolate
these instructions which should still generally apply, if you use different software.) The goal is to merge your new references into your existing Word master bibliography. And, to
continue to be able to merge bibliographies in this way.
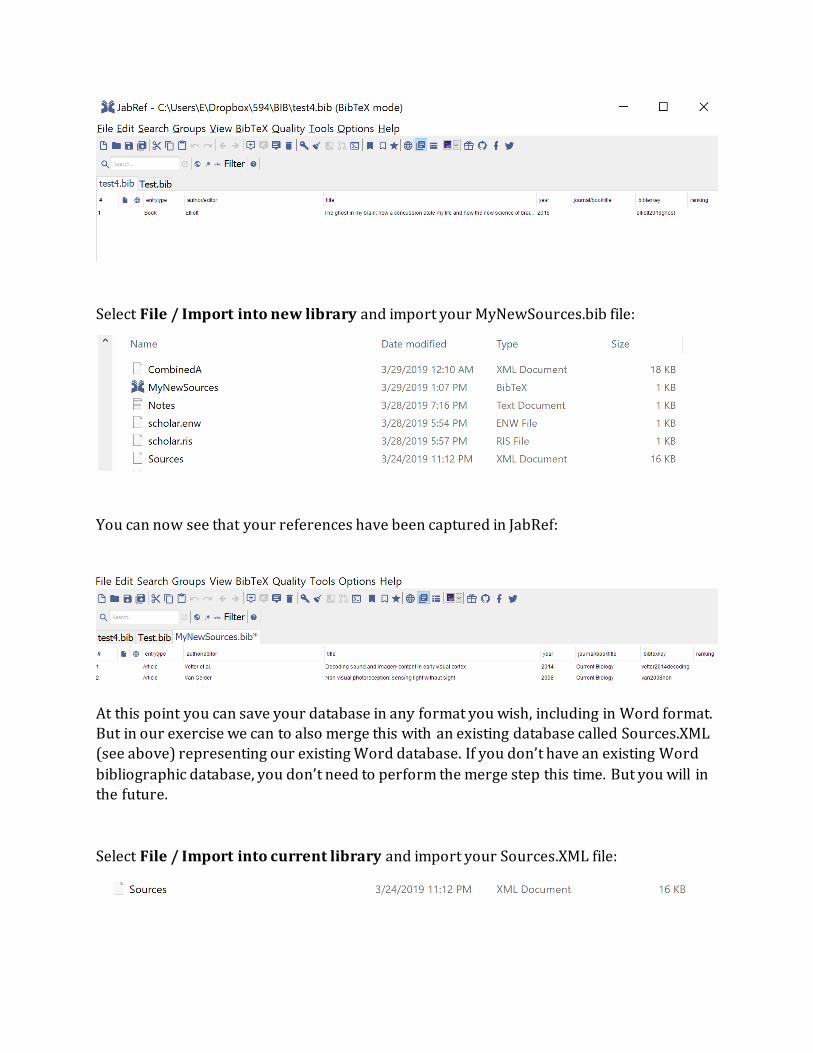
Select File / Import into new library and import your MyNewSources.bib file:
You can now see that your references have been captured in JabRef:
At this point you can save your database in any format you wish, including in Word format.
But in our exercise we can to also merge this with an existing database called Sources.XML
(see above) representing our existing Word database. If you don’t have an existing Word
bibliographic database, you don’t need to perform the merge step this time. But you will in
the future.
Select File / Import into current library and import your Sources.XML file:
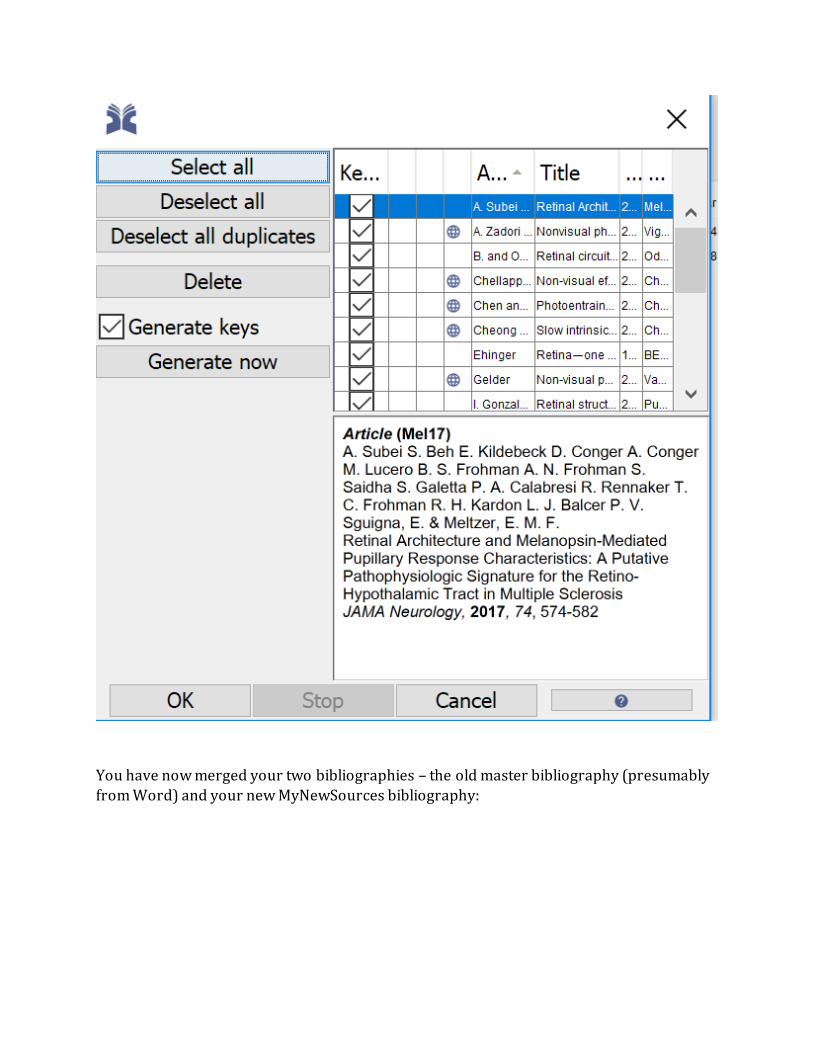
You have now merged your two bibliographies – the old master bibliography (presumably
from Word) and your new MyNewSources bibliography:

Detail:
Select File / Export and export your new combined bibliography to disk. Here we use the
name CombinedB.xml (which will be XML that is compatible with MS Office):

Following is what the CombinedB.xml file looks like (snippet showing the Vetter entry). We
have converted our BibTex format into XML:

Loading our new master sources file and creating our
bibliography in Word.
You have now created the first version of your permanent, lifelong, bibliogr aphy. You
should add new references to it in the same way. Then, for the rest of your life, you should
have immediate access to all of these citations, in any format, within your own Word
editing environment (or within other modern Word Processor).
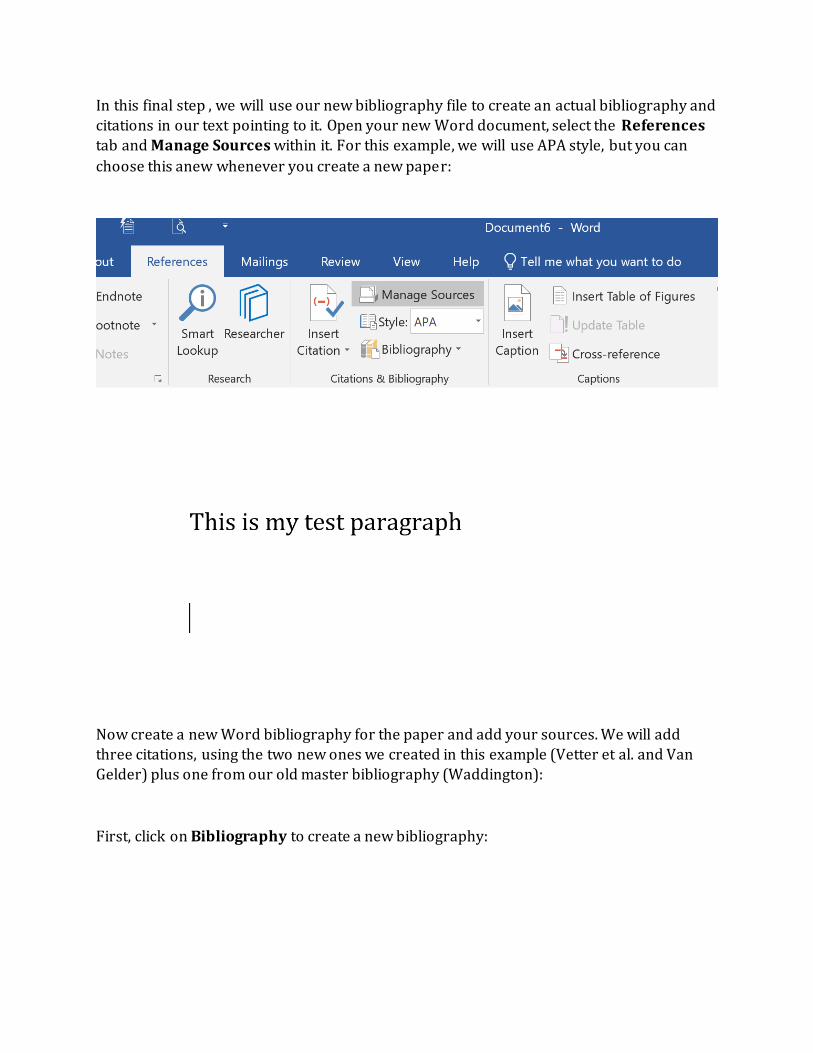
In this final step , we will use our new bibliography file to create an actual bibliography and
citations in our text pointing to it. Open your new Word document, select the References tab and Manage Sources within it. For this example, we will use APA style, but you can
choose this anew whenever you create a new paper:
Now create a new Word bibliography for the paper and add your sources. We will add
three citations, using the two new ones we created in this example (Vetter et al. and Van Gelder) plus one from our old master bibliography (Waddington):
First, click on Bibliography to create a new bibliography:

Now, use Manage Sources / Browse to search for your new CombinedB.xml bibliography
file. NOTE: Be SURE to first note, and SAVE, the location of your CURRENT bibliography file.
You certainly may want to get back to this location, and Word will not help you find it. Note
also that under Windows the AppData directory may not display in your graphics listings of
directories, so you will have to type it into the search bar directly if you want to return to the current location:
Still under the Manage Sources tab, add the three references from your master list (now
called CombinedB.xml) to your current list:
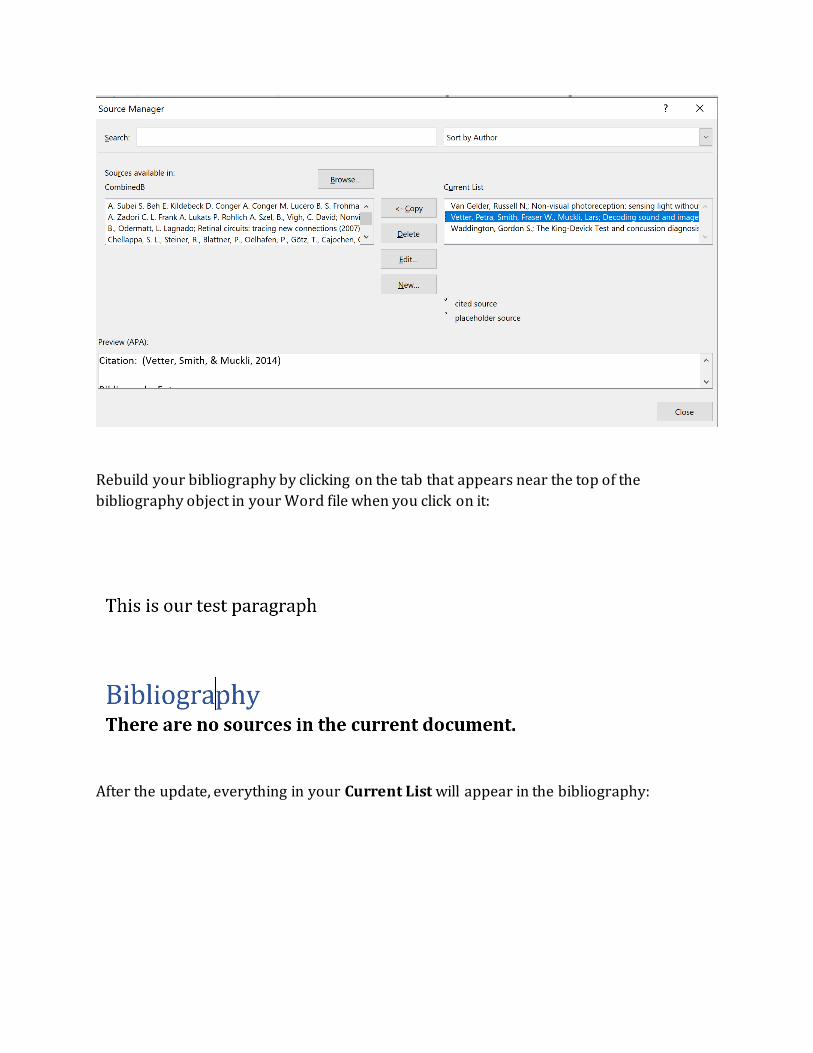
Rebuild your bibliography by clicking on the tab that appears near the top of the
bibliography object in your Word file when you click on it:
After the update, everything in your Current List will appear in the bibliography:

Now using the “Insert Citations” on the same References tab, add the three references to our new test paragraph:
This gives us:

If we wish, we can now generate an entirely different style of bibliography and citation style. In this case we chose IEEE style and the citations and bibliography are automatically
updated:

Summary:
We have now completed our tour of using Google Scholar in several ways, and also the DPU
library when hunting for online versions of articles, and their citations. We have learned
how to locate the resources that DePaul pays for. We further captured the citations, took
them through several conversion steps and merged them into our Word master XML-format bibliography using the http://JabRef.org software. This is our permanent
bibliography and can used to automatically generate any style reference, for any future paper.
Addendum 1, References from Other Sources: Sometimes you find your citations outside of Google Scholar, such as when using the library
catalog. Here is an example path to getting to the same Google Scholar BibTex reference. Imagine that you have found the following reference in Current Biology:

To get the citation find the “Cite” button and “click” it:
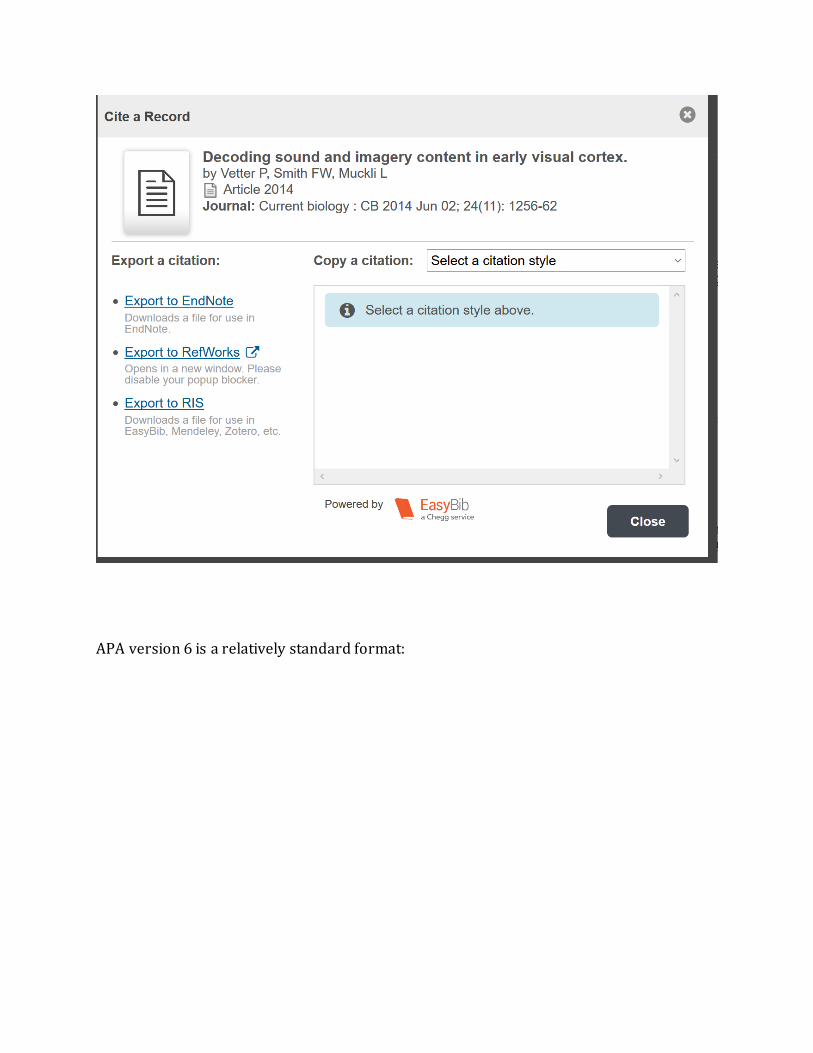
APA version 6 is a relatively standard format:
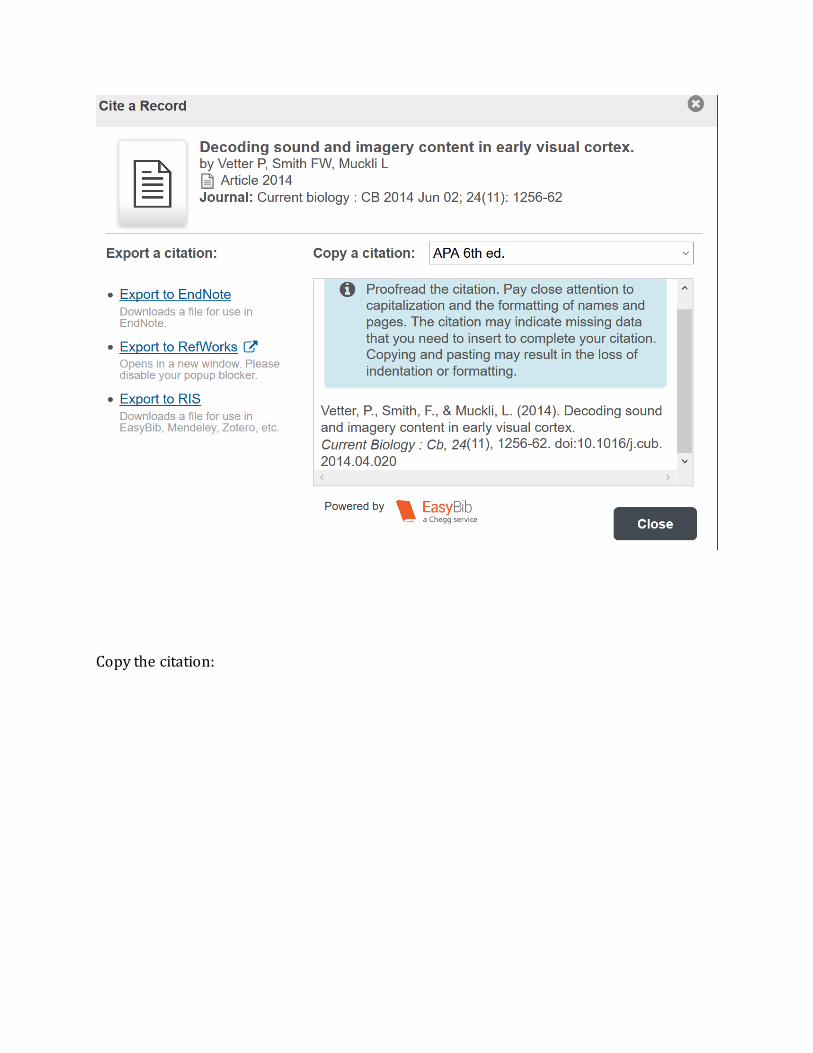
Copy the citation:
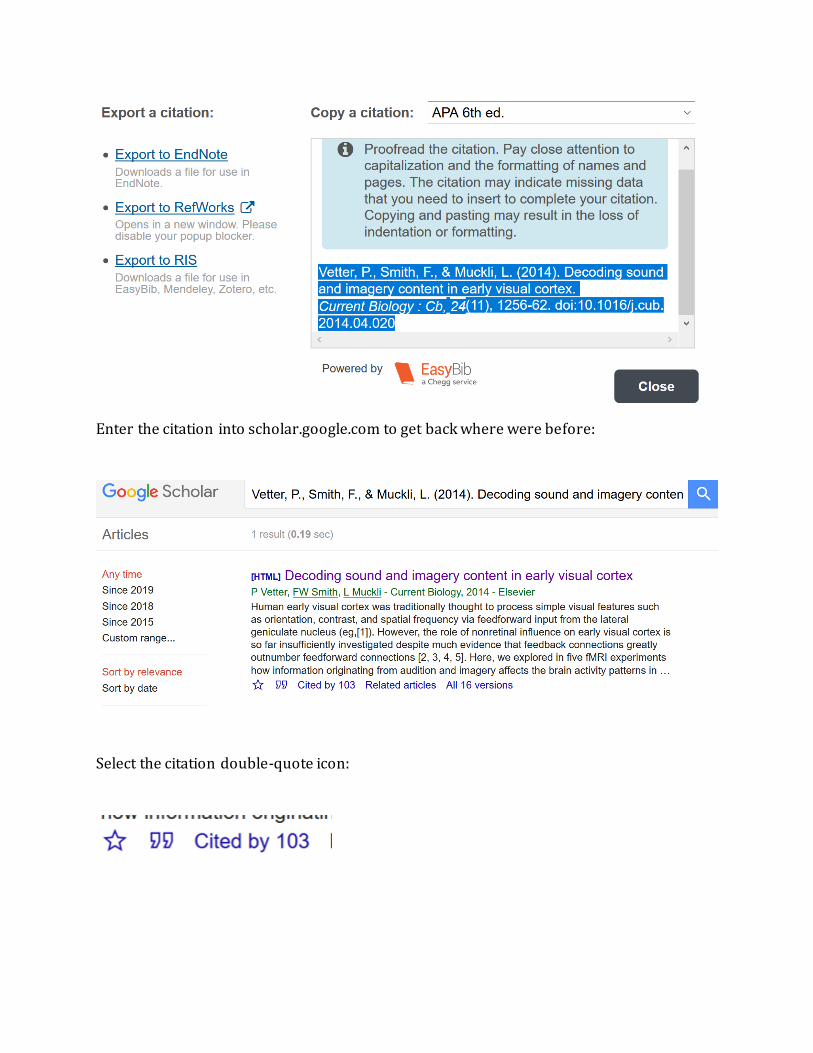
Enter the citation into scholar.google.com to get back where were before:
Select the citation double-quote icon:
Addendum 2: using the DPU Library catalogs:
Using the DePaul Databases to locate your reference article and
its citations:
Personally, I have not found the traditional library searches to be very useful, or intuitive. If
you don’t use the software regularly, it is difficult to remember the “tricks” for getting to
what you want. As just one example, the library pays for a subscription to the New York
Times. We would think that typing “New York Times” into a library search box would get us
to the stories that appear in the times, but this is not at all the case. Instead several rather
baroque steps are required, and these are easy to forget. Having said that, I do, here,
provide the steps to perform a standard, “classical” library search through the extensive catalogs that the DPU library pays for, and uses.
First, a general principle: Publishers and search-aggregation catalogs each charge for their
product which is, respectively expensively edited and typeset journal articles, and sophisticated catalogs that provide search databases to find articles for you. The DePaul
Library pays for many catalog search databases, and also for access to a very wide variety
of articles. When you are enrolled at DePaul as a student, or work at DePaul as a faculty
member, you have library privileges that give you access to these resources.
Following is a tour through logging in to the DePaul Library site, using the search catalogs,
registering the DePaul library at Google Scholar, finding articles, using the automated citation tools, building our own XML-format bibliography file that we intend will follow you
around for the rest of your life, and lastly using your bibliography file to automatically build bibliographies in any style for any papers you write.
From https://library.depaul.edu you can search the DePaul WorldCat database and you
might get lucky when looking for a particular article:
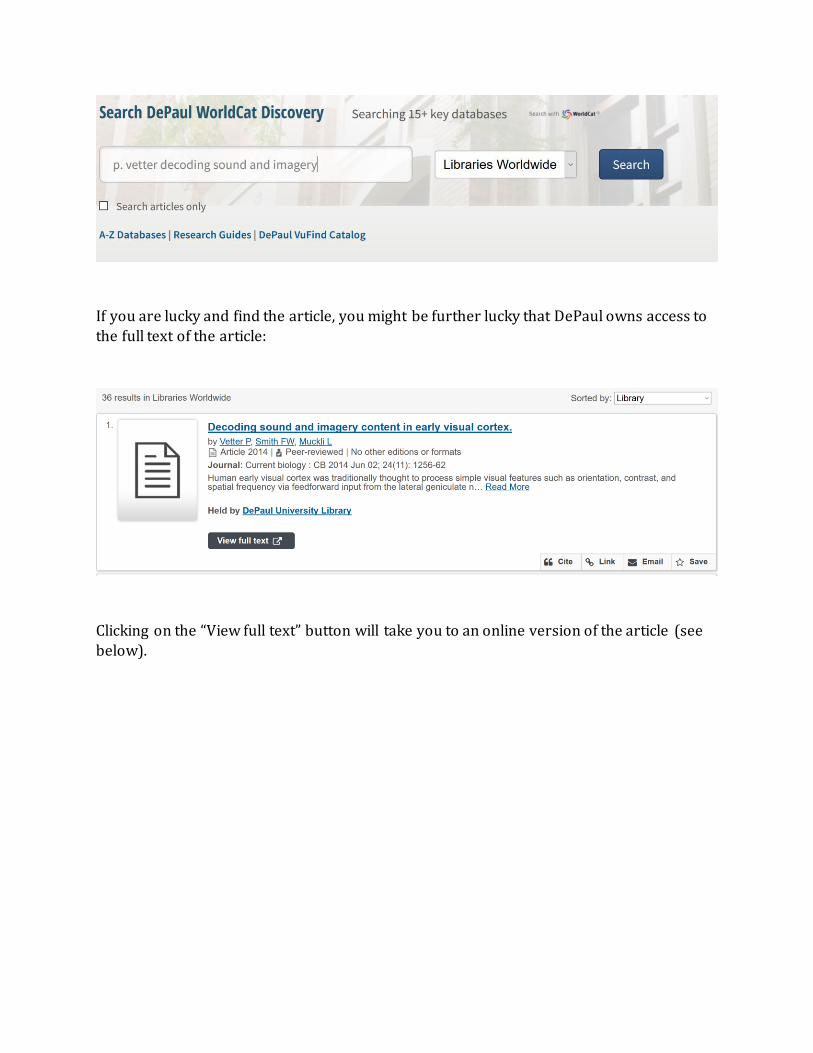
If you are lucky and find the article, you might be further lucky that DePaul owns access to
the full text of the article:
Clicking on the “View full text” button will take you to an online version of the article (see
below).
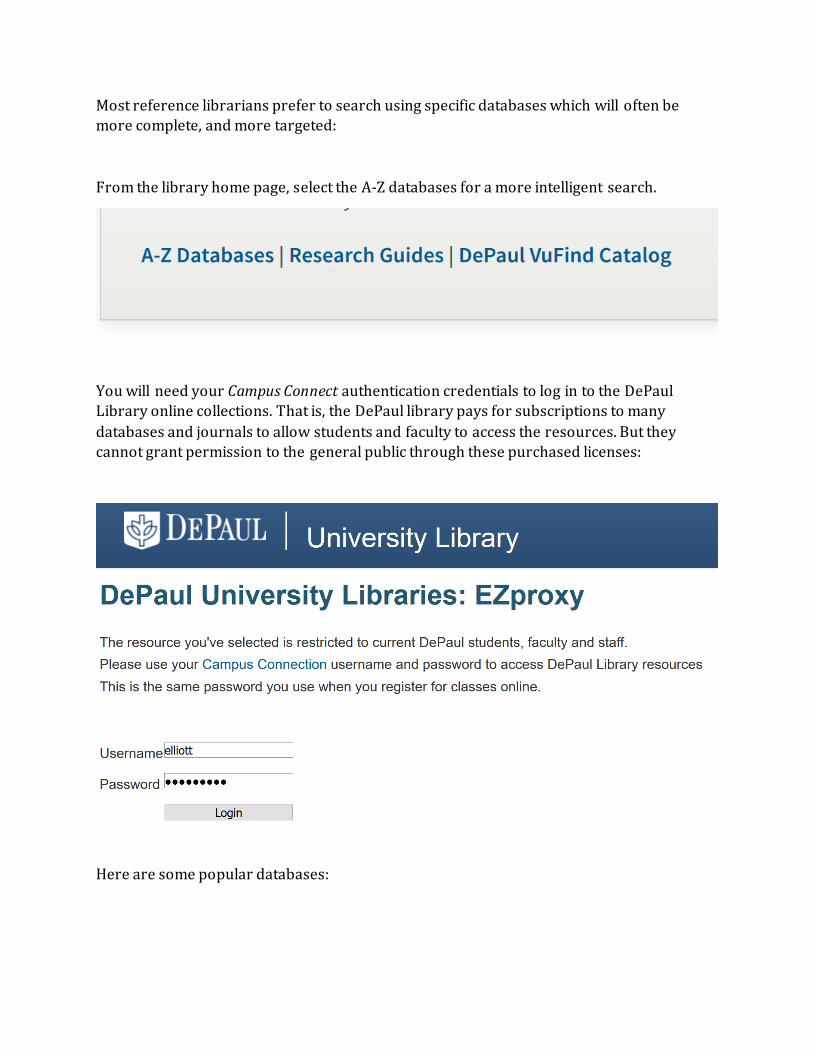
Most reference librarians prefer to search using specific databases which will often be
more complete, and more targeted:
From the library home page, select the A-Z databases for a more intelligent search.
You will need your Campus Connect authentication credentials to log in to the DePaul
Library online collections. That is, the DePaul library pays for subscriptions to many
databases and journals to allow students and faculty to access the resources. But they
cannot grant permission to the general public through these purchased licenses:
Here are some popular databases:

Each of these “popular” options will just serve to check a box in the ~1000 A-Z search
choices. But you can check further search boxes manually. After selecting, say Academic
Search Complete:
…you will see a search box that also allows you to choose your databases:

You can check as many boxes as you wish for promising databases. Here are some that are
generally good starting locations, along with any specific to your area:
• Business complete
• Education Research Complete
• ERIC
• Consumer Host Complete EBSCOhost
• Professional Development Collection
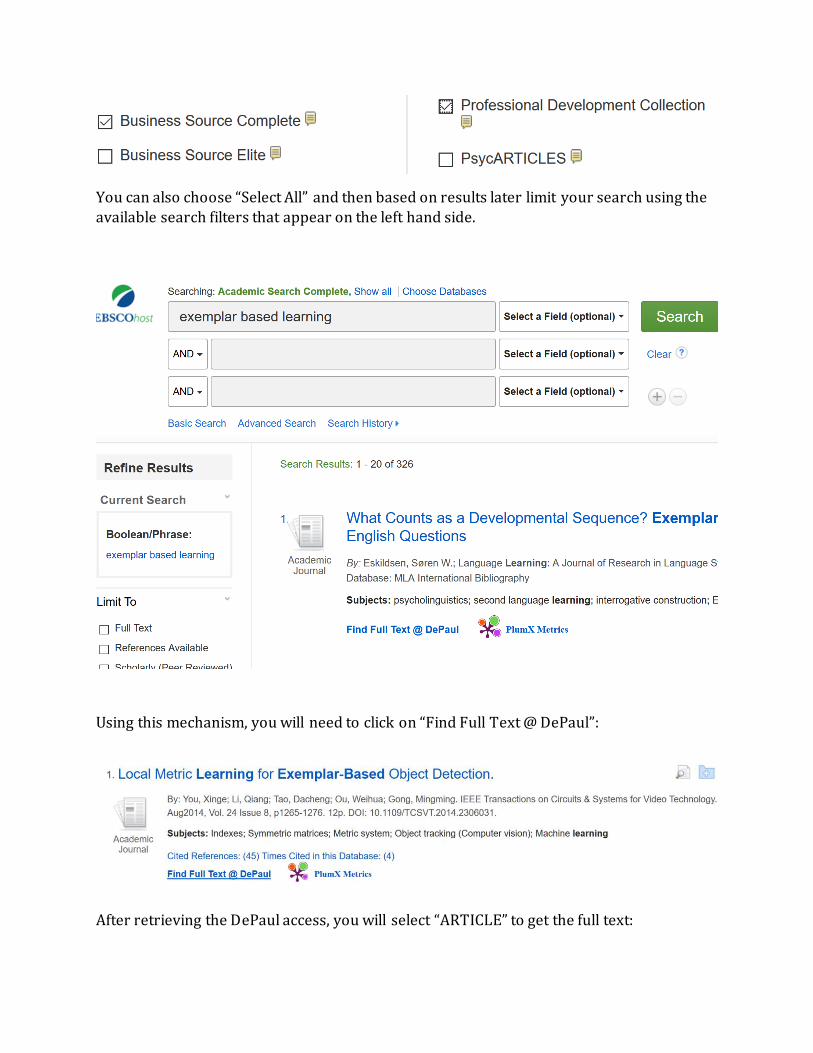
You can also choose “Select All” and then based on results later limit your search using the available search filters that appear on the left hand side.
Using this mechanism, you will need to click on “Find Full Text @ DePaul”:
After retrieving the DePaul access, you will select “ARTICLE” to get the full text:
