user’profile’bardincanvas’for’ instructors’ · division’of’it’...
TRANSCRIPT

Division of IT ©University of Maryland 1
User Profile bard in Canvas for Instructors
Getting Started in Canvas for Instructors
IT Learning Technologies (May 2013 revised version)

Division of IT ©University of Maryland 2

Division of IT ©University of Maryland 3
Getting Started in Canvas for Instructors This workshop will orient you to the ELMS (Canvas) environment and tools and strategies for communicating, customizing the course Home Page and navigation, uploading content, creating a syllabus, and copying content into other Canvas course spaces. The terms ELMS and Canvas will be use synonymously throughout this document. By the end of this workshop you will be able to:
• access and identify components of the ELMS Management Tool set (EMT), • identify components of the “User Dashboard”, • manage navigation menu items and explore “student view”, • create an Announcement and Syllabus entry, • upload content to the Files area, • customize the course Home Page and identify the process for “publishing” a
course for student access, • identify the steps required to Import content between Canvas course spaces, • edit your profile settings and manage your notification preferences, • locate the Conversation inbox and send a message
Course Spaces in Canvas
Canvas spaces are automatically created for all term-‐based courses when the University of Maryland Registrar releases courses to UMEG; this usually happens about three months before the start date of the next term. Instructors then have access to these “unpublished” spaces in Canvas.
ELMS Management Tools
The ELMS Management Tool (EMT) set is designed to help faculty and college-‐based ELMS administrators self-‐manage many of the tasks associated with ELMS. With the tools available at emt.umd.edu (or via the ELMS Management Tool link at the ELMS Home Page, elms.umd.edu), faculty can add designers to a course space, create separate spaces for each section of a multi-‐section course, modify the course name that appears in the Canvas course menu, submit grades to UMEG, and more.
Accessing ELMS
All users—teachers, students, teaching assistants, designers, etc.—access their Canvas courses from the ELMS Home Page at elms.umd.edu.

Division of IT ©University of Maryland 4
User Dashboard
Canvas provides a User Dashboard as the entry point for all of your courses. In the view below you can see all of the activity (e.g., alerts for discussion posts, announcements, assignment submissions) for all of your Canvas courses at a glance. The Dashboard additionally provides a list of “to do’s” (such as upcoming quizzes or assignments), as well as a list of upcoming, non-‐graded events (such as readings reminders).
The links across the top of the page provide a “global view” of assignments, grade activity and calendar entries for all courses in which you are teaching or enrolled. Assignments provides a link to specific assignments within course spaces with student submissions that require grading attention. Grades enables you to see the current cumulative score for a class as a whole and to access a “student interactions report” that provides a view of individual student cumulative scores and links to ungraded assignments, listed by student. (Student submissions are also accessible from within individual course spaces.) Calendar provides a global view of course-‐related assignment and activity due dates; it can also be populated with personal entries, as you will see in Activity 1 below .
You can also generate a feed from the Canvas calendar to any calendaring system that accepts iCal format (e.g., Outlook, Google). The somewhat complex steps can be viewed at: http://guides.instructure.com/s/2204/m/4152/l/54673-‐how-‐do-‐i-‐subscribe-‐to-‐the-‐calendar-‐feed-‐using-‐outlook

Division of IT ©University of Maryland 5
Course (or Course & Groups) is the most significant link on the global toolbar. It provides access to all courses and groups in which you have a role. You can “Customize” this list so that only the courses of the current term are immediately visible.
Activity 1 – Manage Personal Calendar:
1. Click on the Calendar link. 2. To create a personal entry on the global calendar, first select the
checkbox next to your name (and make sure the other checkboxes are not selected).
3. Click once on the date of the proposed activity. 4. Provide an entry title for the “event” and a time, if appropriate. 5. More options enable you to provide additional details about the event.
(Note: if you create a Calendar entry for a course with this tool, the entry will additionally be visible via the Syllabus tool in the course space itself.)
Settings, Notifications and Communication
Conversation (Inbox Tool)
The Inbox tool, available on the User Profile bar in the upper-‐right corner of the Canvas window, provides the means by which Canvas users can communicate with one another. Messages created with the Inbox tool are maintained in the Inbox, for ongoing recordkeeping. Messages can also be pushed out of Canvas to other communication devices, such as email or Facebook, depending upon the individual notification preferences of each user (see page 10).

Division of IT ©University of Maryland 6
The Conversations area is split into two frames. Incoming (new to you) and sent messages are listed in the left frame. New messages or responses to selected messages are composed in the New Message frame on the right.
Activity 2– Create a Message:
In Canvas you can only message people who are enrolled in your course spaces.
1. Click on the Inbox link. 2. Click in the New Message To: field. 3. Type a recipient’s name into the To: field, then select the correct name
from the resulting drop-‐down menu; or, you can select recipients by clicking the contact icon at the right.
a. Select the course your recipient belongs to using the drop-‐down menu. To select all contacts in a given category, check the small box to its left.
4. Type your message in the body of the message window. You can also attach files and record audio/video directly in the message. Once your message is finished, click the Send button.
User Profile
The “User Profile” (below) is located in the User Profile bar on the User Dashboard.
User
Message aggregator
User profile settings—affects all of your courses
Canvas Help Resources

Division of IT ©University of Maryland 7
The “User Profile” bar has other global information settings and tools that affect all courses. From here, you can edit your profile settings, configure your notification settings, and Logout of Canvas.
Editing your Profile
When you log in, your name is displayed on the User Profile bar; however, when using the “Student View,” (discussed in Activity 6, below) your name will change to “Test Student”. Your display name in this area, and other places in the course, can be changed by editing the Profile Settings, as you will see below. To edit your profile, click on your name on the User Profile bar. Next, click on the Edit Profile button to the right.
From this page, you can add your biography, link to personal or professional web pages, and define tools that can be used to contact you such as email, Skype, text messaging, and more. The name you add on this page will be your “display name” in all of your courses. This means that students and teaching staff will see this name in discussions, messages, and comments. You cannot add a picture from this page.

Division of IT ©University of Maryland 8
Contact Settings
In Canvas, there are many options for configuring your personal settings. Click on the Settings link on the User Profile bar. From here, you can configure your notification preferences, upload a profile picture, and more. In the column to the right, note that your default email address is your [email protected] email. To add other email contact methods, click on the Add Email Address link. You can also configure your profile settings to receive text messages or Facebook entries containing new announcements, emails and other
notifications. Click the Add Contact Method link.
Profile Picture
To add or change your profile picture, click on the grey avatar next to the page title.
To edit your name, time zone, language and birthday start by clicking the Edit Settings button in this Settings area (see illustration above). When you make changes to the Settings, they affect every course in which you have a role (instructor, TA, designer or student).

Division of IT ©University of Maryland 9
Activity 3 -‐ Add your Picture to Profile:
1. Click on the Settings link in the User Profile bar. 2. Click on the grey avatar next to your name. 3. To add a profile picture, click on the Upload a New Image link.
4. Click the Browse button and find the picture that you want to upload
from your local computer. Acceptable image formats include .png, .jpg and .gif. Once selected, the path will display in the window.
5. Click the Add File button. 6. Once uploaded, the photo will display with a black box around it. You can
select this photo or upload more images. To select a file, click on the Select Image button.
Note: to remove a profile image from Canvas, go to Files in the Profile menu and delete the file from the profile pictures folder in that location.
7. Complete your edits by clicking the Update Settings button.
Note: Students can change their display name and configure their own contact settings. Most important to you as an instructor is that this changes their name in Discussions, Messages, and comments. It will not change their directory id which will also be visible to you in the gradebook. For students who prefer not to use university email, encourage them to add another email and/or messaging account here.

Division of IT ©University of Maryland 10
Web Services
You can integrate various Web 2.0 services that you frequently use, such as Skype, Facebook, Linkedin, Twitter, Delicious, and Diigo, into your Canvas course. Select the services on the right that you wish to add. All registered services are listed on the left. Once selected and added to your notification preferences, you can identify which services to associate with specific notification preferences.
Configuring Your Notifications
Click on the Notifications link on the Navigation menu in Settings view. On this page, you can configure how frequently (asap, daily, weekly, not at all) you receive different course notifications. You can set up configurations for each email address text messaging number, or other social media device that you have entered in your profile.

Division of IT ©University of Maryland 11
(See http://guides.instructure.com/s/2204/m/4152/l/41434-‐what-‐do-‐each-‐of-‐the-‐notification-‐preferences-‐mean for an annotated list of how each notification alert is prompted.)
Browsing the New Course Environment
The Canvas environments and tools that we have discussed so far are not specific to one course space. The User Dashboard, Inbox, profile and notification settings all exist outside of course or group spaces in which you have a membership. To enter a course, hover over the Courses menu and select a course by clicking on its name in the list.
Once you click on a link to enter a course, you will see the course Home Page view.
Initially, you will view the course Communication Stream in the central content area, the course Navigation menu on the left, basic tools to add to or manipulate the Home Page content to the right, and a “Next Steps” wizard along the bottom of the screen. This is somewhat different from Blackboard in that the default “home page” view is not an Announcements page. Note that the course space is initially unavailable (unpublished) to students in order to allow time for development. While the notation indicates that “only teachers can see the course space until it is published,” individuals in a role of Teaching Assistant or Designer can also see and work in the course space before it is published. Students and Observers will not have access to the course until it is published.
The Next Steps wizard can serve as a guide through common steps for setting up a course, like importing content, creating assignments and adding calendar events. But, most often, you will set your own development path and you can close the Next Steps window by clicking on the Close box (X) in the upper right corner of the wizard window. You can reconstitute the Next Steps Wizard by clicking on the Course Setup Checklist button on the right side of the Home page.

Division of IT ©University of Maryland 12
Announcements
Announcements provide another means of communicating with your students about course activities or topics of interest. When you post an announcement it appears in the Communication Stream and students are notified via their preferred Notification preference (e.g., email, text message, Facebook). Canvas also puts a copy under the Announcements area (available from the Navigation menu) so students can respond to your announcement with comments and questions. The Announcements area is a specialized discussion area. Its main difference from Discussions is in purpose. Announcements serve a useful purpose by reminding students of tasks to do to stay on track, identifying resources, providing class-‐wide messages that include audio or video components, or that can be directed into a custom RSS feed. Discussions are meant to foster interactions between students in a debate-‐like or knowledge-‐building manner.
Activity 4 – Create an Announcement:
1. From the course home page, click on the New Announcement link on the right side of the Canvas window; or, click on the Announcements link in the Navigation menu.
2. Type in the topic field, e.g., Class Meets in New Location. 3. In the rich content editor (more on this tool later), type: We will be
meeting in Woods Hall room 1410 this week. Let me know if you need directions. Note that you can also attach a file to an Announcement.
4. Select the option(s) appropriate to your communication need. You can opt to delay posting and pick a date and time at which the Announcement will be posted. Recalling that an announcement becomes a post in the Announcements area, you can set criteria that restrict students’ ability to see other student responses to the announcement. You can also enable an RSS feed from an external source to the Announcement. This has rather detailed steps than can be viewed at: http://guides.instructure.com/s/2204/m/4152/l/50734-‐how-‐do-‐i-‐add-‐an-‐external-‐rss-‐feed-‐to-‐my-‐announcement
5. Click the Save button. 6. You then view the completed announcement in the Announcements area. 7. Click on the Announcements link in the Navigation menu. This enables you
and your students to view the Announcements list, which can be filtered (read vs. unread) and searched. To read an announcement, click on the announcement topic.
8. Click on Home in the Navigation menu and observe the appearance of the announcement in the Communication Stream.

Division of IT ©University of Maryland 13
Course Navigation
The Navigation menu on the left side of the page provides the means by which instructors and students access content and tools within the course space. The boldface menu links indicate that they are visible to student participants in the course. The grey links provide access to content and tools in the course that have not yet been released to students, but that the instructor, T.A. or designer may need to access for development purposes. The Settings link, at the bottom of the Navigation menu, leads to a toolset useful for managing these links.
To manage the links on the Navigation menu, click on the Navigation tab. Other workshops will provide strategies for determining how to design your course that will help to determine which links you will make available from the Navigation menu. The upper frame represents those links that will be visible to students and the bottom frame houses links that will not be visible to students. As you want to affect the visibility of a Navigation link, simply drag a menu item from one frame to the other.
Canvas vs. Blackboard
In Blackboard, instructors could manage the names of their links (e.g., change the default name Assignments to something else of their choosing, like Homework). Canvas navigation link names are unchangeable. Student feedback on the consistency this affords to those who may experience many course spaces is very positive.

Division of IT ©University of Maryland 14
Activity 5– Manage Course Navigation in Settings:
5. Click on the Settings link. 6. Click on the Navigation tab. 7. Select an item in the “viewable” course navigation list and drag it to the
“hide” list. 8. Click on the Save button. 9. Click on the Course Details, Sections and Users tabs to view the
information about your course that is available through these settings. Most of the information visible under these tabs is “read-‐only”.
Course Statistics
The Course Statistics link provides an overview of such things as quota usage (Files Storage tab), student log-‐in activity (Students tab), usage of Assignments posted in the course space (Assignments tab), and running totals for students and tasks within the course space (Totals tab).
Student View
Canvas enables you to experience your course as your students will experience it in “Student View”. The Student View link in Settings enables you to switch views. In Student View your name in the User Profile bar changes to “Test Student” and a bar across the bottom of the Canvas window indicates which view you are in and provides the means for leaving Student View. In this view you can navigate through content, turn in an assignment, take a quiz, and view grades (for the Test Student). You will return to “Teacher View” by clicking on the Leave Student View link. If, while acting in the role of student you take a quiz or post an assignment, the option to Reset Student will enable you to “erase” the contributions of the Test Student to the course space.

Division of IT ©University of Maryland 15
Activity 6 – Experience Course in Student View:
1. Click on the Student View link. 2. Observe the Navigation menu and click through the available menu
options. 3. Click on the Leave Student View link at the bottom of the Canvas
window.
Managing the Files Repository
The Files area is a repository for content; each course has its own Files area. Content that has been migrated from Blackboard has been moved to the Files areas of “master” course spaces whose course IDs will reflect the term and course name associated with the migrated data (e.g., 201201_UNIV100_dirid). These spaces were created to accommodate the migrated content and to provide a place to rebuild courses in Canvas. (Re)-‐building a course space entails linking files (docx, pdf, pptx, etc.) located in the Files area into the master course space itself. You can additionally upload files from your local computer to the Files area, either one at a time, or in bulk via a zipped file. In the Chrome, Firefox and Safari browsers you can also simply drag and drop files between your local computer and the Files area.
The file storage quota for Canvas course spaces is 5000 megabytes (5 gig), by default.
While an instructor can make the Files area itself visible to students from the Navigation menu, in most cases the Files area is just a workspace available to instructors and teaching assistants. Instructors make the Files content available in either the Modules or Pages areas, most frequently.

Division of IT ©University of Maryland 16
Canvas recognizes and enables you to upload and link a large variety of file formats. In addition to most word processor and presentation formats, Canvas accepts audio file formats that include Real Media (rm), Digital Audio (mp3), and Windows Media Audio (wma). In addition, the following video file formats are also acceptable: Flash Video (fl), Macromedia Flash (swf), Microsoft Media (asf), Apple Quicktime (mov), Digital Video formats (mpg, mpeg, avi, wav, m4v, mp4), Windows Media (wmv) and Multimedia Mobile Format (3gp).
Activity 7 – View and Manage Files Area:
1. Click on the Files link in your course Navigation menu. 2. Click on a folder in the folder list on the left side of the Files window to
view an expanded view of its contents in the file management (right side) of the window.
3. Click on the Add Folder link and type Test Folder in the folder name field.
4. Click on the Test Folder link to open the folder. 5. Click on the Add Files link at the top of the Test Folder content frame.
Upload a file from your local computer.
There are several management tools available for each file in the Files area. From left to right they are: Lock folder: this makes the folder or file unavailable to students (e.g., if you

Division of IT ©University of Maryland 17
linked the files in this folder in your course space they would not be visible to students). Move up/down: this enables you to move a file up or down through the list of files. Edit: this enables you to edit the name of the file (but not its format). Delete: this enables you to remove the file from the Files area.
Chrome, Firefox and Safari Users
An alternative method of uploading a file or group of files is to drag them from the local computer to the Files area. This feature cannot be used to drag folders of files into Canvas, however. To upload folders to Canvas you will use the Upload .zip File option.
Upload or Download a .zip File
The upload .zip file option enables you to upload multiple files at once.
To upload and unzip a .zip file into which multiple files and folders have been compressed, click the Import .zip file icon (green up arrow icon). Once you browse and upload the zipped file from your computer, the file will automatically unzip in the Files area. Files and folders will maintain the same structure in the Files area that they had when you compressed them into a zipped format.
Division of IT ©University of Maryland 18
You can reverse the process and download multiple files from the Files area to the local computer. To do so, make sure you are viewing the files and folders you want to download in the right-‐hand file content window. Click on the .zip Download icon (zipper icon). This initiates a process to “download folder contents” by compressing the files into a zip file at which point you will be prompted to download the archive file.
Preview Files
Another handy feature of the Files area is a link that enables you to preview files in a Scribd window. (Scribd is a rich document format similar to PDF built for the web. It allows Canvas to embed documents in the viewing window without necessitating a file download.) Supported file types include: doc, docx, ppt, pptx, xls, xlsx, pps, ppsx, pdf, ps, odt, odp, sxw, sxi, txt and rtf, as well as web-‐readable formats such as jpg, png, and gif.
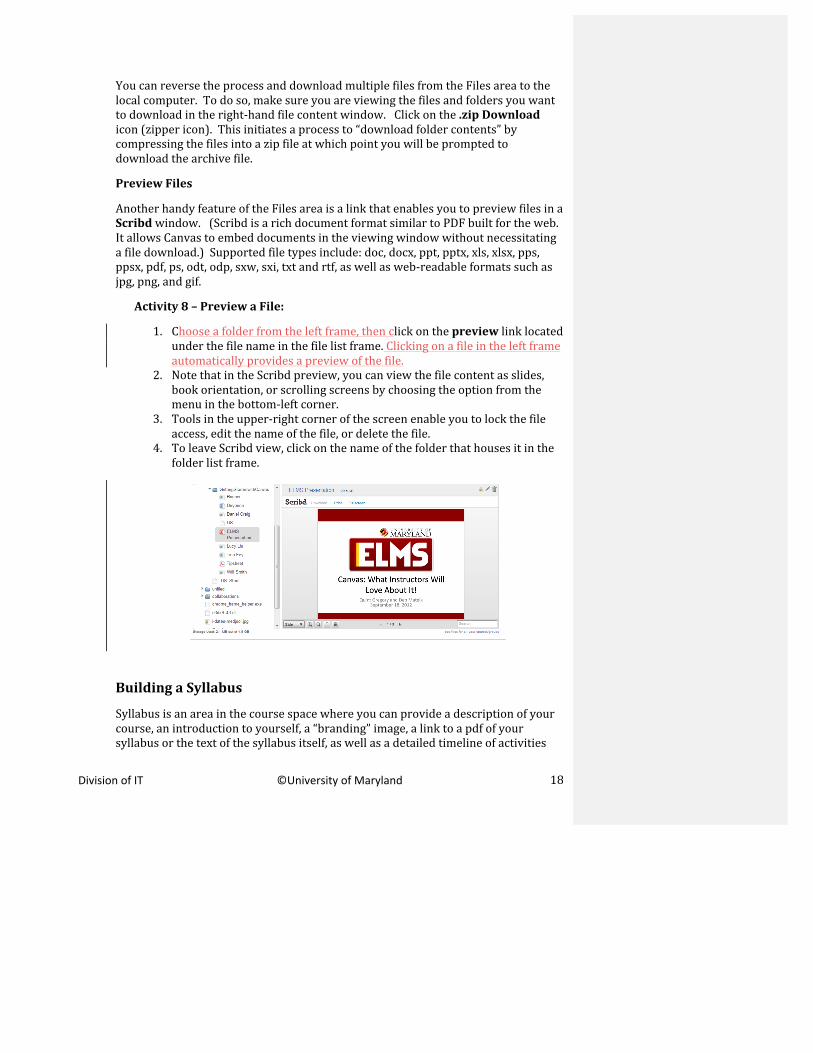
Activity 8 – Preview a File:
1. Choose a folder from the left frame, then click on the preview link located under the file name in the file list frame. Clicking on a file in the left frame automatically provides a preview of the file.
2. Note that in the Scribd preview, you can view the file content as slides, book orientation, or scrolling screens by choosing the option from the menu in the bottom-‐left corner.
3. Tools in the upper-‐right corner of the screen enable you to lock the file access, edit the name of the file, or delete the file.
4. To leave Scribd view, click on the name of the folder that houses it in the folder list frame.
Building a Syllabus
Syllabus is an area in the course space where you can provide a description of your course, an introduction to yourself, a “branding” image, a link to a pdf of your syllabus or the text of the syllabus itself, as well as a detailed timeline of activities

Division of IT ©University of Maryland 19
and assignments in the Syllabus table of events. The Syllabus area is split into two parts. The top half of the Syllabus is akin to a wiki page and can be customized with text and images. You can copy and paste content from a Word document into the “Rich Content Editor” or type directly into the RCE environment. The bottom half of the Syllabus is generated automatically based upon the items you create with either the Assignments tool or the Calendar tool. To edit the contents of this part of the Syllabus you must return to the tool in which the item was created. In addition, a course calendar and grading scheme section display information about course events and cumulative weighted grading totals based on assignment groups.
Edit Syllabus Description
To populate the Syllabus content area with text or images, click on the Edit Syllabus Description button in the frame to the right. You can type or copy/paste text into the Rich Content Editor (RCE). The RCE toolbar then enables you to format the content in the window.
From left to right the options include, boldface, italics, underline, font color, highlighting (or background) color, remove formatting, alignment options, bulleted text, outdent and indent, numbered list, create table, create hyperlink, remove hyperlink, embed image, insert math equation, record or upload media, select font size, select paragraph style. The Switch Views link above the toolbar enables you to view the RCE content in HTML mode.

Division of IT ©University of Maryland 20
Activity 9 – Rich Content Editor:
1. Click on the Edit Syllabus Description link. 2. Type your name into the RCE area. 3. Select the text and click on the Font Size selection menu and apply a size
of 5 (18pt), then select a color from the Font Color menu and click on the Center alignment button.
4. Press Enter, then click on the Embed Image button.
5. You have the option of providing a URL to an image on the Web, in which case you should also provide a 1-‐2 word description of the image in the Alternate Text: field. Or, you can click on the Search flickr link. This option enables you to provide a keyword in order to scan the copyright-‐free Creative Commons collection of images. Click on the Search flickr link.
6. Type the keyword teacher into the Search field. Scroll through the images. Select one image by clicking on it once. Note: you can resize the image once it is embedded in the RCE if you are accessing Canvas with Firefox or Safari; you cannot resize the image in Chrome.
Insert Content into the Page
It is also possible to link to other content or tool areas in your course or link to provide access to files or images using the options available under Insert Content into the Page. These options for Syllabus or Pages development are discussed in detail in the Creating and Managing Content workshop. In brief, Links enables you to create a hyperlink to another wiki page, a specific assignment or quiz or Discussion post from the Syllabus page. The Files option enables you to link to a file that currently exists in the Files area or to upload a new file and link to it. The Images option enables you to upload and embed an image or search flickr for an image to embed on the page.

Division of IT ©University of Maryland 21
Customize the Home Page
When designing your course in Canvas, it is best to totally forget how you had presented your materials in other learning management systems. There are features in Canvas that allow for greater flexibility in how students access course materials. One of these unique features is the Home Page. The Home Page, as the name implies, is the course entry point for students, and Canvas allows multiple options to configure its layout.
To be certain that you are on the Home Page, click on the Home link on the left Navigation menu. By default the Home Page displays the course Communication Stream, a sort of course-‐only version of the Canvas entry page. Click the Change Home Page Layout link in the upper-‐right hand corner of the page.
UnknownFormatted: Font:Cambria
Division of IT ©University of Maryland 22
The page changes and reveals a drop-‐down box of options you can choose for your Home Page:
• the Recent Activity Dashboard (default setting) • a Page I’ll Design Myself • the Course Modules/Sections • the Assignment List • the Assignments with Syllabus
After designing the assignments in your Canvas course, think about how you would like your students to access the information. Canvas recommends having fewer links on the Navigation menu (3-‐4 links), and using the Home Page to access course materials. Here is an overview of each of the Home Page options.
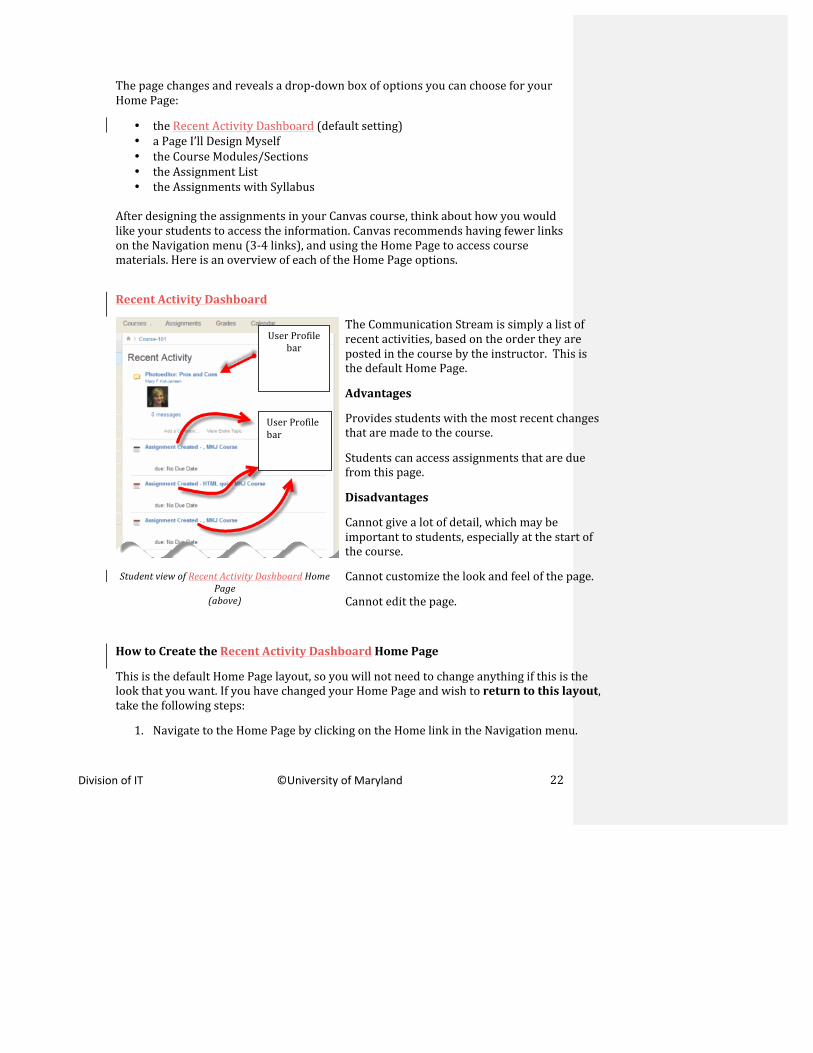
Recent Activity Dashboard
Student view of Recent Activity Dashboard Home
Page (above)
The Communication Stream is simply a list of recent activities, based on the order they are posted in the course by the instructor. This is the default Home Page.
Advantages
Provides students with the most recent changes that are made to the course.
Students can access assignments that are due from this page.
Disadvantages
Cannot give a lot of detail, which may be important to students, especially at the start of the course.
Cannot customize the look and feel of the page.
Cannot edit the page.
How to Create the Recent Activity Dashboard Home Page
This is the default Home Page layout, so you will not need to change anything if this is the look that you want. If you have changed your Home Page and wish to return to this layout, take the following steps:
1. Navigate to the Home Page by clicking on the Home link in the Navigation menu.
User Profile bar
User Profile bar

Division of IT ©University of Maryland 23
2. Click the Change Home Page Layout link in the upper right corner.
3. Click the Update Layout button at the bottom.
NOTE: To see the Recent Activity for the course from any Home Page style, click the See Course Stream link in the upper right corner next to Change Home Page Layout.
A Page I’ll Design Myself
Student view of a Page I’ll Design Myself Home Page (above)
You can design your own course Home Page and include whatever text, links, images or rich media you like. In this design, you can add a link to your syllabus or other parts of the course. You can give students more instruction on how to navigate through the course.
Advantages
Versatile in how the information is presented and the Home Page is formatted.
Can add links to areas of the course that you want students to access, in lieu of or in addition to access from the Navigation menu.
Disadvantages
Does not update automatically.
Activity 10 -‐ Design the Page Yourself:
This Home Page option allows you to have more control over the design of the page.
1. Navigate to Home.
2. Click the Change Home Page Layout link.
3. Select a Page I’ll Design Myself from the drop-‐down list.
User Profile bar
User Profile bar
User Profile bar
User Profile bar

Division of IT ©University of Maryland 24
4. Click the Update Layout button at the bottom.
5. To edit the blank page, click the Edit this Page button to the right.
6. A Rich Content Editor is displayed, as well as Page Tools to the right. You can format text, add tables, links, pictures, mathematical formulas and embed videos.
7. To add links within the course, use the Page Tools menu to the right. All of the images, files and content pages that you have added to the course will be available here. To add an image or link to a document, you must enter the url or upload it in this area.
Add a course banner (or any other image)
a. On the Page Tools navigation bar, select the Images tab. b. Select Upload New Image. c. Browse to find an image on your local computer. d. Choose a folder in your Files . e. Click the Upload button. f. Place your cursor where you want to place the image. g. Then double click the image to add it to the Home Page.
User Profile
User Profile bar
User Profile bar
User Profile bar
Mahrue � 5/14/13 2:01 PMComment [1]: User Profile bar

Division of IT ©University of Maryland 25
Adding a course link
a. Type text on the Home Page to describe the link (e.g., Start Here). b. Highlight the text. c. Go to the Links tab. d. Click on a page to add the link to the highlighted text.
8. If you want students to be notified when content has changed, click that button
at the bottom of the page.
9. Click the Save Changes button.
Note: Pages are great content organization tools and are discussed in greater detail in the Creating and Managing Content in Canvas workshop.
Course Modules/Sections
Student view of Course Modules/Sections
Home Page (above)
If you organize your course into modules or units, then you may wish to use the Modules page as the Home Page. Modules allow you to group the content and activities into smaller units either by theme, date, or performance criteria. Using performance criteria means that a student must complete prerequisites satisfactorily before moving on to the more advanced course material.
Advantages
Students directly access list of activities when they login.
Disadvantages
Only useful if you organize a course using a modularized structure.
Only a list, there are no other instructions for students.
This Home Page layout can only be executed when you have designed your course using the “Modules” format. Follow these steps:
1. Navigate to the Home Page.

Division of IT ©University of Maryland 26
2. Click the Change Home Page Layout link.
3. Select the Course Modules/Sections from the drop-‐down list.
4. Click the Update Layout button at the bottom.
NOTE: If you have not developed any modules, it will prompt you to do so next. To begin, select the blue Create a Module button. Note: Modules will be discussed in greater detail in the Creating and Managing Content in Canvas workshop.
Assignment List
Student view of Assignments Home Page
(above)
The Assignment view lists all of the assignments and quizzes in the course, with the most recent assignments at the top.
Advantages
Students directly access a list of all assignments in the course (assignments, quizzes, graded discussions, etc.), both past and future, with due dates when they login.
Always updated as assignments are added to the course.
Disadvantages
List is generally limited to assignments and quizzes. Discussions are only included if they are graded tasks.
Does not add information that may be helpful for the students, such as content themes.
This Home Page layout can only be used when you have added assignments, quizzes, or graded discussions to your course. To do so you would follow these steps:
1. From the Home Page click the Change Home Page Layout link.
2. Select the Assignment List from the drop-‐down list.
3. Click the Update Layout button at the bottom.
4. Only Assignments and Quizzes will be listed. If you would like Discussions added to the Home Page, you must create the Discussion as a graded assignment, even if it is a zero.

Division of IT ©University of Maryland 27
NOTE: As you add assignments to the course, this list will be updated automatically. More information about creating Assignments will be included in the Assignments and Assessments in Canvas workshop.
Assignments with Syllabus
Student view of the Assignments with Syllabus Home Page (above)
The Syllabus view lets you write a description of course expectations or introduce the course with links, images, etc., and then also displays a calendar view of all assignments and course events.
Advantages
The syllabus can give students more information about the course and the assignments.
Students directly access list of assignments with due dates when they login.
Assignments list is always up-‐to-‐date.
Disadvantages
Page can be rather long and unwieldy.
This Home Page combines the “Page I’ll Design Myself” and “Assignment List” styles.
Copy Course Materials from a Master Course Space
Each semester a term-‐based course shell is created for you automatically for each course that you are teaching. To develop this shell, you can create new course materials or you may wish to:
a. import materials from a master course space in Canvas. b. import content from a Canvas course space from previous semester.
In this workshop, we will review the steps to copy course materials from a Canvas master course or a course taught in a previous semester only. There are separate
User Profile bar
User Profile bar

Division of IT ©University of Maryland 28
instructions for importing course content from another LMS (Learning Management System).
To begin, navigate to the course space that has no content in it yet. Select the Course Setup Checklist button in the upper-‐right corner of the Home Page.
At the bottom of the page, a pop-‐up window called “Next Steps” will open. Click the Import Content link, which is the first selection on the left.
Import Wizard
The Import Content link opens the Import Wizard page. From this page, you can copy content from another Canvas course (a master course or a term-‐based course) or copy content from another system (such as Blackboard). Select the button Copy Content from another Canvas course.

Division of IT ©University of Maryland 29
There are 4 steps to import content from another Canvas course: 1. Select the course that
has the content that you wish to copy.
2. Select the content in that course that you wish to copy.
3. Adjust the dates before you copy the content (optional).
4. Click the “Import Course Content” button.
1. Select the course that has the content that you wish to copy. After clicking the Copy content from another Canvas course button, you must
select the course that contains the content that you wish to copy. You will only see the courses in which you have a role. If you are supposed to copy another instructor’s course, ask them to have you added to their course in a Designer role.
You can select the course in one of two ways. You can type in the name of the course using the “Search for Course” box, or you can find it using the drop-‐down list.
Once you find the course, and select it, confirm the name in the “Selected Course” field (see highlighted text). Click the Copy From this Course button to complete this step.

Division of IT ©University of Maryland 30
2. Select the content to copy. Decide whether you want to copy all of the content from the “host” course, or just
parts of it. If you decide to copy only parts of a course, you can return later and copy other pieces. In addition, you can copy pieces of several courses into your new course space by repeating these steps with each course.
To copy all of the content:
To copy everything in the original course, select the “Copy Everything from…” box.
To select parts of the content to copy: You can be very selective in the content you choose to import. You can import
content by tool or as an item(s) within the tool (e.g., a specific assignment). The following are the groups from which to choose:
• Settings • Assignments • Modules • Quizzes • Files • Wiki Pages • Discussions
Note: Some of these tools are interdependent. If you chose one tool you may
need to copy over another tool or items within another tool. For example, if you copy the Modules tool, you will also need to copy any content that is used in those Modules such as, assignments, quizzes, files, etc.

Division of IT ©University of Maryland 31
3. Adjust the dates before you copy the content (optional)
Next, you may or may not choose to import the date settings from the original course. Dates that are imported from the original course, will be adjusted for the new course by checking the “Adjust events and due dates” box and entering date ranges for both courses. If the day on which you teach the class changes, you can define day substitutions in the new course (ex: course meets M/W in Fall, and T/Th in Spring, change Mon content to Tue)
4. Click the Import Course Content button At the bottom of the page, to complete the copy action, click the Import Course
Content button.
You will be notified via email that your course has copied successfully with an
option to go back to the course to edit the content that you had imported.

Division of IT ©University of Maryland 32
Resetting the Course (or How to Fix-‐it When You Goof)
Did you import the wrong course? Did you import an entire course instead of just a section? Did you not adjust your dates? What can you do? In Canvas, the fix is easy. You can reset your course and start again with the push of a button.
To begin, select the Settings link on the Navigation menu. When you are in the Settings area, click the Reset Course Content button from the menu on the right side of the screen.
A pop-‐up window will review the risks of resetting the course. If you are satisfied with these consequences, click the Reset Course Content button. WARNING: Be certain that you are in the correct course before you click the button. This action will wipe out ALL of the content, quizzes and settings.
UnknownFormatted: Font:Cambria

Division of IT ©University of Maryland 33
Index Add Files, 16 Announcements, 11, 12 Assignment List, 26 Calendar, 4 Communication Stream, 11, 12, 21, 22 Conversations, 6 Copy Course Materials, 27 Course Navigation, 13 Course Setup Checklist, 28 Course Statistics, 14 Courses Menu, 11 Create a message, 5 Customized Home Page, 23 Drag and Drop Files, 17 ELMS Management Tool, 3 Embed Image, 20 File Formats, 16 File Storage Quota, 15 Files, 15 flickr, 20 Global View, 4 Help Bar, 5, 6 Home Page, 21, 22, 23
Import Content, 28 Manage Files, 16 Modules, 25 Navigation Menu, 3, 11, 13, 16 Next Steps Wizard, 11 Notification Preferences, 8, 10 Page Tools, 23 Preview Files, 18 Recent Activity Dashboard, 22 Reset Course Content, 32 Rich Content Editor, 19 Scribd, 18 Settings Link, 6, 14 Student View, 7, 14, 15 Syllabus, 3, 18, 19, 20, 27 Test Student, 14 User Dashboard, 3, 4, 6, 11 User Profile, 6, 7 Web 2.0 Services, 10 Zip File, 17