user manual - nord keyboards · ulations of traditional electromechanical keyboard instruments in a...
TRANSCRIPT

Nord ElEctro 5 UsEr MaNUal os v1.X | 1
User Manual
English
Nord Electro 5d 61Nord Electro 5d 73
Nord Electro 5HP 73
OS Version: 1.XEdition: E
Part No. 50434 Copyright Clavia DMI ABEdition: E

2 | Nord ElEctro 5 UsEr MaNUal os v1.X
CAUTION - ATTENTIONRISK OF ELECTRIC SHOCK
DO NOT OPENRISQUE DE SHOCK ELECTRIQUE
NE PAS OUVRIR
CAUTION: TO REDUCE THE RISK OF ELECTRIC SHOCK DO NOT REMOVE COVER (OR BACK).
NO USER SERVICEABLE PARTS INSIDE.REFER SERVICING TO QUALIFIED PERSONNEL.
ATTENTION:POUR EVITER LES RISQUES DE CHOC ELECTRIQUE, NE PAS ENLEVER LE COUVERCLE.
AUCUN ENTRETIEN DE PIECES INTERIEURES PAR L´USAGER. CONFIER L´ENTRETIEN AU PERSONNEL QUALIFE.
AVIS: POUR EVITER LES RISQUES D´INCIDENTE OU D´ELECTROCUTION, N´EXPOSEZ PAS CET ARTICLE A LA PLUIE OU L´HUMIDITET.
1) Read these instructions.
2) Keep these instructions.
3) Heed all warnings.
4) Follow all instructions.
5) Do not use this apparatus near water.
6) Clean only with dry cloth.
7) Do not block any ventilation openings. Install in accordance with the manufacturer’s instructions.
8) Do not install near any heat sources such as radiators, heat registers, stoves, or other apparatus (including amplifiers) that produce heat.
9) Do not defeat the safety purpose of the polarized or grounding-type plug. A polarized plug has two blades with one wider than the other. A grounding type plug has two blades and a third grounding prong. The wide blade or the third prong are provided for your safety. If the provided plug does not fit into your outlet, consult an electrician for replacement of the obsolete outlet.
10) Protect the power cord from being walked on or pinched particularly at plugs, convenience receptacles, and the point where they exit from the apparatus.
11) Only use attachments/accessories specified by the manu-facturer.
12) Use only with the cart, stand, tripod, bracket, or table specified by the manufacturer, or sold with the apparatus. When a cart is used, use caution when moving the cart/apparatus combination to avoid injury from tip-over.
13) Unplug this apparatus during lightning storms or when unused for long periods of time.
14) Refer all servicing to qualified service personnel. Servicing is required when the apparatus has been damaged in any way, such as power-supply cord or plug is damaged, liquid has been spilled or objects have fallen into the apparatus, the apparatus has been exposed to rain or moisture, does not operate nor-mally, or has been dropped.
The lightning flash with the arrowhead symbol within an equilateral triangle is intended to alert the user to the presence of uninsulated voltage within the products en-closure that may be of sufficient magnitude to constitute a risk of electric shock to persons.
Le symbole éclair avec le point de flèche à l´intérieur d´un triangle équilatéral est utilisé pour alerter l´utilisateur de la presence à l´intérieur du coffret de ”voltage dangereux” non isolé d´ampleur suffisante pour constituer un risque d`éléctrocution.
The exclamation mark within an equilateral triangle is intended to alert the user to the presence of important operating and maintenance (servicing) instructions in the literature accompanying the product.
Le point d´exclamation à l´intérieur d´un triangle équilatéral est employé pour alerter l´utilisateur de la présence d´instructions importantes pour le fonctionnement et l´entretien (service) dans le livret d´instructions accompagnant l´appareil.
Instructions pertaining to a risk of fire, electric shock or injury to persons.
IMPORTANT SAFETY INSTRUCTIONSSAVE THESE INSTRUCTIONS
Trademarks: The Nord logo is a trademark of Clavia DMI AB. All other trademarks mentioned in this publication are the properties of their respective holders.
Specifications and appearances are subject to change without notice. Copyright © Clavia DMI AB
No naked flame sources, such as lighted candles, should be placed on the apparatus;
Do not use the apparatus in tropical climates.
WARNING: To reduce the risk of fire or electric shock, do not expose this apparatus to rain or moisture.
The apparatus shall not be exposed to dripping or splashing and that no objects filled with liquids, such as vases, shall be placed on the apparatus.
The maims plug is used as the disconnect device and shall remain readily operable.
Il convient de ne pas placer sur l´appareil de sources de flammes nues, telles que des bougies allumées;
L´appareil n’est pas destiné á étre utilisé sous un climat tropical.
L´appareil ne doit pas étre exposé á des égouttements d´eau ou des éclaboussures et de plus qu´aucun objet rempli de liquide tel que des vases ne doit étre placé sur l´appareil.
Lorsque la prise du résau d’alimentation est utilisée comme dispositif de déconnexion, ce dispositif doit demeuré aisément accessible.
Warning - When using electric products, basic precautions should always be followed, including the following:
Additional Safety Information

Nord ElEctro 5 UsEr MaNUal os v1.X | 3
1. INtrodUctIoN
tHaNK YoU!thank you for purchasing the Nord Electro 5. our goal when developing the Nord Electro line of instruments has always been to offer the best em-ulations of traditional electromechanical keyboard instruments in a compact and lightweight package. With the Nord Electro 5 we have taken this several steps further by not only upgrading the existing sections but also adding a sample synthesizer section and making the Nord Electro 5 bi-tim-bral – a first for the Electro series. there are also new ways in which sounds can be layered and organized making the Nord Electro 5 one of the most versatile and player friendly instruments on the market today.
dIsclaIMErall trademarks and brand names mentioned in this manual are the property of their respective owners and not in any way affiliated or associated with clavia aB. the trademarks are only mentioned as a reference to certain sonic qualities or actions reproduced by Nord Electro 5.
taBlE oF coNtENts1. INtrodUctIoN ........................................................................ 3
thank you! ........................................................................................................3disclaimer ..........................................................................................................3
2. ovErvIEW ....................................................................................... 4
3. UsING tHE Nord ElEctro 5 .............................. 5
Parts .............................................................................................5Program .............................................................................................................5
storing and naming Programs ...........................................................................6
live Programs ...................................................................................................6
storing sounds to and from live Programs ...................................................6
organ ..................................................................................................................7
Preset 1 and 2 ...................................................................................................7
drWB live and drWB sync .............................................................................7
B3 .....................................................................................................................7
Percussion ....................................................................................................8B3+Bass ......................................................................................................8
Pipe ...................................................................................................................8
vX .....................................................................................................................8
Farf ....................................................................................................................8
Piano ....................................................................................................................8
long release ....................................................................................................8
string resonance ..............................................................................................9
Mono.................................................................................................................9
Kbd touch .........................................................................................................9
Nord Piano library size comparison chart..........................................................9
sample synth ..................................................................................................9
dynamics ..........................................................................................................9
Filter vel .............................................................................................................9
attack, sustain and decay/release ...................................................................9
Effects ...............................................................................................................10
Effect 1 ............................................................................................................10
Effect 2 ............................................................................................................10
spkr/comp .....................................................................................................10
the rotary effect ........................................................................................10delay ...............................................................................................................10
EQ ...................................................................................................................11
reverb ............................................................................................................11
set list Mode ...............................................................................................11
selecting Programs for a song ........................................................................11
storing songs and set lists ............................................................................12
storing Program changes from set list mode .................................................12
list view ...........................................................................................................12
Programs and set lists ...................................................................................13
Piano ...............................................................................................................13
sample synth ..................................................................................................13
organize ..........................................................................................................13
4. MIdI .........................................................................................................14
scenario 1: Nord Electro 5 as controller..........................................14
scenario 2: Nord Electro 5 sending MIdI on Part Upper in KB split mode ...............................................................................................14
scenario 3: Nord Electro 5 receiving MIdI on Part Upper in MIdI Upper receive mode .....................................................................15
scenario 4: Nord Electro 5 with a sequencer ...............................15
5. MENUs ...............................................................................................16
system ..............................................................................................................16
MIdI ....................................................................................................................16
sound ................................................................................................................16
6. Nord soUNd MaNaGEr ...........................................17
system requirements .............................................................................17
Installation .......................................................................................................17
overview ..........................................................................................................17
download and transfer sounds and samples ...............................17
downloading Piano sounds .............................................................................18
downloading samples for the sample synth ....................................................18
deleting sounds and samples ..........................................................................18
substituting sounds and samples ....................................................................18
the organize function......................................................................................18
set lists and Nord sound Manager .................................................................18
Backing up and restoring your Nord Electro 5 .............................19
sound Up and sound down ............................................................................19
Bundle Up and Bundle down ..........................................................................19
Full Backup and restore .................................................................................19
I aPPENdIX: coNNEctIoNs ...........................................20
audio connections .....................................................................................20
Headphones ...................................................................................................20
left and right out ...........................................................................................20
Monitor In ........................................................................................................20
MIdI connections........................................................................................20
MIdI In ............................................................................................................20
MIdI out .........................................................................................................20
UsB connection ..........................................................................................20
Pedal connections .....................................................................................20
sustain pedal ..................................................................................................20
rotor Pedal .....................................................................................................20
control Pedal ..................................................................................................20
II aPPENdIX: MIdI coNtrollEr lIst ................21
III INdEX ....................................................................................................22

4 | Nord ElEctro 5 UsEr MaNUal os v1.X
2. ovErvIEW
above all, the Nord Electro 5 is a player’s instrument, with accessible front panel controls for virtually all performance functions.
the front panel of the NE5 has five main areas: organ, Piano, Program, sample synth and Ef-fects, each of which is discussed in detail in this manual.
Most continuous parameters, such as the master volume level are adjusted using standard knobs. You will also find endless knobs. these are used for browsing Programs, scrolling in lists etc. some knobs serve double purposes, depending on what mode you are in. In these cases the alternate functions are written out separated by a ”/”, such as in PROG/MENU.
a parameter value can be different from the knob’s physical position when you load a Program. as soon as you start turning the knob however, the value will snap to the knob’s physical posi-tion. as adjustments are made, the value of the parameter will also be shown on the large olEd display.
M Pressing and holding the SHIFT button while turning any knob will cause that parameter’s current value to be displayed without changing.
Buttons are used for turning functions on and off and switching between different settings. Many buttons serve multiple purposes, in which case a second function will be described under the button, and is accessed by pressing SHIFT.
on the 5d models (61 and 73) real physical Drawbars are used for adjustment of organ settings. the 5HP models instead have buttons and lEds, sometimes referred to as digital drawbars, which serve the same purpose.
the LED lights on the panel will most commonly be either lit with a fixed light, when their asso-ciated functions are active or non-lit when inactive. In some scenarios blinking lEds are used. For example, blinking Menu lEds indicate that the associated menu is in focus, and the sound source selectors for the two Parts will blink at a slow rate if the same sound source is selected for both of them.
Endless knob
standard knob
digital drawbar (5HP model)
Physical drawbar (5d models)

3. USING THE NORD ELECTRO 5 | 5
PARTS
The Nord Electro 5 is a bi-timbral instrument, meaning that it allows you to play two separate sounds simultaneously. These sound sources are referred to as PART LOWER and PART UPPER. For each Part you can choose from one of the three sound engines:
• The Organ Model
• The Piano Engine
• The Sample Synth
Switch between the three sound engines by using SELECT, or optionally by double-clicking theON OFF button. A single click will turn the respective Part on or off. The two Parts can be blendedin any way you choose by turning the PART MIX knob. In KB SPLIT mode the keyboard is dividedin two, with Part Lower to the left and Part Upper to the right. The split point can be adjusted bypressing the KB SPLIT button while turning the VALUE dial to select from six available split points:C3, F3, C4, F4, C5 and F5. Green LEDs are provided across the keyboard to indicate which splitpoint is active.
M It is also possible to use KB SPLIT to allow PART UPPER to be addressed by an external controller, or to send MIDI only from the upper half of the keyboard. These features require that an Upper Split channel is defined in the MIDI menu. You can read more about possible MIDI setups in the MIDI chapter on page 15.
The OCTAVE SHIFT buttons transpose their respective Parts in octave intervals. The number of octaves available for each Part to be transposed up or down depends on whether you are in KB SPLIT mode or not, designed to always give you access to the entire playable range for both Parts. The SUSTPED function will activate the sustain pedal for that Part, while CTRLPED turns on or offthe control pedal as volume functionality.
The TRANSPOSE function, activated by a single press of the button, will allow the keyboard to be transposed +/- 6 semitones. Pressing and holding the TRANSPOSE button while operating the VALUE dial adjusts the amount of transposition.
PROGRAM
A Program contains all the settings for all of the available parameters, including sound engines and sound processing effects, for both Parts regardless of whether both Parts are active within the Program. Output volume of each Program is controlled using the GAIN knob. This value is also stored within the Program, allowing adjustment of relative volumes between Programs.
The Nord Electro 5 can store up to 400 user Programs organized in eight banks holding 50 Pro-grams each. To scroll through your Programs simply turn the PROG dial.
Program names, along with Bank and Program numbers (separated by a colon), are shown in the display when in Program Mode. The lower half of the display contains small icons representative of the three available sound engines. Current drawbar positions are shown for the Organ model, while the names of the loaded sounds are displayed for the Piano and Sample Synth engines. An asterisk will appear to the right of the program number if/when changes are made to a Program. Note that these changes will be lost upon changing to another Program unless a STORE opera-tion is performed first.
3. USING THE NORD ELECTRO 5
6 | NORD ELECTRO 5 USER MANUAL OS v1.X
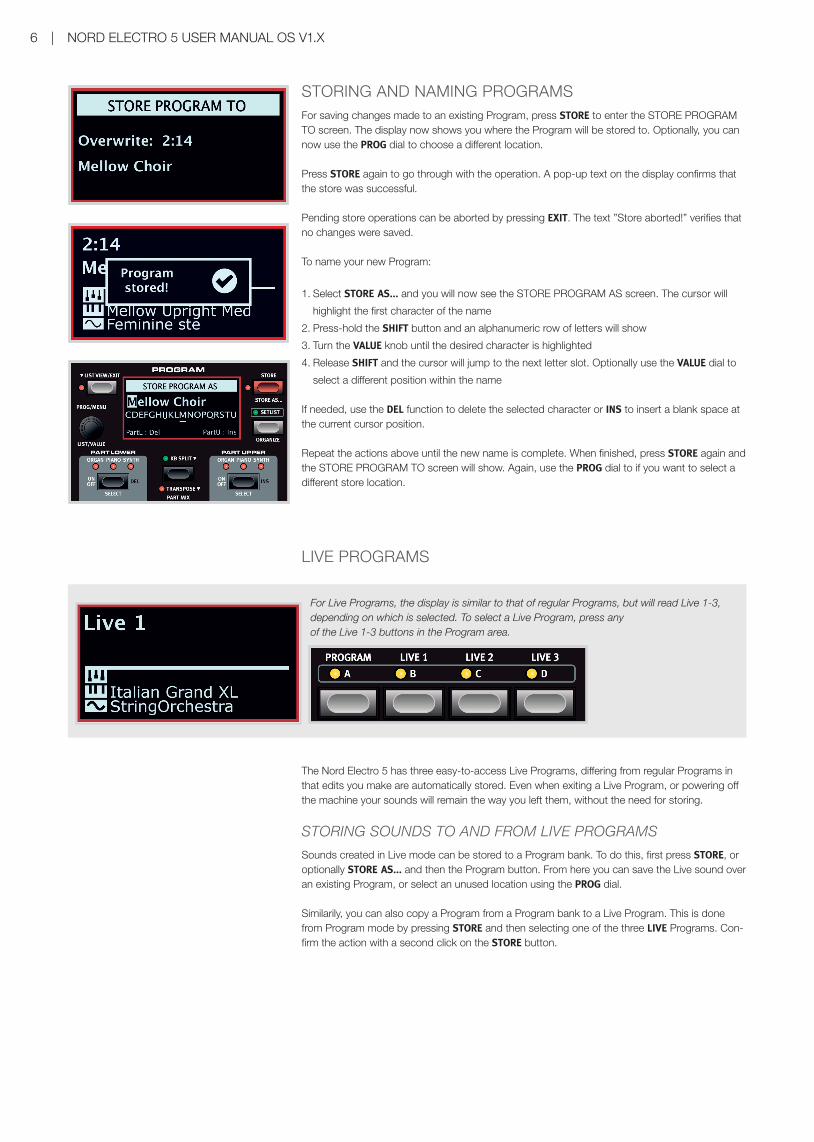
STORING AND NAMING PROGRAMSFor saving changes made to an existing Program, press STORE to enter the STORE PROGRAM TO screen. The display now shows you where the Program will be stored to. Optionally, you can now use the PROG dial to choose a different location.
Press STORE again to go through with the operation. A pop-up text on the display confirms that the store was successful.
Pending store operations can be aborted by pressing EXIT. The text ”Store aborted!” verifies that no changes were saved.
To name your new Program:
1. Select STORE AS... and you will now see the STORE PROGRAM AS screen. The cursor will
highlight the first character of the name
2. Press-hold the SHIFT button and an alphanumeric row of letters will show
3. Turn the VALUE knob until the desired character is highlighted
4. Release SHIFT and the cursor will jump to the next letter slot. Optionally use the VALUE dial to
select a different position within the name
If needed, use the DEL function to delete the selected character or INS to insert a blank space at the current cursor position.
Repeat the actions above until the new name is complete. When finished, press STORE again and the STORE PROGRAM TO screen will show. Again, use the PROG dial to if you want to select a different store location.
LIvE PROGRAMS
The Nord Electro 5 has three easy-to-access Live Programs, differing from regular Programs in that edits you make are automatically stored. Even when exiting a Live Program, or powering off the machine your sounds will remain the way you left them, without the need for storing.
STORING SOUNDS TO AND FROM LIVE PROGRAMS
Sounds created in Live mode can be stored to a Program bank. To do this, first press STORE, or optionally STORE AS... and then the Program button. From here you can save the Live sound over an existing Program, or select an unused location using the PROG dial.
Similarily, you can also copy a Program from a Program bank to a Live Program. This is done from Program mode by pressing STORE and then selecting one of the three LIVE Programs. Con-firm the action with a second click on the STORE button.
For Live Programs, the display is similar to that of regular Programs, but will read Live 1-3, depending on which is selected. To select a Live Program, press any of the Live 1-3 buttons in the Program area.

3. USING THE NORD ELECTRO 5 | 7
ORGAN
The Organ model faithfully reproduces the tonal characteristics of both tone wheel and transistor organs, with a vibrant Principal Pipe organ simulation added to complete the sonic palette. Alter-ing the sound within the Organ section is primarily done through the use of DRAWBARS, whose settings are stored together with your Program.
PRESET 1 AND 2For each Program the Organ model can hold two different drawbar settings in its memory, graph-ically visible in the display, selected by pressing PRESET 1 or PRESET 2 respectively. Additionally, vibrato/Chorus and Percussion can be turned on or off with each Preset.
DRWB LIvE AND DRWB SYNCThe DRWB LIVE option can be used if you would like a particular Program to always use the actu-al positions of the drawbars. The DRWB SYNC command is used for instantly applying the current drawbar postitions to the active organ preset.
M These options are only present on and relevant to the Nord Electro 5D models.
B3Tone wheel organs use notched steel disks - tone wheels - to produce sine waves, generated as a wheel rotates at its designated speed close to a corresponding electromagnetical pick-up. The generated tone, whose pitch depends on the number of notches of that particular disk, is then transformed and amplified, either through the use of a built-in speaker system or through an external cabinet depending on the organ model. The details of this construction and all other aspects of the original design - including its imperfections - are very closely simulated by the B3 model of the Nord Electro 5.
The nine drawbars of the Nord Electro 5 correspond to the available registers on the original B3 model. These are in turn named according to the approximate pipe lengths emulated by its tone wheels. These ”pipe lengths”, 16’ – 1’ are printed at the bottom of the drawbar section. The 8’ drawbar is sometimes referred to as the fundamental, being the root of the overtone series that form the basis for the drawbar selections and the B3 sound.
The vibrato and Chorus effects of the B3 model use a simulation of the original rotating scanner based design. Both effects have three intensities to choose from, v1-v3 and C1-C3 respectively.

8 | NORD ELECTRO 5 USER MANUAL OS v1.X
PERCUSSION
The harmonic percussion feature is available in B3 mode. When switched on, an attack transient is added to the organ tone giving it a more percussive character. The controls within this section let you choose between second or third harmonics, slow or fast decay and soft or hard percus-sion levels.
B3+BASS
One of the new features added to the Nord Electro 5 is the B3+BASS mode, which will give you the traditional B3 Bass tone wheels - 16’ and 8’ - in the left hand and a full B3 in the right. To en-able this feature, select Organ for both parts and enable KB Split. In non-split mode the B3+Bass setting will behave as a normal B3.
M The SOUND menu is home to some additional settings, relevant to the various features of the B3 model. See “Sound” on page 16 for details.
PIPEAnother new addition is the PIPE organ model which uses physical modelling to produce a versa-tile and carefully tuned principal pipe section. Its pipe lengths match those of the B3 tone wheel markings, also ranging from 16’ to 1’.
vXThe tonal controls for the VX transistor organ model range from 16’ to IV, including the funda-mental and its octaves, as well as various combinations of harmonics. Additionally, there is a drawbar for adjusting the sound character between a softer and a brighter (less filtered) mode represented by the sine and sawtooth waveforms.
The vX organ has three vibrato modes to choose from - v1-v3 - each increasing its rate and inten-sity.
FARFThe FARF model is based on another easy-to-recognize transistor organ and has its drawbars labeled after the original Bass 16 – 2 2/3 tabs. In Farf mode the drawbars are configured as on/off switches in order to match the original design.
The vibrato/Chorus options for the Farf model consist of four different settings, v1-v2 and C2-C3. In this case all positions represent variations on the original vibrato model.
PIANOThe Piano engine has a six-part type selector, each type containing a range of individual pianos and keyboard instruments, accessible with the selector below the numeric MODEL display. The Program area display will always show you the name of the currently loaded Piano sound.
From www.nordkeyboards.com you can download any number of piano sounds you like - in ad-dition to the ones that come pre-installed. Nord Piano Library sounds come in four different sizes, letting you choose which range of features you want for each piano sound (see table below). The internal memory of the Nord Electro 5 can hold up to 1 GB worth of piano sounds.
M Refer to the Nord Sound Manager section for details on downloading and transferring sounds.
LONG RELEASEThe first option of the ACOUSTICS section is LONG RELEASE, which adds a slightly longer release to acoustic and electric pianos. This can for instance be useful for acheiving a more legato char-acter in your playing.

3. USING THE NORD ELECTRO 5 | 9
STRING RESONANCEFor sounds that support this feature STRING RES can be activated. When active, notes that you play also affect other ”strings” within the loaded piano sound, making them resonate sympatheti-cally with the played note, just like with a real piano.
MONOIn MONO mode all stereo sampled pianos will be played back in mono. The mono versions of our piano sounds are specially designed to provide the player with optimal sound and playing experi-ence, even in mono.
KBD TOUCHHow a piano sound responds to keyboard touch can be adjusted according to what fits your playing style, or the context which you are performing in. With higher KBD TOUCH settings, less force is required to trigger high velocity levels and vice versa.
NORD PIANO LIBRARY SIZE COMPARISON CHART
S M L XL
Stereo sampled 3 3 3 3
Detailed velocity mapping 3 3 3 3
String resonance for middle region of the range 3
String resonance for entire range 3 3
Fully mapped keyboard 3
SAMPLE SYNTHThe Sample Synth is a powerful addition to the Nord Electro 5’s Organs and Piano sections. The internal memory can hold up to 256 MB of samples.The knob below the SAMPLE display is used to scroll through the available samples. In places 99-159 within the list, samples are displayed using the numbering A0-F9.
New samples can be downloaded from www.nordkeyboards.com or you could create your own samples using the Nord Sample Editor, also available from our website.
M See the Nord Sound Manager section for details on downloading and transferring sounds.
DYNAMICSWith the DYNAMICS function it is possible to select four different modes of velocity response. If this funcion is deactivated, samples will always play back at full velocity. When active, the three different settings will give you increasing degrees of dynamic range.
FILTER vELWith FILTER VEL a low pass filter is applied to the Sample Synth, which reacts to the velocity with which a note is played. Generally, this gives the sound a more dampened quality with low input velocities and a brighter character with higher velocity.
ATTACK, SUSTAIN AND DECAY/RELEASEAnother useful feature of the Sample Synth is the envelope section. With the ATTACK knob you set the time it takes for the sample to reach its full level, whereas DECAY/RELEASE will let you adjust how quickly the sample fades after having been triggered. At 12 o’clock the sample is in SUSTAIN mode - meaning that a (looped) sample will sound as long as the key is pressed. Set-tings past 12 o’clock determine how long the sample sounds after the key has been released.
PERCUSSION
The harmonic percussion feature is available in B3 mode. When switched on, an attack transient is added to the organ tone giving it a more percussive character. The controls within this section let you choose between second or third harmonics, slow or fast decay and soft or hard percus-sion levels.
B3+BASS
One of the new features added to the Nord Electro 5 is the B3+BASS mode, which will give you the traditional B3 Bass tone wheels - 16’ and 8’ - in the left hand and a full B3 in the right. To en-able this feature, select Organ for both parts and enable KB Split. In non-split mode the B3+Bass setting will behave as a normal B3.
M The SOUND menu is home to some additional settings, relevant to the various features of the B3 model. See “Sound” on page 16 for details.
PIPEAnother new addition is the PIPE organ model which uses physical modelling to produce a versa-tile and carefully tuned principal pipe section. Its pipe lengths match those of the B3 tone wheel markings, also ranging from 16’ to 1’.
vXThe tonal controls for the VX transistor organ model range from 16’ to IV, including the funda-mental and its octaves, as well as various combinations of harmonics. Additionally, there is a drawbar for adjusting the sound character between a softer and a brighter (less filtered) mode represented by the sine and sawtooth waveforms.
The vX organ has three vibrato modes to choose from - v1-v3 - each increasing its rate and inten-sity.
FARFThe FARF model is based on another easy-to-recognize transistor organ and has its drawbars labeled after the original Bass 16 – 2 2/3 tabs. In Farf mode the drawbars are configured as on/off switches in order to match the original design.
The vibrato/Chorus options for the Farf model consist of four different settings, v1-v2 and C2-C3. In this case all positions represent variations on the original vibrato model.
PIANOThe Piano engine has a six-part type selector, each type containing a range of individual pianos and keyboard instruments, accessible with the selector below the numeric MODEL display. The Program area display will always show you the name of the currently loaded Piano sound.
From www.nordkeyboards.com you can download any number of piano sounds you like - in ad-dition to the ones that come pre-installed. Nord Piano Library sounds come in four different sizes, letting you choose which range of features you want for each piano sound (see table below). The internal memory of the Nord Electro 5 can hold up to 1 GB worth of piano sounds.
M Refer to the Nord Sound Manager section for details on downloading and transferring sounds.
LONG RELEASEThe first option of the ACOUSTICS section is LONG RELEASE, which adds a slightly longer release to acoustic and electric pianos. This can for instance be useful for acheiving a more legato char-acter in your playing.
10 | NORD ELECTRO 5 USER MANUAL OS v1.X
EFFECTSThe Effects section consists of four different insert effect units capable of processing the sounds of either Part Lower or Upper. This section also includes an Equalizer, which can be used to process either or both Parts, and a global Reverb effect. Each unit, apart from the reverb has a PART SELECT control which can be set to LO (Part Lower), UP (Part Upper) or be inactivated which will bypass the effect.
M In general the effects are applied in the order in which they appear on the panel, but there are some exceptions. For example, the Pan effect of the Effect 1 section is placed after the Spkr/Comp effects (excluding the Rotary), in order for it to be as usable as possible.
EFFECT 1Effect 1 offers Tremolo, Pan, Wah and Ring Modulator effects. The CTRL PED function lets you control any of these using a Control Pedal. Try using the pedal together with the Wah, for some realistic Wah Wah playing or with a Pan effect to gain some real time control of the stereo imaging.
EFFECT 2Effect 2 gives you a selection of modulation effects, including two types of Phaser, Flanger, two Chorus types and a new Vibe effect. This effects section also has an additional DEEP mode available, which will give all effects a more pronounced character.
SPKR/COMPThe Spkr/Comp section contains four different amplifier and cabinet models: Small, JC, Twin and Rotary. There is also a Drive (tube distortion) and a Comp (compressor) effect, the lat-ter being usable for controlling the dynamic range of a sound. The knob controls the DRIVE amount, either of the tube distortion or the selected amp model, or the compression amount when in COMP mode.
THE ROTARY EFFECT
The Rotary speaker effect of the Nord Electro 5 is modeled after a Leslie 122 and can be controlled in a number of different manners. The ROTARY SPEED switch of the Organ sec-tion toggles between FAST and SLOW rotation speeds, and in STOP MODE between fast or stopped rotors. Rotary Speed can also be controlled by attaching a pedal switch, sustain pedal or the optional Nord Half Moon switch to the Rotor Pedal jack.
When both Part Lower and Part Upper are set to Organ, and Rotary is selected, the Spkr/Comp effect is global.
M Within the Rotary section of the SOUND menu you can make some more advanced adjustments to the behaviour of the Rotary speaker. See “Sound” on page 16 for details.
DELAYThe stereo Delay effect features controls for adjusting the DRY/WET signal mix, a selection of four different FEEDBACK intensity levels and a TEMPO button.
TAP the Tempo button repeatedly to enter a tempo, which will show up briefly as a BPM value on the display. Delay tempo can also be SET by pressing down on the Tempo button while turning the VALUE dial.
When Feedback is deactivated, only the initial delay tap will sound. When active, the lowest setting gives you a small number of repeats while the highest gives you a very long feedback tail. Use the Dry/Wet mix control to find the right balance between the unprocessed and processed signals.
There is also an optional PING PONG mode in which the delay repeats are alternated between the left and right channels.
3. USING THE NORD ELECTRO 5 | 11
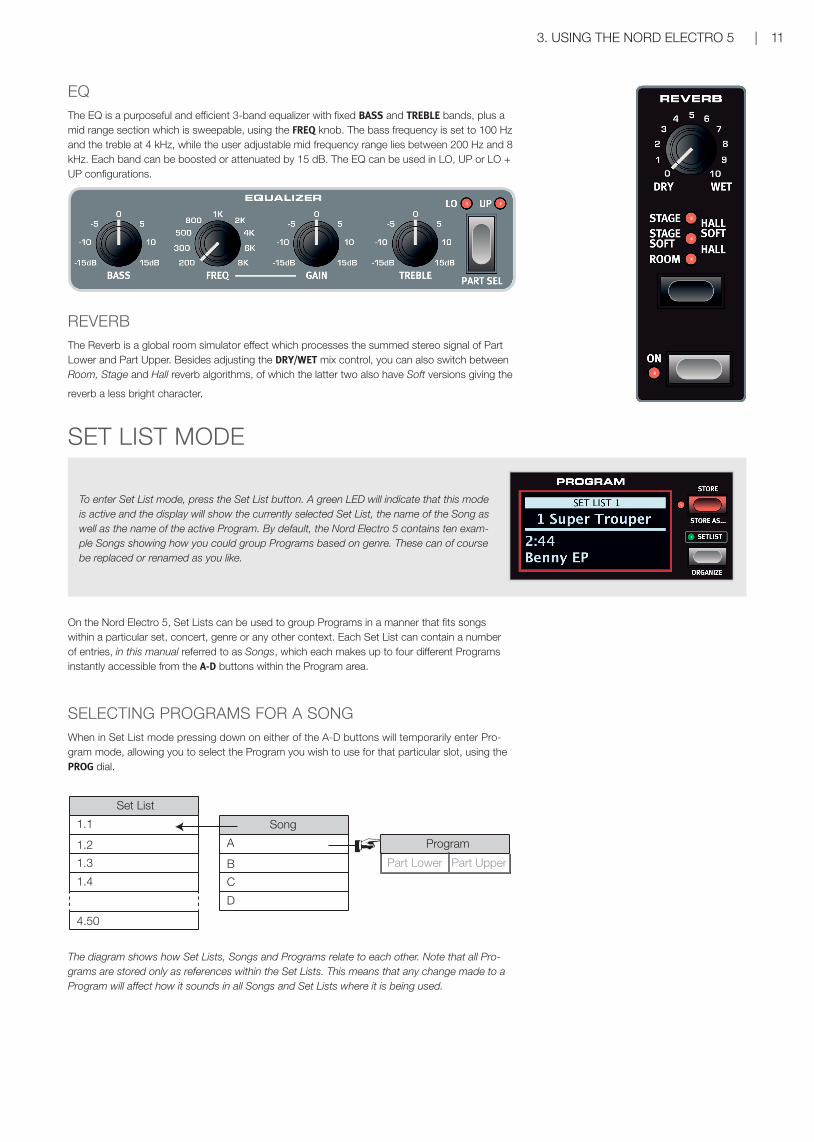
EQThe EQ is a purposeful and efficient 3-band equalizer with fixed BASS and TREBLE bands, plus a mid range section which is sweepable, using the FREQ knob. The bass frequency is set to 100 Hz and the treble at 4 kHz, while the user adjustable mid frequency range lies between 200 Hz and 8 kHz. Each band can be boosted or attenuated by 15 dB. The EQ can be used in LO, UP or LO + UP configurations.
REvERBThe Reverb is a global room simulator effect which processes the summed stereo signal of Part Lower and Part Upper. Besides adjusting the DRY/WET mix control, you can also switch between Room, Stage and Hall reverb algorithms, of which the latter two also have Soft versions giving the
reverb a less bright character.
SET LIST MODE
To enter Set List mode, press the Set List button. A green LED will indicate that this mode is active and the display will show the currently selected Set List, the name of the Song as well as the name of the active Program. By default, the Nord Electro 5 contains ten exam-ple Songs showing how you could group Programs based on genre. These can of course be replaced or renamed as you like.
On the Nord Electro 5, Set Lists can be used to group Programs in a manner that fits songs within a particular set, concert, genre or any other context. Each Set List can contain a number of entries, in this manual referred to as Songs, which each makes up to four different Programs instantly accessible from the A-D buttons within the Program area.
SELECTING PROGRAMS FOR A SONGWhen in Set List mode pressing down on either of the A-D buttons will temporarily enter Pro-gram mode, allowing you to select the Program you wish to use for that particular slot, using the PROG dial.
set list
1.1
1.2
1.3
1.4
4.50
song
a
B
c
d
Program
Part lower Part Upper
The diagram shows how Set Lists, Songs and Programs relate to each other. Note that all Pro-grams are stored only as references within the Set Lists. This means that any change made to a Program will affect how it sounds in all Songs and Set Lists where it is being used.

12 | NORD ELECTRO 5 USER MANUAL OS v1.X
STORING SONGS AND SET LISTS
Set List entries are stored in much the same way in which you would store a Program. When you have made the selection of Programs you want to use within a particular Song, follow the steps below:
1. Select STORE AS... and you will now see the STORE AS screen. The cursor will highlight the
first character of the name
2. Press-hold the SHIFT button and an alphanumeric row of letters will show
3. Turn the PROG/MENU knob until the desired character is highlighted
4. Release SHIFT and the cursor will jump to the next letter slot. Optionally use the VALUE dial to
select a different position within the name
Optionally, use the DEL function to delete the selected character or INS to insert a blank space at the current cursor position.
Repeat the actions above until the name of your Song is complete. When finished, press STORE again and the STORE TO screen will show. Turn the PROG dial for selecting a different store loca-tion.
To save changes made to an existing Song, simply press STORE to enter the STORE TO screen.
STORING PROGRAM CHANGES FROM SET LIST MODEYou also have the option to store an edited Program from within Set List mode. Simply press down on the A-D button corresponding to the Program you want to store, and from there pro-cede as usual when storing a Program (see “Storing and naming Programs” on page 6).
LIST vIEW
On the Nord Electro 5, a new List view mode enables easy browsing and navigation of Pro-grams, Set Lists, Piano sounds and Sample Synth samples.

3. USING THE NORD ELECTRO 5 | 13
PROGRAMS AND SET LISTSTo scroll through your Programs or Set List entries, turn the LIST dial while pressing down on the LIST VIEW button.
PIANOUse the LIST VIEW control within the Piano section, while pressing down on LIST VIEW in the Program Area to see a list of your piano sounds. Turn the LIST dial to scroll up or down the list. The sounds can also be stepped through by using the six part type selector and model controls of the Piano section.
SAMPLE SYNTHTo see a list of all available samples, press down on LIST VIEW in the Program area while turning the LIST VIEW knob of the Sample Synth section. The top part of the display will show the numeric list location of the selected sample.
To return from List view, simply press EXIT and you will be back to your previous Program or Set List screen.
ORGANIZE
With the ORGANIZE function, Programs and Songs can easily be moved to another position within the same or a different Bank.
The Organize command can be used to take you directly to List view’s organize mode from a Program or Song in a Set List, or be accessed the same way when already in List view. Use the LIST dial to move the current selection - indicated by two arrows - up or down the list.
M When browsing the sample list, press down on SHIFT and LIST VIEW to see additional in-formation about the current sample, including its size and author.

14 | Nord ElEctro 5 UsEr MaNUal os v1.X
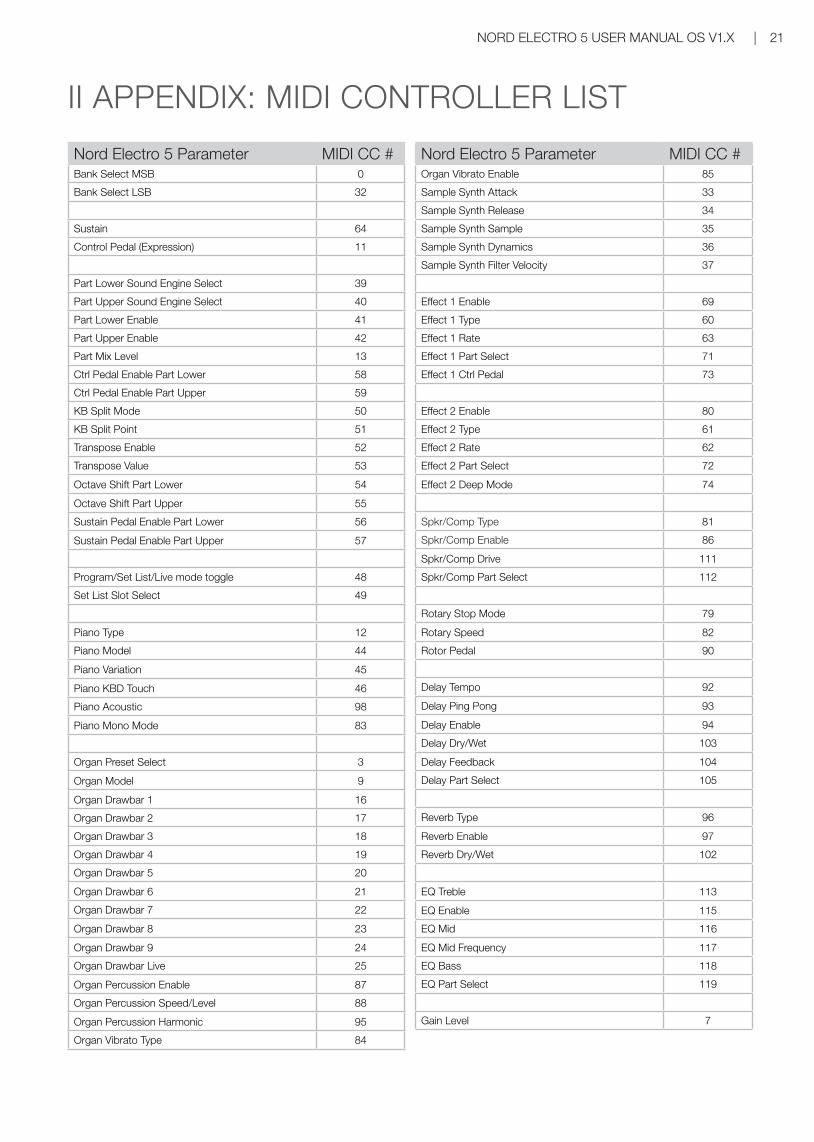
4. MIdIthe Nord Electro 5 is designed to be as flexible as possible in regards to how it can be used together with external controllers, sequencers and sound modules. this section illustrates the most common setups for using the MIdI functionality of the Nord Electro 5 together with other equip-ment. Each scenario requires that appropriate settings are made in the MIdI Menu and/or the KB split section. the tables will show you what parameters needs to be adjusted in each case. also, the Nord Electro 5 can both send and receive an extensive set of MIdI controller messages. For a detailed list of these, see “II appendix: MIdI controller list” on page 21.
MIdI Menu settings
Parameter Setting
local control Mode on or off
channel Global 1-16
channel lower rcv 1-16 or off
channel Upper rcv 1-16 or off
channel Upper split 1-16 or off
KB split settings
Parameter Setting
KB split off
KB split Point - MIDI Connections: connect a 5-pin MIdI cable between the MIdI oUt of the Nord Electro 5 and the MIdI IN of the external module.
scENarIo 1: Nord ElEctro 5...
as coNtrollErthe Nord Electro 5 can be used as a controller keyboard, in cases where you want to play the sounds of an external sound module or synthesizer. local control Mode can be set to on or off depending on if you want to use the Nord Electro 5 as part of a layered sound or not.
scENarIo 2: Nord ElEctro 5...
sENdING MIdI oN Part UPPEr IN KB sPlIt ModEWith this setup, the upper part of the keyboard can be used to send MIdI to an external sound module or synthesizer. Useful for cases where you want to play one of the Nord Electro 5 sound engines in the left hand, but the sound of a different unit in your right. the Part Upper sound engine can either be turned off entirely, or be set to a sound that you want layered with the sound of the external unit.
MIdI messages for sustain and control pedal are only sent if their respective functions are activated for Part Upper. also, transpose and octave shift settings will affect the outgoing MIdI stream, unlike with MIdI sent on the global channel.
Note that the Nord Electro 5 will not send any MIdI generated above the split point on the global channel in this scenario. this is to avoid the external unit receiving double Note on or other MIdI messages. to enable this setup, channel Upper split in the MIdI menu needs to be set to a discrete MIdI channel.
MIdI Menu settings
Parameter Setting
local control Mode on
channel Global 1-16 or off
channel lower rcv 1-16 or off
channel Upper rcv 1-16 or off
channel Upper split 1-16
KB split settings
Parameter Setting
KB split on
KB split Point c3-F5
MIDI Connections: connect a 5-pin MIdI cable between the MIdI oUt of the Nord Electro 5 and the MIdI IN of the external module.

4. MIdI | 15
scENarIo 3: Nord ElEctro 5...
rEcEIvING MIdI oN Part UPPEr IN MIdI UPPEr rEcEIvE ModEIn this scenario, the Nord Electro 5 is set up to receive MIdI on Part Upper, using an external key-board to play its corresponding sound engine. Part lower is played with the keyboard of the Nord Electro 5, using one of the remaining sound engines. In this setup, Part lower will utilize the entire keyboard of the Nord Electro 5 and Part Upper can only be addressed through MIdI sent to the Up-per split channel. also, when playing Part Upper on the Upper split MIdI channel using an external keyboard, any received pitch bend messages will be applied to the sound engine of the Upper part.
MIdI Menu settings
Parameter Setting
local control Mode on
channel Global 1-16 or off
channel lower rcv 1-16 or off
channel Upper rcv 1-16 or off
channel Upper split 1-16
KB split settings
Parameter Setting
KB split on
KB split Point MIdI Upper rcvMIDI Connections: connect a 5-pin MIdI cable between the MIdI IN of the Nord Electro 5 and the MIdI oUt of the external keyboard.
scENarIo 4: Nord ElEctro 5...
WItH a sEQUENcErthere are a few different ways in which you could set up the Nord Electro 5 together with a sequencer. You could either simply use it as a controller keyboard (see scenario 1) to control software synths in a daW setup, or use the sequencer for recording of MIdI data, in turn played back by the Nord Electro 5.
the most common way of doing this would be to use the global MIdI channel both for sending MIdI from the Electro 5 and receiving it back from the sequencer. that way the Nord Electro 5 will play back any sound the same, whether controlled by the local keyboard or the sequencer. to avoid double Note on messages, which may cause sound defects, make sure that channel lower/Upper rcv are both set to off, and that local control Mode is set to off as well.
MIdI Menu settings
Parameter Setting
local control Mode off
channel Global 1-16 or off
channel lower rcv off
channel Upper rcv off
channel Upper split 1-16 or off
KB split settings
Parameter Setting
KB split on
KB split Point MIdI Upper rcv
Electro 5 Program Change reference
Parameter Value
Bank select MsB #0 0
Bank select lsB #32 0-7
Program change 0-49
M A complete Program Change message consists of an MSB message of 0, an LSB message with the requested Bank number and a Prog Change message of 0-49. Values above 49 are ignored.
MIDI Connections: connect a UsB cable between the Nord Electro 5 and your computer, or a 5-pin MIdI cable between the MIdI oUt of the Nord Electro 5 and the MIdI IN of your MIdI interface.

16 | Nord ElEctro 5 UsEr MaNUal os v1.X
5. MENUsGlobal system and MIdI settings, as well as settings for the Piano, B3 and rotary sections are accessed respectively through the SYSTEM, MIDI and SOUND menu buttons. Menus are browsed with the MENU dial, and values are changed with the same dial while pressing SHIFT. any changes made will automatically be stored until changed again except for MIDI Local Con-trol which will be set to on everytime the Nord Electro 5 is powered on.
sYstEM1 - MEMORY PROTECT is set to On by default to prevent accidental overwriting of original Programs. set to Off when you want to store Programs of your own.
2 - GLOBAL TRANSPOSE is 0 by default but could be set to anywhere between -6 to +6 semitones.
3 - FINE TUNE is set to 0 cent 440Hz by default but could be set to ±50 cent = 1 semitone.
4 - SUSTAIN PEDAL is set to Auto by default but could also be set to Closed and Open depending on the polarity of your pedal. the pedal type will automatically be determined when in auto mode.
5 - CONTROL PEDAL TYPE can be set to Ro-land EV7, Yamaha FC7, Korg EXP2, Korg XVP10, Boss FV500L or Fatar SL.
6 - CONTROL PEDAL GAIN ranges from 1-10 and lets you boost the signal of the attached pedal if it does not give you the desired range. default value is 1.
7 - ROTARY CONTROL can be set to Open, Closed or Half Moon depending on how you want your switch pedal to control the rotary Effect and whether you are using a Half Moon switch.
8 - ROTARY PEDAL can be set to either Toggle or Hold. Hold mode will give you Fast speed while the pedal is pressed down. In toggle mode stepping on the pedal will switch be-tween Fast and slow/stop Mode.
9 - SUSTAIN PEDAL MODE can be set to Sus-tain, Sus + Rotor Hold or Sus + Rotor Toggle. the two latter settings let you use the sustain pedal as a rotary speed control.
10 - ORGAN B3 TRIG MODE gives you the option of Fast and Slow trigger modes. In Fast mode notes will be triggered earlier when pressing down on a key.
M This setting is not present on the Nord Electro 5 HP model.
11 - OUTPUT ROUTING MODE can be set to the default Stereo option or to the PartL : L, PartU : R setting. In Stereo mode Part lower and Part Upper will be routed to both outputs, in stereo. With the PartL : L, PartU : R setting Part lower is routed to the left output and
Part Upper to the right, both being in mono.
E Since there is only one instance of each effects unit, applying Rotary or EQ to both Part Lower and Part Upper will route both sounds to the Left output when not using the Stereo setting.
MIdI1 - LOCAL CONTROL MODE will be reset to On everytime the Nord Electro 5 is powered up, but can manually be turned Off. this setting determines whether the keyboard and panel controls are used to play back sounds and alter parameters directly, or are only sent via MIdI.
2 - CHANNEL GLOBAL sets the channel the Nord Electro 5 transmits and responds to. could be set to 1–16, or Off. default is 1.
3 - CHANNEL LOWER RECEIVE determines the MIdI channel which Part lower responds to. can be set to 1-16 or Off. default is off.
4 - CHANNEL UPPER RECEIVE sets the MIdI channel which Part Upper responds to. can also be set to 1-16 or Off. default is off.
5 - CHANNEL UPPER SPLIT sets the MIdI chan-nel used in MIdI Upper split mode. can be set to 1-16 or Off. default is off.
6 - CONTROL CHANGE MODE determines how the Nord Electro 5 handles MIdI cc (control change) messages. Possible settings are Off, Send, Receive or Send/Receive.
7 - PROGRAM CHANGE MODE affects how the Nord Electro 5 handles Program change MIdI messages. Possible settings are Off, Send, Receive or Send/Receive.
8 - TRANSPOSE MIDI AT can be set to MIDI IN or MIDI OUT. If set to MIdI oUt, any active transpose value (global or per Program) will also affect sent MIdI notes. default value is MIdI IN.
soUNd1 - PIANO STRING RES determines the sound level of the Piano string resonance. range is from -6dB to +6dB. default value is 0dB.
2 - B3 TONEWHEEL MODE sets the amount of
tonewheel crosstalk and cable leakage for the B3 Model between Clean, Vintage 1, Vintage 2 or Vintage 3. vintage 1 is default.
3 - B3 KEY CLICK sets the amount of key click for the B3 Model to Low, Normal, High or Higher. Normal is default.
4 - B3 KEY BOUNCE turns the key bounce On or Off. When on the key off click is boosted if the key is released quickly.
5 - B3 PERC DB9 MUTE will in On mode mute the 9th drawbar when percussion is activated, as on a real B3, but could also be set to Off.
6 - B3 PERC DECAY FAST sets the Fast decay time of the B3 percussion to Short, Medium or Long. Medium is default.
7 - B3 PERC DECAY SLOW sets the slow decay time of the B3 percussion to Short, Medium or Long. Medium is default.
8 - B3 PERC VOLUME NORMAL sets the normal percussion volume to Low, Medium or High. Medium is default.
9 - B3 PERC VOLUME SOFT sets the soft per-cussion volume to Low, Medium or High. Me-dium is default.
10 - ROTARY SPEAKER TYPE can be set to 122 or 122Close, the latter being a close miked version of the same speaker emulation. 122 is default.
11 - ROTARY BALANCE sets the balance be-tween the bass rotor and treble horn 70/30, 60/40, 50/50, 40/60 and 30/70. default is 50/50.
12 - ROTARY HORN SPEED could be set to Low, Normal or High. default is set to Medium.
13 - ROTARY HORN ACC sets the acceleration and retardation of the rotary horn to Low, Nor-mal or High. default is set to Normal.
14 - ROTARY ROTOR SPEED sets the speed of the rotary bass reflector to Low, Normal or High. default is set to Normal.
15 - ROTARY ROTOR ACC sets the acceleration and retardation of the rotary bass reflector to Low, Normal or High. default is Normal.

5. NORD SOUND MANAGER | 17
6. NORD SOUND MANAGERThe Nord Sound Manager is your tool of choice for transferring sounds to and from the Nord Electro 5, organizing your Programs, Set Lists and sounds, backing up your instrument and more. The application is avail-able in both Windows and Mac OSX versions. This chapter will describe the most common operations within the Nord Sound Manager - for a complete guide to the application, please refer to the Nord Sound Man-ager manual, available for download from www.nordkeyboards.com.
SYSTEM REQUIREMENTS The Nord Sound Manager and Nord Sample Editor are compatible with computers running Mac OS 10.4 or later, Windows XP, Windows Vista, Windows 7, Windows 8 and Windows 10.
INSTALLATIONThe first step is to download Nord Sound Manager from www.nordkey-boards.com. This way you can also be sure that you are using the latest available version of the application.
Windows: Double click on the ”Nord Sound Manager v6.XX Setup.exe” file and follow the instructions. After the installation completes you will find the application within your Start menu.
Max OSX: Double click on the ”Nord Sound Manager v6.XX.dmg” file and drag the Nord Sound Manager application from the virtual hard drive into your Applications folder.
OVERVIEW
The main area of the Nord Sound Manager is the list view, divided into tabs representing the four partitions: Piano, Samp Lib, Program and Set List. Within each tab the content of the partition is listed. At the top of the list view is a dropdown Bank selector and at the bottom a Partition Mem-ory Indicator, showing how much of the space within each partition is being used.
Towards the top of the application interface is the Toolbar, giving you quick access to the operations most commonly performed. Sometimes a tool icon will be grayed out, meaning it doesn’t apply to the currently selected partition. All of the toolbar functions, and a few more advanced options are also accessible from within the top menu.
DOWNLOAD AND TRANSFER SOUNDS AND SAMPLESSounds from both the Nord Piano Library and the Nord Sample Library 2.0 can freely be downloaded from www.nordkeyboards.com.
The ever growing Nord Piano Library features a large variety of grand pianos and uprights, as well as electric pianos, clavinets and harpsichords. A broad selection of these comes shipped with your instrument, but you may eventually want to exchange some of these for new sounds, or perhaps a different size of the same piano sound. To see what sets the different Nord Piano Library sizes apart, see the “Nord Piano Library size comparison chart” on page 9.
The Nord Sample Library 2.0 is a large collection of quality sampled sounds that cover most categories and instrument families, from vintage to modern and acoustic to electric.
18 | NORD ELEcTRO 5 USER MANUAL OS V1.X
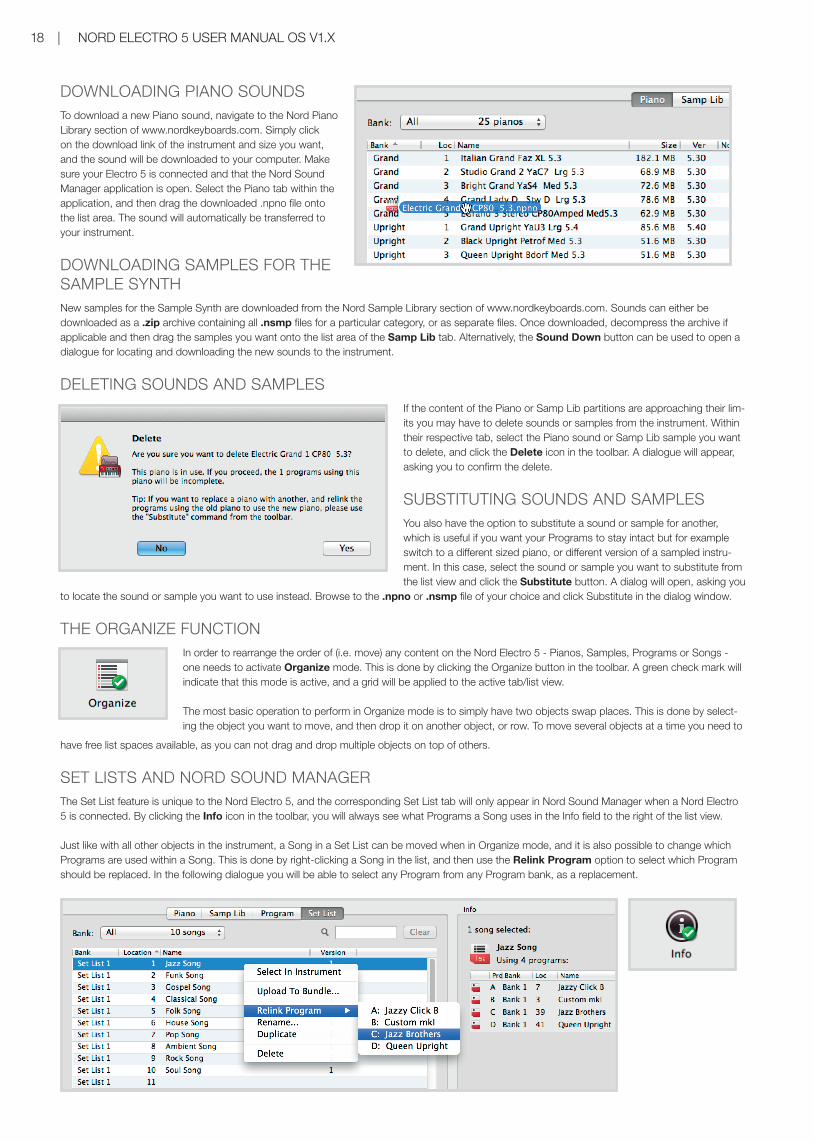
DOWNLOADING PIANO SOUNDSTo download a new Piano sound, navigate to the Nord Piano Library section of www.nordkeyboards.com. Simply click on the download link of the instrument and size you want, and the sound will be downloaded to your computer. Make sure your Electro 5 is connected and that the Nord Sound Manager application is open. Select the Piano tab within the application, and then drag the downloaded .npno file onto the list area. The sound will automatically be transferred to your instrument.
DOWNLOADING SAMPLES FOR THE SAMPLE SYNTHNew samples for the Sample Synth are downloaded from the Nord Sample Library section of www.nordkeyboards.com. Sounds can either be downloaded as a .zip archive containing all .nsmp files for a particular category, or as separate files. Once downloaded, decompress the archive if applicable and then drag the samples you want onto the list area of the Samp Lib tab. Alternatively, the Sound Down button can be used to open a dialogue for locating and downloading the new sounds to the instrument.
DELETING SOUNDS AND SAMPLESIf the content of the Piano or Samp Lib partitions are approaching their lim-its you may have to delete sounds or samples from the instrument. Within their respective tab, select the Piano sound or Samp Lib sample you want to delete, and click the Delete icon in the toolbar. A dialogue will appear, asking you to confirm the delete.
SUBSTITUTING SOUNDS AND SAMPLESYou also have the option to substitute a sound or sample for another, which is useful if you want your Programs to stay intact but for example switch to a different sized piano, or different version of a sampled instru-ment. In this case, select the sound or sample you want to substitute from the list view and click the Substitute button. A dialog will open, asking you
to locate the sound or sample you want to use instead. Browse to the .npno or .nsmp file of your choice and click Substitute in the dialog window.
THE ORGANIZE FUNcTIONIn order to rearrange the order of (i.e. move) any content on the Nord Electro 5 - Pianos, Samples, Programs or Songs - one needs to activate Organize mode. This is done by clicking the Organize button in the toolbar. A green check mark will indicate that this mode is active, and a grid will be applied to the active tab/list view.
The most basic operation to perform in Organize mode is to simply have two objects swap places. This is done by select-ing the object you want to move, and then drop it on another object, or row. To move several objects at a time you need to
have free list spaces available, as you can not drag and drop multiple objects on top of others.
SET LISTS AND NORD SOUND MANAGERThe Set List feature is unique to the Nord Electro 5, and the corresponding Set List tab will only appear in Nord Sound Manager when a Nord Electro 5 is connected. By clicking the Info icon in the toolbar, you will always see what Programs a Song uses in the Info field to the right of the list view.
Just like with all other objects in the instrument, a Song in a Set List can be moved when in Organize mode, and it is also possible to change which Programs are used within a Song. This is done by right-clicking a Song in the list, and then use the Relink Program option to select which Program should be replaced. In the following dialogue you will be able to select any Program from any Program bank, as a replacement.

5. NORD SOUND MANAGER | 19
To create a new Song from within Nord Sound Manager, use the “Duplicate” function, available when right-clicking a song in the list, or through the Edit menu. You can thereafter use Relink Program to assign different Programs to the Song, and Rename to give it a descriptive name.
BAcKING UP AND RESTORING YOUR NORD ELEcTRO 5Programs and Set List entries created on your Electro 5 can be backed up to your computer. Programs can be uploaded individually as .ne5p files, or be bundled together in the .ne5pb format, which also includes all sounds and samples used by the Programs.
Set List entries can be uploaded as bundles, in the .ne5tbundle format and will apart from the Programs used by the Songs also include all the sounds and samples necessary to recreate all Programs and Songs.
SOUND UP AND SOUND DOWNTo upload as indivudal files, select the Programs, pianos or samples you want from the list of their respective tabs and click Sound Up in the toolbar and a dialog will open. You now have the choice to upload the selection you’ve made, or an entire bank. Make your desicion and then browse to the folder where you want your selection to be stored. To download pianos, samples or Programs to the Nord Electro 5 select the relevant tab and click the Sound Down button of the toolbar. The source area within the following dialog gives you the option to browse for files or a folder containing files of the type you want. In the destination area you decide whether to add the downloaded files to an existing bank or replace the entire content of the bank you choose.
M The Sound Up/Down functions are not available for the Set List tab. Songs are always handled as bundles, in order to keep all necessary content intact.
BUNDLE UP AND BUNDLE DOWNTo upload a Bundle make the selection of Programs or Set List entries you want to upload and click Bundle Up in the toolbar. The following dialog gives you the choice of uploading either your selection or a full Program or Set List bank. Select one of the two options and then browse to the folder where the Bundle should be stored.
In order to transfer a Bundle to the Nord Electro 5, select the Program or Set List tab and use the dropdown menu at the top of the tab view to se-lect which bank you want to add the Bundle content to. Press the Bundle Down button of the toolbar and a dialogue will ask you to locate a Bun-dle file (.ne5pb for Program bundles, and .ne5tbundle for Song/Set List bundles). Once you have selected a file, the Nord Sound Manager will verify that it contains valid Songs/Programs and sounds. You can then select whether to add the content of the Bundle to the bank you have selected, or to replace the content of an entire bank of your choice.
M When downloading a Set List/Song bundle containing a Program which is already on the instrument, the Nord Electro 5 will use the existing Program only if its settings are identical to those in the bundle. If the Programs differ, or it is not previously on the instrument, a new Program will be created at the first available location.
FULL BAcKUP AND RESTOREYou can also make a full backup of your entire instrument, including its Programs, Set Lists and all pianos and samples. To do this, click the Backup button of the toolbar. Select a location for your backup file, and optionally change its name. By default it will be named ”Backup YYYY-MM-DD.ne5b”. click Save to begin the backup process, which may take a little while to complete.
To restore your Nord Electro 5 from a backup file, click Restore in the toolbar. Browse to the backup (.ne5b) file that you want to restore from and click Open. A dialog will appear, asking you to confirm the restore operation. Within this dialog you can also click on the Show Details button to see the exact content and settings of the backup. click Restore to go through with the restore operation.
M The backup/restore file only includes the data content of the instrument and will not change the OS version of the instrument it is used to restore.
If you at any point would like to restore your Nord Electro 5 to the state it was in when shipped from the factory, there is a Factory Restore file avail-able for download from the Nord Electro 5 section at www.nordkeyboards.com.

20 | Nord ElEctro 5 UsEr MaNUal os v1.X
I aPPENdIX: coNNEctIoNs
POWER ON/OFFPEDAL
CONTROLPEDALROTOR MIDI MONITOR RIGHT LEFT
OUT HEADPHONESPEDALSUSTAIN
INMIDIINOUT OUTUSB
v1.1
vers.nr
v1.1Korr. nr
1
datum, rev.
2015-01-29
542 002 (NCSS White)
-
-
-
1
2
3
4datum, urspr.
2014-10-17Konstruktör
José Esparza
layout / ändrad av
Tina JeppssonGodkänd av
Benämning
UNDERDELNORD ELECTRO 5 HP
clavia part #
40582
Mått plåt (mm)
1034,20 x 81,5
■ Vit
-
-
-
skala
1:1
Färgnummer (Ncs-nr)lagerordning Färg
LAGER 1: 542 002 Vit (NCSS White) aUdIo coNNEctIoNsGeneral guide on audio connections: Before you turn on your amplifier, make all audio connections. always turn on your amplifier last, and when shutting down, always turn off your amplifier or active speakers first.
HEadPHoNEs ¼ inch stereo headphone jack.
lEFt aNd rIGHt oUt¼ inch unbalanced line level outputs for amplifier or recording equip-ment. the Nord Electro 5 is a stereo instrument with separate signal paths for left and right audio channels.
E Using your Nord Electro 5 at a high volume can damage your hearing.
MoNItor IN1/8 inch jack for connecting devices such as smartphones, tablets or computers to the Nord Electro 5, allowing you to play and rehearse to pre-recorded music. this input is routed to the Headphones output.
MIdI coNNEctIoNs
MIdI IN the 5 pin MIdI In connection is used for receiveing MIdI data sent from external devices such as controller keyboards or computers.
MIdI oUt the 5 pin MIdI out connection will send MIdI data to devices such as external sound modules or computers.
UsB coNNEctIoNthe UsB port is used for connecting your Nord Electro 5 to a computer. the connection can be used for transferring MIdI, for os updates and for connecting to applications such as the Nord sound Manager and Nord sample Editor. these applications, and the latest os version can always be found for download at www.nordkeyboards.com.
M MIDI over USB and the standard MIDI connectors are always both active at the same time. There is no need to select one of the two options in a menu or similar.
PEdal coNNEctIoNs
sUstaIN PEdal¼ inch connector for all common types of sustain pedals. sustain pedal polarity can be set in the systems menu, see “system” on page 16.
rotor PEdal¼ inch connector for a switch type pedal, sustain pedal or the optional half moon switch. rotary speed will change when either the pedal is pressed or the half moon switch is operated. depending on which pedal or control you are using, the appropriate rotary control type and rotary Pedal Mode can be selected in the system menu.
coNtrol PEdal¼ inch connector for an expression pedal of the continuous type, used for controlling volume and/or effects. Most of the common expression pedal makes and models are supported, and can be selected in the system menu.
Nord ElEctro 5 UsEr MaNUal os v1.X | 21
II aPPENdIX: MIdI coNtrollEr lIst
Nord Electro 5 Parameter MIdI cc #Bank select MsB 0
Bank select lsB 32
sustain 64
control Pedal (Expression) 11
Part lower sound Engine select 39
Part Upper sound Engine select 40
Part lower Enable 41
Part Upper Enable 42
Part Mix level 13
ctrl Pedal Enable Part lower 58
ctrl Pedal Enable Part Upper 59
KB split Mode 50
KB split Point 51
transpose Enable 52
transpose value 53
octave shift Part lower 54
octave shift Part Upper 55
sustain Pedal Enable Part lower 56
sustain Pedal Enable Part Upper 57
Program/set list/live mode toggle 48
set list slot select 49
Piano type 12
Piano Model 44
Piano variation 45
Piano KBd touch 46
Piano acoustic 98
Piano Mono Mode 83
organ Preset select 3
organ Model 9
organ drawbar 1 16
organ drawbar 2 17
organ drawbar 3 18
organ drawbar 4 19
organ drawbar 5 20
organ drawbar 6 21
organ drawbar 7 22
organ drawbar 8 23
organ drawbar 9 24
organ drawbar live 25
organ Percussion Enable 87
organ Percussion speed/level 88
organ Percussion Harmonic 95
organ vibrato type 84
Nord Electro 5 Parameter MIdI cc #organ vibrato Enable 85
sample synth attack 33
sample synth release 34
sample synth sample 35
sample synth dynamics 36
sample synth Filter velocity 37
Effect 1 Enable 69
Effect 1 type 60
Effect 1 rate 63
Effect 1 Part select 71
Effect 1 ctrl Pedal 73
Effect 2 Enable 80
Effect 2 type 61
Effect 2 rate 62
Effect 2 Part select 72
Effect 2 deep Mode 74
spkr/comp type 81
spkr/comp Enable 86
spkr/comp drive 111
spkr/comp Part select 112
rotary stop Mode 79
rotary speed 82
rotor Pedal 90
delay tempo 92
delay Ping Pong 93
delay Enable 94
delay dry/Wet 103
delay Feedback 104
delay Part select 105
reverb type 96
reverb Enable 97
reverb dry/Wet 102
EQ treble 113
EQ Enable 115
EQ Mid 116
EQ Mid Frequency 117
EQ Bass 118
EQ Part select 119
Gain level 7

22 | Nord ElEctro 5 UsEr MaNUal os v1.X
III INdEXaacoustics 8a-d buttons 11audio connections 20
BB3 7B3+Bass 8B3+Bass 8B3 Key Bounce 16B3 Key click 16B3 Perc dB9 Mute 16B3 Perc decay Fast 16B3 Perc decay slow 16B3 Perc volume Normal 16B3 Perc volume soft 16B3 tonewheel Mode 16Bundle down 19Bundle Up 19
cchannel Global 16channel lower receive 16channel Upper receive 15, 16channel Upper split 16chorus 10comp 10computer 20connections 20control change Mode 16control Pedal 20control Pedal Gain 16control Pedal type 16copy to live 6
ddeep 10del 12delay 10delete 18download 8, 17drawbars 7drive 10drWB live 7drWB sync 7
EEffect 1 10Effect 2 10Effects 10EQ 11Exit 13External keyboard 15
FFarf 8Fast 8Fine tune 16Flanger 10
GGlobal transpose 16
HHeadphones 20
IIns 12Installation 17Internal memory 8
JJc 10
KKBd touch 9KB split 8, 14
llist view 12local control Mode 16long release 8
MMax osX 17Memory Indicator 17Memory Protect 16Menus 16MIdI 14MIdI connections 20MIdI controller list
MIdI cc 21MIdI In 20MIdI Menu 16MIdI out 20MIdI Upper receive 15Model display 8Monitor In 20Mono 9
NNe5pb file format 19Ne5p file format 19Ne5tbundle file format 19Nord Piano library 17Nord sample library 17Nord sound Manager 17Npno file format 18Nsmp file format 18
oorgan 7organ B3 trig 16organize 13os Update 20output routing Mode 16outputs 20
PPan 10Partitions 17Pedal connections 20Percussion 8Phaser 10Piano 8Piano sizes 8Piano string res 16Ping Pong 10Pipe 8Pipe lengths 8Pitch bend 15Preset 1 and 2 7Principal Pipe organ 7
Program change (MIdI) 15Program change Mode 16
rreverb 11ring Modulator 10rotary 10rotary Balance 16rotary control 16rotary Horn acc 16rotary Horn speed 16rotary Pedal 16rotary rotor acc 16rotary rotor speed 16rotary speaker type 16rotating scanner 7rotor Pedal 20
ssamples 18samp lib 17second harmonic 8set list 11shift 12small 10soft 8song 11sound down 19sound menu 16sound Up 19spkr/comp 10store 6store as... 6, 12store to 12storing set lists 12string res 9string resonance 9substitute 18sustain Pedal 16, 20system menu 16
ttabs 17third harmonic 8tone wheel 7tone wheel organ 7toolbar 17transistor organ 7, 8transpose, Global 16transpose MIdI at 16transpose, Program 5tremolo 10twin 10
UUsB connection 20UsB MIdI 20
vvelocity 9vibe 10vibrato/chorus 7, 8vX 8
WWah 10Windows 17www.nordkeyboards.com 8, 17, 18

FCC Information (U.S.A.)1. IMPORTANT NOTICE: DO NOT MODIFY THIS UNIT!
This product, when installed as indicated in the instructions contained in this manual, meets FCC requirements. Modifications not expressly approved by Clavia may void your authority, granted by the FCC, to use the product.
2. IMPORTANT: When connecting this product to accessories and/ or another product use only high quality shielded cables. Cable/s supplied with this product MUST be used. Follow all installation instructions. Failure to follow instructions could void your FCC authorization to use this product in the USA.
3. Note: This equipment has been tested and found to comply with the limits for a Class B digital device, pursuant to Part 15 of the FCC Rules. These limits are designed to provide reasonable protection against harmful interference in a residential installa-tion. This equipment generates, uses, and can radiate radio frequency energy and, if not installed and used in accordance with the instructions, may cause harmful interference to radio communications. However, there is no guarantee that interference will not occur in a particular installation. If this equipment is found to be the source of interference to radio or television reception, which can be determined by turning the equipment off and on, the user is encouraged to try to correct the interference by one or more of the following measures:
– Reorient or relocate the receiving antenna.
– Increase the separation between the equipment and receiver.
– Connect the equipment into an outlet on a circuit different from that to which the receiver is connected.
– Consult the dealer or an experienced radio/TV technician for help.
This device complies with Part 15 of the FCC Rules. Operation is subject to the following two conditions:
(1) this device may not cause harmful interference, and
(2) this device must accept any interference received, including interference that may cause undesired operation.
Unauthorized changes or modification to this system can void the users authority to operate this equipment.
This equipment requires shielded interface cables in order to meet FCC class B Limit.
For Canada
NOTICEThis Class B - digital apparatus complies with Canadian ICES-003.
AVISCet appareil numérique de la classe B - est conforme à la norme NMB-003 du Canada.
DECLARATION OF CONFORMITY Compliance Information Statement
Model Name: Nord Electro 5D, Nord Electro 5HP
Type of Equipment: Digital Organ and piano
Responsible Party: Clavia DMI AB
Address: P.O. BOX 4214. SE-102 65 Stockholm Sweden
Telephone: +46-8-442 73 60
