user manual - onrobot.com · introduction 2 contents contents .....2
TRANSCRIPT

USER MANUAL
FOR YASKAWA ROBOTS
ORIGINAL INSTRUCTION (EN)
v1.05

Introduction
2
Contents
Contents ....................................................................................................................................... 2
1 Introduction ............................................................................................................................. 4
1.1 Important Safety Notice ..................................................................................................... 4
1.2 Scope of the Manual .......................................................................................................... 4
1.3 Naming convention ............................................................................................................ 4
1.4 How to read the Manual..................................................................................................... 5
2 Safety....................................................................................................................................... 6
2.1 Intended Use ..................................................................................................................... 6
2.2 General Safety Instructions ................................................................................................. 7
2.3 Risk Assessment ................................................................................................................. 8
2.4 Environmental Safety ......................................................................................................... 8
2.5 PLd CAT3 Safety Function ................................................................................................... 9
3 Operation mode(s) ................................................................................................................. 10
Mode I - OnRobot EtherNet/IP..................................................................................................... 12
4 Installation ............................................................................................................................. 13
4.1 Overview ......................................................................................................................... 13
4.2 Mounting ........................................................................................................................ 13
4.2.1 Adapter(s) .............................................................................................................. 13
4.2.2 Quick Changer options ............................................................................................ 15
4.2.3 Tools...................................................................................................................... 17
4.3 Wiring ............................................................................................................................. 23
4.3.1 Tool data cable ....................................................................................................... 23
4.3.2 Ethernet cable ........................................................................................................ 24
4.3.3 Power supply.......................................................................................................... 25
4.4 Software setup ................................................................................................................ 27
4.4.1 Overview ............................................................................................................... 27
4.4.2 Configure the Compute Box as a Scanner ................................................................. 27
4.4.3 Configure the Robot as an Adapter .......................................................................... 29
4.4.4 Upload the OnRobot functions to the robot ............................................................. 34
5 Operation............................................................................................................................... 37
5.1 Overview ......................................................................................................................... 37
5.2 List of functions ............................................................................................................... 38
Mode II - OnRobot WebLogic ....................................................................................................... 46
6 Installation ............................................................................................................................. 47
6.1 Overview ......................................................................................................................... 47

Introduction
3
6.2 Mounting ........................................................................................................................ 47
6.2.1 Adapter(s) .............................................................................................................. 47
6.2.2 Quick Changer options ............................................................................................ 49
6.2.3 Tools...................................................................................................................... 51
6.3 Wiring ............................................................................................................................. 57
6.3.1 Tool data................................................................................................................ 57
6.3.2 Digital I/O wires...................................................................................................... 57
6.3.3 Ethernet cable ........................................................................................................ 62
6.3.4 Power supply.......................................................................................................... 63
7 Operation............................................................................................................................... 64
7.1 Overview ......................................................................................................................... 64
7.2 Ethernet Interface setup................................................................................................... 65
7.3 Web Client....................................................................................................................... 67
7.4 OnRobot WebLogic menu ................................................................................................. 69
7.4.1 Browser ................................................................................................................. 69
7.4.2 Program Editor ....................................................................................................... 70
8 Additional Software Options................................................................................................... 76
8.1 Compute Box ................................................................................................................... 76
8.1.1 Interfaces ............................................................................................................... 76
8.1.2 Web Client ............................................................................................................. 76
8.2 EtherNet/IP ..................................................................................................................... 95
8.2.1 Available connections and assembly instances ......................................................... 95
9 Hardware Specification......................................................................................................... 123
9.1 Technical sheets............................................................................................................. 123
9.2 Mechanical Drawings ..................................................................................................... 161
9.2.1 Adapter plate(s) ................................................................................................... 161
9.2.2 Mountings............................................................................................................ 165
9.2.3 Tools.................................................................................................................... 169
9.3 Center of Gravity............................................................................................................ 179
10 Maintenance ........................................................................................................................ 181
11 Warranties ........................................................................................................................... 184
11.1 Patents .......................................................................................................................... 184
11.2 Product Warranty .......................................................................................................... 184
11.3 Disclaimer...................................................................................................................... 184
12 Certifications ........................................................................................................................ 185
1.2 Declaration of Incorporation ........................................................................................... 191

Introduction
4
1 Introduction
1.1 Important Safety Notice
DANGER:
You must read, understand, and follow all safety information in this manual, and the robot manual and all associated equipment before initiating robot motion. Failure to comply with safety information could result in death or serious injury.
1.2 Scope of the Manual
The manual covers the following OnRobot products and its components:
Grippers Version
Gecko Gripper v2
RG2 v2
RG2-FT v2
RG6 v2
VG10 v2
VGC10 v1
Sensors Version
HEX-E QC v3
HEX-H QC v3
Where applicable the combination of the products is also covered in the manual.
NOTE:
Generally, the products without the Quick Changer v2 interface, are not in the scope of this manual.
1.3 Naming convention
In the user manual Gecko Gripper is called Gecko only.
The RG2 and RG6 names as model variants are used separately or together as RG2/6 if the information is relevant for both variants.
The HEX-E QC and HEX-H QC names as model variants are used separately or together as HEX-E/H QC if the information is relevant for both variants.

Introduction
5
1.4 How to read the Manual
The manual covers all OnRobot products and its components that is available for your robot.
To make it easy to follow what type of product (or combination) or component is the given information is relevant for, the following visual highlights are used:
RG2
This is an instruction relevant for the RG2 product only.
RG2-FT
This is an instruction relevant for the RG2-FT product only.
VG10
This is an instruction relevant for the VG10 product.
All text without these visual marks are relevant for all products or components.
For convenience, in each part that contains visual highlights (that span across pages) a table is provided in the beginning, to guide you which page contains the relevant information for your product or component:
RG2 ................................................... 5
RG2-FT .............................................. 5
VG10 ................................................. 5

Safety
6
2 Safety
The robot integrators are responsible for ensuring that the applicable safety laws and regulations in the country concerned are observed and that any significant hazards in the complete robot application are eliminated. This includes, but is not limited to:
• Performing a risk assessment for the complete robot system
• Interfacing other machines and additional safety devices if defined by the risk assessment
• Setting up the appropriate safety settings in the robot software
• Ensuring that the user will not modify any safety measures
• Validating that the total robot system is designed and installed correctly
• Specifying instructions for use
• Marking the robot installation with relevant signs and contact information of the integrator
• Collecting all documentation in a technical file; including the risk assessment and this manual
2.1 Intended Use
OnRobot tools are intended to be used on collaborative robots and light industrial robots with different payloads depending on the end-of-arm tooling specifications. OnRobot tools are normally use in pick-and-place, palletizing, machine tending, assembly, quality testing and inspection and surface finishing applications.
The end-of-arm tooling should only operate under conditions noted in Technical sheets section.
Any use or application deviating from intended use is deemed to be impermissible misuse. This includes, but is not limited to:
• Use in potentially explosive atmospheres
• Use in medical and life critical applications
• Use before performing a risk assessment
• Use outside the permissible operational conditions and specifications
• Use close to a human’s head, face and eye area
• Use as a climbing aid

Safety
7
2.2 General Safety Instructions
Generally, all national regulations, legislations and laws in the country of installation must be observed. Integration and use of the product must be done in compliance with precautions in this manual. Particular attention must be paid to the following warnings:
DANGER:
You must read, understand, and follow all safety information in this manual, and the robot manual and all associated equipment before initiating robot motion. Failure to comply with safety information could result in death or serious injury.
The information in this manual does not cover designing, installing, and operating a complete robot application, nor does it cover other peripheral equipment that can influence the safety of the complete system. The complete system must be designed and installed in accordance with the safety requirements set forth in the standards and regulations of the country where the robot is installed.
Any safety information provided in this manual must not be construed as a warranty, by OnRobot A/S, that the robot application will not cause injury or damage, even if robot application complies with all safety instructions.
OnRobot A/S disclaims any and all liability if any of OnRobot tools tooling are damaged, changed or modified in any way. OnRobot A/S cannot be held responsible for any damages caused to any of OnRobot tools tooling, the robot, or any other equipment due to programming errors or malfunctioning of any of OnRobot tools.
WARNING:
OnRobot tools are not allowed to be exposed to condensing conditions when power is on or when connected to a robot. If condensing conditions appear during transport or storage, the product must be placed between 20 and 40 Celsius degrees for 24 hours before power is applied or before connected to a robot.
It is recommended that OnRobot tools are integrated in compliance with the following guides and standards:
• ISO 10218-2
• ISO 12100
• ISO/TR 20218-1
• ISO/TS 15066

Safety
8
2.3 Risk Assessment
The robot integrator must perform a risk assessment on the complete robot application. OnRobot tools are only components in a robot application and therefore they can be only safely operated if the integrator has considered the safety aspects of the whole application. OnRobot tools are designed with relatively smooth and round design with a limited amount of sharp edges and pinch points
In collaborative applications, the trajectory of the robot can play a significant safety role. The integrator must consider the angle of contact with a human body, e.g. orientate OnRobot tools and workpieces so that the contact surface in the direction of movement is as large as possible. It is recommended that the tool connectors are pointed in the direction opposite to the movement.
OnRobot A/S have identified the potential hazards listed below as significant hazards that must be considered by the integrator:
• Objects flying from OnRobot tools due to loss of grip
• Objects falling down from OnRobot tools due to loss of grip
• Injuries due to collisions between humans and workpieces, OnRobot tools tooling, robot or other obstacles
• Consequences due to loosen of bolts
• Consequences if OnRobot tools cable gets stuck to something
• Workpiece itself represents a hazard
2.4 Environmental Safety
OnRobot A/S products must be disposed of in accordance with the applicable national laws, regulations and standards.
The product is produced with restricted use of hazardous substances to protect the environment; as defined by the EU RoHS Directive 2011/65/EU. These substances include mercury, cadmium, lead, chromium VI, polybrominated biphenyls and polybrominated diphenyl ethers.
Observe national registration requirements for importers according to EU WEEE Directive 2012/19/EU.

Safety
9
2.5 PLd CAT3 Safety Function
RG2 RG6
A safety-rated function has been designed as two buttons at the two arms of the product, conforming to ISO 13849-1 PLd CAT3.
This Safety Function has a max response time of 100 ms and a MTTF of 2883 years.
The behavior of the safety system is described below:
If something activates the two Safety Buttons, see picture below, the safety control system stops motion of the two arms of the product. Motion is then prevented as long as one or both of the two buttons are activated.
If this happens while running the robot program, user can detect this condition with the help of the provided status information and execute any necessary step on the robot.
To come back to normal operation with the gripper there are provided commands to reset the gripper.
CAUTION:
Before resetting the gripper always make sure that no part will be dropped due to the loss of gripper power. If Dual Quick Changer is used it will cycle the power for both sides.
For further details refer to the Operation section.
PLd CAT3 Safety Buttons

Operation mode(s)
10
3 Operation mode(s)
There are two alternative modes how the device(s) could be used:
Modes of Operation
OnRobot EtherNet/IP
required in the robot: EtherNet/IP module
OnRobot WebLogic
required in the robot: digital I/O module
OnRobot EtherNet/IP
This mode uses the EtherNet/IP industrial network protocol to operate the grippers/sensor.
EtherNet/IP is a fieldbus that uses the standard Ethernet networking (simple UTP cable, standard network switch can be used, etc.).
The Compute Box implements an EtherNet/IP Scanner (master device) and requires the robot controller to implement an EtherNet/IP Adapter (slave device) to operate.
With configurable cycle time (e.g.: 8ms) the Computer Box can "read" and "write" to the robot so the grippers/sensor can be controlled or monitored.
The communication is implemented via EtherNet/IP Assembly Instances that are created for each product or product combination (e.g.: RG2+VG10). The instances are containing a set of words (16-bit data) that can be used to control/monitor the grippers/sensor (e.g.: the 4th word of the Assembly Instance 104 is the Actual Width for the RG2/6).
There are global functions provided (on the USB stick) to make it easy to access the product features.
OnRobot WebLogic
This mode allows simple Digital I/O communication to be used to operate the grippers/sensor.
For example the Compute Box could be easily programmed to:
• when one of the robot digital outputs is set to HIGH, then the RG2 gripper opens to 77mm
• or when the force values measured with the HEX-E QC reach 50N, the Compute Box sends a HIGH digital output to the robot.
The Compute Box has 8 digital inputs and 8 digital outputs that can be freely configured for any "logic".
In this way the user can configure:
• eight gripper/sensor controlling functionality (e.g.: set width to X, close, zero, set preload, etc.)
• and eight gripper/sensor monitoring functionality (e.g.: is grip detected, is preload > 50N, etc.).
Furthermore, the "logic" can be complex, like:
• is grip detected AND force >20 N

Operation mode(s)
11
These "logics" can be programmed through the Compute Box's web interface called Web Client. It requires only a normal computer with a browser.
In this document both modes of operation will be covered and will be referred to as:
• OnRobot EtherNet/IP
• OnRobot WebLogic
Mode I - OnRobot EtherNet/IP ......... 12
Mode II - OnRobot WebLogic ........... 46

Operation mode(s)
12
Mode I - OnRobot EtherNet/IP

Installation
13
4 Installation
4.1 Overview
For a successful installation the following steps will be required:
• Mount the components
• Wire the cables
• Setup the software
In the following sections, these installation steps will be described.
4.2 Mounting
Required steps:
• Mount the robot dependent adapter
• Mount the Quick Changer option
• Mount the tool(s)
In the following three subsections these three mounting steps will be described.
4.2.1 Adapter(s)
For GP7, GP8 models
Adapter F
1 M5x10 screws (ISO14580 A4-70)
2 OnRobot adapter flange (ISO9409-1-31.5-4-M6)
3 Dowel pin Ø5x6 (ISO2338 h8)
4 Robot tool flange (ISO 9409-1-60-4-M5)
Use 5 Nm tightening torque.
For GP12 models

Installation
14
Adapter G
1 M4x10 screws (ISO14580 A4-70)
2 OnRobot adapter flange (ISO9409-1-31.5-8-M4)
3 Dowel pin Ø4x6 (ISO2338 h8)
4 Robot tool flange (ISO9409-1-62-8-M4)
Use 3 Nm tightening torque.
For HC10/DT models
Adapter H
1 M6x8 screws (ISO14580 A4-70)
2 OnRobot adapter flange (ISO9409-1-31.5-4-M6)
3 Dowel pin Ø6x8 (ISO2338 h8)
4 Robot tool flange (ISO 9409-1-80-4-M6)
Use 10 Nm tightening torque.

Installation
15
4.2.2 Quick Changer options
Quick Changer - Robot Side
Quick Changer - Robot Side
1 M6x8mm (ISO14580 8.8)
2 Quick Changer (ISO 9409-1-50-4-M6)
3 Dowel pin Ø6x10 (ISO2338 h8)
4 Adapter/ Robot tool flange (ISO 9409-1-50-4-M6)
Use 10 Nm tightening torque.
Dual Quick Changer
Dual Quick Changer
1 M6x20mm (ISO14580 8.8)
2 Dual Quick Changer
3 Dowel pin Ø6x10 (ISO2338 h8)
4 Adapter/ Robot tool flange (ISO 9409-1-50-4-M6)
Use 10 Nm tightening torque.

Installation
16
HEX-E/H QC
HEX-E/H QC
1 HEX-E/H QC sensor
2 M4x6mm (ISO14581 A4-70)
3 M6x8mm (NCN20146 A4-70)
4 HEX-E/H QC adapter
5 Adapter/ Robot tool flange (ISO 9409-1-50-4-M6)
Use 1.5 Nm tightening torque. for M4x6mm
Use 10 Nm tightening torque. for M6x8mm

Installation
17
4.2.3 Tools
Gecko .............................................. 44
Quick Changer - Tool side ................. 45
RG2 ................................................. 45
RG2-FT ............................................ 46
RG6 ................................................. 46
VG10 ............................................... 47
Gecko
Step 1:
Move the tool close to the Quick Changer as illustrated.
The hook mechanism (rod and hook tongue) will keep the lower part locked once mounted.
Step 2:
Flip the tool until it is fully mated, and you hear a clicking sound.
To unmount the tool, press the aluminum button on the Quick Changer and repeat the steps in the reverse order.
CAUTION:
With a Dual Quick Changer the Gecko Gripper can only be mounted on the Secondary (2) side. Mounting on the Primary (1) side will prevent the devices to function correctly.

Installation
18
RG2
Step 1:
Move the tool close to the Quick Changer as illustrated.
The hook mechanism (rod and hook tongue) will keep the lower part locked once mounted.
Step 2:
Flip the tool until it is fully mated, and you hear a clicking sound.
To unmount the tool, press the aluminum button on the Quick Changer and repeat the steps in the reverse order.
To change the relative angle of the gripper to the Quick Changer:
• first remove the four M4x6 screws
• tilt the gripper between -90° and 90°
• then put the four M4x6 screws back and use 1.35 Nm tightening torque to fix it.
WARNING:
Never use the device while any of the four M4x6 screws are removed.

Installation
19
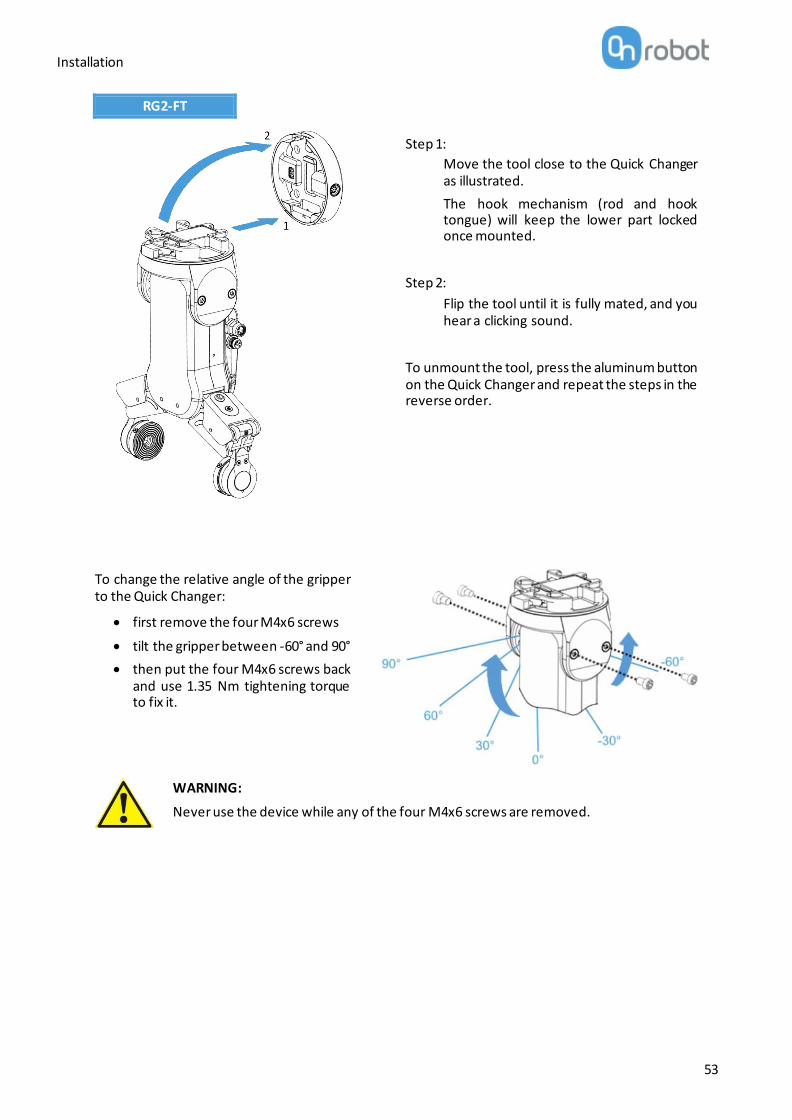
RG2-FT
Step 1:
Move the tool close to the Quick Changer as illustrated.
The hook mechanism (rod and hook tongue) will keep the lower part locked once mounted.
Step 2:
Flip the tool until it is fully mated, and you hear a clicking sound.
To unmount the tool, press the aluminum button on the Quick Changer and repeat the steps in the reverse order.
To change the relative angle of the gripper to the Quick Changer:
• first remove the four M4x6 screws
• tilt the gripper between -60° and 90°
• then put the four M4x6 screws back and use 1.35 Nm tightening torque to fix it.
WARNING:
Never use the device while any of the four M4x6 screws are removed.

Installation
20
RG6
Step 1:
Move the tool close to the Quick Changer as illustrated.
The hook mechanism (rod and hook tongue) will keep the lower part locked once mounted.
Step 2:
Flip the tool until it is fully mated, and you hear a clicking sound.
To unmount the tool, press the aluminum button on the Quick Changer and repeat the steps in the reverse order.
To change the relative angle of the gripper to the Quick Changer:
• first remove the four M4x6 screws
• tilt the gripper between -90° and 90°
• then put the four M4x6 screws back and use 1.35 Nm tightening torque to fix it.
WARNING:
Never use the device while any of the four M4x6 screws are removed.

Installation
21
VG10
Step 1:
Move the tool close to the Quick Changer as illustrated.
The hook mechanism (rod and hook tongue) will keep the lower part locked once mounted.
Step 2:
Flip the tool until it is fully mated, and you hear a clicking sound.
To unmount the tool, press the aluminum button on the Quick Changer and repeat the steps in the reverse order.
VGC10
Step 1:
Move the tool close to the Quick Changer as illustrated.
The hook mechanism (rod and hook tongue) will keep the lower part locked once mounted.
Step 2:
Flip the tool until it is fully mated, and you hear a clicking sound.
To unmount the tool, press the aluminum button on the Quick Changer and repeat the steps in the reverse order.

Installation
22
Quick Changer - Tool side
Step 1:
Move the tool close to the Quick Changer as illustrated.
The hook mechanism (rod and hook tongue) will keep the lower part locked once mounted.
Step 2:
Flip the tool until it is fully mated, and you hear a clicking sound.
To unmount the tool, press the aluminum button on the Quick Changer and repeat the steps in the reverse order.

Installation
23
4.3 Wiring
Three cables need to be connected to wire the system properly:
• Tool data cable between the tool(s) and the Compute Box
• Ethernet communication cable between the robot controller and the Compute Box
• Power supply of the Compute Box
4.3.1 Tool data cable
First connect the data cable to the tool.
For Single or Dual RG2, RG6, VG10, VGC10 or Gecko Gripper
Use the M8-8pin connector on the Quick Changer or on the Dual Quick Changer.
Use the cable holder as illustrated on the left.
CAUTION:
Make sure to use the supplied cable holder to prevent any excessive strain on the 90-degree M8 connector caused by the rotation of the cable.
For RG2-FT
For RG2-FT the Quick Changer tool data connector cannot be used. Instead use the marked M8-4pin connector
CB
bending radius
extra length
Robot controller

Installation
24
For HEX-E/H QC
Use the marked M12-12pin connector on the HEX-E/H QC.
Then route the Tool data cable to the Compute Box (CB) and use the supplied Velcro tape (black) to fix it.
NOTE:
Make sure that during the routing some extra length is used at the joints so that cable is not pulled when the robot moves.
Also make sure that the cable bending radius is minimum 40mm (for the HEX-E/H QC it is 70mm)
Finally, connect the other end of the Tool data cable to the Compute Box's DEVICES connector.
CAUTION:
Use only original OnRobot tool data cables. Do not cut or extend these cables.
CAUTION:
Quick Changer and Dual Quick Changer can only be used to power OnRobot tools.
4.3.2 Ethernet cable
Connect one end of the supplied Ethernet (UTP) cable to the robot controller's Ethernet (LAN) port as shown below.

Installation
25
NOTE:
If the robot controller's Ethernet port is in use, use a standard 4-port Ethernet switch to be able to use two network devices at the same time.
Connect the other end of the supplied cable to the Compute Box's ETHERNET connector.
CAUTION:
Use only shielded, maximum 3m long Ethernet cables.
WARNING:
Check and make sure that the Compute Box enclosure (metal) and the robot controller enclosure (metal) are not connected (no galvanic connection between the two).
4.3.3 Power supply
Connect the supplied power supply to the Compute Box 24V connector.
NOTE:
To disconnect the power connector, make sure to pull the connector housing (where the arrows are shown) and not the cable.

Installation
26
CAUTION:
Use only original OnRobot power supplies.
Finally, power up the power supply that will power the Compute Box and the connected Tool(s).

Installation
27
4.4 Software setup
4.4.1 Overview
There are three steps required to set up the OnRobot device for operation with your robot:
1. Set up the Compute Box as a Scanner.
2. Set up the robot as an Adapter.
3. Upload the OnRobot functions to the robot.
NOTE:
The terms Scanner, Master, and Client can be used interchangeably. Here, we will use the term Scanner. (E.g. The OnRobot Compute Box is a scanner.)
The terms Adapter, Slave, and Server can be used interchangeably. Here, we will use the term Adapter. (E.g. The robot is an adapter.)
The Yaskawa is enabled with Ethernet communication function which provides IO functionality.
The Ethernet IP capability for Yaskawa robots is entirely software based and dependent on the pendant. This guide lists the steps required for the standard teach pendant. The second option is the using the smart pendant, which has additional steps:
• first download the software pendant
• set the smart pendant to remote mode by turning the key all the way to the left
• connect to the controller by using an ethernet cable
• select the special mode option in the software pendant menu
• select maintenance mode for the controller to restart and then follow the same instructions.
NOTE:
Please contact your Yaskawa representative for information regarding the pendants.
4.4.2 Configure the Compute Box as a Scanner
NOTE:
Temporarily the Compute Box will be needed to be connected to your computer.
To configure the Compute Box to be a Scanner you will need to access the Web Client interface of the Compute Box on your computer. To do that first the Ethernet interface needs to be set up to have a proper communication between your computer and the Compute Box. It is recommended to use the Auto Mode (factory default) for IP settings of the Compute Box. For further details on the available IP settings modes see Ethernet Interface setup.
Then do the following steps:
• Connect the Compute Box to your computer with the supplied UTP cable.
• Power the Compute Box with the supplied power supply
• Wait one minute for the Compute Box LED to turn from blue to green.

Installation
28
• Open a web browser on your computer and type in the IP address of the Compute Box (factory default is 192.168.1.1).
The sign-in page opens:
The factory default administrator login is:
Username: admin
Password: OnRobot
For the first login a new password needs to be entered: (password must be at least 8 characters long)

Installation
29
Once logged in, click on the Configuration menu.
Enable the EtherNet/IP scanner settings checkbox and set the values as shown above:
• IP address to connect to: Robot IP address (if default values are used enter 192.168.1.2)
• Origin-to-target instance id: 150
• Target-to-origin instance id: 100
• Configuration instance id: 102
• Requested packet interval (ms): 8
Finally, click the Save button to store the new settings.
NOTE:
Now unplug the UTP cable from your computer and plug it back to the robot.
4.4.3 Configure the Robot as an Adapter
This setup must be done in maintenance mode.

Installation
30
Press the key on the teach pendant and start the controller at the same time to activate maintenance mode.
When in maintenance mode, press the key on the teach pendant, then go to Security and select Safety mode
Enter password: 5555555555555555
NOTE:
Password may change based on controller. Contact your local Yaskawa representative for further details.
Press Enter and this will activate Safety mode.
Next, go to System > Setup > Option function. On the Ethernet IP CPU board got to Detail then select Adapter.

Installation
31
Select Enable and ensure the following parameters are set:
Input size: 64 byte
Output size: 64 byte
Configuration size: 0 word
Input instance: 150
Output instance: 100
Configuration instance: 102
Press Enter twice and select Yes to modify.
This will reveal the IO module screen. Press Enter on Line 19.

Installation
32
It will take you to external IO setup. Press Enter. Mapping will be shown.

Installation
33
Press Enter and confirm Yes to Modify and then the Option Function will be shown.
Next, select File > Initialize. Go to Safety Board Flash Reset and press Select.
Select Yes for reset and wait for the reset process to complete.
Power Cycle the robot controller and when the robot controller has restarted, verify communications have been established.
Press In/Out > Communication Monitor > Ethernet IP option and confirm connection status as OK.
This confirms the Compute Box has been set up as a Scanner Device and the robot as an adapter device.

Installation
34
4.4.4 Upload the OnRobot functions to the robot
In order to make it easier to use the OnRobot products, high level functions have been written and are provided in the USB stick.
To upload the OnRobot functions to the controller follow the steps below:
Connect the USB stick to the robot and then go to Main Menu > Ex. Memory > LOAD.
Go to JOB.
Installation
35
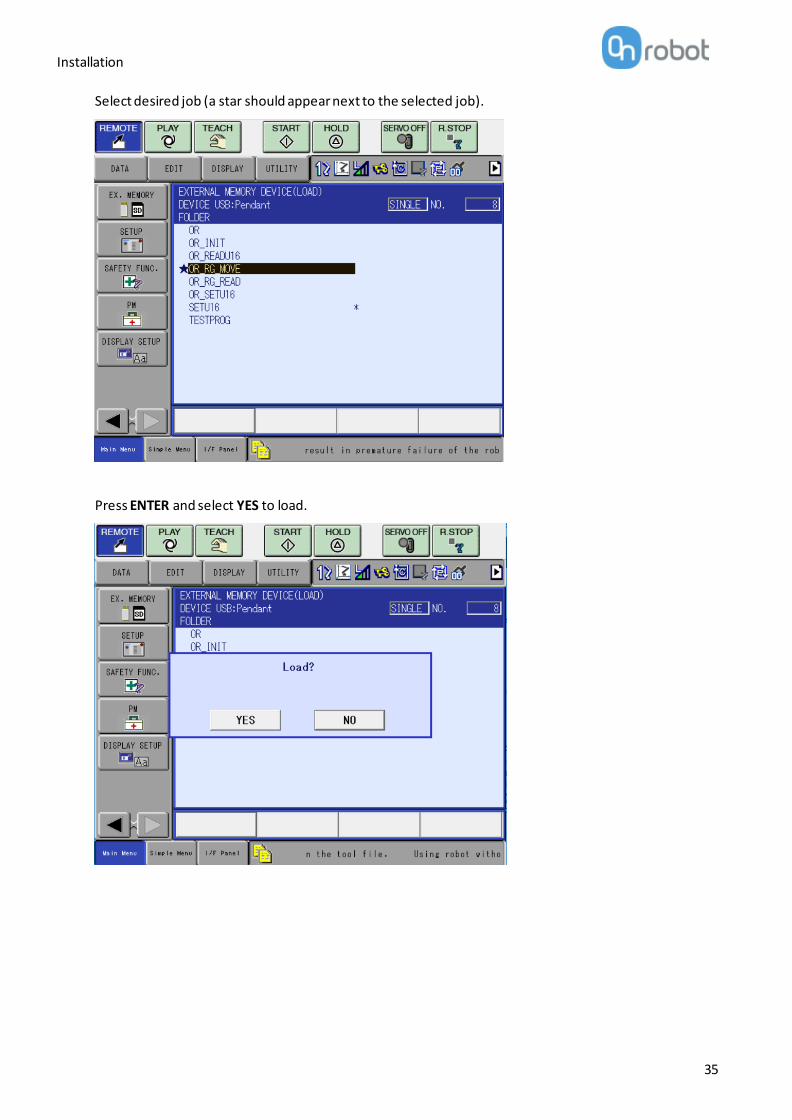
Select desired job (a star should appear next to the selected job).
Press ENTER and select YES to load.

Installation
36
Once loaded to the teach pendant you can press JOB > SELECT JOB Key and you can select and run the program as normal.
Installation is finished.

Operation
37
5 Operation
NOTE:
It is assumed that the Installation has finished successfully. If not, first do the installation steps in the previous section.
5.1 Overview
In order to make it easier to use the OnRobot products, high level functions have been written into the OR_xxxxx.JBI files. Some mandatory parameters, which shall be configured, are stored in the first program (OR_init.JBI). The functions(programs) are uploaded to the robot during the installation.
These high-level functions can be used by calling these functions in your program:
CALL OR_RG_MOVE(instance, width, force, wait)
When a function reads information, the value is stored and returned in the last argument:
CALL JOB:OR_RG_READ (1,”Width”)
GETS D000 $RV
All user program must start with calling the OR_INIT function. It is used to set up which tools are mounted on the robot, in which configuration:
CALL JOB:OR_INIT(toolCfID,fielbusCH)
The table for the correct toolCfgID value is shown in the OR_INIT function.
CAUTION:
Calling the OR_INIT() with parameters that does not match the attached tool(s) can result abnormal behavior.

Operation
38
5.2 List of functions
Function name: OR_INIT(toolCfgID, BitOffset)
Name Type Description
Input:
toolCfgID Double precision
Tool configuration ID:
Primary Secondary 101 - RG2-FT - 101 - RGx - 101 - VGx - 101 - Gecko - 101 HEX - - 102 HEX RGx - 102 HEX VGx - 102 HEX Gecko - 103 - RGx VGx 103 - RGx Gecko 103 - VGx Gecko 104 - RGx RGx 104 - VGx VGx 105 - VGx RGx
BitOffset Double precision
Destination where the EtherNet/IP mapping starts (typical value is 16)
Output: - - -
Behavior:
Function to initialize the communication for the current tool used. Make sure, that this function is called before using any other function. NOTE: The following global variables are initialized by the OR_INIT:
I095 I096 I097 I098 I099
Sharing essential parameters for the other functions. Modifying these parameters can result unpredicted behavior.
It is not recommended to remap these variables, but if it is inevitable, they shall be updated in every OR function.
Example: CALL JOB:OR_INIT(101,16)
Gecko .............................................. 39
HEX ................................................. 40
RG2/6.............................................. 41
RG2-FT ............................................ 42
VG10 / VGC10.................................. 44

Operation
39
Gecko
Function name: OR_GECKO_MOVE(instance, property, value)
Name Type Description
Input:
instance Double precision
1: single or primary - in dual configuration 2: secondary in dual configuration
property String “Pads”: Control pads position
“Preload”: Set preload force threshold
value Double precision
Property was “Pads”: 0 – Pads out 1 – Pads in
Property was “Preload”: 50,90,120 – Preload force threshold in N
Output: - -
Behavior: Retract or engage Gecko Pads or update Preload force threshold.
Example: CALL JOB:OR_GECKO_MOVE(1,”PADS”,0)
Function name: out = OR_GECKO_READ(instance, property)
Name Type Description
Input:
instance Double precision
1: single or primary - in dual configuration 2: secondary in dual configuration
property String
“Preload”: Read set preload force threshold
“US”: Read current distance sensor value “Pads”: Read Pads position
“Busy”: Check if pad motion is finished
“PD”: Check if part was detected
Output: out -
Property was “Type”: 0 – No device connected 48 – Gecko is connected
Property was “Preload”: 50, 90, 120 – preload force threshold in N
Property was “US”: 0 – 200: Distance sensor result in mm
Property was “Busy”: 0 – Pads movement are finished 1 – Pads are in motion
Property was “PD”: 0 – No part is detected 1 – Part is detected
Behavior: Read Gecko parameters
Example: CALL JOB:OR_GECKO_READ(1,”US”)
GETS D000 $RV

Operation
40
HEX
Function name: out = OR_HEX_READ(instance, property)
Name Type Description
Input:
instance Double precision
1: single or primary - in dual configuration 2: secondary in dual configuration
property String “FX”, “FY”, “FZ” : Select which force axis to read
“TX”, “TY”, “TZ” : Select which torque axis to read “Filter: To read the actual filter parameter
Output: out Double precision
Properties was “FX or FY or FZ”: Force value in N
Properties was “TX or TY or TZ”: Torque value in mNm
Properties was “Filter”: 0: No Filter 1: 500Hz 2:150Hz 3: 50Hz 4: 15Hz 5: 5Hz 6: 1.5Hz
Behavior: Return with the value of the requested property
Example: CALL JOB:OR_HEX_READ(1,”Fz”)
GETS D000 $RV
Function name: OR_HEX_SET(instance, property, value)
Name Type Description
Input:
instance Double precision
1: single or primary - in dual configuration 2: secondary in dual configuration
property String “Zero”: Taring the HEX sensors
“Filter”: Filter parameter for HEX sensors
value Double precision
Property was “Zero”: 1 – Execute tarring 2 – Undo tarring Property was “Filter”: 1: Request for no filtering 2: 500Hz 3:150Hz 4: 50Hz 5: 15Hz 6: 5Hz 7: 1.5Hz
Output: - -
Behavior: Modify sensor filtering or execute sensor zeroing
Example: CALL JOB:OR_HEX_SET(1,”Zero”,1)

Operation
41
RG2/6
Function name: OR_RG_MOVE(instance, width, force, wait)
Name Type Description
Input:
instance Double precision
1: single or primary - in dual configuration 2: secondary in dual configuration
width Double precision
Define the desired opening in mm
force Double precision
Define the desired gripping force in N
wait Double precision
0: return after command is executed (without waiting for execution to be complete) 1: return after fingers reached the position
Output: - - -
Behavior: Moves the fingers to the desired position
Example: CALL JOB:OR_RG_MOVE (1,100, 40, 1)
Function name: out = OR_RG_READ(instance, property)
Name Type Description
Input:
instance Double precision
1: single or primary - in dual configuration 2: secondary in dual configuration
property String
“Type”: to get connected device type
“Depth”: to get gripper depth (length)
“RDepth”: to get gripper relative depth (length)
“Width”: to get current width
“Safety”: to get current safety switch state “Busy”: to get if the gripper is in motion “GD”: to get if a grip was detected
Output: out Double precision
Property was “Type”: 0 – No Device 2 – RG2 6 – RG6
Property was “Depth”: actual gripper depth in mm
Property was “RDepth”: relative gripper depth in mm
Property was “Width”: actual gripper opening in mm
Property was ”Safety”: 0 – if gripper safety switches are not active 1 – if either gripper safety switch was pressed
Property was “Busy”: 0 – if gripper is not moving 1 – if gripper is moving
Property was “GD”: 0 – if grip is not detected 1 – if grip is detected
Behavior: Return with the value of the requested property
Example: CALL JOB:OR_RG_READ (1,”Width”)
GETS D000 $RV

Operation
42
RG2-FT
Function name: OR_RG2FT_MOVE(instance, width, force, wait)
Name Type Description
Input:
instance Double precision
1: single or primary - in dual configuration 2: secondary in dual configuration
width Double precision
Define the desired opening in mm
force Double precision
Define the desired gripping force in N
wait Double precision
0: return after command is executed (without waiting for execution to be complete) 1: return after fingers reached the position
Output: - - -
Behavior: Moves the fingers to the desired position
Example: CALL JOB:OR_RG2FT_MOVE (1,100, 40, 1)
Function name: out = OR_RG2FT_READ(instance, property)
Name Type Description
Input:
instance Double precision
1: single or primary - in dual configuration 2: secondary in dual configuration
property String
“Type”: to get the connected device type
“Width”: to get the current with “Busy”: to get if the gripper is in motion “GD”: to get if a grip was detected
Output: out Double precision
Properties was “Type”: 0 – No Device 2 – RG2FT
Property was “Width”: actual gripper opening in mm
Property was “Busy”: 0 – if gripper is not moving 1 – if gripper is moving
Property was “GD”: 0 – if grip is not detected 1 – if grip is detected
Behavior: Return with the value of the requested property
Example: CALL JOB:OR_RG2FT_READ (1,”Width”)
GETS D000 $RV

Operation
43
Function name: out = OR_RG2FT_READHEX(instance, sensor, property)
Name Type Description
Input:
instance Double precision
1: single or primary - in dual configuration 2: secondary in dual configuration
sensor String “L: To get LEFT HEX sensor data “R: To get RIGHT HEX sensor data “GEN: Parameters for both HEX
property String
“FX”, “FY”,FZ” : Select which force axis to read
“TX”, “TY”,TZ” : Select which torque axis to read “P”: To read proximity sensor date “Filter”: To read the actual filter parameter
Output: out Double precision
Properties was “FX or FY or FZ”: Force value in N
Properties was “TX or TY or TZ”: Torque value in mNm Properties was “P”: Proximity sensor data in mm
Properties was “Filter”: 0: No Filter 1: 500Hz 2:150Hz 3: 50Hz 4: 15Hz 5: 5Hz 6: 1.5Hz
Behavior: Return with the value of the requested property
Example: CALL JOB:OR_RG2FT_READHEX (1,”L”,”Fz”)
GETS D000 $RV
Function name: OR_RG2FT_SET(instance, property, value)
Name Type Description
Input:
instance Double precision
1: single or primary - in dual configuration 2: secondary in dual configuration
property String “Zero”: Taring the HEX sensors
“Filter”: Filter parameter for HEX sensors
value Double precision
Property was “Zero”: 1 – Execute tarring 2 – Undo tarring Property was “Filter”: 1: Request for no filtering 2: 500Hz 3:150Hz 4: 50Hz 5: 15Hz 6: 5Hz 7: 1.5Hz
Output: - -
Behavior: Modify sensor filtering or execute sensor zeroing
Example: CALL JOB:OR_RG2FT_SET(1,”Zero”,1)

Operation
44
VG10 / VGC10
Function name: OR_VG_PUMP(instance, vacuumA, vacuumB, waitfor)
Name Type Description
Input:
instance Double precision
1: single or primary - in dual configuration 2: secondary in dual configuration
vacuumA Double precision
Requested vacuum level for channel A, from 0 (off) to 100%
vacuumB Double precision
Requested vacuum level for channel B, from 0 (off) to 100%
wait Double precision
0: return after command is executed 1: return after requested vacuum level is reached
Output: - - -
Behavior: Sets the vacuum level for VG gripper
NOTE:
To increase product lifetime please do not use the VG above 90%
Example: CALL JOB:OR_VG_PUMP (1,50, 50, 1)
Function name: OR_VG_SETCURRENT(instance, current)
Name Type Description
Input:
instance Double precision
1: single or primary - in dual configuration 2: secondary in dual configuration
current Double precision
Maximum allowed current
Default: 500mA
Maximum: 1000mA
Output: - - -
Behavior: Increase the internal current limit, which is proportional to the airflow
Example: CALL JOB:OR_VG_SETCURRENT(1,500)
Operation
45
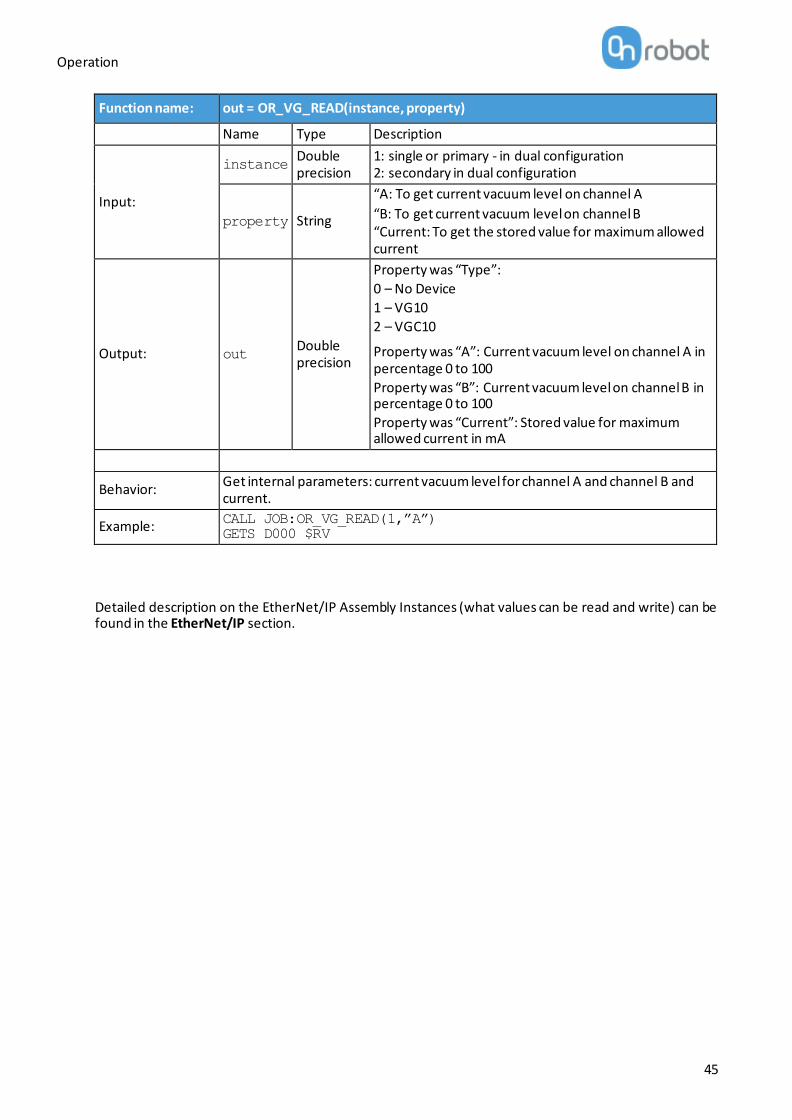
Function name: out = OR_VG_READ(instance, property)
Name Type Description
Input:
instance Double precision
1: single or primary - in dual configuration 2: secondary in dual configuration
property String
“A: To get current vacuum level on channel A
“B: To get current vacuum level on channel B “Current: To get the stored value for maximum allowed current
Output: out Double precision
Property was “Type”:
0 – No Device
1 – VG10
2 – VGC10
Property was “A”: Current vacuum level on channel A in percentage 0 to 100
Property was “B”: Current vacuum level on channel B in percentage 0 to 100
Property was “Current”: Stored value for maximum allowed current in mA
Behavior: Get internal parameters: current vacuum level for channel A and channel B and current.
Example: CALL JOB:OR_VG_READ(1,”A”)
GETS D000 $RV
Detailed description on the EtherNet/IP Assembly Instances (what values can be read and write) can be found in the EtherNet/IP section.

Operation
46
Mode II - OnRobot WebLogic

Installation
47
6 Installation
6.1 Overview
For a successful installation the following steps will be required:
• Mount the components
• Wire the cables
• Setup the software
In the following sections, these installation steps will be described.
6.2 Mounting
Required steps:
• Mount the robot dependent adapter
• Mount the Quick Changer option
• Mount the tool(s)
In the following three subsections these three mounting steps will be described.
6.2.1 Adapter(s)
For GP7, GP8 models
Adapter F
1 M5x10 screws (ISO14580 A4-70)
2 OnRobot adapter flange (ISO9409-1-31.5-4-M6)
3 Dowel pin Ø5x6 (ISO2338 h8)
4 Robot tool flange (ISO 9409-1-60-4-M5)
Use 5 Nm tightening torque.
For GP12 models

Installation
48
Adapter G
1 M4x10 screws (ISO14580 A4-70)
2 OnRobot adapter flange (ISO9409-1-31.5-8-M4)
3 Dowel pin Ø4x6 (ISO2338 h8)
4 Robot tool flange (ISO9409-1-62-8-M4)
Use 3 Nm tightening torque.
For HC10/DT models
Adapter H
1 M6x8 screws (ISO14580 A4-70)
2 OnRobot adapter flange (ISO9409-1-31.5-4-M6)
3 Dowel pin Ø6x8 (ISO2338 h8)
4 Robot tool flange (ISO 9409-1-80-4-M6)
Use 10 Nm tightening torque.

Installation
49
6.2.2 Quick Changer options
Quick Changer - Robot Side
Quick Changer - Robot Side
1 M6x8mm (ISO14580 8.8)
2 Quick Changer (ISO 9409-1-50-4-M6)
3 Dowel pin Ø6x10 (ISO2338 h8)
4 Adapter/ Robot tool flange (ISO 9409-1-50-4-M6)
Use 10 Nm tightening torque.
Dual Quick Changer
Dual Quick Changer
1 M6x20mm (ISO14580 8.8)
2 Dual Quick Changer
3 Dowel pin Ø6x10 (ISO2338 h8)
4 Adapter/ Robot tool flange (ISO 9409-1-50-4-M6)
Use 10 Nm tightening torque.

Installation
50
HEX-E/H QC
HEX-E/H QC
1 HEX-E/H QC sensor
2 M4x6mm (ISO14581 A4-70)
3 M6x8mm (NCN20146 A4-70)
4 HEX-E/H QC adapter
5 Adapter/ Robot tool flange (ISO 9409-1-50-4-M6)
Use 1.5 Nm tightening torque. for M4x6mm
Use 10 Nm tightening torque. for M6x8mm

Installation
51
6.2.3 Tools
Gecko .............................................. 51
RG2 ................................................. 52
RG2-FT ............................................ 53
RG6 ................................................. 54
VG10 ............................................... 55
VGC10 ............................................. 55
Quick Changer - Tool side ................. 56
Gecko
Step 1:
Move the tool close to the Quick Changer as illustrated.
The hook mechanism (rod and hook tongue) will keep the lower part locked once mounted.
Step 2:
Flip the tool until it is fully mated, and you hear a clicking sound.
To unmount the tool, press the aluminum button on the Quick Changer and repeat the steps in the reverse order.
CAUTION:
With a Dual Quick Changer the Gecko Gripper can only be mounted on the Secondary (2) side. Mounting on the Primary (1) side will prevent the devices to function correctly.

Installation
52
RG2
Step 1:
Move the tool close to the Quick Changer as illustrated.
The hook mechanism (rod and hook tongue) will keep the lower part locked once mounted.
Step 2:
Flip the tool until it is fully mated, and you hear a clicking sound.
To unmount the tool, press the aluminum button on the Quick Changer and repeat the steps in the reverse order.
To change the relative angle of the gripper to the Quick Changer:
• first remove the four M4x6 screws
• tilt the gripper between -90° and 90°
• then put the four M4x6 screws back and use 1.35 Nm tightening torque to fix it.
WARNING:
Never use the device while any of the four M4x6 screws are removed.
Installation
53
RG2-FT
Step 1:
Move the tool close to the Quick Changer as illustrated.
The hook mechanism (rod and hook tongue) will keep the lower part locked once mounted.
Step 2:
Flip the tool until it is fully mated, and you hear a clicking sound.
To unmount the tool, press the aluminum button on the Quick Changer and repeat the steps in the reverse order.
To change the relative angle of the gripper to the Quick Changer:
• first remove the four M4x6 screws
• tilt the gripper between -60° and 90°
• then put the four M4x6 screws back and use 1.35 Nm tightening torque to fix it.
WARNING:
Never use the device while any of the four M4x6 screws are removed.

Installation
54
RG6
Step 1:
Move the tool close to the Quick Changer as illustrated.
The hook mechanism (rod and hook tongue) will keep the lower part locked once mounted.
Step 2:
Flip the tool until it is fully mated, and you hear a clicking sound.
To unmount the tool, press the aluminum button on the Quick Changer and repeat the steps in the reverse order.
To change the relative angle of the gripper to the Quick Changer:
• first remove the four M4x6 screws
• tilt the gripper between -90° and 90°
• then put the four M4x6 screws back and use 1.35 Nm tightening torque to fix it.
WARNING:
Never use the device while any of the four M4x6 screws are removed.

Installation
55
VG10
Step 1:
Move the tool close to the Quick Changer as illustrated.
The hook mechanism (rod and hook tongue) will keep the lower part locked once mounted.
Step 2:
Flip the tool until it is fully mated, and you hear a clicking sound.
To unmount the tool, press the aluminum button on the Quick Changer and repeat the steps in the reverse order.
VGC10
Step 1:
Move the tool close to the Quick Changer as illustrated.
The hook mechanism (rod and hook tongue) will keep the lower part locked once mounted.
Step 2:
Flip the tool until it is fully mated, and you hear a clicking sound.
To unmount the tool, press the aluminum button on the Quick Changer and repeat the steps in the reverse order.

Installation
56
Quick Changer - Tool side
Step 1:
Move the tool close to the Quick Changer as illustrated.
The hook mechanism (rod and hook tongue) will keep the lower part locked once mounted.
Step 2:
Flip the tool until it is fully mated, and you hear a clicking sound.
To unmount the tool, press the aluminum button on the Quick Changer and repeat the steps in the reverse order.

Installation
57
6.3 Wiring
Four kind of cables have to be connected to wire the system properly:
• Tool data cable between the tool(s) and the Compute Box
• The provided Digital I/O wires between the Computer Box and the robot controller
• Ethernet communication cable between the Compute Box and your computer
• Power supply of the Compute Box
6.3.1 Tool data
Connect the data cable to the tool(s) then route the cable (blue line) to the Compute Box (CB) and use the supplied Velcro tape (black) to fix it.
NOTE:
Leave some extra cable length around the joints so that the cable is not pulled when the robot moves.
Also make sure that the cable bending radius is minimum 40mm (for the HEX-E/H QC it is 70mm)
Then, connect the other end to the Compute Box's DEVICES connector.
CAUTION:
Use only original OnRobot tool data cables.
6.3.2 Digital I/O wires
For KAWASAKI robots the two most recent controllers are:
The most common Yaskawa controllers are the standard YRC1000 and the YRC1000micro controller.
CB
bending radius
extra length
Robot controller

Installation
58
• For the YRC1000, the I/O breakout board CN308 (Part No. 178669-1) inside the control cabinet can be used to connect the Compute Box to the robot controller.
• For the YRC1000micro controller, use the I/O breakout board CN4 connector to connect the Compute Box to the robot controller.
Make sure that the robot is powered off completely.
First locate the DB37 connector for E-Series on the back side of the cabinet or the DX40-50P connector for the F-Series on the side of the cabinet. Prepare the mating connectors.
Check your digital I/O module installed in the control cabinet and configure the Compute Box DIP switches (red) accordingly:
For PNP type set the 1. and 2. DIP switches to OFF position (down).
For NPN type set the 1. and 2. DIP switches to ON position (up).
DIP switch 1: Digital Input mode
DIP switch 2: Digital Output mode
NOTE:
Do not change the DIP switch 3 and 4 otherwise the network settings will be changed.
(Please refer to the robot manual to check whether it is an NPN or a PNP type.)
NOTE:
Most Yaskawa controllers are in NPN configuration.
Plug in the supplied green pluggable connectors.
The supplied connector types are:
2 x Phoenix Contact MC 1,5/8-ST-3,5 Terminal Block
1 x Phoenix Contact MC 1,5/6-ST-3,5 Terminal Block

Installation
59
Wire the digital I/O wires from the Compute Box to the robot.
DO1-8: Digital outputs of the Compute Box (signals from the grippers/sensor to the robot)
DI1-8: Digital inputs of the Compute Box (signals from the robot to the grippers/sensor)
GND: To be used to have a common ground between the robot and the gripper/sensor
It is recommended to connect all 8 inputs and 8 outputs for simplicity.
CAUTION:
If some of the DO1-8 or DI1-8 wires will not be connected, make sure to unscrew it from the terminal block to avoid an accidental short circuit.
CAUTION:
The 24V and GND pins are only Reference Voltage Output. It cannot be used to power any equipment.
It is recommended to use the supplied wires only. If it is necessary to use different wire, use one that is shorter than 3 m.
Connect the Compute Box inputs to the robot outputs and the Compute Box outputs to robot inputs.
For simplicity, it is recommended to map the pins in order:
DO1 to the robot's Digital input 1
DO2 to the robot's Digital input 2
…
DO8 to the robot's Digital input 8
DI1 to the robot's Digital output 1
DI2 to the robot's Digital output 2
…
DI8 to the robot's Digital output 8

Installation
60
YRC1000
List of the important pins of the CN306 Breakout Board connectors:
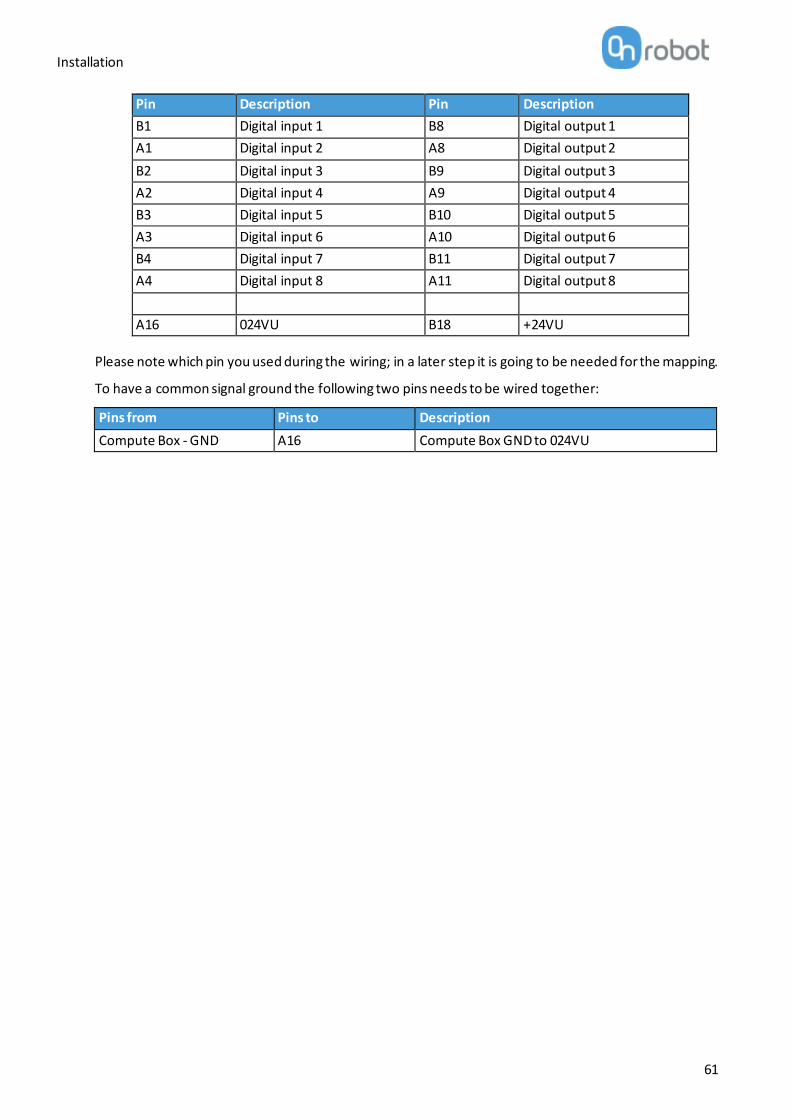
Installation
61
Pin Description Pin Description
B1 Digital input 1 B8 Digital output 1
A1 Digital input 2 A8 Digital output 2
B2 Digital input 3 B9 Digital output 3
A2 Digital input 4 A9 Digital output 4
B3 Digital input 5 B10 Digital output 5
A3 Digital input 6 A10 Digital output 6
B4 Digital input 7 B11 Digital output 7
A4 Digital input 8 A11 Digital output 8
A16 024VU B18 +24VU
Please note which pin you used during the wiring; in a later step it is going to be needed for the mapping.
To have a common signal ground the following two pins needs to be wired together:
Pins from Pins to Description
Compute Box - GND A16 Compute Box GND to 024VU

Installation
62
YRC1000micro
List of the important pins of the C4 breakout board connector:
Pin Description Pin Description
Digital input 1 Digital output 1
Digital input 2 29 Digital output 2
Digital input 3 13 Digital output 3
25 Digital input 4 30 Digital output 4
9 Digital input 5 16 Digital output 5
26 Digital input 6 33 Digital output 6
10 Digital input 7 17 Digital output 7
27 Digital input 8 50 Digital output 8
23 COMMON 15 24V+
Please note which pin you used during the wiring; in a later step it is going to be needed for the mapping.
To have a common signal ground the following two pins needs to be wired together:
Pins from Pins to Description
Compute Box - GND 23 Compute Box GND to COMMON
6.3.3 Ethernet cable
Connect the provided Compute Box (ETHERNET connector) and your computer with the supplied UTP cable.
This connection is only needed for programming.

Installation
63
CAUTION:
Use only original OnRobot ethernet cables or replace it with one that is shielded and no more than 3 meter long.
WARNING:
Check and make sure that the Compute Box enclosure (metal) and the robot controller enclosure (metal) are not connected (no galvanic connection between the two).
6.3.4 Power supply
Connect the supplied power supply to the Compute Box 24V connector.
NOTE:
To disconnect the power connector, make sure to pull the connector housing (where the arrows are shown) and not the cable.
CAUTION:
Use only original OnRobot power supplies.
Finally, power up the power supply that will power the Compute Box and the connected Tool(s).

Operation
64
7 Operation
NOTE:
It is assumed that the Installation has finished successfully. If not, first do the installation steps in the previous section.
7.1 Overview
OnRobot WebLogic requires to be programmed first with the help of a computer connected to the Compute box. Then it can run standalone without any Ethernet connection.
Steps to program it:
• Setup the Compute Box's Ethernet interface and connect to the Compute Box
• Open the Web Client on your computer to access the WebLogic menu
• Write your program in the WebLogic menu
The following subsections will guide you through these steps.

Operation
65
7.2 Ethernet Interface setup
A proper IP address must be set for the Compute Box and the robot/computer to be able to use the Ethernet interface. There are three ways how it could be configured (using the DIP switch 3 and 4):
• Auto mode (factory default)
This is the easiest way of getting the IP addresses to be configured for both the Compute Box and the robot/computer. It is recommended to start with this mode, so this is the factory default setting.
• Fixed IP mode (192.168.1.1)
If the Auto mode does not work, use this mode to have a fixed IP for the Compute Box. This requires a manual IP address configuration for the robot/computer. (This mode could also be used to reset the IP address to a known value if the Compute Box become unreachable in Advanced mode.)
• Advanced mode (any static IP/subnet mask)
If the Fixed IP address (192.168.1.1) is already in use in your network or a different subnet needs to be configured, in this mode the IP address and subnet mask can be changed to any value. This also requires a manual IP address configuration for the robot/computer.
NOTE:
To change between modes, first change the DIP switches and then the Compute Box power needs to be cycled for the changes to take effect.
Auto mode
Use the factory default settings (DIP switch 3 and 4 in OFF position).
In this case, the Compute Box has both Dynamic Host Configuration Protocol (DHCP) client, and DHCP server enabled.
DHCP Client enabled means, Compute Box will automatically obtain ("get") IP address FROM the connected robot/computer if that is capable of assigning ("give") IP to the Compute Box.
DHCP Server enabled means, Compute Box will automatically assign ("give") IP address TO the connected robot/computer if that was configured to obtain ("get") IP address automatically.
NOTE:
The assigned IP range is 192.168.1.100-105 (with subnet mask 255.255.255.0).
If the Compute Box is used in a company network where a DHCP server is already in use, it is recommended to disable the DHCP server of the Compute Box by setting DIP switch 4 to the ON position.
If no IP was assigned to the Compute Box within a minute, it will automatically get a fallback IP address (192.168.1.1).
NOTE:
If the Compute Box was in Advanced mode, first reset the IP setting by switching to Fixed IP mode and then switch back to Auto mode.

Operation
66
Fixed IP mode
Set the DIP switch 3 and 4 in ON position and cycle the power for the changes to take effect.
In this case the IP address of the Compute Box is set to 192.168.1.1 (subnet mask is 255.255.255). Both the DHCP Client and Server options are disabled.
Make sure to set the robot/computer IP address manually. To have a proper communication the robot/computer IP address must be in the range of 192.168.1.2 - 192.168.1.254.
Example robot/computer setting:
IP address: 192.168.1.2
Subnet mask: 255.255.255.0
Other settings like Gateway, DNS Server, etc. could be kept empty or set to 0.0.0.0.
Advanced mode
Set the DIP switch 3 in OFF and DIP switch 4 in ON position and cycle the power for the changes to take effect.
In this case the IP address of the Compute Box could be set to any value by using the Web Client. For more details see section Configuration menu.
In this mode, the DHCP server option is disabled.
Make sure to have a matching IP setting to your robot/computer network for a proper communication.
NOTE:
If the Compute Box become unreachable (due to improper or forgotten IP settings), switch to Fixed IP mode to reset the IP setting.

Operation
67
7.3 Web Client
To access the Web Client on your computer first the Ethernet interface needs to be set up to have a proper communication between your computer and the Compute Box. It is recommended to use Auto mode (for further details see section Ethernet Interface setup).
Then do the following steps:
• Connect the Compute Box to your computer with the supplied UTP cable.
• Power the Compute Box with the supplied power supply
• Wait one minute for the Compute Box LED to turn from blue to green.
• Open a web browser on your computer and type in the IP address of the Compute Box (factory default is 192.168.1.1).
The Sign-in page opens:
The factory default administrator login is:
Username: admin
Password: OnRobot

Operation
68
For the first login a new password needs to be entered: (password must be at least 8 characters long)
Once logged in you can access top menus. Select WebLogic menu.

Operation
69
7.4 OnRobot WebLogic menu
There are two tabs to choose from:
• Browser - manage (import/export, etc.) the WebLogic programs
• Program Editor - create/edit or run WebLogic programs
In the following these two will be described.
7.4.1 Browser
This tab lists the WebLogic programs that are stored on the Compute Box.
• To create a new program, go to the Program Editor tab.
• To edit a stored program, click on the pencil icon and it will be loaded in the Program Editor
• Any program can be deleted by clicking on the trash icon.
• Programs can be exported to your computer by clicking on the down arrow icon.
• Exported programs can be imported with the Import button.
NOTE:
The program name that are edited in the Program Editor is bolded.

Operation
70
7.4.2 Program Editor
This tab shows the currently edited WebLogic program.
WebLogic programs contains 1 or more "rows".
A row contains conditions (blue part) and commands (gray part) like this:
(If) DI1=1 (Then) RG2-Width=77 (force=20N)
(If the robot sets the Digital Input 1 (DI1) of the Compute Box to high, then open the RG2 gripper to 77 mm.)
Another row in a program can be like this:
(If) DI1=0 (Then) RG2-Width=20 (force=40N)
(If the robot sets the Digital Input 1 (DI1) of the Compute Box to low, then close the RG2 gripper to 20 mm.)
With the above two rows in a program an RG2/6 gripper could be operated (opened and closed) with a single Digital output of a robot, while the opening and closing width and force can be programmed to any value.
To execute a WebLogic program first make sure to enter a program name and click on the Save button to store it and then click on the Run button.

Operation
71
NOTE:
To make a program run automatically when the Compute Box is powered on just leave the program running while you power the Compute Box off.
To start a new program, click on the New button.
• To add a new row, click on the Add new conditions and commands.
• To delete a row, click on the icon.
• To move the row up or down click on the icons.
NOTE:
Conditions and commands are executed from the top to the bottom. Same commands at the bottom can override the ones at the top.
• To duplicate a row click on the icon.
• To disable a row (not to be executed) uncheck the checkbox next to the row number.
The rows must have at least one condition and at least one command to be executed.
Conditions
Conditions are the input fields marked by blue.
There are two types of conditions:
• Digital Input type - like DI4=1
• Device specific value type - like HEX Fx > 10N
These types of conditions can be combined with AND or OR logic to form a more complex condition:
If ( DI4=1 ) OR (HEX Fx > 10 N AND HEX Fx < 20N )
Condition is true if Fx is between 10N and 20N or robot has signaled high in Digital Input 4.
Digital inputs (DI1-DI8) can have the following three states: (click to cycle through the states)
• - Don’t care (this bit is masked and will give true result for the bit)
• - give logic true if Input bit is low
• -give logic true if Input bit is high

Operation
72
NOTE:
If no Digital Input type of condition is needed set DI1-DI8 to don't care.
For Device specific values first set the Select device by clicking on the arrow icon.
NOTE:
The list contains only the connected devices. If you would like to select a device that is not currently connected check the Show all devices checkbox.
For RG2/6, VG10 / VGC10 and Gecko there are three numbers after the device name:
• 0 - If the device is mounted on a Quick Changer or a HEX-E/H QC
• 1 - If the device is mounted on the Primary side of a Dual Quick Changer
• 2 - If the device is mounted on the Secondary side of a Dual Quick Changer
NOTE:
If a Device specific value type condition is not needed set it to -- Not selected -- and it will give true result.
Commands
Commands are the input fields marked with gray.
There are two types of commands:
• Device specific value type - like (set RG2 width 77 mm and with force = 20N)
• Digital Output type - like DO4=1 (set Digital Output 4 to logic high)
NOTE:
Both types are always executed so make sure that the not relevant part is always set to Don't change or -- Not selected --.
For Device specific value first set the Select device by clicking on the arrow icon.
NOTE:
The list contains only the connected devices. If you would like to select a device that is not currently connected check the Show all devices checkbox.
For RG2/6, VG10 / VGC10 and Gecko there are three numbers after the device name:
• 0 - If the device is mounted on a Quick Changer or a HEX-E/H QC
• 1 - If the device is mounted on the Primary side of a Dual Quick Changer
• 2 - If the device is mounted on the Secondary side of a Dual Quick Changer

Operation
73
Digital outputs (DO1-DO8) can have the following three states: (click to cycle through the states)
• - Don’t change
• - set the Output bit to logic low
• - set the Output bit to logic high
List of Device specific values
Gecko .............................................. 73
HEX-E/H QC ..................................... 74
RG2/6.............................................. 74
RG2-FT ............................................ 75
VG10 / VGC10.................................. 75
NOTE:
Each device has an OnStart condition that becomes True only once the device is connected or the program is started and then becomes immediately False. This can be used to detect if a device is connected or set any initial value on program start.
Gecko
Conditions Description
Preload Actual force applied to the pads [N] (below 50N it reads 0N)
Ultrasonic Actual distance measured from the bottom of the gripper to the object.[mm]
Pad position Actual position of the pads either In or Out
Pads worn If a Grip was detected and then object distance becomes more than 18mm (without the pads being pulled IN) the object is lost so the Pads are Bad otherwise reads Good.
Busy Pads are in motion
Grip While the pads are OUT if the Preload force is reached and the object distance is less than 18mm, then Grip becomes TRUE otherwise FALSE. (resets to FALSE by pulling the pads IN)
Commands Description
Pad position To pull the pads In or push the pads Out
Preload threshold To set the preload force limit that is used to detect a successful Grip.
Available options are: 50N, 90N, 120N
Reset error logs Clears the errors (e.g.: Pads worn)

Operation
74
HEX-E/H QC
Conditions Description
Bias TRUE if the sensor has been zeroed (biased).
F3D, T3D F3D= √𝐹𝑥2 + 𝐹𝑦2+𝐹𝑧2 [N]
T3D= √𝑇𝑥2 + 𝑇𝑦2+𝑇𝑧2 [Nm]
Fx, Fy, Fz, Tx, Ty, Tz Actual force [N] and torque [Nm] values
Commands Description
Bias Set to TRUE to zero the F/T sensor signals (not permanent, will revert on power reset)
RG2/6
Conditions Description
Width Actual width of the gripper [mm]
Busy True if the gripper is in motion (can only accept new commands when not busy)
Grip Internal or external grip is detected.
Safety pressed True if any of the gripper's safety switch is currently being pressed.
Safety triggered True if any of the gripper's safety switch is triggered.
Commands Description
Width Set the gripper to a new width [mm] with a gripping force [N]
Fingertip offset Set the fingertip offset from the inner side of the metal [mm]. Positive number means inward.
Power cycle
If safety switch stopped the gripper use this to get back to normal operation.
Resets the tool power for a second. If another gripper is connected, that will also be powered off and powered on for a second. (Make sure that during power off no part to will be dropped.)

Operation
75
RG2-FT
Conditions Description
Proximity (L,R) Actual values of the left and right fingertip proximity sensors [mm]
Width Actual width of the gripper [mm]
Busy True if the gripper is in motion (can only accept new commands when not busy)
Grip Internal or external grip is detected.
FT Bias TRUE if the sensor has been zeroed (biased).
Left and Right F3D,T3D
F3D= √𝐹𝑥2 + 𝐹𝑦2+𝐹𝑧2 [N] where Fx, Fy, Fz are the fingertip sensor force components
T3D= √𝑇𝑥2 + 𝑇𝑦2+𝑇𝑧2 [Nm] where Tx, Ty, Tz are the fingertip sensor torque components
Both F3D,T3D The combined F3D and T3D acting on an object that the gripper gripped on
Commands Description
Width Set the gripper to a new width [mm] with a gripping force [N]
Bias Set to TRUE to zero the F/T sensor signals (not permanent, will revert on power reset)
VG10 / VGC10
Conditions Description
Actual vacuum A
Actual vacuum B Actual vacuum level [0-80%] for channel A and channel B
Commands Description
Current limit Set the current limit (0-1000mA), default is 500mA
Grip Sets the vacuum level (0-80%) for channel A (param1) and channel B (param2)
Idle Switch of the motor but keep the valve closed for channel A, B or A+B
Release Opens the valve to quickly release the vacuum for channel A, B or A+B

Additional Software Options
76
8 Additional Software Options
8.1 Compute Box
8.1.1 Interfaces
There are two interface types that could be used:
• Ethernet interface
This interface can be used to access the Web Client that can be used to monitor, control, and update the grippers/devices. Furthermore, via this interface the OnRobot WebLogic can also be accessed to program the Digital I/O Interface.
• Digital I/O interface
This interface could be used to communicate via simple digital I/O lines with the robots. There are 8 digital input and 8 digital output that could be used. These inputs and outputs can be programmed through the OnRobot WebLogic that requires the Ethernet interface to be used (only for programming time).
8.1.2 Web Client
To access the Web Client on your computer first the Ethernet interface needs to be set up to have a proper communication between your computer and the Compute Box. It is recommended to use Auto mode (for further details see section Ethernet Interface Setup).
Then do the following steps:
• Connect the Compute Box to your computer with the supplied UTP cable.
• Power the Compute Box with the supplied power supply
• Wait one minute for the Compute Box LED to turn from blue to green.
• Open a web browser on your computer and type in the IP address of the Compute Box (factory default is 192.168.1.1).

Additional Software Options
77
The Sign-in page opens:
The factory default administrator login is:
Username: admin
Password: OnRobot
For the first login a new password needs to be entered: (password must be at least 8 characters long)
Once signed in the following top menus appear:
• Devices - Monitor and control the connected devices (e.g.: grippers)
• Configuration - Change the Compute Box's settings
• WebLogic - Program the Digital I/O interface through OnRobot WebLogic
• Paths - Import/export the recorded Paths (not available to all robots)
• Update - Update the Compute Box and the devices

Additional Software Options
78
• - Account settings (e.g.: change password, add new user)
• - Select the language of the Web Client
In the following, these menus will be described.
Devices menu
To control/monitor a device click on the Select button.
Gecko .............................................. 79
HEX-E/H QC ..................................... 81
RG2/6.............................................. 82
RG2-FT ............................................ 84
VG10 / VGC10.................................. 86

Additional Software Options
79
Gecko
There is a force and an ultrasonic distance sensor in the gripper. The actual values of these sensors are:
• Preload - the current forces acting on the pads (below 50N it displays 0N)
• Object distance - how far the object is from the bottom of the gripper
The state of the gripper could be:
• Pad position- Pads are either In or Out (out means ready for gripping)
• Part detected - the set preload force limit is reached, and object distance is < 18mm
• Busy - the pads are moving
The pads can be controlled by clicking on the Out and In buttons.
The Preload threshold value can be changed if higher preload force is required for a proper grip.
This value is only used to generate a proper Part detected signal.

Additional Software Options
80
NOTE:
Preload threshold value set on this page is not stored permanently and are restored to the default value (90N) on power reset.
If a part was detected and the object distance becomes > 18mm (part is lost) BEFORE the pads are set to be IN (normal release) the Pads worn warning is displayed in the Device info tab.
To reset the warning:
• either click on the RESET ERRORS button
• or click on the Out button.

Additional Software Options
81
HEX-E/H QC
The force and torque values (Fx,Fy,Fz and Tx,Ty,Tz) are shown in N/Nm.
The Zero toggle switch can be used to zero the force and torque reading.
NOTE:
Zero value set on this page is not stored permanently and are restored to the default values on power reset.

Additional Software Options
82
RG2/6
The state of the gripper could be:
• Busy - the gripper is moving
• Grip detected - the set force limit is reached but the set width is not.
The status of the two safety switch shows:
• Pushed - the safety switch 1/2 is still being pushed
• Triggered - the safety switch 1/2 has been activated and gripper is stopped.
To recover from a Triggered state:
• Check if any of the safety switch is being pushed
• If yes, remove the object pushing the switch

Additional Software Options
83
• Click on Power cycle to power all devices off and then on to recover.
Fingertip offset must be set according to the current fingertips attached to the gripper. Offset is measured from the inner mating face of the bar metal fingertips. To save the value to the gripper permanently click Save.
The gripper can be controlled by adjusting the Force and Width value. First set the required gripping force and then adjust the width slider that will immediately control the gripper.

Additional Software Options
84
RG2-FT
The force and torque values (Fx,Fy,Fz and Tx,Ty,Tz) are shown in N/Nm along with the Proximity sensor values (optical distance sensor built in the fingertip) are show in mm for the left and right fingertip sensor.
The Zero toggle switch can be used to zero the force and torque reading.

Additional Software Options
85
NOTE:
Zero value set on this page is not stored permanently and are restored to the default values on power reset.
The Proximity Offset can be used to calibrate the proximity reading. The calibration requires the following steps to be done:
• Write 0 mm to the Left and Right edit box and click on the Save button.
• Close the gripper fully (set the Width to 0) while you hold a white paper between the fingertips.
• Read the actual Left and Right Proximity values (e.g.: 19mm and 25mm)
• Write these values to the Left and Right edit boxes and click on the Save button to store it permanently.
• Open the gripper and the calibration is finished.
NOTE:
Setting the offsets too high may clip the proximity reading at 0 mm (negative distance is not shown). In case of clipping (reading 0 mm), try to decrease the offset values.
The gripper can be controlled by adjusting the Force and Width value. First set the required gripping force and then adjust the width slider that will immediately control the gripper.

Additional Software Options
86
VG10 / VGC10
The actual vacuum level for Channel A and Channel B can be seen in percentage (in the range of 0…80 kPa vacuum). The actual value of the Power limit is shown in mA.
The Power limit can be adjusted in the range of 0...1000mA with the slider.
NOTE:
The power limit set in this page is not stored permanently and always restored to the default value on power reset.
Higher power limit value means the required vacuum level is reached faster (higher airflow), but if it is set too fast overshoot may occur.
Low power limit may not be sufficient for higher percentage of vacuum and the target vacuum level may not be reached.
The Channel A and Channel B vacuum level can be set individually or in tandem by checking the Lock checkbox.
Make sure to set high enough vacuum before you grip and lift any object.
To release the gripped object, click on the Release button.

Additional Software Options
87
Configuration menu
Network settings:
The MAC address is a world-wide unique identifier that is fixed for the device.
The Network mode drop-down menu can be used to decide if the Compute Box will have a static or a dynamic IP address:
• If it is set to Dynamic IP, the Compute Box expects an IP address from a DHCP server. If the network that the device is connected to has no DHCP server, then the fixed 192.168.1.1 IP is used for the device (after 60 seconds of timeout).
• If it is set to Static IP, then a fixed IP address and subnet mask must be set.
• If it is set to Default Static IP, the fixed IP revert to the factory default and cannot be changed.
After all parameters are set, click on the Save button to store the new values permanently. Wait 1 minute and reconnect to the device using the new settings.

Additional Software Options
88
Compute Box settings:
In case, more than one Compute Box is used within the same network, for identification purpose any user specific name can be entered to the Display name.
EtherNet/IP scanner settings:
NOTE:
This is a special option of the EtherNet/IP connection for some robots.
In case when the robot is the Adapter and the Compute Box needs to be the Scanner the following addition information is required for the communication:
• IP address to connect to - the robot IP address
• Origin-to-target instance id - refer to the robot's EtherNet/IP manual (Scanner mode)
• Target-to-origin instance id - refer to the robot's EtherNet/IP manual (Scanner mode)
• Configuration instance id - refer to the robot's EtherNet/IP manual (Scanner mode)
• Requested packet interval (ms) - RPI value in ms (minimum 4)
Check the checkbox and the Compute Box will try to automatically connect to the robot (via the given IP address).

Additional Software Options
89
Paths menu
NOTE:
The Path feature may not be available to your robot type.
This page can be used to import, export, and delete the previously recorded paths. In this way a Path can be copied to a different Compute Box.
To import a previously exported Path (.ofp file) click on Import and browse for the file.
The available Paths are listed at the end of the page. Any paths can be exported and downloaded as a .ofp file or permanently deleted to free up the list if a path is not needed anymore.
NOTE:
Always make sure that you do not delete any path that is currently in use in any of your robot programs. Otherwise the path will need to be re-recorded, since the delete operation cannot be undone.
The Compute Box can store up to 100 Mbytes of paths that is roughly equal to 1000 hours of recordings.

Additional Software Options
90
Update menu
This page can be used to update the software on the Compute Box and the firmware on the devices.
Start the software update by clicking on the Browse button to browse for the .cbu software update file.
Then the Browse button will turn to Update.
Click on that Update button to start the software update process:
CAUTION:
During the update process (takes about 5-10 minutes) DO NOT unplug any device or close the browser window. Otherwise the updated device could be damaged.

Additional Software Options
91
If the update is finished and was successful, the following message is shown:
Now disconnect the device and use it as usual.
NOTE:
If the software update failed, please contact your distributor.
The firmware update is only required when any of the components is out of date.
To start the firmware update, click on UPDATE button in the firmware section of the page.
CAUTION:
During the update process (takes about 5-10 minutes) DO NOT unplug any device or close the browser window. Otherwise the updated device could be damaged.
If the update is finished and was successful, the following message is shown:
Now disconnect the device and use it as usual.
NOTE:
If the update is failed, please contact your distributor.

Additional Software Options
92
Account settings
This menu can be used to:
• See the currently sign-id user
• Go to Account settings
• Sign-out
Account settings:
This page has two tabs:
• My profile - to see and update the currently logged in users profile (e.g.: change password)
• Users - to manage users (e.g.: add/remove/edit)
On the My profile tab to change any profile data (e.g.: password) click on the Update profile button.

Additional Software Options
93
On the Users tab click on the Add new user button to add more users:
There are three user levels:
• Administrator
• Operator
• User
Fill in the user information and click Save.
Later on to change any user information just click on the edit icon.

Additional Software Options
94
To prevent a user to sign-in either could be:
• deactivated by changing its Active status in the edit mode
• or removed by clicking the delete icon.

Additional Software Options
95
8.2 EtherNet/IP
The OnRobot multi-device EtherNet/IP adapter can be accessed via scanner device (e.g. a robot, a PLC controller). Class 1 (implicit) and Class 3 (explicit) connections are available.
NOTE:
EtherNet/IP EDS file (v1.13 - MAJOR version 1 and MINOR version 13) is provided with the devices and can be located on the USB stick.
8.2.1 Available connections and assembly instances
Every device and device combination have 3 connections implemented:
• Exclusive Owner - RECOMMENDED to be used
• Input-only
• Listen-only
Every connection has an [Input / Target-to-Origin / Producing assembly] - [Output / Origin-to-Target / Consuming assembly] pair.
All assemblies are contained in Class 4 and have the single Attribute 3 implemented.
NOTE:
There is no Configuration Instance implemented, if required use instance number 0 and data size 0.
The following assembly instances are available for the single devices and device combinations:
HEX-E/H QC ..................................... 96
RG2-FT ............................................ 97
RG2/6.............................................. 99
VG10 / VGC10.................................101
Gecko .............................................103
HEX-E/H QC + RG2/6 .......................105
HEX-E/H QC + VG10 / VGC10 ...........108
HEX-E/H QC + Gecko .......................110
RG2/6 + VG10 / VGC10....................112
RG2/6 + Gecko................................116
VG10 / VGC10 + Gecko ....................120

Additional Software Options
96
HEX-E/H QC
T->O assembly id: 100
T->O data size: 24 bytes
T->O parameters:
Parameter name Bytes Type Comments Start bit
HEX Device connected 2 UINT 16 0: Disconnected 64: HEX is connected
1
HEX Status 4 UINT 32 0: No error 17
HEX Filter 2 UINT 16 See below 49
HEX Fx 2 INT 16 1/10 N 65
HEX Fy 2 INT 16 1/10 N 81
HEX Fz 2 INT 16 1/10 N 97
HEX Tx 2 INT 16 1/100 Nm 113
HEX Ty 2 INT 16 1/100 Nm 129
HEX Tz 2 INT 16 1/100 Nm 145
Reserved 4 161
O->T assembly id: 101
O->T data size: 16 bytes
O->T parameters:
Parameter name Bytes Type Comments Start bit
HEX Zero 2 UINT 16 0: Ignored 1: Zero 2: Unzero
1
HEX Filter 2 UINT 16
0: Ignored 1: No filtering 2: 500 Hz 3: 150 Hz 4: 50 Hz 5: 15 Hz 6: 5 Hz 7: 1.5 Hz
17
Reserved 12 33

Additional Software Options
97
RG2-FT
T->O assembly id: 102
T->O data size: 64 bytes
T->O parameters:
Parameter name Bytes Type Comments Start bit
RG2-FT Device connected 2 UINT 16 0: Disconnected 34: RG2-FT is Connected
1
Left HEX Status 4 UINT 32 0: No error 17
Left HEX Filter 2 UINT 16 See below 49
Left HEX Fx 2 INT 16 1/10 N 65
Left HEX Fy 2 INT 16 1/10 N 81
Left HEX Fz 2 INT 16 1/10 N 97
Left HEX Tx 2 INT 16 1/100 Nm 113
Left HEX Ty 2 INT 16 1/100 Nm 129
Left HEX Tz 2 INT 16 1/100 Nm 145
Reserved 4 161
Right HEX Status 4 UINT 32 0: No error 193
Right HEX Filter 2 UINT 16 See below 225
Right HEX Fx 2 INT 16 1/10 N 241
Right HEX Fy 2 INT 16 1/10 N 257
Right HEX Fz 2 INT 16 1/10 N 273
Right HEX Tx 2 INT 16 1/100 Nm 289
Right HEX Ty 2 INT 16 1/100 Nm 305
Right HEX Tz 2 INT 16 1/100 Nm 321
Reserved 4 337
Left Proximity Distance 2 INT 16 mm 369
Left Proximity Raw Dist. 2 INT 16 mm 385
Right Proximity Distance 2 INT 16 mm 401
Right Proximity Raw Dist. 2 INT 16 mm 417
RG Actual width 2 INT 16 1/10 mm 433
RG Status 2 UINT 16
0b___1: Busy 0b__1_: Grip detected 0b_1__: Left Proximity has error 0b1___: Right Proximity has error
449
Reserved 6 465

Additional Software Options
98
O->T assembly id: 103
O->T data size: 32 bytes
O->T parameters:
Parameter name Bytes Type Comments Start bit
RG Target Width 2 UINT 16 1/10 mm 1
RG Target Force 2 UINT 16 1/10 N 17
RG Control 2 UINT 16 0: Ignored 1: Move 2: Stop
33
HEX Zero 2 UINT 16 0: Ignored 1: Zero 2: Unzero
49
HEX Filter 2 UINT 16
0: Ignored 1: No filtering 2: 500 Hz 3: 150 Hz 4: 50 Hz 5: 15 Hz 6: 5 Hz 7: 1.5 Hz
65
Left Proximity Custom Offset 2 UINT 16 mm 81
Right Proximity Custom Offset 2 UINT 16 mm 97
Proximity Store Offset 2 UINT 16 0: Ignored 1: Store actual measured value 2: Store custom offset value
113
Reserved 16 129

Additional Software Options
99
RG2/6
NOTE:
This assembly instance can be used for both single and dual gripper configuration. Not only dual RG2 or dual RG6 but mixed configuration is also possible (RG2+RG6 or RG6+RG2). When used in single gripper configuration always use the Primary (Prim.) values.
T->O assembly id: 104
T->O data size: 32 bytes
T->O parameters:
Parameter name Bytes Type Comments Start bit
Prim. RG Device connected 2 UINT 16 0: Disconnected 32: RG2 is connected 33: RG6 is connected
1
Prim. RG Actual Depth 2 INT 16 1/10 mm 17
Prim. RG Actual Relative Depth 2 INT 16 1/10 mm 33
Prim. RG Actual Width 2 INT 16 1/10 mm (with fingertip offset) 49
Prim. RG Status 2 UINT 16
0b______1: 1 when in motion, 0 when not. The gripper will only accept new commands when 0. 0b_____1_: Internal- or external grip is detected. 0b____1__: Safety switch 1 is pushed. 0b___1___: Safety circuit 1 is activated. The gripper will not move while this flag is high; can only be reset by power cycling the gripper. 0b__1____: Safety switch 2 is pushed. 0b_1_____: Safety circuit 2 is activated. The gripper will not move while this flag is high; can only be reset by power cycling the gripper. 0b1______: General safety error. Possible cause: the gripper is booted with some safety switch pressed or hardware error.
65
Reserved 6 81
Sec. RG Device connected 2 UINT 16 0: Disconnected 32: RG2 is connected 33: RG6 is connected
129
Sec. RG Actual Depth 2 INT 16 1/10 mm 145
Sec. RG Actual Relative Depth 2 INT 16 1/10 mm 161
Sec. RG Actual Width 2 INT 16 1/10 mm (with fingertip offset) 177
Sec. RG Status 2 UINT 16 Same as above 193
Reserved 6 209

Additional Software Options
100
O->T assembly id: 105
O->T data size: 32 bytes
O->T parameters:
Parameter name Bytes Type Comments Start bit
Prim. RG Target Width 2 UINT 16 1/10 mm (corrected with fingertip offset ) 1
Prim. RG Target Force 2 UINT 16 1/10 N 17
Prim. RG Control 2 UINT 16 0: Ignored 1: Start motion to target 2: Stop the current motion
33
Prim. RG Custom Fingertip offset 2 INT 16 Offset measured from metal (1/10mm) 49
Prim. RG Store Fingertip offset 2 UINT 16 0: Ignored 1: Store offset
65
Prim. RG Reset Tool Power 2 UINT 16 0: Ignored 1: Reset
81
Reserved 4 97
Sec. RG Target Width 2 UINT 16 1/10 mm (corrected with fingertip offset ) 129
Sec. RG Target Force 2 UINT 16 1/10 N 145
Sec. RG Control 2 UINT 16 0: Ignored 1: Start motion to target 2: Stop the current motion
161
Sec. RG Custom Fingertip offset 2 INT 16 Offset measured from metal (1/10mm) 177
Sec. RG Store Fingertip offset 2 UINT 16 0: Ignored 1: Store offset
193
Sec. RG Reset Tool Power 2 UINT 16 0: Ignored 1: Reset
209
Reserved 4 225

Additional Software Options
101
VG10 / VGC10
NOTE:
This assembly instance can be used for both single and dual gripper configuration. When used in single gripper configuration always use the Primary (Prim.) values.
T->O assembly id: 106
T->O data size: 32 bytes
T->O parameters:
Parameter name Bytes Type Comments Start bit
Prim. VG Device connected 2 UINT 16 0: Disconnected 16: VG10 is connected 17: VGC10 is connected
1
Prim. VG Current limit 2 UINT 16 mA 17
Prim. VG CH A actual vacuum 2 UINT 16 1/10 % 33
Prim. VG CH B actual vacuum 2 UINT 16 1/10 % 49
Reserved 8 65
Sec. VG Device connected 2 UINT 16 0: Disconnected 16: VG10 is connected 17: VGC10 is connected
129
Sec. VG Current limit 2 UINT 16 mA 145
Sec. VG CH A actual vacuum 2 UINT 16 1/10 % 161
Sec. VG CH B actual vacuum 2 UINT 16 1/10 % 177
Reserved 8 193
O->T assembly id: 107
O->T data size: 32 bytes
O->T parameters:

Additional Software Options
102
Parameter name Bytes Type Comments Start bit
Prim. VG CH A Control 2 UINT 16
0: Ignore 1: Grip 2: Idle 3: Release
1
Prim. VG CH B Control 2 UINT 16 Same as Channel A 17
Prim. VG CH A Target Vacuum 2 UINT 16 % 33
Prim. VG CH B Target Vacuum 2 UINT 16 % 49
Prim. VG Current limit 2 UINT 16 mA 65
Reserved 6 81
Sec. VG CH A Control 2 UINT 16
0: Ignore 1: Grip 2: Idle 3: Release
129
Sec. VG CH B Control 2 UINT 16 Same as Channel A 145
Sec. VG CH A Target Vacuum 2 UINT 16 % 161
Sec. VG CH B Target Vacuum 2 UINT 16 % 177
Sec. VG Current limit 2 UINT 16 mA 193
Reserved 6 209

Additional Software Options
103
Gecko
NOTE:
This assembly instance can be used for both single and dual gripper configuration. When used in single gripper configuration always use the Primary (Prim.) values.
T->O assembly id: 108
T->O data size: 32 bytes
T->O parameters:
Parameter name Bytes Type Comments Start bit
Prim. Gecko Device connected 2 UINT 16 0: Disconnected 48: Gecko is connected
1
Prim. Gecko Status 2 UINT 16
0b___1: Part detected 0b__1_: Pads worn 0b_1__: Pads OUT 0b1___: Busy
17
Prim. Gecko Last Error Code 2 UINT 16 0: No error 33
Prim. Actual Gecko Preload Force
2 INT 16 1/100 N 49
Prim. Actual Gecko Ultrasonic Sensor Value
2 INT 16 1/100 mm 65
Reserved 6 81
Sec. Gecko Device connected 2 UINT 16 0: Disconnected 48: Gecko is connected
129
Sec. Gecko Status 2 UINT 16 Same as above 145
Sec. Gecko Last Error Code 2 UINT 16 0: No error 161
Sec. Actual Gecko Preload Force
2 INT 16 1/100 N 177
Sec. Actual Gecko Ultrasonic Sensor Value
2 INT 16 1/100 mm 193
Reserved 6 209
O->T assembly id: 109
O->T data size: 32 bytes
O->T parameters:

Additional Software Options
104
Parameter name Bytes Type Comments Start bit
Prim. Gecko Pad Control 2 UINT 16 0: Ignored 1: Push Pads OUT 2: Pull Pads IN
1
Prim. Gecko Preload Force Threshold
2 UINT 16
0: Ignored 1: 50N 2: 90N 3: 120N
17
Prim. Gecko Reset Error Logs 2 UINT 16 0: Do not reset, keep logging 1: Reset and disable logging
33
Reserved 10 49
Sec. Gecko Pad Control 2 UINT 16 0: Ignored 1: Push Pads OUT 2: Pull Pads IN
129
Sec. Gecko Preload Force Threshold
2 UINT 16
0: Ignored 1: 50N 2: 90N 3: 120N
145
Sec. Gecko Reset Error Logs 2 UINT 16 0: Do not reset, keep logging 1: Reset and disable logging
161
Reserved 10 177

Additional Software Options
105
HEX-E/H QC + RG2/6
T->O assembly id: 150
T->O data size: 40 bytes
T->O parameters:

Additional Software Options
106
Parameter name Bytes Type Comments Start bit
HEX Device connected 2 UINT 16 0: Disconnected 64: HEX is connected
1
HEX Status 4 UINT 32 0: No error 17
HEX Filter 2 UINT 16 See below 49
HEX Fx 2 INT 16 1/10 N 65
HEX Fy 2 INT 16 1/10 N 81
HEX Fz 2 INT 16 1/10 N 97
HEX Tx 2 INT 16 1/100 Nm 113
HEX Ty 2 INT 16 1/100 Nm 129
HEX Tz 2 INT 16 1/100 Nm 145
Reserved 4 161
Prim. RG Device connected 2 UINT 16 0: Disconnected 32: RG2 is connected 33: RG6 is connected
193
Prim. RG Actual Depth 2 INT 16 1/10 mm 209
Prim. RG Actual Relative Depth 2 INT 16 1/10 mm 225
Prim. RG Actual Width 2 INT 16 1/10 mm (with fingertip offset) 241
Prim. RG Status 2 UINT 16
0b______1: 1 when in motion, 0 when not. The gripper will only accept new commands when 0. 0b_____1_: Internal- or external grip is detected. 0b____1__: Safety switch 1 is pushed. 0b___1___: Safety circuit 1 is activated. The gripper will not move while this flag is high; can only be reset by power cycling the gripper. 0b__1____: Safety switch 2 is pushed. 0b_1_____: Safety circuit 2 is activated. The gripper will not move while this flag is high; can only be reset by power cycling the gripper. 0b1______: General safety error. Possible cause: the gripper is booted with some safety switch pressed or hardware error.
257
Reserved 6 273

Additional Software Options
107
O->T assembly id: 151
O->T data size: 32 bytes
O->T parameters:
Parameter name Bytes Type Comments Start bit
HEX Zero 2 UINT 16 0: Ignored 1: Zero 2: Unzero
1
HEX Filter 2 UINT 16
0: Ignored 1: No filtering 2: 500 Hz 3: 150 Hz 4: 50 Hz 5: 15 Hz 6: 5 Hz 7: 1.5 Hz
17
Reserved 12 33
Prim. RG Target Width 2 UINT 16 1/10 mm (corrected with fingertip offset )
129
Prim. RG Target Force 2 UINT 16 1/10 N 145
Prim. RG Control 2 UINT 16 0: Ignored 1: Start motion to target 2: Stop the current motion
161
Prim. RG Custom Fingertip offset 2 INT 16 Offset measured from metal (1/10mm) 177
Prim. RG Store Fingertip offset 2 UINT 16 0: Ignored 1: Store offset
193
Prim. RG Reset Tool Power 2 UINT 16 0: Ignored 1: Reset
209
Reserved 4 225

Additional Software Options
108
HEX-E/H QC + VG10 / VGC10
T->O assembly id: 152
T->O data size: 40 bytes
T->O parameters:
Parameter name Bytes Type Comments Start bit
HEX Device connected 2 UINT 16 0: Disconnected 64: HEX is connected
1
HEX Status 4 UINT 32 0: No error 17
HEX Filter 2 UINT 16 See below 49
HEX Fx 2 INT 16 1/10 N 65
HEX Fy 2 INT 16 1/10 N 81
HEX Fz 2 INT 16 1/10 N 97
HEX Tx 2 INT 16 1/100 Nm 113
HEX Ty 2 INT 16 1/100 Nm 129
HEX Tz 2 INT 16 1/100 Nm 145
Reserved 4 161
Prim. VG Device connected 2 UINT 16 0: Disconnected 16: VG10 is connected 17: VGC10 is connected
193
Prim. VG Current limit 2 UINT 16 mA 209
Prim. VG CH A actual vacuum 2 UINT 16 1/10 % 225
Prim. VG CH B actual vacuum 2 UINT 16 1/10 % 241
Reserved 8 257
O->T assembly id: 153
O->T data size: 32 bytes
O->T parameters:

Additional Software Options
109
Parameter name Bytes Type Comments Start bit
HEX Zero 2 UINT 16 0: Ignored 1: Zero 2: Unzero
1
HEX Filter 2 UINT 16
0: Ignored 1: No filtering 2: 500 Hz 3: 150 Hz 4: 50 Hz 5: 15 Hz 6: 5 Hz 7: 1.5 Hz
17
Reserved 12 33
Prim. VG CH A Control 2 UINT 16
0: Ignore 1: Grip 2: Idle 3: Release
129
Prim. VG CH B Control 2 UINT 16 Same as Channel A 145
Prim. VG CH A Target Vacuum 2 UINT 16 % 161
Prim. VG CH B Target Vacuum 2 UINT 16 % 177
Prim. VG Current limit 2 UINT 16 mA 193
0 Reserved 6 209

Additional Software Options
110
HEX-E/H QC + Gecko
T->O assembly id: 154
T->O data size: 40 bytes
T->O parameters:
Parameter name Bytes Type Comments Start bit
HEX Device connected 2 UINT 16 0: Disconnected 64: HEX is connected
1
HEX Status 4 UINT 32 0: No error 17
HEX Filter 2 UINT 16 See below 49
HEX Fx 2 INT 16 1/10 N 65
HEX Fy 2 INT 16 1/10 N 81
HEX Fz 2 INT 16 1/10 N 97
HEX Tx 2 INT 16 1/100 Nm 113
HEX Ty 2 INT 16 1/100 Nm 129
HEX Tz 2 INT 16 1/100 Nm 145
Reserved 4 161
Prim. Gecko Device connected 2 UINT 16 0: Disconnected 48: Gecko is connected
193
Prim. Gecko Status 2 UINT 16
0b___1: Part detected 0b__1_: Pads worn 0b_1__: Pads OUT 0b1___: Busy
209
Prim. Gecko Last Error Code 2 UINT 16 0: No error 225
Prim. Actual Gecko Preload Force
2 INT 16 1/100 N 241
Prim. Actual Gecko Ultrasonic Sensor Value
2 INT 16 1/100 mm 257
Reserved 6 273
O->T assembly id: 155
O->T data size: 32 bytes
O->T parameters:

Additional Software Options
111
Parameter name Bytes Type Comments Start bit
HEX Zero 2 UINT 16 0: Ignored 1: Zero 2: Unzero
1
HEX Filter 2 UINT 16
0: Ignored 1: No filtering 2: 500 Hz 3: 150 Hz 4: 50 Hz 5: 15 Hz 6: 5 Hz 7: 1.5 Hz
17
Reserved 12 33
Prim. Gecko Pad Control 2 UINT 16 0: Ignored 1: Push Pads OUT 2: Pull Pads IN
129
Prim. Gecko Preload Force Threshold
2 UINT 16
0: Ignored 1: 50N 2: 90N 3: 120N
145
Prim. Gecko Reset Error Logs 2 UINT 16 0: Do not reset, keep logging 1: Reset and disable logging
161
Reserved 10 177

Additional Software Options
112
RG2/6 + VG10 / VGC10
T->O assembly id: 156
T->O data size: 64 bytes
T->O parameters:

Additional Software Options
113
Parameter name Bytes Type Comments Start bit
Prim. RG Device connected 2 UINT 16 0: Disconnected 32: RG2 is connected 33: RG6 is connected
1
Prim. RG Actual Depth 2 INT 16 1/10 mm 17
Prim. RG Actual Relative Depth 2 INT 16 1/10 mm 33
Prim. RG Actual Width 2 INT 16 1/10 mm (with fingertip offset) 49
Prim. RG Status 2 UINT 16
0b______1: 1 when in motion, 0 when not. The gripper will only accept new commands when 0. 0b_____1_: Internal- or external grip is detected. 0b____1__: Safety switch 1 is pushed. 0b___1___: Safety circuit 1 is activated. The gripper will not move while this flag is high; can only be reset by power cycling the gripper. 0b__1____: Safety switch 2 is pushed. 0b_1_____: Safety circuit 2 is activated. The gripper will not move while this flag is high; can only be reset by power cycling the gripper. 0b1______: General safety error. Possible cause: the gripper is booted with some safety switch pressed or hardware error.
65
Reserved 6 81
Sec. RG Device connected 2 UINT 16 0: Disconnected 32: RG2 is connected 33: RG6 is connected
129
Sec. RG Actual Depth 2 INT 16 1/10 mm 145
Sec. RG Actual Relative Depth 2 INT 16 1/10 mm 161
Sec. RG Actual Width 2 INT 16 1/10 mm (with fingertip offset) 177
Sec. RG Status 2 UINT 16 Same as above 193
Reserved 6 209
Prim. VG Device connected 2 UINT 16 0: Disconnected 16: VG10 is connected 17: VGC10 is connected
257
Prim. VG Current limit 2 UINT 16 mA 273
Prim. VG CH A actual vacuum 2 UINT 16 1/10 % 289
Prim. VG CH B actual vacuum 2 UINT 16 1/10 % 305
Reserved 8 321
Sec. VG Device connected 2 UINT 16 0: Disconnected 16: VG10 is connected 17: VGC10 is connected
385
Sec. VG Current limit 2 UINT 16 mA 401
Sec. VG CH A actual vacuum 2 UINT 16 1/10 % 417
Sec. VG CH B actual vacuum 2 UINT 16 1/10 % 433
Reserved 8 449

Additional Software Options
114
O->T assembly id: 157
O->T data size: 64 bytes
O->T parameters:

Additional Software Options
115
Parameter name Bytes Type Comments Start bit
Prim. RG Target Width 2 UINT 16 1/10 mm (corrected with fingertip offset )
1
Prim. RG Target Force 2 UINT 16 1/10 N 17
Prim. RG Control 2 UINT 16 0: Ignored 1: Start motion to target 2: Stop the current motion
33
Prim. RG Custom Fingertip offset 2 INT 16 Offset measured from metal (1/10mm) 49
Prim. RG Store Fingertip offset 2 UINT 16 0: Ignored 1: Store offset
65
Prim. RG Reset Tool Power 2 UINT 16 0: Ignored 1: Reset
81
Reserved 4 97
Sec. RG Target Width 2 UINT 16 1/10 mm (corrected with fingertip offset )
129
Sec. RG Target Force 2 UINT 16 1/10 N 145
Sec. RG Control 2 UINT 16 0: Ignored 1: Start motion to target 2: Stop the current motion
161
Sec. RG Custom Fingertip offset 2 INT 16 Offset measured from metal (1/10mm) 177
Sec. RG Store Fingertip offset 2 UINT 16 0: Ignored 1: Store offset
193
Sec. RG Reset Tool Power 2 UINT 16 0: Ignored 1: Reset
209
Reserved 4 225
Prim. VG CH A Control 2 UINT 16
0: Ignore 1: Grip 2: Idle 3: Release
257
Prim. VG CH B Control 2 UINT 16 Same as Channel A 273
Prim. VG CH A Target Vacuum 2 UINT 16 % 289
Prim. VG CH B Target Vacuum 2 UINT 16 % 305
Prim. VG Current limit 2 UINT 16 mA 321
Reserved 6 337
Sec. VG CH A Control 2 UINT 16
0: Ignore 1: Grip 2: Idle 3: Release
385
Sec. VG CH B Control 2 UINT 16 Same as Channel A 401
Sec. VG CH A Target Vacuum 2 UINT 16 % 417
Sec. VG CH B Target Vacuum 2 UINT 16 % 433
Sec. VG Current limit 2 UINT 16 mA 449
Reserved 6 465

Additional Software Options
116
RG2/6 + Gecko
T->O assembly id: 158
T->O data size: 64 bytes
T->O parameters:

Additional Software Options
117
Parameter name Bytes Type Comments Start bit
Prim. RG Device connected 2 UINT 16 0: Disconnected 32: RG2 is connected 33: RG6 is connected
1
Prim. RG Actual Depth 2 INT 16 1/10 mm 17
Prim. RG Actual Relative Depth 2 INT 16 1/10 mm 33
Prim. RG Actual Width 2 INT 16 1/10 mm (with fingertip offset) 49
Prim. RG Status 2 UINT 16
0b______1: 1 when in motion, 0 when not. The gripper will only accept new commands when 0. 0b_____1_: Internal- or external grip is detected. 0b____1__: Safety switch 1 is pushed. 0b___1___: Safety circuit 1 is activated. The gripper will not move while this flag is high; can only be reset by power cycling the gripper. 0b__1____: Safety switch 2 is pushed. 0b_1_____: Safety circuit 2 is activated. The gripper will not move while this flag is high; can only be reset by power cycling the gripper. 0b1______: General safety error. Possible cause: the gripper is booted with some safety switch pressed or hardware error.
65
Reserved 6 81
Sec. RG Device connected 2 UINT 16 0: Disconnected 32: RG2 is connected 33: RG6 is connected
129
Sec. RG Actual Depth 2 INT 16 1/10 mm 145
Sec. RG Actual Relative Depth 2 INT 16 1/10 mm 161
Sec. RG Actual Width 2 INT 16 1/10 mm (with fingertip offset) 177
Sec. RG Status 2 UINT 16 Same as above 193
Reserved 6 209
Prim. Gecko Device connected 2 UINT 16 0: Disconnected 48: Gecko is connected
257
Prim. Gecko Status 2 UINT 16
0b___1: Part detected 0b__1_: Pads worn 0b_1__: Pads OUT 0b1___: Busy
273
Prim. Gecko Last Error Code 2 UINT 16 0: No error 289
Prim. Actual Gecko Preload Force
2 INT 16 1/100 N 305
Prim. Actual Gecko Ultrasonic Sensor Value
2 INT 16 1/100 mm 321
Reserved 6 337
Sec. Gecko Device connected 2 UINT 16 0: Disconnected 48: Gecko is connected
385

Additional Software Options
118
Sec. Gecko Status 2 UINT 16 Same as above 401
Sec. Gecko Last Error Code 2 UINT 16 0: No error 417
Sec. Actual Gecko Preload Force
2 INT 16 1/100 N 433
Sec. Actual Gecko Ultrasonic Sensor Value
2 INT 16 1/100 mm 449
Reserved 6 465
O->T assembly id: 159
O->T data size: 64 bytes
O->T parameters:

Additional Software Options
119
Parameter name Bytes Type Comments Start bit
Prim. RG Target Width 2 UINT 16 1/10 mm (corrected with fingertip offset ) 1
Prim. RG Target Force 2 UINT 16 1/10 N 17
Prim. RG Control 2 UINT 16 0: Ignored 1: Start motion to target 2: Stop the current motion
33
Prim. RG Custom Fingertip offset 2 INT 16 Offset measured from metal (1/10mm) 49
Prim. RG Store Fingertip offset 2 UINT 16 0: Ignored 1: Store offset
65
Prim. RG Reset Tool Power 2 UINT 16 0: Ignored 1: Reset
81
Reserved 4 97
Sec. RG Target Width 2 UINT 16 1/10 mm (corrected with fingertip offset ) 129
Sec. RG Target Force 2 UINT 16 1/10 N 145
Sec. RG Control 2 UINT 16 0: Ignored 1: Start motion to target 2: Stop the current motion
161
Sec. RG Custom Fingertip offset 2 INT 16 Offset measured from metal (1/10mm) 177
Sec. RG Store Fingertip offset 2 UINT 16 0: Ignored 1: Store offset
193
Sec. RG Reset Tool Power 2 UINT 16 0: Ignored 1: Reset
209
Reserved 4 225
Prim. Gecko Pad Control 2 UINT 16 0: Ignored 1: Push Pads OUT 2: Pull Pads IN
257
Prim. Gecko Preload Force Threshold
2 UINT 16
0: Ignored 1: 50N 2: 90N 3: 120N
273
Prim. Gecko Reset Error Logs 2 UINT 16 0: Do not reset, keep logging 1: Reset and disable logging
289
Reserved 10 305
Sec. Gecko Pad Control 2 UINT 16 0: Ignored 1: Push Pads OUT 2: Pull Pads IN
385
Sec. Gecko Preload Force Threshold
2 UINT 16
0: Ignored 1: 50N 2: 90N 3: 120N
401
Sec. Gecko Reset Error Logs 2 UINT 16 0: Do not reset, keep logging 1: Reset and disable logging
417
Reserved 10 433
Additional Software Options
120
VG10 / VGC10 + Gecko
T->O assembly id: 160
T->O data size: 64 bytes
T->O parameters:
Parameter name Bytes Type Comments Start bit
Prim. VG Device connected 2 UINT 16 0: Disconnected 16: VG10 is connected 17: VGC10 is connected
1
Prim. VG Current limit 2 UINT 16 mA 17
Prim. VG CH A actual vacuum 2 UINT 16 1/10 % 33
Prim. VG CH B actual vacuum 2 UINT 16 1/10 % 49
Reserved 8 65
Sec. VG Device connected 2 UINT 16 0: Disconnected 16: VG10 is connected 17: VGC10 is connected
129
Sec. VG Current limit 2 UINT 16 mA 145
Sec. VG CH A actual vacuum 2 UINT 16 1/10 % 161
Sec. VG CH B actual vacuum 2 UINT 16 1/10 % 177
Reserved 8 193
Prim. Gecko Device connected 2 UINT 16 0: Disconnected 48: Gecko is connected
257
Prim. Gecko Status 2 UINT 16
0b___1: Part detected 0b__1_: Pads worn 0b_1__: Pads OUT 0b1___: Busy
273
Prim. Gecko Last Error Code 2 UINT 16 0: No error 289
Prim. Actual Gecko Preload Force
2 INT 16 1/100 N 305
Prim. Actual Gecko Ultrasonic Sensor Value
2 INT 16 1/100 mm 321
Reserved 6 337
Sec. Gecko Device connected 2 UINT 16 0: Disconnected 48: Gecko is connected
385
Sec. Gecko Status 2 UINT 16 Same as above 401
Sec. Gecko Last Error Code 2 UINT 16 0: No error 417
Sec. Actual Gecko Preload Force
2 INT 16 1/100 N 433
Sec. Actual Gecko Ultrasonic Sensor Value
2 INT 16 1/100 mm 449
Reserved 6 465

Additional Software Options
121
O->T assembly id: 161
O->T data size: 64 bytes
O->T parameters:
Parameter name Bytes Type Comments Start bit
Prim. VG CH A Control 2 UINT 16
0: Ignore 1: Grip 2: Idle 3: Release
1
Prim. VG CH B Control 2 UINT 16 Same as Channel A 17
Prim. VG CH A Target Vacuum 2 UINT 16 % 33
Prim. VG CH B Target Vacuum 2 UINT 16 % 49
Prim. VG Current limit 2 UINT 16 mA 65
Reserved 6 81
Sec. VG CH A Control 2 UINT 16
0: Ignore 1: Grip 2: Idle 3: Release
129
Sec. VG CH B Control 2 UINT 16 Same as Channel A 145
Sec. VG CH A Target Vacuum 2 UINT 16 % 161
Sec. VG CH B Target Vacuum 2 UINT 16 % 177
Sec. VG Current limit 2 UINT 16 mA 193
Reserved 6 209
Prim. Gecko Pad Control 2 UINT 16 0: Ignored 1: Push Pads OUT 2: Pull Pads IN
257
Prim. Gecko Preload Force Threshold
2 UINT 16
0: Ignored 1: 50N 2: 90N 3: 120N
273
Prim. Gecko Reset Error Logs 2 UINT 16 0: Do not reset, keep logging 1: Reset and disable logging
289
Reserved 10 305
Sec. Gecko Pad Control 2 UINT 16 0: Ignored 1: Push Pads OUT 2: Pull Pads IN
385
Sec. Gecko Preload Force Threshold
2 UINT 16
0: Ignored 1: 50N 2: 90N 3: 120N
401
Sec. Gecko Reset Error Logs 2 UINT 16 0: Do not reset, keep logging 1: Reset and disable logging
417
Reserved 10 433

Additional Software Options
122

Hardware Specification
123
9 Hardware Specification
9.1 Technical sheets
Gecko .............................................124
HEX-E QC ........................................127
HEX-H QC........................................129
Quick Changer ................................131
Quick Changer for I/O .....................131
Dual Quick Changer ........................131
Quick Changer - Tool side ................131
RG2-FT ...........................................133
RG2 ................................................138
RG6 ................................................141
VG10 ..............................................144
VGC10 ............................................151

Hardware Specification
124
Gecko
NOTE:
Avoid preloading the gripper with an inverted robot or in non-vertical loading conditions. If preloaded whilst inverted, preload sensor will not meet typical performance standards.
* Smoother surfaces require less preload force for a desired payload force.
General Properties Unit
Gripper
Workpiece Material Polished Steel
Acrylic Glass Sheet Metal
Maximum payload (x2 safety factor) 6.5
14.3
6.5
14.3
5.5
12.1
5.5
12.1
[kg]
[lb]
Preload required for max adhesion 140 [N]
Detachment time 300 [msec]
Holds workpiece on power loss? yes
Pads
Change-out interval 150 000 to 200 000 cycles for HIGH preload
200 000 to 250 000 cycles for LOW preload [cycles]
Manual Cleaning Isopropyl alcohol and lint free cloth
Robotic cleaning system Cleaning Station
Robotic cleaning interval and % recovery
Refer to Cleaning Station User Guide
Sensors
Pre-load sensor Ultrasonic Range sensor
Range 45 [N]
9 [lb]
140 [N]
31 [lb] 0
260 [mm]
10 [inch]
[N][mm]
[lb][inch]
Error 7% 2%
IP Classification 42
Dimensions (HxW) 187 x 146
7.3 x 5.7
[mm]
[inch]
Weight 2.85
6.3
[kg]
[lb]
Operating Conditions Minimum Typical Maximum Unit
Temperature 0
32
-
-
50
122
[°C] [°F]
Surface Characteristics* Matte finish Highly polished
-

Hardware Specification
125
Specification or Feature Target value
Parts Presence Sensing Yes (Ultrasonic)
Pad Material Proprietary silicone blend
Wear Properties Depends on surface roughness and preload
Pad Attachment Mechanism Magnetic
Change-out interval 150000 – 200000 for HIGH PRELOAD
200000 – 250000 for LOW PRELOAD
Cleaning system Cleaning station
Cleaning interval and % recovery See Cleaning Station Manual
Effectiveness on Different Materials
The Gecko Gripper is best suited for smooth, low surface roughness substrates that are generally flat, stiff, and rigid. For other materials, the Gecko Gripper’s effectiveness drops depending the stiffness and roughness of the picking surface. The table below shows a relationship between rigid and flexible substrates, surface finish, payload and the required preload to pick up said substrate . For example, if the customer knows that their part/substrate is rigid, with a mirror-like finish and weighs 2kg, the preload required to pick up the part/substrate is a medium-level preload.
Flexibility Surface finish Payload (kg) Required Preload
Rigid
Mirror-like finish
0 to 2 Low
2 to 4 Medium
4 to 6 High
Smooth
0 to 2 Medium
2 to 4 High
4 to 6 N/A
Matte
0 to 2 High
2 to 4 N/A
4 to 6 N/A
Flexible
Mirror-like finish
0 to 2 Medium
2 to 4 High
4 to 6 N/A
Smooth
0 to 2 High
2 to 4 N/A
4 to 6 N/A
Matte
0 to 2 N/A
2 to 4 N/A
4 to 6 N/A
To further elaborate the significance between preload and payload, the table below shows visual matrix that displays the capability of the gecko gripper to pick up different materials with varying stiffness and roughness, at three different preload values (low 40N, medium 90N, high 140N).

Hardware Specification
126
Stiffness Roughness Example of material
Preload - 140N Preload - 90N Preload - 40N
Payload [kg] Payload [kg] Payload [kg]
0.1 0.5 1 2 4 6 0.1 0.5 1 2 4 6 0.1 0.5 1 2 4 6
1 1 Mylar ✓ ✓ ✓ * ✓ ✓ * ✓ *
5 1 Transparency sheet
✓ ✓ ✓ ✓ * ✓ ✓ * ✓ *
10 1
Polished mirror-like steel, solar panel
✓ ✓ ✓ ✓ ✓ ✓ ✓ ✓ ✓ ✓ ✓ * ✓ ✓ ✓ ✓ *
1 5 Cling film, ziploc bags
✓ ✓ * ✓ * ✓ *
5 5 Glossy carboard (cereal box)
✓ ✓ * ✓ * ✓ *
10 5 Printed circuit board
✓ ✓ ✓ ✓ * ✓ ✓ * ✓ *
1 10 Laminating plastic / film
*
5 10 Corrugated cardboard
10 10 Sandblasted aluminum
✓ the gripper can easily pick up the material
* the gripper can pick up the material in some cases (requires caution and testing to verify)
Nothing the gripper cannot pick up this type of material.
NOTE:
This table is to be utilized as a guide to better understand the payload capacity and substrate type for the Gecko Gripper.
The criteria for stiffness and roughness is a basic scale from 1-10, here are the benchmarks used to determine the values.
Stiffness Description Example
1 Flexible Fabric
5 Semi-flexible Cardboard
10 Stiff Metal
Roughness Description Example RMS Value
1 Polished/Smooth Polished Metal 0.1 micron
5 Textured Carboard 7 microns
10 Rough Sandblasted Metal 28 microns

Hardware Specification
127
HEX-E QC
* Signal noise is defined as the standard deviation (1 σ) of a typical one second no -load signal.
Complex loading
During single-axis loading, the sensor can be operated up to its nominal capacity. Above the nominal capacity the reading is inaccurate and invalid.
During complex loading (when more than one axis is loaded) the nominal capacities are reduced. The following diagrams show the complex loading scenarios.
General Properties 6-Axis Force/Torque Sensor Unit
Fxy Fz Txy Tz
Nominal Capacity (N.C) 200 200 10 6.5 [N] [Nm]
Single axis deformation at N.C (typical)
± 1.7
± 0.067
± 0.3
± 0.011
± 2.5
± 2.5
± 5
± 5
[mm] [°]
[inch] [°]
Single axis overload 500 500 500 500 [%]
Signal noise* (typical) 0.035 0.15 0.002 0.001 [N] [Nm]
Noise-free resolution (typical) 0.2 0.8 0.01 0.002 [N] [Nm]
Full scale nonlinearity < 2 < 2 < 2 < 2 [%]
Hysteresis (measured on Fz axis , typical)
< 2 < 2 < 2 < 2 [%]
Crosstalk (typical) < 5 < 5 < 5 < 5 [%]
IP Classification 67
Dimensions (H x W x L) 50 x 71 x 93
1.97 x 2.79 x 3.66
[mm]
[inch]
Weight (with built-in adapter plates) 0.347
0.76
[kg]
[lb]
Operating Conditions Minimum Typical Maximum Unit
Power supply 7 - 24 [V]
Power consumption - - 0.8 [W]
Operating temperature 0 32
- -
55 131
[°C] [°F]
Relative humidity (non-condensing) 0 - 95 [%]
Calculated MTBF (operating life) 30.000 - - [Hours]
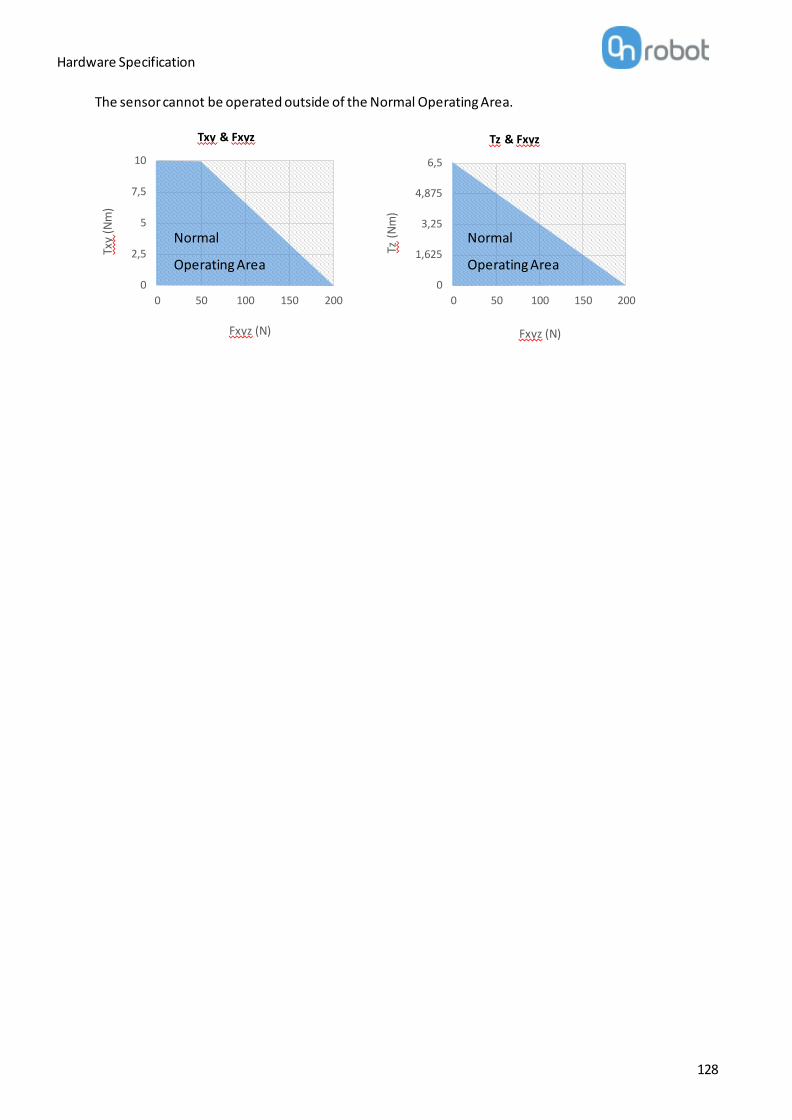
Hardware Specification
128
The sensor cannot be operated outside of the Normal Operating Area.
0
2,5
5
7,5
10
0 50 100 150 200
Txy
(Nm
)
Fxyz (N)
Txy & Fxyz
0
1,625
3,25
4,875
6,5
0 50 100 150 200
Tz(N
m)
Fxyz (N)
Tz & Fxyz
Normal
Operating Area
Normal
Operating Area

Hardware Specification
129
HEX-H QC
* Signal noise is defined as the standard deviation (1 σ) of a typical one second no -load signal.
Complex loading
During single-axis loading, the sensor can be operated up to its nominal capacity. Above the nominal capacity the reading is inaccurate and invalid.
During complex loading (when more than one axis is loaded) the nominal capacities are reduced. The following diagrams show the complex loading scenarios.
General Properties 6-Axis Force/Torque Sensor Unit
Fxy Fz Txy Tz
Nominal Capacity (N.C) 200 200 20 13 [N] [Nm]
Single axis deformation at N.C (typical)
± 0.6
± 0.023
± 0.25
± 0.009
± 2
± 2
± 3.5
± 3.5
[mm] [°]
[inch] [°]
Single axis overload 500 400 300 300 [%]
Signal noise* (typical) 0.1 0.2 0.006 0.002 [N] [Nm]
Noise-free resolution (typical) 0.5 1 0.036 0.008 [N] [Nm]
Full scale nonlinearity < 2 < 2 < 2 < 2 [%]
Hysteresis (measured on Fz axis , typical)
< 2 < 2 < 2 < 2 [%]
Crosstalk (typical) < 5 < 5 < 5 < 5 [%]
IP Classification 67
Dimensions (H x W x L) 50 x 71 x 93
1.97 x 2.79 x 3.66
[mm]
[inch]
Weight (with built-in adapter plates) 0.35
0.77
[kg]
[lb]
Operating Conditions Minimum Typical Maximum Unit
Power supply 7 - 24 [V]
Power consumption - - 0.8 [W]
Operating temperature 0 32
- -
55 131
[°C] [°F]
Relative humidity (non-condensing) 0 - 95 [%]
Calculated MTBF (operating life) 30.000 - - [Hours]

Hardware Specification
130
The sensor cannot be operated outside of the Normal Operating Area.
0
3,25
6,5
9,75
13
0 50 100 150 200
Tz(N
m)
Fxyz
Tz & Fxyz
Normal
Operating Area 0
5
10
15
20
0 50 100 150 200
Txy
(Nm
)
Fxyz (N)
Txy & Fxyz
Normal
Operating Area

Hardware Specification
131
Quick Changer
Quick Changer for I/O
Dual Quick Changer
Quick Changer - Tool side
If not specified, the data represent the combination of the different Quick Changer types/sides.
Technical data Min Typical Max Units
Permissible force* - - 400* [N]
Permissible torque* - - 50* [Nm]
Rated payload* - -
- -
20* 44
[kg] [lbs]
Repeatability - - ±0.02 [mm]
IP Classification 64
Operating life (Tool change) - 5.000 - [cycles]
Operating life (Robot operation) 10 - - [M cycles]
* See load capacity graph below.
Quick Changer
Quick Changer for I/O
Dual Quick Changer
Quick Changer - Tool Side
Units
Weight 0.06
13.22
0.093
2.05
0.41
90.39
0.14
30.86
[kg]
[lb]
Dimensions See Mechanical dimension section
Load capacity
0
5
10
15
20
25
30
35
40
45
0,00 50 100 150 200 250 300 350 400 450 500
Payl
oad
[kg]
Di s tance from center [mm]
Static
Acceleration 2g
Acceleration 4g

Hardware Specification
132
RG2-FT
* see speed table 132
** based on 8mm total movement between fingers. The speed is linearly proportional to the force. For more details see speed table on page 132.
Force Sensor Properties Fxy Fz Txy Tz Units
Nominal capacity (N.C.) 20 40 0.7 0.5 [N] [Nm]
Single axis overload 200 200 200 200 [%]
Noise free resolution 0.1 0.4 0.008 0.005 [N] [Nm]
Single axis deformation at N.C. 0.4
0.015
0.1
0.04 2 5
[mm] [°]
[inch] [°]
Full scale nonlinearity Temperature compensation
< 2 [%]
General Properties Min Typical Max Units
Payload Force Fit -
-
-
-
2
4.4
[kg]
[lb]
Payload Form Fit
-
-
-
-
4
8.8
[Kg]
[lb]
Total stroke (adjustable) 0
0
-
-
100
3.93
[mm]
[inch]
Finger position resolution -
-
0.1
0.004
-
-
[mm]
[inch]
Repetition accuracy -
-
0.1
0.004
0.2
0.007
[mm]
[inch]
Reversing backlash 0.2
0.007
0.4
0.015
0.6
0.023
[mm]
[inch]
Gripping force (adjustable) 3 - 40 [N]
Gripping speed* 55 110 184 [mm/s]
Gripping time** 0.04 0.07 0.11 [s]
Adjustable bracket tilting accuracy - < 1 - °
Ambient operating temperature 5 - 50 [°C]
Storage temperature 0 - 60 [°C]
Motor Integrated, electric BLDC
IP Classification IP54
Dimensions 219 x 149 x 49
8.6 x 5.9 x 1.9
[mm]
[inch]
Product weight 0.98
2.16
[kg]
[lb]

Hardware Specification
133
Proximity Sensor Properties Min Typical Max Units
Sensing range 0
0
-
-
100
3.93
[mm]
[inch]
Precision -
-
2
0.078
-
-
[mm]
[inch]
Non-linearity* - 12 - [%]
* the non-linearity refers to the max value and depends on the object properties (e.g. surface type and color)
Proximity sensor typical accuracy
-20
-10
0
10
20
30
40
50
60
70
80
90
100
0 10 20 30 40 50 60 70 80 90 100
Pro
xim
ity
sen
sor r
ead
ing
(mm
)
Part distance (mm)
Ideal Response White colour Aluminium Black colour
Operating Conditions Minimum Typical Maximum Unit
Power requirement (PELV) 24 - 24 [V]
Power consumption 6.5 - 22 [W]
Operating temperature 0 32
- -
55 131
[°C] [°F]
Relative humidity (non-condensing) 0 - 95 [%]
Calculated MTBF (operating life) 30.000 - - [Hours]

Hardware Specification
134
RG2-FT Gripping Speed Graph
Gripper Working Range
The dimensions are in millimeters.

Hardware Specification
135
Fingertips
The standard fingertips can be used for many different workpieces. If custom fingertips are required, they can be made to fit the Gripper fingers.
Dimensions of the Gripper’s finger, in millimeters.

Hardware Specification
136
NOTE:
During the fingertip design, the following shall be considered to maintain optimal performance:
Clear optical path for the proximity sensors
Protect the proximity sensors from direct sunlight or strong light source
Avoid dust and liquid penetration
WARNING:
The proximity sensors are sensitive parts and shall be protected against:
Direct strong light (such as directional laser sources)
Direct high temperature
Mechanical contacts in any case
Expose to any liquid or fine conductive dust
NOTE:
Please clean regularly the proximity sensor surface with low pressure compressed air (<5 bar) from a 5 cm distance. For stronger contamination use isopropyl alcohol with a soft cotton swab to keep it clean.
Finger Thickness
The default fingertips are considered while the finger thickness has been set and could not be changed in the software. In case when custom fingertips are used, the user should manually compensate for the difference in the finger thickness.

Hardware Specification
137
RG2
*See table on the next page
** based on 8mm total movement between fingers. The speed is linearly proportional to the force. For more details see speed table on next page.
*Current spikes up to 3A (max 6mS) may occur during the release action.
General Properties Minimum Typical Maximum Unit
Payload Force Fit -
-
-
-
2
4.4
[kg]
[lb]
Payload Form Fit -
-
-
-
5
11
[kg]
[lb]
Total stroke (adjustable) 0
0
-
-
110
4.33
[mm]
[inch]
Finger position resolution -
-
0.1
0.004
-
-
[mm]
[inch]
Repetition accuracy -
-
0.1
0.004
0.2
0.007
[mm]
[inch]
Reversing backlash 0.1
0.004
-
-
0.3
0.011
[mm]
[inch]
Gripping force (adjustable) 3 - 40 [N]
Gripping force deviation ±25 %
Gripping speed* 38 - 127 [mm/s]
Gripping time** 0.06 - 0.21 [s]
Adjustable bracket tilting accuracy - < 1 - °
Storage temperature 0
32
-
-
60
122 [°C] [°F]
Motor Integrated, electric BLDC
IP Classification IP54
Dimensions 213 x 149 x 36
8.3 x 5.9 x 1.4
[mm]
[inch]
Weight 0.78
1.72
[kg]
[lb]
Operating Conditions Minimum Typical Maximum Unit
Power supply 20 24 25 [V]
Current consumption 70 - 600* [mA]
Operating temperature 5 41
- -
50 122
[°C] [°F]
Relative humidity (non-condensing) 0 - 95 [%]
Calculated MTBF (operating life) 30.000 - - [Hours]

Hardware Specification
138
RG2 Gripping Speed Graph
RG2 Work Range

Hardware Specification
139
Gripping on long objects can unintentionally activate the Safety switches. The maximum workpiece height (calculated from the end of the fingertips) is dependent on the gripping width (w). For various width values the height (h) limit is given below:
Fingertips
The standard fingertips can be used for many different workpieces. If custom fingertips are required, they can be made to fit the Gripper’s fingers according to the dimensions (mm) shown below:

Hardware Specification
140
RG6
*See table on the next page
** based on 8mm total movement between fingers. The speed is linearly proportional to the force. For more details see speed table on next page.
*Current spikes up to 3A (max 6mS) may occur during the release action.
General Properties Minimum Typical Maximum Unit
Payload Force Fit -
-
-
-
6
13.2
[kg]
[lb]
Payload Form Fit -
-
-
-
10
22.04
[Kg]
[lb]
Total stroke (adjustable) 0
-
-
-
160
6.3
[mm]
[inch]
Finger position resolution -
-
0.1
0.004
-
-
[mm]
[inch]
Repetition accuracy -
-
0.1
0.004
0.2
0.007
[mm]
[inch]
Reversing backlash 0.1
0.004
-
-
0.3
0.011
[mm]
[inch]
Gripping force (adjustable) 25 - 120 [N]
Gripping force deviation ±25 %
Gripping speed* 51 - 160 [mm/s]
Gripping time** 0.05 - 0.15
Adjustable bracket tilting accuracy < 1 °
Storage temperature 0
32
60
122 [°C] [°F]
Motor Integrated, electric BLDC
IP Classification 54
Dimensions 262 x 212 x 42
10.3 x 8.3 x 1.6
[mm]
[inch]
Weight 1.25
2.76
[kg]
[lb]
Operating Conditions Minimum Typical Maximum Unit Power supply 20 24 25 [V]
Current consumption 70 - 600* [mA]
Operating temperature 5 41
- -
50 122
[°C] [°F]
Relative humidity (non-condensing) 0 - 95 [%] Calculated MTBF (operating life) 30.000 - - [Hours]

Hardware Specification
141
RG6 Gripping Speed Graph
RG6 Work Range

Hardware Specification
142
Gripping on long objects can unintentionally activate the Safety switches. The maximum workpiece height (calculated from the end of the fingertips) is dependent on the gripping width (w). For various width values the height (h) limit is given below:
Fingertips
The standard fingertips can be used for many different workpieces. If custom fingertips are required, they can be made to fit the Gripper’s fingers according to the dimensions (mm) shown below:

Hardware Specification
143
VG10
Operating Conditions Minimum Typical Maximum Unit
Power supply 20.4 24 28.8 [V]
Current consumption 50 600 1500 [mA]
Operating temperature 0 32
- -
50 122
[°C] [°F]
Relative humidity (non-condensing) 0 - 95 [%]
Calculated MTBF (operating life) 30.000 - - [hours]
Positioning the VG10 arms and channels
The arms can be folded to the preferred position simply by pulling in the arms. The torque needed to overcome the friction in the rotatable joints of the arm is high (6 N/m) to ensure that the arms do not move when handling 15 kg payloads.
The VG10 suction cups are grouped into two independent channels.
General Properties Minimum Typical Maximum Unit
Vacuum 5 % -0.05 1.5
- - -
80 % -0.810 24
[Vacuum] [Bar] [inHg]
Air flow 0 - 12 [L/min]
Arms adjustment 0 - 270 [°]
Arm holding torque - 6 - [Nm]
Payload
Rated 10 22
[kg] [lb]
Maximum 15 33
[kg] [lb]
Vacuum cups 1 - 16 [pcs.]
Gripping time - 0.35 - [s]
Releasing time - 0.20 - [s]
Foot-inch-foot - 1.40 - [s]
Vacuum pump Integrated, electric BLDC
Arms 4, adjustable by hand
Dust filters Integrated 50µm, field replaceable
IP Classification IP54
Dimensions (folded) 105 x 146 x 146
4.13 x 5.75 x 5.75
[mm]
[inch]
Dimensions (unfolded) 105 x 390 x 390
4.13 x 15.35 x 15.35
[mm]
[inch]
Weight 1.62
3.57
[kg]
[lb]

Hardware Specification
144
When the four arms are adjusted to preferred angles, it is recommended to add the accompanied arrow stickers. This allows for easy realignment and exchanging between different work items.
Payload
The lifting capacity of the VG grippers depends primarily on the following parameters:
• Vacuum cups
• Vacuum
• Air flow
Vacuum Cups
Choosing the right vacuum cups for your application is essential. The VG grippers come with common 15, 30 and 40 mm silicone vacuum cups (see table below) which are good for hard and flat surfaces, but not good for uneven surfaces and it might leave microscopic traces of silicone on the workpiece which can cause issues with some types of painting processes afterwards.
B A
6Nm

Hardware Specification
145
Image External Diameter [mm]
Internal Diameter [mm]
Gripping Area [mm2]
15 6 110
30 8 200
40 12 450
For non-porous materials, the OnRobot suction cups are highly recommended. Some of the most common non-porous materials are listed below:
• Composites
• Glass
• High density cardboard
• High density paper
• Metals
• Plastic
• Porous materials with a sealed surface
• Varnished wood
In an ideal case, working with non-porous material workpieces where there are no air flow going through the workpiece, the table below shows the number of cups and the cup size needed depending on the payload (workpiece mass) and the vacuum used.

Hardware Specification
146
Number of Cups needed for non-porous materials depending on payload and vacuum:
NOTE:
To use more than 7 (15mm), 4 (30mm) or 3 (40mm) vacuum cups with the VGC10 a customized adaptor plate is needed.
The table above is created with the following formula that equalizes the lifting force with the payload considering 1.5g of acceleration.
AmountCups . AreaCup[mm} = 19600Payload [kg]
Vacuum [kPa]
It is often a good idea to use more vacuum cups than needed, to accommodate for vibrations, leaks and other unexpected conditions. However, the more vacuum cups, the more air leakage (air flow) is expected and the more air is moved in a grip resulting in longer gripping times.
When using porous materials, the vacuum that can be achieve by using the OnRobot suction cups will depend on the material itself and will be between the range stated in the specifications. Some of the most common non-porous materials are listed below:
• Fabrics
• Foam
• Foam with open cells
15mm
30mm
40mm
Payload (kg)
Vacuum (kPa) Vacuum (kPa) Vacuum (kPa)
20 40 60 75 20 40 60 75 20 40 60 75
1 7 4 3 2 4 2 2 1 2 1 1 1
2 14 7 5 4 8 4 3 2 4 2 2 1
3 - 11 7 6 12 6 4 3 5 3 2 2
4 - 14 9 8 15 8 5 4 7 4 3 2
5 - - 12 9 - 10 7 5 9 5 3 3
6 - - 14 11 - 12 8 6 10 5 4 3
7 - - 16 13 - 13 9 7 12 6 4 4
8 - - - 15 - 15 10 8 14 7 5 4
9 - - - - - - 12 9 15 8 5 4
10 - - - - - - 13 10 - 9 6 5
11 - - - - - - 14 11 - 9 6 5
12 - - - - - - 15 12 - 10 7 6
13 - - - - - - 16 13 - 11 8 6
14 - - - - - - - 14 - 12 8 7
15 - - - - - - - 15 - 13 9 7

Hardware Specification
147
• Low density cardboard
• Low density paper
• Perforated materials
• Untreated wood
See the table below with general recommendations, in case other suction cups are needed for specific materials.
Workpiece surface Vacuum cup shape Vacuum cup material
Hard and flat Normal or dual lip Silicone or NBR
Soft plastic or plastic bag Special plastic bag type Special plastic bag type
Hard but curved or uneven Thin dual lip Silicone or soft NBR
To be painted afterwards Any type NBR only
Varying heights 1.5 or more bevels Any type
NOTE:
It is recommended to consult a vacuum cup specialist to find the optimal vacuum cup where the standard types are insufficient.
Fittings and Blind Screws.
It is possible to change suction cups simply by pulling them off the fittings. It might be a bit challenging to remove the 15 mm Diameter vacuum cups. As suggestion try to stretch the silicon to one of the sides and then pull it out.
Unused holes can be blinded using a blind screw, and each fitting can be changed to a diffe rent type to match the desired suction cup. The fittings and the blinding screws are mounted or dismounted by screwing (2Nm tightening torque) or unscrewing them with the provided 3 mm Allen key.
.
The thread size is the commonly used G1/8”; allowing for standard fittings, blinders and extenders to be fitted directly to the VG grippers.

Hardware Specification
148
Vacuum
Vacuum is defined as the percentage of absolute vacuum achieved relative to atmospheric pressure, i.e.:
The vacuum in kPa setting is the target vacuum. The pump will run at full speed until the target vacuum is achieved, and then run at a lower speed necessary to maintain the target vacuum.
The pressure in the atmosphere varies with weather, temperature and altitude. The VG grippers automatically compensate for altitudes up to 2km, where the pressure is about 80% of sea level.
Air flow
Air flow is the amount of air that must be pumped to maintain the target vacuum. A completely tight system will not have any air flow, whereas real life applications have some smaller air leakages from two different sources:
• Leaking vacuum cup lips
• Leaking workpieces
The smallest leak under a vacuum cup can be hard to find (see picture below).
Leaking workpieces can be even harder to identify. Things that look completely tight might not be tight at all. A typical example is coarse cardboard boxes. The thin outer layer is often requiring a lot of air flow to create a pressure difference over it (see figure below).
Therefore, the users must be aware of the following:
• VG grippers are not suitable for most uncoated, coarse cardboard boxes.
% vacuum Bar kPa inHg Typically used for
0% 0.00rel. 1.01 abs.
0.00rel. 101.3 abs.
0.0rel. 29.9 abs.
No vacuum / No lifting capacity
20% 0.20rel. 0.81 abs.
20.3rel. 81.1 abs.
6.0rel. 23.9 abs.
Cardboard and thin plastics
40% 0.41rel. 0.61 abs.
40.5rel. 60.8 abs.
12.0rel. 18.0 abs.
Light workpieces and long suction cup life span
60% 0.61rel. 0.41 abs.
60.8rel. 40.5 abs.
18.0rel. 12.0 abs.
Heavy workpieces and strongly secured grips
80% 0.81rel. 0.20 abs.
81.1rel. 20.3 abs
23.9rel. 6.0 abs.
Max. vacuum. Not recommended

Hardware Specification
149
• Extra attention must be paid to leakages, e.g. vacuum cup shape and surface roughness
The air flow capability of a VG grippers is shown in the graph below:
NOTE:
The easiest way to check if a cardboard box is sufficiently tight is simply to test it using the VG grippers.
A high vacuum percentage setting does not give a higher lifting capacity on corrugated cardboard. In fact, a lower setting is recommended, e.g. 20%.
A low vacuum setting results in less air flow and less friction below the vacuum cups. This means VG gripper filters and vacuum cups will last longer.
VG pump, air flow performance
Nl/
min
.
Vacuum percentage

Hardware Specification
150
VGC10
* By using three 40mm cups. More info in a table on page 143.
2 channels
The VGC10 has 4 holes to use fittings with vacuum cups or blinding screws as needed. It also has lines which show the holes that are communicated together. This is useful when using channels A and B independently for vacuum.
General Properties Minimum Typical Maximum Unit
Vacuum 5 % -0.05 1.5
- - -
80 % -0.810 24
[Vacuum] [Bar] [inHg]
Air flow 0 - 12 [L/min]
Payload
With default attachments - -
- -
6 * 13.2 *
[kg] [lb]
With customized attachments - -
10 22
15 33.1
[kg] [lb]
Vacuum cups 1 - 7 [pcs.]
Gripping time - 0.35 - [s]
Releasing time - 0.20 - [s]
Vacuum pump Integrated, electric BLDC
Dust filters Integrated 50µm, field replaceable
IP Classification IP54
Dimensions 101 x 100 x 100
3.97 x 3.94 x 3.94
[mm]
[inch]
Weight 0.814
1.79
[kg]
[lb]
Operating Conditions Minimum Typical Maximum Unit
Power supply 20.4 24 28.8 [V]
Current consumption 50 600 1500 [mA]
Operating temperature 0 32
- -
50 122
[°C] [°F]
Relative humidity (non-condensing) 0 - 95 [%]
Calculated MTBF (operating life) 30.000 - - [hours]

Hardware Specification
151
Adaptor Plate
The VGC10 comes with an Adaptor Plate which provides extra flexibility to locate the vacuum cups in different configurations.
The Adaptor Plate has 7 holes to use fittings with vacuum cups or blinding screws as needed. It also has lines which show the holes that are communicated together. This is useful when using channel A and B independently for vacuum.
The Adaptor Plate can be placed in different positions by rotating it 90º. Having as reference the letters A and B written on the gripper housing, the Adaptor Plate can be placed to separate both channels or to communicate them. If the Adaptor Plate is placed as in picture below on the left, both channels will be separated, and they can be used independently or combined. If the Adaptor Plate is placed as in picture below on the right, both channels will be communicated and a higher air flow can be achieved, although both channels will have to be used combined.

Hardware Specification
152
To mount the Adaptor Plate simply remove the 4 fittings or blinding screws from the gripper, place the Adaptor Plate by choosing the right angle according to the desired configuration, and tighten the 4 screws with 4 Nm tighten torque.
NOTE:
Please, note that the O-Ring in the Adaptor Plate is not glued therefore it can be pulled out. If that happens simply put it back in place and the gripper will work as before.
Extension Pipe
The Extension Pipe provides an extra length of 50 mm to reach narrow spaces.
NOTE:
Remember to use the Adaptor Plate rotated to achieve a higher air flow when using both channels together.

Hardware Specification
153
The Extension Pipe can be mounted in any of the holes by simply screwing it in and adding a fitting on top as shown in the image below.
Below different mounting configurations with the provided attachments are shown.
Customized Adaptor Plates and Push-in Fittings
The design of the VGC10 is meant to facilitate the users to make their own adaptor plates to create different kinds of configurations. The dimensions needed to create a customized adaptor plate are shown in the image below.

Hardware Specification
154
The Push-in Fittings are used to attach 4 mm vacuum tubes to create customized configuration that required remote vacuum. In most cases, this size is enough for generating the needed vacuum from the pump in the gripper.
The commercial name of the Push-in Fittings is Fitting QSM-G1/8-4-I-R in case some more units need to be purchased.
An example of a customized configuration with a homemade adaptor plate and remote vacuum is shown below.
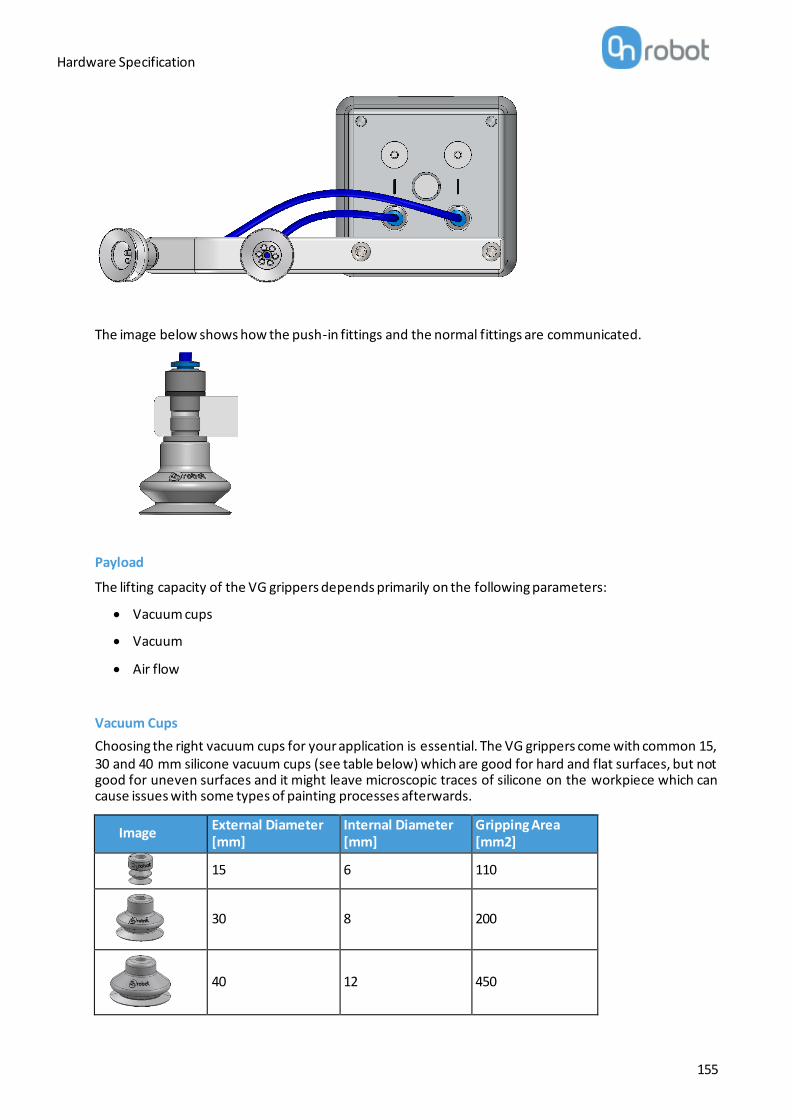
Hardware Specification
155
The image below shows how the push-in fittings and the normal fittings are communicated.
Payload
The lifting capacity of the VG grippers depends primarily on the following parameters:
• Vacuum cups
• Vacuum
• Air flow
Vacuum Cups
Choosing the right vacuum cups for your application is essential. The VG grippers come with common 15, 30 and 40 mm silicone vacuum cups (see table below) which are good for hard and flat surfaces, but not good for uneven surfaces and it might leave microscopic traces of silicone on the workpiece which can cause issues with some types of painting processes afterwards.
Image External Diameter [mm]
Internal Diameter [mm]
Gripping Area [mm2]
15 6 110
30 8 200
40 12 450

Hardware Specification
156
For non-porous materials, the OnRobot suction cups are highly recommended. Some of the most common non-porous materials are listed below:
• Composites
• Glass
• High density cardboard
• High density paper
• Metals
• Plastic
• Porous materials with a sealed surface
• Varnished wood
In an ideal case, working with non-porous material workpieces where there are no air flow going through the workpiece, the table below shows the number of cups and the cup size needed depending on the payload (workpiece mass) and the vacuum used.
Number of Cups needed for non-porous materials depending on payload and vacuum:
NOTE:
15mm
30mm
40mm
Payload (kg)
Vacuum (kPa) Vacuum (kPa) Vacuum (kPa)
20 40 60 75 20 40 60 75 20 40 60 75
1 7 4 3 2 4 2 2 1 2 1 1 1
2 14 7 5 4 8 4 3 2 4 2 2 1
3 - 11 7 6 12 6 4 3 5 3 2 2
4 - 14 9 8 15 8 5 4 7 4 3 2
5 - - 12 9 - 10 7 5 9 5 3 3
6 - - 14 11 - 12 8 6 10 5 4 3
7 - - 16 13 - 13 9 7 12 6 4 4
8 - - - 15 - 15 10 8 14 7 5 4
9 - - - - - - 12 9 15 8 5 4
10 - - - - - - 13 10 - 9 6 5
11 - - - - - - 14 11 - 9 6 5
12 - - - - - - 15 12 - 10 7 6
13 - - - - - - 16 13 - 11 8 6
14 - - - - - - - 14 - 12 8 7
15 - - - - - - - 15 - 13 9 7

Hardware Specification
157
To use more than 7 (15mm), 4 (30mm) or 3 (40mm) vacuum cups with the VGC10 a customized adaptor plate is needed.
The table above is created with the following formula that equalizes the lifting force with the payload considering 1.5g of acceleration.
AmountCups . AreaCup[mm} = 19600Payload [kg]
Vacuum [kPa]
It is often a good idea to use more vacuum cups than needed, to accommodate for vibrations, leaks and other unexpected conditions. However, the more vacuum cups, the more air leakage (air flow) is expected and the more air is moved in a grip resulting in longer gripping times.
When using porous materials, the vacuum that can be achieve by using the OnRobot suction cups will depend on the material itself and will be between the range stated in the specifications. Some of the most common non-porous materials are listed below:
• Fabrics
• Foam
• Foam with open cells
• Low density cardboard
• Low density paper
• Perforated materials
• Untreated wood
See the table below with general recommendations, in case other suction cups are needed for specific materials.
Workpiece surface Vacuum cup shape Vacuum cup material
Hard and flat Normal or dual lip Silicone or NBR
Soft plastic or plastic bag Special plastic bag type Special plastic bag type
Hard but curved or uneven Thin dual lip Silicone or soft NBR
To be painted afterwards Any type NBR only
Varying heights 1.5 or more bevels Any type
NOTE:
It is recommended to consult a vacuum cup specialist to find the optimal vacuum cup where the standard types are insufficient.

Hardware Specification
158
Fittings and Blind Screws.
It is possible to change suction cups simply by pulling them off the fittings. It might be a bit challenging to remove the 15 mm Diameter vacuum cups. As suggestion try to stretch the silicon to one of the sides and then pull it out.
Unused holes can be blinded using a blind screw, and each fitting can be changed to a diffe rent type to match the desired suction cup. The fittings and the blinding screws are mounted or dismounted by screwing (2Nm tightening torque) or unscrewing them with the provided 3 mm Allen key.
.
The thread size is the commonly used G1/8”; allowing for standard fittings, blinders and extenders to be fitted directly to the VG grippers.

Hardware Specification
159
Vacuum
Vacuum is defined as the percentage of absolute vacuum achieved relative to atmospheric pressure, i.e.:
The vacuum in kPa setting is the target vacuum. The pump will run at full speed until the target vacuum is achieved, and then run at a lower speed necessary to maintain the target vacuum.
The pressure in the atmosphere varies with weather, temperature and altitude. The VG grippers automatically compensate for altitudes up to 2km, where the pressure is about 80% of sea level.
Air flow
Air flow is the amount of air that must be pumped to maintain the target vacuum. A completely tight system will not have any air flow, whereas real life applications have some smaller air leakages from two different sources:
• Leaking vacuum cup lips
• Leaking workpieces
The smallest leak under a vacuum cup can be hard to find (see picture below).
Leaking workpieces can be even harder to identify. Things that look completely tight might not be tight at all. A typical example is coarse cardboard boxes. The thin outer layer is often requiring a lot of air flow to create a pressure difference over it (see figure below).
Therefore, the users must be aware of the following:
• VG grippers are not suitable for most uncoated, coarse cardboard boxes.
% vacuum Bar kPa inHg Typically used for
0% 0.00rel. 1.01 abs.
0.00rel. 101.3 abs.
0.0rel. 29.9 abs.
No vacuum / No lifting capacity
20% 0.20rel. 0.81 abs.
20.3rel. 81.1 abs.
6.0rel. 23.9 abs.
Cardboard and thin plastics
40% 0.41rel. 0.61 abs.
40.5rel. 60.8 abs.
12.0rel. 18.0 abs.
Light workpieces and long suction cup life span
60% 0.61rel. 0.41 abs.
60.8rel. 40.5 abs.
18.0rel. 12.0 abs.
Heavy workpieces and strongly secured grips
80% 0.81rel. 0.20 abs.
81.1rel. 20.3 abs
23.9rel. 6.0 abs.
Max. vacuum. Not recommended

Hardware Specification
160
• Extra attention must be paid to leakages, e.g. vacuum cup shape and surface roughness
The air flow capability of a VG grippers is shown in the graph below:
NOTE:
The easiest way to check if a cardboard box is sufficiently tight is simply to test it using the VG grippers.
A high vacuum percentage setting does not give a higher lifting capacity on corrugated cardboard. In fact, a lower setting is recommended, e.g. 20%.
A low vacuum setting results in less air flow and less friction below the vacuum cups. This means VG gripper filters and vacuum cups will last longer.
VG pump, air flow performance
Nl/
min
.
Vacuum percentage

Hardware Specification
161
9.2 Mechanical Drawings
9.2.1 Adapter plate(s)

Hardware Specification
162
Adapter F

Hardware Specification
163
Adapter G
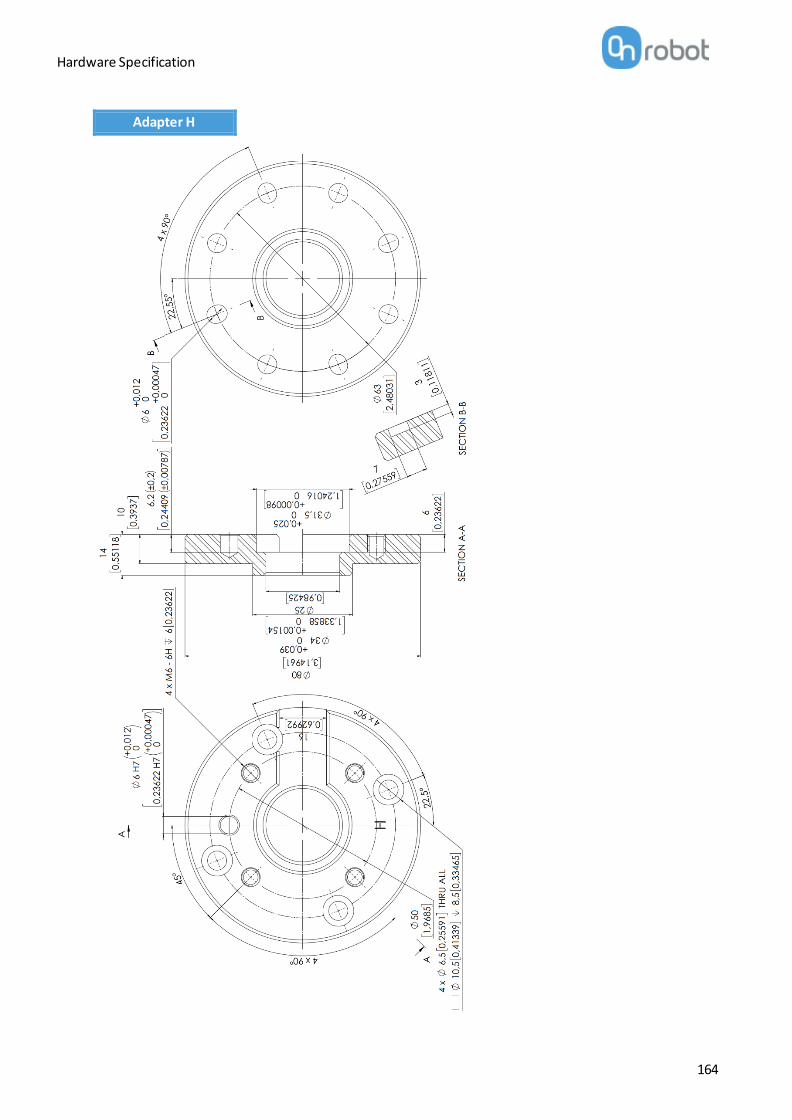
Hardware Specification
164
Adapter H

Hardware Specification
165
9.2.2 Mountings
Quick Changer - Robot side .............166
Quick Changer for I/O - Robot side ..167
Dual Quick Changer ........................168
HEX-E/H QC ....................................169

Hardware Specification
166
Quick Changer - Robot side
* Distance from Robot flange interface to OnRobot tool.
All dimensions are in mm and [inches].

Hardware Specification
167
Dual Quick Changer
* Distance from Robot flange interface to OnRobot tool
All dimensions are in mm and [inches].

Hardware Specification
168
HEX-E/H QC
* Distance from Robot flange interface to OnRobot tool
All dimensions are in mm and [inches].

Hardware Specification
169
9.2.3 Tools
Gecko .............................................170
RG2-FT ...........................................171
RG2 ................................................172
RG6 ................................................173
VG10 ..............................................174
VGC10 ............................................176
Quick Changer - Tool side ................178
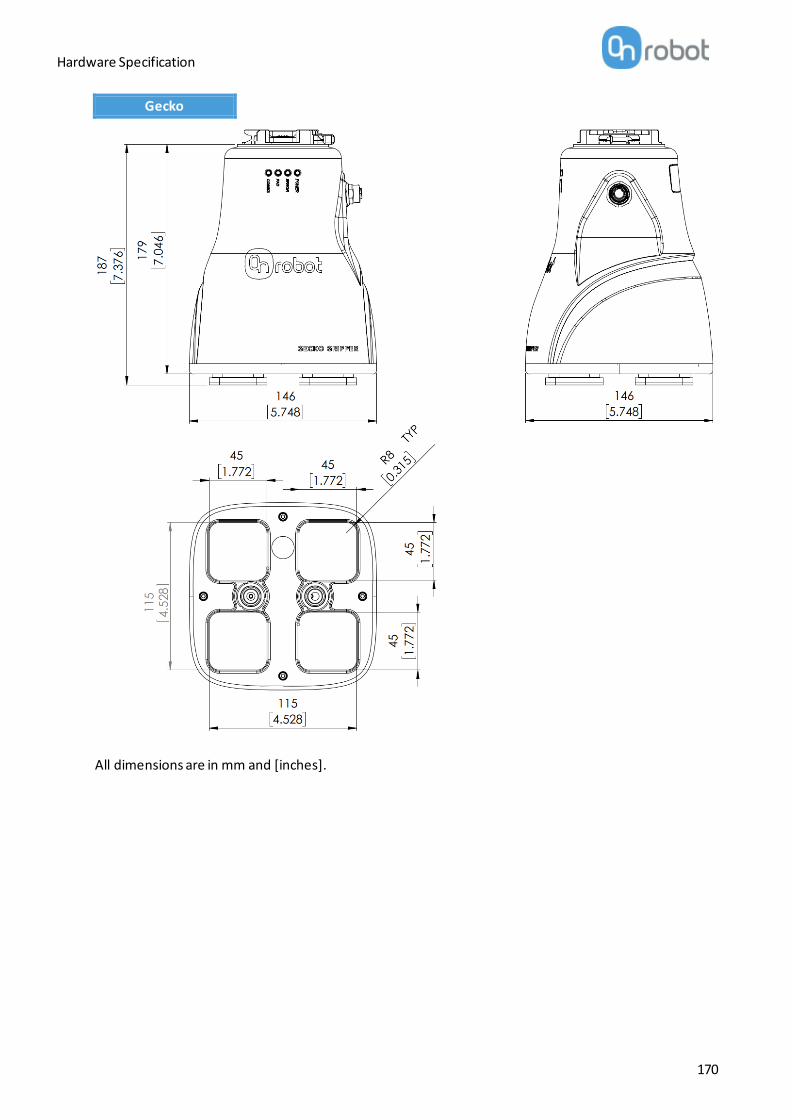
Hardware Specification
170
Gecko
All dimensions are in mm and [inches].

Hardware Specification
171
RG2-FT
All dimensions are in mm and [inches].

Hardware Specification
172
RG2
All dimensions are in mm and [inches].

Hardware Specification
173
RG6
All dimensions are in mm and [inches].

Hardware Specification
174
VG10
All dimensions are in mm and [inches].

Hardware Specification
175
All dimensions are in mm and [inches].
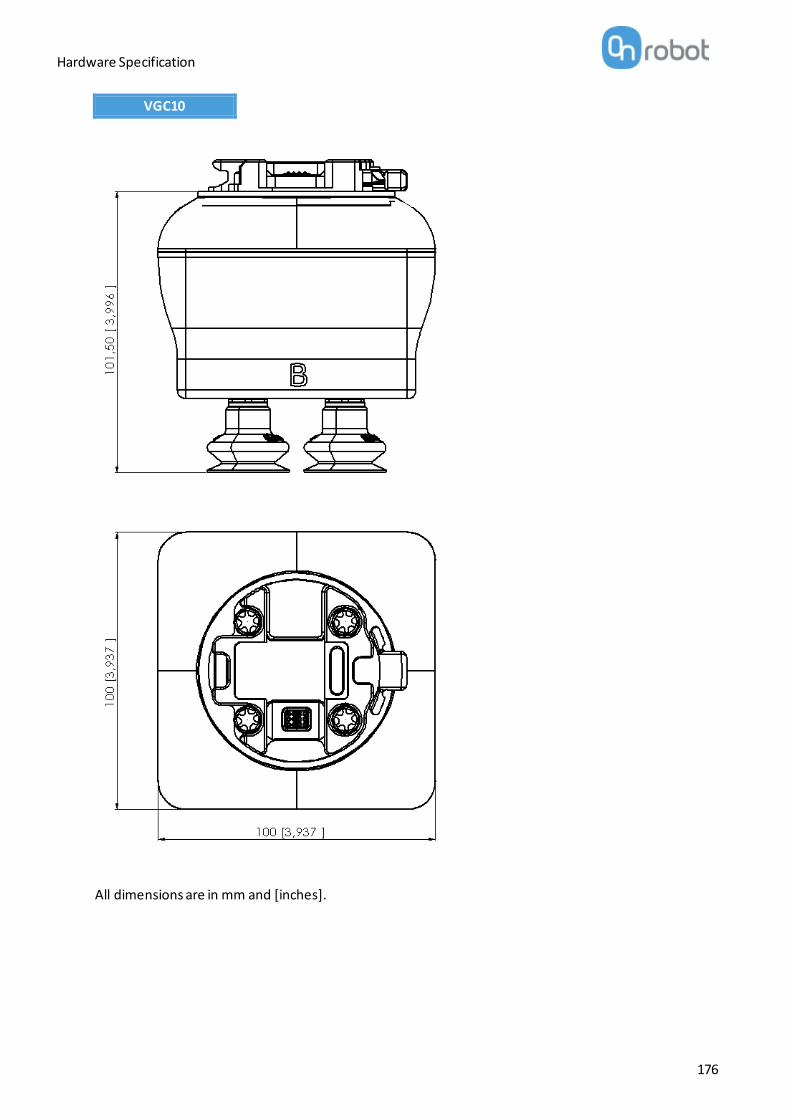
Hardware Specification
176
VGC10
All dimensions are in mm and [inches].

Hardware Specification
177
All dimensions are in mm and [inches].

Hardware Specification
178
Quick Changer - Tool side
All dimensions are in mm and [inches].
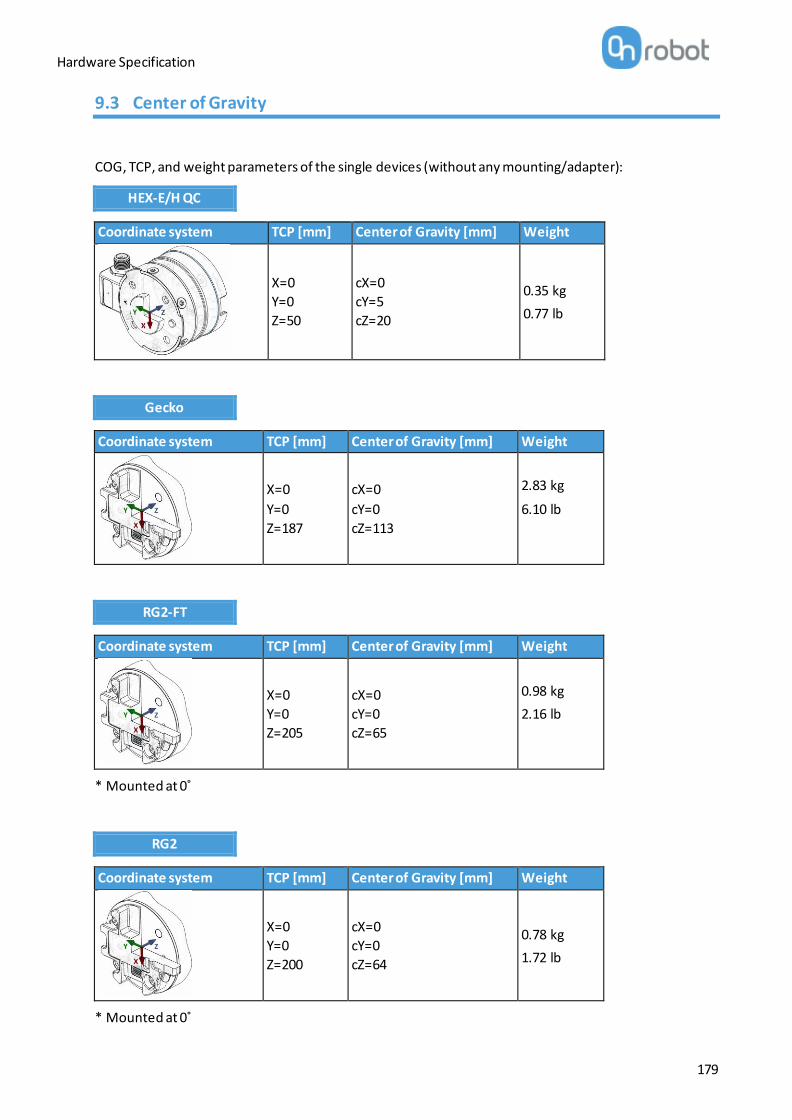
Hardware Specification
179
9.3 Center of Gravity
COG, TCP, and weight parameters of the single devices (without any mounting/adapter):
HEX-E/H QC
Coordinate system TCP [mm] Center of Gravity [mm] Weight
X=0
Y=0
Z=50
cX=0
cY=5
cZ=20
0.35 kg
0.77 lb
Gecko
Coordinate system TCP [mm] Center of Gravity [mm] Weight
X=0
Y=0
Z=187
cX=0
cY=0
cZ=113
2.83 kg
6.10 lb
RG2-FT
Coordinate system TCP [mm] Center of Gravity [mm] Weight
X=0
Y=0
Z=205
cX=0
cY=0
cZ=65
0.98 kg
2.16 lb
* Mounted at 0˚
RG2
Coordinate system TCP [mm] Center of Gravity [mm] Weight
X=0
Y=0
Z=200
cX=0
cY=0
cZ=64
0.78 kg
1.72 lb
* Mounted at 0˚

Hardware Specification
180
RG6
Coordinate system TCP [mm] Center of Gravity [mm] Weight
X=0
Y=0
Z=250
cX=0
cY=0
cZ=90
1.25 kg
2.76 lb
* Mounted at 0˚
VG10
Coordinate system TCP [mm] Center of Gravity [mm] Weight
X=0
Y=0
Z=105
cX=15
cY=0
cZ=54
1.62 kg
3.57 lb
* With arms folded back
VGC10
Coordinate system TCP [mm] Center of Gravity [mm] Weight
X=0
Y=0
Z=7
cX=-1
cY=-1
cZ=37
0.814 kg
1.79 lb
* With no attachments

Maintenance
181
10 Maintenance
WARNING:
An overall inspection of the OnRobot's End of Arm Tooling must be performed regularly and at least once every 6 months. This inspection must include but is not limited to check for defective material and clean gripping surfaces.
Use original spare parts, and original service instructions for the OnRobot's End of Arm Tooling and the robot. Failure to comply with this precaution can cause unexpected risks, resulting in severe injury.
If you have questions regarding spare parts and repair, please visit our website www.onrobot.com to contact us.
Gecko .............................................181
RG2/6.............................................183
RG2-FT ...........................................183
VG10 / VGC10.................................183
Gecko
Gecko Gripper pads are made from a precision cast silicone or polyurethane film with a gecko microstructure. Contact with sharp objects may damage the pad surface and impair function. The Gecko Gripper performance is maximized when the pads are clean and dry. The pads can collect dust, so it is best to use the Gecko Gripper in a clean environment and/or establish a routine cleaning schedule.
Replacing the Gripper Pads
Gecko Gripper pads are designed to last for 200,000-300,000 cycles under typical operating conditions. If the pads do not seem to be gripping properly, even with routine cleaning (see table in the previous page), we recommend fully replacing the gripper pads.
To replace the gripper pads, use the provided pad removal tool.
Step 1: Move gripper pads to the maximum extruded setting such that the pads are maximally exposed/visible.
Part Description of Maintenance Frequency
Pad Cleaning Routine cleaning:
Cleaning Station
Dependent on operating conditions. Guidelines are:
See Cleaning Station User Guide
Pad Wear Replacement due to wear 150000 – 200000 for HIGH preload operation
200000 – 250000 for LOW preload operation

Maintenance
182
Step 2: Insert the edge of the pad removal tool between the shiny silver plate of the pads and the dull backing plate. Leverage the pad removal tool against the gripper housing to pry off the used pad. Repeat for all pads.
Step 3: To install new replacement pads, align the notch of the pad with the tab in the mounting hole. Push the pad into the gripper until there are no gaps between the shiny silver pad plate and backing plate.

Maintenance
183
RG2/6
WARNING:
An overall inspection of the PLd CAT3 Safety Buttons must be performed regularly and at least once every 6 months.
RG2-FT
WARNING:
Please clean the proximity sensor surface regularly with low pressure compressed air (<5 bar) from a 5 cm distance. For stronger contamination use isopropyl alcohol with a soft cotton swab to keep it clean.
VG10 / VGC10
The VG grippers are equipped with one filter for each suction cup socket, and one filter for the exhaust. How often the filters need to be changed depends on the nature of the work piece and the working environment. The VG grippers automatically de-dust the filters every time a grip is released. However, particles can eventually get stuck and build up inside the filter, lowering the VG grippers performance.
A filter service kit is available, which include both new filters and tools needed.
Filter service kit for VG10, PN 100064
Filter service kit for VGC10, PN 103757
Neither use nor power on the VG grippers without filters. Dust, hair and larger particles can get stuck in pump membranes and valve seats, causing permanent damage to the VG grippers.
DANGER:
Identify how often the filters need service and schedule maintenance with a fixed period short enough to ensure a firm grip at all times.
An overall inspection of the VG grippers must be performed regularly and at least once every 6 months.
Never power the VG grippers without filters or with filters mounted incorrectly. Failure to comply with this precaution can cause irreversible failure of pump or valves.
Warranties
184
11 Warranties
11.1 Patents
Products of OnRobot A/S are protected by several patents; some still in global publication process (Patents pending). All manufacturers of copies and similar products violating any patent claims will be prosecuted.
11.2 Product Warranty
Without prejudice to any claim the user (customer) may have in relation to the dealer or retailer, the customer shall be granted a manufacturer’s warranty under the conditions set out below:
In the case of new devices and their components exhibiting defects resulting from manufacturing and/or material faults within 12 months of entry into service (maximum of 15 months from shipment), OnRobot A/S shall provide the necessary spare parts, while the customer (user) shall provide working hours to replace the spare parts, either replace the part with another part reflecting the current state of the art, or repair the said part. This warranty shall be invalid if the device defect is attributable to improper treatment and/or failure to comply with information contained in the user guides. This warranty shall not apply to or extend to services performed by the authorized dealer or the customer themselves (e.g. installation, configuration, software downloads). The purchase receipt, together with the date of purchase, shall be required as evidence for invoking the warranty. Claims under the warranty must be submitted within two months of the warranty default becoming evident. Ownership of d evices or components replaced by and returned to OnRobot A/S shall vest in OnRobot A/S. Any other claims resulting out of or in connection with the device shall be excluded from this warranty. Nothing in this warranty shall attempt to limit or exclude a customer’s statutory rights nor the manufacturer’s liability for death or personal injury resulting from its negligence. The duration of the warranty shall not be extended by services rendered under the terms of the warranty. Insofar as no warranty default e xists, OnRobot A/S reserves the right to charge the customer for replacement or repair. The above provisions do not imply a change in the burden of proof to the detriment of the customer. In case of a device exhibiting defects, OnRobot A/S shall not be liable for any indirect, incidental, special or consequential damages, including but not limited to, lost profits, loss of use, loss of production or damage to other production equipment.
In case of a device exhibiting defects, OnRobot A/S shall not cover any consequential damage or loss, such as loss of production or damage to other production equipment.
11.3 Disclaimer
OnRobot A/S continues to improve reliability and performance of its products, and therefore reserves the right to upgrade the product without prior warning. OnRobot A/S ensures that the content of this manual is precise and correct but takes no responsibility for any errors or missing information.

Certifications
185
12 Certifications

Certifications
186

Certifications
187

Certifications
188

Certifications
189

Certifications
190

Certifications
191
12.1 Declaration of Incorporation
Gecko
CE/EU Declaration of Incorporation (Original)
According to European Machinery Directive 2006/42/EC annex II 1.B.
The manufacturer:
OnRobot A/S Teglværskvej 47H DK-5220, Odense SØ DENMARK
declares that the product:
Type: Industrial Robot Gripper Model: Gecko Gripper Generation: V2 Serial: 1000000000-1009999999
may not be put into service before the machinery in which it will be incorporated is declared in conformity with the provisions of Directive 2006/42/EC, including amendments, and with the regulations transposing it into national law.
The product is prepared for compliance with all essential requirements of Directive 2006/42/EC under the correct incorporation conditions, see instructions and guidance in this manual. Compliance with all essential requirements of Directive 2006/42/EC relies on the specific robot installation and the final risk assessment.
Technical documentation is compiled according to Directive 2006/42/EC annex VII part B and available in electronic form to national authorities upon legitimate request. Undersigned is based on the manufacturer address and authorized to compile this documentation.
Additionally, the product declares in conformity with the following directives, according to which the product is CE marked:
2014/30/EU — Electromagnetic Compatibility Directive (EMC) 2011/65/EU — Restriction of the use of certain hazardous substances (RoHS)
Relevant essential health and safety requirements of the following EU directives are also applied:
2014/35/EU — Low Voltage Directive (LVD) 2012/19/EU — Waste of Electrical and Electronic Equipment (WEEE)
A list of applied harmonized standards, including associated specifications, is provided in this manual.
Budapest, December 16th, 2019
Group Management
Vilmos Beskid CTO

Certifications
192
HEX-E
CE/EU Declaration of Incorporation (Original)
According to European Machinery Directive 2006/42/EC annex II 1.B.
The manufacturer:
OnRobot A/S Teglværskvej 47H DK-5220, Odense SØ DENMARK
declares that the product:
Type: Industrial Force/Torque Sensor Model: HEX-E QC Generation: V3 Serial: 1000000000-1009999999
may not be put into service before the machinery in which it will be incorporated is declared in conformity with the provisions of Directive 2006/42/EC, including amendments, and with the regulations transposing it into national law.
The product is prepared for compliance with all essential requirements of Directive 2006/42/EC under the correct incorporation conditions, see instructions and guidance in this manual. Compliance with all essential requirements of Directive 2006/42/EC relies on the specific robot installation and the final risk assessment.
Technical documentation is compiled according to Directive 2006/42/EC annex VII part B and available in electronic form to national authorities upon legitimate request. Undersigned is based on the manufacturer address and authorized to compile this documentation.
Additionally, the product declares in conformity with the following directives, according to which the product is CE marked:
2014/30/EU — Electromagnetic Compatibility Directive (EMC) 2011/65/EU — Restriction of the use of certain hazardous substances (RoHS)
Relevant essential health and safety requirements of the following EU directives are also applied:
2014/35/EU — Low Voltage Directive (LVD) 2012/19/EU — Waste of Electrical and Electronic Equipment (WEEE)
A list of applied harmonized standards, including associated specifications, is provided in this manual.
Budapest, December 16th, 2019
Group Management
Vilmos Beskid CTO

Certifications
193
HEX-H
CE/EU Declaration of Incorporation (Original)
According to European Machinery Directive 2006/42/EC annex II 1.B.
The manufacturer:
OnRobot A/S Teglværskvej 47H DK-5220, Odense SØ DENMARK
declares that the product:
Type: Industrial Force/Torque Sensor Model: HEX-H QC Generation: V3 Serial: 1000000000-1009999999
may not be put into service before the machinery in which it will be incorporated is declared in conformity with the provisions of Directive 2006/42/EC, including amendments, and with the regulations transposing it into national law.
The product is prepared for compliance with all essential requirements of Directive 2006/42/EC under the correct incorporation conditions, see instructions and guidance in this manual. Compliance with all essential requirements of Directive 2006/42/EC relies on the specific robot installation and the final risk assessment.
Technical documentation is compiled according to Directive 2006/42/EC annex VII part B and available in electronic form to national authorities upon legitimate request. Undersigned is based on the manufacturer address and authorized to compile this documentation.
Additionally, the product declares in conformity with the following directives, according to which the product is CE marked:
2014/30/EU — Electromagnetic Compatibility Directive (EMC) 2011/65/EU — Restriction of the use of certain hazardous substances (RoHS)
Relevant essential health and safety requirements of the following EU directives are also applied:
2014/35/EU — Low Voltage Directive (LVD) 2012/19/EU — Waste of Electrical and Electronic Equipment (WEEE)
A list of applied harmonized standards, including associated specifications, is provided in this manual.
Budapest, December 16th, 2019
Group Management
Vilmos Beskid CTO

Certifications
194
RG2-FT
CE/EU Declaration of Incorporation (Original)
According to European Machinery Directive 2006/42/EC annex II 1.B.
The manufacturer:
OnRobot A/S Teglværskvej 47H DK-5220, Odense SØ DENMARK
declares that the product:
Type: Industrial Robot Gripper Model: RG2-FT Generation: V2 Serial: 1000000000-1009999999
may not be put into service before the machinery in which it will be incorporated is declared in conformity with the provisions of Directive 2006/42/EC, including amendments, and with the regulations transposing it into national law.
The product is prepared for compliance with all essential requirements of Directive 2006/42/EC under the correct incorporation conditions, see instructions and guidance in this manual. Compliance with all essential requirements of Directive 2006/42/EC relies on the specific robot installation and the final risk assessment.
Technical documentation is compiled according to Directive 2006/42/EC annex VII part B and available in electronic form to national authorities upon legitimate request. Undersigned is based on the manufacturer address and authorized to compile this documentation.
Additionally, the product declares in conformity with the following directives, according to which the product is CE marked:
2014/30/EU — Electromagnetic Compatibility Directive (EMC) 2011/65/EU — Restriction of the use of certain hazardous substances (RoHS)
Relevant essential health and safety requirements of the following EU directives are also applied:
2014/35/EU — Low Voltage Directive (LVD) 2012/19/EU — Waste of Electrical and Electronic Equipment (WEEE)
A list of applied harmonized standards, including associated specifications, is provided in this manual.
Budapest, December 16th, 2019
Group Management
Vilmos Beskid CTO

Certifications
195
RG2
CE/EU Declaration of Incorporation (Original)
According to European Machinery Directive 2006/42/EC annex II 1.B.
The manufacturer:
OnRobot A/S Teglværskvej 47H DK-5220, Odense SØ DENMARK
declares that the product:
Type: Industrial Robot Gripper Model: RG2 Generation: V2 Serial: 1000000000-1009999999
may not be put into service before the machinery in which it will be incorporated is declared in conformity with the provisions of Directive 2006/42/EC, including amendments, and with the regulations transposing it into national law.
The product is prepared for compliance with all essential requirements of Directive 2006/42/EC under the correct incorporation conditions, see instructions and guidance in this manual. Compliance with all essential requirements of Directive 2006/42/EC relies on the specific robot installation and the final risk assessment.
Technical documentation is compiled according to Directive 2006/42/EC annex VII part B and available in electronic form to national authorities upon legitimate request. Undersigned is based on the manufacturer address and authorized to compile this documentation.
Additionally, the product declares in conformity with the following directives, according to which t he product is CE marked:
2014/30/EU — Electromagnetic Compatibility Directive (EMC) 2011/65/EU — Restriction of the use of certain hazardous substances (RoHS)
Relevant essential health and safety requirements of the following EU directives are also applied:
2014/35/EU — Low Voltage Directive (LVD) 2012/19/EU — Waste of Electrical and Electronic Equipment (WEEE)
A list of applied harmonized standards, including associated specifications, is provided in this manual.
Budapest, December 16th, 2019
Group Management
Vilmos Beskid CTO

Certifications
196
RG6
CE/EU Declaration of Incorporation (Original)
According to European Machinery Directive 2006/42/EC annex II 1.B.
The manufacturer:
OnRobot A/S Teglværskvej 47H DK-5220, Odense SØ DENMARK
declares that the product:
Type: Industrial Robot Gripper Model: RG6 Generation: V2 Serial: 1000000000-1009999999
may not be put into service before the machinery in which it will be incorporated is declared in conformity with the provisions of Directive 2006/42/EC, including amendments, and with the regulations transposing it into national law.
The product is prepared for compliance with all essential requirements of Directive 2006/42/EC under the correct incorporation conditions, see instructions and guidance in this manual. Compliance with all essential requirements of Directive 2006/42/EC relies on the specific robot installation and the final risk assessment.
Technical documentation is compiled according to Directive 2006/42/EC annex VII part B and available in electronic form to national authorities upon legitimate request. Undersigned is based on the manufacturer address and authorized to compile this documentation.
Additionally, the product declares in conformity with the following directives, according to which the product is CE marked:
2014/30/EU — Electromagnetic Compatibility Directive (EMC) 2011/65/EU — Restriction of the use of certain hazardous substances (RoHS)
Relevant essential health and safety requirements of the following EU directives are also applied:
2014/35/EU — Low Voltage Directive (LVD) 2012/19/EU — Waste of Electrical and Electronic Equipment (WEEE)
A list of applied harmonized standards, including associated specifications, is provided in this manual.
Budapest, December 16th, 2019
Group Management
Vilmos Beskid CTO

Certifications
197
VG10
CE/EU Declaration of Incorporation (Original)
According to European Machinery Directive 2006/42/EC annex II 1.B.
The manufacturer:
OnRobot A/S Teglværskvej 47H DK-5220, Odense SØ DENMARK
declares that the product:
Type: Industrial Robot Gripper Model: VG10 Generation: V2 Serial: 1000000000-1009999999
may not be put into service before the machinery in which it will be incorporated is declared in conformity with the provisions of Directive 2006/42/EC, including amendments, and with the regulations transposing it into national law.
The product is prepared for compliance with all essential requirements of Directive 2006/42/EC under the correct incorporation conditions, see instructions and guidance in this manual. Compliance with all essential requirements of Directive 2006/42/EC relies on the specific robot installation and the final risk assessment.
Technical documentation is compiled according to Directive 2006/42/EC annex VII part B and available in electronic form to national authorities upon legitimate request. Undersigned is based on the manufacturer address and authorized to compile this documentation.
Additionally, the product declares in conformity with the following directives, according to which the product is CE marked:
2014/30/EU — Electromagnetic Compatibility Directive (EMC) 2011/65/EU — Restriction of the use of certain hazardous substances (RoHS)
Relevant essential health and safety requirements of the following EU directives are also applied:
2014/35/EU — Low Voltage Directive (LVD) 2012/19/EU — Waste of Electrical and Electronic Equipment (WEEE)
A list of applied harmonized standards, including associated specifications, is provided in this manual.
Budapest, December 16th, 2019
Group Management
Vilmos Beskid CTO

Certifications
198
VGC10
CE/EU Declaration of Incorporation (Original)
According to European Machinery Directive 2006/42/EC annex II 1.B.
The manufacturer:
OnRobot A/S Teglværskvej 47H DK-5220, Odense SØ DENMARK
declares that the product:
Type: Industrial Robot Gripper Model: VGC10 Generation: V1 Serial: 1000000000-1009999999
may not be put into service before the machinery in which it will be incorporated is declared in conformity with the provisions of Directive 2006/42/EC, including amendments, and with the regulations transposing it into national law.
The product is prepared for compliance with all essential requirements of Directive 2006/42/EC under the correct incorporation conditions, see instructions and guidance in this manual. Compliance with all essential requirements of Directive 2006/42/EC relies on the specific robot installation and the final risk assessment.
Technical documentation is compiled according to Directive 2006/42/EC annex VII part B and available in electronic form to national authorities upon legitimate request. Undersigned is based on the manufacturer address and authorized to compile this documentation.
Additionally, the product declares in conformity with the following directives, according to which the product is CE marked:
2014/30/EU — Electromagnetic Compatibility Directive (EMC) 2011/65/EU — Restriction of the use of certain hazardous substances (RoHS)
Relevant essential health and safety requirements of the following EU directives are also applied:
2014/35/EU — Low Voltage Directive (LVD) 2012/19/EU — Waste of Electrical and Electronic Equipment (WEEE)
A list of applied harmonized standards, including associated specifications, is provided in this manual.
Budapest, December 16th, 2019
Group Management
Vilmos Beskid CTO