user guide for cisco common services platform collector · 20.12.2011 · user guide for cisco...
TRANSCRIPT

User Guide for Cisco Common Services Platform CollectorVersion 2.5May, 2015
Cisco Systems, Inc.www.cisco.com
Cisco has more than 200 offices worldwide. Addresses, phone numbers, and fax numbers are listed on the Cisco website at www.cisco.com/go/offices.

THE SPECIFICATIONS AND INFORMATION REGARDING THE PRODUCTS IN THIS MANUAL ARE SUBJECT TO CHANGE WITHOUT NOTICE. ALL STATEMENTS, INFORMATION, AND RECOMMENDATIONS IN THIS MANUAL ARE BELIEVED TO BE ACCURATE BUT ARE PRESENTED WITHOUT WARRANTY OF ANY KIND, EXPRESS OR IMPLIED. USERS MUST TAKE FULL RESPONSIBILITY FOR THEIR APPLICATION OF ANY PRODUCTS.
THE SOFTWARE LICENSE AND LIMITED WARRANTY FOR THE ACCOMPANYING PRODUCT ARE SET FORTH IN THE INFORMATION PACKET THAT SHIPPED WITH THE PRODUCT AND ARE INCORPORATED HEREIN BY THIS REFERENCE. IF YOU ARE UNABLE TO LOCATE THE SOFTWARE LICENSE OR LIMITED WARRANTY, CONTACT YOUR CISCO REPRESENTATIVE FOR A COPY.
The Cisco implementation of TCP header compression is an adaptation of a program developed by the University of California, Berkeley (UCB) as part of UCB’s public domain version of the UNIX operating system. All rights reserved. Copyright © 1981, Regents of the University of California.
NOTWITHSTANDING ANY OTHER WARRANTY HEREIN, ALL DOCUMENT FILES AND SOFTWARE OF THESE SUPPLIERS ARE PROVIDED “AS IS” WITH ALL FAULTS. CISCO AND THE ABOVE-NAMED SUPPLIERS DISCLAIM ALL WARRANTIES, EXPRESSED OR IMPLIED, INCLUDING, WITHOUT LIMITATION, THOSE OF MERCHANTABILITY, FITNESS FOR A PARTICULAR PURPOSE AND NONINFRINGEMENT OR ARISING FROM A COURSE OF DEALING, USAGE, OR TRADE PRACTICE.
IN NO EVENT SHALL CISCO OR ITS SUPPLIERS BE LIABLE FOR ANY INDIRECT, SPECIAL, CONSEQUENTIAL, OR INCIDENTAL DAMAGES, INCLUDING, WITHOUT LIMITATION, LOST PROFITS OR LOSS OR DAMAGE TO DATA ARISING OUT OF THE USE OR INABILITY TO USE THIS MANUAL, EVEN IF CISCO OR ITS SUPPLIERS HAVE BEEN ADVISED OF THE POSSIBILITY OF SUCH DAMAGES.
Cisco and the Cisco logo are trademarks or registered trademarks of Cisco and/or its affiliates in the U.S. and other countries. To view a list of Cisco trademarks, go to this URL: www.cisco.com/go/trademarks. Third-party trademarks mentioned are the property of their respective owners. The use of the word partner does not imply a partnership relationship between Cisco and any other company. (1110R)
Any Internet Protocol (IP) addresses and phone numbers used in this document are not intended to be actual addresses and phone numbers. Any examples, command display output, network topology diagrams, and other figures included in the document are shown for illustrative purposes only. Any use of actual IP addresses or phone numbers in illustrative content is unintentional and coincidental.
User Guide for Cisco Common Services Platform Collector© 2014 Cisco Systems, Inc. All rights reserved.

78-xxxxx-xx
C O N T E N T S
C H A P T E R 1 CSPC Flow Chart 1-1
C H A P T E R 2 Introduction 2-1
Introduction to Common Services Platform Collector 2-1
Who Should Use This Guide? 2-1
About this Guide 2-1
Accessing the CSPC Collector 2-2
Resetting Password 2-5
Server And Package Versions 2-6
C H A P T E R 3 CSPC Dashboard 3-1
Dashboard 3-1
Device Explorer 3-2
View Device Properties 3-4
View Latest Collection Details 3-4
Export 3-5
C H A P T E R 4 CSPC Workflow 4-1
C H A P T E R 5 Applications 5-1
Device Management 5-1
Settings 5-2
Device Credentials 5-3
Module Credentials 5-8
Changing Credential Import 5-10
Manage Seed File 5-11
Credential Lock Settings 5-12
Import DSIRT Files 5-13
Inventory Settings 5-13
Discovery Settings 5-21
Application Settings 5-25
SMTP Settings 5-28
Advanced Job Settings 5-29
Do Not Manage Device List 5-31
1Common Services Platform Collector User Guide

Contents
Device Discovery and Management 5-32
Discover and Manage Devices 5-32
Unmanage Devices 5-39
Device Access Verification 5-40
Device Prompt Collection 5-44
Data Collection 5-47
Run Collection Profile 5-47
Run Application Profile 5-49
Run Upload Profile 5-51
Data Collection Settings 5-53
Manage Application Discovery Profiles 5-53
Manage SNMP Trap Profiles 5-56
Manage Jump Server 5-58
Manage Data Collection Profiles 5-60
Create Adhoc Data Collection Profiles 5-66
Manage Datasets 5-68
Manage Platform Definitions 5-83
Manage Data Integrity Rules 5-87
Manage Data Masking Rules 5-89
Import All Rules 5-91
Manage Syslog Source Files 5-91
Manage Upload Profiles 5-94
Manage Groups 5-96
Device Groups 5-96
Job Management 5-101
Manage Discovery Jobs 5-101
Manage Device Access Verification Jobs 5-102
Manage Workflow Jobs 5-103
Manage Configuration Jobs 5-104
Manage Device Prompt Collection Jobs 5-105
Manage Health Monitor Jobs 5-106
C H A P T E R 6 Applications - Reports 6-1
Reports 6-1
Inventory Reports 6-1
Managed Devices 6-2
Alerts 6-4
Device Launch Pad 6-4
Interface Summary (IOS, PIX, ASA, IOS-XR) 6-5
Device Display Properties 6-6
2Common Services Platform Collector User Guide
Contents
Device Access Verification Summary 6-7
Device Access Verification By Dataset Type 6-9
Device Access Verification Results 6-10
View Locked Credentials 6-11
View Server Activity Log Messages 6-12
SNMP Trap Report 6-12
Syslog Summary 6-14
Syslog Messages 6-15
Collection Profile Run Summary 6-16
Application Profile Run Summary 6-23
Disabled Protocol Report 6-24
Disable Command Report 6-24
Device Timeout Configuration 6-25
Unreachable Devices 6-25
Duplicate Devices 6-26
Device Jump Server Mapping 6-26
Application Discovery Report 6-26
Non SNMP Devices 6-28
Inventory Summary 6-28
Config Collected Devices 6-29
Config Data Per Device 6-31
Job Reports 6-33
Discovery Jobs 6-33
Inventory Jobs 6-35
Job Management Reports 6-36
Server Audit Trails 6-51
Device Management Audit Trails 6-51
Data Collection Audit Trail Report 6-52
Server Audit Trail Report 6-53
C H A P T E R 7 Applications - Administration 7-1
Administration 7-1
User Management 7-1
Manage Users 7-2
Manage Remote Authentication Servers 7-4
Modify User Account Settings 7-5
User Session Report 7-6
Modify User Preferences 7-7
Configure Default Device Display Property 7-7
Manage Subscribers 7-7
3Common Services Platform Collector User Guide

Contents
Alert Configuration 7-8
Backup and Restore 7-9
Backup 7-9
Restore Backup 7-12
Server Patch Management 7-14
View/Install Downloaded Patches 7-14
Mange Patch Files 7-15
Log Management 7-16
Log Preferences 7-16
Export Log Files 7-17
Miscellaneous Applications 7-18
Server Process Summary 7-18
Server Properties 7-19
Diagnostic Tools 7-21
XML API Console 7-22
Manage UI Add-Ons 7-23
Seed File Viewer 7-23
C H A P T E R 8 Menu Options 8-1
Menus 8-1
User Name 8-1
Settings 8-2
Management 8-4
Reports 8-5
Administration 8-6
Help 8-8
A P P E N D I X 9 Adding Devices to CSPC 9-1
Overview 9-1
Examples 9-2
A P P E N D I X 10 Seed File Formats 10-1
Header Information 10-2
CNC Seed File Format 10-2
Cisco Works Seed File Format 10-4
Simplified Seed File Format 10-6
Export File Format 10-6
4Common Services Platform Collector User Guide

Contents
A P P E N D I X 11 Supported Syslog Formats 11-1
A P P E N D I X 12 Conditional Collection 12-1
Conditional Collection Description 12-1
What is Supported 12-1
Audit Use Case 12-1
Cisco Call Manager Use Case 12-1
SNMP/CLI Configuration Fallback Collection 12-2
Collected Value Based Follow-on Collections 12-2
Commands Requiring Re-login 12-2
Condition Collection in Detail 12-2
Statement 12-2
Condition Statement 12-3
Loop Statement 12-4
Examples 12-5
CLI Complex Collection 12-5
SNMP Complex Collection 12-6
A P P E N D I X 13 Optional Parameter for NATed Appliances 13-1
A P P E N D I X 14 XML APIs 14-1
Seedfile job for runnow 14-1
Scheduled seedfile job 14-1
Add Notification 14-2
Delete All Notifications 14-2
Delete Single Notification 14-3
Get All Notification Types 14-3
Modify Notification 14-3
Add SNMP Trap Profile 14-4
Delete All SNMP Trap Profiles 14-4
Delete Single SNMP Trap profile 14-5
Get All SNMP Trap Profiles 14-5
Get Single SNMP Trap Profile 14-5
Modify SNMP Trap profile 14-6
SNMP Trap Report 14-6
Modify SNMP trap port and Purge Settings 14-7
CSPC DB backup and restore XML API 14-8
Backup Job XML API 14-8
Restore Job XML API 14-9
5Common Services Platform Collector User Guide

Contents
CLI Channel XML API 14-9
New Device Input XML 14-9
Modify Channel XML 14-11
CLI Channel Get Report XML 14-13
Channel Delete Channel XML 14-13
Get CLI Channel List Report XML 14-13
Get Imported Devices Status Report 14-14
A P P E N D I X 15 Frequently Asked Questions 15-1
6Common Services Platform Collector User Guide

Common Se
C H A P T E R 1
CSPC Flow ChartLogin to CSPC
Add DeviceCredentials
Import Seed File
Discover Devices
View Managed Devices
Run DAV
C
Start
CNC V1/V2 & RMESeed File FormatAdd Devices
Is Seed FileImported
Auto Discovery Devices
Import Rules
1-1rvices Platform Collector User Guide

Chapter 1 CSPC Flow Chart
Manage Platform Screen
Manage Masking Rules
Manage Integrity Rules
Manage Datasets Screen
Manage Collection ProfilesScreen
Get Rules from Rules Team
Import All Rules
Enable/Disable Export Option
Enable/Disable Upload
Change Inventory ThreadTimeout SettingsUser Promts SettingsDSIRT RulesModule CredentialsDisable Collection Rules
Run Collection Profiles Screen
View Collection Data Screen
Is rule available
Create manually
C
1-2Common Services Platform Collector User Guide

Common Se
C H A P T E R 2
IntroductionIntroduction to Common Services Platform CollectorCisco System’s Common Services Platform Collector (referred to as CSPC) provides an extensive collection mechanism to collect various aspects of customer network information. CSPC connects to the discovered devices providing delivery of network information to network administrators and network engineers. Data collected by CSPC is used by the network management applications to provide detailed reports and analytics for both the hardware and software, such as inventory reports.
This User Guide explains how to use CSPC software version 2.5. Please refer to CSPC Release Notes for program updates, important notes, image location and other information.
Who Should Use This Guide?
This guide is written for Network and Security Administrators and Cisco Network Engineers who want to collect information on heterogeneous networks comprised of network devices such as routers, switches, firewalls, wireless devices, intrusion prevention systems, and so forth.
You should be familiar with network fundamentals, connectivity, network device configuration and administrative tasks you want to perform over your network.
About this Guide
The CSPC User Guide covers all available functionality in CSPC user interface.
2-1rvices Platform Collector User Guide

Chapter 2 Introduction Accessing the CSPC Collector
Accessing the CSPC CollectorCSPC 2.5 is a web based application and can be accessed by using a URL.
Note The recommended browsers are Microsoft Internet Explorer 8.0, 9.0 and Mozilla Firefox 18.x and above.
Follow the steps given below to access the CSPC application:
Step 1 In a web browser, open the URL:
https://<cspc-server-ip>:8001/cspcgxt
Note • cspc-server-ip in the above URL is the IP address of the machine on which CSPC is installed.
• Certificate Error showing the website's security certificate message is displayed when you access the above URL. Click Continue to this website link to proceed for login.
CSPC Collector Login screen as shown in Figure 2-1 is displayed.
Figure 2-1 CSPC Login Screen
Step 2 Enter the username and password, and click Login button
If you are logging in the first time, an End User License Agreement screen as shown in Figure 2-2 is displayed.
2-2Common Services Platform Collector User Guide

Chapter 2 Introduction Accessing the CSPC Collector
Figure 2-2 End User License Agreement
Step 3 Click Accept button to accept the terms of use.
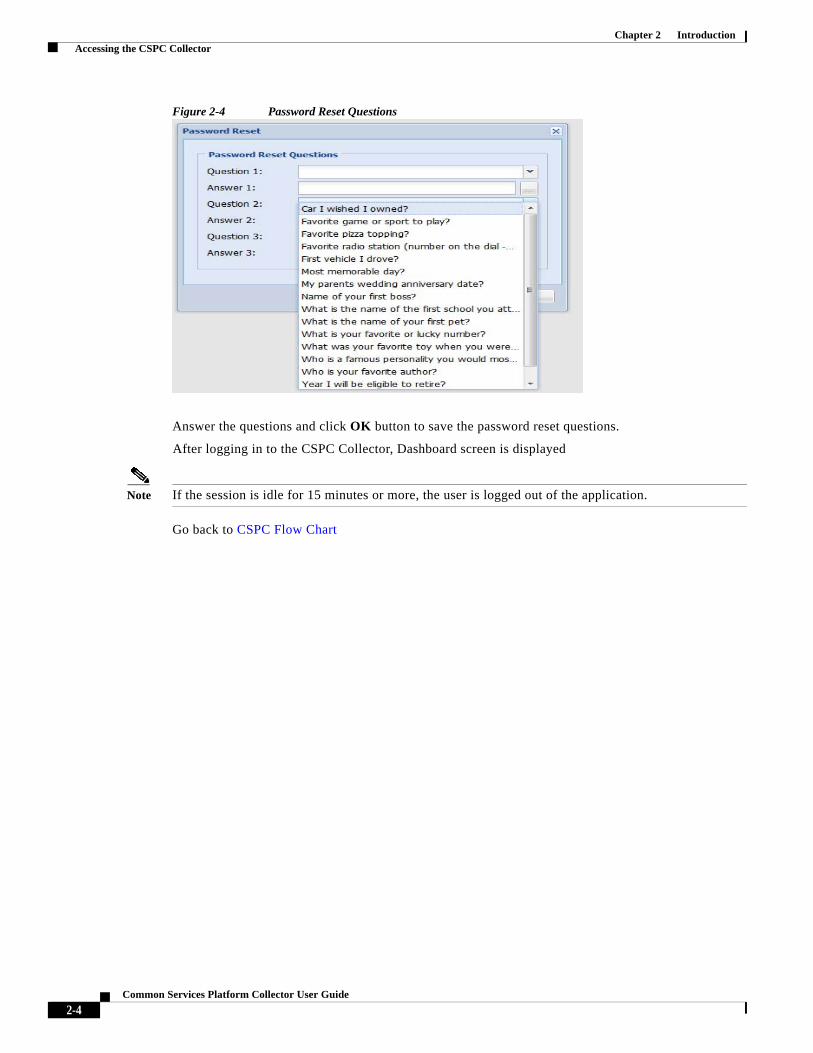
Also, for the first time or until you setup the password reset questions, a message asking you to setup the password reset questions and answers as shown in Figure 2-3 is displayed.
Figure 2-3 Password Reset Questions
Click Yes button, Password Reset screen as shown below is displayed with a set of some predefined questions.
Note Click No button, to continue logging to CSPC without setting the password reset questions.
2-3Common Services Platform Collector User Guide
Chapter 2 Introduction Accessing the CSPC Collector
Figure 2-4 Password Reset Questions
Answer the questions and click OK button to save the password reset questions.
After logging in to the CSPC Collector, Dashboard screen is displayed
Note If the session is idle for 15 minutes or more, the user is logged out of the application.
Go back to CSPC Flow Chart
2-4Common Services Platform Collector User Guide

Chapter 2 Introduction Accessing the CSPC Collector
Resetting Password
If you forget password, click Forgot Password? link on the login screen. A dialog box as shown below is displayed with a set of questions. Answer the set of questions and enter a new password in the New Password text box.
Click OK button and the password is reset.
Figure 2-5 Password Reset
2-5Common Services Platform Collector User Guide

Chapter 2 Introduction Accessing the CSPC Collector
Server And Package Versions
You can view the version of CSPC base collector, add-ons and other optional packages installed on CSPC on View Server Versions screen.
Once you are logged into CSPC, click Help menu > About > View Versions.
A screen showing the version information as shown in Figure 2-6 is displayed.
Figure 2-6 View Server Version
2-6Common Services Platform Collector User Guide

Common Se
C H A P T E R 3
CSPC DashboardDashboardThe dashboard is the primary screen of the CSP Collector. This screen is completely customizable for each user. After the layout is specified, it can be saved, and the next time you log in, you can see the customized layout.
Use the Dashboard to access menu options, Device Explorer Tree, Server Activity Log Messages and the graphs. The dashboard consists of a menu bar (User, Settings, Management, Reports, Administration, and Help), two tabs (Dashboard and Applications). A search option is provide for easy navigation to CSPC Application. CSPC Notification communicator on the right corner detects various types of events such as, Job Completion that includes discovery, collection, DAV, upload, and so on. Once the event is detected CSPC sends an event completion notification to UI and one or more email recipients as configured. Each event can have its own set of recipients. History of events is not maintained. Also you can view the Server Activity Log Messages. Disable Secure Browsing for CSPC disable the Encryption of Communication between browser and server only if require as this might make the application vulnerable to security issues.
The node explorer on the left side of the screen displays all the managed devices by CSPC. Right clicking on any device opens a popup menu displaying selected device properties. Server Activity Log Messages window displays the status messages on both discovery and data collection.
Figure 3-1 CSPC Dashboard
3-1rvices Platform Collector User Guide

Chapter 3 CSPC Dashboard Dashboard
Device Explorer
The Device Explorer Tree displays the list of the network devices, for which data collection is being performed by CSPC. Click on the arrow key next to the device name to expand the list. In the Device Explorer Tree at a given time, only upto 50 devices are shown under each network device in the list. Click next button icon in the pagination bar to see more devices.
Figure 3-2 Device Explorer Tree
3-2Common Services Platform Collector User Guide

Chapter 3 CSPC Dashboard Dashboard
If you right click on any device, a menu as shown in Figure 3-3 is displayed.
Figure 3-3 Device Explorer Menu
Menu option shows the following options:
• View Device Properties
• View Latest Collection Details
• Managed Devices
• Device Display Properties
• Device Access Verification Summary
• Device Access Verification Results
• Disabled Protocol Report
• Device Timeout Configuration
• Unmanage Devices
• Device Access Verification
• Device Prompt Collection
• Export
3-3Common Services Platform Collector User Guide

Chapter 3 CSPC Dashboard Dashboard
View Device Properties
To view the Device Properties, double-click any device or right click and select View Device Properties option. Device Properties screen as shown in Figure 3-4 is displayed.
Figure 3-4 Device Properties
View Latest Collection Details
To view the Latest Collection details right click any collection and select Latest Collection Details option. Latest Collection Details screen as shown in Figure 3-5 is displayed. You have select Dataset name from the drop down to view the details such as Command, Dataset Type, Command Status, Collection Profile, Last Collected, and Error Message. UI Commands have both UI and XML tabs and CLI commands have only CLI tab at the bottom of the page. You can also use search to open the dataset details.
3-4Common Services Platform Collector User Guide

Chapter 3 CSPC Dashboard Dashboard
Figure 3-5 Latest Collection Details
Export
To download the Managed Devices DAV Results file, right click on the folder or the device as shown in Figure 3-3 and select Export option. ManagedDevicesCredentials.csv file is downloaded to your system. You can view this file in Microsoft Excel or any similar application.
3-5Common Services Platform Collector User Guide

Chapter 3 CSPC Dashboard Dashboard
3-6Common Services Platform Collector User Guide

Common Se
C H A P T E R 4
CSPC WorkflowThis is a powerful features that helps you to add, discovery, verify, collect, upload, and merge device in single click. You can start, stop, re-open and resume the work flow from the stage you stop. Quick help tells you the steps in brief. There are two types of wokflows as shown below:
• Import seed file
• Enter IP Address
To start the workflow follow the steps below:
Step 1 Select Create Workflow from the dropdown
Figure 4-1 Workflow Menu
Step 2 Enter the Name and select Service Name from dropdown. Click OK Welcome page with all the details appears as show in Figure 4-3.
Figure 4-2 Create Workflow
4-1rvices Platform Collector User Guide

Chapter 4 CSPC Workflow
Figure 4-3 Help
Step 3 Click Import Seedfile and browse to the location of Seed File goto Step 19
OR
Step 4 Enter the IP Address(s)
4-2Common Services Platform Collector User Guide

Chapter 4 CSPC Workflow
Figure 4-4 Device Tab
Step 5 Select SNMP tab
Step 6 Click button next to Read Community and enter Community String and Confirm Community String. To see the characters check Display Characters and enter the password.
Step 7 Click button next to Write Community and enter Community String and Confirm Community String. To see the characters check Display Characters and enter the password.
Step 8 Enter User Name.
Step 9 Select Auth Algorithm from dropdown.
Step 10 Click button next to Auth Password and enter Auth Password and Confirm Auth Password. To see the characters check Display Character and enter the password.
Step 11 Select Privacy Algorithm
Step 12 Click button next to Privacy Password and enter Privacy Password and Confirm Privacy Password. To see the characters check Display Character and enter the password
Step 13 Select CLI tab and enter User Name
Step 14 Click button next to Password and enter Privacy Password and Confirm Privacy Password. To see the characters check Display Character and enter the password.
Step 15 Enter Enable User Name
Step 16 Click button next to Enable Password enter Privacy Password and Confirm Privacy Password. To see the characters check Display Character and enter the password.
Step 17 Click button next to Pass Phrase enter Privacy Password and Confirm Privacy Password. To see the characters check Display Character and enter the password.
4-3Common Services Platform Collector User Guide

Chapter 4 CSPC Workflow
Step 18 Use forward button to add the device and backward botton to move the IP address (s) and other fields back
Step 19 You can assign a stage after which the workflow should stop using Stop this workflow after or you can also stop the workflow using stop Workflow and resume back when required.
Step 20 Click Discovery tab and enter Timeout and select Protocol.
Figure 4-5 Discovery Tab
Step 21 Click DAV tab and select the Protocol Order.
Figure 4-6 DAV Tab
Step 22 Select Collection tab and choose Services from the dropdown and select the Protocol Order
Figure 4-7 Collection Tab
Step 23 Click Start Workflow. After the workflow finishes a stage it notifies you with green tick on the tab(s).
4-4Common Services Platform Collector User Guide

Chapter 4 CSPC Workflow
Figure 4-8 Completed Workflow
You can stop and resume the work flow when it is required as shown in figure below.
Figure 4-9 Resume workflow
4-5Common Services Platform Collector User Guide

Chapter 4 CSPC Workflow
Reports Panel displays the reports after completion of jobs separately for each tab. To see the reports expand the reports section and click on the required tab
Figure 4-10 Reports Panel
4-6Common Services Platform Collector User Guide

Common Se
C H A P T E R 5
ApplicationsDevice ManagementYou can use the Device Management tab to access tools with which you can specify, collect and store software and hardware information about the network devices.
Figure 5-1 Device Management
This section describes the Device Management tools in the following topics:
• Settings
• Device Discovery and Management
• Data Collection
• Data Collection Settings
• Manage Groups
• Job Management
5-1rvices Platform Collector User Guide

Chapter 5 Applications Device Management
Settings
Use the Settings sub tab of the Device Management tab to set up device or module credentials and settings to assist in the discovery and data collection process.
This section describes the Settings options in the following topics:
• Device Credentials
• Module Credentials
• Manage Seed File
• Changing Credential Import
• Credential Lock Settings
• Import DSIRT Files
• Inventory Settings
• Discovery Settings
• Application Settings
• SMTP Settings
• Advanced Job Settings
• Do Not Manage Device List
5-2Common Services Platform Collector User Guide

Chapter 5 Applications Device Management
Device Credentials
In order to discover network devices and collect the data from the devices, you need to enter the credentials first. Device credentials set up in the CSPC is used for two purposes. The SNMP credentials are used only for initial discovery of the devices.
The remaining credentials like Telnet, SSH, HTTP, HTTPS, WMI, TL1 and SNMP are used for data collection from the discovered devices.
Use the Device Credentials Configuration wizard to add the credentials. Follow the wizard to choose your parameters for the credentials.
Figure 5-2 Device Credentials Configuration
You can add, modify, delete or clone an existing credential. To remove all the credentials from CSPC server, click Delete All button.
You can import credentials from applications like:
• Cisco Works DCR XML File (.xml)
• Pari Networks Credential Repository (.xml)
• Cisco Works DCR CSV File (.csv)
• CNC CSV File (.csv)
• Simplified CSV File (.csv)
5-3Common Services Platform Collector User Guide

Chapter 5 Applications Device Management
Importing a Seed File
Seed file can be imported as a job. Any error or information messages for each device entry from the seed file being imported are captured as part of job log details. You can view the job log to check these messages.
When importing a seed file, save the original seed file by providing it a name. This helps users to get these files from database when required.
Create a new device group or select an existing device group to get the discovered devices added to them, as part of import seed file discovery process. You can map the devices to default entitlement or to the entitlements in the drop down. Discovery and DAV are optional and are only applicable for DCR CSV and CNC CSV formats. DAV can be triggered only when Discovery option is checked.
Figure 5-3 Import Option
Follow the steps given below to import a seed file:
Step 1 In the Device Credentials Configuration window, click Import button
Step 2 From the Import drop down box, select any of the following files:
• Cisco Works DCR XML File (.xml)
• Pari Networks Credential Repository (.xml)
• Cisco Works DCR CSV File (.csv)
• CNC CSV File (.csv)
• Simplified CSV File (.csv)
5-4Common Services Platform Collector User Guide

Chapter 5 Applications Device Management
Step 3 Click Browse button and select the seed file that you want to import
Step 4 Enter the job name, job description and seed file description in the respective fields
Step 5 Choose Default Mapping or Map Devices To. If Map Devices To is selected, then select the entitlement from drop down
Note Job Name is a mandatory field.
Step 6 Click OK button. Seed file is imported.
Export
Export option is provided to export the existing credentials.
Figure 5-4 Export Options
Follow the steps given below to export the contents:
Step 1 In the Device Credentials Configuration window, click Export button
Step 2 You are prompted to verify the password.
Step 3 Enter the password that you used to login to CSPC
Step 4 From the Export Format drop down box, select any of the following formats:
• Pari Networks Credential Repository (.xml)
• CNC CSV File (.csv)
Step 5 Press OK button
Step 6 Save the file on your system
Note • All device in seed file imported by the you are consider as managed devices even if the devices are unreachable at the time of CSPC discovery.
• You can export seed file with Unreachable devices and the status of unreachable devices is shown as Valid_Unreachable:Status in this seed file ManageDevicesCredentials.cvs
Trigger Discovery And DAV Jobs
While importing the seed file you can also trigger the Discovery and DAV jobs. To do so, follow the steps given below:
5-5Common Services Platform Collector User Guide

Chapter 5 Applications Device Management
Step 1 Enter the details for importing seed file as given above
Step 2 From the Import drop down box, select any of the following two options:
• Cisco Works DCR CSV File (.csv)
• CNC CSV File (.csv)
Step 3 Check Trigger Discovery and/or Trigger DAV check boxes
Step 4 You can start Discovery now or to Schedule Discovery at a later time, select Schedule Discovery option and then click Configure Schedule button.
Step 5 You can schedule Start and End Date/Time or select the Recurrence pattern as Minutley, Daily, Weekly, Monthly, or Yearly as shown in Figure 5-5.
Figure 5-5 Configure Schedule
Step 6 Enter the device group name in Device Group Name field
Step 7 Or click Select Device Group Name radio button and select the device group name from the drop down box
Step 8 Click OK button
Go back to CSPC Flow Chart
Adding Credentials
To add credentials, click Add from the Device Credentials screen.
5-6Common Services Platform Collector User Guide

Chapter 5 Applications Device Management
Figure 5-6 Add Credentials
Follow the steps given below to add the credentials:
Step 1 Enter the following information for creating a new Credential:
• Name of the credential (user selected name to identify the credential)
• Transport protocol (CSPC supports various protocols for data collection that includes Telnet, SSHv1,SSHv2, HTTP, HTTPS, SNMPv1, SNMPv2c, SNMPv3, WMI and TL1)
• Authentication (depending on the protocol selected use the following authentication mechanisms:
– Provide User Name, Password, Enable User Name and Enable Password for Telnet, SSH, HTTP or HTTPS protocols
– Provide User Name and Certificate (With/Without Pass Phrase) for SSH protocol certificate based authentication
– Provide User Name, Password for WMI protocol
– For SNMP V1 and V2, provide the READ and WRITE community strings
– For SNMP V3 provide information on User Name, Engine ID, Authentication Algorithm to use and Authentication Password along with Privacy Algorithm and Privacy Password
– Provide User Name, Password for TL1 protocol
• Include IP Address Range and Exclude IP Address Range.
5-7Common Services Platform Collector User Guide

Chapter 5 Applications Device Management
The Include IP Address Range option allows you to enter either a set of IP Addresses or a wildcard IP Addresses like 10.*.*.*, notifying any IP Address starting with 10. The Exclude IP Address Range works only for data collection.
You can enter IP addresses by clicking IP Address List Editor, and give multiple IP addresses with comma separated in IP Address List field.
Step 2 Click OK.
You can also edit an existing credential by clicking Modify. Click Delete to delete a selected credential. Click Clone to create a copy of the selected credential for modification.
Go back to CSPC Flow Chart
Module Credentials
In order to collect the data from the modules you need to enter the credentials first. Module credentials are used to collect data from modules or sub modules that require additional authentication.
Use the Module Credentials wizard to add credentials. Follow the wizard to choose your parameters for credentials.
Figure 5-7 Module Credentials Main Window
You can add, modify, or delete an existing credential. Vertical scroll bars are provided to move to either the previous or the next credential set in the table.
To add credentials, click Add from the Module Credentials screen as shown in Figure 5-8.
5-8Common Services Platform Collector User Guide

Chapter 5 Applications Device Management
Figure 5-8 Module Credentials
Follow the steps given below to add the module credentials:
Step 1 Enter the following information for creating a new Credential:
• Name of the credential (user selected name to identify the credential)
• Module/Sub Mode Matching expression (expression used to match whether to use this credential on the module or not)
• Authentication (depending on the protocol selected use the following authentication mechanisms:
– Provide User Name, Password, Enable User Name and Enable Password to access the module
• Include IP Address Range and Exclude IP Address Range.
The Include IP Address Range option allows you to enter either a set of IP Addresses or a wildcard IP Addresses like 10.*.*.*, notifying any IP Address starting with 10. The Exclude IP Address Range works only for data collection.
You can enter IP addresses by clicking IP Address List Editor.
Step 2 Click OK.
You can also edit an existing credential by clicking Modify. Click Delete to delete a credential.
Go back to CSPC Flow Chart
5-9Common Services Platform Collector User Guide

Chapter 5 Applications Device Management
Changing Credential Import
In Schedule Changing Credential Import window, you can specify a credential file and schedule it to run every n minutes to check the frequently changing credential import. For a credential file on sever you can configure a schedule to run at a specific time.
Follow the steps given below to schedule the Changing Credential Import:
Step 1 Enter the following information:
• In the Filename field, enter the credential filename with full server path with following format:
– IPADDRESS, PROTOCOL, PORT, USERNAME, PASSWORD, ENABLE_USERNAME, ENABLE_PASSWORD, SNMP_RO, SNMP_RW, SNMP_V3_USERNAME, SNMP_V#_AUTH_PASSWORD, V3_ENGINE, SNMP_V3_AUTH_ALGORITHM, SNMP_V3_PRIVILEGE_PROTOCOL, SNMP_V3_PRIVILEGE_PASSWORD,
– Where SNMP_V3_AUTH_ALGORITHM can be MD5 or SHA
– SNMP_V3_PRIVILEGE_PROTOCOL can be DES, 3DES, AES-128, AES-192 or AES-256
– USERNAME is Telnet/SSH or HTTP/HTTPS username
– PASSWORD is Telnet/SSH or HTTP/HTTPS password
– PROTOCOL can be Telnet, SNMPvSNMPv2C, SNMPv1, SNMPv3, SSHV1, SSHV2, HTTP, HTTPS
• Select the checkbox for Schedule Frequently Changing Credential Import
• Enter the description of the job in Job Description text box
• Click Configure Schedule button
• Enter date and time in Schedule Start Date/Time and Schedule End Date/Time fields
• To repeat the schedule select Repeat Schedule check box and enter the minutes, the schedule should be repeated in Repeat Every minutes field.
Step 2 Click OK
5-10Common Services Platform Collector User Guide

Chapter 5 Applications Device Management
Figure 5-9 Changing Credential Import
Manage Seed File
You can import the seed file with the latest credentials and devices by placing the seed file manually in the default path. It determines what devices will be removed, updated, or added then perform the necessary actions. Devices not present in the seed file and are in CSPC will be deleted.
Figure 5-10 Seed File Configuration
To import the seed file perform the steps:
5-11Common Services Platform Collector User Guide

Chapter 5 Applications Device Management
Step 1 Place the CNC V3 format seed file in the default location as shown on the screen. It is mandatory to place the seed file in the location as shown on the screen and read persmission should be allowed to the file for CSPC users.
Step 2 You can start Seed File Import now or to Schedule Seed File Import at a later time, select Schedule Seed File Import option and then click Configure Schedule button.
Step 3 You can schedule Start and End Date/Time or select the Recurrence pattern as Minutley, Daily, Weekly, Monthly, or Yearly as shown in Figure 5-11.
Figure 5-11 Configure Schedule
Step 4 Check the required operation. click OK
Figure 5-12 Operations
Credential Lock Settings
Credential Lock Settings allows you to set the maximum number of failed attempts for any given credential. You can also specify a lock period for a credential. If a lock period is present that credential will be unlocked once the lock period expires.
There is also an option for the user to manually unlock the credential. This helps in continuation of the discovery/inventory processes even after a device fails to respond to a specific credential.
Options Description
Trigger DAV This Triggers Device Access Verification
Unmanage devices not in seed file This Unmanages the devices not in the seed file
Delete device credentials not in seed file This removes only the device credentials which are not in seed file
5-12Common Services Platform Collector User Guide

Chapter 5 Applications Device Management
Figure 5-13 Credential Lock Settings
You can also remove the previously added lock settings by using Remove Settings button.
Import DSIRT Files
In Import DSIRT Files, you can select a DSIRT (Device Software Issues Reporting Tool) file and import it in the tool.
Figure 5-14 Import DSIRT Files
Go back to CSPC Flow Chart
Inventory Settings
Inventory Settings allows you to set some advanced collection settings.
These include setting up inventory threads, device connectivity options, time out options, device prompts, disable protocol rules and disable collection rules.
Advanced Settings:
The Advanced Settings tab of Inventory Settings screen provides the following options:
5-13Common Services Platform Collector User Guide

Chapter 5 Applications Device Management
• Inventory Threads: To set up the maximum number of inventory threads you would like the collector to use. By default the value for Microsoft Windows is 40 and for Linux it varies from 40 - 100 based on the hardware configuration. Maximum value that can be set is for both Microsoft Windows and Linux is 200.
• Connection Settings: To set up the maximum number of connections a device can have, or the maximum number of connections per the whole collector. These settings apply only for Telnet or SSH credentials. In some networks, authentication servers provide a limit on the number of connections of either an application or a device, so this needs to be set. By default there is only one connection per device, and no connection limit for the whole collector.
Figure 5-15 Inventory Settings
Go back to CSPC Flow Chart
5-14Common Services Platform Collector User Guide

Chapter 5 Applications Device Management
Global Timeouts:
The Global Timeouts tab allows you to select the time out options for a given IP address or a range of IP addresses. This is where you can specify a time out option for any given protocol like Telnet, SSH, SNMP or HTTP and so on.
Vertical scroll bars are provided to move to either the previous or the next timeout option on the window.
Figure 5-16 Global Timeouts
You can enter these timeouts by clicking Add button. On Timeout Details screen, you can enter the following details:
• Hostname / IP Address: You can select the IP Address Expression like 10.*.*.* (to represent all IP Addresses that start with a 10)
• Protocol: Select the protocol (Telnet, SSHv1 or SSHv2, HTTP, HTTPS, TL1, SNMPv1, SNMPv2 or SNMPv3 or WMI)
• Timeout (ms): Type timeout in milliseconds (ranging from 1000 milliseconds (1 second) to 600000 milliseconds (10 minutes))
• Establish Timeout (sec): Time taken to establish a connection for a device. By default it is 10 seconds.
• Retry Count: You can select the “retry” count as well
Figure 5-17 Global Timeout
5-15Common Services Platform Collector User Guide

Chapter 5 Applications Device Management
Use the Modify button to modify the global time out value. Use the Delete button to delete a time out value.
Go back to CSPC Flow Chart
Device Prompts:
The Device Prompts tab allows you to select specific prompt options for any given device or device group. Device prompts are used when the data collection is done on a device or device group where the prompts are changed (through an authentication server for security reasons). When the device prompts change, the collector must be able to process those prompts in order to perform data collection successfully.
There are two ways of setting up these options; the first one is based on matching prompts by order and the second one on matching a specific string/regular expression.
Figure 5-18 Device Prompts
Both Order and Regular Expression are explained below.
5-16Common Services Platform Collector User Guide

Chapter 5 Applications Device Management
Figure 5-19 Prompt Details by Order
In the first method the device or a device group is expecting the collector to send the credential information in a particular order. For example, if the device expects to see the Password and Enable User Name and Enable Password in that order, you can change those as shown in Figure 5-19.
Similarly, if the prompts are to be matched by prompting a string, you can select that as shown in Figure 5-20.
Figure 5-20 Prompt Details by String
In this example for the device with IP Address 1.1.1.1 the User Name must have an expression of user: as the device prompt.
Use the Modify button to modify any prompts value. Use the Delete button to delete any prompts.
Go back to CSPC Flow Chart
5-17Common Services Platform Collector User Guide

Chapter 5 Applications Device Management
Disable Protocol Rules:
The Disable Protocol Rules tab allows you to configure the protocols that need to be disabled for a specific platform. Inventory and Device Access Verification will not run for the disabled protocol for the specified platform. This helps in enabling/disabling protocols without modifying the datasets.
Figure 5-21 Device Protocol Rules
You can add, modify or delete an existing disable protocol rule. Vertical scroll bars are provided to move to either the previous or the next rule in the table. To add disable protocol rule, click Add in the Disable Protocol Rules screen.
5-18Common Services Platform Collector User Guide

Chapter 5 Applications Device Management
Figure 5-22 Disable Protocol Rule Details
Follow the steps given below to create a new disable protocol rule:
Step 1 Enter the following information:
• Select Platform: Select a platform for which protocol needs to be disabled from the combo list. All the configured platforms, both system and custom defined are displayed here
• Select Protocols: Select the protocol that has to be disabled for the above selected platform. All the supported protocols (Telnet, SSHv1, SSHv2, SNMPv1, SNMPv2, SNMPv3, HTTP, HTTPS, TL1, WMI) will be displayed here
Step 2 You can also select or unselect all the protocols using Select All/Unselect All buttons
Step 3 Click OK to add the configured rule to CSPC
5-19Common Services Platform Collector User Guide

Chapter 5 Applications Device Management
Disable Collection Rules:
The Disable Collection Rules tab will allow you to disable specific commands/OIDs on a specific platform. Inventory will not run for the disabled command/OIDs.
If in a given dataset, there are multiple OIDs then inventory will run for dataset and results will be displayed for OIDs which are not disabled, but collection will not happen for disabled OID.
Figure 5-23 Disable Collection Rules
You can add, modify, or delete an existing disable collection rule. Vertical scroll bars are provided to move to either the previous or the next rule in the table.
To add disable collection rule, click Add on the Disable Collection Rules screen.
Figure 5-24 Disable Collection Rule Details
5-20Common Services Platform Collector User Guide

Chapter 5 Applications Device Management
Follow the steps given below to create a new disable collection rule:
Step 1 Enter the following information:
• Select Platform: Select a platform for which protocol needs to be disabled from the combo list. All the configured platforms, both system and custom defined will be displayed here
• Select Dataset Type: Supported Dataset types are CLI or SNMP
• Operator: Operator can be any of equals, does not equals, matches regular expression, does not match regular expression
• Value: The exact CLI command or OID to be disabled
• Annotation: You can add a note here
Step 2 Click OK to add the configured rule to CSPC
Go back to CSPC Flow Chart
Discovery Settings
In Discovery Settings you can set preferences of device discovery. You can set values for Discovery timeout, Include platform and Exclude platform.
In Preference tab, enter the values as shown in Table 5-1.
Figure 5-25 Discovery Settings
5-21Common Services Platform Collector User Guide

Chapter 5 Applications Device Management
Table 5-1 Discovery Timeout
Field Name Description
SNMP Timeout (in sec) SNMP connection timeout value in seconds. Default value is 3 seconds
SNMP Retry SNMP connection retry count. Default value is 1
Max Thread Count Thread pool size for each discovery job. Default value is 100.
Max Credential Sets For Protocol
Maximum number of Credential Sets to use for each protocol. Default value is 50.
Max Discovery Time (in sec) Maximum discovery time in seconds for each discovery job. Default value is 600 seconds. Valid values 0 or >= 60. Zero no window time will be enforced. If value is set between 0 and 60, default value 600 will be used.
Max Device Discovery Maximum discovery time in seconds for a single device. Default value is 180 seconds. Valid values: 5 seconds and above.If value is < 5, then 5 is enforced.
IP Phone Discovery Option to enable/disable IP Phone discovery.
NMAP Path Nmap application Installed path (used in case Nmap option is enabled in discovery job)
NMAP Timeout (in sec) Timeout value in seconds to discovery device using Nmap application. Default value is 30 seconds. Valid values > 0. If value is < 0, then default is enforced.
5-22Common Services Platform Collector User Guide

Chapter 5 Applications Device Management
Include Platform (optional):
Any platform that is specified in include platform list, only those specific platform devices will be discovered and all other devices will be discarded.
Figure 5-26 Include Platform
5-23Common Services Platform Collector User Guide

Chapter 5 Applications Device Management
Exclude Platform (optional):
Any platform is specified in exclude platform list, all devices belonging to that platform will be ignored.
Figure 5-27 Exclude Platform
5-24Common Services Platform Collector User Guide

Chapter 5 Applications Device Management
Application Settings
Application settings is used to set device inventory data collection preferences like Device prompt, Submode and Data export settings.
General Settings:
IP Host Mask Settings: If device IP Address and Hostname data privacy is enabled, customer device IP address and Hostname that is sent back to Cisco will be replaced by a set of user defined IP address and Hostname.In IP Address Mask field you can define the IP address range that is used to replace the real IP address of the customer, and define a prefix in Hostname Mask field that is used to replace the real customer hostname.
Figure 5-28 General Settings
Table 5-2 General Settings
Field Name Description
Start IP IP to be used as start value while masking IPv4 data. IP will be incremented from this value for each of the IP’s to be masked
Start IPv6 IP to be used as start value while masking IPv6 data. IP will be incremented from this value for each of the IP’s to be masked
Start Hostname Prefix used for masking hostnames
Global Display Type Device attribute to be shown for distinct devices
Platform List List of platforms for Telnet echo is enabled.
SysObject ID List SystemObject ID for the Telnet echo enabled devices
Total User Session Count Maximum number of unique CSPC user sessions
5-25Common Services Platform Collector User Guide

Chapter 5 Applications Device Management
Prompt Settings:
Figure 5-29 Prompt Settings
Table 5-3 Prompt Settings
Field Name Description
Prompts
Login Prompts Used for extra Login prompts that needs to be handled by CSPC
Password Prompts Used for extra Password prompts that needs to be handled by CSPC
Other Prompts Used for other prompts that needs to be handled by CSPC
CLI Error Prompts Used for extra CLI error prompts that needs to be handled by CSPC
SNMP Error Prompts Used for extra SNMP error prompts that needs to be handled by CSPC
SOAP Error Prompts Used for extra SOPA error prompts that needs to be handled by CSPC
SNMP Trap Settings
Retain Traps for Mention the number of days to retain traps.
Port Number Configure the port to receive the SNMP trap messages. Default port is 162.
Note If you configure a new in-bound port to listen the SNMP Trap messages, then you need to manually update the corresponding IP table rules and NAT router settings.
5-26Common Services Platform Collector User Guide

Chapter 5 Applications Device Management
Submode and Init Settings:
Figure 5-30 Submode And Init Settings
Table 5-4 Submode and Init Settings
Export Settings:
Field Name Description
OS Type Type of OS
IP Address List List of IP addresses
SH Version Command If show version needs to be executed while in submode
SH Version Lines Number of lines in show version that needs to taken
SH Version Ignore Strings Whether to consider or ignore show version settings
Execute New Line for Submode Login Prompt Whether new line has to be executed at the end of submode login prompt
5-27Common Services Platform Collector User Guide

Chapter 5 Applications Device Management
Figure 5-31 Export Settings
Table 5-5 Export Settings
SMTP Settings
This setting provides you with an option to configure a SMTP server for mail exchange.
Field Name Description
Collection Profile Export Boundary VSEM export boundary settings
Job Log Export boundary Job log export boundary
TailEnd Response Counter Response counter for TailEnd
TailEnd SeedFile Counter Seed file counter for TailEnd
Upload Via Set the Upload via option to either of these:
• Transport Gateway
• Connectivity
• Disabled
5-28Common Services Platform Collector User Guide

Chapter 5 Applications Device Management
Figure 5-32 SMTP Settings
Enter all the Mandatory fields and click OK
Table 5-6 SMTP Server Parameters
To reset the SMTP Settings to default value click Default Settings.
Advanced Job Settings
This setting provides with an option to configure various jobs. You can define preferences for triggering a job, as well as define what jobs can be skipped and what jobs needs to wait based on a trigger preference. You can add a new job trigger preferences by selecting Add button in the Advanced Job Settings window.
Field Name Descriptions
SMTP Server Server name or identity of the server
SMTP Port Port number used for the server
Email To Receiver mail address
Sender's Mail ID Sender mail address
User Name Login name
Password Login password
5-29Common Services Platform Collector User Guide

Chapter 5 Applications Device Management
Figure 5-33 Advanced Job Settings
You can add jobs to Wait Job List and Skip Job List:
Wait Job List: Any job specified in Job Type Name will start only after the job specified in Wait Job list completes.
Skip Job List: Any job specified in Job Type Name will not start if any job specified in Skip Job is running.
Figure 5-34 Add a Job Trigger Preferences
5-30Common Services Platform Collector User Guide

Chapter 5 Applications Device Management
Do Not Manage Device List
This setting provides you with an option to select a set of devices that should not be managed by the collector. If a device is added to Do Not Manage Device List then that device will not be discovered and will not be added to CSPC.
Figure 5-35 Do Not Manage Devices List
As specified in the above screen, these three devices with IP Addresses 10.*.*.*, 1.1.1.1, and 10.1.2.43 are not inventoried even though they are all discovered devices.
5-31Common Services Platform Collector User Guide

Chapter 5 Applications Device Management
Device Discovery and Management
Use the Device Discovery and Management sub tab of the Device Management tab to set up device discovery and data collection process.
This section describes the Device Discovery and Management options in the following topics:
• Discover and Manage Devices
• Unmanage Devices
• Device Access Verification
• Device Prompt Collection
Discover and Manage Devices
The Discover and Manage feature allows you to discover devices and manage them. When you double-click Discover and Manage, a new wizard called Discover and Manage Network Devices appear. It allows you to select the Discovery method and the devices to be discovered by entering either the IP address or host name of the device.
There are multiple ways to discover a device:
• Known Device List
• Protocol based discovery (CDP, OSPF,ARP, BGP, etc.). Not supported in UC Discovery.
• IP Address Range Scanning
• Rediscover the currently managed devices
Note A message box “Please select at least one discovery method” is displayed when you click Next button without selecting any Discovery method.
5-32Common Services Platform Collector User Guide

Chapter 5 Applications Device Management
Figure 5-36 Discover and Manage Network Devices
You could also import the device list from either a CiscoWorks DCR file or a Pari Discovery Options XML file.
For Known Device List discovery, enter the IP addresses or hostnames as shown in Figure 5-37.
5-33Common Services Platform Collector User Guide

Chapter 5 Applications Device Management
Figure 5-37 Discover Devices using Known IP Addresses
CSPC uses Nmap (Network Mapper) based discovery when device is not reachable through SNMP protocol because of incorrect SNMP credentials or device does not support SNMP protocol. Nmap uses raw IP packets in novel ways to determine what hosts are available on the network, what services those hosts are offering, what operating systems (and OS versions) they are running and many other characteristics.
Nmap Discovery can be enabled when you are scheduling discovery to discover devices using one of the discovery options like CDP, OSPF, ARP or using IP address range(s). When you select Nmap check box in Discovery Schedule Options screen, NMAP discovery is performed on each of the IP address discovered using the specified discovery protocol or on each of the IP address within the specified address range.
Select Enable NMAP discovery option, in case you want to discover any Non-SNMP devices (devices on which SNMP agent is not running). Any Non-SNMP devices discovered can be viewed under “Non-SNMP devices” report.
If you Select Do not Manage Devices option, then the devices are not be managed but discovered. These devices can be exported as a zip file which contains .csv files for Discovered Devices and Un-Reachable Devices. Discovered Devices csv file is of CNC CSV format. This export option is available under Discovery Jobs.
If required provide job specific SNMP timeout value in SNMP Timeout (in sec) field.
5-34Common Services Platform Collector User Guide

Chapter 5 Applications Device Management
Figure 5-38 Nmap Discovery
For protocol based discovery, enter the following information:
• Protocol (CDP, Routing Table, ARP, OSPF Neighbors, BGP, HSRP, LLDP, etc.)
• Hop count (number of hops the discovery process should traverse)
• Seed IP Address(s) (Initial seed device or devices)
5-35Common Services Platform Collector User Guide

Chapter 5 Applications Device Management
Figure 5-39 Protocol Based Discovery
For IP Range Scanning based discovery, provide the Start IP address and the End IP address. You can also provide the Start IP in CIDR format as show here IP Address/subnet mask (x.x.x.x/x) and the End IP will be auto populated. You have select CIDR Address before providing Start IP Address.
Figure 5-40 IP Scanning
5-36Common Services Platform Collector User Guide

Chapter 5 Applications Device Management
You can select the option “Rediscovering Currently Managed Devices” and discovery process will rediscover all the devices that are currently managed.
Select the management protocol used for the discovery process. The current options are SNMPv1, SNMPv2 or SNMPv3.
Once the type of discovery is specified, you are ready to discover the devices. You can schedule the discovery process either right away or at a later time.
Figure 5-41 Discovery Schedule Options
To Schedule Discovery at a later time, select Schedule Discovery option and then click Configure Schedule button.
You can schedule Start and End Date/Time or select the Recurrence pattern as Minutley, Daily, Weekly, Monthly, or Yearly as shown in Figure 5-42.
5-37Common Services Platform Collector User Guide

Chapter 5 Applications Device Management
Figure 5-42 Configure Schedule
After the Discover and Manage operation is finished, you see the results which include the IP Address (of the selected device), Host Name, Device Type, Status (which indicates whether or not the device is managed), and Message. Discovery operation can be closed and run in the background. You can check the Job Log Reports->Discovery Jobs to view the results of the background operation.
You can also Clone an older discovery job to use as a new discovery job to speed up discovery. Refer to Job Log Reports ->Discovery Jobs for more information on cloning a discovery operation.
In the discovery jobs report, you can create a new discovery job by right clicking on any discovered job and selecting 'Create new discovery by cloning this job'.
Figure 5-43 Discovery in Progress
You can export the Discovery Settings to an XML file, as well export the discovered devices report.
Go back to CSPC Flow Chart
5-38Common Services Platform Collector User Guide

Chapter 5 Applications Device Management
Unmanage Devices
Double-clicking Unmanage Devices opens a new window. It shows the list of devices that are already managed, and allows you to select the devices that you want to Unmanage. After selecting the devices or groups, the selected devices or groups appear on right side of the window. Then, click Unmanage to remove the selected devices or groups, as shown below. You can also browse to upload list of nodes from .txt file.
Figure 5-44 Unmanage Devices
Once this operation is completed, CSPC removes the unmanaged devices along with all the corresponding data (collection profile data and so on) from its database.
5-39Common Services Platform Collector User Guide

Chapter 5 Applications Device Management
Device Access Verification
Use Device Access Verification when you want to check whether a given device is accessible through a specific credential, as shown below.
Follow the steps given below to perform device access verification:
Step 1 Select the devices for which data access needs to be verified. You can also browse to upload list of nodes from .txt file.
Step 2 Select the protocols to be used for verification. If all the protocol fails, then you have an option to use ICMP for reachability of device.
Step 3 Start the verification process now or schedule it at a later time
Figure 5-45 Device Access Verification - Device Selection
5-40Common Services Platform Collector User Guide

Chapter 5 Applications Device Management
Figure 5-46 Device Access Verification - Protocol Selection
Use the Run Discovery before DAV option to rediscover the devices before running DAV.
To Schedule Device Access Verification at a later time, select Schedule Device Access Verification option and then click Configure Schedule button. You can schedule Start and End Date/Time or select the Recurrence pattern as Minutley, Daily, Weekly, Monthly, or Yearly as shown in Figure 5-47.
5-41Common Services Platform Collector User Guide

Chapter 5 Applications Device Management
Figure 5-47 Configure Schedule
You can click on Advanced Options button and select the credentials to run DAV on as shown in Figure 5-48.
Figure 5-48 DAV Advanced Options
Once the job is started you can view the successful and failed credentials/protocols for a given device as shown below.
There is also an option to Optimize device timeouts on successful verification. This is applicable only for SNMP. The option once enabled will automatically calculate the timeout for a specific device and add it to the Global Timeouts under the advanced settings.
5-42Common Services Platform Collector User Guide

Chapter 5 Applications Device Management
When a device access verification job is scheduled to run at a later time, ‘Resume this job automatically if it is interrupted due to a CSPC Server restart’ option will be available. If the CSPC restarts for any reason while device access verification job is running, CSPC will resume the job upon restart.
By default CSPC pings a device to check if it is responding Additional ping.
If all the selected protocols have failed for DAV, by default an Additional Ping feature is triggered to check if the devices are responding.
Figure 5-49 Device Access Verification - Results
Go back to CSPC Flow Chart
5-43Common Services Platform Collector User Guide

Chapter 5 Applications Device Management
Device Prompt Collection
You can use Device Prompt Collection option to collect the Device Prompt and DNS Names for the devices that are selected.
Follow the steps given below to perform device prompt collection:
Step 1 Select the devices for which device prompts needs to be collected
Step 2 Create a job for collection
Step 3 Start the job now or schedule it at a later time
Figure 5-50 Select Devices for Prompt Collection
5-44Common Services Platform Collector User Guide

Chapter 5 Applications Device Management
Figure 5-51 Create a job for prompt collection
To Schedule Device Prompt Collection at a later time, select Schedule Device Prompt Collection option and then click Configure Schedule button. You can schedule Start and End Date/Time or select the Recurrence pattern as Minutley, Daily, Weekly, Monthly, or Yearly as shown in Figure 5-52.
5-45Common Services Platform Collector User Guide

Chapter 5 Applications Device Management
Figure 5-52 Configure Schedule
Once the job is started you can view the successful and failed collection for a given device as shown in Figure 5-53.
Figure 5-53 Prompt Collection Job in Action
5-46Common Services Platform Collector User Guide

Chapter 5 Applications Device Management
Data Collection
You can use the Data Collection sub tab of the Device Management tab to execute a selected collection profile. Collection Profiles are described in the Data Collection Settings chapter.
This section describes the Data Collection options in the following topics:
• Run Collection Profile
• Run Application Profile
• Run Upload Profile
Run Collection Profile
You can select any collection profile from the list of collection profiles defined and run it as needed. Select the profile and click Finish button to run the profile.
Figure 5-54 Select the Collection Profile
Once you start the job, the results are displayed including device name, IP address, and success or failure, as shown below.
5-47Common Services Platform Collector User Guide

Chapter 5 Applications Device Management
Figure 5-55 Executed Data Collection Profile Results
5-48Common Services Platform Collector User Guide

Chapter 5 Applications Device Management
Run Application Profile
Run Application Profile shows the list of application profiles. You can select any application profile from the list of application profiles defined and run it as needed. Select the profile and click Finish button to run the profile.
Figure 5-56 Run Application Profile
Once you start the job, the results are displayed including IP address, Host Name and success or failure, as shown in Figure 5-57.
5-49Common Services Platform Collector User Guide

Chapter 5 Applications Device Management
Figure 5-57 Executed Application Collection Profile Results
5-50Common Services Platform Collector User Guide

Chapter 5 Applications Device Management
Run Upload Profile
Run Upload Profile screen lists all the profiles created using Manage Upload Profiles. You can select a profile from Run Upload Profile screen and click Finish button to start uploading the profile.
Figure 5-58 Run Upload Profile
Job Progress screen showing the status of the uploaded profile is displayed as shown in Figure 5-59.
5-51Common Services Platform Collector User Guide

Chapter 5 Applications Device Management
Figure 5-59 Job Results
The status is shown in orange color if the upload is running, in green if the upload is successful and in red color if the upload failed.
If any of the phase status is failure, you have to re-run the upload profile.
Go back to CSPC Flow Chart
5-52Common Services Platform Collector User Guide

Chapter 5 Applications Device Management
Data Collection Settings
You can use the Data Collection Settings sub tab of the Device Management tab to set up data collection profiles, create new datasets and manage data integrity and masking rules.
This section describes the Data Collection Settings options in the following topics:
• Manage Application Discovery Profiles
• Manage SNMP Trap Profiles
• Manage Jump Server
• Manage Data Collection Profiles
• Create Adhoc Data Collection Profiles
• Manage Datasets
• Manage Platform Definitions
• Manage Data Integrity Rules
• Manage Data Masking Rules
• Import All Rules
• Manage Syslog Source Files
• Manage Upload Profiles
Manage Application Discovery Profiles
In Manage Application Discovery profiles you can add or edit a application discovery profile, define the devices that collect data and how often the data needs to be collected. Application discovery detects what applications are installed/running on devices (typically compute server) by collecting information from devices.
5-53Common Services Platform Collector User Guide

Chapter 5 Applications Device Management
Figure 5-60 Manage Application Discovery Profiles
New application discovery profiles can be created by clicking Add Application Discovery Profile icon from Manage Application Discovery Profiles window.
To add a new application discovery profile, follow the steps given below:
Step 1 Select the Devices
Step 2 Select Profile details
Step 3 Click OK.
5-54Common Services Platform Collector User Guide

Chapter 5 Applications Device Management
Figure 5-61 Select Devices for a Application Discovery Profile
To start the collection, select a device or a set of devices from which the data is to be collected as shown in Figure 5-61. Once you select the devices, select the profile options that define how often you want to collect the data, as shown in Figure 5-62.
5-55Common Services Platform Collector User Guide

Chapter 5 Applications Device Management
Figure 5-62 Profile Details
If you schedule a job for periodic collection, the job can be resumed even if the CSPC server is restarted by selecting the option "Resume this job automatically if it is interrupted due to a CSPC server restart".
Manage SNMP Trap Profiles
This helps you to add the new SNMP Trap profiles and store them depending on the filter you configure. One trap can be applied to multiple filters. You get a notification when a trap is received.
Figure 5-63 Manage SNMP Trap Profiles
To create new SNMP Trap Profile click Add SNMP Trap Configuration icon from Manage SNMP Trap Profiles window.
To add a new SNMP Trap Profile, follow the steps given below:
Step 1 Select Profile Details
a. Enter the Profile and Queue name is JMF queue where add-on process should subscriber to the given JMF Queue
b. Click arrows to select the Notification Types. By default ,there are only two notification types if required you can add as many as notifications through xml request. Refer to “XML APIs”
Step 2 Select the Devices
Step 3 Click OK.
5-56Common Services Platform Collector User Guide

Chapter 5 Applications Device Management
Figure 5-64 Profile Details
Select Devices tab as shown in Figure 5-68 allows you to map the devices to the specific Trap Profiles.
There are two options to map the devices to Taps Profiles:
• All managed devices - It maps all the devices to the specified Taps Profile
• Only the following selected devices - It maps only the selected devices to the specified Taps Profile.
5-57Common Services Platform Collector User Guide

Chapter 5 Applications Device Management
Figure 5-65 Select Devices
Manage Jump Server
The Jump server support allows CSPC to connect to any device CLI via a Jump Server where direct access to the device CLI is prevented. The Jump Server configuration allows you to configure the Jump Server feature. In Manage Jump Server you can add or edit a Jump server. It manages the device and the type of connection and test the connection.
Figure 5-66 Manage Jump Server
To create new Jump Server click Add Jump Server icon from Manage Jump Server window.
To add a new jump server, follow the steps given below:
Step 1 Select Profile details
Step 2 Select the Devices
Step 3 Click OK.
5-58Common Services Platform Collector User Guide

Chapter 5 Applications Device Management
Figure 5-67 Profile Details
Table 5-7 Jump Server Parameters
Select Devices tab as shown in Figure 5-68 allows you to map the devices to the specific Jump Server.
There are two options to map the devices to Jump Server:
• All managed devices - It maps all the devices to the Jump Server
• Only the following selected devices - It maps only the selected devices to the specified Jump Server.
If you select "All managed devices" option, it maps all the devices to the specified Jump Server. If you want to map all devices to specified jump server you have to make sure that no other devices are mapped to any other Jump Server.
If you select "Only the following selected devices" option, it maps only the selected devices to the specified Jump Server. If some of the devices which you are trying to map to the specified Jump Server are already mapped to any other Jump Server, then while creating the Jump Server these already mapped device will be excluded from the mapping and unique devices will be mapped.
Field Name Description
Host name Name defined to server
User Name Login username
Password Login Password
Number of Connections No of connections to jump server.
Protocol Select the protocol to be used
Description Description of the server
Test Connection To check the jump server credentials
5-59Common Services Platform Collector User Guide

Chapter 5 Applications Device Management
Figure 5-68 Select Devices
Manage Data Collection Profiles
Collection profile defines what data to collect, from what devices that data needs to be collected and how often the data needs to be collected.
Figure 5-69 Collection Profile Main Window
If there are no collection profiles created, CSPC does not collect any data from any device.
New data collection profiles can be created by clicking Add Collection Profile from Manage Data Collection Profiles window.
5-60Common Services Platform Collector User Guide

Chapter 5 Applications Device Management
You can also import collection profiles from a zip file stored locally on your system. To do so, click Import Collection Profile from Zip File button and select the zip file with collection profiles.
To add a new data collection profile, follow the steps given below:
Step 1 Select the Devices
Step 2 Select Datasets
Step 3 Select Profile details
Step 4 Click OK
Figure 5-70 Select Devices for a Collection Profile
To start the collection, select a device or a set of devices or improt the .txt file which has IP address of devices and each IP should be enter in the consecutive line, from which the data is to be collected as shown in the above figure. Once you select the devices, the second step in creating a profile is to select some datasets. A dataset in CSPC is an output of a command (CLI), a SNMP request, a SOAP/XML request or a File. Datasets are explained in the Manage Datasets chapter.
5-61Common Services Platform Collector User Guide

Chapter 5 Applications Device Management
Figure 5-71 Select Datasets
Once the required Datasets are selected, select the profile options that define how often you want to collect the data, as shown below.
Figure 5-72 Profile Details
5-62Common Services Platform Collector User Guide

Chapter 5 Applications Device Management
This provides an options to select the priority of the profile itself, and how many versions of this profile run data need to be preserved and finally how often the profile is executed to collect data. You need to provide a title that identifies this profile as well as an identifier (which is used by the XML APIs to uniquely identify this profile). If no identifier is provided, the system generates an automatic identifier for this profile.
Each profile is set up with a specific priority. Higher priority profiles always take precedence when there is a contention for resources.
You can specify the Service Name and Service Version for the profile created. Service version is for the specific service program that collects and uploads the data.
Specify the Rule package version.
The Use Fallback Credentials option is provided in case the credential that is being used for data collection fails (typically if you are using the Discovery Credentials for the data collection as well, it might not work on all the devices). CSPC picks up the next credential that passed Device Access Verification as a fall back credential to collect the data.
Use the Run Discovery before Collection option to rediscover the devices before running the inventory.
The Run Prompt Discovery before Collection option is used to collect the prompts before running the inventory.
Use the Run DAV before Collection option to verify the credentials before running the inventory.
Use the Mask IP Address option to mask the IP addresses collected from the customer before uploading them to Cisco.
Use the Mask Domain Name option to mask the domain names collected from the customer before uploading them to Cisco.
Mask IP Address and Mask Domain Name options are for data privacy and their usage depends on customer needs. You can specify the mask settings in Advanced Settings option under Settings menu.
Use the Export Seed File option, if you want to upload all the original seed files saved in the system along with the Collection profile. You can also export Unreachable devices. This option is disabled if masking/DPA is enabled.
Use Export Options if you would like to export the collection profile data after the successful execution of the collection profile. You can export the data to the following format:
• Cisco VSEM(.zip)
Check the Upload to Remote Server checkbox, if you would like to upload the collection profile details to the remote server. If the Upload to Remote Server box is left unchecked the collection profile data is not uploaded to remote server.
Once these steps are finished, click OK and the Data Collection Profile is created and ready for use.
When a Collection Profile is scheduled to run at later time, ‘Resume this job automatically if it’s interrupted due to a CSPC Server restart’ option will be available. If the CSPC restarts for any reason while Collection Profile is running, CSPC will resume the job upon restart.
When you click Advanced Options in Profile Details window, following windows is displayed.
5-63Common Services Platform Collector User Guide

Chapter 5 Applications Device Management
Figure 5-73 Advanced Collection Profile Options
Advanced Collection Profile Options window shows the available, SNMP, CLI and HTTP protocols. You can selected the desired protocol from the list and add it by clicking arrow or select all by clicking on the double arrow .
You can move the protocol up or down by using the arrow keys next to the selected box. The protocol on top in the selected box takes precedence and is run first as compared to the ones below it.
If you select LocalStorage, then whenever you execute for a particular device or dataset it will first check if it exists in the local database, if it is not found then based on the protocol order selected it will go to the next one.
You can also set a filter to execute the profile only if a certain collection profile changes. To set the filter, select the check box next to Execute this profile only if the following collection profile data changes, click Browse button and select the collection profile.
Click Inventory Change Rules to add of modify the Rule. Select Dataset and enter Ignore Regular Expression and click OK
5-64Common Services Platform Collector User Guide

Chapter 5 Applications Device Management
Figure 5-74 Inventory Change Rule Details
Click OK button to save the selection.
Go back to CSPC Flow Chart
5-65Common Services Platform Collector User Guide

Chapter 5 Applications Device Management
Create Adhoc Data Collection Profiles
You can create adhoc collection profile if you want some devices to be configured to collect data based on the datasets.
In general a collection profile will be associated with a set of devices. This means when you run collection profile, collection will be performed on devices associated with this collection profile definition.
If you wants to run a collection profile for a different set of devices other than what is present in the profile definition. An Adhoc collection profile serves this purpose.
When you create adhoc collection profile, select:
• A base collection profile
• Device details
• Scheduling information
Adhoc collection profiles inherit collection details (like data sets) from a given base collection profile. It inherits all the details except device details and scheduling information.
On clicking “Create Adhoc Data Collection Profiles”, screen as shown in Figure 5-75 is displayed.
Figure 5-75 Adhoc Collection Select Devices
Enter the mandatory details under the following two sections:
• Select Devices
• Profile Details
5-66Common Services Platform Collector User Guide

Chapter 5 Applications Device Management
In Select Devices you can select all managed devices or only few devices. You can also browse to upload list of nodes from .txt file. Profile Details you can add the mandatory details as shown in Figure 5-76.
Figure 5-76 Adhoc Collection Profile Details
The drop down box beside “Base Collection Profile” lists all the collection profiles present in the CSPC. You needs to select a collection profile as a base collection profile. It is mandatory to select a base collection profile.
Configure schedule can be used to schedule adhoc collection at a specified time and can be repeated at certain intervals by giving the required details.
Figure 5-77 Configure Schedule
5-67Common Services Platform Collector User Guide

Chapter 5 Applications Device Management
Click OK to save the Profile and device details to the adhoc collection profile. On successful completion, you will receive a message as shown in Figure 5-78.
Figure 5-78 Confirmation Message
The adhoc collection profile created will appear in the Manage Data Collection Profiles tab.
Manage Datasets
Manage Datasets is used for creating a new data collection point. Datasets are the building blocks of CSPC Collection Profile. Datasets contain the platform definitions, data/masking rules. You can either Add, Modify or Delete a dataset.
A Data Set in CSPC is an output of a command (CLI), SNMP request (SNMP) or XML output (SOAP/XML).
Figure 5-79 Manage Datasets
Select Add Dataset option when you are ready to create a new data set. You can create Static and Dynamic datasets.
You can also import datasets from a zip file.To do so, click “Import Dataset from a zip file” button on the Manage Datasets window and select to the zip file to import.
5-68Common Services Platform Collector User Guide

Chapter 5 Applications Device Management
Static Dataset
Collection mechanism specified in the static dataset is defined as a command or SNMP request
Follow the steps given below to add a new static data set:
Step 1 Provide data set details
Step 2 Provide data set platforms
Step 3 Click OK
Select Create static dataset option and then click OK button to create a static dataset as shown in the figure below.
Figure 5-80 Add Dataset
Add/Modify Dataset is used for creating/modifying a Dataset. Dataset can be added either as locked or unlocked.
The following are the steps to add a dataset.
Step 1 Provide the following dataset details:
Title: Name of the Dataset. This is a mandatory field
Identifier: This can be user defined. If this is not defined by user, this will be generated by System
Category: This is a mandatory field. This is custom defined by user. If you enter a category that does not exist, a new category is created
Collection Interval: You can specify the collection intervals in milliseconds
Tag: Select the tag from the drop down list
Description: Description for the Dataset
5-69Common Services Platform Collector User Guide

Chapter 5 Applications Device Management
Figure 5-81 Provide Dataset Details
Step 2 Once this information is provided, you can now select the applicable platforms for this dataset and the collection method using the following options:
Dataset Type:
• CLI
• SNMP
• SOAP XML Requests
• Config Retrieval using SNMP
• FILE
• XML
• WMI
• HTTP
• TL1
5-70Common Services Platform Collector User Guide

Chapter 5 Applications Device Management
CLI:
CLI is selected in this example. CLIs are the datasets which contains commands to execute on the device.
Figure 5-82 Dataset Platform Options (select CLI)
Select a specific platform for which this dataset is applicable. The list of platforms is pretty extensive, and you can select a platform based on a matching operating system, matching device group or any other format. You can also create your own platform definitions as explained in the Manage Platform Definitions chapter.
Figure 5-83 Dataset Entry Details (CLI)
5-71Common Services Platform Collector User Guide

Chapter 5 Applications Device Management
Once the platform is selected, enter a command string (as you are creating a dataset based on CLI) for NATed Appliances you need to use this format as explained in Optional Parameter for NATed Appliances, page E-1, and enter other details such as:
• The Sub Mode option for configuration (applicable only to the IOS-XR platform for executing commands in admin mode)
• Maximum Lines (some command outputs might run in to thousands of lines, using this option provides a way to curtail that information to the selected number of lines)
• Integrity Rule (helps to determine if the command output returned from the device is a proper output on successful execution of the command or the output returned is an error message. You can define your own integrity rules. Integrity Rules are discussed further in Applications->Device Management->Data Collection Settings tab),
• Masking Rule (what specific fields in the command output needs to be masked)
• Dataset time out (how much time collector should wait for the data output).
SNMP:
Select SNMP option from Dataset Type and click Add button.
Figure 5-84 Dataset Platforms Options (select SNMP)
The following screen shots show adding an SNMP data set. Once you select SNMP in the Dataset Platform Options, add the MIB variables as shown in Figure 5-85. All the MIBs that are preloaded are shown, and you can pick which MIB and which variables you would like to add to your dataset.
5-72Common Services Platform Collector User Guide

Chapter 5 Applications Device Management
Figure 5-85 Dataset Entry Details (SNMP - Select the MIB Variables)
Once the selection is finished, click OK.
SNMP variables are added to your new data set as shown below.
Figure 5-86 Dataset Entry Details - SNMP
5-73Common Services Platform Collector User Guide

Chapter 5 Applications Device Management
SOAP XML Request:
Select SOAP XML Request option from Dataset Type and click Add button.
Figure 5-87 Dataset Platforms (select SOAP XML Requests)
Enter the details for SOAP XML as defined below. Once all the data is entered you are ready to add a new SOAP XML dataset.
Figure 5-88 Dataset Entry Details - SOAP XML
5-74Common Services Platform Collector User Guide

Chapter 5 Applications Device Management
Config Retrieval using SNMP:
Once you select Config Retrieval option, and click Add button you can start collecting the configuration (either running or startup) using SNMP. Once you select the type of data set you would like to create based on the protocol selected, click Add button to enter the details for the data set.
Figure 5-89 Dataset Platforms (select Config Retrieval using SNMP)
Enter the details for SNMP ConfigRetrieval. Once all the data is entered you are ready to add a new ConfigRetrieval using SNMP.
Figure 5-90 Config Retrieval using SNMP Details
5-75Common Services Platform Collector User Guide

Chapter 5 Applications Device Management
FILE:
When you select FILE option, and click Add button, you can start collecting the data based on either a predefined file or user defined file.
Figure 5-91 Dataset Platforms (Select FILE)
Enter the details for File selection (Predefined file or User Defined file). Once all the data is entered you are ready to add a new FILE dataset.
Figure 5-92 Dataset Entry Details - FILE
5-76Common Services Platform Collector User Guide

Chapter 5 Applications Device Management
XML:
Once you select XML Dataset option and click Add button, you can start collecting data in XML format for supported platforms. Once you select the type of data set you would like to create based on the protocol selected, click Add button to enter the details for the data set.
Figure 5-93 Dataset Platforms (Select XML)
Enter the details for XML selection. Once all the data is entered you are ready to add a new XML dataset.
Figure 5-94 Data Entry Details - XML
5-77Common Services Platform Collector User Guide

Chapter 5 Applications Device Management
WMI:
Once you select WMI Dataset option and click Add button, you can start collecting WMI data for supported platforms. Once you select the type of data set you would like to create based on the protocol selected, click Add button to enter the details for the dataset.
Figure 5-95 Dataset Platforms (Select WMI)
Enter the details for WMI selection. Once all the data is entered you are ready to add a new WMI dataset.
Figure 5-96 Dataset Entry Details - WMI
5-78Common Services Platform Collector User Guide
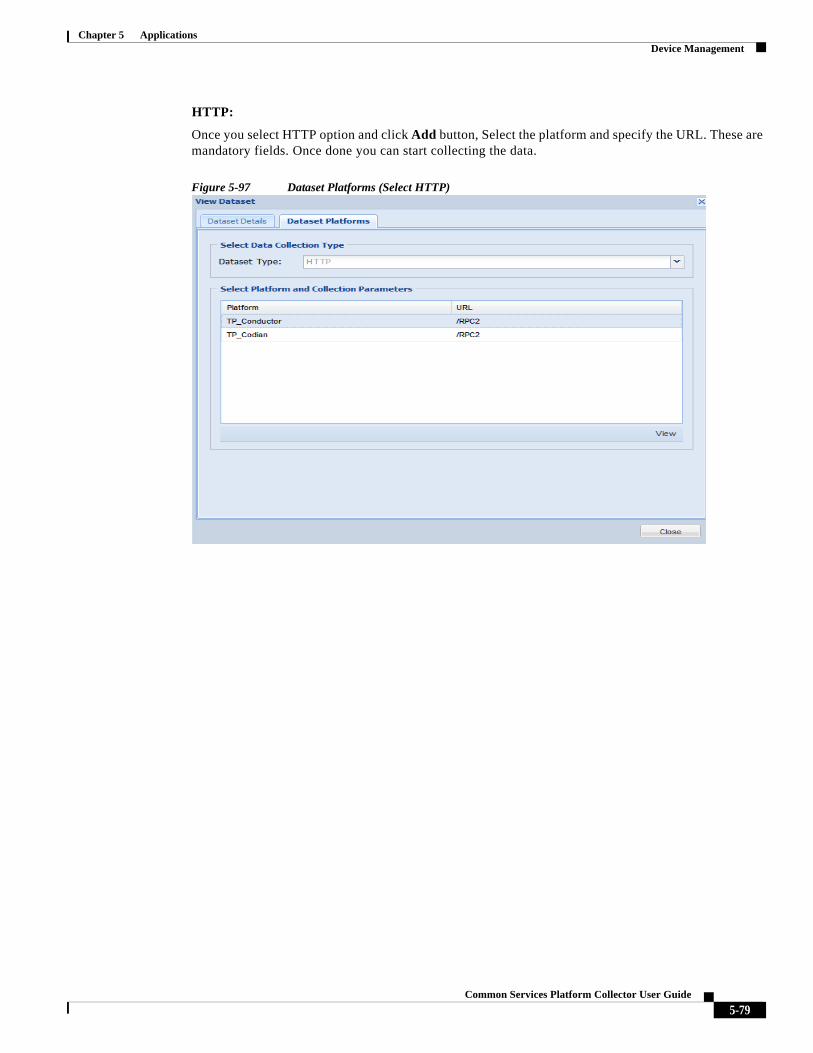
Chapter 5 Applications Device Management
HTTP:
Once you select HTTP option and click Add button, Select the platform and specify the URL. These are mandatory fields. Once done you can start collecting the data.
Figure 5-97 Dataset Platforms (Select HTTP)
5-79Common Services Platform Collector User Guide

Chapter 5 Applications Device Management
TL1:
Once you select TL1 option and click Add button, Select the platform and the Command string. These are mandatory fields. You can also enter Maximum Lines, Integrity Rule, Masking Rule, Dataset Timeout. Click OK button to add the data.
Figure 5-98 Dataset Platforms (Select TL1)
Go back to CSPC Flow Chart
5-80Common Services Platform Collector User Guide

Chapter 5 Applications Device Management
Dynamic Dataset
Dynamic datasets allow the collection of data based on the output of another command or set of commands.
To create a dynamic dataset, follow the steps given below:
Step 1 In Device Management, click Manage Datasets
Step 2 Click Add Dataset button
Figure 5-99 Add Dataset
Step 3 Select Create Dynamic Dataset and click OK
Step 4 In Dataset Definition box, specify the dynamic dataset XML
XML file uses the Pari API XML Schema
Step 5 Click OK
Dynamic Dataset is created and added to Manage Datasets.
5-81Common Services Platform Collector User Guide

Chapter 5 Applications Device Management
Figure 5-100 Create Dynamic Datasets
5-82Common Services Platform Collector User Guide

Chapter 5 Applications Device Management
Manage Platform Definitions
Manage Platform Definitions lets you select a group of devices that match a specific condition. You can select what data is to be collected from this group of devices using Manage Datasets. When a new device is discovered that matches this specific condition, it automatically becomes part of this platform. Hence, the same data that is collected for other devices in this platform definition is collected from the new device.
Creating new platform definitions is shown below:
Figure 5-101 Create Platform Definitions
Step 1 Click Add Platform Definition button
Step 2 As shown in Figure 5-101, enter the Title, Identifier and Description for the new platform definition
Step 3 Once the base data is entered, enter the conditions that make up this platform definition as shown below
5-83Common Services Platform Collector User Guide

Chapter 5 Applications Device Management
Figure 5-102 Add Platform Conditions
Step 4 Select whether all the conditions that you are defining need to match in order for a device to be part of this platform definition or some of the condition matching is sufficient.
Step 5 Click Add to start adding the conditions.
Figure 5-103 Platform Conditions
Step 6 When entering the conditions, you have the following options:
• You can select OS Name, OS Version, Product Model or SNMP Sys Object ID., and SNMP Sys Description
• Depending on the Device Property the Value field is changed (either OS Name selected from the list, or values provided for version, model or sys object id) an Operator can be used to match these two
• The operator provides 6 different options: equals, does not equal, in the list, not in the list, does not match regular expression and matches regular expression.
Go back to CSPC Flow Chart
5-84Common Services Platform Collector User Guide

Chapter 5 Applications Device Management
Step 7 Once the platform definition is created, use Test Platform Definition to check if any platforms match this definition, as shown below.
Figure 5-104 Test Platform Definitions
Figure 5-105 Test Customer Platform Definition
5-85Common Services Platform Collector User Guide

Chapter 5 Applications Device Management
Figure 5-106 Platform Applicability Status
You can also import platform definition from a zip file stored locally on your system. To do so, right-click in the Manage Platform Definitions window and select “Import Platform Definition from Zip File” option, browse to the zip file with platform definition on your system as shown in Figure 5-107 and click Submit.
Figure 5-107 Import from zip file
5-86Common Services Platform Collector User Guide

Chapter 5 Applications Device Management
Manage Data Integrity Rules
Data Integrity Rules are defined to identify whether a command execution returned a correct response or an error message. You can create new data integrity rules as shown below:
Figure 5-108 Create a New Data Integrity Rule
Step 1 Click Add Data Integrity Rules button
Step 2 Enter the Title, Identifier and Description for the new data integrity rule
Step 3 Once the base data is entered, enter the rule conditions that make up this rule as shown below
5-87Common Services Platform Collector User Guide

Chapter 5 Applications Device Management
Figure 5-109 Rule Conditions for Data Integrity Rules
Step 4 Select whether all the conditions that you are defining need to match in order for a device to be part of this integrity rules or if some of the condition matching is sufficient.
Step 5 Click Add to start adding the conditions.
Figure 5-110 Rule Conditions
Step 6 When entering the conditions, select the operator (matches the expression or does not match the expression), the regular expression value and what error message to display.
You can also import platform definition from a zip file stored locally on your system. To do so, right-click in the Manage Data Integrity Rules window and select “Import Data Integrity Rules from a Zip File” option, browse to the zip file with Integrity rules on your system and click Submit.
Go back to CSPC Flow Chart
5-88Common Services Platform Collector User Guide

Chapter 5 Applications Device Management
Manage Data Masking Rules
Masking options are provided to mask certain sensitive information such as User Names/Passwords in the configuration files before exporting them to higher level applications. You can create data masking rules that tell the collector what data to mask before exporting it.
Create a new masking rules as shown below:
Figure 5-111 Create New Data Masking Rule
Step 1 Click Add Masking Rules button
Step 2 In the Add Masking Rules window, enter Title, Identifier and Description for the new masking rule
Step 3 Once the base data is entered, enter the rule patterns that make up this rule as shown below
5-89Common Services Platform Collector User Guide

Chapter 5 Applications Device Management
Figure 5-112 Rule Patterns for Data Masking Rules
Step 4 Click Add to start adding the conditions.
Figure 5-113 Rule Pattern Conditions
Step 5 As defined here whenever there is a Username followed by Password in the configuration files they are replaced by the string xxxxxx.
You can also import masking rules from a zip file stored locally on your system. To do so, right-click in the Manage Data Masking Rules window and select “Import Masking Rules from Zip File” option, browse to the zip file with masking rules on your system and click Submit button.
Go back to CSPC Flow Chart
5-90Common Services Platform Collector User Guide

Chapter 5 Applications Device Management
Import All Rules
You can import all rules by clicking on Import All Rules option under Data Collection Settings. In the dialog box that is displayed click Browse button, select the rules file in zip format and click OK to start importing all rules.
Figure 5-114 Import All Rules
Go back to CSPC Flow Chart
Manage Syslog Source Files
Syslog Source Files options are provided to define the syslog collection from devices. You can add new settings for syslog sources.
For supported syslog formats and examples, see Appendix C, “Supported Syslog Formats”.
Figure 5-115 Manage Syslog Source Files
5-91Common Services Platform Collector User Guide

Chapter 5 Applications Device Management
Create new syslog source file by selecting the Add button.
Add Syslog Source option is provided to add a new Syslog source. There are two tabs in adding the syslog sources.
First tab is File Details as shown in Figure 5-116. You need to provide the following information on this screen:
• Source File Path: The path where the Syslog source is located.
• Identifier: It can be either user defined or system generated.
• Roll Over File Name: This is the name of the file that needs to be spooled in case the primary filed rolled over.
• Polling Frequency: This is the polling frequency to poll the Syslog messages. The value will be in between 5000 to 3600000 milliseconds.
• Description: Description of the file.
Figure 5-116 Add Syslog Source
Second tab is Input Filters; when you select the Add button, Input Filter Details window will pop up. You need to provide the following information for this screen:
• Source Device: Device from which messages to be spooled.
• Minimum Severity: Minimum Severity that needs to be displayed.
• Maximum Severity: Maximum Severity that needs to be displayed.
• Component Name: Name of the component in the message.
• Mnemonic Text: Mnemonic text in the message.
• Description: Description in the message.
• Action to be taken: It can either be Accept or Drop the syslog.
5-92Common Services Platform Collector User Guide

Chapter 5 Applications Device Management
Figure 5-117 Add Input Filter
Click Add button, a screen as shown in Figure 5-54 is displayed. Enter the details as shown below.
Figure 5-118 Add Input Filter Details
5-93Common Services Platform Collector User Guide

Chapter 5 Applications Device Management
Manage Upload Profiles
In Manage Upload Profiles, you can specify the type of data which includes syslogs, inventory, and DAV that needs to be uploaded locally or to the backend.
Figure 5-119 Manage Upload Profile
You can import an upload profile from zip file stored on your system. To do so, click Upload Profile from a Zip file icon on Manage Upload Profiles screen. In Upload File dialog box, browse to the file and click Submit button to start uploading the file.
5-94Common Services Platform Collector User Guide

Chapter 5 Applications Device Management
Figure 5-120 Add Upload Profile
You can upload devices to the default entitlement using Default Upload or to an entitlement from drop down using Upload devices to.
You can specify the module for upload by selecting available services or by querying the collection profile data.You can upload all device data or upload inventory updated device data by specifying the time interval in minutes or choosing an option “From Last Successful Upload”.
To upload DAV data or Syslogs, select the Upload DAV Data checkbox or select the Upload Syslog checkbox. For Syslogs specify the time intervals in minutes.
You can also schedule periodic uploads of the data using Configure Schedule option. This data can be exported to remote server or to a server locally.
5-95Common Services Platform Collector User Guide

Chapter 5 Applications Device Management
Manage Groups
Use the Manage Groups sub tab of the Device Management tab to create and manage device groups.
Device Groups
Device Groups option is used for Adding, Modifying or Deleting device groups. There are certain default system generated groups in CSPC. In addition, if you want to create device groups, then you can use these settings. Device groups can be Static or Dynamic. In static device groups you have to manually select the devices that are part of a given group. In dynamic group you will define a criteria and all devices that match the criteria (either currently managed or not) will automatically appear in this group.
Figure 5-121 Device Groups Main Window
When you select Add Device Group you chose whether to create a static group or dynamic group.
Figure 5-122 Add Device Group
Creation of static group is defined below.
5-96Common Services Platform Collector User Guide

Chapter 5 Applications Device Management
Figure 5-123 Creation of Static Groups
Enter the group name and description, and select group members by clicking Edit in the window. Once the devices are selected or click browse to upload .txt file containg the devices, click OK to create the static device group.
Figure 5-124 Managed Devices
Similarly, when you select the Dynamic Group option while creating new device groups you can define the heuristics used to identify which devices belong to that specific group. This is shown in Figure 5-125.
5-97Common Services Platform Collector User Guide

Chapter 5 Applications Device Management
Figure 5-125 Add a Dynamic Group
Once you define the group name and description you are ready to define the Group Rules, as shown below.
Figure 5-126 Add Group Rules
Define the conditions or rules that must be matched or not matched based on the attributes and values. Add these conditions by clicking Add.
5-98Common Services Platform Collector User Guide

Chapter 5 Applications Device Management
Figure 5-127 Group Rule Details
Select any of the Attributes like Device Host Name, Device OS Version, Device Vendor Name, Device Product Module, or Device IP Address and use one of the Operator like equals, contains in the list and so on, and provide a Value. You can create any number of rules.
Newly discovered devices are matched for these conditions automatically and are added to the dynamic groups.
Table 5-8 Special Cases in Group Rule
Special Cases Figures
If you select Device OS Name as Attribute Name, then you need to select the value form the dropdown
If you select Device Ip Address as Attribute Name and Operator as does not belong to the range, then you need to enter Start Ip Address and End Ip Address
5-99Common Services Platform Collector User Guide

Chapter 5 Applications Device Management
For any of the Attribute Name if you select does not exist in the list as Operator, then you need to add the Value manually using the edit icon on the screen.
If you select Inventory Status or Config Status as Attribute Name and Operator as contains or does not contain. Select the required status on the screen and Select the Available Services from the drop down. Only for Inventory Status NOS lists all the dataset name and you can select for the list.
Inventory status provides you granular information. It is recommended to create the rule based on inventory status if you want to create a group based on dataset specific.
Special Cases Figures
5-100Common Services Platform Collector User Guide

Chapter 5 Applications Device Management
Job Management
Use the Job Management sub tab of the Device Management tab to retrieve Job information. The job information can also be exported to an output file. The currently supported file formats are PDF, HTML, DOC, CSV (Comma delimited), TXT (Tab delimited).
This section describes the Job Management options in the following topics:
• Manage Discovery Jobs
• Manage Device Access Verification Jobs
• Manage Workflow Jobs
• Manage Configuration Jobs
• Manage Device Prompt Collection Jobs
• Manage Health Monitor Jobs
Manage Discovery Jobs
Manage Discovery Jobs provides a list of all the discovery jobs previously run, and provides you with an option to either export the job information or delete job information from the database as shown below.
Figure 5-128 Manage Discovery Jobs
5-101Common Services Platform Collector User Guide

Chapter 5 Applications Device Management
Manage Device Access Verification Jobs
Manage Device Access Verification Jobs provides a list of all the device verification jobs previously run, and provides you with an option to either export the job information or delete job information from the database as shown below.
Figure 5-129 Manage Device Access Verification Jobs
5-102Common Services Platform Collector User Guide

Chapter 5 Applications Device Management
Manage Workflow Jobs
Manage Workflow Jobs provides a list of workflow jobs that are previously run, and provide you with an option to either export the job information or delete the job information from the database as shown below.
Figure 5-130 Manage Workflow Jobs
5-103Common Services Platform Collector User Guide

Chapter 5 Applications Device Management
Manage Configuration Jobs
Manage Configuration Jobs provides a list of all the device configuration jobs previously run, and provides you with an option to either export the job information or delete job information from the database as shown below.
Figure 5-131 Manage Configuration Jobs
5-104Common Services Platform Collector User Guide

Chapter 5 Applications Device Management
Manage Device Prompt Collection Jobs
Manage Device Prompt Collection Jobs provides a list of all the device prompt collection jobs previously run, and provides you with an option to either export the job information or delete job information from the database as shown in Figure 5-132.
The jobs info can also be exported to an output file. The currently supported file formats are PDF, HTML, DOC, CSV (Comma delimited), TXT (Tab delimited)
Figure 5-132 Device Prompt Collection Jobs
5-105Common Services Platform Collector User Guide

Chapter 5 Applications Device Management
Manage Health Monitor Jobs
Health Monitor Jobs provides a list of all the monitor jobs previously run, and provides you with an option to either export the job information or delete job information from the database.
Health Monitor job which comes as part of NOS configure installation. This is a daily scheduled job. A user cannot alter or create a scheduled health monitor job from GUI/CLI. The screen shot of health monitor job after installation is shown in Figure 5-133. The jobs information can also be exported to an output file. The currently supported file formats are PDF, HTML, DOC, CSV (Comma delimited), TXT (Tab delimited)
Figure 5-133 Health Monitor Jobs
Job run details can also be viewed from Reports -> Job Management Reports. From the drop down select Health Collection jobs and click OK as shown in Figure 5-134.
5-106Common Services Platform Collector User Guide

Chapter 5 Applications Device Management
Figure 5-134 Job Report Filter
Figure 5-135 Health Collection Jobs
In Figure 5-135 you could see Job Id, Job Name, Created By, Created On, Modified By, Modified On, First Run Time, Last Run Time, Run Count, Next Scheduled Time. On the screen, there is no option from where the job could be triggered manually.
5-107Common Services Platform Collector User Guide

Chapter 5 Applications Device Management
There are two CLI’s using which this could be achieved. The CLIs are listed below:
• job_schedule_healthMonitor_runnow.sh
• show_settings_healthMonitor_jobparameters.sh
Using show_settings_healthMonitor_jobparameters.sh you could view any health monitor job parameters and the first CLI, job_schedule_healthMonitor_runnow.sh is used to create a run now job. It expects 4 parameters. Figure 5-136 shows the view health monitor job parameters from CLI.
Figure 5-136 CLI Command
A new health monitor runnow job can be scheduled from CLI as shown in Figure 5-137.
Figure 5-137 CLI Command
5-108Common Services Platform Collector User Guide

Common Se
C H A P T E R 6
Applications - ReportsReports Use the Reports tab to view the collected data and job log details for discovery, inventory, collection and backup jobs.
This section describes the Reports options in the following topics:
• Inventory Reports
• Job Reports
• Server Audit Trails
All the reports can be exported to various formats such as HTML, Microsoft Word, PDF, CSV and TXT formats, along with various graphing options. Each report is easy to navigate with filtering and report formatting options.
Inventory Reports
Use the Inventory Reports sub tab to view the collected data for the selected devices. This section describes the Reports options in the following topics:
• Managed Devices
• Alerts
• Device Launch Pad
• Interface Summary (IOS, PIX, ASA, IOS-XR)
• Device Display Properties
• Device Access Verification Summary
• Device Access Verification By Dataset Type
• Device Access Verification Results
• View Locked Credentials
• View Server Activity Log Messages
• SNMP Trap Report
• Syslog Summary
• Syslog Messages
6-1rvices Platform Collector User Guide

Chapter 6 Applications - Reports Reports
• Collection Profile Run Summary
• Application Profile Run Summary
• Disabled Protocol Report
• Disable Command Report
• Device Timeout Configuration
• Unreachable Devices
• Duplicate Devices
• Device Jump Server Mapping
• Application Discovery Report
• Non SNMP Devices
• Inventory Summary
• Config Collected Devices
• Config Data Per Device
Managed Devices
Managed Devices report shows all the devices that have been discovered and managed, along with their respective details such as IP Address, Host Name, Sys Object Id, Device Family, Product Model, Serial Number, Vendor Name, OS Name, OS Version, Discovery date and time, Source, and Reachable. The report can be exported to various formats such as HTML, Microsoft Word, PDF, CSV and TXT formats, along with various graphing options. The report is easy to navigate with filtering and report formatting options.
Figure 6-1 Managed Devices Report
All these reports also provide various graphing options along with a device product family graph as shown in Figure 6-2.
6-2Common Services Platform Collector User Guide

Chapter 6 Applications - Reports Reports
Figure 6-2 Graphing Options
Figure 6-3 Network Summary by Product Model
Go back to CSPC Flow Chart
6-3Common Services Platform Collector User Guide

Chapter 6 Applications - Reports Reports
Alerts
This report provides a list of all Alerts. The report contains Event ID, Module, Time of event, severity, message, and View Details. Alerts that are older than 14 days in CSPC system are purged.
There two types of alerts UI Notification and Email alerts.
• UI Notification alerts appears on the UI when an notification is received.
• Email alerts are the alerts sent via mail to the subscribed email address
Figure 6-4 Alerts
Device Launch Pad
The Device Launch Pad report provides a list of all devices. You can choose what applications to launch for those devices.
Generating report is a two step process. First you select the devices, and then you select the applications. Specific application report selected will be launched against the devices selected.
Figure 6-5 Select Devices
6-4Common Services Platform Collector User Guide

Chapter 6 Applications - Reports Reports
Figure 6-6 Select application to Launch
Once the selection is done, the specific application will be launched for the given devices.
Interface Summary (IOS, PIX, ASA, IOS-XR)
Interface Summary report displays the list of all the interfaces available in CSPC.
6-5Common Services Platform Collector User Guide

Chapter 6 Applications - Reports Reports
Figure 6-7 Interface Summary
Interface Summary data can be also seen in a graphical format, clicking on graphics icon shows following options:
• Interface Status Summary
• Interface IP Address Summary
• Interface Type Summary
Device Display Properties
Device Display Properties report shows the display properties configured for all the devices. In addition, from this window you can configure display property for a specific device or a group of devices. You can assign a specific name for a device property such as Host Name, IP Address, DNS Name and so on.
6-6Common Services Platform Collector User Guide

Chapter 6 Applications - Reports Reports
Figure 6-8 Device Display Properties
Right click on any listed device and select Edit Properties option to add a custom name to the display properties of the device. The settings configured locally will override the global settings.
Figure 6-9 Edit Device Display Properties
Device Access Verification Summary
The Device Access Verification Summary report provides summary of the access verification. This report provides high level overview of the types of protocols used, and number of devices either succeeded or not along with number of devices that are not verified. This is shown in Figure 6-10.
6-7Common Services Platform Collector User Guide

Chapter 6 Applications - Reports Reports
Figure 6-10 Device Access Verification Summary
In Device Access Verification Summary, you can export the failed devices in CNC format. The data related to the selected filter type (Device, Protocol, Status and so on) and only failed credentials are exported as part of a seed file. This export option is supported for both manually added devices and devices added through seed file import.
6-8Common Services Platform Collector User Guide

Chapter 6 Applications - Reports Reports
Device Access Verification By Dataset Type
The Device Access Verification by Dataset Type shows the devices and whether they are support CLI, SNMP, SNM Configuration, SOAP, XML, WMI, FILE type protocols and files.
Figure 6-11 Device Access Verification By Dataset Type
6-9Common Services Platform Collector User Guide

Chapter 6 Applications - Reports Reports
Device Access Verification Results
The Device Access Verification Report shows the latest device access verification results. It provides details on verification time and source of the verification (either part of discovery or a separate verification job) and the successful/failed protocol and device combinations. This is shown in Figure 6-12.
Figure 6-12 Device Access Verification Report
The intelligent search options are shown in this report as well. When you start typing “tel” to list only the Telnet credentials, the report only shows those entries that match the “tel” string you entered. As shown in the above screen, the search options are quite extensive, and you can search based on any field/value in the report. You can also specify wild cards, regular expressions, matching patterns, etc. This helps to pinpoint the data you are looking for in a fast and easy way.
Go back to CSPC Flow Chart
6-10Common Services Platform Collector User Guide

Chapter 6 Applications - Reports Reports
View Locked Credentials
This report provides a list of all the locked credentials. The report contains Credential name, Protocol, User Name, Locked time and Will be Unlocked At (based on the configured Lock Period)
Figure 6-13 View Locked Credentials
To unlock a credential, right click on the Credential you want to unlock and select Unlock the Credential... option.
6-11Common Services Platform Collector User Guide

Chapter 6 Applications - Reports Reports
View Server Activity Log Messages
This report shows all the log messages for inventory jobs (data collection), discovery jobs, device access verification jobs, and son on.
Every action performed using the CSPC is logged, and you can see those logs in this report as shown in Figure 6-14.
Figure 6-14 View Server Activity Log Messages
SNMP Trap Report
This report shows a list of traps sorted by Device, Notification types, Trap Data, and Received At.
To generate the SNMP Trap Report do the following steps:
Step 1 Select the Trap Received Time from drop down
• If custom is selected, then enter the Start Date/Time and End Date/Time
Step 2 Browse to select the Source Device
Step 3 Select Notification Types
Step 4 Click OK
6-12Common Services Platform Collector User Guide

Chapter 6 Applications - Reports Reports
Figure 6-15 SNMP Trap Filter
To view the Trap Data click View Trap Data.
Figure 6-16 SNMP Report
6-13Common Services Platform Collector User Guide

Chapter 6 Applications - Reports Reports
Syslog Summary
Syslog Summary report provides the summary of the all the syslogs collected by CSPC. You need to provide the filtering information such as when was the log(s) received, and do you want to see the summary based on severity and so on as shown in Figure 6-17.
Figure 6-17 Syslog Summary Filter
Once the filter is selected, the summary report matching that filter is provided.
Figure 6-18 Syslog Summary
6-14Common Services Platform Collector User Guide

Chapter 6 Applications - Reports Reports
Syslog Messages
Syslog messages report provides all the syslogs that are collected by CSPC. Just like the Syslog Summary report, you need to provide the filter that needs to be applied before providing the detailed syslog message report.
Figure 6-19 Syslog Filter
Figure 6-20 Syslog Messages
6-15Common Services Platform Collector User Guide

Chapter 6 Applications - Reports Reports
Collection Profile Run Summary
This report provides a summary of the completed collection profiles and the data that is collected while completing those collection profiles. You can view a specific completed collection profile data, export data to a report, look at job log status and delete the collected data.
Figure 6-21 Collection Profile Run Summary Main Window
You can select any row in the report, right click on it to get all the options associated with that row:
• View Data
• Export Collection Profile Run Data
• View Device Collection Summary
• View Device Collection Details
• View Tag Collection Summary
• View Tag Collection Details
• View Job Log
• Search Results
• Upload to Remote Server
• Delete Profile Executions
• View IP Host Masked Values
When you select to View Data you are provided with the data collection profile run data viewer, as shown in Figure 6-22.
6-16Common Services Platform Collector User Guide

Chapter 6 Applications - Reports Reports
Figure 6-22 Collection Profile Run Data Viewer
Once you select a specific dataset the output of the dataset along with whether the data collection is successful or not appears (command status). The Command Status is shown as one of these states:
• Successful
• Failed
• Not Applicable
View Collection Summary and View Collection Details provide collection summary and details for the selected collection profile. This is shown in Figure 6-23.
6-17Common Services Platform Collector User Guide

Chapter 6 Applications - Reports Reports
Figure 6-23 Collection Profile Device Run Summary
Figure 6-24 Collection Profile Run Details
You can view the log messages for specific job runs, along with the status of the collection for each data set for the selected devices as shown below.
6-18Common Services Platform Collector User Guide

Chapter 6 Applications - Reports Reports
Figure 6-25 Collection Profile Run Summary Log Messages
You can also delete a specific instance of the collection profile execution by selecting Delete Profile Executions.
To check the differences between two selected runs, select Show Differences between selected Runs option as shown below.
Use the View Tag Collection Summary option to list the summary of the commands that have been tagged earlier. Collection tag summary screen shows the device count of the tag along with the count of success, failed and not applicable devices, as shown in Figure 6-26.
Figure 6-26 View Tag Collection Summary
6-19Common Services Platform Collector User Guide

Chapter 6 Applications - Reports Reports
Use the View Tag Collection Details option to show the details of the commands that have been tagged. The screen shows the Device name, Tag name, Dataset name, Dataset type, Status and Message.
Figure 6-27 View Tag Collection Details
Use the Search Results option to search for the results. Specify the search string and select the tags to search the results, as shown in Figure 6-28.
Figure 6-28 Collection Profile Run Summary
Use the Upload to Remote Server option to upload the collection profile details to the remote server.
6-20Common Services Platform Collector User Guide

Chapter 6 Applications - Reports Reports
Figure 6-29 Uploading to Remote Server
A message confirming the successful upload as shown in Figure 6-30 is displayed.
Figure 6-30 Upload to Remote Server Message
Select the View IP Host Masked Values option to view the IP hosted masked values. You can also download the file in txt format by clicking on Download button.
Figure 6-31 View IP Host Masked Values
6-21Common Services Platform Collector User Guide

Chapter 6 Applications - Reports Reports
To view the difference between the selected runs chose the option Show Difference Between Selected Runs as shown in Figure 6-32.
Figure 6-32 Show Differences between Selected Runs
When you select two different runs, you can see what has changed between those runs in a Diff report where color codes (green-additions, red-deletions, and blue-changes) identify exactly what has changed.
Figure 6-33 Differences Between Two Collection Profile Runs
Go back to CSPC Flow Chart
6-22Common Services Platform Collector User Guide

Chapter 6 Applications - Reports Reports
Application Profile Run Summary
Application profile run summary report provides a summary of the completed application profiles as shown in Figure 6-34.
Figure 6-34 Application Profile Run Summary
6-23Common Services Platform Collector User Guide

Chapter 6 Applications - Reports Reports
Disabled Protocol Report
Disabled Protocol Report shows all the protocols that are disabled for a given device/group. The report contents can be exported in one of the supported formats. The supported formats are HTML, PDF, Microsoft Word, CSV and TXT.
Figure 6-35 Disabled Protocol Report
Disable Command Report
Disabled Command Report shows the details of commands that are disabled for a given device.
Figure 6-36 Disable Command Report
6-24Common Services Platform Collector User Guide

Chapter 6 Applications - Reports Reports
Device Timeout Configuration
Device Timeout Configuration report provides all the timeout configurations specified for different devices, along with retry counts. These values are populated from the timeouts configured in the Global Timeouts under Advanced Settings. This report can be exported into PDF, HTML, DOC, CSV (Comma delimited), TXT (Tab delimited) formats.
Figure 6-37 Device Timeout Configuration
Unreachable Devices
All the devices that are unreachable and are not detected while performing discovery are shown in this report. This report provides the details like host name, IP address, reason, and discovery time for each unreachable devices.
To perform the rediscovery of the device, right click on any device and select Start Discovery Job option. You can also delete any unreachable device or all unreachable devices by clicking Delete Unreachable Device or Delete All Unreachable Device button respectively.
6-25Common Services Platform Collector User Guide

Chapter 6 Applications - Reports Reports
Figure 6-38 Unreachable Devices
Duplicate Devices
All the devices that are duplicate are shown in this report as shown in Figure 6-40. This report provides the details such as device name, Managed by, and Details of the device.
Figure 6-39 Duplicate Devices
Device Jump Server Mapping
All the devices or groups that are mapped to the jump server are shown in this report as shown in Figure 6-40. This report provides the details such as device/group name or IP address of the device and the Jump server IP which it is mapped to.
Figure 6-40 Jump server Mapping
Application Discovery Report
Application Discovery Report shows the list of discovery applications installed on the server (see list below). For each installed application it shows the system level information like, OS type, OS version, CPU type, Total memory installed and so on as shown in Figure 6-41.
6-26Common Services Platform Collector User Guide

Chapter 6 Applications - Reports Reports
Figure 6-41 Application Discovery Report
Expanding each row shows a list of installed application and its details like Name of the application, Version, Vendor, Path where the application is installed, Installed date and its running state as shown in Figure 6-42.
Installed Discovery Applications
Here is the list of applications that can be discovered on Microsoft Windows and Linux platforms.
Microsoft Window:
Tomact, MySQL, ArgoSoft, DB2, SQL Server, OpenLDAP, NetBIOS Session Service, EmailArchitect Super Service, JBOSS, DNS Server, MSMQ, VMWare Workstation, WebSphere, Oracle, RPC, IIS Admin, SANSurfer.
Linux:
Tomcat, MySQL, httpd, OpenLDAP, FTP Server, SendMail, Telnet, DNS Server.
Figure 6-42 Application Discovery Report Expanded
6-27Common Services Platform Collector User Guide

Chapter 6 Applications - Reports Reports
Non SNMP Devices
Non SNMP Devices report list devices that are discovered through "Nmap" mechanism and on these devices SNMP agent is not running. These devices can be moved to managed state. To do so, select the device and right click on it, select Manage Devices.
Figure 6-43 Non SNMP Devices
If device OS detected by Nmap is not accurate, then you can select the appropriate OS name from drop down list.
Inventory Summary
Inventory Summary report provides the summary of inventory. You can view the Service Specific data or Collection Profile data. To view Service specific data, select the Query Service Specific Data option. In Available Services drop down box, select the available service and click OK button as shown in Figure 6-44.
Figure 6-44 View Inventory Summary Filter
Inventory Summary Input screen is displayed. It shows the list of Device Type and Device Count as shown in Figure 6-45.
6-28Common Services Platform Collector User Guide

Chapter 6 Applications - Reports Reports
Figure 6-45 Inventory Summary
By clicking on the Device Count, Inventory Input Data Report for that Device is displayed as shown in Figure 6-46.
Figure 6-46 Inventory Input Data Report
Config Collected Devices
You can filter and view the Service Specific data or Collection Profile data. You can also enter the filter value in the Search String to view the config collected devices.
6-29Common Services Platform Collector User Guide

Chapter 6 Applications - Reports Reports
Figure 6-47 View Config Collected Devices Filter
6-30Common Services Platform Collector User Guide

Chapter 6 Applications - Reports Reports
Config Data Per Device
Config Data Per Devices report shows the configs collected by CSP Collector. You can select configs based on Service Name or Collection Profile. Config data per device filter can be configured by providing required inputs as shown below.
Figure 6-48 Config Data Per Device Filter
The config data will be processed for the mentioned devices as shown in Figure 6-49. On clicking View Data, collected config data is displayed for the specified device.
6-31Common Services Platform Collector User Guide

Chapter 6 Applications - Reports Reports
Figure 6-49 Collected Config Data
6-32Common Services Platform Collector User Guide

Chapter 6 Applications - Reports Reports
Job Reports
Use the Job Log Reports sub tab to view the collected logs for various operations that are performed through the CSP collector.
This section describes the Reports options in the following topics:
• Discovery Jobs
• Inventory Jobs
• Job Management Reports
Discovery Jobs
The discovery jobs report includes information on all the network device discovery jobs performed.
In addition, you can see the description of each job by clicking the + symbol next to the Job Id. Clicking the + sign shows the Run Id, State (Successful/Aborted), Status (Completed/Not Completed), Start Time, End Time, and Job Log Details for this particular job.
You can cancel any job by clicking the View Job Details -> Cancel Job button.
These details are common to all Job Reports.
Figure 6-50 Discovery Jobs
Select the Action button in the report to view either the Job Log details for this particular job, look at the Job itself (what options are provided for the discovery, etc.) or you can create a new job by cloning this discovery job. Figure 6-51 shows the job log details. You can also Export Seed File and Export Imported Device Status. To know the status of imported devices you can generate/export the report based on Discovery JobId and JobRunId and to export the status of imported devices into .csv file, with the name ImportedDeviceStatus_jobid_jobrunid.cvs click Export Imported Devices Status.
6-33Common Services Platform Collector User Guide

Chapter 6 Applications - Reports Reports
Figure 6-51 Job Log Details
When you select the Cloning or Modify Discovery Job option, you see the exact job that was completed earlier, and can modify it to create another job as shown below.
Figure 6-52 Clone This Discovery Job
To IP Address/Host Name , click Next button.
6-34Common Services Platform Collector User Guide

Chapter 6 Applications - Reports Reports
Figure 6-53 Discover Devices using Known IP Addresses
To schedule discovery options, click Next button.
Figure 6-54 Discovery Schedule Options
Inventory Jobs
This report includes all the network device inventory jobs performed.
6-35Common Services Platform Collector User Guide

Chapter 6 Applications - Reports Reports
In addition, you can see the description of each job by clicking the + symbol next to the Job Id. Clicking the + sign shows the Run Id, State (Successful/Aborted), Status (Completed/Not Completed), Start Time, End Time, and Job Log Details for this particular job, as shown in the figure below.
Figure 6-55 Inventory Jobs Main Window
Select the Action button in the report to view either the Job Log details for this particular job, or to cancel a job while it is still running. You can pause any running job and later resume it by using the Pause Job and Resume Job options.
By selecting Recollect Failed Datasets option, the data from only those devices is collected that showed an error earlier, once the data is collected it is merged with the other data before it is sent to Cisco.
Figure 6-56 shows the job log details.
Figure 6-56 Job Log Details
6-36Common Services Platform Collector User Guide

Chapter 6 Applications - Reports Reports
Job Management Reports
Job Management Reports option is a container from where you can select any of the supported jobs, except for discovery jobs and inventory jobs.
Job Management Reports allows to select any of the supported Job reports. You can select any job from the Job Group Type drop down list to go to the specified Job report. In addition, for all the jobs you can see the description of each job by clicking the + symbol next to the Job Id. Clicking the + sign shows the Run Id, State (Successful/Aborted), Status (Completed/Not Completed), Start Time, End Time, and Job Log Details for the particular job.
Select the Action button in the report to view either the Job Log details for this particular job, or to cancel a job while it is still running.
The currently supported jobs are:
• Device Access Verification Jobs
• Credential Loader Jobs
• Apply Config Jobs
• Backup and Restore Jobs
• Ping Jobs
• Trace Route Jobs
• Prompt Collection Jobs
• Health Collection Jobs
• Upload Jobs
• Upload Run Now Jobs
• Connectivity Jobs
• Import Seed File Jobs
• Miscellaneous Jobs
After opening the Job Management Reports window, select the Job which you want to display and click OK button. More details on the Jobs are given below. Jobs can be either Unscheduled or Scheduled. Jobs can be edited by right clicking on the Job and selecting Edit Job Schedule option.
6-37Common Services Platform Collector User Guide

Chapter 6 Applications - Reports Reports
Figure 6-57 Job Management Reports
Device Access Verification Jobs
The Device Access Verification Jobs report includes all the network device verification jobs performed.
In addition, you can see the description of each job by clicking the + symbol next to the Job Id. Clicking the + sign shows the Run Id, State (Successful/Aborted), Status (Completed/Not Completed), Start Time, End Time, and Job Log Details for this particular job, as shown in Figure 6-58.
Figure 6-58 Device Access Verification Jobs Main Window
Select the Action button in the report to view either the Job Log details for this particular job, or to cancel a job while it is still running.
Figure 6-59 shows the job log details.
6-38Common Services Platform Collector User Guide

Chapter 6 Applications - Reports Reports
Figure 6-59 Job Log Details
Credential Loader Jobs
Credential Loader Jobs allows you to view all the jobs runs/created using Changing Credential Import.
Figure 6-60 Credential Loader Jobs
Jobs can also be Unscheduled or Schedules can be edited by right clicking on the Job name.
In addition, you can see the description of each job by clicking the + symbol next to the Job Id. Clicking the + sign shows the Run Id, State (Successful/Aborted), Status (Completed/Not Completed), Start Time, End Time for this particular job.
Apply Config Jobs
The Apply Config Jobs report allows you to view the configuration jobs that were applied from the CSP collector. You can view all the jobs, job creator, etc.
6-39Common Services Platform Collector User Guide

Chapter 6 Applications - Reports Reports
In addition, you can see the description of each job by clicking the + symbol next to the Job Id. Clicking the + sign shows the Run Id, State (Successful/Aborted), Status (Completed/Not Completed), Start Time, End Time, and Job Log Details for this particular job, as shown in Figure 6-61.
Jobs can also be Scheduled or Unscheduled, and can be edited by right-clicking on the Job name.
Figure 6-61 Apply Config Jobs
6-40Common Services Platform Collector User Guide

Chapter 6 Applications - Reports Reports
Backup and Restore Jobs
The Backup and Restore Jobs report allows you to view the backup and restore jobs that were applied on the CSP collector. You can view all the jobs, job creator, etc.
In addition, you can see the description of each job by clicking the + symbol next to the Job Id. Clicking the + sign shows the Run Id, State (Successful/Aborted), Status (Completed/Not Completed), Start Time, End Time, and Job Log Details for this particular job, as shown in the figure below.
Jobs can also be Scheduled or Unscheduled, and can be edited by right-clicking on the Job name.
Figure 6-62 Backup/Restore Jobs
6-41Common Services Platform Collector User Guide

Chapter 6 Applications - Reports Reports
Ping Jobs
Ping Jobs allows you to view the ping jobs that were applied on the CSP collector from XML API interface.
In addition, you can see the description of each job by clicking the + symbol next to the Job Id. Clicking the + sign shows the Run Id, State (Successful/Aborted), Status (Completed/Not Completed), Start Time, End Time, and Job Log Details for this particular job, as shown in the figure below.
Jobs can also be Scheduled or Unscheduled, and can be edited by right clicking on the Job name.
Figure 6-63 Ping Jobs
6-42Common Services Platform Collector User Guide

Chapter 6 Applications - Reports Reports
Trace Route Jobs
In Trace Route Jobs you can view all the trace route jobs that were performed on a CSP collector.
Figure 6-64 Trace Route Jobs
You can see the description of each job by clicking the + symbol next to the Job Id. Clicking the + sign shows the Run Id, State (Successful/Aborted), Status (Completed/Not Completed), Start Time, End Time, and Job Log Details for this particular job.
Jobs can also be Scheduled or Unscheduled, and can be edited by right clicking on the Job name.
6-43Common Services Platform Collector User Guide
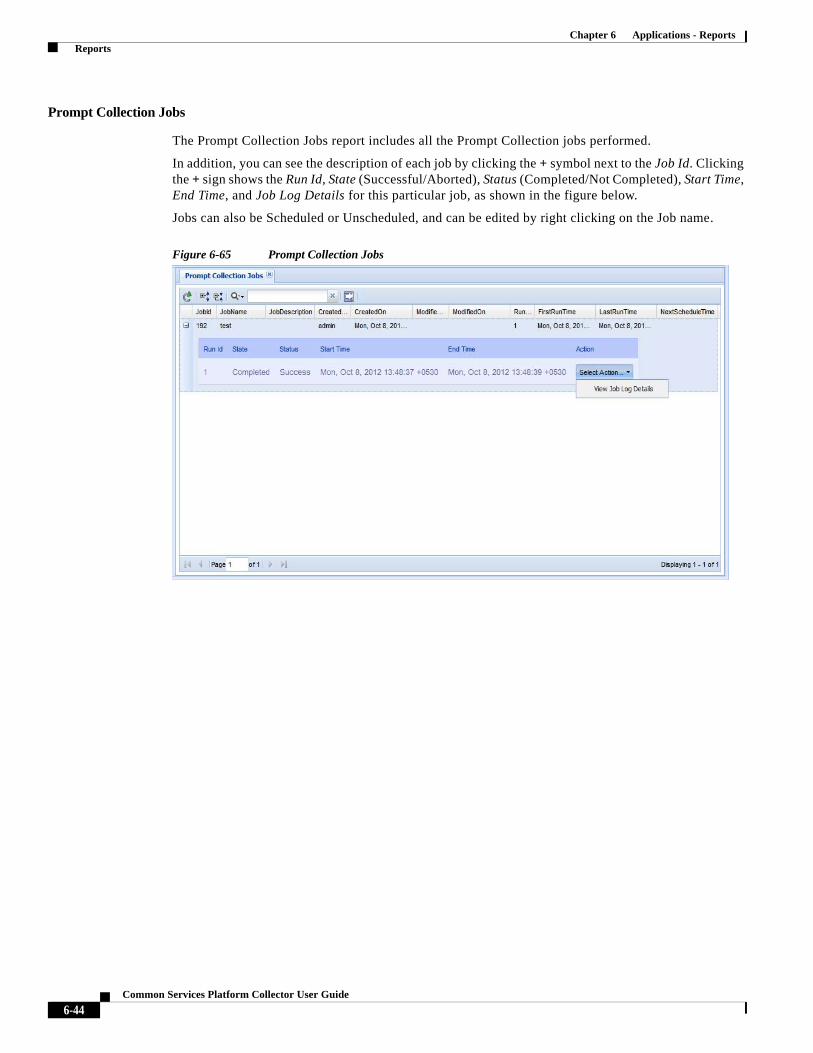
Chapter 6 Applications - Reports Reports
Prompt Collection Jobs
The Prompt Collection Jobs report includes all the Prompt Collection jobs performed.
In addition, you can see the description of each job by clicking the + symbol next to the Job Id. Clicking the + sign shows the Run Id, State (Successful/Aborted), Status (Completed/Not Completed), Start Time, End Time, and Job Log Details for this particular job, as shown in the figure below.
Jobs can also be Scheduled or Unscheduled, and can be edited by right clicking on the Job name.
Figure 6-65 Prompt Collection Jobs
6-44Common Services Platform Collector User Guide

Chapter 6 Applications - Reports Reports
Health Collection Jobs
The Health Collection Jobs report includes all the Health Monitor jobs performed on CSPC
In addition, you can see the description of each job by clicking the + symbol next to the Job Id. Clicking the + sign shows the Run Id, State (Successful/Aborted), Status (Completed/Not Completed), Start Time, End Time, and Job Log Details for this particular job, as shown in Figure 6-66.
Jobs can also be Scheduled or Unscheduled, and can be edited by right clicking on the Job name.
Figure 6-66 Health Collection Jobs
6-45Common Services Platform Collector User Guide

Chapter 6 Applications - Reports Reports
Upload Jobs
In the Upload Jobs report you can view all the scheduled jobs with Upload Profile, view the upload jobs that are user defined and created by the system. You can unschedule a job or edit an existing job schedule. You can also check the status of uploaded jobs, view job log details or cancel any running job.
Figure 6-67 Upload Jobs
To check the status of the Uploaded jobs, click the '+' button next to Job Id. Job status along with data and time is displayed as shown in the above figure. To view the log details of a job as shown in Figure 6-68, click Select Action button and then View Job Log Details.
Figure 6-68 View Job Log Details
If you do not want to run a scheduled upload, right click on the job and then click Unschedule Job button.
6-46Common Services Platform Collector User Guide

Chapter 6 Applications - Reports Reports
Figure 6-69 Unschedule Job / Edit Job Schedule
A confirmation box as shown in Figure 6-70 is displayed.
Figure 6-70 Unschedule Job
Click Yes button to unschedule the job.
If you want to edit an existing upload job schedule, right click on the job and click Edit Job Schedule button. Modify Job Schedule screen as shown below is displayed.
Figure 6-71 Modify Job Schedule
You can reconfigure the schedule by clicking the Configure Schedule button. Except the Job Name all details can be modified.
6-47Common Services Platform Collector User Guide

Chapter 6 Applications - Reports Reports
Upload Run Now Jobs
In Upload Run Now Jobs you can view all the run now jobs performed with upload Profile. Upload Run Now Jobs are System upload jobs created by system with the system generated job schedule.
Figure 6-72 Upload Run Now Jobs
For user jobs which are already completed without repeat schedule, you can only edit the job schedule. This will change the future runs of the system uploads.
Figure 6-73 Edit Job Schedule
The change in schedule will be reflected in the Next Schedule Time of Upload Run Now Jobs.
6-48Common Services Platform Collector User Guide

Chapter 6 Applications - Reports Reports
Connectivity Jobs
Connectivity Jobs report shows the connectivity related information, along with run count, first and last run time.
Figure 6-74 Connectivity Jobs
For user jobs which are already completed without repeat schedule, you can only edit the job schedule. This will change the future runs of the system uploads.
Figure 6-75 Edit Job Schedule
The Change in schedule will be reflected in the Next Schedule Time of Connectivity Run Now Jobs.
6-49Common Services Platform Collector User Guide

Chapter 6 Applications - Reports Reports
Import Seed File Jobs
Import seed file jobs report shows the list of imported seed file jobs. You can see the description of each job by clicking the + symbol next to the Job Id. It shows the Run Id, State (Completed/Not Completed), Status (Successful/Aborted), Start Time, End Time.Select the Action button in the report to view either the Job Log details for this particular job, or to cancel a job while it is still running.
Figure 6-76 Import Seed File Jobs
Miscellaneous Jobs
Miscellaneous Jobs shows a list of all the relatively small one time asynchronous jobs. Example of one such job is Collection Profile export job.
Figure 6-77 Miscellaneous Jobs
6-50Common Services Platform Collector User Guide

Chapter 6 Applications - Reports Reports
Server Audit Trails
Server Audit Trail report includes all the server related logs. Use the Server Audit Trails Reports sub tab to view the audit trails of the server, data collection and device management aspects. The columns displayed are user name, module, sub module, message, log time, job log details.
The sub module includes changes made to session management, patch management, user management, groups. It will also show any unauthorized connection attempts made from other hosts. This report can be exported to PDF, HTML, DOC, CSV (Comma delimited), TXT (Tab delimited) formats.
This section describes the Reports in the following topics:
• Device Management Audit Trails
• Data Collection Audit Trail Report
• Server Audit Trail Report
Device Management Audit Trails
Device Management Audit Trails report includes all device management logs. It also displays the Job Log Details for various jobs. The columns displayed include user name, module, sub module, message, log time, job log details. For some jobs, Job Log Details button is displayed. When you click on it, it displays the appropriate job log.
The sub module includes changes made to device credential, discovery subsystem, device access verification, device state change, inventory subsystem, server preferences. The contents of this report can be exported to PDF, HTML, DOC, CSV (Comma delimited), TXT (Tab delimited) formats.
Figure 6-78 Device Management Audit Trails
6-51Common Services Platform Collector User Guide

Chapter 6 Applications - Reports Reports
Data Collection Audit Trail Report
Data Collection Audit Trail report provides all the data collection profiles audit trails. The columns displayed are user name, module, sub module, message, log time, job log details.
This report includes all the changes made to data collection settings which includes collection profile, datasets, platforms, integrity rule and masking rule.
This report can be exported to PDF, HTML, DOC, CSV (Comma delimited), TXT (Tab delimited) formats.
Figure 6-79 Data Collection Audit Trail Report
6-52Common Services Platform Collector User Guide

Chapter 6 Applications - Reports Reports
Server Audit Trail Report
Server Audit Trail report includes all the server related logs. The columns displayed are user name, module, sub module, message, log time, job log details.
The sub module includes changes made to session management, patch management, user management, groups. It will also show any unauthorized connection attempts made from other hosts.
This report can be exported to PDF, HTML, DOC, CSV (Comma delimited), TXT (Tab delimited) formats.
Figure 6-80 Server Audit Trail Report
6-53Common Services Platform Collector User Guide

Chapter 6 Applications - Reports Reports
6-54Common Services Platform Collector User Guide
Common Se
C H A P T E R 7
Applications - AdministrationAdministrationUse the Administration tab to create users for the CSPC server, take backups of the collected data, look at the server patches, etc.
This section describes the Reports in the following topics:
• User Management
• Backup and Restore
• Server Patch Management
• Log Management
• Miscellaneous Applications
User Management
The User Management sub tab is used to create users and modify user preferences for a given CSPC server.
This section describes the options in the following topics:
• Manage Users
• Manage Remote Authentication Servers
• Modify User Account Settings
• User Session Report
• Modify User Preferences
• Configure Default Device Display Property
7-1rvices Platform Collector User Guide

Chapter 7 Applications - Administration Administration
Manage Users
When you double-click Manage Users, a new Manage Users window appears which allows you to create and manage the collector users, as shown in the following screen.
Figure 7-1 Manage Users
7-2Common Services Platform Collector User Guide

Chapter 7 Applications - Administration Administration
Figure 7-2 Manage Collector Users
To add a new user, click Add User. This window shows the following information for each defined user on the system:
• Login ID
• Authentication Type (Local, Remote User Authentication)
• Password (masked)
• Full Name
• Group Name
• Email Address
• Phone Number
• Pager
You can also setup a set of 3 password reset questions. This is useful in-case you forget your password and need to reset your password. These questions are displayed when you click Forgot Password link on the login screen of CSPC Collector.
Modify the details of existing user by clicking on Modify User button. Click Remove User button to delete an existing user.
7-3Common Services Platform Collector User Guide

Chapter 7 Applications - Administration Administration
Manage Remote Authentication Servers
If the user authentication type is remote authentication, CSPC gets the user credentials from a remote authentication server. The remote authentication servers need to be set up for the server to contact for credentials as defined below.
Figure 7-3 Setup Remote Authentication Servers
7-4Common Services Platform Collector User Guide

Chapter 7 Applications - Administration Administration
Modify User Account Settings
When you double-click Modify User Account Settings, a new User Account Settings window appears. It allows you to modify user information; except for the User ID (this window is primarily for you to change your personal information). You can also setup a or edit the password security questions here.
Figure 7-4 Modify User Account Settings
7-5Common Services Platform Collector User Guide
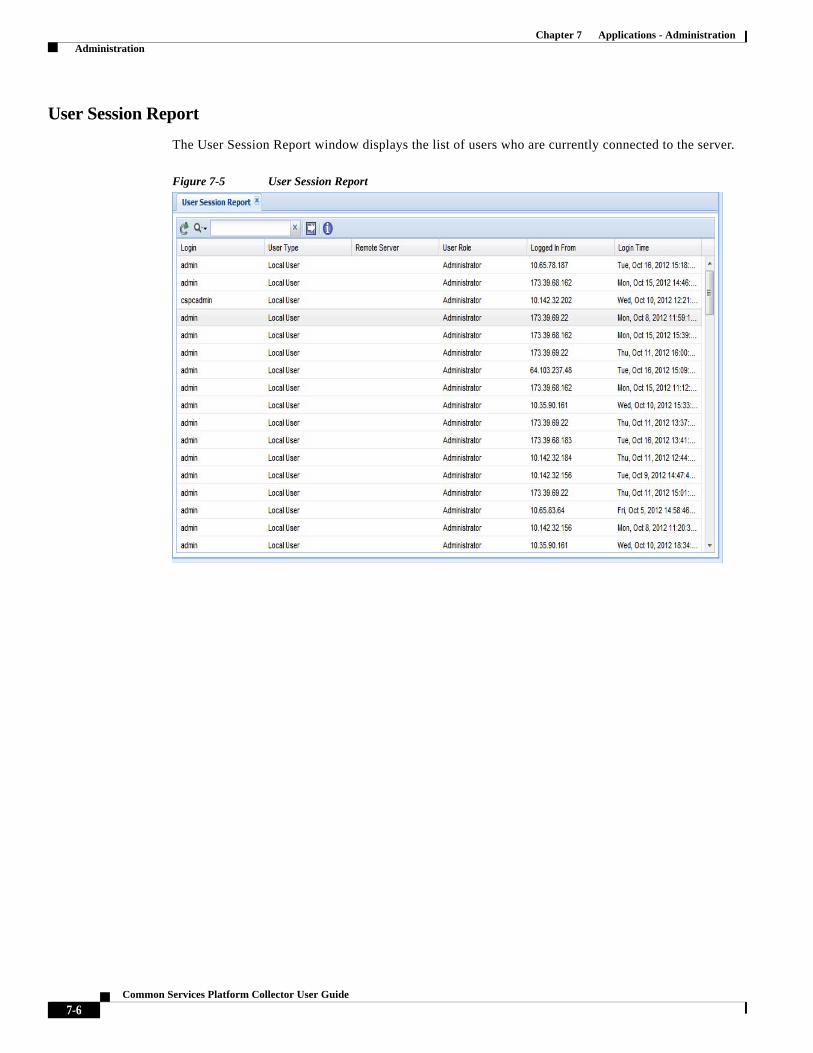
Chapter 7 Applications - Administration Administration
User Session Report
The User Session Report window displays the list of users who are currently connected to the server.
Figure 7-5 User Session Report
7-6Common Services Platform Collector User Guide

Chapter 7 Applications - Administration Administration
Modify User Preferences
Modify User Preferences allows you to setup the data and time preferences. You can choose to display date and time in client time zone or in the server time zone as shown in Figure 7-6.
After the changes are done, the preferences are stored for the specific user account.
Figure 7-6 Modify User Preferences
Configure Default Device Display Property
Configure Default Device Display Property allows you to select the device property that will be the default for all managed devices.
Figure 7-7 Configure Default Device Display Property
Manage Subscribers
This option enables you to manage all the subscribers.
Figure 7-8 Manage Subscribers
7-7Common Services Platform Collector User Guide

Chapter 7 Applications - Administration Administration
Step 1 To add a Subscribers, click Add Subscribers the below screen appears shown in Figure 7-9
Figure 7-9 Add Subscribers
Step 2 Enter Module Name, select Notification Enabled, and if required enter Notification Type and Email To and then click OK.
Alert Configuration
Alert an workflow CSPC service and pushes the notifications to the user. You do not need to login every time to see what the status of the job.
Figure 7-10 Alert Configurations
Step 1 To add an alert, click Add Alert Configurations the screen appears as shown in Figure 7-11
7-8Common Services Platform Collector User Guide

Chapter 7 Applications - Administration Administration
Figure 7-11 Add Alert Configurations
Step 2 Select the Module Name from the drop down,
• If Discovery is selected, then enter the Discovery success Percentage value
• If Inventory or DAV is selected, then select the protocol(s) and the enter the success percentage value for protocol(s)
Step 3 Click OK
Note You can select ALL or any protocol of your choice
Backup and Restore
The Backup and Restore sub tab is used to take backups of the collector data, as well as to restore the backed up data in case of a failure.
This section describes the options in the following topics:
• Backup
• Restore Backup
Backup
The Backup option allows you to select the database backup at a given instant, or to specify options for periodic database backup.
7-9Common Services Platform Collector User Guide

Chapter 7 Applications - Administration Administration
To perform the backup job follow the below steps:
Step 1 Select FTP Server or Local Server
• If FTP Server selected enter the following
– Server Name: IP Address/Host Name of the FTP server
– User Name: FTP server user name
– Password: FTP Server Password
• If Local Server is selected continue
Step 2 Select Incremental Backup or/and Full Backup and enter the following:
• Target Directory: The directory where the backup file needs to be stored
• Backup File prefix: The tag that will be appended to the backed up file
• To start backup instantly select Run Backup Now or to schedule the job later select Schedule Periodic Backup. For Periodic backup, you can configure schedule to specify the range of recurrences, Schedule start date/time, Schedule end date/time and recurrences pattern for the data backup. This is shown in Figure 7-13.
• Job Name: Enter the job name
• Job Description: Enter the description of the job
Figure 7-12 Backup
To disable incremental backup click Disable Incremental Backup and this will prompt for the retart of the CSPC. Similarly to enable click Enable Incremental Backup and it also requires restart.
7-10Common Services Platform Collector User Guide

Chapter 7 Applications - Administration Administration
Figure 7-13 Configure Schedule
Step 3 To exclude the files from Backup unselect the files as shown in Figure 7-14.
Figure 7-14 Exclude Backup Files
7-11Common Services Platform Collector User Guide

Chapter 7 Applications - Administration Administration
Restore Backup
The Restore Backup option lets you restore a previously stored data backup. You need to provide the server information, such as where the backup file resides, and CSPC loads that backup to the system. This is shown in Figure 7-15.
To restore the backup file follow the below steps:
Step 1 Select FTP Server or Local Server
• If FTP Server selected enter the following
– Server Name: IP Address/Host Name of the FTP server
– User Name: FTP server user name
– Password: FTP Server Password
• If Local Server is selected continue
Step 2 Select Incremental Restore or/and Full Restore and enter the following:
• Directory Name: The directory where the backup file needs to be restored
• Backup File: The back up file name
• To start restore instantly select Run Restore Now or to schedule the job later select Schedule Periodic Restore. For Periodic restore, you can configure schedule to specify the range of recurrences, Schedule start date/time, Schedule end date/time and recurrences pattern for the data backup. This is shown in Figure 7-16.
• Job Name: Enter the job name
• Job Description: Enter the description of the job
7-12Common Services Platform Collector User Guide

Chapter 7 Applications - Administration Administration
Figure 7-15 Restore Server Backup
To enable slave mode click Enable Slave Mode and it requires CSPC to restart. This disables all other jobs expect Backup and Restore jobs on CSPC. Similarly to disable click Disable Slave Mode and it also requires restart.
Figure 7-16 Configure Schedule
7-13Common Services Platform Collector User Guide

Chapter 7 Applications - Administration Administration
Server Patch Management
Server Patch Management sub tab is used to manage the software patches (feature enhancements or bug fixes) on the CSPC Server.
This section describes the options in the following topics:
• View/Install Downloaded Patches
• Mange Patch Files
View/Install Downloaded Patches
This option allows you to see the list of all downloaded patches available and choose a patch that you would like to install on to the server.
Figure 7-17 View/Install Downloaded Patches
To uninstall or revert a patch, right click on the patch that you want to remove, and select Uninstall (Revert) Patches option. The patch is removed from the CSPC server.
7-14Common Services Platform Collector User Guide

Chapter 7 Applications - Administration Administration
Mange Patch Files
This window shows the list of patch files available for install. You can upload the patch file to the sever by clicking on Upload Server Patch button. The patch files remain available on the server for one week for install from the time you upload it. You can delete the uploaded patch file by selecting the file and then clicking on Delete Uploaded File button.
Figure 7-18 Mange Patch Files
7-15Common Services Platform Collector User Guide

Chapter 7 Applications - Administration Administration
Log Management
The Server Log Management sub tab is used to manage the server logs that are helpful in identifying and fixing any support issues.
This section describes the options in the following topics:
• Log Preferences
• Export Log Files
Log Preferences
Using Log Preferences, you can select detailed logging level for each module of CSPC. Log preferences of the server as well as UI component can be changed.
Logging levels could be any one of the following:
• Fatal
• Error
• Warning
• Information
• Debug
• Trace
Log levels can be changed by clicking on the logging level and selecting the appropriate level. You can also select none and ignore the log for a specific module. This setting will be used for displaying the log messages in CSPC logs.
Figure 7-19 Log Preferences
7-16Common Services Platform Collector User Guide

Chapter 7 Applications - Administration Administration
Export Log Files
The Export Log Files feature allows you to export all the server log files to the Cisco CSP support staff, in case there is an error and the support staff needs to access the server logs. Log Files can be exported both based on file name or time stamp.This is shown in the following screen.
Figure 7-20 Export Log Files by File
Figure 7-21 Export Log Files by Timestamp
7-17Common Services Platform Collector User Guide

Chapter 7 Applications - Administration Administration
Miscellaneous Applications
The Miscellaneous Applications sub tab shows server information, resynchronizes the client to server and provides some diagnostic tools.
This section describes the options in the following topics:
• Server Process Summary
• Server Properties
• Diagnostic Tools
• XML API Console
• Manage UI Add-Ons
• Seed File Viewer
Server Process Summary
Server Process Summary provides details on all the Server Processes including add-on processes for CSPC. This report includes Process Name, ProcessType, Process State and a Message associated with that process as shown in Figure 7-22.
Figure 7-22 View Server Process Summary
7-18Common Services Platform Collector User Guide

Chapter 7 Applications - Administration Administration
Server Properties
The View CSPC Server Properties window shows information about the server itself. The data shown in this window includes Server Properties and License Properties. This gives information, such, the IP address of the server, server version, default gateway, sever time zone, etc, as shown in Figure 7-23.
Figure 7-23 Server Properties
You can also find the licensing information of the server by clicking License Properties. You can expand each entitlement to see the license properties and click the appropriate button to browse for license file and replace/upload primary and secondary licenses as shown in Figure 7-24.
7-19Common Services Platform Collector User Guide

Chapter 7 Applications - Administration Administration
Figure 7-24 License Properties
7-20Common Services Platform Collector User Guide

Chapter 7 Applications - Administration Administration
Diagnostic Tools
This option provides simple diagnostic tools like ping and traceroute to check if the device is available or connectivity is to the device is established. Pick the command you want to use and select the device on which you want the diagnostics to run, and click Run Command. The results appear in the Command Result section of the window.
Figure 7-25 Diagnostic Tools - ping utility
Figure 7-26 Diagnostic Tools - Trace Route Utility
7-21Common Services Platform Collector User Guide

Chapter 7 Applications - Administration Administration
XML API Console
XML API Console option is provided to execute XML APIs on the CSPC server. This option is provided for third party application integration with CSPC. This is shown in Figure 7-27.
Figure 7-27 XML API Console
7-22Common Services Platform Collector User Guide

Chapter 7 Applications - Administration Administration
Manage UI Add-Ons
Manage UI Add-Ons screen shows the list of Add-Ons, action taken on the Add-On, the user who initiated the action, time of action and next possible action.
Figure 7-28 Manage UI Add-Ons
Seed File Viewer
When you import a seed file, the information is captured in the seed file viewer screen. Each row on the screen corresponds to one Import.
Seed file name field acts as a hyperlink as shown in Figure 7-29, on clicking this link you can download (or export) original seed file saved in the system. Screen captures all the details related to that import, like the file format, user info, file size and so on, along with the job log details of that import run.
You can also delete single or multiple rows from the screen.
Figure 7-29 Seed File Viewer
7-23Common Services Platform Collector User Guide

Chapter 7 Applications - Administration Administration
7-24Common Services Platform Collector User Guide

Common Se
C H A P T E R 8
Menu OptionsMenusMenu options are provided as a quick way to access the applications.
Figure 8-1 Menu Option
The menu options provided in CSPC are:
• User Name
• Settings
• Management
• Reports
• Administration
• Help
User Name
Shows the Name/Username of the user logged into CSPC application. In the illustration shown in Figure 8-1, the Super Administrator is logged in.
It has the following option:
• Logout: Logs out and closes the CSPC client application
8-1rvices Platform Collector User Guide

Chapter 8 Menu Options Menus
Settings
Settings in the menu bar provides various options for setting up device credentials and collection profiles for collecting device specific information, as displayed in the following figure. These options are described in the Applications->Device Management Tab.
Figure 8-2 Menu Option - Settings
Under Settings menu, following options are shown:
• Device Credentials
• Module Credentials
• Manage Seed File
• Credential Lock Settings
• Import DSIRT Files
• Inventory Settings
• Discovery Settings
8-2Common Services Platform Collector User Guide

Chapter 8 Menu Options Menus
• Application Settings
• SMTP Settings
• Advanced Job Settings
• Do Not Manage Device List
• Manage Application Discovery Profiles
• Manage SNMP Trap Profiles
• Manage Jump Servers
• Manage Data Collection Profiles
• Create Adhoc Data Collection Profiles
• Manage Datasets
• Manage Platform Definitions
• Manage Data Integrity Rules
• Manage Data Masking Rules
• Import All Rules
• Manage Syslog Source Files
• Manage Upload Profiles
• Device Group
8-3Common Services Platform Collector User Guide

Chapter 8 Menu Options Menus
Management
Management in the menu bar provides various options for discovering and managing devices and running collection profiles, as shown in the following figure. These options are described in the Applications->Device Management Tab.
Figure 8-3 Menu Option - Management
Under Management menu, following options are shown:
• Discover and Manage Devices
• Unmanage Devices
• Device Access Verification
• Device Prompt Collection
• Run Collection Profile
• Run Application Profile
• Run Upload Profile
8-4Common Services Platform Collector User Guide

Chapter 8 Menu Options Menus
Reports
Reports in the menu bar provide various reporting options for viewing collected data as shown in the following figure. These options are described in the Applications->Reports Tab.
Figure 8-4 Menu Option - Reports
Under Reports menu, following options are shown:
• Managed Devices
• Alerts
• Device Launch Pad
• Interface Summary [IOS, PIX, ASA, IOS-XR]
• Device Display Properties
8-5Common Services Platform Collector User Guide

Chapter 8 Menu Options Menus
• Device Access Verification Summary
• Device Access Verification By Dataset Type
• Device Access Verification Results
• View Locked Credentials
• View Server Activity Log Messages
• SNMP Trap Report
• Syslog Summary
• Syslog Messages
• Collection Profile Run Summary
• Application Profile Run Summary
• Disabled Protocol Report
• Disabled Command Report
• Device Timeout Configuration
• Unreachable Devices
• Duplicate Devices
• Device Jump Server Mapping
• Application Discovery Report
• Non SNMP Devices
• Inventory Summary
• Config Collected Devices
• Config Data Per Device
• Discovery Jobs
• Inventory Jobs
• Job Management Reports
• Device Management Audit Trails
• Data Collection Audit Trail Report
• Server Audit Trail Report
Administration
Administration in menu the bar provides various options for administrating server, device and collection profiles, as shown in the following figure. These options are described in the Applications->Administration Tab.
8-6Common Services Platform Collector User Guide

Chapter 8 Menu Options Menus
Figure 8-5 Menu Option - Administration
Under Administration menu, following options are shown:
• Manage Users
• Manage Remote Authentication Servers
• Modify User Account Settings
• User Session Report
• Modify User Preferences
• Configure Default Device Display Property
• Manage Subscribers
• Alert Configuration
• Backup
• Restore Backup
• View/Installed Downloaded Patches
• Manage Patch Files
• Log Preferences
• Export Log Files
8-7Common Services Platform Collector User Guide

Chapter 8 Menu Options Menus
• Server Process Summary
• Server Properties
• Diagnostic Tools
• XML API Console
• Manage UI Add-Ons
• Seed File Viewer
Help
Under Help menu, following option is shown:
• About
8-8Common Services Platform Collector User Guide

Common Se
A P P E N D I X A
Adding Devices to CSPCOverviewAdding devices to CSPC is a sequential, two step process. First one adds credentials for the devices. Adding credentials for a device does not add the device, however. After the credentials have been added, the additional step of managing the device is necessary. Managing the device uses the credentials to contact the device via SNMP and collect device classification data from it.
There are two ways to add credentials. Credentials can be added individually, or through an import. You can import credentials from applications like:
• Cisco Works DCR XML File (.xml)
• Pari Networks Credential Repository (.xml)
• Cisco Works DCR CSV File (.csv)
• CNC CSV File (.csv)
• Simplified CSV File (.csv)
All the methods of adding credentials are performed on the credentials screen.
In CSPC there is a one-to-many relationship between credentials and devices. Multiple devices are stored against a single credential. The multiple devices can be specified by wildcards matching IP addresses or by IP address enumeration. Wildcards matching IP addresses is the preferred approach.
On the first collection, if the first wildcard matching the device does not succeed, the second wildcard matching the device will be tried. On subsequent collections the last successful credential will be tried first.
In addition, the protocol for the dataset type will be determined by the credentials order. For example the choice between SSH and Telnet is controlled by the order of the SSH and Telnet credentials.
Thus the order of credentials is important, and can be manipulated.
Credentials may be exported, but only in the Pari Credentials File Format.
After the credentials have been added, the devices can be managed. While credentials must be entered by wildcards matching IP addresses or the IP addresses themselves, the devices can be managed by either IP address or DNS name.
A-1rvices Platform Collector User Guide

Appendix A Adding Devices to CSPC Overview
Examples
Here an SSH credential is added against a wildcard:
Figure A-1 Device Credentials
A-2Common Services Platform Collector User Guide

Appendix A Adding Devices to CSPC Overview
Result is shown in Figure A-2:
Figure A-2 Device Credential Configuration
Now the devices can be managed. Devices are managed by discovery of known devices. This is a special kind of discovery that does not discover anything.
A-3Common Services Platform Collector User Guide

Appendix A Adding Devices to CSPC Overview
Figure A-3 Discover and Manage Network Devices
Either the IP Address or the DNS Name.
Figure A-4 Discover and Manage Network Devices
A-4Common Services Platform Collector User Guide

Common Se
A P P E N D I X B
Seed File FormatsCSPC supports following seed file formats:
1. CNC Seed File Format
2. Cisco Works Seed File Format
3. Simplified Seed File Format
CNC seed file format has following three formats:
1. CNC 20-field format
2. CNC 30-field format
3. CNC 36-field format
And Cisco Works has following two formats:
1. Cisco Works 30-field format
2. Cisco Works 34-field format
Note All the above seed file formats are of .csv type.
Simplified seed file format allows users to easily specify credentials for all devices or set of devices using wild cards.
The basic difference between Simplified Format and rest of the formats is that for the same device there are multiple entries, each entry corresponds to one protocol. In other formats same entry carries for all devices.
B-1rvices Platform Collector User Guide

Appendix B Seed File Formats
Header Information
CNC Seed File Format
Header in CNC 20-field format contains the fields listed below:
; Col# = 1: Name (including domain or simply an IP),
; Col# = 2: RO community string,
; Col# = 3: RW community string,
; Col# = 4: Serial Number,
; Col# = 5: User Field 1,
; Col# = 6: User Field 2,
; Col# = 7: User Field 3,
; Col# = 8: User Field 4,
; Col# = 9; Name = Telnet password,
; Col# = 10; Name = Enable password,
; Col# = 11; Name = Enable secret,
; Col# = 12; Name = Tacacs user,
; Col# = 13; Name = Tacacs password,
; Col# = 14; Name = Tacacs enable user,
; Col# = 15; Name = Tacacs enable password,
; Col# = 16; Name = Local user,
; Col# = 17; Name = Local password,
; Col# = 18; Name = Rcp user,
; Col# = 19; Name = Rcp password,
; Col# = 20; Name = Enable User,
Header in CNC 30-field format contains the fields listed below:
; Col# = 1: IP Address (including domain or simply an IP),
; Col# = 2: Host Name,
; Col# = 3: Domain Name,
; Col# = 4: Device Identity,
; Col# = 5: Display Name,
; Col# = 6: SysObjectID ,
; Col# = 7: DCR Device Type,
; Col# = 8: MDF Type,
; Col# = 9; Snmp RO
; Col# = 10; Snmp RW
; Col# = 11; SnmpV3 User Name
B-2Common Services Platform Collector User Guide

Appendix B Seed File Formats
; Col# = 12; Snmp V3 Auth Pass
; Col# = 13; Snmp V3 Engine ID
; Col# = 14; Snmp V3 Auth Algorithm
; Col# = 15; RX Boot Mode User
; Col# = 16; RX Boot Mode Pass
; Col# = 17; Primary User (Tacacs User)
; Col# = 18; Primary Pass (Tacacs Pass)
; Col# = 19; Primary Enable Pass
; Col# = 20; Http User
; Col# = 21; Http Pass
; Col# = 22; Http Mode
; Col# = 23; Http Port
; Col# = 24; Https Port
; Col# = 25; Cert Common Name,
; Col# = 26; Secondary User,
; Col# = 27; Secondary Pass,
; Col# = 28; Secondary Enable Pass,
; Col# = 29; Secondary Http User,
; Col# = 30; Secondary Http Pass,
Header in CNC 36-field format contains the fields listed below:
; Col# = 1: IP Address (including domain or simply an IP),
; Col# = 2: Host Name,
; Col# = 3: Domain Name,
; Col# = 4: Device Identity,
; Col# = 5: Display Name,
; Col# = 6: SysObjectID,
; Col# = 7: DCR Device Type,
; Col# = 8: MDF Type,
; Col# = 9; Snmp RO
; Col# = 10; Snmp RW
; Col# = 11; SnmpV3 User Name
; Col# = 12; Snmp V3 Auth Pass
; Col# = 13; Snmp V3 Engine ID
; Col# = 14; Snmp V3 Auth Algorithm
; Col# = 15; RX Boot Mode User
; Col# = 16; RX Boot Mode Pass
; Col# = 17; Primary User (Tacacs User)
B-3Common Services Platform Collector User Guide

Appendix B Seed File Formats
; Col# = 18; Primary Pass (Tacacs Pass)
; Col# = 19; Primary Enable Pass
; Col# = 20; Http User
; Col# = 21; Http Pass
; Col# = 22; Http Mode
; Col# = 23; Http Port
; Col# = 24; Https Port
; Col# = 25; Cert Common Name,
; Col# = 26; Secondary User,
; Col# = 27; Secondary Pass,
; Col# = 28; Secondary Enable Pass,
; Col# = 29; Secondary Http User,
; Col# = 30; Secondary Http Pass,
; Col# = 31; Snmp V3 Priv Algorithm,
; Col# = 32; Snmp V3 Priv Pass,
; Col# = 33; User Field 1,
; Col# = 34; User Field 2,
; Col# = 35; User Field 3,
; Col# = 36; User Field 4,
Cisco Works Seed File Format
Header in Cisco Works 30 seed file contains these fields:
• management_ip_address
• host_name
• domain_name
• device_identity
• display_name
• sysObjectID
• dcr_device_typemdf_typesnmp_v2_ro_comm_string
• snmp_v2_rw_comm_string
• snmp_v3_user_idsnmp_v3_passwordsnmp_v3_engine_id
• snmp_v3_auth_algorithm
• rxboot_mode_username
• rxboot_mode_password
• primary_username
• primary_password
B-4Common Services Platform Collector User Guide

Appendix B Seed File Formats
• primary_enable_password
• http_username
• http_password
• http_mode
• http_port
• https_port
• cert_common_name
• secondary_username
• secondary_password
• secondary_enable_password
• secondary_http_username
• secondary_http_password
Header in Cisco Works 34 seed file contains these fields:
• management_ip_address
• host_name
• domain_name
• device_identity
• display_name
• sysObjectID
• dcr_device_type
• mdf_type
• sysContact
• sysLocation
• snmp_v2_ro_comm_string
• snmp_v2_rw_comm_string
• snmp_v3_user_id
• snmp_v3_password
• snmp_v3_engine_id
• snmp_v3_auth_algorithm
• snmp_v3_priv_password
• snmp_v3_priv_algorithm
• rxboot_mode_username
• rxboot_mode_password
• primary_username
• primary_password
• primary_enable_password
• http_username
B-5Common Services Platform Collector User Guide

Appendix B Seed File Formats
• http_password
• http_mode
• http_port
• https_port
• cert_common_name
• secondary_username
• secondary_password
• secondary_enable_password
• secondary_http_username
• secondary_http_password
Simplified Seed File Format
Header in Simplified Seed file contains these fields:
• IPAddress
• protocol
• port
• username
• password
• enableusername
• enablepassword
• SnmpRO
• SnmpRW
• SnmpV3Id
• SnmpV3Password
• SnmpV3EngineId
• Snmpv3AuthAlogorithm
• SnmpV3PrivAlgorithm
• SnmpVPrivPassword
Export File Format
These are the contents of the file generated by the export utility of Service Appliance 1.0:
; Col# = 1: IP Address (including domain or simply an IP)
; Col# = 2: Host Name
; Col# = 3: Domain Name
; Col# = 4: Device Identity
; Col# = 5: Display Name
; Col# = 6: SysObjectID
B-6Common Services Platform Collector User Guide

Appendix B Seed File Formats
; Col# = 7: DCR Device Type
; Col# = 8: MDF Type
; Col# = 9; Snmp RO
; Col# = 10; Snmp RW
; Col# = 11; SnmpV3 User Name
; Col# = 12; Snmp V3 Auth Pass
; Col# = 13; Snmp V3 Engine ID
; Col# = 14; Snmp V3 Auth Algorithm
; Col# = 15; RX Boot Mode User
; Col# = 16; RX Boot Mode Pass
; Col# = 17; Primary User(Tacacs User)
; Col# = 18; Primary Pass(Tacacs Pass)
; Col# = 19; Primary Enable Pass
; Col# = 20; Http User
; Col# = 21; Http Pass
; Col# = 22; Http Mode
; Col# = 23; Http Port
; Col# = 24; Https Port
; Col# = 25; Cert Common Name
; Col# = 26; Secondary User
; Col# = 27; Secondary Pass
; Col# = 28; Secondary Enable Pass
; Col# = 29; Secondary Http User
; Col# = 30; Secondary Http Pass
; Col# = 31; Snmp V3 Priv Algorithm
; Col# = 32; Snmp V3 Priv Pass
; Col# = 33; User Field 1
; Col# = 34; User Field 2
; Col# = 35; User Field 3
; Col# = 36; User Field 4
; Col# = 37; Status_Msg
B-7Common Services Platform Collector User Guide

Appendix B Seed File Formats
B-8Common Services Platform Collector User Guide

Common Se
A P P E N D I X C
Supported Syslog FormatsCSPC supports the following Syslog formats:
• Nov 26 17:44:42 CHNTVAAVPND.msc.vzwnet.com evlogd: [local-60sec42.542] [sessmgr 12988 unusual] [7/1/4486 <sessmgr:28> ssmgr_gr_sess.c:1379] [callid 082be77b] [context: PGWin, contextID: 2] [software internal system critical-info syslog] ucheck-point failed for the cmd: 43
• Nov 26 17:42:21 [10.217.186.68.150.41] evlogd: [local-60sec21.785] [sessmgr 12988 unusual] [10/0/5440 <sessmgr:246> ssmgr_gr_sess.c:1379] [callid 4571e772] [context: XGWin, contextID: 6] [software internal system critical-info syslog] ucheck-point failed for the cmd: 43
• 172.21.142.123 235: RP/0/RP0/CPU0:Dec 15 20:34:47.343 UTC: exec[65724]: %SECURITY-login-4-AUTHEN_FAILED : Failed authentication attempt by user 'lab' from '172.21.31.17' on 'vty0'
• Apr 12 01:51:22 172.21.142.123 252: RP/0/RP0/CPU0:Apr 12 02:09:47.690 UTC: exec[65741]: %SECURITY-login-4-AUTHEN_FAILED : Failed authentication attempt by user 'lab' from '10.142.36.103' on 'vty0'
• 172.23.164.86 1594: 001604: *Jun 24 06:09:16.102 PST: %LINK-5-CHANGED: Interface Loopback123, changed state to administratively down
• 172.18.76.117 29: 22w1d: %SYS-5-CONFIG_I: Configured from console by vty1 (64.103.247.104)
Note CSPC also supports all Syslog formats supported by CNC
C-1rvices Platform Collector User Guide

Appendix C Supported Syslog Formats
C-2Common Services Platform Collector User Guide
Common Se
A P P E N D I X D
Conditional CollectionConditional Collection DescriptionThe phrase "Conditional Collection" generally refers to any collection decision (whether to collect/what to collect/how many times to collect) that is made based on the result of bunch of conditions or the results of another data collection. Other terms used for this are "Complex Collection", "Dynamic Collection", "Follow-on Collection".
What is Supported
Audit Use Case
• Execute a dataset (SNMP or CLI)
• Parse the output and capture a bunch of values
• Execute another command for each of the values captured above
Cisco Call Manager Use Case
In Cisco Call Manager detection, if the SysOID is one of a configurable set of OIDs, and an additional OID returns a value, the device is considered a Cisco Call Manager, and the CCM call manager platform applies.
Support Details:
This will be supported in Conditional collection. However, "platform definitions" in CSPC depend only on the results of discovery operation and can not depend on the inventory collection results.
This means that you need to implement it in the following way:
1. Define a platform "Possible Call Manager" by providing the set of SysOIDs
2. Define a Conditional collection that is applicable only for the "Possible Call Manager" platforms
3. In this Conditional collection, execute the additional OIDs and based on their return value, collect the final dataset you wish to collect
D-1rvices Platform Collector User Guide
Appendix D Conditional Collection Condition Collection in Detail
SNMP/CLI Configuration Fallback Collection
There are four configurations controlling config collection from the device. CLI only and SNMP only do not require follow on collections. However, CLI fallback to SNMP and SNMP fallback to CLI configurations will issue a follow on collection if the first attempted collection protocol fails.
Support Details:
This will be supported in Conditional Collection. However, while this makes sense for collecting configuration, it may not be very useful for other collections.
For example: Interface statistics would result in completely different output based on whether you collected it using SNMP or CLI.
Collected Value Based Follow-on Collections
There are more examples of these in Audits than in Inventory. These are the cases of follow on collection controlled by the "Condition" block in the RBML, and so could be considered the "true" conditional collections.
Support Details:
These use cases are supported as part of Audit Use Cases above.
Commands Requiring Re-login
Commands Requiring Re-login to the Same Device multiple times with mutated community strings to access card in different slots
This is the case where the same OID is issued against the same device multiple times, each time after logging in to a different card in a different slot. Here it is not the command that is mutating but the community string. Log in with the password public@SM_1 to access the card in slot module 1. These are issued against WAN switches.
Support Details:
This will be supported in Conditional Collection. However, the support will be limited to changing the community string dynamically. (We do not support changing the other credentials like username/password or device IP address etc. dynamically. That needs to be handled by the add-on module if there is such a requirement).
Condition Collection in DetailConditional Collection in CSPC is based on recursive algorithm were in the output from each processing units will be fed as input to the next processing unit, until the last processing is complete.
Statement
Statement is the fundamental processing units in Conditional Collection. Statements mark the starting point of each processing units. Each statement is identified with an "identifier" and can optionally have a title and Input. Statement is represented by <Statement> tag
D-2Common Services Platform Collector User Guide

Appendix D Conditional Collection Condition Collection in Detail
Statements are classified into two types:
1. Condition
2. Loop
The input of each statement will depend on the type of the statement. Input will be a scalar input for condition statement and vector input for loop statements.
Condition Statement
Condition Statement is represented by <Condition> tag and is identified by the statement identifier. Each condition statements input is a scalar input. In order to process the output of input the <Operation> tag is used where the user choose what to do with the output. Based on the operation performed the <Match> and <NonMatch> tags can be used to decide whether to continue with the single unit of processing or to go to the next processing.
Under the <Match> and <NonMatch> tag, user can choose to store the values in a variable which can be used for further processing. To store the values, <Assignment> tags are used under <Match> tag. Based on the operation performed the engine can be used to:
a. Execute the next statement (Use <Goto>)
b. Use the next value from the processing (Use <Continue>)
c. Exit the process (Use <Exit>)
d. On a certain Matching situation break the recursion (Use <Break>)
Use the <Output> tag if a condition statement is the last program of execution where the output of condition collection is done. Two types of output processing are currently supported in CSPC:
1. Dataset: Execute another dataset with the variables populated in previous steps. Make sure the datasets uses the same variable string (case sensitive) that was used for assigning.
Example: If the variable name is "name" and if the output dataset is to login to each slots then the command will be: session slot <name> processor 1
2. AddOutput: This type of output can be use to display the processed output in the format that is desired by the user.
Scalar Input
Scalar Inputs are the integral part of condition statement and can be only used with condition statements. There are five type of scalar inputs that can be used for processing in condition statements namely:
1. Device Property: Used for validating the device properties
2. Variable: Used in initializations
3. Datasets: Dataset names which needs to be provided if any commands needs to use issued in the device
4. Loop Context: Input Datatype which communicates to the engine if the input needs to be taken from the current loop
5. SNMPIndex / SNMPOid/SNMPValue: Used for processing SNMP data
D-3Common Services Platform Collector User Guide

Appendix D Conditional Collection Condition Collection in Detail
Operation
In order to process the output of the scalar input the <Operation> tag is used. There are two types of operations:
1. String Operation: Used with java regular expression. Each of the matching patterns are then compared with the java string for matches, doesnotmatch, contains, doesnotcontain, isEmpty, equals and notEquals checks
2. Vector Operation: Used as a normal java vector were in the output can be added to a variable and latter used for processing
Assignment
The condition statement assignment is the important place where the resultant variable are populated at the end of each operation. In order to assign values to a variable, a variable is created under <Variable> tag under assignment. The variable is populated with the results based on the following important tags:
a. append: Denotes if the matching result needs to be appended to the resulting variable
b. onlyIfNotNull: Add the result to variable only if the result is not null
c. trim: Trims the resulting string and add to the variable
d. vectorType: List/Set/OrderedList are the vector types in which the result will be added in the resultant list. By default the results will be added to a list. But if the order of insertion is needs to be maintained then OrderedList needs to be used. Use Set, if only unique result string are required in the variable
e. Operation: add/remove. Add, adds the result to the resulting list and Remove, removes the string if present from the resulting list
Loop Statement
Loop statements are like while loop where each statement is executed recursively till the exit criteria is met. Loop Statement is represented by <Loop> tag and is identified by the statement identifier. Loop statement will be the first statement in any conditional collection dataset.
Each loop statements input is a vector input. Each loop-statement must terminate with a condition statement. Data collected from the vector input will be subjected to further processing using specific matching conditions and condition statement(s).
Vector Input
There are four type of vector-inputs used in conditional collection. Each of these vector inputs have discrete significance in achieving the needs of the complex collection. Four type of vector inputs are:
1. Block Vector Input: Block Vector Input is used whenever a block of response from the device response needs to be processed. Each of the block input has a mandatory <Input> and <Params> fields. The input used in block can be any of the scalar inputs except SNMP. The params filed has a start and end string which marks the starting and the ending of the block. Also, the start and end strings are java pattern matched. The result of matched pattern is further processed in a condition statement or in a loop statement.
2. Line Vector Input: Line Vector Input is used whenever the response from device needs to be processed line by line. Each of the line input has a mandatory <Input> and <Params> fields. The input used in line can be any of the scalar inputs except SNMP. The params filed has a match <Match> tag criteria which is string and is java pattern matched against the result. The result of matched pattern is further processed in a condition statement or in a loop statement.
D-4Common Services Platform Collector User Guide

Appendix D Conditional Collection Examples
3. SNMP Table: It is used for processing SNMP response from SNMP Table. Each of the SNMP input has a mandatory <Input> and <Rows> fields. The input used in SNMP must be any of the SNMP scalar inputs.
4. Variable Vector Input: It is used like java array-list. The input list is populated and is fed for subsequent processing units for further processing.
Actions
Actions are used in conditional collection when a specific action needs to be done before, while or after processing a request. In most cases actions do assignment to variables which will be used in further processing
Examples
CLI Complex Collection
Collection of Show interfaces from device followed by interface status of those interface which contain the string "FastEthernet".
<Dataset identifier="ios_show_int_accounting_dynamic">
<Type>Dynamic</Type>
<Title>ios_show_int_accounting_dynamic</Title>
<CollectionType>CLI</CollectionType>
<CategoryName> show_int_accounting</CategoryName>
<Statements>
<Loop identifier="_show_interface_1">
<VectorInput>
<Line>
<Input>
<Dataset>
<DatasetName Failure="error_message">_show interface</DatasetName>
</Dataset>
</Input>
<Params>
<Match ignoreCase="false">FastEthernet[^A-Za-z_]*</Match>
</Params>
</Line>
</VectorInput>
<Statements>
<Condition identifier="output_cond">
<Input>
D-5Common Services Platform Collector User Guide

Appendix D Conditional Collection Examples
<LoopContext></LoopContext>
</Input>
<Operation>
<NotEquals ignoreCase="true"></NotEquals>
</Operation>
<Match>
<Assignment>
<Variable append="false" onlyIfNotNull="true" trim="true" vectorType ="List" operation="add">interface</Variable>
<Value></Value>
</Assignment>
<Output>
<Dataset>
<DatasetName>ios_show_interface accounting</DatasetName>
<Variables>
<Variable>interface</Variable>
</Variables>
</Dataset>
</Output>
<Continue></Continue>
</Match>
<NonMatch>
<Continue></Continue>
</NonMatch>
</Condition>
</Statements>
</Loop>
</Statements>
</Dataset>
SNMP Complex Collection
<Dataset identifier="ifHCOutOctets_all_interfaces_9089">
<Type>Dynamic</Type>
<Title>ifHCOutOctets_all_interfaces For AIF: 9089 Created at Dec 20, 2011 9:48:06 PM</Title>
<CollectionType>SNMP</CollectionType>
<CategoryName>AIF_9089</CategoryName>
<Statements>
D-6Common Services Platform Collector User Guide

Appendix D Conditional Collection Examples
<Loop identifier="loop1">
<Title>Get SNMP Interface Types</Title>
<VectorInput>
<SNMPTable>
<Input>
<Dataset>
<DatasetName>ifType_9089_internal</DatasetName>
</Dataset>
</Input>
<Rows>
</Rows>
</SNMPTable>
</VectorInput>
<Actions>
<Assignment>
<Variable append="false" onlyIfNotNull="false" trim="false" vectorType="Set" Operation="add">ifTypes</Variable>
<Values>
<Value>6</Value><Value>62</Value><Value>5</Value><Value>6</Value><Value>9</Value><Value>15</Value><Value>17</Value><Value>18</Value><Value>19</Value><Value>22</Value><Value>28</Value><Value>30</Value><Value>32</Value><Value>37</Value><Value>39</Value><Value>49</Value><Value>63</Value><Value>73</Value><Value>76</Value><Value>77</Value><Value>81</Value><Value>100</Value><Value>101</Value><Value>102</Value><Value>103</Value><Value>107</Value><Value>108</Value><Value>131</Value><Value>134</Value><Value>166</Value><Value>171</Value></Values>
</Assignment>
</Actions>
<Statements>
<Condition identifier="loop1_cond1">
<Title>Check to see if Interface is require type</Title>
<Input>
<SNMPValue>
<LoopContext></LoopContext>
</SNMPValue>
</Input>
<Operation>
<IsMemberOf><VariableName>ifTypes</VariableName>
</IsMemberOf>
</Operation>
<Match>
D-7Common Services Platform Collector User Guide

Appendix D Conditional Collection Examples
<Goto></Goto>
</Match>
<NonMatch>
<Continue></Continue>
</NonMatch>
</Condition>
<Condition identifier="loop1_cond_last">
<Title>Save the ifIndex</Title>
<Input>
<SNMPIndex>
<LoopContext></LoopContext>
</SNMPIndex>
</Input>
<Operation>
<Matches ignoreCase="false">^.*\.([0-9]+)$</Matches>
</Operation>
<Match>
<Assignment>
<Variable append="true" onlyIfNotNull="true" trim="true" vectorType="Set" Operation="add">interfaceList</Variable>
<Value><loop1_cond_last.1></Value></Assignment>
<Goto></Goto>
</Match>
<NonMatch>
<Continue></Continue>
</NonMatch>
</Condition>
</Statements>
</Loop>
<Loop identifier="loop2">
<Title>Get SNMP Interface Oper Status</Title>
<VectorInput>
<SNMPTable>
<Input>
<Dataset>
<DatasetName>ifOperStatus_9089_internal</DatasetName>
</Dataset>
</Input>
D-8Common Services Platform Collector User Guide

Appendix D Conditional Collection Examples
<Rows>
</Rows>
</SNMPTable>
</VectorInput>
<Statements>
<Condition identifier="loop2_cond1">
<Input>
<SNMPValue>
<LoopContext></LoopContext>
</SNMPValue>
</Input>
<Operation>
<Equals ignoreCase="false">1</Equals>
</Operation>
<Match>
<Continue></Continue>
</Match>
<NonMatch>
<Goto></Goto>
</NonMatch>
</Condition>
<Condition identifier="loop2_cond2">
<Title>Remove If Interface is not up</Title>
<Input>
<SNMPIndex>
<LoopContext></LoopContext>
</SNMPIndex>
</Input>
<Operation>
<Matches ignoreCase="false">^.*\.([0-9]+)$</Matches>
</Operation>
<Match>
<Assignment>
<Variable append="false" onlyIfNotNull="false" trim="false" vectorType="List" Operation="add">interfaceList</Variable>
<Value><loop2_cond2.1></Value></Assignment>
<Goto></Goto>
</Match>
D-9Common Services Platform Collector User Guide

Appendix D Conditional Collection Examples
<NonMatch>
<Continue></Continue>
</NonMatch>
</Condition>
</Statements>
</Loop>
<Loop identifier="last">
<Title>Collect the output</Title>
<VectorInput>
<SNMPTable>
<Input>
<Dataset>
<DatasetName>ifHCOutOctets_all_interfaces_9089_ifHCOutOctets</DatasetName>
</Dataset>
</Input>
<Rows>
</Rows>
</SNMPTable>
</VectorInput>
<Statements>
<Condition identifier="last_cond1">
<Input>
<SNMPIndex>
<LoopContext></LoopContext>
</SNMPIndex>
</Input>
<Operation>
<Matches ignoreCase="false">^.*\.([0-9]+)$</Matches>
</Operation>
<Match>
<Assignment>
<Variable append="false" onlyIfNotNull="true" trim="true" vectorType="List" Operation="add">oid</Variable>
<Value></Value></Assignment>
<Goto></Goto>
</Match>
<NonMatch>
<Continue></Continue>
D-10Common Services Platform Collector User Guide

Appendix D Conditional Collection Examples
</NonMatch>
</Condition>
<Condition identifier="last_cond2">
<Title>Check to see if this is in the final List</Title>
<Input>
<Variable>last_cond1.1</Variable>
</Input>
<Operation>
<IsMemberOf><VariableName>interfaceList</VariableName>
</IsMemberOf>
</Operation>
<Match>
<Goto></Goto>
</Match>
<NonMatch>
<Continue></Continue>
</NonMatch>
</Condition>
<Condition identifier="last_cond3">
<Title>Add the value to the final output</Title>
<Input>
<SNMPValue>
<LoopContext></LoopContext>
</SNMPValue>
</Input>
<Operation>
<Matches ignoreCase="false">^(.*)$</Matches>
</Operation>
<Match>
<Assignment>
<Variable append="false" onlyIfNotNull="true" trim="true" vectorType="List" Operation="add">interface</Variable>
<Value><last_cond1.1></Value></Assignment>
<Output>
<AddOutput>
<Value><SnmpDatasetResponse><SNMPRequest><RequestType>Column</RequestType><ObjectList><Object><oid></Object></ObjectList></SNMPRequest><SnmpResponse><Row><InstanceId><last_cond1.1></InstanceId><Columns><Column><last_cond3.1></Column></Columns></Row></SnmpResponse></SnmpDatasetResponse></Value>
D-11Common Services Platform Collector User Guide

Appendix D Conditional Collection Examples
<Variables>
<Variable>interface</Variable>
</Variables>
</AddOutput>
</Output>
<Goto></Goto>
</Match>
<NonMatch>
<Continue></Continue>
</NonMatch>
</Condition>
</Statements>
</Loop>
</Statements>
</Dataset>
D-12Common Services Platform Collector User Guide

Common Se
A P P E N D I X E
Optional Parameter for NATed AppliancesThis feature allows TFTP dataset/CLI datasets/ ApplyIPSsignature/ApplyConfig to create/execute with commands having CSPC server IP, which needs to be added dynamically while executing the TFTP dataset/CLI datasets/ApplyIPSsignature/ApplyConfig. To use this feature for CLI datasets/ ApplyIPSsignature/ApplyConfig ,a unique tag called <#SERVERIP#> has to be added to the command where CSPC server IP needs to be replaced. Updating TFTP dataset is not needed. By default, CSPC will replace it with its own IP but, in case the externally visible IP is not the same as the internal CSPC IP, then use the following XML to added/modify the IP to be used for replacing the <#SERVERIP#> tag
To add/modify a CSPC Server IP, use below xml API
<Request requestId="" xmlns:xsi="http://www.w3.org/2001/XMLSchema-instance"
xsi:schemaLocation="http://www.parinetworks.com/api/schemas/1.1 pari_api.xsd"
xmlns="http://www.parinetworks.com/api/schemas/1.1">
<Manage>
<Add operationId="1">
<ServerDetails>
<IPAddress>x.x.x.x</IPAddress>
</ServerDetails>
</Add>
</Manage>
</Request>
E-1rvices Platform Collector User Guide

Appendix E Optional Parameter for NATed Appliances
E-2Common Services Platform Collector User Guide

Common Se
A P P E N D I X F
XML APIsSeedfile job for runnow
<Request requestId="" xmlns:xsi="http://www.w3.org/2001/XMLSchema-instance"
xsi:schemaLocation="http://www.parinetworks.com/api/schemas/1.1 ../../../../CSPC2.3Dev/pari/dash/resources/server/schema/pari_api.xsd"
xmlns="http://www.parinetworks.com/api/schemas/1.1">
<Job>
<Schedule operationId="1">
<JobSchedule runnow="true">
</JobSchedule>
<RegressiveSeedFileJob>
<TriggerDav>true</TriggerDav>
<DeleteCreds>true</DeleteCreds>
<DeleteDevices>true</DeleteDevices>
</RegressiveSeedFileJob>
</Schedule>
</Job>
</Request>
Scheduled seedfile job
<Request requestId="" xmlns:xsi="http://www.w3.org/2001/XMLSchema-instance"
xsi:schemaLocation="http://www.parinetworks.com/api/schemas/1.1 ../../../../CSPC2.3Dev/pari/dash/resources/server/schema/pari_api.xsd"
xmlns="http://www.parinetworks.com/api/schemas/1.1">
<Job>
<Schedule operationId="1">
<JobSchedule runnow="false">
<Start>1409607000000</Start>
F-1rvices Platform Collector User Guide

Appendix F XML APIs
<Repeat>
<IntervalMilliSeconds>600000</IntervalMilliSeconds>
<!- <End>1254316663640</End>->
</Repeat>
</JobSchedule>
<RegressiveSeedFileJob>
<TriggerDav>true</TriggerDav>
<DeleteCreds>true</DeleteCreds>
<DeleteDevices>true</DeleteDevices>
</RegressiveSeedFileJob>
</Schedule>
</Job>
</Request>
Add Notification
<Request xmlns="http://www.parinetworks.com/api/schemas/1.1" requestId="4444">
<Manage>
<Add operationId="1">
<NotificationList>
<Notification>
<TrapOID></TrapOID>
<NotificationType></NotificationType>
</Notification>
</NotificationList>
</Add>
</Manage>
</Request>
Delete All Notifications
<Request xmlns="http://www.parinetworks.com/api/schemas/1.1" requestId="4444">
<Manage>
<Delete operationId="1">
<NotificationList all="true">
</NotificationList>
</Delete>
</Manage>
F-2Common Services Platform Collector User Guide

Appendix F XML APIs
</Request>
Delete Single Notification
<Request xmlns="http://www.parinetworks.com/api/schemas/1.1" requestId="4444">
<Manage>
<Delete operationId="1">
<NotificationList>
<Notification>
<TrapOID></TrapOID>
</Notification>
</NotificationList>
</Delete>
</Manage>
</Request>
Get All Notification Types
<Request xmlns="http://www.parinetworks.com/api/schemas/1.1" requestId="4444">
<Manage>
<Get operationId="1">
<NotificationList all="true">
</NotificationList>
</Get>
</Manage>
</Request>
Modify Notification
<Request xmlns="http://www.parinetworks.com/api/schemas/1.1" requestId="4444">
<Manage>
<Modify operationId="1">
<NotificationList>
<Notification>
<TrapOID></TrapOID>
<NotificationType></NotificationType>
</Notification>
</NotificationList>
F-3Common Services Platform Collector User Guide
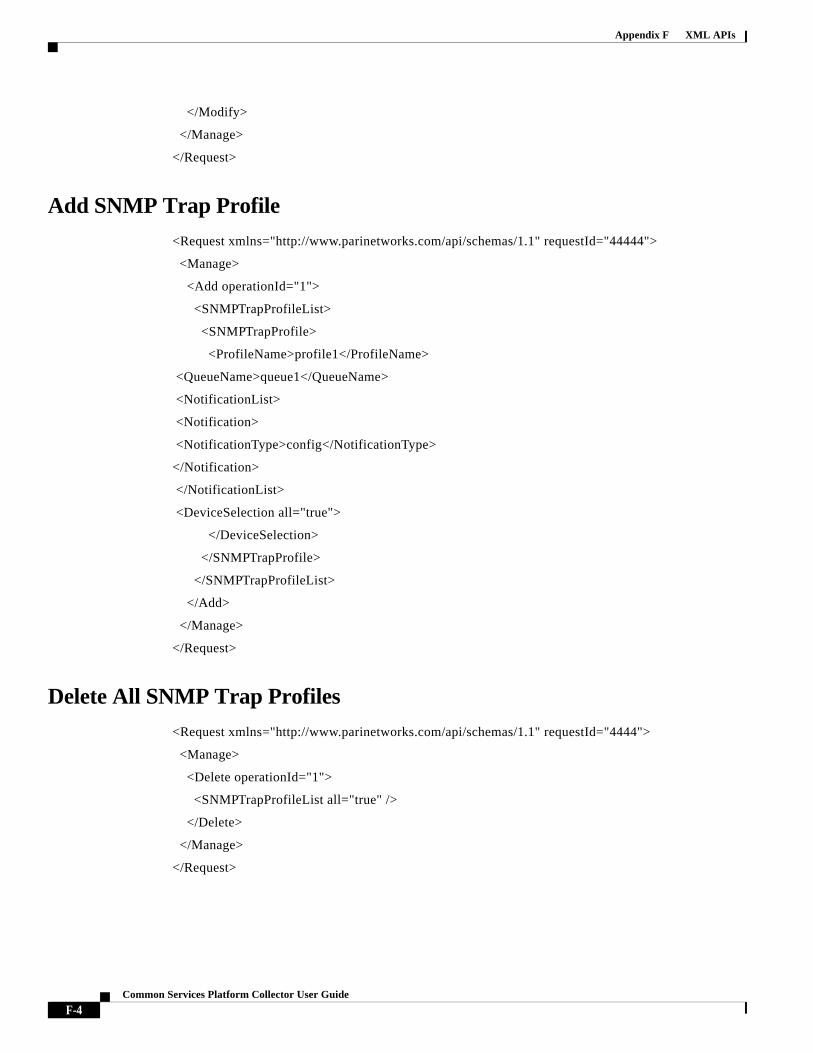
Appendix F XML APIs
</Modify>
</Manage>
</Request>
Add SNMP Trap Profile
<Request xmlns="http://www.parinetworks.com/api/schemas/1.1" requestId="44444">
<Manage>
<Add operationId="1">
<SNMPTrapProfileList>
<SNMPTrapProfile>
<ProfileName>profile1</ProfileName>
<QueueName>queue1</QueueName>
<NotificationList>
<Notification>
<NotificationType>config</NotificationType>
</Notification>
</NotificationList>
<DeviceSelection all="true">
</DeviceSelection>
</SNMPTrapProfile>
</SNMPTrapProfileList>
</Add>
</Manage>
</Request>
Delete All SNMP Trap Profiles
<Request xmlns="http://www.parinetworks.com/api/schemas/1.1" requestId="4444">
<Manage>
<Delete operationId="1">
<SNMPTrapProfileList all="true" />
</Delete>
</Manage>
</Request>
F-4Common Services Platform Collector User Guide

Appendix F XML APIs
Delete Single SNMP Trap profile
<Request xmlns="http://www.parinetworks.com/api/schemas/1.1" requestId="4444">
<Manage>
<Delete operationId="1">
<SNMPTrapProfileList>
<SNMPTrapProfile>
<ProfileName>profile</ProfileName>
</SNMPTrapProfile>
</SNMPTrapProfileList>
</Delete>
</Manage>
</Request>
Get All SNMP Trap Profiles
<Request xmlns="http://www.parinetworks.com/api/schemas/1.1" requestId="4444">
<Manage>
<Get operationId="1">
<SNMPTrapProfileList all="true" />
</Get>
</Manage>
</Request>
Get Single SNMP Trap Profile
<Request requestId="4444" xmlns="http://www.parinetworks.com/api/schemas/1.1">
<Manage>
<Get operationId="1">
<SNMPTrapProfileList>
<SNMPTrapProfile> <ProfileName>profile</ProfileName>
</SNMPTrapProfile>
</SNMPTrapProfileList>
</Get>
</Manage>
</Request>
F-5Common Services Platform Collector User Guide

Appendix F XML APIs
Modify SNMP Trap profile
<Request xmlns="http://www.parinetworks.com/api/schemas/1.1" requestId="44444">
<Manage>
<Modify operationId="1">
<SNMPTrapProfileList>
<SNMPTrapProfile>
<ProfileName>profile1</ProfileName>
<QueueName>queue1</QueueName>
<NotificationList>
<Notification>
<NotificationType>config</NotificationType>
</Notification>
</NotificationList>
<DeviceSelection all="false">
<DeviceList>
<Device>
<IPAddress>x.x.x.x</IPAddress>
</Device>
</DeviceList>
</DeviceSelection>
</SNMPTrapProfile>
</SNMPTrapProfileList>
</Modify>
</Manage>
</Request>
SNMP Trap Report
Custom Report XML
<Request xmlns="http://www.parinetworks.com/api/schemas/1.1 "requestId="44444">
<Report>
<Get operationId="1">
<SnmpTrapReport>
<TimePeriod>
<Custom>
<FromTime></FromTime>
<ToTime></ToTime>
F-6Common Services Platform Collector User Guide

Appendix F XML APIs
</Custom>
</TimePeriod>
<Source>
</Source>
<NotificationList>
<Notification></Notification>
</NotificationList>
</SnmpTrapReport>
</Get>
</Report>
</Request>
Report based on Time Interval
<Request xmlns="http://www.parinetworks.com/api/schemas/1.1 "requestId="44444">
<Report>
<Get operationId="1">
<SnmpTrapReport>
<TimePeriod>
<SinceTime>
</SinceTime>
</TimePeriod>
<Source>
</Source>
<NotificationList>
<NotificationType></NotificationType>
</NotificationList>
</SnmpTrapReport>
</Get>
</Report>
</Request>
<SinceTime><!-- /* Style Definitions */ table.MsoNormalTable
Unknown macro: {mso-style-name}
Modify SNMP trap port and Purge Settings
<Request requestId="4444" xmlns="http://www.parinetworks.com/api/schemas/1.1">
<Manage>
<Modify operationId="1">
F-7Common Services Platform Collector User Guide

Appendix F XML APIs
<ApplicationPreferencesSettings>
<SnmpTrapSettings>
<PurgeSettings>15</PurgeSettings>
<SnmpTrapPort>162</SnmpTrapPort>
</SnmpTrapSettings>
</ApplicationPreferencesSettings>
</Modify>
</Manage>
</Request>
After these changes user has to restart CSPC to get this affect visible
CSPC DB backup and restore XML API
Backup Job XML API
<Request xmlns="http://www.parinetworks.com/api/schemas/1.1" requestId="3333">
<Job>
<Schedule operationId="123">
<JobSchedule runnow="true">
</JobSchedule>
<BackupJob jobName="Backup_Scheduled1">
<IgnoreRunningJobs>false</IgnoreRunningJobs>
<FTPServerOptions>
<ServerHost>10.126.77.129</ServerHost>
<UserName>root</UserName>
<Password>XXXXX</Password>
<Directory>resources</Directory>
<FileName>file_temp_1</FileName>
</FTPServerOptions>
<PropertiesConfigFile>resources/server/backup_resource_config.properties</PropertiesConfigFile>
</BackupJob>
</Schedule>
</Job>
</Request>
F-8Common Services Platform Collector User Guide

Appendix F XML APIs
Restore Job XML API
<Request xmlns="http://www.parinetworks.com/api/schemas/1.1" requestId="3333">
<Job>
<Schedule operationId="123">
<JobSchedule runnow="true" />
<RestoreJob jobName="Backup">
<FTPServerOptions>
<ServerHost>10.126.77.129</ServerHost>
<UserName>user</UserName>
<Password>xxxx</Password>
<Directory>resources</Directory>
<FileName>_1391384366427.pbx</FileName>
</FTPServerOptions>
</RestoreJob>
</Schedule>
</Job>
</Request>
CLI Channel XML API
CSPC CLI Channel dynamically supports the devices and accepts the required inputs using xml and stores these inputs in DB for future use.
New Device Input XML
<?xml version="1.0"?>
<Request xmlns="http://www.parinetworks.com/api/schemas/1.1" requestId="12">
<Manage>
<Add operationId="1" replace="true">
<ChannelType channelId = "StarOS"> <!-- Provide unique name for new channel -->
<ChannelTypeRules>
<Rules>
<MatchType>ANY</MatchType> <!-- MatchType is based on rules provided, ANY or ALL -->
<Rule>
<Attribute><![CDATA[OSTYPE]]></Attribute> <!-- Provide the attribute which needs to be matched with device OSTYPE, SYSOBJID, VERSIONTYPE -->
<Operator>EQUALS</Operator> <!-- Provide operator used to match with attribute EQUALS, INDEXOF, STARTSWITH, ENDSWITH, CONTAINS, GREATERTHAN, LESSTHAN -->
F-9Common Services Platform Collector User Guide

Appendix F XML APIs
<Operands>
<Operand><![CDATA[Star OS]]></Operand> <!-- Operand depend on attribute and operator values -->
</Operands>
</Rule>
</Rules>
</ChannelTypeRules>
<CLIRules>
<MorePromptRules>
<Rules>
<MatchType>ANY</MatchType> <!-- MatchType is based on rules provided, ANY or ALL -->
<Rule>
<Attribute><![CDATA[OUTPUT]]></Attribute>
<Operator>INDEXOF</Operator> <!-- Provide operator used to match with attribute EQUALS, INDEXOF, STARTSWITH, ENDSWITH, CONTAINS -->
<Operands>
<Operand><![CDATA[--More--]]></Operand> <!-- Provide more prompts available for the device -->
</Operands>
</Rule>
</Rules>
<ContinueChar><![CDATA[32]]></ContinueChar> <!-- Provide character needs to be entered if more prompt available -->
</MorePromptRules>
<OtherPromptRules>
<Rules> <!-- This OtherPromptRules are used when the device is having prompts other than more prompts -->
<MatchType>ANY</MatchType>
<Rule>
<Attribute><![CDATA[OSTYPE]]></Attribute>
<Operator>EQUALS</Operator>
<Operands>
<Operand><![CDATA[AsyncOS]]></Operand>
</Operands>
</Rule>
<Rule>
<Attribute><![CDATA[OUTPUT]]></Attribute>
<Operator>INDEXOF</Operator>
F-10Common Services Platform Collector User Guide

Appendix F XML APIs
<Operands>
<Operand><![CDATA[Do you want to mask the password]]></Operand> <!-- The prompt appears on the device -->
</Operands>
</Rule>
</Rules>
<ContinueChar><![CDATA[Y]]></ContinueChar> <!-- ContinueChar is used if we need to input any data/character to continue further from the prompt -->
</OtherPromptRules>
<EnableRules>
<EnableCommand>enable</EnableCommand> <!-- Provide command used to enter into enable mode -->
<EnableUserPrompts><![CDATA[Username:&login:&user:]]></EnableUserPrompts> <!-- Provide user prompts -->
<EnablePwdPrompts><![CDATA[Password:]]></EnablePwdPrompts> <!-- Provide password prompts -->
</EnableRules>
<ClearTerminalLengthDefinition>
<Command>terminal length 0</Command> <!-- Provide commands used to set terminal length for the device -->
<Command>terminal width 0</Command>
</ClearTerminalLengthDefinition>
<AfterLoginCommand>
<Command>clish</Command> <!-- some devices required commands after login to the device and before entering into the enable mode, provide those commands here -->
</AfterLoginCommand>
<ReplaceEscChar>[j</ReplaceEscChar> <!-- Provide escape characters to be replaced -->
<ClearLineDef>3</ClearLineDef> <!-- This will clear the buffer before executing the command while collecting the data from the device -->
<ControlChar>\n</ControlChar>
<Priority>100</Priority>
<UsePariPatentEndOfCommand>true</UsePariPatentEndOfCommand>
</CLIRules>
</ChannelType>
</Add>
</Manage>
</Request>
F-11Common Services Platform Collector User Guide

Appendix F XML APIs
Modify Channel XML
<?xml version="1.0"?>
<Request xmlns="http://www.parinetworks.com/api/schemas/1.1" requestId="12">
<Manage>
<Modify operationId="1">
<ChannelType channelId = "ACNS"> <!-- Provide unique name for new channel -->
<ChannleTypeRules>
<Rules>
<MatchType>ANY</MatchType> <!-- MatchType is based on rules provided, ANY or ALL -->
<Rule>
<Attribute><![CDATA[OSTYPE]]></Attribute> <!-- Provide the attribute which needs to be matched with device OSTYPE, SYSOBJID, VERSIONTYPE -->
<Operator>EQUALS</Operator> <!-- Provide operator used to match with attribute EQUALS, INDEXOF, STARTSWITH, ENDSWITH, CONTAINS, GREATERTHAN, LESSTHAN -->
<Operands>
<Operand><![CDATA[Star OS]]></Operand> <!-- Operand depend on attribute and operator values -->
</Operands>
</Rule>
</Rules>
</ChannleTypeRules>
<CLIRules>
<MorePromptRules>
<Rules>
<MatchType>ANY</MatchType> <!-- MatchType is based on rules provided, ANY or ALL -->
<Rule>
<Attribute><![CDATA[OUTPUT]]></Attribute>
<Operator>INDEXOF</Operator> <!-- Provide operator used to match with attribute EQUALS, INDEXOF, STARTSWITH, ENDSWITH, CONTAINS, GREATERTHAN, LESSTHAN -->
<Operands>
<Operand><![CDATA[--More--]]></Operand> <!-- Provide more prompts available for the device -->
<Operand><![CDATA[<--- More --->]]></Operand>
</Operands>
</Rule>
F-12Common Services Platform Collector User Guide

Appendix F XML APIs
</Rules>
<ContinueChar><![CDATA[32]]></ContinueChar> <!-- Provide character needs to be entered if more prompt available -->
</MorePromptRules>
<OtherPromptRules>
<Rules> <!-- This OtherPromptRules are used when the device is having prompts other than more prompts -->
<MatchType>ANY</MatchType>
<Rule>
<Attribute><![CDATA[OSTYPE]]></Attribute>
<Operator>EQUALS</Operator>
<Operands>
<Operand><![CDATA[AsyncOS]]></Operand>
</Operands>
</Rule>
<Rule>
<Attribute><![CDATA[OUTPUT]]></Attribute>
<Operator>INDEXOF</Operator>
<Operands>
<Operand><![CDATA[Do you want to mask the password]]></Operand> <!-- The prompt appears on the device -->
</Operands>
</Rule>
</Rules>
<ContinueChar><![CDATA[Y]]></ContinueChar> <!-- ContinueChar is used if we need to input any data/character to continue further from the prompt -->
</OtherPromptRules>
<EnableRules>
<EnableCommand>enable</EnableCommand> <!-- Provide command used to enter into enable mode -->
<EnableUserPrompts><![CDATA[Username:&Password:&login:&user:]]></EnableUserPrompts> <!-- Provide user prompts -->
<EnablePwdPrompts><![CDATA[Password:]]></EnablePwdPrompts> <!-- Provide password prompts -->
</EnableRules>
<ClearTerminalLengthDefinition>
F-13Common Services Platform Collector User Guide

Appendix F XML APIs
<Command>terminal length 0</Command> <!-- Provide commands used to set terminal length for the device -->
<Command>terminal width 0</Command>
</ClearTerminalLengthDefinition>
<AfterLoginCommand>
<Command>Clish</Command> <!-- some devices required commands after login to the device and before entering into the enable mode, provide those commands here -->
</AfterLoginCommand>
<ReplaceEscChar>[j</ReplaceEscChar> <!-- Provide escape characters to be replaced -->
<ClearLineDef>3</ClearLineDef> <!-- This will clear the buffer before executing the command while collecting the data from the device -->
<ControlChar>\n</ControlChar>
<Priority>100</Priority>
<UsePariPatentEndOfCommand>true</UsePariPatentEndOfCommand>
</CLIRules>
</ChannelType>
</Modify>
</Manage>
</Request>
CLI Channel Get Report XML
<Request xmlns="http://www.parinetworks.com/api/schemas/1.1" requestId="CLIChannelReport">
<Manage>
<Get operationId="1">
<CLIChannelReport all = "false"> <!-- all equals true will get the all channels Channel Type rules only not CLI rules -->
<ChannelId>IOS</ChannelId> <!-- if all equals false we need to provide channle id to get that particular channel channel type rulas and cli rules -->
</CLIChannelReport>
</Get>
</Manage>
</Request> ?
Channel Delete Channel XML
- <Request xmlns="http://www.parinetworks.com/api/schemas/1.1" requestId="ChannelList">
F-14Common Services Platform Collector User Guide

Appendix F XML APIs
- <Manage>
- <Delete operationId="1">
<ChannelType channelId="Acsw" />
- <!-- This Xml deletes channel defintions which is provided here as channelId
-->
</Delete>
</Manage>
</Request>
Get CLI Channel List Report XML
Request xmlns="http://www.parinetworks.com/api/schemas/1.1" requestId="ChannelList">
<Manage>
<Get operationId="1">
<ChannelList all = "true"/> <!-- This report lists all the existing channel ids list -->
</Get>
</Manage>
</Request>?
Get Imported Devices Status Report
<Request xmlns="http://www.parinetworks.com/api/schemas/1.1" requestId="44444">
<Manage>
<Get operationId="1">
<ImportedDeviceStatusReport>
<DiscoveryJobId>32</DiscoveryJobId>
<DiscoveryJobRunId>1</DiscoveryJobRunId>
</ImportedDeviceStatusReport>
</Get>
</Manage>
</Request>
F-15Common Services Platform Collector User Guide

Appendix F XML APIs
F-16Common Services Platform Collector User Guide

Common Se
A P P E N D I X G
Frequently Asked QuestionsQ. Does adding credentials manage a device?
A. No.
Q. Can credentials be added by DNS Name?
A. No.
Q. Can CNC seed files be imported?
A. Yes.
Q. Can Ciscoworks DCR files be imported?
A. Yes, but only the XML Version and only if the IP Addresses were exported from Ciscoworks, not the DNS Names.
Q. Does importing a credentials file ever manage a device?
A. No.
Q. Can credentials be exported?
A. Yes, but only in Pari credentials format.
Q. Is it better to enumerate IP address or to use wild cards?
A. It is better to use wild cards.
Q. Is the order of credentials important?
A. Yes, the order of credentials is used to choose the preferred protocol for a dataset type and also to choose between multiple matching wildcards.
G-1rvices Platform Collector User Guide

Appendix G Frequently Asked Questions
Q. Does Discovery of Known Devices discover anything?
A. No, but it will filter out any devices it cannot collect device properties from using the SNMP credentials.
Q. How come all my devices weren’t added?
A. Because Discovery of Known Devices filters out any devices it cannot collect device properties from using the SNMP credentials.
Q. Are SNMP credentials necessary to manage a device?
A. Yes.
G-2Common Services Platform Collector User Guide