user and installation guide - henry schein equipment · 2019-06-21 · • tooth numbering system:...
TRANSCRIPT

9H1809 Ed01 2011-07
CS
1200
User and Installation GuideC
S 1200 U
ser and Installation Guide
Carestream DentalA Division of Carestream Health, Inc.150 Verona St.Rochester, NY 14608
©Carestream Health, Inc., 2011.The Kodak trademark and trade dress are used under license from Kodak.
For more information, visit: www.carestreamdental.com

Notice
No part of this publication may be reproduced, stored in a retrieval system, translated to another language, or transmitted in any form by any means, electronic, mechanical, photocopied, recorded, or otherwise, without prior written permission.
The information in this document is subject to change. Neither Carestream Health, Inc. nor any of its subsidiaries shall be liable for errors contained herein or for incidental damages in conjunction with the furnishing, performance, or use of this material.
We recommend that you thoroughly familiarize yourself with this Guide in order to make the most effective use of your system.
Carestream Health is a trademark of Carestream Health, Inc.
All other trademarks and registered trademarks are the property of their respective holders.
The CS 1200 is intended for professional use only. US Federal law restricts this device to sale by or on the order of a dentist.
Manual Name: CS 1200 Intraoral Camera User and Installation Guide Part Number: 9H1809 Revision Number: 05 Print Date: 2017-04
WARNING: We recommend that you consult the “Safety Sheet” and the “Safety and Regulatory Guide” before using the CS 1200 Systems.

Contents
Chapter 1 Conventions in This Guide
Conventions in This Guide . . . . . . . . . . . . . . . . . . . 1
Chapter 2 CS 1200 System Packaging
CS 1200 System Description . . . . . . . . . . . . . . . . . 3
Packaging of the CS 1200 Camera . . . . . . . . . . . . . . 3
Chapter 3 CS 1200 Intraoral Camera Overview
Camera Overview. . . . . . . . . . . . . . . . . . . . . . . . 5
Chapter 4 CS 1200 Software Overview
Minimum Computer System Requirements . . . . . . . . . . 7
General Software Overview . . . . . . . . . . . . . . . . . . 7
CS 1200 Acquisition Interface Overview . . . . . . . . . . . 7
Toolbar Overview. . . . . . . . . . . . . . . . . . . . . . 8
Video Toolbar . . . . . . . . . . . . . . . . . . . . . 8
Image Toolbar . . . . . . . . . . . . . . . . . . . . . 8
Common Video and Image Toolbar . . . . . . . . . . 8
Image Gallery Toolbar . . . . . . . . . . . . . . . . . 9
Monitor Connection Overview. . . . . . . . . . . . . . . 9
Transfer Toolbar . . . . . . . . . . . . . . . . . . . . 9
Select Patient Dialog Box . . . . . . . . . . . . . . . 9
Dialog Boxes Overview . . . . . . . . . . . . . . . . . 10
Image Processing Dialog Box. . . . . . . . . . . . 10
Tooth Chart Dialog Box . . . . . . . . . . . . . . . 10
Select a Format Dialog Box . . . . . . . . . . . . . 11
Preferences Dialog Boxes Overview . . . . . . . . . . 12
General Preferences . . . . . . . . . . . . . . . . 12
Video Adjustment Preferences . . . . . . . . . . . 13
Tools Preferences . . . . . . . . . . . . . . . . . . 13
Chapter 5 Setting Up the CS 1200 Intraoral Camera
Connecting the Camera to a Computer and Installing the Software . . . . . . . . . . . . . . . . . . . . . . . . . 15
Connecting the Camera to a Monitor . . . . . . . . . . . . 16
Installing the Camera Holder . . . . . . . . . . . . . . . . . 17
Camera Holder Components Overview . . . . . . . . . 17
Installing the Camera Holder . . . . . . . . . . . . . . 17
CS 1200 Intraoral Camera User and Installation Guide (9H1809)_Ed05 iii
Chapter 6 Getting Started
Accessing the Acquisition Interface . . . . . . . . . . . . . 19
Setting Up Preferences . . . . . . . . . . . . . . . . . . . . 19
Using the Imaging Software with TWAIN. . . . . . . . . . . 19
Starting the Imaging Software . . . . . . . . . . . . . . 19
Setting Up Preferences. . . . . . . . . . . . . . . . . . 20
Chapter 7 Recording Video and Capturing Images on a Computer
Preparing for Acquisition . . . . . . . . . . . . . . . . . . . 21
Preparing the Camera . . . . . . . . . . . . . . . . . . 21
Acquiring Live Video or Images . . . . . . . . . . . . . . . . 22
Accessing the Acquisition Interface . . . . . . . . . . . 22
Recording or Viewing a Video . . . . . . . . . . . . . . 22
Capturing and Viewing Images . . . . . . . . . . . . . . 23
Chapter 8 Capturing Images on a Monitor and Transferring Images to a Computer
Monitor Interface Overview . . . . . . . . . . . . . . . . . . 25
Delete File Dialog Box . . . . . . . . . . . . . . . . . . 25
Patient Number Dialog Box. . . . . . . . . . . . . . . . 25
Preparing for Acquisition . . . . . . . . . . . . . . . . . . . 26
Preparing the Camera . . . . . . . . . . . . . . . . . . 26
Capturing, Viewing, and Deleting Images. . . . . . . . . . . 27
Assigning a Number to a Patient . . . . . . . . . . . . . 27
Capturing Images . . . . . . . . . . . . . . . . . . . . . 27
Viewing Images . . . . . . . . . . . . . . . . . . . . . . 28
Deleting Images . . . . . . . . . . . . . . . . . . . . . . 29
Transferring Images . . . . . . . . . . . . . . . . . . . . . . 29
Transferring Images to the Acquisition Interface . . . . . 29
Transferring Images to the Computer Hard Disk. . . . . 30
Chapter 9 Maintenance
Cleaning and Disinfecting the Camera . . . . . . . . . . . . 31
Chapter 10 Troubleshooting
CS 1200 Troubleshooting Instructions . . . . . . . . . . . . 33
Chapter 11 Contact Information
Manufacturer’s Address . . . . . . . . . . . . . . . . . . . . 35
Authorized Representatives . . . . . . . . . . . . . . . . . . 35
iv

1 Conventions in This Guide
Conventions in This GuideThe following messages emphasize information or indicate potential risk to personnel or equipment:
WARNING: Warns you to avoid injury to yourself or others by following the safety instructions precisely.
CAUTION: Alerts you to a condition that might cause serious damage.
Important: Alerts you to a condition that might cause problems.
Note: Emphasizes important information.
Tip: Provides extra information and hints.
CS 1200 Intraoral Camera User and Installation Guide (9H1809)_Ed05 1

2 Chapter 1 Conventions in This Guide

2 CS 1200 System Packaging
CS 1200 System DescriptionThe CS 1200 system is available in three configurations:
• Wired USB• AV• S-Video
See “Packaging of the CS 1200 Camera” for the packaging components list. Inspect the packages of the CS 1200 intraoral camera after the shipment is received. If there are any signs of damage or missing parts, contact the shipping company and Carestream Health, Inc., immediately.
Packaging of the CS 1200 Camera
Table 1 Packaging of the CS 1200 Camera
Component Description Quantity
CS 1200 camera 1
Camera holder 1
USB cable(Wired USB ONLY)
1
AV cable(AV ONLY)
1
S-video cable(S-Video ONLY)
1
CS 1200 Intraoral Camera User and Installation Guide (9H1809)_Ed05 3
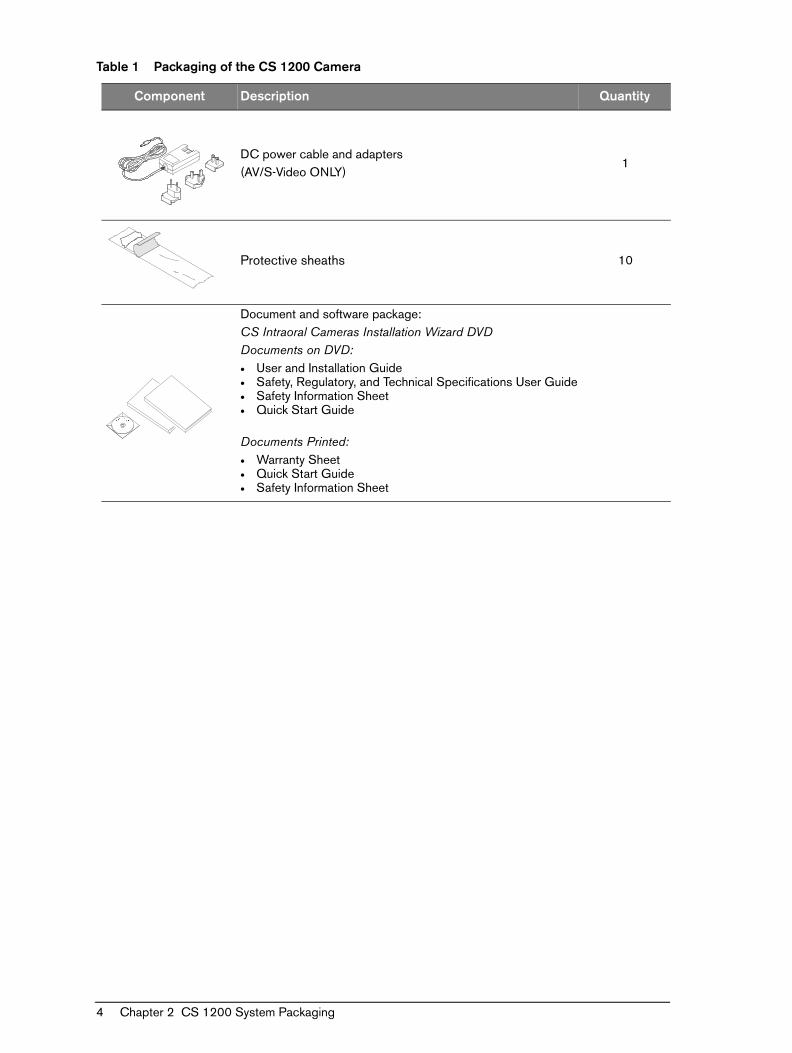
DC power cable and adapters(AV/S-Video ONLY)
1
Protective sheaths 10
Document and software package:CS Intraoral Cameras Installation Wizard DVDDocuments on DVD:• User and Installation Guide• Safety, Regulatory, and Technical Specifications User Guide• Safety Information Sheet• Quick Start Guide
Documents Printed:• Warranty Sheet• Quick Start Guide• Safety Information Sheet
Table 1 Packaging of the CS 1200 Camera
Component Description Quantity
4 Chapter 2 CS 1200 System Packaging
3 CS 1200 Intraoral Camera Overview
The CS 1200 intraoral camera is an easy-to-use, simple-to-share, and high-quality imaging system. It has three connection configurations based on the model you purchased:
• USB• S-Video• AV
When connected to a computer, it has the following functions:
• Recording videos
• Capturing images
• Reviewing recorded videos and captured images
When connected to a monitor, it has the following functions:
• Capturing images
• Reviewing images
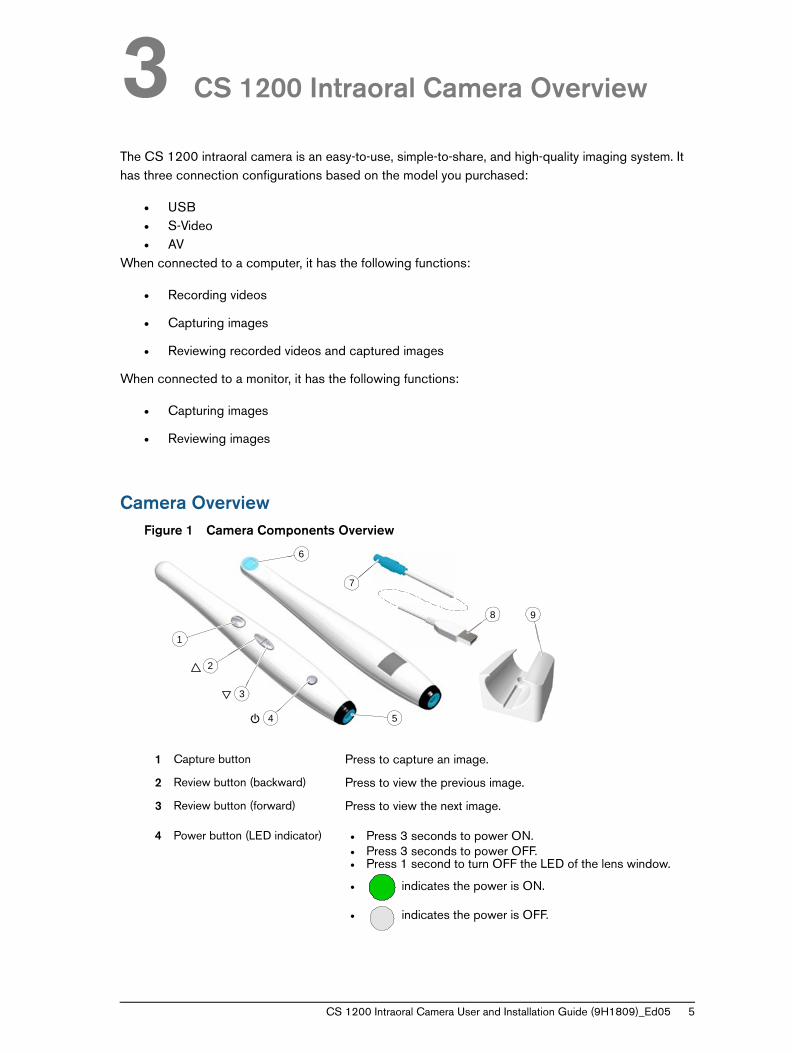
Camera OverviewFigure 1 Camera Components Overview
1 Capture button Press to capture an image.
2 Review button (backward) Press to view the previous image.
3 Review button (forward) Press to view the next image.
4 Power button (LED indicator) • Press 3 seconds to power ON. • Press 3 seconds to power OFF.• Press 1 second to turn OFF the LED of the lens window.
• indicates the power is ON.
• indicates the power is OFF.
1
5
2
6
4
3
7
8 9
CS 1200 Intraoral Camera User and Installation Guide (9H1809)_Ed05 5

5 Cable connection • USB• S-Video• AV
6 Camera lens
7 Push-pull connector
8 USB connector
9 Camera holder
10 Protective sheaths (not pictured)
6 Chapter 3 CS 1200 Intraoral Camera Overview

4 CS 1200 Software Overview
Minimum Computer System RequirementsFor the minimum computer system requirements, see the CS 1200 Safety, Regulatory, and Technical Specifications User Guide.
General Software OverviewThe CS 1200 intraoral imaging system operates with the following software:
• CS Imaging Software
• Imaging software using a TWAIN interface
• CS 1200 Acquisition interface
CS 1200 Acquisition Interface OverviewThe CS 1200 Acquisition interface can acquire, review, and store videos and images of the oral cavity.
Figure 2 Acquisition Interface Overview
1 Title Bar: Displays the patient’s name.
2 Toolbar: See “Toolbar Overview” on page 8.
3 View Screen: Displays live video, selected captured image, or recorded video.
4 Image Gallery: Displays thumbnails of all captured images and recorded videos.
Important: It is MANDATORY to check that your computer system configuration is compatible with the computer system requirements for the CS 1200 software.
1
2
3
4
CS 1200 Intraoral Camera User and Installation Guide (9H1809)_Ed05 7
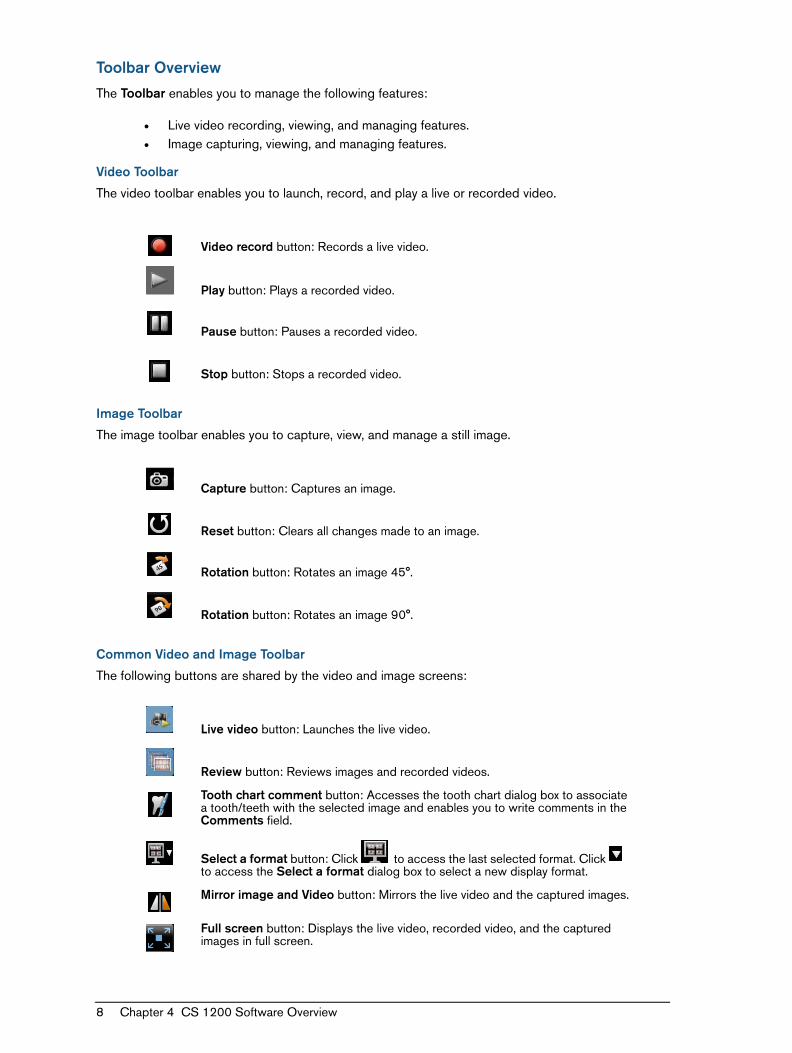
Toolbar Overview
The Toolbar enables you to manage the following features:
• Live video recording, viewing, and managing features.• Image capturing, viewing, and managing features.
Video Toolbar
The video toolbar enables you to launch, record, and play a live or recorded video.
Image Toolbar
The image toolbar enables you to capture, view, and manage a still image.
Common Video and Image Toolbar
The following buttons are shared by the video and image screens:
Video record button: Records a live video.
Play button: Plays a recorded video.
Pause button: Pauses a recorded video.
Stop button: Stops a recorded video.
Capture button: Captures an image.
Reset button: Clears all changes made to an image.
Rotation button: Rotates an image 45°.
Rotation button: Rotates an image 90°.
Live video button: Launches the live video.
Review button: Reviews images and recorded videos.
Tooth chart comment button: Accesses the tooth chart dialog box to associate a tooth/teeth with the selected image and enables you to write comments in the Comments field.
Select a format button: Click to access the last selected format. Click to access the Select a format dialog box to select a new display format.
Mirror image and Video button: Mirrors the live video and the captured images.
Full screen button: Displays the live video, recorded video, and the captured images in full screen.
8 Chapter 4 CS 1200 Software Overview

Image Gallery Toolbar
The image gallery toolbar enables you to manage videos and images displayed in the image gallery.
Monitor Connection Overview
Transfer Toolbar
The transfer toolbar enables you to transfer images from the camera to the Acquisition interface or to the computer. The transfer toolbar displays when the camera supports the monitor connection.
Select Patient Dialog Box
The Select Patient dialog box enables you to transfer images of the selected patient number to the Acquisition interface.
Figure 3 Select Patient Dialog Box
Exit button: Closes the acquisition interface.
USB connection status icon: Displays the camera USB connection status. If the icon is red, the USB is disconnected.
Preference button: Accesses the Preferences dialog box.
Information button: Accesses information on software version, firmware version, and camera serial number.
Online help button: Accesses the online help.
Scroll button: Scrolls images and recorded videos in the image gallery.
Delete button: Deletes selected images and recorded videos.
Delete all button: Deletes all images and recorded videos in the image gallery.
Restore button: Restores the last deleted image or recorded video.
Transfer to ACQ button: Transfers images from the camera to the Acquisition interface.
Transfer to Hard Disk button: Transfers images from the camera to the computer.
CS 1200 Intraoral Camera User and Installation Guide (9H1809)_Ed05 9
Dialog Boxes Overview
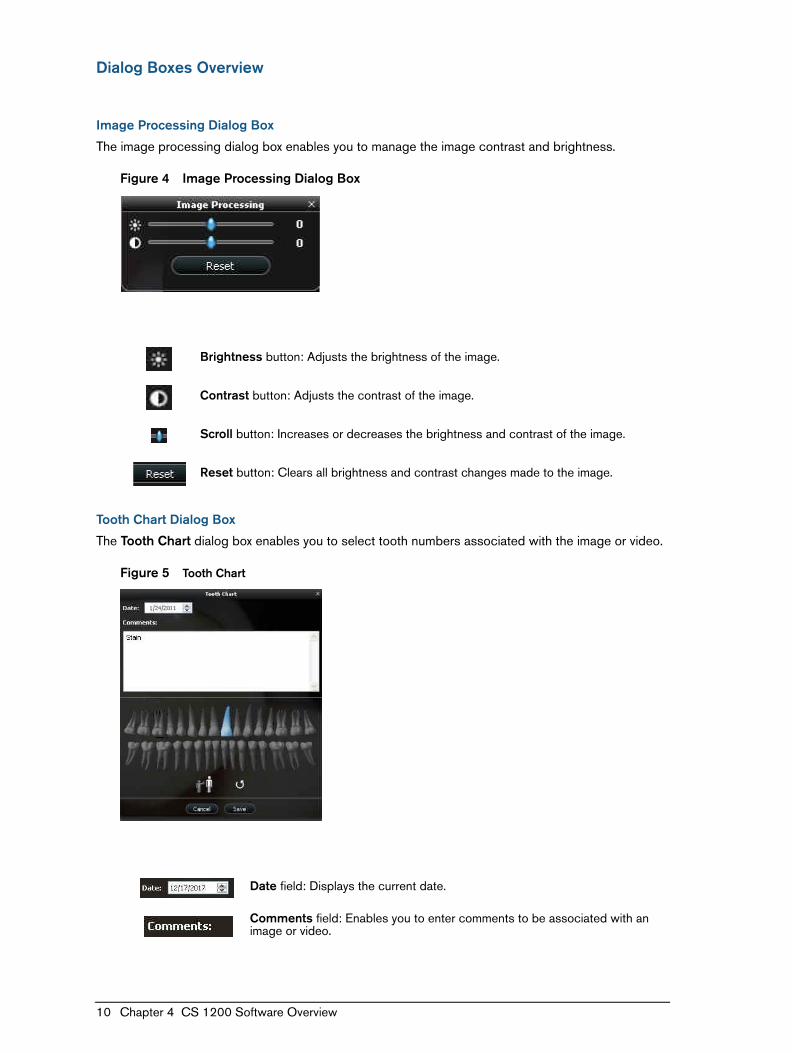
Image Processing Dialog Box
The image processing dialog box enables you to manage the image contrast and brightness.
Figure 4 Image Processing Dialog Box
Tooth Chart Dialog Box
The Tooth Chart dialog box enables you to select tooth numbers associated with the image or video.
Figure 5 Tooth Chart
Brightness button: Adjusts the brightness of the image.
Contrast button: Adjusts the contrast of the image.
Scroll button: Increases or decreases the brightness and contrast of the image.
Reset button: Clears all brightness and contrast changes made to the image.
Date field: Displays the current date.
Comments field: Enables you to enter comments to be associated with an image or video.
10 Chapter 4 CS 1200 Software Overview

Select a Format Dialog Box
The Select a format dialog box enables you to select the display format you want.
Figure 6 Select a Format Dialog Box
Dental arch: Enables tooth selection.
Adult dental arch: Enables tooth selection for an adult.
Child dental arch: Enables tooth selection for a child.
Reset button: Clears all tooth selections.
Cancel button: Cancels all tooth selections.
Save button: Saves tooth selections.
Selections field: Enables you to select the display format you want.
Preview field: Enables you to preview the selected display format.
Cancel button: Cancels the format selection.
Open button: Opens the format selection.
CS 1200 Intraoral Camera User and Installation Guide (9H1809)_Ed05 11
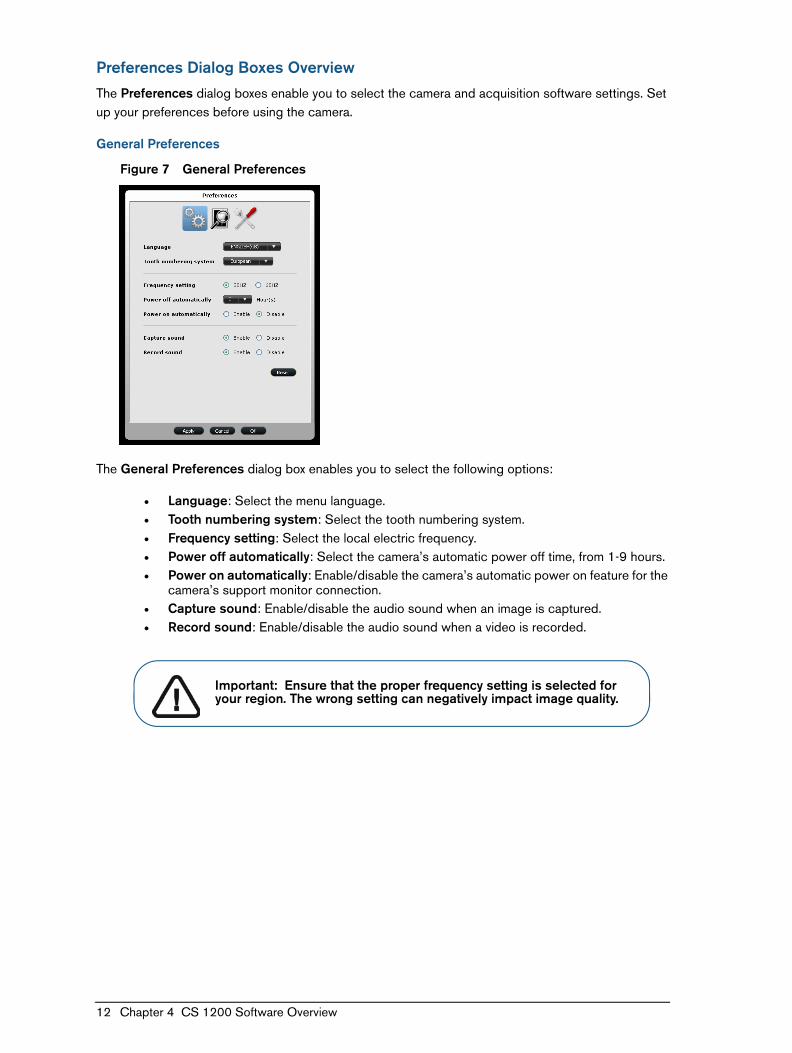
Preferences Dialog Boxes Overview
The Preferences dialog boxes enable you to select the camera and acquisition software settings. Set up your preferences before using the camera.
General Preferences
Figure 7 General Preferences
The General Preferences dialog box enables you to select the following options:
• Language: Select the menu language.• Tooth numbering system: Select the tooth numbering system.• Frequency setting: Select the local electric frequency.• Power off automatically: Select the camera’s automatic power off time, from 1-9 hours.• Power on automatically: Enable/disable the camera’s automatic power on feature for the
camera’s support monitor connection.• Capture sound: Enable/disable the audio sound when an image is captured.• Record sound: Enable/disable the audio sound when a video is recorded.
Important: Ensure that the proper frequency setting is selected for your region. The wrong setting can negatively impact image quality.
12 Chapter 4 CS 1200 Software Overview
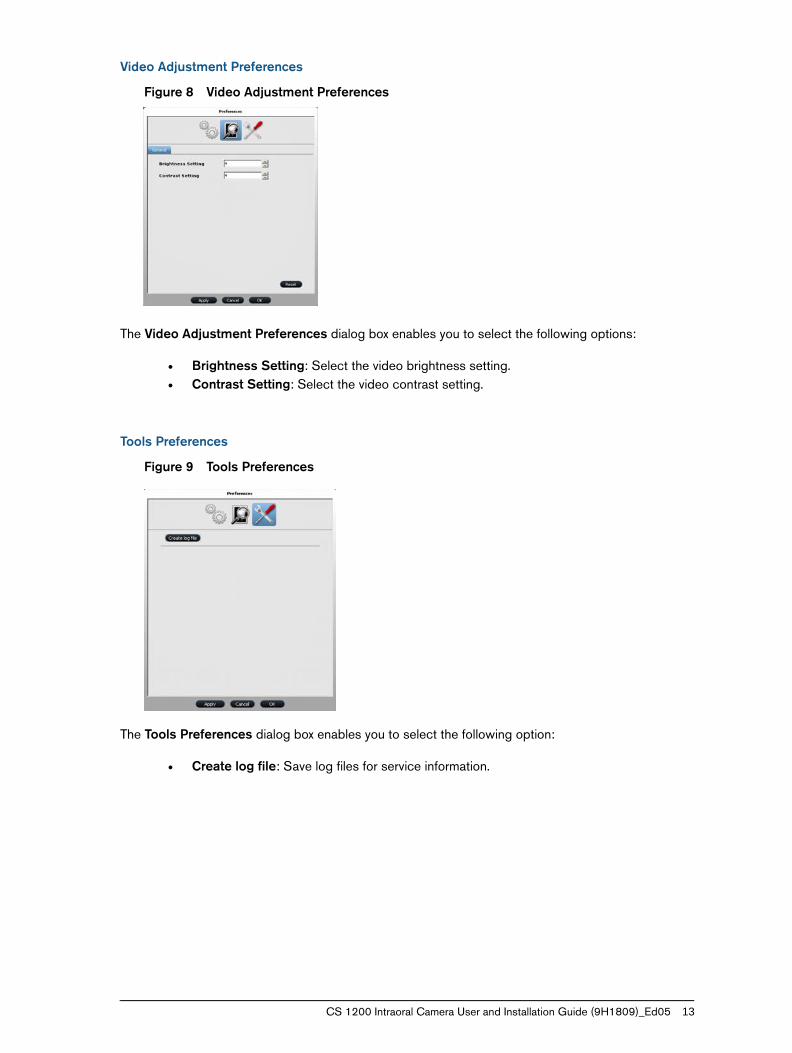
Video Adjustment Preferences
Figure 8 Video Adjustment Preferences
The Video Adjustment Preferences dialog box enables you to select the following options:
• Brightness Setting: Select the video brightness setting.• Contrast Setting: Select the video contrast setting.
Tools Preferences
Figure 9 Tools Preferences
The Tools Preferences dialog box enables you to select the following option:
• Create log file: Save log files for service information.
CS 1200 Intraoral Camera User and Installation Guide (9H1809)_Ed05 13

14 Chapter 4 CS 1200 Software Overview
5 Setting Up the CS 1200 Intraoral Camera
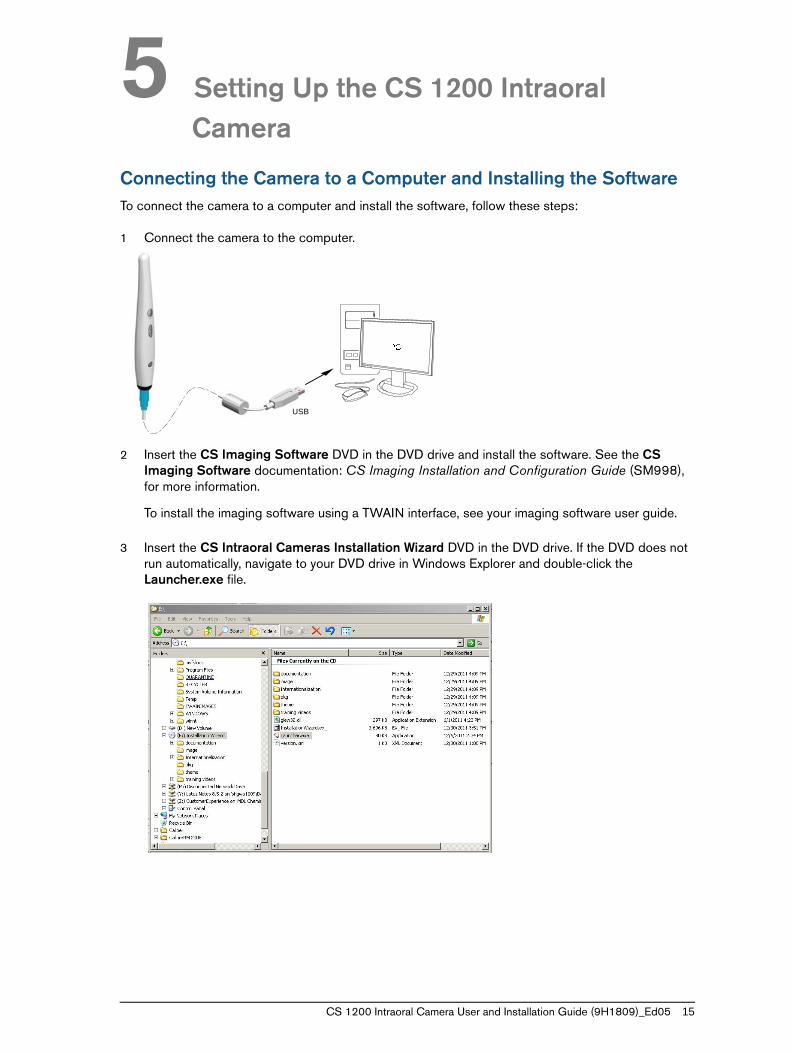
Connecting the Camera to a Computer and Installing the SoftwareTo connect the camera to a computer and install the software, follow these steps:
1 Connect the camera to the computer.
2 Insert the CS Imaging Software DVD in the DVD drive and install the software. See the CS Imaging Software documentation: CS Imaging Installation and Configuration Guide (SM998), for more information.
To install the imaging software using a TWAIN interface, see your imaging software user guide.
3 Insert the CS Intraoral Cameras Installation Wizard DVD in the DVD drive. If the DVD does not run automatically, navigate to your DVD drive in Windows Explorer and double-click the Launcher.exe file.
USB
CS 1200 Intraoral Camera User and Installation Guide (9H1809)_Ed05 15

4 Follow the on-screen instructions to install the Acquisition interface and set up the camera.
A prompt asking you if you want to install the software might display.
Check Always trust software from “Carestream Health” and click Install.
Connecting the Camera to a MonitorTo connect the camera to a monitor, follow the instructions in the figures below.
S-Video Connection
AV Connection
AC/DC
AC/DC
Important: Isolate mains power by unplugging the power adapter.
16 Chapter 5 Setting Up the CS 1200 Intraoral Camera
Installing the Camera Holder
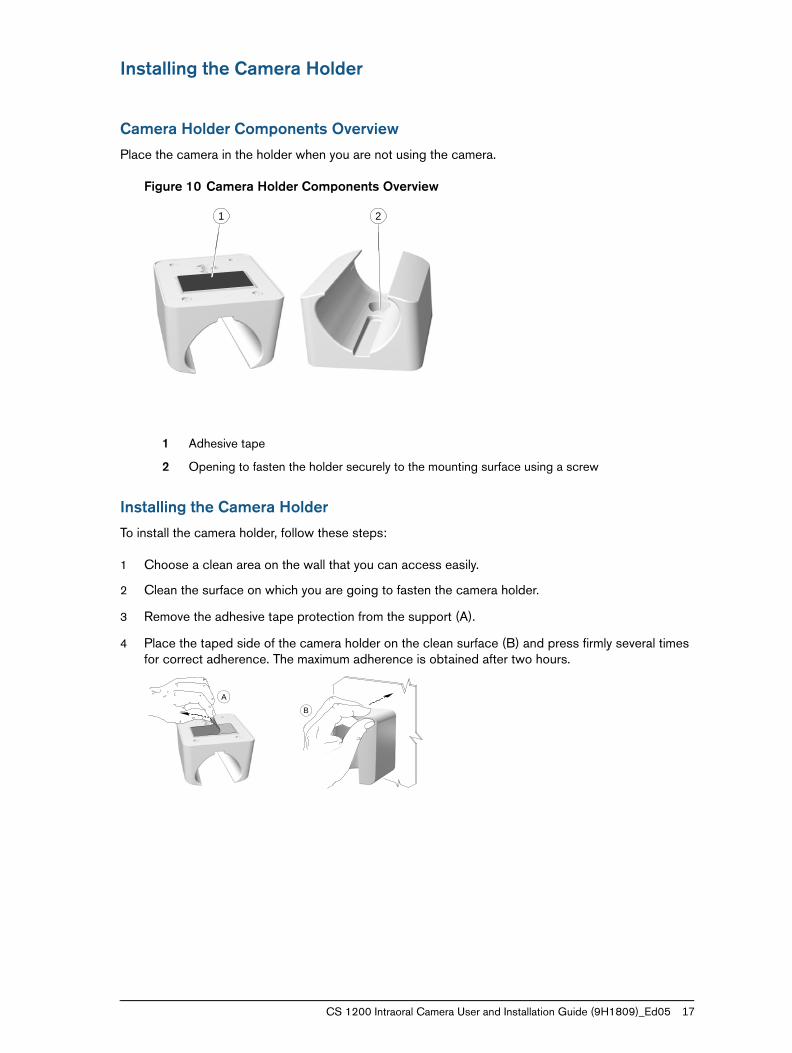
Camera Holder Components Overview
Place the camera in the holder when you are not using the camera.
Figure 10 Camera Holder Components Overview
Installing the Camera Holder
To install the camera holder, follow these steps:
1 Choose a clean area on the wall that you can access easily.
2 Clean the surface on which you are going to fasten the camera holder.
3 Remove the adhesive tape protection from the support (A).
4 Place the taped side of the camera holder on the clean surface (B) and press firmly several times for correct adherence. The maximum adherence is obtained after two hours.
1 Adhesive tape
2 Opening to fasten the holder securely to the mounting surface using a screw
1 2
A
B
CS 1200 Intraoral Camera User and Installation Guide (9H1809)_Ed05 17

5 For places on which you cannot use the adhesive tape, insert a screw through the appropriate hole in the camera holder to affix it to a solid surface.
Important: You must avoid all stress on the camera holder during the first 2 hours.
Important: Adhesive tape can lose its adherence capability due to environmental and other factors. Check the adherence regularly to ensure that it is secure.
Important: Carestream Health is not responsible for accidents involving the camera falling due to loosening of the adhesive tape.
Note: The camera automatically goes into sleep mode when inserted into the camera holder or left idle for 1.5 minutes. To use it again, pick it up or press the Capture button.
Note: When the camera is idle for more than 3 hours (default), it powers off. To change the default automatic power-off time, see “General Preferences” on page 12.
x1
x1
18 Chapter 5 Setting Up the CS 1200 Intraoral Camera

6 Getting Started
Accessing the Acquisition InterfaceTo access the Acquisition interface, follow these steps:
1 In the Imaging window:
• If you installed only the CS 1200 or you have installed the CS 1500 and/or CS 1600 camera
before the CS 1200, click or .
• If you have installed a K 1000 camera before the CS 1200, click the arrow button on or
, and select the CS 1200 camera from the drop-down list.
The Acquisition interface is displayed.
2 Select your preference settings.
Setting Up PreferencesSet up your preferences before using the camera. To set up the preferences, follow these steps:
1 On the Acquisition interface, click . The Preferences dialog box is displayed.
2 Click to set the General preferences.
3 Click to set the Video Adjustment preferences.
4 Click to set the Tools preferences.
You can now capture images or record videos.
Using the Imaging Software with TWAIN
Starting the Imaging Software
To acquire an image using imaging software via TWAIN, follow these steps:
1 From your imaging software, such as Photoshop, open the TWAIN interface.
For example, in Photoshop, go to Import > Select Source.
CS 1200 Intraoral Camera User and Installation Guide (9H1809)_Ed05 19
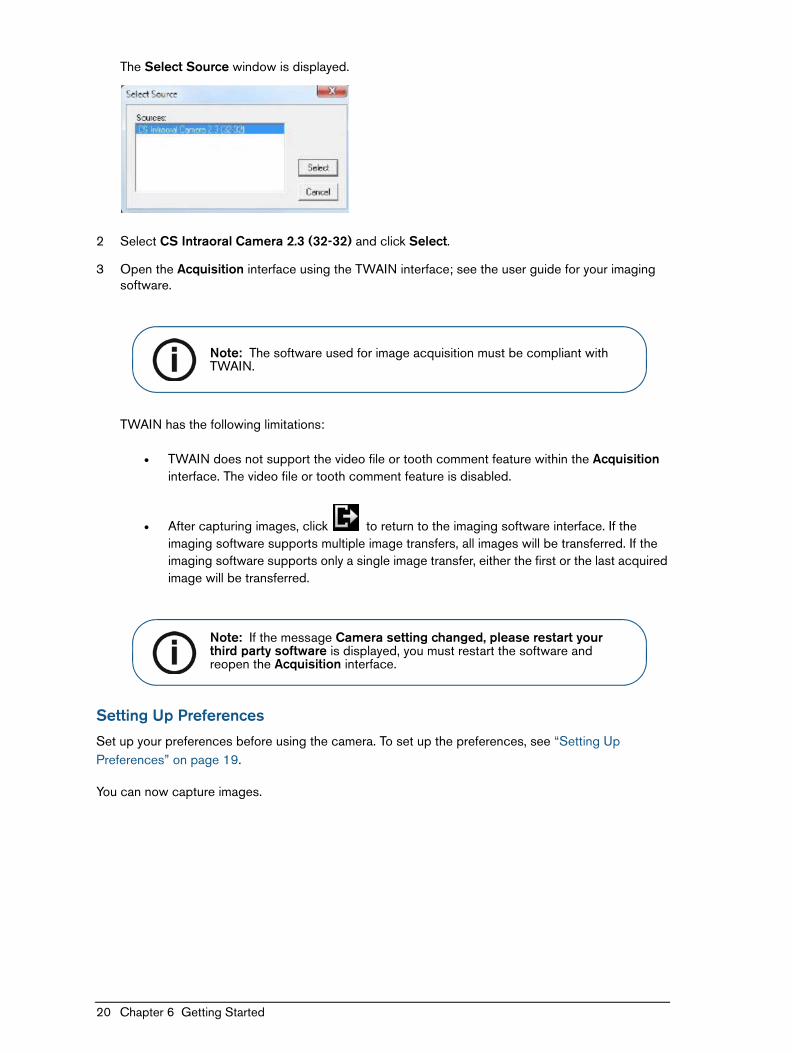
The Select Source window is displayed.
2 Select CS Intraoral Camera 2.3 (32-32) and click Select.
3 Open the Acquisition interface using the TWAIN interface; see the user guide for your imaging software.
TWAIN has the following limitations:
• TWAIN does not support the video file or tooth comment feature within the Acquisition interface. The video file or tooth comment feature is disabled.
• After capturing images, click to return to the imaging software interface. If the imaging software supports multiple image transfers, all images will be transferred. If the imaging software supports only a single image transfer, either the first or the last acquired image will be transferred.
Setting Up Preferences
Set up your preferences before using the camera. To set up the preferences, see “Setting Up Preferences” on page 19.
You can now capture images.
Note: The software used for image acquisition must be compliant with TWAIN.
Note: If the message Camera setting changed, please restart your third party software is displayed, you must restart the software and reopen the Acquisition interface.
20 Chapter 6 Getting Started

7 Recording Video and Capturing Images on a Computer
Preparing for Acquisition
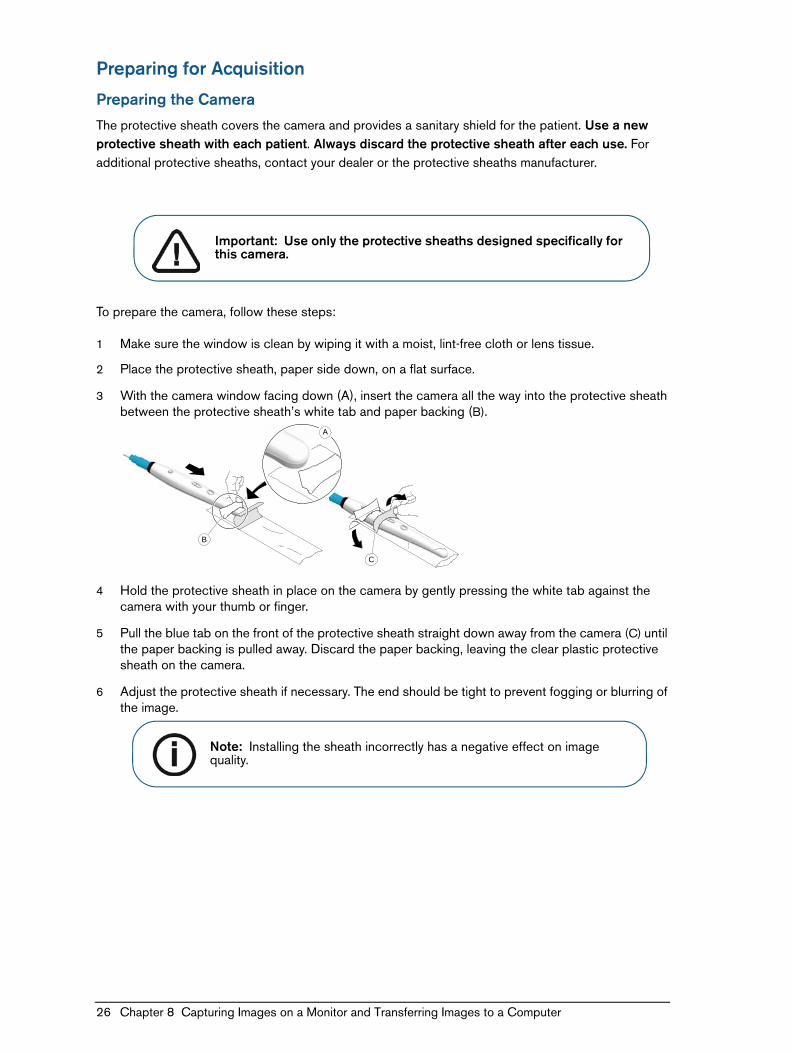
Preparing the Camera
The protective sheath covers the camera and provides a sanitary shield for the patient. Use a new protective sheath with each patient. Always discard the protective sheath after each use. For additional protective sheaths, contact your dealer or the protective sheaths manufacturer.
To prepare the camera, follow these steps:
1 Make sure the window is clean by wiping it with a moist, lint-free cloth or lens tissue.
2 Place the protective sheath, paper side down, on a flat surface.
3 With the camera window facing down (A), insert the camera all the way into the protective sheath between the protective sheath’s white tab and paper backing (B).
4 Hold the protective sheath in place on the camera by gently pressing the white tab against the camera with your thumb or finger.
5 Pull the blue tab on the front of the protective sheath straight down away from the camera (C) until the paper backing is pulled away. Discard the paper backing, leaving the clear plastic protective sheath on the camera.
6 Adjust the protective sheath if necessary. The end should be tight to prevent fogging or blurring of the image.
Important: Use only the protective sheaths designed specifically for this camera.
A
B
C
Note: Installing the sheath incorrectly has a negative effect on image quality.
CS 1200 Intraoral Camera User and Installation Guide (9H1809)_Ed05 21

Acquiring Live Video or Images
Accessing the Acquisition Interface
To access the Acquisition interface:
• If you use CS Imaging Software, click or in the Imaging window and select your
camera.
• If you use imaging software via a TWAIN interface, see the user guide of your imaging software for details on opening the Acquisition interface.
Recording or Viewing a Video
To record or view a video, follow these steps:
1 Press the ON/OFF button 3 seconds to power on the camera.
2 Hold the camera over the area you want to view. Live video appears on the Preview screen.
3 To record the video, on the Acquisition interface, click to record and click again to stop the recording.
The video recording is displayed on the Preview screen of the Acquisition interface.
4 Use the video toolbar to view the recorded video (see “Video Toolbar” on page 8).
5 Use the image gallery toolbar to scroll through, save, or delete the recorded video (see “Image Gallery Toolbar” on page 9).
22 Chapter 7 Recording Video and Capturing Images on a Computer

6 Click to close the Acquisition interface and return to the imaging software interface. The
recorded video is saved and displayed in the Patient history.
7 Remove and dispose of the protective sheath.
Capturing and Viewing Images
To capture or view an image, follow these steps:
1 Press the ON/OFF button 3 seconds to power on the camera.
2 Hold the camera over the area you want to view. Live video appears on the Preview screen.
3 To capture an image, do one of the following:
• Press the Capture button on the camera.
OR
• Click on the Acquisition interface.
The image is displayed on the Review screen of the Acquisition interface.
4 Click to access the Tooth Chart dialog box, select the relevant tooth, and type comments in
the Comments field (see “Tooth Chart Dialog Box” on page 10).
The selected images are displayed and saved temporarily in the image gallery.
5 Use the toolbar to view the image (see “Image Toolbar” on page 8).
CS 1200 Intraoral Camera User and Installation Guide (9H1809)_Ed05 23

6 Press the Review button on the camera to review the images.
OR
Use the image gallery toolbar to scroll through, save, or delete the images (see “Image Gallery
Toolbar” on page 9).
7 Click to close the Acquisition interface.
The images are saved and displayed in the Patient history.
8 Remove and dispose of the protective sheath.
Note: The camera automatically goes into sleep mode when inserted into the camera holder or left idle for 1.5 minutes. To use it again, pick it up or press the Capture button.
Note: When the camera is idle for more than 3 hours (default), it powers off. To change the default automatic power-off time, see “General Preferences” on page 12.
24 Chapter 7 Recording Video and Capturing Images on a Computer
8 Capturing Images on a Monitor and Transferring Images to a Computer
Monitor Interface Overview
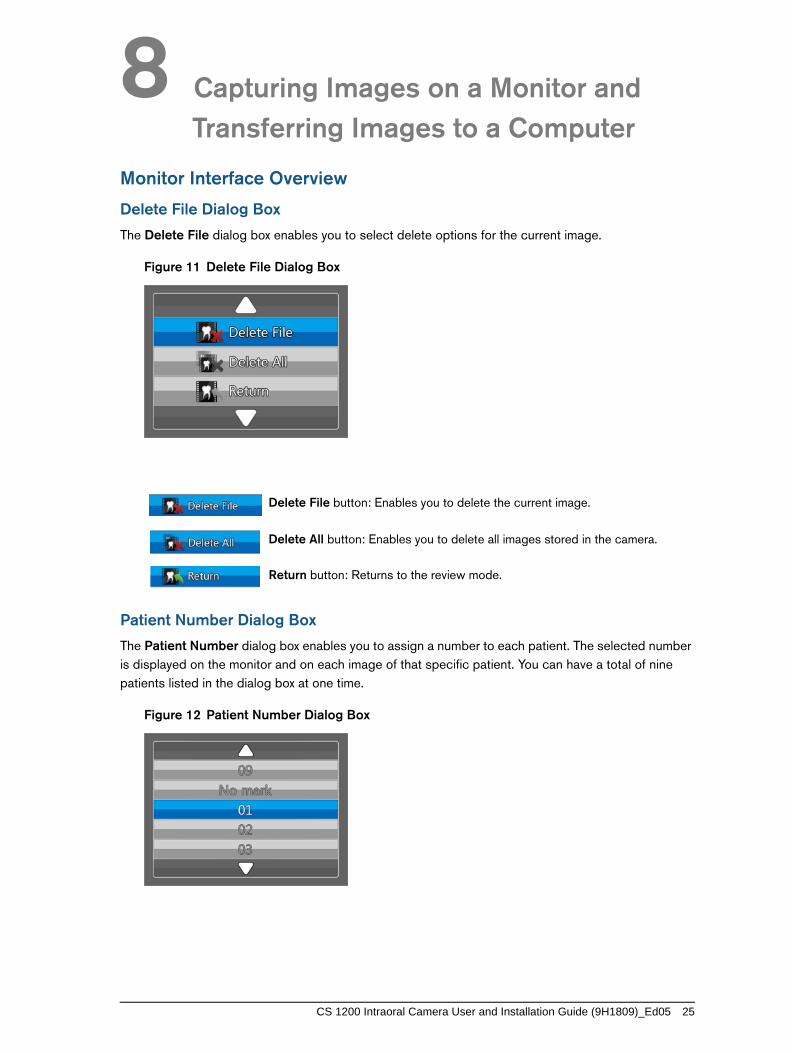
Delete File Dialog Box
The Delete File dialog box enables you to select delete options for the current image.
Figure 11 Delete File Dialog Box
Patient Number Dialog Box
The Patient Number dialog box enables you to assign a number to each patient. The selected number is displayed on the monitor and on each image of that specific patient. You can have a total of nine patients listed in the dialog box at one time.
Figure 12 Patient Number Dialog Box
Delete File button: Enables you to delete the current image.
Delete All button: Enables you to delete all images stored in the camera.
Return button: Returns to the review mode.
CS 1200 Intraoral Camera User and Installation Guide (9H1809)_Ed05 25
Preparing for Acquisition
Preparing the Camera
The protective sheath covers the camera and provides a sanitary shield for the patient. Use a new protective sheath with each patient. Always discard the protective sheath after each use. For additional protective sheaths, contact your dealer or the protective sheaths manufacturer.
To prepare the camera, follow these steps:
1 Make sure the window is clean by wiping it with a moist, lint-free cloth or lens tissue.
2 Place the protective sheath, paper side down, on a flat surface.
3 With the camera window facing down (A), insert the camera all the way into the protective sheath between the protective sheath’s white tab and paper backing (B).
4 Hold the protective sheath in place on the camera by gently pressing the white tab against the camera with your thumb or finger.
5 Pull the blue tab on the front of the protective sheath straight down away from the camera (C) until the paper backing is pulled away. Discard the paper backing, leaving the clear plastic protective sheath on the camera.
6 Adjust the protective sheath if necessary. The end should be tight to prevent fogging or blurring of the image.
Important: Use only the protective sheaths designed specifically for this camera.
A
B
C
Note: Installing the sheath incorrectly has a negative effect on image quality.
26 Chapter 8 Capturing Images on a Monitor and Transferring Images to a Computer
Capturing, Viewing, and Deleting Images
Assigning a Number to a Patient
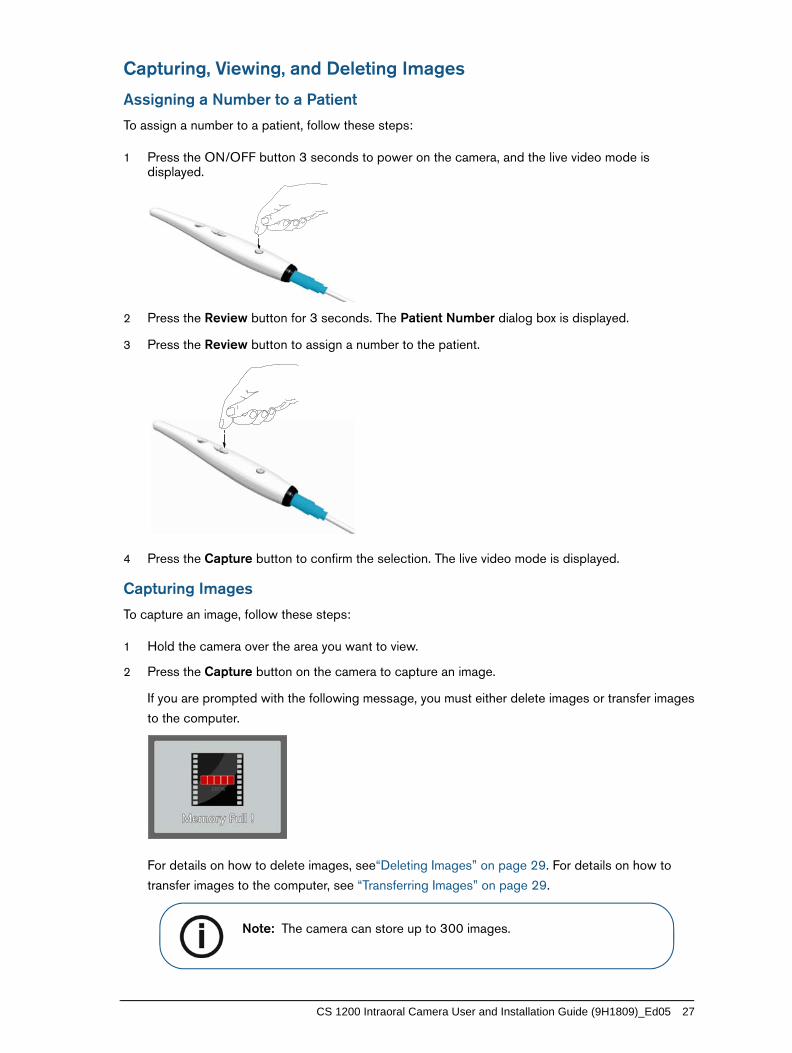
To assign a number to a patient, follow these steps:
1 Press the ON/OFF button 3 seconds to power on the camera, and the live video mode is displayed.
2 Press the Review button for 3 seconds. The Patient Number dialog box is displayed.
3 Press the Review button to assign a number to the patient.
4 Press the Capture button to confirm the selection. The live video mode is displayed.
Capturing Images
To capture an image, follow these steps:
1 Hold the camera over the area you want to view.
2 Press the Capture button on the camera to capture an image.
If you are prompted with the following message, you must either delete images or transfer images
to the computer.
For details on how to delete images, see“Deleting Images” on page 29. For details on how to
transfer images to the computer, see “Transferring Images” on page 29.
Note: The camera can store up to 300 images.
CS 1200 Intraoral Camera User and Installation Guide (9H1809)_Ed05 27
3 Remove and dispose of the protective sheath when you have finished with the current patient.
Viewing Images
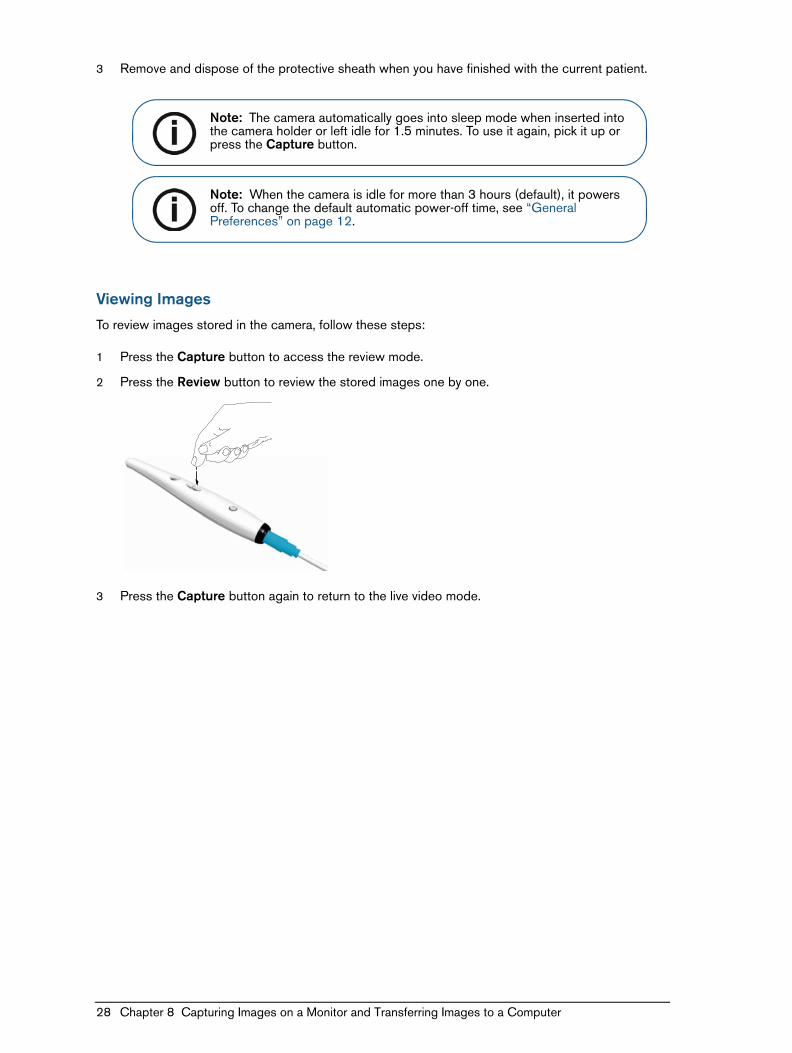
To review images stored in the camera, follow these steps:
1 Press the Capture button to access the review mode.
2 Press the Review button to review the stored images one by one.
3 Press the Capture button again to return to the live video mode.
Note: The camera automatically goes into sleep mode when inserted into the camera holder or left idle for 1.5 minutes. To use it again, pick it up or press the Capture button.
Note: When the camera is idle for more than 3 hours (default), it powers off. To change the default automatic power-off time, see “General Preferences” on page 12.
28 Chapter 8 Capturing Images on a Monitor and Transferring Images to a Computer
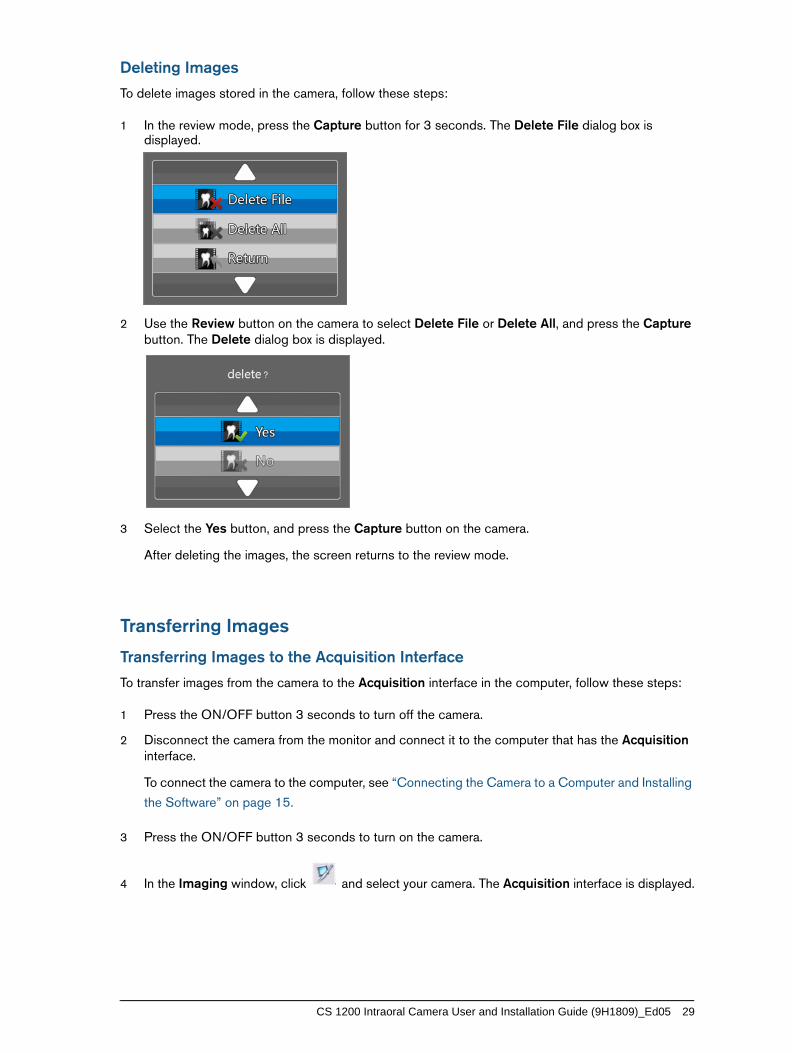
Deleting Images
To delete images stored in the camera, follow these steps:
1 In the review mode, press the Capture button for 3 seconds. The Delete File dialog box is displayed.
2 Use the Review button on the camera to select Delete File or Delete All, and press the Capture button. The Delete dialog box is displayed.
3 Select the Yes button, and press the Capture button on the camera.
After deleting the images, the screen returns to the review mode.
Transferring Images
Transferring Images to the Acquisition Interface
To transfer images from the camera to the Acquisition interface in the computer, follow these steps:
1 Press the ON/OFF button 3 seconds to turn off the camera.
2 Disconnect the camera from the monitor and connect it to the computer that has the Acquisition interface.
To connect the camera to the computer, see “Connecting the Camera to a Computer and Installing
the Software” on page 15.
3 Press the ON/OFF button 3 seconds to turn on the camera.
4 In the Imaging window, click and select your camera. The Acquisition interface is displayed.
CS 1200 Intraoral Camera User and Installation Guide (9H1809)_Ed05 29
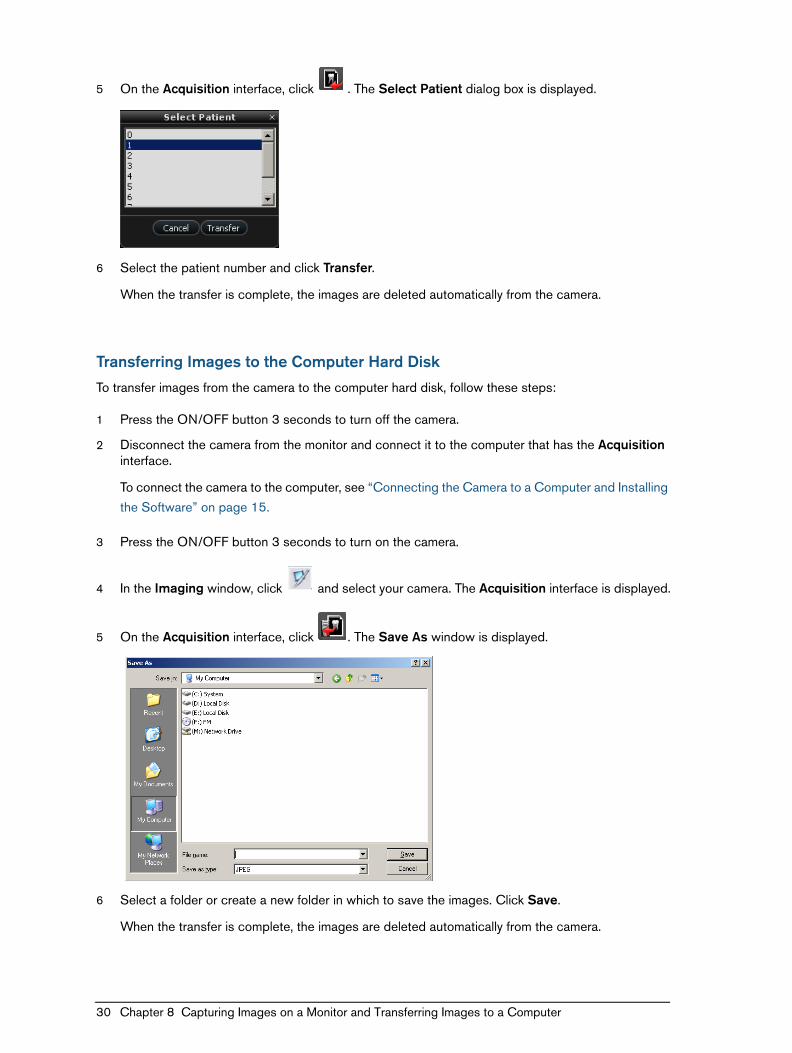
5 On the Acquisition interface, click . The Select Patient dialog box is displayed.
6 Select the patient number and click Transfer.
When the transfer is complete, the images are deleted automatically from the camera.
Transferring Images to the Computer Hard Disk
To transfer images from the camera to the computer hard disk, follow these steps:
1 Press the ON/OFF button 3 seconds to turn off the camera.
2 Disconnect the camera from the monitor and connect it to the computer that has the Acquisition interface.
To connect the camera to the computer, see “Connecting the Camera to a Computer and Installing
the Software” on page 15.
3 Press the ON/OFF button 3 seconds to turn on the camera.
4 In the Imaging window, click and select your camera. The Acquisition interface is displayed.
5 On the Acquisition interface, click . The Save As window is displayed.
6 Select a folder or create a new folder in which to save the images. Click Save.
When the transfer is complete, the images are deleted automatically from the camera.
30 Chapter 8 Capturing Images on a Monitor and Transferring Images to a Computer
9 Maintenance
Cleaning and Disinfecting the CameraYou must clean and disinfect the camera and accessories regularly.
The camera is not delivered in disinfected condition. To ensure maximum hygienic safety for the patient, carefully follow the instructions to disinfect the camera before use.
Important: For information on cleaning and disinfecting, see the Safety, Regulatory, and Technical Specifications User Guide.
CS 1200 Intraoral Camera User and Installation Guide (9H1809)_Ed05 31

32 Chapter 9 Maintenance
10 Troubleshooting
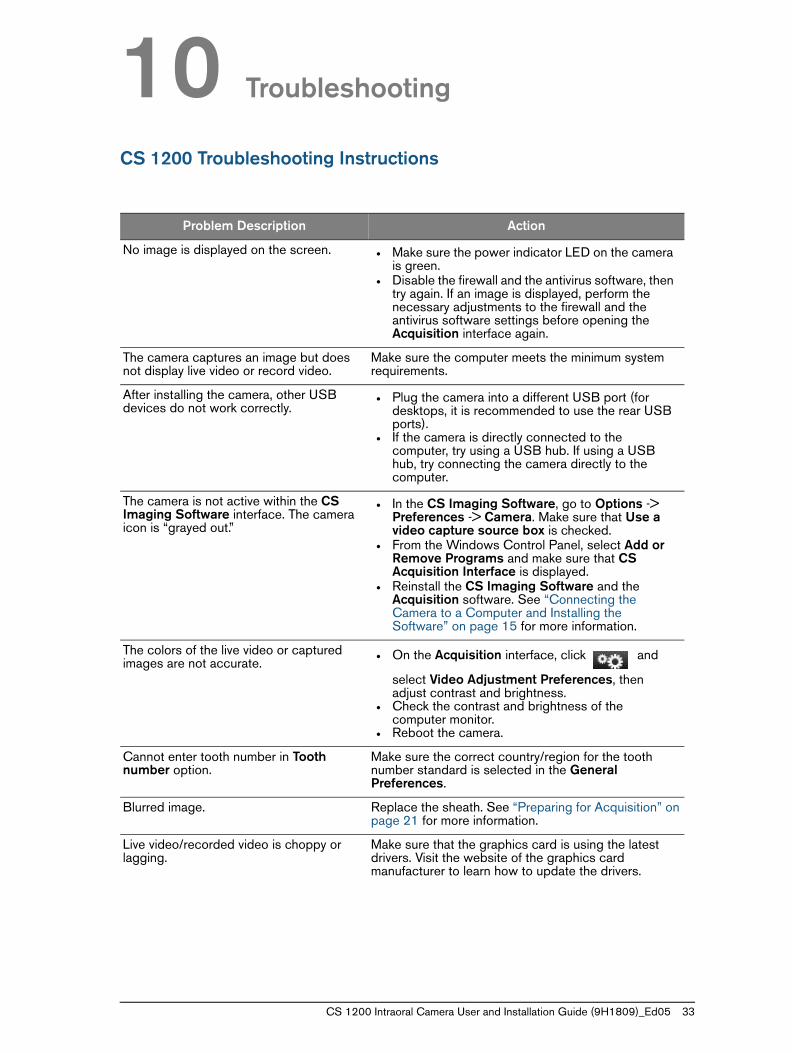
CS 1200 Troubleshooting Instructions
Problem Description Action
No image is displayed on the screen. • Make sure the power indicator LED on the camera is green.
• Disable the firewall and the antivirus software, then try again. If an image is displayed, perform the necessary adjustments to the firewall and the antivirus software settings before opening the Acquisition interface again.
The camera captures an image but does not display live video or record video.
Make sure the computer meets the minimum system requirements.
After installing the camera, other USB devices do not work correctly.
• Plug the camera into a different USB port (for desktops, it is recommended to use the rear USB ports).
• If the camera is directly connected to the computer, try using a USB hub. If using a USB hub, try connecting the camera directly to the computer.
The camera is not active within the CS Imaging Software interface. The camera icon is “grayed out.”
• In the CS Imaging Software, go to Options -> Preferences -> Camera. Make sure that Use a video capture source box is checked.
• From the Windows Control Panel, select Add or Remove Programs and make sure that CS Acquisition Interface is displayed.
• Reinstall the CS Imaging Software and the Acquisition software. See “Connecting the Camera to a Computer and Installing the Software” on page 15 for more information.
The colors of the live video or captured images are not accurate.
• On the Acquisition interface, click and
select Video Adjustment Preferences, then adjust contrast and brightness.
• Check the contrast and brightness of the computer monitor.
• Reboot the camera.
Cannot enter tooth number in Tooth number option.
Make sure the correct country/region for the tooth number standard is selected in the General Preferences.
Blurred image. Replace the sheath. See “Preparing for Acquisition” on page 21 for more information.
Live video/recorded video is choppy or lagging.
Make sure that the graphics card is using the latest drivers. Visit the website of the graphics card manufacturer to learn how to update the drivers.
CS 1200 Intraoral Camera User and Installation Guide (9H1809)_Ed05 33

Glitches with the display in Windows Vista or 7. For example, a "picture in picture" effect in live video or a flashing screen when dragging windows within the Acquisition window.
• Click Start-->Control Panel (View by Large Icons)-->Performance Information and Tools, and select Re-run the assessment to refresh the rating score.
• Make sure that the graphics card is using the latest drivers. Visit the website of the graphics card manufacturer to learn how to update the drivers.
Connection failure between the camera and the computer after computer standby. Reboot the camera and the Acquisition interface.
For the monitor configuration, images cannot be found in drive C:\ after they are exported to the disk from the camera.
The transferred images are saved in folder C:\Users\<user account>\AppData\ Local\VirtualStore. This folder is hidden by default. Change the default setting for the hidden folders in your Windows operating system.
Tooth comments cannot be displayed correctly after they are exported to the CS Imaging Software.
Make sure that the language used for the tooth comments is the same as the language option in the CS Imaging Software.
Firmware upgrade fails when the Acquisition interface is opened. Run your imaging software as an administrator.
Problem Description Action
34 Chapter 10 Troubleshooting
11 Contact Information
Manufacturer’s Address
Authorized RepresentativesAuthorized Representative in the European Community
Carestream Health France 1, rue Galilée93192 Noisy-Le-Grand Cedex, France
Importer for European Union
Carestream Health Netherlands B.V.Bramenberg 123755 BZ EemnesThe Netherlands
Representante no Brasil Carestream do Brasil Comércio e Serviços de Produtos MédicosLtda.
Rua Pequetita, 215 cjs. 31 E 32 Edifício Atrium VII - Vila OlímpiaSão Paulo - BrazilCEP (Zip code): 04552-060
Carestream Health, Inc.150 Verona StreetRochester, NY USA 14608
EC REP
CS 1200 Intraoral Camera User and Installation Guide (9H1809)_Ed05 35

9H1809 Ed05 2017-04
CS
1200
User and Installation Guide
CS 1200
User and Installation G
uide
nfeedback
Carestream DentalA Division of Carestream Health, Inc.150 Verona St.Rochester, NY 14608USA
©Carestream Health, Inc., 2011.The Kodak trademark and trade dress are used under license from Kodak.
For more information, visit: www.carestreamdental.com To give documentation feedback, visit: www.carestreamdental.com/documentatio