uputstvo za upotrebu operation manual sewing machine maŠina za Šivenje za... · ventilacione...
TRANSCRIPT
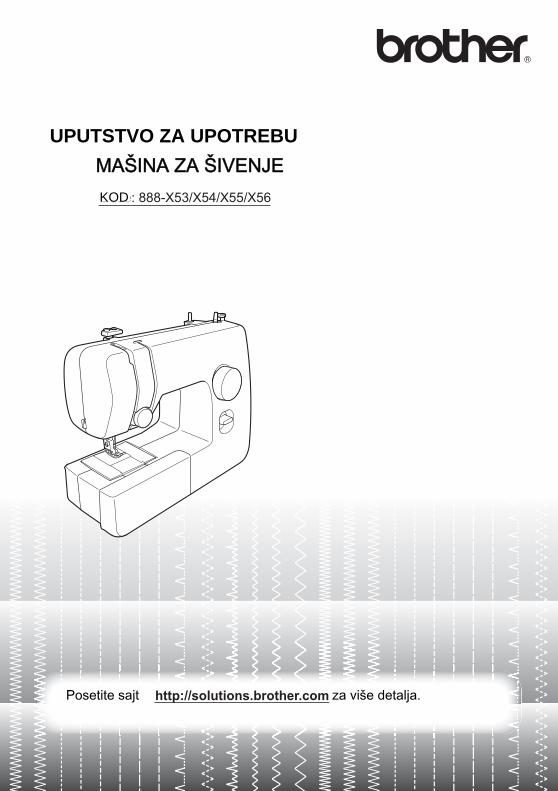
Operation ManualProduct Code: 888-X53/X54/X55/X56Sewing Machine
Please visit us at http://solutions.brother.com where you can get product support and answers to frequently asked questions (FAQs).
UPUTSTVO ZA UPOTREBU
MAŠINA ZA ŠIVENJEKOD
Posetite sajt za više detalja.
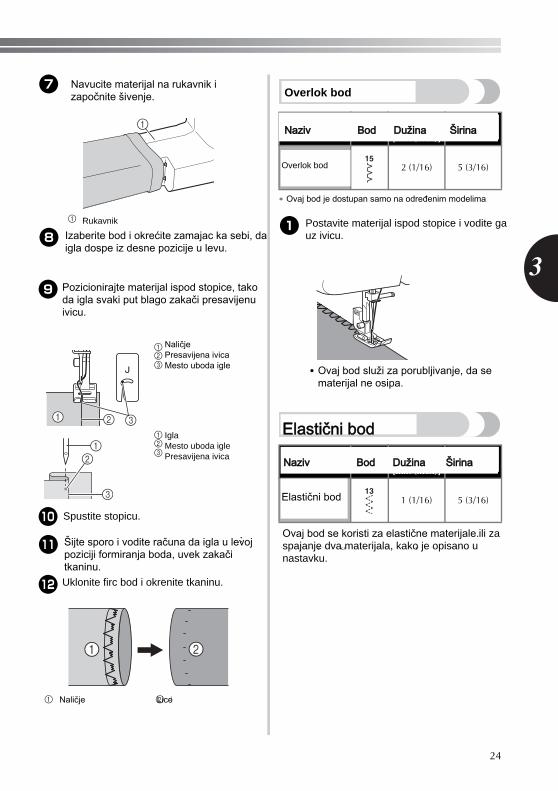
————————————————————————————————————————————————————————————————————————————————————————————————————————————————————————————————————————————————————————————————————————————————————————————————————————————————————————————————————————————————————————————————————————————
1
IMPORTANT SAFETY INSTRUCTIONS
Please read these safety instructions before attempting to use the machine.
DANGER - To reduce the risk of electric shock:
1 Always unplug the machine from the electrical outlet immediately after using, when cleaning, when making any user servicing adjustments mentioned in this manual, or if you are leaving the machine unattended.
WARNING - To reduce the risk of burns, fire, electric shock, or injury to persons.
2 Always unplug the machine from the electrical outlet when making any adjustments mentioned in the instruction manual:• To unplug the machine, switch the
machine to the symbol “O” position to turn it off, then grasp the plug and pull it out of the electrical outlet. Do not pull on the cord.
• Plug the machine directly into the electrical outlet. Do not use an extension cord.
• Always unplug your machine if the power is cut.
3 Never operate this machine if it has a damaged cord or plug, if it is not working properly, if it has been dropped or damaged, or water is spilled on the unit. Return the machine to the nearest authorized dealer or service center for examination, repair, electrical or mechanical adjustment.• While the machine is stored or in use
if you notice anything unusual, such as an odor, heat, discoloration or deformation, stop using the machine
and immediately unplug the power cord.
• When transporting the machine, be sure to carry it by its handle. Lifting the machine by any other part may damage the machine or result in the machine falling, which could cause injuries.
• When lifting the machine, be careful not to make any sudden or careless movements, otherwise you may injure your back or knees.
4 Always keep your work area clear:• Never operate the machine with any
air openings blocked. Keep ventilation openings of the machine and foot control free from the build up of lint, dust, and loose cloth.
• Do not store objects on the foot controller.
• Do not use extension cords. Plug the machine directly into the electrical outlet.
• Never drop or insert any object into any opening.
• Do not operate where aerosol (spray) products are being used or where oxygen is being administered.
• Do not use the machine near a heat source, such as a stove or iron; otherwise, the machine, power cord or garment being sewn may ignite, resulting in fire or an electric shock.
• Do not place this machine on an unstable surface, such as an unsteady or slanted table, otherwise the machine may fall, resulting in injuries.
5 Special care is required when sewing:• Always pay close attention to the
needle. Do not use bent or damaged needles.
VAŽNA SIGURNOSNA UPUTSTVA
Molimo Vas da pročitate sigurnosne instrukcije pre upotrebe ove mašine.
OPASNO - Da smanjite rizik od elektro šoka:
Uvek Isključite mašinu iz dovoda električne energije kada nije u upotrebi,pre čišcenja ili kada vršite bilo kakvo podešavanje, a koje je kao takvo navedeno u ovom uputstvu, ili ako je mašina van nadzora.
UPOZORENJE - Da smanjite rizik od opekotina, vatre, elektro šokova ili povreda korisnika:
Uvek isključite mašinu iz dovoda za napajanje električnom energijom kada uklanjate poklopce, podmazujete ili vršite bilo kakvo podešavanje,a koje je kao takvo, navedeno u ovom uputstvu:• Da isključite mašinu,pritisnite prekidač na mašini na “O” poziciju, prihvatite utičnicu i povucite je iz dovoda za napajanje električnom energijom. Nikada NE vucite kabl.• Mašinu uvek direktno povezujte u dovod električne energije. Nikada ne koristite produžne kablove.• Uvek isključite mašinu ako je došlo do nestanka električne energije tj. napajanja. Nikada ne koristite ovu mašinu ako su oštećeni kabl ili utičnica, ako ne radi pravilno, ako je padala ili je oštećena,ako je bila u dodiru sa vodom. Odnesite mašinu kod najbližeg ovlašćenog prodavca ili u servisni centar radi ispitivanja, popravke, električnog ili mehaničkog podešavanja. Dok je mašina odložena ili je u upotrebi a primetite nešto neobično, miris, zagrevanje, promenu boje ili deformaciju,prekinite sa upotrebom odmah i isključite je iz dovoda za napajanje.
Kada transportujete mašinu, budite sigurni da je držite za ručku. Držanje mašine za bilo koji drugi deo može dovesti do njenog oštećenja ili pada, ali i povređivanja.Kada nosite mašinu,pazite da ne pravite nepredviđene ili nepažljive pokrete, u suprotnommožete povrediti svoja leđa ili kolena.
Uvek održavajte svoju radnu površinu čistom :• Nikada ne koristite mašinu ako je bilo koji ventilacioni otvor blokiran. Održavajte ventilacione otvore mašine za šivenje i pedale uvek slobodnim od skupljanja prašine, prljavštine ili ostataka tkanine.• Ne stavljajte nikakve predmete na pedalu.• Ne koristite produžne kablove. Povežite mašinu direktno u dovod električne energije.• Ne bacajte i ne ubacujte bilo kakav predmet u bilo koji otvor mašine.• Ne koristite mašinu gde postoji velika koncentracija kiseonika i gde se koriste aerosolna sredstva (sprejevi).• Ne koristite mašinu blizu izvora toplote, poput peći ili pegle; u suprotnom, kabl mašine ili tkanina koju šijete može da se zapali, izazivajući požar ili elektro šok.• Ne stavljajte mašinu na nestabilno postolje,kao sto je nestabilan sto ilipostolje,u suprotnom mašina može pasti i dovesti do povređivanja.
Specijalna pažnja je neophodna :• Uvek obratite dobro pažnju na iglu.Ne koristite tupe ili oštećene igle.
2
————————————————————————————————————————————————————————————————————————————————————————————————————————————————————————————————————————————————————————————————————————————————————————————————————————————————————————————————————————————————————————————————————————————————————
• Keep fingers away from all moving parts. Special care is required around the machine needle.
• Do not turn on the machine while pressing down the foot controller. The machine may start unexpectedly and cause personal injury or damage to the machine.
• Switch the machine to the symbol “O” position to turn it off when making any adjustments in the needle area.
• Do not use a damaged or incorrect needle plate, as it could cause the needle to break.
• Do not push or pull the fabric when sewing, and follow careful instruction when freehand stitching so that you do not deflect the needle and cause it to break.
6 This machine is not a toy:• Your close attention is necessary when
the machine is used by or near children.• The plastic bag that this machine was
supplied in should be kept out of the reach of children or disposed of. Never allow children to play with the bag due to the danger of suffocation.
• Do not use outdoors.
7 For a longer service life:• When storing this machine, avoid
direct sunlight and high humidity locations. Do not use or store the machine near a space heater, iron, halogen lamp, or other hot objects.
• Use only neutral soaps or detergents to clean the case. Benzene, thinner, and scouring powders can damage the case and machine, and should never be used.
• Always consult the operation manual when replacing or installing any assemblies, the presser feet, needle, or other parts to assure correct installation.
8 For repair or adjustment:• If the Light unit (light-emitting diode)
is damaged, it must be replaced by authorized dealer.
• In the event a malfunction occurs or adjustment is required, first follow the troubleshooting table in the back of the operation manual to inspect and adjust the machine yourself. If the problem persists, please consult your local authorized Brother dealer.
Use this machine only for its intended use as described in this manual.Use accessories recommended by the manufacturer as contained in this manual.The contents of this manual and specifications of this product are subject to change without notice.For additional product information, visit our web site at www.brother.com
SAVE THESE INSTRUCTIONSThis machine is intended
for household use.This appliance is not intended for use by persons (including children) with reduced physical, sensory or mental capabilities, or lack of experience and knowledge, unless they have been given supervision or instruction concerning use of the appliance by a person responsible for their safety. Children should be supervised to ensure that they do not play with the appliance.
This appliance can be used by children aged from 8 years and above and persons with reduced physical, sensory or mental capabilities or lack of experience and knowledge if they have been given supervision or instruction concerning use of the appliance in a safe way and understand the hazards involved. Children shall not play with the appliance. Cleaning and user maintenance shall not be made by children without supervision.
• Držite prste dalje od svih pokretnih delova. Posebna pažnja je neophodna u polju oko igle na mašini.• Isključite mašinu pritiskom na taster “O”poziciju, kada vršite bilo kakvo podešavanje u polju oko igle na mašini.• Ne koristite oštećenu ili nepravilnu ubodnu ploču, to može dovesti do lomljenja igle.• Ne gurajte i ne vucite tkaninu za vreme šivenja, pratite pažljivo uputstva kada radite slobodno šivenje, tako da ne dođe do krivljenja igle i njenog lomljenja.
Ova mašina nije igračka :• Posebna pažnja je neophodna ako se mašina koristi od strane dece ili u njihovoj blizini.• Plastična torba koja prati mašinu treba da bude van domašaja dece ili njima dostupna. Nikada ne dozvolite deci da se igraju sa ovom torbom jer mogu biti izložena gušenju.• Ne koristite mašinu napolju.Kada odlažete mašinu, nastojite da ne bude direktno izložena svetlosti ili koncentraciji vlage. Ne odlažite mašinu blizu izvora toplote, pegle, halogene lampe ili drugog toplotnog izvora.• Koristite samo neutralne sapune ili deterdžente da očistite kućište. Benzen ili druga hemijska sredstva mogu oštetiti mašinu i nikada ih ne treba koristiti.• Uvek konsultujte uputstvo za upotrebu kada menjate ili postavljate bilo koji deo, stopicu, iglu ili bilo koji drugi deo kako bi ste bili sigurni da ste pravilno postupili.
Za popravke i podešavanja :• Ako je svetlo (dioda) oštećena, mora biti zamenjena od strane ovlašćenog prodavca.
• U slučaju da postoje nepravilnosti u radu, pre svega obratite pažnju na tabelu potencijalnih problema pri kraju uputstva i pokušajte da otklonite sami problem.
Ako problem i dalje postoji, molimo Vas da konsultujete svog ovlašćenog Brother prodavca.
Koristite ovu mašinu isključivo u svrhu koja joj je namenjena, a kako je to opisano u ovom uputstvu.
Koristite dodatni pribor koji je preporučen od strane proizvođača i kao takav naveden u uputstvu.
Sačuvajte ove instrukcije.
Sadržaj ovog uputstva i specifikacija proizvoda su podložni izmenama bez prethodnog obaveštavanja.
Za dodatne informacije o proizvodima, posetite našu stranicu www.brother.com

————————————————————————————————————————————————————————————————————————————————————————————————————————————————————————————————————————————————————————————————————————————————————————————————————————————————————————————————————————————————————————————————————————————
3
FOR USERS IN THE UK, EIRE, MALTA AND CYPRUS ONLY
IMPORTANT• In the event of replacing the plug fuse, use a fuse
approved by ASTA to BS 1362, i.e. carrying the mark, rating as marked on plug.
• Always replace the fuse cover. Never use plugs with the fuse cover omitted.
• If the available electrical outlet is not suitable for the plug supplied with this equipment, you should contact your authorized dealer to obtain the correct lead.
CONTENTS
IMPORTANT SAFETY INSTRUCTIONS ...........1
1. KNOWING YOUR SEWING MACHINE .................................. 4
ACCESSORIES .................................................4Optional accessories .......................................... 4
THE MAIN PARTS ...........................................5Flat bed attachment ............................................ 5
USING YOUR SEWING MACHINE ................6Connecting plugs ............................................... 6Main power and sewing light switch .................. 7Foot controller .................................................... 7Checking the needle ........................................... 7Replacing the needle .......................................... 7Changing the presser foot ................................... 8
THE CONTROLS .............................................9Pattern selection dial .......................................... 9Patterns and stitch names ................................... 9Reverse sewing lever ........................................ 10
THREADING THE MACHINE .......................11Winding the bobbin ......................................... 11Lower threading ............................................... 13Upper threading ............................................... 14Drawing up the lower thread ............................ 16
FABRIC, THREAD, AND NEEDLE COMBINATIONS .........................................17
2. SEWING BASICS ...................... 18
Please read before sewing ................................ 18Starting sewing ................................................. 18Trial sewing ...................................................... 19Changing the sewing direction ......................... 19Sewing thick fabrics ......................................... 19Sewing thin fabrics ........................................... 20Sewing stretch fabrics ....................................... 20Stitching cylindrical pieces ............................... 20Thread tension ................................................. 20
3. BUILT-IN STITCHES ................. 22
Straight stitching ...............................................22Zigzag stitching .................................................22Blind hem stitching ...........................................23Overedge stitching ............................................24Elastic stitching .................................................24Double action stitching .....................................25
4. SEWING BUTTONHOLES AND BUTTONS ............................... 26
Making a buttonhole .........................................26Adjusting buttonholes .......................................27
5. USING ATTACHMENTS AND APPLICATIONS ....................... 28
Zipper insertion ................................................28Gathering ..........................................................29Appliqués .........................................................29
USING OPTIONAL ACCESSORIES ............... 30Sewing buttons .................................................30Darning ............................................................31Using the blind stitch foot .................................32
6. APPENDIX ................................ 33
MAINTENANCE ........................................... 33Restrictions on oiling ........................................33Precautions on storing the machine ..................33Cleaning ...........................................................33
TROUBLESHOOTING .................................. 35INDEX .......................................................... 38
VAŽNO SAMO ZA KORISNIKE U VB, EIRE, MALTI I NA KIPRU
• U slučaju da je potrebno zameniti utičnicu, upotrebite ASTA do BS 1362, sa obaveznomoznakom na utičnici.
• Ako utikač ne odgovara utičnici na kablu za napajanje,obavezno kontaktirajte autorizovaniservisni centar.
SADRŽAJVAŽNE SIGURNOSNE INSTRUKCIJE
UPOZNAVANJE
Pribor Opcioni priborGlavni deloviRukavnikKorišćenje mašinePriključciGlavni prekidačPedalaProvera igle
VAŽNE SIGURNOSNE INSTRUKCIJE
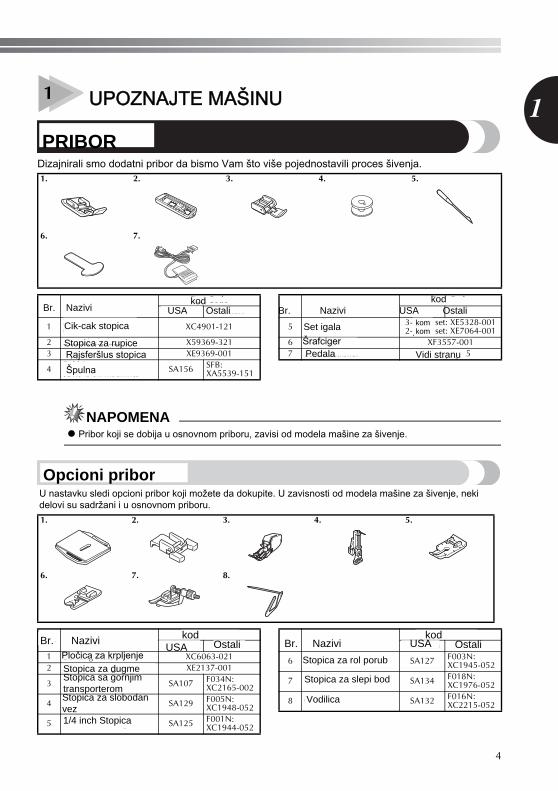
UPOZNAJTE MAŠINU
PRIBORDodatni priborGLAVNI DELOVIRadna površinaUPOTREBAPriključakGlavni predkidač
VAŽNA SIGURNOSNA UPUTSTVA 1
1. UPOZNAJTE MAŠINU 4
Dodatni pribor 4GLAVNI DELOVI 5Radna površina 5UPOTREBA 6Priključak 6Glavni predkidač 7Pedala 7Provera igle 7Zamena igle 7Zamena stopica 8KONTROLE 9Brojčanik za odabir bodova 9Uzorci i nazivi bodova 9Poluga za šivenje unazad 10UVLAČENJE KONCA U MAŠINU 11Postavljanje špulne 11Uvlačenje donjeg konca 13Uvlačenje gornjeg konca 14Izvlačenje donjeg konca 16KOMBINACIJE TKANINE, IGLE i KONCA 172. OSNOVE ŠIVENJA 18
Pročitajte pre šivenja 18Početak šivenja 18Probno šivenje 19Promena smera šivenja 19Šivenje debelih tkanina 19Šivenje tankih tkanina 20Šivenje rastegljivih tkanina 20Šivenje cevastih projekata 20Napetost konca 20
UGRAĐENI BODOVI 22
Ravni bodovi 22Cik-cak bodovi 22Nevidljivi bod 23Opšivanje 24Elastični bod 24Spojni bod 25ŠIVENJE RUPICA I DUGMADI
Izrada rupica za dugme 26Podešavanje rupice 27
UPORABA DODATAKA I APLIKACIJA
Postavljanje rajsferšlusa 28Nabori 29Aplikacije 29UPORABA DODATNOG PRIBORA 30Šivenje dugmadi 30Krpljenje 31Stopica za nevidljivi bod 32DODATAK
ODRŽAVANJE 33Ograničeno podmazivanje 33Mere opreza pri čuvanju mašine 33Čišćenje 33OTKLANJANJE TEŠKOĆA 35
UPOTREBA DODATAKA I APLIKACIJA
UPOTREBA DODATNOG PRIBORA 30
4
————————————————————————————————————————————————————————————————————————————————————————————————————————————————————————————————————————————————————————————————————————————————————————————————————————————————————————————————————————————————————————————————————————————————————
11 KNOWING YOUR SEWING MACHINE
ACCESSORIES
We have designed these accessories to help you easily perform most sewing tasks.
Note● The included accessories vary depending on the machine model.
Optional accessoriesThe following are available as optional accessories to be purchased separately. Depending on the model you purchased, the following accessory may be included with your machine.
1. 2. 3. 4. 5.
6. 7.
No. Part NamePart Code
Americas Others
1 Zigzag foot “J” (on machine) XC4901-121
2 Buttonhole foot “A” X59369-3213 Zipper foot “I” XE9369-001
4 Bobbin(One is on machine) SA156 SFB:
XA5539-151
5 Needle set(90/14 needle)
3-piece set: XE5328-0012-piece set: XE7064-001
6 Screwdriver XF3557-0017 Foot controller See page 5
No. Part NamePart Code
Americas Others
1. 2. 3. 4. 5.
6. 7. 8.
No. Part NamePart Code
Americas Others1 Darning Plate XC6063-0212 Button sewing foot “M” XE2137-001
3 Walking Foot SA107 F034N: XC2165-002
4 Quilting Foot SA129 F005N: XC1948-052
5 1/4-inch Quilting Foot SA125 F001N: XC1944-052
6 Narrow Hemmer Foot SA127 F003N: XC1945-052
7 Blind Stitch Foot SA134 F018N: XC1976-052
8 Quilting guide SA132 F016N: XC2215-052
No. Part NamePart Code
Americas Others
Dizajnirali smo dodatni pribor da bismo Vam što više pojednostavili proces šivenja.
Cik-cak stopica
Stopica za rupice Rajsferšlus stopica
Špulna
Set igala
ŠrafcigerPedala
Br. Nazivikod
USA Ostali Br. Nazivi USA Ostalikod
Vidi stranu
Pribor koji se dobija u osnovnom priboru, zavisi od modela mašine za šivenje.
U nastavku sledi opcioni pribor koji možete da dokupite. U zavisnosti od modela mašine za šivenje, nekidelovi su sadržani i u osnovnom priboru.
komkom
Br. Nazivi kodUSA Ostali Br. Nazivi
kodUSA Ostali
Pločica za krpljenjeStopica za dugmeStopica sa gornjimtransporteromStopica za slobodanvez1/4 inch Stopica
Stopica za rol porub
Stopica za slepi bod
Vodilica
UPOZNAJTE MAŠINU
PRIBOR
NAPOMENA
Opcioni pribor
KNOWING YOUR SEWING MACHINE ——————————————————————————————————————————————————————————————————————————————————————————————————————————————————————————————————————————————————————————————————————————————————————
5
THE MAIN PARTS
1 Bobbin winder (Page 11)This winds the thread onto the bobbin for use as the lower thread.
2 Spool pin (Page 11, 14)This holds the spool of thread.
3 Thread guide (Page 11, 14)This is used when winding the thread onto the bobbin and then threading the machine.
4 Thread take-up lever (Page 15)5 Upper tension-control dial (Page 21)
This controls the tension of the upper thread.6 Thread cutter (Page 19)
Pass the threads through the thread cutter to cut them.
7 Flat bed attachment with accessory compartment (Page 5)
8 Presser foot (Page 8)9 Reverse sewing lever (Page 10)
Push this lever to stitch in the reverse direction.0 Buttonhole fine-adjustment screw (Page 27)A Pattern selection dial (Page 9)
Rotate the dial in either direction to choose the stitch you want.
B HandwheelUsed to manually raise and lower the needle.
C Main power and sewing light switch (Page 7)You can turn the main power and sewing light switch on and off.
D Foot controller jack / socket (Page 6)Plug in the foot controller plug and connect the machine to the power supply.
E Presser foot lever (Page 14)Used to raise and lower the presser foot.
F Foot controller (Page 7)You can use this to control the sewing speed, and to start and stop sewing.
Foot Controller:Model KD-1902 for 110-120V area
KD-1902 for 110-127V area (Brazil only)Model KD-2902 for 220-240V area
The foot controller part code differs depending on the country or region. Contact your dealer or the nearest authorized service center.
Flat bed attachmentThe accessories can be stored in a compartment inside the flat bed attachment.
1 Slide the flat bed attachment to the left to open it.
1 Flat bed attachment2 Storage compartment
123
4
6
7 8
50
9
D
C
F
A
E
B
1
2
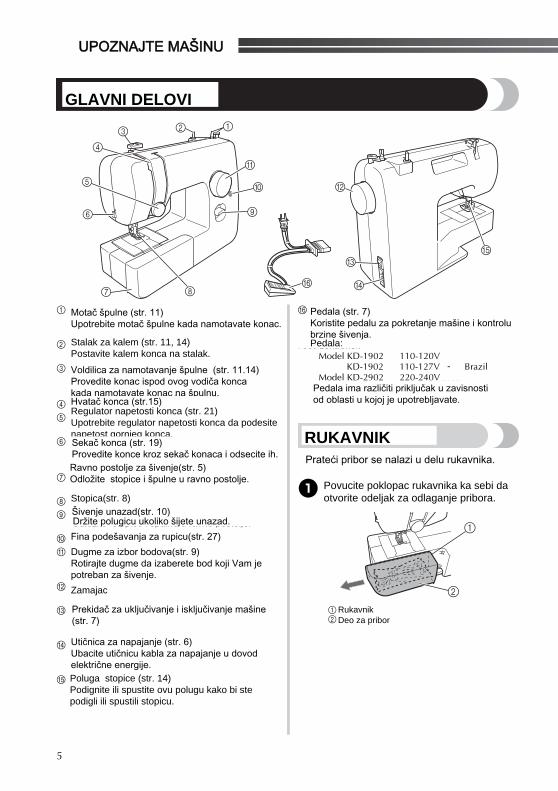
Motač špulne (str. 11)Upotrebite motač špulne kada namotavate konac.
Stalak za kalem (str. 11, 14)Postavite kalem konca na stalak.
Voldilica za namotavanje špulne (str. 11.14)Provedite konac ispod ovog vodiča konca kada namotavate konac na špulnu.Hvatač konca (str.15)Regulator napetosti konca (str. 21)Upotrebite regulator napetosti konca da podesitenapetost gornjeg konca.Sekač konca (str. 19)Provedite konce kroz sekač konaca i odsecite ih.Ravno postolje za šivenje(str. 5)Odložite stopice i špulne u ravno postolje.
Stopica(str. 8)Šivenje unazad(str. 10)Odložite stopice i špulne u ravno postolje.Držite polugicu ukoliko šijete unazad.
Fina podešavanja za rupicu(str. 27)
Dugme za izbor bodova(str. 9)Rotirajte dugme da izaberete bod koji Vam je potreban za šivenje.
Zamajac
Prekidač za uključivanje i isključivanje mašine(str. 7)
Utičnica za napajanje (str. 6)Ubacite utičnicu kabla za napajanje u dovod električne energije.Poluga stopice (str. 14)Podignite ili spustite ovu polugu kako bi ste podigli ili spustili stopicu.
Pedala (str. 7)Koristite pedalu za pokretanje mašine i kontrolu brzine šivenja.Pedala:
-
Pedala ima različiti priključak u zavisnostiod oblasti u kojoj je upotrebljavate.
Prateći pribor se nalazi u delu rukavnika.
Povucite poklopac rukavnika ka sebi daotvorite odeljak za odlaganje pribora.
RukavnikDeo za pribor
UPOZNAJTE MAŠINU
GLAVNI DELOVI
RUKAVNIK
6
————————————————————————————————————————————————————————————————————————————————————————————————————————————————————————————————————————————————————————————————————————————————————————————————————————————————————————————————————————————————————————————————————————————————————
1USING YOUR SEWING MACHINE
WARNING
CAUTION
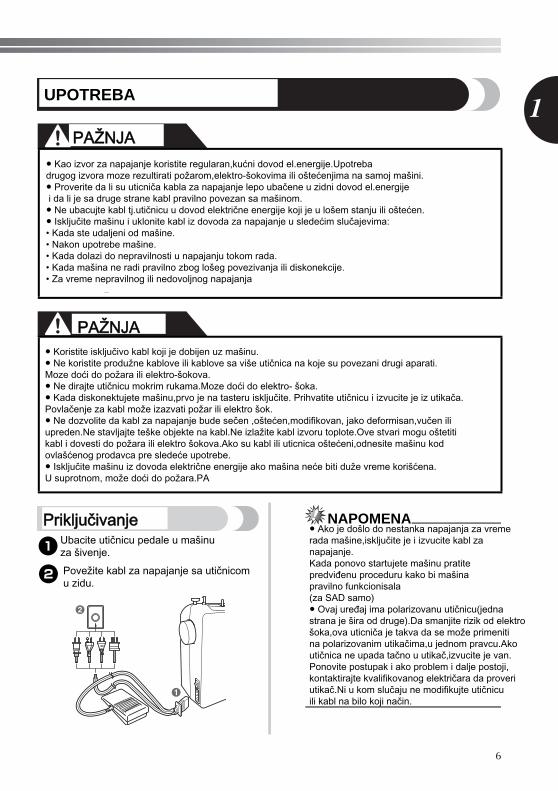
Connecting plugs
1 Connect the foot controller plug to the machine.
2 Connect the power supply plug to a wall outlet.
Note● If a power outage occurs while the sewing
machine is being operated, turn off the main power and unplug the power supply cord. When restarting the sewing machine, follow the necessary procedure to correctly operate the machine.
(For U.S.A. only)● This appliance has a polarized plug (one
blade wider than the other). To reduce the risk of electric shock, this plug is intended to fit in a polarized outlet only one way. If the plug does not fit fully in the outlet, reverse the plug.If it still does not fit, contact a qualified electrician to install the proper outlet. Do not modify the plug in any way.
● Use only regular household electricity for the power source. Using other power sources may result in fire, electric shock, or damage to the machine.
● Make sure that the plugs on the power cord are firmly inserted into the electrical outlet and the power supply jack on the machine.
● Do not insert the plug on the power cord into an electrical outlet that is in poor condition.● Turn off the main power and remove the plug in the following circumstances:
• When you are away from the machine• After using the machine• When the power fails during use• When the machine does not operate correctly due to a bad connection or a disconnection• During electrical storms
● Use only the power cord included with this machine.● Do not use extension cords or multi-plug adapters with many other appliances plugged in to
them. Fire or electric shock may result.● Do not touch the plug with wet hands. Electric shock may result.● When unplugging the machine, always turn off the main power first. Always grasp the plug to
remove it from the outlet. Pulling on the cord may damage the cord, or lead to fire or electric shock.● Do not allow the power cord to be cut, damaged, modified, forcefully bent, pulled, twisted,
or bundled. Do not place heavy objects on the cord. Do not subject the cord to heat. These things may damage the cord and cause fire or electric shock. If the cord or plug is damaged, take the machine to your authorized dealer for repairs before continuing use.
● Unplug the power cord if the machine is not to be used for a long period of time. Otherwise a fire may result.
● Kao izvor za napajanje koristite regularan,kućni dovod el.energije.Upotreba drugog izvora moze rezultirati požarom,elektro-šokovima ili oštećenjima na samoj mašini.● Proverite da li su uticniča kabla za napajanje lepo ubačene u zidni dovod el.energije i da li je sa druge strane kabl pravilno povezan sa mašinom.● Ne ubacujte kabl tj.utičnicu u dovod električne energije koji je u lošem stanju ili oštećen.● Isključite mašinu i uklonite kabl iz dovoda za napajanje u sledećim slučajevima:• Kada ste udaljeni od mašine.• Nakon upotrebe mašine.• Kada dolazi do nepravilnosti u napajanju tokom rada.• Kada mašina ne radi pravilno zbog lošeg povezivanja ili diskonekcije.• Za vreme nepravilnog ili nedovoljnog napajanja
● Koristite isključivo kabl koji je dobijen uz mašinu.● Ne koristite produžne kablove ili kablove sa više utičnica na koje su povezani drugi aparati.Moze doći do požara ili elektro-šokova.● Ne dirajte utičnicu mokrim rukama.Moze doći do elektro- šoka.● Kada diskonektujete mašinu,prvo je na tasteru isključite. Prihvatite utičnicu i izvucite je iz utikača.Povlačenje za kabl može izazvati požar ili elektro šok.● Ne dozvolite da kabl za napajanje bude sečen ,oštećen,modifikovan, jako deformisan,vučen ili upreden.Ne stavljajte teške objekte na kabl.Ne izlažite kabl izvoru toplote.Ove stvari mogu oštetiti kabl i dovesti do požara ili elektro šokova.Ako su kabl ili uticnica oštećeni,odnesite mašinu kod ovlašćenog prodavca pre sledeće upotrebe.● Isključite mašinu iz dovoda električne energije ako mašina neće biti duže vreme korišćena.U suprotnom, može doći do požara.PA
● Ako je došlo do nestanka napajanja za vremerada mašine,isključite je i izvucite kabl zanapajanje.Kada ponovo startujete mašinu pratitepredviđenu proceduru kako bi mašinapravilno funkcionisala(za SAD samo)● Ovaj uređaj ima polarizovanu utičnicu(jednastrana je šira od druge).Da smanjite rizik od elektrošoka,ova uticniča je takva da se može primenitina polarizovanim utikačima,u jednom pravcu.Akoutičnica ne upada tačno u utikač,izvucite je van.Ponovite postupak i ako problem i dalje postoji,kontaktirajte kvalifikovanog električara da proveriutikač.Ni u kom slučaju ne modifikujte utičnicuili kabl na bilo koji način.
Ubacite utičnicu pedale u mašinuza šivenje.
Povežite kabl za napajanje sa utičnicomu zidu.
NAPOMENA
UPOTREBA
PAŽNJA
PAŽNJA
Priključivanje
KNOWING YOUR SEWING MACHINE ——————————————————————————————————————————————————————————————————————————————————————————————————————————————————————————————————————————————————————————————————————————————————————
7
Main power and sewing light switch
This switch turns the main power and sewing light on or off.
1 Turn on (toward the ‘I’ mark)2 Turn off (toward the ‘O’ mark)
CAUTION
Foot controllerWhen you press the foot controller down lightly, the machine will run at a low speed. When you press harder, the machine’s speed will increase. When you take your foot off the foot controller, the machine will stop.
1 Slower2 Faster
You should make sure that nothing is placed on the foot controller when the machine is not in use.
CAUTION
Note(For U.S.A. only)● Foot Controller: Model KD-1902
This foot controller can be used on the machine with product code 888-X53/X54/X55/X56.The product code is mentioned on the machine rating plate.
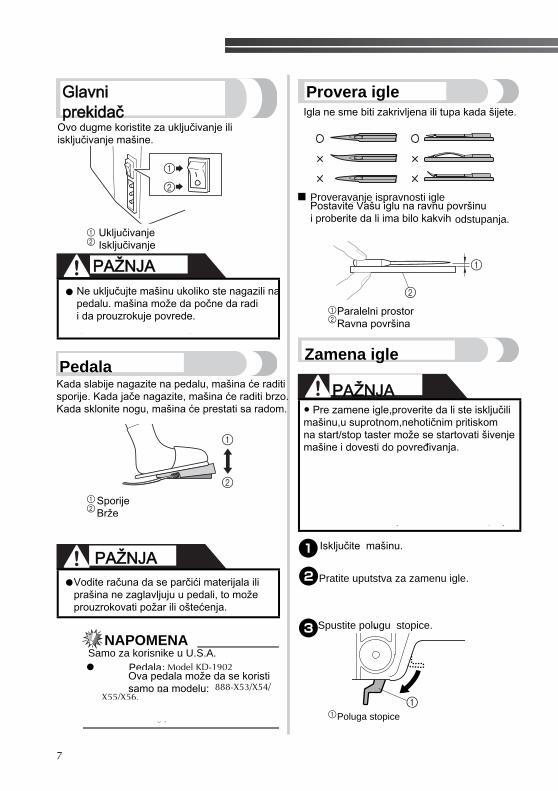
Checking the needleThe sewing needle must always be straight and sharp for smooth sewing.
■ Checking the needle correctlyPut the flat side of the needle on a flat surface. Check the needle from the top and the sides. Dispose of any bent needles safely.
1 Parallel space2 Level surface (bobbin cover, glass, etc.)
Replacing the needle
CAUTION
1 Turn off the machine.
2 Raise the needle by turning the handwheel toward you (counterclockwise) so that the mark on the wheel points up.
3 Lower the presser foot lever.
1 Presser foot lever
● Do not turn on the machine while pressing down the foot controller. The machine may start unexpectedly and cause personal injury or damage to the machine.
● Do not allow pieces of cloth and dust to build up on the foot controller. Doing so could cause a fire or an electric shock.
2
1
1
2
● Always turn off the machine before you change the needle. Otherwise, injuries may occur if the foot controller is accidentally pressed and the machine starts sewing.
● Only use sewing machine needles for home use. Other needles may bend or break and cause injury.
● Never sew with a bent needle. A bent needle will easily break and cause injury.
1
2
1
Uključivanje Isključivanje
Ovo dugme koristite za uključivanje ili isključivanje mašine.
Sporije Brže
Kada slabije nagazite na pedalu, mašina će raditisporije. Kada jače nagazite, mašina će raditi brzo.Kada sklonite nogu, mašina će prestati sa radom.
Ne uključujte mašinu ukoliko ste nagazili na pedalu. mašina može da počne da radii da prouzrokuje povrede.
Vodite računa da se parčići materijala iliprašina ne zaglavljuju u pedali, to možeprouzrokovati požar ili oštećenja.
Samo za korisnike u U.S.A. Pedala
Ova pedala može da se koristi samo na modelu:
Igla ne sme biti zakrivljena ili tupa kada šijete.
Proveravanje ispravnosti iglePostavite Vašu iglu na ravnu površinui proberite da li ima bilo kakvih odrtupanja.
Paralelni prostorRavna površina
● Pre zamene igle,proverite da li ste isključilimašinu,u suprotnom,nehotičnim pritiskomna start/stop taster može se startovati šivenjemašine i dovesti do povređivanja.
● Pre zamene igle,postavite tkaninu ili papirispod stopice da sprečite upadanje iglekroz rupicu na ubodnoj ploči.
Isključite mašinu.
Spustite polugu stopice.
Poluga stopice
Pratite uputstva za zamenu igle.
odstupanja.
NAPOMENA
PAŽNJA
PAŽNJA
PAŽNJA
Glavniprekidač
Provera igle
PedalaZamena igle
8
————————————————————————————————————————————————————————————————————————————————————————————————————————————————————————————————————————————————————————————————————————————————————————————————————————————————————————————————————————————————————————————————————————————————————
1CAUTION
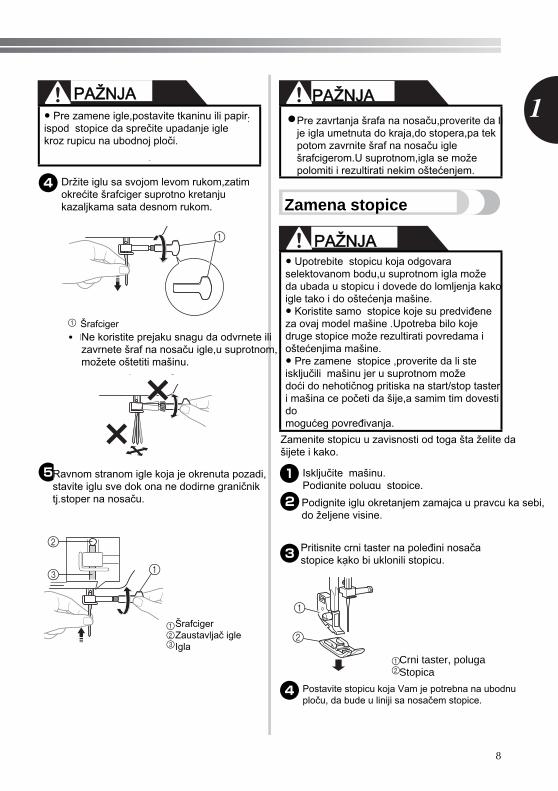
4 Hold the needle with your left hand, and then use a screwdriver to turn the needle clamp screw counterclockwise to remove the needle.
1 Use a screwdriver
• Do not use excessive force when loosening or tightening the needle clamp screw, otherwise certain parts of the sewing machine may be damaged.
5 With the flat side of the needle toward the back of the machine, insert the needle until it touches the needle stopper. Next, tighten the needle clamp using a screwdriver.
CAUTION
Changing the presser foot
CAUTION
You will have to change the presser foot depending on what you want to sew and how.
1 Turn off the machine.Raise the presser foot lever.
2 Raise the needle by turning the handwheel toward you (counterclockwise) so that the mark on the wheel points up.
3 Remove the presser foot by pulling it vertically downward.
4 Put a different presser foot on the needle plate so that the bar on the presser foot is in line with the slot on the shank.
● Before replacing the needle, place fabric or paper under the presser foot to prevent the needle from falling into the hole in the needle plate.
1 Use a screwdriver2 Needle stopper3 Needle
1
2
3 1
● Make sure you insert the needle until it touches the stopper, and securely tighten the needle clamp screw with a screwdriver, otherwise the needle may break or the machine may be damaged.
● Always turn off the machine before you change the presser foot. If you leave the power on and step on the controller, the machine will start and you may be injured.
● Always use the correct presser foot for the stitch pattern you have chosen. If you use the wrong presser foot, the needle may strike the presser foot and bend or break, and may cause injury.
● Only use presser feet that have been designed to be used with this machine. Using any other presser foot may cause accident or injury.
1 Presser foot holder2 Presser foot
1
2
● Pre zamene igle,postavite tkaninu ili papirispod stopice da sprečite upadanje iglekroz rupicu na ubodnoj ploči.
Držite iglu sa svojom levom rukom,zatim okrećite šrafciger suprotno kretanju kazaljkama sata desnom rukom.
ŠrafcigerNe koristite prejaku snagu da odvrnete ilizavrnete šraf na nosaču igle,u suprotnom,možete oštetiti mašinu.
Ravnom stranom igle koja je okrenuta pozadi,stavite iglu sve dok ona ne dodirne graničniktj.stoper na nosaču.
ŠrafcigerZaustavljač igleIgla
Pre zavrtanja šrafa na nosaču,proverite da lije igla umetnuta do kraja,do stopera,pa tekpotom zavrnite šraf na nosaču igle šrafcigerom.U suprotnom,igla se može polomiti i rezultirati nekim oštećenjem.
● Upotrebite stopicu koja odgovara selektovanom bodu,u suprotnom igla može da ubada u stopicu i dovede do lomljenja kakoigle tako i do oštećenja mašine.● Koristite samo stopice koje su predviđene za ovaj model mašine .Upotreba bilo koje druge stopice može rezultirati povredama i oštećenjima mašine.● Pre zamene stopice ,proverite da li steisključili mašinu jer u suprotnom možedoći do nehotičnog pritiska na start/stop tasteri mašina ce početi da šije,a samim tim dovesti domogućeg povređivanja.
Zamenite stopicu u zavisnosti od toga šta želite da šijete i kako.
Isključite mašinu.Podignite polugu stopice.
Podignite iglu okretanjem zamajca u pravcu ka sebi,do željene visine.
Pritisnite crni taster na poleđini nosača stopice kako bi uklonili stopicu.
Crni taster, polugaStopica
Postavite stopicu koja Vam je potrebna na ubodnu ploču, da bude u liniji sa nosačem stopice.
PAŽNJA PAŽNJA
PAŽNJA
Zamena stopice
KNOWING YOUR SEWING MACHINE ——————————————————————————————————————————————————————————————————————————————————————————————————————————————————————————————————————————————————————————————————————————————————————
9
5 Lower the presser foot lever and fix the presser foot onto the shank. If the presser foot is in the correct place, the bar should snap in.
1 Shank2 Bar
■ Presser foot installation orientation
CAUTION
THE CONTROLS
Pattern selection dial
CAUTION
To choose a stitch, simply turn the pattern selection dial in either direction.
1 Pattern selection dial2 Chosen pattern number
Patterns and stitch names
*1 : Stitch nos. 15-17 are only available on certain models.
1 2
● If the presser foot is not installed with the correct orientation, the needle may strike the presser foot, which may bend or break the needle and cause injury.
● When you use the pattern selection dial to choose a pattern, raise the needle by turning the handwheel toward you (counterclockwise) so that the mark on the wheel points up. If the needle is in the down position when you turn the pattern selection dial, the needle, presser foot or fabric may be damaged.
1
2 11
Pattern Preset Length (mm (inch)) Reference
PageStitch Name Preset Width
(mm (inch))
0.5 (1/32)26
4-STEP AUTOMATIC BUTTONHOLE 5 (3/16)
0.7 (1/32) 22, 29, 30, 32
ZIGZAG STITCH 1.8 (1/8)
1.5 (1/16) 22, 29, 30, 32
ZIGZAG STITCH 3.3 (3/16)
1
2 3 4 5 6 7
8 9 10 11 12 13 14 15 16 17
1
2
3
*1 *1 *1
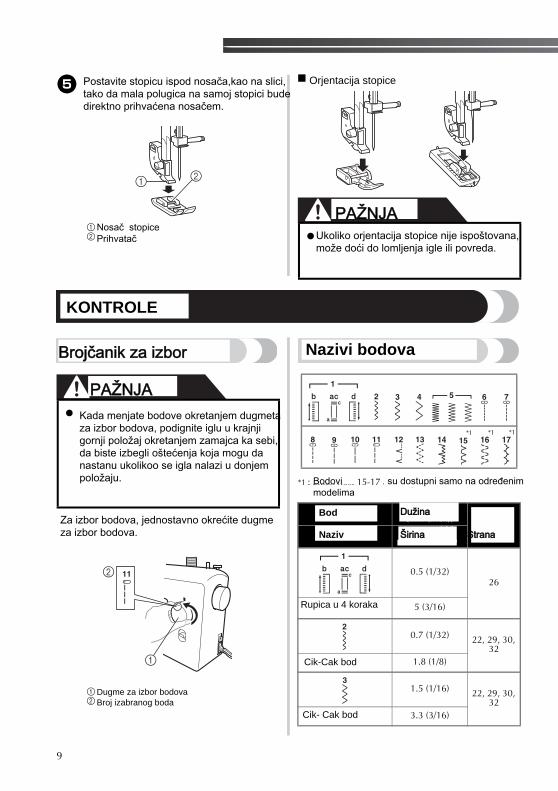
Postavite stopicu ispod nosača,kao na slici,tako da mala polugica na samoj stopici budedirektno prihvaćena nosačem.
Nosač stopicePrihvatač
Orjentacija stopice
Ukoliko orjentacija stopice nije ispoštovana,može doći do lomljenja igle ili povreda.
Kada menjate bodove okretanjem dugmeta za izbor bodova, podignite iglu u krajnji gornji položaj okretanjem zamajca ka sebi, da biste izbegli oštećenja koja mogu da nastanu ukolikoo se igla nalazi u donjempoložaju.
Za izbor bodova, jednostavno okrećite dugmeza izbor bodova.
Dugme za izbor bodovaBroj izabranog boda
Bodovi su dostupni samo na određenimmodelima
Rupica u 4 koraka
Cik-Cak bod
Cik- Cak bod
PAŽNJA
PAŽNJA
KONTROLE
Brojčanik za izbor Nazivi bodova
Bod
Naziv
Dužina
Širina Strana
Bod
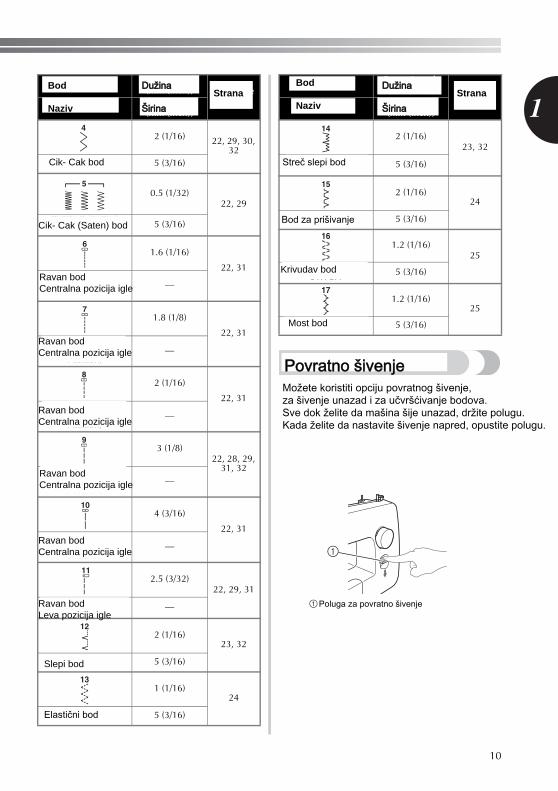
10
————————————————————————————————————————————————————————————————————————————————————————————————————————————————————————————————————————————————————————————————————————————————————————————————————————————————————————————————————————————————————————————————————————————————————
1
Reverse sewing leverYou can use reverse sewing for back tacking and reinforcing seams.To sew in reverse, push the reverse sewing lever in as far as possible and hold it in that position while you lightly push the foot controller. To sew forward, release the reverse sewing lever. The machine will then sew forward.The length of reverse stitches is fixed at 2 mm (1/16 inch).
1 Reverse sewing lever
2 (1/16) 22, 29, 30, 32
ZIGZAG STITCH 5 (3/16)
0.5 (1/32)22, 29
ZIGZAG (SATIN) STITCH 5 (3/16)
1.6 (1/16)
22, 31STRAIGHT STITCH
(Center Needle Position)
—
1.8 (1/8)
22, 31STRAIGHT STITCH
(Center Needle Position)
—
2 (1/16)
22, 31STRAIGHT STITCH
(Center Needle Position)
—
3 (1/8)22, 28, 29,
31, 32STRAIGHT STITCH (Center Needle
Position)—
4 (3/16)
22, 31STRAIGHT STITCH
(Center Needle Position)
—
2.5 (3/32)22, 29, 31
STRAIGHT STITCH (Left Needle Position) —
2 (1/16)23, 32
BLIND HEM STITCH 5 (3/16)
1 (1/16)24
ELASTIC STITCH 5 (3/16)
Pattern Preset Length (mm (inch)) Reference
PageStitch Name Preset Width
(mm (inch))
4
5
6
7
8
9
10
11
12
13
2 (1/16)23, 32
STRETCH BLIND HEM STITCH 5 (3/16)
2 (1/16)24
OVEREDGE STITCH 5 (3/16)
1.2 (1/16)25
DOUBLE ACTION STITCH 5 (3/16)
1.2 (1/16)25
BRIDGING STITCH 5 (3/16)
Pattern Preset Length (mm (inch)) Reference
PageStitch Name Preset Width
(mm (inch))
14
15
16
17
1
Cik- Cak bod
Cik- Cak (Saten) bod
Ravan bodCentralna pozicija igle
Ravan bodCentralna pozicija igle
Ravan bodCentralna pozicija igle
Ravan bodCentralna pozicija igle
Ravan bodCentralna pozicija igle
Ravan bodLeva pozicija igle
Slepi bod
Elastični bod
Streč slepi bod
Most bod
Krivudav bod
Bod za prišivanje
Poluga za povratno šivenje
Možete koristiti opciju povratnog šivenje,za šivenje unazad i za učvršćivanje bodova.Sve dok želite da mašina šije unazad, držite polugu. Kada želite da nastavite šivenje napred, opustite polugu.
Bod
Naziv
Dužina
Širina
StranaBod
Naziv
Dužina
Širina
Strana
Povratno šivenje
KNOWING YOUR SEWING MACHINE ——————————————————————————————————————————————————————————————————————————————————————————————————————————————————————————————————————————————————————————————————————————————————————
11
THREADING THE MACHINE
Winding the bobbin
CAUTION
1 Pull up the spool pin and put a spool of thread on this pin.
2 While holding the thread from the spool with your right hand, pass the thread toward you, in the groove on the thread guide. Then, pass the thread around the pre-tension disk and pull the thread in completely.
CAUTION
● We designed the bobbin that comes with this machine. If you use bobbins from other models, the machine will not work properly. Only use the bobbin that comes with this machine or bobbins of the same type (part code: SA156, SFB: XA5539-151). Using other bobbins may cause damage to the machine.
Actual size
11.5 mm(7/16 inch)
This model Other models
1 Pre-tension disk 2 Bobbin winder shaft 3 Bobbin
3
2
1
1 Pull the thread in completely.
● If the spool of thread is in the wrong place, or is set incorrectly, the thread may tangle on the spool pin.
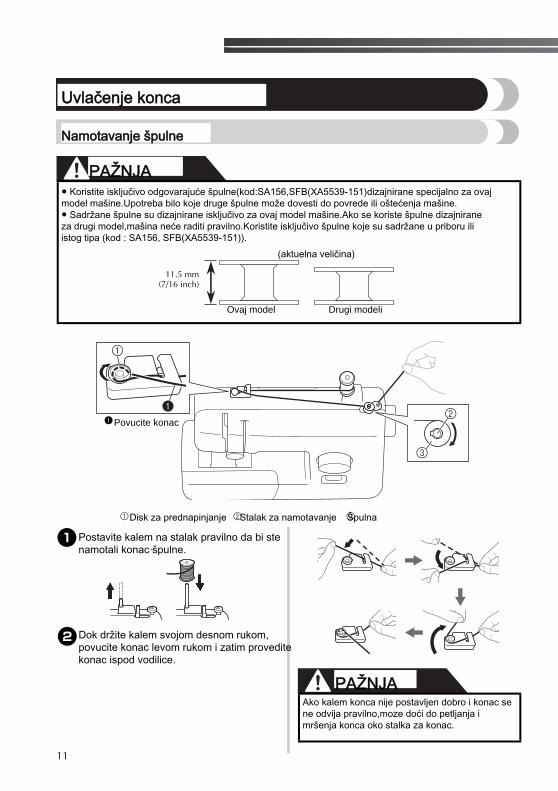
Namotavanje špulne
● Koristite isključivo odgovarajuće špulne(kod:SA156,SFB(XA5539-151)dizajnirane specijalno za ovaj model mašine.Upotreba bilo koje druge špulne može dovesti do povrede ili oštećenja mašine.● Sadržane špulne su dizajnirane isključivo za ovaj model mašine.Ako se koriste špulne dizajnirane za drugi model,mašina neće raditi pravilno.Koristite isključivo špulne koje su sadržane u priboru ili istog tipa (kod : SA156, SFB(XA5539-151)).
Ovaj model Drugi modeli
(aktuelna veličina)
Disk za prednapinjanje Stalak za namotavanje Špulna
Ako kalem konca nije postavljen dobro i konac sene odvija pravilno,moze doći do petljanja imršenja konca oko stalka za konac.
Povucite konac
Dok držite kalem svojom desnom rukom,povucite konac levom rukom i zatim provedite konac ispod vodilice.
Postavite kalem na stalak pravilno da bi stenamotali konac špulne.
PAŽNJA
PAŽNJA
Uvlačenje konca

12
————————————————————————————————————————————————————————————————————————————————————————————————————————————————————————————————————————————————————————————————————————————————————————————————————————————————————————————————————————————————————————————————————————————————————
13 Pass the end of the thread through the hole
on the bobbin from the inside of the bobbin.
4 Put the bobbin onto the bobbin winder shaft and slide the bobbin winder shaft to the right. Turn the bobbin clockwise, by hand, until the projection slides into the notch of the bobbin.
• Make sure to pull out 7 to 10 cm (3-4 inches) of thread from the hole on the bobbin.
1 Projection2 Notch3 7-10 cm (3 – 4 inches)
CAUTION
5 Turn on the machine.
CAUTION
6 While holding the end of the thread, gently press the foot controller to wind the thread around the bobbin a few times. Then stop the machine.
7 Trim the excess thread above the bobbin.• Leave 1 cm (1/2 inch) of thread from the hole
on the bobbin.
1 1 cm (1/2 inch)
CAUTION
8 Press the foot controller to start.
9 When the bobbin seems full and begins spinning slowly, take your foot off the foot controller.
0 Cut the thread, slide the bobbin winder shaft to the left and remove the bobbin.
Note● When the sewing machine is started or the
handwheel is turned after winding the thread around the bobbin, the machine will make a clicking sound; this is not a malfunction.
● The needle bar does not move when you slide the bobbin winder shaft to the right.
CAUTION
● Pull the thread taut and hold the end of the thread straight up. If the thread is too short, not pulled taut or held at an angle, injuries may occur when the thread is wound around the bobbin.
● Do not turn on the machine while pressing down the foot controller. The machine may start unexpectedly and cause personal injury or damage to the machine.
3 1
2
● Make sure you follow the instructions carefully. If you do not cut the excess thread completely before winding the bobbin, when the thread runs low it may tangle around the bobbin and cause the needle to break.
● Not winding the bobbin properly may cause the thread tension to loosen, and may break the needle.
1 Wound evenly2 Wound poorly
1
1 2
Provucite kraj konca kroz rupicu na špulni.
ProrezZarez
Namestite špulnu na držač špulne. Špulna ima zarez koji treba da sklizne u prorezna nosaču.Povucite nosač sa špulnom skroz u levo.Budite sigurni da ste ostavili 10ak cmviška konca, kao što je prikazano na slici.
Višak konca3
Zategnite i držite kraj konca.Ukoliko je kraj isuviš kratak, možedoći do povreda.
Uključite mašinu.
Nemojte da uključujete mašinu ukoliko ste nagazili na pedalu. mašina može da počnesa radom i da prouzrokuje oštećenja ili povrede.
Dok u ruci držite slobodnu ivicu konca, lagano nagazite na pedalu. Zaustavite mašinu posle nekolikonamotanih slojeva.
Isecite konac koji viri, kao na slici.
U procesu namotavanja špulne, vodite računa o uputstvima i pridržavajte ih se.Ukoliko ih zanemarite, može doći do mršenja konca i pucanja igle.
Nagazite na pedalu.
Kada je špulna namotana, opustite nogu i sklonite je sa pedale.
Odsecite konac, vratite nosač špilne u levo i skinite špulnu.
Izvucite zamajac u desno kada namotavatešpulnu.Na taj način ćete blokirati iglu da idegore-dole.
Nepravilno namotavanje špulne možeda utiče negativno na zategnutostkonca.
IspravnoNeispravno
NAPOMENA
PAŽNJA
PAŽNJA
PAŽNJA
PAŽNJA
KNOWING YOUR SEWING MACHINE ——————————————————————————————————————————————————————————————————————————————————————————————————————————————————————————————————————————————————————————————————————————————————————
13
Lower threadingInstall the bobbin wound with thread.
CAUTION
1 Prepare the bobbin wound properly before threading the lower thread.
• See page 11 for the details about bobbin winding.
2 Raise the needle by turning the handwheel toward you (counterclockwise) and raise the presser foot lever.
3 Remove the bobbin cover by sliding it and lift toward you.
1 Bobbin cover
4 Put the bobbin in so the thread comes out in the direction shown by the arrow.
CAUTION
5 Hold the end of the thread, push the bobbin down with your finger, and then pass the thread through the slit, as shown.
• If the thread is not correctly inserted through the tension-adjusting spring of the bobbin case, it may cause incorrect thread tension.
1 Tension-adjusting spring
6 Replace the bobbin cover. Put the projection into the race retainer groove and push closed.
1 Groove2 Projection
• Make sure that the end of the thread comes out from the cover toward the rear of the machine (as shown in the illustration).
• Draw up the lower thread before starting sewing. Refer to “Drawing up the lower thread” on page 16 after threading the upper thread.
● Make sure you turn off the machine while threading. If you accidentally step on the foot controller and the machine starts to sew, you could be injured.
● Make sure you set the bobbin so the thread unrolls in the right direction. If the thread unrolls in the wrong direction, it may cause the thread tension to be incorrect or break the needle.
1
1
12
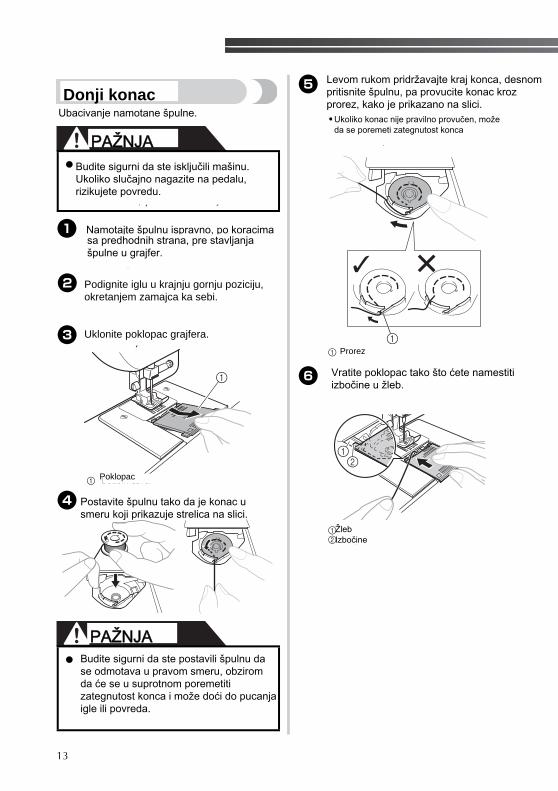
Ubacivanje namotane špulne.
Budite sigurni da ste isključili mašinu. Ukoliko slučajno nagazite na pedalu,rizikujete povredu.
Namotajte špulnu ispravno, po koracima sa str. 11sa predhodnih strana, pre stavljanja špulne u grajfer.
Podignite iglu u krajnju gornju poziciju, okretanjem zamajca ka sebi.
Uklonite poklopac grajfera.
Poklopac
Postavite špulnu tako da je konac u smeru koji prikazuje strelica na slici.
Budite sigurni da ste postavili špulnu da se odmotava u pravom smeru, obziromda će se u suprotnom poremetiti zategnutost konca i može doći do pucanja igle ili povreda.
Levom rukom pridržavajte kraj konca, desnompritisnite špulnu, pa provucite konac krozprorez, kako je prikazano na slici.
Ukoliko konac nije pravilno provučen, možeda se poremeti zategnutost konca
Prorez
Vratite poklopac tako što ćete namestiti izbočine u žleb.
ŽlebIzbočine
PAŽNJA
PAŽNJA
Donji konac

14
————————————————————————————————————————————————————————————————————————————————————————————————————————————————————————————————————————————————————————————————————————————————————————————————————————————————————————————————————————————————————————————————————————————————————
1Upper threading
1 Spool pin2 Thread guide (back)3 Thread guide (front)
4 Thread take-up lever5 Mark on the handwheel
CAUTION
1 Turn off the machine.
2 Raise the presser foot lever.
1 Presser foot lever
3 Raise the needle by turning the handwheel toward you (counterclockwise) so that the mark on the wheel points up.
• If the needle is not correctly raised, the sewing machine can not be threaded.
1 Mark on the wheel
4 Pull up the spool pin and put a spool of thread on this pin.
CAUTION
4
3
221
5
● When threading the upper thread, carefully follow the instructions. If the upper threading is not correct, the thread may become tangled or the needle may bend or break.
● Never use a thread weight of 20 or lower.● Use the needle and the thread in the correct combination. For details on the correct
combination of needles and threads, refer to “FABRIC, THREAD, AND NEEDLE COMBINATIONS” on page 17.
1
1
● If the spool of thread is in the wrong place, or is set incorrectly, the thread may tangle on the spool pin and cause the needle to break.
Isključite mašinu.
Podignite polugu stopice.
Poluga stopice
Držač koncaVodilica 1Vodilica 2
Prihvatač koncaObeležje na zamajcu
● Kada uvodite konce u mašinu,pažljivo pratite instrukcije.Ako gornji konac nije pravilno uveden,može se zaplesti,iskriviti iglu ili je polomiti.● Koristite odgovarajući konac.● Koristite odgovarajuću kombinaciju igle i konca. O kompatibilnosti igle i konca i detaljima pogledajte u odeljku “Tipovi igala i njihova primena” (str. 17).
Obeležje na zamajcu
Podignite iglu okretanjem zamajca u pravcuka sebi.
Izvucite držač konca i namestitekalem konca na držač.
Ukoliko konac nije namešten po uputstvu, može doći do mršenja konca, lomljenja igleili povreda.
PAŽNJA
PAŽNJA
Gornji konac
KNOWING YOUR SEWING MACHINE ——————————————————————————————————————————————————————————————————————————————————————————————————————————————————————————————————————————————————————————————————————————————————————
15
5 While holding the thread from the spool with your right hand, pass the thread toward you, in the groove on the thread guide.
• Make sure that the spring in the groove catches the thread.
1 Spring
6 Feed the upper thread as shown in the following illustration.
7 Make sure you guide the thread through the thread take-up lever from right to left as shown in the following illustration.
1 Thread take-up lever
Memo● If the thread take-up lever is lowered, the
upper thread can not be wrapped around the thread take-up lever. Make sure you raise the needle by turning the handwheel toward you (counterclockwise) so that the mark on the wheel points up.
8 Put the thread behind the guide above the needle.
• The thread can easily be passed behind the needle bar thread guide by holding the thread in your left hand, then feeding the thread with your right hand.
1 Needle bar thread guide
9 Thread the needle from front to back leaving a thread tail of about 5 cm (2 inches).
1 5 cm (2 inches)
Note● Make sure you raise the presser foot lever
and the thread take-up lever before you feed the upper thread.
● If you incorrectly feed the thread you may cause sewing problems.
1
1
2
3
4
5
1
1
1
1
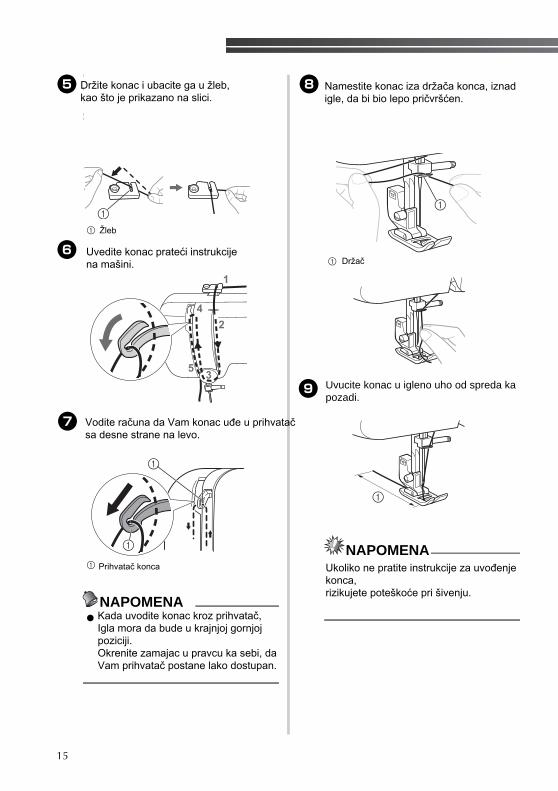
Držite konac i ubacite ga u žleb, kao što je prikazano na slici.
Žleb
Uvedite konac prateći instrukcijena mašini.
Vodite računa da Vam konac uđe u prihvatač sa desne strane na levo.
Prihvatač konca
Kada uvodite konac na prihvatač,Kada uvodite konac kroz prihvatač,Igla mora da bude u krajnjoj gornjojpoziciji.Okrenite zamajac u pravcu ka sebi, da Vam prihvatač postane lako dostupan.
Namestite konac iza držača konca, iznadigle, da bi bio lepo pričvršćen.
Držač
Uvucite konac u igleno uho od spreda ka pozadi.
Ukoliko ne pratite instrukcije za uvođenje konca,rizikujete poteškoće pri šivenju.
NAPOMENA
NAPOMENA
16
————————————————————————————————————————————————————————————————————————————————————————————————————————————————————————————————————————————————————————————————————————————————————————————————————————————————————————————————————————————————————————————————————————————————————
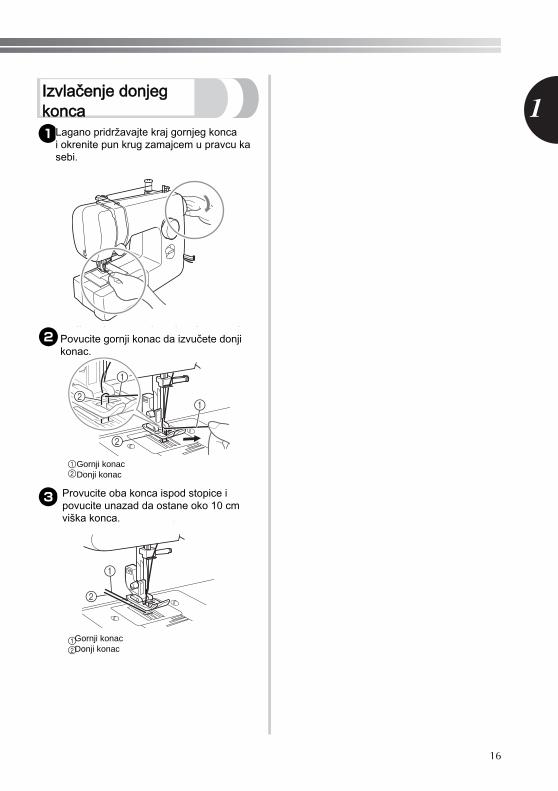
1Drawing up the lower thread
1 While lightly holding the end of the upper thread, slowly turn the handwheel toward you (counterclockwise) by hand to lower and then raise the needle.
2 Pull on the upper thread to draw up the lower thread.
1 Upper thread2 Lower thread
3 Pull out about 10 cm (4 inches) of both threads and put them toward the back of the machine under the presser foot.
1 Upper thread2 Lower thread
1
1
2
2
1
2
Lagano pridržavajte kraj gornjeg konca i okrenite pun krug zamajcem u pravcu ka sebi.
Povucite gornji konac da izvučete donji konac.
Gornji konacDonji konac
Povucite oba konca ispod stopice i unazad, paostavite oko 10 cm konca viška.Provucite oba konca ispod stopice i povucite
daProvucite oba konca ispod stopice i povucite unazad da ostane oko 10 cm viška konca.
Gornji konacDonji konac
Izvlačenje donjegkonca
KNOWING YOUR SEWING MACHINE ——————————————————————————————————————————————————————————————————————————————————————————————————————————————————————————————————————————————————————————————————————————————————————
17
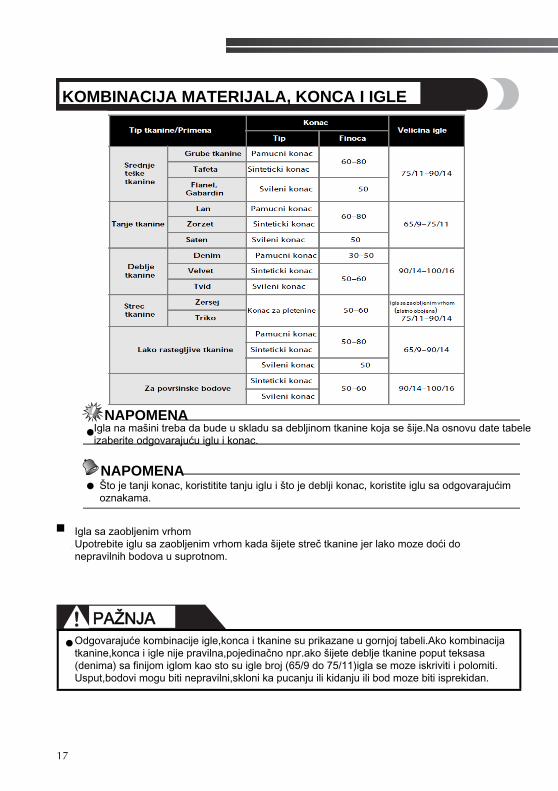
FABRIC, THREAD, AND NEEDLE COMBINATIONS
Note● Never use a thread weighted #20 or lower. It may cause machine malfunction.
Memo● The lower the thread number, the thicker the thread; and the higher the needle number, the thicker the
needle.
■ Ball point needleUse the ball point needle when sewing on stretch fabrics or fabrics where skipped stitches easily occur. The factory recommended needle is “HG-4BR” (Organ). Schmetz needles “JERSEY BALL POINT” 130/705H SUK 90/14 may be used as a substitute.
■ Transparent nylon threadUse a 90/14 to 100/16 needle, regardless of the fabric or thread.
CAUTION
Fabric Type/ApplicationThread
Size of NeedleType Size
Medium weight fabrics
Broadcloth Cotton thread60–90
75/11–90/14Taffeta Synthetic threadFlannel, Gabardine Silk thread 50
Thin fabricsLawn Cotton thread
60–9065/9–75/11Georgette Synthetic thread
Challis, Satin Silk thread 50
Thick fabricsDenim Cotton thread
30 100/1650
90/14–100/16Corduroy Synthetic thread50–60
Tweed Silk thread
Stretch fabricsJersey
Thread for knits 50–60Ball point needle
75/11–90/14(gold colored)Tricot
Easily frayed fabrics
Cotton thread50–90
65/9–90/14Synthetic thread
Silk thread 50
For top-stitching Synthetic threadSilk thread
30 100/16
50–60 75/11–90/14
● Make sure you follow the needle, thread, and fabric combinations listed in the table. Using the wrong combination, such as heavyweight fabric like denim with a small needle(65/9-75/11), may bend or break the needle. The wrong combination may also cause the seamto be uneven, the fabric to pucker, or the machine to skip stitches.
Uvek koristite odgovarajući konac.
Što je tanji konac, koristitite tanju iglu i što je deblji konac, koristite iglu sa odgovarajućim oznakama.
Igla sa zaobljenim vrhomUpotrebite iglu sa zaobljenim vrhom kada šijete streč tkanine jer lako moze doći donepravilnih bodova u suprotnom.
Igla na mašini treba da bude u skladu sa debljinom tkanine koja se šije.Na osnovu date tabeleizaberite odgovarajuću iglu i konac.
Odgovarajuće kombinacije igle,konca i tkanine su prikazane u gornjoj tabeli.Ako kombinacijatkanine,konca i igle nije pravilna,pojedinačno npr.ako šijete deblje tkanine poput teksasa(denima) sa finijom iglom kao sto su igle broj (65/9 do 75/11)igla se moze iskriviti i polomiti.Usput,bodovi mogu biti nepravilni,skloni ka pucanju ili kidanju ili bod moze biti isprekidan.
NAPOMENA
NAPOMENA
PAŽNJA
KOMBINACIJA MATERIJALA, KONCA I IGLE
18
————————————————————————————————————————————————————————————————————————————————————————————————————————————————————————————————————————————————————————————————————————————————————————————————————————————————————————————————————————————————————————————————————————————————————
2
2 SEWING BASICS
Please read before sewing
CAUTION
Starting sewing
1 Turn on the machine.
CAUTION
2 Raise the needle by turning the handwheel toward you (counterclockwise) so that the mark on the wheel points up.
3 Turn the pattern selection dial to select a stitch (see page 9).
4 Change the presser foot (see page 8).
5 Raise the presser foot lever.
1 Presser foot lever
6 Place the fabric under the presser foot, pass the thread under the presser foot, and then pull out about 5 cm (2 inches) of thread toward the rear of the machine.
1 5 cm (2 inches)
● To avoid being injured, watch the needle carefully while you are using the machine. Keep your hands away from moving parts.
● Do not stretch or pull the fabric during sewing, otherwise the needle may be damaged and you may be injured.
● Do not use bent or broken needles, otherwise you may be injured.● Take care that the needle does not hit basting pins or other objects during sewing. The needle
may break and you may be injured.● Always use the correct presser foot. If you use the wrong presser foot, the needle may hit the
presser foot and bend or break and you may be injured.● When you turn the handwheel by hand, always turn it toward you (counterclockwise).
Turning it the other way may cause the thread to tangle and damage the needle or fabric, and you may be injured.
● Do not start sewing without placing the fabric under the presser foot, otherwise the presser foot may be damaged.
● Do not turn on the machine while pressing down the foot controller. The machine may start unexpectedly and cause personal injury or damage to the machine.
1
1
● Dok je mašina u radu,obratite posebnu pažnju na polje oko igle.Držite ruke dalje od svih pokretnihdelova kao što su igla,zamajac,prihvatač konca jer ,u suprotnom, može doći do povreda.
● Ne gurajte i ne vucite tkaninu za vreme šivenja jer može doći do lomljenja igle ili povreda.
● Nikada ne koristite iskrivljene igle.Krive igle se lako lome što moze izazvati povređivanje.
● Upotrebite odgovarajuću stopicu,u skladu sa izabranim bodom ,u suprotnom,igla može ubadati u stopicu,iskriviti se ili polomiti.● Za vreme šivenja,pazite da igla ne kači špenadle za pričvršćivanje,u suprotnom se može iskriviti ili polomiti.● Pre zamene stopice ,isključite mašinu jer ,u suprotnom,nehotičnim pritiskom na pedalumože se aktivirati mašina i doći do povređivanja.
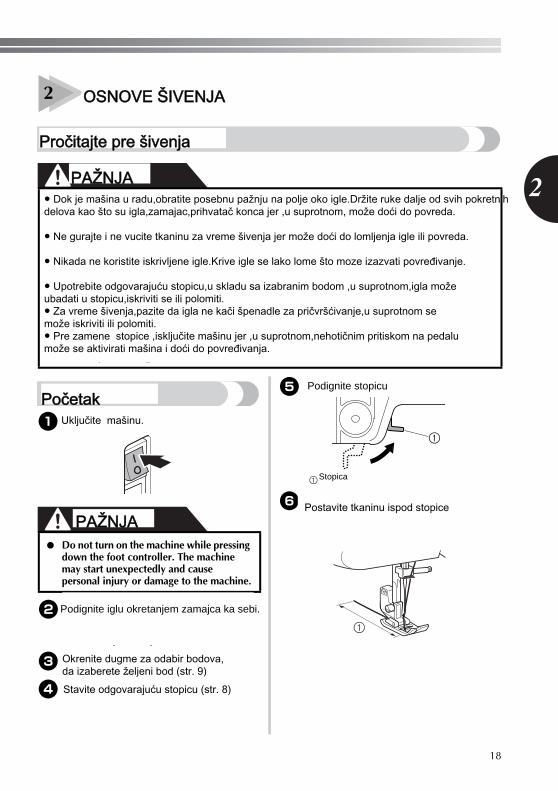
Uključite mašinu.
Podignite iglu okretanjem zamajca ka sebi.
Okrenite dugme za odabir bodova, da izaberete željeni bod (str. 9)
Stavite odgovarajuću stopicu (str. 8)
Podignite stopicu
Stopica
Postavite tkaninu ispod stopicei počnite sa šivenjem.
PAŽNJA
PAŽNJA
OSNOVE ŠIVENJA
Pročitajte pre šivenja
Početak
SEWING BASICS ———————————————————————————————————————————————————————————————————————————————————————————————————————————————————————————————————————————————————————————————————————————————————————————————————————————————————————————————————————
19
7 While holding the end of the thread and the fabric with your left hand, turn the handwheel toward you (counterclockwise) with your right hand to lower the needle to the starting point of the stitching.
8 Lower the presser foot lever.
1 Presser foot lever
9 Slowly press down on the foot controller.
The machine starts sewing.
0 Take your foot off the foot controller.The machine stops sewing.
• You can use reverse sewing for back tacking and reinforcing seams by pressing the reverse sewing lever. Refer to “Reverse sewing lever” on page 10 for the details.
a Raise the needle by turning the handwheel toward you (counterclockwise).
b Raise the presser foot lever.
c Pull the fabric to the left side of the machine, and then pass the threads through the thread cutter to cut them.
.
1 Thread cutter
Trial sewingA trial piece of fabric should be sewn. Use a piece of fabric and thread that are the same as those used for your project, and check the thread tension and stitch length and width.
Changing the sewing direction
Stop the machine with the needle in the fabric at the point where you want to change the sewing direction, and then raise the presser foot lever. Using the needle as a pivot, turn the fabric, lower the presser foot lever, and then continue sewing.
Sewing thick fabrics■ If the fabric does not fit under the presser
footIf the fabric does not fit easily under the presser foot, raise the presser foot lever even higher to bring the presser foot to its highest position.
CAUTION
1
1
● If fabric more than 6 mm (15/64 inch) thick is sewn or if the fabric is pushed with too much force, the needle may bend or break.
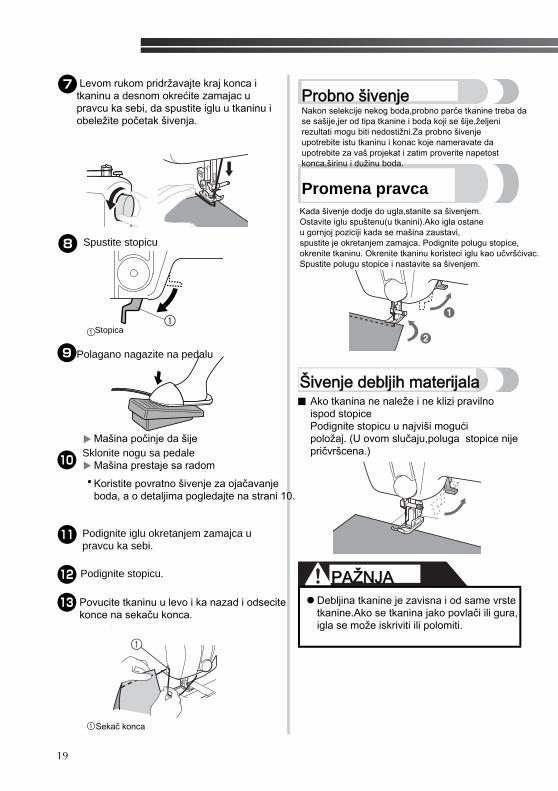
Levom rukom pridržavajte kraj konca itkaninu a desnom okrećite zamajac u pravcu ka sebi, da spustite iglu u tkaninu i obeležite početak šivenja.
Spustite stopicu
Stopica
Polagano nagazite na pedalu
Mašina počinje da šijeSklonite nogu sa pedale
Mašina prestaje sa radom
Koristite povratno šivenje za ojačavanjeboda, a o detaljima pogledajte na strani 10.
Podignite iglu okretanjem zamajca u pravcu ka sebi.
Podignite stopicu.
Povucite tkaninu u levo i ka nazad i odsecitekonce na sekaču konca.
Sekač konca
Nakon selekcije nekog boda,probno parče tkanine treba dase sašije,jer od tipa tkanine i boda koji se šije,željenirezultati mogu biti nedostižni.Za probno šivenjeupotrebite istu tkaninu i konac koje nameravate daupotrebite za vaš projekat i zatim proverite napetostkonca,širinu i dužinu boda.
Kada šivenje dodje do ugla,stanite sa šivenjem.Ostavite iglu spuštenu(u tkanini).Ako igla ostaneu gornjoj poziciji kada se mašina zaustavi,spustite je okretanjem zamajca. Podignite polugu stopice,okrenite tkaninu. Okrenite tkaninu koristeci iglu kao učvršćivac.Spustite polugu stopice i nastavite sa šivenjem.
Ako tkanina ne naleže i ne klizi pravilnoispod stopicePodignite stopicu u najviši mogućipoložaj. (U ovom slučaju,poluga stopice nijepričvršcena.)
Debljina tkanine je zavisna i od same vrstetkanine.Ako se tkanina jako povlači ili gura,igla se može iskriviti ili polomiti.
PAŽNJA
Probno šivenje
Promena pravca
Šivenje debljih materijala
20
————————————————————————————————————————————————————————————————————————————————————————————————————————————————————————————————————————————————————————————————————————————————————————————————————————————————————————————————————————————————————————————————————————————————————
2
Sewing thin fabricsWhen sewing thin fabrics, the stitching may become misaligned or the fabric may not feed correctly. If this occurs, place thin paper or stabilizer material under the fabric and sew it together with the fabric. When you have finished sewing, tear off any excess paper.
1 Stabilizer material or paper
Sewing stretch fabricsFirst, baste the pieces of fabric together, and then sew without stretching the fabric.
1 Basting
Stitching cylindrical pieces
Removing the flat bed attachment makes it easier to sew cylindrical pieces such as cuffs and pant legs, or hard-to-reach areas.
1 Slide the flat bed attachment to the left to release it.
1 Flat bed attachment
With the flat bed attachment removed, free-arm sewing is possible.
Note● When you are finished with free-arm
sewing, install the flat bed attachment back in its original position.
2 Slide the part that you wish to sew onto the arm, and then sew from the top.
Thread tensionThe tension of the thread will affect the quality of your stitches. You may need to adjust it when you change fabric or thread.
Memo● We recommend that you do a test sample
on scrap of a fabric before you start to sew.
■ Correct tensionCorrect tension is important as too much or too little tension will weaken your seams or cause puckers on your fabric.
1
1
1
1 Surface of fabric2 Back of fabric3 Upper thread4 Lower thread
1
2
34
Kada šijete tanje tkanine,bodovi mogu biti nepravilnii tkanina se možda neće pravilno kretati ispod stopice.Ako se ovo dešava,postavite papir(reteks) ili stabilizatorispod tkanine i šijte oba sloja zajedno.Kada završite sašivenjem,otcepite svaki višak tkanine ili stabilizatora.
Stabilizator ili papir
Prvo,spojite komade tkanine zajedno,zatim šijtebez razvlačenja tkanine.Dodatno,da bi se postiglibolji rezultati,upotrebite konac za za streč tkanine.
Štep
Uklonite rukavnik za šivenje cevastih materijala.
Rukavnik povucite da sklizne u levo.
Rukavnik
Kada završite sa željenim radom, vratiterukavnik.
Navucite cevasti materijal koji želite dašijete na rukavnik.
Napetost gornjeg konca i konca špulne treba da budeusklađena i podešena jer utiče na kvalitet rezultata šivenja.
Predlažemo da pre šivenja isprobate podešavanja na parčetu materijala.
Pravilna napetost koncaGornji konac i konac špulne treba da se ukrštajuu centralnom delu tkanine.Samo gornji konac treba dabude vidljiv sa lica tkanine i samo donji konactreba da bude vidljiv sa nalicja tj.poledjinitkanine.
Lice Naličje Gornji konac Donji konac
NAPOMENA
NAPOMENA
Šivenje tanjih materijala
Šivenje streč materijala Napetost konca
Šivenje cevastihmaterijala
SEWING BASICS ———————————————————————————————————————————————————————————————————————————————————————————————————————————————————————————————————————————————————————————————————————————————————————————————————————————————————————————————————————
21
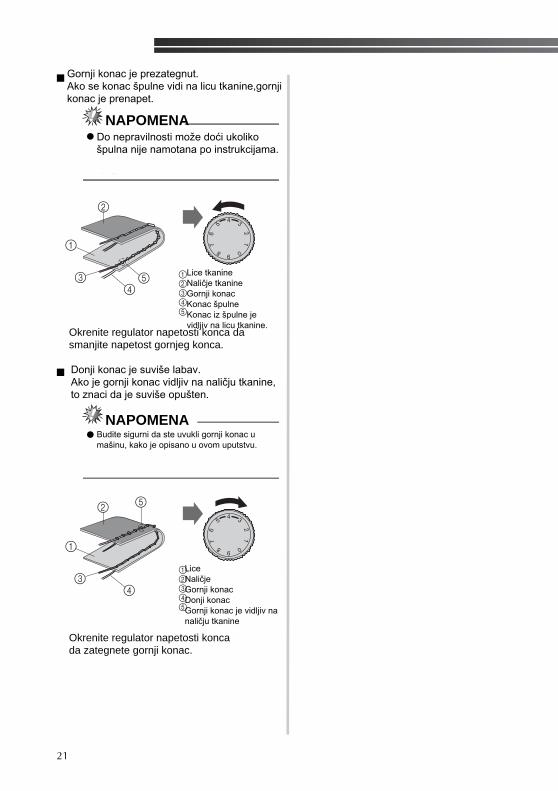
■ Upper tension is too tightLoops will appear on the surface of the fabric.
Note● If the bobbin thread was incorrectly
threaded, the upper thread may be too tight. In this case, refer to “Lower threading” on page 13 and rethread the bobbin thread.
SolutionReduce the tension by turning the upper tension control dial to a lower number.
■ Upper tension is too loose Loops appear on the back of the fabric.
Note● If the upper thread was incorrectly threaded,
the upper thread may be too loose. In this case, refer to “Upper threading” on page 14 and rethread the upper thread.
SolutionIncrease the tension by turning the upper tension control dial to a higher number.
1 Surface of fabric2 Back of fabric3 Upper thread4 Lower thread5 Loops appear on
surface of fabric
1 Surface of fabric 2 Back of fabric3 Upper thread4 Lower thread5 Loops appear on back
of fabric
1
2
345
1
2
34
5
Gornji konac je prezategnut.Ako se konac špulne vidi na licu tkanine,gornji konac je prenapet.
Do nepravilnosti može doći ukolikošpulna nije namotana po instrukcijama.
Okrenite regulator napetosti konca dasmanjite napetost gornjeg konca.
Lice tkanineNaličje tkanineGornji konacKonac špulneKonac iz špulne jevidljiv na licu tkanine.
Budite sigurni da ste uvukli gornji konac umašinu, kako je opisano u ovom uputstvu.
Donji konac je suviše labav.Ako je gornji konac vidljiv na naličju tkanine,to znaci da je suviše opušten.
Okrenite regulator napetosti konca da zategnete gornji konac.
LiceNaličjeGornji konacDonji konacGornji konac je vidljiv na naličju tkanine
NAPOMENA
NAPOMENA
22
————————————————————————————————————————————————————————————————————————————————————————————————————————————————————————————————————————————————————————————————————————————————————————————————————————————————————————————————————————————————————————————————————————————————————
3
3 BUILT-IN STITCHES
Straight stitchingStraight stitches are used for sewing plain seams.
■ Top stitching and stretch materialsYou can use a straight stitch for top stitching and sewing lightweight fabrics.
Zigzag stitching
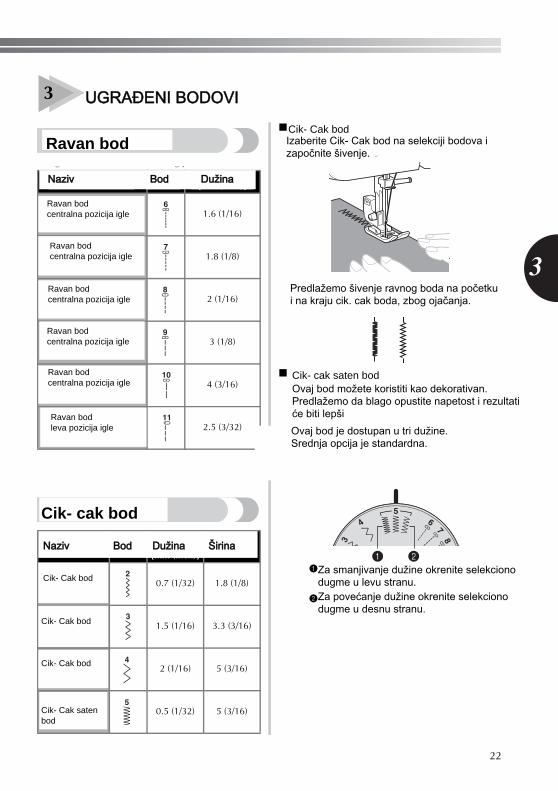
■ Zigzag stitchTurn the pattern selection dial to the Zigzag Stitch, and then start sewing.
We recommend that you sew using the Straight Stitch at the beginning and end of Zigzag Stitches. (This acts as a reinforcement stitch.)
■ Zigzag (Satin) StitchYou can use the Zigzag (Satin) Stitch for making decorative stitches.When sewing a Zigzag (Satin) Stitch, use a slightly looser upper-thread tension to produce more beautiful stitches.With the pattern selection dial, the Zigzag (Satin) Stitch (number 5) can be set to one of three stitch lengths. The middle position is the setting for the standard stitch length.
1 For a shorter stitch length, turn the pattern selecting dial to the left position of Zigzag (Satin) Stitch (number 5).
2 For a longer stitch length, turn the pattern selecting dial to the right position of Zigzag (Satin) Stitch (number 5).
Stitch Name Pattern Stitch Length[mm (inch)]
Straight Stitch (Center Needle Position) 1.6 (1/16)
Straight Stitch (Center Needle Position) 1.8 (1/8)
Straight Stitch (Center Needle Position) 2 (1/16)
Straight Stitch (Center Needle Position) 3 (1/8)
Straight Stitch (Center Needle Position) 4 (3/16)
Straight Stitch (Left Needle Position) 2.5 (3/32)
Stitch Name PatternStitch Length
[mm (inch)]
Stitch Width [mm (inch)]
Zigzag Stitch 0.7 (1/32) 1.8 (1/8)
Zigzag Stitch 1.5 (1/16) 3.3 (3/16)
Zigzag Stitch 2 (1/16) 5 (3/16)
Zigzag (Satin) Stitch 0.5 (1/32) 5 (3/16)
6
7
8
9
10
11
2
3
4
5
87
65
4
3
1 2
Ravan bodleva pozicija igle
Ravan bodcentralna pozicija igle
Ravan bodcentralna pozicija igle
Ravan bodcentralna pozicija igle
Ravan bodcentralna pozicija igle
Ravan bodcentralna pozicija igle
Cik- Cak bod
Cik- Cak bod
Cik- Cak bod
Cik- Cak satenbod
Cik- Cak bodIzaberite Cik- Cak bod na selekciji bodova izapočnite šivenje.
Predlažemo šivenje ravnog boda na početku i na kraju cik- cak boda, zbog ojačanja.Predlažemo šivenje ravnog boda na početku i na kraju cik- cak boda, zbog ojačanja.
Cik- cak saten bodOvaj bod možete koristiti kao dekorativan.Predlažemo da blago opustite napetost i rezultati će biti lepši
Predlažemo šivenje ravnog boda na početkui na kraju cik. cak boda, zbog ojačanja.
Ovaj bod je dostupan u tri dužine.Srednja opcija je standardna.
Za smanjivanje dužine okrenite selekcionodugme u levu stranu.Za povećanje dužine okrenite selekcionodugme u desnu stranu.
UGRAĐENI BODOVI
Ravan bod
Naziv Bod Dužina
Cik- cak bod
Naziv Bod Dužina Širina
Naziv Bod Dužina
Naziv Bod Dužina Širina

BUILT-IN STITCHES ————————————————————————————————————————————————————————————————————————————————————————————————————————————————————————————————————————————————————————————————————————————————————————————————————————————————————————————————
23
Blind hem stitching
Memo● When the size of cylindrical pieces is too
small to slide onto the arm or the length is too short, the fabric will not feed and desired results may not be achieved.
1 Reverse the skirt or pants.
1 Wrong side of fabric2 Right side of fabric3 Bottom side4 Edge of fabric
2 Fold the fabric along the desired edge of the hem, and press.
3 Use a chalk to mark on the fabric about 5 mm (3/16 inch) from the edge of the fabric, and then baste it.
4 Fold back the fabric inside along the basting.
5 Unfold the edge of fabric, and position the fabric with the wrong side facing up.
6 Remove the flat bed attachment and make free-arm sewing possible.
• For details on free-arm sewing, refer to “Stitching cylindrical pieces” (Page 20).
Stitch Name PatternStitch Length
[mm (inch)]
Stitch Width [mm (inch)]
Blind Hem Stitch 2 (1/16) 5 (3/16)
Stretch Blind Hem Stitch 2 (1/16) 5 (3/16)
1 Wrong side of fabric
2 Right side of fabric
3 Edge of fabric4 Desired edge of
hem
<Thick fabric>
<Normal fabric>
<Seen from the side>
12
14
2
1 3
4
1
2
1 2
1
3
3
4
2
1 Wrong side of fabric
2 Right side of fabric
3 Edge of fabric4 Basting stitching5 5 mm (3/16 inch)6 Desired edge of
hem
<Thick fabric>
<Normal fabric>
<Seen from the side>
1 Wrong side of fabric
2 Edge of fabric3 Basting4 5 mm (3/16 inch)5 Desired edge of
hem6 Right side of
fabric7 Basting point
<Thick fabric>
<Normal fabric>
<Seen from the side>
1 Wrong side of fabric
2 Right side of fabric
3 Basting4 Edge of fabric5 Desired edge of
hem6 Basting point
<Thick fabric>
<Normal fabric>
<Seen from the side>
1 2
1 2
35
6
4
1 2
1
2
3
4
1
1
6
7
5
6
11
11
12
3
45
Slepi bod
Streč slepi bod
Kada je obim cilindričnih materijalapremali i kada ne može da se navuče na rukavnik, rezultati šivenja neće bitipedantni i uspešni.
Obrnite suknju ili pantalone.
NaličjeLiceUnutrašnja tranaIvica
Presavijte materijal i upeglajte ga.
Naličje
LiceIvicaŽeljeni porub
Debeli materijali
Normalni materijali
Koristite kredu i obeležite materijal na 5mm od ivice, a zatim ga profircajte.
Naličje
Lice
IvicaFirc5mmŽeljeni porub
Debeli materijali
Normalni materijali
Presavijte materijal unutra
Naličje
IvicaFirc
Željenja ivica
Lice
Firc
Debeli materijali
Normalni materijali
Debeli materijali
Normalni materijali
i pozicionirajte materijal tako da naličje bude odozgo.
Presavijte materijal po ivici
Naličje
Lice
Firc Ivica Željeni porub
Firc
Uklonite radnu površinu i omogućite šivenje na rukavniku.
Slepi bod
Naziv Bod Dužina Širina
NAPOMENA
Naziv Bod Dužina Širina
24
————————————————————————————————————————————————————————————————————————————————————————————————————————————————————————————————————————————————————————————————————————————————————————————————————————————————————————————————————————————————————————————————————————————————————
3
7 Slide the part that you wish to sew onto the arm, make sure that the fabric feeds correctly, and then start sewing.
1 Arm
8 After selecting a stitch, slowly turn the handwheel toward you (counterclockwise) until the needle has moved from the right side to the left.
9 Position the fabric under the presser foot, and then adjust the fabric position until the needle slightly catches the fold of the hem when the needle comes to the left end of the stitch.
0 Lower the presser foot lever.
a Sew at a slow speed holding the fabric with your hands, so that the needle slightly catches the fold of the hem.
b Remove the basting stitching and turn the fabric right side up.
Overedge stitching
* Stitch no. 15 is only available on certain models.
1 Put the fabric under the presser foot so that the seamline (or arrowhead point) is approximately 3 mm (1/8 inch) to the left of the center of the presser foot.
• If the seam allowance is wider than the stitch pattern, trim away any excess fabric after stitching.
Elastic stitching
You can use the Elastic Stitch for mending, sewing elastic or joining fabric. Each is explained below.
1 Wrong side of fabric2 Fold of hem3 Needle drop point
1 Needle2 Needle drop point3 Fold of hem
1 Wrong side of fabric 2 Right side of fabric
1
1 2 3
12
3
1 2
Stitch Name PatternStitch Length
[mm (inch)]
Stitch Width [mm (inch)]
Overedge Stitch 2 (1/16) 5 (3/16)
Stitch Name PatternStitch Length
[mm (inch)]
Stitch Width [mm (inch)]
Elastic Stitch 1 (1/16) 5 (3/16)
15
13
Navucite materijal na rukavnik i započnite šivenje.
Rukavnik
Izaberite bod i okrećite zamajac ka sebi, da igla dospe iz desne pozicije u levu.
Pozicionirajte materijal ispod stopice, takoda igla svaki put blago zakači presavijenuivicu.
NaličjePresavijena ivicaMesto uboda igle
IglaMesto uboda iglePresavijena ivica
Spustite stopicu.
Šijte sporo i vodite računa da igla u levojpoziciji formiranja boda, uvek zakačitkaninu.Uklonite firc bod i okrenite tkaninu.
Naličje Lice
Overlok bod
Ovaj bod je dostupan samo na određenim modelima
Postavite materijal ispod stopice i vodite ga uz ivicu.
Ovaj bod služi za porubljivanje, da se materijal ne osipa.
Elastični bod
Ovaj bod se koristi za elastične materijale.ili zaspajanje dva materijala, kako je opisano u nastavku.
Overlok bod
Naziv Bod Dužina Širina
Elastični bod
Naziv Bod Dužina Širina
Naziv Bod Dužina Širina
Naziv Bod Dužina Širina
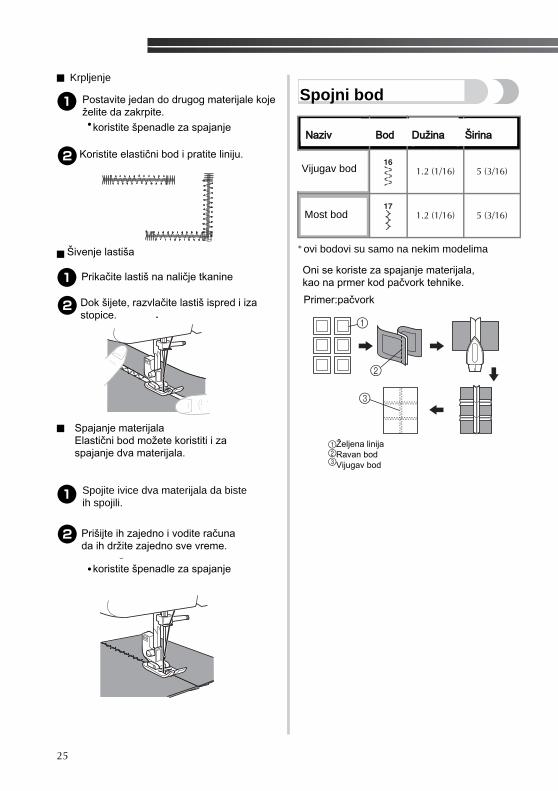
BUILT-IN STITCHES ————————————————————————————————————————————————————————————————————————————————————————————————————————————————————————————————————————————————————————————————————————————————————————————————————————————————————————————————
25
■ Mending
1 Place the reinforcement fabric under the area you want to mend.
• Use the basting pins to hold the reinforcement fabric.
2 Following the line of the tear, sew using the Elastic Stitch as shown.
■ Sewing elastic
1 Pin the elastic tape to the wrong side of the fabric.
2 As you sew, stretch the elastic in front of and behind the presser foot.
■ Joining fabricYou can use the Elastic Stitch to join two pieces of fabric together and it is very effective when sewing knitted fabrics. If you are using nylon thread, the stitch will not be visible.
1 Put the edge of the two pieces of fabric together and center them under the presser foot.
2 Sew them together using the Elastic Stitch. Make sure you keep the two fabric edges close together.
• Use the basting pins to hold the two fabric edges close together.
Double action stitching
* Stitch nos. 16-17 are only available on certain models.
These stitches are used for joining two pieces of fabric, such as when making patchwork.
Example: Patchwork with Double Action Stitch
1 Desired seamline2 Straight Stitch3 Double Action Stitch
Stitch Name PatternStitch Length
[mm (inch)]
Stitch Width [mm (inch)]
Double Action Stitch 1.2 (1/16) 5 (3/16)
Bridging Stitch 1.2 (1/16) 5 (3/16)
16
17
1
2
3
Krpljenje
Postavite jedan do drugog materijale koje želite da zakrpite.
koristite špenadle za spajanje
Koristite elastični bod i pratite liniju.
Šivenje lastiša
Prikačite lastiš na naličje tkanine
Dok šijete, razvlačite lastiš ispred i iza stopice.
Spajanje materijalaElastični bod možete koristiti i zaspajanje dva materijala.
Spojite ivice dva materijala da biste ih spojili.
Prišijte ih zajedno i vodite računada ih držite zajedno sve vreme.
koristite špenadle za spajanje
ovi bodovi su samo na nekim modelima
Oni se koriste za spajanje materijala,kao na prmer kod pačvork tehnike.
Vijugav bod
Most bod
Primer:pačvork
Željena linijaRavan bodVijugav bod
Spojni bod
Naziv Bod Dužina ŠirinaNaziv Bod Dužina Širina
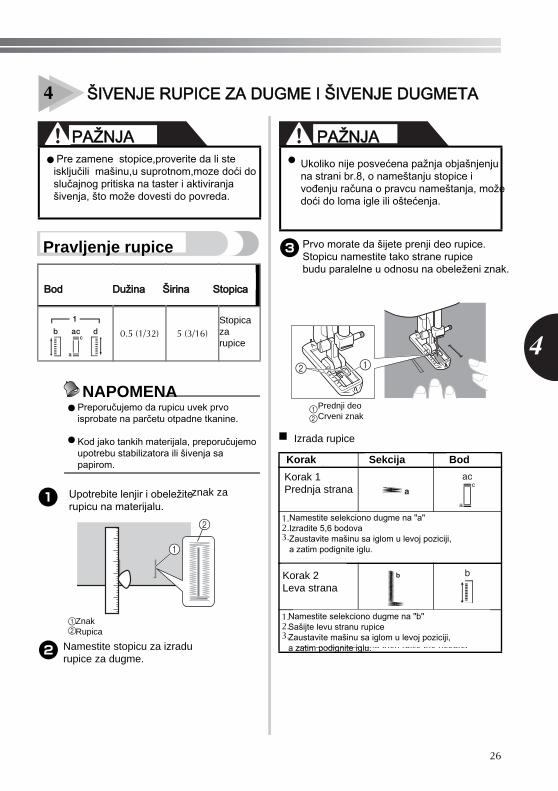
26
————————————————————————————————————————————————————————————————————————————————————————————————————————————————————————————————————————————————————————————————————————————————————————————————————————————————————————————————————————————————————————————————————————————————————
4
4 SEWING BUTTONHOLES AND BUTTONS
CAUTION
Making a buttonhole
Memo● We recommend that you practice making a
buttonhole on a scrap piece of fabric before you try it on an actual garment.
● When making buttonholes on soft fabrics, place a stabilizer material on the underside of the fabric.
1 Using tailor’s chalk, mark the position and length of the buttonhole on the fabric.
1 Marks on fabric2 Buttonhole sewing
2 Attach the buttonhole foot and push the frame back until it stops with the plastic insert at the front of the frame.
CAUTION
3 You need to sew the front bar tack first. Line the bar tack mark under the center of the presser foot and match it up to the two lines on the presser foot.
1 Front of chalk mark2 Red lines
■ Making a Buttonhole
● Always turn off the machine before replacing the presser foot. Otherwise, injuries may occur if the foot controller is accidentally pressed and the machine starts sewing.
Pattern
Stitch Length[mm
(inch)]
Stitch Width [mm
(inch)]
Foot
0.5 (1/32) 5 (3/16)Button-
hole Foot “A”
1
1
2
● If the presser foot is not installed with the correct orientation, the needle may strike the presser foot, which may bend or break the needle and cause injury. (See page 8 for the correct presser foot orientation.)
Step Sewn section Pattern
Step 1(Front bar tack)
1. Set the pattern selection dial to “a”.2. Lower the presser foot and sew 5 to 6 stitches.3. Stop the machine when the needle is at the left
side of the stitches and then raise the needle from the material.
Step 2(Left side)
1. Turn the pattern selection dial to “b”.2. Sew the length of the tailor’s chalk line.3. Stop the machine when the needle is at the left
side of the stitch and then raise the needle.
12
Pre zamene stopice,proverite da li ste isključili mašinu,u suprotnom,moze doći do slučajnog pritiska na taster i aktiviranja šivenja, što može dovesti do povreda.
Stopicaza rupice
Preporučujemo da rupicu uvek prvo isprobate na parčetu otpadne tkanine.
Kod jako tankih materijala, preporučujemo upotrebu stabilizatora ili šivenja sa papirom.
Upotrebite lenjir i obeležiterupicu na materijalu.
ZnakRupica
znak za
Namestite stopicu za izradu rupice za dugme.
Ukoliko nije posvećena pažnja objašnjenjuna strani br.8, o nameštanju stopice i vođenju računa o pravcu nameštanja, možedoći do loma igle ili oštećenja.
Prvo morate da šijete prenji deo rupice.Stopicu namestite tako strane rupicebudu paralelne u odnosu na obeleženi znak.
Prednji deoCrveni znak
Izrada rupice
Korak 1Prednja strana
Korak 2Leva strana
Namestite selekciono dugme na "a"Izradite 5,6 bodovaZaustavite mašinu sa iglom u levoj poziciji,a zatim podignite iglu.
Namestite selekciono dugme na "b"Sašijte levu stranu rupiceZaustavite mašinu sa iglom u levoj poziciji,a zatim podignite iglu.
PAŽNJA PAŽNJA
ŠIVENJE RUPICE ZA DUGME I ŠIVENJE DUGMETA
Pravljenje rupice
NAPOMENA
Bod Dužina Širina Stopica
Korak Sekcija Bod
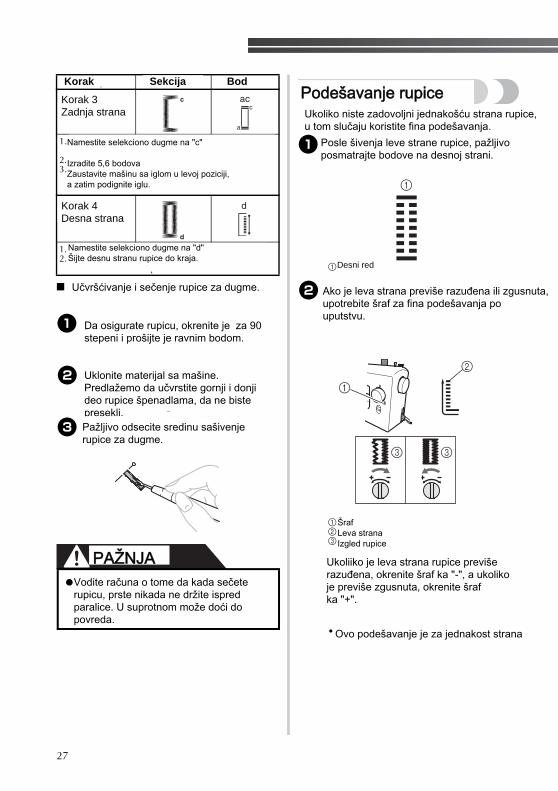
SEWING BUTTONHOLES AND BUTTONS —————————————————————————————————————————————————————————————————————————————————————————————————————————————————————————————————————————————————————————————————————————————
27
■ Securing the Stitching and Cutting the Buttonhole
1 To secure the stitching, turn the material 90 degrees counterclockwise and sew straight stitches to the end of the front bar tack of the buttonhole.
2 Remove the material from the machine. We recommend that you put pins across both ends of the buttonhole to prevent the stitches from being cut.
3 Cut an opening in the middle of the buttonhole with the seam ripper tool. Be careful not to cut through any stitches.
CAUTION
Adjusting buttonholes If the stitching on the two sides of the buttonhole is not the same, you can make the following adjustments.
1 After sewing the left side of the buttonhole, stitch the right side and observe the feeding.
1 Right row
2 If the left side is too open or tight compared with the right side, adjust the buttonhole fine-adjustment screw as described in the following paragraphs.
1 Buttonhole fine-adjustment screw2 Left side3 Buttonhole appearance
If the left side is too open, turn the buttonhole fine-adjustment screw with a large screwdriver in the “–” direction.If the left side is too tight, turn the buttonhole fine-adjustment screw with a large screwdriver in the “+” direction.
• This adjustment ensures both sides of the buttonhole are the same.
Step 3(Back bar tack)
1. Turn the pattern selection dial to “c” (same position as in step 1).
2. Sew 5 to 6 stitches.3. Stop the machine when the needle is at the right
side of the stitch and then raise the needle from the material.
Step 4(Right side)
1. Set the pattern selection dial to “d”.2. Sew the right side until the needle reaches the
stitches sewn in step 1.
● When using the seam ripper to open the buttonhole, do not put your hand or finger in the path of the ripper. The seam ripper may slip and you may be injured.
Step Sewn section Pattern
1
1
2
3 3
Korak 3Zadnja strana
Korak 4Desna strana
Namestite selekciono dugme na "c"
Izradite 5,6 bodovaZaustavite mašinu sa iglom u levoj poziciji,a zatim podignite iglu.
Namestite selekciono dugme na "d"Šijte desnu stranu rupice do kraja.
Učvršćivanje i sečenje rupice za dugme.
Da osigurate rupicu, okrenite je za 90 stepeni i prošijte je ravnim bodom.
Uklonite materijal sa mašine. Predlažemo da učvrstite gornji i donjideo rupice špenadlama, da ne biste presekli.Pažljivo odsecite sredinu sašivenjerupice za dugme.
Vodite računa o tome da kada sečeterupicu, prste nikada ne držite ispredparalice. U suprotnom može doći do povreda.
Ukoliko niste zadovoljni jednakošću strana rupice,u tom slučaju koristite fina podešavanja.
Posle šivenja leve strane rupice, pažljivoposmatrajte bodove na desnoj strani.
Desni red
Ako je leva strana previše razuđena ili zgusnuta,upotrebite šraf za fina podešavanja pouputstvu.
Šraf Leva strana Izgled rupice
Ovo podešavanje je za jednakost strana
Ukoliiko je leva strana rupice previšerazuđena, okrenite šraf ka "-", a ukolikoje previše zgusnuta, okrenite šraf ka "+".
PAŽNJA
Podešavanje rupiceKorak Sekcija Bod

28
————————————————————————————————————————————————————————————————————————————————————————————————————————————————————————————————————————————————————————————————————————————————————————————————————————————————————————————————————————————————————————————————————————————————————
5
5 USING ATTACHMENTS AND APPLICATIONS
CAUTION
Zipper insertion
You can use the zipper foot “I” to sew different types of zippers, and can easily position it to the right or left side of the needle. When sewing with the zipper on the right side, attach the shank to the left pin of the zipper foot. When sewing with the zipper on the left side, attach the shank to the right pin of the zipper foot.
1 Right pin for sewing with the zipper on the left side
2 Left pin for sewing with the zipper on the right side
3 Needle drop point for sewing with the zipper on the left side
4 Needle drop point for sewing with the zipper on the right side
1 Prepare the fabric with the zipper basted on the wrong side.
1 Basting stitching2 Reverse stitches3 Wrong side of fabric4 End of zipper opening5 Zipper
2 Turn off the machine.Attach the zipper foot “I”.
CAUTION
3 Turn on the machine.
CAUTION
4 With the right side of the fabric facing up, continue sewing with the zipper on the right side of the presser foot.
1 End of zipper opening2 Basting stitching3 Zipper
• Sew the stitching in order, from 1 to 3.
● Always turn off the machine before replacing the presser foot. Otherwise, injuries may occur if the foot controller is accidentally pressed and the machine starts sewing.
Stitch Name PatternStitch Length
[mm (inch)]Foot
Straight Stitch (Center Needle
Position)3 (1/8) Zipper
Foot “I”
9
I
1
2
3
4
1
2
3
4
1
53
4
● Turn the handwheel toward you (counterclockwise) and check that the needle does not touch the zipper foot before you start sewing. Choosing a different stitch will cause the needle to hit the presser foot and break, and you may be injured.
● Do not turn on the machine while pressing down the foot controller. The machine may start unexpectedly and cause personal injury or damage to the machine.
1
23
1
2
3
Uvek isključite mašinu pre zamene stopice. Ukoliko kojim slučajem dođe do pokretanja mašine,može doći do povreda.
Isključite mašinu.Namestite stopicu za rajsferšlus "I".
Uključite mašinu.
Ravan bodCentralna pozicija igle
Stopicaza rajsferšlus
Stopicu možete koristiti za različite vrsterajsferšlusa. Obe strane su lako dostupne.Kada šijete rajsferšlus sa desne strane, zakačitestopicu za levi žleb, a kada šijete levu stranu,zakačite je na desni žleb.
Desni žleb
Levi žleb Desna ubodna tačka igle
leva ubodna tačka igle
Pripremite materijal fircanjem rajsferšlusa sa naličja.
FircObrnuti štepNaličjeKraj rajsferšlusaRajsferšlus
Okretanjem zamajca u pravcu ka sebi,proverite da igla ne udara u stopicu ili rajsferšlus.Korišćenjem pogrešnih bodova ili nepravilnihpodešavanja, može doći do povrede.
Vodite računa da sklonite nogu sa pedale,dok uključujete mašinu.U suprotnom mašina može početi sa radomi prouzrokovati oštećenja i povrede.
Kraj rajsferšlusaFircRajsferšlusKoristite bodove od 1 do 3
Započnite šivenje kombinujući pravu stranumaterijala i pravu stranu stopice za rajsferšlus.
PAŽNJA
PAŽNJA
PAŽNJA
UPOTREBA DODATAKA
Rajsferšlus
Naziv Bod Dužina StopicaNaziv Bod Dužina Stopica
USING ATTACHMENTS AND APPLICATIONS ——————————————————————————————————————————————————————————————————————————————————————————————————————————————————————————————————————————————————————————————————————
29
CAUTION
5 When you have finished sewing, remove the basting stitching.
Gathering
1 Loosen the tension of the upper thread so that the lower thread lies on the underside of the material.
2 Sew a single row (or many rows) of straight stitches.
3 Pull the lower threads to gather the material.
Appliqués
You can create an appliqué by cutting a different piece of fabric into a shape and applying it as a decoration.
1 Baste the cut design to the fabric.
2 Carefully sew around the edge of the design with a zigzag stitch.
● Make sure the needle does not hit the zipper during sewing. If the needle hits the zipper, the needle may break and you may be injured.
Stitch Name Pattern Stitch Length[mm (inch)]
Straight Stitch (Center Needle
Position)3 (1/8)
Straight Stitch(Left Needle Position) 2.5 (3/32)
9
11
Stitch Name PatternStitch Length
[mm (inch)]
Stitch Width [mm (inch)]
Zigzag Stitch 0.7 (1/32) 1.8 (1/8)
Zigzag Stitch 1.5 (1/16) 3.3 (3/16)
Zigzag Stitch 2 (1/16) 5 (3/16)
Zigzag (Satin) Stitch
0.5 (1/32) 5 (3/16)
2
3
4
5
Kada završite šivenje, uklonitefirc šav.
Vodite računa da igla ne udara u rajsferšlus, tako može da se ošteti ili polomi.
Ravan bodCentralna pozicijaigle
Ravan bodLevapozicijaigle
Opustite nametost konca na manje vrednosti.
Prošijte jedan ili više paralelnih redova.
Povucite donji konac da se nabere materijal.
Cik- cakbod
Cik- cakbod
Cik- cakbod
Cik- caksatenbod
Možete napraviti svoju aplikaciju odsecanjem različitihoblika od materijala i prišiti ih kao dekoraciju.
Ufircajte isečeni motiv na tkaninu.
Pažljivo prošite aplikaciju duž ivice,koristeći cik- cak bod.
PAŽNJA Aplikacije
Nabori
Naziv Bod Dužina Širina
Naziv Bod Dužina
30
————————————————————————————————————————————————————————————————————————————————————————————————————————————————————————————————————————————————————————————————————————————————————————————————————————————————————————————————————————————————————————————————————————————————————
5
USING OPTIONAL ACCESSORIESL
Sewing buttons
1 Measure the distance between the buttonholes and set the pattern selection dial to the Zigzag Stitch with the desired width.
2 Turn off the machine.
3 Change the foot to the button sewing foot “M”.
4 Place the darning plate on the needle plate.
5 Turn on the machine.
CAUTION
6 Put a button between the foot and the fabric and make sure that the needle enters the holes without hitting the button. If it hits, see step 1.
7 At a slow speed, sew about 10 stitches.
CAUTION
8 Pull the upper thread at the end of the stitching to the wrong side of the fabric, and then tie it with the bobbin thread.
Use scissors to cut the upper thread and the bobbin thread at the beginning of the stitching.
Stitch Name Pattern
Stitch Length[mm
(inch)]
Stitch Width [mm
(inch)]
Foot Other
Zigzag Stitch
0.7 (1/32)
1.8 (1/8)
Button Sewing
Foot “M”
Darning Plate
Zigzag Stitch
1.5 (1/16)
3.3 (3/16)
Button Sewing
Foot “M”
Darning Plate
Zigzag Stitch
2 (1/16)
5 (3/16)
Button Sewing
Foot “M”
Darning Plate
● Do not turn on the machine while pressing down the foot controller. The machine may start unexpectedly and cause personal injury or damage to the machine.
2
3
4
● Make sure the needle does not hit the button during sewing. The needle may break and you may be injured.
Cik- cakbod
Cik- cakbod
Cik- cakbod
Stopicazadugme "m"Stopicazadugme "m"Stopicazadugme "m"
Pločica za krpljenje
Pločica za krpljenje
Pločica za krpljenje
Izaberite cik- cak bod i izaberite odgovarajuću širinu bodu, da ulazi u rupice.
Isključite mašinu.
Postavite stopicu za prišivanje dugmad "m".
Namestite pločicu za krpljenje, da blokiratetransporter.
Uključite mašinu.
Vodite računa da ne gazite pedalu dokuključujete mašinu za šivenje.mašina neočekivano može da počne sa radom i da prouzrokuje povrede.
Postavite dugme između materijala i stopice iproverite okretanjem zamajca ka sebi,da igla ne udara u dugme.
Polagano prošijte 10 bodova.
Budite sigurni da igla ne udara u dugme.Tako može doći do oštećenja i povreda.
Zavežite gornji konac i konac iz špulne i na tajnačin osigurajte dugme.
PAŽNJA
PAŽNJA
Opcioni pribor
Šivenje dugmad
Naziv Bod Dužina Širina Stopica Drugo

USING ATTACHMENTS AND APPLICATIONS ——————————————————————————————————————————————————————————————————————————————————————————————————————————————————————————————————————————————————————————————————————
31
Darning
1 Turn off the machine.Place the darning plate on the needle plate, then turn on the machine.
2 Either remove both the presser foot and presser foot holder assembly and then lower the presser foot lever.
3 Put the section you want to darn under the presser foot together with fabric for reinforcement.
4 Turn on the machine.
CAUTION
5 Begin sewing by alternating between gently drawing the work away from you and pulling it toward you.
Note● Sew while holding the fabric stretched in
order to keep the fabric held down.
6 Repeat this motion until the section being darned is filled with parallel lines of stitching.
Stitch Name PatternStitch Length
[mm (inch)]Other
Straight Stitch (Center Needle
Position)1.6 (1/16) Darning
Plate
Straight Stitch (Center Needle
Position)1.8 (1/8) Darning
Plate
Straight Stitch (Center Needle
Position)2 (1/16) Darning
Plate
Straight Stitch (Center Needle
Position)3 (1/8) Darning
Plate
Straight Stitch (Center Needle
Position)4 (3/16) Darning
Plate
Straight Stitch (Left Needle
Position)2.5 (3/32) Darning
Plate
● Do not turn on the machine while pressing down the foot controller. The machine may start unexpectedly and cause personal injury or damage to the machine.
6
7
8
9
10
11
Ravan bodCentralnapozicija igleRavan bodCentralnapozicija igle
Ravan bodCentralnapozicija igle
Ravan bodCentralnapozicija igleRavan bodCentralnapozicija igle
Ravan bodLevapozicija igle
Pločicazakrpljenje
Pločicazakrpljenje
Pločicazakrpljenje
Pločicazakrpljenje
Pločicazakrpljenje
Pločicazakrpljenje
Isključite mašinu.Postavite pločicu za krpljenje.Uključite mašinu.
Uključite mašinu.
Budite sigurni da ne pritiskate pedaludok uključujete mašinu.Tako može doći do povreda i oštećenja.
Postavite materijal koji želite da zakrpite ispod stopice.
Ponavljajte ovaj korak paralelnih štepova, sve dok sekcija koju ste hteli da krpite nije gotova.
Započnite šivenje tako da naizmenično vučetetkaninu od sebe i ka sebi.
Rastežite tkaninu dok šijete
Istovremeno uklonite stopicu i nosačstopice, a zatim spustite polugu stopice.
NAPOMENA
PAŽNJA
Krpljenje
Naziv Bod Dužina Drugo
32
————————————————————————————————————————————————————————————————————————————————————————————————————————————————————————————————————————————————————————————————————————————————————————————————————————————————————————————————————————————————————————————————————————————————————
5
Using the blind stitch foot
This foot comes in handy not only for stretch blind hem stitching, but also for sewing fabric edges and seams.
■ When edge stitching
1 Turn off the machine.
2 Attach the blind stitch foot. Turn on the machine.
CAUTION
3 Position the needle the distance you want the stitch to be from the edge of the fabric, and then lower the needle in that position.
4 Turn the foot guide screw and carefully adjust to guide the fabric.
1 Screw2 Guide
■ When sewing seams
1 Turn off the machine.
2 Attach the blind stitch foot. Turn on the machine.
CAUTION
3 Set the pattern selection dial to the Straight Stitch (Center Needle Position). Align the foot guide with the needle position.
4 Set the pattern selection dial to the Zigzag Stitch with the desired width.
5 Place the fabric under the foot so the foot guide is aligned between both edges of the fabric.
6 Lower the presser foot and start sewing.
■ When stretch blind hem stitchingWhen stretch blind hem stitching using the blind stitch foot, turn the screw to adjust the guide to the folded hem.
• For more details on blind hem stitching, see page 23.
1 Screw2 Guide3 Folded hem
Stitch Name PatternStitch Length
[mm (inch)]
Stitch Width [mm (inch)]
Zigzag Stitch 0.7 (1/32) 1.8 (1/8)
Zigzag Stitch 1.5 (1/16) 3.3 (3/16)
Zigzag Stitch 2 (1/16) 5 (3/16)
Straight Stitch(Center Needle
Position)3 (1/8) —
Blind Hem Stitch 2 (1/16) 5 (3/16)
Stretch Blind Hem Stitch 2 (1/16) 5 (3/16)
● Do not turn on the machine while pressing down the foot controller. The machine may start unexpectedly and cause personal injury or damage to the machine.
2
3
4
9
12
14
12
1
2
● Do not turn on the machine while pressing down the foot controller. The machine may start unexpectedly and cause personal injury or damage to the machine.
1
2
3
Cik- cak bod
Cik- cak bod
Cik- cak bod
Ravan bodcentralnapozicija igle
Slepi bod
Streč slepi bod
Ova stopica je korisna pri šivenju nevidljivih bodova, a i pri šivanju ivica i spojeva.
Šivenje ivica
Isključite mašinu
Namestite stopicu za slepi bod.Uključite mašinu.
Budite sigurni da ne gazite pedaludok uključujete mašinu, jer tako mašina može da počne da radi i da izazovepovrede i oštećenja.
Postavite iglu tako da bude na mestu koje je od ivice tkanine udaljeno toliko koliko će od njega biti udaljen željeni šav i zatim spustite iglu u tkaninu na to mesto.Okrenite šraf vodilice stopice i pažljivo podesite za vođenje tkanine.
ŠrafVodilica
Šivenje spojeva
Isključite mašinu.
Namestite stopicu za slepi bod.Uključite mašinu.
Budite sigurni da ne gazite padaludok uključujete mašinu, jer tako mašinamože da počne da radi i da izazove povrede i oštećenja.
Selekciono dugme za odabir boda postavite na ravni bod (srednji položaj igle). Poravnajte vodilicu stopice sa položajem igle.
Selekciono dugme za odabir boda postavite na cik-cak bod željene širine.
Postavite tkaninu ispod stopice tako da vodilica bude poravnata između obe ivice tkanine.Spustite stopicu i počnite sa šivenjem.
Šivenje rastegljivog nevidljivog porubaPri šivenju rastegljivog nevidljivog poruba stopicom za nevidljivi bod, okrenite šraf tako da prilagodite vodilicu presavijenom rubu.
Detalje o nevidljivom bodu pročitajte na stranici 23.
ŠrafVodilicaPresavijena ivica
j ivici.
PAŽNJA
PAŽNJA
Stopica za slepi porub
Naziv Bod Dužina Širina
APPENDIX ————————————————————————————————————————————————————————————————————————————————————————————————————————————————————————————————————————————————————————————————————————————————————————————————————————————————————————————————————————————————————
33
6 APPENDIX
MAINTENANCE
Restrictions on oilingIn order to prevent damaging this machine, it must not be oiled by the user.This machine was manufactured with the necessary amount of oil applied to ensure correct operation, making periodic oiling unnecessary.
If problems occur, such as difficulty turning the handwheel or an unusual noise, immediately stop using the machine, and contact your authorized dealer or the nearest authorized service center.
Precautions on storing the machine
Do not store the machine in any of the locations described below, otherwise damage to the machine may result, for example, rust caused by condensation.
• Exposed to extremely high temperatures• Exposed to extremely low temperatures• Exposed to extreme temperature changes• Exposed to high humidity or steam• Near a flame, heater or air conditioner• Outdoors or exposed to direct sunlight• Exposed to extremely dusty or oily environments
Note● In order to extend the life of this machine,
periodically turn it on and use it.Storing this machine for an extended period of time without using it may reduce its efficiency.
Cleaning
CAUTION
1 Turn off the machine and unplug it.
2 Raise the needle and the presser foot.
3 Loosen the presser foot screw and the needle clamp screw to remove the presser foot holder and the needle.
4 Using the screwdriver, remove the two screws. Lift up the needle plate as shown in the illustration, and then slide the needle plate to the left to remove it.
1 Use the screwdriver
5 Grasp the bobbin case, and then lift it out to the left.
● Make sure you unplug the machine before you clean it, otherwise you risk getting an electric shock or being injured.
1
DODATAK
Da bi spriečili oštećenja mašine, korisnici ne smeju sami podmazivati uređaj.Ovoj mašini je u procesu proizvodnje bila stavljena dovoljna količina ulja za osiguran i pravilan rad, što čini periodično podmazivanje nepotrebnim.U slučaju teškoća kao što je otežano okretanje pogonskog točka ili neobičan zvuk, odmah prestanite koristiti mašinu i obratite se ovlaštenom distributeru ili najbližem ovlaštenom servisnom centru.
Mašinu ne čuvajte na bilo kojem od mesta opisanih u nastavku. U suprotnom postoji rizik oštećenja mašine, npr. nastanak rđe uzrokovan kondenzacijom.Izložena izrazito visokim temperaturamaIzložena izrazito niskim temperaturamaIzložena ekstremnim temperaturnim promenamaIzložena visokoj vlagi ili pariU blizini plamena, grejača ili klimatskog uređajaNa otvorenom ili izložena sunčevoj svetlostiIzložena izrazito prašnjavoj ili masnoj okolini.
Za duži životni vek uređaja povremeno ga uključujte i koristite.Dugotrajno čuvanje uređaja bez povremenog korištenja može smanjiti njegovu učinkovitost.
Obvezno izvucite utikač iz utičnice pre čišćenja. U suprotnom postoji rizik od strujnog udara ili povrede.
Upotrebite šrafciger
Isključite mašinu i izvucite utikač.
Podignite iglu i stopicu.
Olabavite šraf stopice i šraf igle da uklonite nosač stopice i iglu.
Šrafcigerom uklonite oba šrafa. Podignite ubodnu ploču kao što prikazuje ilustracija i pomerite ploču u levo da je sklonite.
Čvrsto uhvatite hvatač donjeg konca i izvadite ga prema levoj strani.
NAPOMENA
PAŽNJA
ODRŽAVANJE
Podmazivanje
Čuvanje mašine
Čišćenje
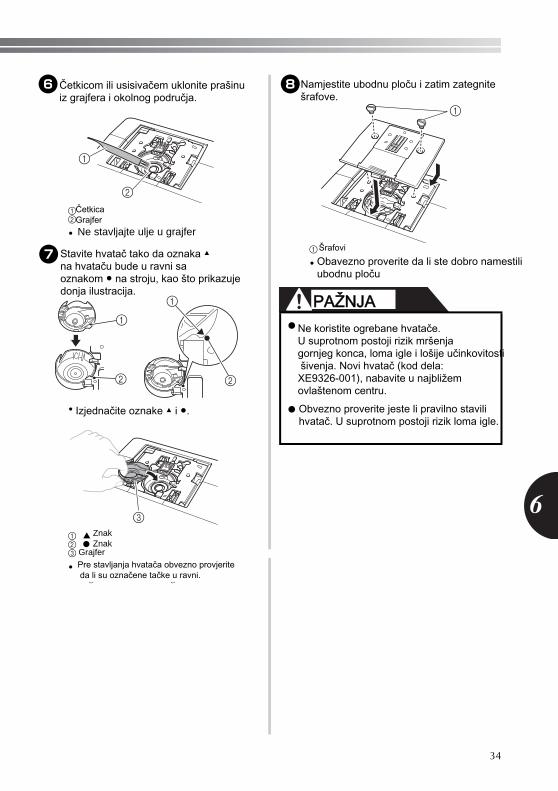
34
————————————————————————————————————————————————————————————————————————————————————————————————————————————————————————————————————————————————————————————————————————————————————————————————————————————————————————————————————————————————————————————————————————————————————
6
6 Use the cleaning brush or a vacuum cleaner to remove any dust from the race and its surrounding area.
1 Cleaning brush2 Race
• Do not apply oil to the bobbin case.
7 Insert the bobbin case so that the ▲ mark on the bobbin case aligns with the ● mark on machine as shown below.
• Align the ▲ and ● marks.
1 ▲ mark2 ● mark3 Bobbin case
• Make sure that the indicated points are aligned before installing the bobbin case.
8 Install the needle plate, and then tighten the screws.
1 Screws
• Make sure that you install the needle plate securely.
CAUTION
1
2
1
2
1
2
3
● Never use a bobbin case that is scratched; otherwise the upper thread may become tangled, the needle may break, or sewing performance may suffer. For a new bobbin case (part code: XE9326-001), contact your nearest authorized service center.
● Make sure that you fit the bobbin case properly, otherwise the needle may break.
1
Četkicom ili usisivačem uklonite prašinu iz grajfera i okolnog područja.
ČetkicaGrajferNe stavljajte ulje u grajfer
Stavite hvatač tako da oznaka ▲ na hvataču bude u ravni sa oznakom ● na stroju, kao što prikazuje donja ilustracija.
Izjednačite oznake ▲ i ●.
ZnakZnak
GrajferPre stavljanja hvatača obvezno provjerite da li su označene tačke u ravni.
Namjestite ubodnu ploču i zatim zategnite šrafove.
Šrafovi
Obavezno proverite da li ste dobro namestili ubodnu ploču
Ne koristite ogrebane hvatače. U suprotnom postoji rizik mršenjagornjeg konca, loma igle i lošije učinkovitosti šivenja. Novi hvatač (kod dela: XE9326-001), nabavite u najbližem ovlaštenom centru.
Obvezno proverite jeste li pravilno stavilihvatač. U suprotnom postoji rizik loma igle.
PAŽNJA
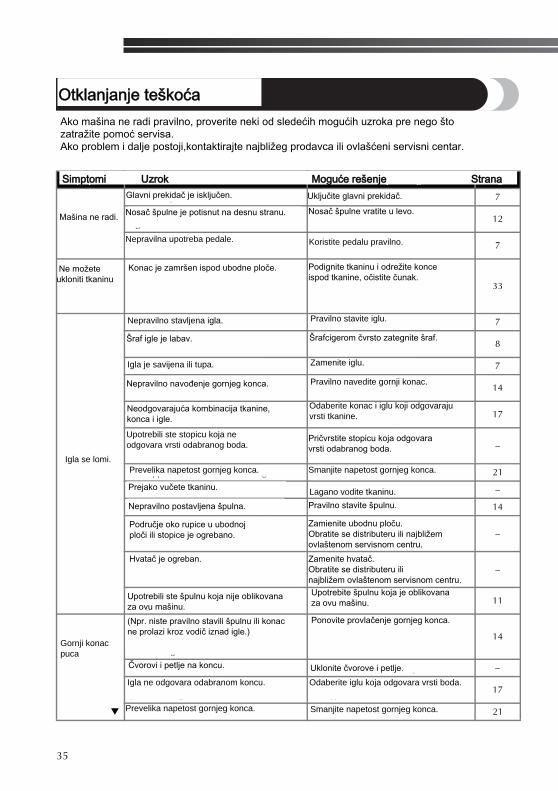
APPENDIX ————————————————————————————————————————————————————————————————————————————————————————————————————————————————————————————————————————————————————————————————————————————————————————————————————————————————————————————————————————————————————
35
TROUBLESHOOTING
If the machine stops operating correctly, check the following possible problems before requesting service. You can solve most problems by yourself. If you need additional help, the Brother Solutions Center offers the latest FAQs and troubleshooting tips. Visit us at “ http://solutions.brother.com ”. If the problem persists, contact your dealer or the nearest authorized service center.
Symptom Possible cause How to put it right Page
The sewing machine does not work.
The main power switch is turned off. Turn on the main power switch. 7
The bobbin-winder shaft is pushed to the right.
Move the bobbin-winder shaft to the left. 12
You have not used the foot controller properly. Use the foot controller properly. 7
Fabric being sewn with the machine cannot be removed.
Thread is tangled below the needle plate. Lift up the fabric and cut the threads below it, and clean the race. 33
The needle breaks.
The needle is incorrectly installed. Correctly install the needle. 7
The needle clamp screw is loose. Use the screwdriver to firmly tighten the screw. 8
The needle is bent or blunt. Replace the needle. 7
The upper thread was not threaded correctly. Correct the upper threading. 14
You have not used the right combination of fabric, thread and needle.
Choose a thread and needle that are appropriate for the type of fabric. 17
The presser foot you are using is not appropriate for the type of stitch that you want to sew.
Attach the presser foot that is correct for the type of stitch that you want to sew.
–
The upper thread tension is too tight. Loosen the upper thread tension. 21
You are pulling the fabric too much. Lightly guide the fabric. –
You have not fitted the spool properly. Fit the spool properly. 14
The area around the hole in the needle plate or the presser foot is scratched.
Replace the needle plate.Contact your retailer or the nearest authorized service center.
–
The bobbin case is scratched.Replace the bobbin case.Contact your retailer or the nearest authorized service center.
–
You have not used a bobbin that has been designed for this machine.
Use a bobbin that has been designed for this machine. 11
The upper thread breaks.
You have not threaded the upper thread properly. (For example, you have not fitted the spool properly, or the thread has come out of the guide above the needle.)
Correct the upper threading. 14
There are knots or tangles in the thread. Remove any knots or tangles. –
The needle is not appropriate for the thread you are using.
Choose a needle that is appropriate for the type of stitch. 17
▼ The upper thread tension is too tight. Loosen the upper thread tension. 21
Ako mašina ne radi pravilno, proverite neki od sledećih mogućih uzroka pre nego što zatražite pomoć servisa.Ako problem i dalje postoji,kontaktirajte najbližeg prodavca ili ovlašćeni servisni centar.
Nosač špulne je potisnut na desnu stranu.
Glavni prekidač je isključen.
Mašina ne radi.
Uključite glavni prekidač.
Nosač špulne vratite u levo.
Nepravilna upotreba pedale. Koristite pedalu pravilno.
Konac je zamršen ispod ubodne ploče. Podignite tkaninu i odrežite konce ispod tkanine, očistite čunak.
Ne možete ukloniti tkaninu
Nepravilno stavljena igla.
Šraf igle je labav.
Igla je savijena ili tupa.
Nepravilno navođenje gornjeg konca.
Neodgovarajuća kombinacija tkanine, konca i igle.
Upotrebili ste stopicu koja ne odgovara vrsti odabranog boda.
Prevelika napetost gornjeg konca.
Prejako vučete tkaninu.
Igla se lomi.
Nepravilno postavljena špulna.
Područje oko rupice u ubodnoj ploči ili stopice je ogrebano.
Hvatač je ogreban.
Upotrebili ste špulnu koja nije oblikovana za ovu mašinu.
Upotrebite špulnu koja je oblikovana za ovu mašinu.
Zamenite hvatač.Obratite se distributeru ili najbližem ovlaštenom servisnom centru.
Zamienite ubodnu ploču.Obratite se distributeru ili najbližem ovlaštenom servisnom centru.
Pravilno stavite špulnu.Lagano vodite tkaninu.
Smanjite napetost gornjeg konca.
Pričvrstite stopicu koja odgovara vrsti odabranog boda.
Odaberite konac i iglu koji odgovaraju vrsti tkanine.
Pravilno navedite gornji konac.
Zamenite iglu.
Šrafcigerom čvrsto zategnite šraf.
Pravilno stavite iglu.
Gornji konac puca
Čvorovi i petlje na koncu.
Igla ne odgovara odabranom koncu.
Prevelika napetost gornjeg konca.
(Npr. niste pravilno stavili špulnu ili konac ne prolazi kroz vodič iznad igle.)
Ponovite provlačenje gornjeg konca.
Uklonite čvorove i petlje.
Odaberite iglu koja odgovara vrsti boda.
Smanjite napetost gornjeg konca.
Otklanjanje teškoća
Simptomi Uzrok Moguće rešenje Strana
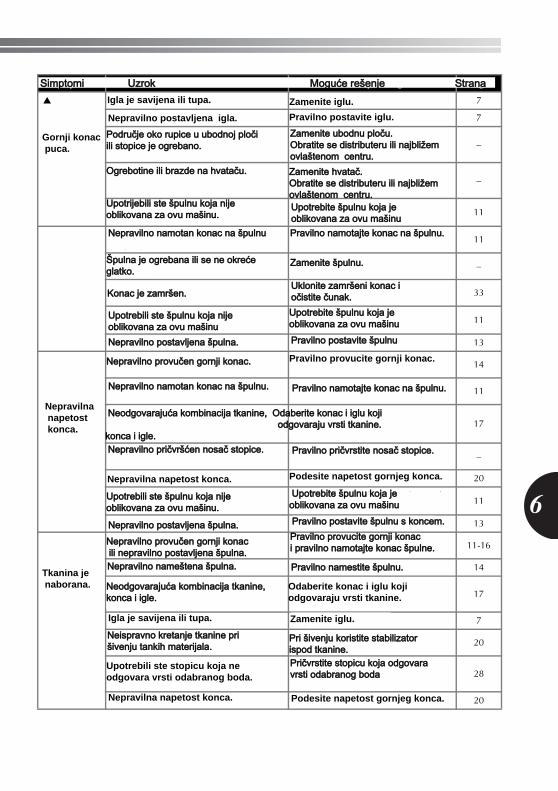
36
————————————————————————————————————————————————————————————————————————————————————————————————————————————————————————————————————————————————————————————————————————————————————————————————————————————————————————————————————————————————————————————————————————————————————
6
▲ The needle is bent or blunt. Replace the needle. 7
The upper thread breaks.
The needle is incorrectly installed. Correctly install the needle. 7
The area around the hole in the needle plate or the presser foot is scratched.
Replace the needle plate.Contact your retailer or the nearest authorized service center.
–
The bobbin case is scratched, or has a burr on it.
Replace the bobbin case.Contact your retailer or the nearest authorized service center.
–
You have not used a bobbin that has been designed for this machine.
Use a bobbin that has been designed for this machine. 11
The lower thread is tangled or breaks.
You have not wound the bobbin thread properly. Wind the bobbin thread properly. 11
The bobbin is scratched or does not turn smoothly. Replace the bobbin. –
The thread is tangled. Remove the tangled thread and clean the race. 33
You have not used a bobbin that has been designed for this machine.
Use a bobbin that has been designed for this machine. 11
Bobbin is set incorrectly. Reset the bobbin thread correctly. 13
The thread tension is incorrect.
You have not threaded the upper thread properly. Correct the upper threading. 14
You have not wound the bobbin thread properly. Wind the bobbin thread properly. 11
You have not threaded the right combination of thread and needle for the fabric you are using.
Choose a thread and needle that are appropriate for the type of fabric. 17
You have not attached the presser foot holder properly. Attach the presser foot holder properly. –
The thread tension is incorrect. Adjust the tension of the upper thread. 20
You have not used a bobbin that has been designed for this machine.
Use a bobbin that has been designed for this machine. 11
Bobbin is set incorrectly. Reset the bobbin thread correctly. 13
The fabric is wrinkled.
You have not threaded the upper thread properly or fitted the bobbin properly.
Thread the upper thread and wind the bobbin thread properly. 11-16
You have not fitted the spool properly. Fit the spool properly. 14
You have not used the right combination of fabric, thread and needle.
Choose a thread and needle that are appropriate for the type of fabric. 17
The needle is bent or blunt. Replace the needle. 7
If thin fabrics are being sewn, the fabric is not being fed correctly.
Sew with stabilizer material under the fabric. 20
The presser foot you are using is not appropriate for the type of stitch that you want to sew.
Attach the presser foot that is correct for the type of stitch that you want to sew.
28
The thread tension is incorrect. Adjust the tension of the upper thread. 20
Symptom Possible cause How to put it right Page
Gornji konac puca.
Igla je savijena ili tupa. Zamenite iglu.
Nepravilno postavljena igla. Pravilno postavite iglu.
Zamenite ubodnu ploču.Obratite se distributeru ili najbližem ovlaštenom centru.
Područje oko rupice u ubodnoj ploči ili stopice je ogrebano.
Ogrebotine ili brazde na hvataču. Zamenite hvatač.Obratite se distributeru ili najbližem ovlaštenom centru.
Upotrijebili ste špulnu koja nije oblikovana za ovu mašinu.
Upotrebite špulnu koja je oblikovana za ovu mašinu
Nepravilno namotan konac na špulnu Pravilno namotajte konac na špulnu.
Špulna je ogrebana ili se ne okreće glatko.
Zamenite špulnu.
Konac je zamršen.Uklonite zamršeni konac i očistite čunak.
Upotrebili ste špulnu koja nije oblikovana za ovu mašinu
Upotrebite špulnu koja je oblikovana za ovu mašinu
Nepravilno postavljena špulna. Pravilno postavite špulnu
Nepravilno provučen gornji konac. Pravilno provucite gornji konac.
Nepravilno namotan konac na špulnu. Pravilno namotajte konac na špulnu.
Neodgovarajuća kombinacija tkanine, Odaberite konac i iglu koji odgovaraju vrsti tkanine.konca i igle. Nepravilno pričvršćen nosač stopice. Pravilno pričvrstite nosač stopice.
Nepravilna napetost konca.
Nepravilna napetost konca. Podesite napetost gornjeg konca.
Upotrebili ste špulnu koja nije oblikovana za ovu mašinu.
Upotrebite špulnu koja je oblikovana za ovu mašinu
Nepravilno postavljena špulna. Pravilno postavite špulnu s koncem.
Tkanina je naborana.
Nepravilno provučen gornji konac ili nepravilno postavljena špulna.Nepravilno nameštena špulna.
Neodgovarajuća kombinacija tkanine, konca i igle.
Igla je savijena ili tupa.
Neispravno kretanje tkanine pri šivenju tankih materijala.
Upotrebili ste stopicu koja ne odgovara vrsti odabranog boda.
Nepravilna napetost konca. Podesite napetost gornjeg konca.
Pričvrstite stopicu koja odgovara vrsti odabranog boda
Pri šivenju koristite stabilizator ispod tkanine.
Zamenite iglu.
Odaberite konac i iglu koji odgovaraju vrsti tkanine.
Pravilno namestite špulnu.
Pravilno provucite gornji konac i pravilno namotajte konac špulne.
Simptomi Uzrok Moguće rešenje Strana
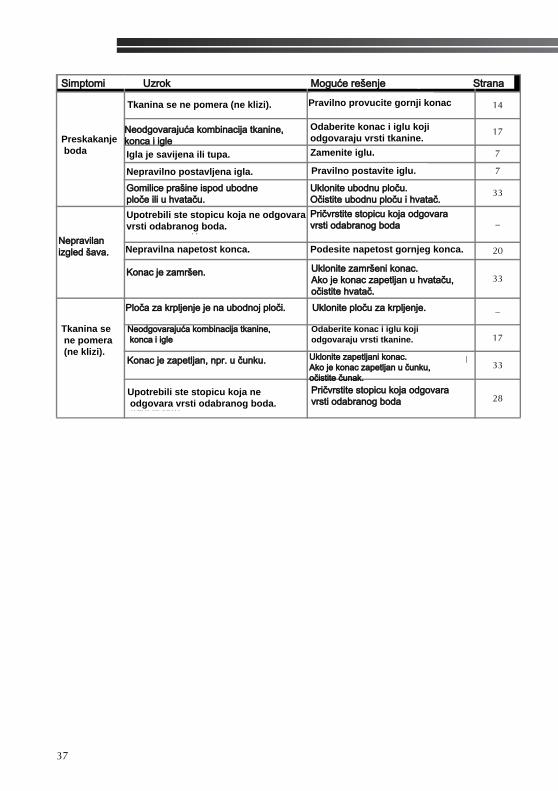
APPENDIX ————————————————————————————————————————————————————————————————————————————————————————————————————————————————————————————————————————————————————————————————————————————————————————————————————————————————————————————————————————————————————
37
Stitches are skipped.
You have not threaded the upper thread properly. Correct the upper threading. 14
You have not used the right combination of fabric, thread and needle.
Choose a thread and needle that are appropriate for the type of fabric. 17
The needle is bent or blunt. Replace the needle. 7
The needle is incorrectly installed. Correctly install the needle. 7
Dust has accumulated under the needle plate or in the bobbin case.
Remove the needle plate and clean the plate and the bobbin case. 33
The stitch is not sewn correctly.
The presser foot that you are using is not correct for the type of stitch.
Attach the presser foot that is correct for the type of stitch that you want to sew.
–
The thread tension is incorrect. Adjust the tension of the upper thread. 20
The thread is tangled.Remove the tangled thread. If the thread is tangled in the bobbin case, clean the bobbin case.
33
The fabric does not feed.
The darning plate is fitted on the needle plate. Remove the darning plate. –
You have not used the right combination of fabric, thread and needle.
Choose a thread and needle that are appropriate for the type of fabric. 17
The thread is tangled, for example, in the race.
Remove the tangle thread. If the thread is tangled in the race, clean the race. 33
The presser foot you are using is not appropriate for the type of stitch that you want to sew.
Attach the presser foot that is correct for the type of stitch that you want to sew.
28
Symptom Possible cause How to put it right Page
Preskakanje boda
Nepravilan izgled šava.
Tkanina se ne pomera (ne klizi).
Tkanina se ne pomera (ne klizi). Pravilno provucite gornji konac
Neodgovarajuća kombinacija tkanine, konca i igle
Odaberite konac i iglu koji odgovaraju vrsti tkanine.
Igla je savijena ili tupa. Zamenite iglu.
Nepravilno postavljena igla. Pravilno postavite iglu.
Gomilice prašine ispod ubodne ploče ili u hvataču.
Uklonite ubodnu ploču. Očistite ubodnu ploču i hvatač.
Upotrebili ste stopicu koja ne odgovaravrsti odabranog boda.
Pričvrstite stopicu koja odgovaravrsti odabranog boda
Nepravilna napetost konca. Podesite napetost gornjeg konca.
Konac je zamršen. Uklonite zamršeni konac. Ako je konac zapetljan u hvataču, očistite hvatač.
Ploča za krpljenje je na ubodnoj ploči. Uklonite ploču za krpljenje.
Neodgovarajuća kombinacija tkanine, konca i igle
Odaberite konac i iglu koji odgovaraju vrsti tkanine.
Konac je zapetljan, npr. u čunku. Uklonite zapetljani konac. Ako je konac zapetljan u čunku, očistite čunak.
Upotrebili ste stopicu koja ne odgovara vrsti odabranog boda.
Pričvrstite stopicu koja odgovaravrsti odabranog boda
Simptomi Uzrok Moguće rešenje Strana

XE4544-001_Hyoushi.indd 4 2008/03/24 10:50:21
English888-X53/X54/X55/X56