ultrafine 468 - intellipure · model # kj468f power 100-240v ac, 50-60hz wattage 95 watts maximum...
TRANSCRIPT

U S E R M A N U A L
Ultrafine 468
Professional Multistage Air Purification Systemwith DFS Technology

Color options vary depending on region / market

Congratulations on your investment in the brand new Intellipure Ultrafine Series Air Cleaning
Device. We believe you deserve the best. This built in USA hand-crafted air cleaner is
individually tested and certified to guarantee better than HEPA performance at ultrafine particle
levels. Your choice of the Intellipure Ultrafine series will bring pure air and create a healthier
indoor environment for you and your loved ones. Now let’s get started.
Table of Contents
What’s In the Box 2
How your air purifier works 2
Exploded View & Specifications 3
Setting Up the Unit 4
Operation | Function Description 5
Routine Care & Maintenance 6
Troubleshooting 10
Warranty 11
Filter Replacement Schedule 12
Contact Info 13

How your air purifier worksDouble Pre-filtration: Two stages of pre-filtration not only capture large particles such as dust, hair and lint efficiently, but also greatly enhance the lifespan of the main filter. The replaceable VOC pre-filter is a proprietary spongy material that greatly improves adsorption of TVOCs. The cleanable polymesh pre-filter serves as a guard to keep large particles out of the system. (fig 1, component 2 &3)
Patented DFS (Disinfecting Filtration System) Technology: Traps microorganisms for continuous germicidal exposure, resulting in the most powerful indoor air purification in the world. DFS Technology has four times the filter loading capacity of a typical HEPA rated filter, capturing 99.99% of particles at 0.007 microns. This makes Intellipure’s air purification systems the most efficient available. Media efficiently traps up to 99.99 % of bacteria, mold spores, fungi and virus sized particles (.007 to 10 micron). This revolutionary technology reduces bioburden and inhibits microorganism growth through Microbiostasis. (fig 1, component 4 & 6)
Proprietary Blend VOC post-filter: Innovative VOC adsorption filter for removal of harmful gases and odors with 90% removal efficiency on Formaldehyde and 95% removal efficiency on Toluene. It is an effective means to treat heavily VOC/gas polluted areas such as newly renovated homes/offices. (fig 1, component 7)
World Class High Efficiency Motor: We selected a world class motor with the most cutting edge technology for our Ultrafine series air cleaning devices. It provides an excellent airflow within the system, which results in extraordinary CADR (clean air delivery rate), great energy efficiency and super quiet operation. (fig 1, component 9)
Built-in-USA exquisite quality: Heavy duty metal outer housing with a high-end anti-scratch finish. (fig 1, component 11)
Convenient Worldwide Application: KJ468F Series can operate from 100V-240V AC, 50-60Hz
What’s in the boxIntellipure Ultrafine 468 Main Unit 1Cleanable integrated pre-filter (inside main unit) 1Replaceable VOC pre-filter (inside main unit) 1Main + VOC post-filter Cartridge (inside main unit) 1
Power cord 1 User Manual 1Warranty Card 1Microfiber cloth 1
Certificate of Performance 1
2
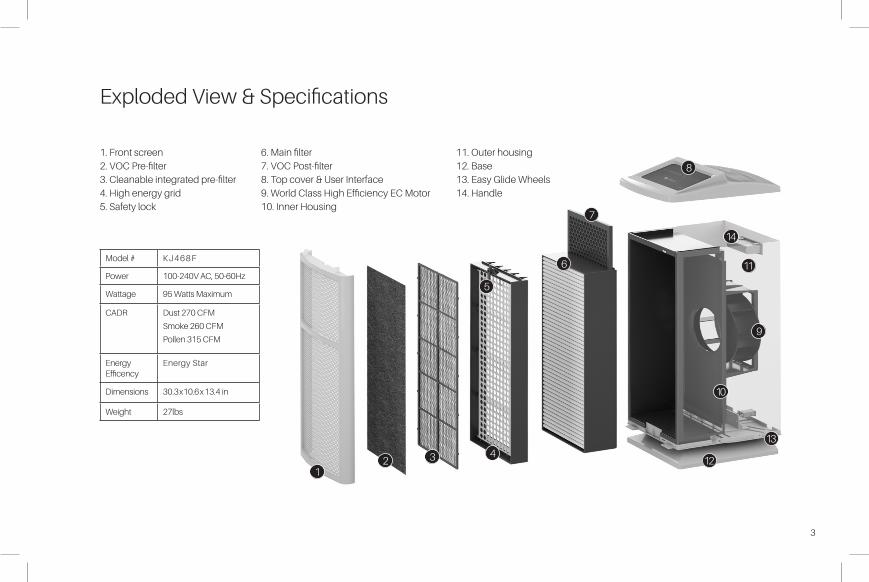
Model # K J 4 6 8 F
Power 100-240V AC, 50-60Hz
Wattage 95 Watts Maximum
CADR Dust 270 CFM
Smoke 260 CFM
Pollen 315 CFM
Energy Efficency
Energy Star
Dimensions 30.3x10.6x13.4 in
Weight 27lbs
Exploded View & Specifications
1. Front screen 2. VOC Pre-filter3. Cleanable integrated pre-filter 4. High energy grid 5. Safety lock
6. Main filter7. VOC Post-filter8. Top cover & User Interface9. World Class High Efficiency EC Motor10. Inner Housing
11. Outer housing 12. Base 13. Easy Glide Wheels 14. Handle
3
14
13
12
11
10
9
8
7
6
5
4321

f-1 g-1 h-1 i-1
f-2 g-2 h-2 i-2edcba
Setting up the unitCarefully remove the unit from the carton and remove the dust bag covering the unit. The dust bag prevents scratches and damage to the unit during transportation. Please keep it in a dry and cool place. The unit is a plug and play design for indoor use only.
FOR FIRST USE, BEFORE PLUGGING IN THE UNIT
Each filter is individually wrapped to ensure freshness. Follow steps in Routine Care and Maintenance Section Point 2 filter replacement and maintenance to remove the filters, un-wrap and replace them in the unit. Filters include VOC Pre-filter, Main Filter and VOC Post-filter. Inspect the power cord for damage. If the power cord is damaged, please contact Intellipure’s customer service department to obtain a replacement. If your power cord is intact, Congratulations! You may plug in your unit and enjoy exceptionally pure air NOW!
a) Power button
b) Sleep mode
c) Slide speed control
d) High speed
e) Turbo mode
FIG 2f-1) VOC Pre-filter indicator
f-2) Change VOC pre-filter indicator
g-1) Main filter indicator
g-2) Change main filter indicator
h-1) VOC post-filter indicator
h-2) Change VOC post-filter indicator
i-1) DFS indicator
i-2) DFS deactivation indicator
4
5
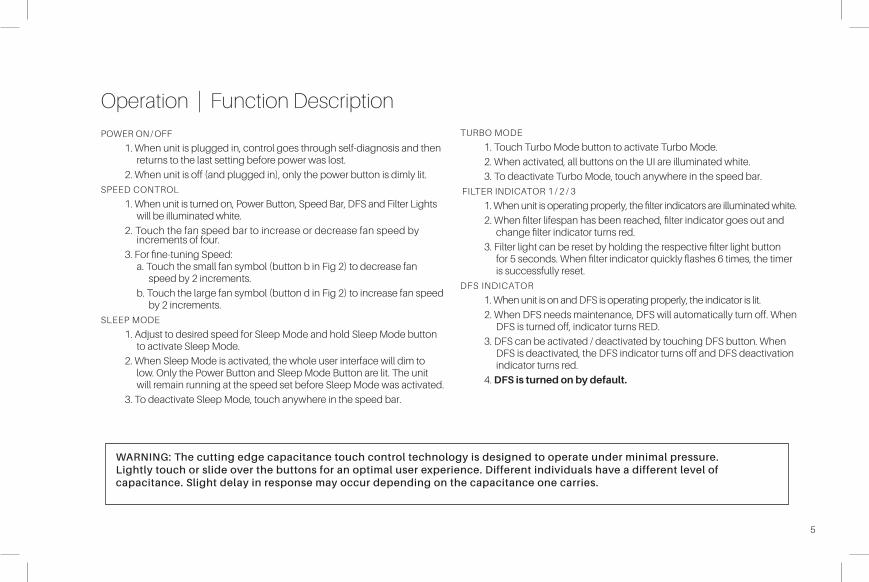
Operation | Function Description POWER ON / OFF
1. When unit is plugged in, control goes through self-diagnosis and then returns to the last setting before power was lost.
2. When unit is off (and plugged in), only the power button is dimly lit.
SPEED CONTROL
1. When unit is turned on, Power Button, Speed Bar, DFS and Filter Lights will be illuminated white.
2. Touch the fan speed bar to increase or decrease fan speed by increments of four.
3. For fine-tuning Speed: a. Touch the small fan symbol (button b in Fig 2) to decrease fan
speed by 2 increments.
b. Touch the large fan symbol (button d in Fig 2) to increase fan speed by 2 increments.
SLEEP MODE
1. Adjust to desired speed for Sleep Mode and hold Sleep Mode button to activate Sleep Mode.
2. When Sleep Mode is activated, the whole user interface will dim to low. Only the Power Button and Sleep Mode Button are lit. The unit will remain running at the speed set before Sleep Mode was activated.
3. To deactivate Sleep Mode, touch anywhere in the speed bar.
TURBO MODE
1. Touch Turbo Mode button to activate Turbo Mode.
2. When activated, all buttons on the UI are illuminated white.
3. To deactivate Turbo Mode, touch anywhere in the speed bar.
FILTER INDICATOR 1 / 2 / 3
1. When unit is operating properly, the filter indicators are illuminated white.
2. When filter lifespan has been reached, filter indicator goes out and change filter indicator turns red.
3. Filter light can be reset by holding the respective filter light button for 5 seconds. When filter indicator quickly flashes 6 times, the timer is successfully reset.
DFS INDICATOR
1. When unit is on and DFS is operating properly, the indicator is lit.
2. When DFS needs maintenance, DFS will automatically turn off. When DFS is turned off, indicator turns RED.
3. DFS can be activated / deactivated by touching DFS button. When DFS is deactivated, the DFS indicator turns off and DFS deactivation indicator turns red.
4. DFS is turned on by default.
WARNING: The cutting edge capacitance touch control technology is designed to operate under minimal pressure.Lightly touch or slide over the buttons for an optimal user experience. Different individuals have a different level ofcapacitance. Slight delay in response may occur depending on the capacitance one carries.

FIG 3-1
FIG 3-2
FIG 4
Routine Care & Maintenance 1. Filter replacement and maintenance schedule
Filters need to be replaced or maintained properly to maximize the unit’s performance. Maintenance schedule is based on pollution level. Following is the recommended maintenance schedule for most environments. Filters need to be replaced/cleaned more often if unit is being used in a heavily polluted environment:
2. Filter replacement and maintenance
Replaceable VOC pre-filter - replace every 6 months
Cleanable Poly Mesh Pre-filter and High Energy Grid - clean every 3 months
Main filter - replace every 9-12 months
VOC post-filter - replace every 6 months
WARNING: When DFS needs service, dirt in the high energy grid can create a short circuit. The power supply PCB shuts off and the RED indicator turns on. Turn the unit off and unplug it; then perform maintenance as indicated in the Filter replacement and maintenance section below.
WARNING: The unit should be turned off, unplugged and the motor should completely stop before any maintenance.
2-1 Pre-filter set maintenance
• Remove the front cover of main unit by grabbing both sides of about 1/3 of the distance from the bottom and pulling the bottom part away from the main body of the unit. (Fig 3-1)
• When the bottom of the front cover is a few inches away from the main body, use both hands to pull the front cover down slowly to disable child lock on top of the front cover. (Fig 3-2)
6

FIG 5
FIG 6
FIG 7
• The cleanable integrated pre-filter is locked into the front cover. Use one hand to hold the front cover frame. Use one finger to grab the small ring and pull out the integrated pre-filter. Clean as necessary. (FIG 4)
• After pulling out the integrated pre-filter, you will see the replaceable VOC pre-filter laying underneath. Replace as necessary. (FIG 5)
• Put the integrated pre-filter back into the front cover by locking all the side tabs to the front cover frame. Make sure all tabs are secured in the holes. (FIG 6)
2-2 High Energy Grid maintenance
• Turn the Safety Lock on High Energy Grid from vertical to horizontal; gently pull out the High Energy Grid and put aside on a secure, clean and dry surface. (FIG 7)
• Use a clean microfiber cloth to wipe off the dust on the High Energy plate and High Energy Wires. If High Energy Grid is cleaned with a damp cloth, air dry High Energy Grid before reinstallation. (FIG 8)
• Reinstall the High Energy Grid. High Energy Plate with holes and Safety Lock facing out towards the front of the unit (towards the cover). Safety Lock needs to be on top. Turn the lever from horizontal to vertical to lock the High Energy Grid in place.
WARNING: Please DO NOT put High Energy Grid on any wet surface. DO NOT drop the High Energy Grid. Dropping can result in serious damage. High Energy Grid should be completely dry before putting back into the unit or the red light will not go out and the DFS will not function.
7

FIG 10
FIG 8
FIG 9
2-3 Main filter & VOC post-filter replacement
• Pull out the High Energy Grid following steps described in the same section, Point 2-2 High
• Energy Grid maintenance. Then gently pull out the main filter and VOC post-filter cartridge.
(FIG 10)
• Un-wrap the plastic bag on both the new main filter and the new VOC post-filter.
• Reinstall main filter and VOC post-filter cartridge. Make sure the VOC post-filter is facing inside (toward the motor/fan). Main filter must go all the way back in the inner housing toward the fan.
• Reinstall the High Energy Grid following steps described above in the same section, Point 2-2High Energy Grid maintenance.
WARNING: The appliance is not to be used by children or persons with reducedphysical, sensory or mental capabilities, or lack of experience and knowledge,unless they have been given supervision or instruction. Children shall be supervisednot to play with the appliance.
8
NOTE: After maintenance of the filters, simply put the front cover back and your unit will run like new. Carefully align the vertically protrud ing child lock tabs in place, move the front cover upwards to secure to tabs. (Fig 3-2) Then use care to align the horizon tab with the slot on the bottom of the unit. Make sure it is closed tightly. (Fig 3-1)

This product complies with the maximum allowable concentration of ozone of 0.050 parts per million by volume (ppmv) in a 24h period. The Health Canada Guideline 2010 recommends that the maximum exposure limit, based on an averaging time of 8 hours, be 0.020 ppmv or less when tested in an ASHRAE 52.2 conforming test duct.*
9
3. Reset respective indicator after replacing/cleaning filters.
3-1 Reset pre-filter indicator: Hold filter 1/VOC pre-filter indicator for at least 5 seconds to reset timer.
3-2 Reset main filter indicator: Hold filter 2/main filter indicator for at least 5 seconds to reset timer.
3-3 Reset VOC post-filter indicator: Hold filter 3/VOC post-filter indicator for at least 5 seconds to reset timer.
3-4 Reset DFS indicator: Touch DFS indicator button to turn DFS on or off.
Note: When indicator is reset, the respective red light will go out and the indicator will return to normal (illuminated in white).

Troubleshooting 1. Unit will not turn ON. a. Check power connection: See if unit is plugged into a working AC outlet and the rear receptacle of the unit. b. Check front cover: see if the unit’s front cover is in place; inner lock pin located on bottom edge of the front screen frame should be placed in the interlock switch; front cover should be tightly shut. c. Check if fuse is blown.
2. The unit turns ON but no air blows out: Check whether plastic wrap on main filter, VOC pre-filter and VOC post-filter hasbeen removed.
3. Unit is ON, but no change in speed: Call Intellipure Customer Service (further examination by trained technician).
4. Pre-filter indicator is out and Change pre-filter indicator is illuminated in red: replaceable VOC pre-filter needs to be replaced and cleanable pre-filter needs to be cleaned.
5. Main filter indicator is out. Change main filter indicator is illuminated in red: Main filter needs to be replaced.
6. VOC post-filter indicator is out. Change VOC post-filter indicator is illuminated in red: VOC post-filter needs to be replaced.
7. DFS indicator is out and maintenance indicator is illuminated in red: DFS Technology is turned off or High Energy Gridneeds to be cleaned.
WARNING: If all suggested steps have been taken and problems persist, please contact Intellipure’s Customer Service Department for further examination by a trained technician.
NOTE: Contact Intellipure’s Customer Service Department to order new filters.
10

11
Warranty
Intellipure offers a 5 Year Limited Warranty
1. Retain proof of purchase and the original box and packaging materials
2. Mail Warranty Registration Card within 10 days of date of original purchase
OR
1. Fax Warranty Registration Card within 10 days of date of original purchase
2. To make a product claim, call 1.315.298.2904 to obtain a warranty claim number
Product RegistrationIntellipure offers a 5 Year Limited Warranty only to the original retail purchaser who completes the enclosed Warranty Registration Card and mails it within 10 days of purchase to: Intellipure Inc. 3420 Maple Ave. Pulaski, NY 13142-0485. or FAXES it to: 315.298.6992.
Phone: 315.298.2904 or Toll Free: 1.800.843.3860.
Limited WarrantyThis limited warranty applies only to the repair or replacement of any manufactured or supplied part of this product which, upon inspection by Intellipure authorized personnel, proves to have failed in normal use due to defects in material or workmanship. The sole responsibility of Intellipure under this Limited Warranty is, in its sole discretion, to either repair or replace a duly registered product (or defective part thereof) with the same or a comparable model within a reasonable period of time, subject to the following exclusions, limitations, statutory rights, and warranty claim procedures. This Limited Warranty is exclusive, and Intellipure expressly disclaims all other or additional warranties, whether written or oral, expressed or implied, including, but not limited to, warranties of merchantability, workmanship, or fitness for a particular purpose.
Warranty Coverage
5 Years on motor and blower
1 Year on electronic components
( Warranty information continued on page 12 )

12
Intellipure Customer ServiceUS Corporate Office3420 Maple Avenue, Pulaski NY USA 13142Tel: (+1) 315-298-2904 Toll Free 1.800.843.3860Please contact your local dealer for timely and professional service.
ExclusionsA.This Limited Warranty does not apply, or is void, as to any product or part damaged by (1) accident, misuse, abuse, or lack of reasonable care or normal maintenance; (2) installation or operation under conditions other than those recommended by Intellipure; (3) subjecting the product to any but the specified voltage; (4) servicing or disassembly by unauthorized personnel; (5) removing or defacing the serial number; or (6) modifying the original factory-assembled unit in any way.
B.THIS LIMITED WARRANTY DOES NOT APPLY TO SHIPPING CHARGES FOR PRODUCT SHIPPED TO OR FROM THE FACTORY OR DESIGNATED SERVICE CENTER IN CONNECTION WITH WARRANTY CLAIMS NOR DOES IT APPLY TO ANY DAMAGES OCCURRING DURING EACH SHIPMENT.
C.This Limited Warranty does not apply to installation, removal, reinstallation, and/or related expenses. This Limited Warranty does not apply to re-placeable filters and high-energy grid wires.
LimitationsIntellipure shall not be liable for property, incidental, and/or consequential damages of any kind and, unless otherwise prescribed by applicable state law, Intellipure shall not be liable for personal injury resulting from malfunctions, defects, misuse, improper operation or installation, or alteration of an Intellipure product or any part thereof. The exclusive remedy for a breach of this Limited Warranty is the repair or replacement of the defective product. In no case, shall liability under any other remedy prescribed by law exceed the purchase price of the product.
Statutory RightsThis Limited Warranty, subject to the above exclusions and limitations, gives you specific legal rights in addition to statutory rights you may have un-der application state law. Some states, however, do not permit the limitation or exclusion of incidental or consequential damages, so much limitation may not apply to you. To the extent that any provision of this Limited Warranty is inconsistent with applicable law, such provision shall be deemed void or amended, as necessary, to comply with such law.
intellipure.com
( Warranty information continued from page 11 )
Filter Replacement Schedule
DATE FILTER NOTE
