trihal - directory listing of sn/trihal dtr/trihal... · trihal cast resin transformer ... the...
TRANSCRIPT
GB
Trihal
Cast resin transformerinstructions for installationand maintenance

GB
- 2 -
Cast resin transformerinstructions for installation and maintenance
receipt and handling . . . . . . . . . . . . . . . . . . . . . . . . . . . . . . . . . . . . . . . . . . . . . . . 2installation . . . . . . . . . . . . . . . . . . . . . . . . . . . . . . . . . . . . . . . . . . . . . . . . . . . . . . . 2HV and LV connections . . . . . . . . . . . . . . . . . . . . . . . . . . . . . . . . . . . . . . . . . . . . 3Z option thermal protection . . . . . . . . . . . . . . . . . . . . . . . . . . . . . . . . . . . . . . . . . 4T option thermal protection . . . . . . . . . . . . . . . . . . . . . . . . . . . . . . . . . . . . . . . . . 5option forced ventilation . . . . . . . . . . . . . . . . . . . . . . . . . . . . . . . . . . . . . . . . . . . . 6commissioning . . . . . . . . . . . . . . . . . . . . . . . . . . . . . . . . . . . . . . . . . . . . . . . . . . . 6maintenance and after sales services . . . . . . . . . . . . . . . . . . . . . . . . . . . . . . . . . 7check-list before commissioning . . . . . . . . . . . . . . . . . . . . . . . . . . . . . . . . . . . . . 7
receipt and handling
preliminary checks
On receipt, ensure that the transformer has not been damaged during transport (LV busbars or HV connection terminals bent, broken insula-tors, damaged windings, wet transformer, damaged cover, contamination by foreign bodies, etc.), and check that any ordered accessories have been included in the delivery (rollers, electronic converter, etc.).Should the device have been damaged:
take delivery subject to reservations which should be indicated to the transporter and con-firm this by registered letter within three days.
write a report and send it without delay to your supplier (France Transfo or retailer as appropriate).
warning
This instruction manual is designed to apply to standard range cast resin dry type trans-formers, as defined in the France Transfo catalogues. For special transformers, i.e. those produced in accordance with a special require-ment or a customers specification, certain statements and recommendations may not be applicable (particular the paragraphs dealing with the IP31 enclosure, the HV and LV connections, the thermal protection, etc.)If you are in any doubt, please contact the after sales department.
tel. : +33 (0)3.87.70.57.72fax : +33 (0)3.87.70.56.21e-mail: [email protected]
storage
The cast resin transformer must be protected in storage from water and protected from dust generating work (masonry, sanding, etc.). The transformer is delivered in a plastic cover, this cover must be kept over the equipment whilst it is in storage. The cast resin transformer can be stored at a temperature down to – 25°C.
handling
The transformers are equipped with specific handling attachments.
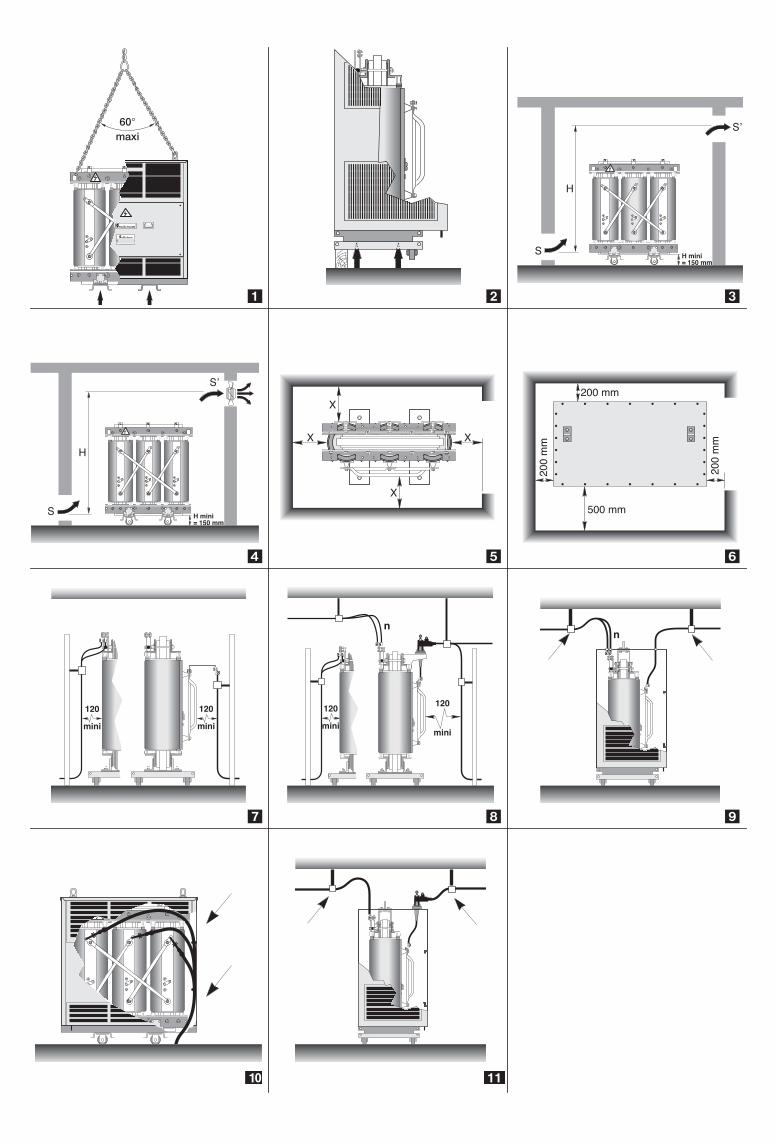
Iifting with slings (figure 1).For a transformer without an enclosure lifting is carrieed out using the 4 lifting lugs and for a transformer with an enclosure using 2 lifting lugs. The slings should not form an inside angle greater than 60°.
Iifting with a fork lift truck (figure 1).Remove the rollers and insert the forks in the
base channels.
towing.Towing the transformer, with or without enclo-sure, must be performed from the underbase. Holes of 27 mm diameter are provided for this purpose on all sides of the underbase. Towing can only be carried out in two directions: paral-lel to the underbase axis and perpendicular to that axis.
fitting the rollers.
either by lifting with slings (figure 1);
or by lifting with a fork lift truck (figures 1 and 2). In this case position the lifting forks in under-base channels. Place timbers of a greater height than the rollers under the channels and lower the transformer onto them. Position the jacks and remove the timbers.Attach the rollers in the desired position (two bi-directional rollers).Remove the jacks and allow the apparatus to rest on its rollers.
Note
: Transformers are generally wedged dur-ing transport using timbers that are attached to the vehicle’s base. It is thus essential to remove these timbers before lifting the transformer.
installation
general information
Due to the absence of any liquid dielectric, there is no risk of liquid “cold” (spillage) and “hot” (combustion) pollution, and due to the qualities of cast resin transformers, no fire precautions are necessary.
the cast resin transformer should not be installed in a flood hazard area.
it should not be installed at an altitude above 1000 metres, unless the altitude is specified at the time of ordering.
the transformer is designed to operate at rat-ed power in the ambient temperatures detailed below,
without reducing temperature rise due to the enclosure
.
the ambient temperature of the substation, where the transformer is installed, should be within the following limits : - minimum temperature : – 25°C ;- maximum temperature : + 40°C (unless a special request is made for a specially designed transformer to operate in higher ambient temperatures).
standard transformers are dimensioned in accordance with IEC 76 for an ambient temperature of :• maximum :40°C• daily average :30°C• yearly average :20°C.
Generally speaking the installation must be in compliance with IEC standard 71-1, 2 and 3 concerning insulation co-ordination.
Note : In order to ensure correct ventilation of the transformer, it should always be mounted on its rollers or raised to a height equal to that of the rollers
so as not to hinder correct transformer coding.
natural substation ventilation
(see figure 3)In the general case of natural cooling (AN), ventilation of the substation or the enclosure by natural convection, such ventilation must dissipate the heat generated by the trans-former’s total losses in operation.It should be noted that restricted air circulation reduces the transformer’s available power.Appropriate ventilation will consist of a fresh air intake opening of S cross-section at the bottom of the substation and an air outlet of cross-section S’ located above on the opposite wall at height H metres above the air intake opening.
and
P = the sum of the no-load and load losses of the transformer expressed in kW at 120°C as well as the losses emitted from all the equipement present in the premises.
S = the area of the air intake opening (allow for mesh factor) expressed in square metres.
S’ = area of the air outlet opening (allow for mesh factor) expressed in square metres.
H = height difference between the two openings expressed in metres.
This formula is valid for an average annual room temperature of 20°C and an altitude of 1000 m maximum.
Example : - one single transformer 1000 kVA,- Po = 2300 W, Pcc at 120°C = 11000 W,
i.e. P = 13.3 kW.If the distance between the grills = 2 m, then S = 1.7 m
2
of net surface area necessary.If we imagine a grill obstructing the air inlet by 30% ; the air inlet grill surface area should then be 1.5 m
1.5 m, and that of the air outlet should be 1.5 m
1.6 m.
S 0,18P
H---------------= S’ 1 10, S×=

- 3 -
forced ventilation of the premises
(see figure 4)This is required in the case of small or badly ventilated premises, with an annual average temperature greater than 20°C, or in the instance of frequent overloading of the transformer.So as not to disturb the natural convection in the premises, an extractor fan discharging air outside will be installed in the outlet hole located in the top part of the unit; it can be thermostat controlled.Recommended flowrate (m
3
/second) at 20°C = 0.10 PP = total losses to be removed, in kW, emitted by all the installed equipment, at full load.
Cast resin transformer without enclosure (IP 00)
(see figure 5)As the IP 00 protection index indicates, this transformer has no protection against touching or direct contact. In no instance should the surface of the resin be touched when the transformer is live, even if the transformer is equipped with plug-in connectors.When installing transformer in a secure substation :
eliminate risks of water dropping on the transformer (e.g. condensation from overhead pipes, etc.);
maintain minimum clearance distances to the walls in accordance with the insulation volt-ages given in the above table,
whilst providing sufficient space to access the primary volta-ge tapping points.
Should these distances not be possible to achieve please contact us.
according to HD 637 S1.Don’t take into account the access to tapping on the UV side.
ensure that the substation ventilation is sufficient to dissipate all losses emmitted by all equipment.
Cast resin transformer with IP 31 metal enclosure
(see figure 6)The integral, IP 31 metal enclosure is of indoor type and is not able to be installed as it stands outdoors. Its installation requires no particular precautions other than those detailed in the general installation instructions with the addi-tional consideration of
a minimum clearance requirement of 200 mm (500 mm on the HV side) between the exterior of the enclosure and the walls of the substation
so as not to obstruct the enclosures ventilation grills and to allow adequate cooling (figure 6), whilst providing sufficient space to access the primary voltage tapping points.Ventilation of the substation should be studied so as to fully dissipate all of the heat generated through losses the total losses emitted by all the equipement.
Recall
: the cast resin transformer must not be installed in a flood hazard area.
Warning
: the standard metal enclosure for transformers is IP 31, except for the underbase which is IP 21.
HV and LV connections
Important : the distance between the HV ca-bles, the LV cables or busbars, the neutral and the surface of the HV winding must be at least 120 mm except on the flat front part where the minimum distance will be that gi-ven by the HV terminals.
Cast resin transformer without metal enclosure (IP00)
Warning
: the resin coating, does not guarantee protection against touching or against direct contact when the transformer is energized.
standard HV and LV connections (figure 7).In all cases, the cables or busbars must be supported to avoid mechanical stress on the HV or LV terminals. The outgoing (or incoming) LV connections can be made from the top or the bottom (figure 7).The outgoing (or incoming) HV connections must be made to the top of the delta connection bars. It is possible to connect to the HV from below using a spacer (the spacer will not be supplied by France Transfo).
LV connections using CEP prefabricated busbar trunking.Connection is simplified as far as possible since the interface is delivered ready-mounted on the transformer, fixed to a support and connected to the LV terminals with flexible foil.Thus mounted, the assembly allows an on-site adjustment clearance of ±15mm along the 3 axes.The terminal block is delivered with the trans-former so that the interface and trunking can be connected.
HV connections with plug-in bushing (figure 8).In any case, the cables or busbars must be sup-ported to avoid mechanical stress on the plug-in bushing and the transformer’s LV output terminals. The outgoing (or incoming) LV connections can be made from above or below (see figure 8). The outgoing (or incoming) HV plug-in bushing must be made from above on the HV side (see figure 8).On request, as an option, a key-less locking system for the plug-in connectors can be in-stalled on the fixed parts.
In this configuration, the installation of plug-in connectors does not provide safety against direct contacts.
Cast resin transformer with IP 31 metal enclosure
The IP 31 metal enclosure must under no circumstances support loads other than those of the transformer’ HV supply cables. For any modifications to the enclosure, please consult us.
standard HV and LV connections (figure 9).In all cases, the cables or busbars must be supported to avoid mechanical stress on the transformer’s HV or LV terminals. The outgoing (or incoming) LV connections must be made upwards from the terminals under the enclosure cover (see figure 9).
The LV
cables should never pass between the HV coils and the enclosure.
The outgoing (or incoming) HV connections must be made to the top of the delta connection bars. The HV cables should pass upwards from the terminals under the enclosure cover, but they also have the possibility of entry from below (figure 10).
LV connections using CEP prefabricated busbar trunking.Connection is simplified as far as possible since the interface is delivered ready-mounted on the transformer, fixed to a support and connected to the LV terminals with flexible foil.Thus mounted, the assembly allows an on-site adjustment clearance of ±15mm along the 3 axes.The top of the enclosure is fitted with an aluminium cover plate opposite the interface connection terminals. This plate should be removed during installation and replaced by the sealing system supplied with the CEP trunking in compliance with IP 54.The terminal block is delivered with the transformer so that the interface and trunking can be connected.
HV connections from below (figure 10).In all cases, the cables or busbars must be supported to avoid mechanical stress on the transformer’s HV or LV terminals. The outgoing (or incoming) LV connections must be made upwards from the terminals under the enclosure cover (see figure 10).
The LV cables should never pass between the HV coils and the enclosure.
The outgoing (or incoming) HV connections must be made to the top of the delta connec-tions bars. A remove flap door located on the bottom right of the enclosure’s HV side allows the HV cables to be connected from below. The HV cables must be fastened inside the enclosure on the side panel, and they should at no time be at less than 120 mm from the HV coils (except on the flat front part where the minimum distance will be that of the HV terminals). For cables in cable ducts, allow a depth sufficient to accomodate the cable’s minimum bending radius.
HV connections with plug-in bushing (figure 11).In all cases, the cables or busbars must be sup-ported to avoid mechanical stress on the fixed parts of the plug-in bushing and the transformer’s terminals. The outgoing (or incoming) LV connections must be made upwards from the terminals under the enclosure cover (see figure 11).
The LV cables should never pass between the HV coils and the enclosure.
The outgoing (or incoming) HV plug-in bushing are made on the enclosure cover on the HV side. An optional, a key-less locking system for the plug-in connectors can be installed on the enclosure cover.
Warning
: the standard enclosure is IP 31, except for the underbase which is IP 21.
It is necessary to verify conformity with the IP 31 index after having drilled the cover plates provided for this purpose for the HV, LV and other connections.
insulation
(kV)
dimension X (mm) of the figure 5
7.2 9012 12017.5 16024 22036 320
GB
- 4 -
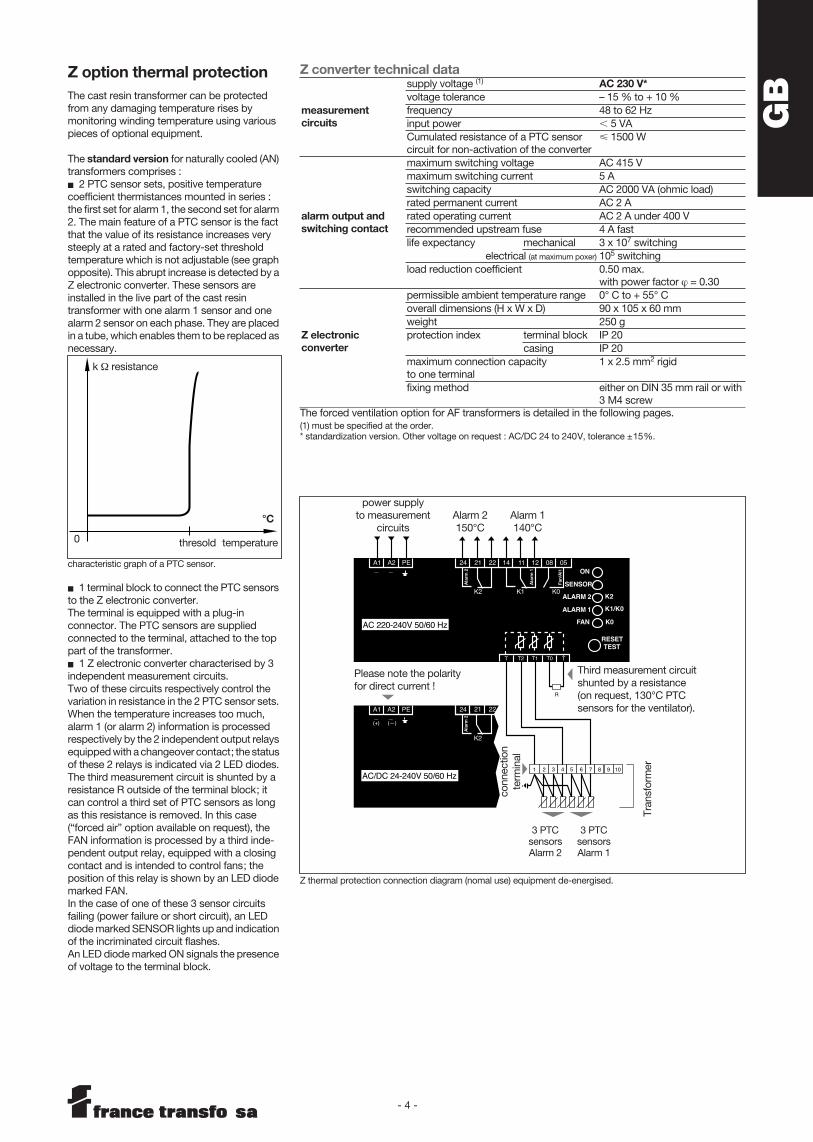
Z option thermal protection
The cast resin transformer can be protected from any damaging temperature rises by monitoring winding temperature using various pieces of optional equipment.
The
standard version
for naturally cooled (AN) transformers comprises :
2 PTC sensor sets, positive temperature coefficient thermistances mounted in series : the first set for alarm 1, the second set for alarm 2. The main feature of a PTC sensor is the fact that the value of its resistance increases very steeply at a rated and factory-set threshold temperature which is not adjustable (see graph opposite). This abrupt increase is detected by a Z electronic converter. These sensors are installed in the live part of the cast resin transformer with one alarm 1 sensor and one alarm 2 sensor on each phase. They are placed in a tube, which enables them to be replaced as necessary.
characteristic graph of a PTC sensor.
1 terminal block to connect the PTC sensors to the Z electronic converter.The terminal is equipped with a plug-in connector. The PTC sensors are supplied connected to the terminal, attached to the top part of the transformer.
1 Z electronic converter characterised by 3 independent measurement circuits. Two of these circuits respectively control the variation in resistance in the 2 PTC sensor sets. When the temperature increases too much, alarm 1 (or alarm 2) information is processed respectively by the 2 independent output relays equipped with a changeover contact; the status of these 2 relays is indicated via 2 LED diodes.The third measurement circuit is shunted by a resistance R outside of the terminal block; it can control a third set of PTC sensors as long as this resistance is removed. In this case (“forced air” option available on request), the FAN information is processed by a third inde-pendent output relay, equipped with a closing contact and is intended to control fans; the position of this relay is shown by an LED diode marked FAN. In the case of one of these 3 sensor circuits failing (power failure or short circuit), an LED diode marked SENSOR lights up and indication of the incriminated circuit flashes.An LED diode marked ON signals the presence of voltage to the terminal block.
k Ω resistance
temperaturethresold0
°C
Z converter technical data
The forced ventilation option for AF transformers is detailed in the following pages.
(1) must be specified at the order.* standardization version. Other voltage on request : AC/DC 24 to 240V, tolerance ±15%.
measurement circuits
supply voltage
(1)
AC 230 V*
voltage tolerance – 15 % to + 10 %frequency 48 to 62 Hzinput power
5 VACumulated resistance of a PTC sensorcircuit for non-activation of the converter
1500 W
alarm output and switching contact
maximum switching voltage AC 415 Vmaximum switching current 5 Aswitching capacity AC 2000 VA (ohmic load)rated permanent current AC 2 Arated operating current AC 2 A under 400 Vrecommended upstream fuse 4 A fastlife expectancy mechanical 3 x 10
7
switchingelectrical
(at maximum poxer)
10
5
switchingload reduction coefficient 0.50 max.
with power factor
ϕ
= 0.30
Z electronic converter
permissible ambient temperature range 0° C to + 55° Coverall dimensions (H x W x D) 90 x 105 x 60 mmweight 250 gprotection index terminal block IP 20
casing IP 20maximum connection capacity to one terminal
1 x 2.5 mm
2
rigid
fixing method either on DIN 35 mm rail or with 3 M4 screw
1 2 3 4 5 6 7 8 9 10
R
ON
SENSOR
ALARM 2
ALARM 1
FAN
RESETTEST
K0
K1/K0
K2
T TT2
K2
A1 A2 PE 24 21 22 14 11 12 08 05
K1 K0
T1 T0
Ala
rm 2
Ala
rm 1
Fan
/Al1
K2
A1
(—)(+)
A2 PE 24 21
Ala
rm 2
22
Z thermal protection connection diagram (nomal use) equipment de-energised.
power supply to measurement
circuits
3 PTC sensorsAlarm 2
Alarm 2150°C
Alarm 1140°C
Please note the polarity for direct current !
3 PTC sensorsAlarm 1
Third measurement circuit shunted by a resistance (on request, 130°C PTC sensors for the ventilator).
conn
ectio
n te
rmin
al
Tran
sfor
mer

- 5 -
T option thermal protection
The second option for thermal protection device a digital display of winding temperatures and includes :
PT100 sensors.The main feature of a PT100 sensor is that it gives the real time temperature on a scale of 0°C to 200°C, see graph opposite (accuracy
0.5 % of the measurement scale
1 deg.). Temperature control and display functions are performed via a digital thermometer. The 3 sensors, each comprising 1 white wire and 2 red wires, are installed in the live part of the Trihal transformer with 1 located on each phase.They are placed in a tube, which allows them to be replaced if necessary.
characteristic graph of a PT100 sensor.
1 terminal block to connect the PT100 sensors to the T digital thermometer.The terminal block is equipped with a plug-in connector. PT100 sensors are supplied connected to the terminal block fixed to the top part of the trans-former.
1 T digital thermometer characterised by 3 independent circuits. Two of these circuits monitor the temperature captured by the PT100 sensors, one for alarm 1, the other for alarm 2. When the temperature reaches 140°C (or 150°C) the alarm 1 infor-mation (or alarm 2) is processed by 2 indepen-dent output relays equipped with changeover contacts.The position of these relays is indicated by 2 diodes (LED).The third circuit monitors sensor or electrical supply failure.The corresponding relay (FAULT), which is independent and equipped with changeover contacts, is instantly switched as soon as the device is supplied power. Its position is also indicated by a diode (LED).
A FAN output is intended to control the start up of tangential fans in the case of forced venti-lation of the transformer (AF) : this option is shown on page 6.An additional input (CH4) can be connected to a sensor outside of the transformer (not supplied), intended to measure ambient temperature in the MV/LV substation.An RS 232 or RS 485 series output is available for connection to a plc or computer.
T thermal protection options available are :
- FAN 2 output variant to control the start up of an additional fan.- RS 232 or RS 485 series output variant for PLC or computer.The T digital thermometer is delivered with an installation manual.
Warning
: since the transformer is thermal
class F, the user has responsibility for setting the T digital thermometer with a maximum temperature of 140°C for alarm 1 and 150°C for alarm 2.Non compliance with these maximum temperatures release France Transfo from any liability for damage which may possibly be incurred by the transformer.
temperature °C
k Ω resistance
T converter technical data
(1) universal supply irrespective of polarity.
measurement circuits
supply voltage
(1)
24 V to 220 V AC/DC
frequency 50-60 Hz AC/DC
input power 10 VA AC/DC
alarm output and tripping contact
maximum switching voltage 250 V AC
maximum switching current 5 A (resistive circuit)
rated permanent/operating current 2 A under 220 V AC/DC
recommended upstream fuse 3 A
life expectancy mechanical 20 000 000 switching
electrical 50 000 h/85°C
load reduction coefficient 0.50 max. power factor
ϕ
= 0.30
operating conditions
permissible ambient temperature – 20° C to + 60° C
ambient humidity 90% RH (non condensable)
T digital thermometer
overall dimensions (H x W x D) 96 x 96 x 130 mm
weight 520 g
terminal bloc protection index IP 54 self extinguishing
maximum connection capacityon one terminal
25 mm
2
fixing method 92 x 92 mm, flush hole, attached with two rear pressure hooks
operating principle diagram for the T digital thermometer
RS 232 orRS 485 seriesoutput
FAN 2ventilation (outside of the transformer)
24-220 Vsupply
AC - DC
FANtransformerventilation(AF) 130°C
FAULTmonitoringof sensorfailures
AL 2alarm 2150°C
AL 1alarm 1140°C
PT100 sensors outsideof the transformer
PT100 sensors fittedin the transformer
transformercolumns
terminal block mountedon the transformer
whi
tere
dre
d

GB
- 6 -
option forced ventilation
In the event of temporary overloading, to avoid overheating of the windings, it is possible to in-stall forced ventilation.For IP 00, for powers greater than 630 kVA, it is possible to install forced ventilation to achieve a
temporary
increase in power of 25%, without any special modification.In all cases, this temporary increase of 25% can be obtained if detailed on ordering, and can even be taken as high as 40%.
However, if an increase in power is requested, account must be taken of the impact of this choice on the following points :- sections of cables and of prefabricated bus-bar trunking (CEP),- the rating of the transformer’s protective circuit breaker,- the size of inlet and outlet openings for air in the transformer room,- the life span of fans in service, which is considerably shortened compared with that of the transformer (3.5 compared to 30 years).
This option includes the supply of :- 2 sets of tangential fans, pre-cabled and con-nected to 1 single power connector per set,- 1 temperature measurement device, either Z or T type. For Z type, a third set of PTC sensors is added to the standard thermal protection, in place of the R resistor which originally shunts the third Z converter measurement circuit (see diagram shown on the “Z thermal protection” option).For T type, the digital converter comprises an output (FAN) intended to start the tangential fans (see diagram shown in the T thermal protection option).
This option includes either of the following :
a wiring box, mounted outside of the protective enclosure, to which are connected, sensors and power supplies for the fan sets on a terminal block,
a control cabinet, delivered separately (trans-former IP 00) or mounted on the protective enclosure, including :- motor protection fuses,- start up contactors,- thermal protection device.This unit is connected to the temperature sensors and fan sets if the transformer is delivered as IP31. Otherwise, it is the installer who makes the connections.
commissioning
installation location.The location must be dry, finished and free from any possibility of water entry.
The cast resin transformer should not be installed in an area liable to be flooded.
The location should have sufficient ventilation to ensure that the total heat losses of the installed transformers can be adequately dissipated. See pages 2 and 3.
checking the condition after storage.If the transformer is found to be covered with dust, clean it as much as possible with a vacuum cleaner then carefully blow with dry, degreased, compressed air or nitrogen and thoroughly clean the insulators.
cast resin transformers supplied with a plastic cover.To avoid contamination by foreign bodies (such as screws, nuts and washers, etc.),
the cover should remain in place whilst the trans-
former is being connected
: to gain access to the HV and LV connections, tear the cover around the tapping points, this cover will be re-moved when the equipment is commissioned.
transformer delivered with the original enclosure.The enclosure must never be subject to loads other than those of the transformer’s MV supply cables.Driling of the removable aluminium (amagnetic) plates at top and bottom, intended for the pas-sage of connecting cables must be performed with the plates removed from the enclosure to avoid any swarf being introduced into the windings.The installation within the enclosure of any swichgear or accessory, apart from correctly installed connections, is formally advised against and renders the warranty invalid.For any modifications, attachments and mounting of non France Transfo accessories on to the transformer, please fax our After Sales Service. See page 3.
HV and LV connections cables.In no case should the fixing points be made on the live part of the transformer.
The distance between the HV cables, the LV cables, or the LV bars and the surface of the HV winding must be at least 120 mm
, except on the flat front face where the minimum clear-ance will be that given by the terminals. See page 3.
connections of HV connectors.Connections tightening torque on the HV terminal and the tapping link bars (brass fixing with flat washers and contact) :
Maximum force on the HV terminals: 500 N.
connection of LV connectors.Connection tightening torque for the LV bars (6-8, lubrificated steel fixings) :
recall
: 1m.kg = 0.98 daN.m1N.m = 0.102 m.kg
auxiliary wiring.Auxiliary wiring from the transformer (con-nection to sensor terminal block) should be attached on rigid supports (without slack) and have sufficient clearance from live parts. The minimum clearance to be respected is deter-mined by the insulation voltage indicated on the rating plate. In addition, in no case should attachments be made to the live parts of the transformer.
parallel operation.Verify the identity of the HV and LV voltages and the compatibility of characteristics and especially of the vector groups and the imped-ance voltage. Make sure that identical tappings are selected for transformers to be connected in parallel.
checks before commissioning :
remove the protective cover and check all the connections (arrangements, distances, tightening torque);
check cable and busbars entries after con-nection through aluminium cover plates to ensure IP rating has been maintained;
in the same way, should there be an enclosure, check the earthing connections after
reassembling the covers;
verify that the position identity of tapping links on the three phases
are in accordance with the diagrams on the rating plate;
verify the transformer’s general state of cleanliness and carry out an insulation test checking HV / earth and HV / LV using a 2500 V insulation tester (Megger). The approximate value of the resistances are :HV/earth = 250 M
Ω
LV/earth = 50 M
Ω
HV/LV = 250 M
Ω
.If the values measured are significantly below this, check that the transformer is not moist. If it is, dry it with a rag and repeat the verification.If it is not, please contact our After Sales Service :
tel. : +33 (0)3.87.70.57.72fax : +33 (0)3.87.70.56.21e-mail: [email protected]
bolts M8 M10 M12 M14
tightening torque
m.kg
1 2 3 5
bolts M8 M10 M12 M14 M16
tightening torque
m.kg
1,25 2,5 4,5 7 10

- 7 -
maintenance and after sales service
maintenance
In normal use and environmental conditions, once a year check the tightness of the bolts on terminals and tapping links, and vacuum clean, and blow those places which are less accessible, with dry compressed air or nitrogen.The frequency of cleaning will depend on environmental conditions.In case of fast dust deposits, increase the yearly frequency, and if necessary filter the air cooling flow.In the case of greasy dust deposits, use only cold degreasing product to clean the resin surfaces.
after sales service
For any information or replacement parts it is essential to quote the main characteristics on the rating plate and especially the transformer’s serial number.
TECHNICAL MEMO(to be read from the rating plate)
N° :_________________
Year :_________________
Power :_________________ kVA
Frequency :_________________ Hz
Cooling :_________________
Vector group :_________________
Imp. voltage :_________________ %
HV insul. level :_________________ kV
LV insul. level :_________________ kV
High voltage
- position 1 :_________________ V
- position 2 :_________________ V
- position 3 :_________________ V
- position 4 :_________________ V
- position 5 :_________________ V
Low voltage :_________________ V
Total weight :_________________ kg
After Sales Service : tel. : +33 (0)3.87.70.57.72fax : +33 (0)3.87.70.56.21e-mail: [email protected]
check-list before commissioningoperations before connecting
check the information on the rating plate compared with your requirements (power, voltage, etc.)
install in clean, dry and flood-proof premisescorrect ventilation- the premise’s ventilation grills are unblocked and of a suitable size- distance of the device relative to the premise’s walls- distance of the device from the ground.
check the cleanness of the transformer and its general condition
chek the insulation resistances using a 2,500 V insulation tester measured values : HV / earth . . . . . . . . . . . . . . . . . . . . . . . MΩ MV / earth . . . . . . . . . . . . . . . . . . . . . . . MΩ HV / LV. . . . . . . . . . . . . . . . . . . . . . . . . . MΩ
tapping bars :- position according to the network voltage- check the bars are similarly positioned on all three coils (see rating plate) - check the tightening torque
Checks performed date : . . . . . . . . . . . . . . .
by : . . . . . . . . . . . . . . . . . . . . . . . . . . . . . . . .
operations before switching live
remove plastic cover
no foreign bodies on the device (swarf, screws, etc.) ; dust removal by vacuum clean
correct insulating distances between the cables and live parts (120 mm min.)The cast coils are considered as live parts
correct fixing of cables and busbars. No stress exerted on the transformer’s tapping points
wiring of the protection or ventilation auxiliary devices- insulation distances and fixing- functioning.
tightening torque of connections checked
earthing continuity (transfo cables - casing)
compliance with original protection index (IP) at cable passage points
unobstructed ventilation grills
in the case of parallel operation, checking of short circuit voltages, concordance of phases, voltage ratio
protections coordination must be checked : false informations or wrong setting of pro-tections (SEPAM) may lead to transformer’s destruction
Checks performed date : . . . . . . . . . . . . . . .
by : . . . . . . . . . . . . . . . . . . . . . . . . . . . . . . . . .
S’
H
S H mini = 150 mm
S
H
S’
H mini = 150 mm
X
X X
X
500 mm
200
mm
200
mm
200 mm
120
mini
120
mini
120
mini
n
120
mini
n
n° 216 452
Groupe Merlin Gerin · Usine de Maizières-lès-Metz (Moselle) France nº 216540
60°maxi

GE 215000 a En-Fr
Due to the evolution of standards and materials, the present document will bind us only after confirmation from our technical department.
Publication : Schneider Electric SAConception, réalisation : COREDIT
Schneider Electric Industries SA
05/2002
Adresse postale :France Transfo S.A.BP 10140F-57281Maizières-lès-Metz cedexFrancetél : 33 (0)3 87 70 57 57fax: 33 (0)3 87 51 10 16http://www.schneider-electric.com
RCS Nanterre B 954 503 439