transient thermal analysis workshop 6.2. workshop supplement transient thermal analysis august 26,...
TRANSCRIPT

Transient Thermal Analysis
Workshop 6.2

August 26, 2005Inventory
#002266WS6.2-2
AN
SY
S W
ork
ben
ch
- Sim
ula
tion
AN
SY
S W
ork
ben
ch
- Sim
ula
tion
AN
SY
S W
ork
ben
ch
- Sim
ula
tion
AN
SY
S W
ork
ben
ch
- Sim
ula
tion
Workshop Supplement
Transient Thermal Analysis
Workshop 6.2 - Goals
• In this workshop, we will analyze the electrically heated base typical of consumer steam irons like the one shown below.

August 26, 2005Inventory
#002266WS6.2-3
AN
SY
S W
ork
ben
ch
- Sim
ula
tion
AN
SY
S W
ork
ben
ch
- Sim
ula
tion
AN
SY
S W
ork
ben
ch
- Sim
ula
tion
AN
SY
S W
ork
ben
ch
- Sim
ula
tion
Workshop Supplement
Transient Thermal Analysis
Workshop 6.2 - Assumptions
Assumptions:
• The heating element contacts and transfers heat to the base using the pattern shown here
• Upon initial startup a heat flux of 0.001 W/mm2 is applied until a steady state is reached
• Heating follows a 30 second step cycle of 0 to 0.003 W/mm2 after steady state is reached
• The analysis will begin with the steady state solution and proceed through the cyclic loading described above

August 26, 2005Inventory
#002266WS6.2-4
AN
SY
S W
ork
ben
ch
- Sim
ula
tion
AN
SY
S W
ork
ben
ch
- Sim
ula
tion
AN
SY
S W
ork
ben
ch
- Sim
ula
tion
AN
SY
S W
ork
ben
ch
- Sim
ula
tion
Workshop Supplement
Transient Thermal Analysis
Workshop 6.2 - Start Page
• From the launcher start Simulation.
• Choose “Geometry > From File . . . “ and browse to the file “Iron.x_t”.
• When DS starts, close the Template menu by clicking the ‘X’ in the corner of the window.
August 26, 2005Inventory
#002266WS6.2-5
AN
SY
S W
ork
ben
ch
- Sim
ula
tion
AN
SY
S W
ork
ben
ch
- Sim
ula
tion
AN
SY
S W
ork
ben
ch
- Sim
ula
tion
AN
SY
S W
ork
ben
ch
- Sim
ula
tion
Workshop Supplement
Transient Thermal Analysis
Workshop 6.2 - Preprocessing
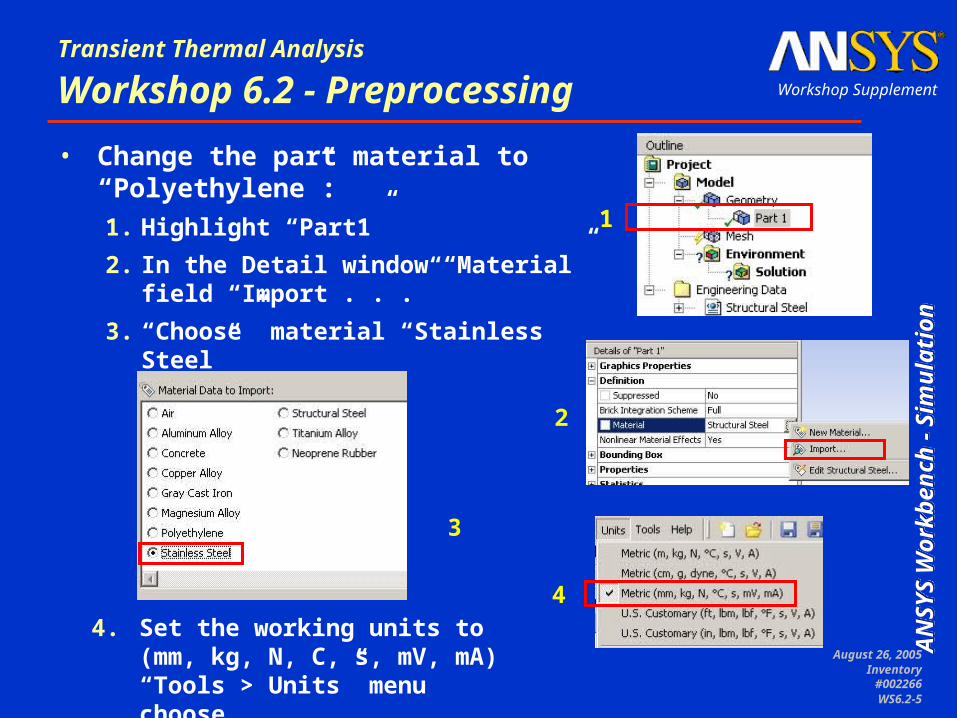
• Change the part material to “Polyethylene”:
1. Highlight “Part1”
2. In the Detail window “Material” field “Import . . .”
3. “Choose” material “Stainless Steel”
1
2
3
4. Set the working units to (mm, kg, N, C, s, mV, mA) “Tools > Units” menu choose
4

August 26, 2005Inventory
#002266WS6.2-6
AN
SY
S W
ork
ben
ch
- Sim
ula
tion
AN
SY
S W
ork
ben
ch
- Sim
ula
tion
AN
SY
S W
ork
ben
ch
- Sim
ula
tion
AN
SY
S W
ork
ben
ch
- Sim
ula
tion
Workshop Supplement
Transient Thermal Analysis
Workshop 6.2 - Environment
5. Select surface representing the heating element on the face of the iron
6. “RMB > Insert > Heat Flux”.
7. Set “Magnitude” field to 0.001 W/mm27
5
6

August 26, 2005Inventory
#002266WS6.2-7
AN
SY
S W
ork
ben
ch
- Sim
ula
tion
AN
SY
S W
ork
ben
ch
- Sim
ula
tion
AN
SY
S W
ork
ben
ch
- Sim
ula
tion
AN
SY
S W
ork
ben
ch
- Sim
ula
tion
Workshop Supplement
Transient Thermal Analysis
. . . Workshop 6.2 - Environment
8. Select the bottom surface (opposite the heat flux side) and 6 side surfaces of the iron (7 faces)
9. “RMB > Insert > Convection”
10. Change to “Temperature Dependent”
11. Choose “Import” in the correlation field
12. Select “Stagnant Air – Vertical Planes1”
13. Set ambient temperature to 20 deg. C
8
9
12
11
10
13
August 26, 2005Inventory
#002266WS6.2-8
AN
SY
S W
ork
ben
ch
- Sim
ula
tion
AN
SY
S W
ork
ben
ch
- Sim
ula
tion
AN
SY
S W
ork
ben
ch
- Sim
ula
tion
AN
SY
S W
ork
ben
ch
- Sim
ula
tion
Workshop Supplement
Transient Thermal Analysis
. . . Workshop 6.2 - Environment
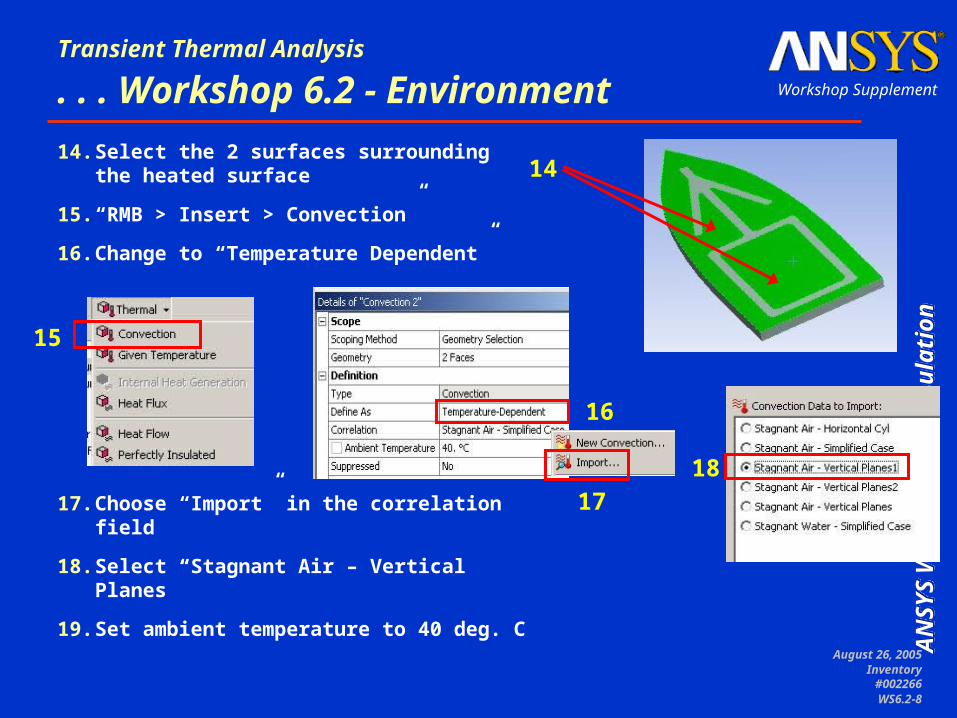
14. Select the 2 surfaces surrounding the heated surface
15. “RMB > Insert > Convection”
16. Change to “Temperature Dependent”
17. Choose “Import” in the correlation field
18. Select “Stagnant Air – Vertical Planes”
19. Set ambient temperature to 40 deg. C
14
15
18
16
17

August 26, 2005Inventory
#002266WS6.2-9
AN
SY
S W
ork
ben
ch
- Sim
ula
tion
AN
SY
S W
ork
ben
ch
- Sim
ula
tion
AN
SY
S W
ork
ben
ch
- Sim
ula
tion
AN
SY
S W
ork
ben
ch
- Sim
ula
tion
Workshop Supplement
Transient Thermal Analysis
Workshop 6.2 - Solution
• Add temperature and total heat flux results.
20. Highlight the Solution branch.
21. “RMB > Insert > Thermal > Temperature”, repeat for total heat flux
22. Solve
22
20
21

August 26, 2005Inventory
#002266WS6.2-10
AN
SY
S W
ork
ben
ch
- Sim
ula
tion
AN
SY
S W
ork
ben
ch
- Sim
ula
tion
AN
SY
S W
ork
ben
ch
- Sim
ula
tion
AN
SY
S W
ork
ben
ch
- Sim
ula
tion
Workshop Supplement
Transient Thermal Analysis
Workshop 6.2 - Results
• A review of the results shows the maximum steady state temperature is approximately 51.7 degrees C
• The worksheet view of the environment shows that an energy balance has been achieved– Convection1 + Convection2 ≈ 5.2 W
– Applied Load = 0.001W/mm2 * Area• Area ≈ 5276 mm
August 26, 2005Inventory
#002266WS6.2-11
AN
SY
S W
ork
ben
ch
- Sim
ula
tion
AN
SY
S W
ork
ben
ch
- Sim
ula
tion
AN
SY
S W
ork
ben
ch
- Sim
ula
tion
AN
SY
S W
ork
ben
ch
- Sim
ula
tion
Workshop Supplement
Transient Thermal Analysis
Workshop 6.2 – Transient Solution
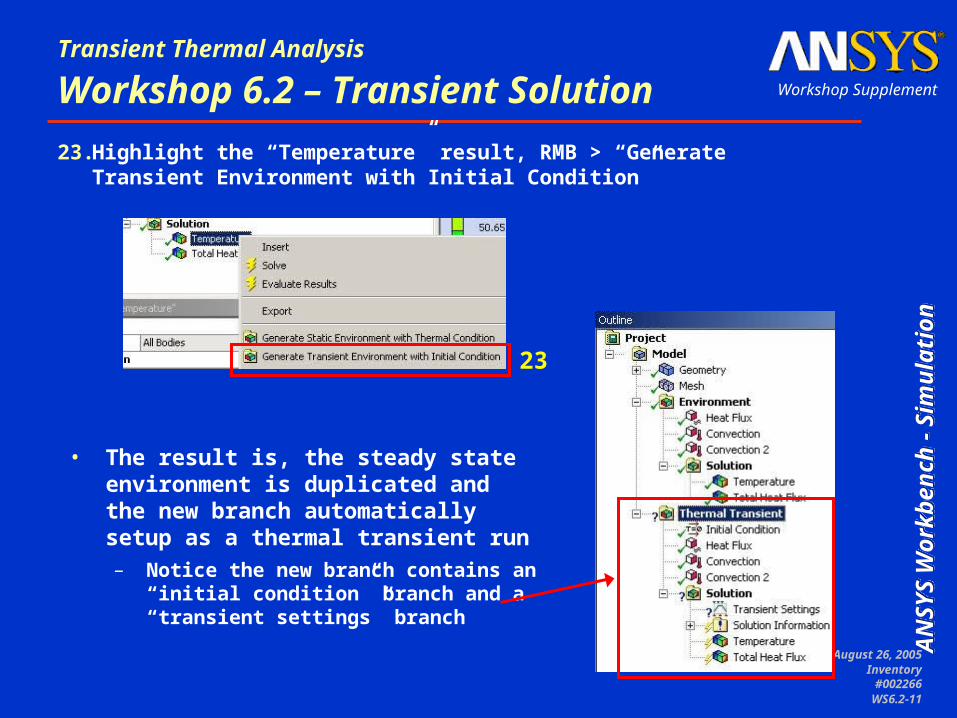
23. Highlight the “Temperature” result, RMB > “Generate Transient Environment with Initial Condition”
23
• The result is, the steady state environment is duplicated and the new branch automatically setup as a thermal transient run– Notice the new branch contains an
“initial condition” branch and a “transient settings” branch

August 26, 2005Inventory
#002266WS6.2-12
AN
SY
S W
ork
ben
ch
- Sim
ula
tion
AN
SY
S W
ork
ben
ch
- Sim
ula
tion
AN
SY
S W
ork
ben
ch
- Sim
ula
tion
AN
SY
S W
ork
ben
ch
- Sim
ula
tion
Workshop Supplement
Transient Thermal Analysis
Workshop 6.2 – Transient Setup
24. Begin the transient setup by specifying an end time of 180 seconds for the analysis in the toolbar
25. Inspection of the initial condition details shows no action is required. The steady state (non-uniform) temperature result from the “Environment” branch is mapped to the transient branch
24
25

August 26, 2005Inventory
#002266WS6.2-13
AN
SY
S W
ork
ben
ch
- Sim
ula
tion
AN
SY
S W
ork
ben
ch
- Sim
ula
tion
AN
SY
S W
ork
ben
ch
- Sim
ula
tion
AN
SY
S W
ork
ben
ch
- Sim
ula
tion
Workshop Supplement
Transient Thermal Analysis
. . . Workshop 6.2 - Transient Setup
26. Highlight “Heat Flux” in the Thermal Transient branch
27. In the heat flux detail change “Define As” to “Load History”
28. In the “History Data” field choose “New Load History . . . “
26
27
28
August 26, 2005Inventory
#002266WS6.2-14
AN
SY
S W
ork
ben
ch
- Sim
ula
tion
AN
SY
S W
ork
ben
ch
- Sim
ula
tion
AN
SY
S W
ork
ben
ch
- Sim
ula
tion
AN
SY
S W
ork
ben
ch
- Sim
ula
tion
Workshop Supplement
Transient Thermal Analysis
. . . Workshop 6.2 - Transient Setup
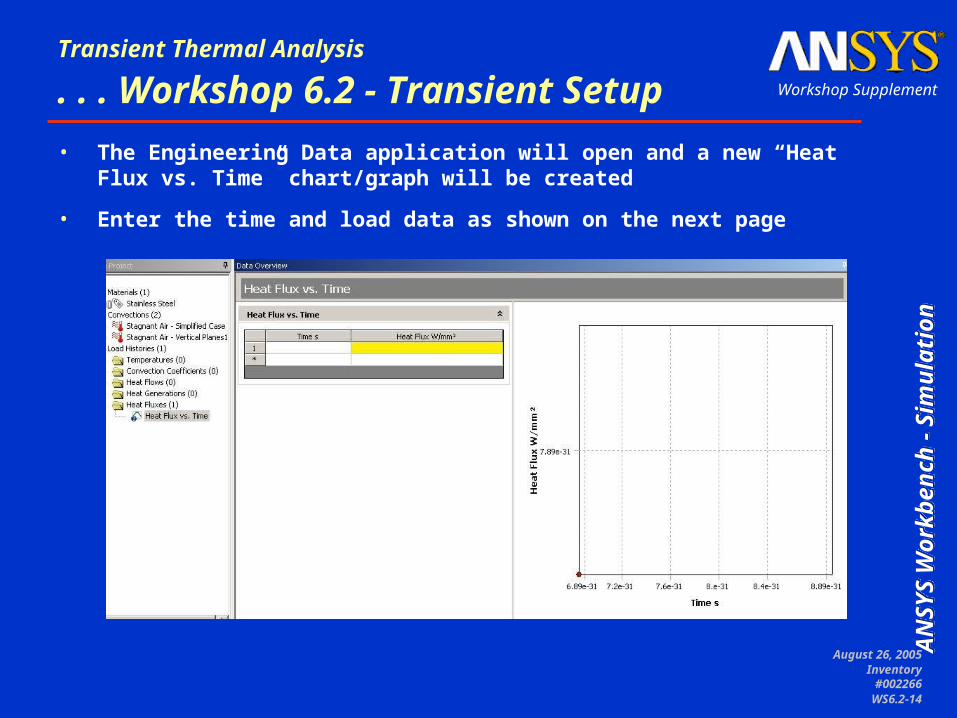
• The Engineering Data application will open and a new “Heat Flux vs. Time” chart/graph will be created
• Enter the time and load data as shown on the next page

August 26, 2005Inventory
#002266WS6.2-15
AN
SY
S W
ork
ben
ch
- Sim
ula
tion
AN
SY
S W
ork
ben
ch
- Sim
ula
tion
AN
SY
S W
ork
ben
ch
- Sim
ula
tion
AN
SY
S W
ork
ben
ch
- Sim
ula
tion
Workshop Supplement
Transient Thermal Analysis
. . . Workshop 6.2 - Transient Setup
29. Enter time and load information as described in the problem statement– 30 second increments
– 0.003 W/mm2 Heat Flux
29

August 26, 2005Inventory
#002266WS6.2-16
AN
SY
S W
ork
ben
ch
- Sim
ula
tion
AN
SY
S W
ork
ben
ch
- Sim
ula
tion
AN
SY
S W
ork
ben
ch
- Sim
ula
tion
AN
SY
S W
ork
ben
ch
- Sim
ula
tion
Workshop Supplement
Transient Thermal Analysis
. . . Workshop 6.2 - Transient Setup
30. Highlight the “Transient Settings” branch
31. Toggle off all items but “Heat Flux” in the “Visible” and “Active” columns of the Timeline Legend Control
31
30
Notice the automatic time steps are based on the end time:
Initial = ET/100, Min = ET/1000, Max = ET/10
Leave time steps as default

August 26, 2005Inventory
#002266WS6.2-17
AN
SY
S W
ork
ben
ch
- Sim
ula
tion
AN
SY
S W
ork
ben
ch
- Sim
ula
tion
AN
SY
S W
ork
ben
ch
- Sim
ula
tion
AN
SY
S W
ork
ben
ch
- Sim
ula
tion
Workshop Supplement
Transient Thermal Analysis
. . . Workshop 6.2 - Transient Setup
• Toggling off all but the heat flux allows easier inspection of the timeline chart in this case
• Since the heat flux is the only load defined as a “non-constant” it will have the only influence on the placement of the automatic step resets
Reset points
As expected, each reset point coincides
with an inflection point on the load
history
August 26, 2005Inventory
#002266WS6.2-18
AN
SY
S W
ork
ben
ch
- Sim
ula
tion
AN
SY
S W
ork
ben
ch
- Sim
ula
tion
AN
SY
S W
ork
ben
ch
- Sim
ula
tion
AN
SY
S W
ork
ben
ch
- Sim
ula
tion
Workshop Supplement
Transient Thermal Analysis
Workshop 6.2 - Transient Results
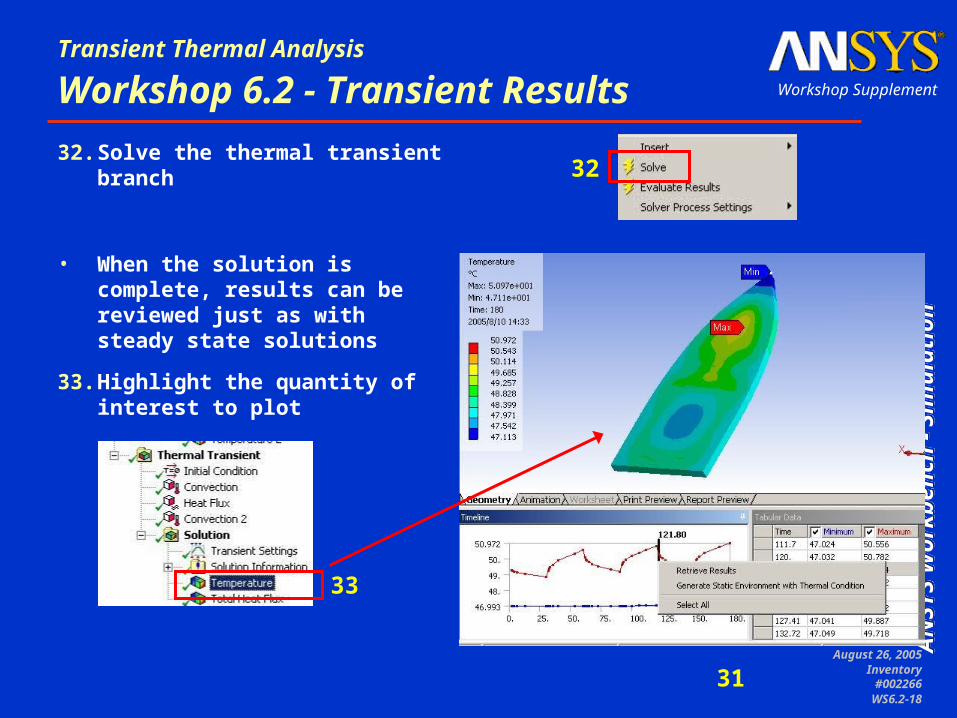
32. Solve the thermal transient branch
• When the solution is complete, results can be reviewed just as with steady state solutions
33. Highlight the quantity of interest to plot
31
33
32
August 26, 2005Inventory
#002266WS6.2-19
AN
SY
S W
ork
ben
ch
- Sim
ula
tion
AN
SY
S W
ork
ben
ch
- Sim
ula
tion
AN
SY
S W
ork
ben
ch
- Sim
ula
tion
AN
SY
S W
ork
ben
ch
- Sim
ula
tion
Workshop Supplement
Transient Thermal Analysis
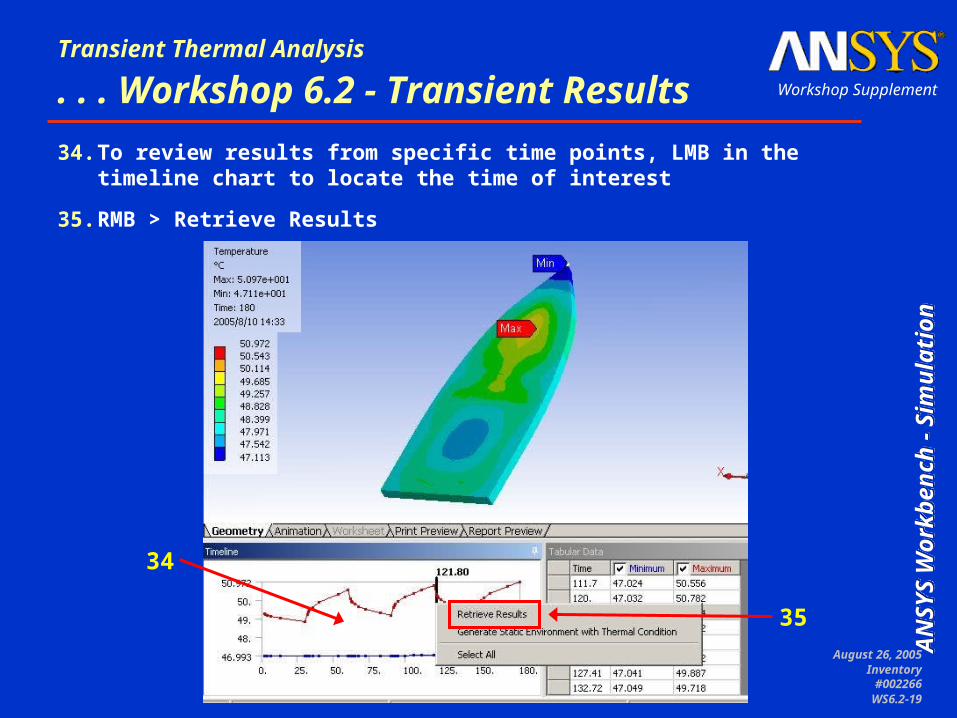
. . . Workshop 6.2 - Transient Results
34. To review results from specific time points, LMB in the timeline chart to locate the time of interest
35. RMB > Retrieve Results
35
34

August 26, 2005Inventory
#002266WS6.2-20
AN
SY
S W
ork
ben
ch
- Sim
ula
tion
AN
SY
S W
ork
ben
ch
- Sim
ula
tion
AN
SY
S W
ork
ben
ch
- Sim
ula
tion
AN
SY
S W
ork
ben
ch
- Sim
ula
tion
Workshop Supplement
Transient Thermal Analysis
. . . Workshop 6.2 - Transient Results
• Notice, when a new time point is selected in the time line, the result detail is displayed in red until the results matching the time selection are retrieved
• Plotting the “Global Maximum” temperature from the Solution Information branch shows the model has not reached a cyclic equilibrium

August 26, 2005Inventory
#002266WS6.2-21
AN
SY
S W
ork
ben
ch
- Sim
ula
tion
AN
SY
S W
ork
ben
ch
- Sim
ula
tion
AN
SY
S W
ork
ben
ch
- Sim
ula
tion
AN
SY
S W
ork
ben
ch
- Sim
ula
tion
Workshop Supplement
Transient Thermal Analysis
. . . Workshop 6.2 - Transient Results
• Using the Probe Tool allows individual parts of the model to be evaluated over time
• Multiple Probes can be plotted on the same graph
Single Probe Multiple Probes
