training basic (nx power_lite)_india_20111115 (2)
TRANSCRIPT


Shoe Adhesive Training
- Basic group
Henkel

C·O·N·T·E·N·T·S
The Theory of Adhesion
Classification of Shoe Adhesive
Various Types of Bonding Failure
Standard Operation Procedures for Stockfit
Standard Operation Procedures for Assembly
2

The Theory of Adhesion
Classification of Shoe Adhesive
Various Types of Bonding Failure
Standard Operation Procedures for Stockfit
Standard Operation Procedures for Assembly
3

Definition
Adhesive Substance(s) to be applied to surfaces with a view
to producing either a temporary attachment or a permanent
bond between component part of a footwear
Adhesive joint An assembly made by the use of an
adhesive
Adherends (substrate)
Solids materials in the adhesive
joint, other than the adhesive
Adhesion (bond)
The phenomenon, which allows A
the adhesive to transfer a load B
AB
CB
A
Adherend
Adhesion betweensubstrate and adhesive
from the adherend to the C Adhesive
adhesive joint4

Terminology
POT LIFE
- The time for which the adhesive, prepared for application
including the incorporation of any curing agent or other
additive, remains usable.
- Factors affecting pot life
• 1-component: Tendency of the adhesive to dry out and
lose solvent
• 2-component:
• Type and amount of additive(curing agent or additive)
• Pot life tends to be shorter at higher temperatures
which speed up the chemical reaction.
5

Terminology
SHELF LIFE (STORAGE LIFE)
- The time for which an adhesive can be stored, under the
conditions recommended by the manufacturer, and still
remain usable.
- Normally specified for unopened containers
- Users should store adhesives at the correct temperature.
• Too low temp : irreversible phase separation
• Too high temp: accelerate solvent loss or premature
reaction of constituents
• The temperature for water-based type is somewhat
higher than for solvent-based type.
6

Terminology
VISCOSITY
- The resistance of a liquid to flow
- The more difficult it is to stir a liquid adhesive, the
higher viscosity.
- Viscosity can be controlled for improving workability
and penetrating property and adjusting coating weight.
- Viscosity depends on,
• Solvent-based: Type of solvent, solids content
• Water-based: Solids content, presence of thickening
agents
• Hot-melt: Melt temperature
7

Terminology
SOLIDS CONTENT
- The proportion of the adhesive which remains as solid
material in the bond area once any volatile substances have
been lost.
- Usually expressed as percentage by mass.
COATING WEIGHT (COVERAGE)
- The amount of adhesive applied per unit area
- It depends on solids content, viscosity, application method
and nature of the surface.
8

Terminology
DRYING TIME
- The time taken for the volatile solvents or water to
evaporate from an applied coating.
- Factors affecting DRYING TIME
• Solvent blend, water to be lost
• Temperature, relative humidity
• Rate of air flow over the coating
Air movement and increased temperature speed up
drying, whereas high humidity may retard drying
especially with water-based adhesive.
9

Terminology
OPEN TIME
- The time between adhesive application and assembling the
bond.
- There is a recommended minimum-to ensure sufficient
drying, and a maximum-to ensure that the tack life is not
exceeded, for a satisfactory bonding result.
- Therefore, the open time is longer than the drying time but
shorter than the tack life.
10

Terminology
TACK
- An empirical property of an adhesive-coated surface which
is to a great extent assessed subjectively by the feeling of
stickiness to touch and which up to a point is an indication
that the adhesive film is still active.
- Pressure sensitive adhesive may be permanently tacky.
GREEN STRENGTH (INITIAL STRENGTH)
- The bond strength immediately on release from the bonding
press.
- Green strength varies with time from bonding.
11

Terminology
HEAT RESISTANCE
- Shoes must resist exposure to heat during the service life.
- Heat sources: Warm conditions during storage, transport or
display in shop windows, warm climates, and heaters and
hot conditions in the home or workplace.
AGEING
- The change of properties of an adhesive bond with time,
especially under the influence of heat, moisture and
chemicals.
12

How Adhesive Work?
By wetting the surface of substrate, gaps are filled up
with adhesive and through Chemical/Physical bond
and cohesive force of adhesive, adhesion is formed.
Moisture, oil, dust,
other contaminants
Substrate
Attaching
Cleaning the surface
Cementing
Roughing
Priming
13
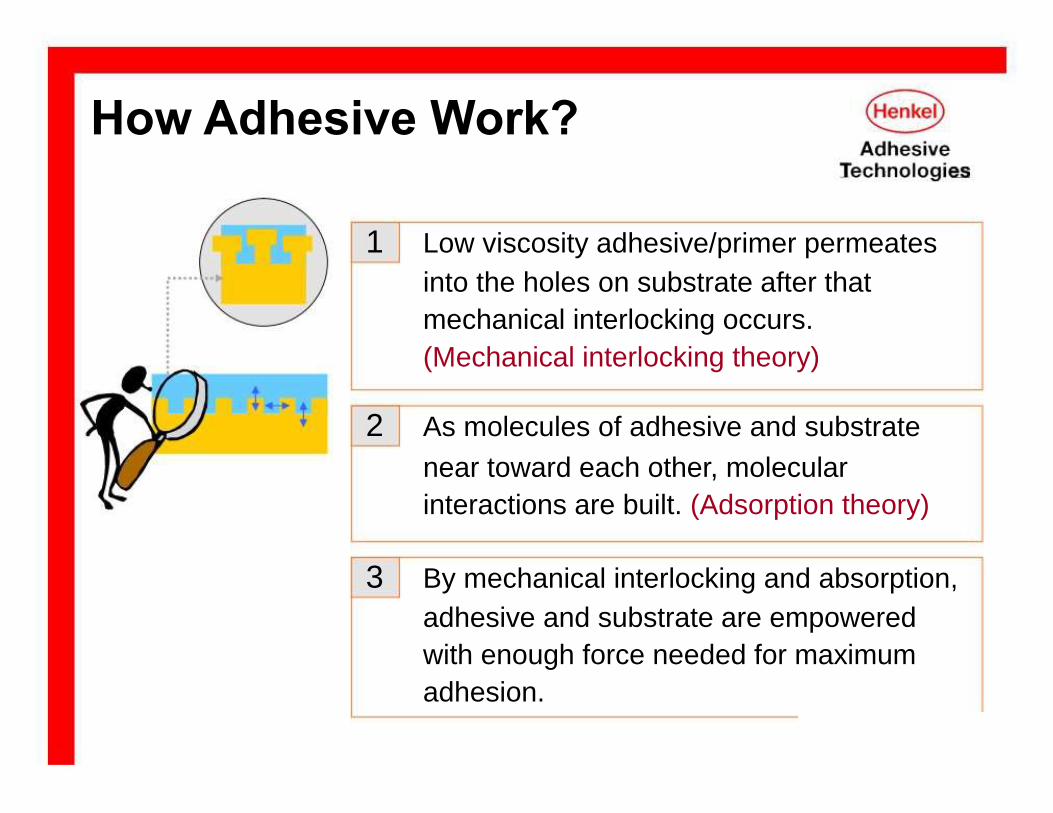
How Adhesive Work?
1 Low viscosity adhesive/primer permeates
into the holes on substrate after that
mechanical interlocking occurs.
(Mechanical interlocking theory)
2 As molecules of adhesive and substrate
near toward each other, molecular
interactions are built. (Adsorption theory)
3 By mechanical interlocking and absorption,
adhesive and substrate are empowered
with enough force needed for maximum
adhesion.
14

How Adhesive Work?
4 For compatible polymers, molecular chain
extending on the interface, hydrogen
bond and ionic bond collaborate to
achieve the adhesion force. By this stage,
interfaces disappear and even formation
is formed. (Diffusion theory)
So cleaning, surface treatment, priming and
cementing all play an important role in achieving
the necessary adhesion!
15

Importance of Cleaning
What the most important in bonding process is to keep
the surface of substrate clean.
Rubber O/S : W/B Detergent Degreasing
Cleaning the
surfacePhylon M/S : Warm Water Wash
PU M/S : W/B Cleaning
Plastics, Synthetics : S/B Cleaning
Leather : Mechanical Roughing
16

Requirements for Good Shoe Adhesives
• Flexible and Strong
• Resistance to heat, water, weather, solvent, etc.
• Workability
• Proper price
• Discoloration resistance against contaminants and
sunlight
• Resistance to plasticizer
• Being curable at room temp or quick curing type
• Good grab(=Setting) after pressing
• Low hazards
• Stable property and appearance during storage andtransportation.
17

The Theory of Adhesion
Classification of Shoe Adhesive
Various Types of Bonding Failure
Standard Operation Procedures for Stockfit
Standard Operation Procedures for Assembly
18

Classification of Shoe Adhesives
- Main bonding items
Edge foldingTPR counter
Padding
Sockliner
Mid sole / Out sole
Accessories, Logo
PU sole / Air bag
19

Basic Process
Bonding Process
Check the bonding property and information ofSubstrate
Pretreatment
Priming
Cementing
substrate, ingredient & composition
Choose the most efficient way to remove
bonding disturbing factor from the adherend
Choose the best Primer according to the substrate
Choose the best Adhesive according to the
property and environment
20

Classification of Shoe Adhesives
Adhesive
Primer
Cleaner
Curing agent
• Solvent-based PU & CR
• Water-based PU & CR
• Water-based acrylic emulsion
• Thermoplastic & PU reactive hot-melt
adhesive
• Solvent-based / Water-based
• Solvent-based / Water-based
• For solvent-based adhesives
• For water-based adhesives
21

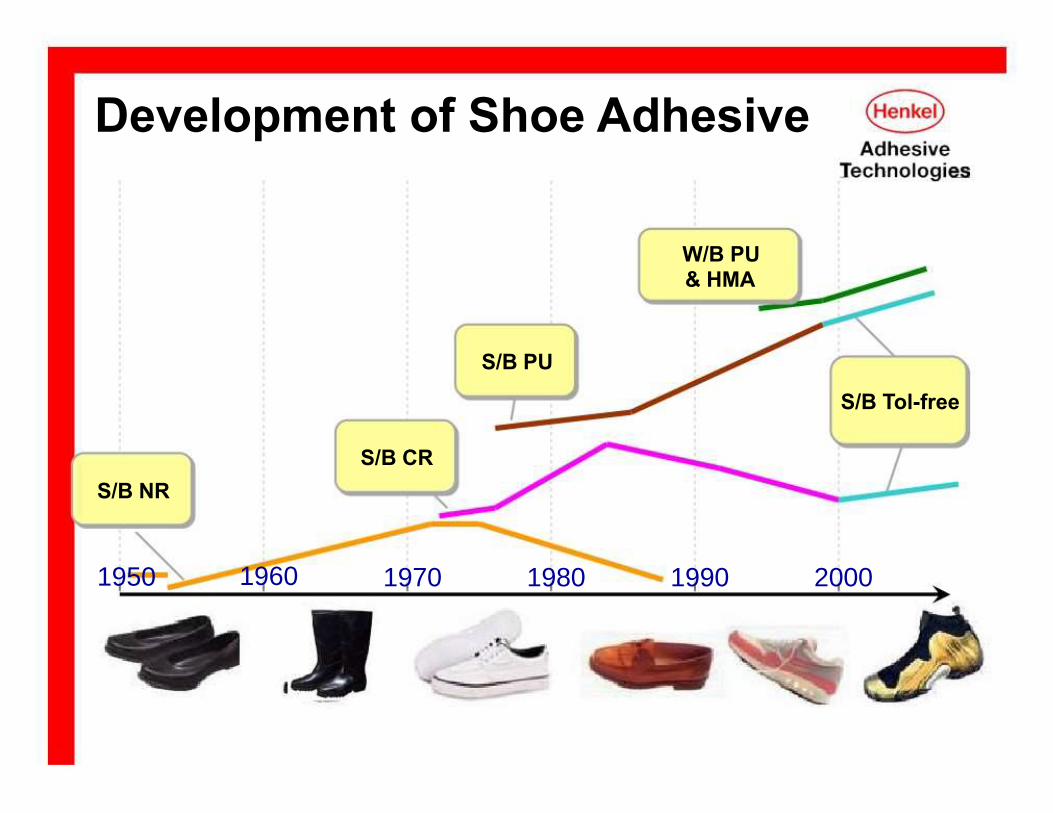
Development of Shoe Adhesive
W/B PU& HMA
S/B PU
S/B Tol-free
S/B CR
S/B NR
1950 1960 1970 1980 1990 2000
22

Classification of Shoe Adhesives
CR(Chloroprene Rubber) based adhesive- The main component is Polychloroprene rubber, a kind of
synthetic rubber called as Neoprene rubber. It is classified into
two types, general solution and modified reaction type.
- Along with the development of shoe industry, most of CR based
adhesives have been replaced with PU based adhesives and
Hot-melt adhesive.
- Henkel Product
D-TAC: S/B CR Solution type
D-PLY, BUFFNON: S/B Modified CR type
AQUACE C- series : W/B CR adhesives
23

Classification of Shoe Adhesives
PU(Polyurethane) based adhesive- The main components of PU adhesive RM are
polyisocyanates
and polyester polyol and the using areas are stock-fitting and
assembly line.
- With characteristic of good Anti-discoloration,good green
bonding
strength , good green heat resistance etc, the using PU
Adhesive
is very common.- Toluene-free type adhesives are currently being converted
with
WB PU product.
- Henkel Product
BONDACE series : S/B PU adhesives
AQUACE W- series : W/B PU adhesives24

Classification of Shoe Adhesives
Hot Melt Adhesive- Hot melt adhesive is defined as an adhesive applied from the
melter, gaining strength upon solidification and crystallization
- 100% Solid & Simplification working process, productivity
improvement and PDS reduction.
- Temporary bonding before upper stitching,adhesion of padding
and liner,fixing back counter, lamination of sockliner, attaching
accessory and making shoe box.
- Henkel Product
MELTACE series : Thermoplastic HMA
MELTACE R- series : Reactive HMA
25

Classification of Shoe Adhesives
z W/B Acryl adhesive
- Adhesive made by Polymerization with acrylate monomer
- For lamination & sticker on upper material
- Good to water resistance , washing , anti-discoloration and
adhesion
- Good to continuous working with using of lamination machine.
- Henkel Product
z AQUACE L- series : For lamination
z AQUACE S- series : For sticker
26

The Theory of Adhesion
Classification of Shoe Adhesive
Various Types of Bonding Failure
Standard Operation Procedures for Stockfit
Standard Operation Procedures for Assembly
27

Types of Bonding Failure
Adhesive peeling from material
x Unsuitable primer or/and adhesive used.
x Poor pretreatment of material before
applying an adhesive.
Poor coalescence of adhesive film
x Over drying time.
x Over cooling time and/or temperature.
x Poor compatibility between adhesives
28

Types of Bonding Failure
Material breakdown
x The best result in peeling test.
Material breakdown - a shallow layer
of material separate
x Insufficient roughing against leather skin.
x Not enough penetration of adhesive into the
surface of a material.
29

Types of Bonding Failure
Cohesive failure of adhesive
x Insufficient drying.
x Insufficient cohesive force & green strength.
x Migration of plasticizer, if contained.
x Insufficient curing due to lack of amount
and poor quality of hardener.
30

The Theory of Adhesion
Classification of Shoe Adhesive
Various Types of Bonding Failure
Standard Operation Procedures for Stockfit
Standard Operation Procedures for Assembly
31

Standard Operating Procedures
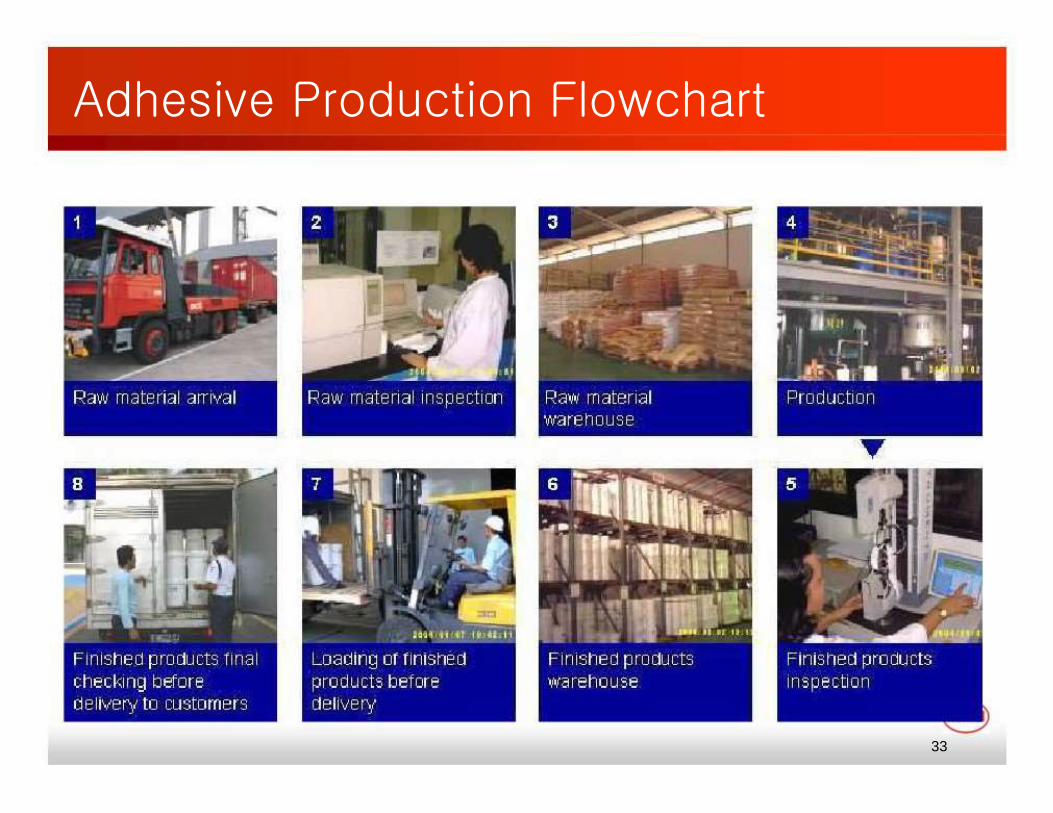
Adhesive Production Flowchart
33

Warehousing
Ideal Storage Condition
SBA WBA HMA HMMC
5~40 5~35 5~40 5~40Temp.
40±20% 40±20% 40±20% 40±20%Humidity
Avoid Avoid Avoid AvoidSunlight
RequiredVentilation
Not Notrequired required
Required
34

How to Use Adhesive
Water-based PU adhesive / primer / fluid
• Subdivide W/B primer and adhesive product preferably into 3Kg PE
beaker.(Fig. 1) - Maximum weight of adhesive for hardener mixing
should not exceed 5Kg,
• Add suitable hardener with proper quantity/percentage.(Fig. 2)
Water Based Cement
• AQUACE W-06 : ARF-40 : ARF-45 = 100 : 5 : 1
• AQUACE W-08 : ARF-40 = 100 : 5
Water Based Primer
• AQUACE W-104/105 : ARF-40 = 100 : 5
• AQUACE PR-651: ARF-45 = 100 : 3
• Mix them using electric agitator at 200~300RPM for over 8 minutes.(Fig.
3)
• Recommended Pot Life : 2 hrs maximum
1
2
3
35

How to Use Adhesive
Solvent-based adhesive / primer
• Subdivide S/B primer and adhesive product preferably into 3Kg PE
beaker.(Fig. 1) - Maximum weight of adhesive for hardener mixing should
not exceed 5Kg,
• Add the suitable hardener with proper quantity/percentage.(Fig. 2)
• Influence by relative humidity is not significant to primer and adhesive
properties but following changes are recommended for extreme humidity
condition.
• When RH is 80% and above,
: Solvent Based Cement
Desmodur RFE = 100 : 5, ARF 1000 = 100 : 6
: Solvent Based Primer
Desmodur RFE = 100 : 4, ARF 1000 = 100 : 5
• When RH is below 80%,
: Solvent Based Cement
Desmodur RFE = 100 : 4, ARF 1000 = 100 : 5
: Solvent Based Primer
Desmodur RFE = 100 : 3, ARF 1000 = 100 : 4
• Mix them using electric agitator at 200~300RPM for over 3 minutes.(Fig.
3)
• Recommended Pot Life : 1 hr maximum
• For special purpose primer (e.g. primer for difficult to bond material), please
1
2
3
36

How to Use Adhesive
Water-based chlorinating primer for rubber
• Slightly shake the container of base solution 3-4 times before
putting in the powder.
• Put the powder into the container of base solution.(Fig. 1)
• Record the powder mixing time. Pot life is max 1 hour for WB O/S
primer and max 3 hours for TFA O/S primer.
• Shake the container manually for 5 minutes or by shaking machine
at the rate of 60 times/min until complete dissolution.(Fig. 2)
• While shaking the container, the color of the mixture will turn to
colorless transparent.
• Leave the solution at room temp for 20 minutes.
• Make visual confirmation of the complete dissolution of the powder
before use.
• Pour 200~300g of the solution into a proper glass or ceramic
bowl.(Fig 3)
• The rest of the solution in the PE container should be kept tightly
sealed.
• Use lid to cover the upper part of the bowl to prevent thinner from
the evaporation into the work place which results in the
condensation of the solution and contamination of the air.(Fig. 4)
1 2
3
437

Production
Stockfit
Material Pretreatment
Assembly
Material Pretreatment
Priming Cementing
Priming Cementing
Pressing
& Cooling
Pressing
& CoolingFinishing
38

Stockfit
Material Pretreatment
Rubber
Phylon
Die-cut EVA
TPU
Pebax
Nylon
Priming CementingPressing
& Cooling
39

Stockfit
Rubber Degreasing Priming Cementing
1 Prepare rubber
• Prevent the generation of blooming on rubber surface.
• Rubber should be degreased using Ultrasonic Machine within 14
days after pressing. (Within 7 days if possible)
• More intensive care in rubber compounding is needed to reduce
failure bonding, adhesive peeling from the rubber surface.
• There should be no change in rubber compounding formulation.
• Rubber scrap should be max.25%
• Rubber should be optimally cured. (not over / under cure)
• Minimize usage of mold release agent.
Pressing& Cooling
40

Stockfit
Rubber Degreasing Priming Cementing
2 Degrease with CL-800A ˧ Dehydrate
• Dilute CL-800A with water. Water : CL-800A = 25:1
• Immerse rubber sole in CL-800A solution for above 50 seconds.
• Dehydrate rubber by air blow for 5~10 seconds.
• Tips!
- Keep the pH value of the solution at >10.5
- Check pH every hour.
- Keep the solution temperature between 60~70.
- Clean the tank every week.
3 Rinse with water
• Rinse with water for over 35 seconds.
• Tips!
- Water should be kept clean.
Pressing& Cooling
41

Stockfit
Rubber Degreasing Priming Cementing
4 Rinse with CL-800B ˧ Dehydrate
• Dilute CL-800B with water. Water : CL-800B = 25:1
• Immerse rubber sole in CL-800B solution over 35 seconds.
• Dehydrate rubber by air blow for 5~10 seconds.
• Tips!
- Keep the pH value of the solution as 2~3.
- Check pH every hour.
- Keep the solution temperature between 45~55.
- Clean the tank every week.
5 Heat dry
• Dry by heat chamber at 60×3minutes.
Pressing& Cooling
42

Stockfit
Rubber Degreasing Priming Cementing
6 Preheat the surface of rubber
• Preheating is not a mandatory process but is recommendable before
priming because it improves workability and bond strength.
• Preheating condition is 50(surface temp)×2 min 30 sec ~3 min.
7 Apply rubber primer on rubber
• Prepare WB Rubber primer. See page 33 for details.
• Apply WB Rubber primer on rubber thinly and evenly using cotton
cloth.
• Tips!
- Apply primer within 5 hours after sole degreasing. Max is 24
hours
- Change used cotton cloth every 1 hour.
- Residual solution and extracted powder on the bowl should be
removed before re-filling the solution. Provide 2 bowls per one
operator.
Pressing& Cooling
43

Stockfit
Rubber Degreasing Priming Cementing
8 Dry
• Dry completely at 50(surface temp)×3min ~ 3 min 30 sec.
• The drying condition might change depending on the process or
material applied.
• Tips!
- Constantly check the inner chamber temperature to avoid
sudden temperature increase
- Insufficient drying causes adhesive failures and over drying
causes interface separating between adhesives.
Pressing& Cooling
44

Stockfit
Rubber Degreasing Priming Cementing
9 Apply adhesive ˧ Dry
• Prepare AQUACE W-08, a water-based PU adhesive. See page 33 for
details.
• Apply AQUACE W-08 evenly and thinly by brush.
• Dry at 55~60× 3 min.
• Tips!
- Apply adhesive within 18 hours after priming.
- Change application tool regularly.
- The drying condition might change depending on the process or
material applied.
Pressing& Cooling
45

Stockfit
Rubber Degreasing Priming Cementing
10 Attach ˧ Press ˧ Cooling (Chilling)
• Attach each cemented material as soon as possible.
• Pressing condition
- Assure steady, even pressure and sufficient pressing time
- Required pressure: 30 kg/cm2, 8~10 seconds minimum
• Cooling condition
- Proper cooling helps to achieve better initial bond strength
- Recommended cooling condition: Perform enough chilling to
lower the surface temp of center part of M/S to below 40
Pressing& Cooling
46

Stockfit
Material Pretreatment
Rubber
Phylon
Die-cut EVA
TPU
Pebax
Nylon
Priming CementingPressing
& Cooling
47

Stockfit
Phylon Degreasing Priming Cementing
1 Degrease with CL-800B ˧ Dehydrate
• Dilute CL-800B with water. Water : CL-800B = 30:1
• Immerse phylon in CL-800B solution for 4 minutes.
• Dehydrate phylon by air blow for 5~10 seconds.
• Tips!
- Keep the pH value of the solution as 2~3.
- Check pH every hour.
- Keep the solution temperature between 50~60.
- Clean and refresh the tank every week.
2 Rinse with water ˧ Dehydrate
• Rinse with water for 2 minutes.
• Dehydrate phylon by air blow for 5~10 seconds.
• Tips!
- Water should be kept clean.
- Keep the water temperature between 52~58.
Pressing& Cooling
48

Stockfit
Phylon Degreasing Priming Cementing
3 Heat dry
• Dry at 50×above 90 seconds.
The alternative
• Rubber degreasing process can be applied for phylon cleaning.
Pressing& Cooling
49

Stockfit
Phylon Degreasing Priming Cementing
4 Preheat the surface of phylon
• Preheating is not a mandatory process but is recommendable
before priming because it improves bond strength.
• Preheating condition is 40~50(surface temp)×2min 30sec ~ 3min.
5 Apply UV primer on phylon
• Apply UV Primer on phylon evenly using cotton cloth or brush.
• Tips!
- Apply an UV primer within 24 hours after sole washing.
Pressing& Cooling
50

Stockfit
Phylon Degreasing Priming Cementing
6 Dry
• Dry completely at 45~50(surface temp)×2 minutes.
• The drying condition might change depending on the process or
material applied.
7 Apply UV
• UV Treatment Condition:
- Regular Phylon-Black: 0.50 ~ 0.55 J/cm2
- Regular Phylon-White: 0.54 ~ 0.59 J/cm2
- LS-3 Phylon-Black: 0.60 ~ 0.70 J/cm2
- LS-3 Phylon-White: 0.65 ~ 0.75 J/cm2
Pressing& Cooling
51

Stockfit
Phylon Degreasing Priming Cementing
8 Stamping ˧ Keeping
• After UV irradiation, mark irradiation date on the surface of the sole.
• UV treated phylon should be kept in a black poly-bag immediately
after irradiation.
• Shelf life after UV irradiation is max 2 weeks.(3 days preferred)
• Tips!
- Time from UV irradiation to stockfit and assembly should be
minimized.
- It is important to follow the time constraints in accordance with
stamped date on the sole.
- “First-in, First-out guide line should be followed at all times to
make sure it does not exceed the time constraints.
Pressing& Cooling
52

Stockfit
Phylon Degreasing Priming Cementing
9 Apply adhesive ˧ Dry
• Prepare AQUACE W-08. See page 33 for details.
• Apply AQUACE W-08 evenly and thinly by brush.
• Dry at 55~60(surface temp)× 3 min.
• Tips!
- Apply adhesive within 18 hours after priming.
- Change application tool regularly.
- The drying condition might change depending on the process or
material applied.
Pressing& Cooling
53

Stockfit
Phylon Degreasing Priming Cementing
10 Attach ˧ Press ˧ Cooling(Chilling)
• Attach cemented material as soon as possible.
• Pressing condition
- Assure steady, even pressure and sufficient pressing time
- Required pressure: 30 kg/cm2, 8~10 seconds minimum
• Cooling condition
- Proper cooling helps to achieve better initial bond strength
- Recommended cooling condition: Perform enough chilling to lower
the surface temp of center part of M/S to below 40
Pressing& Cooling
54

Stockfit
Material Pretreatment
Rubber
Phylon
Die-cut EVA
TPU
Pebax
Nylon
Priming CementingPressing
& Cooling
55

Stockfit
Die-cutEVA
Roughing Priming CementingPressing& Cooling
1 Roughing
• Rough the bonding area of EVA after skiving.
• Remove residual dust on the surface by air blow.
• Tips!
- Since residual dust on the surface after roughing can cause
bonding problem, it should be removed completely.
2 Priming ˧ Dry
• Apply EVA Primer )to the whole surface of EVA using cotton cloth.
• Dry completely at 45~50(surface temp)×3min ~ 3min 30sec.
• Tips!
- Sufficient amount of primer should be applied.
- Divide primer into 500~600g unit and fill in a bowl with a lid in order
to prevent the solution from evaporating into the air during use.
- The drying condition might change depending on the process or
material applied.
56

Stockfit
Die-cut
EVARoughing Priming
PressingCementing
& Cooling
3 Apply adhesive ˧ Dry
• Prepare AQUACE W-08. See page 33 for details.
• Apply AQUACE W-08 evenly and thinly by brush.
• Dry at 55~60(surface temp)× 3 min.
• Tips!
- Apply adhesive within 18 hours after priming.
- Change application tool regularly.
- The drying condition might change depending on the process or
material applied.
57

Stockfit
Die-cut
EVARoughing Priming Cementing
Pressing
& Cooling
4 Attach ˧ Pressing ˧ Cooling ( Chilling )
• Attach cemented material as soon as possible.
• Pressing condition
- Assure steady, even pressure and sufficient pressing time
- Required pressure: 30 kg/cm2, 8~10 seconds minimum
• Cooling condition
- Proper cooling helps to achieve better initial bond strength
- Recommended cooling condition: Perform enough chilling to lower
the surface temp of center part of M/S to below 40
5

Stockfit
Material Pretreatment
Rubber
Phylon
Die-cut EVA
TPU
Pebax
Nylon
Priming CementingPressing
& Cooling
59

Stockfit
TPUSolvent
PrimingCleaning
PressingCementing
& Cooling
1 Solvent Cleaning
• Wipe the surface of TPU with cotton cloth soaked with solvent(MEK) or solvent-based
cleaner(233seires).
• Dry completely at room temp.×10min or 45~50(surface temp)×2min.
• Tips!
- Refresh the bowl/container with solvent or cleaner on a regular basis to prevent solvent or
cleaner from contamination.
2 Priming
• Apply BONDACE 232-2 or 232HF-2 onto TPU with cotton cloth or brush.
• Tips!
- Sufficient amount of primer should be applied.
- Divide primer into 500~600g unit and fill in a bowl having a lid in order to prevent the solution from
evaporating into the air during use.
60

Stockfit
TPU
3 Dry
SolventCleaning
Priming CementingPressing& Cooling
• Dry completely at 50(surface temp)×3min ~ 3min 30sec.
• Tips!
- The drying condition might change depending on the process or material applied.
4 Apply adhesive ˧ Dry
• Prepare AQUACE W-08. See page 33 for details.
• Apply AQUACE W-08 evenly and thinly by brush.
• Dry at 55~60(surface temp)× 3 min.
• Tips!
- Apply adhesive within 18 hours after priming.
- Change application tool regularly.
- The drying condition might change depending on the process or material applied.
61

Stockfit
TPUSolvent
PrimingCleaning
PressingCementing
& Cooling
5 Attach ˧ Pressing ˧ Cooling (Chilling)
• Attach cemented material as soon as possible.
• Pressing condition
- Assure steady, even pressure and sufficient pressing time
- Required pressure: 30 kg/cm2, 8~10 seconds minimum
• Cooling condition
- Proper cooling helps to achieve better initial bond strength
- Recommended cooling condition: Perform enough chilling to lower
the surface temp of center part of M/S to below 40
62

Stockfit
Material Pretreatment
Rubber
Phylon
Die-cut EVA
TPU
Pebax
Nylon
Priming CementingPressing
& Cooling
63

Stockfit
PebaxSolvent
PrimingCleaning
PressingCementing
& Cooling
1 Solvent Cleaning
• Wipe the surface of Pebax with cotton cloth soaked with
solvent(MEK) or solvent-based cleaner(233series).
• Dry completely at room temp.×10min or 45~50(surface
temp)×2min.
• Tips!
- Refresh the bowl/container with solvent or cleaner on a regular
basis to prevent solvent or cleaner from contamination.
2 Priming
• Mix Pebax primer with hardener(Desmodur RFE, 5~7% by primer weight)
and apply to the whole surface of Pebax with cotton cloth.
• Tips!
- Pot life is 3 hrs max.(1 hour preferred)
- Divide primer into 500~600g unit and fill in a bowl having a lid in
order to prevent the solution from evaporating into the air during use.
64

Stockfit
Pebax
3 Dry
SolventCleaning
Priming CementingPressing& Cooling
• Dry completely at 70(surface temp)×above 5min.
• Tips!
- Insufficient drying may result in defective bonding.
- The drying condition might change depending on the process or
material applied.
4 Apply adhesive ˧ Dry
• Prepare AQUACE W-08. See page 33 for details.
• Apply AQUACE W-08 evenly and thinly by brush.
• Dry at 55~60(surface temp)× 3 min.
• Tips!
- Apply adhesive within 18 hours after priming.
- Change application tool regularly.(Usually every 30 minutes)
- The drying condition might change depending on the process or
material applied.
65
Stockfit
PebaxSolvent
PrimingCleaning
PressingCementing
& Cooling
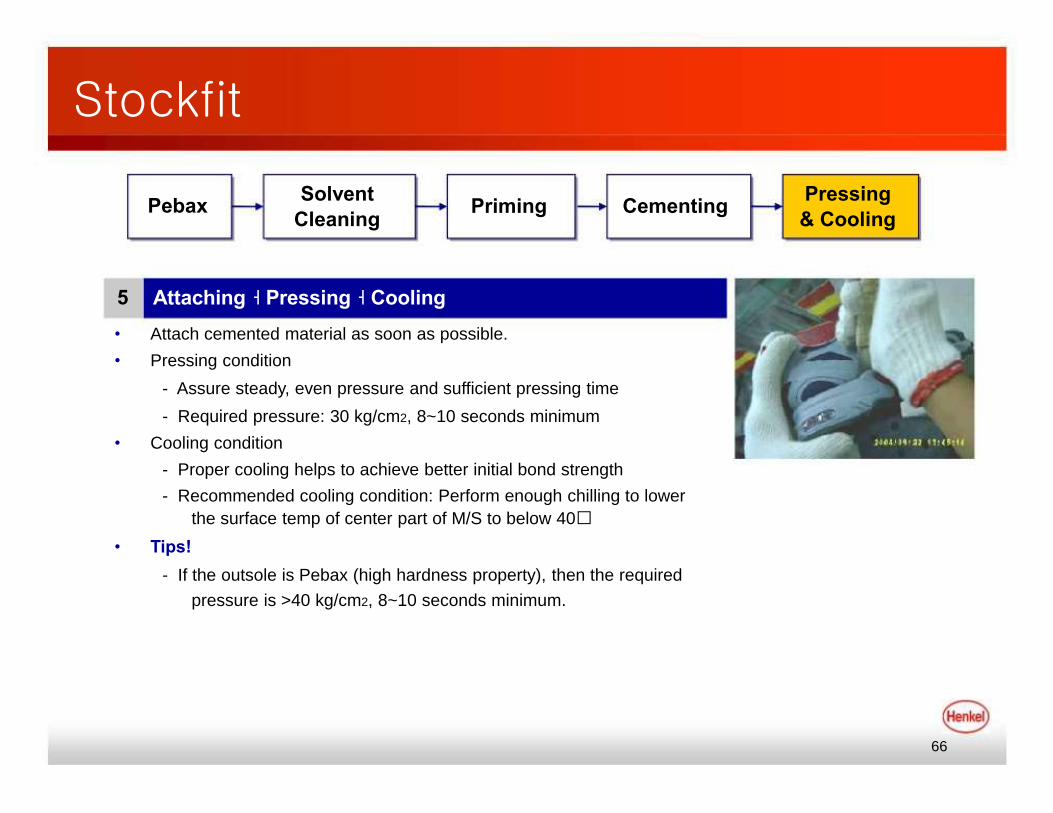
5 Attaching ˧ Pressing ˧ Cooling
• Attach cemented material as soon as possible.
• Pressing condition
- Assure steady, even pressure and sufficient pressing time
- Required pressure: 30 kg/cm2, 8~10 seconds minimum
• Cooling condition
- Proper cooling helps to achieve better initial bond strength
- Recommended cooling condition: Perform enough chilling to lower
the surface temp of center part of M/S to below 40
• Tips!
- If the outsole is Pebax (high hardness property), then the required
pressure is >40 kg/cm2, 8~10 seconds minimum.
66

Stockfit
Material Pretreatment
Rubber
Phylon
Die-cut EVA
TPU
Pebax
Nylon
Priming CementingPressing
& Cooling
67

Stockfit
NylonSolvent
PrimingCleaning
PressingCementing
& Cooling
1 Solvent Cleaning
• Wipe the surface of Nylon with cotton cloth soaked with solvent(MEK) or solvent-based
cleaner(233series).
• Dry completely at room temp.×10min or 45~50(surface temp)×2min.
• Tips!
- Refresh the bowl/container with solvent or cleaner on a regular basis to prevent solvent or
cleaner from contamination.
2 Priming
• Mix Nylon primer with hardener(Desmodur RFE, 5~7% by primer weight) and apply to the whole surface
of Nylon with cotton cloth.
• Tips!
- Pot life is 3 hrs max.(1 hour preferred)
- Divide primer into 500~600g unit and fill in a bowl having a lid in order to prevent the solution from
evaporating into the air during use.
68

Stockfit
Nylon
3 Dry
SolventCleaning
Priming CementingPressing& Cooling
• Dry completely at 70(surface temp)×above 5min.
• Tips!
- Insufficient drying may result in defective bonding.
- The drying condition might change depending on the process or material applied.
4 Apply adhesive ˧ Dry
• Prepare AQUACE W-08. See page 33 for details.
• Apply AQUACE W-08 evenly and thinly by brush.
• Dry at 55~60(surface temp)× 3 min.
• Tips!
- Apply adhesive within 18 hours after priming.
- Change application tool regularly.
- The drying condition might change depending on the process or material applied.
69

Stockfit
NylonSolvent
PrimingCleaning
PressingCementing
& Cooling
5 Attach ˧ Pressing ˧ Cooling
• Attach cemented material as soon as possible.
• Pressing condition
- Assure steady, even pressure and sufficient pressing time
- Required pressure: 30 kg/cm2, 8~10 seconds minimum
• Cooling condition
- Proper cooling helps to achieve better initial bond strength
- Recommended cooling condition: Perform enough chilling to lower
the surface temp of center part of M/S to below 40
70

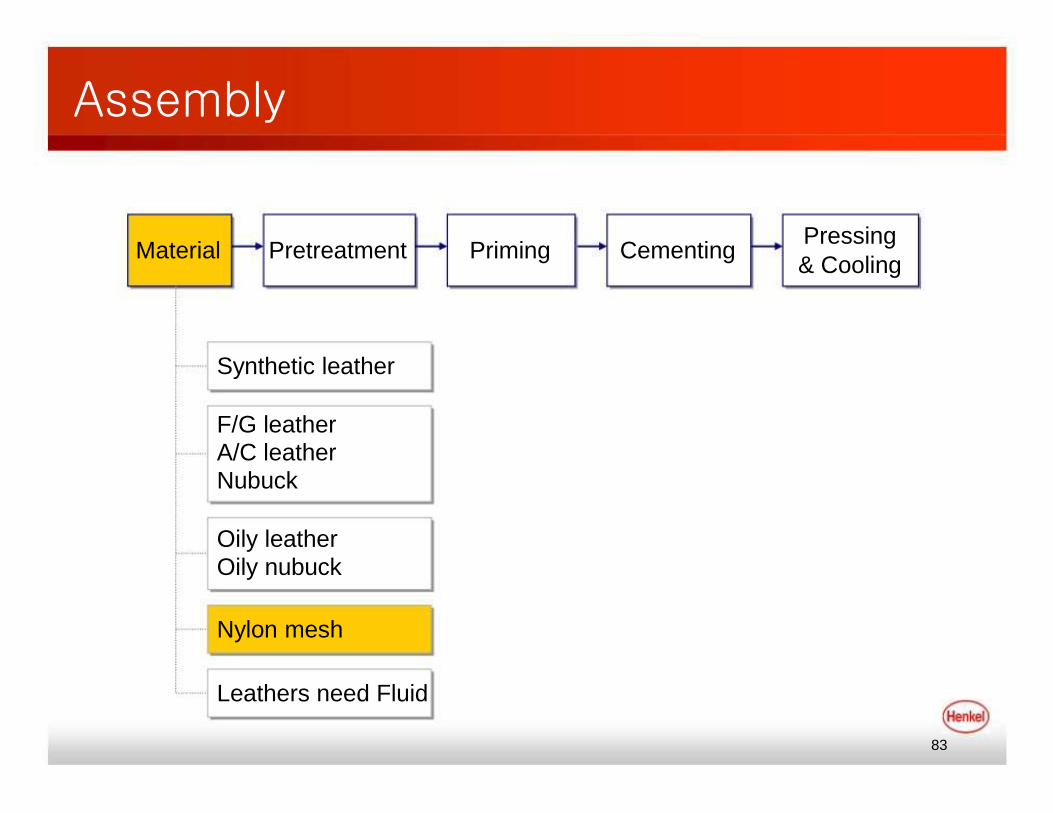
Assembly
Material Pretreatment
Synthetic leather
F/G leatherA/C leather
Nubuck
Oily leather
Oily nubuck
Nylon mesh
Leathers need Fluid
Priming CementingPressing
& Cooling
71

Assembly
Synthetic Solventleather Cleaning
1 Solvent Cleaning
Priming CementingPressing& Cooling
• Wipe the surface of leather with cotton cloth soaked with MEK or
water-based cleaner.
• Dry completely at room temp.×10min or 45~50(surface temp)×2min.
2 Priming
• Apply BONDACE 232HF-2*(SB) or AQUACE W-104*(WB) evenly using
cotton cloth(only for SB primer) or brush. See page 33 for details of
preparation of W-106.
• Tips!
- Mixing with hardener completely prior to application.
• BONDACE 232HF-2: Desmodur RFE=100: 3~5
• AQUACE W-104 : ARF-40 = 100 : 5
- Divide primer into 500~600g unit and fill in a bowl having a lid in
order to prevent the solution from evaporating into the air during use.72
Assembly
Synthetic Solventleather Wiping
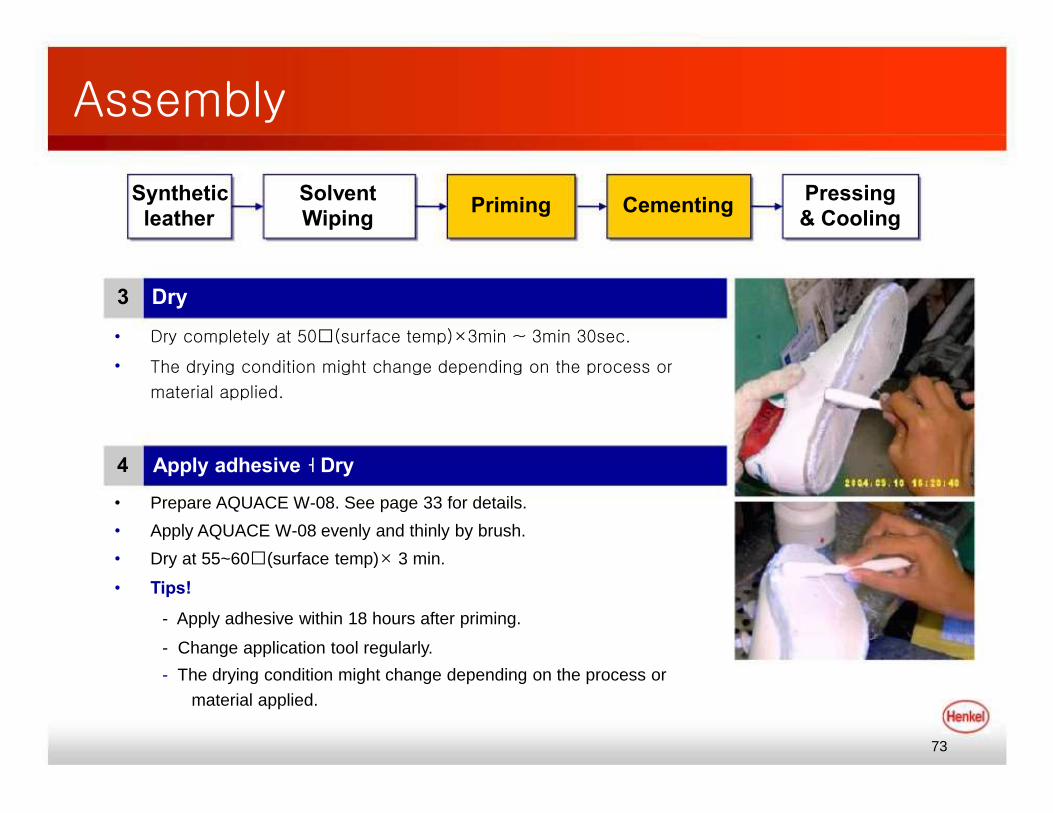
3 Dry
Priming CementingPressing& Cooling
• Dry completely at 50(surface temp)×3min ~ 3min 30sec.
• The drying condition might change depending on the process or
material applied.
4 Apply adhesive ˧ Dry
• Prepare AQUACE W-08. See page 33 for details.
• Apply AQUACE W-08 evenly and thinly by brush.
• Dry at 55~60(surface temp)× 3 min.
• Tips!
- Apply adhesive within 18 hours after priming.
- Change application tool regularly.
- The drying condition might change depending on the process or
material applied.
73

Assembly
Synthetic Solvent
leather Wiping
5 Attach ˧ Press ˧ Cooling
Priming CementingPressing
& Cooling
• Attach cemented material as soon as possible.
• Pressing condition
- Assure steady, even pressure and sufficient pressing time
- Required pressure: 30 kg/cm2, 10~12 seconds minimum
• Cooling condition
- Proper cooling helps to achieve better initial bond strength
- Recommended cooling condition: Last temperature measured on the
heel base of the last immediately after de-lasting is below 40
74

Assembly
Material Pretreatment
Synthetic leather
F/G leatherA/C leather
Nubuck
Oily leather
Oily nubuck
Nylon mesh
Leathers need Fluid
Priming CementingPressing
& Cooling
75

Assembly
F/G, A/CNubuck
1 Roughing
Roughing Priming CementingPressing& Cooling
• Remove the grain layer of leather completely by roughing with wire
roughing M/C or hand roughing M/C.
• Remove residual dust or other contaminants on the surface
completely after roughing by air blow or brush.
• Tips!
- If a sand paper is used for roughing, a proper sand paper should
be selected after considering the thickness of leather surface
layer.2 Priming
• Apply BONDACE 232HF-2*(SB) or AQUACE W-104* or W-105*(WB)
evenly using cotton cloth(only for SB primer) or brush. See page 33 for
details on preparation of W-105 and W-106.
• Tips!
- Mixing with hardener completely prior to application.
• BONDACE 232HF-2: Desmodur RFE =100:3~5
- Divide primer into 500~600g unit and fill in a bowl having a lid in
order to prevent the solution from evaporating into the air during use.76

Assembly
F/G, A/CNubuck
3 Dry
Roughing Priming CementingPressing& Cooling
• Dry completely at 50(surface temp)×3’~3’30”.
• Tips!
- The drying condition might change depending on the process
or material applied.
4 Apply adhesive ˧ Dry
• Prepare AQUACE W-08. See page 33 for details.
• Apply AQUACE W-08 evenly and thinly by brush.
• Dry at 55~60(surface temp)× 3 min.
• Tips!
- Apply adhesive within 18 hours after priming.
- Change application tool regularly.
- The drying condition might change depending on the process or
material applied.
77

Assembly
F/G, A/C
NubuckRoughing Priming
PressingCementing
& Cooling
5 Attach ˧ Press ˧ Cooling
• Attach cemented material as soon as possible.
• Pressing condition
- Assure steady, even pressure and sufficient pressing time
- Required pressure: 30 kg/cm2, 10~12 seconds minimum
• Cooling condition
- Proper cooling helps to achieve better initial bond strength
- Recommended cooling condition: Last temperature measured on the
heel base of the last immediately after de-lasting is below 40
7

Assembly
Material Pretreatment
Synthetic leather
F/G leatherA/C leather
Nubuck
Oily leather
Oily nubuck
Nylon mesh
Leathers need Fluid
Priming CementingPressing
& Cooling
79

Assembly
Oily leather
Oily nubuck
1 Roughing
Roughing Priming CementingPressing& Cooling
• Remove the grain layer having high content of oil completely by roughing
with wire roughing M/C or hand roughing M/C.
• Remove residual dust or other contaminants on the surface completely
after roughing by air blow or brush.
• Tips!
- If a sand paper is used for roughing, a proper sand paper should be
selected after considering the thickness of leather surface layer.
2 Priming
• Apply BONDACE 224-2*(SB) evenly using cotton cloth or brush.
• Tips!
- Mixing with hardener completely prior to application.
• BONDACE 224-2: ARF-11 =100: 5
• BONDACE 224-2:Desmodur RFE = 100:2~3
- Divide 224-2 into 500~600g and fill in a bowl having a lid in order to
prevent the solution from evaporating into the air during use.
80

Assembly
Oily leather
Oily nubuck
3 Dry
Roughing Priming CementingPressing& Cooling
• Dry completely at 50(surface temp)×3min ~ 3min 30sec.
• Tips!
- The drying condition might change depending on the process
or material applied.
4 Apply adhesive ˧ Dry
• Apply SB PU adhesive* or AQUACE W-08*(WB) evenly and thinly by
brush.
• Dry completely at 50(surface temp)×min. 3mins for SBA or
55~60(surface temp)×min. 3mins for WBA .
• Tips!
- Mixing with hardener completely prior to application
• SB PU adhesive : Desmodur RFE=100:4~5
• AQUACE W-08 : ARF-40 = 100 : 5
- Divide adhesive into 500~1000g unit and fill in a bowl having a lid in
order to prevent the solution from evaporating into the air during use.81

Assembly
Oily leather
Oily nubuckRoughing Priming Cementing
Pressing
& Cooling
5 Attach ˧ Press ˧ Cooling
• Attach cemented material as soon as possible.
• Pressing condition
- Assure steady, even pressure and sufficient pressing time
- Required pressure
• For Assembling: 30 kg/cm2, 10~12 seconds minimum
• Cooling condition
- Proper cooling helps to achieve better initial bond strength
- Recommended cooling condition: Last temperature measured on
the heel base of the last immediately after de-lasting is below
40
82
Assembly
Material Pretreatment
Synthetic leather
F/G leatherA/C leather
Nubuck
Oily leather
Oily nubuck
Nylon mesh
Leathers need Fluid
Priming CementingPressing
& Cooling
83

Assembly
Nylon Solventmesh cleaning
1 Solvent cleaning
Priming CementingPressing& Cooling
• Wipe the surface of Nylon with with solvent(MEK) or solvent-based
cleaner(233series).
• Dry completely at room temp.×10min or 45~50(surface temp)×2min.
• Tips!
- Slightly scratch the surface with sand paper(100~200) if necessary.
- Refresh the bowl/container with solvent or cleaner on a regular
basis to prevent solvent or cleaner from contamination.
2 Priming
• Apply a primer evenly using cotton cloth or brush.
• BONDACE 224-2, D-PLY 160-2 or D-PLY 167 can be applied.
• Tips!
- Mixing with hardener completely prior to application.
• BONDACE 224-2 : Desmodur RFE =100 : 2~3
• D-PLY 160-2 or 167 : Desmodur RFE=100 : 5~7
84

Assembly
Nylon Solventmesh wiping
3 Dry
Priming CementingPressing& Cooling
• Dry completely at 70(surface temp)×above 5min.
• Tips!
- The drying condition might change depending on the process
or material applied.
4 Apply adhesive ˧ Dry
• Prepare AQUACE W-08. See page 33 for details.
• Apply AQUACE W-08 evenly and thinly by brush.
• Dry at 55~60(surface temp)× 3 min.
• Tips!
- Apply adhesive within 18 hours after priming.
- Change application tool regularly.
- The drying condition might change depending on the process or
material applied.
85

Assembly
Nylon Solvent
mesh wiping
5 Attach ˧ Press ˧ Cooling
Priming CementingPressing
& Cooling
• Attach cemented material as soon as possible.
• Pressing condition
- Assure steady, even pressure and sufficient pressing time
- Required pressure
• For Assembling: 30 kg/cm2, 10~12 seconds minimum
• Cooling condition
- Proper cooling helps to achieve better initial bond strength
- Recommended cooling condition: Last temperature measured on
the heel base of the last immediately after de-lasting is below
40
86

Summary of Bonding Process
Material
Rubber
Phylon
Die-cut EVA
TPU
Pebax
Nylon
Pretreatment
CL-800A + Water &CL-800B + Water
CL-800B + Water
Roughing
MEK or 233 series
MEK or 233 series
MEK or 233 series
Priming
PR-505A or 505ID +Powder(2 wt%)
P-5-2 + UV or P-7-2
008-2
232F-2 + D-RFE(3-4wt%) or232HF-2 + D-RFE(3-4wt%)
167 + D-RFE(5-7wt%) or160-2 + D-RFE(5-7wt%)
167 + D-RFE(5-7wt%) or160-2 + D-RFE(5-7wt%)
Cementing
W-08
+ARF-40 (5 wt%)
WB SB
87

Summary of Bonding Process
Material
Synthetic leather
Full grain leatherAction leatherNubuck
Nylon mesh
Oily leatherOily nubuck
Pretreatment
MEK or
CL-811
Roughing
MEK or 233 series
Roughing
Priming
232HF-2+D-RFE(3-4wt%) or
W-106 + ARF-40(5wt%)
232HF-2+D-RFE(3-4wt%) or
W-105 + ARF-40(5wt%) orW-106 + ARF-40(5wt%)
224-2 + D-RFE(3-4wt%) or167 + D-RFE(5-7wt%) or160-2 + D-RFE(5-7wt%)
224-2 + ARF-11(5wt%)224-2 + D-RFE(3-4wt%)
Cementing
W-08
+
ARF-40 (5 wt%)
SB PU adhesive +D-RFE (4-5wt%)
W-08 +
ARF-40(5wt%)
WB SB
88

Troubleshooting
VOC evaporation
Trouble Solution
The workplace is contaminated with solvent which • Use a good bowl/dispenser which can reduce
evaporates from adhesive. evaporation of solvent.
• Install a local ventilation and wear necessary PPE.
• Consider the use of VOC-reduced adhesive such
as water-based type or hot-melt.
89

Troubleshooting
Fluorescent lamp
Trouble
Since fluorescent lamp is placed deep inside of the
chamber, workers may feel annoyed by confirming the
coverage of primer for each substrate through pushing
the primed substrate toward deep inside of the chamber.
Conveyor
A cross-section of the chamber
Solution
Move fluorescent lamp to the outside so that workers
can confirm the coverage of primer quickly and easily.
Conveyor
90

Troubleshooting
UV dosage
Trouble
1. Different UV dosage (intensity) on side and center.
Especially on wall with high height, insufficient UV
is irradiated.
2. Not checking regularly for constant UV dosage.
Solution
1. Adjust the angle of a reflecting mirror to give
almost same UV dosage regardless of bonding
area, and clean the mirror regularly to increase
reflecting effect.
2. Check UV dosage every 2 hours with UV
radiometer.
UV radiometer
91

Troubleshooting
Hardener
Trouble
If open the cap of hardener opened frequently, moisture
in the air may penetrate into the hardener. Then the
quality of hardener deteriorates.
Solution
Use only required amount by pouring into an appropriate
dispenser having a cap. Residual hardener should be
capped tightly and stored in a cool and dry area.
92

Troubleshooting
Pot life
Trouble Solution
Workers could forget the time of changing adhesive (pot- Mark the time to change adhesive on the bowl or
life), for example, if they are busy. dispenser so that workers can recognize the time and
use adhesive properly.
93

Troubleshooting
Coating weight
Trouble
As workers get familiar with water-based adhesive, they
follow application method of water-based type, applying
thinly, even when applying solvent-based type. So
bonding problem may caused due to insufficient coating.
Solution
The solids content of water-based adhesive is much
higher than that of solvent-based type. For example,
water-based PU contains 50% of solids while solvent-
based type has 20%. Therefore, supervisors should train
their employees to differentiate coating amount of water-
based type from solvent-based type.
94

Troubleshooting
Application tool
Trouble Solution
Excessive amount of adhesive by using a thick brush Use an appropriate-thickness brush considering its
causes puddling on the surface of substrate and makes purpose.
brush hard.
95

Troubleshooting
Contamination
Trouble
If using a cleaner not refreshing or changing regularly, it
could be contaminated by the application tool which has
contacted with contaminated substrate. Then, certain
contaminants may concentrate in the cleaner.
Solution
• Refresh or change with new cleaner regularly to
minimize contamination of cleaner in use.
• Change an application tool regularly by marking
exchanging time on a deposit case.
96

Troubleshooting
HMA applicator
Trouble
When running HMA applicator with small amount of hot-
melt in the thank, or leaving the applicator heat at high
temperature, melted adhesive in the nozzle and hose
chars. Charred adhesive makes bonding area stained.
Solution
• Charge hot-melt in the tank at 50~70% of the tank
capacity.
• Reduce temperature when on standby.
• Clean the tank (once a week) and nozzles (once a
day) regularly.
97

PPE
Safety glasses
A. Safety glasses with side shield
Protect eyes against chemical splashes from
hot liquids, solvents or hazardous solutions.
B. UV-resistance glasses
Protect eyes against intense concentrations of UV.
Safety gloves
A. Chemical-resistant gloves
Protect hands against chemical splashes from
solvents or hazardous solutions.
B. Thermal-protection glovesProtect hands against chemical splashes from hot
liquids (hot-melt adhesive)
Protective clothingProtect body against chemicals, hot splashes or
physical hazards. Ensure that the protective clothing
selected will provide protection against the specific
hazard.
A B
A B
98

PPE
Local ventilation
Protect respiratory system against gas, vapor
Contaminants, particulate contaminants and other air
Contaminants. Ensure compliance with applicable
exposure limits.
Chemical mask
Protect respiratory system against gas, vapor
contaminants particulate contaminants and other air
contaminants,. Wear chemical mask whenever
engineering and work practice control measures are
not adequate to prevent atmospheric contamination at
the worksite. Ensure that the mask selected will
provide protection against the specific hazard.
Dust mask
Protect respiratory system against particulate
contaminants. Wear dust mask whenever
engineering and work practice control measures are
not adequate to prevent atmospheric contamination at
the worksite. Ensure that the mask selected will
provide protection against the specific hazard.
99

PPE
Employers should explore all possible engineering and work practice
controls to eliminate hazards and use PPE (Personal Protective
Equipment) to provide additional protection against hazards that cannot
be completely eliminated through other means.
- from “Personal Protective Equipment” established by OSHA
100

Q & A
101