training and reference manual · keeping up with technology . training and reference manual sale...
TRANSCRIPT

Keeping Up With Technology
Training and Reference Manual
Volume
3

K E E P I N G U P W I T H T E C H N O L O G Y
Training and Reference Manual
Sale Control Systems Box 662 • Okotoks, Alberta • T1S 1A8
Phone 403-510-7017 • Fax 403-938-5085 Edmonton Alberta Phone 780-701-2675
www.posal.com

Table of Contents
Five files you need to have set up in order to run your new POSAL system_________________ - 1 -
The Salesperson File__________________________________________________________________ - 2 -
The Vendor File _____________________________________________________________________ - 3 -
The Category File ____________________________________________________________________ - 4 -
The Customer File ___________________________________________________________________ - 5 -
The Inventory Table__________________________________________________________________ - 6 -
Purchasing Stock From Suppliers _________________________________________________ - 8 -
Purchasing Procedures ______________________________________________________________ - 10 -
Day End Procedures ___________________________________________________________ - 19 -
Extended Features of APSW – Inventory Features ___________________________________ - 23 -
Entering On Hand Values – Opening or Year End Counts _________________________________ - 24 -
Putting Product on Sale ______________________________________________________________ - 26 -
Retail Price Changes ________________________________________________________________ - 27 -
Automatic Package Splitting __________________________________________________________ - 28 -
Change Inventory By Range __________________________________________________________ - 30 -
Inventory Reports___________________________________________________________________ - 31 -
Extended Features of APSW – Selling Features _____________________________________ - 32 -
Payment Code File __________________________________________________________________ - 33 -
Browse Signed on Clerks _____________________________________________________________ - 34 -
Sales Reports_______________________________________________________________________ - 35 -
Transaction Browse _________________________________________________________________ - 36 -
Extended Features of APSW – System Features _____________________________________ - 37 -
Favorites __________________________________________________________________________ - 38 -
Activity Log________________________________________________________________________ - 39 -
Label Design _______________________________________________________________________ - 39 -

The Point of Sale ______________________________________________________________ - 40 -
The POSALRW program (POS)_______________________________________________________ - 41 -
Sales Order Entry (SOE) _____________________________________________________________ - 49 -
Common Errors in Stock Receiving _______________________________________________ - 51 -
Ordering Methods _____________________________________________________________ - 53 -
Putting Your Registers On and Off Line____________________________________________ - 57 -
Regular Register Maintenance ___________________________________________________ - 59 -
Trouble Shooting on POS Registers _______________________________________________ - 60 -
POS program will not run ____________________________________________________________ - 60 -
POS register will not go on line________________________________________________________ - 61 -
Filtered Reports – Creating a Filtered Report _______________________________________ - 63 -
Index _______________________________________________________________________________ 67

Chapter
1 T R A I N I N G M A N U A L
Five files you need to have set up in order to run your new POSAL system The POSAL system includes countless features to help you control your inventory and save money. In this chapter, you will learn the basic files that you will need to have set up in order to run the basic features of the POSAL system.
his manual is designed to be used together with the On Line Help. To access the On Line Help, press F1 on your keyboard, when you are in the APSW Program. On Line Help is context sensitive. If you need help on a certain entry box, place the cursor in the box and press F1. For general help, press F1
when there are no applications open within the system.
T Using the icons These icons will appear throughout the manual to help you find the information that you are looking for.
To begin, Open the APSW program by double clicking on the APSW icon. Enter your user name and password, and click OK.
- 1 -
I C O N K E Y
Don’t forget! Quick Steps Click Here Keyboard Button

T R A I N I N G M A N U A L
The Salesperson File Every Employee that will have access to the system, for any reason, needs to be entered in the salesperson file.
- 2 -
Quick Steps 1. Open the Salesperson file by clicking on
Modules
System Maintenance
Salesperson Maintenance
Click INSERT to enter a new salesperson.
2. Enter the following information
A.. Code
B.. Name
C.. Password
D. Security Level
Click OK when you have entered the information.

T R A I N I N G M A N U A L
The Vendor File The Vendor File is where you keep information for the companies that you purchase products from. You must have it set up properly to receive inventory properly.
●Click on the HELP button or press F1 to learn how to set up your tax flags correctly.
● If the tax flags are not set up properly, you will not be receiving your inventory properly.
- 3 -
Quick Steps 1. Open the vendor file by clicking on
Modules
Inventory Maintenance
Vendor Maintenance
. Click INSERT to enter a new Vendor.
2. Enter the following information
A. Number
B. Name
C. Flags – The flags are located on the DEFAULTS tab. They are
i. Tax In
ii. Deposit In
iii. Case Price
iv. Extended Price
Click OK when you have entered the information.

T R A I N I N G M A N U A L
The Category File The Category File records the main categories that you will group your inventory into. These categories can be broken down even further in the Inventory File.
●If you are unsure what to enter into an entry box, place your curser in the box and then press F1 on the keyboard. This will bring up the help file, with information on that entry box..
- 4 -
Quick Steps 1. Open the category file by clicking on
Modules
Inventory Maintenance
. Category Maintenance
. Click INSERT to enter a new category.
2. Enter the following information
A. Code
B. Description
Click OK when you have entered the information.

T R A I N I N G M A N U A L
The Customer File The Customer File contains information about the specific customers that purchase product from you. You can use this file to keep track of their information. Once you have the customer entered into the file, you are then able to track all of the sales made to that customer. You may also choose to give your customer’s discounts, by entering the discount in this file.
●If you are unsure what to enter into an entry box, place your curser in the box and then press F1 on the keyboard. This will bring up the help file with information on that entry box.
● Account Numbers can NEVER be changed once they are used to sell product to a customer!
- 5 -
Note You can also use the Customer file to create generic discounts that you may want to give to customers, like employee discounts.
Quick Steps 1. Open the category file by clicking on
Modules
Customer Control
Customer Maintenance
Click INSERT to enter a new customer.
2. Enter the following information
A. Account Number
B. Store
C. Name
D. Discount Code
Click OK when you have entered the information.

T R A I N I N G M A N U A L
The Inventory Table
The Inventory Table contains information with regards to the product that you sell in your store. You will use this table to look up and reference each individual item. Set up in the inventory table can be very extensive to allow for many extra features. This section will show you how to set up the basic information that you need entered in order to track an item in your inventory.
- 6 -
Note The inventory Table can also be accessed by clicking on the picture of a file folder in the tool bar.
Quick Steps 1. Open the category file by clicking on
. Modules
. Inventory Maintenance
. Inventory Table
Click INSERT to enter a new item
2. Enter the following information
A. Item Number
B. Description
C. Category
D. Size
E. UPC code (for scanning purposes)
F. Case Quantity
G. Bottle Deposit (if applicable)
Click STORE INFORMATION when you have entered the information.
Continued…

T R A I N I N G M A N U A L
●All other entries in the Inventory Master File are not necessary for basic operation of your system, however filling in the information will increase the number of functions that you may carry out with the POSAL system.
● To find out more information about the individual entry boxes, place the cursor in any entry box, and press F1.
- 7 -
Continuing from page 6…
3. After clicking Store Information, enter the following information
H. Retail Price
I. Unit Cost
J. Last Ordered Cost
K. Tax Flags (Y or N)
L. Reorder Vendor
Click OK when you have entered the information.
Click OK again to save the general information.

Chapter
2 T R A I N I N G M A N U A L
Purchasing Stock From Suppliers The POSAL system has a very powerful stock receiving utility. It is extremely important that you are very familiar with this feature in order for your inventory to be tracked and reported correctly. This chapter will cover the steps for entering Purchase Orderings into your POSAL system, and trouble shooting common problems
his manual is designed to be used together with the On Line Help. To access the On Line Help, press F1 on your keyboard, when you are in the APSW Program. On Line Help is context sensitive. If you wish for help on a certain entry box, place the cursor in the box and press F1. For general help, press F1
when there are no application open within the system.
T Using the icons These icons will appear throughout the manual to help you find the information that you are looking for.
- 8 -
I C O N K E Y
Don’t forget! Quick Steps Click Here Keyboard Button

P U R C H A S I N G P R O C E D U R E S
- 9 -
To begin, Open the APSW program by double clicking on the APSW icon. click OK. Enter your user name and password, and

P U R C H A S I N G P R O C E D U R E S
- 10 -
Purchasing Procedures When you order new stock from your suppliers, it will need to be entered into your APSW program. There are 4 steps that need to be completed when entering your
em. These steps my be completed in any number of ways.
1. Creating yo
2. Sending your order to your suppliers
3. Updating y ith any changes
4. Updating your inventory
order into the syst
ur order
our order w

P U R C H A S I N G P R O C E D U R E S
- 11 -
1. Cr ting Your Order ea
Quick Steps Choose one of the following two options for creating you
r order
B. Au matically Create 1. Enter the Automated Ordering Feature by clicking on i. odules ii ventory maintenance iii tock Receipts & Adjustments iv utomated Orders button 2. If an order has already been set up for you, skip to step 12, if not, continue to step 3. 3. Insert to create a new ordering method 4. En r a Code that you will use for this ordering method. 5. Enter the Description of this type of order.
to
M In S A
te
Continued…
A. Manually Create 1. Open Stock Receipts and Adjustmen by clickion i. Modules ii Inventory maintenance iii Stock Receipts & Adjustments 2. Click on Create New Order 3. Enter the Vendor Number that you orderfrom. 4. Click on the Details Tab. 5. Click Insert to begin entering the order. 6. Enter the Item Number (TAB), and esired Quantity. 7. Press Enter on the keyboard or click 8. Repeat steps 6 and 7 until all items youare entered.
ts ng
are ing
items on your
D
OK.
wish to order
Continued…
To get more instructions on what inform ation toput in an entrybox, place your curser in the box, and then press F1.
Tabs are always across the top of the file.
When entering the desired quantity, put in a number that your vendor will understand. If you order from your vendor in cases, then this will be the number of cases that you want.

P U R C H A S I N G P R O C E D U R E S
- 12 -
… Automatically create Continued 6. Select an Ordering Method.
7. Enter the number of days supply that you would like
se.
k
ul e
d, click Select.
to
Ent would
15. Select the type of order. 16. Select where you would like the order sent to.
Continued…
to have on hand. 8. Select the number of days/weeks of history to u 9. Set the Calculation Method.
10. Select the Promotion Weight. 11. Once you have finished your order plan, clicOK. 12. Select the order plan that you wo d like to usfrom the list, by clicking on it. Once the plan is highlighte
13. Enter the store number that you would like order for, and click Accept Current Store. 14. er the Vendor Order Number that youlike to order from.
For a
detailed description of the ordering methods see “Ordering Methods” in the Appendix.
…Manually create continued 9. When finished enter items, click Cancel. 10. Click on the Receiving formation Tab to see the total value of the items that you have entered. 11. When you are finished loo at your order, you may close it by clicking OK r move to Section 2, Sending your Order to your suppliers.
End
In
king, o
If you are unsure of the vendor , ’s order numberrefer to your Vendor Maintenan der ce File, unInventory maintenance.
Most orders will be ORDER FROM SUPPLIERS. If you have a multi-store system then you may use TRANSFER FROM HEAD OFFICE. This entry must be filled out, or your order will not work properly.
If you would simply like to view the
order, then click on none. If you would like to view the order, and then have it sent directly to Stock Receipts and Adjustments, click on Purchase Order ?receiving.
If you are e ring your nte
order directly from an invoice, Skip to Section 4, ep 4. St

P U R C H A S I N G P R O C E D U R E S
- 13 -
.
… Automatically Creating Continued
three entries are filled out, click OK
18. Your order will be shown on the screen. You may look over your order. To print your order, click on the printer in the upper left hand corner. If you do not wish to print your order, click on the red X in the upper left-hand corner of the screen. 19. If you chose PURCHASE ORDER RECEIVING, then your order is now in the Stock Receipts and Adjustments Table. The order you just created will be at the top of the list. To make changes to the order, highlight it, and then click on Change.
ls Tab to see all of the items
21. You can make changes by clicking Insert to
Delete to delete the highlighted to change the highlighted item.
the the total value of
er, you to
End
17. Once all
20. Click on the Detaion your order.
add a new item, item, or Change 22. On dified your order, click once you have mo Receiving Information Tab to see
er. your ord 23. When you are finished looking at your ord
se it by clicking OK, or movemay cloSection 2, sending your Order to your suppliers.
Tabs are always across the top of the file.

P U R C H A S I N G P R O C E D U R E S
- 14 -
2. Sending Your Order to Yo iers ur Suppl
QuCho
ick Steps ose one of the following two options for Sending Your Order to Your Suppliers
A. Manually Send
7. Open Stock Receipts and Adjustments by
A. Modules B. Inventory Maintenance Stock Receipts and Adjustments
r that you would like to Change.
9. Click on the nt PO button. Your order
n the pi e of a printer your order.
End
B. Electronically Send 1. Open Sto Receipts and Adjustments by clicking
nd Adjustments 2. Hi light the order that you would like to
3. Cl n Place on Order. 4. Enter the name of the text file that you would
5. Cl6. Yo le in
the APSW folder on your computer.
End
clicking
C.8. Highlight the orde
print and then click
ck A. Modules B. Inventory Maintenance
C. Stock Receipts agh
send and then click Change. ick o
like to create. ick OK. ur order is now in the form of a text fi
You may now upload that text file to your vendor.
Pri
ctur to print
will now be displayed 10. Click o

T R A I N I N G M A N U A L
- 15 -
3. Updating Your Order with Any Changes
uick Steps nce you receive yo order back from your suppliers, there may be changes that they have made to it.
Refer to your invoice when you receive it, to make the changes. You will need to look for changes to the Item Numbers, quantities, and invoice prices on your order. You may also change your retail price for each product at this stage. Choose one of the following two options for updating your order with any changes.
QO ur
A. Manually Update 1. Open Stock Receipts and Adjustments by clicking on i. Modules ii Inventory maintenaniii Stock Receipts & Adj nts 2. Highlight the order that click Change. 3. Click on the Details T . 4. Highlight an item that was not shipped, and click Delete. 5 Highlight an item that needs to be changed, and click Change. 6 Change the Received quantity and invoice price as needed. 7 Click OK.
Continued…
ce ustme
you would like to adjust and
ab
B. Electronically Update 1. Make sure that the file with your updated order is saved in the APSW folder on your computer. This file must be an .ORD file. 2. Open Stock Receipts and Adjustments by clicking on
ii Inventory maintenance iii Stock Receipts & Adjustments 3 Highlight the order that you would like to confirm and click Change. 4. Electronic Confirm. 5. Enter the name of the file that has your confirmed order in it. 6. Click OK. 7. The order will be uploaded into the APSW system. Click on the Details tab to view your order.
Continued…
i. Modules
Tabs are always across the top of the file.
If any error messages come up when you are confirmation your order, they are important. See “Electronic Confirming Errors“ in the Appendix.

T R A I N I N G M A N U A L
- 16 -
…Manually Update Continued
8 Repeat steps 4-6 until all items that need changes have been changed. 9. Click Insert to add items to the order. Enter the Received Quantity, and Invoice Price. 10. Once all items match the invoice, you are ready to procedure to Section 4, Updating your Inventory.
End
… Automatically Create Continued 8. Your order is now uploaded, proceed to Section 4, Updating your Inventory.
End

T R A I N I N G M A N U A L
- 17 -
4. Updating Your Inventory 4. Updating Your Inventory
T R A I N I N G M A N U A L
- 17 -
Quick Steps ory file to receive your new order. Use the
A. Modules
B. Any Adjustments (credits) that you have been given
6. Compare the TAX total on this page with the total on your invoice. These totals should be very close (there may be round off differences). 7. Look at the discrepancy box. This figure should be minimal.
Continued…
There is only one method of updating your inventfollowing steps to receive your order into inventory.
1. Open Stock Receipts and Adjustments by clicking on
B. Inventory maintenance
C. Stock Receipts & Adjustments
2. Highlight the order that you would like to adjust and click Change. 3. Click on the Receiving Information tab.
4. Enter
A. Any Shipping Charges
C. The vendor Invoice number
D. The complete Invoice total
5. Check the Deposit total on this page (if applicable). It should match to the penny with the total on your invoice.

P U R C H A S I N G P R O C E D U R E S
- 18 -
…Updating Your In
8. If the discrepancy is not minimal, or the TAX or Deposits are out, click on the List button errors with your order. Check the following on each item
a. Case Quantities
b. Tax
c. Bottle Deposit
d. Vendor N
e. Invoice P
9. At the bottom of charges, and adjustments.
10. Fix any errors on
11. Once the discrepancy is minimal, the bottle deposits match, and the Tax is similar, the order is ready to be posted.
12. Click on Post
13. A task selection
14. You may be asked “Are the shelf labels in the printer?’ If you have special paper for Shit in the printer now, and then click Yes. Labels will only be prone item.
15. You may be asked you have stick-on labspecify which row n gin your printing on. Enter it in the space provided, or leave the number at 1, an
16. New labels will on ged on east one item during receiving. If the labels display, click t them.
17. You may be asked “Have the labels printed correctly?” Click es to continue the receiving process.
18. The first receivin report will be displayed. Click on the picture of the Printer to print the report.
19. The second recei oth reports to the inv
20. You will be asked, “Have the reports printed correctly?” If you click Yes, your order will be posted into inventory. If you click No, the order will need to be posted again later.
End
ventory Continued
to find any
umber
rice
the list check the Total Cases and Order Total. This number is before shipping
the order and in the Inventory Table.
For further help with balancing your order see “Common Errors in Stock Receiving” in the Appendix.
Transactions to Update your inventory
list will appear. In most cases you will leave the default boxes checked and click OK.
elf Label Printing, put inted if you have changed the retail price on at least
els that you are printing on, you may “Starting Row Number?” Ifeumber you would like to b
d click OK.
ly display if the retail price was chanon the picture of a printer to prin
at l
Y
g
ving report will be displayed. Click on the picture of the Printer to print the report. Staple boice.

T R A I N I N G M A N U A L
- 19 -
Day End Proc For each day that your store is open ll need to complete the Day End Procedures. These pr nt to ensure that your sales data is correct. Please fol .
his manual is designed to be used together with the On Line Help. To access the On Line Help, press F1 on your keyboard, when you are in the APSW
n Line Help is context sensitive. If you wish for help on a certain ace the cursor in the box and press F1. For general help, press F1
ere are no application open within the system.
appear nd the
.
To begin, Open the APSW program by double clicking on the APSW icon. Enter your user name and password, and click OK.
eduresfor business you wiocedures are importalow them consistently
Program. Oentry box, pl
when th
Using the icons These icons will throughout the manual to help you fiinformation that you are looking for.
Chapter
3
T I C O N K E Y
Don’t forget! s Quick Step Click Here Keyboard Button

P U R C H A S I N G P R O C E D U R E S
- 20 -
Day End Procedures Once you have completed a day’s transactions yoProcedures. Step 1 MUST be completed at the end of the day. Steps 2-4 may be
p to 3 days later. Any discrepancies found in your reports need to be addressed witSupp
u must complete your Day End
completed uhin 5 business days. To report discrepancies in your Sales reports call you
ort representative during regular business hours.
Quick Ste1. Z report
Each Register MUST print 1 Z report at the end of the day. To print a Z r
POS rt button on the POS k your reports that you print in the APSW program.
Do n
woul OS keyboard.
You do not need to print a Z report on registers that you did not use the POSALRW program for your sales during the day.
Continued…
ps
eport use your POSALRW (cash) program. On each register, when the
ALRW program is open, press the Z repoeyboard.. Use this report to compare to
ot press the Z report button more than one time in a day. If you
d like an intermittent report use the X report button on the P

T R A I N I N G M A N U A L
- 21 -
…
2.
The Cash out allows you to compare that currency that you received from customers with your back office reports. You may do your cash out by C taller know which method you would like to use. To do your cash out you will need to
hecks, coupons, and Gift Cards that you Cashier /Register.
Debit, MasterCard, and Amex, that you each Cashier/Register. To do this, use your
To do your C he APSW program.
llar
Day End Procedures Continued
Cash Out
lerk or by Register. Let your ins
A. Count the Cash, cbrought in for each
B. Total up the Visa, brought in for Debit Machine reports.
ash Out use t
A. To open the Cash Out Table, click on the picture of a dosign that is located on the toolbar in the APSW program
B. Find the Clerk/Register that you would like to cash out in the list. Click on the name to highlight it.
C. Click on Do Cash Out.
D. A list of tenders that the Clerk/Register brought in will be listed. The total that the system calculated for each tender will also be listed. Click on a tender, and click Change.
E. Enter in the amount that you calculated that the Clerk/Register took in for that tender during that day.
F. Click OK.
Repeat steps D, E and F until all tenders have a counted amount entered.
H. Click Close.
I. Click Print to print a cash out report for this Clerk/Register.
J. Repeat Steps B through I for each Clerk/Register that took in sales for the day.
K. When finished all Clerks/Registers, click Close.
Continued…
G.

P U R C H A S I N G P R O C E D U R E S
- 22 -
…Day End
3. Print Reports
The following reports need to be viewed for each day.
A. Tender Summary
Modules
B. Cash Register Management
like to print.
pare the totals on the Tender Summary and the Category Summary
ot need to print the register totals report. If you notice any problems with your reports call your support representative within 5business days your support re
balance tha
End
Procedures Continued
B. Category Summary
C. Register Totals.
To access these reports click
A.
C. Reports
D. The name of the report that you would
4. Check Totals
Comreport. They should match to the penny. Look at the Register Totals Report. It will show you the total from the Z report that you printed, and compare it to the total of sales that reached the back office. These numbers should be the same. If you are not using the POSALRW program to process your sales then you will n
business days. If you do not call within 5 presentative will no longer have access to t day. back up files to help

T R A I N I N G M A N U A L
- 23 -
Extended Features of
The POSAL system has numerous features to simplify your work, and provide you with more information. This section describes features that involve maintaining your inventory. Th used extended features will be explained in this sect raining more specific to your store’s needs, please contac ms to schedule a training session.
his manual is designed to be used together with the On Line Help. To access the On Line Help, press F1 on your keyboard, when you are in the APSW Program. On Line Help is context sensitive. If you wish for help on a certain
ace the cursor in the box and press F1. For general help, press F1 plication open within the system.
Using the icons These icons will appear throughout the manual to help you find the information that you are looking for.
To begin, Open the APSW icon.
ssword, and click OK.
APSW – Inventory Features
e most commonly ion. If you require tt Sale Control Syste
entry box, plwhen there are no ap
program by double clicking on the APSW Enter your user name and pa
Chapter
4
T I C O N K E Y
Don’t forget! Quick Steps Click Here Keyboard Button

P U R C H A S I N G P R O C E D U R E S
- 24 -
Entering On Hand Values
After you hainven s for your
A. Have purchased an existing store
B. Are switching from another POS system
odic inventory count.
If you are opening a new store, you should enter your inventory on hands using the instructions in Chapter 2, Purc
– Opening or Year End Counts
ve completed the set up in chapter 1, you will be able to enter your tory on Hand values. You will use this feature to enter your On Hand Valueinventory if you:
C. Would like to do a year end or peri
hasing Stock from Suppliers.
Quick Steps 1. Print Physical Count Sheets
In the APSW program, click on
A. Modules
B. Inventory Maintenance
C. Physical Counts
D. Print Stock Count Sheets
A table will appear.,
E. Click on the name of the list that you would like to print
F. Do Function
The list of items to count will be displayed on the screen.
H. Click on the picture of a printer to print the list.
Continued….
If you don’t’ see the name of the list that you would like to print, go to the section entitled “Creating a Filtered Report.

T R A I N I N G M A N U A L
- 25 -
…Entering On Hand Values Continued
2.
Once you have counted your on hand values, you will need to enter them into the APSW program.. To do this, click on:
A. Modules
B. Inventory M
C. Physical Co
D. Enter Stoc
A Stock Counts Table will appear.
E. Insert
ter the first Item Number that you have counted
er the Count for this item
to enter the next item
until all items have been en
ntered, you may print the var, by clicking on the buttons at the bottom o
that you ney.
End
Entering the Count into the computer
aintenance
unts
k Counts.
F. En
tered.
ious reports f the table.
ed, click on
G. Ent
H. OK.
I. Insert
J. Continue entering items
K. Once all counts are eavailable
L. Once you have printed all the reports Post Counts to update your inventor
Once you have encocoAPwill now keetrack of thatitem. If you sell one of the items that you have counted. The APSW program will take that into account when updati
tered the unt into the mputer, the SW program
p
ng your inventory.

P U R C H A S I N G P R O C E D U R E S
Putting Product on SaleIf you wish to have a promotional price on
an item for a limited amount of time, you can use the Promotional Pricing section to create your Promotional sale.
ck Steps
1. Promotional Pricing
gram, click on
ules
ance
al Pricing
A table
new promotion.
Price Code that is linked to the item(s)
.
Time and End time if this promotion is only
ive.
End
Qui If you do not know the price code, you can look it up in the inventory Master File. Highlight the item that you would like to place on sale, and then Click Change. The Price Code is listed on the General Page. The price code will automatically be the same as the item number, unless you change it.
In the APSW pro
A. Mod
B. Inventory Mainten
C. Promotion
will appear.,
D. Click Insert to enter a
E. Enter the you would like to put on sale. F. Enter the Special Price that you would like to sell the item(s) for
G. Enter the Effective Dates for this promotion.
- 26 -
H. Enter a Start during certain hours of the day.
I. Select the Days of the Week that this promotion is act
J. Click OK to save the information.
If youto set up acomplex ppress the Flearn moredifferent pthat you can set up.
would like more romotion, 1 key to about romotions

T R A I N I N G M A N U A L
- 27 -
Retail Price Changes
If you would like to permanently change the price of an item, you can use this feature to do this. Using Retail Price Changes to change the prices on items can also automatically print new Shelf tags for those items. Any prices changes that are done using this feature are logged in the system.
Quick St1. Retail Price Changes
In the APSW program, click on
A. Modules
B. Inventory Maintenance
C. Retail Price Changes.
A table will appear.,
Insert to change the price of an item.
ce that you would like for this item.
I. Repeat steps E- H until all price ch
J. If you would like to print Shelf Labels for the new changes, check the Shelf Labels box..
. Click Post Changes when you are ready to update your retail prices.
End
eps
D. Click on
E. Enter the Item Number that you wish to change the price on.
F. Enter the new Retail Pri
G. Click OK.
H. Click Insert to enter the next item
anges are entered.
K
You can also change the retail price by entering in the margin that you would like to have on that item.

T R A I N I N G M A N U A L
- 28 -
T R A I N I N G M A N U A L
- 28 -
Automatic Package Splitting
used if you have items that you sell as cases or indiv tory, eithe
This feature in the system can be idually. Automatic Package Splitting allows you to split the cases up in invenr automatically when you sell the singles, or manually at the push of a button.
Quick Steps 1. Set up the Automatic Package Splitting file
In
A table w
D ist that you would like to print
E p a new package split
Fw
G al items that will be created.
Hth
I.
Continued….
the APSW program, click on
A. Modules
B. Inventory Maintenance
C. Automatic Package Splitting
ill appear.,
Click on the name of the l
. Click Insert to set u
. Enter the From Item. This is the item number for the case that ill be split.
. Enter the To Item. This is the item number for the individu
. Enter the Conversion. This is the amount of individual items at there are in a case.
Click OK to save the information.

T R A I N I N G M A N U A L
- 29 -
…Entering On Hand Values Continued
2.
t you would like to perform.
umber of package that you are splitting under
ual Split Button.
The cases wil e appropriate single items will be added.
3. Splitting th
If youchoose to let the packages split themselves automatically. This will occur when the On Hand valu e of the items w e items will be added. To use this method, perform the following additional setup after setting u
E. Change the Status of the item to S for Split Automatically.
item that is being created and then
Order Control Item
I. Click OK.
The cases will now be broken down automatically in the inventory.
End
Splitting the packages Manually
Once you have the Automatic Package Splitting Table set up, you are now ready to split the packages in the inventory. If you would like to manually split your packages, follow these instructions.
A. Click on the split tha
B. Enter the n Quantity. C. Click once on the Man
l be taken out of inventory and th
e packages Automatically
would prefer to have less maintenance on your inventory, you can
e of the individual items falls below zero. When this happens, a casill be removed from inventory, and the appropriate amount of singl
p the Automatic Package Splitting Table.
A. Modules.
B. Inventory Maintenance
C. Inventory Table
D. Highlight the Case that is being split in the table and click on Store Information.
F. Click OK.
G. Highlight the Individual click on Store Information
H. Change the Status of the item to O for From Split.

P U R C H A S I N G P R O C E D U R E S
Change Inventory BMany times when you are workin
y Range
g with the APSW system, you may need to change information in a large group of inventory items. It can be quite cumbersome to go through every inventory item one at a time, making the necessary changes. Change By Range allows you to select a group of inventory items and make the same change to all of them, all in one step. Please be extremely careful with this feature. The changes that you make with it are not reversible.
A. Modules.
B. Inventory Main
C. Change Inven
D. Under Select b thod of selecting inventory from the available lis
r Store, select Current to change only the store that you tly signed into, OR, select All to change the inventory is
ti-store only).
he first item in the range of items that you ange, based on the Select by method that you have
e last item in the range of items that you d on the Select by method that you have
d to Change select from the drop down list the exact to change the data in.
e to, enter the new information that you would like
gisters box, if you would like this change egisters. This will slow down the system
n sent.
tenance
tory by Range
y .choose the met..
E. Undeare currenall of the stores (mul
F. Under Start at enter twould like to chindicated.
G. Under End at enter thwould like to change, baseindicated.
H Under Fielfield that you would like
I. Under Changto appear in the field that you chose.
J. Click the Update Resent immediately to the runtil the change has bee
K. Double Check the information! Make sure that you did not make a mista
ke. These changes are irreversible.
L. Click Go to make the change.
- 30 -

T R A I N I N G M A N U A L
- 31 -
Inventory Reports
There are several Inventory Reports included in the APSW system.help you to manage your inventory properly. The most commonCurrent Inventory by Category, and Inventory Summary by Categothe option of creating Filtered Reports. Filtered reports allow you tyou would like included on your reports.
These reports will ly used reports are ry. APSW also has o define what items
ick Steps ssing the Inventory Reports
In the APSW program, lick on
A.
QuAcce
c
Modules
Acc
In the APSW program, click on
A
Maintenance
ry Reports
s
e repo hat you would like to view.
A table will appear.,
F. Click Report current store, to report only information in the store you are currently signed in under. Click Report all stores to report information on all stores in your APSW system.
End
B. Inventory Maintenance
C. Inventory Reports
D. The name of the report that you would like to view.
essing Filtered Reports
. Modules
B. Inventory
C. Invento
C. Filtered Report
D. The name of th rt t
E. Click on the name of the filter that you would like to use.
E. Click Do Function.
To how to your owpress F1keyboard. This will bring up the help files.
learn create n filter, on the

T R A I N I N G M A N U A L
- 32 -
Extended Fea f APSW – Sellin es The POSAL system has numerous our work, and
ide you with more information. es features that y. The most commonly used extended
features will be explained in this section. If you require training more specific ease contact Sale Control Systems to schedule a
his manual is designed to be used together with the On Line Help. To access the On Line Help, press F1 on your keyboard, when you are in the APSW Pr nsitive. If you wish for help on a certain entry box, place the cursor in the box and press F1. For general help, press F1
when there are no application open within the system.
Using the icons These icons will appear nd the
.
To begin, Open the APSW program by double clicking on the APSW icon. Enter your user name and password, and click OK.
tures og Featur
features to simplify y This section describprov
involve maintaining your inventor
to your store’s needs, pltraining session.
ogram. On Line Help is context se
throughout the manual to help you fiinformation that you are looking for.
Chapter
5
T I C O N K E Y
Don’t forget! Quick Steps Click Here Keyboard Button

P U R C H A S I N G P R O C E D U R E S
- 33 -
Payment Code File
The payment Code File, stores information with regards to which type of payments you will accept at your Point of Sale. You also store your foreign currency exchange rates in the Payment code file. Your trainer or your support representative can assist you in linking your payments to keys on the POS keyboard.
ck Steps
1. Accessing the Payment Code File
gram, click on
tenance
ode file
A table
tender, change the details of a lete a tender.
End
Qui
In the APSW pro
A. Modules
B. Cash Register Main
C. Payment C
will appear.,
D. From here you can Insert a newtender, or de

T R A I N I N G M A N U A L
- 34 -
Browse Signed on Clerks
is secured onto the register, if another clerk tries to sign onto the register, and the POS program informs you that the first clerk is already logged onto the register.
When a clerk is signed onto the Point of Sale Program, they will appear in the Browse Signed on Clerks table. If you delete a clerk from the table they will no longer be signed in at the register. This is useful, if a clerk has secured themselves onto the register, and then gone home, without signing off. You will know that a clerk
Quick St1. Removing a er
In the APSW program, click on
B. Cash Register Management
C. Currently Signed on Clerks
A table will appear.,
D. Click on the name of the clerk that you would like to remove.
E. Click Delete.
F. Click Close to close the table.
eps clerk that is signed onto a regist
A. Modules
d

T R A I N I N G M A N U A L
- 35 -
Sales Reports
There are several sales Reports included in the APSW system. These reports will hyou to manage and monitor your sales and your clerks. The most commonlySales reports are Tender S
elp used
ummary, Category Summary, and Register totals. Additional reports in the system will allow you to see more specific information on your sales.
Quick Steps Accessing the Inventory Reports
In the APSW program, click on
A. Modules
B. Cash Register Management
C. Reports
C. The name of the report that you would like to view.
End

T R A I N I N G M A N U A L
- 36 -
Transaction Browse This feature allows you to bring up a table of all transactions within From there you can select the transaction that you are interested in, details of the transaction.
a time period. and print the
ick Steps ing the details of a transaction
In the APSW ro r m, lick on
QuPrint
p g a c
A. Modules
An e
D. Enter the Starting Date and Ending date that you would like to view transactions for.
A tabl
a line from the transaction that you would like to
G. Print Invoice.
End
B. Cash Register Management
C. Transaction Browse
ntry box will appear
E. OK
e will appear
F. Click on print.

T R A I N I N G M A N U A L
- 37 -
Extended Features of APSW – Syste ures The POSAL system has numerousprovide you with more information. s features that involve System Set up and functiona only used extended features will be explained in this section. If you require training more specific
ease contact Sale Control Systems to schedule a
his manual is designed to be used together with the On Line Help. To access the On Line Help, press F1 on your keyboard, when you are in the APSW Pr text sensitive. If you wish for help on a certain entry box, place the cursor in the box and press F1. For general help, press F1
when there are no application open within the system.
Using the icons These icons will appear lp you
information that you are looking for.
.
To begin, Open the AP icon. Enter your user name and password, and click OK.
m Feat features to simplify your work, and This section describelity. The most comm
to your store’s needs, pltraining session.
ogram. On Line Help is con
throughout the manual to he find the
SW program by double clicking on the APSW
Chapter
6
T I C O N K E Y
Don’t forget! Quick Steps Click Here Keyboard Button

P U R C H A S I N G P R O C E D U R E S
- 38 -
Favorites
The favorites section on the tool bar allows you easy access to the system features that you use most. Each user can have their own favorites linked under the favorites menu.
QuicSetting up you
In the A
B. System Maintenance
C. Favorite Procedure Maintenance
An entry box will appear
D. Click Insert to add a menu item to your favorite list.
E. Enter your Employee ID/Salesperson code.
F. Enter ‘A’ under Procedure Name.
A ne
H. Scroll through the table until you find the name of the menu item that you would like to add to your favorites menu.
I. Click the menu item that you would like to add, to highlight it.
J. Select
K. OK.
k Steps r Favorites
PSW program, click on
A. Modules
G. Press Tab.
w table will appear
You will need to close the program and sign back in before the selected menu items will
appear under your favorites.

P U R C H A S I N G P R O C E D U R E S
Activity Log
The Activity log displays a log of the procedures that have been prsystem. The user that preformed the procedure is also shown. Theby Date, Clerk, or Type of activity.
Label Design
he APSW system has the ability to create user specific shelf labels and price tags. you wish to make changes to either of
ese tags.
eformed within the table can be sorted
ick Steps ew the Activity log
QuTo vi
PSW program, click on In the A
A. Modules
B. System Maintenance
C. Activity Log
TPlease contact your support representative ifth
- 39 -
End

P U R C H A S I N G P R O C E D U R E S
- 40 -
The Point oOnce you have mastered th u are ready to learn the Point of Sale Programs. The of Sale Programs. These programs are the POSALR Sales Order Entry Program. Your dealer will have assisted you to determine which of these
s of your store.
his manual is designed to be used together with the On Line Help. To access in the APSW
certain ress F1
when there are no application open within the system.
appear throughout the manual to help you find the information that you are looking for.
f Sale e APSW program yore are two main PointW program and the
programs meet the need
the On Line Help, press F1 on your keyboard, when you are Program. On Line Help is context sensitive. If you wish for help on a entry box, place the cursor in the box and press F1. For general help, p
Using the icons These icons will
.
Chapter
7
T I C O N K E Y
Don’t forget! Quick Steps ck Here Cli Keyboard Button

P U R C H A S I N G P R O C E D U R E S
P U R C H A S I N G P R O C E D U R E S
- 41 -
The POSALRW program (POS) The POSALRW program is the most commonly used Point of Sale program. This program performs basic cash register sales.
Opening the POSALRW program
A. Double Click the POS icon on your desktop
up to date file from the server.
The POSALRW program will open. InN
C. Enter your Clerk number using the POS keyboard and then press Enter.
You will be prompted for your password
Enter your
In the upper left hand st incorrectly. Try again.
G. Begin using the POSALRW program for the days’ sales.
End
B. Wait for the program to copy the most
the upper left hand corner it will ask you for your Clerk umber
D. password using the POS keyboard and then press Enter.
corner it will read Enter Command. If this is not displayed, and you are ill being prompted for your clerk number then you have entered it
E. Check that the date is correct on the screen
F. Check that the program is On Line

T R A I N I N G M A N U A L
- 42 -
Executing a sale with the POSALRW program
A. When the screen says Enter Command you may begin a sale. To sell am item you may e er sc If your item numbers begin with a letter then to enter these items you must first press Enter. The pro t wi and then press ain.
here is
no need to total the sales.
is important to note that in all transactions where a debit/credit card is the form of yment, it must be approved through your debit/credit authorization system BEFORE ing entered at the register.
OTE: If the amount of payment received is EXACT, it is not necessary to enter the amount
CASH 1. amount using the keyboard:
EXAMPLE: ter [20.50] for $20.50
NOTE: If the amount received is EXACT, then press the CASH Key without entering the amount
…continued
ith an the item or enter the item number, and then press enter.
mp ll say Enter Item Number. You may now enter the item numberEnter ag
B. Once all items have been entered, payment may be collected from the customer. T
Itpabe
Do the following for the applicable TENDER:
Ntendered
Enter the EXAMPLE: Enter [20.] for $20.00
En
2. Press the CASH ey d K on the keyboar

P U R C H A S I N G P R O C E D U R E S
- 43 -
…Execu the POSALRW program continued
American Express (Amex)/Mastercard/Visa/Cheque/Debit
Obtain approval for the amount through your debit/credit authorization
2. Once approved, press the appropriate tender key on the keyboard
3. Provide the receipt to the customer
CASH
Enter [20.] for $20.00 EXAMPLE: ] for $20.50 Press the on the keyboard
3. will calculate the equivalent C$ CASH and the change in C$
Provide the receipt to the customer
End
ting a sale with
1.
system
US$
1. Enter the amount using the keyboard:
EXAMPLE:
Enter [20.50
2. US CASH Key
The registerCASH
4.
If the customer wishes to pay with two
1. different tenders:
Enter the amount of
key. 2. The amount remaining
with be displayed in the total box.
3. Enter the amount of the second tender and then press the appropriate key.
the 1st tender and then press the appropriate

P U R C H A S I N G P R O C E D U R E S
- 44 -
P U R C H A S I N G P R O C E D U R E S
- 44 -
Additional Function in the POSALRW program
Clears any
QUIT
Closes the
SU
Cltra
RESUME
Resumes a
1. Press the2. Select
POS keyb
3. When the d, press enter.
R
Al
1. Press the Reprint key
number that you wish to reprint, using the POS ke
3. Press Enter.
…continued
CLEAR
error message or incorrect data
POS program
SPEND
ears and saves the current transaction. The customer may return later and the nsaction may be continued using the resume key
saved transaction.
Resume key
the transaction from the list using the up and down arrows on your oard.
transaction is highlighte EPRINT
lows you to reprint a previous transaction from the same day.
2. Enter the transaction
yboard.

P U R C H A S I N G P R O C E D U R E S
- 45 -
…Additional Function in the POSALRW program Continued
VOID
ves the entire transaction. Must be done before a tender is entered.
VOID
Remov h
1. the POS keyboard to select the ion
CUST LOOK
Customer look up key. This key allows you to access discounts for the Customers that you created in your Customer File.
t the Customer/Discount that you wish to use.
E
ALL
Remo
es t e currently highlighted item from the transaction.
Use the Up and Down arrows on item that you wish to remove from the transact
2. Press the void key.
1. Press the Cust Look key
2. Use the up and down arrows to selec
3. When the Customer is highlighted press the enter key on the POS keyboard.
4. The discount will now apply to all items that are entered after the discount was selected.
NO SAL
This key opens the cash drawer. This key will not work during the middle of a transaction.
ON/OFF
This key turns the receipt printer on and off
…continued

P U R C H A S I N G P R O C E D U R E S
- 46 -
…Additional Function in the POSALRW program Continued
ITEM LOOK
Allows you to view the inventory file and sell an item, or check the quantity on ha
1.
2. y item you are looking for. On hand
3. s select the item
4. Press enter if you wish to sell the item
X REP
X. Report. This prints a running total of the register’s sales for the day. This report can be printed at any time during the day.
Z
Z. reset the register for the next business day.
nd.
Press the Item Look key
T pe the description of the value and retail price are displayed.
U e the up and down arrows to
5. Press clear is you do not wish to sell the item. This will close the file.
REP
Report. This prints the total sales for that register for the day. It will
It is very important that you only execute one Z report each day. If you execute more than les will be compromised.
TR
Tr de for the instruction of new cashiers.
one Z report a day your back up fi
AIN
aining Mode. This key puts your register into training mo
No transactio
ss the Train key
3. To exit training mode press the Cash key on the POS keyboard
4. then press the Train key. …continued
ns preformed in this mode will be saved.
1. To enter training mode press the Cash key on the POS keyboard
2. Then pre

P U R C H A S I N G P R O C E D U R E S
- 47 -
RETURN
Allows omer.
is purchasing first
3. Enter/Scan any items that the customer is returning
PAY OUT
Cash Paid Out. This allows you to remove cash from the register to pay for items/s i ged in the cash out.
ove from the register in nd cents.
2. Press the Pay Out key.
SAFE DROP
This allows you to remove money from the register to put into the safe.
1. Enter the amount that you wish to remove in dollars and cents
2. Press the Safe Drop key.
SIGN OFF
This key logs off the current clerk. A new clerk can then log on.
SECURE
This key logs off the current clerk. If a clerk uses the Secure key to log off of the program, only he/she will be able to log into the program. This protects the cash in the register from other employees when the clerk is away from the register. A manager may remove the clerk from the register by using Browse Signed on Clerks.
…continued
…Additional Function in the POSALRW program Continued
you to return merchandise for the cust
1. Enter/Scan any items that the customer
2. Press the Return key
6. Complete the sale as usual.
erv ces. The transaction is log
1. Enter the amount that you wish to remdollars a

P U R C H A S I N G P R O C E D U R E S
- 48 -
the POSALRW program Continued
PR
y using the up and down arrows.
2. Press th Button
3. Enter the new price in dollars and cents
4. Press th n the POS keyboard.
QUAN
Quantity. This key allows the clerk to sell more than one item at a time.
er the quantity of the item that you are selling
…End
…Additional Function in
ICE OVER
Price Override. This allows the clerk to change the retail price of an item.
1. Highlight the item that you wish to change the price on b
e Price Over
e Enter key o
1. Ent
2. Press the Quan key.
3. Scan the item or enter the item number.

P U R C H A S I N G P R O C E D U R E S
Sales Order Entry (SOE) The SOE program is an op may also choose to add an Accounts Receivable program to your SOE program. You may choose to use the SOE program instead of the POS program, or to use both the SOE a Discuss the benefits of both programs with your dealer.
tional program that can be used for invoicing. You
nd POS programs.
Creating an invo
A SOE icon on your desktop
The Sales O rogram will open.
C. On the tool bar, click on
D.
Your Customer Table will appear
E..
F. Sh
G Ins
A Header information entry box will appear
H
I.
The Header Infor
J. sert.
K. Enter the Item Number that you wish to sell to this customer
Continued…
ice for a customer
. Double Click the
B. Enter your user name and password, and press enter.
rder Entry p
Order Entry.
Order Entry – Customer Selection
Highlight the name of the Customer that you wish to create an invoice for by clicking on them
ow Customer Orders
. ert to enter a new invoice for this customer
. Enter your clerk code under Sold by and Entered by.
OK
mation entry box will close and you will be brought to an Order form.
Running In
- 49 -

T R A I N I N G M A N U A L
- 50 -
…Creating an invoice for a customer continued
L. Press Tab.
L. Enter the Quantity of this item that you wish to sell to this customer.
or this item, if you wish to change the current price of
The entry box will clear, and you may now enter the next item by repeating steps K - O.
You will be brought back to the order form, and all items that the customer is ordering will be shown in the table.
S. You may add a payment for the invoice by clicking on Payment
iii. Enter the amount of the payment under Value.
iv. Click OK
Save/Exit.
V. You may Post the invoice (update the inventory and the sales) by clicking on Post Order.
M. Press Tab.
N. Enter the Unit Price fthe item.
O. Press Enter.
P. When all items that the customer is purchasing have been entered, click
Cancel.
Q. You may print a Packing List by clicking on Packing List.
R. You may add Special Instructions to the invoice, by clicking on
Special Instructions.
i. Insert
ii. Highlight the payment type and then click Select.
T. You may print the invoice by clicking on Print Invoice.
U. You may save the invoice to work with later by clicking on
…End
For this entry box only, the + key on the keyboard keypad can be used as a TAB key. This speeds up your data entry.

P U R C H A S I N G P R O C E D U R E S
A
- 51 -
ppendix Common Errors in Stock Receiving To find errors with the following, go into your order in Stock Receipts and Adjustments, and click on the List button. Print the List, and exam your order for any of the following errors:
ay come up different than the p ular vendor that you are receiving stock from. As you enter
e item numbers, wat isplayed with ch item. Examine th bers.
C. Tax Flag. If the Tax flag is not set right on each individual item that you are receiving your Tax will be calculated incorrectly, and you may have a discrepancy. Examine the LIST for any items with an incorrect tax flag.
D. Case Quantity. If the Case Quantity is incorrect on any item, it will cause your argins to be incorrect and may cause a discrepancy when receiving. Examine the ST for any items that have the wrong case quantity displayed.
. Bottle Deposit. If you are using bottle deposits, an incorrect or missing deposit ll cause your deposit total to be wrong and may cause a discrepancy when receiving.
Examine the LIST for any items that may have missing or incorrect bottle deposits.
A. Incorrect data entry. Check that data that you have entered and make sure that the item numbers, quantities, and invoice prices are correct.
B. Vendor Number. If an individual inventory item does not have the correct vendor linked to it in the Inventory Master File, then the flags for that item m
articch to make sure that the proper vender number is de LIST for any items with incorrect Vendor num
thea
mLI
Ewi

P U R C H A S I N G P R O C E D U R E S
- 52 -
ure that the mistake does prices, and on hands that were posted.
Once you post a receipt the new cost prices are posted as well. The cost price of each inventory item will be adjusted to reflect what you have specified in the Vendor flags, and the invoice price that was entered. If the inventory items were not received properly, then your margins will be incorrect. This can be changed by manually correcting the cost price on the individual inventory items, or upon your next receipt of the items, if they are received properly.
The consequences of incorrect stock receipts are not only incorrect margins, and cost prices, but also, incorrect Inventory value, and anything that is related to incorrect margins, incorrect on hand values, and cost prices (ie. Cost plus pricing.) There is no way to reverse these consequences of incorrect margins and incorrect total inventory value. You can only correct your receiving procedure, to insnot happen again and correct the cost
If you come across aninventory file, first go to thmistake. Next, go to the or
item that has a mistake in the e inventory file and correct the der. Delete this item from the
the discre
order and re-enter the item. Make sure that you enter the correct item number, quantity and invoice amount. Once the changes have been made, check your order to see if
pancy has been resolved.
Remember, once you have entered your invoice total under the Financial Tab, your discrepancy should be minimal. If you have followed these instructions to correct your discrepancies, and you have not been able to correct your discrepancy, call your support representative and correct the discrepancy before posting your order.

T R A I N I N G M A N U A L
- 53 -
Ordering Methods
Currently there are 7 basicneeds. You may w
methods to order. Choose the method that best suits your ant to choose different methods for different vendors.
Maximum on-hand amounts are set up in the Store Information g method will pick up any items in which int. These items will be ordered to bring
n-hand amounts are set up in the Store Information area of the Inventory This ordering method will pick up any items in which the on-hand value he maximum on-hand. These items will be ordered to bring the inventory
(but not exceeding) the maximum on-hand value.
eeks
order to use orders based on Sales History, a history record must be kept for the ry records can be set up in the Inventory Master File.
This ordering method is based on Sales history. A history week ends on Sunday. This
weeks as you wish to use in your ordering. The umber of units of history to use is 8. The system will take the specified
nits of history and divide them to calculate the average daily sales. The average daily
ted inventory level. The actually inventory on hand is then subtracted
r these
Below Reorder Up To Maximum
Reorder Points andarea of the inventory master file. This orderinthe on-hand value is less than the reorder pothe inventory level up to the maximum on-hand value. If the dedicated amount is greater than the maximum on-hand value, then the system will order the dedicated amount minus the on-hand amount.
Below Maximum
Maximum oMaster File.
tis less thanlevel up to
Previous W
Initems being ordered. Histo
report will not use the current week in the calculation. The number of units of history to use will determine how many weeks worth of Sales that the system is to take into account when ordering. Please note that you must have your system set up to record weekly history for at least as many maximum nusales are then multiplied with the number of days supply that you require. This willcreate the suggesfrom the suggested inventory level. The remaining amount is the suggested ordering amount. If the suggested inventory level is less than either the minimum on hand or the dedicated amount (Head Office only), the system will automatically ordeitems up to the greater of the two.
If the suggested ordering amount is less than 1 (ie. 0.87), then the system will not order this item. For low sales volume items, we recommend that you enter “1" into the reorder point field. This way the system will insure that you always have at least one of

P U R C H A S I N G P R O C E D U R E S
- 54 -
this item on hand. The maximum on hand value will override the suggested order based on sales history, but will not override the amount to be ordered for dedicated. If you do not think that the system is ordering sufficient amounts for an item, based on the sales history, examine your Maximum on-hand value and adjust accordingly.
Dedicated Only
This method will create an order for those items that have a dedicated amount that is greater than the on-hand amount. This method will order just enough to cover the amount dedicated.
Specified Days Back from Entered Date
the days used to calculate the order would be:
/00 ec 7/00
Etc.
Dedicated Plus Reorder
n the on hand amount. This method will order enough to cover the dedicated amount, plus leave enough stock in the store to
eet your minimum requirements.
ays
use orders based on Sales History, a history record must be kept for the being ordered. History records can be set up in the inventory master file.
les History. This report will not use the current day in the calculation. The number of units of history to use will determine how may days worth of sales that the system is to take into account when ordering. Please note that you must have your system set up to record daily history for at least as many days as you wish to use in your ordering. The maximum number of units of history to use
This ordering method is the same as Previous Days, except that the days used in the calculation are taken from a user specified day. This date is entered when the order is calculated. For example if the date entered is Dec 12/01, and you create an order based on specified Days Back from Entered Date,
Dec 11/00Dec 10/00 Dec 9/00 Dec 8D
This method will create an order for those items in which the dedicated amount plus the minimum on hand amount is less tha
m
Previous D
In order to items
This ordering method is based on Sa

P U R C H A S I N G P R O C E D U R E S
- 55 -
is 8. The system will take the specified units of history and divide them to calculate the average daily sales. The average daily sales are then multiplied with the number of days
ire. This will create the suggested inventory level. The actually inventory on hand is then subtracted from the suggested inventory level. The
), then the system will not order this item. For low sales volume items, we recommend that you enter “1” into the reorder point field. This way
at you always have at least one of this item on hand.
/01 and you create an order based on last year’s weeks, the weeks used to calculate the order would be:
Dec 1/00 Dec 8/00 Dec 15/00 Dec 22/00 Etc.
Last Year Days
This ordering method is the same as Previous Days, except that the days used in the calculation are taken from the previous year in order to predict seasonal sales. For example if the date is Dec 12/01, and you create an order based on last year’s days, the days used to calculate the order would be:
Dec 13/00 Dec 14/00 Dec 15/00 Dec 16/00 Dec 17/00 Etc.
supply that you requ
remaining amount is the suggested ordering amount. If the suggested inventory level is less than either the minimum on hand or the dedicated amount, the system will automatically order these items up to the greater of the two. If the suggested ordering amount is less than 1 (ie.87
the system will insure th
Last Year Weeks
This ordering method is the same as Previous Weeks, except that the weeks used in the calculation are taken from the previous year in order to predict seasonal sales. For example in the date is Dec 1

P U R C H A S I N G P R O C E D U R E S
- 56 -
Calculation Methods
tage of the calculation you wish to use. The ory level and multiply it by the promotion
Promotion Weight
The promotion weight states the percensystem will take the suggested inventpercentage before calculating the amount to order. We recommend that you keep the Promotion Weigh at 100%
Calculation Method
Average- this will calculate your orders as stated above
Weighted average- The weighted average, if selected, will take the most recent day/week of history and multiply it by three. In the end this will give more emphasis to the most recent history.

P U R C H A S I N G P R O C E D U R E S
- 57 -
Putting Your Registers On and Off Line
You may be required to put your registers off line if: -Your system is being updated -Your server computer is not operational -You need to restart your server When your registers are off line they will not transmit any data to the server. Transactions are stored at each register until the registers are put back on line, and the processor is running. Once this happens, transactions for that day will be sent to the server. You must not execute a Z report while the registers are off line. If you do execute a Z report while the registers are off line, it will not print. Also, all of the transaction executed since the last Z report will be sent into a back up file. The processor does not have access to this back up file, until the day end procedures are executed. The day end procedures will recover the transactions in the back up file as long as the registers are back on line, the processor is running, and only one Z report was executed that day. The day end procedures must be set up to run automatically on your system. Most stores already have these set up on their system. Very rarely a register will go off line by itself. This may be caused by a power surge, a loss of power, or lost communication with the server. If this happens the register must be put back on line in order for the transactions to be processed for that day. You will know if a register is off line by looking in the bottom left hand corner of the screen. The register will show the word LINE followed by either N or Y. If there is an N there, then the register is off line. If there is a Y there, then the register is on line.
Putting the Registers Off Line WINDOWS XP Each register must be put off line individually. To put a register off line, go to the register and close all programs that are running on the register. Click START then click Log Off, then click Switch User.’ Select the user called off-line. Now when you enter the POS program the register will be off line.
Putting the Registers On-Line Windows XP
Each register must be put on line individually. To put a register on line, go to the register and click START then click Log Off’, then click Switch User. Select the user called Staff. Now when you enter the POS program the register will be on line.

P U R C H A S I N G P R O C E D U R E S
- 58 -
If this does not put e computer.
If you are still hav resentative.
gencies only.
your POS program on line, try restarting th
ing problems call your support rep
Business hours are Monday through Friday 8 AM to 5 PM. Please reserve calls outside of these hours for emer

P U R C H A S I N G P R O C E D U R E S
- 59 -
Regular Register Maintenance
o avoid complications with your registers the following should be applied to your procedures:
1. Restart your registers ever that may have een corrupted. This will also insure that your registers are on line every day. If you
rt representative. Do not restart computers by pressing the ‘Reset’
ogram you are using the QUIT key located on the keyboard. DO NOT exit the program in any other manner.
4. Make sure that you have a quality surge protector on every computer. A universal
5. Make sure that when computers are shut down that they are shut down properly, using
T
y morning. This will reset settings in Windowsbare unsure how to restart your registers properly, please request a document on this from your suppobutton, or by shutting the power off.
2. Restart your server at least once a week.
3. Make sure that every time that you exit the POS pr
Power Supply is also highly recommended for each computer.
the start menu. DO NOT shut down computers by unplugging them, turning off the power, or pressing the Reset button. If you are unsure of how to shut down your computer properly, please request a document on this from your support representative.

P U R C H A S I N G P R O C E D U R E S
- 60 -
Trouble Shooting on POS
POS program will not run
gister is not responding try the following before calling your Support Representative:
y using the POS program to see if the problem has been fixed.
program.
file.
the exact problem, and
Registers
If your POS Re
After Each step tr
1. Use the mouse and click in the middle of the screen on the POS
2. Check to see if your Receipt Printer is out of paper.
3. Restart the computer
4. Turn off the power/unplug all peripherals, and then turn on all peripherals (ie printers, scanners, pole display). Make sure that all connection are tight.
5. Make sure that no clerks are logged onto the register. To do this go to the APSW program (back office), click on Modules, then Cash Register Maintenance, then Browse Signed on Clerks. If there is a clerk signed onto the register, delete the clerk from this
6. Write down any errors that the system is giving you. Write down note any symptoms. Note exactly what you were doing when the problem occurred. Call your support representatives and relay the information.

P U R C H A S I N G P R O C E D U R E S
- 61 -
POS register will not go on line
on to the server is restored. At this point any transactions that have not
ilar to a phone line, but thicker) that comes out should be connected to your hub or router (small box with
router to the back of the ck to make sure that the
5. Once you are positive that the connections are tight, the hub/router has power, and that there is one light on for each computer connected to the hub/router, restart your server computer and your register.
6.
My Computer. You should see listed in the main box the name of your server. It should say something similar to “C on server
A.
B. If when you click on the name of your server an error message appears, you will need to call your personal computer technician to assist you in restoring the connection to your server.
C. If when you click on the name of your server, the files from your server are displayed. Check to see if your register is on line now. If your register is not on line, move to step 8.
8. In My Computer, on the tool bar, click on Tools
9. Click Map Network Drive
If your POS register is not on line, you can still use the register. Transactions will be stored on the register until the connectibeen sent will be sent to the server. You will not be able to execute a Z report while the register is off line. To put your register back on line use the following steps.
1. Restart the Server
2. Restart the register
3. Check to see if the register is on line. If it is not on line, continue to step 4.
4. Check all connections. There is a network wire (simof the back of the register. This wirelights on it). From there another network wire should go from the hub orserver. Check to make sure that all of these connections are tight. Chehub/router has power. Check to make sure that the lights are on, on your hub/router. There should be one light for each computer that is hooked up to the hub/router. There may also be another light indicating power.
Check to see if your register is on line. If it is not on line move to step 7.
7. On the desktop of the register computer, double click on
(E:)” . Double click on the name of the server.
If you do not see the name of your server move to step 8.

P U R C H A S I N G P R O C E D U R E S
- 62 -
10. Under drive choose E:
11. Beside Folder, clic
12. Look thoroughly u r server. Clicking on the (+) sign will expand the ca
13. If you find the na , click on the (+) to expand it, and select the C drive on your server.
14. Click OK
15. Make sure that
16.
17. Check to see if your register is on line. If it is not online, move to step 18.
18. Restart your server, and your register.
19. Check to see if your register is on line. If it is not online move to step 20.
20. If you were able to map the network drive without errors, and your register will still not go on line, call your SCS supp ou were not able to map the network drive without errors, call your personal assist you in restoring your network connection.
Information for your Computer Technician to assist in putting your register on line:
For the register to be on line, it must be able to have free access to the server, with no restrictions. The server must b ive of the register. Check to make sure that the network is running smoothly the network will put the register off line.
k Browse.
nder Entire Network to find the name of youtegory.
me of your server
Reconnect at logon box is checked.
Click Finish
ort representative. If ycomputer technician to
e mapped to the E dr. Any interruptions in

P U R C H A S I N G P R O C E D U R E S
- 63 -
Filtered Reports –
for. There are two steps to creating a st step is to select the information that will be reported. The
Selecting the informa
ory
Monthly Dollar History
Monthly Sales History
Previous Year Comparative
Selected Inventory
Weekly sales History
1.
2. Inventory Maintenance
3. Inventory Reports
4. Filtered Reports
Creating a Filtered Report Filtered Reports are used to create user defined reports. These reports will help you find specific information that you are looking filtered report. The firsecond step is to select the items that will be reported on.
tion that will be reported. To select the information that will be reported you need to choose a report format. The report formats that are available are as follows:
Custom Report
Daily Sales Hist
Margin Analysis
Selected Sales History
Monthly Sales History
To select a report format do the following:
Modules

P U R C H A S I N G P R O C E D U R E S
- 64 -
5. the nam the repore of t format that you would like to use.
A selection table will appear.
To select the items that you will be reporting on, do the following:
2. you remember the items that it includes. ( IE Pop Category)
3. .
5. de Select Data Field. Select how you t your ory)
6. rop do arrow beside Select Operator. Select an operator.
ion of
8. Click OK.
9. the method you would like to use for sorting this report
10. Click OK.
11. Your new report will be shown in the Custom Reports Table. To print the the na
Do Function.
In the previous example, the filter we created would bring up a report that included all items in the category POP. Here are more examples of filters that you could create using the Filtered Reports feature:
erator:: =
Enter Value: 6 PK
This report would bring up all items that have 6 PK entered under their Department
1. Insert
Type a name for this filter that will help
Press Tab
4. A filter selection table will appear
Click on the drop down arrow besiwould like to selec items (IE categ
Click on the d wn(IE =)
7. Click on the drop down arrow beside Enter Value. Enter a descriptthe Data you are requesting (IE POP)
Under Sort by click
report click on me of the report that you want to print, and then click
Select Data Field: Department
Select op

P U R C H A S I N G P R O C E D U R E S
- 65 -
Select D ndor
endor
Ha d
Select Data Field: Case Quantity
Select operator:: <
This report would bring up every item that did not have a case quantity entered.
Select Data Field: Deposit Code
Select operator:: =
Enter Value: (leave blank
This report would bring up all items that did not have a bottle deposit linked to them.
Select Data Field: Discountable Item Flag
Select operator:: =
Enter Value: 0
his report would bring up all items that were set to be non-discountable. For a report of discountable items, use 1 under Enter Value.
ata Field: Ve
Select operator:: =
Enter Value: 1
This report would bring up all items that had Vendor 1 selected as the reorder v
Select Data Field: Quantity On n
Select operator:: <
Enter Value: 0
This report would bring up every item that had a negative on hand value.
Enter Value: 2
T
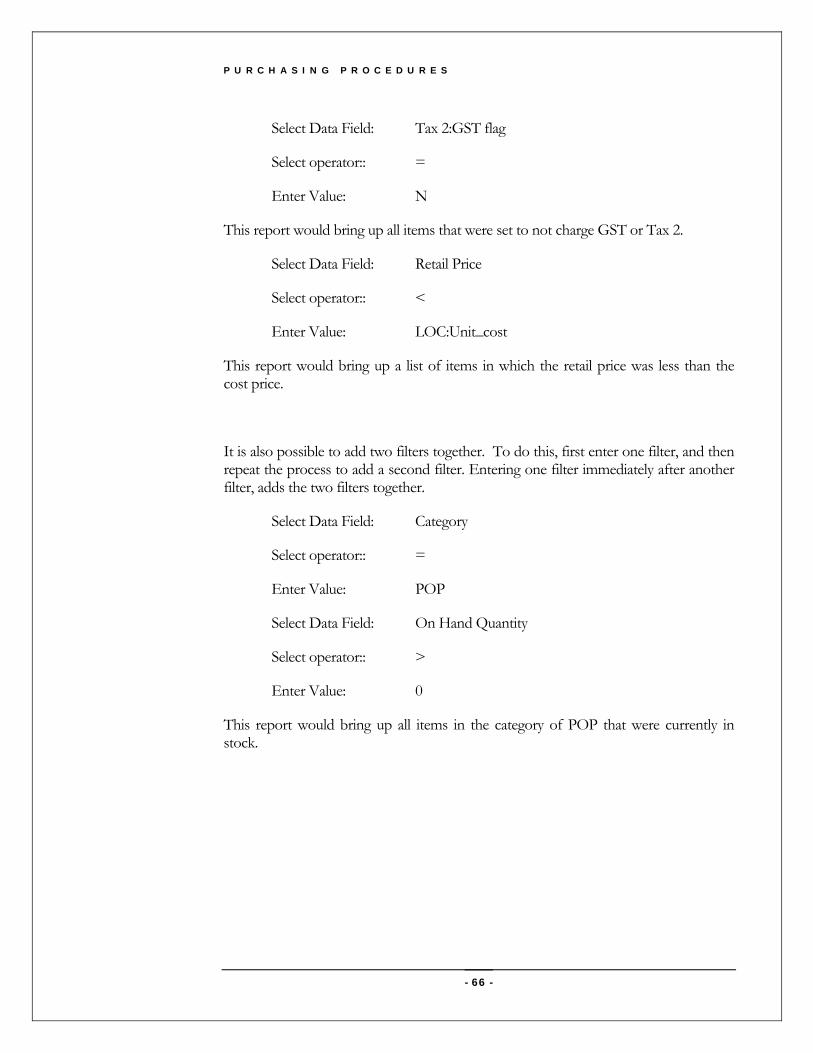
P U R C H A S I N G P R O C E D U R E S
- 66 -
Select Data Field: Tax 2:GST flag
Select operator:: =
Enter Value: N
This report would bring up all items that were set to not charge GST or Tax 2.
Select Data Field: Retail Price
Select operator:: <
Enter Value: LOC:Unit_cost
This report would bring up a list of items in which the retail price was less than the cost price.
It is also possible to add two filters together. To do this, first enter one filter, and then eat the process to add a second filter. Entering one filter immediately after another
filter, adds the two filters together.
Select Data Field: Category
Select operator:: =
Enter Value: POP
Select Data Field: On Hand Quantity
Select operator:: >
Enter Value: 0
This report would bring up all items in the category of POP that were currently in stock.
rep

67
Index
A
Activity Log · - 38 - Automatic Package Splitting · - 27 -
B
Bottle Deposit · - 6 -
C
Case Quantity · - 6 - Out · - 18 - gory · - 4 -, - 6 -, - 30 -, - 34 -, - 63 -, - 65 -
Change Inventory By Range · - 29 -
D
CashCate
clerk · - 2 - Clerk monitoring · - 38 - Clerks · - 33 -, - 59 - Customer · - 5 -
Day End · - 18 -, - 19 - Debit · - 32 -
cription · - 6 - Des
F
Favorites · - 37 - port · - 6Filtered Re 2 -
Funds · - 32 -
I
Inventory Reports · -
· - 30 -, - 62 - 6 - Inventory Table
Item Number · - 6 -
L
Label · - 38 - Last Ordered Cost · - 6 -

68
M
Mastercard · - 32 -
O
Off Line · - 56 - On Hand · - 23 -, - 64 -, - 65 - on line · - 56 -, - 57 -, - 58 -, - 60 -, - 61 - Ordering · - 52 -
P
Payment Code · - 32 - Payment methods · - 32 - POS · - 23 -, - 32 -, - 33 -, - 40 -, - 48 -, - 56 -, - 57 -, - 58 -, - 59 -, - 60 - Purchasing · - 8 -, - 9 -, - 23 -
R
Receiving · - 50 - Register Maintenance · - 58 -, - 59 - Registers · - 56 -, - 59 - Reorder Vendor · - 6 - Reports · - 30 -, - 34 -, - 62 -, - 63 -
Inventory Reports · - 30 - Sales Reports · - 34 -
Retail · - 26 -, - 65 - Retail Price · - 6 -
S
Sale · i, - 22 -, - 25 -, - 31 -, - 32 -, - 33 -, - 36 -, - 39 -, - 40 - Sales Order Entry · - 39 -, - 48 - salesperson · - 2 - Salesperson · - 2 - Size · - 6 - SOE · See Sales Order Entry
T
Tax Flags · - 6 - Tenders · - 32 - Transaction Browse · - 35 -
U
Unit Cost · - 6 - UPC code · - 6 -

69
V
Vendor · - 3 -, - 50 -, - 51 -, - 64 - Visa · - 32 -