toolbar for mozilla firefox browser - messaging.ooredoo…messaging.ooredoo.qa/downloads/ooredoo...
TRANSCRIPT
Page 1 of 25
Toolbar for Mozilla Firefox browser
User’s guide
Software version: 1.18
April 26, 2011

Page 2 of 25
Copyright
Copyright © 2001 – 2011 PowerMeMobile Co. All rights reserved. No part of this publication, or any software included with it may be reproduced, stored in a retrieval system, or transmitted in any form or by any means, including photocopying, electronic, mechanical, recording, or otherwise, without the prior written permission of the copyright holder.
Trademarks and Registered Trademarks
Products and product names mentioned in this document may be trademarks or registered trademarks of their respective owners.

Page 3 of 25
Table of Contents
ABOUT THIS MANUAL .................................................................................................. 4
Disclaimer .................................................................................................................................................... 4
I. MM TOOLBAR OVERVIEW ................................................................................. 5
II. INSTALLING AND UNINSTALLING MM TOOLBAR .......................................... 6
III. REGISTERING AS A VALID USER ..................................................................... 7
IV. CREATING MESSAGES ...................................................................................... 9
IV.1. Creating an SMS message ............................................................................................................ 9
IV.1.a. Using and managing templates ............................................................................................... 9
IV.2. Creating an MMS message .......................................................................................................... 10
V. SENDING THE COMPOSED MESSAGE .......................................................... 14
V.1. Defining recipients for your message ........................................................................................ 14
V.2. Defining an originator for your message ................................................................................... 14
V.3. Setting date and time for your message to be delivered ......................................................... 14
V.4. Sending one message to multiple recipients ............................................................................ 15
VI. GETTING MOST OF YOUR PHONEBOOK ....................................................... 16
VI.1. Searching your contacts ............................................................................................................. 18
VI.2. Selecting recipients for messages ............................................................................................. 19
VI.3. Importing data into your Phone Book from external sources ................................................. 19
VI.4. Synchronizing your Phonebook with the server....................................................................... 21
VII. ADDING MONEY TO YOUR ACCOUNT ........................................................... 22
FREQUENTLY ASKED QUESTIONS .......................................................................... 23
Troubleshooting ........................................................................................................................................ 23
Index ........................................................................................................................................................... 23
Page 4 of 25
About this manual
Thank you for choosing Message Manager Toolbar, your most competitive solution for keeping in touch with your current and potential customers, employees, and just friends. This manual is to conveniently assist you with your everyday work with Message Manager Toolbar. We organized it as a reference and a small study guide, so that each chapter stands alone, giving you quick and easy answers to particular questions and step-by-step instructions for specific tasks. You can find the necessary information in the chapters through the Contents, or use Troubleshooting and Frequently Asked Questions sections for immediate help in many typical situations.
But we are reasonable enough not to boast that in our manual we predicted all possible questions, in any situation, for all our most respected users. That is why we would greatly appreciate any your comments, critique especially. You can always find the feedback email address if you click the MM Toolbar button usually located far left on your Message Manager Toolbar, and then select About.
PowerMeMobile Co. is constantly working on improving the Message Manager Toolbar for the Mozilla Firefox Internet browser, so there may be insignificant differences between the actual Toolbar looks and the screenshots in this manual.
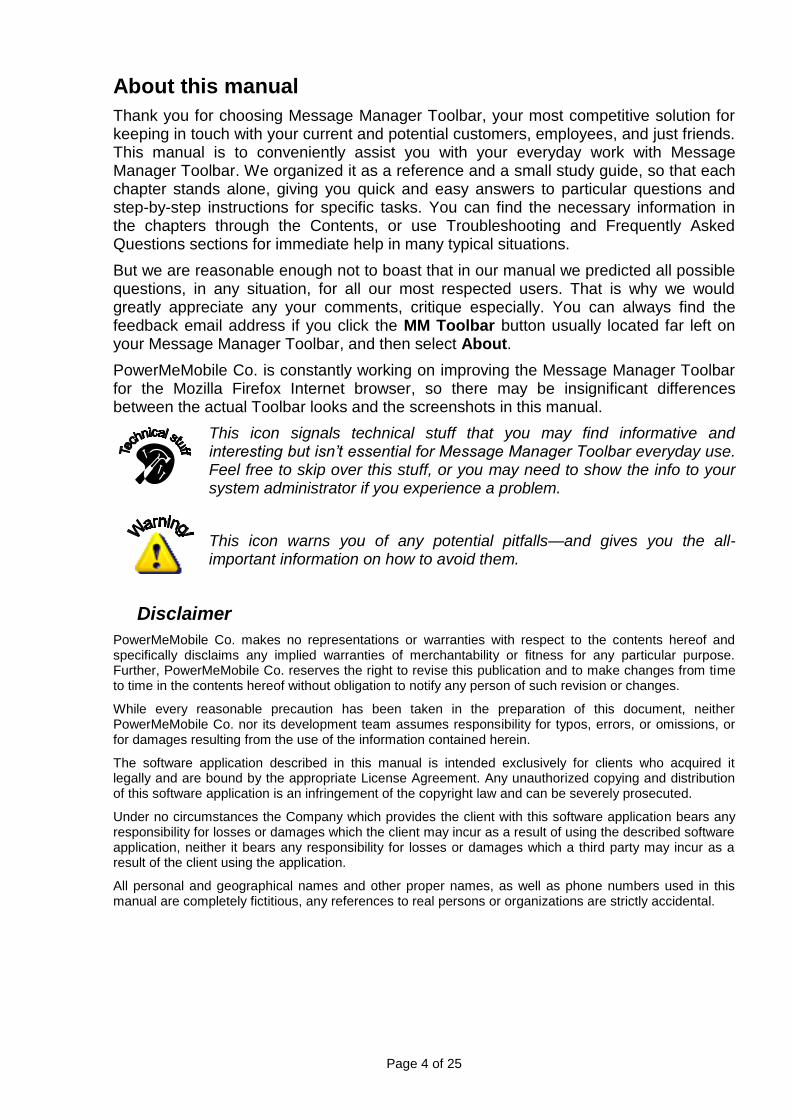
This icon signals technical stuff that you may find informative and interesting but isn’t essential for Message Manager Toolbar everyday use. Feel free to skip over this stuff, or you may need to show the info to your system administrator if you experience a problem.
This icon warns you of any potential pitfalls—and gives you the all-important information on how to avoid them.
Disclaimer
PowerMeMobile Co. makes no representations or warranties with respect to the contents hereof and specifically disclaims any implied warranties of merchantability or fitness for any particular purpose. Further, PowerMeMobile Co. reserves the right to revise this publication and to make changes from time to time in the contents hereof without obligation to notify any person of such revision or changes.
While every reasonable precaution has been taken in the preparation of this document, neither PowerMeMobile Co. nor its development team assumes responsibility for typos, errors, or omissions, or for damages resulting from the use of the information contained herein.
The software application described in this manual is intended exclusively for clients who acquired it legally and are bound by the appropriate License Agreement. Any unauthorized copying and distribution of this software application is an infringement of the copyright law and can be severely prosecuted.
Under no circumstances the Company which provides the client with this software application bears any responsibility for losses or damages which the client may incur as a result of using the described software application, neither it bears any responsibility for losses or damages which a third party may incur as a result of the client using the application.
All personal and geographical names and other proper names, as well as phone numbers used in this manual are completely fictitious, any references to real persons or organizations are strictly accidental.

Page 5 of 25
I. MM Toolbar overview
Message Manager Toolbar lets you compose and send SMS and MMS messages in a most convenient way and in the time you want it. It is a plug-in, or a program installed as an addition to a bigger, stand-alone software (the Mozilla Firefox Internet browser in our case, version 3 recommended).
Fig. 1. This is how MM Toolbar generally looks on your screen.
The main functions of Message Manager Toolbar are:
Composing and sending SMS and MMS messages to individual recipients throughout the world;
Creating complex MMS messages in Message Manager Toolbar environment, utilizing various sources for image, audio, and video data (including YouTube clips) to be used in the MMS messages;
Saving the MMS messages you created, so that you can edit them later and send them again;
Sending your messages at a specified time and date;
Managing your contacts with the help of the Phonebook;
Please note that Message Manager Toolbar for Firefox is just one of many useful products offered by PowerMeMobile Co. For the complete list of supported applications, please visit www.powermemobile.com.
Page 6 of 25
II. Installing and uninstalling MM Toolbar
Message Manager Toolbar plugin is easy to install and operate, provided your computer meets the following installation requirements:
10 MB of free space on your hard disk;
Windows NT, or Windows-2000, Windows XP (recommended), Windows Vista, or Windows 7;
Mozilla Firefox Internet browser, versions 1-4, version 3 recommended.
You will have to have Administrator rights to install the plug-in. If you experience problems with the installation, most probably you have to change the user accounts. You may need to contact your system administrator for this.
The installation process for MM Toolbar does not differ from installing any other virus-proof and user-friendly professional software. You should execute MM-Toolbar-Setup.exe file and then follow the instructions from the setup screen. Windows XP™ allows you to do it directly from Windows Explorer, though many people prefer a more traditional way—through Add/Remove Programs menu. Of course, you can change the path for MM Toolbar files to be installed, but we must say that in 90% cases the default settings work very well and trouble-free, so you just hit Next button several times. The whole process will take you about three minutes.
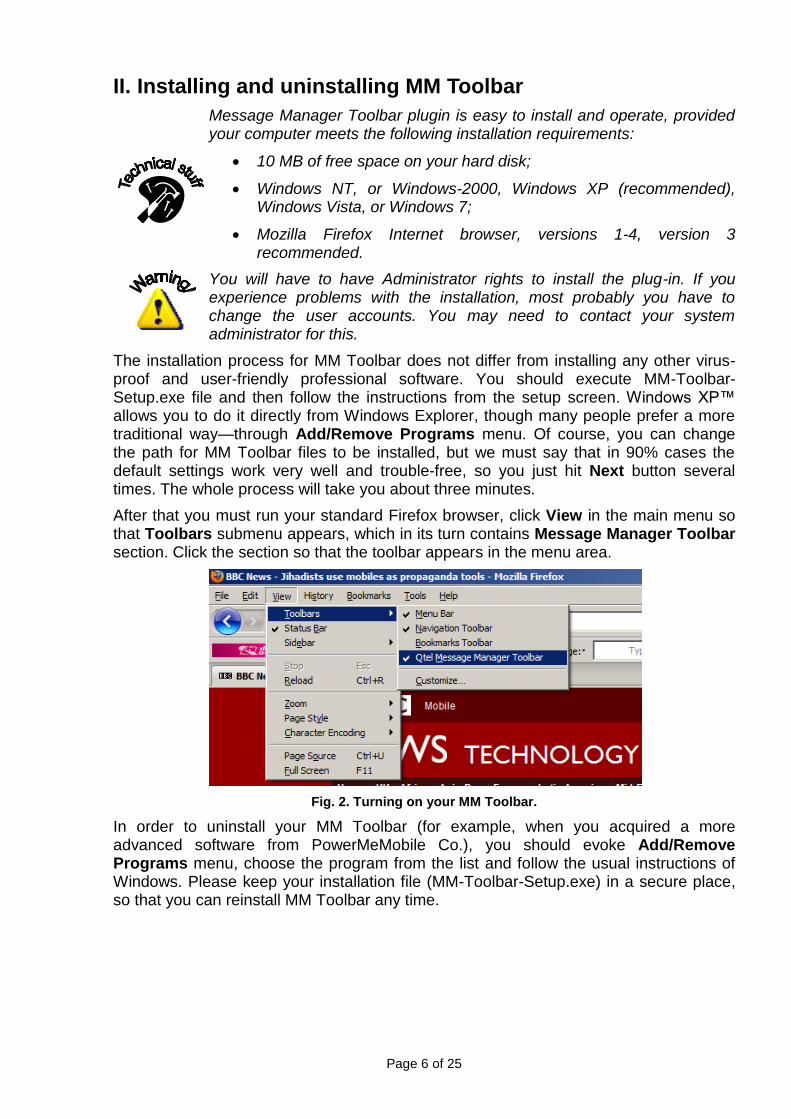
After that you must run your standard Firefox browser, click View in the main menu so that Toolbars submenu appears, which in its turn contains Message Manager Toolbar section. Click the section so that the toolbar appears in the menu area.
Fig. 2. Turning on your MM Toolbar.
In order to uninstall your MM Toolbar (for example, when you acquired a more advanced software from PowerMeMobile Co.), you should evoke Add/Remove Programs menu, choose the program from the list and follow the usual instructions of Windows. Please keep your installation file (MM-Toolbar-Setup.exe) in a secure place, so that you can reinstall MM Toolbar any time.

Page 7 of 25
III. Registering as a valid user
After you installed MM Toolbar and evoked it on screen, you must register as a valid user. For this click the Settings section and choose the User Configuration subsection (see the right side of Fig. 3).
Please note that your Operator can configure the Login/Logout control element slightly different, so that it is not hidden behind the User Configuration button, but shows up right next to the Settings button.
Fig. 3. In order to get to the Authentication screen, select the User Configuration option.
You get the smaller window, in which you should enter the information sent to you by the software vendor (PowerMeMobile Co., [email protected]) or your GSM provider. Note that Customer ID is always numeric.
Fig. 4. User Configuration.
After entering the information, hit Login Now, and then Apply buttons. No need to mention that you must have working Internet connection for this.
It usually helps to tick Show notification messages in popup window box. Then you will be getting immediate information about the results of your operations with the MM Toolbar, even if you are not in the Firefox browser. You can switch off this function any time.
In case you are using the Consumer mode of the MM Toolbar for Firefox, the fields to fill in for the authentication are just Username and Password (no Customer ID). Please note that in the Consumer mode you have to type your phone number. In this case, if you are in the country of the Operator, you can omit the country code, substituting it with ‘0’.
You can send your messages only if you have enough Netpoints for this. Please note that generally MMS messages are much more costly than SMS ones. In order to get Netpoints to your account, you should go to SettingsAdd Netpoints. This will direct you to your GSM provider web site, where you should follow the appropriate
Page 8 of 25
instructions, or you can contact your GSM provider directly. In the same section you can also get your Account Statement (see Fig. 3).
If your Operator configures the setting correspondingly, you can also get the Remember password checkbox. If you select it, the MM Toolbar for IE does not log out when you close the browser. It can be convenient because it lets you immediately get down to business when you re-open the browser.
On the other hand, storing your password is not secure. Besides, if another person gets to your computer and re-opens the browser, they receive full access to your account.
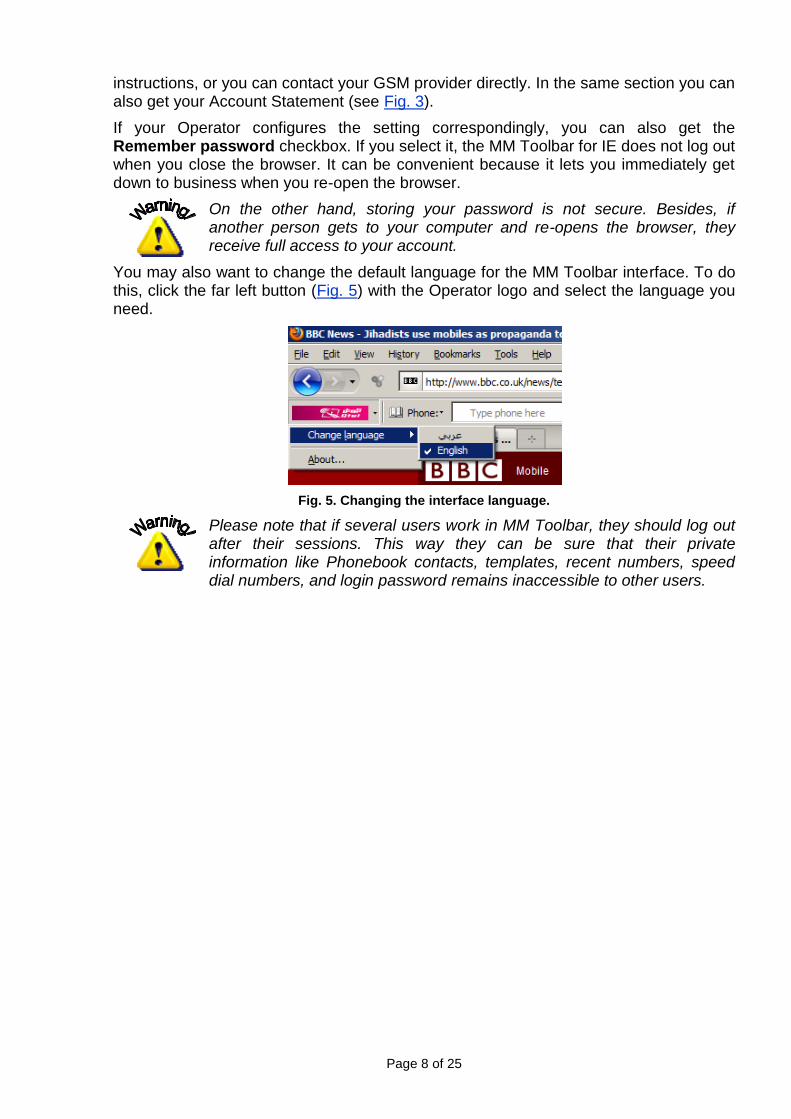
You may also want to change the default language for the MM Toolbar interface. To do this, click the far left button (Fig. 5) with the Operator logo and select the language you need.
Fig. 5. Changing the interface language.
Please note that if several users work in MM Toolbar, they should log out after their sessions. This way they can be sure that their private information like Phonebook contacts, templates, recent numbers, speed dial numbers, and login password remains inaccessible to other users.

Page 9 of 25
IV. Creating messages
With your Message Manager Toolbar for Firefox, you are in complete control of how to compose your SMS and MMS contents. While SMS mode is very useful when you need to send bare text quickly and cheaply, MMS messages are more suitable in situations when ‘a picture’s worth a thousand words’. MMS messages can contain multimedia information: voice records, music, pictures, animation, video files, and formatted text.
IV.1. Creating an SMS message
You can create your SMS messages by typing the text manually in Message section,
Fig. 6. Message section.
or you can highlight a piece of the text you need, right-click it for the context menu to appear, and then choose ‘Send Text as SMS using MM Toolbar’.
If you want your text to flow from right to left (for example, when you type your messages in Arabic), toggle the small button shown on Fig. 7. Please note that if your SMS message is in Arabic, as a rule, it cannot exceed 201 characters (spaces including).
Fig. 7. Switching between English and Arabic text.
Usually your SMS text cannot exceed 459 characters (spaces including), if in English, and you might want to avoid some service characters like ‘[‘, ‘\’, ‘]’, ‘^’, ‘{‘, ‘|’, ‘}’, ‘~’, because each of them is counted as 2 characters, not 1. How big is your current message is shown literally right next to your text. If you think it is not enough, remember Shakespeare who once said that brevity is the soul of wit. Is it not?
Please note that if your SMS message is in Arabic, as a rule, it cannot exceed 201 characters (spaces including). Both SMS text limits (for English and for Arabic) depend on your Operator’s settings.
IV.1.a. Using and managing templates
If you have to send the same or similar SMS messages, MM Toolbar can save them as templates for you so that you save your time. You just choose the message from the drop-down list, edit it if necessary, and then send it.
Page 10 of 25
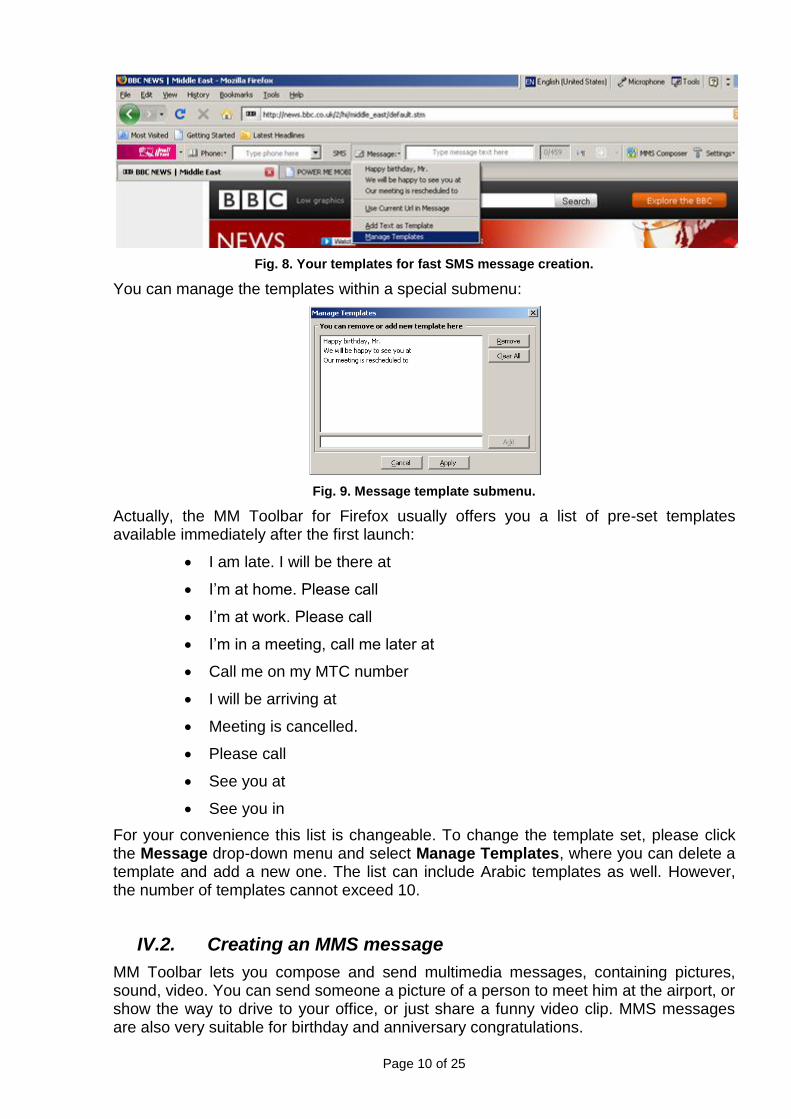
Fig. 8. Your templates for fast SMS message creation.
You can manage the templates within a special submenu:
Fig. 9. Message template submenu.
Actually, the MM Toolbar for Firefox usually offers you a list of pre-set templates available immediately after the first launch:
I am late. I will be there at
I’m at home. Please call
I’m at work. Please call
I’m in a meeting, call me later at
Call me on my MTC number
I will be arriving at
Meeting is cancelled.
Please call
See you at
See you in
For your convenience this list is changeable. To change the template set, please click the Message drop-down menu and select Manage Templates, where you can delete a template and add a new one. The list can include Arabic templates as well. However, the number of templates cannot exceed 10.
IV.2. Creating an MMS message
MM Toolbar lets you compose and send multimedia messages, containing pictures, sound, video. You can send someone a picture of a person to meet him at the airport, or show the way to drive to your office, or just share a funny video clip. MMS messages are also very suitable for birthday and anniversary congratulations.
Page 11 of 25
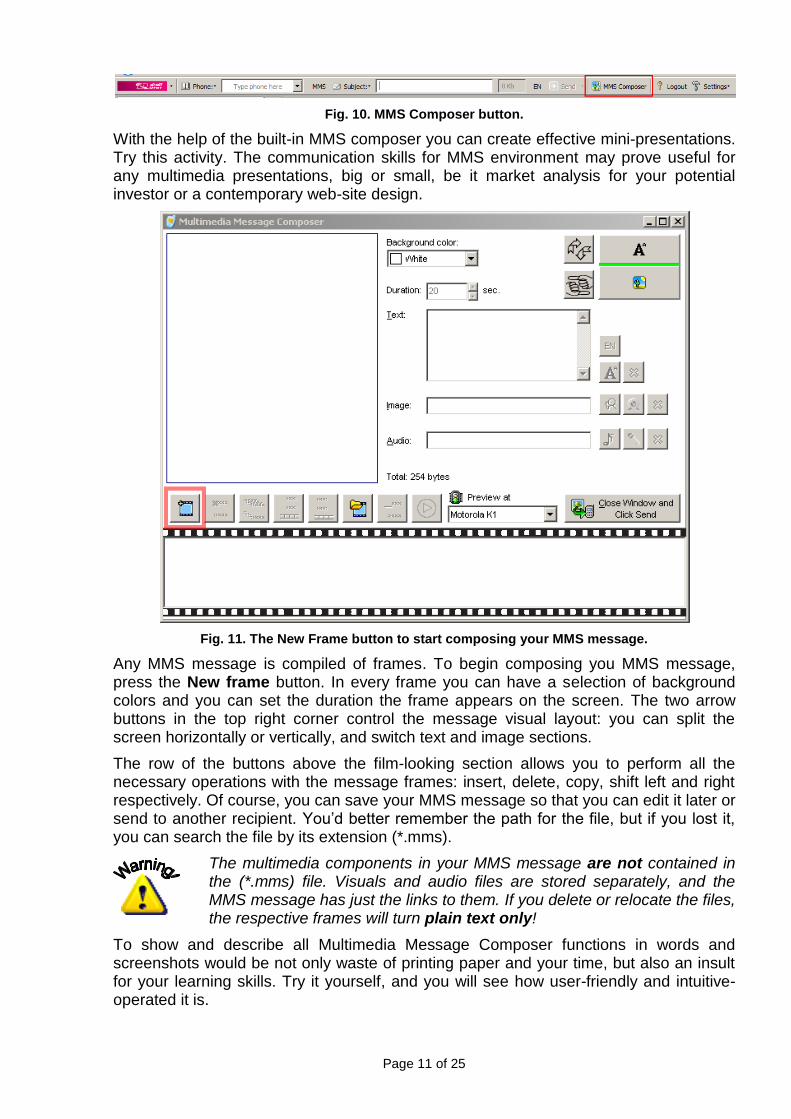
Fig. 10. MMS Composer button.
With the help of the built-in MMS composer you can create effective mini-presentations. Try this activity. The communication skills for MMS environment may prove useful for any multimedia presentations, big or small, be it market analysis for your potential investor or a contemporary web-site design.
Fig. 11. The New Frame button to start composing your MMS message.
Any MMS message is compiled of frames. To begin composing you MMS message, press the New frame button. In every frame you can have a selection of background colors and you can set the duration the frame appears on the screen. The two arrow buttons in the top right corner control the message visual layout: you can split the screen horizontally or vertically, and switch text and image sections.
The row of the buttons above the film-looking section allows you to perform all the necessary operations with the message frames: insert, delete, copy, shift left and right respectively. Of course, you can save your MMS message so that you can edit it later or send to another recipient. You’d better remember the path for the file, but if you lost it, you can search the file by its extension (*.mms).
The multimedia components in your MMS message are not contained in the (*.mms) file. Visuals and audio files are stored separately, and the MMS message has just the links to them. If you delete or relocate the files, the respective frames will turn plain text only!
To show and describe all Multimedia Message Composer functions in words and screenshots would be not only waste of printing paper and your time, but also an insult for your learning skills. Try it yourself, and you will see how user-friendly and intuitive-operated it is.

Page 12 of 25
You might want to pay special attention to our new features which can make your message special. Those are the possibilities to the use of:
Text: with the help of the button you can have your text flow from left to right (for European languages), or from right to left (for Arabic, for example). You can also import a ready-made text for your message;
Image: with the help of the button you can use many popular still image formats. Besides, you can add a picture from a web-site opened on your computer. Just right-click it and select Send picture as MMS using MM Toolbar. The supported image formats are: bmp, gif, jpeg, jpg, mbm, png, tif, tiff, wbmp.
Audio: you can use many popular audio record formats, including records from audio
CDs or your microphone (try the button for this). The audio record duration cannot exceed 45 sec, but you can hardly need for most of your MMS messages. The supported audio formats are: amr, au, mid, mp3, wav.
Video: you can use many popular video formats, including video from DVD disks or
your web-camera (try the button for this). The supported video formats are: wma, mp4, mpg, mpeg, 3GP, avi, wmv, mov, rm, vob.
Fig. 12. An MMS message in progress.
After you finish, please locate the button (see Fig. 12), and click it. The Composer window is closed, and you get to your familiar MM Toolbar environment,
where you are supposed to click the sending button. Do not forget to switch to MMS sending mode (see Fig. 17).
Page 13 of 25
MMS composition is probably a piece of the most fun in the software—you can even play with it in your free time, instead of Solitaire or other computer games . It is truly an exquisite art, comparable even to the ancient masterpieces—to create a powerful message on a small screen, being very limited in duration and size!
You can preview your message the way it will play back on different mobile phone makes. Hit Preview at submenu and choose the necessary model.
In order to give you extra choice, the Toolbar can send your MMS message not only to a mobile phone number, but also to an email—just type a valid email address in the Phone field (Fig. 13).
As a rule, GSM providers limit MMS message size. Currently the most widely used limit is around 100-200 kB. The composed MMS message size is shown in Total: line.
Please note that with some Operators the cost of your MMS message can depend on its size, and your Operator can charge your MMS message in ranges. For example, the first 50 Kb of your MMS message cost 0.05 currency units per Kb, then every Kb added costs 0.10 currency units.
Page 14 of 25
V. Sending the composed message
V.1. Defining recipients for your message
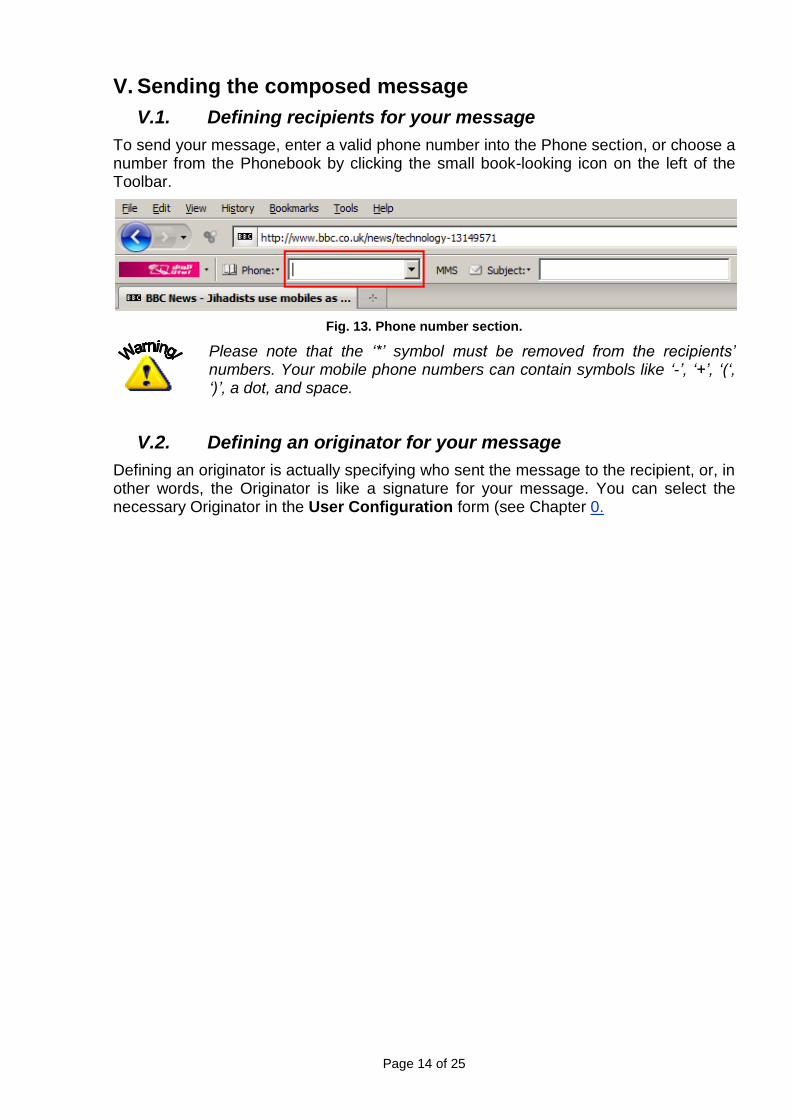
To send your message, enter a valid phone number into the Phone section, or choose a number from the Phonebook by clicking the small book-looking icon on the left of the Toolbar.
Fig. 13. Phone number section.
Please note that the ‘*’ symbol must be removed from the recipients’ numbers. Your mobile phone numbers can contain symbols like ‘-’, ‘+’, ‘(‘, ‘)’, a dot, and space.
V.2. Defining an originator for your message
Defining an originator is actually specifying who sent the message to the recipient, or, in other words, the Originator is like a signature for your message. You can select the necessary Originator in the User Configuration form (see Chapter 0.
Page 15 of 25
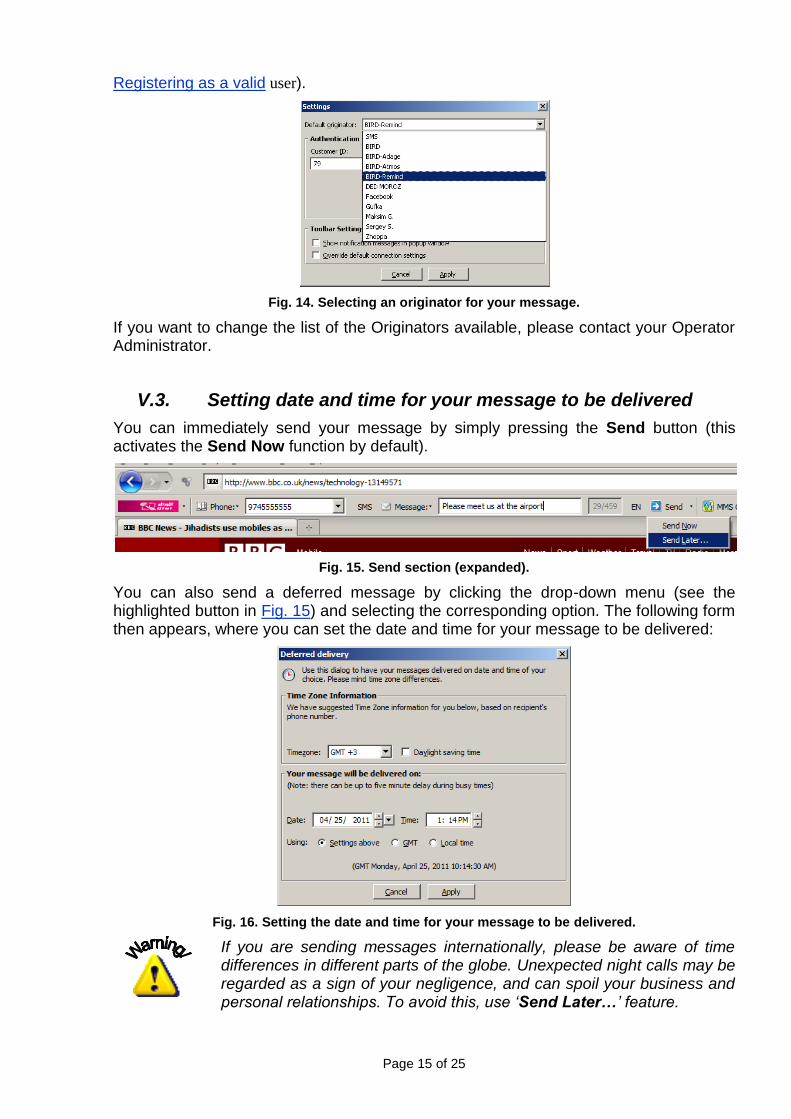
Registering as a valid user).
Fig. 14. Selecting an originator for your message.
If you want to change the list of the Originators available, please contact your Operator Administrator.
V.3. Setting date and time for your message to be delivered
You can immediately send your message by simply pressing the Send button (this activates the Send Now function by default).
Fig. 15. Send section (expanded).
You can also send a deferred message by clicking the drop-down menu (see the highlighted button in Fig. 15) and selecting the corresponding option. The following form then appears, where you can set the date and time for your message to be delivered:
Fig. 16. Setting the date and time for your message to be delivered.
If you are sending messages internationally, please be aware of time differences in different parts of the globe. Unexpected night calls may be regarded as a sign of your negligence, and can spoil your business and personal relationships. To avoid this, use ‘Send Later…’ feature.

Page 16 of 25
If you are sending an MMS message, you can send it not only to a mobile phone number, but also to an email. To do this, just type a valid email address in the Phone field (Fig. 13).
You can toggle between SMS and MMS sending modes by just clicking on SMS/MMS button.
Fig. 17. SMS/MMS button.
Please remember that if you are in SMS sending mode, only the text from Message section will be sent, and your recipient will not get the important information or will not have a chance to appreciate your artistic skills ... And your MMS message will not be sent until you put some subject for it.
V.4. Sending one message to multiple recipients
MM Toolbar can send one message to multiple recipients. To do this, just type the mobile phone numbers separated by comma. Your mobile phone numbers can contain symbols like ‘+’, ‘(‘, ‘)’, and space.
Please note that the ‘*’ symbol must be removed from the recipients’ numbers.
You can also select multiple recipients from your Phonebook (see Chapter VI.2. Selecting recipients for messages).
VI. Getting most of your Phonebook
In spite of being just a plug-in, MM Toolbar is equipped with a powerful contact management tool. To do this, click the Phone button and select the option shown in Fig. 18.
Fig. 18. Getting to the Phonebook.
The Phonebook lets you:
Quickly enter frequently used telephone numbers;
Organize your contacts in groups and subgroups;
Create, rename, move, and delete groups and subgroups for your contacts;
Create, rename, copy, move, and delete individual contacts.

Page 17 of 25
Fig. 19. Evoking the Phonebook on-screen.
Practically all the manipulations within the Phonebook can be performed with the help of context menus, i. e., you right-click on the contact or on the group, or just in the window, and you get the necessary menu.
If your contact is your business partner, your friend, and your neighbor at the same time, the contact info can be present in several groups or subgroups. For this you just have to put a blue tick in the small boxes in Phone book groups section (see Fig. 20).
Fig. 20. Recipient Information card.
You do not have to supply the country code in the Phone number section. MM Toolbar will do it for you, as soon as you provide the country. The plug-in will also give you the recipient’s local time, which may be useful for scheduling your messages.
After you entered information in your Speedial Configuration submenu, you must validate the telephone numbers. MM Toolbar does not let you save numbers with fictional country codes or GSM provider codes. But the responsibility for the actual telephone number digits is fully yours .

Page 18 of 25
Fig. 21. Managing your frequently used contacts.
After you set your frequently used contacts, they are available for Speedial use (see Fig. 22).
Fig. 22. Choosing a frequently used contact.
Local Contacts folder in your Phonebook lets you create, delete, rename, and move the groups within your Contacts. By default you get Clients, Colleagues, Family, and Friends groups. However, you can also create a whole hierarchy of your contacts, with a sufficient number of subgroups in any of the group. All the operations are performed by right-clicking on a contact or a group.

Page 19 of 25
Fig. 23. Contact groups in your Phonebook.
In addition to groups, the program has the Distribution list, which you can use as a temporary group containing just the telephone numbers. This can be handy for promotion message deliveries, when the real names are just not available.
VI.1. Searching your contacts
A database without a proper search function is not a database, but just a data heap. The Phone Book IS a database, and you can find a contact if you remember at least some pieces of its fields. You can perform search using the Contacts field (top left corner in Fig. 23). To find a contact, just begin typing a name or a phone number in this field. The Message Manager Toolbar immediately displays the groups and subgroups with matching information, indicating how many matching contacts there are in the group or subgroup. Just click the group or subgroup, and the name is shown in the field below the contact tree.
VI.2. Selecting recipients for messages
You can choose any of your contacts to become a Recipient of the message. When you select a group, the list of contacts shows up below the group section. To add a contact to the list of recipients, double-click the contact’s name, or select it and click the
button. You can select several recipients for your message.
In case you want to add the whole group to the recipient list, choose the necessary
group and click the button. This is especially useful for promotional messages to some target audience.
To remove a contact from the recipient list, double-click it, or select it and click the button.
Page 20 of 25
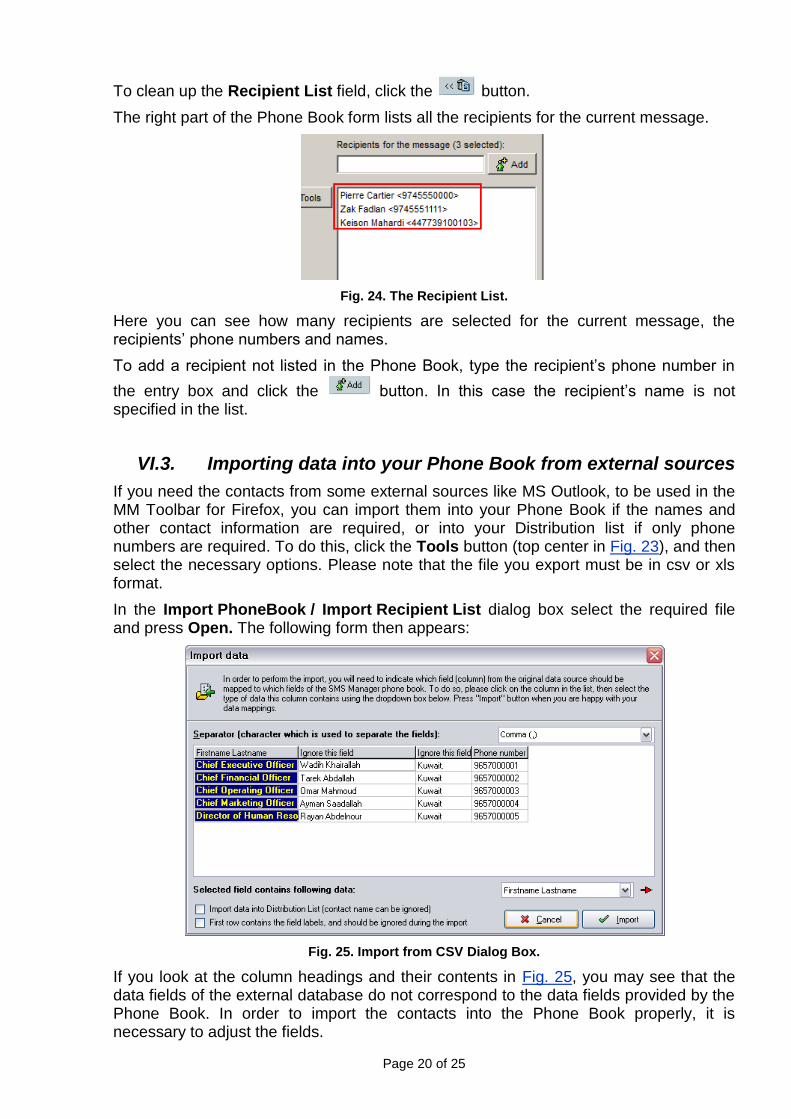
To clean up the Recipient List field, click the button.
The right part of the Phone Book form lists all the recipients for the current message.
Fig. 24. The Recipient List.
Here you can see how many recipients are selected for the current message, the recipients’ phone numbers and names.
To add a recipient not listed in the Phone Book, type the recipient’s phone number in
the entry box and click the button. In this case the recipient’s name is not specified in the list.
VI.3. Importing data into your Phone Book from external sources
If you need the contacts from some external sources like MS Outlook, to be used in the MM Toolbar for Firefox, you can import them into your Phone Book if the names and other contact information are required, or into your Distribution list if only phone numbers are required. To do this, click the Tools button (top center in Fig. 23), and then select the necessary options. Please note that the file you export must be in csv or xls format.
In the Import PhoneBook / Import Recipient List dialog box select the required file and press Open. The following form then appears:
Fig. 25. Import from CSV Dialog Box.
If you look at the column headings and their contents in Fig. 25, you may see that the data fields of the external database do not correspond to the data fields provided by the Phone Book. In order to import the contacts into the Phone Book properly, it is necessary to adjust the fields.

Page 21 of 25
Select the title for each column (the highlighted field in Fig. 25), so that the MM Toolbar can place these data in the right field of the Recipient Information form (see Fig. 20). The MM Toolbar does its best to properly recognize the fields, but anyway, it cannot predict all the versatility of human inventiveness, so it needs your valuable help. Use the
red arrow to move from column to column. In a column is not needed, choose Ignore this field from the list.
Fig. 26. Your .CSV file is now almost properly processed and ready to be imported.
Check your file to import before the actual importing. The .CSV file in Fig. 26 looks nice and the column headings seem to be fully corresponding to the fields in the Recipient Information form. However, Wadih Khairallah’s contact at the top will loose its Country information, because the name of his country (Kuwait.) has a dot, which does not suit the entry (Kuwait) from the Message Manager Country database. Remove the dot (you have to do it in the source file and repeat the Import procedure again), and Mr. Wadih Khairallah will find his country again.
Select ‘Check for duplicates while importing’ if you do not want the MM Toolbar to import the contacts that already exist in your Phone Book. Select ‘First row contains the field labels, and should be ignored during the import’ if this option is relevant to the data fields you have. If you do not need the contacts for future use, you can also mark the appropriate box and import the data only into your current Distribution List.
The procedure of importing Phonebook/Recipients List from xls files is just as easy as importing from csv file.
VI.4. Synchronizing your Phonebook with the server
You may find MM plugins or the desktop application comfortable enough to use the MM Platform services from several places (for example, from your office and from home). In this case you may need to synchronize the PhoneBook changes in your MM applications and on the server, so that changes made on one computer are effective for all the applications on different computers you use.
For this you must use the Replicate AddressBook item in the Phone drop-down menu shown in Fig. 18. As usual with synchronizing, the later changes take preference over the earlier ones.

Page 22 of 25

Page 23 of 25
VII. Adding money to your account
If you want to see how many currency units you have, click Settings. If you are prepaid customer, you can see the number of currency units available for you. If you are a postpaid customer, the number of remaining messages is shown. In order to refill your account, contact your GSM provider. Many providers allow you to do it on-line by a credit card.
You can also buy the Messaging Platform services by sending SMS message with the word ‘buy’ followed by the ID of the package you need. The message is sent from your mobile phone to a designated shortcode, and in this case the money is taken from your balance in your mobile Operator system. The designated shortcode and the list of the packages available to you can be obtained from your Operator.

Page 24 of 25
Frequently Asked Questions
Can I use MM Toolbar with other browsers?
If you want to use MM functionality with Internet Explorer, you can acquire a separate plugin for this. Besides, MM functionality can be accessible via many popular applications, like MS Outlook or LotusNotes. For the complete list of supported applications, please visit www.powermemobile.com.
Troubleshooting
Problem Solution
I cannot install MM Toolbar. The initial DLL registration is constantly failing.
You must log on with an administrative rights account, otherwise you cannot install any programs or plug-ins.
My MM Toolbar is open, but the buttons do not respond.
Please check if you have any other pop-up windows from the MM Toolbar open (like an SMS message pop-up window or the User Configuration form). Finish working with them and close them. This may solve the problem. If it does not, contact your Operator’s Administrator.
I input all the information into the contact card, but cannot save it, because OK button is not highlighted for some reason.
Check the telephone number. The plug-in recognizes only valid telephone numbers, i. e., the country code should be correct, the GSM provider code should be real, and the number of digits valid.
Index
Arabic, 8
Consumer mode, 7
frames, 10
groups within your Contacts, 17
installation requirements, 5
multimedia components, 11
Netpoints, 7
save your MMS message, 10
subgroups, 17
templates, 9
time differences, 14
uninstall your MM Toolbar, 6