thhis coihuohurehcoacbnmu dprldptugeacib coseu .bifecebea · soft tissue around preparation...
TRANSCRIPT

This course has been made possible through an unrestricted educational grant. The cost of this CE course is $59.00 for 4 CE credits. Cancellation/Refund Policy: Any participant who is not 100% satisfied with this course can request a full refund by contacting PennWell in writing.
Earn
4 CE creditsThis course was
written for dentists, dental hygienists,
and assistants.
Go Green, Go Online to take your course
Innovation in Dentistry: CAD/CAM Restorative ProceduresA Peer-Reviewed Publication Written by James Klim, DDS, FAGD, FADFE and Edward B. Corrales
PennWell is an ADA CERP Recognized Provider
PennWell is an ADA CERP recognized provider ADA CERP is a service of the American Dental Association to assist dental professionals in identifying quality providers of continuing dental education. ADA CERP does not approve or endorse individual courses or instructors, nor does it imply acceptance of credit hours by boards of dentistry.Concerns of complaints about a CE provider may be directed to the provider or to ADA CERP at www.ada.org/goto/cerp.
2 www.ineedce.com
Educational ObjectivesThe overall goal of this article is to provide information on restor-ative procedures and materials using CAD/CAM technology.
Upon completion of this course, the clinician will be able to do the following:1. Know the origins of CAD/CAM and its introduction into
dentistry.2. Understand the CAD/CAM technique used for chairside and
integrated chairside—laboratory CAD/CAM procedures. 3. Describe the advantages and disadvantages of both traditional
and CAD/CAM restorative procedures.4. Know the types and properties of ceramic CAD/CAM blocks,
and the considerations in selecting them for restorations.
AbstractComputer Aided Design/Computer Aided Manufacturing (CAD/CAM) was first introduced to dentistry in the mid-1980s. Both chairside and chairside—laboratory integrated procedures are available for CAD/CAM restoration fabrication. In select-ing which procedure to follow, consideration should be given to esthetic demands, chairside time, laboratory costs, number of visits and convenience and return on investment associated with CAD/CAM equipment. Depending on the method selected, CAD/CAM ceramic blocks available for restoration fabrication include leucite-reinforced ceramics, lithium disilicate, zirconia, and composite resin. In order to determine which type of ceramic to use, the practitioner must take into account esthetics, strength, and ease of customizing milled restorations. CAD/CAM gives both the dentist and the laboratory technician an opportunity to automate fixed restoration fabrication and to offer patients highly esthetic restorations in just one or two visits.
IntroductionThe genesis of Computer Aided Design/Computer Aided Manufacturing (CAD/CAM) occurred during the 1950s. Af-ter the U.S. Air Force developed an air defense system using graphics in the mid-1950s, the PRONTO was subsequently introduced as the first commercial use of system programming using numerical controls. CAD/CAM’s first commercial intro-duction was at the end of 1962, when the Auto-trol was used to manufacture a digitizer.1 During the 1970s and 1980s, CAD/CAM transformed design and manufacturing with widespread use of this method across industries.2 The introduction of CAD/CAM to dentistry took place during the 1980s.3 The first CAD/CAM devices introduced were CEREC (Sirona) and Procera (Nobel Biocare). CEREC was originally introduced strictly as a chairside technique; the objective was to perform a one-visit procedure for fixed restorations, with a focus on the provision of inlays and onlays.4 In contrast, Procera was introduced as a nonchairside CAD/CAM device. The dental laboratory sent models to a Procera lab, where they were scanned; metal copings were then milled before being sent back to the dental laboratory for fabrication of ceramics on the copings. Since that time, dental CAD/CAM has evolved to include more sophisticated tech-
niques, improved esthetic results, and a wider variety of options for the clinician and the laboratory technician.
Esthetic inlays, onlays, veneers, copings, substructures and full-coverage crowns can all be fabricated using current tech-niques. It is estimated that in 2007, more than 33 million crowns, 10 million bridges, and 3 million veneers were provided to patients in the United States.5 Inlays represent a very small portion of all fixed restorations, an estimated 3% in 1999.6 While all these fixed restorations can be fabricated using current CAD/CAM technol-ogy, using traditional chairside techniques followed by traditional laboratory techniques to fabricate the restoration continues to be more common.
Table 1. Types of CAD/CAM restorations
Inlays and onlaysVeneersCopingsSubstructuresFull coverage crowns
Traditional Restorative TechniquesTraditional restorative techniques for fixed restorations require the use of impression materials to record the contours and dimensions of the preparation. This is followed by the pouring of stone models and dies prior to laboratory fabrication of the definitive fixed res-toration. Taking an accurate impression is one of the more difficult procedures in dentistry, requiring careful retraction or removal of soft tissue around preparation margins, hemostasis, and selection of an appropriate impression material and tray for the technique used. Materials developments have resulted in impressions that are more accurate and more dimensionally stable after setting and prior to the pouring of models. Nonetheless, even when the appro-priate materials are used, care is required to avoid the introduction of voids, inaccurate margins, recoils, tears, and other inaccuracies. After the impression has been recorded, a temporary restoration must be provided that dimensionally matches the space created; has an anatomical contour with good marginal fit; has sufficient strength for the length of time it is to function; is not an irritant; and is esthetically acceptable.7,8 Subsequently, dies and models are poured, with care taken to ensure that no dimensional inac-curacies are introduced and that all contours and margins are fully represented. The laboratory technician then waxes up and casts a metal fixed restoration or substructure, and/or incrementally places and bakes ceramic material for an esthetic restoration. In either case, attention to detail and precision are required. The use of contemporary ceramic materials has enhanced the esthetics that can be achieved for ceramic restorations.
Advantages of the traditional technique include the use of a proven method that does not require any procedure-specific capital equipment for fixed restorations. In addition, there is no learning curve beyond staying current with the use and handling of materi-als. Further advantages include the ability to provide patients with fixed restorations that, in the past, were esthetically superior to those fabricated using a chairside CAD/CAM milling technique.

www.ineedce.com 3
Disadvantages of the traditional technique include the oppor-tunity for material and operator error at the impression making, model- and die-pouring, and laboratory stages of the procedure. In addition, it is never possible to provide a custom-fabricated, single-visit fixed restoration, and temporary restorations must be fabricated whether or not they are required to provide a healing period, promote gingival form, or help plan the final restorations for complex cases.
CAD/CAM Restorative TechniqueUsing a CAD/CAM restorative technique, a number of steps can be simplified or eliminated. Traditional impressions can be replaced by use of a handheld scanning device that digitally records the form and margins of the preparation. Care must be taken to ensure that the whole preparation is scanned, to avoid introducing errors. As with a traditional impression, soft tissue retraction and hemostasis are prerequisites for an accurate result. In fact, these steps are more critical for CAD/CAM preparation scanning than with traditional impressions. While impression material has some tolerance for small amounts of sulcular fluid, and light-body material can flow into deeper subgingival margins, scanners require a dry field and soft tissue that must be thoroughly separate at the level of the margin from the hard tissue. For this reason, it has been suggested that a soft tissue diode laser (Odyssey Navigator, Ivoclar Vivadent; GENTLEray 980, Kavo; DioDent Micro 980, HOYA ConBio) be used to expose subgingival margins. The soft tissue diode laser has been found to offer precision, to result in a narrow band of lased tis-sue, and to produce good hemostasis.9 Good healing has also been the case following use of diode lasers on gingival tissues.10 Selecting a laser with sterilizable sleeves assists with infection control, and portability and precut laser tips aid convenience (Odyssey Naviga-tor). Alternative soft tissue management techniques include elec-trosurgery and one of the standard manual retraction techniques. In addition, a modified preparation design may be necessary.
Figure 1. Soft tissue diode laser
Depending on the system used, the clinician can see the prepa-ration magnified on the computer screen as the scan is being processed. This visualization – also available with intraoral cameras and operating microscopes – enables early detection of any preparation design defect, which can then be adjusted
before the preparation is rescanned. In addition, the interoc-clusal distance and space created by preparing the tooth can be assessed by the software, enabling the dentist to make adjust-ments, if necessary.
Two basic techniques can be utilized for CAD/CAM restora-tions. One is strictly chairside – a single-visit technique – while the other involves an integrated chairside—laboratory CAD/CAM procedure. One factor for the clinician considering CAD/CAM is the capital costs associated with purchase of a unit: Will monthly production support the investment? It is important to take into account both the potential for reduced laboratory costs and chair-side time as well as the consumable costs for each technique, such as cements, temporaries, impression materials, and trays for the traditional technique − or in the case of CAD/CAM, the consum-able block of ceramic material.
Chairside CAD/CAM TechniqueThe chairside technique involves scanning the preparation and then fabricating the restoration in the milling device (CEREC 3, Sirona; E4D, D4D TECH). Prior to scanning, a very thin layer of powder is distributed over the preparation using the CEREC sys-tem. During scanning, the clinician must ensure that all margins of the cavity are captured by the scan and visualized.11 The CEREC 3 uses still images, while the E4D uses a laser in the handheld scanning device. A third system, CICERO, was developed in The Netherlands and used a pressing, sintering, and milling technique prior to laboratory finishing of the restoration.12
From the patient’s perspective, there are several potential ad-vantages of chairside CAD/CAM fabrication of fixed restorations. No impression is required, which removes a source of discomfort and gagging; the restoration is ready in one visit, removing the need for an additional appointment or anesthetic; there is reduced potential for tooth sensitization; and a temporary restoration is not needed. CAD/CAM also helps project a state-of-the-art, high-technology image for marketing the dental office.
Chairside CAD/CAM has been found in numerous studies to offer accuracy. One study comparing the CEREC 2 and later-generation CEREC 3 found that both milled inlay and onlay restorations met the American Dental Association’s standard of fit within 50 micrometers.13 In 2003 a second study, however, found 47% of 2,328 restoration margins were underfilled and had a 95% probability of nine-year survival.14 Using Vita Mark I feld-spathic ceramic as the restorative material, Otto and Schneider found an 88.7% success rate up to 17 years after placement for 187 inlays and onlays placed using an early-generation chairside CEREC between 1989 an 1991. There were 21 failures, for which the most common reason was ceramic fracture (13 failures).15 Sjögren et al. found that the success rate depended on the etching and luting cement used. The success rate for 61 inlays examined 10 years after placement was 100% for those luted using chemi-cally cured resin composite cement, compared to 77% for those luted with dual-cured resin composite cement. Of seven inlays requiring replacement in one study, four involved inlay fracture and were all in dual-cured restorations on molars.16 Wiedhahn

4 www.ineedce.com
et al. found that CAD/CAM veneers offered good clinical re-sults and success rates. Of 617 veneers placed over an eight-year period (1989-1997) and then reevaluated, the survival rate was 94% after up to nine years; of these veneers, 98% were clinically acceptable.17 In a one-year study of 20 crowns milled chairside using CEREC 3, Otto found all were clinically acceptable at the one-year follow up, with no fractures or loss of retention.18 In a 2002 study, Bindl and Mörmann found a 100% success rate for 19 milled Vitabloc In-Ceram Spinell core crowns (4 premolars and 15 molars) and a 92% success rate for 24 Vitabloc In-Ceram Alumina core crowns (2 premolars and 22 molars); each of these were milled using CEREC 2 and were in place for 28-50 months.19 It is worth noting that by virtue of the time horizon of some studies, the CAD/CAM methods and luting cements were earlier variants.
Table 2. Chairside CAD/CAM technique
AdvantagesOne-visit fixed restorative procedureNo impression makingNo temporary restoration requiredReduced potential for tooth sensitizationNo laboratory costsNo model or die pouringAccuracyLess opportunity for error compared to traditional techniqueAids prep visualization Projects a state-of-the-art imageDisadvantagesSoft tissue management more critical than with traditional techniqueDepending on the material and patient, customization may be requiredHigh learning curveHigher production required to cover capital investment
Traditionally, one drawback of chairside milled, finished restorations was inferior esthetics compared to a custom laboratory-fabricated restoration. CAD/CAM materials have included IPS Empress (Ivoclar Vivadent), a leucite-reinforced ceramic; Vita Mark II (Vita Zahnfabrik), a feldspathic ceramic; and Paradigm (3M ESPE), a composite resin-based material. A ceramic block is inserted into the machine and is milled using diamonds. CAD/CAM restorative materials are currently available in many shades and translucencies, including multiple shades within one dense gradated restorative block. The material used depends on functional and esthetic demands and on whether a chairside or laboratory CAD/CAM restoration is fabricated.20 For chairside CAD/CAM restorations, an esthetic, strong material requiring minimal post-milling esthetic adjustment to minimize chairside time is needed. Leucite-reinforced glass ceram-ics (IPS Empress CAD, Ivoclar Vivadent; Paradigm C, 3M ESPE) and lithium disilicate glass ceramics (IPS e.max, Ivoclar Vivadent) can be used for chairside and laboratory CAD/CAM single restora-tions. Composite-resin blocks are also available (Paradigm MZ100, 3M ESPE). Leucite-reinforced material is designed to match the
dentition for strength and surface smoothness and to offer esthetic results by scattering light in a manner similar to enamel. Traditional ceramic crowns fabricated with leucite have been found to offer a survival rate of 95% after 11 years.21 The blocks are available in a number of sizes, in high or low translucency. High translucency is indicated for inlays and onlays, enabling transmission of the tooth’s shade through the material. Low translucency is indicated for crowns and veneers, providing superior masking of the underlying tooth structure. Leucite-reinforced blocks with multiple shading created within the block to match the chroma shading and shading gradations of a natural tooth from the incisal edge to the gingival margin are also available and offer a natural shaded and translucent appearance (IPS Empress CAD Multi, Ivoclar Vivadent). After the tooth has been milled, the clinician can quickly polish or glaze the restoration before seating it. For chairside cases where strength is a consideration, lithium disilicate CAD restorations offer a strength of 400 MPa as compared to leucite-reinforced ceramic with an MPa ranging from 120-160, and still provide good esthetics. Lithium disilicate is used as a monolithic (single layer) material, providing strength.
For specific cases, milled restorations can be characterized by staining and/or layering ceramic material (IPS Empress Esthetic Veneering Materials, Ivoclar Vivadent) on top, with or without cut-ting back the milled restoration, then placing the glaze and firing the material. In the case of veneers, as with traditionally fabricated veneers, the final shade of the bonded restoration is influenced by the selected shade of luting cement. If additional characterization is required, a thin layer of color shading can be applied and light-cured in the internal surface of the veneer. The cases below courtesy of Dr. Klim show the results of chairside CAD/CAM for inlay and crown restorations.
Case 1. Anterior Esthetic Zone CAD/CAM anterior tooth design is very similar to posterior capture and design protocols and is ideal for recreating tooth har-mony for anterior esthetic demands. This case shows the esthetics achieved using color, translucency and multi-layered blocks. In recent years, CEREC veneer design and milling has also been simplified. The final restorations are equal to laboratory-fabricated restorations in function and esthetics.
Figure 2. Maxillary incisors pre-treatment

www.ineedce.com 5
Figure 3. CAD/CAM milled and finished restorations
Figure 4. Finished CAD/CAM restoration placed
Case 2. Replacement of Failing AmalgamsCAD/CAM conservative preparation design preserves more of the natural tooth structure compared with a crown and offers the clinical longevity of gold without the esthetic drawbacks. When using the current generation bonding adhesives accord-ing to the manufacturer’s instructions, the CEREC ceramic will re-create a toothlike strength.
Figure 5. Amalgam restorations and caries pre-treatment
Figure 6. Preparations
Figure 7. Completed esthetic CAD/CAM restorations (IPS Empress CAD)
Case 3. Replacement of Posterior RestorationsCAD/CAM produces high strength ceramics for functionally demanding areas such as molars. The software is designed to pre-cisely stitch together multiple digital images and propose an ef-fective virtual die for multiple restoration design (CEREC). With proper design, digital image, and bite registration, the operator has control in occlusal design resulting in minimal adjustments.
Figure 8. Failed molar restorations
6 www.ineedce.com
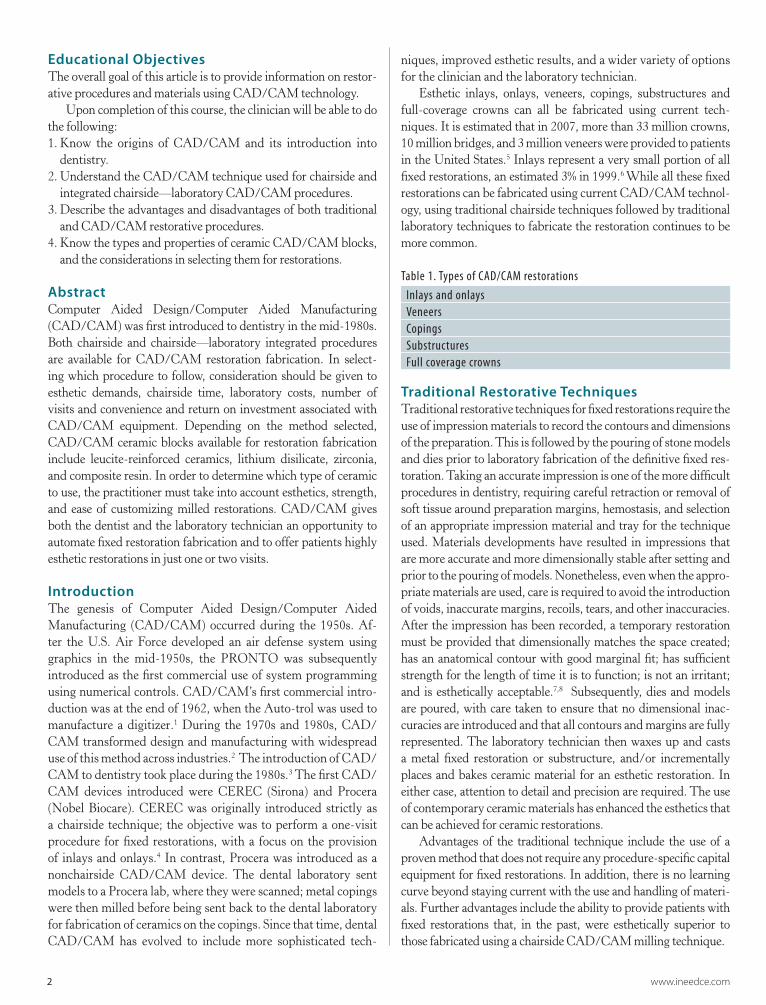
Figure 9. Preparations completed with partial subgingival margins
Figure 10. Hemostasis and margin exposure following laser troughing
Figure 11. Virtual design of posterior crown
Figure 12. Digital image of occlusal virtual contact placement (light blue) designed from bite registration
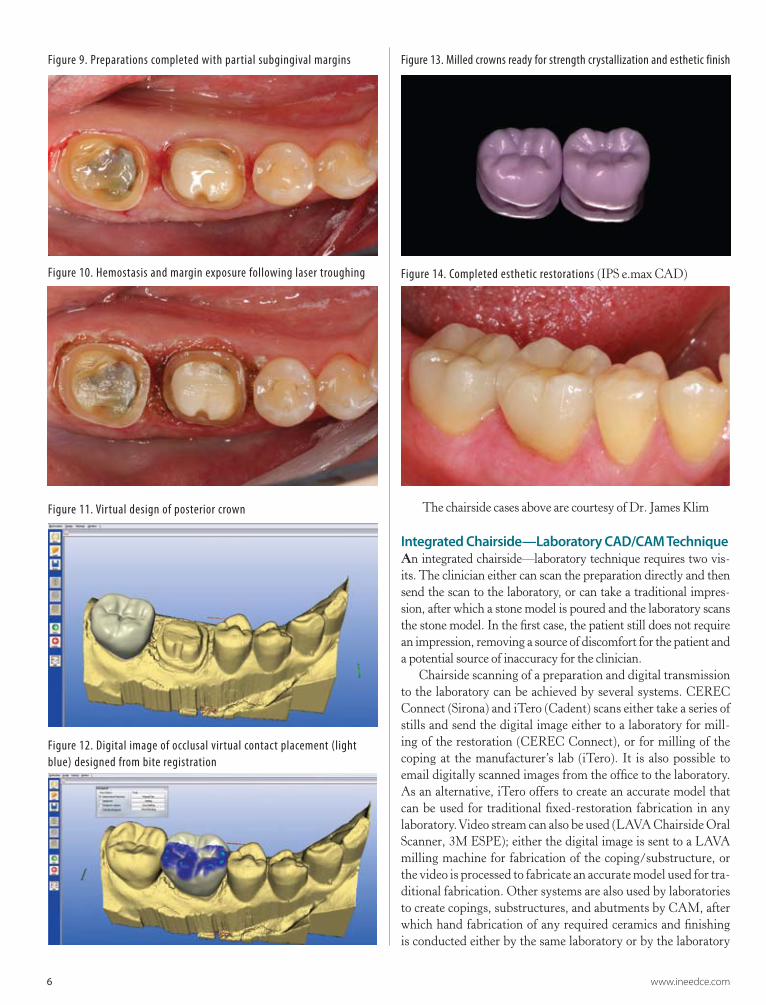
Figure 13. Milled crowns ready for strength crystallization and esthetic finish
Figure 14. Completed esthetic restorations (IPS e.max CAD)
The chairside cases above are courtesy of Dr. James Klim
Integrated Chairside—Laboratory CAD/CAM TechniqueAn integrated chairside—laboratory technique requires two vis-its. The clinician either can scan the preparation directly and then send the scan to the laboratory, or can take a traditional impres-sion, after which a stone model is poured and the laboratory scans the stone model. In the first case, the patient still does not require an impression, removing a source of discomfort for the patient and a potential source of inaccuracy for the clinician.
Chairside scanning of a preparation and digital transmission to the laboratory can be achieved by several systems. CEREC Connect (Sirona) and iTero (Cadent) scans either take a series of stills and send the digital image either to a laboratory for mill-ing of the restoration (CEREC Connect), or for milling of the coping at the manufacturer’s lab (iTero). It is also possible to email digitally scanned images from the office to the laboratory. As an alternative, iTero offers to create an accurate model that can be used for traditional fixed-restoration fabrication in any laboratory. Video stream can also be used (LAVA Chairside Oral Scanner, 3M ESPE); either the digital image is sent to a LAVA milling machine for fabrication of the coping/substructure, or the video is processed to fabricate an accurate model used for tra-ditional fabrication. Other systems are also used by laboratories to create copings, substructures, and abutments by CAM, after which hand fabrication of any required ceramics and finishing is conducted either by the same laboratory or by the laboratory

www.ineedce.com 7
that scanned and referred the case for milling of the substruc-ture (Procera, Nobel Biocare; Medifacturing, Bego; Cercon, Dentsply; Atlantis, Astra Tech; Everest, Kavo). It is estimated that the number of scanners in the United States will increase by almost 20% per year between 2008 and 2013, indicative of their increasing appeal and application.22
Ceramic blocks for laboratory-milled restorations are available as zirconia (zirconium oxide) and lithium disilicate glass blocks. Zirco-nium oxide (IPS e.max ZirCAD, Ivoclar Vivadent; Cercon, Dentsply Ceramco) can be used to create accurate and strong copings and bridge substructures. After milling, the unit can be adjusted using an external liner (Zirliner, Ivoclar Vivadent) that enables characteriza-tion before the outer ceramic suprastructure is created. The external ceramic layer can be created either using press ceramics (in the same manner as for a traditional bridge) or layering ceramic material onto the substructure using a fine brush and powder/liquid.
Table 3. Chairside-laboratory integrated technique AdvantagesAutomates steps or all of fixed restorative fabrication AccuracyLess opportunity for error compared to traditional techniqueOpportunity to subcontract CAD/CAM to avoid capital costsOpportunity to focus on artistic ceramics Scanned image transferred directly to the laboratory from the officeReduced chairside timeTeam approach to fixed restorations DisadvantagesRequires two visits
Where esthetics is the key consideration, lithium disilicate ceramic glass blocks can be used (IPS e.max CAD or IPS e.max CAD LT, Ivoclar Vivadent) for crowns and implant crowns, se-lecting either a high- or low-translucency block. Lithium disilicate blocks achieve full strength only when crystallized at 850 degrees Celsius after milling; this allows rapid cutbacks for customization of shading. After milling in the machine (inLab System, Sirona; Everest System, Kavo), the restoration can be veneered with nano-fluorapatite ceramic material (IPS e.max Ceram, Ivoclar Vivadent) to further customize esthetics, if desired, and then stained and glazed in the same manner as traditional restorations.
Advantages of a laboratory CAD/CAM milled restoration include reduced chairside time and increased accuracy. Since a stone model is not used, stone pouring errors are eliminated, as are errors associated with abrasion of the adjacent and opposing teeth due to manipulation of the models during fabrication that could result in over-contouring, tight contacts, and excessive occlusal height. In addition, reduced time is required for fabri-cation of the substructure. Depending on the laboratory, it may be more cost-effective to subcontract CAD/CAM milling to a different laboratory. The laboratory would then focus on the demanding artistic process of optimizing the ultimate contour and esthetics of the restoration. The case below courtesy of Mr. Corrales shows the results of chairside—laboratory CAD/CAM restorations for the anterior esthetic zone. The patient presented with a discolored upper right central incisor, her only complaint. After discussing the available options, the dentist and patient decided that the most esthetic option would be fabrication of a full-coverage ceramic crown and a veneer on the upper left cen-
One Visit Two Visits
Chairside CAD/CAM Chairside-Laboratory CAD/CAM
In-office milling of restoration In-lab milling of ceramic restoration
In-lab milling of coping/substructure
Estheticcustomization
Estheticcustomization
Suprastructure ceramicsfabricated traditionally
Restoration placement
Restoration delivered to office
Restoration placement Restoration placement
Restoration delivered to office
Chairside scanning of preparation
Figure 15. Flow chart: CAD/CAM methods and options

8 www.ineedce.com
tral incisor. A chairside—laboratory CAD/CAM technique was selected and customization of the restoration was achieved in the laboratory after milling of the restorations.
Case Presentation: Integrated Chairside— Laboratory TechniqueFigure 16. Preoperative view showing discolored right central incisor
Figure 17. Crown and veneer preparations with severe disparity in color
Figure 18. Scanned image from dental office
Figure 19. Virtual design image of a framework (custom impression tray)
Figure 20. Impression milled using CAD wax
Figure 21. InLab image of crown design
Figure 22. InLab image of veneer design

www.ineedce.com 9
Figure 23. Poured model and CAD milled wax
Figure 24. CAD ceramic blocks used for the restorations
Figure 25. Milled restorations
Note the bluish shade of the upper right central incisor crown compared to the upper left central incisor veneer. This temporary blue shading is a feature of e.max CAD while the ceramic is in a crystalline intermediate phaseAfter final firing, the ceramic will be stronger and with the esthetic shade selected for the crown.
Figure 26. Restorations after cutbacks have been created incisally to enable ceramic layering for customization
Figure 27. Ceramic layering in progress
Figure 28. Final seated crown and veneer
The case above is courtesy of Mr. Edward B. Corrales
Luting Lithium Disilicate and Zirconium Oxide CAD/CAM Restorations with Resin Adhesive CementsThe choice of luting cement for a CAD/CAM restoration is based on the same criteria as for any other prefabricated restoration – the restorative material and the type/design of the preparation. CAD/CAM restorations are typically fabricated from lithium disilicate or zirconia, providing both strength and esthetics. Depending on the preparation design, either an adhesive or non-adhesive luting cement can be used with these materials. Retentive full-coverage crowns with an underlying taper of between 4 and 8 degrees can be luted with either type of cement from the perspective of reten-tion. Non-retentive restorations rely on the bonding strength of an adhesive luting cement to retain the final restoration. Luting cements can be divided into two basic categories – resin adhesive cements and conventional cements. Conventional cements such as zinc phosphate and zinc polycarboxylate have a long history of use; there are some drawbacks with these cements however. Zinc phosphate cement sets through an acidic chemical reaction that may cause pulpal irritation, taking 48 hours to reach a neutral pH, it is soluble intraorally and it does not bond to the tooth. Zinc polycarboxylate cement does offer some bonding through the interaction of calcium in the tooth and polycarboxylate. Both zinc phosphate cements and zinc polycarboxylate cement possess a film thickness that may preclude full seating of the restoration under some circumstances. Neither is suitable for esthetic restorations. The third group of conventional cements are the glass ionomers. In comparison to zinc phosphate and polycarboxylate, they offer a

10 www.ineedce.com
thinner film thickness and higher strength. The low initial pH and setting reaction can result in sensitivity, although the low pH is of short duration. The solubility of glass ionomer cements is consid-erably lower than for zinc phosphate and zinc polycarboxylate.
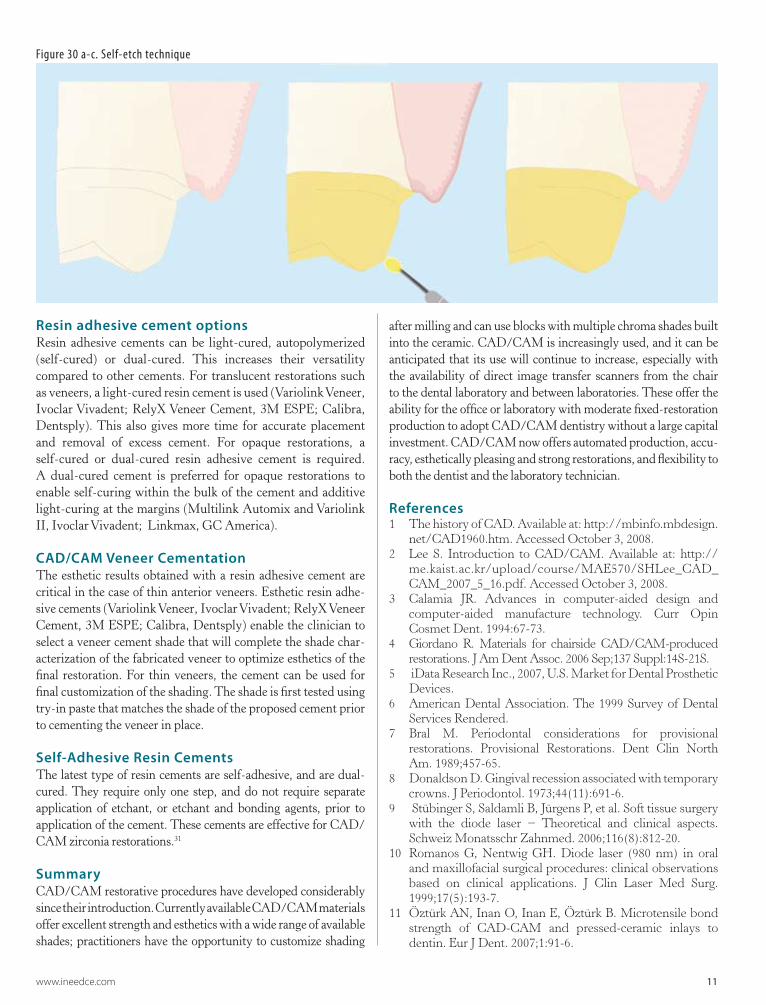
Resin Adhesive CementsResin adhesive cements offer superior esthetics and low viscos-ity. They chemically bond to the restoration surface and the tooth surface, either providing all of the retention or, for reten-tive preparations, improved retentive strength. They also have greater compressive strength. Use of a resin adhesive luting cement is essential for restorations with a non-retentive form or short preparations such as posterior crowns in patients with low inter-occlusal heights.23 As a group, resin adhesive luting ce-ments are used for veneers, inlays, onlays, full coverage crowns and fixed partial dentures. They use either a self-etch or etch-and-rinse (also known as total etch) technique, differentiated by the manner in which etching and bonding is achieved. The etch technique was first suggested in dentistry by Buonocore.24 Since these two techniques have different characteristics with respect to bonding to enamel and dentin, the type of preparation and whether bonding will be substantially to enamel or substantially to dentin should be considered. However, both techniques are proven to provide adequate bonding for enamel and dentin pro-vided an appropriate technique is used, with the etching process creating microscopic recesses into which the adhesive can flow prior to curing. Before etching the surface of interest, it must be clean and free of debris. This is especially important when using a self-etch technique since there is no rinsing step involved that could remove any residual debris. Etching and rinsing removes the smear layer from the enamel and dentin that was created dur-ing instrumentation25, enabling the adhesive to reach the micro-scopic recesses in the surface. Self-etching leaves the smear layer in place but increases its permeability such that the adhesive can still reach the tooth surface as well as mix with the smear layer, forming a hybrid layer. This hybrid layer becomes part of the adhesive interface.
Etching and bonding resin adhesives to enamelEnamel is largely inorganic, consisting of approximately 96% hy-droxyapatite crystals and contains little organic material or water. Either a self-etch or etch-and-rinse technique can be used for enamel, with the etched enamel layer being up to 50 μm after treat-ment.26 It has been found that an etch-and-rinse technique produc-es a stronger bond to enamel than the self-etch technique.27 Bond strengths to enamel are greater if the enamel was first instrumented if using a self-etch technique. For the surfaces of preparations with both enamel and dentin, dentin – which is more porous and less resistant to etching – should be etched for less time than enamel.
Etching and bonding resin adhesives to dentinDentin comprises more organic material and is more porous than enamel, and contains dense collagen fibrils. Self-etch adhesives have been found to provide greater bond strength to dentin than etch-and-rinse adhesives and tolerate moisture better. Using the self-etch technique, the residual smear layer becomes part of the adhesive layer. Since the adhesive contains water, it is not necessary to ensure that the dentin is slightly moist (without being too moist) prior to application of the ad-hesive (as is required with the etch-and-rinse technique). If an etch-and-rinse technique is used for dentin, the dentin must be slightly moist to avoid reduced bond strength.28,29
Resin adhesives and CAD/CAM restoration surfacesRestoration surfaces can be treated to increase the surface area available for bonding of resin adhesives. This results in increased retention of the adhesive to the restoration. An etching technique using hydrofluoric acid followed by silanation can be utilized for CAD/CAM restorations fabricated from lithium disilicate- and leucite-containing ceramics (as well as restorations fabricated from feldspathic porcelain) to increase the available surface area of the intaglio (inner surface of the ceramic restoration) for adhesion. For CAD/CAM and traditional restorations fabricated from zirconia, sandblasting is an important step for retention to increase the sur-face area as etching is ineffective on these surfaces.30
Figure 29 a-c. Etch-and-rinse technique
www.ineedce.com 11
Resin adhesive cement optionsResin adhesive cements can be light-cured, autopolymerized (self-cured) or dual-cured. This increases their versatility compared to other cements. For translucent restorations such as veneers, a light-cured resin cement is used (Variolink Veneer, Ivoclar Vivadent; RelyX Veneer Cement, 3M ESPE; Calibra, Dentsply). This also gives more time for accurate placement and removal of excess cement. For opaque restorations, a self-cured or dual-cured resin adhesive cement is required. A dual-cured cement is preferred for opaque restorations to enable self-curing within the bulk of the cement and additive light-curing at the margins (Multilink Automix and Variolink II, Ivoclar Vivadent; Linkmax, GC America).
CAD/CAM Veneer CementationThe esthetic results obtained with a resin adhesive cement are critical in the case of thin anterior veneers. Esthetic resin adhe-sive cements (Variolink Veneer, Ivoclar Vivadent; RelyX Veneer Cement, 3M ESPE; Calibra, Dentsply) enable the clinician to select a veneer cement shade that will complete the shade char-acterization of the fabricated veneer to optimize esthetics of the final restoration. For thin veneers, the cement can be used for final customization of the shading. The shade is first tested using try-in paste that matches the shade of the proposed cement prior to cementing the veneer in place.
Self-Adhesive Resin CementsThe latest type of resin cements are self-adhesive, and are dual-cured. They require only one step, and do not require separate application of etchant, or etchant and bonding agents, prior to application of the cement. These cements are effective for CAD/CAM zirconia restorations.31
SummaryCAD/CAM restorative procedures have developed considerably since their introduction. Currently available CAD/CAM materials offer excellent strength and esthetics with a wide range of available shades; practitioners have the opportunity to customize shading
after milling and can use blocks with multiple chroma shades built into the ceramic. CAD/CAM is increasingly used, and it can be anticipated that its use will continue to increase, especially with the availability of direct image transfer scanners from the chair to the dental laboratory and between laboratories. These offer the ability for the office or laboratory with moderate fixed-restoration production to adopt CAD/CAM dentistry without a large capital investment. CAD/CAM now offers automated production, accu-racy, esthetically pleasing and strong restorations, and flexibility to both the dentist and the laboratory technician.
References1 The history of CAD. Available at: http://mbinfo.mbdesign.
net/CAD1960.htm. Accessed October 3, 2008.2 Lee S. Introduction to CAD/CAM. Available at: http://
me.kaist.ac.kr/upload/course/MAE570/SHLee_CAD_CAM_2007_5_16.pdf. Accessed October 3, 2008.
3 Calamia JR. Advances in computer-aided design and computer-aided manufacture technology. Curr Opin Cosmet Dent. 1994:67-73.
4 Giordano R. Materials for chairside CAD/CAM-produced restorations. J Am Dent Assoc. 2006 Sep;137 Suppl:14S-21S.
5 iData Research Inc., 2007, U.S. Market for Dental Prosthetic Devices.
6 American Dental Association. The 1999 Survey of Dental Services Rendered.
7 Bral M. Periodontal considerations for provisional restorations. Provisional Restorations. Dent Clin North Am. 1989;457-65.
8 Donaldson D. Gingival recession associated with temporary crowns. J Periodontol. 1973;44(11):691-6.
9 Stübinger S, Saldamli B, Jürgens P, et al. Soft tissue surgery with the diode laser − Theoretical and clinical aspects. Schweiz Monatsschr Zahnmed. 2006;116(8):812-20.
10 Romanos G, Nentwig GH. Diode laser (980 nm) in oral and maxillofacial surgical procedures: clinical observations based on clinical applications. J Clin Laser Med Surg. 1999;17(5):193-7.
11 Öztürk AN, Inan O, Inan E, Öztürk B. Microtensile bond strength of CAD-CAM and pressed-ceramic inlays to dentin. Eur J Dent. 2007;1:91-6.
Figure 30 a-c. Self-etch technique

12 www.ineedce.com
12 van der Zel J, Vlaar S, de Ruiter W, Davidson C. The CICERO system for CAD/CAM fabrication of full-ceramic crowns. J Pros Dent. 2001;85(3):261- 7.
13 Estefan D, Dussetschleger F, Agosta C, Reich S. Scanning electron microscope evaluation of CEREC II and CEREC III inlays. Gen Dent. 2003:51(5):450-4.
14 Posselt A, Kerschbaum T. Longevity of 2,328 chairside CEREC inlays and onlays. Int J Comput Dent. 2003;6:231-48.
15 Otto T, Schneider D. Long-term clinical results of chairside CEREC CAD/CAM inlays and onlays: A case series. Int J Prosthodont. 2008 Jan-Feb;21(1):53-9.
16 Sjögren G, Molin M, van Dijken JW. A 10-year prospective evaluation of CAD/CAM-manufactured (CEREC) ceramic inlays cemented with a chemically cured or dual-cured resin composite. Int J Prosthodont. 2004 Mar-Apr;17(2):241-6.
17 Wiedhahn K, Kerschbaum T, Fasbinder DF. Clinical long-term results with 617 CEREC veneers: A nine-year report. Int J Comput Dent. 2005;8:233-46.
18 Otto T. Computer-aided direct all-ceramic crowns: Preliminary 1-year results of a prospective clinical study. Int J Perio Restor Dent. 2004;24(5):446-55.
19 Bindl A, Mörmann WH. An up-to-5-year clinical evaluation of posterior in-ceram CAD/CAM core crowns. Int J Prosthodont. 2002;15(5):451-6.
20 Fasbinder DJ. CAD/CAM ceramic restorations in the operatory and laboratory. Compend Contin Educ Dent. 2003;24(8):595-8, 600-4.
21 Fradeani M, Redemagni M. Clinical evaluation of leucite-reinforced glass-ceramic crowns over 11 years. Quintess. 2003;54:379-86.
22 More dental labs outsourcing custom crown and bridge production. Available at: http://www.reuters.com/article/pressRelease/idUS131479+09-Jan-2008+PRN20080109.
23 El-Mowafy OM, Fenton AH, Forrester N, et al. Retention of metal ceramic crowns cemented with resin cements: Effects of preparation taper and height. J Prosthet Dent. 1996;76(5):524-9.
24 Buonocore MG. A simple method of increasing the adhesion of acrylic filling materials to enamel surfaces. J Dent Res.1995;34(6):849-53.
25 Bowen RL, Eick JD, Henderson DA, et al. Smear layer: Removal and bonding considerations. Oper Dent Suppl. 1984;(suppl 3):30-34.
26 Gwinnett AJ. Histologic changes in human enamel following treatment with acidic adhesive conditioning agents. Arch Oral Biol. 1971;16:731–8.
27 Pashley DH, Tay FR. Aggressiveness of contemporary self-etching adhesives. Part II: Etching effects on unground enamel. Dent Mater. 2001;17(5):430-44.
28 Kanca J. Effect of resin primer solvents and surface wetness on resin composite bond strength to dentin. Am J Dent. 1992;5:213–5.
29 Jacobsen T, Söderholm KJ. Effect of primer solvent, primer agitation, and dentin dryness on shear bond strength to dentin. Am J Dent. 1998;11:225–8.
30 Tsuo Y, Yoshida K, Atsuda M. Effects of aluminablasting
and adhesive primers on bonding between resin luting agent and zirconia ceramics. Dent Mater. 2006;25(4):669-674.
31 Palacios RP, Johnson GH, Phillips KM, et al. Retention of zirconium oxide ceramic crowns with three types of cement. J Prosthet Dent. 2006;96(2):104–14.
Author ProfileDr. James Klim graduated Summa cum Laude, Valedictorian, from Loma Linda University in 1984. He has been awarded high academic recognition by the Alpha Omega Fraternity and the Omicron Kappa Upsilon Society and has received the Prince Award from Loma Linda University School of Dentistry. He has been awarded fellowships from the Academy of General Den-tistry and Academy of Dental-Facial Esthetics. He is an Accred-ited member in the American Academy of Cosmetic Dentistry. He is an international speaker, author, and instructor of current dental technology, practice development and aesthetic dentistry. In addition, he has taught at several advanced post graduate in-stitutes in practice development and aesthetic dentistry around the country. Currently, Dr. Klim has a full time restorative practice in Santa Rosa, California and is founder and director of CADStar™, the training center for advanced dental CAD/CAM (CEREC) education.
Edward B. Corrales is the owner of Downtown Dental Design, San Diego, CA. Mr. Corrales trained at the Dental Technology Institute in Orange County, California and holds a Master LVI Ceramic certificate. His laboratory specializes in esthetic and full mouth reconstruction cases and implantology, utilizing advanced digital technologies for dental photography, dental imaging and digital lab communication and production. He has written articles and lectured nationally and internationally to dentists and dental technicians on materials, techniques and digital technology. He is currently teaching courses in the San Diego area on subjects including basic porcelain layering, digital dental photography, and software implementiation with CAD/CAM technology. He is the founder of the San Diego Dental Institute. Mr. Corrales is currently pursuing AACD accreditation, and is an instructor at the Scottsdale Center for Dentistry.
AcknowledgmentThe chairside cases in this course were provided by Dr. Klim and the integrated chairside-laboratory case was provided by Mr. Corrales.
DisclaimerThe author(s) of this course has/have no commercial ties with the sponsors or the providers of the unrestricted educational grant for this course.
Reader FeedbackWe encourage your comments on this or any PennWell course. For your convenience, an online feedback form is available at www.ineedce.com.

www.ineedce.com 13
Questions
1. The introduction of CAD/CAM to dentistry took place during the 1960s.a. Trueb. False
2. Only inlays, onlays, and veneers can be fabricated using CAD/CAM techniques.a. Trueb. False
3. Using a traditional technique (non-CAD/CAM) _________.a. requires careful retraction or removal of soft tissue
around the preparation marginsb. requires selection of an appropriate impression material
for the technique usedc. is one of the more difficult procedures in dentistryd. All of the above
4. An advantage of the traditional technique is _________.a. the lack of a learning curve beyond staying current with
the use and handling of materialsb. that no procedure-specific capital equipment is requiredc. that it consistently provides superior results, compared
to other techniquesd. a and b
5. Using a traditional technique, it is usually possible to provide a custom-fabricated, single-visit fixed restoration.a. Trueb. False
6. Using a CAD/CAM restorative technique, traditional impressions can be replaced by use of _________.a. a handheld scanning device that mechanically records
the form and margins of the preparationb. a handheld scanning device that digitally records the
form and margins of the preparationc. a static scanning device that digitally records the form
and margins of the preparationd. none of the above
7. According to the article, it has been sug-gested that a _________ be used to expose subgingival margins. a. soft tissue electrosurgical unit b. soft tissue diode laserc. hard tissue diode laserd. all of the above
8. The basic techniques that can be utilized for CAD/CAM restorations _________.a. involve a chairside and chairside-processing areab. are chairside and integrated chairside –laboratory
techniquesc. are an integrated chairside laboratory and laboratory
–store techniqued. a and b
9. The clinician should consider whether monthly production would support investing in a chairside CAD/CAM unit.a. Trueb. False
10.During scanning for a CAD/CAM restoration, the clinician must ensure that all margins of the cavity are captured by the scan and then visualized.a. Trueb. False
11. From the patient’s perspective, a potential advantage of chairside CAD/CAM fabrica-tion of fixed restorations is that _________.a. the restoration is ready in one visitb. no impression is requiredc. there is reduced potential for tooth sensitizationd. all of the above
12. Estefan et al. found that both milled inlay and onlay restorations met the American Dental Association’s standard of fit within 50 micrometers.a. Trueb. False
13. Otto and Muhlemann found an 88.7% success rate up to 17 years after placement for 187 inlays and onlays placed using an early-generation chairside CEREC between 1989 and 1991.a. True b. False
14. _________ found that the success rate depended on the etching and luting cement used.a. Black et al.b. Pearlmutter et al. c. Sjogren et al.d. none of the above
15. Of 617 veneers placed over an eight-year period (1989-1997) that were then reevalu-ated by Wiedhahn et al., the survival rate was _____ after up to nine years.a. 78%b. 84%c. 88%d. 94%
16. CAD/CAM materials have included leucite-reinforced ceramic, feldspathic ceramic, and composite resin.a. Trueb. False
17. For chairside CAD/CAM restorations, the objective is an esthetic, strong material requiring maximal post-milling esthetic adjustment to tailor the restoration chairside.a. Trueb. False
18. Leucite-reinforced material is designed to _________. a. match the dentition for strengthb. match the dentition for surface smoothnessc. scatter light similarly to enameld. all of the above
19. Low translucency material is indicated for crowns and veneers, giving a brighter appearance.a. Trueb. False
20. Leucite-reinforced blocks with multiple shading created within the block offer a ____________.a. natural-shaded and opaque appearanceb. natural-shaded and translucent appearancec. striped and translucent appearanced. none of the above
21. For specific cases, milled restorations can be characterized by layering ceramic material on top. a. True
b. False
22. An integrated chairside-laboratory technique requires one or two visits.a. True
b. False
23. Ceramic blocks for laboratory-milled restorations are available as _________.a. zirconium chloride
b. zirconium oxalate
c. zirconium oxide
d. all of the above
24. Where esthetics is the key consideration, lithium disilicate ceramic glass blocks are preferable to zirconia.a. True
b. False
25. An advantage of a laboratory CAD/CAM milled restoration is the _________.a. reduced chairside time
b. elimination of stone model errors
c. increased accuracy
d. all of the above
26. Retentive full-coverage crowns with an underlying taper of between 8 and 23 degrees can be luted with adhesive or nonadhesive cement from the perspective of retention.a. True
b. False
27. Use of a resin adhesive luting cement is essential for restorations with a nonretentive form or for short preparations such as posterior crowns in patients with low interocclusal heights.a. True
b. False
28. _________ have been found to provide great-er bond strength to dentin than _________ and tolerate moisture better.a. Etch-and-rinse adhesives; self-etch adhesives
b. Self-etch adhesives; etch-and-paste adhesives
c. Etch-and-rinse adhesives; dry-etch adhesives
d. Self-etch adhesives; etch-and-rinse adhesives
29. Self-adhesive resin cements are effective for CAD/CAM zirconia restorations.a. True
b. False
30. Currently available CAD/CAM materials offer excellent strength and esthetics.a. True
b. False

For immediate results, go to www.ineedce.com to take tests online.
answer sheets can be faxed with credit card payment to (440) 845-3447, (216) 398-7922, or (216) 255-6619.
�Payment of $59.00 is enclosed. (Checks and credit cards are accepted.)
If paying by credit card, please complete the following: MC Visa AmEx Discover
Acct. Number: _______________________________
Exp. Date: _____________________
Charges on your statement will show up as PennWell
Mail completed answer sheet to
Academy of Dental Therapeutics and Stomatology,A Division of PennWell Corp.
P.O. Box 116, Chesterland, OH 44026 or fax to: (440) 845-3447
14 www.ineedce.com
AUTHOR DISCLAIMERThe author(s) of this course has/have no commercial ties with the sponsors or the providers of the unrestricted educational grant for this course.
SPONSOR/PROVIDERThis course was made possible through an unrestricted educational grant from Ivoclar Vivadent. No manufacturer or third party has had any input into the development of course content. All content has been derived from references listed, and or the opinions of clinicians. Please direct all questions pertaining to PennWell or the administration of this course to Machele Galloway, 1421 S. Sheridan Rd., Tulsa, OK 74112 or [email protected].
COURSE EVALUATION and PARTICIPANT FEEDBACKWe encourage participant feedback pertaining to all courses. Please be sure to complete the survey included with the course. Please e-mail all questions to: [email protected].
INSTRUCTIONSAll questions should have only one answer. Grading of this examination is done manually. Participants will receive confirmation of passing by receipt of a verification form. Verification forms will be mailed within two weeks after taking an examination.
EDUCATIONAL DISCLAIMERThe opinions of efficacy or perceived value of any products or companies mentioned in this course and expressed herein are those of the author(s) of the course and do not necessarily reflect those of PennWell.
Completing a single continuing education course does not provide enough information to give the participant the feeling that s/he is an expert in the field related to the course topic. It is a combination of many educational courses and clinical experience that allows the participant to develop skills and expertise.
COURSE CREDITS/COSTAll participants scoring at least 70% (answering 21 or more questions correctly) on the examination will receive a verification form verifying 4 CE credits. The formal continuing education program of this sponsor is accepted by the AGD for Fellowship/Mastership credit. Please contact PennWell for current term of acceptance. Participants are urged to contact their state dental boards for continuing education requirements. PennWell is a California Provider. The California Provider number is 3274. The cost for courses ranges from $49.00 to $110.00.
Many PennWell self-study courses have been approved by the Dental Assisting National Board, Inc. (DANB) and can be used by dental assistants who are DANB Certified to meet DANB’s annual continuing education requirements. To find out if this course or any other PennWell course has been approved by DANB, please contact DANB’s Recertification Department at 1-800-FOR-DANB, ext. 445.
RECORD KEEPINGPennWell maintains records of your successful completion of any exam. Please contact our offices for a copy of your continuing education credits report. This report, which will list all credits earned to date, will be generated and mailed to you within five business days of receipt.
CANCELLATION/REFUND POLICYAny participant who is not 100% satisfied with this course can request a full refund by contacting PennWell in writing.
© 2008 by the Academy of Dental Therapeutics and Stomatology, a division of PennWell
IV0902PAT
AGD Code 250
Educational Objectives1. Know the origins of CAD/CAM and its introduction into dentistry.
2. Understand the CAD/CAM technique used for chairside and integrated chairside/laboratory CAD/CAM procedures.
3. Describe the advantages and disadvantages of both traditional and CAD/CAM restorative procedures.
4. Know the types and properties of ceramic CAD/CAM blocks, and the considerations in selecting ceramic blocks for
CAD/CAM restorations.
Course EvaluationPlease evaluate this course by responding to the following statements, using a scale of Excellent = 5 to Poor = 0.
1. Were the individual course objectives met? Objective #1: Yes No Objective #3: Yes No
Objective #2: Yes No Objective #4: Yes No
2. To what extent were the course objectives accomplished overall? 5 4 3 2 1 0
3. Please rate your personal mastery of the course objectives. 5 4 3 2 1 0
4. How would you rate the objectives and educational methods? 5 4 3 2 1 0
5. How do you rate the author’s grasp of the topic? 5 4 3 2 1 0
6. Please rate the instructor’s effectiveness. 5 4 3 2 1 0
7. Was the overall administration of the course effective? 5 4 3 2 1 0
8. Do you feel that the references were adequate? Yes No
9. Would you participate in a similar program on a different topic? Yes No
10. If any of the continuing education questions were unclear or ambiguous, please list them.
___________________________________________________________________
11. Was there any subject matter you found confusing? Please describe.
___________________________________________________________________
___________________________________________________________________
12. What additional continuing dental education topics would you like to see?
___________________________________________________________________
___________________________________________________________________
ANSWER SHEET
Innovation in Dentistry: CAD/CAM Restorative Procedures
Name: Title: Specialty:
Address: E-mail:
City: State: ZIP: Country:
Telephone: Home ( ) Office ( )
Requirements for successful completion of the course and to obtain dental continuing education credits: 1) Read the entire course. 2) Complete all information above. 3) Complete answer sheets in either pen or pencil. 4) Mark only one answer for each question. 5) A score of 70% on this test will earn you 4 CE credits. 6) Complete the Course Evaluation below. 7) Make check payable to PennWell Corp.