the deluxe door & panel
TRANSCRIPT

FramedContinuous
HingeDoor & Panel
Shower Door
DLXH35AA531
the DELUXE DOOR & PANEL
B E C A U S E T H E S H O W E R I S E V E R Y T H I N Gwww.BascoShowerDoor.com | 800.45.BASCO
QCI5230

shower
new
QCI5230 Rev 0 Page 2 Certified 06/20/2016
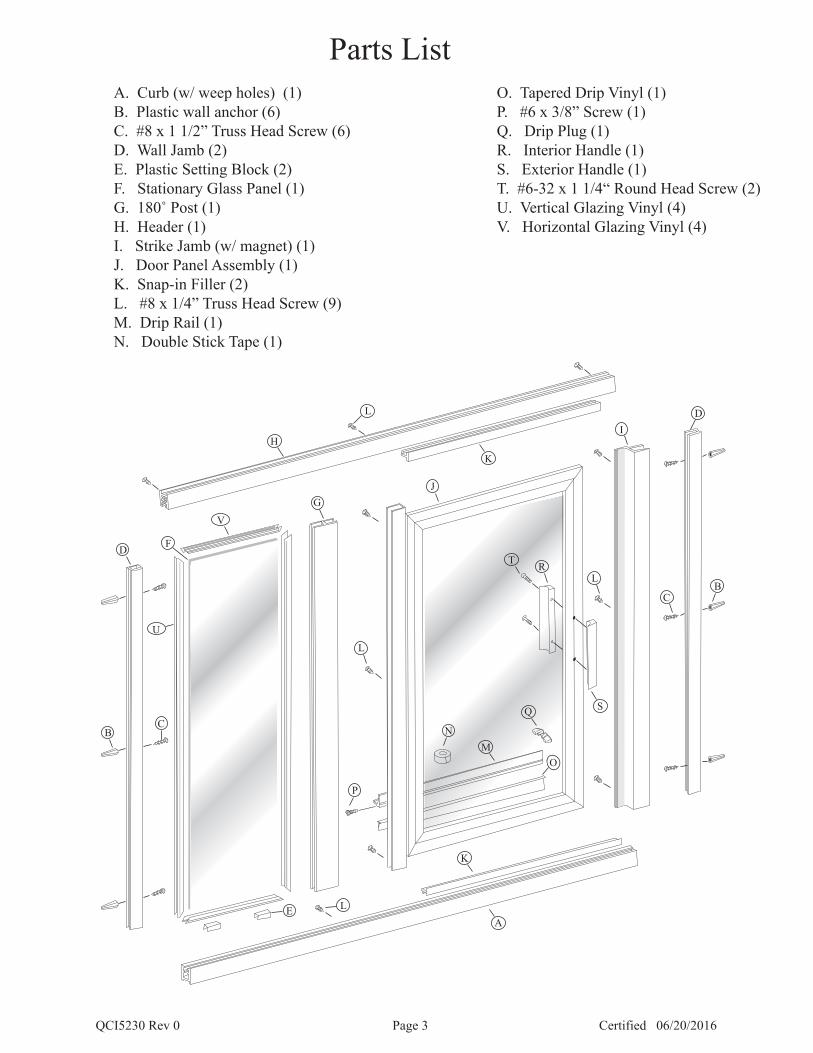
Parts ListA. Curb (w/ weep holes) (1) O. Tapered Drip Vinyl (1)B. Plastic wall anchor (6) P. #6 x 3/8” Screw (1)C. #8 x 1 1/2” Truss Head Screw (6) Q. Drip Plug (1) D. Wall Jamb (2) R. Interior Handle (1)E. Plastic Setting Block (2) S. Exterior Handle (1)F. Stationary Glass Panel (1) T. #6-32 x 1 1/4“ Round Head Screw (2)G. 180˚ Post (1) U. Vertical Glazing Vinyl (4)H. Header (1) V. Horizontal Glazing Vinyl (4)I. Strike Jamb (w/ magnet) (1) J. Door Panel Assembly (1) K. Snap-in Filler (2)L. #8 x 1/4” Truss Head Screw (9)M. Drip Rail (1)N. Double Stick Tape (1)
A
B
B
C
C
D
D
E
F
G
HI
J
K
L
MN
O
K
L
L
L
P
Q S
RT
U
V
QCI5230 Rev 0 Page 3 Certified 06/20/2016
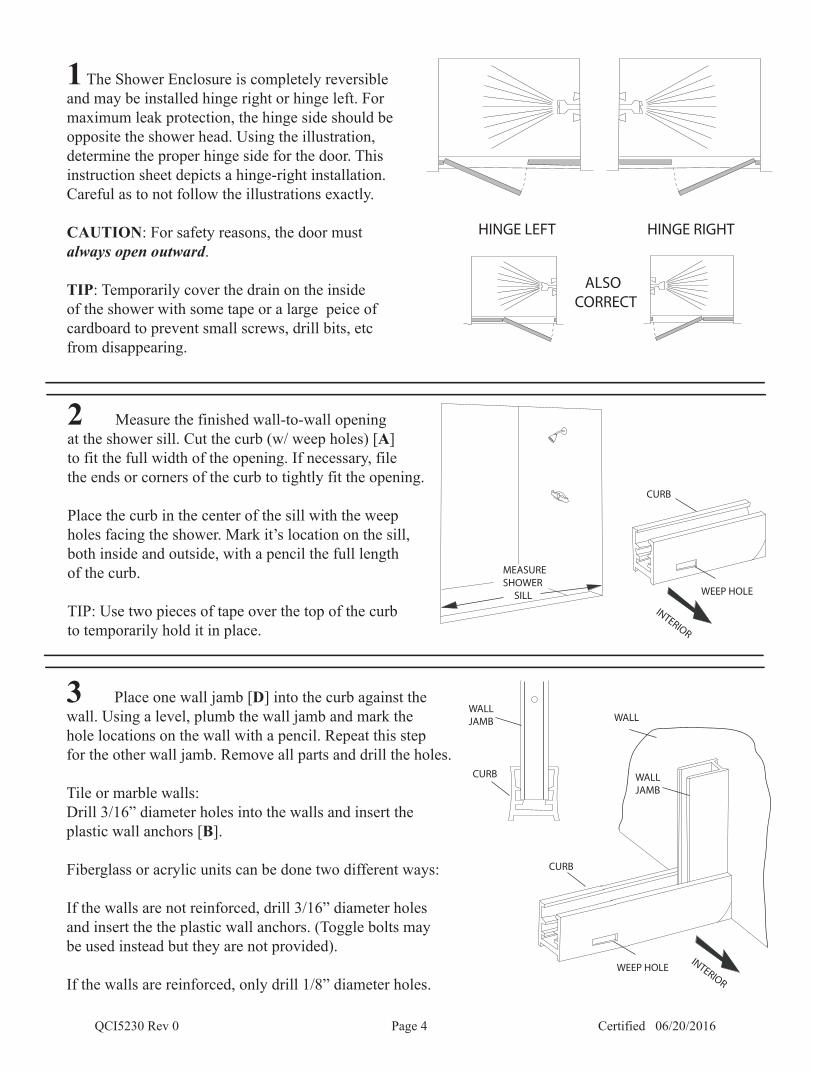
HINGE LEFT HINGE RIGHT
ALSOCORRECT
MEASURESHOWER SILL
CURB
WEEP HOLE
INTERIOR
CURB
CURB
INTERIORWEEP HOLE
WALLJAMB
WALLJAMB WALL
1 The Shower Enclosure is completely reversible and may be installed hinge right or hinge left. For maximum leak protection, the hinge side should be opposite the shower head. Using the illustration, determine the proper hinge side for the door. This instruction sheet depicts a hinge-right installation. Careful as to not follow the illustrations exactly.
CAUTION: For safety reasons, the door must always open outward.
TIP: Temporarily cover the drain on the inside of the shower with some tape or a large peice of cardboard to prevent small screws, drill bits, etc from disappearing.
2 Measure the finished wall-to-wall opening at the shower sill. Cut the curb (w/ weep holes) [A] to fit the full width of the opening. If necessary, file the ends or corners of the curb to tightly fit the opening.
Place the curb in the center of the sill with the weep holes facing the shower. Mark it’s location on the sill, both inside and outside, with a pencil the full length of the curb.
TIP: Use two pieces of tape over the top of the curb to temporarily hold it in place.
3 Place one wall jamb [D] into the curb against the wall. Using a level, plumb the wall jamb and mark the hole locations on the wall with a pencil. Repeat this step for the other wall jamb. Remove all parts and drill the holes.
Tile or marble walls:Drill 3/16” diameter holes into the walls and insert the plastic wall anchors [B].
Fiberglass or acrylic units can be done two different ways:
If the walls are not reinforced, drill 3/16” diameter holes and insert the the plastic wall anchors. (Toggle bolts may be used instead but they are not provided).
If the walls are reinforced, only drill 1/8” diameter holes.
QCI5230 Rev 0 Page 4 Certified 06/20/2016
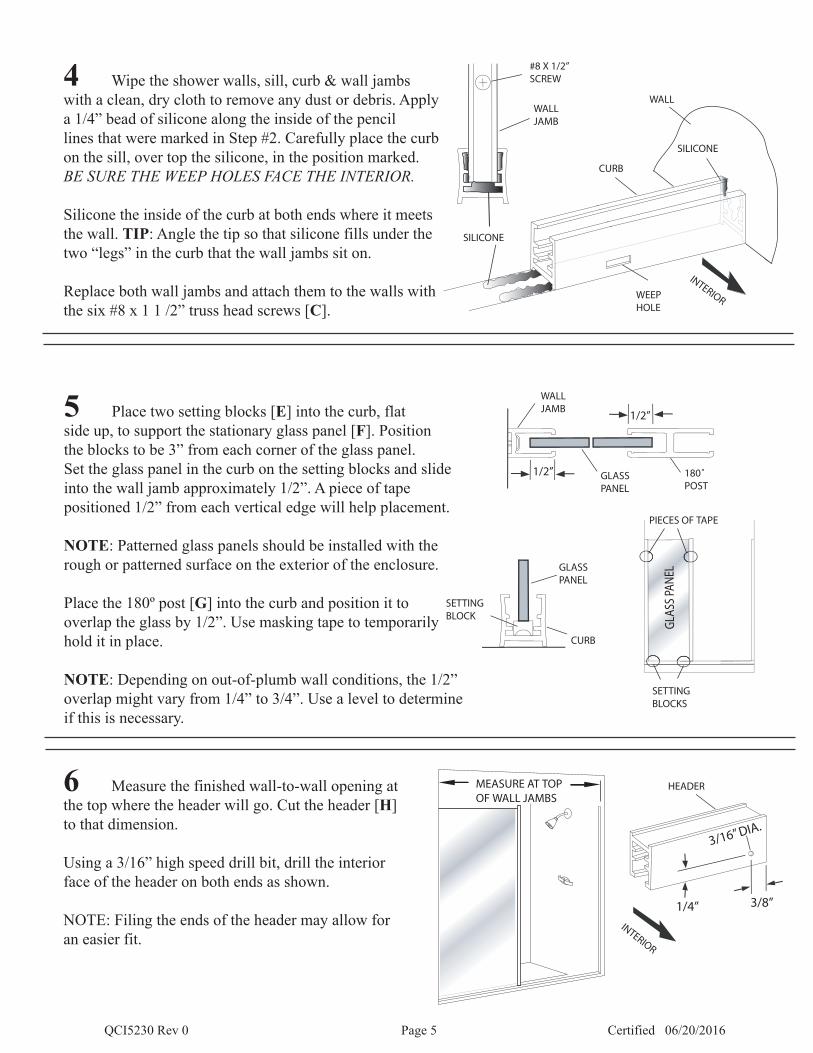
4 Wipe the shower walls, sill, curb & wall jambs with a clean, dry cloth to remove any dust or debris. Applya 1/4” bead of silicone along the inside of the pencillines that were marked in Step #2. Carefully place the curbon the sill, over top the silicone, in the position marked.BE SURE THE WEEP HOLES FACE THE INTERIOR.
Silicone the inside of the curb at both ends where it meetsthe wall. TIP: Angle the tip so that silicone fills under the two “legs” in the curb that the wall jambs sit on.
Replace both wall jambs and attach them to the walls withthe six #8 x 1 1 /2” truss head screws [C].
5 Place two setting blocks [E] into the curb, flat side up, to support the stationary glass panel [F]. Position the blocks to be 3” from each corner of the glass panel. Set the glass panel in the curb on the setting blocks and slide into the wall jamb approximately 1/2”. A piece of tape positioned 1/2” from each vertical edge will help placement.
NOTE: Patterned glass panels should be installed with the rough or patterned surface on the exterior of the enclosure.
Place the 180º post [G] into the curb and position it to overlap the glass by 1/2”. Use masking tape to temporarily hold it in place.
NOTE: Depending on out-of-plumb wall conditions, the 1/2”overlap might vary from 1/4” to 3/4”. Use a level to determine if this is necessary.
6 Measure the finished wall-to-wall opening at the top where the header will go. Cut the header [H] to that dimension.
Using a 3/16” high speed drill bit, drill the interior face of the header on both ends as shown.
NOTE: Filing the ends of the header may allow for an easier fit.
#8 X 1/2” SCREW
WALLJAMB
WALL
SILICONE
SILICONE
WEEP HOLE
CURB
INTERIOR
WALLJAMB
1/2”
1/2”
GLASSPANEL
180˚POST
SETTING BLOCK
CURB
GLASSPANEL
MEASURE AT TOPOF WALL JAMBS
HEADER
3/16” DIA.
3/8”1/4”INTERIOR
PIECES OF TAPE
SETTING BLOCKS
GLA
SS P
ANEL
QCI5230 Rev 0 Page 5 Certified 06/20/2016
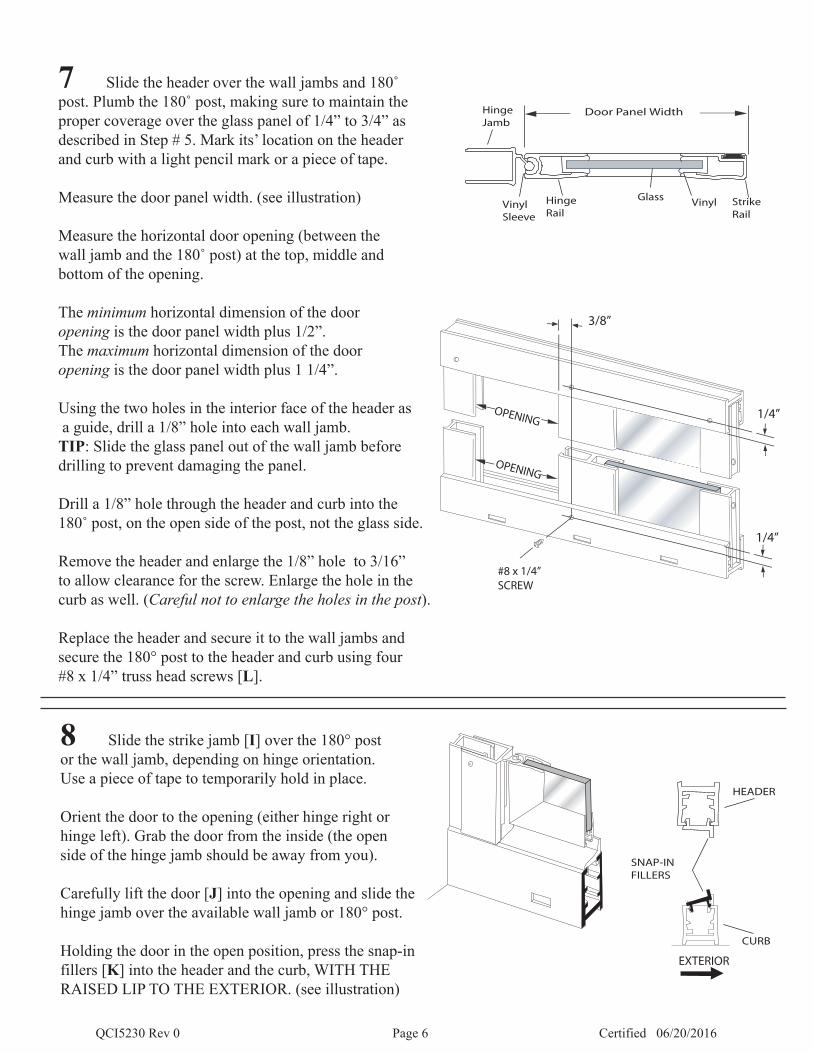
7 Slide the header over the wall jambs and 180˚ post. Plumb the 180˚ post, making sure to maintain the proper coverage over the glass panel of 1/4” to 3/4” as described in Step # 5. Mark its’ location on the header and curb with a light pencil mark or a piece of tape.
Measure the door panel width. (see illustration)
Measure the horizontal door opening (between the wall jamb and the 180˚ post) at the top, middle and bottom of the opening.
The minimum horizontal dimension of the door opening is the door panel width plus 1/2”. The maximum horizontal dimension of the door opening is the door panel width plus 1 1/4”.
Using the two holes in the interior face of the header as a guide, drill a 1/8” hole into each wall jamb. TIP: Slide the glass panel out of the wall jamb before drilling to prevent damaging the panel.
Drill a 1/8” hole through the header and curb into the 180˚ post, on the open side of the post, not the glass side.
Remove the header and enlarge the 1/8” hole to 3/16” to allow clearance for the screw. Enlarge the hole in the curb as well. (Careful not to enlarge the holes in the post).
Replace the header and secure it to the wall jambs and secure the 180° post to the header and curb using four #8 x 1/4” truss head screws [L].
Hinge Jamb
VinylSleeve
HingeRail
VinylGlass
Door Panel Width
8 Slide the strike jamb [I] over the 180° post or the wall jamb, depending on hinge orientation. Use a piece of tape to temporarily hold in place.
Orient the door to the opening (either hinge right or hinge left). Grab the door from the inside (the open side of the hinge jamb should be away from you).
Carefully lift the door [J] into the opening and slide the hinge jamb over the available wall jamb or 180° post.
Holding the door in the open position, press the snap-infillers [K] into the header and the curb, WITH THE RAISED LIP TO THE EXTERIOR. (see illustration)
3/8”
1/4”
1/4”
OPENING
#8 x 1/4”SCREW
OPENING
SNAP-INFILLERS
EXTERIOR
StrikeRail
HEADER
CURB
QCI5230 Rev 0 Page 6 Certified 06/20/2016
WALL JAMB
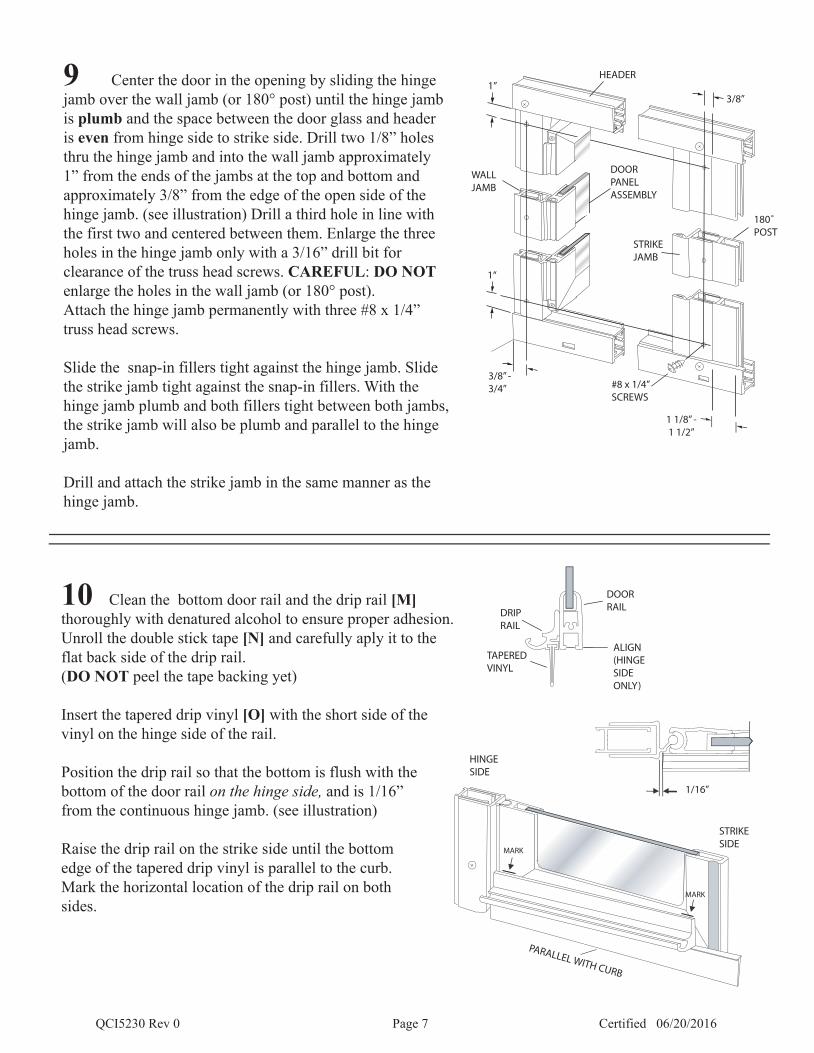
9 Center the door in the opening by sliding the hinge jamb over the wall jamb (or 180° post) until the hinge jamb is plumb and the space between the door glass and header is even from hinge side to strike side. Drill two 1/8” holes thru the hinge jamb and into the wall jamb approximately 1” from the ends of the jambs at the top and bottom and approximately 3/8” from the edge of the open side of the hinge jamb. (see illustration) Drill a third hole in line with the first two and centered between them. Enlarge the three holes in the hinge jamb only with a 3/16” drill bit for clearance of the truss head screws. CAREFUL: DO NOT enlarge the holes in the wall jamb (or 180° post). Attach the hinge jamb permanently with three #8 x 1/4” truss head screws.
Slide the snap-in fillers tight against the hinge jamb. Slide the strike jamb tight against the snap-in fillers. With the hinge jamb plumb and both fillers tight between both jambs, the strike jamb will also be plumb and parallel to the hinge jamb.
Drill and attach the strike jamb in the same manner as the hinge jamb.
3/8”
180˚POST
1“
1 1/8” - 1 1/2”
1”
#8 x 1/4”SCREWS
STRIKEJAMB
DOORPANELASSEMBLY
HEADER
3/8” - 3/4”
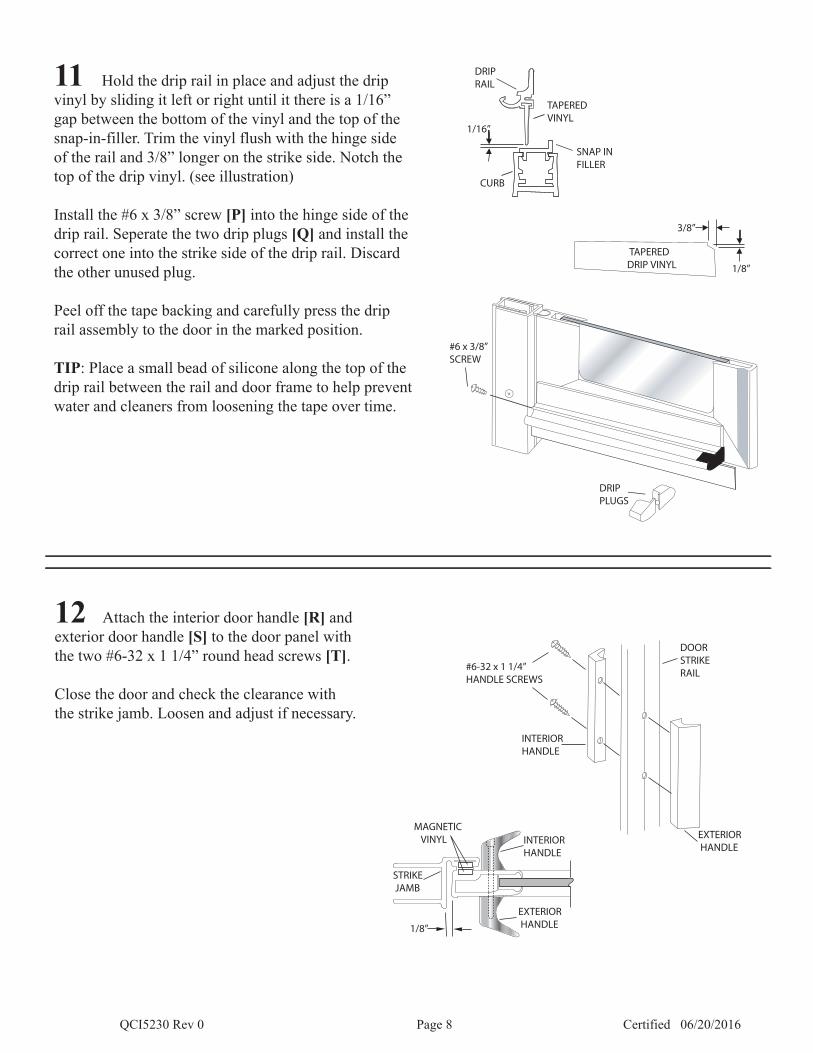
10 Clean the bottom door rail and the drip rail [M] thoroughly with denatured alcohol to ensure proper adhesion. Unroll the double stick tape [N] and carefully aply it to the flat back side of the drip rail. (DO NOT peel the tape backing yet)
Insert the tapered drip vinyl [O] with the short side of the vinyl on the hinge side of the rail.
Position the drip rail so that the bottom is flush with the bottom of the door rail on the hinge side, and is 1/16” from the continuous hinge jamb. (see illustration)
Raise the drip rail on the strike side until the bottom edge of the tapered drip vinyl is parallel to the curb. Mark the horizontal location of the drip rail on both sides.
DOORRAIL
DRIPRAIL
TAPEREDVINYL
ALIGN(HINGESIDEONLY)
STRIKESIDE
HINGESIDE
1/16”
PARALLEL WITH CURB
MARK
MARK
QCI5230 Rev 0 Page 7 Certified 06/20/2016
#6-32 x 1 1/4”HANDLE SCREWS
INTERIORHANDLE
DOORSTRIKERAIL
INTERIORHANDLE
EXTERIOR HANDLE
EXTERIOR HANDLE
MAGNETIC VINYL
STRIKE JAMB
1/8”
TAPEREDDRIP VINYL
3/8”
1/8”
DRIPRAIL
TAPEREDVINYL
#6 x 3/8”SCREW
11 Hold the drip rail in place and adjust the drip vinyl by sliding it left or right until it there is a 1/16” gap between the bottom of the vinyl and the top of the snap-in-filler. Trim the vinyl flush with the hinge side of the rail and 3/8” longer on the strike side. Notch the top of the drip vinyl. (see illustration)
Install the #6 x 3/8” screw [P] into the hinge side of the drip rail. Seperate the two drip plugs [Q] and install the correct one into the strike side of the drip rail. Discard the other unused plug.
Peel off the tape backing and carefully press the drip rail assembly to the door in the marked position.
TIP: Place a small bead of silicone along the top of the drip rail between the rail and door frame to help prevent water and cleaners from loosening the tape over time.
1/16”
CURB
SNAP INFILLER
DRIPPLUGS
12 Attach the interior door handle [R] and exterior door handle [S] to the door panel with the two #6-32 x 1 1/4” round head screws [T].
Close the door and check the clearance with the strike jamb. Loosen and adjust if necessary.
QCI5230 Rev 0 Page 8 Certified 06/20/2016

13 Inspect the strips of black glazing vinyl and note the two different profiles. The flat shaped vinyl [U] is installed vertically and the crescent shaped vinyl [V] is installed horizontally. There should be a total of four (4) individual vertical and four (4) individual horizontal pieces of vinyl about a 1/2” wide each. (May need to peel apart from a wider strip).These vinyls are designed to fit tightly between the glass and metal frame. TIP: Wet the glass and vinyl with water or glass cleaner immediately before installing vinyl and use a small block of wood to press the vinyl into place.
NOTE: Different glass sizes require different vinyl. Refer to the chart for clarification if installation is extremely difficult.
14 Cut the four (4) pieces of vertical vinyl [U] 1” longer than the vertical opening. Verify depth of glass into post and wall jamb is sufficient and even (refer to Step #5). Starting on the exterior, slide one end of the vertical vinyl up into the header and press into the wall jamb about 6” down. Apply light pressure against the interior of the glass panel to hold vinyl in place and install vinyl on the interior in a similar fashion. Press the vinyl into the wall jamb alternating between the interior and exterior. Remove the tape from glass surface before installing the vinyl.
Caution: Do not to stretch the vinyl when pressing into place.
Repeat above steps for the 180º post.
VERTICALOPENING
GLAZINGVINYL
180˚POST
WALL JAMB
GLASSPANEL
OVERHEAD VIEW:
GROOVE GROOVE
15 Cut four (4) pieces of the horizontal vinyl [V] 1/2”longer than the horizontal opening. Cut both ends of the vinyl with a back mitre so that they sit tight against the face of the vertical vinyl. (see illustration)
Starting at the top on the exterior, place the vinyl againstthe glass (open side of the crescent shape against the glass) and press into the header at both corners. Continue pressing vinyl into the header from both ends working toward the middle.
Install the top interior vinyl on the same side.
Repeat above steps for the bottom of the panel.
HORIZONTAL OPENING
HEADER
CURB
HORIZONTAL VINYL
GLASSPANEL
VINYLREMOVE
QCI5230 Rev 0 Page 9 Certified 06/20/2016
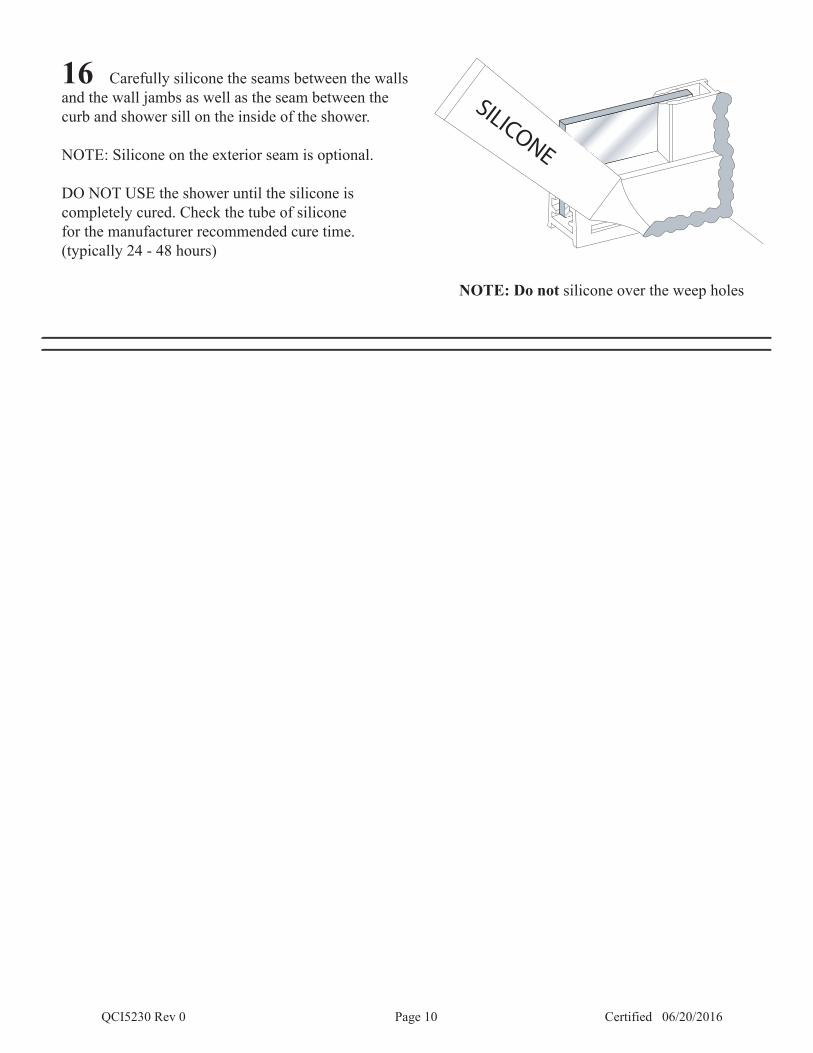
16 Carefully silicone the seams between the walls and the wall jambs as well as the seam between thecurb and shower sill on the inside of the shower.
NOTE: Silicone on the exterior seam is optional.
DO NOT USE the shower until the silicone is completely cured. Check the tube of silicone for the manufacturer recommended cure time. (typically 24 - 48 hours)
NOTE: Do not silicone over the weep holes
SILICONE
QCI5230 Rev 0 Page 10 Certified 06/20/2016