the basicsthe basics - hollowsurfboards.comhollowsurfboards.com/documents/thebasics.pdf · the...
TRANSCRIPT

The BasicsThe BasicsThe BasicsThe Basics
The essential sections of “How To Build A HollowSurfboard”
ProcessProcessProcessProcess
Building even the simplest hollow wood board takes significantly more time, skills, and patience than the most complex foam /fiberglass board …The time to build a hollow can take weeks or even months…
The tools needed to build a hollow are what a cabinet shop usually has…Table saw, stationary
planer, routers, belt sanders…etc… An understanding of wood’s properties and its tendencies to move are also required…Also, there is a need to be open to materials not specifically designed for
surfboards…
The number of steps to make a hollow board are many…Foremost is the planning of how to create a blank from thin flat wood…It requires a vision, and a plan with flexibility to make the complex form take shape…It requires getting the right materials for the specific task … understanding the differences in
selecting the right adhesives for specific tasks…It requires cutting the rough parts to precise pieces…A typical hollow board has over 300 pieces…It requires sensitivity with the tools, where one mistake can and will ruin weeks of work…It requires patience beyond belief…It requires a mastery of
the process…With the ability to adapt to minor crisis’s and be open to new ideas and materials…

ToolsToolsToolsTools
Tools that are essential for building a Hollowsurfboard…
Pencil...
Tape Measure...
The best Utility Knife you can buy, always with a very sharp blade...!!!...
Jig Saw, they're all about the same...

Small, hand held router with a "Flush Trim" router bit...
Block Plane or Surform...
Drill & drill bits...
Belt Sander - I like the 3" x 21" Bosch or Ryobi...
Orbital 1/4 Sheet Sander or plenty of elbow grease sanding...

Spring clamps - At least a dozen... Harbor Freight has these on sale for cheap, all the time...
Fine Tooth Handsaw... I only use Japanese "Pull Saws"...
A Table Saw
and maybe a Surfacing Planer
If your lumber yard is any good, and you have any kind of working relationship with them, they will have both of those that they can use to cut and mill your wood strips that'll be your deck and bottom skins...
If the lumber yard can't do that, most Door Shops will have that stuff in back and can help you
out...Again explain what you are doing and make them part of the process...It will save you from having

to buy those two big tools, unless you really want them...They do come in handy for lots of other things around the house though...Just my opinion...
You' will use a lot of masking tape, don’t buy really cheap tape, it just doesn't stretch...You don’t need
that more expensive "Blue Tape"...Just get a high quality professional grade tape... A roll of non-stretch “Filament Tape” is great on the stubborn areas…
Have fun …!!!...
Sources of SuppliesSources of SuppliesSources of SuppliesSources of Supplies
Your local lumber yard is the best place to start...Go talk with the "special orders" person, let them know what you're doing...Bring a picture of what you're trying to do...Get them stoked to help you...I always show my local yards what I'm up to...They get a bit emotionally connected and see themselves as being part of the process...A good thing...Explain to them that there might be some products that you're looking for that they might not be familiar with, but they most likely can order...They probably
don't even know some of the stuff exists...Be patient with them...It really pays off...

Lowe's / Home Depot has a lot of the bulk stuff you need...Adhesives, sanding belts and sheet
sandpaper, hand tools, power tools, etc...Just don't expect the special order stuff to come through them, it's not their gig...
Online sources are aplenty...I link to most of those that are specific to what I use on the "Links" page
on my website, www.hollowsurfboards.com …
Of course, the best resource for anything surfboard related is www.swaylocks.com … A www.google.com search can be very productive also...
Materials ListMaterials ListMaterials ListMaterials List
Gluing Form:Gluing Form:Gluing Form:Gluing Form: One sheet of ¼” plywood…
About ¼ sheet of ¾” plywood or pine to be cut for blocking… Some sheetrock nails or screws to keep it together…
Stringer and Cross Ribs:Stringer and Cross Ribs:Stringer and Cross Ribs:Stringer and Cross Ribs:
About ¼ sheet of 1/8” luan plywood… LuanPlywood
Inner Rails:Inner Rails:Inner Rails:Inner Rails: Another ¼ sheet of 1/8” luan plywood…
If you’re building a board with a round nose or a round tail, maybe get some 1/8” bending plywood, if the curves are tight…
Yellow Glue & Hot Glue
Deck / Skins:Deck / Skins:Deck / Skins:Deck / Skins: 1/8” Cedar / Basswood / Redwood / Whatever…
If you use Balsa get it ¼” thick…
Outer Rails:Outer Rails:Outer Rails:Outer Rails: One sheet of 1/8” bending plywood - NorthAmericanPly

48” x72” of 3/16” sheet cork… CorkStore One gallon of Solvent Based Contact Cement - WeldwoodContactCement
Interior Carbon Fiber or FiberglassInterior Carbon Fiber or FiberglassInterior Carbon Fiber or FiberglassInterior Carbon Fiber or Fiberglass ---- FiberglassSupply
One layer of either…4 oz. or 6 oz….Remember there’s 2 sides…
Exterior FiberglassExterior FiberglassExterior FiberglassExterior Fiberglass I like 4 oz. S-cloth...E-cloth is fine also…Get 3x your boards length…
Epoxy ResinEpoxy ResinEpoxy ResinEpoxy Resin
1.5 gallons of Epoxy Resin – I only use ResinResearch
Fins …Fin Boxes…Fins …Fin Boxes…Fins …Fin Boxes…Fins …Fin Boxes… You know what you want…
TemplTemplTemplTemplatesatesatesates
To start making a hollow board, you’ll need a couple of full size templates, a ½ board “planshape” template and a full size “rocker” template…
Creating a Planshape TemplateCreating a Planshape TemplateCreating a Planshape TemplateCreating a Planshape Template

The planshape template can be transferred from an existing board by simply tracing around a reference board with a pen or pencil onto your template material…I’ll use either a piece of 1/8”
plywood, cardboard, or heavy paper for templates…Most of the time I use 1’8” plywood, since I’ll likely be using the templates again…They’re just more durable…When tracing, be sure to keep your pen or
pencil straight up and down…
Creating a Rocker TemplateCreating a Rocker TemplateCreating a Rocker TemplateCreating a Rocker Template
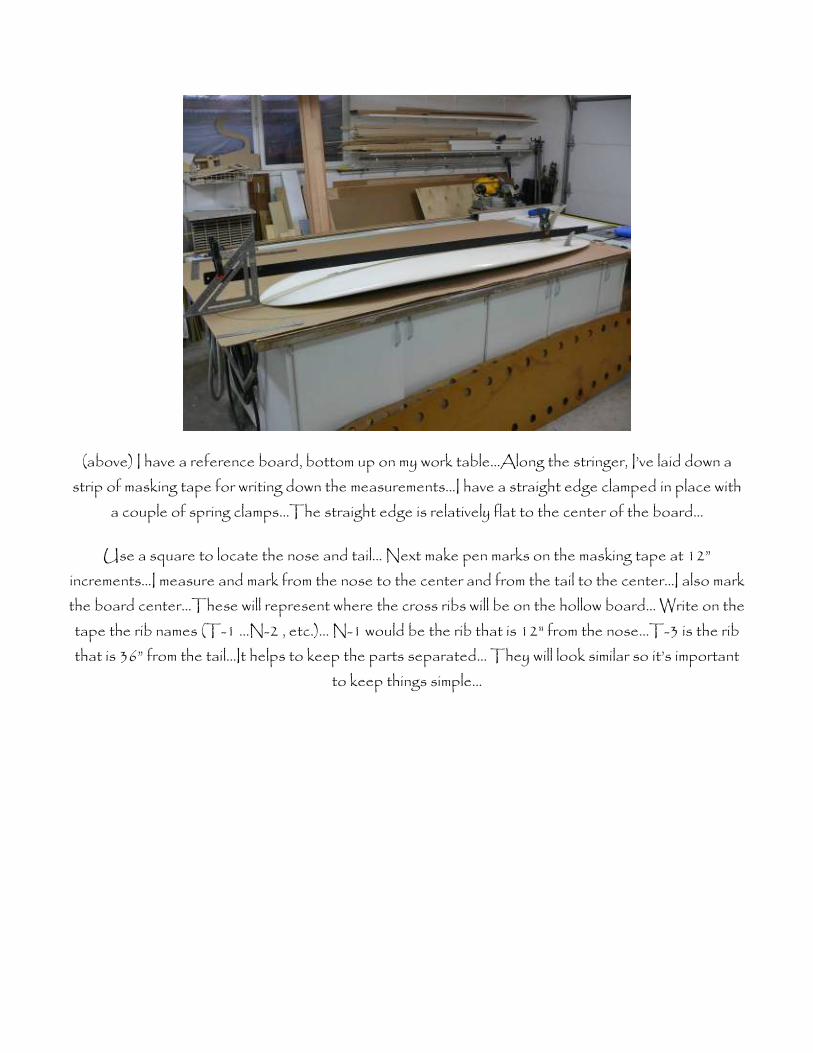
(above) I have a reference board, bottom up on my work table…Along the stringer, I’ve laid down a strip of masking tape for writing down the measurements…I have a straight edge clamped in place with
a couple of spring clamps…The straight edge is relatively flat to the center of the board…
Use a square to locate the nose and tail… Next make pen marks on the masking tape at 12” increments...I measure and mark from the nose to the center and from the tail to the center…I also mark the board center…These will represent where the cross ribs will be on the hollow board… Write on the tape the rib names (T-1 …N-2 , etc.)… N-1 would be the rib that is 12" from the nose…T-3 is the rib that is 36” from the tail…It helps to keep the parts separated… They will look similar so it’s important
to keep things simple…

(above) I’m measuring the rocker along the reference board…The measurements are taken at the 12” increment marks…
(above) Write on the masking tape the rocker measurement on the tape, at each location…

(above) Be as accurate as possible…
(above) Go to your template material…Trace a straight line…Mark on the line your 12” from nose and tail rib locations…From the masking tape on the reference board, transfer the rocker numbers to your
rocker template…Measuring and marking carefully…Next connect those dots with a flexible strip of 1/8” plywood…Smooth is important…Most of the time I use previous rocker curves to connect the

dots…Take your time to get it the way it needs to be…At the bottom of the picture is the ½ planshape template with lines at the rib locations…
(above) Next, with calipers measure the thickness of the reference board at the 12” intervals…Write them down… Before you transfer those numbers to the rocker template, you’ll need to subtract the thickness of the wood top and bottom skins that the hollow board will have…Remember, right now you’re making an interior part…You’ve just measured an exterior surface…There’s a difference…. I
usually figure the deck and bottoms to be each 3/16” thick…Combined that’s 3/8”…So if you subtract 3/8” from your reference board thickness measurements, you’ll have the measurement of the
hollow board’s stringer…

(above) Now you can transfer those numbers to the rocker template… Mark the nose and tail with perpendicular marks to the straight template edge...Again you connect the dots… Smoothly…This is
important...Looks good…???...If not take the time to smooth out the lines…
Now go back to the planshape template…You’ll need to adjust the width of the template to account for the built up “inner-rails” and finished rails of the hollow board…You’ll need to allow 1-1/2” for
each of the finished rails, and ¼” for the inner-rail…So you’ll need to subtract 1-3/4” from the outside edge of the planshape template…Make the necessary compensation and your ready to do
some cutting...

(above) Now that you're ready to cut out the templates, congratulate yourself for getting this far...Here I’m just cutting cardboard, but the 1/8” plywood cuts well with a SHARPSHARPSHARPSHARP utility knife…A
jigsaw works well, too...I usually just use a knife...Hand strength helps here…Make the cuts on both the planshape and the rocker templates, then clean up the contours with a sanding block…
Your rocker template is now your Stringer...There's more to do with it later...
If you are not building a round nose or round tail board, transfer the Planshape template
onto a piece of ¼” plywood and mark the Stringer and Rib locations and cut out the plywood… You can skip the next chapter on Gluing Forms, because you don’t need one…

Pattern MakingPattern MakingPattern MakingPattern Making
Sometime I might want to make more than one board from a set of templates…Here’s how I do that…This method is similar to a CNC cutter in it’s ability to replicate parts over and over…At a
fraction of the cost and it’s something I can do without outsourcing…
You’ll need a few things…Your paper templates, some 1/8” plywood for the underlying template, some 1/4” -3 ply plywood, wood glue, some ½” brads or pin-nails, a handsaw and a router with a ‘rub
collar” guide and a ¼” straight cut router bit…
First, I’ll create the lines and curves that are the Stringer, Ribs and Outer Frame Rails on 1/8” plywood…You simply transfer a paper Template Kit to 1/8” plywood by tracing around the
templates…Next I’ll cut away the parts, either with a knife or a saw…
Once I have a part, in this case an Outside Frame Rail for an 11’6” Paddle Board (the dark brown hardboard piece), I’ll cut a few 8’ strips of ¼” 3ply plywood… The strips for this project are 5/8”
wide…You can see I also have some wood glue, a hand saw, a nail gun with ½” pin nails…Underneath the hardboard template is a piece of ½” plywood…It’s sacrificial in that it will get routered into later…

Here I’ve spread some glue on a strip of the ¼” thick plywood…
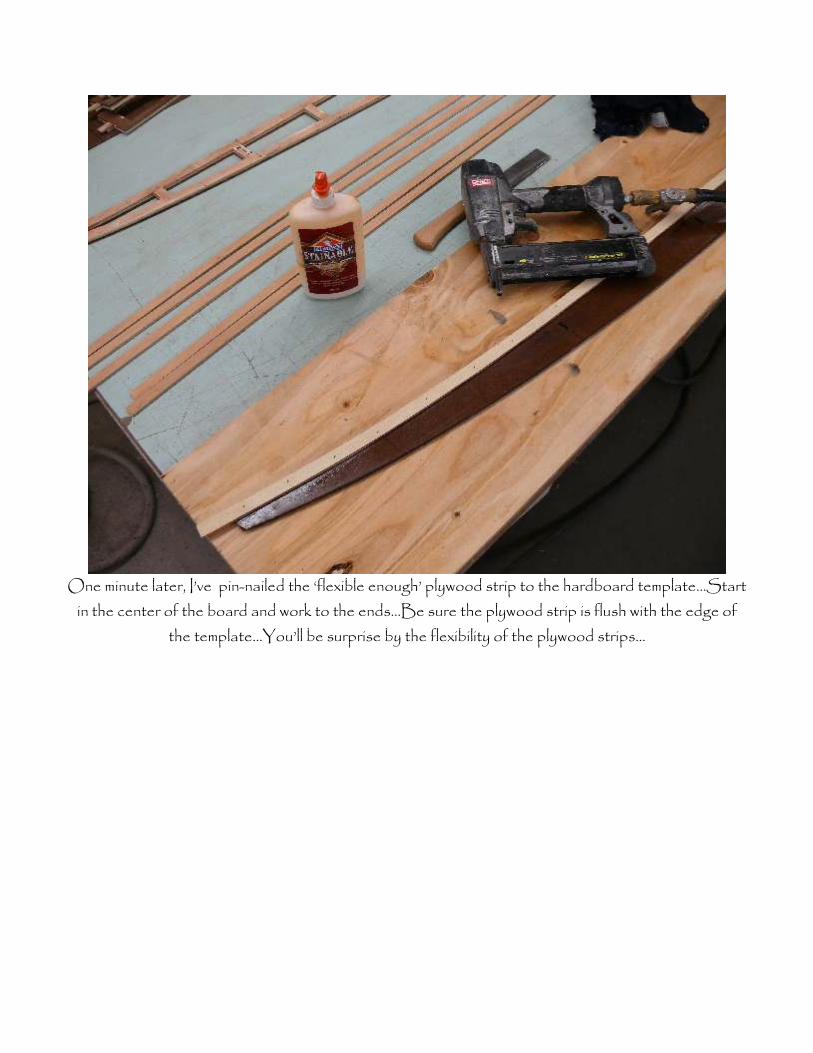
One minute later, I’ve pin-nailed the ‘flexible enough’ plywood strip to the hardboard template…Start
in the center of the board and work to the ends…Be sure the plywood strip is flush with the edge of the template…You’ll be surprise by the flexibility of the plywood strips…

The bottom strips is now glued and nailed…So far so easy…

Since this is an Outer Frame Rail and I’m wanting to make more than one board and have the
assembly easy, I’ve decided to have the Ribs have tabs that will go through the Rails…There are pictures below that will show that, but now I’m adding vertical plywood strips that are at the Rib / Rail
contact points…Above, the pieces are all cut and a gob of glue is dropped…

You with me so far…???...When I cut out the template I chiseled out holes that are where the Rib pegs
will penetrate the Rails…If you do not want or need to build your board this way, skip down seven pictures in this section…
OK advanced builders, above you can see a couple of things…First is the router base…It has a ¼” bit in it and a Rub Collar guide bushing…Eventually all these 5/8” plywood strips will be guides for the
Rub Collar to move against while the router bit cuts away the stuff we don’t want…The goal is to removerexcess weight…The other thing you see is the piece of 1/4” plywood inserted into the Rail
Template…It’s there temporarily to give me a clue to where to place the vertical Guide Strip…I eyeball a small gap between the Rail Notch and where the Rub Collar will ride…Once in the right
place, I pin-nail the strip to the template…

This Rub Collar needs 5/16” clearance…
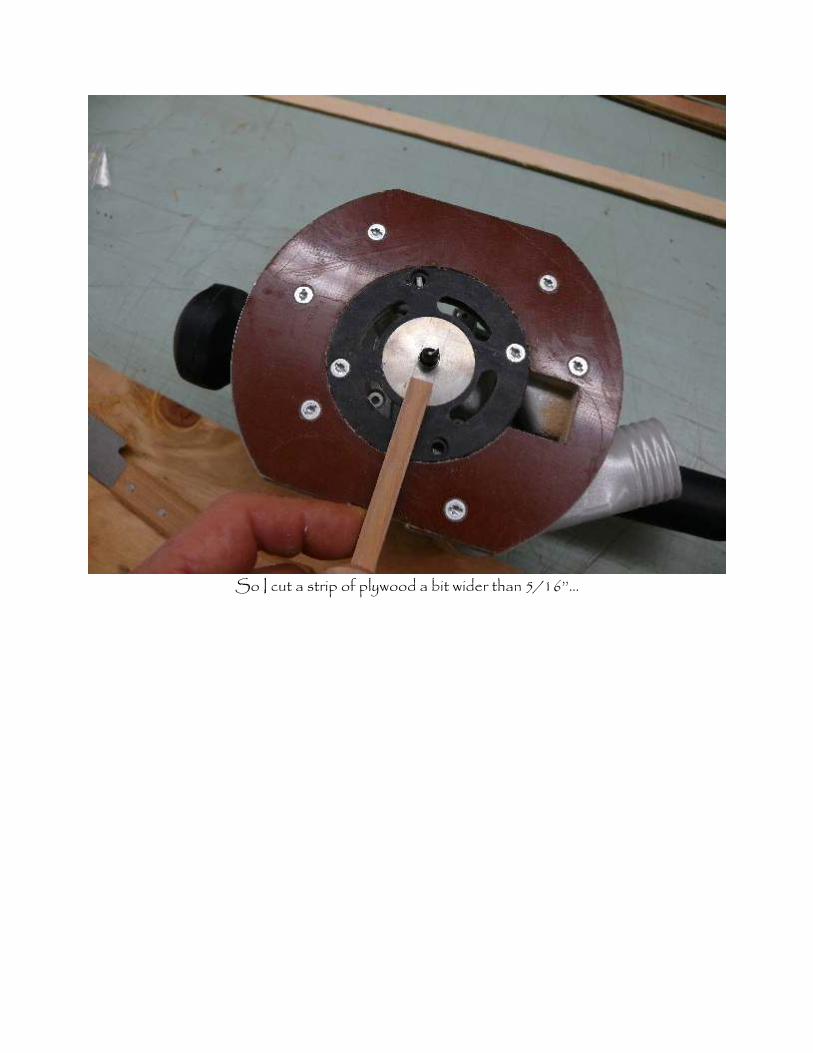
So I cut a strip of plywood a bit wider than 5/16’’…

From that strip of the 5/16”+ wide ply, I cut a piece to mark the top of the Rail notch…No glue yet…

The bottom piece of 5/16”+ is cut as well as the other vertical 5/8” wide piece…Glue is placed…

Then pin-nailed…Not the 5/16” pieces, they’d split…Glue alone is fine…

Welcome back all you non-Rail penetration folks…
Above you can see the other vertical Router Guide Strips ready to glue and nail…I spaced these
about 3” between each other…Enough vertical support for the purpose…

Glue dropped and ready to nail…I like to do an entire series of actions…Cut all the strips…Spread all
the glue…Nail all the pieces, instead of going one by one…Production…

Elapsed time so far, about a half hour…Ready to router…

Simply place the router between the guides and have the Rub Collar follow the guide strips around
each opening…Set the depth about ½ way or maybe 1/3 of the way through for the first pass…Your router will appreciate not having to work overly hard…Make another pass or two at lower depths until
you are through the template material and into the sacrificial plywood below…

What it looks like after the first pass…

And after the last pass…With a putty knife carefully separate the Templates from the sacrificial
plywood…Sand down any pin-nails that stick through the templates…

Alright, as you can see all the patterns are done…All of them were created the way I just described…
To use the Router Patterns to make the real board parts, I again get the sacrificial plywood and on
top of it I lay the real plywood that will be the parts, then on top of that I place the Router Patterns…A few pin-nails through the patterns, the real plywood and into the sacrificial ply is
next..Use the router and cut out the parts as you did above…Clean up the mess and you’re ready to assemble the frame…!!!...
Gluing FormsGluing FormsGluing FormsGluing Forms
Gluing Forms are needed to provide a mold for the inner rails to be bent to, and to keep the stringer and ribs aligned during construction...

You need two pieces of 1/4" plywood that's the size of your board...
(above) Trace your adjusted planshape template onto both pieces, then cut them out...Here Mike is cutting both pieces at the same time…They are tacked together at the corners…After they're cut out,
make sure they are both identical...Sometimes it helps to flip one on top of the other and belt sand the edges together to make sure they are both the same... Take your time to get it right... It’s
important…

(above) With these two identical pieces, drill 2” holes at 6” o/c. along the outer edges...The hole centers were 3” in from the edges...The purpose of the holes is for clamping the inner rail plywood
strips to the forms.

(above) Next, cut some 4" x 4” blocks that will be used to make the gluing form into a surfboard shaped "box"...Space the blocks about 3” or 4 " apart and fasten them to the plywood with hot glue,
nails or screws...The form in this picture needs a few more blocks…
(above) Keep the top and bottom pieces aligned vertically...
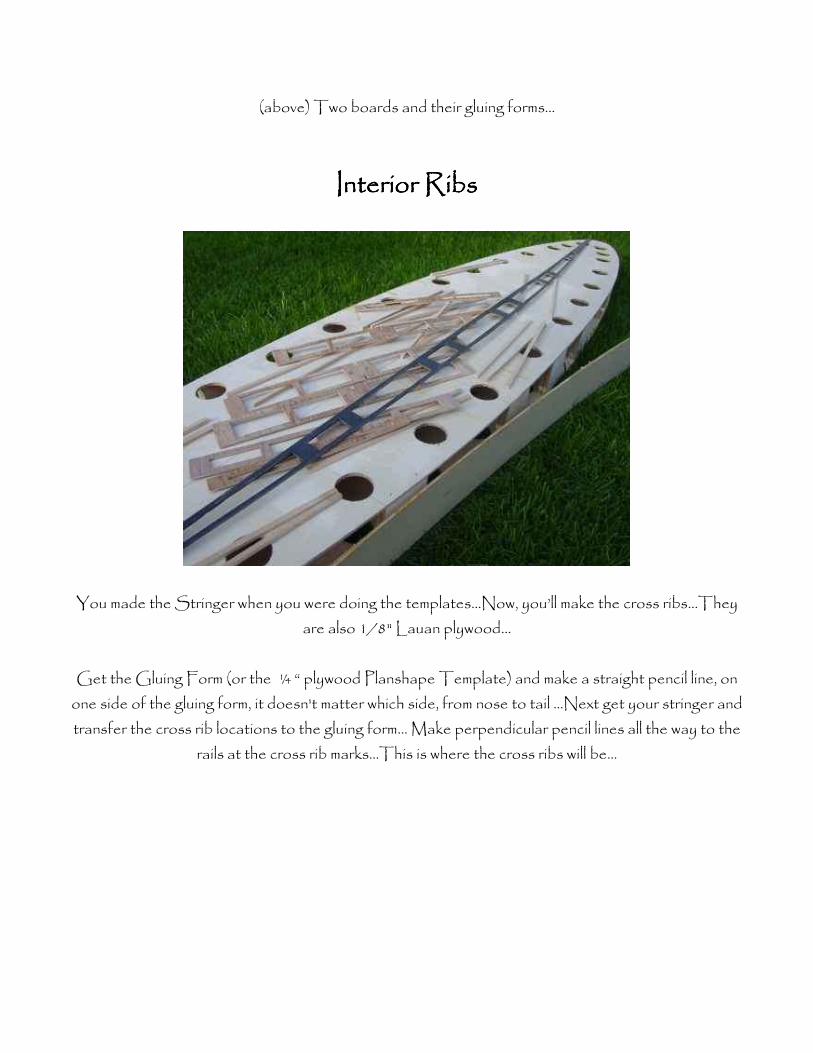
(above) Two boards and their gluing forms…
Interior RibsInterior RibsInterior RibsInterior Ribs
You made the Stringer when you were doing the templates...Now, you’ll make the cross ribs…They are also 1/8" Lauan plywood…
Get the Gluing Form (or the ¼ “ plywood Planshape Template) and make a straight pencil line, on
one side of the gluing form, it doesn't matter which side, from nose to tail ...Next get your stringer and transfer the cross rib locations to the gluing form... Make perpendicular pencil lines all the way to the
rails at the cross rib marks...This is where the cross ribs will be...

(above) The cross ribs are cut from 3.5” strips of 1/8" Lauan plywood...Each rib is cut to width as indicated on the gluing form...Then cut to height as measured from the stringer... Each rib is
different... Mark on each rib it's location so as not to confuse it with a similar one...T-2 , N-3 , etc...
Where the ribs attach to the stringer, lay out on the stringer an area that would allow a rib to be inserted diagonally though the stringer’s webs then rolled vertically to lock it into place...Look at the
picture of the parts at the bottom of this section...

(above) The webbing of the ribs is 1/2”... Cut away the rib’s excess plywood carefully with a sharp knife, or a jigsaw. This significantly reduces the weight if the framework. On the center of each rib cut
notches that are the depth of the webbing of the stringer. In these pictures, the ribs aren't notched yet...
Sometimes, the stringer is reinforced with a layer of Fiberglass or Carbon Fiber/ Epoxy to
significantly strengthen the stringer... I only laminate the stringer, the ribs only hold the rails apart until the deck / bottom is on, and provide some compression strength underfoot...
If you laminate the stringer, do it after you’re done with the webbing cutouts...Put masking tape on the other side of the stringer that you're laminating...It helps to keep the other side clean...I like to wet out
the wood stringer with epoxy then lay on the cloth, then fill in with more epoxy on top of the cloth...After the epoxy has gelled pretty firm but not rock hard, it's easier to cut away the Fiberglass or CF from the cutouts and edges...When you're ready to do laminate the other side of the stringer,
again use masking tape on the down side...
If you are not using a Gluing Form, skip the next Chapter – Outer Frame Rails and go to Chapter 14 - Gluing The Interior Rails

(above) (Not needed if you are not using a Gluing Form) Add to the bottom gluing form small blocks of plywood... The blocks hold the stinger and ribs temporarily in position. The blocks are attached
with hot melt glue…The rib still isn’t notched yet…

(above) Add blocks under the cross ribs at the rails, to keep the ribs aligned vertically...This helps to keep the frame from twisting... The blocks should be whatever the rocker is at those points… You can
now see how the ribs fit with the stringer…
Outer Frame RailsOuter Frame RailsOuter Frame RailsOuter Frame Rails
If you are not building a board with a round nose or tail, and you can get through this stage of design, you won’t need a gluing form...It works well on a fish type board, or a pulled in pintail gun, or a square
tail retro-style single fin…Using this method will save you a lot of time, something like five days of evenings and weekends… So pay close attention…

Let's say you have your Planshape Template drawn out on paper...
Transfer that to a piece of thin plywood and cut it out... Go ahead and mark the location of the Ribs on the plywood, perpendicular to the stringer...
Next get a thin strip of 1/8" plywood a little bit taller than your Center Stringer and press and bend it on edge against the curved plywood Planshape Template ...
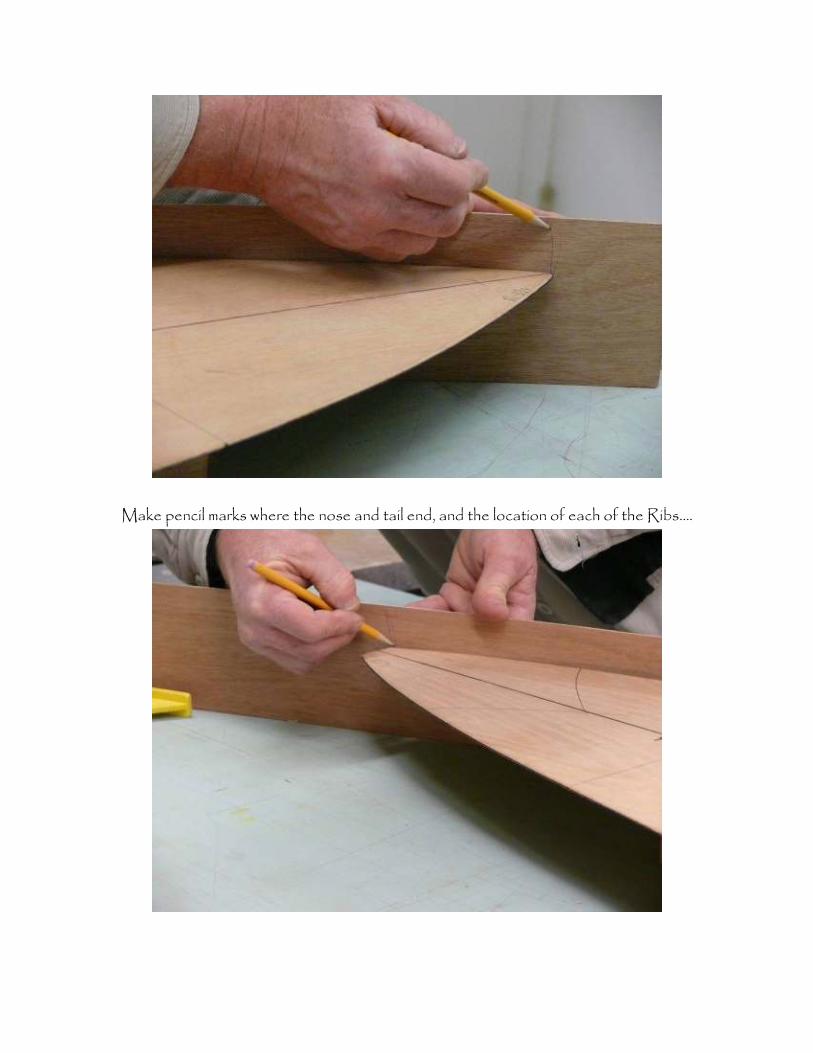
Make pencil marks where the nose and tail end, and the location of each of the Ribs….

This piece will be your template for the Outer Frame Rail… So far so good…
Next get a marking square and a pencil, and make perpendicular pencil mark on your thin strip of Plywood ( Outer Frame Rail Template) where the Ribs will be on those Rail locations...

Get your existing Center Stringer and lay it on the Outer Frame Rail Template... Starting at the middle rib location (IMPORTANT) and working in one direction at a time,
mark the bottom rocker of your Center Stringer to the Outer Frame Rail Template...

You will have to slide your Center Stringer a bit to adjust for the increased curve of the Outer Frame Rail... It increases more at the nose and tail...Keep an eye on the Rib locations on the Center Stringer and the Rib locations on the Outer Frame Rail Template… You have to be a bit artful to
get the lines right at those areas...

It’s not hard, but keep it smooth…That’s it for the bottom… Next, the deck line...
You will likely need to adjust the Outer Frame Rail Template to reflect the depth of
the Ribs at their contact point on the Outer Frame Rail Template... You probably have a domed deck, tail vee, etc. that need to be compensated for...

Get your Ribs and line up the bottom of the Rib with the bottom of the Outer Frame Rail, make your marks on the top edge…

Connect the dots using the Center Stringer as the tracing curve…

Take your time and get those points / lines right...
That's it...Not so hard and it just saved you a ton of time…!!!...
Cut out the Outer Frame Rail Template with a sharp knife…Use a new blade…

A few passes with a sharp knife goes through the 1/*” plywood pretty easy… No hurry, stay safe, smooth lines…

After the Outer Frame Rail Template is cut out and the edges are sanded smooth, drill two holes on either side of the rib location…
Through these hole will go a Zip-Tie to pull the Ribs andthe Outer Frame Rails together… It’s our clamping method…Super simple and strong…
Get some good quality 1/4" plywood and trace your Outer Frame Rail Templates onto it…
Make two… Those will be your Outer Frame Rails...
Cut them out with a Jigsaw and sand the cut edges smooth and you’re done… Go ahead and drill out the Zip-Tie holes now…

There will be a tendency for the nose and tail curves of the 1/4" Outside Rails to go straight when you assemble the frame and attach the Ribs and Stringer to it,
so make nose and tail curve braces that will fit against the last rib and stringer... Trace those directly off of the planshape template…

You can skip the next two chapters and go straight to Chapter 16 – Frame Kit…
Gluing the Interior RailsGluing the Interior RailsGluing the Interior RailsGluing the Interior Rails

The interior rails are strips of 1/8” Luan plywood laminated together with wood glue, then clamped to the Gluing Form…After the glue dries the curved form will remain…Later the stringer and ribs will
be glued within the inner rails to complete the basic frame…
(above) The thin plywood strips are cut to about 4.5" wide...They need to be wide enough, so that when you lay your stinger on a strip, the stringer doesn't extend beyond the wood strip...Just make
sure it's wide enough...

(above) To build each inner rail, two plywood strips are coated with yellow glue, laid together then clamped to the gluing form...Here Mike is spreading some glue using a short stiff brush to spread the
glue …Don’t skimp on glue… A putty knife, or a roller, work fine to spread the glue as well…

(above) Once the two pieces of plywood are coated with glue, it’s time to clamp them to the gluing form…Spring clamps work great for this…Here I laid the glued strips together, and started the
clamping from the nose to the tail… Note the stagger to the plywood layers, so that there will be at least six inches of overlap on the plywood strips…
On a round nose board, the easiest way to get the plywood to bend around the gluing form is to use 1/8" Bending plywood…If you can’t get 1/8” bending plywood, you can use ¼” three ply plywood, with one veneer face planed or sanded off…It can be more flexible than bending ply, but more fragile
until it’s clamped and glued…Bending ply would be my first choice…

(above) Sometimes with non-bending plywood, extra claming methods are needed at the ends to keep the curve flush with the tip of the gluing form…Here on a pointy nose board, I’m using duct tape to pull
the end in…Non-stretch Filament Tape works even better…
The next day, after the glue is dry, the clamps are removed...Then the glued rail is loosened and removed...

On a pointy nose board I just do one rail at a time…The gluing procedure is then repeated on the other edge of the Gluing Form the next day…
Attaching The Inner RailsAttaching The Inner RailsAttaching The Inner RailsAttaching The Inner Rails
(above) Get the gluing form...Have it spacer-block side up...Attach a small block of wood under the top edge of the gluing form extending at least 1" beyond the rail line...This is to keep the rails from
dropping while you're working...
Get your stringer and cross ribs...Put them in place, on the blocks of the gluing form...You're ready to attach the rails to them...

(above) If you have a pointy nose board, you need to cut the excess nose plywood off before you can glue the two sides together…I precisely cut the plywood with a fine tooth hand saw…Once both sides are cut, I put some glue on the miter and tape them together…Here you can see how it all should look
at this point…
Next, apply Hot Glue to the vertical edges of the ribs where they contact the rail...Do only one edge of the board at a time... Clamp the rail to each rib... Allow the glue to set firmly... Repeat the gluing
procedure on the other edge of the board.
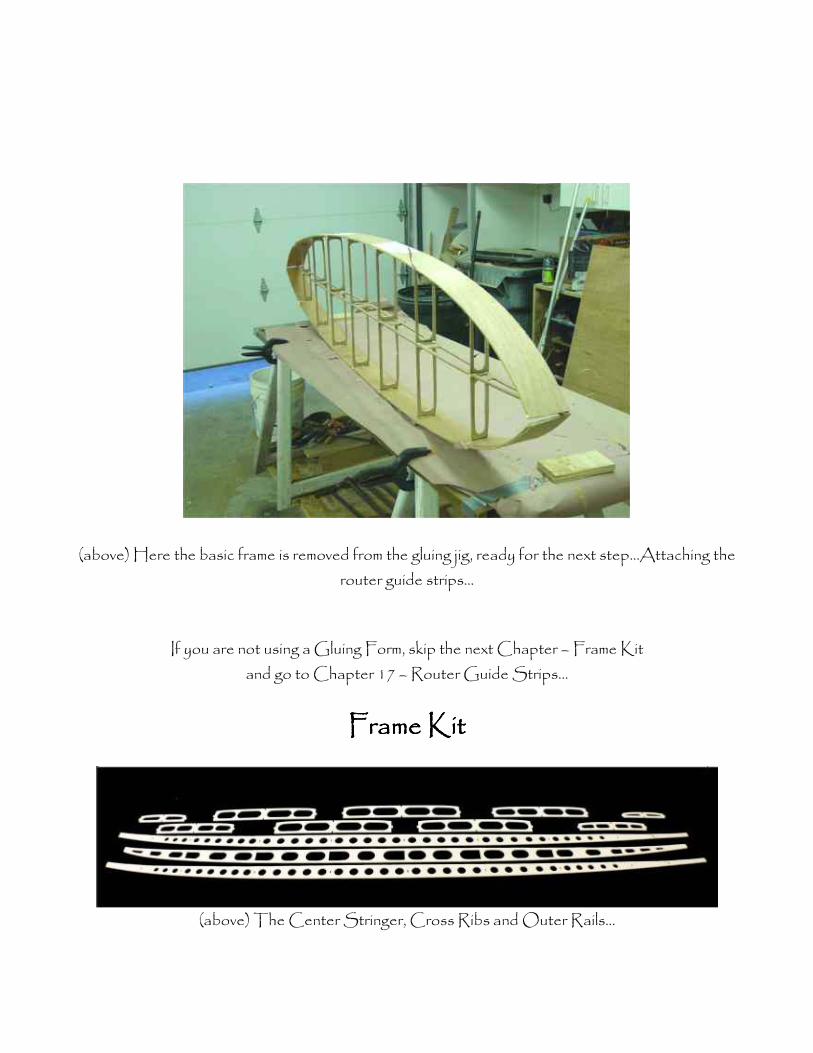
(above) Here the basic frame is removed from the gluing jig, ready for the next step…Attaching the router guide strips…
If you are not using a Gluing Form, skip the next Chapter – Frame Kit and go to Chapter 17 – Router Guide Strips…
Frame KitFrame KitFrame KitFrame Kit
(above) The Center Stringer, Cross Ribs and Outer Rails…

(above) The Cross Ribs are inserted through the Stringer…
(above) The Outer Rails are Zip-tied to the Cross Ribs…

(above) The frame parts are numbered specific to their location and are notched to fit together easily…

(above) The Cross Ribs are inserted and rotated into the frame…
(above) Zip-ties are loosely connected through the Outer Rails and Cross Ribs…
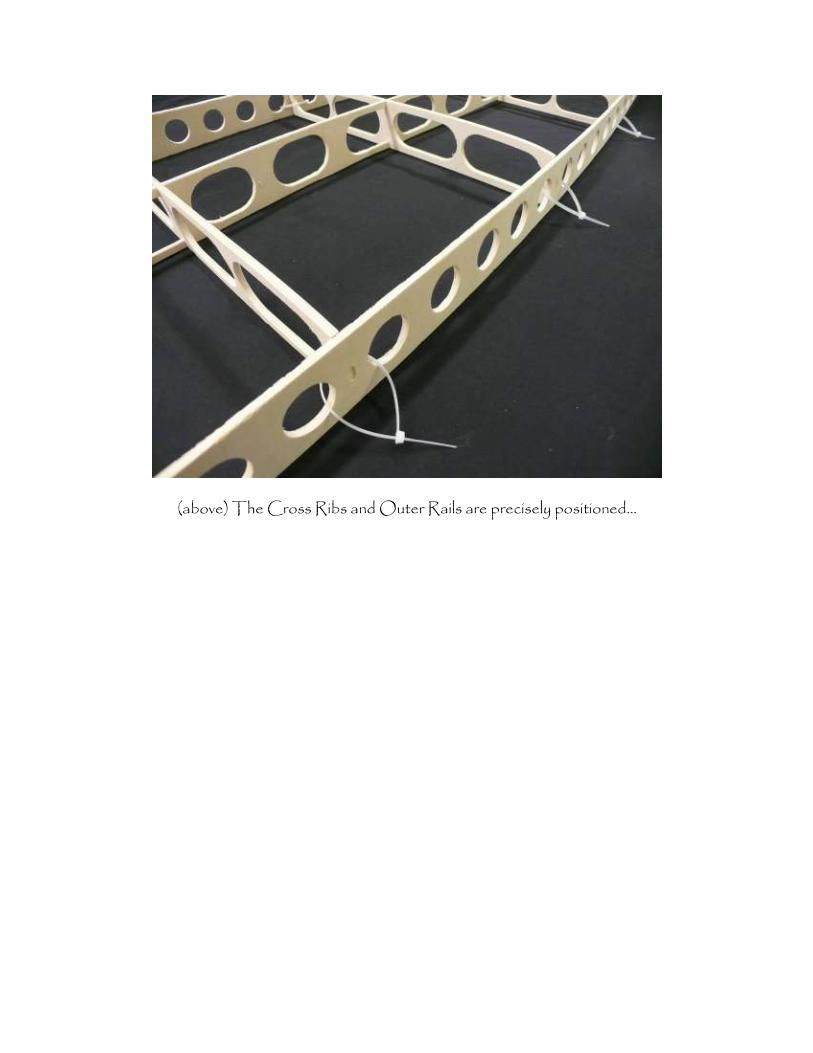
(above) The Cross Ribs and Outer Rails are precisely positioned…

(above) The Zip-ties are finally drawn snug…
Start at the middle of the board and work towards the ends…

(above) At the nose and tail there is greater stress on the thin plywood that is the Outer Rails…They are susceptible to breaking without something to back up the accelerated
curves…Attached to the Stringer and the last Cross Rib are curved pieces that ease the Outer Rail plywood into position…

(above) Here is the Tail Insert on a custom board…
At this point, the Frame Parts can be glued together…
I use Polyurethane type glue (Gorilla Glue) which expands and fills the joints nicely…
Run a bead of glue on both sides of all the joints…
After the glue dries and you remove the Zip-ties, the frame is now a single unit, but probably a bit un-straight…Not to worry, that is to be expected…But you do need to align the frame, before you attach
the Bottom or Deck skin to it…
Here’s how to do that…
Get a piece of scrap 1/8” or ¼” plywood about 4” wide and as long as your board…Draw a straight line as wide as the stringer, lengthwise down the center of the plywood… Next lay that piece of thin
plywood over the frame and mark where the cross ribs are…Fire up your hot glue gun and glue some 1”

x 2” wood bocks on both sides of the stinger line, close but not tight, and away from the cross ribs…You just made a Stringer Alignment Jig …See below …
(above) The Stringer Alignment Jig is now Zip-Tied to the frame…
Note the plywood blocking next to the stringer… (ignore the shaping rack cross brace)

(above) Here’s how it looks from the top…

(above) Simple but effective…
(above) The Outer Rails at this point are a bit flexible and need a bit of firming up…
The sticks on the frame are ¼” x 3/8” Balsa…If you hot glue them between the cross ribs, flush with the edges, the frame will stiffen up perfectly, with little weight gain…You do not need to add the strips
at the nose and tail, but it doesn’t hurt either…

(above) One edge done, one side ready…
In addition to stiffening up the frame, the balsa strips add some surface contact area for when you glue on the deck or bottom…
It’s not a bad idea to add similar balsa strips to the deck side cross ribs…
Leave the Stringer Alignment Jig in place until you attach the deck or bottom…
You can skip the next Chapter – Router Guide Strips and go to Chapter -18 the Deck and Bottom Skins…
Router Guide StripsRouter Guide StripsRouter Guide StripsRouter Guide Strips
To cut the excess rail material from the frame, router guide strips are attached between each rib at both the top and bottom...

(above) The router guide strips are 1/4” x 1/2"” plywood strips...Hot Glue each strip in place...
(above) At the nose and tail I usually don’t use router guide strips…
I prefer to cut those freehand with a fine, small tooth handsaw, then clean up the cut with a sanding block…
Next, remove the framework from the Gluing Form, then use router with a ‘pilot bearing flush trim router bit’ to remove the excess rail material from the top and bottom…

Proceed carefully…!!!...
(above) On the inner rails, drill out the excess material with hole saws...
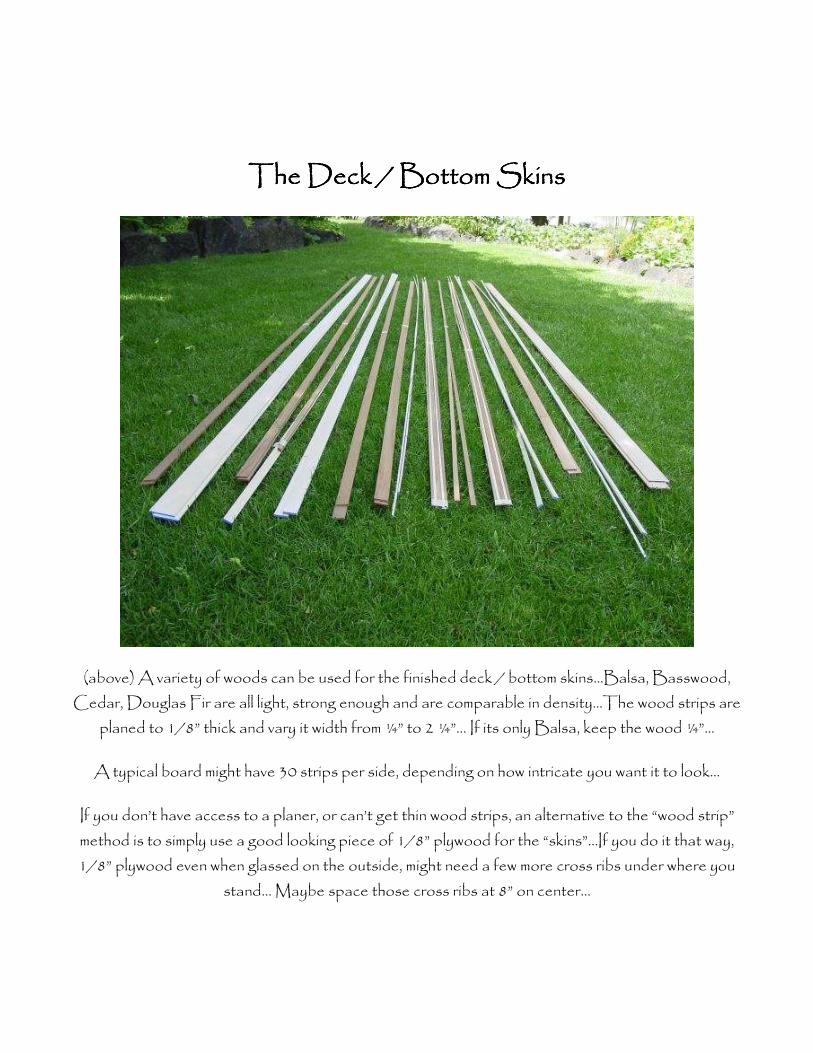
The Deck / Bottom SkinsThe Deck / Bottom SkinsThe Deck / Bottom SkinsThe Deck / Bottom Skins
(above) A variety of woods can be used for the finished deck / bottom skins...Balsa, Basswood, Cedar, Douglas Fir are all light, strong enough and are comparable in density...The wood strips are
planed to 1/8” thick and vary it width from ¼” to 2 ¼”... If its only Balsa, keep the wood ¼”…
A typical board might have 30 strips per side, depending on how intricate you want it to look…
If you don’t have access to a planer, or can’t get thin wood strips, an alternative to the “wood strip” method is to simply use a good looking piece of 1/8” plywood for the “skins”…If you do it that way, 1/8” plywood even when glassed on the outside, might need a few more cross ribs under where you
stand… Maybe space those cross ribs at 8” on center…

(above) Arrange all the wood strips top-side up on a large table...With good quality masking tape…Start from the center of the board and use the tape to "tie" one strip to the next…Put tape
pieces on perpendicularly from one strip to the next...About every foot...
Good quality tape has some stretch, use it to your advantage...It works great...You'll figure out how much tension to use in a short while...

(above) After the perpendicular tape strips are all on. Tape over all the wood seams lengthwise...The reason for this is you don't want epoxy draining through, and gluing your deck / bottom to your work table ...The subsequent clean-up / sanding is a hassle…I learned this the hard way...You'll easily go
through a full roll of tape per side...Tape is cheap…


(above) When all the taping is done, flip the deck / bottom over, so that it's tape side down...You are now looking at the surface that you'll laminate with the Fiberglass and Epoxy resin…I usually just put
one layer of Fiberglass on the inside of the bottom and one on the inside of the deck...
This board had a Fiberglass cloth on the inside, but in the past I’ve used Carbon Fiber cloth… It is much stronger…However, the increasingly limited availability leading to the extra cost of CF push the overall board cost up more than it’s worth…It’s one of those cost / benefit ratio things…Use it only if
you really need a lot of extra strength…Most of the time you won’t…

(above) If I’m going for light and extra strong, I'll add a 2" strip where the stringer makes contact with the deck / bottom skin, and on the deck between where the cross ribs are, not where they contact the
ribs…
After the fiberglass cloth / epoxy has set-up, flip it over and remove the masking tape…Timing is important, you want to pull the tape shortly after the resin sets and is hard, but still just a bit tacky before it gets fully hard…If the resin gets too hard, pulling the tape will be very difficult due to the
bleed through of resin between the boards…Time it right it’s super easy, wait too long and you have hours of frustration in front of you…
Next, get the gluing form and trace that shape onto the skin…Cut away the excess skins…Be sure to oversize the cut by an inch in width and a couple inches in length…The reason for the increased
length, is the gluing form width does not have the inner rails on it, and the length of the deck / bottom skins is longer as it curves to follow the rocker…Nothing is worse than cutting out the skin to find it
won’t cover the frame…Don’t ask me how I know, just trust me that I do…!!!...

(above) To attach the deck / bottom skin to the frame, I use a heavy duty, polyurethane construction adhesive from a caulking gun or a Polyurethane glue like Gorrilla Glue…
Run a bead on top of the ribs, stringer and rails...
Carefully lay the deck / bottom skin on the frame, make sure the nose and tail are aligned with the stringer, then use spring clamps to hold the skin to the rails...
Let the adhesive set up firmly before removing the clamps, overnight is good...
Use a flush trim router bit to remove any deck / bottom skin overhanging the rails. Repeat procedure on the other side of the board.
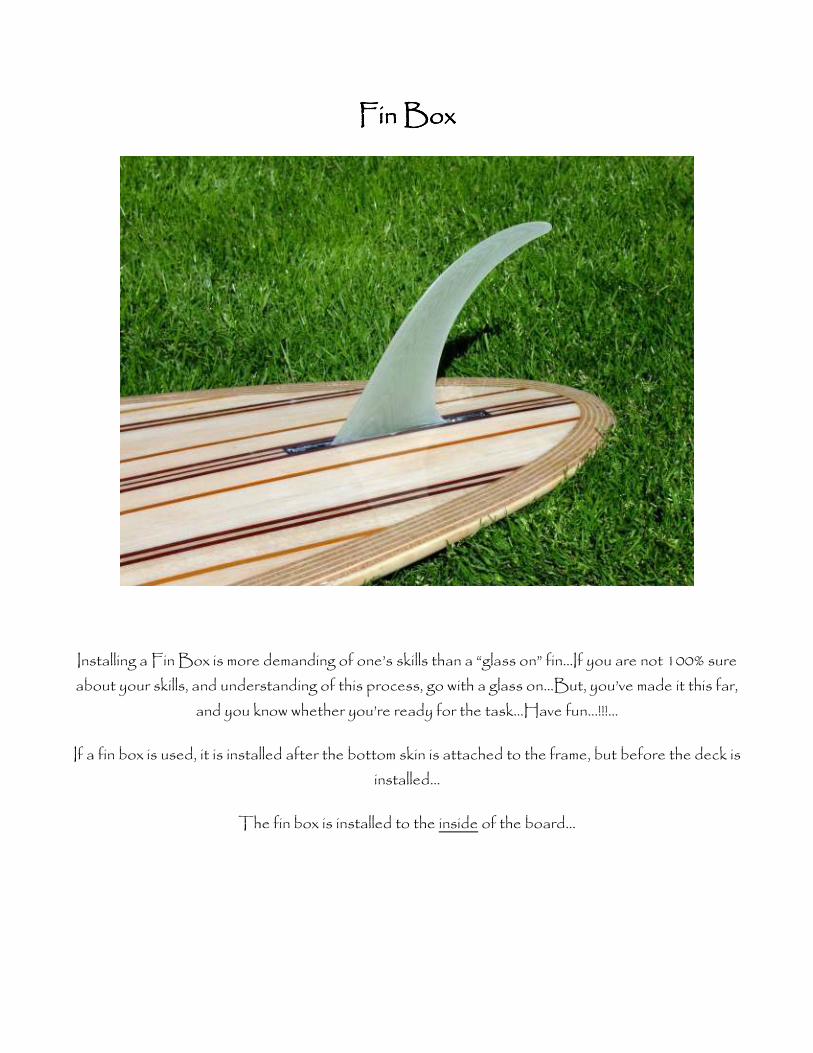
Fin BoxFin BoxFin BoxFin Box
Installing a Fin Box is more demanding of one’s skills than a “glass on” fin…If you are not 100% sure about your skills, and understanding of this process, go with a glass on…But, you’ve made it this far,
and you know whether you’re ready for the task…Have fun…!!!...
If a fin box is used, it is installed after the bottom skin is attached to the frame, but before the deck is installed…
The fin box is installed to the inside of the board…

(above) Details of a fin box installation…
With the bottom of the board facing up, position the fin box where you want it…Make some light pencil marks on the bottom of the board where the fin box will be…Remove the fin box…Carefully
measure the size of the slot in the fin box…Then mark on the bottom of the board exactly the length and width of that slot… It’s usually about 3/8” wide…Next get four small nails and push them through
the bottom where the slot will be…
Flip the board over…With the inside of the board now facing you, you should see the nails…That is where you want your fin box…With a fine handsaw, cut away the stringer and tail rib enough to get the
fin box to fit over the nails…Position the box carefully in straight alignment with the bottom of the board…
Mix up a small amount of epoxy and brush it to the contact points of the fin box and the inside base of the board…This will set up and hold the fin box in place while you reinforce the fin box with carbon
fiber or fiberglass cloth and epoxy…
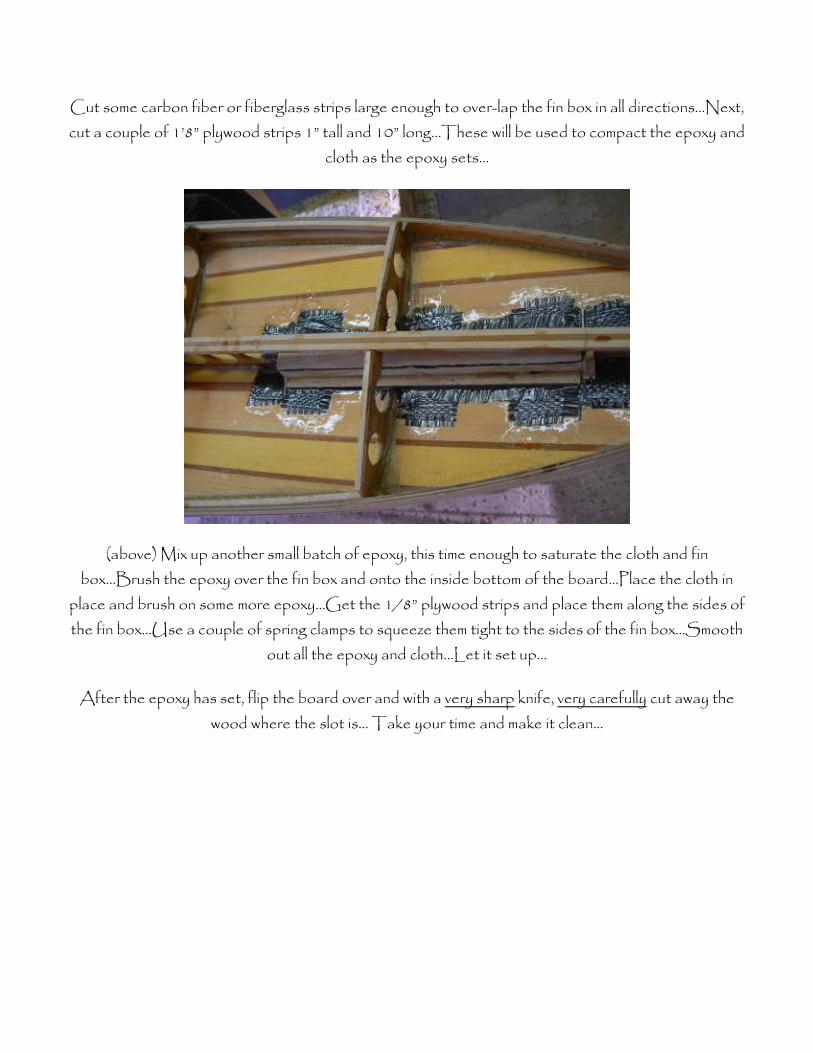
Cut some carbon fiber or fiberglass strips large enough to over-lap the fin box in all directions…Next, cut a couple of 1’8” plywood strips 1” tall and 10” long…These will be used to compact the epoxy and
cloth as the epoxy sets…
(above) Mix up another small batch of epoxy, this time enough to saturate the cloth and fin box…Brush the epoxy over the fin box and onto the inside bottom of the board…Place the cloth in
place and brush on some more epoxy…Get the 1/8” plywood strips and place them along the sides of the fin box…Use a couple of spring clamps to squeeze them tight to the sides of the fin box…Smooth
out all the epoxy and cloth…Let it set up…
After the epoxy has set, flip the board over and with a very sharp knife, very carefully cut away the wood where the slot is… Take your time and make it clean…

Building out the RailsBuilding out the RailsBuilding out the RailsBuilding out the Rails
The Outer Rails are built out from the Inner Rails to a thickness that allows for a shaped finished rail…

(above) This is a cross-section drawing of how I usually build out the rails… Multiple layers of cork/plywood are applied until the final rail thickness is about 1.5”…
In the drawing, you can see the top and bottom, a rib, router guide strip and the inner rails…You can also see how the rails are built out in a ‘stair-step” method to create a hollow rail…It saves a lot of
weight…The drawback is, it takes longer…
For aesthetics, I like to alternate between cork and plywood layers…It creates an interesting contrast between light and dark... On the drawing, ‘C’ indicates cork, and ‘P’ represents bending plywood…
Cork also has as one of it’s physical properties, when glued to a more solid surface such as bending plywood, the ability to compress and expand…This allows for the cork to overcome minor
inconsistencies of the lay-up of the rails…Something an all wood rail can’t…

(above) For my 10’4”, a 4’x8’sheet of 1/8” bending plywood and a 4'x8' sheet of 3/16" cork are needed.
All the cork and plywood layers are attached with industrial strength contact cement….When using this solvent based cement, a vapor respirator is a must, something more than just a dust mask…Good
ventilation is necessary also…There are water based contact cements with low VOCs (bad stuff) but they take a lot longer to set up and cure…To me time is important, so I use the solvent based cement…
Even if I use the faster high VOC contact cement it still takes all day to build out the rails…This is the single longest step to the board building process…Get comfortable, you’re going to be here a
while…

(above) Before I put any glue on anything, I like to protect the deck and bottom surfaces with a layer of protective paper…I hold my tapeline in about 1/8” in from the edge…
When it’s time to start spreading glue, I like to have my bending plywood strips ripped to the width they need to be, starting about ½” to ¾” and to have the cork un-cut…I backside tape the plywood
strips together, flip it over, then with a 4” paint roller cover the wood and cork with a generous layer of contact cement…Next I go to the board and roll on some glue to the inner rail…I let the glue dry to the
touch, then put one more coat on everything…

(above) After the contact cement has dried to the touch, I cut a few strips of cork using a razor knife and a metal straight edge…With a strip of cork in hand, I carefully place it on the edge of the board, glue to glue, following the rocker…Once the glued faces make contact, that’s where they will be…No second chances unless you know some tricks, which I’m not going into here…Just make sure you have
things aligned…
Cork is great for being able to bend great in one direction (along the planshape curve of the rail) and not bad for following the rocker…I use butt joints from strip to strip…
After the first cork strip is on I use a laminate roller to apply pressure to the cork / board connection…A smooth block of wood is an OK substitute for a roller…Just try to compress the two
surfaces together…
Next you need to trim the excess cork (later on, plywood) from the plane of the deck / bottom…I use either a sharp knife or a flush trim router bit to get the rails the same as the top / bottom…
Now it’s glue time again, I put a coat of glue on the cork that I just put on the board…Often I’ll roll some more glue on the next strips to be put on the board…Again, wait till it’s dry to the touch, then put on a strip of bending plywood onto the cork layer that’s on the board…If you have ripped the
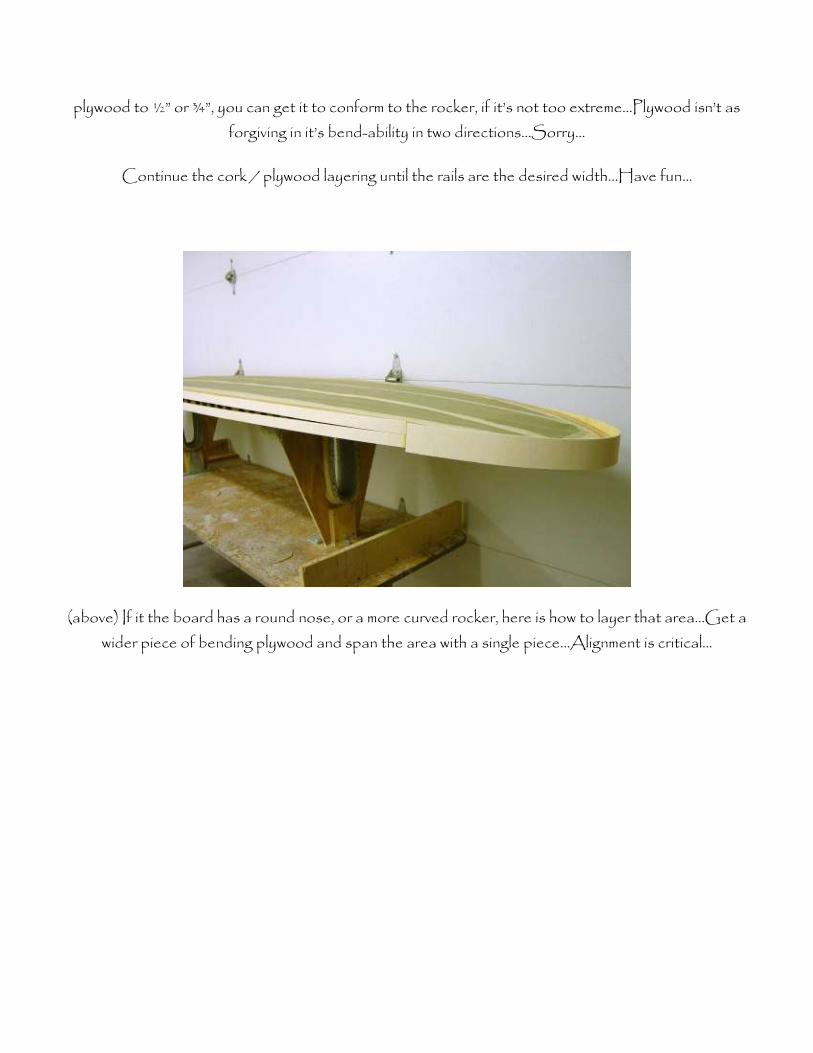
plywood to ½” or ¾”, you can get it to conform to the rocker, if it’s not too extreme…Plywood isn’t as forgiving in it’s bend-ability in two directions…Sorry…
Continue the cork / plywood layering until the rails are the desired width…Have fun…
(above) If it the board has a round nose, or a more curved rocker, here is how to layer that area…Get a wider piece of bending plywood and span the area with a single piece…Alignment is critical…

(above) One way to finish off the nose or tail is with a wedge of wood…Here, I’ve pre-glued the wood wedge, then marked it carefully on the board, both on the top and the bottom, then with the fine
handsaw cut out the cork / ply rail…Some yellow glue and tape keep the wedge in place…

(above) After the glue has set, peel away the tape and cut away the excess wedge…
(above) Now you’re ready to shape…!!!...Congratulations the hardest parts are over…
Shaping the RailsShaping the RailsShaping the RailsShaping the Rails
The shaping of the rails is done primarily with a belt sander with a 36-grit belt, followed with progressively finer grits, finishing with various hand sanding blocks...

Before you start shaping the rails, put on the outer edge of the deck/bottom skins one or two layers of masking tape as a guard against sanding into the finished deck/bottom skins...

(above) Hold the sander parallel to the rail and move the sander horizontally in long smooth strokes.

(above) Don’t work on one rail too much. Keep both sides even…Stay smooth…
Keep these words to live by in mind, as you’re shaping the rails…”Don’t do more, than you can fix…”
Oh, the headphones…They are industrial level ear protection that I hot glued some earphone speakers into…It’s easy to get into the “zone’ with a set-up like this…!!!...Rock on baby, rock on…!!!...“
After the belt sanding I use a series of progressively finer sanding papers, with and without sanding block backing to get the rails like I want them…
Sand the deck and bottom with an orbital sander followed by hand sanding parallel with the grain of the wood. Finish up the machine sanding by blending the deck and bottom with the rails by hand…
It’s important to sand with the grain of the wood…You’ll be surprised how cross sanding scratches will show up…Don’t say you weren’t warned… Progress through the grits, finishing with 150 or 220 grit.
Again, look carefully for cross grain scratches.

(above) Ready for glassing…You should be feeling pretty good about now…!!!...

VentVentVentVent
A hollow surfboard is full of air…That’s obvious…What’s not so obvious is what air does within a sealed container, as is a hollow surfboard…Think of a balloon, as it heats up it expands, as it cools it
contracts…Those movements are dictated by physics…Those same air movements within a sealed surfboard can physically do structural damage to the hollow board…To prevent that kind of damage,
it’s important to vent the board when it’s not in the water…

(above) The part that goes in the board is a product called "Bookbinding Screw Posts"...
These are for 8/32 screws... My local screw specialty store orders them for me...I only use brass, with an open back...

(above) These are the brass 8/32 screws (real size: the shaft is about 3/16” in diameter) that go into the binding post…
You can see they are drilled out... I did that with a hand held power drill, something I do not recommend anyone else trying…
If you look at the screw on the right, just below the rubber o-ring, you can see the drill hole that connects to the hole in the shaft…

I install one near the nose of the board after laminating the deck with fiberglass, the next phase of this process…
I drill a hole in the wood deck of the board and slip the binding post into the hole... I put a bit of epoxy under the flange to keep it from turning...Finally I put a patch of fiberglass over it… To keep the hole
clear during fiberglassing put a small plug of surfboard wax in the binding post screw hole...
In action with this set-up, I only have to loosen the screw a bit until it self-vents…No need to fully remove the entire screw…Just unscrew it a few turns, enough to expose the hole and "Voila, It
Breathes"...

The best part of this kind of vent is there are no more lost vent screws... Nice…!!!.. .
FiberglassingFiberglassingFiberglassingFiberglassing
(above) Following sanding, the board is covered with. fiberglass cloth and epoxy resin…Due to the inconsistent results of polyester resin to bond with wood, epoxy resin should always be used….

(above) Ready for resin……………….
However, this is where “How To Build A Hollow Surfboard” ends it’s process description…
There is just too much to the fiberglassing part of board building to go into here…
But don’t despair, there is more…Also on this CD, you’ll find a lot of “Bonus Material” that more than covers what you’ll need to know…Take your time to go through ‘Surfboard Design and Construction’ and ‘Shaping and Glassing’….If after reading through those two and you have questions, the best source for answers is www.swaylocks.com , finally I’m here to answer your
questions…

Epoxy Resin TipsEpoxy Resin TipsEpoxy Resin TipsEpoxy Resin Tips
by: by: by: by: Greg LoehrGreg LoehrGreg LoehrGreg Loehr
Below I'm writing some tips on making our stuff easier to use. If you take your time, epoxy is actually easier to laminate than polyester, uses much less
material and eliminates harmful chemicals in the factory.
1. Mix ratio must be adhered to. Deviation from the mix ratio will keep the resin from attaining a full cure. Also, the material must be
THOROUGHLY mixed. If not there can be soft spots. We use metered buckets (I'm sending you one which we get at the local hardware store) to assure proper mix. We use large paint stir sticks (like the ones hardware
stores give you to stir paint). All our resins are 2 to 1 mix ratio by volume. The metered buckets work unreal, actually better than pumps and we
laminate right out of those buckets.
2. Additive F. We use it in every batch we shoot, including laminates. It eliminates blush, which is the biggest problem in building epoxy boards. It only
takes 1cc per ounce of hardener in the mix. We put it in after pouring the resin and hardener into the bucket and then mix them all at once. It makes the
resin a bit cloudy but clears out when the resin cures.
3. When laminating, the first thing to do is to pour all the resin out and spread it over the glass. You then wet the rails and tuck them. This gives the resin
time to soak into the cloth on the flats. Polyester must be pushed through the cloth. Epoxy just soaks in and it does that in its own good time. It can't and shouldn't be forced. Additive F actually helps with this quite a bit. After it
soaks in, squeegee out any air and remove any excess. We use plastic, "spreader," type squeegees. We've found that they move epoxy better than rubber squeegees do. They take a couple boards to get wired but after the
initial learning curve, laminating is much easier.

4. We use VERY little resin. Below is an example of our use levels for different size boards. As there is no "gel" time, any resin left over can be used
on the next board. If you run short, you can easily mix up additional resin to finish with. Usually we just work out of one bucket and simply keep mixing more material as needed. It isn't the same, "this bucket for this board," as
polyester. These are estimates for total mixed material.
6' and under - 9 -12 oz. bottom 12-15oz. deck 7' and under - 12 -15oz bottom 15-18 oz. deck
8' and under - 18 - 21 oz bottom 21- 24 oz. deck 9' and under - 24 - 27 oz bottom 27- 33 oz deck
Hot coats run just a bit more than an ounce per foot. For instance, a 6' board
would take about 7 oz. per side. Longboards, 9', take about 12-15 oz. per side. If you’re glossing use a bit less than a hot coat.
We use 3" disposable white bristle brushes for hot coating. We don't clean
them. We use them for one batch and pitch em. Not only do we feel that their not worth cleaning but we've also had problems in the past with contamination from cleaned brushes which manifested itself in bad hot coats. New brushes
always make for clean hot coats.
5. Do not use acetone for clean up and never let contaminated acetone touch the skin. Any toxicity problems we've seen in the past always included
contaminated acetone. Not only that but acetone doesn't work that well with epoxy anyway. Leaves everything sticky. For your hands use disposable vinyl gloves. Clean gloves between boards with scrap fiberglass. I usually cut scrap
and pile it neatly on the table so I have plenty ready. Clean your squeegee with scrap glass. Anytime the squeegee gets slick I just wipe it and my gloves down. When the gloves get funky, peel em off and put on a new pair. 10 cents a pair is cheaper than acetone. With so little resin being used very little goes anywhere except on the board so things tend to stay much cleaner. We don't ever get more than a drop or two on us. If you do get some on you, use Go-

Jo or Fast Orange or some other waterless cleaner with water to get it off. These clean epoxy more effectively and are much safer to use than acetone.
Different Resins & Hardeners Different Resins & Hardeners Different Resins & Hardeners Different Resins & Hardeners
Mixing hardeners for custom applications is one of the reasons we made everything 2 to 1.
With fast, you have a 25 min pot life, slow 50 min and extra slow 200 min.
Slow has 4-6 hours flip time; fast has 2-3 hours flip time. Mixing different hardeners together will give you other results and there isn't
any algebra necessary.
Additive FAdditive FAdditive FAdditive F
First, as I've stated earlier Additive F is a miracle breakthrough in the production of epoxy surfboards. It does so many things it's unbelievable.
In laminating, it helps wet the cloth eliminates most air bubbles, especially
around wings and boxes, reduces the amount of resin needed, and most of all eliminates blush. Blush is what causes the banana peel effect you were referring to. In hot coats it eliminates blush, fish eyes, and other surface
blemishes and increases Barcol hardness. This increase in Barcol makes the board sand easy and improves the bond and strength between layers.
It also doesn't interfere with recoating as wax solution in polyester does.

That means no sanding between layers. One of the things I've tried to relay on this site is that epoxy boards have become easier to make (and safer as
well) than polyester boards. Somehow I don't think that has gotten through.
Additive F reduces resin use by about 20% in laminates.
How much?: 1cc per ounce of hardener = Laminations
2cc per ounce or hardener = Hot/Gloss Coats
Sometimes over dark color there can be some cloudiness with Additive F. In dry climates you don't get very much carbonate blush development.... much more in humidity. When you have a lot, you can have delamination between layers and Addtive F tends to reduce or eliminate this. I use Add F all the time unless I'm working with dark colors. Then I tend to not use it and sand
between layers. Maybe mix some xylene in to help dissipate the bubbles. For hot coating Add F is indispensible. Sanding before the F days was a
nightmare.
Laminating TipsLaminating TipsLaminating TipsLaminating Tips
Epoxy doesn't need to be pushed into the fabric. If you do this it will get frothy. [GO SLOW].
The first thing to do after mixing is to pour all the resin on the board and
spread it around so the entire surface is covered.
The first pass is merely spreading the resin out over the cloth leaving it very wet. Then let it soak. Move the resin from the middle towards the ends. Don't push towards the middle. That way you won't rake the glass. This is the really

hard part to explain to people that are used to polyester. Letting the resin soak in instead of pushing.
Then wet your laps by pulling resin off the flats onto the lap. This gives the
resin time to soak into the flats. Also, use a stiff squeegee that moves the resin more effectively. I use one of those plastic spreaders, the yellow ones. After you wet and tuck the laps, the resin should have sufficiently soaked
into the flats with no elbow grease. Now simply remove the excess while flattening the fabric and clean your laps. It's that simple. Also by pouring all
the resin out immediately you reduce exotherm and lengthen work time. Using the above technique I laminated a 12 foot board with a 3 layer 6 oz deck the
other day with our new fast hardener in 85º with time to spare.
Hot Coat TipsHot Coat TipsHot Coat TipsHot Coat Tips
Hotcoating/Gloss Coats:
With RR epoxy you double the amount of additive F when hotcoating or glossing, they are the same mix. For glossing/hotcoating you add 2cc of F
for every ounce of hardener used. When you laminate you just use 1cc per oz. So , yes....just another layer....with double the F...
There are some simple rules to glossing:
1. Everything must be clean. That's the board, the room, the brush, the bucket and everything else that might come in contact with the resin.
Contamination will surely ruin your gloss coat.
2. I usually sand to 100 for glossing. I've seen others go to as far as 220 but I've never seen the advantage to the extra work. 100 is just fine.
3. You'll never get a good gloss using a squeegee, you have to use a brush. It

takes a certain amount of resin for it to be able to "flow out". Using too little and the resin can't move and self level. This does add a bit more weight than getting it really thin but it's the only way to get that show room finish. If you
don't want the extra weight then go for a sanded finish.
4. With Additive F you can polish RR epoxy. In fact it polishes just about like polyester. Without Additive F epoxy doesn't polish well at all.
5. When glossing with epoxy double the amount of Additive F. This will give
you better flow and your gloss will come out flatter.
As for urethane finishing, this takes really good equipment and a VERY clean spray booth with a constant flow of fresh air. Most of us aren't set up to do this reasonably. I've done a good bit of this and it's a real professional type of effort to even attempt it. As much as I did, I never had the equipment
to get the consistent results I wanted. This is also VERY toxic.
The dry spots on the rails are probably from oil in your hands. All hands have a certain amount of oil. Wiping the board down with denatured alcohol will help remove this. By the way, denatured alcohol is ethanol with 5% wood alcohol which makes it poison. They put a small amount in so people can't
drink it since ethanol (grain alcohol) is what is in alcoholic beverages.
Temperature:Temperature:Temperature:Temperature: Keeping a small room between 60º and 85º isn't that difficult and gives
consistent quality results. The new fast hardener is fine above 50º. Additive F will solve many climate
problems as well. At less than 70º time is usually not an issue. Fast hardener has plenty of work time and you can still flip it in less than 5 hours. Slower curing agents like our slow or the surf source resin doesn't allow you to flip in less than 12 hours, or even more, in cooler temps. Also when the resin doesn't kick in a reasonable
amount of time, bad things happen. Again Additive F eliminates these
problems and a faster curing agent always gets better results in cool temps. Keep Additive F warm to keep the solids in solution.
Epoxy hot coat disasterEpoxy hot coat disasterEpoxy hot coat disasterEpoxy hot coat disaster
I've made a major blunder whilst hot coating the deck of my first timber hollow board. I'm using epoxy. I brushed it on to the deck and it looked ok, but an
hour later it had gone all pitted and wavy. It hasn’t delaminated, but there are areas which are still sticky (toffee like) even after 4 days. …Gray
Re: Epoxy hot coat disasterRe: Epoxy hot coat disasterRe: Epoxy hot coat disasterRe: Epoxy hot coat disaster
I'm sure that there is an easier way, but I'll pass on my disaster correction. I used a hair dryer and a scraper. After I got most of the non set up epoxy off,
I went through a BUNCH of sand paper.... Jeff Wells
Re: Epoxy hot coat disasterRe: Epoxy hot coat disasterRe: Epoxy hot coat disasterRe: Epoxy hot coat disaster Jeff has it exactly right. Always be sure to THOROUGHLY mix epoxy.
It is not a catalytic reaction like polyester so each part (resin and hardener) has molecules that must react with the other part. It's called an addition
reaction. If they don't get together they won't kick. Thorough mixing is the solution and an easy one at that. We use big paint stir sticks, they do a better job than tongue depressors. One good thing about having this problem...you
won't ever do it again…. Greg Loehr
Product OverviewProduct OverviewProduct OverviewProduct Overview Resin Research Project 21 SystemResin Research Project 21 SystemResin Research Project 21 SystemResin Research Project 21 System
This base resin system This base resin system This base resin system This base resin system was originally developed for lightweight hand lay up composite systems. It’s was originally developed for lightweight hand lay up composite systems. It’s was originally developed for lightweight hand lay up composite systems. It’s was originally developed for lightweight hand lay up composite systems. It’s
unique four way flex controlled resin ensemble gives the engineer more latitude in developing unique four way flex controlled resin ensemble gives the engineer more latitude in developing unique four way flex controlled resin ensemble gives the engineer more latitude in developing unique four way flex controlled resin ensemble gives the engineer more latitude in developing production systems than any other resin system available today.production systems than any other resin system available today.production systems than any other resin system available today.production systems than any other resin system available today.
The balance of excellThe balance of excellThe balance of excellThe balance of excellent color, UV stability, varying hardener speeds, easy mix ratios, extremely low ent color, UV stability, varying hardener speeds, easy mix ratios, extremely low ent color, UV stability, varying hardener speeds, easy mix ratios, extremely low ent color, UV stability, varying hardener speeds, easy mix ratios, extremely low vapor pressure, excellent chemical adhesion and high gloss finish make this resin system easy to use vapor pressure, excellent chemical adhesion and high gloss finish make this resin system easy to use vapor pressure, excellent chemical adhesion and high gloss finish make this resin system easy to use vapor pressure, excellent chemical adhesion and high gloss finish make this resin system easy to use

and an effective production contributor to everyone from the small craftsmand an effective production contributor to everyone from the small craftsmand an effective production contributor to everyone from the small craftsmand an effective production contributor to everyone from the small craftsman to large scale an to large scale an to large scale an to large scale producers.producers.producers.producers.
Very safe to use, the resin system also comes with additives and modifiers to produce a myriad of high Very safe to use, the resin system also comes with additives and modifiers to produce a myriad of high Very safe to use, the resin system also comes with additives and modifiers to produce a myriad of high Very safe to use, the resin system also comes with additives and modifiers to produce a myriad of high quality products.quality products.quality products.quality products.
ProductProductProductProduct Color Color Color Color
(Gardener)(Gardener)(Gardener)(Gardener) Viscosity Viscosity Viscosity Viscosity
cps @ 25Ccps @ 25Ccps @ 25Ccps @ 25C Typical ApplicationsTypical ApplicationsTypical ApplicationsTypical Applications
1980 1 1800 High modulus resin for high performance composites including S
glass, carbon fiber and Kevlar. It’s very stiff nature give high physicals in performance demanding products.
2000 1 1600
Our standard all purpose system. More flexible than 1980. Best for use with most fiberglass hand lay up systems. Also used in
flooring, adhesives, coatings, vacuum bagging, decoupage, casting, and electronic encapsulation.
2020 1 1400
Flexible resin system. For use where flexibility and toughness are required. Also good in conjunction with synthetic fabrics, Xynole,
Dynel, Etc. Also used in flooring, casting, coatings, electronic encapsulation, vacuum bagging and concrete primers.
2040 1 1200
Very Flexible system. Used for flexible composites and for bonding to difficult substrates. Good for metal bonding. Excellent penetration and bond for porous substrates. Concrete primer. Also excellent for casting, electronic
encapsulation and coating.
Specialty HardenersSpecialty HardenersSpecialty HardenersSpecialty Hardeners Resin Research Project 21 SystemResin Research Project 21 SystemResin Research Project 21 SystemResin Research Project 21 System
Each system incorporates four resins and four curing agEach system incorporates four resins and four curing agEach system incorporates four resins and four curing agEach system incorporates four resins and four curing agents to make it the one system that can be ents to make it the one system that can be ents to make it the one system that can be ents to make it the one system that can be
used for all composites and coatings. All the components are interchangeable so changing from a high used for all composites and coatings. All the components are interchangeable so changing from a high used for all composites and coatings. All the components are interchangeable so changing from a high used for all composites and coatings. All the components are interchangeable so changing from a high

modulus resin to a more flexible resin is as easy as picking up a different bottle. Likewise the modulus resin to a more flexible resin is as easy as picking up a different bottle. Likewise the modulus resin to a more flexible resin is as easy as picking up a different bottle. Likewise the modulus resin to a more flexible resin is as easy as picking up a different bottle. Likewise the hardeners are ahardeners are ahardeners are ahardeners are all 2 to 1 mix ratio with all four resins and with four different hardener speeds almost ll 2 to 1 mix ratio with all four resins and with four different hardener speeds almost ll 2 to 1 mix ratio with all four resins and with four different hardener speeds almost ll 2 to 1 mix ratio with all four resins and with four different hardener speeds almost
any job can be finished with working ease.any job can be finished with working ease.any job can be finished with working ease.any job can be finished with working ease.
This system has the best balance of color, U.V. stability* and high gloss in a high strength, high This system has the best balance of color, U.V. stability* and high gloss in a high strength, high This system has the best balance of color, U.V. stability* and high gloss in a high strength, high This system has the best balance of color, U.V. stability* and high gloss in a high strength, high modulus (when used with 1modulus (when used with 1modulus (when used with 1modulus (when used with 1980 & 2000 resins ) or flexible ( when used with 2020 & 2040 resins) 980 & 2000 resins ) or flexible ( when used with 2020 & 2040 resins) 980 & 2000 resins ) or flexible ( when used with 2020 & 2040 resins) 980 & 2000 resins ) or flexible ( when used with 2020 & 2040 resins)
system of epoxies. These features provide clear, blush free, high strength composites. In composites system of epoxies. These features provide clear, blush free, high strength composites. In composites system of epoxies. These features provide clear, blush free, high strength composites. In composites system of epoxies. These features provide clear, blush free, high strength composites. In composites its low viscosity provides easy and complete wet out and excellent adhesion of fiberglits low viscosity provides easy and complete wet out and excellent adhesion of fiberglits low viscosity provides easy and complete wet out and excellent adhesion of fiberglits low viscosity provides easy and complete wet out and excellent adhesion of fiberglass, carbon and ass, carbon and ass, carbon and ass, carbon and
Kevlar fabrics. The excellent UV characteristics, high gloss and chemical adhesion qualities make Kevlar fabrics. The excellent UV characteristics, high gloss and chemical adhesion qualities make Kevlar fabrics. The excellent UV characteristics, high gloss and chemical adhesion qualities make Kevlar fabrics. The excellent UV characteristics, high gloss and chemical adhesion qualities make this system excellent for numerous other industries including architectural, flooring, coatings, this system excellent for numerous other industries including architectural, flooring, coatings, this system excellent for numerous other industries including architectural, flooring, coatings, this system excellent for numerous other industries including architectural, flooring, coatings,
decoupage and repair.decoupage and repair.decoupage and repair.decoupage and repair.
When working with wood When working with wood When working with wood When working with wood its low viscosity gives excellent penetration and bonding properties, while its low viscosity gives excellent penetration and bonding properties, while its low viscosity gives excellent penetration and bonding properties, while its low viscosity gives excellent penetration and bonding properties, while providing an excellent moisture vapor barrier. This excellent bonding properties also extend to providing an excellent moisture vapor barrier. This excellent bonding properties also extend to providing an excellent moisture vapor barrier. This excellent bonding properties also extend to providing an excellent moisture vapor barrier. This excellent bonding properties also extend to
concrete and metals. Low vapor, easy sandability, simple mix ratio, low exotherm andconcrete and metals. Low vapor, easy sandability, simple mix ratio, low exotherm andconcrete and metals. Low vapor, easy sandability, simple mix ratio, low exotherm andconcrete and metals. Low vapor, easy sandability, simple mix ratio, low exotherm and four hardener four hardener four hardener four hardener speeds make this system a pleasure to work with.speeds make this system a pleasure to work with.speeds make this system a pleasure to work with.speeds make this system a pleasure to work with.
Product Color Mix Ratio Pot Life Set Time Typical Cure
(Gardener) Weight Volume @25C Schedule
2100XF 1 45 50 12 min. 1.5 hrs room temp
2100F 1 45 50 25 min. 2.5 hrs room temp
2100S 1 45 50 50 min. 5 hrs. room temp
2100X 1 45 50 200 min. 16 hrs. room temp
*Note: 2100XF is a very fast hardener but without the excellent UV charateristics of our other hardeners. It should not be used in areas where color stability is important.
AddAddAddAdditives and Modifiersitives and Modifiersitives and Modifiersitives and Modifiers

Our epoxy systems are broad in application but to increase their usefulness we offer a unique range Our epoxy systems are broad in application but to increase their usefulness we offer a unique range Our epoxy systems are broad in application but to increase their usefulness we offer a unique range Our epoxy systems are broad in application but to increase their usefulness we offer a unique range of additives and modifiers. Some of these like the colloidal silica and micro balloons are common to of additives and modifiers. Some of these like the colloidal silica and micro balloons are common to of additives and modifiers. Some of these like the colloidal silica and micro balloons are common to of additives and modifiers. Some of these like the colloidal silica and micro balloons are common to the epoxy industry. We however do the epoxy industry. We however do the epoxy industry. We however do the epoxy industry. We however do have additives that are unique to our system that enable even have additives that are unique to our system that enable even have additives that are unique to our system that enable even have additives that are unique to our system that enable even
broader application parameters.broader application parameters.broader application parameters.broader application parameters.
Additive FAdditive FAdditive FAdditive F
A flow agent/ surfacing agent/ wetting agent unique to the epoxy industry. Invented in 2001 this A flow agent/ surfacing agent/ wetting agent unique to the epoxy industry. Invented in 2001 this A flow agent/ surfacing agent/ wetting agent unique to the epoxy industry. Invented in 2001 this A flow agent/ surfacing agent/ wetting agent unique to the epoxy industry. Invented in 2001 this individual chemical compound has shown itself to be reindividual chemical compound has shown itself to be reindividual chemical compound has shown itself to be reindividual chemical compound has shown itself to be revolutionary in the production of many products. volutionary in the production of many products. volutionary in the production of many products. volutionary in the production of many products.
It’s primary function is as a surfacing/sanding agent which gives excellent flow characteristics by It’s primary function is as a surfacing/sanding agent which gives excellent flow characteristics by It’s primary function is as a surfacing/sanding agent which gives excellent flow characteristics by It’s primary function is as a surfacing/sanding agent which gives excellent flow characteristics by reducing surface tension. The same forces that act as a surfacing agent also seal the surface raising reducing surface tension. The same forces that act as a surfacing agent also seal the surface raising reducing surface tension. The same forces that act as a surfacing agent also seal the surface raising reducing surface tension. The same forces that act as a surfacing agent also seal the surface raising
barcolbarcolbarcolbarcol hardness. This improves the sanding characteristics of the composites allowing for finer hardness. This improves the sanding characteristics of the composites allowing for finer hardness. This improves the sanding characteristics of the composites allowing for finer hardness. This improves the sanding characteristics of the composites allowing for finer finishing, something epoxy fabricators have always struggled with.finishing, something epoxy fabricators have always struggled with.finishing, something epoxy fabricators have always struggled with.finishing, something epoxy fabricators have always struggled with. Additive FAdditive FAdditive FAdditive F has alsohas alsohas alsohas also found use as a found use as a found use as a found use as a
wetting agent/viscosity reducer in fabric intensive hand lay up.wetting agent/viscosity reducer in fabric intensive hand lay up.wetting agent/viscosity reducer in fabric intensive hand lay up.wetting agent/viscosity reducer in fabric intensive hand lay up. Unlike other wetting and surfacing Unlike other wetting and surfacing Unlike other wetting and surfacing Unlike other wetting and surfacing agents Additive F also enhances bond between epoxy coats by eliminating blush chemically. Blush in agents Additive F also enhances bond between epoxy coats by eliminating blush chemically. Blush in agents Additive F also enhances bond between epoxy coats by eliminating blush chemically. Blush in agents Additive F also enhances bond between epoxy coats by eliminating blush chemically. Blush in
epoxy coatingsepoxy coatingsepoxy coatingsepoxy coatings is the primary reason for recoating difficulties in the past and required physical is the primary reason for recoating difficulties in the past and required physical is the primary reason for recoating difficulties in the past and required physical is the primary reason for recoating difficulties in the past and required physical removal (usually sandinremoval (usually sandinremoval (usually sandinremoval (usually sanding) before recoating could be attempted. Additive F eliminates this step.g) before recoating could be attempted. Additive F eliminates this step.g) before recoating could be attempted. Additive F eliminates this step.g) before recoating could be attempted. Additive F eliminates this step.
UV AbsorberUV AbsorberUV AbsorberUV Absorber
To protect sensitive substrates such as urethane foam, UV sensitive polymers and woods. Comes To protect sensitive substrates such as urethane foam, UV sensitive polymers and woods. Comes To protect sensitive substrates such as urethane foam, UV sensitive polymers and woods. Comes To protect sensitive substrates such as urethane foam, UV sensitive polymers and woods. Comes as a liquid mixed into the epoxy side of the system.as a liquid mixed into the epoxy side of the system.as a liquid mixed into the epoxy side of the system.as a liquid mixed into the epoxy side of the system.
XXXX----55 Accelerator55 Accelerator55 Accelerator55 Accelerator
InventeInventeInventeInvented in the mid 80’s Xd in the mid 80’s Xd in the mid 80’s Xd in the mid 80’s X----55 is primarily used in fill coats to shorten pot life and set times. This 55 is primarily used in fill coats to shorten pot life and set times. This 55 is primarily used in fill coats to shorten pot life and set times. This 55 is primarily used in fill coats to shorten pot life and set times. This shortens production time and reduces curtains and draining. Used with moderate heat (100shortens production time and reduces curtains and draining. Used with moderate heat (100shortens production time and reduces curtains and draining. Used with moderate heat (100shortens production time and reduces curtains and draining. Used with moderate heat (100----110F) 110F) 110F) 110F)
and in combination with 2000/2100F fill coats can be ready to sandand in combination with 2000/2100F fill coats can be ready to sandand in combination with 2000/2100F fill coats can be ready to sandand in combination with 2000/2100F fill coats can be ready to sand in 1 hour. in 1 hour. in 1 hour. in 1 hour.
Alcohol ThinnerAlcohol ThinnerAlcohol ThinnerAlcohol Thinner
A unique blend of alcohols that can be used up to 5%A unique blend of alcohols that can be used up to 5%A unique blend of alcohols that can be used up to 5%A unique blend of alcohols that can be used up to 5% for viscosity reduction.for viscosity reduction.for viscosity reduction.for viscosity reduction.

Pricing Pricing Pricing Pricing
Project 21 SystemProject 21 SystemProject 21 SystemProject 21 System ---- November 2008 November 2008 November 2008 November 2008 ----
3 Pt set - 2 Pt. Resin, 1 Pt. Hardener: $38
1.5 Gal set - 1 Gal Resin, 1/2 Gal. Hardener $105
Price per gallon $70
3 Gal set - 2 Gal Resin, 1 gal. Hardener $192 Price per gallon $64
Additive F $16 per pint
Greg Loehr e-mail: [email protected]
Resin Research 131 Tomahawk Dr.
Indian Harbour Beach, Fl. 32937 Ph. 321-779-2369
Resin Research
4231 S. Fremont Av. Tucson, Az. 85714-1628
Ph. 321-223-5276

Solvents
Paint Thinner The best accepted, most economical, general purpose solvent.
Thinning: A general purpose solvent. Use with most oil based paints, varnishes, stains, polyurethanes and wiping oil finishes. Do not use with shellac, lacquers or latex paints. Helps
increase flow and reduce brush drag or pull. Extends drying time slightly. Aids leveling. Cleaning: A mild solvent. Use to clean painting tools while coating is still wet. Will not soften
dry paint well.
Mineral Spirits A high grade, quality solvent, low odor.
Thinning: A general purpose solvent. Use with most oil based paints, varnishes, stains, polyurethanes and wiping oil finishes. Do not use with shellac, lacquers or latex paints. Helps
increase flow and reduce brush drag or pull. Extends drying time slightly. Aids leveling. Cleaning: A mild solvent. Use to clean painting tools while coating is still wet.
Gum Turpentine The best quality paint solvent.
Thinning: The ideal strength for thinning most oil based paints, varnishes, stains, polyurethanes and wiping oil finishes. Not compatible with shellac, lacquers and latex paints. Helps increase flow and reduce brush drag or pull. Will not increase drying time noticeably.
Aids leveling. Cleaning: Gum Turpentine leaves a slight rosin residue. Excellent for cleaning brushes and
paint roller trays after painting. General: Made from the living pine tree. Gum Turpentine is the painter's traditional favorite.
Its strength and evaporation rate are the same as most paints. Read cautions on label carefully.
Lacquer Thinner
A thinner for one part epoxies and lacquer wood finishes. Thinning: This is a specialized thinner. Use to thin epoxy or two part coatings. Consult

coating manufacturers specifications. Use to thin nitrocellulose based wood lacquers. Do not use
with acrylic lacquers, automotive lacquers, varnishes, shellac, polyurethanes or paints.
Cleaning: Clean painting tools after painting. Will soften most types of coatings with overnight
immersion in Lacquer Thinner. Will attack some synthetic brushes. The favorite for cutting grease on metal parts, etc. Prolonged exposure can attack seals and gaskets. Much stronger
than Paint Thinner and more flammable.
Denatured Alcohol The safest, purest grade of denatured ethyl alcohol.
Thinning: Alcohol is used to thin shellac based products only. Use with clear or orange shellac
or pigmented shellac primers. Do not use with other finishes. Cleaning: A specialty cleaner. Use to clean painting tools after using shellac. Will soften dry
or hard shellac. Can dissolve most inks, lipsticks, crayons and many other stains. General: This
is the best grade of fuel for alcohol chafing dishes and stoves. Complete combustion produces no harmful gases or vapor. Alcohol is soluble in water and can be used as an
antifreeze agent. However, it evaporates rapidly and is flammable. Read cautions on the container
before using.
Boiled Linseed Oil A natural oil preservative treated to dry faster. General: Use as directed as an additive to
many paints or stains, will increase flow coverage and gloss. An essential part of many coatings, aids water repellency. Helps prevent unfinished wood from drying, checking or
cracking. A thin coat will inhibit rust formation on metal. Rags or cloths soaked with linseed oil must be handled carefully. Linseed oil releases heat as it dries. Soaked rags in confined
areas could combust spontaneously. Wash rags after using linseed oil.

Acetone The strongest, fastest evaporating solvent.
Thinning: A specialty solvent. Use only where directed. Generally for epoxies, fiberglass resins
and specialty coatings. Acetone is too strong to use in thinning most coatings. Cleaning: Use to clean painting tools after applying any type of coating. Will soften
hardened coating with overnight immersion. Caution: Will soften most synthetic materials. General:
The extreme strength limits thinning uses to specialty coatings. The high evaporation rate also
means it is very flammable.
Xylol A solvent for specialty coatings and uses.
Thinning: Use as directed to thin many lacquers, rust inhibitive, rubberized, marine and other specialty coatings. Do not use with most oil based paints, varnishes, stains, shellac or
polyurethanes. Cleaning: Clean painting tools. For all types of coatings except shellac. General: Most uses
for Xylol are in specialized coating systems where its use is carefully designated. Xylol fumes are
flammable and ingestion is dangerous. Read label cautions carefully.
MEK The high strength solvent with a moderate evaporation rate.
Thinning: A specialty solvent. Use only where directed. Generally for epoxies, fiberglass resins
and specialty coatings. Cleaning: Use to clean painting tools after applying any type of coating. Will soften
hardened coating with overnight immersion. Caution: Will soften most synthetic materials. General:
This is a solvent with a strength equal to Acetone but with a slower evaporation rate. It is

flammable. Read cautions on the label carefully.
That’s it, The Basics…
I hope you’ve had fun through the process and are a better person because of it…
Paul Jensen – www.hollowsurboards.com
© 2008 Paul Jensen