thank you very much for purchasing this air ... - hisense.es
TRANSCRIPT

Thank you very much for purchasing this Air Conditioner. Please
read this carefully before installing
and using this appliance and keep this manual for future reference.
use and installation instructions

YXE-C02U(E)
Welcome to use our product!
Thanks for trusting us.
Please read this manual carefully before installation!
Keep it properly for future use after installation!
APPLICATION MODEL
确定

CONTENTS
----------------- ------------- --------- ---- -----14
-- --- - --- ------------- --- ------
Filter Clean Reset------------------------------- -- - - --------14
Maintenance, & 15
Sa
Self Recovery of Power Break 14
fety precautions ------------------------------------------------------------------------------------------------------------------1
1.Important notice----------------------------------------------------------------------------1
2.Checking product---------------------------------------------------------------------------1
3.Safety summary----------------------------------------------------------------------------2
Wire Remote Controller introduction-------------------------------------------------------------------------------------------3
Wire Remote Controller-----------------------------------------------------------------------3
Liquid Crystal Display Screen------------------------------------------------------------------5
Simple Operation--------------------------------------------------------------------------------------------------------------------6
Function Set---------------------------------------------------------------------------------------------------------------------------8
Sleep Mode----------------------------------------------------------------------------------8
Button Locked-------------------------------------------------------------------------------8
Clock Set/Correction------------------------------------------------------------------------ 9
Electric Heater Set--------------------------------------------------------------------------9
Simple Timer ON/OFF ----------------------------------------------------------------------10
Weekly Timer ------------------------------------------------------------------------------12
Other Functions--------------------------------------------------------------------------------------------------------------------14
TEMP. Display Setting-------------------------------- --------------------------------14
Buzzer Indicator Select----------------------------------------- ---------------------------14
Dimmer Set---- -- - --------------
-- -- -- -------------
-- -------------
----------------------------------------------------------------------
-------
--
-----------
-------- - ----
-------- --------
Troubleshooting After-Sale Service
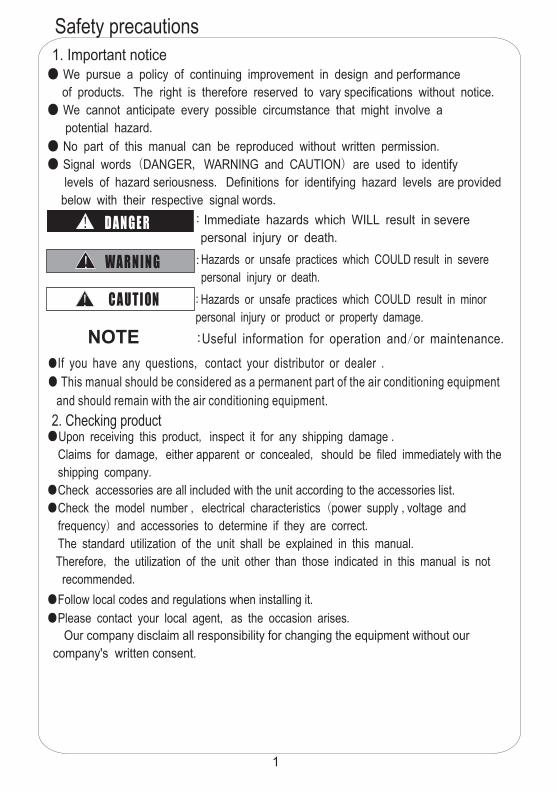
Safety precautions
1. Important notice
2. hecking productC
● We pursue a policy of continuing improvement in design and performance
of products. The right is therefore reserved to vary specifications without notice.
● We cannot anticipate every possible circumstance that might involve a
potential hazard.
● No part of this manual can be reproduced without written permission.
● Signal words (DANGER, WARNING and CAUTION) are used to identify
levels of hazard seriousness. Definitions for identifying hazard levels are provided
below with their respective signal words.
Useful information for operation and/or maintenance.
●
●
●
T
●
●
Upon receiving this product, inspect it for any shipping damage .
Claims for damage, either apparent or concealed, should be filed immediately with the
shipping company.
Check the model number , electrical characteristics (power supply ,voltage and
frequency) and accessories to determine if they are correct.
he standard utilization of the unit shall be explained in this manual.
Therefore, the utilization of the unit other than those indicated in this manual is not
recommended.
Please contact your local agent, as the occasion arises.
Check accessories are all included with the unit according to the accessories list.
Follow local codes and regulations when installing it.
!
!
!
●If you have any questions, contact your distributor or dealer .
● This manual should be considered as a permanent part of the air conditioning equipment
and should remain with the air conditioning equipment.
Immediate hazards which WILL result in severe
personal injury or death.
Hazards or unsafe practices which COULD result in severe
personal injury or death.
Hazards or unsafe practices which COULD result in minor
personal injury or product or property damage.
:
:
:
1
Our company disclaim all responsibility for changing the equipment without our
company's written consent.

●Do not install the appliance by the user. Ask the dealer or authorized company to install it. Improper installation could cause damage by fire or electric shock .●Perform the installation correctly referring to the installation manual. Incorrect installation could cause a personal injury due to fire, electric shock. ●Do not splash water on the appliance and do not touch it with wet hand . These products are equipped with electrical components , splashing water could cause serious electric shock or short-circuit.●Must not touch or regulate safety device in the appliance.Otherwise serious accident may occur.●Please be sure to cut off the main power supply before opening the panel to repair.●Please use specify specifications cable.Firmly connected to the connection part of wire terminals , and avoid being shell. Do not apply wire stress to these parts. Otherwise it will cause fever or fire,etc.●Install the appliance on the base that can support its weight. Otherwise it may cause injury in the event the appliance falls off the base.●Connect with the electric supply after installation and check electric leakage.
●Avoid the following places for installation where appliance trouble is liable to occur.·Places with an oily ambient.·Places where sulfide gas occurs such as hot springs.·Places with a flammable gas.·Salty places such as seaside.·Places with high temperature or flames,may lead to heat or fire.·Where there is high-frequency or wireless equipment. It will cause interference .Moisture or water flooding place. Once the water enters the inside of the remote control, electric shock or electronic parts failure may occur.●Do not install the appliance or connect the wires before reading the manual.
3. Safety summary
2
!
!
●Prohibit within the scope of 1 meter of the appliance using spray,such as pesticides, paint, hair gel or other toxic gases. ●If the ELB(Electric Leakage Break) or fuse trouble is liable to occur,please consult local service shop. ●Installation and wring work should be perform according to the manual. Otherwise electric shock or fire may occur.●Do not ride or place the object that with no relation with the appliance on the unit.●Protect the wires, electrical parts, etc. from rats or other small animals. If not protected, rats may gnaw at unprotected parts and at the worst, a fire will occur.●Firmly connect wires. Excessive force may cause fire.●If the electric box or fuse break is liable to occur, please consult local service shop.
●Install indoor unit,outdoor unit ,wire remote controller or cables at least 3 meters away from high-frequency source (such as medical appliance) .● Do not trample products or place anything on it.●Choose a place as described below to install wire remote controller in order to let TEM. sensor work normally. A.A place where average temperature in the room can be detected.
B.A place where is not exposed to direct sunlight.
C.Avoid extremely hot or cold locations.●Do not play with the wire remote controller.
!
Safety precautions

确定
Wire Remote Controller Introduction(Part Name)
Wire remote controller
Parts names
3
1
10
13
11
12
2
1
3
4
7
8
9
5
6

4
部件介绍
1
2
3
11
13
12
4
5
5
5
5
7
8
9
6
SWING BUTTON
FAN BUTTON
INCREASE SETTING BUTTON
LIQUID CRYSTAL DISPLAY(LCD) SCREEN
DECREASE SETTING BUTTON
SLEEP BUTTON
ENTER BUTTON
CANCEL BUTTON
TIMER/CLOCK BUTTON
ON/OFF BUTTON
RUN INDICATOR
MODE BUTTON
Used to stop or start adjustment louver swinging and set the desired airflow direction.
Used to select fan speed in sequence high- low.low-medium- auto-
Used to set or cancel Sleep Mode operation.
Used to confirm settings.
Used to cancel settings.
Used to set the current time or set timer on/off.
The appliance will be started when it is energized or will be stopped when it is in operation, if you press this button.
Indicates that the appliance is on.
Press this button to select the operation mode.
Used to raise the set temperature ;It changes the TIMER ON/OFF settings and WEEKLY TIMER settings.
Used to display indicator screens.
Used to lower the set temperature ;It changes the TIMER ON/OFF settings and WEEKLY TIMER settings.
10 ADD.FUNC. BUTTONUsed to set filter clean , hot water ,fresh air , electric heater ,etc.
(invalid for some models)
Wire Remote Controller Introduction(Part Name)

LCD screen
NOTE:1.For purpose of explanation,all parts of the display are shown.During actual operation,only the relevant
items will be displayed.
2.
3.Air direction,Filter Clean,Hot Water,Floor Heat,Filter Clean, Electric Heating etc.
are only effective for dedicated models, details please refer to operation manual.
4.ERROR and Maintenance,Address Setting,Centrol Control,TEM.Range Limit,
should be set by dealer.
Heating and electric heating function are not available for single cooling only models.
Ventilation,
Fahrenheit Temperature
Temperature Setting
Temperature Range Limit
Home Leave ControlDefrost Indicator
Locked IndicatorFilter Clean
Sleep Indicator
Timer Indicator
Fan Speed Clock
Day of Week Indicator
Up/Down Air Direction IndicatorLeft/Right Air Direction IndicatorTimer ON Indicator
Timer Group Indicator
Timer OFF Indicator
VentilationElectric Heater
Cooling Mode
Address Setting
Central Control Room TEMP. Hot Water TEMP.
Error Indicator
Dry Mode
Fan-only Mode
Heating Mode
Auto
Compressor Run Indicator
Relative Moisture
Hot WaterAir Purge
Centigrade Temperature
Fahrenheit Temperature
Floor HeaterFan
5
Wire Remote Controller Introduction(Part Name)

确定
1
2
45
3
3
SIMPLE OPERATION This wire remote controller should be used with the air- conditioner,it can be used for cooling,
heating, dry and fan etc. Other functions and settings please refer to the specific operation in this
manual.
1.Turning ON/OFF<to start operation>
Press the ON/OFF button , the ON lamp lights up, the appliance will be started.<to Stop Operation>
Press the ON/OFF button again,the ON lampgoes off,the appliance will be stopped.Hold down "ON/OFF" button for more than 3 seconds,the appliance will enter completely shutdown state. (indoor unit stops, cannot use timer ON to start, only manual start), the buzzer beeps 4 times.
2. Mode settingPress "MODE” button to select mode operation under shutdown state and no timer has been set.
AUTO mode is invalid for models without AUTO mode when setting.
After received turn off command from central controller, the remote controller will enter completely shutdown state.
6
COOLING HEATING AUTOFAN ONLYDRY
Each time MODE button is pressed, the operation mode is changed in sequence:
3.Temperature setting“ ” or“ ”button to set desired temperature under shutdown and no timer has been set .
blinking on the LCD,indicating entering setting mode.
Each time “ ” button is pressed,temperature setting rises by 1℃;
Each time“ ” button is pressed,temperature setting lowers by 1℃;
Setting temperature is finished 3 seconds after setting temperature value blinking.
Press
16℃ /18℃~ ~30℃ 32℃
Range of temperature setting
*HEATING, COOLING,DRY
unable to setFAN ONLY
*: 1.Heating mode is ineffective for COOLING ONLY models. 2.Default temperature setting range is different for different types of indoor unit.
4.
3.Setting range can be changed by professional stuff , please contact installation service when needed.
When setting temperature is above setting range, will display on the LCD, setting temperature
will not rise or lower any more .
NOTE:
NOTE:
NOTE:

5.Airflow direction settingPress "SWING” button to select airflow direction under running mode or shutdown with timer
set .
"SWING” Each time button is pressed, the airflow direction changes in the following sequence.
Up/Down Airflow Direction Up/Down/Left/Right Nothing Airflow Direction
Left/Right Airflow Direction
No Display
LOW MEDIUM HIGH AUTO ( ) display moves from the left to the right
4.Fan speed settingPress "FAN” button to select fan speed under running mode or shutdown state with timer
set .Each time “FAN” button is pressed, the fan speed changes in the following sequence:
6.Central control signal receiveAfter receive central control signal ,central control indicator begin to light up , and it will
run according to the order of the central controller.
The later order that from the central controller or remote controller has the prior order.
7
1.This setting is only effective for units with this swing function. 2. is only available for specific models. 3.At "DRY" mode, Fan speed is set at "AUTO” automatically, "FAN" button is ineffective in this case.
SIMPLE OPERATION
NOTE:

SLEEP mode is NOT available in FAN mode.For some models,the set temperature displayed on the LCD may not change with the actual setting temperature in sleep mode.
Operation:Press "SLEEP” button when the appliance is on, will display on the LCD, then start SLEEP mode.
How to cancel:
: If you want change the OFF time during SLEEP mode , please set “TIMER OFF ”in addition, for detailed operation please refer to “ TIMER OFF" setting.
Press "SLEEP ”button again, will disappear on the LCD,the SLEEP mode has been canceled. KNOWLEDGE
Comfortable sleep mode:
SLEEP mode can be set in COOLING ,HEATING or DRY mode.This function gives you a more comfortable environment to sleep.
After wire remote controller setting set button locked function to avoid children or other people’s wrong operation.All operations are invalid after button locked function has been set.
is finished, you can
How to set:Hold down “ENTER”button for 3seconds,the buzzer beeps 4 times indicating the setting is successively set and display on the LCD,indicating that the lock is now energized.
How to cancel:Hold down “ENTER”button for 3 seconds,the buzzer beeps 4 times indicating the setting is canceled and disappear from the LCD ,indicating that the button locked function has been canceled.
8
SLEEP Mode
Button Locked
Set temperature will rise by 1 in cooling mode for 1 hour , rise by 2 ℃after 2 hours, then turning off automatically after 8 hours. Set temperature will decrease by 1℃ if the appliance operates in heating mode for 1 hour , decrease by 2℃after 2 hours, then turning off automatically after 8 hours.
℃if the appliance operates
FUNCTION SET
NOTE:
For button locked by the next higher command of central controller, it cannot be canceled, and only be unlock by the central controller.
NOTE:

DAY HOUR MINUTE
indicator of day of week
clock
9
1
2
3
2
FUNCTION SET
When the appliance is turning on or turning off also with timer
set,press“ADD.FUNC.”can manually select electric heater on/off .Electric heater function changes in the following sequence:
After manually set the electric heater on, the indicator will lights on, and will light on/off according to the actual state after 5 minutes(electric heater may not start as the internal control condition is not satisfied).After manually set electric heater off, the indicator will goes off, and the electric heater turn off immediately.
CLOCK SET/CORRECTION
Electric heater set
BLANKElectric Heater ON Electric Heater OFF
1.It is only valid for models with electric heater, and only can be selected under heating mode.2.If not manually set electric heater function, it will auto turn on/off according to the outer temperature ,etc.3.After mode changing, power failure, turning on/off ,manually electric heater function set will be cleared.
NOTE:
NOTE:
How to set:1. and all .2.Press“ ”and“ ”to set the current day of the weekan current time. 3.Press “ENTER” to confirm. After setting is completed, and stop blink.
When the clock is different with the standard time,need for clock correction.
How to set:1.Hold down“TIMER/CLOCK” button for 3 seconds under complete shutoff state,enter clock correct setting.2.Adjust the clock following the sequence below:
①
press “ENTER” to confirm .②Then blinks,press“ ” (increase) or “ ” (decrease)to select,when reaches the desired time press enter to confirm.③Then need seconds setting,setting method is the same as hours setting.3.After making the appropriate settings,the buzzer beeps 4 times indicating clock setting has been changed.
CLOCK SET
CLOCK CORRECTION
First time using and clock loss caused by unused for a long time, setting clock is needed at first.
Firstly the day of the week indicator blinks, and press and to select the desired day, for example,(Thursday) ,
blinks after turning on
1.CLOCK CORRECTION should be set under complete shutoff state.
3.After the wire remote controller get into the access of central control system its clock will be the same with the central controller.
2.Complete Shutoff:When turning on,hold down “ON/OFF”button for 3 seconds will enter complete shutoff state. Temporary Shutoff:When turning on,press “ON/OFF”button will turn to shutoff state. Shut off state in this manual all means temporary shutoff state.

1
2
10
( nvalid under weekly timer set)i
Simple timer only to be set under shutoff mode.
Time Set of TIMER ON Function
Display of TIMER ON Mode
Rest time of TIMER ON Mode
Simple TIMER ON
FUNCTION SET
NOTE:
Operation:
1 After you press TIMER/CLOCK button when the
appliance is shut off, and timer on indicator “ON”
display on LCD, and timer hour setting blinks.
2 Press “ ” (increase) and “ ” (decrease) button to adjust
the time.
Each time “ ” button is pressed, time setting increases
by 1h.
Each time“ ” button is pressed, time setting decreases
by 1h.
It can be set from 1h to 24h, and time setting resolution is
1 hour.
3 Press “ENTER” button when the desired time is reached.
After operation, the display will be back to previous display
before timer on set, and “Timer” indicator appears on the
left corner of the screen.
You can press the “CANCEL” button at any time to cancel
the timer on setting and exit.
You can press the “TIMER/CLOCK” button to cancel the
current setting and exit.
Press “TIMER/CLOCK” button again after TIMER ON has
been set to display the rest of the time.
As shown in the figure, it indicates that the appliance will
be started after 58 minutes.
30s without any operation will quit query.

11
1
2
Time Set of TIMER OFF Function
Display of TIMER OFF Mode
Rest time of TIMER OFF Mode
( nvalid under weekly timer set)i
Simple timer on/off can not set/save simultaneously.If need simple timer on/off setting effective continuously , please set weekly timer on/off.
Simple TIMER OFF
FUNCTION SET
NOTE:
Operation:
1 After you press TIMER/CLOCK button when the
appliance is on, and timer off indicator “OFF”
display on LCD, and timer hour setting blinks.
2 Press “ ” (increase) and “ ” (decrease) button to adjust
the time.
Each time “ ” button is pressed, time setting increases
by 1h.
Each time“ ” button is pressed, time setting decreases
by 1h.
It can be set from 1h to 24h, and time setting resolution is
1 hour.
3 Press “ENTER” button when reaches the desired time .
After operation, the display will be back to previous display
before timer off set, and “Timer” indicator appears on the
left corner of the screen.
You can press the “CANCEL” button at any time to cancel
the timer off setting and exit.
You can press the “TIMER/CLOCK” button to cancel the
current setting and exit.
Press “TIMER/CLOCK” button again after TIMER OFF has
been set to display the rest of the time.
As shown in the figure, it indicates that the appliance will
turn off after 58 minutes.
30s without any operation will quit query.

Weekly Timer Set Procedure
Operation Procedure
OPERATION:
1.Hold down “TIMER/CLOCK” buttonfor 3 seconds to enter
weekly timer setting under turning ON/OFF mode. appears
on the LCD, group number blinks.
Follow the sequence below to the next set:
First timer group numer1 blinks,press“ENTER”button,enter Timer ON setting.
Weekly timer on/off time can be set for four group at most, the four groups can be assigned to
any day regularly.
Note:Please set the clock correctly before weekly timer set.
Weekly timer can be used to set on/off time respectively for seven days a week. Air conditioner
can be on/off in preset time every day, without manual control.The air conditioner can be on/off
automatically before you wake up in the morning, back home from work or during sleep at night.
2
3
4
GROUP SELECT
GROUP SELECT
GROUP SELECT
GROUP SELECT
QUIT
NOTE:
START
Pres
s“TI
MER
/CLO
CK”
butto
n or“
ON/O
FF”
butto
n
Hold on“TIMER/CLOCK”button for 3 seconds
PRESS“TIMER/CLOCK”BUTTON
PRESS“TIMER/CLOCK”BUTTON
PRESS“TIMER/CLOCK”BUTTON
PRESS“TIMER/CLOCK”BUTTON
OR
OR
OR
OR
(Turning ON/OFF)
DAY SELECT
DAY SELECT
DAY SELECT
DAY SELECT
Press the "ENTER" button to the next step
Press or button to select the next group
TIMER ON HOUR
TIMER ON HOUR
TIMER ON HOUR
TIMER ON HOUR
TIMER ON MINUTE
TIMER ON MINUTE
TIMER ON MINUTE
TIMER ON MINUTE
TIMER OFF HOUR
TIMER OFF HOUR
TIMER OFF HOUR
TIMER OFF HOUR
TIMER OFF MINUTE
TIMER OFF MINUTE
TIMER OFF MINUTE
TIMER OFF MINUTE
GROUP SELECT DAY SELECTTIMER ON HOUR TIMER ON MINUTE TIMER OFF HOUR TIMER OFF MINUTE
12
Weekly Timer
FUNCTION SET

If need to temporarily leave for a few days when weekly timer has been set,at the meanwhile timer ON/OFF is not permitted to work and continue to work after back,you can hold down“ON/OFF”button for 3 seconds to turn it off completely. At this moment, weekly timer set time can still save, but air conditioner will not run.Weekly timer setting resolution is 1 minute.Timer ON/OFF signal is effective within 1 minute.
13
2.Timer on hour blinks,press ncrease
to set the desired time.
Each press“ ”button,time increases 1;
Each press“ ”button,time decreases 1.
After timer ON hour has been set,press “ENTER”button to return to timer
ON minute setting.
If you don't need timer OFF Setting, press the"CANCEL" button to cancel.
Timer OFF setting is the same step with timer ON setting.
After TIMER ON/OFF setting is completed,press “ ”(increase)or
“ ”(decrease)to select desired day,press “ENTER”button to confirm
it,or press “cancel”button to cancel.The selected day will be marked with
“ ”. For example , shows 7days of a week all selected are
effective.
Continue group 2 setting,repeat the same setting procedure as group1.
Four groups timer on/off can be set at most .
You can quit WEEKLY TIMER setting by pressing“TIMER/CLOCK”
or “ON/OFF” button when group number blinking.
CHECKING THE CURRENT WEEKLY TIMER SETTING
Press “TIMER/CLOCK”button to check WEEKLY TIMER setting
when WEEKLY TIMER exit.
“ ”(i )or “ ”(decrease)
Timer Groop Select
Timer ON Setting
Timer OFF Setting
Timer Day Select
FUNCTION SET
NOTE:

Default display temperature .
If need display room temperature, press " " button and"ENTER"button
simultaneously for 3 seconds,the buzzer beeps 4 times indicating setting has
been changed. appears on the LCD,temperature shown on LCD is room
temperature.
If need cancel setting, press " " button and" ENTER "button simultaneously
for 3 seconds, disappears on the LCD,indicating displaying setting tempe-
rature.
set
FILER CLEAN is only effective for specific models . Details please refer to indoor unit manuals.
Be sure to stop the operation and turn off the power supply before performing any cleaning.
14
Please contact with professional stuff to do filter cleaning.After cleaning,
hold down”CANCEL”button 3 seconds,the buzzer beeps 4 times indicating
FILTER CLEAN has been successfully reset.
TEMPERATURE DISPLAY SETTING
BUZZER INDICATOR SELECT
DIMMER SET
FILTER CLEAN RESET
When displays on LCD,indicates that the filiter needs to be cleaned.
(available for models equipped with filter clean function and need operate by professional stuff)
OTHER FUNCTIONS
Default buzzer indicate when operation.If need operation mute ,hold down
“FAN”button for 3 seconds,the buzzer beeps 4 times indicating setting has been
successfully changed.
If need return to normal,repeat steps above.
Default bright screen.If need screen darkness ,hold down“MODE”
button for 3seconds,the buzzer beeps 4 times indicating setting has been
successfully changed.
If need return to normal ,repeat steps above.

MAINTENANCE
MAINTENANCE
●
●
●
Wipe the LCD and other surface part of the remote controller with a dry cloth when
they become dirty.
If the dirt on the surface cannot be removed,soak the cloth in neutral detergent diluted
with water,squeeze the cloth tightly,and clean the surface.Wipe the surface with a dry
cloth then.
Do not use any thinner, organic solvents, or strong acid .
15

TROUBLESHOOTING
TROUBLESHOOTING AND SERVICE
ERROR CODE
When the airconditioner is malfuction, will display on the LCD,and error codes will
appear and blink.
Please take note of the indicated error codes to contact with dealer or service.
16
Contact the service shop where you bought the remote controller.
AFTER-SALE SERVICE

VERSION NO.:1844539,D