th-p65s20a operating instructions...do not damage the mains lead. (a damaged lead may cause fire or...
TRANSCRIPT

English TQBC2536
Operating InstructionsPlasma Television
Thank you for purchasing this Panasonic product. Please read these instructions before operating your set and retain them for future reference.The images shown in this manual are for illustrative purposes only.
Model No.
TH-P58S20ATH-P65S20A

Experience an amazing level of multimedia excitementReceive digital terrestrial services using an integrated Digital TV tunerSharp pictures with HDMI terminalCreate home theatre and DVD recorder link-ups with “VIERA Link”without complicated settings!
Enjoy rich multimedia
SD Card
Set top boxDVD playerDVD Recorder
Amplifier withSpeaker System
VCR
Personal computer
Camcorder
2
This product is licensed under the AVC patent portfolio license for the personal and non-commercial use of a consumer to (i) encode video in compliance with the AVC Standard (“AVC Video”) and/or (ii) decode AVC Video that was encoded by a consumer engaged in a personal and non-commercial activity and/or was obtained from a video provider licensed to provide AVC Video. No license is granted or shall be implied for any other use. Additional information may be obtained from MPEG LA, LLC. See http://www.mpegla.com.
Notice about Digital TV FunctionsThe MPEG-4 AVC feature was designed to specifications as we know them today. This ●specification may be subject to future changes beyond our control that may not guarantee the decoding of such services.
February 2010

Qui
ck S
tart
G
uide
Bas
icA
dvan
ced
Tech
nica
l
3
● This product contains possibly dangerous parts (such as plastic bags), which can be breathed in or swallowed by young children accidentally. Keep these parts out of reach of young children.
REC
TV AV
Remote ControlN2QAYB000494 ●
Batteries for the Remote Control (2)R6 (AA) ●
Pedestal p. 6
Operating Instructions with Warranty statement
Check that you have the accessories and items shown
Incorrect installation may cause battery ●leakage and corrosion, resulting in damage to the remote control.Do not mix old and new batteries. ●Do not mix different battery types (such as ●alkaline and manganese batteries).Do not use rechargeable (Ni-Cd) batteries. ●Do not burn or breakup batteries. ●Batteries must not be exposed to excessive heat such as sunshine, fire or the like. Do not disassemble or modify the remote ●control.
Standard accessories
Fall-prevention parts p. 7
Mains Lead p. 8
Inserting and removing remote’s batteries
Note the correct polarity (+ or -)
Close
2
1 Open
Hook
ContentsBe Sure to Read
Safety Precautions ● ···································· 4(Warning / Important Installation Notices)
Quick Start GuideAccessories / Options ● ······························· 6Basic Connection ● ······································ 8Identifying Controls ● ································· 10Auto Tuning ● ············································· 12 Q
uick
Sta
rt
Gui
de
Basic FeaturesWatching TV ● ············································ 13Using TV Guide ● ······································· 16Viewing Teletext ● ······································ 17Watching External inputs ● ························ 19
Bas
ic
Advanced FeaturesHow to Use VIERA TOOLS ● ····················· 21How to Use Menu Functions ● ··················· 22Tuning and Editing Channels ● ·················· 28Child Lock ● ··············································· 32Input Labels ● ············································ 33Shipping Condition (Reset settings) ● ········ 34 ●Updating the TV Software ······················· 35Using Media Player ● ································· 36VIERA Link Functions ● ····························· 43External Equipment ● ································· 48
Adv
ance
d
TechnicalTechnical Information ● ······························ 50Maintenance ● ··········································· 54FAQs ● ······················································· 55Licence ● ···················································· 58Specifications ● ·········································· 59WARRANTY ● ············································ 60
Tech
nica
l

4
Safety PrecautionsHandling the mains plug and lead
Insert the mains plug fully into the socket outlet. (If the mains plug is loose, it could generate heat ●and cause fire.)Ensure that the mains plug is easily accessible. ●Ensure the earth pin on the mains plug is securely connected to prevent electrical shock. ●Do not touch the mains plug with a wet hand. (This may cause electrical shock.) ●Do not use any mains lead other than that provided with this TV. (This may cause fire or ●electrical shock.)Do not damage the mains lead. (A damaged lead may cause fire or electrical shock.) ●• Do not move the TV with the lead plugged in the socket outlet. • Do not place a heavy object on the lead or place the lead near a high-temperature object.• Do not twist the lead, bend it excessively, or stretch it.• Do not pull on the lead. Hold onto the mains plug body when disconnecting lead.• Do not use a damaged mains plug or socket outlet.
Do not insert foreign objects into the TVDo not allow any objects to drop into the TV ●through the air vents. (Fire or electrical shock may result.)
Do not place the TV on sloped or unstable surfaces
The TV may fall off or tip over. ●
Use only the dedicated pedestals / mounting equipment
Using an unapproved pedestal or other ●fixtures may make the TV unstable, risking injury. Be sure to ask your local Panasonic dealer to perform setup.Use approved pedestals (p. 6) / wall-hanging ●brackets (p. 7).
Do not allow children to handle SD CardAs with any small object, SD Cards can be ●swallowed by young children. Please remove SD Card immediately after use and store out of reach of children.
Power source / InstallationThis TV is designed for: ●• AC 220 - 240 V, 50 / 60 Hz• Indoor use
Do not expose to rain or excessive moisture
To prevent damage which might result in ●electric shock or fire, do not expose this TV to rain or excessive moisture. This TV must not be exposed to dripping or splashing water and objects filled with liquid, such as vases, must not be placed on top of or above the TV.
Do not remove covers and NEVER modify the TV yourself
Do not remove the rear cover as live parts ●are accessible when it is removed. There are no user serviceable parts inside. (High-voltage components may cause serious electrical shock.)Have the TV checked, adjusted, or repaired ●at your local Panasonic dealer.
Do not expose to direct sunlight and other sources of heat
● Avoid exposing the TV to direct sunlight and other sources of heat. To prevent fire never place any type of candle or naked flame on top or near the TV.
Warning
AC 220 - 240 V50 / 60 HzIf you find any
abnormality, remove the mains plug immediately!

5
■ Install TV on a stable surfaceIf a television is not positioned in a sufficiently stable location, it can be potentially hazardous due to falling. Many injuries, particularly to children, can be avoided by taking simple precautions such as:
Using cabinets or stands recommended by the manufacturer of the television. ● Only using furniture that can safely support the television. ●Ensuring the television is not overhanging the edge of the supporting furniture. ●Not placing the television on tall furniture (for example, cupboards or bookcases) without ●anchoring both the furniture and the television to a suitable support.Not standing the televisions on cloth or other materials placed between the television and ●supporting furniture. Educating children about the dangers of climbing on furniture to reach the television or its controls. ●
■ When cleaning the TV, remove the mains plugCleaning an energized TV may cause electrical shock. ●
■ When the TV is not going to be used for a long period of time, remove the mains plugThis TV will still consume some power even in the Off mode, as long as the mains plug is still ●connected to a live socket outlet.
■ Transport only in upright positionTransporting the TV with its display panel facing upward or downward may cause damage to the ●internal circuitry.
■ Allow sufficient space around the TV for radiated heat
Important Installation Notices
■ Do not block the rear air vents Blocked ventilation by newspapers, table cloths, curtains, etc. may cause overheating, fire or ●electrical shock.
■ Do not apply strong force or impact to the display panel.This may cause damage resulting in injury. ●
■ Do not expose your ears to excessive volume from the headphonesIrreversible damage can be caused. ●
■ The TV is heavy. Handle the TV by 2 or more people. Support as shown to avoid injury by the TV tipping or falling.
Do not display a still picture for a long timeThis causes the image to remain on the plasma screen (“image retention”).This is not considered a malfunction and is not covered by the warranty.Typical still images
Programme number and other logos ● Image displayed in “4:3” mode ●Video game ●Computer image ●
To prevent image retention, contrast is lowered automatically after a few minutes if no signals are sent or no operations are performed. (p. 55)
When using the pedestal, keep a space between the bottom ●of the TV and the surface where the TV is set.In case of using Wall-hanging bracket, follow the manual of it. ●10
(cm)Minimum distance
10
10 7
■ Auto power standby functionThe TV will automatically go to Standby mode in the following conditions: ●
no signal is received and no operation is performed for 30 minutes in Analogue TV mode• “Off Timer” is active (p. 13)• no operation is performed for the period selected in “Auto Standby” (p. 27)•
■ Keep the TV away from these types of equipmentElectronic equipment ●In particular, do not place video equipment near the TV. Electromagnetic interference may distort images / sound.Equipment with an infrared sensor ●This TV also emits infrared rays. This may affect operation of other equipment.

6
Accessories / Options
Do not disassemble or modify the pedestal.Otherwise the TV may fall over and become damaged, and personal injury may result. ●
Do not use the pedestal for any other TV or displays.Otherwise the TV or the display may fall over and become damaged, and personal injury may result. ●
Do not use the pedestal if it becomes warped or physically damaged.If you use the pedestal while it is physically damaged, personal injury may result. Contact your ●nearest Panasonic dealer immediately.
During set-up, make sure that all screws are securely tightened.If insufficient care is taken to ensure screws are properly tightened during assembly, the pedestal ●will not be strong enough to support the TV, and it might fall over and become damaged, and personal injury may result.
Ensure that the TV does not fall over.If the TV is knocked or children climb onto the pedestal with the TV installed, the TV may fall over ●and personal injury may result.
Two or more people are required to install and remove the TV.If two or more people are not present, the TV may be dropped, and personal injury may result. ●
Attaching the pedestal
Assembly screw (silver) Assembly screw (black) Pole (2) BaseM5 × 25 (4) ●(TH-P58S20A)
M5 × 30 (4) ●(TH-P58S20A)
(TH-P58S20A)
L R
M5 × 30 (6) ●(TH-P65S20A)
M6 × 25 (4) ●(TH-P65S20A)
(TH-P65S20A) Allen wrench(TH-P65S20A)
Assembling the pedestalUse the assembly screws to fasten the poles to the base securely.
Make sure that the screws are securely tightened. ●Forcing the assembly screws the wrong way will strip the ●threads.
Securing the TVInsert the pole into the TV, and then fasten securely with the assembly screws .
Tighten the four assembly screws ●loosely at first, then tighten them firmly to fix securely.Carry out the work on a ●horizontal and level surface.
(TH-P58S20A) (TH-P65S20A)
- L
D
C
- RC A
Front
D
C
C
E
A
Front
D
B
(View from the bottom)
Hole for pedestal
installation
Arrow mark
“L” or “R” mark is stamped ●on the bottom of the pole.
Use the allen wrench ● to tighten the screws.

Qui
ck S
tart
G
uide
Acc
esso
ries
/ Opt
ions
7
Please contact your nearest Panasonic dealer to purchase the recommended wall-hanging bracket.For additional details, please refer to the wall-hanging bracket installation manual.
Using other wall-hanging brackets, or installing a wall-hanging bracket by yourself have the risk ●of personal injury and product damage. In order to maintain the unit’s performance and safety, be absolutely sure to ask your dealer or a licensed contractor to secure the wall-hanging brackets. Any damage caused by installing without a qualified installer will void your warranty.Carefully read the instructions accompanying optional accessories, and be absolutely sure to take ●steps to prevent the TV from falling off.Handle the TV carefully during installation since subjecting it to impact or other forces may cause ●product damage.Take care when fixing wall brackets to the wall. Always ensure that there are no electrical cables or ●pipes in the wall before hanging bracket.To prevent fall and injury, remove the TV from its fixed wall position when it is no longer in use. ●
Optional accessories
This image is for illustrative purposes only.●
Preventing the TV from falling overThis TV could fall over if it is pushed, pulled or knocked down.We therefore recommend the TV is secured to the furniture as illustrated.
This measure is designed to reduce the risk of injury from a falling TV. However, it cannot guarantee ●protection in all cases.
Fall-prevention parts Securing to a furnitureFix pedestal and furniture together with band.
Band (2) Clamp (2)
Screw (2) Wood screw (2)
Screw
Band
Clamp Wood screw
Wall-hanging bracketTY-WK5P1RW●(TH-P58S20A)
TY-WK6P1RW●(TH-P65S20A) a : 500 mm ● (TH-P58S20A)
: 684 mm (TH-P65S20A)
[View from the side]Holes for wall-hanging bracket installation
Depth of screw: minimum 15 mm (TH-P58S20A)minimum 14 mm(TH-P65S20A)
maximum 30 mm
Screw for fixing the TV onto the wall-hanging bracket (not supplied with the TV)
a
300 mm
Rear of the TV

Push until both side tabs click
Make sure that the mains lead is securely fixed.
To remove from the TV: ●
Press both tabs and pull on mains connector to release
tabs
AC 220 - 240 V,50 / 60 Hz
Aerial
RF cable
Rear of the TV
Mains lead (supplied)
8
Basic ConnectionExternal equipment and cables shown are not supplied with this TV.Please ensure that the unit is disconnected from the mains socket before attaching or disconnecting any leads.When disconnecting the mains lead, be absolutely sure to disconnect the mains plug at the socket outlet first.
TV onlyConnecting aerial
Do not put the RF cable close to the mains lead to avoid noise. ●Do not place the RF cable under the TV. ●To obtain optimum quality picture and sound, an aerial, the correct cable (75 ● Ω coaxial) and the correct terminating plug are required. If a communal aerial system is used, you may require the correct connection cable and plug ●between the wall aerial socket and the TV. Your local Television Service Centre or dealer may be able to assist you in obtaining the correct ●aerial system for your particular area and the accessories required.Any matters regarding aerial installation, upgrading of existing systems or accessories required, and ●the costs incurred, are the responsibility of you, the Customer.VIERA Link connection ● p. 43Other equipment connection ● p. 48, 49 and p. 56Read the manual of the equipment, too. ●
■Mains Lead

Qui
ck S
tart
G
uide
Bas
ic C
onne
ctio
n
AC 220 - 240 V,50 / 60 Hz
Rear of the TV
Aerial
Mains lead (supplied)
RF cable
RF cableDVD Recorder or VCR
RCA cable
TV, DVD Recorder or VCR
9
Connecting DVD Recorder / VCR

EXIT
TEXT STTL INDEX HOLD
PROGRAMME
REC
ASPECT MENU
INPUTTV AV
OPTION RETURN
MUTE SURROUND
R G Y B
POWER
POWER
OFF TIMER
SD CARD
INFO
1
9
6
7
8
10
11
12
13
1415
16
18
19
21
22
23
25
26
27
20
172
45
3
24
10
Identifying ControlsRemote control
1 Standby On / Off switchSwitches TV On or Off standby ●
2 Aspect (p. 15)Changes aspect ratio from Aspect ●Selection list Also possible by pressing this button ●repeatedly until you reach the desired aspect
3 Main Menu (p. 22)Press to access Picture, Sound and Setup ●Menus
4 Channel / Programme Information (p. 14)Displays channel and programme ●information
5 VIERA TOOLS (p. 21)Displays some special feature icons and ●accesses easily
6 VIERA Link (p. 45)Accesses VIERA Link Menu ●
7 OKConfirms selections and choices ●Press after selecting channel positions to ●quickly change programme
8 Option Menu (p. 14)Easy setting for sound options ●
9 Teletext (p. 17)Switches to teletext mode ●
10 Subtitles (p. 13)Displays subtitles ●
11 Numeric buttonsChanges channel and teletext pages ● When in Standby mode, switches TV On ●
12 Sound MuteSwitches sound mute On or Off ●
13 Volume Up / Down14 Media Player (p. 36)
Switches to SD Card and USB device ●viewing / listening mode
15 Input mode selectionTV - switches Digital TV / Analogue TV ●
mode (p. 13)AV - switches to AV input mode from Input ●
Selection list (p. 19)16 Off Timer (p. 13)
Sets the time the TV automatically turns off ●17 Sound Selection
Changes the sound track in Digital TV ●mode (if available)Changes multiplex sound mode in ●Analogue TV mode (if available) (p. 50)
18 ExitReturns to the normal viewing screen ●
19 Guide (p. 16)Displays TV Guide ●
20 Cursor buttonsMakes selections and adjustments ●
21 Return Returns to the previous menu / page ●
22 Coloured buttonsUsed for the selection, navigation and ●operation of various functions
23 HoldFreeze / unfreeze picture (p. 13) ●Holds the current teletext page ●(teletext mode) (p. 17)
24 Index (p. 17)Returns to the teletext index page ●(teletext mode)
25 Surround (p. 25)Switches surround sound setting ●
26 Channel Up / DownSelects channel in sequence ●
27 Connected equipment operations (p. 20)

Qui
ck S
tart
G
uide
Iden
tifyi
ng C
ontro
ls
11
Many features available on this TV can be accessed via the On Screen Display menu.
SelectEXITChangeRETURN
Page up
Page down
Sound Menu 1/2Mode MusicBassTrebleBalanceHeadphone Volume
OffSurroundVolume CorrectionSpeaker Distance to Wall Over 30cmMPX Stereo
0
11000
Operation guide will help you.
Example (Sound Menu):
How to use remote control
Open the Main MenuMENU Access the menu / store settings
after adjustments have been made or options have been set
Return to the previous menuRETURN
Exit the menu system and return to the normal viewing screen
EXIT
Move the cursor / select the menu item
Move the cursor / adjust levels / select from a range of options
9 SD Card slot8 USB port
12 AV3 terminals11 Headphones jack10 HDMI3 terminal2 Remote control signal receiver
Do not place any objects between the TV ●remote control signal receiver and remote control.
3 C.A.T.S. (Contrast Automatic Tracking System) sensor
Senses brightness to adjust picture quality ●when “Eco Mode” in the Picture Menu is set to “On” (p. 24)
4 Power LEDStandby: red / On: green ● When using the remote control, indicates ●the TV has received a command.
5 Function Select Volume / Contrast / Brightness / Colour / ●Sharpness / Tint (NTSC mode) / Bass (“Music” or “Speech” mode in the Sound Menu) / Treble (“Music” or “Speech” mode in the Sound Menu) / Balance / “Digital TV Auto Tuning” or “Analogue TV Auto Tuning” (p. 28)
6 Increases or decreases the channel position by one. When a function is already displayed, press to increase or decrease the selected function. When in standby mode, switches TV on.
7 Changes the input mode1 Mains power On / Off switch Switch On to turn on the TV or turn the TV ●to Standby mode by the remote control
TV
Using the On Screen Displays
5
3 4
7
6
10
11
12
1 2
9
8

PROGRAMME
INDEX HOLDSTTLTEXT
INPUT
ASPECT
TV AV
REC
OPTION
MUTE SURROUND
R G Y B
POWER
POWER
OFF TIMERMENU
EXIT
RETURN
POWER
12
Auto TuningSearch and store TV channels automatically.These steps are not necessary if the setup has been completed by your local dealer.
4 Select “Home”Please select your viewing environment.
Home Shop
∗
2 Select your areaSelect State / Territory
Northern Territory
QueenslandVictoria
New South Wales / Australian Capital Territory
Tasmania
South AustraliaWestern Australia
3 Select Auto Scan Type
You can now use the remote control to turn On the TV or ●switch the TV to standby mode. (Power LED: On)
Auto Tuning will start to ●search for TV channels and store them.The sorted channel order depends upon the TV signal, the broadcasting system and reception conditions.
change
confirm
Auto Tuning is complete
Auto Scan Type
Digital TV Channels onlyAll Channels
confirm
select
Auto Tuning starts
Auto Tuning
This will take about 6 minutes.
6HCDigital TV Scan 69
62ytilauQepyTemaN lennahCRF Ch
01 lennahC CBBC01 selaW oidaR CBB2601 4E2601 kwN nootraC26
Digital TV: 4 Analogue TV: 2Searching
0HCAnalogue TV Scan 75
Analogue TVAnalogue TV
Digital TVDigital TVDigital TV
9233
Digital TV--
change
start Auto Tuning
1 Plug the TV into mains socket and switch On
∗Viewing environment mode Home : Recommended mode for viewing at home. Select “Home” for optimal picture / power
consumption. “Viewing Mode” is set as “Normal” (p. 24).Shop : Demonstration mode to explain main features of this TV (for in-store display). “Viewing
Mode” is set as “Dynamic” (p. 24).
To return to viewing environment selection mode if you selected “Shop”Shop
You have selected shop mode
Automatic DemoOff On
RETURNPlease select your viewing environment.
Home Shop
RETURN
To change viewing environment mode later on, reset all settings by accessing Shipping Condition. ● “Shipping Condition” (p. 34)

Qui
ck S
tart
G
uide
Bas
icA
uto
Tuni
ngW
atch
ing
TV
AV
INDEXTEXT
MUTE SURROUND
G Y
PROGRAMMEPOWER
RETURN
MENU
HOLDSTTL
ASPECT
OPTION
B
POWER
OFF TIMER
EXIT
TVINPUT
INFO
R
13
Display subtitlesHold
Watching TV
When the TV is ●switched to standby, there will be a clicking sound after a short delay. This is normal.
Other useful functions
Freeze / unfreeze picture Display / hide subtitles (if available)HOLD STTL
Also possible to set the time from “Off timer” in the Setup Menu (p. 26) ●To cancel ● Set to “0” or turn the TV off.To display the remaining time ● Information banner (p. 14)When the remaining time is within 3 minutes, the remaining time will flash on screen. ●
1 Turn power onPOWER
2 Select Digital TV or Analogue TV modeTV
Mains power On / Off switch should be ●On (p. 11).
Also possible to select the mode pressing the TV button ●repeatedly on the remote control or side panel of the TV. (p. 11)
OFF TIMER
Turn the TV off automatically after a fixed period of time (0 / 15 / 30 / 45 / 60 / 75 / 90 minutes)Off Timer
Press repeatedly until desired time appears.
Information banner appears whenever you select a channel
For details ● p. 14
Digital TV
1 BBC ONE WALESCoronation Street
Rating: PG11:00 pm - 11:55 pm Now
All Digital ChannelsSelect favourites
11:35 pm
The selected mode is displayed.
3 Select a channelup
downor
To select the two or three-digit channel ●number, e.g. 112
(in a short time)If one or two-digit channel number, ●e.g. 39
(quickly changes the channel )
Cartoon NwkAll Digital Channels
BBC Radio WalesBBC Radio CymruBBC ONE WalesBBC THREEBBCiCBBC Channel
6781234
watch
select a channel
To select from the Channel List ●
Select a channel using information banner (p. 14)Possible to confirm the programme name before selecting channels.Display information banner if it is not displayed
While the banner is displayed, select a channel
Possible to set display timeout in “Banner Display Timeout” (p. 26).
INFO
Select a channel using TV Guide (p. 16)Possible to confirm the TV Guide (EPG) before selecting channels.Display TV Guide Select a channel
watch
select watch
select

Other useful functions
14
OPTION Check or change the current programme status instantly
Audio Selection (Digital TV mode)Allows you to select between alternative language for sound tracks (if available)
Dual Audio (Digital TV mode)Selects multiplex sound (if available)
MPX (Analogue TV mode)Selects multiplex sound (if available)
Sound Menu (p. 25)
Volume CorrectionAdjusts volume of individual programme or input mode Sound Menu (p. 25)
Watching TV
To change ●
select change
INFO
1 BBCCH 02 Prompt Street
45
All Analogue Channels9:35 pmExample (Analogue TV mode)
Channel Status
Display information bannerAlso appears when changing a channel ●
1 BBC ONE WALESCoronation Street
Rating: PG 4511:00 pm - 11:55 pm Now
All Digital ChannelsSelect favourites
11:35 pm
Software update
Channel position and name
Programme Start / Finish time
Programme
Current timeExample (Digital TV mode)
Features available / Message meanings
Sound mute On
Rating Rating information (p. 50)(Digital TV mode)
Bad signal Poor TV signal quality (Digital TV mode)
Encrypted Scrambled programme (Digital TV mode)
Subtitle service available (Digital TV mode)
Multiple image or audio available (Digital TV mode)
Teletext service available
, I , II ,
Audio mode (p. 50)(Analogue TV mode)
1 - 90 Off Timer remaining timeFor settings ● p. 13
Display information banner
Display the selectable settings for the current programme
To confirm another tuned channel name ●To watch the programme listed in the banner ●Information on the next programme ●(Digital TV mode)
To set display timeout ● “Banner Display Timeout” (p. 26)
To hide ●EXIT
Extra information ●(press again to hide the banner) (Digital TV mode)
INFO
To update the TV software ●(if available)
R
To select a favourite list (Digital TV mode) ●(if the favourite list is created in “Favourites Edit” p. 29 )
B

Bas
icW
atch
ing
TV
Other useful functions
15
Region Select Adjust the standard time Daylight Saving Time Adjust for Summer Time
ASPECT Display Aspect Selection list
SelectChange EXIT
RETURN
Aspect Selection
16:9
Just14:9
4:3 Full4:3
Zoom1Zoom2Zoom3
16:9 14:9 JustDirectly displays the image at “16:9” without distortion (anamorphic).
Displays the image at the standard “14:9” without distortion.
Displays a “4:3” image full-screen. Stretching is only noticeable at the left and right edges.
4:3 4:3 Full Zoom1Displays the image at the standard “4:3” without distortion.
Displays a “4:3” image enlarged horizontally to fit the screen.
Digital TV mode or ●HD signal
Displays a “16:9” letterbox or “4:3” image without distortion.
Zoom2 Zoom3Displays a “16:9” letterbox (anamorphic) image full-screen without distortion.
Displays a “2.35:1” letterbox (anamorphic) image full-screen without distortion. At “16:9”, displays the image at its maximum (with slight enlargement).
Only ”16:9” and “4:3 Full” are available in Digital TV mode. ●Only “16:9” and “4:3” are available in PC input mode. ●Aspect is fixed to “16:9” when “Viewing Mode” is set to “Game” in the Picture Menu. ●Not available in teletext mode. ●Aspect mode can be memorized separately for each SD (Standard definition) and HD (High ●definition) signals except in Digital TV mode.
To change the mode using the ASPECT button only
ASPECT
Press repeatedly until you reach the desired mode
change
select
While the list is displayed, select the mode
Enjoy viewing the picture at its optimum size and aspect.
Aspect Selection16:9
Just4:34:3 FullZoom1Zoom2Zoom3
14:9
Select the region where you live to adjust the standard time.
The time contained in the broadcast signal is ●UTC (Universal Time coordinated) formally known as GMT (Greenwich Mean Time).
Select time offset from the standard time for Summer Time.
Normally select “Auto”. ●If there is a gap between displayed time and ●actual time, set this function.
Region Standard time Daylight Saving Time: Auto(During Summer Time)
NSW / ACT +10:00 +11:00VictoriaQueensland +10:00South Australia +9:30 +10:30Western Australia +8:00Northern Territory +9:30Tasmania +10:00 +11:00
(Based on GMT)These items can be set from “Other settings” in the Setup Menu. (p. 27) ●
Change aspect ratio

HOLDSTTL
POWERINPUT
TV AV
INDEXTEXT
MUTE SURROUND
PROGRAMME
REC
POWER
Y
ASPECT
OPTION RETURN
OFF TIMERMENU
B
EXIT
R G
INFO
Y
All Channels
All Digital Channels
All Analogue Channels
Favourites1
Favourites2
Favourites3
Favourites4
FavouritesAll Channels
16
Using TV Guide
To return to TV EXIT
Using TV Guide enables you to select a programme easily, view programme information, etc.TV Guide―Electronic Programme Guide (EPG) provides an on screen listing of the current and future programmes over the next seven days depending on broadcasters.Digital TV and Analogue TV channels are displayed on the same TV Guide screen. “D” means Digital TV channel and “A” means Analogue TV channel. There will be no programme listings for Analogue TV channels.
When this TV is turned on for the first time, or the TV is switched off for more than a week, it may ●take some time before the TV Guide is completely shown.
To the previous day R
(Digital TV mode)
To the next day G
(Digital TV mode)
watch
select
To view a channel list of the selected favourite list
View TV GuideEach time pressed, the layout will be changed. (Landscape / Portrait)
(favourite list)
select a favourite list
view
To list favourite channels p. 29
Only Analogue TV channels are listed
To watch the programmeSelect the current programme or channel B
To view a channel list of the selected type
All Types
Movie
News
Entertainment
Sport
Prog. TypeAll Types
Children’s
Music ....
(Type list)
Y
select type
view
TV Guide: Landscape
All ChannelsAll Types11 Home
HomeTime:
WorldJadePearl
11168184
DDDD
1A2A3A
View
Select channel
Select programmeInfoPortrait/Landscape
RETURN+24 hours FavouritesProg. Type
EXIT
Wed 10 Mar 2010 10:27 am
Wed 10 Mar 2010
11:30 am - 12:00 pm DIY SOS : We open in the Battersbys
Page down
Page up
Hot WarsEmerald
Holiday ProgramThe BillEast ender
10 O’ clock News BBC Pepsi Char.
Live junctionDrama
NEWS
Sports
The Bill
Good bye
Red Cap
Coronation Street
DIY SOS
GUIDE
-24 hours
11:00am am pm pm11:30 12:00 12:30 1 :00 pm
TV Guide dateProgramme
Landscape (Displays by channel)
Current date and timeExample:
Channel position and name
TV Guide time
D 11 Home
D 16 World D 84 Pearl A 1D 81 Jade
View
Select programme
Select channelRETURN Page down
+24 hours
EXIT Page up
Favourites
Info
TV Guide: Portrait
All Channels
-24 hours Prog. Type
Portrait/Landscape
East ender
GUIDE
DIY SOSThe BillRed CapLive junctionPOP 100Rugby
News
All Types
Wed 10 Mar 2010 10:27 am
Wed 10 Mar 2010
11:00 am - 12:30 pm12:30 pm - 02:00 pm02:00 pm - 02:30 pm02:30 pm - 03:00 pm03:00 pm - 03:30 pm03:30 pm - 04:30 pm04:30 pm - 05:00 pm05:00 pm - 05:30 pm
Portrait (Displays by time)
Example:D: Digital TVA: Analogue TV
To view details of the programme(Digital TV mode)Select the programme
select
INFO
Press again ●to return to TV Guide.

Bas
icU
sing
TV
Gui
deVi
ewin
g Te
lete
xt
17
PROGRAMME
MUTE SURROUND
POWER
ASPECT
OPTION RETURN
OFF TIMER
INDEX HOLDSTTLTEXT
MENU
R G Y B
EXIT
Viewing TeletextTeletext services are the text information provided by the broadcasters.The features may vary depending on the broadcasters.What is FASTEXT mode? In FASTEXT mode, four differently coloured subjects are situated at the bottom of the screen. To access more information about one of these subjects, press the appropriately coloured button. This facility enables fast access to information on the subjects shown.What is TOP mode? (In case of TOP text broadcasting)TOP is a particular improvement of the standard teletext service that results in an easier search and effective guide.
Fast overview of the teletext information available ●Easy to use step-by-step selection of the topical subject ●Page status information at the bottom of the screen ●Available page up / down
R G
To select among subject blocks B
To select next subject within the subject block(After the last subject, it moves to the next subject block.)
Y
What is List mode?In List mode, four differently coloured page numbers are situated at the bottom of the screen. Each of these numbers can be altered and stored in the TV’s memory. (“Store frequently viewed pages” p. 18)
Functions (Teletext mode)
Stop automatic updating(If you wish to hold the current page without updating)To resume
HOLD
HOLD
INDEX STTL
Return to the main index page
MENU Reveal hidden words e.g. quiz page answers
To hide R
Hold
INDEX
Reveal hidden data
Call up Subtitle
1 Switch to TeletextTEXT Displays Index ●
(content variesdepending on the broadcasters)
2 Select the page (up to page 899)
<< 01 02 03 04 05 06 07 >>
TELETEXT INFORMATION
17:51 28 Feb Time /date
Current page number
Sub page number
Colour bar
To adjust contrast
MENU (press three times) As the blue bar is displayed
To return to TV TEXT
or EXIT
To change mode “Teletext” in the Setup Menu (p. 26)
or orR G Y B
(Corresponds to the colour bar)or
up
down
Display subtitlesCall up P801 (subtitle page) if available. ●If you press this button during P801 ●is displayed, teletext mode will be cancelled and return to TV.
R

18
Functions (Teletext mode)
Operations can be made only in Teletext screen. ●
Watch TV and Teletext in two windows at once
Normal (FULL)(BOTTOM)
(Expand the BOTTOM half)
(TOP)
(Expand the TOP half)
Store frequently viewed pages in the colour bar (List mode only)
The number changes to white.
press and hold
To change stored pagesEnter new page number
press and hold
View sub page (Only when teletext is more than one page)
To view specific sub page
Appears at top of the screen
Sub pages: ●The number of sub pages varies depending on the broadcasters.It may take some time for searching, during which time you can watch TV.
The news page provides a function that indicates arrival of latest news (“News Flash”). ●
View the TV picture while searching for a teletext pageTeletext automatically updates itself when new information becomes available.
P108 Appearswhenupdating iscompleted
Changes to TV screen temporarily (You cannot change the programme.)
Viewing Teletext
(press twice)
G
B
Y
MENU
MENU
MENU
MENU
Select teletext onlyor picture / teletext
Correspondingcolour button(As page is displayed)
Colour button youwant to change
View in multi window
FULL / TOP / BOTTOM
Store frequently viewed pages
View sub page
Watch TV while waiting for update
Enter the 4-digit numberexample: P6
View the updated page
Y

Bas
icVi
ewin
g Te
lete
xtW
atch
ing
Ext
erna
l inp
uts
MENUASPECT
POWER
OFF TIMER
INDEX HOLDSTTLTEXT
OPTION RETURN
MUTE SURROUND
R G Y B
EXIT
PROGRAMME
INPUTTV AV
REC
POWER
19
Watching External inputsConnect the external equipment (VCRs, DVD equipment, PC, etc.) and you can watch through the input.
To connect the equipment ● p. 9, 48 and p. 49The Remote Control is capable of operating some functions of selected external equipment.For details, see the manual of the equipment or ask your local dealer.
To return to TV TV
1 Display the input selection menuAV
2 Select the input mode of the connected equipment
3 View
select
access
You can also select the input using the AV button on the remote ●control or the side panel of the TV (p. 11).Press the button repeatedly until the desired input is selected. You can label or skip each input mode ● “Input Labels” (p. 33)Skipped inputs will not be displayed when the AV button is pressed.
Example (AV2) Example (PC)Input Selection
AV1AV2AV3PCHDMI1HDMI2HDMI3TV
Input SelectionAV1AV2AV3PCHDMI1HDMI2HDMI3TV
16:9
PC640X480 / 60Hz16:9
The selected mode is displayed on the screen.
If the external equipment has an aspect adjustment function, set to ●“16:9”.
Example (AV2)
You can also listen to PC sound with the audio cable connected. ●(To connect p. 48 and p. 49)You can setup some functions ● Advanced PC Settings (p. 24) in the Picture Menu and PC Setup (p. 26) in the Setup MenuFor HDMI-compatible PC (p. 51 and p. 52), possible to connect to ●HDMI terminals (HDMI1 / HDMI2 / HDMI3) by using HDMI cable.
Example (PC)

20
POWER StandbySet to Standby mode / Turn on
PlayPlayback videocassette / DVD
StopStop the operation
Rewind / Skip / SearchVCR: Rewind, view the picture rapidly in reverseDVD: Skip to the previous track or title
Press and hold to search backward
Fast-forward / Skip / SearchVCR: Fast-forward, view the picture rapidly forwardDVD: Skip to the next track or title
Press and hold to search forward
PausePause / ResumeDVD: Press and hold to play at slow speed
PROGRAMME Programme Up / DownSelect programme
REC RecordStart recording
The equipment connected to the TV can be directly operated with the below buttons of this TVremote control.
How to change the code for each equipmentEach type of Panasonic equipment has its own remote control code.Please change the code for each equipment you want to operate.If you operate the connected equipment in VIERA Link (p. 46), select the code “73”.Press and hold POWER during the following operations
Enter the appropriate code (see table below)
Press
Type of equipment CodeDVD Recorder / DVD Player 70 (default)
Player theatre / Blu-ray Disc theatre 71VCR 72
The equipment using in VIERA Link “VIERA Link Control” (p. 46) 73
Confirm if the remote control works correctly after changing the code. ●The codes may be reset to default values if batteries are replaced. ●Some operations may not be possible on some equipment models. ●
Watching External inputsOperating the equipment with the TV remote control
Bas
icA
dvan
ced
Wat
chin
g E
xter
nal i
nput
sH
ow to
Use
VIE
RA
TOO
LS
PROGRAMME
INDEX HOLDSTTLTEXT
INPUT
MENUASPECT
TV AV
REC
OPTION RETURN
MUTE SURROUND
R G Y B
POWER
POWER
OFF TIMER
EXIT
21
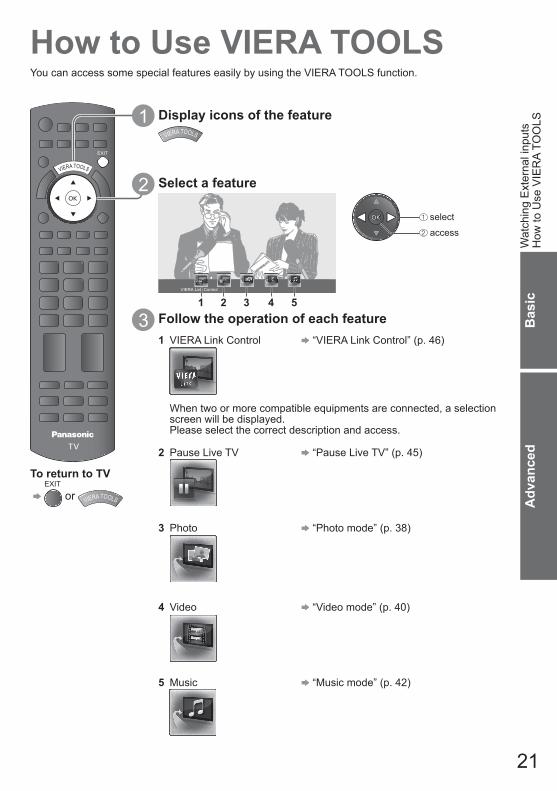
How to Use VIERA TOOLSYou can access some special features easily by using the VIERA TOOLS function.
To return to TV
EXIT
or
1 Display icons of the feature
select
access
2 Select a feature
VIERA Link Control
3 Follow the operation of each feature1 VIERA Link Control “VIERA Link Control” (p. 46)
2 Pause Live TV “Pause Live TV” (p. 45)
3 Photo “Photo mode” (p. 38)
4 Video “Video mode” (p. 40)
5 Music “Music mode” (p. 42)
When two or more compatible equipments are connected, a selection screen will be displayed.Please select the correct description and access.
1 2 3 4 5

TEXT STTL INDEX HOLD
PROGRAMME
REC
ASPECT
INPUTTV AV
OPTION
MUTE SURROUND
G Y
POWER
POWER
OFF TIMERMENU
RETURN
EXIT
R B
22
How to Use Menu FunctionsVarious menus allow you to make settings for the picture, sound, and other functions.
To return to TV at any time
EXIT
To return to the previous screen
RETURN
To change menu pages
up
down
4 Adjust or selectPicture Menu 1/2
Viewing Mode NormalContrastBrightnessColourSharpnessTintColour BalanceVivid Colour
Normal
090
5050
0
OnEco Mode Off (example)
store or access( Required by some functions)
change
Colour Balance Normal
Changed
To reset the settingsTo reset the picture settings only ●
“Reset Picture Defaults” in the Picture Menu (p. 24)
To reset the sound settings only ● “Reset Sound Defaults” in the Sound Menu (p. 25)
To reset all settings ● “Shipping Condition”in the Setup Menu (p. 34)
Choose from among alternatives
Adjust using the slide bar
Go to the next screen
Enter characters by free input menu
Number and positions of alternatives
Sharpness 50Moved
Digital TV Tuning Menu Access
Displays the next screen
To delete a character ● R
To delete all characters ● B
Every press changes the character by one. Leave it for a second to set the character, or press OK or any numeric button within a second.See the table below for the corresponding characters for each numeric button.
Numeric buttons Characters Numeric buttons Characters. 1 ! : # + - * _ ( ) m n o 6 M N O
a b c 2 A B C p q r s 7 P Q R Sd e f 3 D E F t u v 8 T U Vg h i 4 G H I w x y z 9 W X Y Zj k l 5 J K L Space 0
User inputNameA B C D E F G H I J K L M NU V W X Y Z 0 1 2 3 4 5 6a b c d e f g h i j k l m nu v w x y z ( ) + - . * _
O P Q R S T7 8 9 ! : #o p q r s t
RETURN
Store set
selector
1 Display the menuMENU
2 Select the menuMain Menu
PictureSoundSetup (example)
3 Select the itemPicture Menu 1/2
Viewing Mode NormalContrastBrightnessColourSharpnessTintColour BalanceVivid Colour
Normal
090
5050
0
OnEco Mode Off (example)
Displays the functions that can be set ●(varies according to the input signal)
access
select
select

Adv
ance
dH
ow to
Use
Men
u Fu
nctio
ns
(p. 26)
(p. 26 and p. 27)
(p. 24)
(p. 25)
Picture Menu 1/2Viewing Mode NormalContrastBrightnessColourSharpnessTintColour Balance Normal
090
5050
0
Vivid Colour OnEco Mode Off
Picture Menu 2/2OffOn
P-NR3D-COMBPanelAdvanced PC SettingsReset Picture Defaults
OnAccessReset
Sound Menu 1/2Mode MusicBassTreble
BalanceHeadphone Volume
OffSurroundVolume CorrectionSpeaker Distance to Wall Over 30cm
0
1200
0
AccessEqualizer0
Sound Menu 2/2
Digital Audio Preference Dolby DMPX Stereo
Auto0 dBDigital
SPDIF SelectionMPEG Optical LevelHDMI1 InputReset Sound Defaults Reset
Setup Menu
Digital TV Tuning Menu
Display SettingsVIERA Link SettingsSystem Menu
Off Timer OffChild Lock
Other Settings
Access
PC Setup AccessDVI Position Settings Access
AccessAnalogue TV Tuning Menu Access
AccessAccessAccessAccess
Auto StandbyPower Save16:9 OverscanRegion Select NSW / ACT
Off24p Smooth Film OffIntelligent Frame Creation Off
OffOn
Daylight Saving TimeDVI Input Setting Normal
Auto
Other Settings
Software LicenceSystem Information
Shipping Condition AccessSystem Update Access
AccessAccess
System Menu
Auto TuningManual TuningUpdate Channel ListNew Channel MessageSignal Condition
Favourites Edit AccessChannel List Access
AccessAccessAccessOnAccess
Add MPEG-4 AVC Channels Access
Digital TV Tuning Menu
Main MenuPictureSoundSetup
Picture
Sound
Setup (p. 27)
(p. 27)
Manual Tuning
Channel List AccessAuto Tuning Access
Access
Analogue TV Tuning Menu
(p. 26)
Input LabelsBanner Display TimeoutPlaying Time Display
Teletext TOPSide Panel High
Access3 secondsOn
Display Settings
(p. 26)
Power off LinkStandby Power SaveIntelligent Auto Standby
VIERA LinkPower on Link
OnOffOnOffOff
VIERA Link Settings
(p. 27)
23Depending on the received signals, available items are varied. ●
Overview

24
Menu listMenu Item Adjustments / Configurations (alternatives)
Pict
ure
Viewing Mode
Basic picture mode (Dynamic / Normal / Cinema / True Cinema / Game)In each Viewing Mode and input, Contrast, Brightness, Colour, Sharpness, Tint, Colour Balance, Vivid Colour, Eco Mode, P-NR and 3D-COMB can be adjusted and stored to suit your particular viewing requirement.
Set for ● each input signal.Dynamic : Provides enhanced picture contrast and sharpness when
viewing in a bright roomNormal : Recommended for viewing under normal ambient room
lighting conditions.Cinema : For watching movies in a darkened room with improving the
performance of contrast, black and colour reproductionTrue Cinema : Precisely reproduces the original image quality without any
revision.Game : Fast response signal specifically to provide suitable images
for playing gamesNot valid on TV mode ●A continuous record of time spent using Game mode can ●be displayed in the top right of the screen.
“Playing Time Display” (p. 26)
Contrast, Brightness, Colour, Sharpness
Increases or decreases the levels of these options according to your personal preference
Tint The picture hue can be adjusted to suit your taste.For NTSC signal, Component or HDMI input ●
Colour Balance Allows you to set the overall colour tone of the picture (Cool / Normal / Warm)Not valid when the viewing mode is set to “True Cinema” ●
Vivid Colour Automatically adjusts colours to vivid ones (Off / On)Not valid on PC signal ●
Eco ModeAutomatically adjusts the screen brightness appropriately as thesurrounding light level lowers to reduce the power consumption (Off / On)
Not available in shop mode (Dynamic picture mode) ●
P-NRPicture Noise ReductionAutomatically reduces unwanted picture noise and flicker noise in the contoured parts of a picture (Off / Min / Mid / Max)
Not valid on PC signal ●
3D-COMB
Makes still or slow moving pictures look more vivid (Off / On)Occasionally, while viewing still or slow moving pictures, colour ●patterning may be seen. Set to “On” to display sharper and more accurate colours.For PAL or NTSC signal reception only ●Not valid on Component, PC, HDMI and Media Player ●
Panel
Turns the screen off when you select “Off” (Off / On)The sound is active even if the screen turns off. ●Press any buttons to turn the screen on. ●This function is effective in reducing power consumption when listening ●to a sound without watching the TV screen.
Adv
ance
d PC
Set
tings R-Gain,
G-Gain,B-Gain
Adjusts each gain
R-Cutoff,G-Cutoff,B-Cutoff
Cuts off each area
Gamma Changes the gamma curve (S Curve / 1.8 / 2.0 / 2.2 / 2.4 / 2.6)Please note the numerical values are reference for the adjustment. ●
Reset PC Settings Press the OK button to reset the Advanced PC Settings to the default.
Reset Picture Defaults
Press the OK button to reset settings of Picture Viewing Mode to the default.

Adv
ance
dH
ow to
Use
Men
u Fu
nctio
ns
25
Menu Item Adjustments / Configurations (alternatives)So
und
Mode
Selects basic sound mode (Music / Speech / User)The selected mode affects all input signals. ●
Music : Improves sound quality for watching music videos, etc.Speech : Improves sound quality for watching news, drama, etc.
In Music and Speech modes, you can adjust “Bass” and “Treble” ●settings, and those settings will be stored for each mode.
User : Adjusts the sounds manually by using the equalizer to suit your favourite sound quality.
For the User mode, “Equalizer” will appear on the Sound Menu ●instead of “Bass” and “Treble”. Select the “Equalizer” and adjust the frequency. “Equalizer” (below)
Bass Increases or decreases level to enhance or minimise lower, deeper sound output Treble Increases or decreases level to enhance or minimise sharper, higher sound output
Equalizer
Adjusts the frequency level to suit your favourite sound qualityThis function is available when “Mode” is set to “User”. ●Select the frequency and change the frequency level by using the cursor button. ●If you want to enhance the bass sound, raise the level of the lower frequency. If ●you want to enhance the treble sound, raise the level of the higher frequency. ● To reset the levels of each frequency to the default settings, select the “Reset Equalizer Settings” by using cursor button, and then press the OK button.
Balance Adjusts the volume level of right and left speakersHeadphone Volume Adjusts the volume of the headphones
Surround
Surround sound settings (Off / V-Audio / V-Audio Surround)V-Audio : Provides a dynamic enhancer to simulate improved
spatial effectsV-Audio Surround : Provides a dynamic enhancer of width and depth to
simulate improved spatial effects ● Switching is also possible by the Surround button on the remote control (p. 10).
Volume Correction Adjusts the volume of individual channel or input mode
Speaker Distance to Wall
Adjusts the low frequency sound (Over 30cm / Up to 30cm) If the back space between the TV and wall is over 30 cm, “Over 30cm” is recommended. ● If the back space between the TV and wall is within 30 cm, “Up to 30cm” is recommended. ●
MPX
Selects multiplex sound mode (if available) (p. 50)Normally : Stereo ●Stereo signal cannot be received: Mono ●M1 / M2 : Available while mono signal is transmitted ●Analogue TV mode only ●
Digital Audio Preference
Selects the initial setting for Audio tracks (Dolby D / MPEG)If programme has both Dolby Digital and MPEG audio tracks, priority is given to what you selectDolby D : A method of coding digital signals developed by Dolby
Laboratories. Apart from stereo (2ch) audio, these signals can also be multi-channel audio.
MPEG : An audio compression method that compresses audio to small size without any considerable loss of audio quality.
Digital TV mode only ●
SPDIF Selection
SPDIF : A standard audio transfer file formatSelects the initial setting for digital audio output signal from DIGITAL AUDIO OUT terminal (Auto / PCM)Auto : Dolby Digital is output as Dolby Digital Bitstream. HE-AAC and
MPEG are output as PCM.PCM : Digital output signal is fixed to PCM.
For Digital TV mode or Video mode (p. 40) ●MPEG Optical Level
Adjusts the audio level of MPEG output from DIGITAL AUDIO OUT terminal as the initial setting (0 / -2 / -4 / -6 / -8 / -10 / -12dB)
● Normally, MPEG sound is louder comparing with the other types of audio track.Digital TV mode only ●
HDMI1 / 2 / 3 Input
Select to fit the input signal (Digital / Analogue) (p. 51).Digital : HDMI cable connectionAnalogue : HDMI-DVI adapter cable connection
HDMI input mode only ●Reset Sound Defaults
Press the OK button to reset settings of the present Mode, Balance, Headphone Volume and Surround in the Sound Menu to the default.

26
Menu Item Adjustments / Configurations (alternatives)
Setu
p
PC S
etup
InputResolution
Switches to a wide viewVGA (640 × 480 pixels), WVGA (852 × 480 pixels), ●XGA (1,024 × 768 pixels), WXGA (1,280 × 768 pixels, 1,366 × 768 pixels)Options change depending on signals ●
Clock Set to the minimum level if noise occurs.
H-posAdjusts horizontal position
V-posAdjusts vertical position
Clock Phase Eliminates flicker and distortionAdjust after Clock adjustment ● ● Set to the minimum level if noise occurs
SyncPC sync signal type (H & V / SOG)H & V : by the horizontal and vertical signals from your PCSOG : Sync on Green sync from your PC
Reset PC Settings Press the OK button to reset the PC Setup settings to the default.
DVI P
ositi
on S
ettin
gs H-pos Adjusts horizontal position settings of DVI
V-pos Adjusts vertical position settings of DVI
Reset DVI Position Settings
Press the OK button to reset the DVI Position Settings to the default.
Off Timer Sets the time the TV automatically goes to Standby mode (Off / 15 / 30 / 45 / 60 / 75 / 90 minutes) (p. 13)
Child Lock Locks a channel / AV input to prevent access to it (p. 32)
Tuni
ng M
enu
Favourites Edit Creates list of favourite channels (Digital TV mode) (p. 29)
Channel List Skips the unwanted channels or edits channels (p. 29 and p. 31)Auto Tuning Sets all Digital TV or Analogue TV channels automatically (p. 30 and p. 31)Manual Tuning Sets the TV channels manually (p. 30 and p. 31)Update Channel List Updates the channel list while keeping your settings (Digital TV mode) (p. 30)
New Channel Message
Selects whether to give a notification message when a new channel is found (Digital TV mode) (Off / On) (p. 30)
Signal Condition Checks the Digital TV signal condition (p. 30)
Add MPEG-4 AVC Channels
Activates the reception of MPEG-2 and MPEG-4 AVC channelsUse this function if MPEG-4 AVC services start in your area. ●All the previous tuning settings are erased. ●Once activated, this option is removed from the Digital TV Tuning Menu. ●
Dis
play
Set
tings
Teletext Teletext display mode (TOP(FASTEXT) / List) (p. 17)
Side Panel Increases the brightness of the side panel (Off / Low / Mid / High)The recommended setting is “High” to prevent panel “image retention”. ●
Input Labels Labels or skips each input terminal (p. 33)Banner Display Timeout
Sets how long the information banner stays on screen (p. 14)(0 (No display) / 1 / 2 / 3 / 4 / 5 / 6 / 7 / 8 / 9 / 10 seconds)
Playing Time Display
Set to “On” to display a continuous record of time spent using Game mode every 30 mins (Off / On)
● This function is available when “Game” is selected in “Viewing Mode” (p. 24).

Adv
ance
dH
ow to
Use
Men
u Fu
nctio
ns
27
Menu Item Adjustments / Configurations (alternatives)Se
tup
VIER
A Li
nk S
ettin
gsVIERA Link Sets to use VIERA Link functions (Off / On)
VIERA Link functions become available when “VIERA Link” is set to “On” (p. 44). ●Power on Link Sets to use Power on Link functions (Off / On) (p. 44)Power off Link Sets to use Power off Link functions (Off / On) (p. 44)
Standby Power Save
Controls the power consumption in Standby mode of the connected equipment to reduce the power consumption (Off / On) (p. 44)
This function is available when “VIERA Link” is set to “On” and “Power ●off Link” is set to “On”.
Intelligent Auto Standby
Makes non-watched or non-used connected equipment go into Standby mode to reduce the power consumption (Off / On (With reminder) / On (No reminder)) (p. 44)
This function is available when “VIERA Link” is set to “On”. ●
Syst
em M
enu
Shipping Condition Resets all settings to the original condition (p. 34)
System Update Downloads new software to TV (p. 35)
Software Licence Displays the software licence information
System Information Displays the system information of this TV
Oth
er S
ettin
gs
Intelligent FrameCreation
Automatically compensates the picture frame rate and removes juddering movements to make the images smooth and clear (Off / On)
Set to “Off” if noise is generated on the screen. ● This function is not available for selection (default to “Off”) when “Viewing ●Mode” is set to “Game” or in the mode of PC input or photo.
24p Smooth Film
Automatically compensates the picture frame rate to make the 24p source movie images smooth (Off / On)
This is available only for 24p signal input and displayed instead of ●“Intelligent Frame Creation”. This function is not available for selection (default to “Off”) when “Viewing ●Mode” is set to “Game” or in the mode of PC input or photo.
Auto Standby
Sets the time the TV automatically goes to Standby mode when no operation is performed for the selected times (Off / 2 / 4 hours)
Automatic input switching with the connected equipment affects this ●function and time-count will be reset. ● The notification message will appear 3 minutes before going to Standby mode.
Power Save Reduces brightness of picture to economise on power consumption (Off / On)
16:9 Overscan
Selects the screen area for displaying the image (Off / On)On: Enlarges the image to hide the edge of the imageOff: Displays the image in the original size
Set to “On” if noise is generated on the edges of the screen. ●This function is available when aspect is set to “16:9”. ●This function can be memorized separately for SD (Standard Definition) ●and HD (High Definition) signals.
Region Select
Selects the region where you live to adjust the standard time (NSW / ACT / Victoria / Queensland / South Australia / Western Australia / Northern Territory / Tasmania) (p. 15)
Daylight Saving Time
Select time offset from the standard time for Summer Time (Auto / Off / +1/2 hour / +1 hour) (p. 15)
Set to “Auto” normally. ●
DVI Input Setting
Changes the black level in the image for HDMI input mode with DVI input signal manually (Normal / Full)
●When the DVI input signal from the external equipment, especially from PC, is displayed, the black level may not be suitable. In this case, select “Full”.The black level for HDMI input signal will be adjusted automatically. ●
A different menu will be displayed in the mode of Media Player (p. 36 - 42). ●Only available items can be selected. ●

PROGRAMME
INDEX HOLDSTTLTEXT
INPUT
ASPECT
AV
REC
OPTION
MUTE SURROUND
POWER
POWER
OFF TIMER
RETURNRETURN
MENU
EXIT
R G Y B
TV
28
Tuning and Editing ChannelsYou can make Auto Tuning, listing your favourite channels, skipping unwanted channels, etc.
To return to TV EXIT
1 Select Digital TV or Analogue TVTV
4 Select “Digital TV Tuning Menu” or “Analogue TV Tuning Menu”
6 Set (see p. 29 - 31)
access
select
access
select
5 Select a function
Setup MenuOff Timer Off
AccessChild LockAnalogue TV Tuning MenuDisplay SettingsVIERA Link SettingsSystem MenuOther Settings
Setup MenuOff Timer Off
AccessChild LockDigital TV Tuning MenuDisplay SettingsVIERA Link SettingsSystem MenuOther Settings
Digital TV Tuning Menu Analogue TV Tuning Menu
access
select
For details ● p. 31
For details ● p. 29 and p. 30
Analogue TV Tuning Menu
Auto TuningManual Tuning
Channel List AccessAccessAccess
Digital TV Tuning Menu
Auto TuningManual TuningUpdate Channel ListNew Channel MessageSignal Condition
Favourites Edit AccessChannel List Access
AccessAccessAccessOnAccess
Digital TV Tuning Menu Analogue TV Tuning Menu
The selected mode is displayed on the ●screen (p. 13).
2 Display the menuMENU
3 Select “Setup”Main Menu
PictureSoundSetup
For Auto Tuning, using the buttons on the side panel of the TV (p. 11)
Press repeatedly until “Auto Tuning” appearsF
Access “Auto Tuning” TV
Start “Auto Tuning”TV
To return to TV ● F

Adv
ance
d Tu
ning
and
Edi
ting
Cha
nnel
s
29
Create your favourite channel lists (Favourites) from various broadcasters (up to 4: Favourites1 to 4).The Favourites lists are available from the Information banner (p. 14) and the TV Guide (p. 16).
Digital TV Favourites Editor
TEN DigitalAll Digital Channels
1ABC TV Sydney2SBS DIGITAL13FTV guide47 Digital7NINE DIGITAL97 HD Digital707 Guide77
Favourites1
Digital TV Favourites Editor
TEN DigitalAll Digital Channels
1ABC TV Sydney2SBS DIGITAL13FTV guide47 Digital7NINE DIGITAL97 HD Digital707 Guide77
Favourites1TEN Digital1
A channel is added
Add it to the Favourites list
StoreRETURN
Select a channel to list
You can hide unwanted channels. The hidden channels cannot be displayed except in this function. Use this function to skip unwanted channels.
Digital TV Channel List7072
105719720
17
CBBC ChannelCartoon NwkBBCiBBC Radio WalesBBC Radio CymruBBC ONE WalesBBC THREE
reveal / hide
select
:reveal:hide (skip)
To reveal all channels ● Y
To retune each channel (Manual Tuning) ● R (p. 30)
To edit channelsYou can also edit each channel in Channel List.
Select a channel and reveal / hide
Digital TV Tuning Menu
To name the Favourites ● R
● To display another Favourites
G To add all channels ● to the list Y
Channel numbers are defined by the broadcaster and cannot be changed. ●Hidden channels (see below) can be selected but not viewed. ●
To edit List
Select the field of Favourites to edit and:
You can set characters by using numeric ●buttons (p. 22).
To delete the channel ● To delete all channels ● Y
User inputNameA B C D E F G H I J K L M NU V W X Y Z 0 1 2 3 4 5 6a b c d e f g h i j k l m nu v w x y z ( ) + - . * _
O P Q R S T7 8 9 ! : #o p q r s t
(maximum: ten characters)
Set characters set
selectRETURN
Store
To swap the channel position ● G
Enter the new position number Store
G
1 BBC ONE WALESCoronation Street
Rating: PG11:00 pm - 11:55 pm Now
All Digital ChannelsSelect favourites
11:35 pm
Channel position
or
Select a channel to edit and:
Channel List Skip unwanted channels / Edit channels
Favourites Edit List favourite channels
add
select
To move the channel ● G Select the new position or Confirm
G
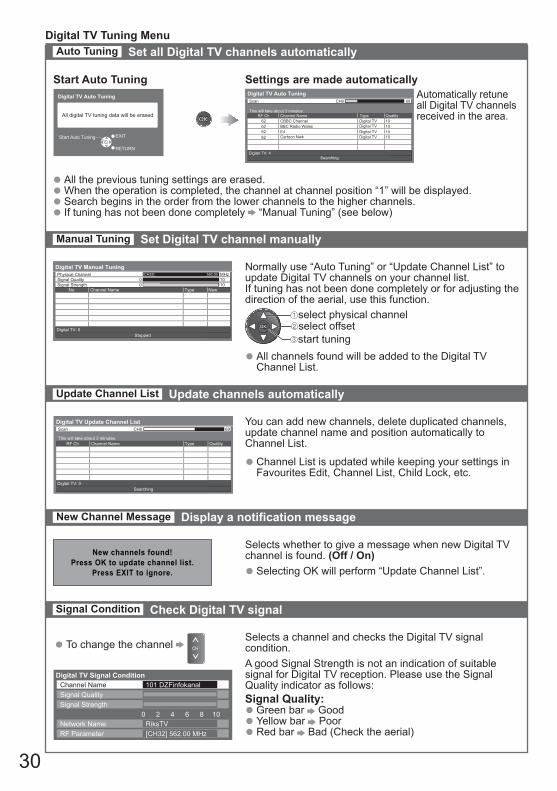
Auto Tuning Set all Digital TV channels automatically
Signal Condition Check Digital TV signal
To change the channel ●
Digital TV Signal ConditionChannel Name 101 DZFinfokanalSignal QualitySignal Strength
Network Name RiksTV0 2 4 6 8 10
RF Parameter [CH32] 562.00 MHz
A good Signal Strength is not an indication of suitable signal for Digital TV reception. Please use the Signal Quality indicator as follows:Signal Quality:
Green bar ● GoodYellow bar ● PoorRed bar ● Bad (Check the aerial)
Selects a channel and checks the Digital TV signal condition.
Selecting OK will perform “Update Channel List”. ●
Selects whether to give a message when new Digital TV channel is found. (Off / On)New channels found!
Press OK to update channel list.Press EXIT to ignore.
New Channel Message Display a notification message
Manual Tuning Set Digital TV channel manually
select physical channel
start tuning select offset
All channels found will be added to the Digital TV ●Channel List.
Normally use “Auto Tuning” or “Update Channel List” to update Digital TV channels on your channel list.If tuning has not been done completely or for adjusting the direction of the aerial, use this function.
Digital TV Manual Tuning
Analogue Scan 21 68
weNTypeemaN lennahC.oN
Digital TV: 0Stopped
Signal Strength 0 100ytilauQ langiS 10
Physical Channel 562,00 [CH32] MHz
Update Channel List Update channels automatically
You can add new channels, delete duplicated channels, update channel name and position automatically to Channel List.
Channel List is updated while keeping your settings in ●Favourites Edit, Channel List, Child Lock, etc.
Digital TV Update Channel List
ytilauQepyTemaN lennahCRF Ch
Searching
Analogue Scan 21 68CH6Scan 69
This will take about 3 minutes.
Digital TV: 0
Automatically retune all Digital TV channels received in the area.
Start Auto Tuning Settings are made automatically
All the previous tuning settings are erased. ●When the operation is completed, the channel at channel position “1” will be displayed. ●Search begins in the order from the lower channels to the higher channels. ●If tuning has not been done completely ● “Manual Tuning” (see below)
All digital TV tuning data will be erased
Digital TV Auto Tuning
EXIT
RETURN
Start Auto Tuning
Digital TV Auto TuningAnalogue Scan 21 68
RF Ch
Searching
This will take about 3 minutes.
69CH6Scan
62626262
Digital TV: 4
TypeDigital TV Digital TV
Channel Name
1010
1010
Digital TVDigital TVCartoon Nwk
Quality
E4BBC Radio WalesCBBC Channel
30
Digital TV Tuning Menu
Adv
ance
d Tu
ning
and
Edi
ting
Cha
nnel
s
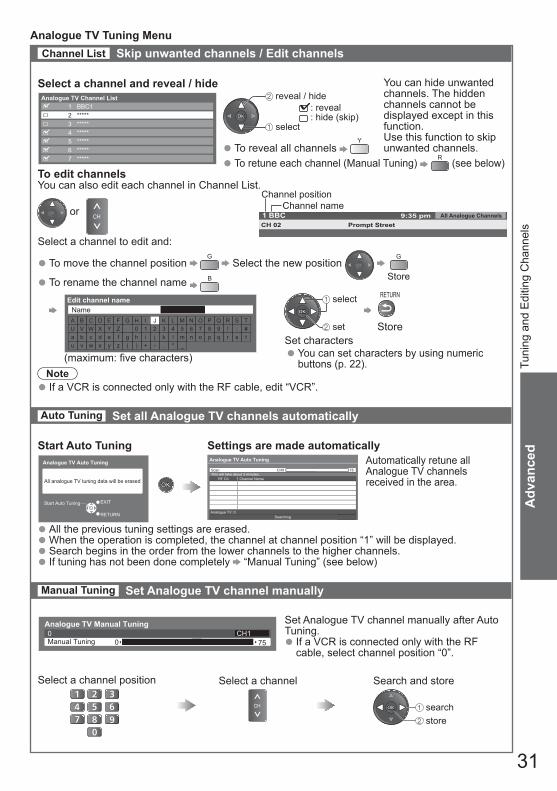
Channel List Skip unwanted channels / Edit channels
Auto Tuning Set all Analogue TV channels automatically
Manual Tuning Set Analogue TV channel manually
Automatically retune all Analogue TV channels received in the area.
Settings are made automaticallyStart Auto Tuning
All analogue TV tuning data will be erased
Analogue TV Auto Tuning
EXIT
RETURN
Start Auto Tuning
Analogue TV Auto Tuning
emaN lennahCRF Ch
Analogue TV: 0Searching
This will take about 3 minutes.Scan CH0 75
All the previous tuning settings are erased. ●When the operation is completed, the channel at channel position “1” will be displayed. ●Search begins in the order from the lower channels to the higher channels. ●If tuning has not been done completely ● “Manual Tuning” (see below)
Set Analogue TV channel manually after Auto Tuning.
If a VCR is connected only with the RF ●cable, select channel position “0”.
0CH33
Analogue TV Manual Tuning
Manual Tuning 0 75CH1
Select a channel position Select a channel Search and store
store search
31
Analogue TV Tuning Menu
Select a channel and reveal / hideAnalogue TV Channel List
1234567
BBC1******************************
: reveal: hide (skip)
To reveal all channels ● Y
Channel positionChannel name
To edit channelsYou can also edit each channel in Channel List.
Select a channel to edit and:
If a VCR is connected only with the RF cable, edit “VCR”. ●
You can hide unwanted channels. The hidden channels cannot be displayed except in this function. Use this function to skip unwanted channels.
reveal / hide
select
1 BBCCH 02 Prompt Street
All Analogue Channels9:35 pmor
● To retune each channel (Manual Tuning) R (see below)
To rename the channel name ● B Edit channel name
NameA B C D E F G H I J K L M NU V W X Y Z 0 1 2 3 4 5 6a b c d e f g h i j k l m nu v w x y z ( ) + - . * _
O P Q R S T7 8 9 ! : #o p q r s t
(maximum: five characters)
set
select
Store
RETURN
Set characters ● You can set characters by using numeric buttons (p. 22).
Store
GTo move the channel position ●
G Select the new position
RETURN
INDEX HOLDSTTLTEXT
INPUT
ASPECT
TV AV
OPTION
MUTE SURROUND
POWER
OFF TIMER
B
MENU
EXIT
YR G
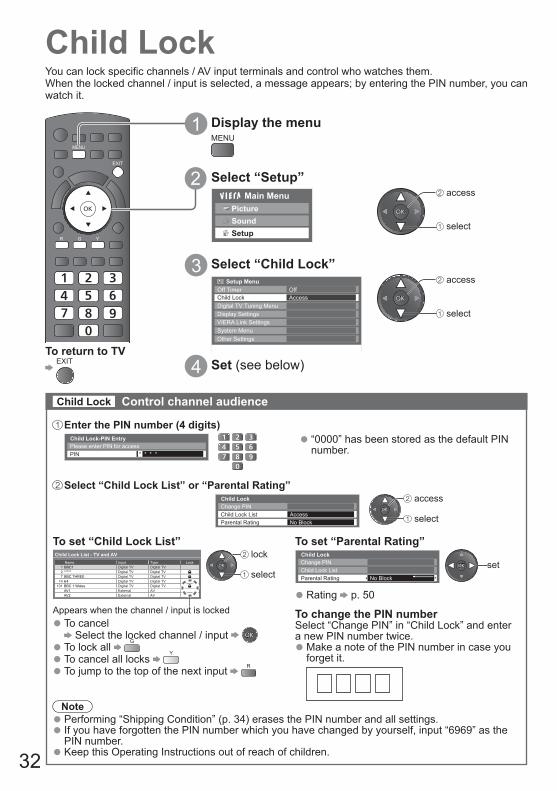
Child LockYou can lock specific channels / AV input terminals and control who watches them.When the locked channel / input is selected, a message appears; by entering the PIN number, you can watch it.
To return to TV EXIT
access
select
access
select
32
1 Display the menuMENU
2 Select “Setup”
3 Select “Child Lock”Setup Menu
Digital TV Tuning MenuDisplay SettingsVIERA Link SettingsSystem Menu
Off Timer OffChild Lock
Other Settings
Access
4 Set (see below)
Performing “Shipping Condition” (p. 34) erases the PIN number and all settings. ●If you have forgotten the PIN number which you have changed by yourself, input “6969” as the ●PIN number.Keep this Operating Instructions out of reach of children. ●
Child Lock-PIN EntryPlease enter PIN for accessPIN * * * *
Child LockChange PINChild Lock ListParental Rating
AccessNo Block
Child Lock List - TV and AVkcoLtupnIemaN Type
Digital TV Digital TVDigital TV LockDigital TVDigital TV LockDigital TV
E414 Digital TV LockDigital TVDigital TV LockDigital TV
AV1 External LockAVAV2
BBC11*****2BBC THREE7
BBC 1 Wales101
External LockAV
select
access
select
lock
Enter the PIN number (4 digits)
Select “Child Lock List” or “Parental Rating”
To set “Child Lock List”
“0000” has been stored as the default PIN ●number.
To cancel ● Select the locked channel / input
To lock all ● G
To cancel all locks ● Y
To jump to the top of the next input ● R
Appears when the channel / input is locked To change the PIN numberSelect “Change PIN” in “Child Lock” and enter a new PIN number twice.
Make a note of the PIN number in case you ●forget it.
Child LockChange PINChild Lock ListParental Rating No Block
To set “Parental Rating”
Rating ● p. 50
set
Child Lock Control channel audience
Main MenuPictureSoundSetup

Adv
ance
dC
hild
Loc
kIn
put L
abel
s
PROGRAMME
INDEX HOLDSTTLTEXT
INPUT
ASPECT
TV AV
REC
OPTION
MUTE SURROUND
POWER
POWER
OFF TIMER
R G Y B
MENU
RETURN
EXIT
33
Input LabelsFor easier identification and selection of the input mode, you can label each input terminals or skip terminal that is not connected to any equipment.
To select the input mode ● p. 19
To return to TV EXIT
1 Display the menuMENU
5 Select an input terminal and set
AV3PC
HDMI3Digital TVAnalogue TV
AV1 AV1AV2 AV2
AV3PC
HDMI3Digital TVAnalogue TV
HDMI1HDMI2
HDMI1HDMI2
Input Labels
2 Select “Setup”
3 Select “Display Settings”Setup Menu
Digital TV Tuning MenuDisplay SettingsVIERA Link Settings
Off Timer OffChild Lock
Access
System MenuOther Settings
The labels you set will be displayed in “Input Selection” menu (p. 19) or banner.
If “Skip” is selected, you cannot select the mode. ●
access
select
select
change
access
select
4 Select “Input Labels”
Input LabelsBanner Display Timeout
Teletext TOPSide Panel High
Access3 seconds
Display Settings change
select
Main MenuPictureSoundSetup
(maximum: ten characters)
access
select
Select “User input”
User inputNameA B C D E F G H I J K L M NU V W X Y Z 0 1 2 3 4 5 6a b c d e f g h i j k l m nu v w x y z ( ) + - . * _
O P Q R S T7 8 9 ! : #o p q r s t
set
select
Set charactersYou can set ●characters by using numeric buttons (p. 22).
RETURN
Store
User inputYou can name each input terminals freely.

PROGRAMME
INDEX HOLDSTTLTEXT
INPUT
ASPECT
TV AV
REC
OPTION RETURN
MUTE SURROUND
R G Y B
POWER
POWER
OFF TIMERMENU
EXIT
EXIT
RETURN
Confirm
All tuning data will be erasedAre you sure?Are you sure?
Shipping Condition
(confirm)
(confirm)
(start Shipping Condition)
To retune TV channels only, e.g. after moving house “Auto Tuning” in “Tuning and Editing Channels” (p. 30 and p. 31)
34
Shipping Condition (Reset settings)Resets the TV to its original condition, i.e. no channels tuned in.All settings are reset (channels, picture, sound settings, etc.).
To return to TV EXIT
3 Select “System Menu”Setup Menu
Digital TV Tuning MenuDisplay SettingsVIERA Link SettingsSystem Menu
Off Timer Off
Access
Child Lock
Other Settings
1 Display the menuMENU
2 Select “Setup” access
select
select
access
5 Set (see below)
4 Select “Shipping Condition”System Menu
Software LicenceSystem Information
Shipping Condition AccessSystem Update
access
select
Check the message and reset Follow the on screen instructions
Reset to Factory Shipping Condition Completed.
Please switch off TV.
“Auto Tuning” will automatically start ●when Mains power On / Off switch is next turned On (p. 12).
Shipping Condition Reset settings
Main MenuPictureSoundSetup

Adv
ance
dS
hipp
ing
Con
ditio
n (R
eset
set
tings
)U
pdat
ing
the
TV S
oftw
are
change select
To update automatically To update immediately
Download may take about 60 mins. ●During software download and update, DO NOT switch Off the TV or press any buttons. The TV ●will automatically be activated after downloading is completed.A clicking sound will occur at 3:00 AM and 5:00 AM when “Auto Update Search in Standby” is set ●to “On”. This sound is normal. During downloading, the TV will display a blank screen for 40 to 50 seconds. Do not interrupt the ●TV during this procedure.
System UpdateAuto Update Search in Standby OnSystem Update Search Now Start
start
select
Download
Searches for an update(for several mins.) anddisplays a correspondingmessage if any
If System Update is performed, the software will be updated (it may change TV functions).If you do not wish to do so, set “Auto Update Search in Standby” to “Off”.
Automatically performs a search in standby and ●downloads an update, if any software updates are available.The automatic updating is performed at 3:00 AM ●and 5:00 AM every morning under the following conditions:• Standby (TV turned Off with the remote control)
Set “Auto Update Search in Standby” to “On”
Select “System Update Search Now”
35
Updating the TV SoftwareFrom time to time, a new version of software may become available for download to enhance theperformance or operations of the TV. If there is an update available, a notification banner is displayed when the channel has the update information.
3 Select “System Menu”Setup Menu
Digital TV Tuning MenuDisplay SettingsVIERA Link SettingsSystem Menu
Off Timer Off
Access
Child Lock
Other Settings
4 Select “System Update”
Software LicenceSystem Information
Shipping ConditionAccessSystem Update
System Menu
access
select
access
select
INDEX HOLDSTTLTEXT
ASPECT
AV
OPTION RETURN
MUTE SURROUND
R G Y B
POWER
OFF TIMERMENU
EXIT
To return to TV EXIT
access
select
5 Set (see below)
To download ● If you choose not to download ● EXIT
You can update any new software automatically or manually.
System Update Update TV’s software system
1 Display the menuMENU
2 Select “Setup”Main Menu
PictureSoundSetup

36
To insert SD Card ●SD Card
To remove SD Card ●Push the centre of the card
Gently insert the SD Card label surface facing front.
Push until a click is heard
Label surface
Cutout
USB Flash Memory
For more information of the SD Card ● p. 53
Insert or remove straightly and completely. ●
Using Media PlayerMedia Player allows you to enjoy photo, video or music recorded on an SD Card and a USB Flash Memory.VIERA IMAGE VIEWER is the function of the easy viewing for photos or videos recorded on an SD Card on the TV screen by simply inserting into the SD Card slot.Photo mode : Still pictures recorded by digital cameras will be displayed.Video mode : Moving pictures recorded by digital video cameras will be played back.Music mode : Digital music data will be played back.When these functions are used, the audio signal is output from audio output terminals, but video signals are not output.
“Date” shows the date on which the recording was made by the recording equipment. The file ●without record of the date is shown “**/**/****”.
Data format for SD Card / USB Flash Memory browsingPhoto : Still images recorded with digital still cameras compatible with JPEG files of DCF ● ∗ and
EXIF standardsData format - Baseline JPEG (Sub-sampling 4:4:4, 4:2:2 or 4:2:0)Image resolution - 8 × 8 to 30,719 × 17,279 pixels
Video : SD-Video Standard Ver. 1.2 [MPEG-2 (PS format)] and AVCHD Standard compatible files ●with an audio format that is either MPEG-1/Layer-2 format or Dolby Digital format (A modified data with a PC may not be displayed correctly.)
Music : Data format - MP3 (.mp3) ●SD Card format : SDXC Card - exFAT ●
SDHC Card / SD Card - FAT16 or FAT32Compliant card type (maximum capacity): SDXC Card (64 GB), SDHC Card (32 GB), SD Card (2 GB), ● miniSD Card (2 GB) (requiring miniSD adapter)If miniSD Card is used, insert / remove it together with the adapter. ●Check the latest information on the card type at the following website. (English only) ●http://panasonic.jp/support/global/cs/tv/USB Flash Memory format : FAT16, FAT32 or exFAT ●
∗DCF (Design rule for camera file system): Unified standard established by Japan Electronics and Information Technology Industries Association (JEITA).
Format the device with the recording equipment. ●The picture may not appear correctly on this TV depending on the recording equipment used. ●Display may take some time when there are many files and folders. ●This function cannot display Motion JPEG and still image not JPEG formatted (i.e. TIFF, BMP). ●A data modified with a PC may not be displayed. ● ● Images imported from a PC must be compatible with EXIF (Exchangeable Image File) 2.0, 2.1, and 2.2.Partly degraded files might be displayed at a reduced resolution. ● ● The folder and file names may be different depending on the digital camera or digital video camera used.Do not use two-byte characters or other special codes. ●The device may become unusable with this TV if the file or folder names are changed. ●
To insert or remove the SD Card / USB Flash Memory

Adv
ance
dU
sing
Med
ia P
laye
r
PROGRAMME
INDEX HOLDSTTLTEXT
INPUTTV AV
REC
MUTE SURROUND
POWER
POWER
OFF TIMER
OPTION
MENU
RETURN
R G B
EXITINFO
SD CARD
OPTION
ASPECT
37
Contents Select
EXIT
RETURNSelect
Access Photo Video MusicSD Card
To switch to the other mode
B
Select the contents
access select
While the thumbnail is displayed, display the contents selection.
To return to TV EXIT
or SD CARD
To return to theprevious screen
RETURN
Starting Media Player
access
select
selected device name
If two or more devices are not ●connected, this step will be skipped.
Display the menu
MENU
2 Switch to Media PlayerSD CARD
1 Insert the SD Card or USB Flash Memory When the SD Card is inserted, switching to Media Player (Photo mode) will be done automatically. p. 38
It is assumed the SD Card contains photos. If not, press the blue ●button to activate the “Contents Select” screen and select the other mode.
“To switch to the other mode” (see below)
You can change to the other device directly in the same mode if two devices are connected.Change the device
Select “Drive Select” Select the icon you want to access to
Photo ● “Photo mode” (p. 38)Video ● “Video mode” (p. 40)Music ● “Music mode” (p. 42)
select
access select access
Main MenuPictureSound
Photo SetupVideo SetupMusic SetupDrive Select
Media Player
SD Card
Drive Select
EXIT
RETURNSelect
Access
access
select
4 Select the contentMedia Player
Photo Video MusicSD Card
Contents Select
EXIT
RETURNSelect
Access
selected device name
3 Select the icon you want to access toMedia Player
SD Card
Drive Select
EXIT
RETURNSelect
Access

To sort by folder, date recorded or month recorded
select
access
Display the view selection
Select the sort type
To return to the thumbnail (All photos) ●
Displays thumbnails of photos grouped by folderDisplays thumbnails of photos grouped by dateDisplays thumbnails of photos grouped by month
Files that are not stored in a folder are grouped in a folder named “/”. ●Photos without a recorded date are displayed as “Unknown”. ●
select “All photos”
accessG
GFolder viewSort by Date
Sort by Month
38
Photo mode will read all “.jpg” extension files in the SD Card or USB Flash Memory.
1/12Folder name
23/10/2009Number of files
3
sotohp llAotohP reyalP aideM
tceleS stnetnoCwohsedilS
InfoEXITView
RETURNView Select
SelectSD Card
Thumbnail images of all photos in the SD Card or USB Flash Memory are displayed.
To change the background music ● “Photo Setup” (p. 39)
To display the information of the highlighted photo ●
(Thumbnail - All photos)
Error display (images that could not be loaded, etc.)
1/48File name
p1010001.JPGDate
23/10/2009Pixel
1600X1200
file number / total file number
Single view - Display one photo at a time.Select the photo that you want to view
select
single view
Rotate
Slideshow
Select
Single view
Single view
EXIT
RETURN
Operation guide (Single view)
Slideshow - Slideshow ends with the same thumbnail from which it started.Select the photo that you want to start the slideshow from
select R
To display / hide the operation guide ● INFO
To pause (returns to Single view) ●
Start Slideshow
INFOIn case of the sorted group view (see below)
In case of all photos
Insert the SD Card or access to “Photo” mode (p. 37)
Photo mode
folder name, date or month
group number / total group number
To return to thumbnail ● RETURN
To the previous photoRotate 90˚ (anti-clockwise)To the next photoRotate 90˚ (clockwise)
To display / hide the operation guide ● INFO
To return to thumbnail ● RETURN
To operate Single view ●
Using Media Player

Adv
ance
dU
sing
Med
ia P
laye
r
39
Display the menu
select change
select
accessMain Menu
PictureSound
Photo SetupVideo SetupMusic SetupDrive Select
MENU
Photo Setup MenuBack Ground Music Type1
Colour EffectTransition EffectScreen Mode
OffFadeNormal
Frame Off
Interval NormalRepeat On
Menu Item Adjustments / Configurations (alternatives)
Photo Setup
Back Ground Music
Selects the background music played during Photo mode (Off / Type1 / Type2 / Type3 / Auto / User)Type1 / 2 / 3 : Pre-installed music tracksAuto : Music data stored in the root folder of the current device will be
played back randomly.If there is no available music data, no sound will be produced. ●
User : Plays music set by you For setting ● p. 42
FrameSelects the display frame for the slideshow (Off / Multi / Collage)Multi : Display is divided into 9 sections in a tiled designCollage : Photos are displayed in random positions and random scale
Colour Effect Selects the colour effect of photos (Off / Sepia / Gray scale)
TransitionEffect
Selects the transition effect used when switching between photos during the slideshow (Off / Fade / Slide / Dissolve / Motion / Random)Fade : The next photo fades in gradually.Slide : The next photo slides and appears from the left side.Dissolve : The photo is replaced by an indefinite block unit.Motion : The photo is replaced with enlarged, reduced, moved up or
moved down.Random : Each transition is selected at random.
This function is only available when “Frame” is set to “Off”. ●Screen Mode
Selects whether to display photos in normal or enlarged size during Single view and Slideshow (Normal / Zoom)
Depending on the photo size, the photo may not be enlarged. ●Interval Selects slideshow interval (Short / Normal / Long)Repeat Slideshow repeat (Off / On)
Photo Setup Setup for Photo mode

40
Using Media Player
weiv eltiToediV reyalP aideM
Play Contents Select
InfoEXITAccess
RETURN
2009_9
Nature2 Nature3 Nature4 Nature5 Nature6 2009_4 2009_7
Trip1 Trip2 Trip3 Trip4 Trip5 Room Nature1
SelectSD Card
(Thumbnail - Title view)
Film icon will be displayed if the file does not support thumbnail view.
select R
Playback from Title viewPlayback of the selected title starts.Select the title Start playback
Playback from the selected scene in the titlePlayback starts from the selected scene, and runs to the end of the title.Select the title Select the scene to start playback
select
access
select
playback
Title view > Trip1
Contents Select
InfoEXITPlay
RETURN
Trip1_8
Trip1_1 Trip1_2 Trip1_3 Trip1_4 Trip1_5 Trip1_6 Trip1_7
Media Player Video
SelectSD Card
Video mode supports AVCHD and MPEG2 file formats.Access to “Video” mode (p. 37)
(Thumbnail - Scene view)
When a scene is highlighted, preview starts (if the scene supports previewing).
To turn preview off ● “Video Setup” (p. 41)
Video mode
Thumbnails of video titles in the SD Card or USB Flash Memory are displayed.When a title is highlighted, preview starts (if the title supports previewing).
To turn preview off ● “Video Setup” (p. 41)
To display the information of the highlighted title ●
1/15Title
Trip1Date & Time
19/02/2009 11:21Number of scenes
8Duration
00h15m39s
Trip1
INFO
title number / total title number
file format
To repeat playback ● “Video Setup” (p. 41)
To display the information of the highlighted scene ● INFO
1/8Scene
Trip1_1Date & Time
19/02/2009 11:21Duration
00h04m12s
Trip1
scene number / total scene numberfile format

Adv
ance
dU
sing
Med
ia P
laye
r
41
● To change the aspect ratio(only for the 4:3 video content)
ASPECT
To the previous scene ● R
To the next scene ● G
To operate the playback ●
Rewind Pause / Playback
Playback Fast forward
StopInformation banner (Playback)
EXIT
RETURN
TitleDate & Time
Trip101/12/2008 10:12
00:00.05 / 00:00.30
Operation guide
To return to thumbnail ● RETURN
● To display / hide the operation guide and information banner
INFO
Operations during playback
Sound SettingsYou can enjoy multi-channel sound by connecting an amplifier to the DIGITAL AUDIO OUT terminal.To confirm or change the current sound status (during playback)Display the Option menu Change the sound (if the video has multiple audio signals)OPTION Option Menu
Audio Selection Stereo
(Current sound status) changeIt may take several seconds for the changes ●to take effect
Audio output settingsDisplay the menu
Select “Sound” Select “SPDIF Selection” and set
MENUMain Menu
PictureSound
Photo SetupVideo SetupMusic SetupDrive Select
select
accessSound Menu 1/2
Mode MusicBassTrebleBalanceHeadphone Volume
OffSurroundVolume CorrectionSpeaker Distance to Wall Over 30cmSPDIF Selection Auto
0
11000
select set
Menu Item Adjustments / Configurations (alternatives)
Sound SPDIF Selection
SPDIF : Standard audio transfer file formatSelects the initial setting for digital audio output signal from DIGITAL AUDIO OUT terminal (Auto / PCM)Auto: Dolby Digital is output as Dolby Digital Bitstream. MPEG is output as PCM.PCM: Digital output signal is fixed to PCM.
Select “Video Setup”
Select “Other Settings”
Select the items and setDisplay the menu
MENU Main MenuPictureSound
Photo Setup
Music SetupDrive Select
Video Setup
Video Setup MenuDisplay SettingsOther Settings Access
Other Settings
16:9 Overscan OnIntelligent Frame Creation Off
Video Preview OnRepeat Off
select
access
select set
Menu Item Adjustments / Configurations (alternatives)
Video Setup
OtherSettings
Video Preview
Sets whether to start previewing the title or scene in a thumbnail screen (Off / On)
Images may not be displayed for a short time in the thumbnail ●screen. To resolve this problem, set preview to “Off”.
Repeat Playback repeat within the title (Off / On)
Video Setup Setup for Video mode
The structure of titles and scenes may vary depending on the digital video camera used. In this case, titles ●and scenes may not be displayed correctly.

42
Using Media Player
Display the menu
MENU
Select “Music Setup” SetMain Menu
PictureSound
Photo SetupVideo Setup
Drive SelectMusic Setup
Music modeMusic mode supports MP3 file format.
Error display (images that could not be loaded, etc.)
To the previous music ● R
To the next music ● G
Rewind Pause / Playback
Playback Fast forward
Stop
Operation during playback
select R
To playback from folder view ●
(Thumbnail - File view)
Access to “Music” mode (p. 37)
Start playbackSelect the folder
Menu Item Adjustments / Configurations (alternatives)
Music Setup Repeat
Selects the repeated mode (Off / Folder / One)Folder: All music in the selected folder are played back repeatedly.One: The selected music is played back repeatedly.
Set background music for Photo mode
00:00.05 / 00:02.30
Music titleAlbum titleArtist name
Folder view
Contents SelectPlay Folder
InfoEXITAccess
RETURN
Folder1 Folder2 Folder3 Folder4 Folder5
Media Player
Select
Music
Folder6 Folder7
Folder8
SD Card
Folder view > music
Contents Select
InfoEXITPlay
RETURN
Media Player
Select
Music
01 Music1 02 Music2 03 Music3 04 Music4 05 Music5 06 Music6 07 Music7
08 Music8 09 Music9 10 Music10 11 Music11 12 Music12 13 Music13 14 Music14
15 Music15 16 Music16 17 Music17 18 Music18 19 Music19 20 Music20 21 Music21
SD Card
Playback starts
(Thumbnail - Folder view)
To display/ hide the operation guide ● INFO
To operate the playback ●
The information banner is displayed as shown below. ●
Elapsed time / Total playing time
Music Setup Setup for Music mode
To display the information of the ●highlighted folder or music
INFO
playback
select
setMusic Setup MenuRepeat Off
select
access
File : The current music will be registered as back ground music.
Folder : All the music in the current folder will be registered as back ground music.
While playing music, display the selection screen
You can register your favourite music as background music for Photo mode.Select “User” in “Back Ground Music” ● “Photo Setup” (p. 39)
B Register Slideshow BGM ?FileFolder select
set
Select “File” or “Folder” and set
select
access

Adv
ance
dU
sing
Med
ia P
laye
rV
IER
A Li
nk F
unct
ions
43
Summary of featuresConnected equipment with
VIERA Link function Features
DIGA Recorder∗1
DVD Player / Blu-ray Disc
Player∗1
HD Video Camera /
LUMIX Camera∗1
Player theatre∗2
Blu-ray Disc theatre∗2 Amplifier∗2
Channel download ∗4 – – – – –Easy playback ∗7 ∗7 –Power on link –Power off linkReduce unnecessary power consumption in standby ∗5 ∗5 – – ∗5 –
Auto standby for unnecessary equipment ∗3 ∗3 – ∗3 ∗8 ∗3
∗8 ∗3
Pause Live TV programme ∗4 ∗6 – – – – –
Direct TV Recording ∗4 – – – – –Control the menu of the connected equipment by VIERA remote control ∗3 ∗3 ∗3 ∗3 ∗3 –
Speaker control – – –
Enjoy additional HDMI interoperability with Panasonic products which have “HDAVI Control” function.This TV supports “HDAVI Control 5” function.Connections to the equipment with HDMI cable such as DIGA Recorder, HD Video Camera, Player theatre, Amplifier, etc., allow you to interface them automatically.These features are limited to models incorporating “HDAVI Control” and “VIERA Link”.
Some functions are not available depending on the equipment’s version of HDAVI Control. Please ●confirm the connected equipment’s version of HDAVI Control.VIERA Link “HDAVI Control”, based on the control functions provided by HDMI which is an industry ●standard known as HDMI CEC (Consumer Electronics Control), is a unique function that we have developed and added. As such, its operation with other manufacturers’ equipment that supports HDMI CEC cannot be guaranteed.Please refer to individual manuals for the equipment. About applicable Panasonic equipment, ●consult your local Panasonic dealer.
∗1: HDMI Connection only∗2: HDMI and Audio out connections∗3: available with the equipment which has “HDAVI Control 2 or
later” function∗4: available with the equipment which has “HDAVI Control 3 or
later” functionConnection
To use DIGA Recorder / DVD Player / Blu-ray Disc Player / HD Video Camera / LUMIX Camera ●
To use Player theatre / Blu-ray Disc theatre: ● To use Amplifier: ●
HDMI cable
DIGA Recorder / DVD Player / Blu-ray Disc Player / HD Video Camera / LUMIX Camera with VIERA Link function
HDMI cable
Optical digital audio cable
or RCA cable
Player theatre / Blu-ray Disc theatre with VIERA Link function
Speaker system
HDMI cable
Optical digital audio cable
or RCA cable
HDMI cable
HDMI cable
Amplifier with VIERA Link function
DIGA Recorder with VIERA Link function
HD Video Camera / LUMIX Camera with VIERA Link function
Speaker system
∗9 ∗9
∗9: If the connected equipment has “HDAVI Control 5” function, you do not have to use this audio cable (Optical digital audio cable or RCA cable). In this case, connect the equipment to the TV’s HDMI2 terminal via an HDMI cable.
VIERA Link Functions
∗5: available with the equipment which has “HDAVI Control 4 or later” function
∗6: available with DIGA Recorder which has HDD∗7: while playing a disc∗8: except for watching a disc
VIERA Link “ ControlTM”

44
VIERA Link Functions
Features available
For DIGA Recorder / DVD Player / Blu-ray Disc Player / HD Video Camera / LUMIX Camera with ●VIERA Link function, connect to HDMI1, HDMI2 or HDMI3 terminal via an HDMI cable.For Player theatre / Blu-ray Disc theatre / Amplifier, connect to HDMI1, HDMI2 or HDMI3 terminal ●via an HDMI cable, and also connect either the optical digital audio cable or RCA cable for audio output from the TV.Use fully wired HDMI compliant cable. Non-HDMI-compliant cables cannot be utilized. ●Recommended Panasonic’s HDMI cable part number:• RP-CDHS15 (1.5 m) • RP-CDHS30 (3.0 m) • RP-CDHS50 (5.0 m)
PreparationsConnect the equipment supporting VIERA Link. ●Set up the connected equipment. Read the manual of the equipment. ●For optimal recording, the settings of the recorder might be required. For details, read the manual of ●the recorder.Set VIERA Link On in the Setup Menu ● “VIERA Link” (p. 27)Set up the TV ● After connection, turn the equipment on and then switch the TV on. Set the input mode to HDMI1, HDMI2 or HDMI3 (p. 19), and make sure that an image is displayed correctly.This setup should be done each time when the following conditions occur:• for the first time • when adding or reconnecting equipment • when changing setup
Channel download
Easy playback
Power on link
Power off link
Standby Power Save Reduce unnecessary power consumption in standby
Intelligent Auto Standby Auto standby for unnecessary equipment
Channel setting can be downloaded to the recorder.
Automatic input switching - When the connected equipment is operated, input mode is switched automatically.
Set Power on Link “On” in the Setup Menu to use this function “Power on Link” (p. 27)When the connected equipment starts playback or direct navigator / function menu for the equipment are activated, the TV is automatically turned on. (Only when the TV is in Standby mode.)
Set Power off Link “On” in the Setup Menu to use this function “Power off Link” (p. 27)When the TV is set to Standby mode, the connected equipment is also automatically set to Standby.
This function will work even if the TV enters standby mode automatically by auto power standby ●function.
Set Standby Power Save “On” in the Setup Menu to use this function “Standby Power Save” (p. 27)
The power consumption in Standby mode of the connected equipment is controlled higher or lower in synchronization with the TV On / Off state to reduce the consumption.When the TV is set to Standby mode, the connected equipment is automatically set to Standby and the power consumption in Standby mode of the connected equipment is automatically minimized.When the TV is turned on, the connected equipment is still in Standby mode, but the power consumption is increased to make startup time early.
This function is effective if the connected equipment can change the power consumption in ●Standby mode and is set to higher consumption.This function will work when “Power off Link” is set to “On”. ●
Set Intelligent Auto Standby “On (With reminder)” or “On (No reminder)” in the Setup Menu to use this function “Intelligent Auto Standby” (p. 27)When the TV is On, non-watched or non-used connected equipment goes into Standby mode automatically to reduce the power consumption. For example, when the input mode is switched from HDMI, when Speaker Selection is changed to “TV” (except for watching a disc).
If you select “On (With reminder)”, the on screen message will be displayed to be noticed before ●working this function.This function may not work properly depending on the connected equipment. If required, set to ●“Off”.

Adv
ance
dV
IER
A Li
nk F
unct
ions
45
Features available (Using VIERA Link Menu)
INDEX HOLDSTTLTEXT
INPUT
MENUASPECT
AV
RETURN
R G Y B
POWER
OFF TIMER
EXIT
OPTION
TV
OPTION
INPUT
VIERA Link MenuPause Live TV StartDirect TV RecVIERA Link ControlSpeaker Selection
StartRecorderHome Cinema
select
pause
Access and pause the live TV programmeYou can pause the live TV programme and resume later.Live TV programme will be recorded on HDD of the connected DIGA Recorder.
This function is available with DIGA Recorder which has HDD. ●If you connect several recorders including other manufacturers’ recorders at the same time, ●please connect DIGA Recorder which has HDD to the TV’s lower HDMI terminal number. For example, if you use HDMI1 and HDMI2 for two recorders, in this case connect DIGA Recorder which has HDD to HDMI1.If you cannot operate, check the settings and the equipment ●
“Summary of features”, “Connection”, “Preparations” (p. 43 and p. 44)
Display “VIERA Link Menu”
Select “Pause Live TV” and pause
You can also access Pause Live TV by using VIERA TOOLS. ● p. 21 Live TV programme is recorded on HDD from where it was paused. ●If the paused TV picture disappears after a few minutes ●
OPTION
(the paused picture will be restored)
search backwardpausesearch forwardplaybackstop
Pause Live TV
Yes
Stop Pause Live TV?
No
select stop
TVSelect “Yes”
To operate Pause Live TV
To return to Live TV (stop playback of Pause Live TV / cancel pause)
Operations may be different depending on the recorder. In ●this case, follow the operation guide or read the manual of the recorder.
If you stop playback or cancel pause, the recorded programme will be deleted from HDD. ●
start
select
VIERA Link MenuPause Live TV StartDirect TV RecVIERA Link ControlSpeaker Selection
StartRecorderHome Cinema
VIERA Link MenuPause Live TV StartDirect TV RecVIERA Link ControlSpeaker Selection
StopRecorderHome Cinema
Display “VIERA Link Menu”
EXIT
INDEX HOLDSTTLTEXT
MENUASPECT
AV
OPTION RETURN
R G Y B
POWER
OFF TIMER
EXIT
INDEX HOLDSTTLTEXT
MENUASPECT
AV
OPTION RETURN
R G Y B
POWERINPUT
TV
OFF TIMER
To stop recordingSelect “Stop” in “Direct TV Rec” and stop recording
Recording the current programme in DIGA Recorder immediately.If you connect a variety of recorders including other manufacturers’ recorders at the same time, ●please connect DIGA Recorder to the TV’s lower HDMI terminal number. For example, if you use HDMI1 and HDMI2 for two recorders, in this case connect DIGA Recorder to HDMI1.If you cannot operate, check the settings and the equipment ●
“Summary of features”, “Connection”, “Preparations” (p. 43 and p. 44)
stop select
Select “Direct TV Rec” and start recording
Pause Live TV Pause Live TV programme
Direct TV Rec Direct TV Recording - What you see is What you record
TV picture will be paused.

46
Features available (Using VIERA Link Menu)
Access and operate the menu of the equipmentYou can control some functions of the connected equipment with this TV remote control by pointing at the TV’s signal receiver.
If you cannot operate, check the settings and the equipment ● “Summary of features”, “Connection”, “Preparations” (p. 43 and p. 44)
For details of the operation of the connected equipment, read the manual of the equipment. ●
INDEX HOLD
INPUT
MENUASPECT
TV AV
POWER
OFF TIMER
STTLTEXT
OPTION
R G Y B
EXIT
RETURN
Display “VIERA Link Menu”
Select “VIERA Link Control”VIERA Link MenuPause Live TV StartDirect TV RecVIERA Link ControlSpeaker Selection
StartRecorderHome Cinema
Select the equipment you want to accessThe type of the connected equipment is displayed.Select the type of the equipment and access.
Recorder / Player / Home Cinema / Video Camera / LUMIX / Digital Camera / Other
VIERA Link MenuPause Live TV StartDirect TV RecVIERA Link ControlSpeaker Selection
StartRecorderHome Cinema
access select
You can also access VIERA Link control by using VIERA TOOLS. ● p. 21 The displayed item may vary depending on the connected equipment. ●“Home Cinema” means Player theatre, Blu-ray Disc theatre or Recorder theatre. ●“Other” means Tuner set top box. ●
The menu of the accessed equipment (Input mode will be changed automatically)
Operate the connected equipment1. Set the remote control code to “73” (p. 20)2. Follow the operation guide
To display the operation guide
Move the cursor / select the menu
Move the cursor / access / adjust
OPTION
RETURNStore / set / access
Return to the previous menuEXITExit the menu
When the key words are displayed on colour bar BYGR
Type of the connected equipment is displayed.
VIERA Link MenuPause Live TV StartDirect TV RecVIERA Link ControlSpeaker Selection
StartRecorderHome Cinema
If you access non-VIERA Link equipment
You can access the menu of the equipment. But you cannot operate it.Use its own remote control to operate the equipment.
● Some operations may not be available depending on the equipment. If so, use its own remote control.
select
Recorder1-3 / Player1-3
VIERA Link MenuPause Live TV StartDirect TV RecVIERA Link ControlSpeaker Selection
StartRecorder2Home Cinema
The number is given from the TV’s lower HDMI terminal number connected to the same type equipment. For example, two recorders to HDMI2 and HDMI3, in this case the recorder connected to HDMI2 is displayed as “Recorder1”, and the recorder connected to HDMI3 is displayed as “Recorder2”.
If multiple recorders or players are connected
VIERA Link Control Operate the connected equipment with VIERA remote control
VIERA Link Functions

Adv
ance
dV
IER
A Li
nk F
unct
ions
PROGRAMME
INDEX HOLDSTTLTEXT
INPUT
MENUASPECT
TV AV
REC
OPTION RETURN
SURROUND
R G Y B
POWER
POWER
OFF TIMER
EXIT
MUTE
47
Features available (Using VIERA Link Menu)
These functions may not work properly depending on the connected equipment. ●Image or sound may not be available for the first few seconds when input mode is switched. ●Easy playback may be available by using the remote control for Player theatre, Blu-ray Disc theatre ●or Amplifier. Read the manual of the equipment.“HDAVI Control 5” is the newest standard (current as of December, 2009) for HDAVI Control ●compatible equipment. This standard is compatible with conventional HDAVI equipment.To confirm this TV’s version of HDAVI Control ● “System Information” (p. 27)
Access and control the speaker volumeYou can control the theatre speaker with this TV remote control by pointing at the TV’s signal receiver.
If you cannot operate, check the settings and the equipment ● “Summary of features”, “Connection”, “Preparations” (p. 43 and p. 44)
Display “VIERA Link Menu”
Select “Speaker Selection”VIERA Link MenuPause Live TV StartDirect TV RecVIERA Link ControlSpeaker Selection
StartRecorderHome Cinema
select
set Set to “Home Cinema” or “TV”
If you wish to enjoy the multi-channel sound (e.g. Dolby Digital 5.1ch) via an Amplifier, connect ●with HDMI cable and Optical digital audio cable (p. 43), and then select “Home Cinema”. If your Amplifier has “HDAVI Control 5” function, you can connect only with HDMI cable. In this case, connect your Amplifier to the TV’s HDMI2 terminal.To enjoy the sound from the DIGA Recorder in multi-channel sound, connect an HDMI cable from the DIGA Recorder to the Amplifier (p. 43).
Speaker Selection Speaker control
Home CinemaPlayer theatre, Blu-ray Disc theatre or Amplifier will be automatically turned on if it is in Standby mode and the sound is from theatre speakers connected to the equipment.
Volume up / down ●
Mute ● MUTE
The sound of TV speakers is mute. ●When the equipment is turned off, TV speakers will be active. ●
TVTV speakers are active.

48
External EquipmentThese diagrams show our recommendations for how to connect the TV to your various equipment.For other connections, consult the instructions for each piece of equipment, the table below, and the specifications (p. 59).
To listen with speakers
To record / playback
(Viewing)(Viewing)
(Listening)
(Listening)
PCConversion adapter (if necessary)
Computer
To watch satellite broadcasts
Set top box
DVD Recorder / VCR
Fully wired HDMI compliant cable
orRF cable
To watch DVDs
DVD Player
Fully wired HDMI compliant cable
(Listening)
Satellite dish
Satellite cable
(Viewing)
Aerial
Amplifier with speaker system
RCA cable
or
or
Optical digital audio cable
∗1

Adv
ance
dE
xter
nal E
quip
men
t
Fully wired HDMI compliant cable
49
Types of connectable equipment to each terminal
Terminal
Recording / Playback (equipment)
AV1 INAV2 INAV3 IN
( Side panel of the TV )
MONITOR OUT
DIGITAL AUDIO OUT
1 2 3To record / playback videocassettes / DVDs (VCR / DVD recorder)To watch DVDs (DVD player)To watch camcorder images (Video camera)To watch satellite broadcasts (Set top box)To play games (Game equipment)To use amplifier with speaker system ∗1
VIERA Link : Recommended Connection
∗1: applicable if your amplifier has ARC (Audio Return Channel) function
Hot Plug Detect 19DDC/CEC Ground 17SCL 15CEC 13TMDS Clock Shield 11TMDS Data0− 9TMDS Data0+ 7TMDS Data1 Shield 5TMDS Data2− 3TMDS Data2+ 1
18 +5V Power16 SDA14 ∗ Reserved
(in cable but N.C. on device)12 TMDS Clock−10 TMDS Clock+ 8 TMDS Data0 Shield 6 TMDS Data1− 4 TMDS Data1+ 2 TMDS Data2 Shield
HDMI terminal
∗ HDMI2 only: ARC
Headphones
(Viewing)
(Listening)
To adjust volume “Headphone Volume” in the Sound Menu (p. 25)
(M3 stereo mini plug)Camcorder /
Game equipment
Camcorder / HDMI equipment
Fully wired HDMI compliant cable
Rear of the TV
HDMI equipment
DVD Recorder
“HDMI connection”(p. 43 and p. 51)

50
Technical InformationCH Display / Receive Channel
CH 0 - CH 5 S 2 - S 10 CH 5A CH 6 - CH 9CH 9A CH 10 - CH 12 S 11 - S 44 CH 20 - CH 75
Rating Meaning Rating Meaning
No Block Not classified M Mature
P Pre school MA 15+ Mature Adult 15+
C Children AV 15+ Adult strong Violence 15+
G General R Restricted 18+
PG Parental Guidance recommended
Channel Allocation (Analogue TV mode)
Rating (Digital TV mode)
When you receive the stereo / bilingual sound system, sound output modes can be selected by pressing the Sound Selection button.
Audio Signal STEREO MAIN I SUB II MONOMode Indicator I II
NICAM .......Used in New Zealand, Singapore, Hong Kong etc.
Type of broadcast Regular broadcast(Standard Audio)
Regular + NICAM MONO I (MAIN I ) NICAM STEREO NICAM DUAL MONO
(MAIN I / SUB II )
Mode Indicator No Indicator I I II
A2 (German) .......Used in Australia, Malaysia etc.
Type of broadcast Regular broadcast(Standard Audio)
BILINGUAL or DUAL MONO:MAIN I / SUB II STEREO
Mode Indicator No Indicator I II
If the stereo signal is poor or the receiving conditions are not optimum or if STEREO:MONO ●automatic switching occurs, it is recommended you switch from STEREO to MONO.Even when the contents of the receiving signal undergo changes, selection mode is kept intact. ●When the receiving conditions deteriorate, listening will be easier if the mode is set to the MONO ●position, using the Sound Selection button.DUAL, also known as DUAL MONO or as BILINGUAL is not currently transmitted in some ●countries.
Stereo / Bilingual Sound Selection (Analogue TV mode)

Tech
nica
l Te
chni
cal I
nfor
mat
ion
51
HDMI (high-definition multimedia interface) is the world’s first complete digital consumer AV interface complying with a non-compression standard.HDMI allows you to enjoy high-definition digital images and high-quality sound by connecting the TV and the equipment.HDMI-compatible equipment (∗1) with an HDMI or DVI output terminal, such as a DVD player, a set top box or a game equipment, can be connected to the HDMI terminal using an HDMI compliant (fully wired) cable. About connections, see “External Equipment” (p. 48 and p. 49).Applicable HDMI features
Input audio signal : 2ch Linear PCM (sampling frequencies - 48 kHz, 44.1 kHz, 32 kHz) ●Input video signal : 480i, 480p, 576i, 576p, 720p, 1080i and 1080p ● “Input signal that can be displayed” (p. 52) Match the output setting of the digital equipment.Input PC signal : ● “Input signal that can be displayed” (p. 52) Match the output setting of the PC.VIERA Link (HDAVI Control 5) : ● “VIERA Link” (p. 43)Audio Return Channel ( ● ∗2) (HDMI2 terminal only)
DVI connectionIf the external equipment has only a DVI output, connect to the HDMI terminal via a DVI to HDMI adapter cable (∗3).When the DVI to HDMI adapter cable is used, connect the audio cable to the audio input terminal (HDMI1 / 2: use AV2 audio terminals / HDMI3: use AV3 audio terminals).If the picture position is not fit to the screen during the DVI connection, adjust the position on “DVI Position Settings” in the Setup Menu (p. 26). The settings are memorized for each HDMI terminals and input signals.
Audio settings can be made on the “HDMI1 / 2 / 3 Input” in the Sound Menu. (p. 25) ●If the connected equipment has an aspect adjustment function, set the aspect ratio to “16:9”. ●These HDMI connectors are “type A”. ●These HDMI connectors are compatible with HDCP (High-Bandwidth Digital Content Protection) ●copyright protection.An equipment having no digital output terminal may be connected to the input terminal of either ●“COMPONENT” or “VIDEO” to receive analogue signals.This TV incorporates HDMI™ technology. ●
A PC may be connected to this TV so that the PC screen is displayed and sound is heard from the TV.PC signals that can be inputted: Horizontal scanning frequency 31 to 69 kHz; vertical scanning ●frequency 59 to 86 Hz. More than 1,024 signal lines could result in incorrect display of the image.A PC adapter is not necessary for the DOS/V-compliant D-sub 15-pin connector. ●
Some PC models cannot be connected to this TV. ●When using PC, set the colour display quality of PC to the highest position. ●For details of the applicable PC signals, see ● p. 52.Max. display resolution ●Aspect
4:3 1,440 × 1,080 pixels16:9 1,920 × 1,080 pixels
D-sub 15-pin connector signal ●
Pin No. Signal Name Pin No. Signal Name Pin No. Signal NameR GND (Ground) NC (not connected)G GND (Ground) NC (not connected)B GND (Ground) HD
NC (not connected) NC (not connected) VDGND (Ground) GND (Ground) NC (not connected)
(∗1): The HDMI logo is displayed on HDMI-compliant equipment.(∗2): Audio Return Channel (ARC) is a function to be able to send digital sound signals via an HDMI cable.(∗3): Enquire at your local digital equipment retailer shop.
HDMI connection
PC connection
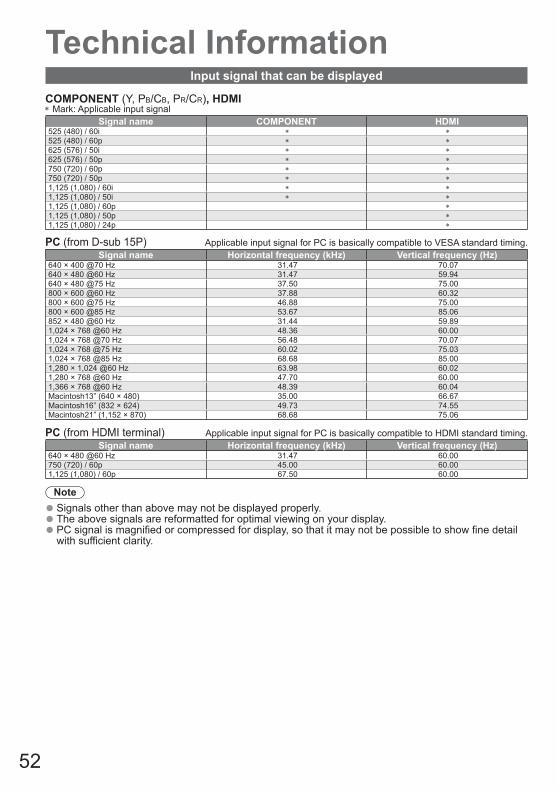
Technical Information
52
COMPONENT (Y, PB/CB, PR/CR), HDMI∗ Mark: Applicable input signal
Signal name COMPONENT HDMI525 (480) / 60i ∗ ∗525 (480) / 60p ∗ ∗625 (576) / 50i ∗ ∗625 (576) / 50p ∗ ∗750 (720) / 60p ∗ ∗750 (720) / 50p ∗ ∗1,125 (1,080) / 60i ∗ ∗1,125 (1,080) / 50i ∗ ∗1,125 (1,080) / 60p ∗1,125 (1,080) / 50p ∗1,125 (1,080) / 24p ∗
PC (from D-sub 15P) Applicable input signal for PC is basically compatible to VESA standard timing.Signal name Horizontal frequency (kHz) Vertical frequency (Hz)
640 × 400 @70 Hz 31.47 70.07640 × 480 @60 Hz 31.47 59.94640 × 480 @75 Hz 37.50 75.00800 × 600 @60 Hz 37.88 60.32800 × 600 @75 Hz 46.88 75.00800 × 600 @85 Hz 53.67 85.06852 × 480 @60 Hz 31.44 59.891,024 × 768 @60 Hz 48.36 60.001,024 × 768 @70 Hz 56.48 70.071,024 × 768 @75 Hz 60.02 75.031,024 × 768 @85 Hz 68.68 85.001,280 × 1,024 @60 Hz 63.98 60.021,280 × 768 @60 Hz 47.70 60.001,366 × 768 @60 Hz 48.39 60.04Macintosh13” (640 × 480) 35.00 66.67Macintosh16” (832 × 624) 49.73 74.55Macintosh21” (1,152 × 870) 68.68 75.06
PC (from HDMI terminal) Applicable input signal for PC is basically compatible to HDMI standard timing.Signal name Horizontal frequency (kHz) Vertical frequency (Hz)
640 × 480 @60 Hz 31.47 60.00750 (720) / 60p 45.00 60.001,125 (1,080) / 60p 67.50 60.00
Signals other than above may not be displayed properly. ●The above signals are reformatted for optimal viewing on your display. ●PC signal is magnified or compressed for display, so that it may not be possible to show fine detail ●with sufficient clarity.
Input signal that can be displayed

Tech
nica
l Te
chni
cal I
nfor
mat
ion
53
Use an SD Card which meets SD standards. If not, it may cause the TV to ●malfunction. ● Do not remove the card while the TV is accessing data (this can damage card or TV).Do not touch the pins on the back of the card. ●Do not subject the card to a high pressure or impact. ●Insert the card in the correct direction (otherwise, card may be damaged). ●Electrical interference, static electricity, or erroneous operation may damage the ●data or card.Back up the recorded data at regular intervals in case of deteriorated or damaged ●data or erratic operation of the TV. (Panasonic is not liable for any deterioration or damage of recorded data.)About SD Card format and maximum capacity ● p. 36
SD Card
24 mm
2.1 mm
32 m
m
Message Meaning / ActionCannot read file The file is broken or unreadable. ●
The TV does not support the format. ●No Device Inserted Confirm SD Card or USB device is inserted correctly. ●No valid file to play The card has no data. ●This operation is not possible Your operation is not available. ●
On screen messages

54
First, remove the mains plug from the socket outlet.
For regular care: Gently wipe the surface of the display panel, cabinet, or pedestal by using a soft cloth to clean the dirt or fingerprints.For stubborn dirt:Dampen a soft cloth with clean water or diluted neutral detergent (1 part detergent to 100 parts water). Then wring the cloth and wipe the surface. Finally, wipe away all the moisture.
Do not use a hard cloth or rub the surface too hard. This may cause scratches on the surface. ●Take care not to subject the TV’s surfaces to water or detergent. A liquid inside the TV could lead to ●product failure.Take care not to subject the surfaces to insect repellent, solvent, thinner, or other volatile substances. ●This may degrade surface quality or cause peeling of the paint.The surface of the display panel is specially treated and may be easily damaged. Take care not to ●tap or scratch the surface with your fingernail or other hard objects.Do not allow the cabinet and pedestal to make contact with a rubber or PVC substance for a long ●time. This may degrade surface quality.
Wipe the mains plug with a dry cloth at regular intervals. Moisture and dust may lead to fire or electrical shock.
MaintenanceDisplay panel, Cabinet, Pedestal
Mains plug

Tech
nica
lM
aint
enan
ceFA
Qs
55
FAQsBefore requesting service or assistance, please follow these simple guides to resolve the problem.If the problem still persists, please contact your local Panasonic dealer for assistance.
White spots or shadow images (noise)
Check the position, direction, and ●connection of the aerial.
Neither image nor sound is produced
Is the TV in “AV mode”? ●Is the mains lead plugged into the ●socket outlet?Is the TV turned On? ●Check the Picture Menu (p. 24) and ●volume.Check all required cables and ●connections are firmly in place.
An error message appearsFollow the message’s instructions. ●If the problem persists, contact your ●local Panasonic dealer.
“VIERA Link” function does not work and an error message appears
Confirm the connection. (p. 43) ●Turn the connected equipment on and ●then switch the TV on. (p. 44)
Contrast is reducedContrast is lowered in the following conditions ●without any user operation for a few minutes:• no signal in Digital TV mode or AV mode• selected locked channel• selected invalid channel• selected radio channel• displayed menu• Thumbnail or still picture
Pixel StatementAn image on a LCD or Plasma TV screen is created ●by many small groups of dots known as pixels (which is similar to the image in a newspaper). It also naturally follows that higher panel resolutions contain more pixels. To create a colour image, each pixel consists of three tiny coloured dots (known as sub-pixels), one each of red, green and blue. Each one of these dots is precisely controlled by the electronics of the TV to produce the picture. Whilst Panasonic maintains the highest standards in manufacturing technology and processes in the construction of these panels, there are a number of allowable pixel/subpixel failures that still allow the panel to be defined as a good panel. It is not possible to guarantee absolutely no pixel loss.

56
FAQsProblem Actions
Scre
en
Chaotic image, noisy Change the setting of “P-NR” in the Picture Menu (to remove ●noise). (p. 24)Check nearby electrical products (car, motorcycle, ●fluorescent lamp).
No image can be displayed Is “Colour” or “Contrast” in the Picture Menu set to the ●minimum? (p. 24)
Blurry or distorted image(no sound or low volume) Reset channels (p. 30 and p. 31). ●
Unusual image is displayed Turn off the TV with Mains power On / Off switch, then turn it ●on again.
“Shop” appears on screen at switch on
“Shop” was selected in “Auto Tuning” (p. 12) ●Reset settings in “Shipping Condition” (p. 34), then select “Home” in “Auto Tuning” (p. 12)
Soun
d
No sound is produced Is “Sound Mute” active? (p. 10) ●Is the volume set to the minimum? ●
Sound level is lowor sound is distorted
Sound signal reception may be deteriorated. ●Set “MPX” in the Sound Menu to “Mono” (p. 25). ●
Unusual sound from the display unit
When power is on, drive noise may be heard from inside the ●display unit (not a sign of faulty operation).
HD
MI
Sound is unusual
Set the sound setting of the connected equipment to “2ch ●L.PCM”.Check the “HDMI1 / 2 / 3 Input” setting in the Sound Menu. ●(p. 25)If digital sound connection has a problem, select analogue ●sound connection. (p. 51)
Pictures from external equipment are unusual when the equipment is connected via HDMI
Is the HDMI cable connected properly? (p. 43, 48 and p. 49) ●Turn Off the TV and equipment, then turn them On again. ●Check an input signal from the equipment. (p. 52) ●Use an equipment compliant with EIA/CEA-861/861B. ●
Dig
ital T
V
Note: Digital TV reception is only as good as the antenna and the antenna cabling delivering the DTV signals to the television. Reliable digital TV reception requires high quality, robust DTV signals which can only be achieved when using a TV antenna and cabling designed for digital TV reception.
Further reading please visit: http://www.digitalready.gov.au/publications.aspx where you can ●download ‘The Digital TV Antenna Systems for Homes Handbook’ information pdf file. For your safety, the antenna and cabling should be inspected / installed by a licenced installer ●that should comply with Australian Standard AS1417.1 for Domestic installations or AS1367 for MATV installations.
Connecting devices such as DTV recorder / PVR / VCR etc that also require an antenna connection to the digital television
To maintain optimum antenna signal quality, use an ‘F’ type ●TV signal splitter (as illustrated) when connecting two or more devices to the same antenna socket.
Hint: Some degradation of the DTV signal may occur if you ●are connecting the aerial through an external device (e.g. DVD Recorder or Set Top Box). In this case it is better to use a splitter and connect the aerial directly to both devices.
TV
DTV Recorder / PVR / VCR
RG6Q Fly Lead
Out
in
‘F’ type Antenna Splitter
Antenna SocketWall Plate
RG6Q Fly Lead
RG6Q Fly Lead

Tech
nica
lFA
Qs
57
Problem Actions
Dig
ital T
V
After digital TV tuning, (or re-tuning) some or all DTV channels are missing
Check to ensure your area is covered by DTV ●transmissions.Check that the aerial and antenna cable are designed ●for DTV reception. If you live within 5-10 Km of DTV transmission towers, a combined VHF / UHF Digital TV aerial should be adequate. Outside this area, separate VHF and UHF aerials provide superior reception performance.If you live in a unit or apartment, check to ensure the Master ●Antenna TV (MATV) system is designed for analogue and DTV reception. Please consult your body corporate.
Picture regularly pixelates on some channels, or ‘No Signal’ message
Check “Signal Condition” via TV Setup menu. If “Signal ●Quality” is red/orange or constantly changing, check aerial/cable/connections. If problem persists consult your local TV antenna installer.Too much signal; is “Signal Strength” always at full strength? ●If yes, try attenuating (reducing) the signal strength Check that the aerial and antenna cable are designed for ●DTV reception. ● The received signal may be too weak to allow the TV to reliably lock to the selected channel to generate a viewable picture. If problem persists consult your local TV aerial installer.Interference from household appliances (known as impulse ●noise) such as light switches, fridges etc may cause picture break up and / or audio distortion. Use high quality quad shielded coaxial cable (RG6Q) fly lead between TV and antenna wall socket to minimise impulse noise pickup. If problem persists consult your local TV aerial installer.Antenna installation may be using an aerial amplifier that is ●faulty or an older style aerial amplifier that was not designed for digital TV.Older style antenna cabling, loose fitting/corroded wall ●socket connections/terminals etc.
Picture infrequently pixelates on some or all channels
Electrical interference caused by local or distant lighting ●storms, heavy rain, high wind etc may cause picture to break up and or audio to mute/distort momentarily.Impulse noise interference from an infrequently used ●electrical appliance, or a passing vehicle or lawn mower with a “noisy” ignition system.Older style antenna cabling, loose fitting/corroded wall ●socket connections/terminals etc.
Oth
er
TV goes into Standby mode
Auto power standby function is activated. ●The TV enters Standby mode about 30 mins. after analogue ●broadcasting ends.
The remote control does not work or is intermittent
Are the batteries installed correctly? (p. 3) ●Has the TV been switched On? ●Point the remote control directly at the front of the TV (within ●about 7 m and a 30 degree angle of the front of the TV).Situate the TV away from sunshine or other sources of ●bright light not to shine on the TV’s remote control signal receiver.
Parts of the TV become hotEven when the temperature of parts of the front, top and rear ●panels has risen, these temperature rises will not pose anyproblems in terms of performance or quality.

58
LicenceVGA is a trademark of International Business Machines Corporation. ●S-VGA is a registered trademark of the Video Electronics Standard Association. ●SDXC Logo is a trademark of SD-3C, LLC. ●HDMI, the HDMI Logo and High-Definition Multimedia Interface are trademarks or registered ●trademarks of HDMI Licensing LLC in the United States and other countries.HDAVI Control ● TM is a trademark of Panasonic Corporation.“AVCHD” and the “AVCHD” logo are trademarks of Panasonic Corporation and Sony Corporation. ●Manufactured under license from Dolby Laboratories. ●Dolby and the double-D symbol are trademarks of Dolby Laboratories.Macintosh is a trademark of Apple Inc. ●
Even if no special notation has been made of company or product trademarks, these trademarks have been fully respected.

Tech
nica
lLi
cenc
e S
peci
ficat
ions
59
SpecificationsTH-P58S20A TH-P65S20A
Pow
er Power rating AC 220 - 240 V, 50 / 60 Hz 3.0 A AC 220 - 240 V, 50 / 60 Hz 3.2 ANormal (Home) mode 202 W 249 WStandby condition 0.4 W
Dis
play
pa
nel Aspect Ratio 16:9
Visible screen size 147 cm (diagonal)1,284 mm (W) × 722 mm (H)
165 cm (diagonal)1,434 mm (W) × 806 mm (H)
Number of pixels 2,073,600 (1,920 (W) × 1,080 (H)) [5,760 × 1,080 dots]
Soun
d Speaker 160 mm × 40 mm × 2 pcs, 6 ΩAudio Output 20 W (10 W + 10 W )Headphones M3 (3.5 mm) stereo mini Jack × 1
PC signalsVGA, SVGA, WVGA, XGASXGA, WXGA ······ (compressed)Horizontal scanning frequency 31 - 69 kHzVertical scanning frequency 59 - 86 Hz
Receiving Systems / Band name
PAL B/G Reception of Off air broadcastsDigital TV 7 MHz VHF / UHF (Australia) free-to-air TV broadcast receptionPAL 60 HzM.NTSCNTSC
Playback of NTSC tape from some PAL Video recorders (VCR)Playback from M. NTSC Video recorders (VCR)Playback from NTSC Video recorders (VCR)
Aerial - Rear Standard Belling & Lee connector
Operating Conditions Temperature : 0 °C - 35 °CHumidity : 20 % - 80 % RH (non-condensing)
Con
nect
ion
Term
inal
s
AV1 Input
AUDIO L - R RCA PIN Type × 2 0.5 V[rms]VIDEO RCA PIN Type × 1 1.0 V[p-p] (75 Ω)
COMPONENT Y 1.0 V[p-p] (including synchronization)PB/CB, PR/CR ±0.35 V[p-p]
AV2Input
AUDIO L - R RCA PIN Type × 2 0.5 V[rms]VIDEO RCA PIN Type × 1 1.0 V[p-p] (75 Ω)
AV3Input
AUDIO L - R RCA PIN Type × 2 0.5 V[rms]VIDEO RCA PIN Type × 1 1.0 V[p-p] (75 Ω)
MonitorOutput
AUDIO L - R RCA PIN Type × 2 0.5 V[rms] (high impedance)VIDEO RCA PIN Type × 1 1.0 V[p-p] (75 Ω)
Others
HDMI1 - 3 Input TYPE A Connectors This TV supports “HDAVI control 5” function. ●PC Input HIGH-DENSITY D-SUB 15PIN R / G / B: 0.7 V[p-p] (75 Ω)
HD / VD: TTL Level 2.0 - 5.0 V[p-p] (high impedance)DIGITAL AUDIO OUT PCM / Dolby Digital, Fiber optic
Card slot SD Card slot × 1USB USB 2.0 TYPE A Connector DC 5V, Max. 500 mA
Dimensions ( W × H × D )1,424 mm × 933 mm × 387 mm (With Pedestal)1,424 mm × 882 mm × 104 mm (TV only)
1,574 mm × 1,016 mm × 415 mm (With Pedestal)1,574 mm × 965 mm × 105 mm (TV only)
Mass 48.5 k Net (With Pedestal)46.0 k Net (TV only)
62.0 k Net (With Pedestal)56.0 k Net (TV only)
Design and Specifications are subject to change without notice. Mass and Dimensions shown are ●approximate.

Customer’s RecordThe model number and serial number of this product may be found on its rear panel. You should note the model number and the serial number in the space provided below and retain this book, plus your purchase receipt, as a permanent record of your purchase to aid in identification in the event of theft or loss, and for Warranty Service purposes.
Model Number Serial Number
1. The product is warranted for 12 months from the date of purchase. Subject to the conditions of this warranty Panasonic or its Authorised Service Centre will perform necessary service on the product without charge for parts or labour if, in the opinion of Panasonic, the product is found to be faulty within the warranty period.
2. This warranty only applies to Panasonic products purchased in Australia and sold by Panasonic Australia or its Authorised Distributors or Dealers and only where the products are used and serviced within Australia or it's territories. Warranty cover only applies to service carried out by a Panasonic Authorised Service Centre and only if valid proof of purchase is presented when warranty service is requested.
3. This warranty only applies if the product has been installed and used in accordance with the manufacturer’s recommendations (as noted in the operating instructions) under normal use and reasonable care (in the opinion of Panasonic). The warranty covers normal domestic use only and does not cover damage, malfunction or failure resulting from use of incorrect voltages, incorrect installation, accident, misuse, neglect, build-up of dirt or dust, abuse, maladjustment of customer controls, mains supply problems, thunderstorm activity, infestation by insects or vermin, tampering or repair by unauthorised persons (including unauthorised alterations), introduction of sand, humidity or liquids, commercial use such as hotel, office, restaurant, or other business or rental use of the product, exposure to abnormally corrosive conditions or any foreign object or matter having entered the product.
4. This warranty does not cover the following items unless the fault or defect existed at the time of purchase: (a) Cabinet Part(s) (e) DVD Video, Blu-ray, or Recordable Discs (b) Video or Audio Tapes (f) Video / Audio Heads from wear and tear in normal use (c) SD cards or USB devices (g) Information stored on Hard Disk Drive, USB stick or SD card (d) User replaceable Batteries (h) DTV reception issues caused by TV Aerial / Cabling / Wall socket(s) etc5. Some products may be supplied with Ethernet connection hardware. The warranty is limited on such products and will not cover (a) Internet and or DLNA connection / setup related problems (b) Access fees and or charges incurred for internet connection (c) The use of incompatible software or software not specifically stipulated in the product operations manual; and
(d) Any indirect or consequential costs associated with the incorrect use or misuse of the hardware, its connection to the internet or any other device.
6. If warranty service is required you should: • Telephone Panasonic’s Customer Care Centre on 132600 or visit our website and use the Service Centre Locator for the
name/address of the nearest Authorised Service Centre. • Send or bring the product to a Panasonic Authorised Service Centre together with your proof of purchase receipt as a proof of purchase
date. Please note that freight and insurance to and / or from your nearest Authorised Service Centre must be arranged by you.7. The warranties hereby conferred do not extend to, and exclude, any costs associated with the installation, de-installation or
re-installation of a product, including costs related to the mounting, de-mounting or remounting of any screen, (and any other ancillary activities), delivery, handling, freighting, transportation or insurance of the product or any part thereof or replacement of and do not extend to, and exclude, any damage or loss occurring by reason of, during, associated with, or related to such installation, de-installation, re-installation or transit.
Panasonic Authorised Service Centres are located in major metropolitan areas and most regional centres of Australia, however, coverage will vary dependant on product. For advice on exact Authorised Service Centre locations for your product, please telephone our Customer Care Centre on 132600 or visit our website and use the Service Centre Locator.Unless otherwise specified to the consumer the benefits conferred by this express warranty are additional to all other conditions, warranties, guarantees, rights and remedies expressed or implied by the Trade Practices Act 1974 and similar consumer protection provisions contained in legislation of the States and Territories and all other obligations and liabilities on the part of the manufacturer or supplier and nothing contained herein shall restrict or modify such rights, remedies, obligations or liabilities. Feb 2010
Panasonic Warranty
THIS WARRANTY CARD AND THE PURCHASE DOCKET (OR SIMILAR PROOF OF PURCHASE)SHOULD BE RETAINED BY THE CUSTOMER AT ALL TIMES
If you require assistance regarding warranty conditions or any other enquiries,please contact our Customer Care Centre via the Panasonic website www.panasonic.com.au or
by phone on 132 600. If phoning in, please ensure you have your operating instructions available.Panasonic Australia Pty. Limited
ACN 001 592 187 ABN 83 001 592 187Locked Bag 505, Frenchs Forest, NSW 2086
PRO-031-F11 Issue: 2.0 18-02-2010RQA0245
Web Site: http://panasonic.net© Panasonic Corporation 2010
M0610-0
Printed in Japan