texturing metal - kj artworks
TRANSCRIPT

©2007 All Rights Reserved. Texts, techniques and graphics/images presented in this tutorial were cre-ated by Karen J Lauseng (unless otherwise stated). The written instruc-tions, photographs, designs, patterns and projects are intended for the personal use of the viewer and may be reproduced for that purpose only. Every effort has been made to ensure that the information in these tutori-als is accurate, based on my experience. HOWEVER, I take no responsi-bility for any harm that may be caused from the use or misuse of any ma-terials or processes mentioned herein; nor is any condition or warranty im-plied. Any other use, especially commercial use, is forbidden under law without written permission of the copyright holder. If you want to copy or use any of the images, texts or instructions in this tutorial for any purpose other than personal use, please contact me directly. Thank you for honoring this request. If you have comments or suggestions about this project, please feel free to email me. I would love to hear from you. [email protected].
Texturing Metal Reticulation And Other Texture Techniques

©2007 All Rights Reserved. Texts, techniques and graphics/images presented in this tutorial were created by Karen J Lauseng (unless otherwise stated). The written instructions, photographs, designs, patterns and projects are intended for the personal use of the viewer and may be reproduced for that purpose only. Every effort has been made to ensure that the information in these tutorials is accurate, based on my experience. HOWEVER, I take no responsi-bility for any harm that may be caused from the use or misuse of any materials or processes mentioned herein; nor is any condition or warranty implied. Any other use, especially commercial use, is forbidden under law without written permission of the copyright holder. If you want to copy or use any of the images, texts or instructions on this site for any purpose other than personal use, please contact me directly. Thank you for honoring this request.
Materials
22-gauge reticulation silver
Tools Torch with various tips Fireproof surface Pickle pot with fresh pickle Copper tongs Soft brass brush Dishwashing detergent
What You Will Need
Reticulation is a heat-induced metal texturing technique. Although time consuming, reticulation opens many possibilities and the results are un-predictable, fun to produce, and often stunning. By varying the size of the torch nozzle, speed of movement, force of the flame, distance from the metal, angle of the torch, etc., you will produce different surface patterns. With experience, you can even achieve a somewhat predictable re-sult. If you’re reticulating for the first time, order extra metal to allow for mistakes and experimentation.
Introduction
Let’s Get Started
Tip: For best results, use fresh clean pickle for this project.
1. Place sheet of 22-gauge reticulation silver on
flat soldering surface. Use a large torch tip and heat metal to dull red or annealing temperature and remove flame.
©2007 All Rights Reserved. Texts, techniques and graphics/images presented in this tutorial were created by Karen J Lauseng (unless otherwise stated). The written instructions, photographs, designs, patterns and projects are intended for the personal use of the viewer and may be reproduced for that purpose only. Every effort has been made to ensure that the information in these tutorials is accurate, based on my experience. HOWEVER, I take no responsi-bility for any harm that may be caused from the use or misuse of any materials or processes mentioned herein; nor is any condition or warranty implied. Any other use, especially commercial use, is forbidden under law without written permission of the copyright holder. If you want to copy or use any of the images, texts or instructions on this site for any purpose other than personal use, please contact me directly. Thank you for honoring this request.
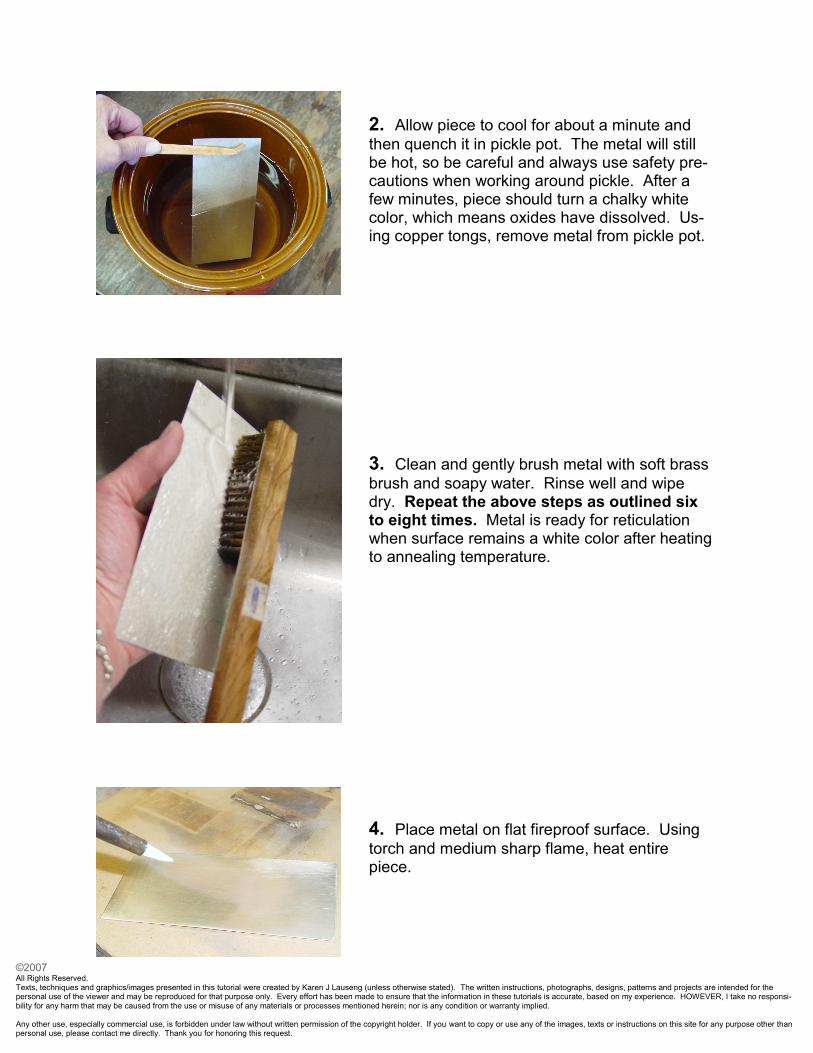
2. Allow piece to cool for about a minute and
then quench it in pickle pot. The metal will still be hot, so be careful and always use safety pre-cautions when working around pickle. After a few minutes, piece should turn a chalky white color, which means oxides have dissolved. Us-ing copper tongs, remove metal from pickle pot.
3. Clean and gently brush metal with soft brass
brush and soapy water. Rinse well and wipe dry. Repeat the above steps as outlined six to eight times. Metal is ready for reticulation when surface remains a white color after heating to annealing temperature.
4. Place metal on flat fireproof surface. Using
torch and medium sharp flame, heat entire piece.
©2007 All Rights Reserved. Texts, techniques and graphics/images presented in this tutorial were created by Karen J Lauseng (unless otherwise stated). The written instructions, photographs, designs, patterns and projects are intended for the personal use of the viewer and may be reproduced for that purpose only. Every effort has been made to ensure that the information in these tutorials is accurate, based on my experience. HOWEVER, I take no responsi-bility for any harm that may be caused from the use or misuse of any materials or processes mentioned herein; nor is any condition or warranty implied. Any other use, especially commercial use, is forbidden under law without written permission of the copyright holder. If you want to copy or use any of the images, texts or instructions on this site for any purpose other than personal use, please contact me directly. Thank you for honoring this request.
Other Textures
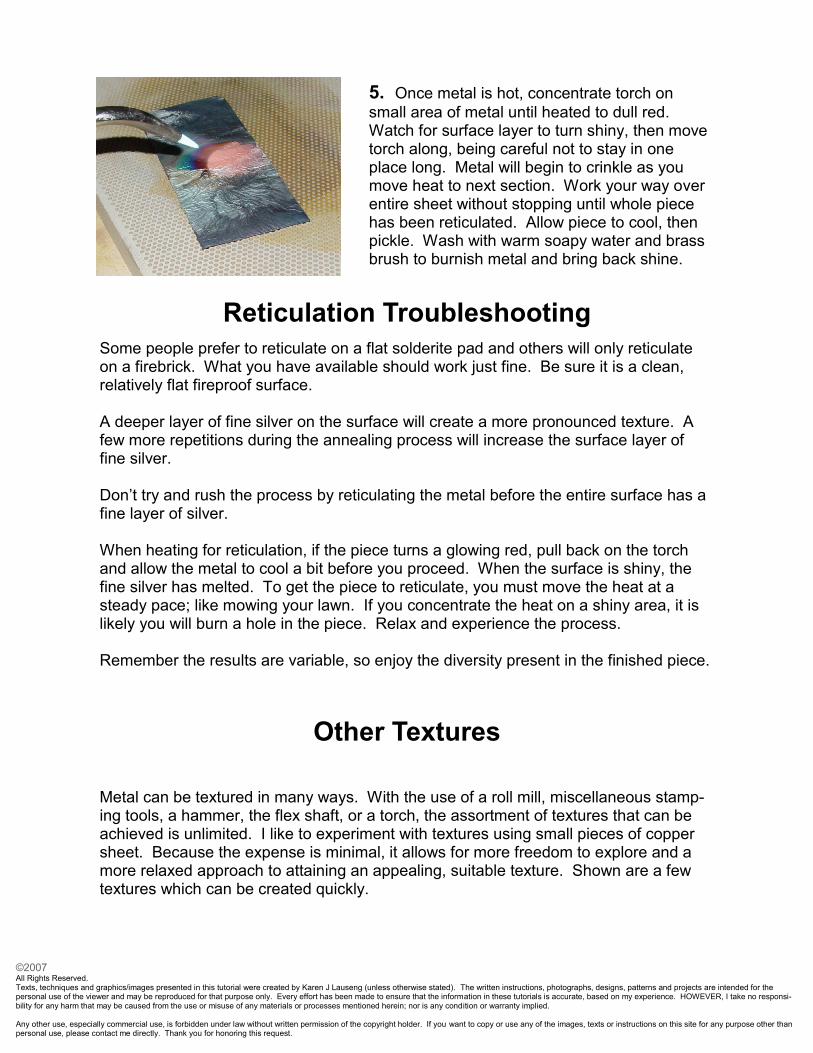
5. Once metal is hot, concentrate torch on
small area of metal until heated to dull red. Watch for surface layer to turn shiny, then move torch along, being careful not to stay in one place long. Metal will begin to crinkle as you move heat to next section. Work your way over entire sheet without stopping until whole piece has been reticulated. Allow piece to cool, then pickle. Wash with warm soapy water and brass brush to burnish metal and bring back shine.
Reticulation Troubleshooting
Some people prefer to reticulate on a flat solderite pad and others will only reticulate on a firebrick. What you have available should work just fine. Be sure it is a clean, relatively flat fireproof surface. A deeper layer of fine silver on the surface will create a more pronounced texture. A few more repetitions during the annealing process will increase the surface layer of fine silver. Don’t try and rush the process by reticulating the metal before the entire surface has a fine layer of silver. When heating for reticulation, if the piece turns a glowing red, pull back on the torch and allow the metal to cool a bit before you proceed. When the surface is shiny, the fine silver has melted. To get the piece to reticulate, you must move the heat at a steady pace; like mowing your lawn. If you concentrate the heat on a shiny area, it is likely you will burn a hole in the piece. Relax and experience the process. Remember the results are variable, so enjoy the diversity present in the finished piece.
Metal can be textured in many ways. With the use of a roll mill, miscellaneous stamp-ing tools, a hammer, the flex shaft, or a torch, the assortment of textures that can be achieved is unlimited. I like to experiment with textures using small pieces of copper sheet. Because the expense is minimal, it allows for more freedom to explore and a more relaxed approach to attaining an appealing, suitable texture. Shown are a few textures which can be created quickly.

©2007 All Rights Reserved. Texts, techniques and graphics/images presented in this tutorial were created by Karen J Lauseng (unless otherwise stated). The written instructions, photographs, designs, patterns and projects are intended for the personal use of the viewer and may be reproduced for that purpose only. Every effort has been made to ensure that the information in these tutorials is accurate, based on my experience. HOWEVER, I take no responsi-bility for any harm that may be caused from the use or misuse of any materials or processes mentioned herein; nor is any condition or warranty implied. Any other use, especially commercial use, is forbidden under law without written permission of the copyright holder. If you want to copy or use any of the images, texts or instructions on this site for any purpose other than personal use, please contact me directly. Thank you for honoring this request.
A. By applying a consistent number of strokes
to the metal’s surface with a ball peen hammer, I made a simple, appealing texture. For a varia-tion, use round punches in different sizes.
B. I used a roofing nail to create this striking
texture. Tapping lightly on the nail head pro-duced the indentation. Once dots covered the entire surface, I placed the nail on its side and struck the edge to make linear grooves.
C. To texture the background of this piece, I
used a flex shaft with a pearl-setting bur. Then I used a spring-loaded center punch to randomly dot the surface.
I like making my own textures as I create my jewelry designs. Experiment with tools you have available and see how fun it is to create textured metal using your creative inspiration. If you would prefer a manufactured texture, the choices are infinite. Various jewelry suppliers carry an endless selection of patterned sheet silver, crinkle bi-metal, etched and laminated metal, etc. You can even purchase sheet silver that has been reticu-lated.
©2007 All Rights Reserved. Texts, techniques and graphics/images presented in this tutorial were created by Karen J Lauseng (unless otherwise stated). The written instructions, photographs, designs, patterns and projects are intended for the personal use of the viewer and may be reproduced for that purpose only. Every effort has been made to ensure that the information in these tutorials is accurate, based on my experience. HOWEVER, I take no responsi-bility for any harm that may be caused from the use or misuse of any materials or processes mentioned herein; nor is any condition or warranty implied. Any other use, especially commercial use, is forbidden under law without written permission of the copyright holder. If you want to copy or use any of the images, texts or instructions on this site for any purpose other than personal use, please contact me directly. Thank you for honoring this request.
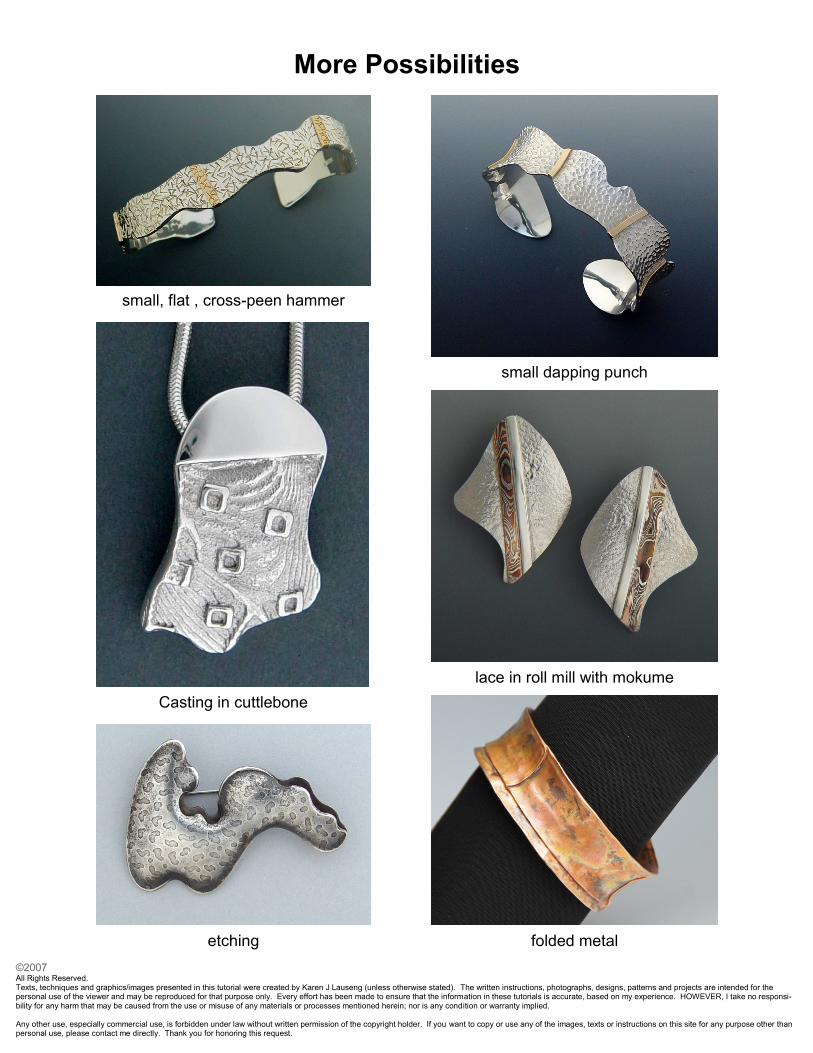
small, flat , cross-peen hammer
small dapping punch
etching
Casting in cuttlebone
lace in roll mill with mokume
More Possibilities
folded metal