telecommunications service ordering process guide
TRANSCRIPT
Oracle® Telecommunications Service OrderingProcess Guide
Release 11i
Part No. B14384-01
January 2005

Oracle Telecommunications Service Ordering Process Guide, Release 11i
Part No. B14384-01
Copyright © 2003, 2005, Oracle Corporation. All rights reserved.
The Programs (which include both the software and documentation) contain proprietary information of Oracle Corporation; they are provided under a license agreement containing restrictions on use and disclosure and are also protected by copyright, patent and other intellectual and industrial property laws. Reverse engineering, disassembly or decompilation of the Programs, except to the extent required to obtain interoperability with other independently created software or as specified by law, is prohibited.
The information contained in this document is subject to change without notice. If you find any problems in the documentation, please report them to us in writing. Oracle Corporation does not warrant that this document is error-free. Except as may be expressly permitted in your license agreement for these Programs, no part of these Programs may be reproduced or transmitted in any form or by any means, electronic or mechanical, for any purpose, without the express written permission of Oracle Corporation.
If the Programs are delivered to the U.S. Government or anyone licensing or using the programs on behalf of the U.S. Government, the following notice is applicable:
Restricted Rights Notice Programs delivered subject to the DOD FAR Supplement are "commercial computer software" and use, duplication, and disclosure of the Programs, including documentation, shall be subject to the licensing restrictions set forth in the applicable Oracle license agreement. Otherwise, Programs delivered subject to the Federal Acquisition Regulations are "restricted computer software" and use, duplication, and disclosure of the Programs shall be subject to the restrictions in FAR 52.227-19, Commercial Computer Software - Restricted Rights (June, 1987). Oracle Corporation, 500 Oracle Parkway, Redwood City, CA 94065.
The Programs are not intended for use in any nuclear, aviation, mass transit, medical, or other inherently dangerous applications. It shall be the licensee's responsibility to take all appropriate fail-safe, backup, redundancy, and other measures to ensure the safe use of such applications if the Programs are used for such purposes, and Oracle Corporation disclaims liability for any damages caused by such use of the Programs.
Oracle is a registered trademark of Oracle Corporation and/or its affiliates. Other names may be trademarks of their respective owners.

iii
Contents
Send Us Your Comments ................................................................................................................... xi
Preface........................................................................................................................................................... xiii
Part I Overview
1 Introduction
1.1 Purpose ................................................................................................................................... 1-2
2 TSO Business Process
2.1 Telecommunications Service Ordering Business Process ............................................... 2-22.1.1 Create a Quote or Order................................................................................................ 2-42.1.1.1 Create a Quote ......................................................................................................... 2-42.1.1.2 Create an Order ....................................................................................................... 2-62.1.2 Configure New Items .................................................................................................... 2-62.1.3 Reconfigure a Customer’s Installed Services ............................................................. 2-72.1.4 Place Order and Verify Order Fulfillment ............................................................... 2-102.1.4.1 Pricing Items in Oracle Quoting ......................................................................... 2-112.1.4.2 After Placing the Order ........................................................................................ 2-13
Part II Functionality and Setup
3 Process Functionality
3.1 Key Functionality of the TSO Solution............................................................................... 3-23.2 Oracle Quoting and Oracle Order Management .............................................................. 3-33.3 Pricing ..................................................................................................................................... 3-53.3.1 Definitions ....................................................................................................................... 3-63.4 Configurator........................................................................................................................... 3-93.5 Install Base ........................................................................................................................... 3-12

iv
3.6 Service Fulfillment Manager .............................................................................................. 3-14
4 Setup Flow and Checklist
4.1 About Setting Up Telecommunications Service Ordering .............................................. 4-24.2 Setup Flow .............................................................................................................................. 4-24.3 Setup Checklist....................................................................................................................... 4-4
5 Set Up Order Management
5.1 Modification to OM Workflow Processes .......................................................................... 5-25.1.1 Add Install Base Activity to the OM Line Workflow................................................ 5-25.1.2 Create SFM Enabled Order Header and Line Workflows........................................ 5-25.1.3 Replace the Fulfill Node in the OM Line Workflow ................................................. 5-35.2 Design Tips ............................................................................................................................. 5-4
6 Set Up Inventory
6.1 Setup of Telecommunications Service Items ..................................................................... 6-36.2 Specify Install Base Tracking for Each Component Item................................................. 6-36.3 Set an Item as Provisionable ................................................................................................ 6-46.4 Set Up an Item of Type Link ................................................................................................ 6-56.5 Create a Container Model .................................................................................................... 6-66.5.1 Specify Container Model............................................................................................... 6-6
7 Set Up Bill of Materials
7.1 About Setting Up BOM......................................................................................................... 7-2
8 Set Up Install Base
8.1 Enable Network Configurations ......................................................................................... 8-38.2 Create Extended Attributes.................................................................................................. 8-38.2.1 Set Up Extended Attribute Pools ................................................................................. 8-48.3 Map Extended Attributes to Items...................................................................................... 8-68.4 Design Tips ............................................................................................................................. 8-7

v
9 Set Up Advanced Pricing
9.1 Set Up Recurring and One-Time Charges ......................................................................... 9-29.2 Pricing Attributes and Sourcing Rules............................................................................... 9-29.3 Get Custom Price ................................................................................................................... 9-7
10 Set Up Configurator and Customize the Solution
10.1 About Configurator Implementation in the Solution .................................................... 10-210.1.1 Conventions for Connector and Components of a Model ..................................... 10-310.1.2 Using Container Models ............................................................................................. 10-310.1.3 Container Model Settings and Structure .................................................................. 10-410.1.4 Importing Container Models into Oracle Configurator ......................................... 10-510.1.5 Structuring Container Models.................................................................................... 10-710.1.6 Connecting Components........................................................................................... 10-1010.1.7 Transient Items and Attributes ................................................................................ 10-1310.1.7.1 About Transient Items........................................................................................ 10-1310.1.7.2 Flagging Transient Items ................................................................................... 10-1310.1.7.3 About Transient Attributes ............................................................................... 10-1410.1.7.4 Flagging Transient Attributes ........................................................................... 10-1410.1.7.5 Assumptions and Restrictions .......................................................................... 10-1510.1.8 Using Configuration Rules ....................................................................................... 10-1510.2 Create the Configuration Model ..................................................................................... 10-1810.3 Publish a Container Model .............................................................................................. 10-2110.4 Define Profile Options ...................................................................................................... 10-2110.5 Disable Pricing ................................................................................................................... 10-2210.6 CZ Schema Customizations ............................................................................................. 10-2210.6.1 TSO Solution CZ_DB_SETTINGS Parameters ....................................................... 10-2310.6.1.1 DISPLAY_SUMMARY_FULFILLMENT_ACTION....................................... 10-2310.6.2 CZ_CONFIG_EXT_ATTRIBUTES Table ................................................................ 10-2310.6.3 Map Install Base Extended Attributes to CZ Attributes in Developer............... 10-2410.6.4 Mapping of CZ tables to Install Base Schema (CSI) .............................................. 10-2610.6.5 Schema Change for Link Items ................................................................................ 10-2810.6.6 Schema Change for Transient Items........................................................................ 10-2910.7 Initialization Parameters .................................................................................................. 10-2910.8 Batch Validation Parameters ........................................................................................... 10-3010.9 Programmatic Tools for TSO Development .................................................................. 10-31

vi
10.9.1 COPY_CONFIGURATION....................................................................................... 10-3210.9.1.1 Considerations Before Running ........................................................................ 10-3310.9.1.2 Syntax and Parameters ....................................................................................... 10-3410.9.1.3 Considerations After Running .......................................................................... 10-3610.9.2 COPY_CONFIGURATION_AUTO ........................................................................ 10-3610.9.3 VALIDATE .................................................................................................................. 10-3710.9.3.1 Syntax and Parameters ....................................................................................... 10-37
11 Set Up Configurator Extensions
11.1 Implementing the TSO Configurator Extensions ........................................................... 11-211.1.1 Overview ....................................................................................................................... 11-311.1.2 Use Interactive Location Search ................................................................................. 11-411.1.2.1 Purpose of the Interactive Location Search Configurator Extension ............ 11-411.1.2.2 Example Code for the Interactive Location Search Configurator Extension 11-511.1.2.3 Setup for the Interactive Location Search Configurator Extension ............... 11-511.1.2.4 Effects of the Interactive Location Search Configurator Extension ............. 11-1011.1.2.5 Modify the Interactive Location Search Configurator Extension ................ 11-1111.1.3 Specify the Line Type................................................................................................. 11-1111.1.3.1 Purpose of the Line Type Configurator Extension......................................... 11-1111.1.3.2 Example Code for the Line Type Configurator Extension............................ 11-1211.1.3.3 Setup for the Line Type Configurator Extension ........................................... 11-1211.1.3.4 Effects of the Line Type Configurator Extension ........................................... 11-2111.1.3.5 Modify the Line Type Configurator Extension............................................... 11-2111.1.4 Use Configuration Attributes with Install Base (IB) ............................................. 11-2111.1.4.1 Purpose of the IBAttribute Configurator Extension ...................................... 11-2211.1.4.2 Example Code for the IBAttribute Configurator Extension ......................... 11-2211.1.4.3 Setup for the IBAttribute Configurator Extension ......................................... 11-2211.1.4.4 Effects of the IBAttribute Configurator Extension ......................................... 11-2511.1.4.5 Modify the IBAttribute Configurator Extension ............................................ 11-2611.2 Using the Oracle Configuration Interface Object (CIO)............................................... 11-2711.2.1 Reconfigure Installed Configurations ..................................................................... 11-2711.2.1.1 Identify Changes to a Configuration................................................................ 11-2711.2.1.2 Access Discontinued Items ................................................................................ 11-2911.2.1.3 Access Instances .................................................................................................. 11-2911.2.1.4 Report on Link Items .......................................................................................... 11-30

vii
11.2.2 Event-Driven Behavior for Configuration.............................................................. 11-3011.2.2.1 Attribute Synchronization ................................................................................. 11-3111.2.2.2 Instance Name Synchronization ....................................................................... 11-3211.2.2.3 Location Synchronization .................................................................................. 11-32
12 Set Up Quoting
12.1 Summary of Reconfiguration ............................................................................................ 12-212.2 Define Profile Options ........................................................................................................ 12-312.3 Set Up the Lines Page--HTML........................................................................................... 12-712.3.1 Display or Hide Columns--HTML .......................................................................... 12-1012.3.2 Hide a Seeded Column--HTML ............................................................................... 12-1112.3.3 Edit Column Labels--HTML..................................................................................... 12-1212.3.4 Edit Column Sequence--HTML................................................................................ 12-1312.3.5 Enable or Disable Line-Level Actions or Table-Level Buttons--HTML ............. 12-1412.3.6 Change Default Number of Rows--HTML............................................................. 12-1612.4 Set Up the Quote Lines Tab Pricing Region--Forms .................................................... 12-1712.4.1 Enable or Disable Line-Level Actions--Forms ....................................................... 12-2012.5 Design Tips......................................................................................................................... 12-21
13 Set Up Service Fulfillment Manager
13.1 Create SFM Enabled Order Management Workflow Header Process ........................ 13-313.2 Create SFM Enabled Order Management Workflow Line Process.............................. 13-413.3 Add Function for Menu Notifications.............................................................................. 13-513.4 Create a PL/SQL Procedure That Updates a Certain Workitem Parameter.............. 13-613.5 Create Workflow Process ................................................................................................... 13-713.6 Define Work Item ................................................................................................................ 13-913.7 Map Work Item to Item and Action (Line Transaction Type) Combination............ 13-1013.8 Enable Order Cancellation ............................................................................................... 13-1113.8.1 Create a Validation Template................................................................................... 13-1113.8.2 Create a Processing Constraint ................................................................................ 13-1213.8.3 Build Rollback Activities into the Workflow ......................................................... 13-1313.9 Cancel an Order ................................................................................................................. 13-1313.10 Design Tips......................................................................................................................... 13-14

viii
Part III Using and Administering the Solution
14 Using the Solution
14.1 Working with Quotes--HTML........................................................................................... 14-214.1.1 Telecommunication Services Ordering Functionality Flow--HTML.................... 14-214.1.2 Create a New Quote--HTML ...................................................................................... 14-414.1.3 Add Products to the Quote--HTML .......................................................................... 14-614.1.4 Add Telecommunication Services for Reconfiguration--Installed Base............... 14-714.1.5 Reconfigure a Telecommunications Service--HTML ............................................ 14-1014.1.6 Add to Container Model from Install Base--HTML.............................................. 14-1114.1.7 Remove Unchanged Components--HTML............................................................. 14-1214.1.8 Remove Lines--HTML ............................................................................................... 14-1414.1.9 Place an Order--HTML.............................................................................................. 14-1414.2 Working with Quotes--Forms.......................................................................................... 14-1514.2.1 Telecommunication Services Ordering Functionality Flow--Forms................... 14-1614.2.2 Reconfigure a Telecommunications Service--Forms ............................................. 14-1814.2.3 Create a New Quote--Forms..................................................................................... 14-1914.2.4 Add Products to the Quote--Forms ......................................................................... 14-2114.2.5 Add Telecommunications Services for Reconfiguration--Forms ........................ 14-2214.2.6 Reconfigure a Service--Forms................................................................................... 14-2414.2.7 Remove Unchanged Components--Forms ............................................................. 14-2614.2.8 Remove Lines--Forms ................................................................................................ 14-2614.2.9 Place the Order--Forms.............................................................................................. 14-27
15 Administering the Solution
15.1 Re-validate Installed Configurations After Modifications ............................................ 15-215.2 Managing Notification Errors............................................................................................ 15-315.3 Find an Order in the SFM Order Flow-Through Area................................................... 15-415.4 Retry Install Base Updates ................................................................................................. 15-415.5 Retry Failed Outgoing Messages....................................................................................... 15-515.6 Manage Failure Notifications in HTML........................................................................... 15-7
Part IV Appendixes

ix
A Assumptions and Restrictions
A.1 List of Assumptions and Restrictions................................................................................. A-1
B Set Up Special Charges in Advanced Pricing
B.1 Set Up Charges ...................................................................................................................... B-1B.1.1 Create Charge Names.................................................................................................... B-1B.1.2 Define Modifier for an Item or Service ....................................................................... B-3B.1.3 Define Qualifiers on the Modifier................................................................................ B-6B.2 Discounting Charges Using the Get_Custom Price Function......................................... B-7
Glossary
Index

x

xi
Send Us Your Comments
Oracle Telecommunications Service Ordering Process Guide, Release 11i
Part No. B14384-01
Oracle welcomes your comments and suggestions on the quality and usefulness of this document. Your input is an important part of the information used for revision.
■ Did you find any errors?■ Is the information clearly presented?■ Do you need more information? If so, where?■ Are the examples correct? Do you need more examples?■ What features did you like most?
If you find any errors or have any other suggestions for improvement, please indicate the document title and part number, and the chapter, section, and page number (if available). You can send com-ments to us in the following way:
■ Electronic mail: [email protected]
If you would like a reply, please give your name, address, telephone number, and (optionally) elec-tronic mail address.
If you have problems with the software, please contact your local Oracle Support Services.

xii

xiii
Preface
Welcome to the Oracle Telecommunications Service Ordering Process Guide.
This document provides the reader with an understanding of the telecommunications service ordering (TSO) solution, the overall user flow and functionality that the solution supports, setup information to implement this solution, the end-user tasks, and the administrative tasks.
Intended AudiencesThis document is intended for implementers and end users of a TSO solution. Before using this book as an implementer, you should have a working knowledge of Oracle Order Management, Oracle Inventory, Bills of Material, Oracle Install Base, Oracle Configurator, Oracle Quoting, and Oracle Service Fulfillment Manager. For guidance in determining which parts of this book are of interest to you, see the Structure section on page xv.
Audience and User DefinitionsThis document has multiple audiences and refers to different audiences, users, and customers. These audiences and users include:
■ Implementer: The technically oriented person who thoroughly understands setting up a variety of Oracle applications and who is setting up the TSO solution for purchaser of the TSO solution. A key area of interest to the implementer is Part II, "Functionality and Setup", which provides the implementer technical overviews and solution-specific setup information.
■ End user: The person who interacts with directly customers who bought or are buying telecommunication services or products. This person might be a customer service representative who is helping their customer with specifying a

xiv
sales order. A key area of interest to the end user is Chapter 14, "Using the Solution".
■ Administration user: The person who monitors and maintains sales orders after placement of the sales orders. The tasks that this person performs are "behind the scene" and do not involve direct contact with the customer. A key area of interest to the administration user is Chapter 15, "Administering the Solution".
■ Customer: The person who is purchasing or is changing their telecommunication services or products. This person is not an intended audience for this document and would typically have no knowledge of Oracle Applications or the TSO solution.
TTY Access to Oracle Support ServicesOracle provides dedicated Text Telephone (TTY) access to Oracle Support Services within the United States of America 24 hours a day, seven days a week. For TTY support, call 800.446.2398.
Documentation AccessibilityOur goal is to make Oracle products, services, and supporting documentation accessible, with good usability, to the disabled community. To that end, our documentation includes features that make information available to users of assistive technology. This documentation is available in HTML format, and contains markup to facilitate access by the disabled community. Accessibility standards will continue to evolve over time, and Oracle is actively engaged with other market-leading technology vendors to address technical obstacles so that our documentation can be accessible to all of our customers. For more information, visit the Oracle Accessibility Program Web site at http://www.oracle.com/accessibility/.
Accessibility of Code Examples in Documentation Screen readers may not always correctly read the code examples in this document. The conventions for writing code require that closing braces should appear on an otherwise empty line; however, some screen readers may not always read a line of text that consists solely of a bracket or brace.
Accessibility of Links to External Web Sites in Documentation

xv
This documentation may contain links to Web sites of other companies or organizations that Oracle does not own or control. Oracle neither evaluates nor makes any representations regarding the accessibility of these Web sites.
StructureThe Oracle Telecommunications Service Ordering Process Guide comprises:
Part I, "Overview"This part introduces the TSO solution.
Chapter 1, "Introduction" ■ This chapter includes a high-level summary of the Telecommunications Service
Ordering (TSO) solution and a list of terms and definitions.
Chapter 2, "TSO Business Process"■ This chapter describes business flows in the Telecommunications Service
Ordering solution.
Part II, "Functionality and Setup"This part explains the functionality of the TSO solution and how to set up the TSO process.
Chapter 3, "Process Functionality"■ This chapter describes solution functionality by Oracle Application in the
Telecommunications Service Ordering solution.
Chapter 4, "Setup Flow and Checklist"■ This chapter provides you a suggested setup flow and checklist.
Chapter 5, "Set Up Order Management"■ This chapter provides you setup information for Oracle Order Management
that is specific to the Telecommunications Service Ordering solution.
Chapter 6, "Set Up Inventory"■ This chapter provides you setup information for Oracle Inventory that is
specific to the Telecommunications Service Ordering solution.

xvi
Chapter 7, "Set Up Bill of Materials"■ This chapter provides you setup information for Oracle Bill of Materials that is
specific to the Telecommunications Service Ordering solution.
Chapter 8, "Set Up Install Base"■ This chapter provides you setup information for Oracle Install Base that is
specific to the Telecommunications Service Ordering solution.
Chapter 9, "Set Up Advanced Pricing"■ This chapter provides you setup information for Oracle Advanced Pricing that
is specific to the Telecommunications Service Ordering solution
Chapter 10, "Set Up Configurator and Customize the Solution"■ This chapter provides you setup information for Oracle Configurator that is
specific to the Telecommunications Service Ordering solution.
Chapter 11, "Set Up Configurator Extensions"■ This chapter provides you setup information for Oracle Configurator
Extensions that is specific to the Telecommunications Service Ordering solution.
Chapter 12, "Set Up Quoting"■ This chapter provides you setup information for Oracle Quoting that is specific
to the Telecommunications Service Ordering solution.
Chapter 13, "Set Up Service Fulfillment Manager"■ This chapter provides you setup information for Oracle Service Fulfillment
Manager that is specific to the Telecommunications Service Ordering solution.
Part III, "Using and Administering the Solution"This part explains how to use the TSO solution and perform administration tasks.
Chapter 14, "Using the Solution"■ This chapter describes the end-user procedures of a TSO solution.
Chapter 15, "Administering the Solution"■ This chapter provides procedural information that an administrator performs to
monitor sales orders to check for and respond to failure notification messages.

xvii
Part IV, "Appendixes"This part provides you with extra information about which you should be aware and examples of code that Functional Companion uses.
Appendix A, "Assumptions and Restrictions"■ This chapter provides you with various assumptions and restrictions of which
you should be aware.
Appendix B, "Set Up Special Charges in Advanced Pricing"■ This chapter provides you with information about setting up special charges in
Advanced Pricing.
GlossaryThis glossary contains definitions that you may need while implementing a Telecommunications Services Ordering solution.
IndexThe Index lets you search for contents by key words.
Related DocumentsThe following documents provide Oracle Application-specific information relating to the Oracle Telecommunications Service Ordering solution.
■ Oracle Advanced Pricing Implementation Manual
■ Oracle Advanced Pricing User’s Guide
■ Oracle Bills of Material User's Guide
■ Oracle Configurator About documentation
■ Oracle Configurator Developer User’s Guide
■ Oracle Configurator Extensions and Interface Object Developer's Guide
■ Oracle Configurator Implementation Guide
■ Oracle Configurator Installation Guide
■ Oracle Configurator Methodologies
■ Oracle Install Base Implementation Guide
■ Oracle Install Base User Guide

xviii
■ Oracle Inventory User's Guide
■ Oracle Order Management User’s Guide
■ Oracle Order Management Suite Implementation Manual
■ Oracle Quoting Implementation Guide
■ Oracle Quoting User Guide
■ Oracle Service Fulfillment Manager Concepts and Procedures Guide
■ Oracle Service Fulfillment Manager Implementation Guide
ConventionsThe following conventions are used in this manual:
Convention Meaning
. . .
Vertical ellipsis points in an example mean that information not directly related to the example has been omitted.
. . . Horizontal ellipsis points in statements or commands mean that parts of the statement or command not directly related to the example have been omitted
boldface text Boldface type in text indicates a term defined in the text, the glossary, or in both locations.
italic Italic type in text, tables, or code examples indicates user-supplied text. Replace these placeholders with a specific value or string.
name() In text other than code examples, the names of programming language methods and functions are shown with trailing parentheses. The parentheses are always shown as empty. For the actual argument or parameter list, see the reference documentation. This convention is not used in code examples.
< > Angle brackets enclose user-supplied names.
[ ] Brackets enclose optional clauses from which you can choose one or none.

Part I Overview
This part contains the following chapters:
■ Chapter 1, "Introduction"
■ Chapter 2, "TSO Business Process"


Introduction 1-1
1Introduction
The topic in this chapter includes:
■ Section 1.1, "Purpose" on page 1-2

Purpose
1-2 Oracle Telecommunications Service Ordering Process Guide
1.1 PurposeOrdering and delivering telecommunication services is complex. The complexity increases significantly with service changes. The telecommunications service ordering (TSO) functionality in Oracle Applications supports the processes involved in moving, adding, changing, and disconnecting customer services.
Oracle Applications reduce the complexity of the ordering process by providing:
■ A centralized view of the customer, including the installed service configuration (Oracle Install Base).
■ The products and services available to the customer.
■ The ability to restore, reconfigure, and re-price an existing service configuration.
The TSO solution spans multiple Oracle applications, including:
■ Oracle Order Management
■ Oracle Inventory
■ Oracle Bills of Material
■ Oracle Install Base
■ Oracle Configurator
■ Oracle Quoting
■ Oracle Service Fulfillment Manager
Each application has developed a set of functionality which when used together with all the other applications enables the TSO solution. Section 3.1, "Key Functionality of the TSO Solution" on page 3-2 provides you with a summary of TSO functionality by Oracle application.
The Oracle Telecommunications Service Ordering (TSO) solution enables you to update existing configurations of telecommunication services by moving, adding, changing, or disconnecting a customer's services.To enable the upgrade process flow, companies need the ability to track the full life cycle of an item instance--product information, location, status, and so on--from order creation to order fulfillment. If a customer requests an upgrade of a product from a company after several years have passed, the company must know the exact current state of that product and must verify that any requested changes are feasible, such as whether or not these changes are compatible with a customer's existing installed product, and fulfilling only those requested changes.

TSO Business Process 2-1
2TSO Business Process
Main topics in this chapter include:
■ Section 2.1, "Telecommunications Service Ordering Business Process" on page 2-2
■ Section 2.1.1, "Create a Quote or Order" on page 2-4
■ Section 2.1.2, "Configure New Items" on page 2-6
■ Section 2.1.3, "Reconfigure a Customer’s Installed Services" on page 2-7
■ Section 2.1.4, "Place Order and Verify Order Fulfillment" on page 2-10
About this ChapterThis chapter provides you with high-level flow descriptions of end-user TSO business processes. If you would like procedural directions that the end-user performs, see Chapter 14, "Using the Solution".
Alternately, if you would like information about TSO setup and processes, see Chapter 4, "Setup Flow and Checklist".

Telecommunications Service Ordering Business Process
2-2 Oracle Telecommunications Service Ordering Process Guide
2.1 Telecommunications Service Ordering Business ProcessThe Telecommunications Service Ordering solution consists of the follow processes.
■ Creating a new configuration for a customer.
■ Reconfiguring a customer’s installed services.
You can initiate these processes from either Oracle Quoting or Oracle Order Management.
Figure 2–1, "Overall TSO Business Process" shows the overall Telecommunications Service Ordering business process.

Telecommunications Service Ordering Business Process
TSO Business Process 2-3
Figure 2–1 Overall TSO Business Process
The following paragraphs refer to the flow elements in Figure 2–1.
To begin the Telecommunications Service Ordering business process, create an order (1a) or quote(1b). To view the expanded diagram, see Section 2.1.1, "Create a Quote or Order" on page 2-4.

Telecommunications Service Ordering Business Process
2-4 Oracle Telecommunications Service Ordering Process Guide
To add a new service for an existing customer, select an item from the Oracle Inventory Product Catalog and configure it (2a). To view the expanded diagram, see Section 2.1.2, "Configure New Items" on page 2-6.
To reconfigure a customer’s existing service, select the item to move, change, add to, or disconnect from Oracle Install Base and reconfigure it (2b). To view the expanded diagram, see Section 2.1.3, "Reconfigure a Customer’s Installed Services" on page 2-7.
To place the sales order of the configured or reconfigured item, save the configuration and convert the quote to a sales order (3). After you place the sales order, the order fulfilment process begins (4). To view the expanded diagram, see Section 2.1.4, "Place Order and Verify Order Fulfillment" on page 2-10.
2.1.1 Create a Quote or OrderWhen a customer requests an addition or change to a service, create a quote or order to begin the Telecommunications Service Ordering process.
2.1.1.1 Create a QuoteFigure 2–2 shows the choices that are available when creating a quote.
Note: In the telecommunications service industry, it is common to use the term upgrade to refer to the reconfiguration of a service by moving, adding, changing, or disconnecting items. However, in the context of the Telecommunications Service Ordering solution, these changes to installed configurations of Container Models are regarded as updates to those configurations. To avoid confusion, this document uses the term reconfiguration to encompass both upgrade and update.

Telecommunications Service Ordering Business Process
TSO Business Process 2-5
Figure 2–2 Choices for Creating a Quote
The following paragraphs refer to the flow elements in Figure 2–2.
When you create a quote (1a) or create a quote from a template (1b), you must specify the quote name (2) and the customer (3). If the customer has multiple locations, you select a specific customer location. Many of the other fields contain default values, which you can change. Verify that the Order Type for your quote is Service Fulfillment Order before continuing.
When you modify an existing quote (1c), create a quote from an opportunity (1d), copy an existing quote (1e), or create a new version of a quote (1f), the quote name,

Telecommunications Service Ordering Business Process
2-6 Oracle Telecommunications Service Ordering Process Guide
customer, and other information originate from the source opportunity and quote, respectively.
For detailed information about creating quotes using the above methods, refer to the Oracle Quoting User Guide.
2.1.1.2 Create an OrderYou can create an order by accessing the Order Management Responsibility and then accessing one of the following:
■ Sales Order form
■ Quick Sales Order form
You can also launch the Sales Order form or Quick Sales Order form from the Order tab in the Contact Center. When you launch the forms from the Contact Center, the customer context information that is available in the Contact Center form automatically appears in the order header region of the Sales Order or the Quick Sales Order forms.
2.1.2 Configure New ItemsYou begin the process of configuring a new item by selecting a configurable item from the Oracle Inventory Item Catalog and creating a quote or order line. From the quote or order line, you can access Oracle Configurator.
Figure 2–3 shows the process of configuring new items.
Figure 2–3 Process for Configuring New Items
The following paragraphs refer to the flow elements in Figure 2–3.

Telecommunications Service Ordering Business Process
TSO Business Process 2-7
From your quote or order line, you add items--products or services--to the quote or order line from either the Oracle Inventory Item Catalog (1) or Oracle Install Base. To add to the quote or order, select a configurable Container Model from the Item Catalog. Each selected item creates a quote or order line.
For more information about:
■ Adding items from Oracle Install Base, see Section 2.1.3, "Reconfigure a Customer’s Installed Services" on page 2-7.
■ Container Models, see Section 6.5, "Create a Container Model" on page 6-6.
■ Creating quotes, see Section 14.1.2, "Create a New Quote--HTML" on page 14-4.
During the Oracle Configurator session, you can configure Pick to Order model items by selecting their attributes, locations, relationships between items, and by specifying the instance names for the selected items (2). Configurator identifies, for every item in the configuration, a provisioning action, for example, add or disconnect (3). Oracle Configurator validates the configuration against defined technical and business configuration rules. When you are satisfied with the configuration, you submit your configuration (4), which results in:
■ The Oracle Configurator window closing and:
– Passing the changes back to Oracle Quoting or Oracle Order Management.
– Passing information about the transaction lines associated with each item to Oracle Install Base (5).
■ Multiple lines, one for each item within the context of the configuration appearing in the quote or order.
You can expand or collapse the quote lines of a configuration in Oracle Quoting by clicking an Expand or Collapse icon on the root level of the quote line. In Oracle Order Management, the order lines appear as a “flat” list. The quote or order lines also display the actions derived and the instance name captured for each item during the configuration session.
2.1.3 Reconfigure a Customer’s Installed ServicesYou begin the process of reconfiguring item instances by selecting a configurable item instance from Oracle Install Base. Item instances created in a common Container Model appear in a single quote or order line. You access Oracle Configurator from the quote or order line.
When reconfiguring an item, consider whether you want to charge the customer for the reconfiguration. If you make changes to an installed item in the field, you can

Telecommunications Service Ordering Business Process
2-8 Oracle Telecommunications Service Ordering Process Guide
reconfigure the configuration directly from Oracle Install Base without involving Oracle Quoting, Oracle Order Management and Oracle Service Fulfillment Manager.
Figure 2–4 shows the process of reconfiguring items.
Figure 2–4 Process of Reconfiguring Items
The following paragraphs refer to the flow elements in Figure 2–4.
You can search the Installed Base for a customer’s existing (instances) products (1). You can then select a subset of the product instances to change, disconnect, or move--that is, reconfigure (2).
The item instances that you select from Oracle Install Base appear in the quote or order line within their original Container Model. (3).
Expand the quote line to view the chosen item instances, hierarchy, and components associated with the quote line. In Oracle Order Management, the chosen item instances appear as a flat list (4).

Telecommunications Service Ordering Business Process
TSO Business Process 2-9
Next, launch Oracle Configurator (5). Oracle Configurator retrieves the baseline configuration status from Oracle Install Base. The baseline configuration represents the latest revision of a configurable item and reflects the current installation at a customer’s site.
Reconfigure items by changing their attributes, locations, and relationships between items, or by moving or disconnecting the item, or by adding new items (6). Oracle Configurator validates the changed configuration against defined configuration rules.
Optionally, compare the reconfiguration to the previous configuration in the Configurator Summary window. The Summary window shows the changes since the previously fulfilled, baseline configuration. From the View list of the Summary page you can choose either:
■ Current Selections: This option displays the configuration model’s entire structure and highlights all items that have changed (7) compared to the installed baseline configuration or in the current configuration session.
■ Changes Relative to Installed Configuration: This option shows only the parts that have changed and displays their ancestors or hierarchy for context. Parts of the configuration model that have not changed do not appear in this view (8).
The Summary window indicates the type of change in the Line Type column. When an Oracle Quoting user submits a quote, creating a sales order in Oracle Order Management, the provisioning action for each quote and order line appears in the Line Type column in the Oracle Order Management Sales Orders window. Downstream applications, such as Oracle Service Fulfillment Manager, also reference the line type for further processing.
When you are satisfied with and have completed the configuration (9):
■ The Oracle Configurator session ends.
■ Oracle Quoting extracts the configuration information from Oracle Configurator to create quote lines, one for each item of the configuration. You can expand or collapse the quote lines of a configuration in Oracle Quoting by clicking an expand or collapse icon on the root level of the quote line. You can view the prices for the configuration (10a).
■ Oracle Configurator writes transaction details of the configuration to the Oracle Install Base (10b).
Note that it is also possible to launch Oracle Configurator directly from Oracle Install Base, rather than from Oracle Quoting or Oracle Order Management. In this case, provisioning is skipped.

Telecommunications Service Ordering Business Process
2-10 Oracle Telecommunications Service Ordering Process Guide
2.1.4 Place Order and Verify Order FulfillmentAfter you configure items, default prices appear in the quote or order lines. You have the option to adjust prices, along with some other quote or order information before placing an order.
When you place the sales order in Oracle Quoting, Oracle Order Management receives the sales order.
When you place an order from Oracle Quoting, an order is created in Oracle Order Management. You can create an order in either Entered or Booked status.
You can create an order in either Entered or Booked status. You can make changes to the order while it is in Entered status.
Oracle Service Fulfillment Manager receives the sales order from Oracle Order Management for provisioning. When you provision the order, Oracle Install Base receives the reconfigured item information and the sales order is complete.
Pricing a ConfigurationWhen configuration is completed, validated, and saved in Oracle Configurator, the configuration returns to the hosting application, such as Oracle Quoting or Oracle Order Management. Quote or order lines are created for each item in the configuration. The hosting application then calls Oracle Advanced Pricing to price the configuration. The prices of each item appear on each quote or order line.
Figure 2–5 shows the process of converting a quote to a sales order and verifying order fulfillment.

Telecommunications Service Ordering Business Process
TSO Business Process 2-11
Figure 2–5 Converting a Quote to a Sales Order and Verifying Order Fulfillment
The following paragraphs refer to the flow elements in Figure 2–5.
2.1.4.1 Pricing Items in Oracle QuotingWhen you finish configuring an item, Oracle Advanced Pricing prices the selected items. These prices appear in the quote line (1). You can choose which columns appear on the Lines page and change the column labels to best meet your needs. For more information, see Section 12.3, "Set Up the Lines Page--HTML" on page 12-7.
Changing the QuoteYou can change the following quote information by:
■ Changing the price of an item on the quote by:
– Providing a manual discount.

Telecommunications Service Ordering Business Process
2-12 Oracle Telecommunications Service Ordering Process Guide
– Adjusting the price of a quote line by applying a promotion or clicking a price list.
– Applying a pricing agreement.
■ Changing the shipping and billing information for a selected quote line.
■ Specifying the expiration date of the quote.
Submitting the Quote for ApprovalSubmit the quote for approval using Oracle Approvals Management. Define the approval Rules and Approvers during the setup process. The quote remains in read-only mode during the approval process. Oracle Approvals Management submits requests for approval to each approver in sequence, sending an e-mail notification to you upon completion of the approval process. During the approval process, you can view the response of each approver. You can also cancel an approval request that is in progress, which sends e-mail notification to the approver with whom the approval request is pending.
Placing the OrderWhen you are satisfied with the quote, you can:
– Place an order for the quote (2).
– Print the quote.
– Freeze the quote prices.
– Create a new version of the quote.
– Create a proposal from the quote.
Note: If a line does not include a specified price list, then the header's price list is the default. If the header does not include a price list, then Oracle Advanced Pricing determines the price list.
Note: If a product or service item does not include a specified Installed At address during the configuration session, then the shipping address becomes the default Installed At address in Oracle Install Base.
Telecommunications Service Ordering Business Process
TSO Business Process 2-13
2.1.4.2 After Placing the OrderAfter you place an order from the quote, Oracle Order Management creates an order in Order Manager (3).
After placing an order in Booked status, all of the order lines with provisionable items flow into the Oracle Service Fulfillment Manager (4).
Oracle Service Fulfillment Manager fulfills each order line by performing the provisioning action--appearing in the Line Type field--on the item. (5).
After provisioning the service on the network, Oracle Service Fulfillment Manager:
■ Records all of the activation information and modifications performed during the fulfillment process.
■ Updates the Oracle Install Base transaction details schema if any configuration attributes that changed during provisioning, along with the fulfillment date of each order line (6). A workflow updates the fulfillment date in Oracle Order Management. For more information about the workflow processes associated with the Oracle Order Management Order Line item type, refer to Using Oracle Workflow in Oracle Order Management.
The Oracle Install Base and Oracle Order Management integration process either:
■ Creates instances in Oracle Install Base based on the fulfilled transaction details, or
■ Makes updates if any configuration attributes changed during provisioning (8).
Before creating or updating an instance, however, Oracle Install Base runs the Oracle Configurator batch validation process to validate the instance.
When SFM completes provisioning, the order line status becomes Provisioning Successful, and then it becomes Fulfilled (7).
Note: If you place an order from a quote in Entered status, the order lines requiring provisioning do not flow into SFM until you change the status of the order to Booked. Changing the status of an order requires you to access the order in Oracle Order Management and manually change the status from Entered to Booked. The Telecommunications Service Ordering solution requires that you set the Oracle Quoting profile option ASO: Default Order State to a default order status of Booked.

Telecommunications Service Ordering Business Process
2-14 Oracle Telecommunications Service Ordering Process Guide
See AlsoYou can find detailed end-user procedural steps in Chapter 14, "Using the Solution". Topics include how to:
■ Create a new quote.
■ Add products to the quote.
■ Reconfigure a telecommunications service.
■ Add products to quote from Oracle Install Base.
■ Add to Container Model from Oracle Install Base.
■ Remove unchanged components.
■ Remove lines.
■ Place an order.

Part II Functionality and Setup
This part contains the following chapters:
■ Chapter 3, "Process Functionality"
■ Chapter 4, "Setup Flow and Checklist"
■ Chapter 5, "Set Up Order Management"
■ Chapter 6, "Set Up Inventory"
■ Chapter 7, "Set Up Bill of Materials"
■ Chapter 8, "Set Up Install Base"
■ Chapter 9, "Set Up Advanced Pricing"
■ Chapter 10, "Set Up Configurator and Customize the Solution"
■ Chapter 11, "Set Up Configurator Extensions"
■ Chapter 12, "Set Up Quoting"
■ Chapter 13, "Set Up Service Fulfillment Manager"


Process Functionality 3-1
3Process Functionality
Main topics in this chapter include:
■ Section 3.1, "Key Functionality of the TSO Solution" on page 3-3
■ Section 3.2, "Oracle Quoting and Oracle Order Management" on page 3-3
■ Section 3.3, "Pricing" on page 3-5
■ Section 3.4, "Configurator" on page 3-9
■ Section 3.5, "Install Base" on page 3-12
■ Section 3.6, "Service Fulfillment Manager" on page 3-14

Key Functionality of the TSO Solution
3-2 Oracle Telecommunications Service Ordering Process Guide
3.1 Key Functionality of the TSO SolutionThe Oracle Telecommunications Service Ordering (TSO) solution spans multiple Oracle applications. Each application has developed a set of functionality that when used together enables the TSO solution. The purpose of the this document is to provide the reader with an understanding of the solution, the overall user flow, the functionality and the setup required on each Oracle Application to enable to TSO solution.
Key functionality of the Telecommunications Service Ordering solution includes:
■ Oracle Order Management
– Supports Container Models. This involves solution-based modeling, network connections (or links), and partial configurations.
– Search Oracle Install Base for the purpose of reconfiguring existing installed instances.
– Launch Oracle Configurator to add new instances or reconfigure installed instances to the order.
For more functionality information, see Section 3.2, "Oracle Quoting and Oracle Order Management" on page 3-3.
■ Oracle Quoting
– Supports Container Models. This involves solution-based modeling, network connections (or links), and partial configurations.
– Search Oracle Install Base for the purpose of reconfiguring existing installed instances.
– Launch Oracle Configurator to add new instances or reconfigure installed instances to the quote.
For more functionality information, see Section 3.2, "Oracle Quoting and Oracle Order Management" on page 3-3.
■ Oracle Configurator
– Configure new items and create new configurations.
– Restore configurations from Oracle Install Base.
– Reconfigure existing configurations.
– Determine the differences between the installed and the reconfigured configuration.

Oracle Quoting and Oracle Order Management
Process Functionality 3-3
– Submit the reconfigured configuration to the hosting application--Oracle Quoting or Oracle Install Base.
For more functionality information, see Section 3.4, "Configurator" on page 3-9.
■ Oracle Install Base
– Store network configuration models.
– Identify and maintaining the current baseline configuration.
– Launch and validating updates to the baseline configuration.
– Manage connected-to relationships.
For more functionality information, see Section 3.5, "Install Base" on page 3-12.
■ Oracle Service Fulfillment Manager
Oracle Service Fulfillment Manager provisions the telecommunication services that the customer ordered.
For more functionality information, see Section 3.6, "Service Fulfillment Manager" on page 3-14.
3.2 Oracle Quoting and Oracle Order ManagementFunctionality topics in Oracle Quoting and Oracle Order Management include:
■ About the Hosting Applications--Oracle Quoting and Oracle Order Management on page 3-3
■ Supporting Container Models on page 3-4.
■ Search Oracle Install Base on page 3-5.
■ Launch Oracle Configurator on page 3-5.
About the Hosting Applications--Oracle Quoting and Oracle Order ManagementOracle Telecommunications Service Ordering allows sales agents to add or reconfigure telecommunication services in the customer’s installed base. When a customer wants to make changes or add Components to a product configuration that they have ordered and received, the sales agent can either search Oracle Install Base and select the customer’s telecommunication service or search Oracle Inventory to add new items. The sales agent can launch Oracle Configurator from
Oracle Quoting and Oracle Order Management
3-4 Oracle Telecommunications Service Ordering Process Guide
the hosting applications--Oracle Order Management or Oracle Quoting--and either revise the original configuration or configure the new items.
Oracle Configurator returns a Line Type or Action, to the hosting applications to inform the user if a change has been made. The Container Model and all Components have the default line category ORDER. After configuration, the pricing of the quote or order occurs, after which placement of the order occurs. When the order is booked, fulfillment of order lines occurs in Oracle Service Fulfillment Manager. When Oracle Service Fulfillment Manager has fulfilled an order line, Oracle Install Base is updated with any changes to extended attributes that occurred during fulfillment.
Supporting Container ModelsOracle Quoting and Oracle Order Management support the ordering of an entire telecommunications network within one configuration. When your customer requests a quote for network items or services, you can individually configure multiple occurrences of a Model or Component (solution-based modeling) and ensure the connection of all network Components before finalizing the configuration (network connections). When a customer with an existing network requests changes within the network, Oracle Quoting and Oracle Order Management also support the reconfiguration of portions of the network (partial configurations).
Solution-based modeling enables the use of multiple instantiation. Multiple instantiation is the ability to create and individually configure multiple occurrences of a Model or Component in a runtime Oracle Configurator session. Each individually configured item instance appears under the Container Model quote line when you expand the quote line.
Network connections or links enable you to specify how to connect some or all of the Components of a configuration. You can establish network connections when you access Oracle Configurator through Oracle Quoting or Oracle Order Management.
You can reconfigure a partial configuration of an existing network when a customer requests a move, addition, change, or disconnection within the network from Oracle Quoting or Oracle Order Management:
■ Select the current network configuration within Oracle Install Base.
■ Launch Oracle Configurator to make changes to the current configuration.
For more information about solution-based models and connectivity, see the Oracle Configurator Developer User's Guide.

Pricing
Process Functionality 3-5
Search Oracle Install BaseOracle Install Base stores the current configuration for customers’ existing products. When a customer requests a change to an existing configuration, you can search Oracle Install Base for the existing configuration. You can access Oracle Install Base instances from both Oracle Quoting and Oracle Order Management. When you select the Oracle Install Base instances, the system returns the instances to a quote or order. The Oracle Install Base user interface that appears in Oracle Quoting is different from the user interface that is available through Oracle Order Management. For reference, see Querying Item Instances on page 3-13.
After completing the reconfiguration, you return to Oracle Quoting or Oracle Order Management, where the Line Type column shows the provisioning action performed on each telecommunication service line during reconfiguration. Oracle Quoting or Oracle Order Management calls Oracle Pricing to get updated pricing for the Model and Components. You can remove unchanged Components from the quote or order if the customer only wants to view changed items. For more information on unchanged Components, see Section 14.1.7, "Remove Unchanged Components--HTML" on page 14-12 or Section 14.2.7, "Remove Unchanged Components--Forms" on page 14-26.
You can also control unchanged components by setting the profile option CZ: Only Create CZ Config Items for Selected Nodes. For more information, see Section 10.4, "Define Profile Options" on page 10-21 and also the Oracle Configurator Installation Guide.
Launch Oracle ConfiguratorBoth Oracle Quoting and Oracle Order Management can launch Oracle Configurator either directly, when you select a model for configuration from Oracle Inventory, or after retrieving an existing configuration from Oracle Install Base.
3.3 PricingFunctionality topics for Pricing include:
■ Recurring Charges on page 3-6
■ One-Time Charges on page 3-6
■ Modeling Options on page 3-6
■ Discounts on Recurring Charges on page 3-7
■ Discounts on One-Time Charges on page 3-8
Pricing
3-6 Oracle Telecommunications Service Ordering Process Guide
■ Recurring Totals on page 3-8
■ One-Time Charge Totals on page 3-9
3.3.1 Definitions
Recurring ChargesCharges that a customer pays the telecommunications service provided on a periodic basis are recurring charges. Examples of recurring charges are $29.99 per month for a Wireless Phone Service or $5000.00 per year for a full T1 line. The period of recurrence for the Wireless Phone Service is every month, and the period of recurrence for the full T1 is once a year.
The Recurring Price of a service is captured as the Unit List Price of the item representing the service. The Unit Of Measure (UOM) of the item representing the telecommunications service is the period of recurrence for the charge.
For information on adding items to a price list, refer to the Oracle Advanced Pricing User’s Guide.
One-Time ChargesA fixed charge that a customer pays the telecommunications service provider only once is a one-time charge. Some examples of one-time charges include Activation Fees, Installation Fees, and fees to switch long-distance carriers.
Modeling Options In the previous release, it was only possible to create or reconfigure a configuration in Oracle Quoting. It was then recommended to model the recurring charges as price list item and one-time charges as special charges of the recurring items. This would ensure separate totals for recurring and one-time charges in Oracle Quoting.
In this release, Order Management also supports reconfiguration of instance in Oracle Install Base.
It is recommended that you use separate items to model recurring and one-time charges.
The implementer has the following modeling options:
■ Option 1
– Recurring Charges = Price List Items, with price greater than zero.

Pricing
Process Functionality 3-7
– One-Time charges = Price List items with a price equal to zero AND a special charge.
■ Option 2
– Recurring Charges = Price List Items, with price greater than zero
– One-Time charges = Price List items with a price greater than zero
In both options, the one-time charge must be flagged as a transient item, that is, items that do not persist in a configuration after fulfillment. For more information on how to setup an item as transient, see Section 10.1.7.1, "About Transient Items" on page 10-13.
Option 1 enables separate Subtotals for one-time and recurring charges in both Oracle Quoting and Oracle Order Management. The Total in both Oracle Order Management and Oracle Quoting is the sum of the Recurring and One-Time Charges. The Total One-Time Charges are the special charges total.
With option 1, you can use the Advanced Pricing function get_custom price to provide discounts on one-time charges. For more information on get_custom function, see Section B.2, "Discounting Charges Using the Get_Custom Price Function" on page B-7. Additionally, the Forms version of Oracle Quoting allows the user to open the Charges Summary form to override the charge values at the line level. For more information, see the Oracle Quoting User Guide.
Option 1 does not support taxes on the special charges in both Oracle Quoting and Oracle Order Management.
With option 2, the Subtotals are the sum of the one-time and recurring charges, both in Oracle Order Management and Oracle Quoting.
Option 2 lets you use standard line-level discounts to provide discounts for one-time charges.
Option 2 enables taxes on the one-time charges.
Note that Oracle Configurator rules or Oracle Configurator Extensions are required to select the one-time charge items into the configuration.
Discounts on Recurring ChargesBy product, information about discounts on recurring charges include:
■ Oracle Quoting
You apply discounts to the Recurring List price of a telecommunications service by specifying the discount in the Unit Adjustment Percent column on the Oracle

Pricing
3-8 Oracle Telecommunications Service Ordering Process Guide
Quoting Lines user interface. You can change the label of the quote lines column. For more information on customizing columns in the quote, see Section 12.3, "Set Up the Lines Page--HTML" on page 12-7.
■ Oracle Order Management
You can use the standard Order Management line discount functionality to discount recurring charges on an order.
Discounts on One-Time ChargesBy product, information about discounts on one-time charges include:
■ Oracle Quoting
If you use modeling option 1--that is, One-Time charges = Price List items with a price equal to zero AND a special charge--to model a one-time charge, then you can give discounts on one-time charges by using the standard Oracle Advanced Pricing functionality GET_CUSTOM and the Order Capture descriptive flexfield, LINE:Additional Information. Additionally, Forms Quoting allows the user to open the Charges Summary form to override the charge values at the line level. Refer to Oracle Quoting User Guide.
■ Order Management
If you use modeling option 1, you can both increase or decrease the freight and special charge for a line with a manual price. Note that you must set up the freight charge "overied allowed" for the user to be able to manully increase or decrease the value.
If you use modeling option 2--that is, One-Time charges = Price List items with a price greater than zero--to model one-time charges, then you can use the standard line discounting functionality to discount one-time charges both in Oracle Order Management and Oracle Quoting.
Recurring TotalsBy product, information about recurring totals include:
■ Oracle Quoting
If you use modeling option 1--that is, One-Time charges = Price List items with a price equal to zero AND a special charge--to model a one-time charge, then the Lines page in Oracle Quoting shows the sum of recurring charges as the Subtotal (List Price) in the Grand Total section.

Configurator
Process Functionality 3-9
If you use modeling option 2--that is, One-Time charges = Price List items with a price greater than zero--to model one-time charges, then the subtotal is the sum of both the recurring and one-time charges.
■ Order Management
If you use modeling option 1--that is, One-Time charges = Price List items with a price equal to zero AND a special charge--, then the total recurring charges appear as the Subtotal of the Sales Order.
If you use modeling option 2--that is, One-Time charges = Price List items with a price greater than zero--to model one-time charges, then the Subtotals include both recurring and one-time charges.
One-Time Charge Totals■ Oracle Quoting
If modeling option 1--that is, One-Time charges = Price List items with a price equal to zero AND a special charge--then the Lines page in Oracle Quoting shows:
– The sum of the one-time charges on the Charges row of the Grand Total section.
– That the user can view a break-down of all the one-time charges, included with the sum, by clicking the link.
■ Order Management
If you use modeling option 1--that is, One-Time charges = Price List items with a price equal to zero AND a special charge--then the sum of one-time charges appear in the Charges Total.
3.4 ConfiguratorThe Oracle TSO solution supports integration with Oracle Install Base, the computation of deltas and Line Types, the support of attributes, and the partial
Note: Applicable only to Oracle Quoting: If you have large configurations or complex pricing, then see topics about:
■ Setting up Manual Pricing and Tax Calculation Request Options in the Oracle Quoting Implementation Guide.
■ Pricing, Products, and Quotes in the Oracle Quoting User Guide.

Configurator
3-10 Oracle Telecommunications Service Ordering Process Guide
reconfiguration of Components only when the Components are children of a Container Model.
The key topics of Oracle Configurator functionality that enable the Reconfigure Installed Customer Services Flow for telecommunications service networks include:
■ Integration with Oracle Install Base on page 3-10.
■ Partial Network Reconfiguration and Validation on page 3-10.
■ Computation of Configuration Deltas on page 3-11.
■ Identification and Fulfillment Based on User-Defined Actions (Move, Add, Change, Disconnect) on page 3-11.
■ Persistence of User-Defined Attribute Values Throughout the Fulfillment Process on page 3-11.
Integration with Oracle Install BaseWith the integration with Oracle Install Base, you can track the full life cycle flow of a product as it is uniquely configured, ordered, fulfilled, serviced, and reconfigured over time. Oracle Install Base serves as the central repository for storing all product information. In performing any type of product reconfiguration, Oracle Install Base is called upon for the most up-to-date product data. Oracle Configurator uses the Oracle Install Base data as the baseline when performing product reconfiguration.
Partial Network Reconfiguration and ValidationPartial network reconfiguration and validation invoke only the Components that the end-user chooses to reconfigure. Even though only potentially those chosen Components are actively restored within the runtime configuration session, Oracle Configurator validates any proposed changes against all impacted Components to ensure a valid state of the complete network.
In terms of the runtime environment, the end-user can identify in Oracle Quoting that he or she wants to reconfigure existing services, as opposed to purchasing new ones. A new Install Base Search window appears where the end user can perform queries based on a variety of different search criteria. The Search window returns all Components that match the end user's search criteria, and the end user can choose the Components to reconfigure. Oracle Configurator launches with only those Components that are directly impacted--the chosen Components (also called active Components)--and those Components that could be indirectly impacted (also called passive Components).

Configurator
Process Functionality 3-11
The major benefits to this partial network reconfiguration and validation functionality are:
■ The end user can reconfigure sub-Components independently, while ensuring validity throughout the entire network.
■ Runtime performance is based on the size of the Components to be reconfigured. When a company is selling complex products, such as Frame Relay Services, consisting of thousands of locations and thousands of connections, it is a major performance advantage to be able to invoke only those Components that the end user chooses to reconfigure.
Computation of Configuration DeltasComputation of Configuration Deltas is the ability to identify the installed state of a configuration as the baseline, allow the end user to reconfigure from this installed state, and to quote, price, and fulfill only those changes.The end user can change these options and items to meet new requirements. The Configurator Summary page displays the changes that took place during the configuration session. The user has the option to view either:
■ The changes with respect to what was selected from Oracle Install Base.
■ The entire configuration including the changes.
Identification and Fulfillment Based on User-Defined Actions (Move, Add, Change, Disconnect)Oracle Configurator associates changes with appropriate Line Types. For example, changing the configuration by adding an item results in a Line Type that might be named ADD-MACD. You define the Line Type ADD-MACD when you implement the TSO solution. Furthermore, the TSO implementer can tie these Line Types to the appropriate fulfillment steps.
Persistence of User-Defined Attribute Values Throughout the Fulfillment ProcessUser-defined attribute values, such as custom names and location, persist throughout the fulfillment process in one global instance (Install Base), so that all applications can have access to the most up-to-date information. These values are stored and reconfigured throughout the order creation to order fulfillment process to ensure timely and accurate service fulfillment.

Install Base
3-12 Oracle Telecommunications Service Ordering Process Guide
3.5 Install Base When you complete ordering and fulfillment of the Container Model defined in Oracle Inventory, Oracle Bills of Material, and Oracle Configurator, the saved configuration appears in Oracle Install Base as item instances. You can view or reconfigure the configured item instances, their attributes, and relationships from Oracle Install Base, Oracle Quoting, or Oracle Order Management, which access Oracle Install Base.
For more information about Oracle Install Base, see the Oracle Install Base Implementation Guide and Oracle Install Base User Guide.
Functionality topics about Install Base include:
■ Storing Network Configuration Models on page 3-12
■ Identifying and Maintaining the Current Baseline Configuration on page 3-12
■ Managing Connected-to Relationships on page 3-13
■ Querying Item Instances on page 3-13
Storing Network Configuration ModelsOracle Install Base can support a network connection at multiple service locations. This includes networks implemented in rings; for example, a network where A is connected to B, B is connected to C, and C is connected to A.
Identifying and Maintaining the Current Baseline ConfigurationOracle Configurator validates every new, configured service or changed service before the service is saved in Oracle Install Base. You can initiate service configuration changes from a quote, an order, or from Oracle Install Base. When you launch Oracle Configurator directly from Oracle Install Base, rather than from Oracle Quoting or Oracle Order Management, then provisioning is skipped.
Changes can include moves, additions, changes, or disconnections to an existing service. Oracle Quoting and Oracle Order Management retrieve the existing configuration from Oracle Install Base. You can launch Oracle Configurator from Oracle Quoting, Oracle Order Management, or Oracle Install Base and then reconfigure the service.
Before saving the configuration to Oracle Install Base, processing of the revised configuration includes:
■ Reconfiguring a customer’s installed services. For more information, see Section 2.1.3, "Reconfigure a Customer’s Installed Services" on page 2-7.

Install Base
Process Functionality 3-13
■ Converting the quote to a sales order. For more information, see Section 2.1.4, "Place Order and Verify Order Fulfillment" on page 2-10.
■ Verifying order fulfillment. For more information, see Section 2.1.4, "Place Order and Verify Order Fulfillment" on page 2-10.
Managing Connected-to RelationshipsOracle Configurator uses connected-to relationships to make network connections and show the service configuration. You can view the connected-to relationships of a configured instance from Oracle Install Base. If you define items in Oracle Inventory as link items, you can use Oracle Install Base to show the start and end locations of the link. The locations for the link instance are the geographic addresses of the instance items. For information about defining an inventory item as a network link, see Section 6.3, "Set an Item as Provisionable" on page 6-4.
If you use a Configurator Extension to set the location of a link item, then the location is saved into Install Base, and is retained when the configured instance is later reconfigured. If you do not set the location (that is, with a Configurator Extension), then Install Base sets the Location and Location Type Code during fulfillment, using the values from one of the targets of the link item.
Querying Item Instances The Item Instance Query window displays existing configured item instances, including attributes and components, primarily to support the Oracle Order Management Telecommunications Service Ordering (TSO) functionality using Sales Orders or Quick Sales Orders windows. The Item Instance Query window provides integration and flexibility in entering TSO changes from multiple sources.
The key features of the window are:
■ Ability to query instances based on a wide range of query parameters, including extended attributes.
■ Ability to view configurations, in a tree structure, from the Sales Order window and select those instances where you want the configuration to change.
■ When called from the Sales Orders window, the ability to return a PL/SQL table of records for processing by Oracle Order Management.
The following figure shows the Item Instance Query window.

Service Fulfillment Manager
3-14 Oracle Telecommunications Service Ordering Process Guide
Figure 3–1 Item Instance Query Window
3.6 Service Fulfillment ManagerOracle Service Fulfillment Manager provisions the telecommunication services that the customer ordered by:
1. Capturing a service order request.
2. Validating the order.
3. Analyzing the order.
4. Fulfilling the order.
5. Completing the order.
And, if necessary,

Service Fulfillment Manager
Process Functionality 3-15
6. Managing order fallout.
Refer to Oracle Service Fulfillment Manager Concepts and Procedures for a description of the provisioning process. The provisioning functions are the same for the Oracle Telecommunications Service Ordering solution as they are for any other service order request that Oracle Service Fulfillment Manager receives. However, Oracle Service Fulfillment Manager requires some specific setup steps to receive a configured order from Oracle Order Management and to retrieve and reconfigure extended attributes from the Oracle Install Base Transaction Details window.
For more information about setting up Oracle Service Fulfillment Manager, see Chapter 13, "Set Up Service Fulfillment Manager".

Service Fulfillment Manager
3-16 Oracle Telecommunications Service Ordering Process Guide

Setup Flow and Checklist 4-1
4Setup Flow and Checklist
Topics in this chapter include:
■ Section 4.1, "About Setting Up Telecommunications Service Ordering" on page 4-2
■ Section 4.2, "Setup Flow" on page 4-2
■ Section 4.3, "Setup Checklist" on page 4-4

About Setting Up Telecommunications Service Ordering
4-2 Oracle Telecommunications Service Ordering Process Guide
4.1 About Setting Up Telecommunications Service OrderingThis document includes setup information that is specific to the Oracle Telecommunications Service Ordering (TSO) solution.
The Oracle Telecommunications Service Ordering functionality requires the use of the following Oracle Applications:
■ Oracle Order Management
■ Oracle Inventory
■ Oracle Bill of Materials (BOM)
■ Oracle Install Base
■ Oracle Configurator
■ Oracle Quoting
■ Oracle Service Fulfillment Manager (SFM)
For complete information on setting up the preceding applications, refer to that Oracle Application’s documentation.
4.2 Setup FlowThe setup flow shows the Oracle Application sequence and their dependencies for setting up the Oracle Telecommunications Service Ordering solution.
Note: This document provides additional setup information that is not included in the implementation guides of the Oracle Applications that are required to support this release of Oracle Telecommunications Service Ordering. The setup and design tips apply primarily to Oracle Configurator, Oracle Quoting, Install Base, and Oracle Service Fulfillment Manager. You should use this document in conjunction with the implementation guides of each of these Oracle Application.

Setup Flow
Setup Flow and Checklist 4-3
Figure 4–1 shows the TSO setup flow by Oracle Application product.
Figure 4–1 TSO Setup Flow by Oracle Application
For example,
■ First, set up both Oracle Order Management and Oracle Inventory.
■ After you set up Oracle Inventory, you can set up both Oracle Bill of Materials and Oracle Install Base.
■ After you set up Oracle Order Management, Oracle Bill of Materials, and Install Base, you can set up Oracle Configurator.
■ After you have set up both Oracle Order Management and Install Base, you can set up Oracle Service Fulfillment Manager.
■ After you have set up Oracle Order Management, you can set up Oracle Advanced Pricing.
■ After you have set up both Oracle Configurator and Oracle Advanced Pricing, you can set up Oracle Quoting.

Setup Checklist
4-4 Oracle Telecommunications Service Ordering Process Guide
4.3 Setup ChecklistThe following is a setup checklist. Note that you can set up some applications in different sequences, since the various Oracle Applications that are part of the Oracle Telecommunications Service Ordering solution have different dependencies and setup flows. For more information, see Section 4.2, "Setup Flow" on page 4-2.
Table 4–1 TSO Setup Check List by Product
Chapter Setup
Set Up Order Management -
Modification to OM Workflow Processes on page 5-2
Add Install Base Activity to the OM Line Workflow on page 5-2
Create SFM Enabled Order Header and Line Workflows on page 5-2
Replace the Fulfill Node in the OM Line Workflow on page 5-3
Design Tips on page 5-4
Set Up Inventory -
Setup of Telecommunications Service Items on page 6-3
Specify Install Base Tracking for Each Component Item on page 6-3
Set an Item as Provisionable on page 6-4
Set Up an Item of Type Link on page 6-5
Create a Container Model on page 6-6
Specify Container Model on page 6-6
Set Up Bill of Materials -
About Setting Up BOM on page 7-2
Set Up Install Base -
Enable Network Configurations on page 8-3
Create Extended Attributes on page 8-3
Set Up Extended Attribute Pools on page 8-4
Map Extended Attributes to Items on page 8-6

Setup Checklist
Setup Flow and Checklist 4-5
Design Tips on page 8-7
Set Up Advanced Pricing -
Set Up Recurring and One-Time Charges on page 9-2
Pricing Attributes and Sourcing Rules on page 9-2
Get Custom Price on page 9-7
Set Up Configurator and Customize the Solution
-
Create the Configuration Model on page 10-18
Publish a Container Model on page 10-21
Define Profile Options on page 10-21
Disable Pricing on page 10-22
CZ Schema Customizations on page 10-22
Mapping of CZ tables to Install Base Schema (CSI) on page 10-26
Set Up Configurator Extensions
-
Implementing the TSO Configurator Extensions on page 11-2
Use Interactive Location Search on page 11-4
Setup for the Interactive Location Search Configurator Extension on page 11-5
General Setup on page 11-5
Define the Configurator Extension Rules
Deploy the Configurator Extension Class on page 11-6
Deploy the Oracle Applications Framework Files on page 11-6
Define the Configurator Extension Rules on page 11-7
Modify the Interactive Location Search Configurator Extension on page 11-11
Specify the Line Type on page 11-11
Table 4–1 TSO Setup Check List by Product (Cont.)
Chapter Setup

Setup Checklist
4-6 Oracle Telecommunications Service Ordering Process Guide
Setup for the Interactive Location Search Configurator Extension on page 11-5
Setup in Order Management on page 11-12
Setup in Oracle Applications Database on page 11-13
Setup in Oracle Configurator Developer Using Features on page 11-16
Setup in Oracle Configurator Developer Using Indirection on page 11-17
Define the Configurator Extension Rule on page 11-18
Modify the Line Type Configurator Extension on page 11-21
Use Configuration Attributes with Install Base (IB) on page 11-21
Setup for the IBAttribute Configurator Extension on page 11-22
General Setup on page 11-22
Define the Configurator Extension Rule on page 11-23
Optional Instances Setup on page 11-24
Modify the IBAttribute Configurator Extension on page 11-26
Using the Oracle Configuration Interface Object (CIO) on page 11-27
Reconfigure Installed Configurations on page 11-27
Reconfigure Installed Configurations on page 11-27
Identify Changes to a Configuration on page 11-27
Access Discontinued Items on page 11-29
Access Instances on page 11-29
Report on Link Items on page 11-30
Set Up Quoting -
Summary of Reconfiguration on page 12-2
Define Profile Options on page 12-3
Table 4–1 TSO Setup Check List by Product (Cont.)
Chapter Setup

Setup Checklist
Setup Flow and Checklist 4-7
Set Up the Lines Page--HTML on page 12-3
Display or Hide Columns--HTML on page 12-10
Hide a Seeded Column--HTML on page 12-11
Edit Column Labels--HTML on page 12-12
Edit Column Sequence--HTML on page 12-13
Enable or Disable Line-Level Actions or Table-Level Buttons--HTML on page 12-14
Change Default Number of Rows--HTML on page 12-16
Set Up the Quote Lines Tab Pricing Region--Forms on page 12-17
Enable or Disable Line-Level Actions--Forms on page 12-20
Design Tips on page 12-21
Set Up Service Fulfillment Manager
-
Create SFM Enabled Order Management Workflow Header Process on page 13-3
Create SFM Enabled Order Management Workflow Line Process on page 13-4
Add Function for Menu Notifications on page 13-5
Create a PL/SQL Procedure That Updates a Certain Workitem Parameter on page 13-6
Create Workflow Process on page 13-7
Define Work Item on page 13-9
Map Work Item to Item and Action (Line Transaction Type) Combination on page 13-10
Enable Order Cancellation on page 13-11
Create a Validation Template on page 13-11
Create a Processing Constraint on page 13-12
Build Rollback Activities into the Workflow on page 13-13
Cancel an Order on page 13-13
Table 4–1 TSO Setup Check List by Product (Cont.)
Chapter Setup

Setup Checklist
4-8 Oracle Telecommunications Service Ordering Process Guide
Design Tips on page 13-14
Table 4–1 TSO Setup Check List by Product (Cont.)
Chapter Setup

Set Up Order Management 5-1
5Set Up Order Management
The main topics in this chapter are:
■ Section 5.1, "Modification to OM Workflow Processes" on page 5-2
■ Section 5.2, "Design Tips" on page 5-4
Reference MaterialThis chapter describes setup tasks that you must perform in Oracle Order Management (OM) that are specific to the Oracle Telecommunications Service Ordering (TSO) solution. For more information on setting up and using Oracle Order Management, refer to:
■ Oracle Order Management Suite Implementation Manual
■ Oracle Order Management User’s Guide
Before You BeginAmong the Oracle Applications that are directly a part of the Oracle Telecommunications Service Ordering solution, there are no dependencies to setting up Oracle Order Management. It is recommended that you set up Oracle Order Management first.
After You Set Up Oracle Order ManagementAfter you set up Oracle Order Management, you can set up Oracle Advanced Pricing or Oracle Service Fulfillment Manager. For more information, see:
■ Chapter 9, "Set Up Advanced Pricing"
■ Chapter 13, "Set Up Service Fulfillment Manager"

Modification to OM Workflow Processes
5-2 Oracle Telecommunications Service Ordering Process Guide
5.1 Modification to OM Workflow ProcessesThe modification to OM Workflow processes involves these topics:
■ Section 5.1.1, "Add Install Base Activity to the OM Line Workflow" on page 5-2
■ Section 5.1.2, "Create SFM Enabled Order Header and Line Workflows" on page 5-2
■ Section 5.1.3, "Replace the Fulfill Node in the OM Line Workflow" on page 5-3
5.1.1 Add Install Base Activity to the OM Line Workflow
ModuleWorkflow Builder
Steps1. To customize the Workflow, change the Access Level to 100:
– Choose Help > About Oracle Workflow Builder.
– In the Access Level field, enter 100.
– Click OK.
2. Open the OM Order Line workflow item type (OEOL).
3. Open the Service Fulfillment Line workflow item type (XDPOMOL).
4. In item type OEOL, open the Line Flow- Generic process.
5. Save the Line Flow- Generic process with a new name Line Flow - Service Fulfillment.
6. Drag the activity Installed Base from item type XDPOMOL and drop it between Fulfill and Invoice Interface - Line.
7. Save your work.
5.1.2 Create SFM Enabled Order Header and Line WorkflowsThis step is required only if you are using Oracle Service Fulfillment Manager.
To enable the flow of order from Oracle Order Management to Oracle Service Fulfillment Manager (SFM), you must make some required customizations to Oracle Order Management’s Workflow processes. This enables fulfillment of provisionable items from Oracle Order Management by way of SFM.

Modification to OM Workflow Processes
Set Up Order Management 5-3
For more information, see:
■ Section 13.1, "Create SFM Enabled Order Management Workflow Header Process" on page 13-3
■ Section 13.2, "Create SFM Enabled Order Management Workflow Line Process" on page 13-4
5.1.3 Replace the Fulfill Node in the OM Line WorkflowReplacing the Fulfill Node in the OM Line Workflow is optional.
Currently the Fulfill Node:
■ Performs a gating activity for Components of a configuration.
■ Ensures that all the lines in a configuration are fulfilled together.
As a consequence of the gating activity, the update of Install Base occurs only after fulfillment of all the Components of a configuration. In the business-to-business communications world, especially in the data services like Frame Relay, provisioning of Components may occur days or months apart from each other.
Because of the gating activity of the Fulfill node in the OM Line Workflow, the updating of installed base does not occur until provisioning of all the Components of the configuration occur. For example, this might be three months after provisioning the first Component. This can result in the Install Base not accurately reflecting all the customer's current services. To avoid this issue, it is recommended that you replace the Fulfill node with one that stamps fulfilled flag, the fulfillment date, and the fulfillment quantity for each order line.
Important: Oracle Install Base does not process an order line without a fulfillment date. It is essential that if you remove the Fulfillment node, you must replace it with a node that stamps the fulfilled flag, the fulfillment date, and the fulfilled quantity of each order line.
Note: You should replace the Fulfill Node only if the implementation requires that the order lines of a Container Model are fulfilled independent of each other.

Design Tips
5-4 Oracle Telecommunications Service Ordering Process Guide
For more information, see:
■ Oracle Order Management Suite Implementation Manual
■ Oracle Order Management User’s Guide
5.2 Design TipsYou must map all actions and Line Types associated with the Configurator Line Type Functional Companion to the Order Line Type in Oracle Order Management transaction types setup.
Note: You cannot reconfigure Container Models after booking. You can always reconfigure Container Models when the order is in the negotiation phase. If the order is in the Entered state, you can reconfigure Container Models only if the line workflow that is attached to the line types is the same. For more information, see Appendix A, "Assumptions and Restrictions".
Set Up Inventory 6-1
6Set Up Inventory
The main topics in this chapter are:
■ Section 6.1, "Setup of Telecommunications Service Items" on page 6-3
■ Section 6.2, "Specify Install Base Tracking for Each Component Item" on page 6-3
■ Section 6.3, "Set an Item as Provisionable" on page 6-4
■ Section 6.4, "Set Up an Item of Type Link" on page 6-5
■ Section 6.5, "Create a Container Model" on page 6-6
Reference MaterialThis chapter describes setup tasks specific to the Oracle Telecommunications Service Ordering (TSO) solution that you must perform in Oracle Inventory to implement the TSO solution. For more information on setting up Oracle Inventory, refer to:
■ Oracle Inventory User's Guide
After You Set Up Oracle InventoryExcept for Oracle Order Management and Oracle Advanced Pricing, most other Oracle Applications that are part of the Oracle Telecommunications Service Ordering solution have either direct or indirect dependencies on Oracle Inventory.
For more information on setting up the TSO solution in these dependent Oracle Applications see:
■ Chapter 7, "Set Up Bill of Materials"
■ Chapter 8, "Set Up Install Base"
6-2 Oracle Telecommunications Service Ordering Process Guide
■ Chapter 10, "Set Up Configurator and Customize the Solution"
■ Chapter 11, "Set Up Configurator Extensions"
■ Chapter 12, "Set Up Quoting"
■ Chapter 13, "Set Up Service Fulfillment Manager"

Specify Install Base Tracking for Each Component Item
Set Up Inventory 6-3
6.1 Setup of Telecommunications Service ItemsWhen you define telecommunication service items in Oracle Inventory, you can flag them as:
■ Install Base trackable, if you must track the life-cycle of the service in Oracle Install Base. For more information, see Section 6.2, "Specify Install Base Tracking for Each Component Item" on page 6-3.
■ A network link, required only if you use the selected inventory item as a network link. For more information, see Section 6.3, "Set an Item as Provisionable" on page 6-4.
■ A provisionable item, if you are going to provision or electronically fulfill the item. For more information, see Section 6.4, "Set Up an Item of Type Link" on page 6-5.
■ A Container Model, a model that you use to contain telecommunications service products that you can reconfigure. For more information, see Section 6.5, "Create a Container Model" on page 6-6.
6.2 Specify Install Base Tracking for Each Component ItemAfter you have specified that the item representing your top level BOM Model is a Container Model (Section 6.5.1, "Specify Container Model"), you need to indicate whether or not you want to track each Oracle Inventory Item that is a Component of the container BOM Model. Do this for each BOM Model, BOM Option Class, and BOM Standard Item to track in Oracle Install Base.
ModuleOracle Applications (Forms)
ResponsibilityOracle Inventory
Note: The item representing your top-level BOM Model item should not have the selected Install Base Tracking option. Only items to track in Install Base should have the selected Install Base Tracking option.

Set an Item as Provisionable
6-4 Oracle Telecommunications Service Ordering Process Guide
PrerequisitesSection 6.5.1, "Specify Container Model" on page 6-6
NavigationMaster Item window
Steps1. Query the Item or define it if it does not exist.
2. Click the Service tab.
3. On the Service tab, select both the Provisionable and the Installed Base Tracking check boxes.
4. If you use the item only to link installed Components and you do not usually associate the item with a location, set the Instance Class to Link.
For example, a Permanent Virtual Circuit (PVC) does not have a specific location, but the PVC connects two Ports in a network configuration model. Upon installation of the item, Oracle Install Base derives the location from connected the Components.
5. Verify that the Container Model’s structure does not violate any of the requirements.
For more information, see Section 10.1.3, "Container Model Settings and Structure" on page 10-4.
6. Click Save.
6.3 Set an Item as ProvisionableIf you are using Oracle Service Fulfillment Manager, you must specify as provisionable the items that require provisioning in Oracle Service Fulfillment Manager by selecting the Enable Provisioning check box for the item.
If you are not using Oracle Service Fulfillment Manager, then these procedures are optional.
ModuleOracle Applications (Forms)

Set Up an Item of Type Link
Set Up Inventory 6-5
ResponsibilityOracle Inventory
Steps1. In Oracle Inventory, query the Item, or define it if it does not yet exist.
2. In the Master Item window, click the Service tab.
3. In the lower left of the tab, select the Provisionable check box.
4. Click Save.
6.4 Set Up an Item of Type LinkYou must specify items as the Type Link only if you use the selected inventory item as a network link. You must set up a configured link item with the Install Base Instance class = Link.
In Oracle Configurator Developer (OCD), you must give exactly two Connectors to a Model that is flagged as an item of type Link.
ExampleSuppose ITEM_C is an item with the IB_ITEM_INSTANCE_CLASS set to Link. If ITEM_C is connected to ITEM_A in location A and ITEM_B in location B, then a search for ITEM_C results in its connected locations, such as locations A and B, appearing as the starting and ending locations.
ModuleOracle Applications (Forms)
ResponsibilityOracle Inventory
Steps1. In Oracle Inventory, query the Item, or define it if it does not yet exist.
2. In the Master Item window, click the Service tab.
3. In the Install Base section, choose Link from the Instance Class list.

Create a Container Model
6-6 Oracle Telecommunications Service Ordering Process Guide
4. Click Save.
6.5 Create a Container ModelTo create a Container Model, create a model that supports updates to its installed configurable Components using the following procedures:
■ Section 6.5.1, "Specify Container Model" on page 6-6 to indicate that the item representing your top level BOM Model is a Container Model.
■ Section 6.2, "Specify Install Base Tracking for Each Component Item" on page 6-3 to indicate whether or not you want to track each Oracle Inventory item that is a Component of the Container BOM Model.
6.5.1 Specify Container ModelYou need to specify that the item representing your top level BOM Model, such as the item representing the network, is a Container Model.
ModuleOracle Applications (Forms)
ResponsibilityOracle Inventory
PrerequisitesReview "Container Model Settings and Structure" on page 10-4 very carefully before defining a Container Model in Oracle Applications.
NavigationMaster Item window
Note: You can select the Instance Class only if you have enabled Install Base Tracking for this item. For more information, see Section 6.2, "Specify Install Base Tracking for Each Component Item" on page 6-3.
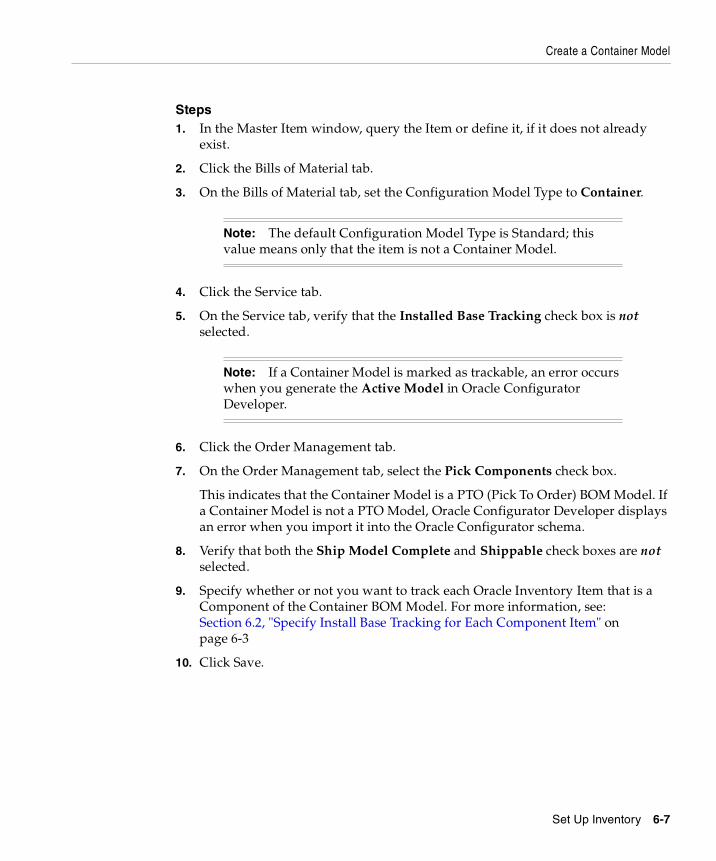
Create a Container Model
Set Up Inventory 6-7
Steps1. In the Master Item window, query the Item or define it, if it does not already
exist.
2. Click the Bills of Material tab.
3. On the Bills of Material tab, set the Configuration Model Type to Container.
4. Click the Service tab.
5. On the Service tab, verify that the Installed Base Tracking check box is not selected.
.
6. Click the Order Management tab.
7. On the Order Management tab, select the Pick Components check box.
This indicates that the Container Model is a PTO (Pick To Order) BOM Model. If a Container Model is not a PTO Model, Oracle Configurator Developer displays an error when you import it into the Oracle Configurator schema.
8. Verify that both the Ship Model Complete and Shippable check boxes are not selected.
9. Specify whether or not you want to track each Oracle Inventory Item that is a Component of the Container BOM Model. For more information, see: Section 6.2, "Specify Install Base Tracking for Each Component Item" on page 6-3
10. Click Save.
Note: The default Configuration Model Type is Standard; this value means only that the item is not a Container Model.
Note: If a Container Model is marked as trackable, an error occurs when you generate the Active Model in Oracle Configurator Developer.

Create a Container Model
6-8 Oracle Telecommunications Service Ordering Process Guide

Set Up Bill of Materials 7-1
7Set Up Bill of Materials
The main topics in this chapter are:
■ Section 7.1, "About Setting Up BOM" on page 7-2
Reference MaterialThis chapter describes setup tasks specific to the Oracle Telecommunications Service Ordering (TSO) solution that you must perform in Oracle Bill of Materials to implement the TSO solution. For more information on setting up Oracle Bill of Materials, refer to:
■ Oracle Bills of Material User's Guide
Before You BeginBefore you can set up Oracle Bill of Materials, you must set up Oracle Inventory. For more information, see:
■ Chapter 6, "Set Up Inventory".
After You Set Up Oracle Bill of MaterialsAfter you set up Oracle Bill of Materials for use with the Oracle Telecommunications Service Ordering solution, you can set up Oracle Configurator. For more information, see:
■ Chapter 10, "Set Up Configurator and Customize the Solution"
■ Chapter 11, "Set Up Configurator Extensions"

About Setting Up BOM
7-2 Oracle Telecommunications Service Ordering Process Guide
7.1 About Setting Up BOMIn the Oracle Telecommunications Service Ordering solution, you use Bills of Material to define the structure of the Container Model and its contents. A Container Model must be a pick-to-order (PTO) model, and it can include Standard Items, other PTO models, and Option Classes. The Container Model and its contents must meet certain requirements. For a listing of those requirements, see "Container Model Settings and Structure" on page 10-4.

Set Up Install Base 8-1
8Set Up Install Base
The main topics in this chapter are:
■ Section 8.1, "Enable Network Configurations" on page 8-3
■ Section 8.2, "Create Extended Attributes" on page 8-3
■ Section 8.3, "Map Extended Attributes to Items" on page 8-6
■ Section 8.4, "Design Tips" on page 8-7
Reference MaterialThis chapter describes setup tasks that you must perform to Oracle Install Base that are specific to the Oracle Telecommunications Service Ordering (TSO) solution. For more information on functionality, setting up, or using Oracle Install Base, refer to:
■ Section 3.5, "Install Base" on page 3-12
■ Oracle Install Base Implementation Guide
■ Oracle Install Base User Guide
Before You BeginBefore you can set up Oracle Install Base for use with the Oracle Telecommunications Service Ordering solution, you must set up Oracle Inventory. For more information, see:
■ Chapter 6, "Set Up Inventory".
After You Set Up Install BaseAfter you set up Oracle Install Base, you can set up Oracle Configurator and Oracle Service Fulfillment Manager. For more information, see:
8-2 Oracle Telecommunications Service Ordering Process Guide
■ Chapter 10, "Set Up Configurator and Customize the Solution"
■ Chapter 11, "Set Up Configurator Extensions"
■ Chapter 13, "Set Up Service Fulfillment Manager"

Create Extended Attributes
Set Up Install Base 8-3
8.1 Enable Network Configurations
RequiredYou must ensure that you have set the profile option CSI: Configurator Enabled to Network Models Only. This setting allows the transfer of the Network configurations to Install Base.
ModuleSystem Administrator
ResponsibilitySystem Administrator
Steps1. Navigate to Applications > System Administrator.
2. In the Navigator - System Administration window, navigate to Menu Profiles > System, and click Open.
3. In the Profile field, search for the profile CSI: Configurator Enabled.
The System Profile Values window opens.
4. On the CSI: Configurator Enabled row in the Site column, choose Network Models Only.
5. Click Save.
8.2 Create Extended AttributesOracle Install Base supports user-definable extended attributes by item, item category, instance, and enterprise.
■ Global: Global level extended attributes are applicable to all the item instances in Install Base.
■ Item Category: Category-level extended attributes are applicable to the items of the category for which there are defined extended attributes.
■ Inventory Item: Item level extended attributes are applicable to all the instances of the item type for which there is a defined extended attribute.

Create Extended Attributes
8-4 Oracle Telecommunications Service Ordering Process Guide
■ Instance: Instance level extended attributes are applicable only to the instance for which there is a defined extended attribute.
The extended attribute is created as a CSI lookup of type CSI_EXTEND_ATTRIB_POOL. When the lookup is created, it is associated with an item, item category, or instance using the Install Base Extended Attribute Template.
After the attributes are associated, they can be mapped to Oracle Configurator attributes or Oracle Service Fulfillment Manager attributes. The item attributes (features) defined in Oracle Configurator Developer are mapped to these Oracle Install Base attributes.
See AlsoFor more information on extended attribute setup, see the Oracle Install Base Implementation Guide.
8.2.1 Set Up Extended Attribute PoolsIn the Extended Attributes window, you must define the extended attributes that the Install Base item instances use.

Create Extended Attributes
Set Up Install Base 8-5
Figure 8–1 shows an Oracle Install Base Lookup window.
Figure 8–1 Install Base Lookup
Creation of the extended attribute is a lookup of type CSI_EXTEND_ATTRIB_POOL.
ModuleOracle Applications (Forms)
ResponsibilityOracle Installed Base Admin
NavigationInstall Base Lookups
Steps1. Search Install Base Lookups where Type = CSI_EXTEND_ATTRIB_POOL
A list of available lookups appears.

Map Extended Attributes to Items
8-6 Oracle Telecommunications Service Ordering Process Guide
2. Enter a new Lookup Code, Meaning, and Description.
Example:
– Code = PHONE_NUM
– Meaning = Phone Number
– Description = Phone Number
3. Save the new lookup.
8.3 Map Extended Attributes to Items
ModuleOracle Applications (Forms)
ResponsibilityOracle Installed Base Admin
NavigationSetups > Extended Attribute Template
PrerequisitesYou must have defined the item and extended attributes.
StepMap Extended Attributes (See Section 8.2, "Create Extended Attributes" on page 8-3) or any other attribute (Lookup) available in the CSI_EXTEND_ATTRIB_POOL to the Service Fulfillment Items.
Figure 8–2 shows the extended attribute and its details of an inventory item.

Design Tips
Set Up Install Base 8-7
Figure 8–2 Extended Attribute And Details of an Inventory Item
8.4 Design TipsUsers of the Oracle Telecommunications Service Ordering solution must manually verify that the attributes set up in Oracle Configurator Developer are coordinated with Install Base's extended attributes setup for trackable items.
See AlsoSection 10.6.2, "CZ_CONFIG_EXT_ATTRIBUTES Table" on page 10-23
Section 11.1.4, "Use Configuration Attributes with Install Base (IB)" on page 11-21

Design Tips
8-8 Oracle Telecommunications Service Ordering Process Guide

Set Up Advanced Pricing 9-1
9Set Up Advanced Pricing
The main topics in this chapter include:
■ Section 9.2, "Pricing Attributes and Sourcing Rules" on page 9-2
■ Section 9.3, "Get Custom Price" on page 9-7
Reference MaterialThis chapter describes setup tasks that you must perform to Oracle Advanced Pricing that are specific to the Oracle Telecommunications Service Ordering (TSO) solution. For more information on functionality, setting up, or using Oracle Advanced Pricing, refer to:
■ Oracle Advanced Pricing Implementation Manual
■ Oracle Advanced Pricing User’s Guide
Before You BeginBefore you can set up Oracle Advanced Pricing for use with the Oracle Telecommunications Service Ordering solution, you must set up Oracle Order Management. For more information, see:
■ Chapter 5, "Set Up Order Management"
After You Set Up Oracle Advanced PricingAfter you set up Oracle Advanced Pricing, you can set up Oracle Quoting if have already set up Oracle Configurator. (Oracle Quoting is dependent on both Oracle Configurator and Oracle Advanced Pricing.) For more information, see:
■ Chapter 10, "Set Up Configurator and Customize the Solution"
■ Chapter 11, "Set Up Configurator Extensions"

Set Up Recurring and One-Time Charges
9-2 Oracle Telecommunications Service Ordering Process Guide
■ Chapter 12, "Set Up Quoting"
9.1 Set Up Recurring and One-Time ChargesA recurring charge is a fixed charge that a customer pays the telecommunications service provider on a periodic basis. Examples of recurring charges are $29.99 per month for a Wireless Phone Service or $5,000.00 per year for a full T1 line. The Charge Periodicity for the Wireless Phone Service is every month and the Charge Periodicity for the full T1 line is once a year.
A one-time charge is a fixed charge that a customer pays the telecommunications service provider only once. Examples of one-time charges include Activation Fees and Installation Fees.
When a customer orders a telecommunications service with a recurring charge, it is quite common that also a one-time charge is inferred the customer. For example, when a customer orders a phone line it may be necessary for the telecommunications service provider to send a service technician to the customer's home to install the phone service. You should model a one-time charge (the installation service) as one item in Inventory. You should model the product with the recurring charge (the phone service) as another item.
The charge periodicity ('Monthly', 'Quarterly' and so on) of a product with a recurring charge can be set up as the UOM of the item.
The functionality in Oracle Advanced Pricing is available for the products with recurring charges as well as the products with one-time charges. Please refer Oracle Advanced Pricing Implementation Manual and Oracle Advanced Pricing User's Guide for details on functionality available in Oracle Advanced Pricing.
For more information, see Appendix B, "Set Up Special Charges in Advanced Pricing".
9.2 Pricing Attributes and Sourcing RulesPricing objects in Oracle Advanced Pricing enable users to define pricing actions and pricing rules for a given business process. Through price lists, modifiers, and formulas, these pricing actions provide the ability to define prices, price adjustments, and other benefits. By defining pricing rules such as qualifiers and pricing attributes, you use these pricing rules to drive your pricing actions. You can use the attributes as elements to express your product or customer hierarchy.
A product hierarchy element is a level at which you can define pricing characteristics. Examples of product hierarchy include item number, category, or

Pricing Attributes and Sourcing Rules
Set Up Advanced Pricing 9-3
brand. Customer hierarchy is an example of a qualifier hierarchy, such as customer group.
Through Attribute Management, the Pricing Engine receives all the values of the attributes defined in the qualifier and pricing attributes to determine which price lists and modifiers the transaction is qualified for. The data sources for the qualifiers and pricing attributes can be within Oracle Applications or from outside Oracle Applications. Users can use the feature of Attribute Mapping to extend Pricing to tap into data from a wide variety of non-standard sources to drive their pricing actions. In the attribute management windows, users can create new attributes, update existing attribute properties, or disable attributes.
The calling application first uses the attribute mapping API to get all qualifier and pricing attributes associated with the transaction. Then the calling application makes a call to the pricing engine. The pricing engine evaluates these values to determine which price lists and modifiers are eligible for the transaction. The data sources for the qualifiers and pricing attributes can be within Oracle Applications or from outside Oracle Applications.
The Attribute Management feature enables you to create new contexts and attributes, update existing context or attribute properties, or disable existing contexts. Creating new context or attributes extends Oracle Advanced Pricing's ability to provide user defined data sources to drive pricing actions. The methods to source data for an attribute are:
■ User Entered (user enters attribute value)
■ Custom Sourced (uses custom code to derive an attribute)
■ Attribute Mapping (Pricing Engine derives information from other Oracle Applications and non-Oracle data sources.
In the context of TSO, attribute management can be used to derive the price of a Frame Relay PVC depending upon the PVC Speed which is both an Oracle Install Base attribute and an Oracle Configurator Attribute. You can custom-source the value of this attribute and provide it to the pricing engine to derive the price based on this attribute value.
Attribute Based Pricing SetupThe navigation to Attribute Based Pricing setup is:
Pricing > Setup > Attribute Management > Context and Attributes
Figure 9–1 shows an example of setting up pricing attributes for PVC Speed.

Pricing Attributes and Sourcing Rules
9-4 Oracle Telecommunications Service Ordering Process Guide
Figure 9–1 Context and Attributes
Attribute Linking and MappingThe navigation to Attribute Linking and Mapping setup is:
Pricing > Setup > Attribute Management > Attribute Linking and Mapping
Figure 9–2 shows an example of pricing attribute linking and mapping for PVC.

Pricing Attributes and Sourcing Rules
Set Up Advanced Pricing 9-5
Figure 9–2 Attribute Linking and Mapping
Attribute LinkingThe navigation to Link Attributes setup is:
Pricing > Setup > Attribute Management > Attribute Linking and Mapping > Link Attributes
Figure 9–3 shows an example of the attribute linking.

Pricing Attributes and Sourcing Rules
9-6 Oracle Telecommunications Service Ordering Process Guide
Figure 9–3 Attribute Linking
Attributes MappingThe navigation to Attributes Mapping is:
Pricing > Setup > Attribute Management > Attribute Linking and Mapping > Link Attributes > Attributes Mapping
Figure 9–4 shows an example of attribute mapping.

Get Custom Price
Set Up Advanced Pricing 9-7
Figure 9–4 Attribute Mapping
The PLSQL Package can use the elements of the global object ASO_PRICING_INT.G_LINE_REC as input parameters.
For example, the global parameter quote_line_id can be used to link by way of the configurator keys to the CZ_Config_Ext_Attributes table to select the attribute value for by the attribute name.
The value returned is sourced to the Pricing Attribute PVC_Speed. This pricing attribute can either be used in a Formula and associated to a price list or can be just used to define various prices for an item.
9.3 Get Custom PriceThis is a public, supported API that lets you extend Oracle Advanced Pricing to obtain a price lets you extend the functionality of the product while avoiding the downsides of customization. The data structure underlying Oracle Advanced Pricing may change over time, but the mechanics of Get_Custom_Price will not (or will be migrated if they do). In other words, if you keep all your custom code in this function, you are playing by the rules.
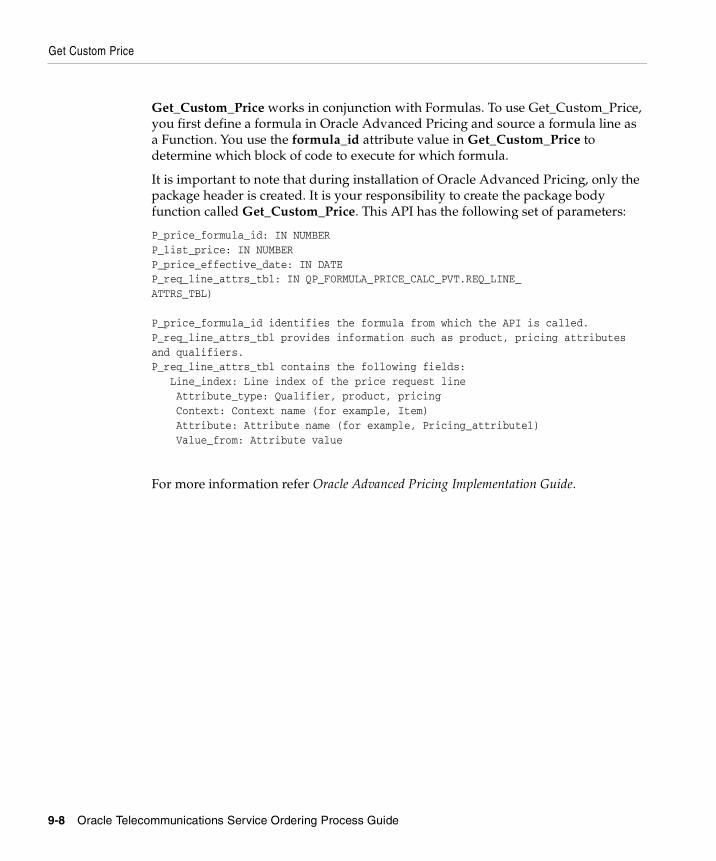
Get Custom Price
9-8 Oracle Telecommunications Service Ordering Process Guide
Get_Custom_Price works in conjunction with Formulas. To use Get_Custom_Price, you first define a formula in Oracle Advanced Pricing and source a formula line as a Function. You use the formula_id attribute value in Get_Custom_Price to determine which block of code to execute for which formula.
It is important to note that during installation of Oracle Advanced Pricing, only the package header is created. It is your responsibility to create the package body function called Get_Custom_Price. This API has the following set of parameters:
P_price_formula_id: IN NUMBERP_list_price: IN NUMBERP_price_effective_date: IN DATEP_req_line_attrs_tbl: IN QP_FORMULA_PRICE_CALC_PVT.REQ_LINE_ATTRS_TBL)
P_price_formula_id identifies the formula from which the API is called. P_req_line_attrs_tbl provides information such as product, pricing attributes and qualifiers. P_req_line_attrs_tbl contains the following fields: Line_index: Line index of the price request line Attribute_type: Qualifier, product, pricing Context: Context name (for example, Item) Attribute: Attribute name (for example, Pricing_attribute1) Value_from: Attribute value
For more information refer Oracle Advanced Pricing Implementation Guide.

Set Up Configurator and Customize the Solution 10-1
10Set Up Configurator and Customize the
Solution
The main topics in this chapter are:
■ Section 10.1, "About Configurator Implementation in the Solution" on page 10-2
■ Section 10.2, "Create the Configuration Model" on page 10-18
■ Section 10.3, "Publish a Container Model" on page 10-21
■ Section 10.4, "Define Profile Options" on page 10-21
■ Section 10.5, "Disable Pricing" on page 10-22
■ Section 10.6, "CZ Schema Customizations" on page 10-22
■ Section 10.7, "Initialization Parameters" on page 10-29
■ Section 10.8, "Batch Validation Parameters" on page 10-30
■ Section 10.9, "Programmatic Tools for TSO Development" on page 10-31
Reference MaterialThis chapter describes setup tasks that you perform to Oracle Configurator that are specific to the Oracle Telecommunications Service Ordering (TSO) solution. For more information on functionality, setting up, or using Oracle Configurator, refer to:
■ Section 3.4, "Configurator" on page 3-9
■ Oracle Configurator Developer User’s Guide
■ Oracle Configurator Implementation Guide
■ Oracle Configurator Installation Guide
■ Oracle Configurator Extensions and Interface Object Developer’s Guide

About Configurator Implementation in the Solution
10-2 Oracle Telecommunications Service Ordering Process Guide
■ Oracle Configurator Methodologies
■ Oracle Configurator About documentation
Before You BeginBefore you can set up Oracle Configurator for use with the Oracle Telecommunications Service Ordering solution, you must set up Oracle Bill of Materials, Oracle Install Base, and Oracle Order Management. For more information, see:
■ Chapter 7, "Set Up Bill of Materials"
■ Chapter 8, "Set Up Install Base"
■ Chapter 5, "Set Up Order Management"
In addition to this chapter, there is another chapter on setting up Oracle Configurator for use with the Telecommunications Services Ordering solution, Chapter 11, "Set Up Configurator Extensions".
After You Set Up Oracle ConfiguratorAfter you set up Oracle Configurator, you can set up Oracle Quoting. Note, however, that Oracle Quoting is also dependent on the setup of Oracle Advanced Pricing. For more information, see Chapter 12, "Set Up Quoting".
10.1 About Configurator Implementation in the SolutionTopics in this section include:
■ Section 10.1.1, "Conventions for Connector and Components of a Model" on page 10-3
■ Section 10.1.2, "Using Container Models" on page 10-3
■ Section 10.1.3, "Container Model Settings and Structure" on page 10-4
■ Section 10.1.4, "Importing Container Models into Oracle Configurator" on page 10-5
■ Section 10.1.5, "Structuring Container Models" on page 10-7
■ Section 10.1.6, "Connecting Components" on page 10-10
■ Section 10.1.8, "Using Configuration Rules" on page 10-15

About Configurator Implementation in the Solution
Set Up Configurator and Customize the Solution 10-3
10.1.1 Conventions for Connector and Components of a ModelSome of the diagrams that appear in this chapter show the structural relationship between Connectors and Components of a Model. The following sample diagram and Table 10–1 show and describe the conventions for the Model diagrams.
Table 10–1 refers to the preceding diagram.
10.1.2 Using Container ModelsYou can mark BOM Models within a Container Model as trackable. You can also mark BOM Option Classes and BOM Standard Items as trackable if they are inside a BOM Model. Tracking enables Oracle Install Base to record information about the item, including its location, status, current configuration, change history, and so on. You must define the Container Model itself as untrackable. Oracle Install Base does not record information about untrackable items. For more information about making an item Install Base trackable, see Section 6.2, "Specify Install Base Tracking for Each Component Item" on page 6-3.
Before an end user can reconfigure any of a Container Model’s installed configurable instances, the Container Model must meet certain requirements, such
Table 10–1 Model Diagram Conventions
Diagram Part Description
Model A
|_ Component X
This part represents a simple Model structure. In this case, Component X is a child of Model A.
| |_Feature 1 Feature 1 is a child of Component X.
|->Model B This represents a Reference node. Model A references Model B.
| |~> Model C This represents a Connector node. Model B has a Connector to Model C.

About Configurator Implementation in the Solution
10-4 Oracle Telecommunications Service Ordering Process Guide
as a valid Container Model structure, Connectors, and rules, to ensure that the configured items are trackable in Oracle Install Base. For more information about the necessary requirements, see:
■ Section 10.1.3, "Container Model Settings and Structure" on page 10-4
■ Section 6.5, "Create a Container Model" on page 6-6
10.1.3 Container Model Settings and StructureThe following list identifies the requirements for a Container Model in Oracle Inventory and Oracle Bills of Material.
A Container Model must be:
■ A Pick-to-Order (PTO) BOM Model
A Container Model cannot:
■ Be trackable.
■ Reference another Container Model. In other words, a Container Model cannot be a Component within another Container Model.
■ Contain more than one effective reference to the same trackable BOM Model For more information about references and effectivities, see the Oracle Configurator Developer User’s Guide.
■ Contain a non-trackable BOM Model with trackable children--one or more BOM Option Classes or BOM Standard Items.
■ Contain any BOM Models or BOM Option Classes that have a default quantity greater than 1.
■ Have any trackable BOM Standard Items or trackable BOM Option Classes as direct children.
For example, Figure 10–1 on page 10-5, shows BOM trackable items StndItem1, StndItem2, and BOM OC 1. This structure is invalid because these BOM items are all direct children of the Container Model.

About Configurator Implementation in the Solution
Set Up Configurator and Customize the Solution 10-5
Figure 10–1 Invalid Container Model Structure
For more information on creating or specifying Container Models, see Section 6.5, "Create a Container Model" on page 6-6.
10.1.4 Importing Container Models into Oracle ConfiguratorTo develop a Container Model in Oracle Configurator Developer, you must import the Oracle Inventory and BOM data into the Oracle Configurator (CZ) schema of the Oracle Applications database. For information about populating the CZ schema, see the Oracle Configurator Implementation Guide.
The concurrent programs under Populate and Refresh Configuration Models in Oracle Applications import the completed bills of material into the Oracle Configurator schema. Run the concurrent programs from the Oracle Configurator Administrator menu.
These concurrent programs import BOM structure--assemble-to-order, pick-to-order or Container Models, structure, and rules--and require complete BOM that are identified at the desired root.
The concurrent programs under Populate and Refresh Configuration Models in Oracle Applications include:
■ Populate Configuration Models: Populates the CZ schema online tables with data that is appropriate for creating configuration models that are based on existing BOM or legacy data.
■ Refresh a Configuration Model: Updates a specific BOM Model with any changes that may have been made in Oracle Applications since the time the BOM was first imported into the CZ schema.
■ Refresh all Imported Configuration Models: Updates all of the BOM Models that were imported into the specific database instance that the user is logged into.

About Configurator Implementation in the Solution
10-6 Oracle Telecommunications Service Ordering Process Guide
■ Disable/Enable Refresh of a Configuration Model: Enables the user to prevent specific configuration models from being refreshed if the Refresh all Imported Configuration Models concurrent program is run.
When importing a container BOM Model, the system creates a Model node in Oracle Configurator Developer. If the imported BOM Model has Components that are assemble-to-order or pick-to-order Models, then the import process creates:
■ A model structure for each child Model.
■ A corresponding reference node in the parent model.
Note that the Importing of a BOM model into Oracle Configurator Developer (OCD) is not TSO-specific functionality. The preceding section sets the context for what may happen when a BOM model that is also a Container is imported or refreshed into OCD.
Important! The concurrent programs under Populate and Refresh Configuration Models do not verify that all of the settings that you selected when defining a Container Model in Oracle Applications are correct. If a Container Model violates any of the requirements listed in this section, an error occurs only when you generate logic in Configurator Developer, not when you import or refresh the model.
The Refresh a Configuration Model and the Refresh all Imported Configuration Models concurrent programs check only two settings that you specify in Oracle Applications. When you refresh a Container Model, the concurrent program displays:
■ A warning, if the Configuration Model Type changed from Container to Standard. The Refresh concurrent programs do not display a warning if you changed the Configuration Model Type from Standard to Container.
■ An error, if any of the Container Model’s child BOM Models capable of multiple instances changed from a pick-to-order to an assemble-to-order BOM Model. For example, the Instantiability Initial Minimum and Initial Maximum values for Model X (a pick-to-order BOM Model) are not equal in Configurator Developer. In Oracle Inventory, you change Model X from a pick-to-order model to an assemble-to-order model. When you refresh the Container Model, the concurrent program displays an error.

About Configurator Implementation in the Solution
Set Up Configurator and Customize the Solution 10-7
10.1.5 Structuring Container ModelsIn a Container Model, if one of the trackable child Models does not have a trackable parent or ancestor, then there cannot be a limit on how many instances of that trackable child Model can be created at runtime. In other words, the trackable BOM Model’s Instantiability setting must be Multiple or Variable Instances with an Initial Minimum of 0 and Initial Maximum of null in Configurator Developer.
If the Initial Minimum and Initial Maximum values are not 0/null, respectively, for a trackable instance, Configurator Developer displays an error when you generate logic. A trackable instance can contain both trackable and non-trackable items, such as BOM Models and Option Classes, as well as Components created in Configurator Developer.
Because you can create multiple instances of such a BOM Model during configuration and Oracle Install Base tracks these instances when they are installed, a BOM Model matching this criteria is a trackable instance. An example of a trackable instance appears in Figure 10–2.
Note: The first time you import a Container Model, the Populate Configuration Models concurrent program sets the Initial Minimum and Initial Maximum values to 0/null, respectively, for all trackable child BOM Models. However, refreshing a Container Model does not reset these values if you change them in Oracle Configurator Developer. If the model’s structure violates any of the requirements listed in this section, Oracle Configurator Developer displays an error when you generate logic.
Note: Remember that you can only track BOM items and that Oracle Install Base only records information about trackable BOM items.

About Configurator Implementation in the Solution
10-8 Oracle Telecommunications Service Ordering Process Guide
Figure 10–2 Example of Trackable Instances
In Figure 10–2, PTO Trackable1 and PTO Trackable3 (in bold) are trackable instances because they are trackable and do not have a trackable parent or ancestor. Therefore, you must set the Instantiability Initial Minimum and Initial Maximum values to 0 and null, respectively. The table shows these settings as 0/null.
Note that the Initial Minimum and Initial Maximum values for PTO Trackable 2 and PTO Trackable 4 are not set to 0/null. This is because a trackable model that is a child or a descendant of a trackable instance does not have the same configuration requirements as a trackable instance. That is, the trackable child instance does not have to obey the rule when no instances exist when both:
■ The configuration session begins.
■ There is no limit to how many instances the end user can create.
Refer to the Oracle Configurator Developer User’s Guide for more information about creating multiple instances of Components during configuration.
Examples of Valid and Invalid Container Model StructureThis section provides examples of how trackable instances can impact the validity of a Container Model’s structure in Oracle Configurator Developer.

About Configurator Implementation in the Solution
Set Up Configurator and Customize the Solution 10-9
In a Container Model, a trackable descendant model can be a child of a non-trackable model only if the non-trackable model’s Initial Minimum and Initial Maximum values are both set to 1, and:
■ The trackable model’s Initial Minimum and Initial Maximum values are 0/null. See Figure 10–3.
or
■ Another trackable model whose Instances values are 0/null is the parent of the non-trackable model. See Figure 10–4.
Figure 10–3 Valid Model Structure: Non-Trackable Parent and Trackable Child
In Figure 10–3, the model structure is valid because the Initial Minimum and Initial Maximum for Trackable2 equals 0/null.
Figure 10–4 Valid Model Structure: Trackable Child and Trackable Ancestor
Although Trackable2 is a child of NonTrackable2, the structure shown in Figure 10–4 is valid because the Initial Minimum and Initial Maximum for Trackable1 equal 0/null and Trackable1 is an ancestor of Trackable2. Because Trackable1 is a trackable instance, an Oracle Install Base or Oracle Quoting user can select an installed instance of Trackable1 and launch Oracle Configurator to reconfigure it.

About Configurator Implementation in the Solution
10-10 Oracle Telecommunications Service Ordering Process Guide
Figure 10–5 Invalid Model Structure: Non-Trackable Parent and Trackable Child
Figure 10–5 shows an invalid structure because NonTrackable’s Initial Minimum equals 0. If an Oracle Install Base or Oracle Quoting user selects an instance of Trackable2 for reconfiguration, its parent (NonTrackable) is not part of the configuration when the Oracle Configurator session begins. Therefore, Oracle Configurator cannot add an instance of Trackable2 to the configuration either.
Figure 10–6 Invalid Model Structure: Non-Trackable Parent and Trackable Child
In Figure 10–6, Trackable2 is the first trackable BOM Model in the Container Model’s structure. However, its Instances values are not 0/null. This structure is invalid because although you can configure and track Trackable2 in Oracle Install Base, there is a restriction on how many instances of Trackable2 are allowed at runtime.
10.1.6 Connecting ComponentsOracle Install Base tracks the relationships that the connections formed that you create between Components. Oracle Install Base keeps a record only of trackable BOM items, so any connections that you make at runtime must be from an instance of a trackable BOM Model to instances of other trackable BOM Models.
Because Oracle Install Base keeps a record of connected instances only if they are trackable, any Connectors that you create within a Container Model in Oracle

About Configurator Implementation in the Solution
Set Up Configurator and Customize the Solution 10-11
Configurator Developer must be valid. If a Container Model contains Connectors that violate any of the requirements listed in this section, Oracle Configurator Developer displays an error when you generate logic.
Connectors enable you to define rules that include nodes from trackable instances as participants. See Section 10.1.8, "Using Configuration Rules" on page 10-15.
When working in a Container Model in Oracle Configurator Developer, you must create Connectors only from:
■ A trackable BOM Model to another trackable BOM Model
■ A non-trackable BOM Model to another non-trackable BOM Model
You must not create Connectors:
■ From the Container Model’s root node to a trackable model.
■ From the Container Model’s root node to any model that is a child of a trackable model.
For example, a Container Model references a trackable model named PTO1. PTO1 references a non-trackable model named PTO2. You create a Connector from the Container Model to PTO2. Because you created a Connector from the Container Model to a model that is a child of a trackable model, Oracle Configurator Developer displays an error when you generate logic.
■ Within a trackable model to a non-trackable model that has the trackable model as an ancestor (see Figure 10–7 on page 10-12).

About Configurator Implementation in the Solution
10-12 Oracle Telecommunications Service Ordering Process Guide
Figure 10–7 Invalid Connectors
In Figure 10–7:
■ Connector C1, C2, and C3 are invalid because you cannot connect a trackable model and a non-trackable model.
■ Connectors C4 and C5 are allowed because the Connectors’ parent and target are both non-trackable models (in other words, they do not cause an error when you generate logic)
But there are differences. Connector C5 has only a non-trackable target in NonTrackable5. Connector C4 has a non-trackable target with model NonTrackable4 being a child of the Container. The model NonTrackable4 is also a child of Trackable4, but these instances would be excluded from consideration by the Connector, and will not appear in the list of eligible targets.
Note: In Oracle Configurator Developer, when you select a BOM Model node, the BOM Item Type field indicates whether it is an assemble-to-order model, a pick-to-order model, or a Container Model. Additionally, when you select any BOM node, the Trackable check box indicates whether the item is trackable. You can expand the Definition attribute to view these settings.

About Configurator Implementation in the Solution
Set Up Configurator and Customize the Solution 10-13
10.1.7 Transient Items and AttributesTransient items and transient attributes are related concepts. For additional background, see Recurring Charges on page 3-6 and Recurring Charges on page 3-6.
10.1.7.1 About Transient ItemsA transient item is a BOM Standard Item used for the purpose of pricing a non-recurring service or fee. This concept is narrower than that of a one-time charge.
The ordering of a wireless phone may be a one-time charge, which requires a one-time fulfillment. This charge can also be trackable, in which case it reappears during a subsequent reconfiguration of the service.
Another type of charge associated with changing a service, such as an Installation Fee or a Service Termination Fee, is also a one-time charge. However, charges of this type should never reappear during a subsequent reconfiguration of the service. Such items are termed transient.
Transient items are not trackable, and must be removed after the quote is ordered and before the end user reconfigures the service. If these items are not removed, their appearance during the reconfiguration might confuse the end user. Therefore, you must use the transient flag to designate the transient items in your configuration model.
Since only BOM Standard Items can be transient, and since BOM Standard Items are always leaf nodes in a configuration model hierarchy, transient items are always leaf nodes. Leaf nodes are nodes without children.
10.1.7.2 Flagging Transient ItemsYou flag items as transient in Oracle Configurator Developer.
If a node satisfies all of the following criteria, then the Transient check box is enabled:
■ Is a BOM Standard Item (not a BOM Model or BOM Option Class)
■ Being a BOM Standard Item requires that the node is a leaf node (has no child nodes)
■ Is not trackable (the Trackable flag is not set)
To mark an item as transient:

About Configurator Implementation in the Solution
10-14 Oracle Telecommunications Service Ordering Process Guide
1. In Main area of the Repository, edit the BOM Model containing the BOM Standard Item.
2. Navigate to the Structure area of the Workbench.
3. Edit the BOM Standard Item.
4. In the Details page for the BOM Standard Item, select the Transient check box.
5. Click Apply.
See Section 10.6.6, "Schema Change for Transient Items" on page 10-29 for related database details.
10.1.7.3 About Transient AttributesA transient attribute is conceptually similar to a transient item. After a service is fulfilled, attributes that are transient are not restored during the reconfiguration of the service.
You model transient attributes in Configurator Developer, with Features. Any type of Feature (Integer, Decimal, Boolean, Text or Option Feature) can be used as a transient attribute.
During the reconfiguration of a trackable instance, Oracle Configurator ignores any inputs that are values of Features flagged as Transient.
Attributes are assigned by implementing the IB Attribute Configurator Extension. See Section 11.1.4, "Use Configuration Attributes with Install Base (IB)" on page 11-21 for details.
10.1.7.4 Flagging Transient AttributesYou flag attributes as transient in Oracle Configurator Developer.
If a node satisfies all of the following criteria, then the Transient check box is enabled:
■ Is a Feature (Integer, Decimal, Boolean, Text or Option Feature)
■ Is not an Option of an Option Feature
■ Is not a Resource or a Total
Do not choose an Option Feature with a Maximum greater than 1. This will cause an error at runtime.
To mark an item as transient:
1. In Main area of the Repository, edit the Model containing the Feature.

About Configurator Implementation in the Solution
Set Up Configurator and Customize the Solution 10-15
2. Navigate to the Structure area of the Workbench.
3. Edit the Feature.
4. In the Details page for the Feature, select the Transient check box.
5. Click Apply.
10.1.7.5 Assumptions and RestrictionsDuring the design and testing phases of your solution, you must ensure that the following issues do not cause problems.
■ When a saved configuration of a trackable instance is restored for reconfiguration, the CIO ignores all configuration inputs that have been flagged as transient, and does not report any deltas for the transient entity.
■ The removal of transient items or attributes at reconfiguration can result in changes to the set of selected items. In addition, if you have defined constraint rules between transient and non-transient entities, then logical contradictions may result when the transient participants to the rules are not restored.
■ Assertions to transient items or attributes must be performed by end user selections or by Configurator Extensions. Transient items or attributes should not participate in constraint rules. (Assertions are changes to the state, value, or quantity of an entity.)
10.1.8 Using Configuration RulesOracle Quoting and Oracle Install Base end users typically need to reconfigure only a few Components within a network of connected Components. To facilitate this process and improve runtime performance, you can view only the following Components when an Oracle Configurator session begins:
■ The Components selected for reconfiguration.
■ Any Components required to enforce constraints defined in the model.
When an end user reconfigures an installed configuration, Oracle Configurator may need to add Components to the configuration session to ensure the validity of all connections, and the entire configuration. At runtime, only rules that you define using Connectors can propagate to Component instances that may not be visible in the configuration session.
For this reason, it is important to define rules using Connectors when any rule participants are not part of the same trackable instance. In other words, no parent-and-child or ancestor-and-descendant relationship exists between the

About Configurator Implementation in the Solution
10-16 Oracle Telecommunications Service Ordering Process Guide
trackable items. For more information on trackable instances, see Section 10.1.5, "Structuring Container Models" on page 10-7.
When a rule defined using Connectors propagates to instances that are not visible in the configuration session, Oracle Configurator prompts you to add instances to the configuration session so other required changes are applied and the configuration remains valid.
For more information on using Connectors to define rules, see the Oracle Configurator Developer User’s Guide.
Valid Configuration Rule CombinationsThe following are examples of valid configuration rules for trackable models within a Container Model.
■ A rule can contain participants from a trackable model and one of its trackable child Models.
■ You can create a rule between Connectors that have the same trackable model as their target.
Using the structure in Figure 10–8 on page 10-17 as an example, you can create rules using nodes from Connector A and Connector B, even though their targets are the same. (You can also create rules using nodes from Connector A and Connector B if their targets are different.)
Note: If two trackable items are part of the same trackable instance, it is not necessary to create a Connector between them in order to define a rule in which they are both participants. For example, Model A is a trackable BOM Model that has two children, Model B and Model C. Since Model A references these models (thus they are Model A’s children), you can use nodes from both Model B and Model C when defining rules.

About Configurator Implementation in the Solution
Set Up Configurator and Customize the Solution 10-17
Figure 10–8 Connectors to the Same Trackable Model
■ A rule that includes nodes from two non-trackable models is valid as long as neither model is a child of a trackable model, or they are both children of the same trackable model.
Invalid Configuration Rule CombinationsIf a configuration rule violates any of the requirements in this section, Oracle Configurator Developer displays an error when you generate logic.
The following are examples of invalid configuration rules for trackable models within a Container Model.
■ A numeric rule that dynamically changes how many allowable instances of a trackable child BOM Model can exist at runtime. This type of rule changes how many instances of a model are allowed at runtime.
■ A numeric rule in which a Container Model node contributes to or consumes from the minimum or maximum number of allowed instances at runtime for another model (regardless of the model’s type).
For more information about this type of numeric rule, see the Oracle Configurator Developer User’s Guide.
■ A rule that uses nodes from sibling trackable models (that is, the models exist at the same level in the Container Model’s structure).
■ A rule between a trackable model and a non-trackable model that is not one of the trackable model’s children.
For example, using the structure shown in Figure 10–9 on page 10-18, create a rule containing participants from Trackable1 and NonTrackable1. This rule is invalid and causes an error when you generate logic.

Create the Configuration Model
10-18 Oracle Telecommunications Service Ordering Process Guide
Figure 10–9 Container Model Structure0
■ A rule with participants from one trackable model and any other node from a non-trackable child of the Container Model.
For example, in the structure appearing in Figure 10–10 on page 10-18, both PortSpeed and Speed are Features. A rule using PortSpeed and Speed is invalid because Port is trackable, PortSpeed is a Feature in Port, and Speed is a direct child of the Container Model.
Figure 10–10 Container Model Structure
10.2 Create the Configuration ModelThis section explains how to define a configuration model specifically for an Oracle Telecommunications Service Ordering solution.
For information about defining configuration models, see the Oracle Configurator Developer User’s Guide.
ModuleForms (Oracle Applications)
Note: This restriction does not apply to Configurator Extensions.

Create the Configuration Model
Set Up Configurator and Customize the Solution 10-19
ResponsibilityConfigurator Administrator
NavigationPopulate/Refresh Configuration Models > Populate Configuration Models
Steps1. Import the Container Model by running the Import Configuration Models
concurrent program.
For more information on:
– Setting up Container Models, see Section 6.5, "Create a Container Model" on page 6-6.
– Concurrent programs, see the Oracle Configurator Implementation Guide.
2. After importing the Container Model, verify that its structure is valid by opening the Model for editing in Configurator Developer, and choosing Generate Logic from the General area of the Workbench.
3. Add the Model structure and define configuration rules.
For transient items and attributes, set the transient flag. See Section 10.1.7, "Transient Items and Attributes" on page 10-13.
For more information, see the Oracle Configurator Developer User’s Guide.
4. Generate a User Interface and optionally create Activate Instance UI controls on specific UI windows.
An Activate Instance UI control is a button or picture to which you assign the Activate Instance action.
To generate a new User Interface, see the Oracle Configurator Developer User’s Guide.
Customizing the User Interface consists of adding Activate buttons, creating Connection List buttons, hiding Configurator Extensions, and altering the format in the UI Editor.
To add graphics and buttons to specific UI windows, see the Oracle Configurator Developer User’s Guide.

Create the Configuration Model
10-20 Oracle Telecommunications Service Ordering Process Guide
The Activate Instance UI control appears in a UI window only if you create the control on the selected Component’s UI window. When you make the Oracle Configurator UI window editable, the Activate Instance control does not appear.
5. Define Line Types in Oracle Order Management (OM).
In Oracle Order Management, Transaction Types are the source of various attributes on a sales order’s header and lines.
When you reconfigure an installed configuration, Oracle Configurator uses Line transaction types to describe the type of change made to each item. For more information, see:
– Oracle Order Management Suite Implementation Manual
– Oracle Order Management User’s Guide
6. Use the following Configurator Extensions. These Configurator Extensions should be suitable without modification, but you may adapt them if necessary.
– Line Type: Identifies the Line Type for use in the Summary window, and for use in downstream quoting and fulfillment activities. The Line Type column in the Summary window lists the type of change made to each item during the reconfiguration session. For more information, see Section 11.1.3, "Specify the Line Type" on page 11-11.
– Interactive Location Search: Sets the Location ID and Location Type Code for BOM trackable root instances and passes this information to downstream applications (that is, Oracle Order Management, Oracle Service Fulfillment Manager and Install Base). For more information, see Section 11.1.2, "Use Interactive Location Search" on page 11-4.
– IB Attribute: Collects configuration attributes of configured Components. For more information, see Section 11.1.4, "Use Configuration Attributes with Install Base (IB)" on page 11-21.
7. Publish the Container Model and specify Oracle Install Base, Oracle Quoting, and Oracle Order Management in the list of hosting applications.
Note: To help end users to navigate when updating an installed configuration, you may also want to display the Navigation Tree in a Container Model’s User Interface. For more information, see the Oracle Configurator Developer User’s Guide.

Define Profile Options
Set Up Configurator and Customize the Solution 10-21
For a list of Oracle Applications short names, see the Oracle Configurator Implementation Guide. For information about publishing, see the Oracle Configurator Developer User’s Guide.
10.3 Publish a Container ModelTo allow Oracle Install Base or Oracle Quoting users to reconfigure installed configurations, you must include Install Base and Oracle Quoting when publishing the Model from Configurator Developer.
Additionally, you must make the publication available to Oracle Order Management. For more information about publishing, see the Oracle Configurator Developer User’s Guide.
10.4 Define Profile OptionsYou must define some profile options before Install Base and Oracle Quoting users can reconfigure installed configurations using Oracle Configurator.
The following Oracle Configurator profile options affect how Oracle Configurator integrates with Install Base, or how Oracle Configurator saves data internally and returns it for use by the host application:
■ CZ: Auto-Expire Discontinued IB Trackable Items
■ CZ: Configurator Install Base
■ CZ: Include Unchanged Install Base Items
■ CZ: Only Create CZ Config Items for Selected Nodes
■ CZ: Report All Baseline Conflicts
■ CZ: Suppress Baseline Errors
These profile options have default values, but you may want to modify them for your installation. For more information, see the Oracle Configurator Installation Guide.
You must also define some additional Oracle Install Base and Oracle Quoting profile options to allow these applications to integrate with Oracle Configurator. For more information, refer to:
■ Oracle Install Base Implementation Guide
■ Oracle Quoting Implementation Guide

Disable Pricing
10-22 Oracle Telecommunications Service Ordering Process Guide
10.5 Disable PricingPricing attributes sourced from Configurator output configuration attributes are not available to the pricing engine until you have exited the Configurator by clicking Done. Therefore, if you are sourcing pricing attributes from Configurator output configuration attributes, you should disable pricing display within the Configurator.
If your application that supports reconfigurations of installed configurations includes pricing that depends on the Line Type (action) or configuration attributes of the line item, then you should disable pricing. Since such a dependency is likely to be common, it is recommended that you disable pricing in Oracle Configurator if your application supports reconfigurations of installed configurations.
You should be aware that pricing is disabled by default by RapidInstall, so you may not need to perform this task.
To disable pricing in Oracle Configurator, set the cz.activemodel property of the OC Servlet as follows:
cz.activemodel=/nolp|/nodp|
For more information on setting this property, see the Oracle Configurator Installation Guide.
10.6 CZ Schema CustomizationsThis section describes some customizations to the CZ schema related to the TSO solution:
■ See Section 10.6.1, "TSO Solution CZ_DB_SETTINGS Parameters" on page 10-23, for information on how to set a value that controls the display of the Line Type column in the Summary window.
■ See Section 10.6.2, "CZ_CONFIG_EXT_ATTRIBUTES Table" on page 10-23, for a description of the table used to hold configuration attribute data while it is being compared with the data in Oracle Install Base
■ Perform the steps in Section 10.6.3, "Map Install Base Extended Attributes to CZ Attributes in Developer" on page 10-24 to ensure the association of configuration attributes with their corresponding trackable items in Oracle Install Base.
■ See Section 10.6.4, "Mapping of CZ tables to Install Base Schema (CSI)" on page 10-26, for background information that helps you understand how data in the CZ schema is related to data in Install Base.

CZ Schema Customizations
Set Up Configurator and Customize the Solution 10-23
■ See Section 10.6.5, "Schema Change for Link Items" on page 10-28 for a description of a schema change to support link items.
■ See Section 10.6.6, "Schema Change for Transient Items" on page 10-29 for a description of a schema change to support transient items.
10.6.1 TSO Solution CZ_DB_SETTINGS ParametersSee the Oracle Configurator Implementation Guide for background on viewing or editing the values in the CZ_DB_SETTINGS table.
10.6.1.1 DISPLAY_SUMMARY_FULFILLMENT_ACTIONDISPLAY_SUMMARY_FULFILLMENT_ACTION determines whether the Line Type column appears in the Oracle Configurator Summary window during a reconfiguration session.
If it is a new configuration (that is, the end user is not updating an existing configuration), then the Line Type column does not appear, regardless of this setting’s value.
If DISPLAY_SUMMARY_FULLMENT_ACTION is set to True or is not defined, then the Line Type column appears in the Summary window, if a reconfiguration.
If DISPLAY_SUMMARY_FULLMENT_ACTION is set to False, then the Line Type column does not appear in the Summary window.
For more information about how Oracle Configurator uses this setting, see Section 11.1.3, "Specify the Line Type" on page 11-11.
10.6.2 CZ_CONFIG_EXT_ATTRIBUTES TableThe table CZ_CONFIG_EXT_ATTRIBUTES is the intermediate store of configuration attribute data between Oracle Configurator and Oracle Install Base. Oracle Configurator writes output data to the table when the IBAttribute
Table 10–2 Settings in CZ_DB_SETTINGS Table
SETTING_IDSECTION_NAME
DATA_TYPE Default VALUE More information in...
DISPLAY_SUMMARY_FULFILLMENT_ACTION
UISERVER String True DISPLAY_SUMMARY_FULFILLMENT_ACTION on page 10-23

CZ Schema Customizations
10-24 Oracle Telecommunications Service Ordering Process Guide
Configurator Extension runs. For more information about this Configurator Extension, see Section 11.1.3.1, "Purpose of the Line Type Configurator Extension" on page 11-11. Oracle Configurator compares the attribute values written to CZ_CONFIG_EXT_ATTRIBUTES with the values of the corresponding columns in the Install Base tables.
The layout and description of the CZ_CONFIG_EXT_ATTRIBUTES table appear in the Table 10–3, "CZ_CONFIG_EXT_ATTRIBUTES".
The columns CONFIG_HDR_ID, CONFIG_REV_NBR, CONFIG_ITEM_ID, ATTRIBUTE_LEVEL, and ATTRIBUTE_NAME are the primary key for CZ_CONFIG_EXT_ATTRIBUTES.
For brevity, the preceding table does not include standard columns such as LAST_UPDATE_DATE.
10.6.3 Map Install Base Extended Attributes to CZ Attributes in DeveloperYou must map the following to each other for all trackable items:
■ The extended attributes that you define in Oracle Install Base.
Table 10–3 CZ_CONFIG_EXT_ATTRIBUTES
Column NameNull?
PK? Type Comments
CONFIG_HDR_ID N Y NUMBER Instance Header ID. Corresponds to CZ_CONFIG_ITEMS.INSTANCE_HDR_ID.
CONFIG_REV_NBR N Y NUMBER Instance Revision Number. Corresponds to CZ_CONFIG_ITEMS.INSTANCE_REV_NBR.
CONFIG_ITEM_ID N Y NUMBER Configuration Item ID. Corresponds to CZ_CONFIG_ITEMS.CONFIG_ITEM_ID.
ATTRIBUTE_LEVEL N Y VARCHAR2(255) Corresponds to CSI_I_EXTENDED_ATTRIBS.ATTRIBUTE_LEVEL.
ATTRIBUTE_NAME N Y VARCHAR2(255) Corresponds to CSI_I_EXTENDED_ATTRIBS.ATTRIBUTE_CODE.
ATTRIBUTE_GROUP Y N VARCHAR2(255) Corresponds to CSI_I_EXTENDED_ATTRIBS.ATTRIBUTE_GROUP.
ATTRIBUTE_VALUE Y N VARCHAR2(255) Corresponds to CSI_I_EXTENDED_ATTRIBS.ATTRIBUTE_VALUE.

CZ Schema Customizations
Set Up Configurator and Customize the Solution 10-25
■ The configuration attributes that you define on your configuration model in Configurator Developer.
The result of this mapping is that the values of configuration attributes produced during a session in Oracle Configurator remain associated with their trackable items in Oracle Install Base.
You may not need to map transient attributes to Install Base Extended Attributes. You should map them if they are needed during fulfillment. See Section 10.1.7.3, "About Transient Attributes" on page 10-14 for background.
ModuleOracle Applications (Forms)
ResponsibilityOracle Installed Base Admin
NavigationSetups > Extended Attribute Template
Steps1. Define the desired extended attributes, associating them at the item group level.
For information on defining Oracle Install Base attributes, see the chapter on setting up Oracle Install Base, and the Oracle Install Base Implementation Guide.
2. In Oracle Configurator Developer, modify your Model to add attribute Features and Properties.
The methodology for modifying your Model is described in Oracle Configurator Methodologies, in the section on implementing configuration attributes for output. Consult that chapter for guidance, with these essential differences:
■ Instead of descriptive flexfield segments and contexts, use Oracle Install Base extended attributes and groups.
■ In place of the Property names ATTR_CONTEXT and ATTR_n_CONTEXT, use ATTR_GROUP and ATTR_n_GROUP.
Example:
In Oracle Install Base, define an extended attribute at the Global access level with:
■ Attribute Code = PORT_SPEED

CZ Schema Customizations
10-26 Oracle Telecommunications Service Ordering Process Guide
■ Attribute Name = Port Speed
■ Attribute Category = EAST
In Configurator Developer, in a trackable BOM Model, define an attribute Feature with:
■ Feature Name = Port_Speed
■ Feature Options = 192 Kbps, 256 Kbps, 640 Kbps
For the Feature named Port_Speed, define a Property with:
■ Property Name = ATTR_NAME
■ Property Value = PORT_SPEED
For the trackable BOM Model, define a Property with:
■ Property Name = ATTR_1_PATH
■ Property Value = Port_Speed
For the trackable BOM Model, define a second Property with:
■ Property Name = ATTR_1_MODE
■ Property Value = 2
For the trackable BOM Model, define a third Property with:
■ Property Name = ATTR_1_GROUP
■ Property Value = EAST
10.6.4 Mapping of CZ tables to Install Base Schema (CSI)When adding trackable data, the system adds the item into the CSI_T_TXN_LINE_DETAILS table. If change occurs to a transaction value after a reconfiguration, then a comparison happens between CSI_T_TXN_LINE_DETAILS and CZ_CONFIG_ITEMS to report the change. The CSI_T_TRANSACTION_LINES table contains the transaction detail for the configured item. There is one transaction line for each source transaction. For more information, see:
■ Section 3.4, "Configurator" on page 3-9
■ Section 11.2, "Using the Oracle Configuration Interface Object (CIO)" on page 11-27
Table 10–4 shows the mapping of the CZ tables to the Install Base schema.

CZ Schema Customizations
Set Up Configurator and Customize the Solution 10-27
Table 10–4 Mapping of CZ tables to IB (CSI) tables
CZ_TABLE.COLUMN CSI_TABLE.COLUMN Description
CZ_CONFIG_ITEMS.INSTANCE_HDR_ID CSI_T_TXN_LINE_DETAILS.CONFIG_HDR_ID
Each configured Component has its own unique instance header identification. The CONFIG_HDR_ID populates the INSTANCE_HDR_ID from the CZ_CONFIG_ITEMS table.
CZ_CONFIG_ITEMS.INSTANCE_REV_NBR CSI_T_TXN_LINE_DETAILS.CONFIG_REV_NBR
Each configured Component has its own unique instance revision number. The CONFIG_REV_NBR populates the INSTANCE_REV_NBR from the CZ_CONFIG_ITEMS table.
CZ_CONFIG_ITEMS.CONFIG_ITEM_ID CSI_T_TXN_LINE_DETAILS.CONFIG_ITEM_ID
This is the unique identifier for the configured item.
CZ_CONFIG_ITEMS.TARGET_HDR_ID CSI_T_II_RELATIONSHIPS.OBJ_CONFIG_INST_HDR_ID
This field is populated only for Connectors that point to the target.
CZ_CONFIG_ITEMS.TARGET_REV_NBR CSI_T_II_RELATIONSHIPS.OBJ_CONFIG_REV_NBR
This field is populated only for Connectors that point to the target.
CZ_CONFIG_ITEMS.TARGET_ITEM_ID CSI_T_II_RELATIONSHIPS.OBJ_CONFIG_ITEM_ID
This field is populated only for Connectors that point to the target.
CZ_CONFIG_ITEMS.CONFIG_ITEM_ID CSI_T_TRANSACTION_LINES.SOURCE_TRANSACTION_ID
This is the ID of the item being configured.
CZ_CONFIG_ITEMS.UOM_CODE CSI_T_TXN_LINE_DETAILS.UNIT_OF_MEASURE
This is the units of measurement code.
CZ_CONFIG_ITEMS.LOCATION_ID CSI_T_TXN_LINE_DETAILS.LOCATION_ID
The Location ID for the item. For background information, see Section 11.1.2, "Use Interactive Location Search" on page 11-4.
CZ_CONFIG_ITEMS.LOCATION_TYPE_ID CSI_T_TXN_LINE_DETAILS.LOCATION_TYPE_CODE
The Location Type Code for the item. For background information, see Section 11.1.2, "Use Interactive Location Search" on page 11-4.

CZ Schema Customizations
10-28 Oracle Telecommunications Service Ordering Process Guide
10.6.5 Schema Change for Link ItemsThe column IB_LINK_ITEM_FLAG has been added to the tables CZ_PS_NODES and CZ_IMP_PS_NODES. A true value for this column indicates that the node is a link item. This data is regarded as the link flag. For more information on links, see Section 6.4, "Set Up an Item of Type Link" on page 6-5.
CZ_CONFIG_HDRS_V.BASELINE_REV_NBR
CSI_ITEM_INSTANCES.CONFIG_INST_REV_NUM
CSI_T_TXN_LINE_DETAILS.CONFIG_INST_BASELINE_REV_NUM
CZ_CONFIG_HDRS_V.BASELINE_REV_NBR is a reference to CSI_ITEM_INSTANCES.CONFIG_INST_REV_NUM, which is the existing instance revision in Install Base that is being reconfigured. When Oracle Configurator writes transactions for a reconfiguration, it inserts this number in both CZ_CONFIG_HDRS_V.BASELINE_REV_NBR and CSI_T_TXN_LINE_DETAILS.CONFIG_INST_BASELINE_REV_NUM.
For more information, see Section 2.1.3, "Reconfigure a Customer’s Installed Services" on page 2-7 and Section 11.2.1.1, "Identify Changes to a Configuration" on page 11-27.
CZ_CONFIG_EXT_ATTRIBUTES.ATTRIBUTE_NAME
CSI_T_EXTEND_ATTRIBS_V.ATTRIBUTE_CODE
The name of the extended attribute for the item. For more information, see Section 11.1.4, "Use Configuration Attributes with Install Base (IB)" on page 11-21.
CZ_CONFIG_EXT_ATTRIBUTES.ATTRIBUTE_VALUE
CSI_T_EXTEND_ATTRIBS_V.ATTRIBUTE_VALUE
The value of the extended attribute for the item. For more information, see Section 11.1.4, "Use Configuration Attributes with Install Base (IB)" on page 11-21.
Table 10–4 Mapping of CZ tables to IB (CSI) tables (Cont.)
CZ_TABLE.COLUMN CSI_TABLE.COLUMN Description

Initialization Parameters
Set Up Configurator and Customize the Solution 10-29
See Section 11.2.1.4, "Report on Link Items" on page 11-30 for information on how the CIO uses the link flag.
For table details, see the CZ eTRM on OracleMetaLink, Oracle’s technical support Web site.
10.6.6 Schema Change for Transient ItemsThe column TRANSIENT_FLAG has been added to the table CZ_PS_NODES. A true value for this column indicates that the node is a transient item. This data is regarded as the transient flag. See Section 10.1.7, "Transient Items and Attributes" on page 10-13 for more information about transient nodes.
For table details, see the CZ eTRM on OracleMetaLink, Oracle’s technical support Web site.
10.7 Initialization ParametersThis section describes parameters that are specific to the TSO solution.
For information on the use of parameters in the initialization message, see the Oracle Configurator Implementation Guide.
When configuring instances of trackable Components prior to their installation in Oracle Install Base, the system uses the following parameters:
■ instance
■ validation_context
For background on updating configuration instances, see Chapter 2, "TSO Business Process".
instanceThe system uses the instance parameter when configuring instances of trackable Components. This parameter lets you configure multiple instances in the same configuration session. In a host application, this corresponds to the end user’s ability to select multiple Components for configuration.
This is the only initialization parameter that can be specified multiple times in the initialization message.
In order to specify each instance that requires configuration, provide the Configuration Header ID (CZ_CONFIG_DETAILS_V.CONFIG_HDR_ID) as the value of the header_id sub-parameter. For example:

Batch Validation Parameters
10-30 Oracle Telecommunications Service Ordering Process Guide
<instance header_id="17848"/><instance header_id="18333"/><instance header_id="23445"/>
validation_contextThe system uses the validation_context parameter when configuring instances of trackable configuration Components. The value sets the context in which the following occur:
■ Validation of the current instances.
■ Comparison of the current instances to the installed instances in Oracle Install Base.
Batch validation uses the validation_context parameter. For more information, see Section 10.8, "Batch Validation Parameters" on page 10-30.
The allowed values for the validation_context parameter appear in the following table, Table 10–5:
Default The default value is INSTALLED. If you omit this parameter, the default value applies.
Not required.
10.8 Batch Validation ParametersFor background and details about batch validation, see the Oracle Configurator Implementation Guide.
TSO implementers must use one of the following optional parameters to the <batch_validate> element. Values are:
■ validate_order
The process should pass this value when validating orders, such as what Oracle Order Management does. This is the default value.
Table 10–5 Allowed Value for the validation_context Parameter
Value Meaning
INSTALLED Compare the revisions of the current instances only to the revisions of those instances that have been installed in Oracle Install Base.
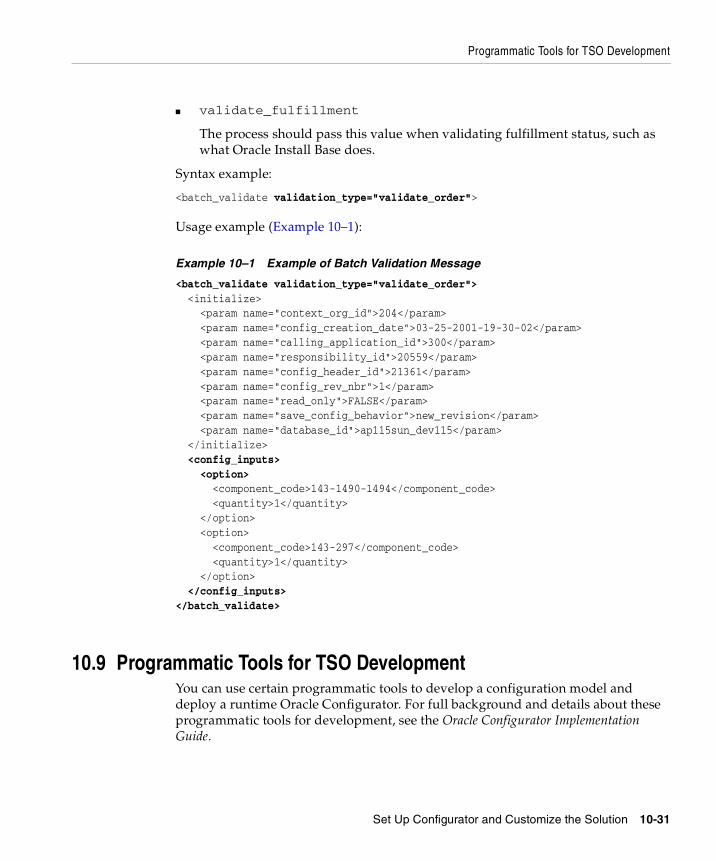
Programmatic Tools for TSO Development
Set Up Configurator and Customize the Solution 10-31
■ validate_fulfillment
The process should pass this value when validating fulfillment status, such as what Oracle Install Base does.
Syntax example:
<batch_validate validation_type="validate_order">
Usage example (Example 10–1):
Example 10–1 Example of Batch Validation Message
<batch_validate validation_type="validate_order"> <initialize> <param name="context_org_id">204</param> <param name="config_creation_date">03-25-2001-19-30-02</param> <param name="calling_application_id">300</param> <param name="responsibility_id">20559</param> <param name="config_header_id">21361</param> <param name="config_rev_nbr">1</param> <param name="read_only">FALSE</param> <param name="save_config_behavior">new_revision</param> <param name="database_id">ap115sun_dev115</param> </initialize> <config_inputs> <option> <component_code>143-1490-1494</component_code> <quantity>1</quantity> </option> <option> <component_code>143-297</component_code> <quantity>1</quantity> </option> </config_inputs></batch_validate>
10.9 Programmatic Tools for TSO DevelopmentYou can use certain programmatic tools to develop a configuration model and deploy a runtime Oracle Configurator. For full background and details about these programmatic tools for development, see the Oracle Configurator Implementation Guide.

Programmatic Tools for TSO Development
10-32 Oracle Telecommunications Service Ordering Process Guide
This section describes the tools or modified procedures for use with the TSO solution. For a list of these procedures, see Table 10–6, "Procedures Modified for TSO Development".
For this release, these procedures have been modified so that they also operate on configurations having connectivity, as well as on those that do not.
Table 10–7, " Custom Data Types for CZ_CONFIG_API_PUB" describes the custom data types that these procedures use. For background on custom data types, see the appropriate references in the Oracle Configurator Implementation Guide.
10.9.1 COPY_CONFIGURATIONThis procedure makes a copy of a saved configuration in the Oracle Configurator schema.
This procedure, COPY_CONFIGURATION in the CZ_CONFIG_API_PUB package, has been created for use with the TSO solution. It is a variation of COPY_CONFIGURATION in the CZ_CF_API package. For a description of the CZ_CF_API package, see the Oracle Configurator Implementation Guide. The most important difference is that this TSO procedure has two additional OUT parameters: x_orig_item_id_tbl and x_new_item_id_tbl. These parameters inform host applications about changes to the Configuration Item IDs (CZ_CONFIG_ITEMS.CONFIG_ITEM_ID) in the configuration in a case where you are copying Component instances that are not yet installed in Oracle Install Base. These parameters are of type CZ_API_PUB.NUMBER_TBL_TYPE, which is a table of the NUMBER type. As used by the COPY_CONFIGURATION procedure, these output tables are indexed from 1 to n, where n is the number of Configuration Item IDs changed from the source configuration to the new configuration. You can use the
Table 10–6 Procedures Modified for TSO Development
API Name
CZ_CONFIG_API_PUB.COPY_CONFIGURATION on page 10-32
CZ_CONFIG_API_PUB.COPY_CONFIGURATION_AUTO on page 10-36
CZ_CF_API.VALIDATE on page 10-37
Table 10–7 Custom Data Types for CZ_CONFIG_API_PUB
Custom Type Description
CZ_API_PUB.NUMBER_TBL_TYPE Table of NUMBER.

Programmatic Tools for TSO Development
Set Up Configurator and Customize the Solution 10-33
index number of the IDs stored in the tables to map the Configuration Item IDs in the original configuration to the Configuration Item IDs in the new copy of that configuration. Example 10–2, "Mapping Original Configuration Item IDs to New IDs When Copying a Configuration" shows how a host application might process these outputs using Oracle Configurator.
Example 10–2 Mapping Original Configuration Item IDs to New IDs When Copying a Configuration
...FORALL i IN x_orig_item_id_tbl.FIRST..x_orig_item_id_tbl.LAST UPDATE my_order_lines SET config_item_id = x_new_item_id_tbl(i) WHERE my_order_header = l_header AND config_hdr_id = x_config_hdr_id AND config_rev_nbr = x_config_rev_nbr AND config_item_id = x_orig_item_id_tbl(i);...
The non-TSO version of COPY_CONFIGURATION, in the package CZ_CF_API, has been modified to create an exception if it generates any new Configuration Item IDs. This averts data corruption in Oracle Order Management, Order Capture, and Contracts. If you encounter this exception, you must apply the appropriate patch for your host application that invokes the new COPY_CONFIGURATION procedure from CZ_CONFIG_API_PUB.
For background on configurations, see the chapter on managing configurations in the Oracle Configurator Implementation Guide.
10.9.1.1 Considerations Before Running
PrerequisitesThe configuration that you are copying must exist. If the configuration has been logically deleted, then you can pass 0 as the value of p_handle_deleted_flag to enable copying.
TimingYou should use this procedure every time you copy a configuration. The procedure ensures copying of all inputs, outputs, attributes, and messages.

Programmatic Tools for TSO Development
10-34 Oracle Telecommunications Service Ordering Process Guide
WarningsIf the configuration does not exist, or if the copy fails, x_msg_count will be greater than zero, and x_msg_data will contain error information. Check x_return_status for the return status.
10.9.1.2 Syntax and ParametersThe syntax for this procedure is:
PROCEDURE copy_configuration(p_api_version IN NUMBER ,p_config_hdr_id IN NUMBER ,p_config_rev_nbr IN NUMBER ,p_copy_mode IN VARCHAR2 ,x_config_hdr_id OUT NOCOPY NUMBER ,x_config_rev_nbr OUT NOCOPY NUMBER ,x_orig_item_id_tbl OUT NOCOPY CZ_API_PUB.number_tbl_type ,x_new_item_id_tbl OUT NOCOPY CZ_API_PUB.number_tbl_type ,x_return_status OUT NOCOPY VARCHAR2 ,x_msg_count OUT NOCOPY NUMBER ,x_msg_data OUT NOCOPY VARCHAR2 ,p_handle_deleted_flag IN VARCHAR2 := NULL ,p_new_name IN VARCHAR2 := NULL );
Table 10–8 on page 10-34 describes the parameters for the COPY_CONFIGURATION procedure.
Table 10–8 Parameters for the COPY_CONFIGURATION Procedure
Parameter Data Type Mode Note
p_api_version number in Required. See the description of API Version Numbers in the Oracle Configurator Implementation Guide.
p_config_hdr_id number in Required. Specifies the Configuration Header ID of the source configuration to copy.
p_config_rev_nbr number in Required. Specifies the Configuration Revision Number of the source configuration to copy.
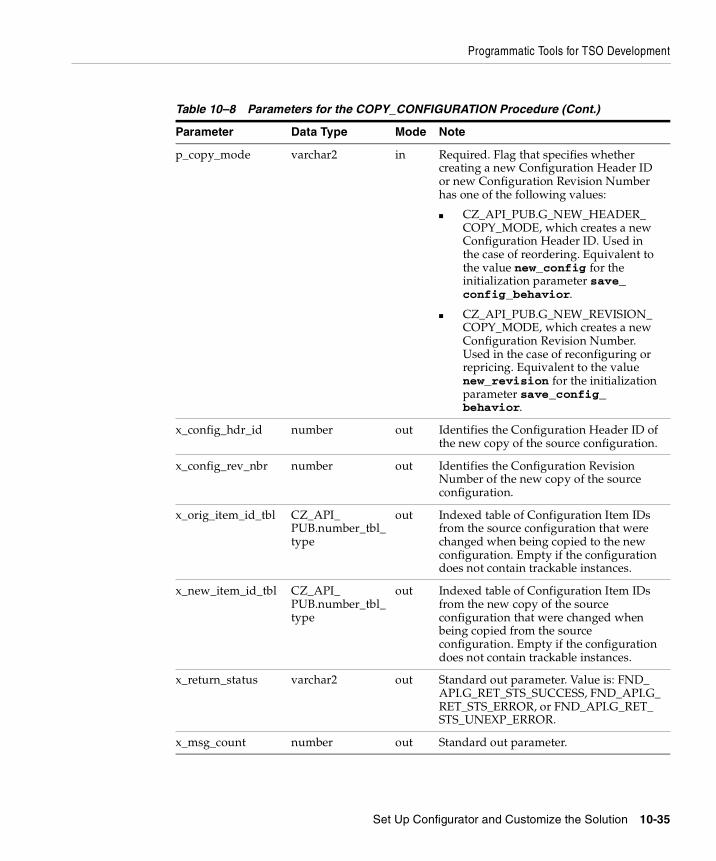
Programmatic Tools for TSO Development
Set Up Configurator and Customize the Solution 10-35
p_copy_mode varchar2 in Required. Flag that specifies whether creating a new Configuration Header ID or new Configuration Revision Number has one of the following values:
■ CZ_API_PUB.G_NEW_HEADER_COPY_MODE, which creates a new Configuration Header ID. Used in the case of reordering. Equivalent to the value new_config for the initialization parameter save_config_behavior.
■ CZ_API_PUB.G_NEW_REVISION_COPY_MODE, which creates a new Configuration Revision Number. Used in the case of reconfiguring or repricing. Equivalent to the value new_revision for the initialization parameter save_config_behavior.
x_config_hdr_id number out Identifies the Configuration Header ID of the new copy of the source configuration.
x_config_rev_nbr number out Identifies the Configuration Revision Number of the new copy of the source configuration.
x_orig_item_id_tbl CZ_API_PUB.number_tbl_type
out Indexed table of Configuration Item IDs from the source configuration that were changed when being copied to the new configuration. Empty if the configuration does not contain trackable instances.
x_new_item_id_tbl CZ_API_PUB.number_tbl_type
out Indexed table of Configuration Item IDs from the new copy of the source configuration that were changed when being copied from the source configuration. Empty if the configuration does not contain trackable instances.
x_return_status varchar2 out Standard out parameter. Value is: FND_API.G_RET_STS_SUCCESS, FND_API.G_RET_STS_ERROR, or FND_API.G_RET_STS_UNEXP_ERROR.
x_msg_count number out Standard out parameter.
Table 10–8 Parameters for the COPY_CONFIGURATION Procedure (Cont.)
Parameter Data Type Mode Note

Programmatic Tools for TSO Development
10-36 Oracle Telecommunications Service Ordering Process Guide
10.9.1.3 Considerations After Running
ResultsThis procedure copies all database records associated with a configuration to a new Configuration Header ID and Configuration Revision Number. The changes that the procedure made are not automatically committed. When you call this procedure, you must check x_return_status and commit the transaction if the copy was successful.
TroubleshootingExamine x_return_status. If it does not indicate success, then examine x_msg_count for the number of error messages, and x_msg_data for the error messages themselves.
10.9.2 COPY_CONFIGURATION_AUTO This procedure runs COPY_CONFIGURATION within an autonomous transaction. If the copy is successful, new data will be committed to the database without impacting the caller’s transaction.
For more information, see "COPY_CONFIGURATION" on page 10-32.
x_msg_data varchar2 out Standard out parameter.
p_handle_deleted_flag
varchar2 in Specifies how to handle an attempt to copy a logically deleted source configuration. If the source configuration is logically deleted, and the value passed to this parameter is 0, then the source configuration is undeleted so that the copy can proceed. If the value passed is null, then an error is raised by the attempt to copy.
p_new_name varchar2 in The new name applied to the copied configuration.
Table 10–8 Parameters for the COPY_CONFIGURATION Procedure (Cont.)
Parameter Data Type Mode Note

Programmatic Tools for TSO Development
Set Up Configurator and Customize the Solution 10-37
10.9.3 VALIDATEFor TSO, you must call this procedure with the parameter p_validation_type, which Table 10–9 on page 10-37 describes.
When Oracle Configurator calls this procedure during batch validation, it uses the following values:
■ CZ_API_PUB.VALIDATE_ORDER
This value should be passed when validating orders, such as what Oracle Order Management does. This is the default value.
■ CZ_API_PUB.VALIDATE_FULFILLMENT
This value should be passed when validating fulfillment status, such as what Oracle Install Base does.
For other essential information about this procedure, see the Oracle Configurator Implementation Guide.
10.9.3.1 Syntax and ParametersThe syntax for this procedure is:
PROCEDURE VALIDATE ( config_input_list IN CFG_INPUT_LIST, init_message IN VARCHAR2, config_messages IN OUT CFG_OUTPUT_PIECES, validation_status IN OUT NUMBER, URL IN VARCHAR2 DEFAULT FND_PROFILE.Value('CZ_UIMGR_URL'), p_validation_type IN VARCHAR2 DEFAULT CZ_API_PUB.VALIDATE_ORDER));
Table 10–9 on page 10-37 describes the parameter for the VALIDATE procedure with special meaning for the TSO solution. For information on the other parameters for the VALIDATE procedure, see the Oracle Configurator Implementation Guide.
Table 10–9 Special Parameter for the VALIDATE Procedure
Parameter Data Type Mode Note
p_validation_type
varchar2 in The possible values are CZ_API_PUB.VALIDATE_ORDER, CZ_API_PUB.VALIDATE_FULFILLMENT, and CZ_API_PUB.INTERACTIVE. The default is CZ_API_PUB.VALIDATE_ORDER.

Programmatic Tools for TSO Development
10-38 Oracle Telecommunications Service Ordering Process Guide

Set Up Configurator Extensions 11-1
11Set Up Configurator Extensions
The main topics in this chapter are:
■ Section 11.1, "Implementing the TSO Configurator Extensions" on page 11-2
■ Section 11.2, "Using the Oracle Configuration Interface Object (CIO)" on page 11-27
Reference MaterialThis chapter describes setup tasks that you must perform to Configurator that are specific to the Oracle Telecommunications Service Ordering (TSO) solution. For more information on functionality, setting up, or using Configurator, refer to:
■ Section 3.4, "Configurator" on page 3-9
■ Oracle Configurator Developer User’s Guide
■ Oracle Configurator Implementation Guide
■ Oracle Configurator Installation Guide
■ Oracle Configurator Extensions and Interface Object Developer’s Guide
■ Oracle Configurator Methodologies
■ Oracle Configurator About documentation
Before You BeginThis chapter explains:
■ The role of Configurator Extensions in a Telecommunications Services Ordering solution, and how to modify these Configurator Extensions where necessary for your requirements. The Configurator Extensions provide a certain amount of the TSO functionality without modification by installing them. Other optional

Implementing the TSO Configurator Extensions
11-2 Oracle Telecommunications Service Ordering Process Guide
functionality requires you to modify the Configurator Extensions. For more information, see Section 11.1.1, "Overview" on page 11-3.
■ How to use certain features of the Oracle Configuration Interface Object (CIO) that are specifically designed to support a Telecommunications Services Ordering solution. For more information, see Section 11.2, "Using the Oracle Configuration Interface Object (CIO)" on page 11-27.
In addition to this chapter, there is another chapter on setting up Configurator for use with the Telecommunications Services Ordering solution, Chapter 10, "Set Up Configurator and Customize the Solution".
Before you can set up Configurator for use with the Oracle Telecommunications Service Ordering solution, you must set up Oracle Bill of Materials, Oracle Install Base, and Oracle Order Management. For more information, see:
■ Chapter 7, "Set Up Bill of Materials"
■ Chapter 8, "Set Up Install Base"
■ Chapter 5, "Set Up Order Management"
After You Set Up ConfiguratorAfter you set up Configurator, you can set up Oracle Quoting. Note, however, that Oracle Quoting is also dependent on the setup of Oracle Advanced Pricing. For more information, see Chapter 12, "Set Up Quoting".
11.1 Implementing the TSO Configurator ExtensionsThis section describes the use of several defined Configurator Extensions used in reconfiguring installed configurations of Container Models.
Main topics in this section include:
■ Section 11.1.1, "Overview" on page 11-3
■ Section 11.1.2, "Use Interactive Location Search" on page 11-4
■ Section 11.1.3, "Specify the Line Type" on page 11-11
■ Section 11.1.4, "Use Configuration Attributes with Install Base (IB)" on page 11-21

Implementing the TSO Configurator Extensions
Set Up Configurator Extensions 11-3
11.1.1 OverviewReconfiguring installed configurations of Container Models relies on the use of one or more Configurator Extensions, depending on how much you want to customize the Telecommunications Services Ordering solution, if at all. The available solutions are:
■ Default solutions, which require modest implementation work on your part.
■ Customized solutions, which may require additional customization to achieve your desired results. (The provided examples may be sufficient for demonstrations.)
Table 11–1 on page 11-3 lists the Configurator Extensions that Telecommunications Services Ordering uses and indicates the solution for which each is applicable.
Table 11–1 Configurator Extensions for Telecommunications Services Ordering
Solution Name Description See...
Customized Interactive Location Search
Sets the Location of configured Components
Section 11.1.2, "Use Interactive Location Search" on page 11-4
Default Line Type Sets the Line Type of a configured Component
Section 11.1.3, "Specify the Line Type" on page 11-11
Default IBAttribute Collects configuration attributes of a configured Component
Section 11.1.4, "Use Configuration Attributes with Install Base (IB)" on page 11-21
Note: The ability to reconfigure installed configurations of Container Models is designed for and intended for use by the telecommunications service industry. Users in this area of business need to configure and reconfigure a large network of connected Components, such as a long-distance telephone network. Installed configurations such as these contain only serviceable items; they do not contain manufacturable items (such as items based on ATO BOM Models) or items that can be shipped. Therefore, this functionality is not intended for configuration models that are manufacturable or contain any manufacturable sub-Components.
For more information about reconfiguring installed configurations of Container Models, see Chapter 2, "TSO Business Process".

Implementing the TSO Configurator Extensions
11-4 Oracle Telecommunications Service Ordering Process Guide
You should consult these other documents for information on the tasks in this section:
■ For information on how to build a configuration model that enables you to reconfigure installed configurations of Container Models, see Chapter 2, "TSO Business Process".
■ For information on how to write and compile Configurator Extensions, see the Oracle Configurator Extensions and Interface Object Developer’s Guide.
■ For information on how to incorporate Configurator Extensions into your configuration model and make them available to the runtime Oracle Configurator, see the Oracle Configurator Developer User’s Guide.
11.1.2 Use Interactive Location SearchThe Interactive Location Search Configurator Extension is recommended, but not required for implementing the reconfiguring of installed configurations of Container Models.
The Interactive Location Search Configurator Extension enables you to query and select location information from the Oracle Trading Community Architecture (TCA).
Use of the Interactive Location Search Configurator Extension might be optional. If the TSO solution puts all services at a single location, the Location can be inherited from the Quote address. Location is needed when services are deployed to multiple locations, or the location differs from that of the Quote.
11.1.2.1 Purpose of the Interactive Location Search Configurator ExtensionThe Interactive Location Search Configurator Extension determines and sets a Location ID and Location Type Code on a trackable Component instance and all its trackable descendants.To understand the need for the Location ID and Location Type Code, see Background for Locations.
Note: Implementing the Interactive Location Search Configurator Extension assumes that you are using a User Interface generated with the HTML-based version of Oracle Configurator Developer. If you want to use a DHTML User Interface, you must implement a Functional Companion as described in a previous release of this document. Functional Companions do not have all the functionality of Configurator Extensions.

Implementing the TSO Configurator Extensions
Set Up Configurator Extensions 11-5
Background for LocationsOracle Sales lets you create multiple addresses for customers. Each address is identified by a Location ID, which the Oracle Sales end user cannot see. At the other end of the quote-to-installation flow, Oracle Install Base requires that every installed Component instance have a Location ID, to identify the location at which an item has been installed. Along the course of this flow, the Location Type Code points to the database table containing the detailed information for the address that the Location ID identifies.
An Oracle Configurator configuration model normally represents only the configurable aspects of a Component, and thus does not have any innate means of expressing the location of a configured Component. Consequently, there is no built-in equivalent to the Location ID. For a trackable Component to be configured and later accepted by Install Base, a Location ID must be assigned to every configured Component.
11.1.2.2 Example Code for the Interactive Location Search Configurator ExtensionFor the full source code of the Interactive Location Search Configurator Extension, consult OracleMetaLink, Oracle’s technical support Web site.
11.1.2.3 Setup for the Interactive Location Search Configurator ExtensionThis section describes what you must do before using the Interactive Location Search Configurator Extension. For clarity, the phases of setup are described separately:
■ General Setup
■ Deploy the Configurator Extension Class
■ Deploy the Oracle Applications Framework Files
■ Define the Configurator Extension Rules
General SetupThis section describes how to set up elements of the Oracle Applications database for use with the Interactive Location Search Configurator Extension.
1. In Oracle Trading Community Architecture (TCA), perform the required tasks for setting up locations and Location IDs.
2. In Oracle Sales, define your Customers.

Implementing the TSO Configurator Extensions
11-6 Oracle Telecommunications Service Ordering Process Guide
For more information, see Background for Locations on page 11-5.
Deploy the Configurator Extension ClassThis section describes how to deploy the Java class for the Interactive Location Search Configurator Extension. For background, see the Oracle Configurator Installation Guide and Oracle Configurator Implementation Guide.
1. Obtain the source code for the Interactive Location Search Configurator Extension from OracleMetaLink, Oracle’s technical support Web site.
To follow this procedure, assume that the name of the source file to obtain is ValidateLocationCX.java.
2. Optionally modify the Java source file for the Configurator Extension.
See Section 11.1.2.5, "Modify the Interactive Location Search Configurator Extension" on page 11-11 for information on possible modifications.
3. Compile the Java class.
See the Oracle Configurator Extensions and Interface Object Developer’s Guide for information about compiling Configurator Extensions.
4. Place the compiled Java class in a Java class archive file (using valid Zip or JAR format) with a name of your choice.
5. In Oracle Configurator Developer, create a Configurator Extension Archive for the class.
See the Oracle Configurator Developer User’s Guide for details.
6. Now you can define the Configurator Extension Rule, as described in Define the Configurator Extension Rules on page 11-7.
Deploy the Oracle Applications Framework FilesThis section describes how to deploy the Oracle Applications Framework files for the Interactive Location Search Configurator Extension.
1. Obtain the Oracle Applications Framework files for Interactive Location Search from OracleMetaLink, Oracle’s technical support Web site.
2. Customize the files as desired, using Oracle JDeveloper. See Section 11.1.2.5, "Modify the Interactive Location Search Configurator Extension" on page 11-11 for restrictions.
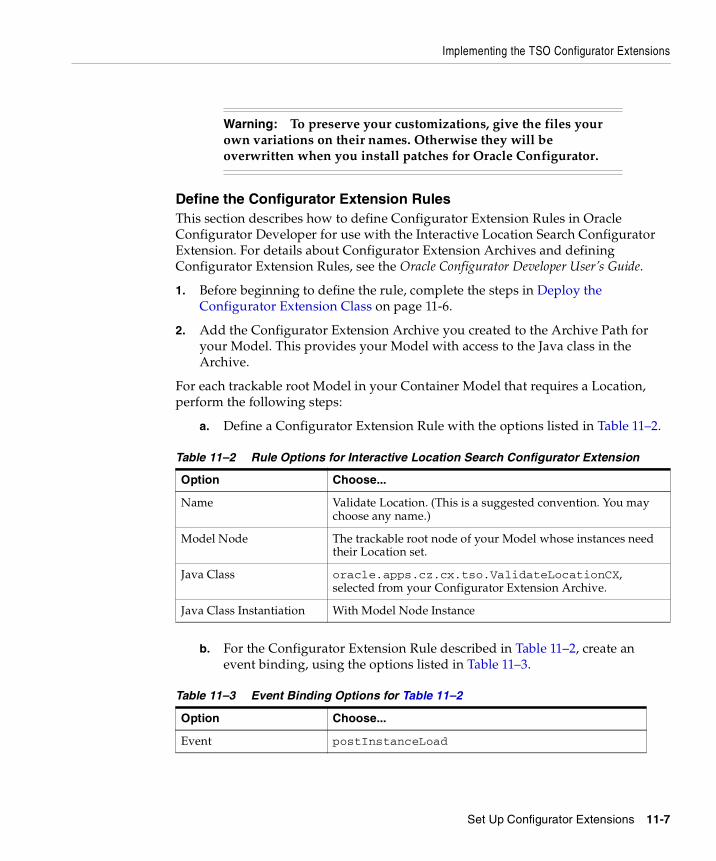
Implementing the TSO Configurator Extensions
Set Up Configurator Extensions 11-7
Define the Configurator Extension RulesThis section describes how to define Configurator Extension Rules in Oracle Configurator Developer for use with the Interactive Location Search Configurator Extension. For details about Configurator Extension Archives and defining Configurator Extension Rules, see the Oracle Configurator Developer User’s Guide.
1. Before beginning to define the rule, complete the steps in Deploy the Configurator Extension Class on page 11-6.
2. Add the Configurator Extension Archive you created to the Archive Path for your Model. This provides your Model with access to the Java class in the Archive.
For each trackable root Model in your Container Model that requires a Location, perform the following steps:
a. Define a Configurator Extension Rule with the options listed in Table 11–2.
b. For the Configurator Extension Rule described in Table 11–2, create an event binding, using the options listed in Table 11–3.
Warning: To preserve your customizations, give the files your own variations on their names. Otherwise they will be overwritten when you install patches for Oracle Configurator.
Table 11–2 Rule Options for Interactive Location Search Configurator Extension
Option Choose...
Name Validate Location. (This is a suggested convention. You may choose any name.)
Model Node The trackable root node of your Model whose instances need their Location set.
Java Class oracle.apps.cz.cx.tso.ValidateLocationCX, selected from your Configurator Extension Archive.
Java Class Instantiation With Model Node Instance
Table 11–3 Event Binding Options for Table 11–2
Option Choose...
Event postInstanceLoad

Implementing the TSO Configurator Extensions
11-8 Oracle Telecommunications Service Ordering Process Guide
c. For the event binding shown in Table 11–3, create argument bindings, using the options listed in Table 11–4 and Table 11–5.
d. For the Configurator Extension Rule described in Table 11–2, create another event binding, using the options listed in Table 11–6.
Event Scope Base Node
Method updateCurrentAddress()
Table 11–4 Argument Binding Options for Table 11–3
Option Choose...
Argument Name trackableRoot
Argument Type oracle.apps.cz.cio.IRuntimeNode
Argument Specification System Parameter
Binding Base Node of Rule
Table 11–5 Argument Binding Options for Table 11–3
Option Choose...
Argument Name currentAddress
Argument Type oracle.apps.cz.cio.TextFeature
Argument Specification Model Node or Property
Binding The text feature that displays the current address.
Table 11–6 Event Binding Options for Table 11–2
Option Choose...
Event onCommand
Command Name A string that you choose as a command. For example: Show Locations. Do not enclose the string in quotation marks. The string can contain spaces.
Event Scope Base Node
Table 11–3 (Cont.) Event Binding Options for Table 11–2
Option Choose...

Implementing the TSO Configurator Extensions
Set Up Configurator Extensions 11-9
e. For the event binding shown in Table 11–6, create argument bindings, using the options listed in Table 11–7, Table 11–8, and Table 11–9.
3. After you have defined the event and argument bindings for the items requiring Locations, generate logic for your Model, to reflect the addition of the Configurator Extension Rules.
Method redirectLocationSearch()
Table 11–7 Argument Binding Options for Table 11–6
Option Choose...
Argument Name response
Argument Type javax.servlet.http.HttpServletResponse
Argument Specification Event Parameter
Binding HttpServletResponse
Table 11–8 Argument Binding Options for Table 11–6
Option Choose...
Argument Name trackableRoot
Argument Type oracle.apps.cz.cio.IRuntimeNode
Argument Specification System Parameter
Binding Base Node of Rule
Table 11–9 Argument Binding Options for Table 11–6
Option Choose...
Argument Name currentAddress
Argument Type oracle.apps.cz.cio.TextFeature
Argument Specification Model Node or Property
Binding The text feature that displays the current address.
Table 11–6 (Cont.) Event Binding Options for Table 11–2
Option Choose...

Implementing the TSO Configurator Extensions
11-10 Oracle Telecommunications Service Ordering Process Guide
4. Create or refresh a User Interface for your Model. This creates a button in the User Interface that by default is captioned with the Command Name that you specified in the binding for the onCommand event. The button appears on the page for the Model Node that you associated with the Configurator Extension.
5. In order to test the Interactive Location Search Configurator Extension from Configurator Developer, you must provide a custom initialization parameter named calling_application_id, with a value that specifies your desired calling application. You must also provide another custom initialization parameter that depends on the calling application, as shown in the following table:
See the Oracle Configurator Implementation Guide for details about initialization parameters
6. Test the Configurator Extension from Configurator Developer by choosing the Test Model button, then choosing the Model Debugger, or the User Interface that you generated.
11.1.2.4 Effects of the Interactive Location Search Configurator ExtensionThis section describes, at a high level, the operation of the Interactive Location Search Configurator Extension, so that you can better understand its effects on your configuration.
When you test the model and click the button you created for each top-level node requiring a Location, the Interactive Location Search Configurator Extension replaces the current Oracle Configurator window and points to an OA (Oracle Applications) page. The OA page determines the host application that called it, and determines the Customer ID. Then the OA page queries the TCA for all Locations for that Customer, and presents them so that end users can select one. When the user selects a Location and clicks OK, the Location ID (typically a PARTY_SITE_ID) is stored as the Location ID for the runtime component bound to the Configurator Extension.
See Section 11.2.2.3, "Location Synchronization" on page 11-32 for important information about the synchronization of location data with Install Base when Configurator reconfigures an instance.
Application Custom Initialization Parameter
Oracle Quoting
client_header

Implementing the TSO Configurator Extensions
Set Up Configurator Extensions 11-11
11.1.2.5 Modify the Interactive Location Search Configurator ExtensionSince the Interactive Location Search solution is constructed with Oracle Applications Framework, you must use the business logic written into the Java source for the controller object to modify its behavior. This requires expertise in programming for the Oracle Applications Framework.
11.1.3 Specify the Line TypeThe Line Type Configurator Extension is required for implementing the reconfiguring of installed configurations of Container Models.
■ If you do not install the Line Type Configurator Extension, then the Line Types for your fulfilled items will be defaulted in Oracle Order Management (OM). The Line Type is a mandatory field on an order line. OM defaults the Line Type from the default Line Type that is set up for the order type. Line Types are also known as Actions.
■ If you install the Line Type Configurator Extension, and complete the setup steps described in this chapter, then your fulfilled orders will have Line Types in SFM. The Line Types will be those defined in the Line Type Configurator Extension and the associated setup.
11.1.3.1 Purpose of the Line Type Configurator ExtensionThe Line Type Configurator Extension determines and sets the Line Type value for the associated node and its trackable descendants by either:
■ Detecting the type of change that was made to the Component being configured or reconfigured, relative to the latest valid baseline recorded in Oracle Install Base
■ Detecting a change in the state of specified Features in the Model
Note: Implementing the Line Type Configurator Extension assumes that you are using a User Interface generated with the HTML-based version of Oracle Configurator Developer. If you want to use a DHTML User Interface, you must implement a Functional Companion as described in a previous release of this document. Functional Companions do not have all the functionality of Configurator Extensions.

Implementing the TSO Configurator Extensions
11-12 Oracle Telecommunications Service Ordering Process Guide
The Line Type is a reference to a Transaction Type in Order Management that indicates the fulfillment actions to be applied to the configured Component instances. The Configurator Extension assigns the Line Type during a configuration session when the configuration is saved or when the Summary window appears.
11.1.3.2 Example Code for the Line Type Configurator ExtensionFor the full source code of the Line Type Configurator Extension, consult OracleMetaLink, Oracle’s technical support Web site.
11.1.3.3 Setup for the Line Type Configurator ExtensionThis section describes what you must do before using the Line Type Configurator Extension. For clarity, the phases of setup are described separately:
■ Setup in Order Management
■ Setup in Oracle Applications Database
■ Setup in Oracle Configurator Developer Using Properties
■ Setup in Oracle Configurator Developer Using Features
■ Setup in Oracle Configurator Developer Using Indirection
■ Define the Configurator Extension Rule
Setup in Order ManagementThis section describes how to set up Oracle Order Management for use with the Line Type Configurator Extension. For background and details, see the Oracle Configurator Implementation Guide.
1. In Oracle Order Management, define the desired Line Types, by defining Transaction Types that have a Transaction Type Code of Line.
Transaction Types are stored in the Order Management table ONT.OE_TRANSACTION_TYPES_TL. The name you enter in the Transaction Types window is stored as NAME. Oracle Applications stores a numeric code for the type, TRANSACTION_TYPE_ID. The NAME value is used to display the Line Type values on the Summary window of the runtime Oracle Configurator.
2. Table 11–10 shows a set of Line Types that you might define. The IDs shown are example values; the actual values of the IDs depend on the data in the particular database instance in which you define the Line Types.

Implementing the TSO Configurator Extensions
Set Up Configurator Extensions 11-13
These types are passed downstream to SFM to indicate the type of fulfillment action to perform.
3. Use the following query to see the other Transaction Types currently defined:
SELECT transaction_type_id, name, description FROM ont.oe_transaction_types_tl;
4. Record the TRANSACTION_TYPE_ID and NAME values for your Line Types. You will use them in Setup in Oracle Applications Database on page 11-13.
Setup in Oracle Applications DatabaseThis section describes how to set up the CZ schema of the Oracle Applications database for use with the Line Type Configurator Extension. For background and details, see the Oracle Configurator Implementation Guide.
1. Confirm that DISPLAY_SUMMARY_FULFILLMENT_ACTION is set correctly in the CZ_DB_SETTINGS table, as described in Section 10.6.1, "TSO Solution CZ_DB_SETTINGS Parameters" on page 10-23. The default setting should be correct.
2. After you set DISPLAY_SUMMARY_FULFILLMENT_ACTION correctly, the Summary window of the runtime Oracle Configurator displays the Line Types assigned to nodes of a BOM Model.
Setup in Oracle Configurator Developer Using PropertiesThis section describes how to define elements of a Model in Oracle Configurator Developer for use with the Line Type Configurator Extension. For details about defining Model elements, see the Oracle Configurator Developer User’s Guide.
Table 11–10 Example Line Types Defined in OE_TRANSACTION_TYPES_TL
TRANSACTION_TYPE_ID NAME
2516 MOVE
2476 ADD
2477 CHANGE
2556 DISCONTINUED
2560 SUSPEND
2570 RESUME

Implementing the TSO Configurator Extensions
11-14 Oracle Telecommunications Service Ordering Process Guide
1. For as many of the Line Types as you have defined (as shown in the example in Table 11–10 on page 11-13), define a pair of Properties in the Main area of the Repository. Use the settings shown in Table 11–11. In each pair of Property names, replace n with an integer, incrementing n by 1 for each pair. There is no limit on the number of pairs you can specify.
The result should be a set of pairs of Properties named LINETYPE_1_ID, LINETYPE_1_TEST, LINETYPE_2_ID, LINETYPE_2_TEST, and so on. The form of these Property names is mandatory, unless you modify the source code for the Line Type Configurator Extension.
2. For each trackable root node in your Container Model that requires Line Types, add a pair of these Properties for each applicable Line Type, as described in the following steps.
The Properties can be defined on a BOM Model, BOM Option Class, or BOM Standard Item.
3. Set the priority of the Line Type relative to the other Line Types, by selecting the pair of Properties that correspond to this priority, using the integer part of the Property name to indicate the priority. The priority determines the order, at runtime, in which the Line Type Configurator Extension applies tests to the associated node. The first test that passes (that is, returns a true value) causes the assignment of the corresponding Line Type to the node and its BOM descendants.
For example:
■ LINETYPE_1_TEST is applied first.
■ If LINETYPE_1_TEST fails, then LINETYPE_2_TEST is applied.
■ If LINETYPE_2_TEST passes, then the value of LINETYPE_2_ID is assigned to the node as its Line Type.
■ If LINETYPE_2_TEST fails, then LINETYPE_3_TEST is applied, and so on.
Table 11–11 User Properties for Line Types, in Repository
Name Data Type Default Value
LINETYPE_n_ID Text (Do not define one.)
LINETYPE_n_TEST Text (Do not define one.)
Implementing the TSO Configurator Extensions
Set Up Configurator Extensions 11-15
4. For the LINETYPE_n_ID member of the Property pair, enter the database-specific TRANSACTION_TYPE_ID for the Line Type, as shown in Table 11–10 on page 11-13.
For example, for the Line Type called ADD, enter 2476.
5. For the LINETYPE_n_TEST member of the Property pair, enter a token string which indicates the CIO test that determines whether the specified type of change occurred that corresponds to the Line Type. The token string is composed of &BaseNode. combined with one of the predefined CIO test methods listed in Table 11–22, "Methods for Identifying Changes Against the Baseline" on page 11-28. (If you wish to use the method isIBNodeOrDescendantChanged(), you must customize the code of the Line Type Configurator Extension.)
For example, for the Line Type called ADD, you would probably enter the following token string:
&BaseNode.isAddChanged()
You must determine which test corresponds to your own definition of the meaning of a particular Line Type. If the CIO tests listed in Table 11–22 do not capture some of your Line Types, then see Setup in Oracle Configurator Developer Using Features on page 11-16.
6. When you have finished defining your Property pairs, the results should resemble the contents of Table 11–12, which combines the Line Types shown in Table 11–10 on page 11-13 with the Property definition pairs that correspond to each of them. The Line Type priorities shown for LINETYPE_n_ID are for demonstration only. You must assign your own priorities.
Table 11–12 Line Type Definitions Compared to User Properties for Line Types
TRANSACTION_TYPE_ID NAME n
LINETYPE_n_ID LINETYPE_n_TEST
2476 ADD 1 2476 &BaseNode.isAddChanged()
2556 DISCONTINUED 2 2556 &BaseNode.isDeleteChanged()
2477 CHANGE 3 2477 &BaseNode.isAttributeChanged()
2516 MOVE 4 2516 &BaseNode.isLocationChanged()

Implementing the TSO Configurator Extensions
11-16 Oracle Telecommunications Service Ordering Process Guide
Setup in Oracle Configurator Developer Using FeaturesIf the CIO tests listed in Table 11–22 on page 11-28 do not capture the meaning of some of your Line Types, then you can model those Line Types as nodes whose state can be tested as being true or false. You can model a Line Type as either the true state of a Boolean Feature or as the selected Option of an Option Feature.
1. Determine which of your Line Types (such as those in Table 11–10 on page 11-13) are not captured by the CIO tests listed in Table 11–22 on page 11-28.
2. Define a Feature whose state, when it is evaluated as true, corresponds to that Line Type. You might choose to use either an Option Feature or a Boolean Feature.
■ Define an Option Feature whose Options correspond to the names of those Line Types.
For example:
– Define an Option Feature named Use Cases
– For the Line Type called SUSPEND, define an Option of Use Cases named Suspend
– For the Line Type called RESUME, define an Option of Use Cases named Resume
■ Define Boolean Features whose true states correspond to the names of those Line Types.
For example:
– For the Line Type called SUSPEND, define a Boolean Feature named Suspended?
– For the Line Type called RESUME, define a Boolean Feature named Resumed?
3. Follow steps 1 through 4 under Setup in Oracle Configurator Developer Using Properties.
4. For the LINETYPE_n_TEST member of the Property pair, enter the relative node path from the nearest parent BOM Model to the Option or Boolean Feature that corresponds to the Line Type.
For example, for the Line Type called SUSPEND, you would enter the following path:

Implementing the TSO Configurator Extensions
Set Up Configurator Extensions 11-17
Use Cases.Suspend
5. When you have finished defining your Property pairs, using both the Property-based and Feature-based methods, the results might resemble the contents of Table 11–13, which combines the Line Types shown in Table 11–10 on page 11-13 with the Property definition pairs that correspond to each of them. Table 11–13 is like Table 11–12 on page 11-15, with the addition of Feature-based definitions for the Line Types SUSPEND and RESUME. For the sake of demonstration, the table shows both an Option Feature-based value and a Boolean Feature-based value for LINETYPE_n_TEST. This is not necessarily a recommended practice.
The Line Type priorities shown for LINETYPE_n_ID are for demonstration only. You must assign your own priorities.
Setup in Oracle Configurator Developer Using IndirectionThe setup described elsewhere in this section assumes that some of the items in a trackable Component instance share the same data that the Line Type Configurator Extension uses to assign the Line Type (that is, the Line Type’s ID, test, and priority).
It is very possible that your own configuration model requires different IDs, tests, or priorities for certain different trackable items. The different items might be other trackable root components, or trackable descendants of the component you have already defined Line Types for. You could accomplish this distinction by defining User Properties on all the affected items, but this course might require many Property definitions.
Table 11–13 More Line Type Definitions Compared to User Properties for Line Types
TRANSACTION_TYPE_ID NAME n
LINETYPE_n_ID LINETYPE_n_TEST
2476 ADD 1 2476 &BaseNode.isAddChanged()
2556 DISCONTINUED 2 2556 &BaseNode.isDeleteChanged()
2477 CHANGE 3 2477 &BaseNode.isValueChanged()
2516 MOVE 4 2516 &BaseNode.isLocationChanged()
2560 SUSPEND 5 2560 Use Cases.Suspend
2570 RESUME 6 2570 Resumed?

Implementing the TSO Configurator Extensions
11-18 Oracle Telecommunications Service Ordering Process Guide
To remedy this situation, the Line Type Configurator Extension allows you to define Line Type data for a node by specifying only the path to a node that already has the required Property definitions. This method is called indirection, since the Property definitions for a node are obtained indirectly, from another node.
1. In the Main area of the Repository, define a single Text Property, named LINETYPE_CHECKLIST, with no default value.
2. Determine which of your trackable nodes require Property definitions for Line Types that differ from the set that you have defined on the originally selected node.
3. In one of those differing nodes, define the Property pairs for Line Types, as described in Setup in Oracle Configurator Developer Using Properties on page 11-13.
If the differing node is a trackable descendant of the originally selected node, then at runtime it inherits the Line Type-related User Properties of that ancestor node. Consequently, you do not have to define a full set of Property pairs on the differing child node; you only have to define the Property pairs with values that differ from the original node’s. Any Property definitions that are defined locally on a node override the inherited definitions.
4. In one of the other differing nodes, add the User Property LINETYPE_CHECKLIST that you defined.
5. For the value of the Property LINETYPE_CHECKLIST, enter the relative node path from the nearest parent BOM Model to the differing node that carries the Properties that you defined in steps 3.
6. Expanding on the explanation under step 3, the Properties of the node specified by LINETYPE_CHECKLIST are inherited. If you need to further redefine the Properties for one of the differing nodes, you only have to define the Property pairs with values that differ from the checklist node. These local values override the inherited ones.
7. Repeat steps 4 through 6 for all of the other differing nodes in your Model.
Define the Configurator Extension RuleThis section describes how to define a Configurator Extension Rule in Oracle Configurator Developer for use with the Line Type Configurator Extension. For details about defining Configurator Extension Rules, see the Oracle Configurator Developer User’s Guide.
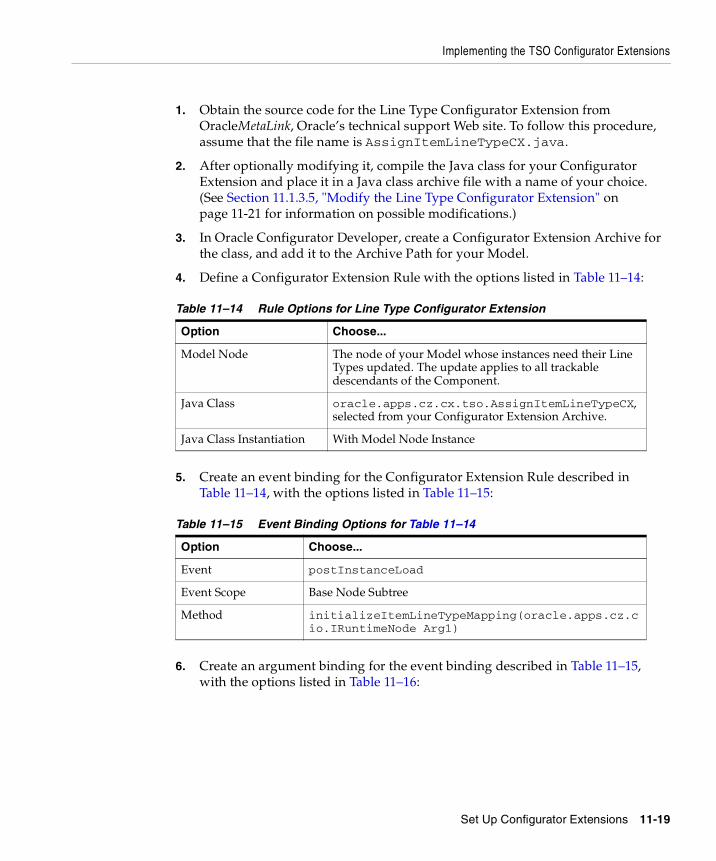
Implementing the TSO Configurator Extensions
Set Up Configurator Extensions 11-19
1. Obtain the source code for the Line Type Configurator Extension from OracleMetaLink, Oracle’s technical support Web site. To follow this procedure, assume that the file name is AssignItemLineTypeCX.java.
2. After optionally modifying it, compile the Java class for your Configurator Extension and place it in a Java class archive file with a name of your choice. (See Section 11.1.3.5, "Modify the Line Type Configurator Extension" on page 11-21 for information on possible modifications.)
3. In Oracle Configurator Developer, create a Configurator Extension Archive for the class, and add it to the Archive Path for your Model.
4. Define a Configurator Extension Rule with the options listed in Table 11–14:
5. Create an event binding for the Configurator Extension Rule described in Table 11–14, with the options listed in Table 11–15:
6. Create an argument binding for the event binding described in Table 11–15, with the options listed in Table 11–16:
Table 11–14 Rule Options for Line Type Configurator Extension
Option Choose...
Model Node The node of your Model whose instances need their Line Types updated. The update applies to all trackable descendants of the Component.
Java Class oracle.apps.cz.cx.tso.AssignItemLineTypeCX, selected from your Configurator Extension Archive.
Java Class Instantiation With Model Node Instance
Table 11–15 Event Binding Options for Table 11–14
Option Choose...
Event postInstanceLoad
Event Scope Base Node Subtree
Method initializeItemLineTypeMapping(oracle.apps.cz.cio.IRuntimeNode Arg1)

Implementing the TSO Configurator Extensions
11-20 Oracle Telecommunications Service Ordering Process Guide
7. Create a second event binding for the Configurator Extension Rule described in Table 11–14, with the options listed in Table 11–17:
8. Create an argument binding for the event binding described in Table 11–17, with the options listed in Table 11–18:
9. Generate logic for your Model, to reflect the addition of the Configurator Extension Rule.
10. Create or refresh a User Interface for your Model.
11. Test the Configurator Extension from Configurator Developer by choosing the Test Model button, then choosing the Model Debugger, or the User Interface that you generated.
Table 11–16 Argument Binding Options for Table 11–15
Option Choose...
Argument Type oracle.apps.cz.cio.IRuntimeNode
Argument Name Arg1
Argument Specification Event Parameter
Binding newNode
Table 11–17 Event Binding Options for Table 11–14
Option Choose...
Event onConfigLineType
Event Scope Global
Method assignItemLineType(oracle.apps.cz.cio.IRuntimeNode Arg1)
Table 11–18 Argument Binding Options for Table 11–17
Option Choose...
Argument Type oracle.apps.cz.cio.IRuntimeNode
Argument Name Arg1
Argument Specification System Parameter
Binding Base Node of Rule

Implementing the TSO Configurator Extensions
Set Up Configurator Extensions 11-21
11.1.3.4 Effects of the Line Type Configurator ExtensionThis section describes, at a high level, the operation of the Line Type Configurator Extension, so that you can better understand its effects on your configuration.
The method initializeItemLineTypeMapping() is bound to the event postInstanceLoad, so it is triggered immediately after a component instance or other associated node is created, or brought into the configuration. This method validates that all the Line Type-related Property data is correct, and then initializes initializes the mapping structures that will cache this data for use by the assignItemLineType() method.
The method assignItemLineType() is bound to the event onConfigLineType, so it is triggered when the Summary window appears and displays the Line Type values, or when the current configuration is saved, such as when the user clicks the Finish button at the end of a configuration session. This method proceeds recursively through each BOM entity in the configuration, assigning the Line Types, based on the Property data cached by the method initializeItemLineTypeMapping(). Line Types can be assigned to both trackable and non-trackable BOM nodes.
Because of the interdependency of the two methods, it is essential to perform the event binding for both of them.
11.1.3.5 Modify the Line Type Configurator ExtensionIf you modify your Model in accordance with the steps in Section 11.1.3.3, "Setup for the Line Type Configurator Extension" on page 11-12, then you should not need to modify the Line Type Configurator Extension.
11.1.4 Use Configuration Attributes with Install Base (IB)The IBAttribute Configurator Extension to allow end users to collect attributes of configured Components.
The IBAttribute Configurator Extension is recommended, but not required for implementing the reconfiguring of installed configurations of Container Models.
This section describes a Configurator Extension and associated methodology for using configuration attributes.

Implementing the TSO Configurator Extensions
11-22 Oracle Telecommunications Service Ordering Process Guide
11.1.4.1 Purpose of the IBAttribute Configurator ExtensionThe IBAttribute Configurator Extension enables an end user of the runtime Oracle Configurator to collect the values of attribute Features that have been set on the trackable children of a runtime Component instance. When the configuration is saved, the configuration attribute values are automatically written to the pending transactions for Oracle Install Base.
11.1.4.2 Example Code for the IBAttribute Configurator ExtensionFor the full source code of the IBAttribute Configurator Extension, consult OracleMetaLink, Oracle’s technical support Web site.
11.1.4.3 Setup for the IBAttribute Configurator ExtensionThis section describes what you must do before using the IBAttribute Configurator Extension. For clarity, the phases of setup are described separately:
■ General Setup
■ Define the Configurator Extension Rule
General SetupThis section describes how to set up elements of the Oracle Applications database for use with the IBAttribute Configurator Extension. For background and details, see the Oracle Configurator Implementation Guide.
1. For trackable items, map extended attributes in Oracle Install Base to configuration attribute Features and Properties in Configurator Developer.
For more information, see Section 10.6.3, "Map Install Base Extended Attributes to CZ Attributes in Developer" on page 10-24.
Note: Implementing the IBAttribute Configurator Extension assumes that you are using a User Interface generated with the HTML-based version of Oracle Configurator Developer. If you want to use a DHTML User Interface, you must implement a Functional Companion as described in a previous release of this document. Functional Companions do not have all the functionality of Configurator Extensions.

Implementing the TSO Configurator Extensions
Set Up Configurator Extensions 11-23
Define the Configurator Extension RuleThis section describes how to define a Configurator Extension Rule in Oracle Configurator Developer for use with the IBAttribute Configurator Extension. For details about defining Configurator Extension Rules, see the Oracle Configurator Developer User’s Guide.
1. Obtain the source code for the IBAttribute Configurator Extension from OracleMetaLink, Oracle’s technical support Web site. To follow this procedure, assume that the file name is IBAttributeCX.java.
Also obtain the source code for the Optional Attribute Configurator Extension from OracleMetaLink. To follow this procedure, assume that the file name is OptionalAttributeCX.java.
2. After optionally modifying the IBAttribute Configurator Extension, compile it and the unmodified Optional Attribute Configurator Extension, and place them in a Java class archive file with a name of your choice. (See Section 11.1.4.5 on page 11-26 for information on possible modifications to the IBAttribute Configurator Extension.)
3. Create a Configurator Extension Archive for these classes, and add it to the Archive Path for your Model.
4. Define a Configurator Extension Rule with the options listed in Table 11–19.
5. Create an event binding for the Configurator Extension Rule with the options listed in Table 11–20:
Table 11–19 Rule Options for IBAttribute Configurator Extension
Option Choose...
Model Node The node of your Model whose instances need their attributes collected. The Configurator Extension searches all descendants of the Component for attributes.
Java Class oracle.apps.cz.cx.tso.IBAttributeCX, selected from your Configurator Extension Archive.
Java Class Instantiation With Model Node Instance
Table 11–20 Event Binding Options for IBAttribute Configurator Extension
Option Choose...
Event onInstanceLoad

Implementing the TSO Configurator Extensions
11-24 Oracle Telecommunications Service Ordering Process Guide
6. Create an argument binding for the event binding, with the options listed in Table 11–21:
7. Generate logic for your Model, to reflect the addition of the Configurator Extension Rule.
8. Create or refresh a User Interface for your Model.
9. Test the Configurator Extension from Configurator Developer by choosing the Test Model button, then choosing the Model Debugger, or the User Interface that you generated.
To use the Test Model button in Configurator Developer, you must log in with an Oracle Applications ID and password. This is because the IBAttribute Configurator Extension uses AppsContext for connecting to the database. This requires a login that generates an ICX session ticket. Therefore, your initialization message must pass the parameters database_id (instead of alt_database_name) and icx_session_ticket (instead of gwyuid, user, and pwd).
Optional Instances SetupIt is likely that your model structure contains instantiable components under the trackable root node. If these components have attributes that you need to collect, then you must add the Optional Attribute Configurator Extension to your Model.
Event Scope Base Node Subtree
Method onLoad(oracle.apps.cz.cio.RuntimeNode Arg1)
Table 11–21 Argument Binding Options for IBAttribute Configurator Extension
Option Choose...
Argument Type oracle.apps.cz.cio.IRuntimeNode
Argument Name Arg1
Argument Specification Model Node or Property
Binding The trackable root node of your Model whose instances need their attribute data collected.
Table 11–20 (Cont.) Event Binding Options for IBAttribute Configurator Extension
Option Choose...

Implementing the TSO Configurator Extensions
Set Up Configurator Extensions 11-25
1. The compiled class for the Optional Attribute Configurator Extension should already be contained in the Configurator Extension Archive that you created for the IBAttribute Configurator Extension’s class, as described in Define the Configurator Extension Rule on page 11-23.
2. Repeat the steps for defining a Configurator Extension Rule, event binding, and argument binding described in Define the Configurator Extension Rule on page 11-23, with the following differences:
■ For Java Class, select OptionalAttributeCX.
■ For Model Node, select the instantiable component under the trackable root node whose attributes you want to collect.
11.1.4.4 Effects of the IBAttribute Configurator ExtensionThis section describes, at a high level, the operation of the IBAttribute Configurator Extension, so that you can better understand its effects on your configuration.
The IBAttribute Configurator Extension runs whenever a trackable instance is loaded. For each trackable BOM child of the instance, the Configurator Extension:
■ Collects configuration attribute information from the Properties.
■ Finds the attribute Feature.
■ Associates the attribute with the RuntimeNode.
■ Propagates the attribute to the node’s children based on the propagation mode. The IBAttribute Configurator Extension associates attributes with a RuntimeNode by using the public class Attribute, which is part of the CIO.
Finally, the attribute values are saved to the CZ_CONFIG_EXT_ATTRIBUTES table when the configuration is saved. The CZ_CONFIG_EXT_ATTRIBUTES table is a temporary holder for the attribute values while the attribute details are pending for acceptance in Install Base. At this point, the attributes become part of the transaction details in the transaction that is pending for acceptance into Oracle Install Base. When the transaction is accepted (by installation through SFM), the configuration attribute values become part of the installed instance.
See Section 11.2.2.1, "Attribute Synchronization" on page 11-31 for important information about the synchronization of attribute data with Install Base when Configurator reconfigures an instance.

Implementing the TSO Configurator Extensions
11-26 Oracle Telecommunications Service Ordering Process Guide
11.1.4.5 Modify the IBAttribute Configurator ExtensionFor information on using the classes and methods of the Configuration Interface Object (CIO), see the Oracle Configurator Extensions and Interface Object Developer’s Guide.
If you modify your Model in accordance with the steps in Section 11.1.4.3, "Setup for the IBAttribute Configurator Extension" on page 11-22, then you do not need to modify the IBAttribute Configurator Extension.
When modifying your Model, you must follow the conventions for naming Properties described in the Oracle Configurator Methodologies documentation chapter on configuration attributes. Otherwise, the IBAttribute Configurator Extension will not be able to collect values for the attribute Features. To use different Property names, you must modify the character strings used to match Property names, so that they match your own Property names. The following example--Example 11–1--shows typical matching strings.
Example 11–1 Strings for Property Names in the Configurator Extension
... private void getAttributes(RuntimeNode node) {... if (prop.getName().startsWith("ATTR_")) {
... int beginningIndex = new String("ATTR_"). length(); StringTokenizer tokens = new StringTokenizer(name.substring(beginningIndex), "_", false);... if (name.endsWith("PATH")) {... } else if (name.endsWith("MODE")) {
... } else if (name.endsWith("NAME")) {... } else if (name.endsWith("GROUP")) {... if (prop.getName().startsWith("ATTR_NAME")) {...

Using the Oracle Configuration Interface Object (CIO)
Set Up Configurator Extensions 11-27
11.2 Using the Oracle Configuration Interface Object (CIO)For information about using this API, see the Oracle Configurator Extensions and Interface Object Developer’s Guide.
Main topics in this section include:
■ Section 11.2.1, "Reconfigure Installed Configurations" on page 11-27
■ Section 11.2.2, "Event-Driven Behavior for Configuration" on page 11-30
11.2.1 Reconfigure Installed ConfigurationsIn addition to single-instance configurations, Oracle Configurator can create and maintain configurations that consist of multiple instances of trackable configurable Components. That is, the instances can be joined into a network by creating connections. For more information about instance configurations, see the Oracle Configurator Extensions and Interface Object Developer’s Guide.
Each Component instance has a unique Instance Header ID identifier, stored as CZ_CONFIG_ITEMS.INSTANCE_HDR_ID. You can save, restore, revise, and save again a Component instance. Each saved instance revision has a non-unique Instance Revision Number identifier, stored as CZ_CONFIG_ITEMS.INSTANCE_REV_NBR. The unique combination of Header ID and Revision Number identifies an instance record. For more information on identifying configurations, see the Oracle Configurator Implementation Guide.
Configurations can include multiple Component instances, and you can configure the same Component instance in multiple configuration sessions.
In Oracle Install Base, you can track the baseline and revised Component instances in a configuration. For information about how to determine differences between the baseline for a Component in Install Base and the revised instance of that Component, see Section 11.2.1.1, "Identify Changes to a Configuration" on page 11-27.
For information on creating configuration models that support reconfiguration, see Section 10.2, "Create the Configuration Model" on page 10-18.
11.2.1.1 Identify Changes to a ConfigurationYou can use the set of methods appearing in Table 11–22, "Methods for Identifying Changes Against the Baseline" on page 11-28 to identify the types of changes that occurred during a configuration session between the baseline revision of the trackable Component instance (as installed in Oracle Install Base when the

Using the Oracle Configuration Interface Object (CIO)
11-28 Oracle Telecommunications Service Ordering Process Guide
configuration session began) and the current Component instance (which is being reconfigured).
The methods appearing in Table 11–22, "Methods for Identifying Changes Against the Baseline" are all members of the IRuntimeNode interface.
ExamplesFor a fragmentary example of how to use one of these methods, see Example 11–2, "Identifying a Change Against the Baseline".
Example 11–2 Identifying a Change Against the Baseline
...
Table 11–22 Methods for Identifying Changes Against the Baseline
Method Returns TRUE If...
isIBNodeOrDescendantChanged() Any of the other methods listed here return TRUE.
isAddChanged() This node has been added in this session, meaning that it is not present in the installed revision.
isDeleteChanged() This node has been deleted in this session and was present in the installed revision.
isValueChanged() This node's value has changed from that of the installed revision.
isTargetChanged() This Connector's target has changed from that of the installed revision.
isAttributeChanged() Any of this node's configuration attributes have changed from those of the latest installed revision.
A transient attribute is considered changed only if there is a change to value of the attribute Feature.
isLocationChanged() This node's Location or Location Type Code has changed from that of the installed revision.
isNameChanged() This instance's name has changed from that of the installed revision.
isChildChanged() Any descendant of this node has changed from that of the installed revision.

Using the Oracle Configuration Interface Object (CIO)
Set Up Configurator Extensions 11-29
public boolean wasAdded(RuntimeNode node) { boolean added = node.isAddChanged(); return added;}...
For additional explanation, see Section 11.1.3, "Specify the Line Type" on page 11-11.
11.2.1.2 Access Discontinued ItemsTo access both current and discontinued items in a Telecommunications Services Ordering solution, you must use the following alternate signatures for these methods:
■ RuntimeNode.getChildByName(String name, int type)
■ RuntimeNode.getChildByID(int ID, int type)
■ RuntimeNode.getChildByPersistentID(int ID, int type)
Each signature includes a second argument, type. The possible values for type are:
■ RuntimeNode.CURRENT_OR_DISCONTINUED_CHILD
■ RuntimeNode.CURRENT_CHILD
■ RuntimeNode.DISCONTINUED_CHILD
The default type is CURRENT_CHILD.
11.2.1.3 Access InstancesTo access trackable Component instances in a Telecommunications Services Ordering solution, use one of the following methods:
■ Use Component.getInstanceNumberLong() to get the Instance Header ID of a trackable Component instance. If the Component instance is not trackable, this method returns the Instance Number. If the Component is a mandatory Component (Minimum Instances and Maximum Instances are both 1), this method returns 1.
■ Use ComponentSet.getChildByInstanceNumber(int instNum) to get a trackable Component instance by passing an Instance Header ID.
■ If you have set the name for a Component instance--by using Component.setInstanceName(String newName)--then you can get that instance by the name you set, by using

Using the Oracle Configuration Interface Object (CIO)
11-30 Oracle Telecommunications Service Ordering Process Guide
ComponentSet.getChildByName(String userSetName) on the ComponentSet that includes the instance.
■ In order to access both current and discontinued Component instances, use the following alternate signature: ComponentSet.getChildByInstanceNumber(int instNum, int type). For type, specify one of the values listed under Section 11.2.1.2, "Access Discontinued Items" on page 11-29 (such as CURRENT_CHILD).
11.2.1.4 Report on Link ItemsIf the link flag on a node is set by Oracle Configurator, then this marks it as a link. Links are trackable, but do not have a location. See Section 10.6.5, "Schema Change for Link Items" on page 10-28 for database details.
The CIO reports as unsatisfied any model instance that is:
■ A trackable root
■ Does not have a location assigned
The following methods report whether a node is a link:
■ BomInstance.isIBLinkItem()
■ ITrackableInstance.isIBLinkItem()
11.2.2 Event-Driven Behavior for ConfigurationThe use of events to trigger Configurator Extensions is a notable feature of this release of Configurator. The TSO solution does not introduce any new events or restrict the use of existing events. However, there are some events with particular significance for TSO. Table 11–23 on page 11-31 lists these events. For details on Configurator Extension events, see the Oracle Configurator Developer User’s Guide.

Using the Oracle Configuration Interface Object (CIO)
Set Up Configurator Extensions 11-31
11.2.2.1 Attribute SynchronizationDuring the fulfillment phase of the TSO flow, end users can change the attributes of instances of trackable items. These changes are saved in Install Base, but are not kept as data in the saved configuration results. When Configurator reconfigures an instance, it synchronizes the attribute data for the item’s saved configuration with the latest attribute data from Install Base. This synchronization occurs in the following order relative to events listed in Table 11–23:
1. The onInstanceLoad event is dispatched.
2. Configurator synchronizes the attribute data in the saved configuration of an instance with the latest attribute data from Install Base (except for transient attributes).
3. The postInstanceLoad event is dispatched.
Table 11–23 Events Specially Related to TSO
Event Description Comments
onInstanceLoad Event dispatched when a Component instance or other associated node is created, or brought into the configuration.
This event is dispatched before synchronization of attribute data with Oracle Install Base.
The primary purpose of this event is for synchronizing attributes.
This event is specific to the TSO solution.
postInstanceLoad Event dispatched immediately after a Component instance or other associated node is created, or brought into the configuration.
This event is dispatched after synchronization of attribute data with Oracle Install Base.
This event is the best one to use for inspecting the instance before presenting it in the UI to end users.
This event is not specific to the TSO solution.

Using the Oracle Configuration Interface Object (CIO)
11-32 Oracle Telecommunications Service Ordering Process Guide
See Section 11.1.4, "Use Configuration Attributes with Install Base (IB)" on page 11-21 for background on how attribute values are assigned.
Transient attribute values are not restored during attribute synchronization. See Section 10.1.7.3, "About Transient Attributes" on page 10-14 for background.
11.2.2.2 Instance Name SynchronizationDuring reconfiguration, Configurator synchronizes the instance name for the item’s configuration with the latest instance name from Install Base. If you have changed the instance name during fulfillment, the name is restored when you reconfigure the instance in the runtime Configurator. The synchronization of instance names has the same relation to Configurator Extension events as the synchronization of attribute data described in Section 11.2.2.1, "Attribute Synchronization" on page 11-31.
11.2.2.3 Location SynchronizationDuring reconfiguration, Configurator synchronizes the location for the item’s configuration with the latest location from Install Base. If you have changed the location during fulfillment, the location is restored when you reconfigure the instance in the runtime Configurator. The synchronization of location has the same relation to Configurator Extension events as the synchronization of attribute data described in Section 11.2.2.1, "Attribute Synchronization" on page 11-31.
Note: If you create a Configurator Extension that depends on attribute data, ensure that you bind it to the proper event. If you are creating attribute data before fulfillment, choose onInstanceLoad. If you are restoring attribute data after fulfillment, choose postInstanceLoad.

Set Up Quoting 12-1
12Set Up Quoting
The main topics in this chapter are:
■ Section 12.1, "Summary of Reconfiguration" on page 12-2
■ Section 12.2, "Define Profile Options" on page 12-3
■ Section 12.3, "Set Up the Lines Page--HTML" on page 12-7
■ Section 12.4, "Set Up the Quote Lines Tab Pricing Region--Forms" on page 12-17
■ Section 12.5, "Design Tips" on page 12-21
Reference MaterialThis chapter describes setup tasks that you must perform to Oracle Quoting that are specific to the Oracle Telecommunications Service Ordering (TSO) solution. For more information on functionality, setting up, or using Oracle Quoting, refer to:
■ Section 3.2, "Oracle Quoting and Oracle Order Management" on page 3-3
■ Oracle Quoting Implementation Guide
■ Oracle Quoting User Guide
Before You BeginBefore you can set up Oracle Quoting for use with the Oracle Telecommunications Service Ordering solution, you must set up Oracle Advanced Pricing and Oracle Configurator. For more information, see:
■ Chapter 9, "Set Up Advanced Pricing"
■ Chapter 10, "Set Up Configurator and Customize the Solution"
■ Chapter 11, "Set Up Configurator Extensions"

Summary of Reconfiguration
12-2 Oracle Telecommunications Service Ordering Process Guide
12.1 Summary of ReconfigurationTo make use of reconfiguring services, you specify:
■ Profile Options
■ Additional Line Types
Profile OptionsTo make use of reconfiguring services, specify the following profile options.
■ ASO: Allow Quantity Updates for Component Item
■ ASO: Allow Quantity Updates for Top Level Model Item
■ *ASO: Configurator URL
■ ASO: Default IB Search Results
■ ASO: Default Install Base Relationship
■ *ASO: Default Ordered Quantity in OC UI
■ *ASO: Default Order Type
■ *ASO: Default Quote Status
■ ASO: Display Installed Base Attributes
■ ASO: Max Number of IB Search Results
■ *ASO: Use Network Container
■ * BOM: Configurator URL of UI Manager
■ OM: Sequential Numbering
For more information, see Section 12.2, "Define Profile Options" and Table 12–1, "Oracle Telecommunications Service Ordering Profile Options for Configurator".
Additional Line TypesYou can set up additional customized Line Types for reconfigurations.
For instructions on how to set up additional Line Types, refer to the steps for defining Transaction Types in the Oracle Order Management Suite Implementation Manual. For information on setting up the Line Type that ensures that orders pass into Oracle Service Fulfillment Manager, see the Oracle Service Fulfillment Manager Implementation Guide.
For more information on related TSO setup for Line Types, see:

Define Profile Options
Set Up Quoting 12-3
■ Section 11.1.3, "Specify the Line Type" on page 11-11
12.2 Define Profile OptionsThe following Oracle Quoting and Oracle Order Management profile options pertain to the Oracle Telecommunications Service Ordering (TSO) functionality. For a complete list of mandatory Oracle Quoting profile options, see the Oracle Quoting Implementation Guide.
■ ASO: Allow Quantity Updates for Component Item
This profile option:
– Determines whether users can change the quantity of a Component.
– Applies to both Forms and HTML.
If the setting is Yes, users can change component quantity.
If the setting is No, users cannot change component quantity.
You must set this option to No to prevent the user from changing the quantity of Component items of a Container Model.
■ ASO: Allow Quantity Updates for Top Level Model Item
This profile option:
– Determines whether users can change the quantity of a top-level model product. You must set this option to No to prevent users from changing the quantity of the network container.
– Applies to both Forms and HTML.
If the setting is Yes, users can change the quantity of top-level model products.
If the setting is No, users cannot update the quantity of top-level model products.
If the setting is null, the default value is Yes.
■ *ASO: Configurator URL
This profile option:
Note: Profile options with an asterisk are mandatory for the Oracle Telecommunications Service Ordering functionality.

Define Profile Options
12-4 Oracle Telecommunications Service Ordering Process Guide
– Specifies the URL for the Configurator window.
– Is mandatory if you use Oracle Configurator for product configurations.
– Applies only to Forms.
If the setting is null, there is no default value.
■ ASO: Default IB Search Results
This profile option:
– Determines if instances appear by default in the search results form.
– Applies only to Forms.
If the setting is None, no instances appear by default, and you must conduct a search in order to view any results.
If the setting is null, the default value is None.
■ ASO: Default Install Base Relationship
This profile option:
– Determines the default Install Base relationship for Relationship Type menu on the Install Base Relationships page.
– Applies to both Forms and HTML.
If the setting is Component_Of, the Relationship Type default value is Component-of.
If the setting is Connected_To, the Relationship Type default value is Connected-To.
If the setting is null, the default value is Component_Of.
■ *ASO: Default Ordered Quantity in OC UI
This profile option:
– Determines the default quantity that appears in the QTY field of the Oracle Telecommunications Service Ordering window.
– Applies to both Forms and HTML.
If the setting is null, a default quantity of 1 applies.
You must set this value to 1 if you are using a Container Model.
■ *ASO: Default Order Type

Define Profile Options
Set Up Quoting 12-5
This profile option:
– Determines how to process the order in Oracle Order Management and Oracle Service Fulfillment Manager. You set up order types in Oracle Order Management, and you must include workflow to pass order to Oracle Service Fulfillment Manager.
– Applies to both Forms and HTML.
If the setting is null, there is no assumed default value.
■ *ASO: Default Quote Status
This profile option:
– Determines the default status of a new quote.
– Applies to both Forms and HTML.
■ ASO: Display Installed Base Attributes
This profile option:
– Determines whether or not attributes appear in the Installed Base search results for reconfiguration and trade-ins.
– Applies only to Forms.
If the setting is Yes, the attributes appear in the search results.
If the setting is No, the attributes do not appear in the search results.
If the setting is null, the default value is No.
■ ASO: Max Number of IB Search Results
This profile option:
– Determines the number of instances that can appear at one time in the component or connection details.
– Applies only to Forms.
If the setting is null, the default value is 100.
■ *ASO: Use Network Container
This profile option:
– Determines if network container functionality is enabled.
– Applies to both Forms and HTML.

Define Profile Options
12-6 Oracle Telecommunications Service Ordering Process Guide
If the setting is Yes, you can reconfigure telecommunications services.
If the setting is No, you cannot reconfigure telecommunications services.
If the setting is null, the default value is No.
■ * BOM: Configurator URL of UI Manager
This profile option:
– Specifies the URL for the Configurator window.
– Is mandatory if you use Oracle Configurator for product configurations.
– Applies only to HTML.
If the setting is null, there is no default value.
■ OM: Sequential Numbering
This profile option:
– Determines if order numbers are automatically generated by Oracle Order Management or if users must enter them. For more information, see the Oracle Order Management Suite Implementation Manual.
– Applies to both Forms and HTML.
Note: Oracle Quoting only supports use of automatically generated order numbers.
Table 12–1 shows you the Profile Options, Default Value, Application Level, and Suggested Setting if you are using TSO functionality.
Table 12–1 Oracle Telecommunications Service Ordering Profile Options for Configurator
Profile Option Default Value Forms or HTML Application Level
Suggested setting if using Telecommunication Services Functionality
ASO: Allow Quantity Updates for Component Item
Yes Both Site, Application No
ASO: Allow Quantity Updates for Top Level Model Item
Yes Both Site, Application No
*ASO: Configurator URL N/A Forms Site, Application, Responsibility, User
N/A

Set Up the Lines Page--HTML
Set Up Quoting 12-7
12.3 Set Up the Lines Page--HTMLOracle Quoting allows customization of certain aspects of the Lines page to meet your needs. The following list shows the suggested setup of the Lines page when using Oracle Telecommunications Service Ordering.
■ Select
■ Line
ASO: Default IB Search Results None Forms Site, Application, Responsibility, User
All, if small number of instances
None, if large number of instances
ASO: Default Install Base Relationship
Component-Of Both Site, Application Component-Of
*ASO: Default Ordered Quantity in OC UI
1 Both Site, Application, Responsibility, User
1
*ASO: Default Order Type N/A Both Site, Application, Responsibility, User
N/A
*ASO: Default Quote Status Draft Both Site, Application Draft
ASO: Display Installed Base Attributes
No Forms Site Yes
ASO: Max Number of IB Search Results
100 Forms Site Depends on customer’s performance requirements
*ASO: Use Network Container No Both Site, Responsibility Yes
* BOM: Configurator URL of UI Manager
N/A HTML Site, Application, Responsibility, User
N/A
OM: Sequential Numbering Both Site, Application, Responsibility
Always Used
Table 12–1 Oracle Telecommunications Service Ordering Profile Options for Configurator (Cont.)
Profile Option Default Value Forms or HTML Application Level
Suggested setting if using Telecommunication Services Functionality

Set Up the Lines Page--HTML
12-8 Oracle Telecommunications Service Ordering Process Guide
■ Action
■ Instance Name
■ Product
■ Description
■ Additional Information
■ UOM
■ Quantity
■ Recurring List
■ Recurring Adjustment
■ Recurring Net
Steps1. Expose the following columns.
– Line Type
– Instance Name
– Charges
For more information, see Section 12.3.1, "Display or Hide Columns--HTML".
2. Hide the following column.
– Total Price
For more information, see Section 12.3.1, "Display or Hide Columns--HTML".
3. Rename columns.
For more information, see Section 12.3.3, "Edit Column Labels--HTML".
Table 12–2 shows the original and suggested column names on the Line Page.
Table 12–2 Suggested Renaming of Columns on the Line Page
Original Column Name Suggested Name
Line Type Action.
Instance Name Instance Name or Description.
Use this field to enter the name of the configured instance.

Set Up the Lines Page--HTML
Set Up Quoting 12-9
4. Change the column sequence.
For more information, see Section 12.3.4, "Edit Column Sequence--HTML".
You can disable Line Actions that users cannot perform on reconfigured telecommunications service products. For more information, see Section 12.3.5, "Enable or Disable Line-Level Actions or Table-Level Buttons--HTML". You can disable the following Actions:
■ Split Line
■ Add Service
Table 12–3 shows a mapping of the column name to the attribute name.
Unit List Price Recurring List.
The price list includes the recurring price of a service. The recurring price of the service appears here.
Unit Adjustment Percent Recurring Adjustment
Unit Selling Price Recurring Net
Charges One Time Charges.
This column displays the applicable fixed charges for the quote line.
This name change should take place only if you chose modeling option 1. For more information, see Modeling Options on page 3-6.
Note: After you change the seeded values, you cannot automatically reset them back to their original definitions.
Table 12–3 Column to Attribute Mapping
Column Name Attribute Name
Select QOT_SELECT
Product QOT_PRODUCT
Description QOT_DESCRIPTION
Table 12–2 Suggested Renaming of Columns on the Line Page (Cont.)
Original Column Name Suggested Name
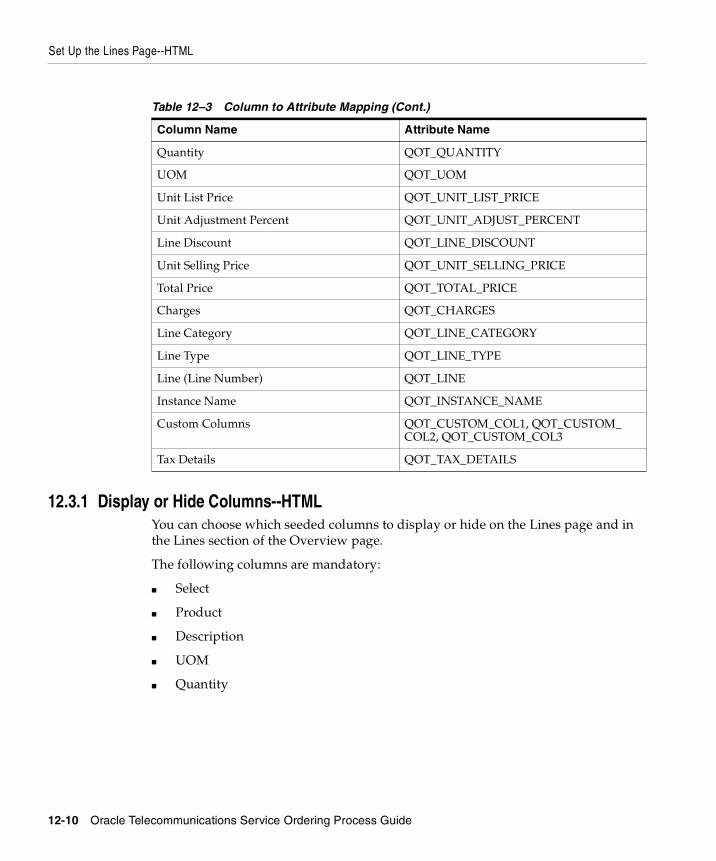
Set Up the Lines Page--HTML
12-10 Oracle Telecommunications Service Ordering Process Guide
12.3.1 Display or Hide Columns--HTMLYou can choose which seeded columns to display or hide on the Lines page and in the Lines section of the Overview page.
The following columns are mandatory:
■ Select
■ Product
■ Description
■ UOM
■ Quantity
Quantity QOT_QUANTITY
UOM QOT_UOM
Unit List Price QOT_UNIT_LIST_PRICE
Unit Adjustment Percent QOT_UNIT_ADJUST_PERCENT
Line Discount QOT_LINE_DISCOUNT
Unit Selling Price QOT_UNIT_SELLING_PRICE
Total Price QOT_TOTAL_PRICE
Charges QOT_CHARGES
Line Category QOT_LINE_CATEGORY
Line Type QOT_LINE_TYPE
Line (Line Number) QOT_LINE
Instance Name QOT_INSTANCE_NAME
Custom Columns QOT_CUSTOM_COL1, QOT_CUSTOM_COL2, QOT_CUSTOM_COL3
Tax Details QOT_TAX_DETAILS
Table 12–3 Column to Attribute Mapping (Cont.)
Column Name Attribute Name

Set Up the Lines Page--HTML
Set Up Quoting 12-11
The following seeded columns are optional:
■ Unit List Price
■ Unit Adjustment Percent
■ Line Discount
■ Unit Selling Price
■ Total Price
■ Charges
■ Line Category
■ Line Type
■ Line Number
■ Instance Name
■ Link to Customer Page
■ Tax Details
12.3.2 Hide a Seeded Column--HTMLYou can hide a seeded column if you do not want a column to appear on the Lines page or in the Lines section of the Overview page.
ModuleOracle Applications (Forms)
Note: Although you can deselect the Node Display check box for the mandatory columns, they will still appear in the Oracle Quoting user interface. You cannot disable the preceding columns.
Note: If you set profile option ASO: Calculate Price to Manual, the Line Discount field does not appear even if you have enabled it and the user has the ability to perform price overrides.

Set Up the Lines Page--HTML
12-12 Oracle Telecommunications Service Ordering Process Guide
ResponsibilityApplications Developer Common Modules
NavigationDefine Regions...the Define Regions form
Steps1. From the View menu, choose Query by Example > Enter.
2. To hide or unhide a column on the Lines page, enter QUOTELINEDETAILS_MACD in the Region ID field.
3. In the Region Name column, enter QUOTELINEDETAILS_MACD.
4. From the View menu, choose Query by Example > Run.
5. Select Region Items.
The Region Items form appears.
6. To hide a seeded column, deselect the Node Display check box for the corresponding column.
Selecting this check box displays the column.
7. Click the Save icon.
A confirmation message appears with your request identification.
8. Bounce Apache.
When you login the next time, the changes take effect.
12.3.3 Edit Column Labels--HTMLYou can edit default text labels for each column.
Table 12–2 on page 12-8 shows the recommended columns and labels for the Telecommunications Services Ordering solution.
Note: Although you can deselect the Node Display check box for the mandatory columns, they will still appear in the Oracle Quoting user interface. You cannot disable these columns.

Set Up the Lines Page--HTML
Set Up Quoting 12-13
The following steps describe how to specify the order in which columns appear in the HTML version of Oracle Quoting.
ModuleOracle Applications (Forms)
ResponsibilityApplications Developer Common Modules
NavigationDefine Regions...the Define Regions form
Steps1. From the View menu, choose Query by Example > Enter.
2. In the Region ID column, enter QUOTELINEDETAILS_MACD.
3. In the Region Name column, enter QUOTELINEDETAILS_MACD.
4. From the View menu, choose Query by Example > Run.
5. Select Region Items.
The Region Items form appears.
6. To change a column’s label, enter a new value in the Long Label field of the corresponding line.
7. Click the Save icon.
A confirmation message appears with your request identification.
8. Bounce Apache.
When you login the next time, the changes take effect.
12.3.4 Edit Column Sequence--HTMLThe following steps describe how to specify the order in which columns appear in the HTML version of Oracle Quoting.
ModuleOracle Applications (Forms)

Set Up the Lines Page--HTML
12-14 Oracle Telecommunications Service Ordering Process Guide
ResponsibilityApplications Developer Common Modules
NavigationDefine Regions...the Define Regions form
Steps1. From the View menu, choose Query by Example > Enter.
2. In the Region ID column, enter QUOTELINEDETAILS_MACD.
3. In the Region Name column, enter QUOTELINEDETAILS_MACD.
4. From the View menu, choose Query by Example > Run.
5. Select Region Items.
The Region Items form appears.
6. To rearrange columns, change the values in the Sequence fields.
The lowest sequence number is the first column on the Lines page.
7. Click the Save icon.
A confirmation message appears with your request identification.
8. Bounce Apache.
When you login the next time, the changes take effect.
12.3.5 Enable or Disable Line-Level Actions or Table-Level Buttons--HTMLThrough customization, you determine which options or actions appear.
You can customize the Actions menu on the Lines and Overview pages in the Oracle Quoting HTML view.
You can also customize the buttons on the Lines page of the Oracle Quoting HTML view.
Note: To add new lookup codes to the lookup types, you must implement the logic. Oracle Quoting only supports the seeded out-of-box values.

Set Up the Lines Page--HTML
Set Up Quoting 12-15
Lookup codes control the menus. Table 12–4 shows the lookup types for action menus and buttons for the HTML version of Oracle Quoting.
The following steps describe how to enable or disable line-level actions or table-level buttons in the HTML version of Oracle Quoting.
ModuleOracle Applications (Forms)
ResponsibilityQuoting Sales Manager
PrerequisitesThe lookup code must be extensible.
NavigationQuick Codes
Steps1. Choose View > Query by Example > Enter.
Table 12–4 Lookup Types for Action Menus and Buttons--HTML
Lookup Type This lookup type determines...
ASO_LINE_ITEM_ACTION ...which actions appear on the Lines page Actions menu.
ASO_LINE_ACTION ...which table-level buttons appear on the Lines page.
ASO_QUOTE_ACTION ...which actions appear in the Overview page Actions menu.
ASO_IB_ACTION_TYPES ...which actions are available on the Search and Select: Install Base Product page.
ASO_PRODUCT_SOURCE ...which sources are available when performing a product search.
ASO_IB_RELATIONSHIP_TYPES ...which Install Base relationship types are available.
ASO_FORMS_ACTIONS ...which actions appear in the Actions menu on the main Quoting form.

Set Up the Lines Page--HTML
12-16 Oracle Telecommunications Service Ordering Process Guide
2. Enable or disable actions in the HTML version of Oracle Quoting:
a. To enable the Add to Model Item From Install Base action, enter ASO_LINE_ITEM_ACTION in the Type field.
b. To enable the Reconfigure action, enter ASO_IB_ACTION_TYPES in the Type field.
c. To enable the Remove Product action, enter ASO_LINE_ITEM_ACTION in the Type field.
d. To enable the Connected-To option on the Relationships page, enter ASO_IB_RELATIONSHIP_TYPES in the Type field.
e. To disable the Add Service or Split Line actions, enter ASO_LINE_ACTION in the Type field.
f. Choose View > Query by Example > Run.
The record appears.
g. Locate the code to enable and select the Enabled check box:
* ADDIB: Enable the Add to Model Item from Install Base action.
* RECONFIG: Enable the Reconfigure action.
* REMOVEPROD: Enable the Remove Product action.
* CONNECTED-TO: Enable the Connected-To option.
h. To disable the lookup code, deselect the check box:
* SPLIT: Disable Split Line action
* ADDSVC: Disable Add Service action
3. Save your work.
12.3.6 Change Default Number of Rows--HTMLA user can search Install Base to select product instances for reconfiguration. Based on the specified search criteria in the Search and Select: Installed Base Product page, a list of search results appears.
If the number of rows resulting from the search exceeds one page, the user is restricted to selecting items only from one search results page. The user can select products from other pages for reconfiguration by using the Add To Model from Installed Base line action. For more information, see Section 14.1.6, "Add to Container Model from Install Base--HTML" on page 14-11.

Set Up the Quote Lines Tab Pricing Region--Forms
Set Up Quoting 12-17
You can also increase the number of rows that appear after a search so that the user can select more products for reconfiguration from one search results page. This section describes how to change the default number of rows appearing in the Oracle Quoting application.
The following steps describe how to change the default number of rows in the HTML version of Oracle Quoting.
ModuleOracle Applications (Forms)
ResponsibilitySystem Administrator
NavigationProfile > System
Steps1. On the Find System Profile Values form, select the Application check box
2. In the Application field, enter Oracle Quoting.
3. In the Profile field, enter JTF_PROFILE_DEFAULT_NUM_ROWS.
4. Click the Find button.
The System Profile Values page appears.
5. In the Application column, enter the number of default rows that you want to display.
6. Save your work.
7. Bounce apache with no clear cache to view the change in Oracle Quoting.
12.4 Set Up the Quote Lines Tab Pricing Region--FormsThe Forms version of Oracle Quoting uses Oracle Applications Folder technology to allow you to customize the Quote Lines tab. When you make changes to an existing folder, you can save the changes to a new folder or the same folder.
The following list shows an example of how you can set up the Quote Lines tab Pricing region when you are using Telecommunications Service Ordering solution.

Set Up the Quote Lines Tab Pricing Region--Forms
12-18 Oracle Telecommunications Service Ordering Process Guide
■ Line
■ Model Status
■ Product
■ Quantity
■ UOM
■ Description
■ Action
■ Instance Name
■ Recurring List
■ Recurring Adjustment %
■ Recurring Net
■ One Time Charges
You can change fields in the following ways:
■ Hide or Show
■ Move fields
■ Change field size
■ Rename Prompt
The following procedures describe how to set up the Quote Lines tab > Pricing region according to this model.
Steps1. Expose the following columns:
– Description
– Line Type
– Instance Name
Note: This is an example of how you can set up the Quoting Lines tab > Pricing region. Your setup may differ depending on your business needs.

Set Up the Quote Lines Tab Pricing Region--Forms
Set Up Quoting 12-19
– Charges
2. Hide the following columns:
– Unit Selling Price
– Unit Adjustment
3. Rename Columns.
Table 12–5 shows the original column names and the suggested names. The suggested renaming applies to all columns, except for Line Type, if you implement modeling option 1. For more information, see Modeling Options on page 3-6.
4. Place your cursor in a field on the form that you want customize and right-click or select an action from the Folder menu.
For information on hiding or showing a field, changing a prompt, changing the length of a field, moving a field, or saving a folder configuration, see the Oracle Application User’s Guide, Folders.
5. Save the folder configuration so that you can easily access it when using the Telecommunication Services Ordering solution.
Fields That You Cannot Hide--Forms OnlyTable 12–6 shows the specific fields in Forms that you cannot hide.
Table 12–5 Suggested Renaming of Columns in the Quote Lines Tab, Pricing Region
Original Column Name Suggested Name
Line Type Action
Total Price Recurring Net
Charges One Time Charges
Unit List Price Recurring List
Unit % Adjustment Recurring Adjustment %
Note: You should not hide mandatory fields.

Set Up the Quote Lines Tab Pricing Region--Forms
12-20 Oracle Telecommunications Service Ordering Process Guide
12.4.1 Enable or Disable Line-Level Actions--FormsThrough customization, you determine which actions appear.
You can customize the Actions menu on the main Quoting form in the Oracle Quoting Forms view.
Lookup codes control the menus. Table 12–7 shows the lookup types for action menus and buttons for the Forms version of Oracle Quoting.
ModuleOracle Applications (Forms)
ResponsibilityQuoting Sales Manager
Table 12–6 Fields That You Cannot Hide
Form Field
Quote Lines > Pricing Line
Quote Lines > Pricing Model Status
Quote Lines > Pricing Product
Quote Lines > Pricing Qty
Quote Lines > Pricing UOM
Note: To add new lookup codes to the lookup types, you must implement the logic. Oracle Quoting only supports the seeded out-of-box values.
Table 12–7 Lookup Types for Action Menus and Buttons--Forms
Lookup Type This lookup type determines...
ASO_IB_RELATIONSHIP_TYPES ...which Install Base relationship types are available.
ASO_FORMS_ACTIONS ...which actions appear in the Actions menu on the main Quoting form.

Design Tips
Set Up Quoting 12-21
PrerequisitesThe lookup code must be extensible.
NavigationQuick Codes
Steps1. Choose View > Query by Example > Enter.
2. Enable or disable actions in the Forms version of Oracle Quoting:
a. To enable the Remove Unchanged Components or Add to Installed Base Changes actions, enter ASO_FORMS_ACTION in the Type field.
b. Choose View > Query by Example > Run. The record appears.
c. Locate the code to enable and select the Enabled check box:
* REMOVE_UNCHANGED_COMPS: Removed Unchanged Components action.
* ADD_TO_INSTL_BASE_CHGS: Add to Install Base Changes action.
3. Save your work.
12.5 Design TipsConsider either of the following for the default Line Type:
■ An Oracle Configurator Functional Companion must always set the default Line Type.
■ The default Line Type should be blank in Oracle Quoting, and the Oracle Order Management defaulting rules in the order (as opposed to the quote) set the default Line Type.
Use the selectable columns feature to show the Line Type on the Quoting lines page and to rename columns, such as renaming Line Type to Action.
Use lookups to disable line and table-level actions that do not apply to the given implementation, such as Split Line, Add Service, ATP check, or Trade In option in Install Base searches.

Design Tips
12-22 Oracle Telecommunications Service Ordering Process Guide

Set Up Service Fulfillment Manager 13-1
13Set Up Service Fulfillment Manager
The main topics in this chapter are:
■ Section 13.1, "Create SFM Enabled Order Management Workflow Header Process" on page 13-3
■ Section 13.2, "Create SFM Enabled Order Management Workflow Line Process"
■ Section 13.3, "Add Function for Menu Notifications" on page 13-5
■ Section 13.4, "Create a PL/SQL Procedure That Updates a Certain Workitem Parameter" on page 13-6
■ Section 13.5, "Create Workflow Process" on page 13-7
■ Section 13.6, "Define Work Item" on page 13-9
■ Section 13.7, "Map Work Item to Item and Action (Line Transaction Type) Combination" on page 13-10
■ Section 13.8, "Enable Order Cancellation" on page 13-11
■ Section 13.9, "Cancel an Order" on page 13-13
■ Section 13.10, "Design Tips" on page 13-14
Reference MaterialThis chapter describes setup tasks that you must perform to Oracle Service Fulfillment Manager that are specific to the Oracle Telecommunications Service Ordering (TSO) solution. For more information on functionality, setting up, or using Oracle Service Fulfillment Manager, refer to:
■ Section 3.6, "Service Fulfillment Manager" on page 3-14
■ Oracle Service Fulfillment Manager Implementation Guide

13-2 Oracle Telecommunications Service Ordering Process Guide
Before You BeginBefore you can set up Oracle Service Fulfillment Manager for use with the Oracle Telecommunications Service Ordering solution, you must set up Oracle Install Base and Oracle Order Management. For more information, see Chapter 8, "Set Up Install Base".

Create SFM Enabled Order Management Workflow Header Process
Set Up Service Fulfillment Manager 13-3
13.1 Create SFM Enabled Order Management Workflow Header Process
ModuleWorkflow Builder
Steps1. Open the OM Order Header workflow item type (OEOH).
2. Open the Service Fulfillment Header workflow item type (XDPOMOH).
3. In the item type OEOH, open the Order Flow - Generic process.
Figure 13–1, "Example Order Flow - Generic Process" shows an example of the order flow process.
Figure 13–1 Example Order Flow - Generic Process
4. Save this process with a new name Order Flow - Service Fulfillment.
5. Drag and drop the Service Fulfillment Order process from the item type XDPOMOH into Order Flow - Service Fulfillment between the Book - Order, Manual and Close - Order processes.

Create SFM Enabled Order Management Workflow Line Process
13-4 Oracle Telecommunications Service Ordering Process Guide
Figure 13–2 shows the positioning of the Service Fulfillment Order process in the process.
Figure 13–2 Order Flow - Service Fulfillment
6. Save your work.
13.2 Create SFM Enabled Order Management Workflow Line Process
ModuleWorkflow Builder
Steps1. To customize the Workflow, change the Access Level to 100:
– Choose Help > About Oracle Workflow Builder.
– In the Access Level field, enter 100.
– Click OK.
2. Open the OM Order Line workflow item type (OEOL).
3. Open the Service Fulfillment Line workflow item type (XDPOMOL).
4. In item type OEOL, open the Line Flow - Service Fulfillment process that you created in Section 5.1.1, "Add Install Base Activity to the OM Line Workflow" on page 5-2.

Add Function for Menu Notifications
Set Up Service Fulfillment Manager 13-5
5. Drag the activity Service Fulfillment (For Activation Required Items) from item type XDPOMOL and drop it between Ship - Line, Manual and Fulfill - Deferred.
6. Save your work.
13.3 Add Function for Menu NotificationsThis is an optional procedure.
In this procedure you are adding the Workitem Notification Redirection to the menu for notifications. This procedure assumes that you have not already added Workitem Notification Redirection to the menu. This function lets you view error notifications in HTML. For more information, see Section 15.6, "Manage Failure Notifications in HTML" on page 15-7.
ModuleOracle Applications (Forms)
ResponsibilitySystem Administrator
NavigationApplications > Menu
Steps1. Select Menu and click Open.
The Menus window opens.
2. In the Menu field, query FND_WFADMIN_NEW.
3. To add a line, click the New icon.
4. On the new empty line, keep the Prompt and Submenu fields empty.
5. In the Function field, click the List of Values.
The Function window opens.
6. Enter the Search criteria, %redirect%.
7. Select Workitem Notification Redirection, and click OK.
Both the Function and Description fields automatically populate.

Create a PL/SQL Procedure That Updates a Certain Workitem Parameter
13-6 Oracle Telecommunications Service Ordering Process Guide
8. Click the Save icon.
9. When the message about recompiling menus appears, click OK.
See AlsoThe end-user procedure that uses the preceding setup is Section 15.6, "Manage Failure Notifications in HTML" on page 15-7
13.4 Create a PL/SQL Procedure That Updates a Certain Workitem Parameter
The following information is a specific example that you can consider for a reference. It is not a requirement to you create your PL/SQL Procedure in this manner.
ModuleYour favorite PL/SQL Editor
StepCreate the following package in your instance.
The procedure in this package updates the work item parameter ACTIVE_FLAG to Y. You defined ACTIVE_FLAG as an extended attribute for your Service Fulfilment Items in Section 13.7, "Map Work Item to Item and Action (Line Transaction Type) Combination" on page 13-10.
CREATE OR REPLACE PACKAGE XXMACD_SFM_UTILS AS
PROCEDURE SET_ACTIVE(itemtype IN VARCHAR2, itemkey IN VARCHAR2, actid IN NUMBER, funcmode IN VARCHAR2, resultout OUT VARCHAR2);END;/CREATE OR REPLACE PACKAGE BODY XXMACD_SFM_UTILS AS PROCEDURE SET_ACTIVE(itemtype IN VARCHAR2, itemkey IN VARCHAR2, actid IN NUMBER, funcmode IN VARCHAR2, resultout OUT VARCHAR2) IS l_wi_instance_id NUMBER ;

Create Workflow Process
Set Up Service Fulfillment Manager 13-7
BEGIN -- RUN mode - normal process execution -- IF (funcmode = 'RUN') THEN l_wi_instance_id := WF_ENGINE.GetItemAttrNumber (itemtype => itemtype , itemkey => itemkey , aname => 'WORKITEM_INSTANCE_ID');
XDP_ENGINE.SET_WORKITEM_PARAM_VALUE (P_WI_INSTANCE_ID => l_wi_instance_id, P_PARAMETER_NAME => 'ACTIVE_FLAG', P_PARAMETER_VALUE => 'Y');
resultout := 'COMPLETE'; RETURN; ELSE resultout := xdp_om_util.HandleOtherWFFuncmode(funcmode); RETURN; END IF; EXCEPTION WHEN OTHERS THEN wf_core.context('XXMACD_SFM_UTILS','SET_ACTIVE', itemtype, itemkey, actid, NULL); RAISE; END SET_ACTIVE;END XXMACD_SFM_UTILS;
13.5 Create Workflow ProcessThe following example is an option. It is not a requirement.
This example assumeS sample names for:
■ Item Type: SFMTEST - SFM Test Item Type
■ Function: Update WI Active Flag
■ Procedure: XXMACD_SFM_UTILS.SET_ACTIVE
■ Process: SFM MACD Test WorkItem Process
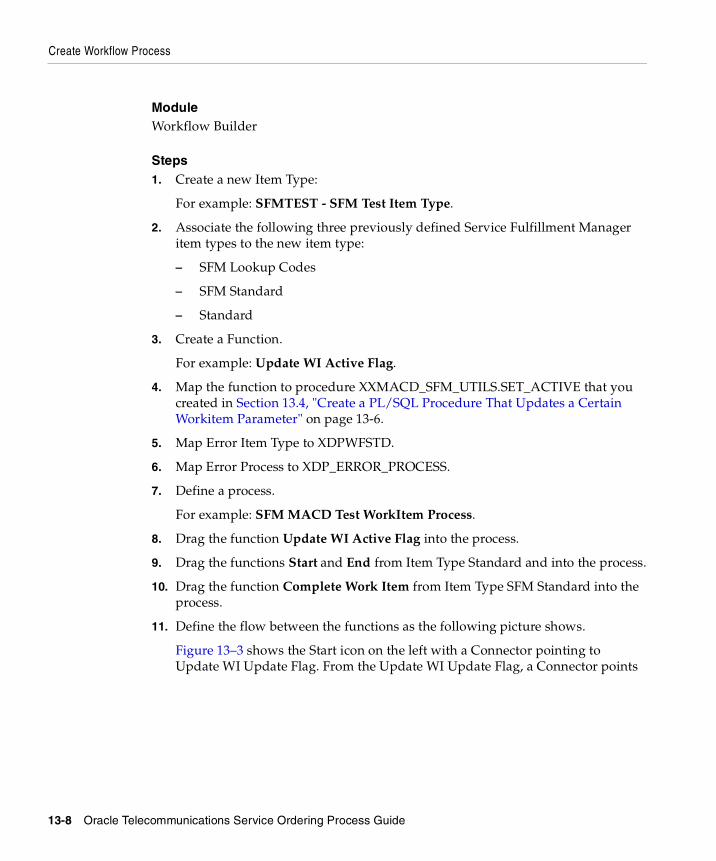
Create Workflow Process
13-8 Oracle Telecommunications Service Ordering Process Guide
ModuleWorkflow Builder
Steps1. Create a new Item Type:
For example: SFMTEST - SFM Test Item Type.
2. Associate the following three previously defined Service Fulfillment Manager item types to the new item type:
– SFM Lookup Codes
– SFM Standard
– Standard
3. Create a Function.
For example: Update WI Active Flag.
4. Map the function to procedure XXMACD_SFM_UTILS.SET_ACTIVE that you created in Section 13.4, "Create a PL/SQL Procedure That Updates a Certain Workitem Parameter" on page 13-6.
5. Map Error Item Type to XDPWFSTD.
6. Map Error Process to XDP_ERROR_PROCESS.
7. Define a process.
For example: SFM MACD Test WorkItem Process.
8. Drag the function Update WI Active Flag into the process.
9. Drag the functions Start and End from Item Type Standard and into the process.
10. Drag the function Complete Work Item from Item Type SFM Standard into the process.
11. Define the flow between the functions as the following picture shows.
Figure 13–3 shows the Start icon on the left with a Connector pointing to Update WI Update Flag. From the Update WI Update Flag, a Connector points

Define Work Item
Set Up Service Fulfillment Manager 13-9
to Complete Work Item. From Complete Work Item, a Connector points to the End.
Figure 13–3 Flow Between the Functions
12. Save your work.
13.6 Define Work ItemThe following example is an option. It is not a requirement.
This example assumeS sample names for:
ModuleOracle Applications (Forms)
ResponsibilitySFM System Administrator
PrerequisitesSection 13.4, "Create a PL/SQL Procedure That Updates a Certain Workitem Parameter" on page 13-6
Section 13.5, "Create Workflow Process" on page 13-7
NavigationSetup > Service Definition > Work Items
Steps1. For the work item, specify Display Name (Set Active), Internal Name, Version
and Begin Date.

Map Work Item to Item and Action (Line Transaction Type) Combination
13-10 Oracle Telecommunications Service Ordering Process Guide
2. From the list, choose Work Item Type User-Defined Workflow.
3. From the Item Type list of values, choose SFM Test Item Type that you created in Section 13.5, "Create Workflow Process" on page 13-7.
4. From the Process list of values, choose SFM MACD Test WorkItem Process that you created in Section 13.5, "Create Workflow Process" on page 13-7.
5. Specify an Item Key for this Work Item.
For example, an Item Key could be SFMMACD. The Item Key value becomes the prefix for the Workflow Item Key.
The value that you specify in this step will be the workflow item type defined in the section.
6. Navigate to the Parameters tab.
7. Choose the parameters Active, Phone, and Primary.
These parameters are extended attributes that you defined in Section 8.2, "Create Extended Attributes" on page 8-3.
13.7 Map Work Item to Item and Action (Line Transaction Type) Combination
You can attach one or more work items or tasks to a combination of item and action.
ModuleService Fulfillment Manager
ResponsibilitySFM Administrator
NavigationSetup > Service Definition > Service Actions
PrerequisitesYou must have created the work item, the item, and the action.

Enable Order Cancellation
Set Up Service Fulfillment Manager 13-11
Steps1. For each of the Service Fulfillment items that you defined according to standard
setup for Oracle Service Fulfillment Manager, navigate to the Actions tab and map the Line Transaction Types ADD and CHANGE to the item.
For more information on setting up Service Fulfillment items, see Oracle Service Fulfillment Manager Implementation Guide.
2. Next, navigate to the Work Item for Action tab and map Work Item Set Activate to the two Item Action combinations.
13.8 Enable Order CancellationTo set up order cancellation, you must:
■ Create a validation template in Oracle Order Management
■ Create a Processing Constraint
■ Build Rollback Activities into Workflow
13.8.1 Create a Validation Template The following procedures describe how to create a validation template in Oracle Order Management for the purpose of setting up order cancellation in Oracle Service Fulfillment Manager.
ResponsibilityOrder Management
NavigationOM > Setup > Rules > Security > Validation Templates
Steps1. In the Entity field, specify Order Header.
2. Enter the Template Name, for example Validate SFM Cancel.
3. Enter the Short Name, for example SFMCNCL.
4. Enter Description, for example Attempt to cancel order in SFM.
5. Select Validation Type as the API.

Enable Order Cancellation
13-12 Oracle Telecommunications Service Ordering Process Guide
6. Enter PL/SQL Package Name = "XDP_CANCEL_ORDER".
7. Enter Procedure Name = "CANCEL_SFM_ORDER".
8. Save the Validation Template.
To enable order cancellation in Oracle Service Fulfillment Manager, you must also:
■ Create a Processing Constraint
■ Build Rollback Activities into the Workflow
13.8.2 Create a Processing ConstraintAfter you have created a Validation Template, create a Processing Constraint in order to enable order cancellation in Oracle Service Fulfillment Manager.
PrerequisiteYou have created a Validation Template. See Section 13.8.1, "Create a Validation Template". You need the Validation Template name when you create the processing constraint.
ResponsibilityOrder Management
NavigationOM > Setup > Rules > Security > Processing Constraints
Steps1. Query for the Application Order Management and the Entity Order Header.
2. For the Constraint Cancel, add the following condition:
a. Navigate to Condition tab.
b. Select the Scope Any.
c. In Validation Entity field, enter Order Header.
d. In the Record Set field, enter Order.
e. Enter the Validation Template name that you specified when you created the Validation Template. For more information, see Section 13.8.1, "Create a Validation Template" on page 13-11.
f. Enter a User Msg that should appear when the order cannot be cancelled.

Cancel an Order
Set Up Service Fulfillment Manager 13-13
3. Save the Processing Constraint.
13.8.3 Build Rollback Activities into the WorkflowTo enable order cancellation in Oracle Service Fulfillment Manager, you must also build Rollback Activities into the workflow.
This is an implementation dependent task.
An SFM_Rollback Workflow has seeded:
■ Item_Type = XDPPROV (SFM Fulfillment Processes)
■ Dummy Process = CANCEL_ORDER_PROCESS
You can extend this process at implementation time to do business-specific rollback for any Oracle Service Fulfillment Manager work done up to the point that the cancel order was executed.
13.9 Cancel an OrderYou can cancel orders only at header level and not at the line level.
The following procedure describes how to cancel an order.
ResponsibilityOrder Management
NavigationOrder, Returns > Sales Order
Steps1. Query the Order for cancellation.
2. At the Order Header level, click the Action button.
3. From the List of Actions, select Cancel.
4. Enter a Reason for cancellation and any comments.
Note: The condition for the Cancel Order functionality should always be the last condition.

Design Tips
13-14 Oracle Telecommunications Service Ordering Process Guide
5. Click the OK button.
13.10 Design TipsSome tips relating to Oracle Service Fulfillment Manager include:
■ An attribute that is mandatory in Oracle Service Fulfillment Manager also needs to be mandatory in Configurator Developer. For more information about configuration attributes, see Oracle Configurator Methodologies.
■ If Oracle Service Fulfillment Manager fails to accept the order after booking the order in Oracle Quoting, then Oracle Quoting never receives the error message. In Oracle Order Management's Sales Order form, these errors have a status of Provisioning Failed. To see the status of these provisionable order lines, you must go to Oracle Order Management's Sales Order form.
■ If Oracle Service Fulfillment Manager fails to accept the order after booking the order in Oracle Quoting, you must progress the order from Oracle Order Management's Sales Order form.
■ The Oracle Bill of Materials routing includes the definition of the activation sequence of lines. When Oracle Service Fulfillment Manager receives a provisionable model with provisionable Components, Oracle Service Fulfillment Manager provisions the model first and then its Components.
■ The model developer must ensure that:
– Every provisionable item includes a mapped Line Type in Oracle Service Fulfillment Manager.
– The item and Line Type combination maps to a Workitem.
– When order booking occurs, Oracle Service Fulfillment Manager receives all the mandatory Workitem parameters (also known as extended attributes) with a value.
Note: If cancellation is successful, the Rollback Workflow starts, or otherwise, the user-defined error message appears.

Part III Using and Administering the Solution
This part contains the following chapters:
■ Chapter 14, "Using the Solution"
■ Chapter 15, "Administering the Solution"


Using the Solution 14-1
14Using the Solution
Topics in this chapter include:
■ Section 14.1, "Working with Quotes--HTML" on page 14-2
■ Section 14.2, "Working with Quotes--Forms" on page 14-15
See AlsoFor administration and maintenance-oriented tasks, see Chapter 15, "Administering the Solution".

Working with Quotes--HTML
14-2 Oracle Telecommunications Service Ordering Process Guide
14.1 Working with Quotes--HTMLTopics in this section cover working with the HTML version of Oracle Quoting to create and maintain orders using the Oracle Telecommunications Service Ordering solution.
Topics include:
■ Section 14.1.1, "Telecommunication Services Ordering Functionality Flow--HTML" on page 14-2
■ Section 14.1.2, "Create a New Quote--HTML" on page 14-4
■ Section 14.1.3, "Add Products to the Quote--HTML" on page 14-6
■ Section 14.1.4, "Add Telecommunication Services for Reconfiguration--Installed Base" on page 14-7
■ Section 14.1.5, "Reconfigure a Telecommunications Service--HTML" on page 14-10
■ Section 14.1.6, "Add to Container Model from Install Base--HTML" on page 14-11
■ Section 14.1.7, "Remove Unchanged Components--HTML" on page 14-12
■ Section 14.1.8, "Remove Lines--HTML" on page 14-14
■ Section 14.1.9, "Place an Order--HTML" on page 14-14
For information on using the Oracle Telecommunications Service Ordering solution using the Forms version of Oracle Quoting, see Section 14.2, "Working with Quotes--Forms" on page 14-15.
ReferenceFor detailed information about working with quotes, see the Oracle Quoting User Guide.
14.1.1 Telecommunication Services Ordering Functionality Flow--HTMLFigure 14–1 shows a typical telecommunication services ordering functionality scenario from the perspective of the HTML version of Oracle Quoting.

Working with Quotes--HTML
Using the Solution 14-3
Figure 14–1 TSO Functionality Through Oracle Quoting--HTML Version
A customer contacts a sales agent for a service change. The sales agent creates a quote by selecting the customer in Oracle Quoting through the Search and Select: Customer page. After selecting Add Product on the Lines page, the sales agent searches the Installed Base and thus begins Telecommunication Services Ordering functionality. From the Installed Base search, the sales agent can search for all activated services by leaving the fields blank or search by a range of criteria. The selected telecommunication service, and its network container, are added to the quote. A default Action may display for each component of the network container.

Working with Quotes--HTML
14-4 Oracle Telecommunications Service Ordering Process Guide
The sales agent then calls Oracle Configurator, allowing reconfiguration of the telecommunication service. Available modifications are controlled by Oracle Configurator rules. After the reconfiguration is complete, the sales agent returns to Oracle Quoting where the Action column shows the action performed on each telecommunication service line during reconfiguration. Oracle Quoting then calls Oracle Pricing to get updated pricing for the model and components. The sales agent can remove unchanged components if the customer wants to know the change in price due to reconfiguration. The sales agent then submits the order to Oracle Order Management. Oracle Service Fulfillment retrieves the order from Oracle Order Management and fulfills it. Once order fulfillment is complete, the customer’s Installed Base is updated with the completed telecommunication service changes.
14.1.2 Create a New Quote--HTMLWhen you create a new configuration for your customer, you create either a totally new quote or a quote from a template. In either case, you:
■ Specify a name for the quote
■ Specify the customer’s name and location by performing a search.
■ Change default values, if necessary.
■ Select the appropriate Order Type that allows the process to flow into Oracle Service Fulfillment Manager.
If you are modifying an existing service, see Section 14.1.5, "Reconfigure a Telecommunications Service--HTML" on page 14-10.
The following steps describe how to create a new quote using the HTML version of Oracle Quoting. For information on using the Forms version of Oracle Quoting, see Section 14.2.3, "Create a New Quote--Forms" on page 14-19.
ModuleOracle Sales
NavigationQuotes tab
Steps1. On the Quotes page, click Create Quote.
Working with Quotes--HTML
Using the Solution 14-5
The Create Quote page opens.
2. In the Quote Name field, enter either the full Customer Name or a partial value and click Go to search for and select a customer.
3. Optionally:
a. Enter a Contact Name or enter a partial value and click Go to search for the contact.
b. Change the defaulted quote-to address, if any, or click Go to search for customer addresses.
c. Change the default expiration date.
d. Select a different Primary Salesperson.
e. From the menu, choose a Primary Sales Group.
f. From the menu, choose a Sales Channel.
g. Select a source for the quote.
The source name refers to marketing sources that you set up in Oracle Marketing Online. If you create a quote from an opportunity, the source name defaults from Oracle Sales (OSO). If you are creating a quote directly, you can specify a source name in this field.
h. From the menu, choose a different Order Type.
i. From the menu, choose an Agreement.
The Agreement menu lists only agreements that are valid for the customer.
j. From the menu, choose a different Currency.
Note: If the ASO: Automatic Numbering profile option is set to No at the appropriate level, you can enter a quote number which will be unique across all quotes. If this profile option is set to Yes, the system will automatically assign a number.
Note: The Primary Salesperson defaults to the user creating the quote, if that user is set up as a salesperson for the current operating unit. If not, it defaults to the sales representative designated in the profile option ASO: Default Salesrep.

Working with Quotes--HTML
14-6 Oracle Telecommunications Service Ordering Process Guide
k. From the menu, choose a different Price List.
l. From the menu, choose a different Contract Template.
4. Click Apply.
Processing creates the quote, and the Lines page opens. On the Lines page, you can add products to your quote. For more information, see Section 14.1.3, "Add Products to the Quote--HTML" on page 14-6.
14.1.3 Add Products to the Quote--HTMLThe following steps describe how to add products to a quote using the HTML version of Oracle Quoting. For information on using the Forms version of Oracle Quoting, see Section 14.2.4, "Add Products to the Quote--Forms" on page 14-21.
ModuleOracle Sales
NavigationQuotes tab > Lines page
Steps1. Click the Add Product button.
The Search and Select: Product page opens.
2. Verify that the Source is Product Catalog.
3. In the Product list, choose the Product Inventory category.
Select All to search across all inventory categories.
4. In the text field, enter the part number or product name for an exact match, or partial information and % for a restricted or filtered list.
5. Click Go.
The Product page shows the products matching your search criteria, including part number, product description, and unit of measure.
6. To add to the quote, select the Select check box next to the products.
7. Optionally, select a Line Price List for the selected products.

Working with Quotes--HTML
Using the Solution 14-7
8. Click Select to add the products to the quote and return to the Lines page, or choose Select and Add More to add the products and search for additional products in different categories.
On the Lines page, a line can have either:
– A circle with an X, which indicates that the product is configurable, but that the configuration is incomplete or invalid. To create a valid configuration, Section 14.2, "Working with Quotes--Forms" to launch Oracle Configurator.
– A circle with a check mark, which indicates that the configuration is valid.
The lines can include a triangle icon that contains either a plus or a minus. This icon allows you to expand the view of a configured model:
– The plus indicates that the model view is in a collapsed state.
– The minus signs indicates that the model view is in an expanded state. You can view all Components of a fully expanded model.
14.1.4 Add Telecommunication Services for Reconfiguration--Installed BaseThe following procedures describe how to add telecommunication services for reconfiguration.
ModuleOracle Sales
PrerequisitesMust be existing telecommunication services in the customer’s Installed Base.
Tip: If a product is included (contained) in a Container Model, then you must search by the product name of the container. If you search by a product name that is in the container, then you cannot put those product in the quote.
Note: You can perform Installed Base searches on root trackable items. The search results show only root trackable items.

Working with Quotes--HTML
14-8 Oracle Telecommunications Service Ordering Process Guide
NavigationQuotes tab > Quote Information > Lines page
Steps
1. Select Add Products.
The Search and Select: Product page opens.
2. From the Source menu, choose Installed Base.
The Search and Select: Installed Base page opens.
3. From the Action menu, choose Reconfigure.
4. Enter search criteria as necessary and click Go.
You can search by:
■ Category
■ Order number
■ Order date
■ Product
■ Description
■ Serial Number
■ System
■ Installed At City
■ Installed At Country
■ Attribute Name
■ Attributes Value
■ Instance Number
■ Instance Name
You can also leave all fields empty and allow Installed Base to return all telecommunication services.
Note: You can search for product by Extended Attribute values, such as Attribute Name or Attribute Value.

Working with Quotes--HTML
Using the Solution 14-9
The results of the search appear. Results include:
■ Product
■ Description
■ UOM
■ Quantity
■ Serial Number
■ System
■ Installed At Address
■ Relationships
■ Line Price List
5. Optionally, click the hyperlinked description for a service to view the product details.
The Installed Base Product Details page displays:
■ Product
■ Description
■ UOM
■ Quantity
■ Instance Name
■ Instance Number
■ Serial Number
■ System
■ Order Number
■ Order Date
■ Installed At Address
6. Optionally, click the View Relationships icon.
This icon appears for Configurator model products only. The View Relationships page displays the children or parents of the telecommunication service.
7. Select the telecommunications services to add to the quote and click Select.
Working with Quotes--HTML
14-10 Oracle Telecommunications Service Ordering Process Guide
A network container, encompassing the telecommunication services, appears in the quote. If the configuration is complete, the total price of the model appears following the description.
The configuration appears as the last line of the quote on the Lines page. The Action field indicates any action relative to the component during reconfiguration. Oracle Configurator returns this line type, which appears in the Actions column, to Oracle Quoting.
If no changes are on a line, a visual indicator appears in the Actions column to alert you that there was no change to the original configuration.
The quantity and UOM for the network container and telecommunication service appear by default into Oracle Quoting from the Installed Base.
The network container price list defaults from the header level price list on the quote. The model and all components also have the default line category ORDER.
8. Optionally, expand the network container to view the components.
14.1.5 Reconfigure a Telecommunications Service--HTMLThe following steps describe how to modify or change your customer’s existing telecommunications service using the HTML version of Oracle Quoting. For information on using the Forms version of Oracle Quoting, see Section 14.2.6, "Reconfigure a Service--Forms" on page 14-24.
ModuleOracle Sales
Prerequisites■ The product to configure must be a telecommunications service.
■ ASO: Use Network Container must be set to Yes.
NavigationQuotes tab > Quote Information > Lines page
Note: The network container quantity must always be 1 and should not be changed.

Working with Quotes--HTML
Using the Solution 14-11
Steps1. Select the network container for the Telecommunications Service.
2. From the Actions menu, choose Configure and click Go.
Oracle Configurator opens.
3. Reconfigure as necessary.
For more information on using Configurator, see Oracle Configurator Methodologies.
After closing Oracle Configurator, the Lines page appears with the new configuration.
4. Expand the network container to see the components.
The Action field indicates any action relative to the component during reconfiguration. Oracle Configurator returns this line type, which appears in the Actions column, to Oracle Quoting. If the configuration is complete, the total price of the model appears following the description.
14.1.6 Add to Container Model from Install Base--HTMLA search of a customer's Install Base could result in multiple search result pages. Currently, you can select only installed products from one search results page into a quote. To select products from additional search result pages you can:
■ Use the Add to Model from Installed Base action on the quote lines pages. For more information, see the Steps section of this topic.
■ Increase the number of rows appearing on a search result page. For more information, see Section 12.3.6, "Change Default Number of Rows--HTML" on page 12-16.
The following steps describe how to add more items from Install Base to the container when you have a Container Model in a quote with items from Install Base and you are using the HTML version of Oracle Quoting. In the following procedure, your search for items is limited to items in the selected Container Model.
Note: You cannot perform the following actions on a telecommunication service from Install Base: split line, remove changed lines, or add services.

Working with Quotes--HTML
14-12 Oracle Telecommunications Service Ordering Process Guide
ModuleOracle Sales
PrerequisitesDisplay a quote with a container in the quote line.
NavigationQuotes tab > Quote Information > Lines page
Steps1. Select the container to which you want to add a product.
2. From the Action menu, choose Add to Model From Installed Base.
3. Click Go.
The Search and Select: Installed Base Product page opens.
4. Specify your search criteria, and click Go.
Search results appear. The search is limited to items in the selected Container Model that you indicated in the first step of this procedure.
5. In the Select column, select the item to add to the quote’s Container Model.
6. Click the Select button.
The items that you selected appear in the container on the quote.
14.1.7 Remove Unchanged Components--HTMLAn unchanged Component is one that either:
■ The user explicitly selected from Install Base, brought the Component into a configuration session, but did not change it, or
■ A passive Component that was made active during the configuration session, but did not change.
If after reconfiguring the telecommunications service, you want to view only the changes, you can choose to remove all unchanged Components. This is helpful to
Note: You can perform Installed Base searches on root trackable items. The search results show only root trackable items.
Working with Quotes--HTML
Using the Solution 14-13
see the difference in cost after reconfiguration. Each unchanged Component has a visual indicator in the Actions column, alerting you that the Component is unchanged during the configuration session.
The following steps describe how to remove unchanged Components using the HTML version of Oracle Quoting. If you are using the Forms version of Oracle Quoting, see Section 14.2.7, "Remove Unchanged Components--Forms" on page 14-26.
ModuleOracle Sales
PrerequisitesThe line must be unchanged from the original configuration.
NavigationQuotes tab > Quote Information > Lines page
Step1. Click Remove Unchanged Products.
This process removes all unchanged items in any configuration on the quote. Processing removes unchanged Components, and the configuration view collapses. Expand the levels to view the telecommunications service. The pricing for the telecommunication service reflects only the changed Components.
Note: After you remove unchanged Components in the quote, you cannot add the unchanged Components to the quote by re-launching configurator. An unchanged Component, when removed from the quote, continues to be visible in Configurator. The visual indicator is a triangle that contains an exclamation point.
Important: You cannot undo the Remove Unchanged Components action. Before performing this action, ensure that this is the action that you want to perform.

Working with Quotes--HTML
14-14 Oracle Telecommunications Service Ordering Process Guide
14.1.8 Remove Lines--HTMLThe following steps describe how to remove unchanged Components individually or remove entire Container Models using the HTML version of Oracle Quoting. If you are using the Forms version of Oracle Quoting, see Section 14.2.8, "Remove Lines--Forms" on page 14-26.
ModuleOracle Sales
PrerequisitesYou have searched for and are displaying the quote that contains the line to remove.
The line to remove must not be a changed Component of the Container Model.
NavigationQuotes tab > Quote Information > Lines page
Steps1. Select the line to remove.
2. From the Actions menu, choose Remove Line.
3. Click Go.
The line no longer appears on the Lines page.
14.1.9 Place an Order--HTMLWhen you convert the quote into an order, Oracle Service Fulfillment Manager (SFM) retrieves the order from Oracle Order Management. SFM fulfills the order and the service changes appear in Install Base.
The following step describes how to place an order by converting a quote to a sales order using the HTML version of Oracle Quoting. If you are using the Forms version of Oracle Quoting, see Section 14.2.9, "Place the Order--Forms" on page 14-27.
ModuleOracle Sales

Working with Quotes--Forms
Using the Solution 14-15
Prerequisites■ There is a valid transition defined from the current status to Order Submitted.
■ You must have Update access to the quote
■ The quote is in the highest version.
■ ASO: Enable Submit Button is set to Yes at the appropriate level.
■ At least one line is in the quote.
■ The quote is not expired.
NavigationQuotes tab > Overview link > Quote Overview page
Step1. If the billing and shipping information has not been entered, then enter it.
2. If the payment information has not been entered, then enter it.
3. From the Actions menu, choose Place Order.
The Overview page refreshes and displays confirmation that the quote was submitted as an order. The Order Number appears as a link.
4. Click the Order Number link to view the order details.
14.2 Working with Quotes--FormsTopics in this section cover working with the Forms version of Oracle Quoting to create and maintain orders using the Oracle Telecommunications Service Ordering solution.
Topics include:
■ Section 14.2.1, "Telecommunication Services Ordering Functionality Flow--Forms" on page 14-16
■ Section 14.2.2, "Reconfigure a Telecommunications Service--Forms" on page 14-18
■ Section 14.2.3, "Create a New Quote--Forms" on page 14-19
■ Section 14.2.4, "Add Products to the Quote--Forms" on page 14-21

Working with Quotes--Forms
14-16 Oracle Telecommunications Service Ordering Process Guide
■ Section 14.2.5, "Add Telecommunications Services for Reconfiguration--Forms" on page 14-22
■ Section 14.2.6, "Reconfigure a Service--Forms" on page 14-24
■ Section 14.2.7, "Remove Unchanged Components--Forms" on page 14-26
■ Section 14.2.8, "Remove Lines--Forms" on page 14-26
■ Section 14.2.9, "Place the Order--Forms" on page 14-27
For information on using the Oracle Telecommunications Service Ordering solution using the HTML version of Oracle Quoting, see Section 14.1, "Working with Quotes--HTML" on page 14-2.
14.2.1 Telecommunication Services Ordering Functionality Flow--FormsFigure 14–2 shows a typical telecommunication services ordering functionality scenario from the perspective of the Forms version of Oracle Quoting.
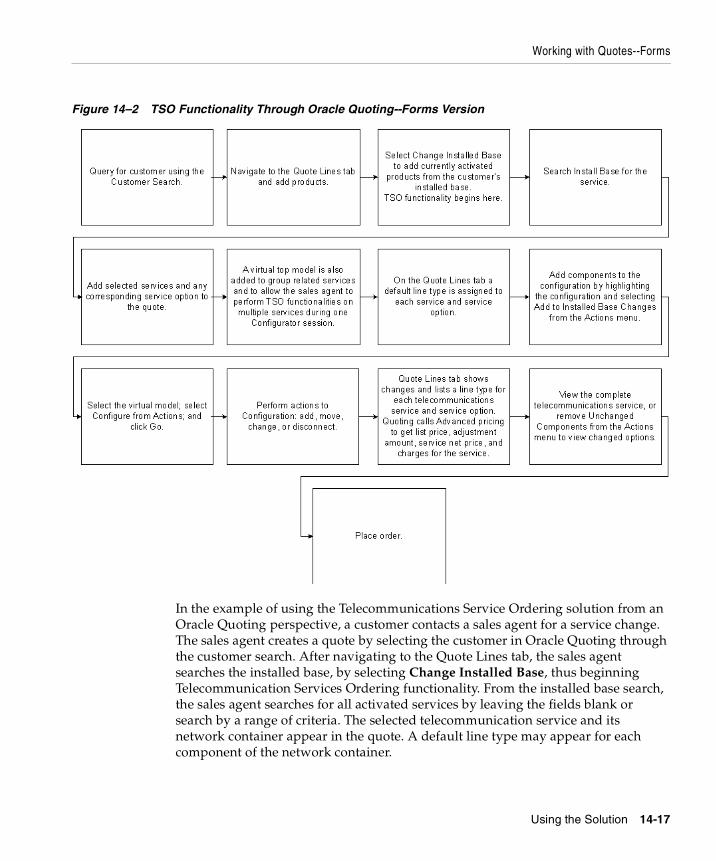
Working with Quotes--Forms
Using the Solution 14-17
Figure 14–2 TSO Functionality Through Oracle Quoting--Forms Version
In the example of using the Telecommunications Service Ordering solution from an Oracle Quoting perspective, a customer contacts a sales agent for a service change. The sales agent creates a quote by selecting the customer in Oracle Quoting through the customer search. After navigating to the Quote Lines tab, the sales agent searches the installed base, by selecting Change Installed Base, thus beginning Telecommunication Services Ordering functionality. From the installed base search, the sales agent searches for all activated services by leaving the fields blank or search by a range of criteria. The selected telecommunication service and its network container appear in the quote. A default line type may appear for each component of the network container.

Working with Quotes--Forms
14-18 Oracle Telecommunications Service Ordering Process Guide
The sales agent then accesses Oracle Configurator to allow reconfiguration of the telecommunication service. Oracle Configurator rules control available modifications. After the reconfiguration is complete, the sales agent returns to Oracle Quoting where the Line type field shows the action performed on each telecommunication service line during reconfiguration. Oracle Quoting obtains updated pricing for the model and components from Oracle Pricing. The sales agent can remove unchanged components if the customer wants to know the change in price due to reconfiguration. The sales agent then submits the order to Oracle Order Management. Oracle Service Fulfillment retrieves the order from Oracle Order Management and fulfills it. When order fulfillment is complete, the customer’s installed base shows the completed telecommunication service changes.
14.2.2 Reconfigure a Telecommunications Service--FormsThe following steps describe how to reconfigure a telecommunications service using the Forms version of Oracle Quoting.
ModuleOracle Sales
Prerequisites
Navigation
Step1. Create a quote.
2. Add products to the quote.
3. Search the installed base for the telecommunications services to reconfigure.
4. Reconfigure telecommunication services in Oracle Configurator.
5. Place the order.
Note: You cannot perform the following actions on a telecommunication service from the installed base: split line, duplicate lines, add services, or designate line level shipping or billing.

Working with Quotes--Forms
Using the Solution 14-19
14.2.3 Create a New Quote--FormsA quote lists--before you place an order--the products that your customer is interested in purchasing.
The functioning of the Customer and Account list of values in the header depends on the ASO: Auto Account Creation profile option setting. For more information, see the section about Customers and Relationships in the Oracle Quoting User Guide.
To create a quote, you must specify:
■ Customer
■ Customer Account (if the customer has an active account)
■ Primary Salesperson
■ Expiration Date
■ Order Type
■ Currency
■ Quote Number (if ASO: Automatic Numbering is set to No)
■ Contract Template (if ASO: Enable User Contracts is set to Yes)
The following steps describe how to create a new quote using the Forms version of Oracle Quoting. If you are using the HTML version of Oracle, see Section 14.1.2, "Create a New Quote--HTML" on page 14-4.
ModuleOracle Forms
ResponsibilityQuoting Sales Agent
Prerequisites
Note: The profile option ASO: Max Number of Results limits the maximum number of results in the list of values for the Quote To, Ship To, and Bill To customers and accounts at the header and line level.

Working with Quotes--Forms
14-20 Oracle Telecommunications Service Ordering Process Guide
NavigationNavigator > Quoting
Steps1. Enter the customer information for the quote.
2. Optionally, enter a quote name.
3. Choose the customer name from the Customer list, or use the Customer search.
4. From the Account list, choose an active account number for the customer. This field automatically populates when you select the customer.
If the customer does not have an account number, the system creates one based on the setting of the ASO: Auto Account Creation profile option. For more information, see the section about Customers and Relationships in the Oracle Quoting User Guide.
If you have not specified the customer, you can choose from the Account list to choose the Quote To customer and account. The chosen Quote To customer automatically appears in the Customer field.
5. Optionally, choose a Contact for the customer.
6. Optionally, enter a different Expiration Date.
7. Optionally, choose a different order type from the Order Type list.
The system automatically populates the Order Type field with the value from the ASO: Default Order Type profile option.
8. From the Salesperson list, select a primary sales agent for the quote.
The system automatically populates the Salesperson field with the current user if the user is set up as a valid salesperson. If not, the field defaults to the sales representative designated in the ASO: Default Salesrep profile option.
9. Optionally, choose a different contract template from the Contract Template list.
The system automatically populates the Contract Template field based on the setting of the ASO: Contract Template for Standard Terms and Conditions profile option.
10. Add products to the quote.
For information on adding products to a quote, see Section 14.2.4, "Add Products to the Quote--Forms" on page 14-21.
11. Click the Save icon.

Working with Quotes--Forms
Using the Solution 14-21
The application saves the quote and generates a quote number that appears in the Quote Number field. If the Quote Name has not been specified, the system automatically populates the field with Quote for <Customer Name>.
14.2.4 Add Products to the Quote--FormsThe following steps describe how to add products to the quote using the Forms version of Oracle Quoting. If you are using the HTML version of Oracle Quoting, see Section 14.1.3, "Add Products to the Quote--HTML" on page 14-6.
ModuleOracle Forms
Responsibility
PrerequisitesYour customer appears on the Header tab of the Oracle Telecommunications Service Ordering form.
NavigationNavigator > Quoting > Quote Lines tab
Steps1. Click the first available line of the Product field.
2. If the Product field already displays a product, click New Record on the toolbar.
3. Choose a product from the Product list, or enter the product description or part number. The functioning of this field depends on whether you have enabled interMedia Search. For more information, see the section on using interMedia Search in the in the Oracle Quoting User Guide.
The product appears on the tab.
Alternately, perform a product search by choosing Actions > Product Search to copy and paste the part number from the search results to the Product field.
4. To view the product details, click the Product Details button.
This Product Details form shows the user item type and whether the product is returnable, is serviceable, is shippable, or is a support service.

Working with Quotes--Forms
14-22 Oracle Telecommunications Service Ordering Process Guide
5. Optionally, update the default UOM value.
6. Enter the quantity in the Qty field.
The ASO: Default Ordered Qty in OC UI profile option provides the default quantity. For more information, see the Oracle Quoting Implementation Guide.
7. From the Price List, choose a price list for the line. You can only select a price list if the ASO: Price List Override profile option is set to Yes.
If the Item Type is Model, then the product is configurable. The displayed product is the base model. You can configure this product to add more components. For more information, see the section on configuring a product in the Oracle Quoting User Guide.
For all other products, the product pricing appears. In the Price List field, you can view the unit price.
8. Save the quote.
Repeat this procedure to add other products to the quote.
14.2.5 Add Telecommunications Services for Reconfiguration--FormsThe following steps describe how to add telecommunications services for reconfiguration for the Forms version of Oracle Quoting.
ModuleOracle Forms
Responsibility
PrerequisitesMust be existing telecommunication services in the customer’s installed base.
NavigationNavigator > Quoting
Steps1. Select Change Installed Base.
2. Enter search criteria as necessary and select Search.

Working with Quotes--Forms
Using the Solution 14-23
You can search by:
■ Category
■ Product
■ Description
■ Order Number
■ Order Date (From)
■ Order Date (To)
■ Instance Name
■ Instance Number
■ System
■ Serial Number
■ Installed At City
■ Installed At Country
■ Attribute Name
■ Attributes Value
You can also leave all fields blank and allow the installed base to return all telecommunication services.
The results of the search display. Results include:
■ Instance ID
■ Root Instance ID
■ Product
■ Description
■ UOM
■ Quantity
■ System Name
■ Serial Number
■ Installed At Address

Working with Quotes--Forms
14-24 Oracle Telecommunications Service Ordering Process Guide
Relationships of the telecommunication services appear in the Components/Connections bin.
3. Optionally, view details for the related telecommunication service by selecting the service and clicking Details.
4. Choose the telecommunications services to add to the quote and click Add to Quote.
A network container that includes the telecommunications services appears in the quote. If the configuration is complete, the total price of the model appears in the Line Total field.
The configuration appears as a new line in the Pricing region of the Quote Lines tab. The Line Type field indicates any action relative to the component during reconfiguration. Oracle Configurator returns this line type to Oracle Quoting.
If there are no changes on a line, a visual indicator appears in the Line Type field to alert you that there was no change to the original configuration.
The quantity and UOM for the network container and telecommunication service default into Oracle Quoting from the installed base.
The network container price list defaults from the header level price list on the quote. The model and all components also have the default line category ORDER.
14.2.6 Reconfigure a Service--FormsThe following steps describe how to reconfigure telecommunication services for the Forms version of Oracle Quoting. If you are using the HTML version of Oracle Quoting, see Section 14.1.5, "Reconfigure a Telecommunications Service--HTML" on page 14-10.
Note: If the Attributes bin is available, you can view the attributes for each telecommunications service.
Note: The network container quantity must always be 1 and should not be changed.

Working with Quotes--Forms
Using the Solution 14-25
ModuleOracle Forms
Responsibility
Prerequisites■ The product to configure must be a telecommunications service.
■ ASO: Use Network Container must be set to Yes.
NavigationNavigator > Quoting
Steps1. Highlight the line to reconfigure.
2. Select Actions > Add to Installed Base Changes > OK.
3. Enter criteria by which to search or leave all fields blank to see all results.
4. Select Search.
The results appear in the lower part of the window. The search results are restricted to telecommunications services related to the model in the quote. Relationships of the telecommunication services appear in the Components/Connections bin.
5. Optionally, view details for the related telecommunication service by highlighting the service and selecting Details.
6. Select a telecommunications service and click Add to Quote.
The product appears in the quote lines for the network container.
7. Highlight the line to reconfigure and click Configure.
8. Reconfigure as necessary.
For more information on using Configurator, see Oracle Configurator Methodologies.
After closing Oracle Configurator, the Quote Lines tab displays the new configuration. The Line Type field indicates any action relative to the component during reconfiguration. Oracle Configurator returns this line type to

Working with Quotes--Forms
14-26 Oracle Telecommunications Service Ordering Process Guide
Oracle Quoting. If the configuration is complete, the total price of the model appears in the Line Total field.
14.2.7 Remove Unchanged Components--FormsIf after reconfiguring the telecommunications service, you want to view only the changes, you can choose to remove all unchanged components. Viewing the changes is helpful if you want to see the difference in cost after reconfiguration.
Unchanged components include an asterisk in the Line Type field.
The following procedure describes how to remove all unchanged components for the Forms version of Oracle Quoting. If you are using the HTML version of Oracle Quoting, see Section 14.1.7, "Remove Unchanged Components--HTML" on page 14-12.
PrerequisitesThe line must be unchanged from the original configuration.
Step1. Choose Actions > Remove Unchanged Products.
2. Click OK.
The system removes unchanged components. The pricing for the telecommunications service reflects only the changed components.
14.2.8 Remove Lines--FormsThe following steps describe how to remove products from the quote for the Forms version of Oracle Quoting. If you are using the HTML version of Oracle Quoting, see Section 14.1.8, "Remove Lines--HTML" on page 14-14.
PrerequisitesAt least one product must be in the quote.
Steps1. Navigate to the Quote Lines tab.
2. Select the line to remove.
3. From the Edit menu, choose Delete.

Working with Quotes--Forms
Using the Solution 14-27
A message prompt asks you to confirm the deletion.
4. Click OK.
The system removes the line from the quote and renumbers the remaining lines.
14.2.9 Place the Order--FormsThe following steps describe how to place an order for the Forms Quoting version of Oracle Quoting. If you are using the HTML version of Oracle Quoting, see Section 14.1.9, "Place an Order--HTML" on page 14-14.
ModuleOracle Forms
Responsibility
Prerequisites■ There is a valid transition defined from the current status to Order Submitted.
■ You must have the Update access to the quote.
■ The quote is in the highest version.
■ The setting for ASO: Enable Submit Button must be Yes and at the appropriate level.
■ At least one line is in the quote.
■ The quote has not expired.
NavigationQuote Overview page
Steps1. If the billing and shipping information has not been entered, then enter it.
2. If the payment information has not been entered, then enter it.
3. From the Actions menu, choose Place Order.
The Overview page refreshes and displays confirmation that the quote was submitted as an order. The Order Number is a hyperlink.

Working with Quotes--Forms
14-28 Oracle Telecommunications Service Ordering Process Guide
4. Select the Order Number link to view the order details.
When you convert the quote into an order, Oracle Service Fulfillment Manager (SFM) retrieves the order from Oracle Order Management. SFM fulfills the order and the system updates the customer’s installed base with the service changes.

Administering the Solution 15-1
15Administering the Solution
Topics in this chapter include:
■ Section 15.1, "Re-validate Installed Configurations After Modifications" on page 15-2
■ Section 15.2, "Managing Notification Errors" on page 15-3
■ Section 15.3, "Find an Order in the SFM Order Flow-Through Area" on page 15-4
■ Section 15.4, "Retry Install Base Updates" on page 15-4
■ Section 15.5, "Retry Failed Outgoing Messages" on page 15-5
■ Section 15.6, "Manage Failure Notifications in HTML" on page 15-7
See AlsoFor non-administrative end-user tasks, see Chapter 14, "Using the Solution".

Re-validate Installed Configurations After Modifications
15-2 Oracle Telecommunications Service Ordering Process Guide
15.1 Re-validate Installed Configurations After ModificationsIf you modify a Container Model in either Oracle Applications or Oracle Configurator Developer, model data can become out of synchronization with configured Components at a customer’s site. If you make changes to a Container Model in either Oracle Applications or Oracle Configurator Developer, it is strongly recommended that you re-validate any installed configurations.
The following are examples of changes that occur in Oracle Applications to a Container Model that require you to re-validate installed configurations:
■ Deleting a trackable child Model.
■ Making a trackable child Model non-trackable.
The following are examples of changes made in Oracle Configurator Developer that require you to re-validate a Container Model:
■ Deleting a Connector node from a trackable model when a rule contains participants from the Connector’s parent and the target model.
■ Adding, deleting, or changing a rule defined using a Connector, when the rule contains participants from two trackable Components.
■ Adding, deleting, or changing a rule in a trackable model that is not defined using a Connector, but the rule propagates to a participant in a rule defined using a Connector between trackable Components.
■ Adding, deleting, or changing any item that is a participant in a rule defined using a Connector, when the Connector’s parent and target are both trackable.
ModuleOracle Configurator Developer
ResponsibilityConfigurator Administrator or Configurator Developer
Steps1. Open the Container Model.
2. Regenerate the Active Model.
3. Republish the model.
4. In Oracle Quoting, create a new quote.

Managing Notification Errors
Administering the Solution 15-3
5. Search for all Components within the customer’s existing network configuration.
6. Select all of the Components, and add them to the quote.
If this step fails due to a large number of Components, create multiple quotes with fewer sets of connected Components, then continue the validation process separately for each quote. For each quote, try to select sets that have very few, if any, connections between each set.
7. If the changes made to the Container Model do not affect the customer’s installed configurations, verify that all items appear with your No Action or Reprice Line Type.
Because you define Line Types in Oracle Order Management, the exact text can vary. For more information, see the Oracle Order Management Suite Implementation Manual.
8. Verify that any items affected by the changes made in the Container Model are invalid within the configuration.
9. Submit the quote.
If no errors occur, you have re-validated the configuration successfully.
10. If errors occur:
a. Launch Oracle Configurator.
b. Update the configuration to resolve each error.
c. Resubmit the quote.
Repeat steps a-c until you can submit the quote with no errors.
15.2 Managing Notification ErrorsEnhancements to Oracle Service Fulfillment Manager (SFM) that assist you with notification errors while using the Oracle Telecommunications Service Ordering solution include:
■ Incorporating enhancements to allow you to act upon notifications created as a result of a failed action.
■ Improving interactions with third parties by automatically re-sending XML messages to them if the original XML message failed to send.
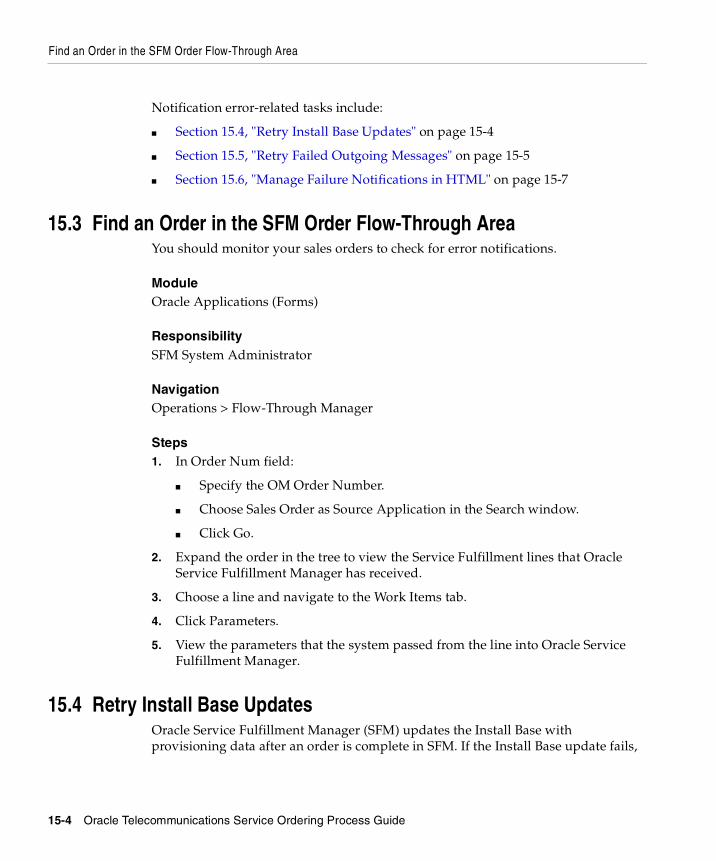
Find an Order in the SFM Order Flow-Through Area
15-4 Oracle Telecommunications Service Ordering Process Guide
Notification error-related tasks include:
■ Section 15.4, "Retry Install Base Updates" on page 15-4
■ Section 15.5, "Retry Failed Outgoing Messages" on page 15-5
■ Section 15.6, "Manage Failure Notifications in HTML" on page 15-7
15.3 Find an Order in the SFM Order Flow-Through AreaYou should monitor your sales orders to check for error notifications.
ModuleOracle Applications (Forms)
ResponsibilitySFM System Administrator
NavigationOperations > Flow-Through Manager
Steps1. In Order Num field:
■ Specify the OM Order Number.
■ Choose Sales Order as Source Application in the Search window.
■ Click Go.
2. Expand the order in the tree to view the Service Fulfillment lines that Oracle Service Fulfillment Manager has received.
3. Choose a line and navigate to the Work Items tab.
4. Click Parameters.
5. View the parameters that the system passed from the line into Oracle Service Fulfillment Manager.
15.4 Retry Install Base UpdatesOracle Service Fulfillment Manager (SFM) updates the Install Base with provisioning data after an order is complete in SFM. If the Install Base update fails,

Retry Failed Outgoing Messages
Administering the Solution 15-5
SFM sends a response notification to the SFM System Administrator. The System Administrator has the option to retry the failed action.
It is recommended that you routinely monitor sales orders to be aware of errors that can occur, such as when provisioning fails. Provisioning failure can occur when there is an incompatible discrepancy between the order and the information in either Oracle Service Fulfillment Manager or Install Base. A provisioning failure appears on the Sales Order form in the status of the flow.
After you have fixed any problems pertaining to the incompatible discrepancy, you can retry to update the Install Base.
ModuleOracle Applications (Forms)
ResponsibilitySFM System Administrator
NavigationOperations > Flow Through Manager
Steps1. Enter search criteria to find the Order Number.
2. Select the Order Number, and click View Details.
The Order Information window appears.
3. Click the Notification button.
4. The Notification Inbox opens.
5. Select a notification whose status is Open.
6. Click View Details.
For more information on your options, such as retrying to update the Install Base, refer to the Oracle Service Fulfillment Manager Implementation Guide.
15.5 Retry Failed Outgoing MessagesThe XDP Resubmit Failed Message concurrent program resends XML messages that have failed to be sent successfully to 3rd party systems. The concurrent program takes a message code as input. When you run the concurrent program, SFM

Retry Failed Outgoing Messages
15-6 Oracle Telecommunications Service Ordering Process Guide
identifies and attempts to resend all failed messages with the specified message code.
You should run the XDP Resubmit Failed Message program if:
■ You have information that some of your messages failed to send
■ You want to monitor and verify the sending of your messages.
ModuleOracle Applications (Forms)
ResponsibilitySFM System Administrator
NavigationConcurrent > Run Requests
PrerequisitesYou need to know the Message Code of the message that you want to check.
Steps1. Select Single Request and click OK.
2. In the Name field, choose XDP Resubmit Failed Message.
3. Click OK.
4. Enter the Message Code.
5. Click OK.
Any messages that the system had failed to send reappear in the Outbound Message Queue. An adapter program polls the queue to send messages from the queue.
6. To view messages in the Outbound Message Queue, choose Administration > Queue Console.
7. In the Queue Console, select and open the Outbound Message Queue.
The Entries field shows the number of messages in the queue.
8. Select a message and click the View Details button.

Manage Failure Notifications in HTML
Administering the Solution 15-7
15.6 Manage Failure Notifications in HTMLSFM includes an HTML version of the Fallout Manager that you access to manage failure notifications. You view the automatically created failure notifications in HTML using Oracle Workflow. From the Workflow Notification page, you can navigate to the SFM HTML user interface to modify the work item parameters and retry the failed action.
ModuleOracle Applications (Forms)
ResponsibilityWorkflow Administrator Web (New)
NavigationStatus Monitor area
PrerequisitesSection 13.3, "Add Function for Menu Notifications" on page 13-5
Steps1. In the Status Monitor area, click the Notifications link.
2. The Workflow Notifications page opens and displays: Type, Subject, and notification Date.
3. To view details of the order number notification, click the Subject hypertext link.
The Notification Details page shows the selected failure notification message and hypertext links that let you fix the errors, such as Workitem Parameters.
4. In the Details area, click the link to update Workitem Parameters.
The Workitem Parameters for Failed Order Line page opens.
5. In the Retry Value column, enter corrections to the workitem parameters.
6. Click the Update button.
The Workitem Parameters for Failed Order Line page closes and the Notification Message Details page opens.
7. Click the Retry button.

Manage Failure Notifications in HTML
15-8 Oracle Telecommunications Service Ordering Process Guide

Part IV Appendixes
This part contains the following appendices:
■ Appendix A, "Assumptions and Restrictions"
■ Appendix B, "Set Up Special Charges in Advanced Pricing"


Assumptions and Restrictions A-1
AAssumptions and Restrictions
A.1 List of Assumptions and RestrictionsThe following is a list of assumptions and restrictions for the current release of Oracle Telecommunications Service Ordering (TSO) functionality.
■ To successfully reconfigure an instance, you must accurately follow all setup steps and tips. For more information, see Part II, "Functionality and Setup".
■ To reconfigure instances in Install Base, you must define and house models in a Container Model.
■ You may not flag a Container Model item as Install Base Trackable, Returnable, or Serviceable.
■ The quantity of an IB Trackable item in a Container Model is restricted to one.
■ Users do not connect two or more Connectors from one source item to one target item.
■ It is recommended that users do not use pricing on Oracle Configurator Summary window. It is recommended that all pricing of telecommunications products should occur through Oracle Quoting or Oracle Order Management. Oracle Quoting and Oracle Order Management can use all the functionality that Oracle Advanced Pricing provides, which includes pricing based on attributes and sourcing rules.
■ You can reconfigure order lines for an order that is in the Negotiation phase. The line workflow for an order line of an order that is in the Negotiation phase does not start until it becomes an order in the Entered state.
■ You can reconfigure order lines for an order that is in the Entered state if the workflows for the line types are the same. When you enter an order line, the workflow for the order line starts. For example, if you reconfigure an order line

List of Assumptions and Restrictions
A-2 Oracle Telecommunications Service Ordering Process Guide
such that its line type changes from Disconnect to Change, the workflow that implements the line types Disconnect and Change must be the same.
■ You cannot reconfigure order lines that are part of a Container Model after booking the order.
■ When item instances are selected for reconfiguration from the Oracle Install Base onto the Sales Order or Quick Sales Order forms, the values for the Bill To Address and Ship To Address for the order lines default from the values stored for these attributes for the item instance in Oracle Install Base (if available).
When item instances are selected for reconfiguration from the Install Base onto the Forms Quoting or HTML Quoting pages, these values are not carried over from the Installed Base.
■ If the customer would like to add more item instances into a Container Model that has already been added as an order line in the Sales Order or Quick Sales Order forms, the sales representative positions the cursor on the order line that is holding the Container Model and selects the function that invokes the Install Base (Item Instance Query) to select more item instances. When the Item Instance Query form is invoked in this way, the list of available item instances to select in the Install Base are restricted to only show item instances that have been set up in the Bills of Materials to be a part of the selected Container Model.
In Oracle Quoting, this functionality is represented with a separate action--Add to Model--instead of basing the logic on the cursor is on the line that is holding the Container Model.
■ During fulfillment, Oracle Service Fulfillment Manager can only change user attribute values. No changes occur to structure, quantity, or connection information.
■ Orders that hold Container Models are solution-based models. Importing of solution-based models is not supported.
■ Orders that hold Container Models require transaction details to hold, for example item instance attribute values and relationships. Importing of transaction details as part of an order import is not supported.
■ From the order, you cannot directly remove an order line that is holding an item instance that has been reconfigured in Configurator. To remove such an order line, invoke Configurator, undo the change, and then explicitly remove the order line.

List of Assumptions and Restrictions
Assumptions and Restrictions A-3
■ TSO functionality is not available from the options window in Oracle Order Management. The TSO functionality is not available if the profile option OM: Use Configurator is N.
■ You cannot copy order lines that hold reconfigured item instances.
■ You cannot copy a booked order that is holding reconfigured item instances.
■ Before you can find item instances from either the Sales Order or Quick Sales Order forms, you must specify the Customer field in the order header.
■ In the Sales Order Form or the Quick Sales Order Form, you cannot update the customer information in the order header or the order line when you have selected an item instance on a line
■ You cannot invoke the window to choose item instances back to order lines from Oracle Install Base after booking the order.
■ You cannot update order line attributes IB Owner, Installed at Location and Current Location that are holding a reference to an item instance.
■ You can cancel an order or all order lines belonging to the same model. You must implement processing constraints to prevent cancellation of orders, given customer specific business rules.
■ It is not possible to convert an order in the Negotiation phase into an order if the revision of the item instance in the installed base is higher than the revision of the item instance on the order line of the order that is in the Negotiation phase.
■ If the function Remove Unchanged Components is invoked from the header level in the Sales Order or Quick Sales Order forms, then all the unchanged lines below any Container Model on the order will be removed. If function Remove Unchanged Components is invoked from the line level in the Sales Order or Quick Sales Order forms, only the unchanged lines below the top model or sub-model of the line that the cursor resides on will be removed from the order.
In Oracle Quoting, the function Remove Unchanged Components always removes all the unchanged lines on the quote.
■ The line type for an order line that is holding a component that is part of a Container Model cannot be changed on the order line itself - the line type for such a line can only be changed by invoking Configurator. Configurator will feed the appropriate line type back to the order line based on the rules set up in Configurator.

List of Assumptions and Restrictions
A-4 Oracle Telecommunications Service Ordering Process Guide
■ Configurator cannot infer disassembly sequences from the delta computations. Consulting must build the fulfillment workflows.
■ You can only reconfigure instances of quotes and orders for the SOLD_TO customer that owns the service in Oracle Install Base. For example, Customer X cannot reconfigure services belonging to Customer Y.
■ Fulfillment of orders occur in the same order in which they were booked.
■ Certain types of substantial changes to a configuration model require the developer to re-validate existing instances. These changes include:
– Changing a trackable multiple instantiable child Model of the Container Model to non-trackable.
– Deleting a trackable multiple instantiable child Model of the Container Model.
– Deleting a Connector node from one trackable model if there are connection rules with participants across the Connector.
– Adding, deleting, or changing a connection rule between trackable items.
– Adding, deleting, or changing any item that is a participant of a connection rule between trackable items.
Set Up Special Charges in Advanced Pricing B-1
BSet Up Special Charges in Advanced
Pricing
Main topics in this appendix include:
■ Section B.1, "Set Up Charges" on page B-1
■ Section B.2, "Discounting Charges Using the Get_Custom Price Function" on page B-7
B.1 Set Up ChargesIf you use Modeling option 1 to setup one-time and recurring charges, you can define Multiple Charges (or Charge Names) for an item. (For more information on modeling options, see Modeling Options on page 3-6.) To define Multiple Charges (or Charge Names) for an item, you create a pricing modifier for each Charge Name. When the charge is applied to the item, it is controlled by defining a Pricing Qualifier on the Pricing Modifier. For a detailed description of Pricing Modifiers and Qualifiers, refer to the Oracle Advanced Pricing Implementation Manual.
To setup a charge you must:
■ Create Charge Names
■ Define Modifier for an Item or Service
■ Define Qualifiers on the Modifier
B.1.1 Create Charge NamesYou must create names for charges--such as Change Fee, Install Fee and Disconnect Fee--as a Lookup of type FREIGHT_CHARGE_TYPE.

Set Up Charges
B-2 Oracle Telecommunications Service Ordering Process Guide
ModuleOracle Applications (Forms)
ResponsibilityOracle Pricing Manager
Navigation Setups > Lookups > Oracle Pricing Lookups page
Steps1. On the Oracle Pricing Lookups page, search for the lookup type FREIGHT_
CHARGES_TYPE.
2. Enter a Code, Meaning and Description for the charge.
Note that what you enter in the MEANING field is what appears in the Charges column in the Oracle Quoting Lines and Overview pages.
3. Select the Enable option.
4. Save your work.
Figure 15–1 shows a sample setup of the lookup type FREIGHT_CHARGES_TYPE.

Set Up Charges
Set Up Special Charges in Advanced Pricing B-3
Figure 15–1 Lookup Type FREIGHT_CHARGES_TYPE
B.1.2 Define Modifier for an Item or ServiceCreate a modifier to specify the price of the charge for a selected item.
ModuleOracle Applications (Forms)
ResponsibilityOracle Pricing Manager
NavigationModifiers > Modifier Setup > Advanced Pricing - Define Modifier page
Steps1. On the Advanced Pricing - Define Modifier page, click the Main tab.
2. On the Main tab, select a modifier Type = Freight and Special charge list.
3. Enter a Number for the modifier.

Set Up Charges
B-4 Oracle Telecommunications Service Ordering Process Guide
This number can be any text or numeric value, such as, Change Service.
4. Enter a Name for the modifier.
This name can be any text value, such as, Change Service.
5. Select the Currency for the modifier and specify a Description.
6. Select the Active option.
7. On the Modifiers Summary tab:
– If you do not enter a Modifier No (this can be a text value), a number automatically generates for you.
– Select the Level = Line, since the charge applies at the Line Level.
For example, a Change Fee applies at the Line level.
– Select Modifier Type = Freight/Special Charge.
– Set Product Attribute = Item Number, Product Attribute Value = <Item Number>, and select a precedence.
Figure 15–2 shows a sample window of Modifiers Summary tab of the Advance Pricing - Define Modifier page.

Set Up Charges
Set Up Special Charges in Advanced Pricing B-5
Figure 15–2 Modifiers Summary Tab
8. On the Discounts/Charges tab:
– Select the Charge Name.
This is the Lookup of Type FREIGHT_CHARGES_TYPE that you created previously.
– Select and Application Method.
For more information, refer to Oracle Advanced Pricing Implementation Guide. This example uses the Application Method of Amount.
– Enter a Value.
This is the value of the modifier, such as the price of the Change Fee for the Frame Relay Port item.
9. Save your work.
Figure 15–3 shows a sample of Discounts/Charges tab of the Advanced Pricing - Define Modifier page.

Set Up Charges
B-6 Oracle Telecommunications Service Ordering Process Guide
Figure 15–3 Discounts/Charges Tab
B.1.3 Define Qualifiers on the ModifierYou use qualifiers to specify when to apply a charge to an item.
The setup example shows the creation of a qualifier so that the Change Fee applies to the item only when the provisioning action (which is identified by the Line Type of the item) on the item is CHANGE.
ModuleOracle Applications (Forms)
ResponsibilityOracle Pricing Manager
NavigationModifiers > Modifier Setup > Advanced Pricing - Define Modifier page

Discounting Charges Using the Get_Custom Price Function
Set Up Special Charges in Advanced Pricing B-7
Steps1. On the Advanced Pricing - Define Modifier page, select the Charge No to which
the Qualifier is to be defined.
The setup example shows the selected Change Service modifier.
2. Click the Line Qualifiers button.
This causes the Line Level Qualifiers page to appear.
3. Choose or specify:
■ Qualifier Context
■ Qualifier Attribute equal to Line Type
■ Operator equal =
■ Value From equal to CHANGED
This is the line type defined in Oracle Order Management.
Figure 15–4 shows sample data in the Qualifier - Line Level Qualifiers window.
Figure 15–4 Qualifier - Line Level Qualifiers Window
B.2 Discounting Charges Using the Get_Custom Price FunctionSetup the Order Capture descriptive flexfield, LINE: Additional Information, to capture the line charge discount percent.

Discounting Charges Using the Get_Custom Price Function
B-8 Oracle Telecommunications Service Ordering Process Guide
Define a formula with the Get_Custom Price function to query the descriptive flexfield attribute and apply it to the amount specified for the Charge in the modifier form.

Glossary-1
Glossary
This glossary contains definitions that you may need while implementing a Oracle Telecommunications Service Ordering solution. For terms specific to other Oracle Applications, refer to that application’s documentation.
Accepted
A quote status indicating that the customer has accepted the quote terms.
API
Application Programming Interface
ATO
Assemble to Order. An environment where you open a final assembly order to assemble items that customers order. Assemble-to-order is also an item attribute that you can apply to standard, Model, and Option Class items. An item you make in response to a customer order.
baseline configuration
The existing configuration, used as the basis for computing a new configuration. Generally, the baseline configuration is the latest booked, provisioned, or installed configuration revision. When updating a configured item, you must reconfigure from this baseline. You can update the baseline to meet your new needs.
bill of material
A list of Component items associated with a parent item and information about how each item relates to the parent item. Oracle Manufacturing supports standard, Model, Option Class, and planning bills. The item information on a bill depends on the item type and bill type. The most common type of bill is a standard bill of material. A standard bill of material lists the Components associated with a product

Glossary-2
or subassembly. It specifies the required quantity for each Component plus other information to control work in process, material planning, and other Oracle Manufacturing functions. Also known as product structures.
BOM
See bill of material.
BOM item
The node imported into Oracle Configurator Developer that corresponds to an Oracle Bills of Material item. Can be a BOM Model, BOM Option Class node, or BOM Standard Item node.
BOM Model
A Model that you import from Oracle Bills of Material into Oracle Configurator Developer. When you import a BOM Model, effective dates, ATO rules, and other data are also imported into Configurator Developer. In Configurator Developer, you can extend the structure of the BOM Model, but you cannot modify the BOM Model itself or any of its attributes.
BOM Model node
The imported node in Oracle Configurator Developer that corresponds to a BOM Model created in Oracle Bills of Material.
BOM Option Class node
The imported node in Oracle Configurator Developer that corresponds to a BOM Option Class created in Oracle Bills of Material.
BOM Standard Item node
The imported node in Oracle Configurator Developer that corresponds to a BOM Standard Item created in Oracle Bills of Material.
category
Code used to group items with similar characteristics, such as plastics, metals, or glass items.
CIO
See Oracle Configuration Interface Object (CIO).
Component item
An item associated with a parent item on a bill of material.

Glossary-3
concurrent manager
Components of your applications concurrent processing facility that monitor and run time–consuming tasks for you without tying up your terminal. Whenever you submit a request, such as running a report, a concurrent manager does the work for you, letting you perform many tasks simultaneously.
concurrent process
A task in the process of completing. Each time you submit a task, you create a new concurrent process. A concurrent process runs simultaneously with other concurrent processes (and other activities on your computer) to help you complete multiple tasks at once with no interruptions to your terminal.
concurrent processing facility
An Oracle Applications facility that runs time-consuming, non-interactive tasks in the background.
concurrent program
Executable code (usually written in SQL*Plus or Pro*C) that performs the functions of a requested task. Concurrent programs are stored procedures that perform actions such as generating reports and copying data to and from a database.
concurrent request
A user-initiated request issued to the concurrent processing facility to submit a non-interactive task, such as running a report.
configurable item
A base Model item that a user can configure by adding Components.
configuration
A specific set of specifications for a product, resulting from selections that a user made in Oracle Configurator. See also partial configuration.
configuration attribute
A characteristic of an item that is defined in the host application (outside of its inventory of items), in the Model, or captured during a configuration session. Configuration attributes are inputs from or outputs to the host application at initialization and termination of the configuration session, respectively.
Configuration Interface Object
See Oracle Configuration Interface Object (CIO).

Glossary-4
configuration Model
Represents all possible configurations of the available options, and consists of Model structure and rules. It also commonly includes User Interface definitions and Functional Companions. A configuration Model is usually accessed in a runtime Oracle Configurator window.
configuration session
The time from launching or invoking to exiting Oracle Configurator, during which end users make selections to configure an orderable product. A configuration session is limited to one configuration Model that is loaded when the session is initialized.
configurator
The part of an application that provides custom configuration capabilities. Commonly, a window that can be launched from a hosting application so end users can make selections resulting in valid configurations.
Configurator Extension
An extension to the configuration model beyond what you can implement in Oracle Configurator Developer.
A type of configuration rule that associates a Model node, a Java class, and an event binding so that the rule operates when an event occurs during a configuration session.
A Java class that provides methods that can be used to perform configuration actions.
As of this release, Configurator Extensions replace Functional Companions.
connected-to relationships
Models network connections and shows the service configuration. You can view the connected-to relationships of a configured instance from Oracle Install Base. If you define items in Oracle Inventory as link items, you can then use Oracle Install Base to show the start and end locations of the link. The locations for the link instance are the geographic addresses of the instance items.
Connector
The node in the Model structure that enables an end user at runtime to connect the Connector node’s parent to a referenced Model.

Glossary-5
Container Model
A pick-to-order bill of material (BOM) Model that you import from Oracle Bills of Material into Oracle Configurator Developer which supports multiple instantiation reconfiguration and active and passive Components from Oracle Install Base.
CTO
Configure to Order
delta
The difference between the new and the baseline configuration.
Drafted
A quote status indicating that the quote is in the initial phase.
Entered
A quote status indicating that the quote has been successfully submitted as an order in Oracle Order Management. You can modify orders with this status in Oracle Order Management.
fulfillment
Fulfilled sales order lines have successfully completed all Workflow processing activities up to the point of becoming eligible for invoicing.
Functional Companion
An extension to the configuration Model beyond what you can implement in Configurator Developer.
An object associated with a Component that supplies methods that you can use to initialize, validate, and generate customer-centric views and outputs for the configuration.
As of this release, Functional Companions are replaced by Configurator Extensions.
ICX
Inter-Cartridge Exchange
Install Base
The sum total of all products that a company has responsibility to provide service for at customer sites.

Glossary-6
instance
A single representation of an item in a configuration. See also instantiate.
Also, the memory and processes of a database.
instance name
A method of capturing additional information about a product or instance. An instance name can be either automatically generated or manually assigned during a configuration session.
instantiate
To create an instance of something. Commonly, to create an instance of a Component in the runtime user interface of a configuration Model. See also multiple instantiation.
item
Anything you make, purchase, or sell, including Components, subassemblies, finished products, supplies, or services. Oracle Manufacturing also uses items to represent planning items that you can forecast, standard lines that you can include on invoices, and Option Classes you can use to group options in Model and Option Class bills.
item attributes
Specific characteristics of an item, such as order cost, item status, revision control, account, and so on.
location
A point in geographical space that a street address describes. Also, a shorthand name for an address. Location appears in address lists of values to let you choose the correct address based on an intuitive name. For example, you can specify the location name of Receiving Dock to the Ship To business purpose of 100 Main Street.
LOV
A list of values in a text field, from which the user must choose.
MACD
An acronym for the following actions: move, add, change, and disconnect. The Oracle Telecommunications Service Ordering solution enables these actions for a customer’s telecommunications services.
Glossary-7
multiple instantiation
The ability to configure a child Model or Component of a top-level Model multiple times during the same configuration session. The child Model appears in the bill of materials only once, but you can individually configure it as many times as needed while running Oracle Configurator.
network Model
Refer to the Container Model definition.
notifications (notification id)
Notifications are instances of messages which some role receives. The message includes a row that shows status flags to record the state of the notification, date fields for when the notification was sent, due, and responded to. A new row appears in the Notifications table each time a role receives a message. The row persists even after the notification has been responded to, until a purge operation moves to close notifications to an archive.
one-time charge
A charge that a customer pays only one time. Examples include installation fees, activation fees, and change fees.
Oracle Configuration Interface Object (CIO)
A server in the runtime application that creates and manages the interface between the client and the underlying representation of Model structure and rules in the Term.
The CIO is the API that supports creating and navigating the Model, querying and modifying selection states, and saving and restoring configurations.
partial configuration
The ability to modify part of an existing configuration without launching the entire configuration in Oracle Configurator.
pick-to-order (PTO)
A configure-to-order environment where the options and included items in a Model appear on pick slips and order pickers gather the options when they ship the order. Alternative to manufacturing the parent item on a work order and shipping it. Pick-to-order is also an item attribute that you can apply to standard, Model, and Option Class items.

Glossary-8
pick-to-order (PTO) item
A previously defined configuration order that pickers gather as separately finished included items just before they ship the order.
pick-to-order (PTO) Model
An item with an associated bill of material with optional and included items. At order entry, the configurator is used to choose the optional items to include for the order. The order picker gets a detailed list of the chosen options and included items to gather as separately finished items just before order shipment.
provisioning or provisionable
When Oracle Order Management passes the sales order information on to Oracle Service Fulfillment Manager for provisioning. Provisioning involves capturing an order request, validating the order, analyzing the order, fulfilling the order, completing the order, and if necessary, managing order fallout. When you provision the order, Oracle Install Base receives the reconfigured item information and the sales order is complete.
quote
A collection of items with pricing that a sales representative with a Sales Representative role creates on behalf of a customer in Oracle Quoting.
quote status
The quote status indicates the stage of preparation that a quote is in. Possible quote statuses include drafted, bid, accepted, entered, ordered, order problem, order reviewed, lost, and inactive.
reconfigure
Make changes to a configured Model that a customer has already purchased.
recurring charge
A charge that the customer pays periodically (such as per month, quarter, or year) like a subscription fee.
SFM
Oracle Service Fulfillment Manager (SFM) provisions the telecommunication services that the customer ordered. See also provisioning or provisionable.
TSO
An acronym for the Oracle Telecommunications Service Ordering solution.

Glossary-9
update
A change to an installed configuration of a Container Model, made in the context of the Telecommunications Services Ordering solution. This document replaces the term with reconfigure. See also upgrade.
upgrade
In the parlance of the telecommunications service industry, the reconfiguration of a service by moving, adding, changing, or disconnecting items. This document replaces the term with reconfigure. See also update.
WIP (Work in Progress)
An item in various phases of production in a manufacturing plant. This includes raw material awaiting processing up to final assemblies ready to be received into inventory.
Workflow
This determines the header flow for an order transaction type or line flows possible for a line transaction type. There can be only one header flow associated with an order transaction type but a line transaction type can be coupled with different order types and item types and there can be different flow couplings for the permitted transaction type and item type combinations.

Glossary-10

Index-1
IndexAaccess
discontinued items, 11-29instances, 11-29
access level, change Workflow, 5-2, 13-4action
Activate Instance, 10-19add to Model from Installed Base, HTML
Quoting, 14-11disable Add Service, 12-16disable Split Line, 12-16enable Add to Model Item From Install
Base, 12-16enable Reconfigure, 12-16enable Remove Product, 12-16failed, 15-3, 15-5, 15-7fulfillment, 11-13fulfillment based on, 3-11identify based on, 3-11known as Line Type, 3-4map work item to item and, 13-10pricing dependency on Line Type or, 10-22provisioning, for each quote, 2-9set up Lines page, 12-8suggested renaming of column, 12-8
Actions menu, customize, 12-14Activate buttons, adding, 10-19Activate Instance action, 10-19Activate Instance UI control, button or
picture, 10-19activation sequence of lines, about, 13-14active Components, 3-10Active Models
error when generating, 6-7regenerate, 15-2
add new services, 2-4Add Service
disable action, 12-16from Install Base, 14-11
Add to Model from Installed Base, about, HTML Quoting, 14-11
Add to Model Item From Install Base, enable, 12-16
additional Line TypeQuoting setup, 12-2reconfiguration setup, 12-2
address, specify for quote, HTML Quoting, 14-4administration tasks, 15-1Advanced Pricing, set up, 9-1agreement, choose for quote, 14-5API, Oracle Configuration Interface Object, 11-27approvals, submit quote for, 2-12approvers, view responses of, 2-12ASO Allow Quantity Updates for Component Item
profile option, 12-3ASO Allow Quantity Updates for Top Level Model
Item profile option, 12-3ASO Auto Account Creation, Forms
Quoting, 14-19, 14-20ASO Automatic Numbering
for quote, Forms Quoting, 14-19for quote, HTML Quoting, 14-5
ASO Configurator URL profile optionASO Configurator URL, 12-3
ASO Contract Template for Standard Terms and Conditions, Forms Quoting, 14-20
ASO Default IB Search Results profile option, 12-4

Index-2
ASO Default Install Base Relationship profile option, 12-4
ASO Default Order Quantity profile option, 12-4ASO Default Order Type, Forms Quoting, 14-20ASO Default Ordered Qty in OC UI, Forms
Quoting, 14-22ASO Default Salesrep
profile option, Forms Quoting, 14-20profile option, HTML Quoting, 14-5
ASO Enable Submit Button, Forms Quoting, 14-27ASO Enable User Contracts, Forms Quoting, 14-19ASO Max Number of IB Search Results profile
option, 12-5ASO Max Number of Results, Forms
Quoting, 14-19ASO Price List Override, Forms Quoting, 14-22ASO Use Network Container
Forms Quoting, 14-25profile option, 12-5
assumptions and restrictions, A-1ATO BOM Models, not included in TSO
solution, 11-3Attribute Code, 10-25attribute values
See also attributes., 14-8changing user, A-2compared with IB tables, 10-24extended, 14-8item instances, A-2persistence of user-defined, 3-11price based on, 9-3product, B-4saved in configuration, 11-21, 11-25source data for, 9-3transient, 10-14used to select, 9-7using the formula_id for, 9-8
attributesSee also attribute values.code, 10-25configuration, using with IB, 11-21create extended, 8-3custom code, 9-3extended. See extended attribute.global level, 8-3
instance level, 8-4inventory item level, 8-3item category level, 8-3mandatory, 13-14map column, 12-9map extended, to SFM items, 8-6persistence of values, 3-11set up extended pools of, 8-4synchronization after fulfillment, 11-31user-defined values, 3-11verify coordination of, 8-7what is an extended, 13-14
Bbaselines
configuration, identify and maintain, 3-3configuration, status, 2-9current state of configuration, 3-11identify current configuration, 3-12methods to identify changes against, 11-28show changes since, 2-9upgrades and configuration, 3-10
batch validation parameter, 10-30Bill of Materials (BOM)
activation sequence of lines, 13-14dependencies, 7-1Model node, 10-12Model, component tracking, specify, 6-3Option Class, component tracking, specify, 6-3reference material, 7-1setup, 7-1Standard Item, component tracking, specify, 6-3
billing information, change, 2-12BOM Configurator URL of UI Manager profile
option, 12-6BOM. See Bill of Materials.booked orders, about copying, A-3Booked status
after placing order in, 2-13creating an order in, 2-10need to change to, 2-13place order in, 2-10
business processes, 2-2buttons
Index-3
Activate Instance UI control, 10-19add to UI, 10-19adding Activate, 10-19create Connection List, 10-19customize, 12-14enable or disable line-level, 12-14lookup type for, 12-15, 12-20Test Model, 11-10, 11-20, 11-24
Ccatalog, Product Inventory, HTML Quoting, 14-6change
billing information, 2-12column label, 12-12column sequence, 12-9default expiration date, HTML Quoting, 14-5default number of rows in search results, 12-16default values, HTML Quoting, 14-4detecting type of, 11-11existing configuration, 2-7existing service, Forms Quoting, 14-18, 14-24existing service, HTML Quoting, 14-10identify configuration, 11-27installed item in the field, 2-7make to configuration, 3-3multiple instantiable child Models, A-4price of item, 2-11quantity of component, 12-3quantity of component items, prevent, 12-3quantity of model product, 12-3quote, 2-11required revalidation to substantial, A-4seeded values, 12-9sequence of columns, 12-14shipping information, 2-12since baseline configuration, 2-9status, 2-13status manually, 2-13user attribute in SFM, A-2validation of, 2-9workflow access level, 5-2, 13-4
changed items, view, 3-5changes to installed configuration, option, 2-9checklist setup, 4-4
child Modelabout deleting trackable, 15-2import process creates structure for, 10-6trackable, structure of, 10-7tracking multiple instantiable, A-4valid configuration rule combinations, 10-16
child of Component, 10-3child of Model, 10-3code
Attribute, 10-25custom, derive attribute, 9-3custom, Get_Customer_Price, 9-7customize, 11-15customized to derive attribute, 9-3enable action or option, 12-16enter, one-time charge, B-2Get_Custom_Price, 9-8Line Type Functional Companion, 11-12Location and Location Type, 3-13Location Type, 10-27, 11-4, 11-5lookup, 8-6, 12-14message, 15-5, 15-6source, Interactive Location Search Functional
Companion, 11-6units of measurement, 10-27
columnattribute mapping, 12-9change sequence of, 12-9, 12-14determine display of Line Type, 10-23display, 12-10hide, 12-10label, edit, 12-12Line Type optional seeded, 12-11mandatory, 12-10name, suggested renaming of, 12-8optional seeded, 12-11seeded, hide, 12-11sequence, edit, 12-13
component instancesabout, 11-27in Install Base, track, 11-27multiple, 11-27
component itemsprevent changing quantity of, 12-3specify, 6-3

Index-4
tracking, 6-3Components
active, 3-10passive, 3-10
componentschange quantity of, 12-3unchanged, remove, Forms Quoting, 14-26unchanged, remove, HTML Quoting, 14-12
concurrent programsDisable/Enable Refresh of a Configuration
Model, 10-6Import Configuration Models, 10-19Populate Configuration Models, 10-5, 10-7Refresh a Configuration Model, 10-5, 10-6Refresh all Imported Configuration
Models, 10-5, 10-6under Populate and Refresh Configuration
Models, 10-5XDP Resubmit Failed Message, 15-5
configurable itemsnetwork link, 6-5setup, 6-3
configurationSee also reconfigure.as item instances, 3-12attribute, CZ_CONFIG_EXT_ATTRIBUTES
table, 10-23attributes with Install Base, 11-21automatic behavior of, 11-30baseline, current state of, 3-11change existing, 2-7changes to, identify, 11-27complete product, HTML Quoting, 14-7CSI_T_TRANSACTION_LINES, update, 10-26CSI_T_TXN_LINE_DETAILS, update, 10-26delta computation, 3-11identify current baseline, 3-12invalid rule combinations, 10-17make changes to, 3-3Model, create, 10-18multiple component instances, 11-27remove unchanged components from, Forms
Quoting, 14-26remove unchanged components from, HTML
Quoting, 14-12
rules, define, 10-19show changes since baseline, 2-9store Container Model, 3-12update, 11-27valid rule combinations, 10-16verify invalid items, 15-3
Configuration Model Type, 10-6Configurator
configuration Model, create, 10-18Container Model settings and structure, 10-4Container Model structure, 10-7customize, 10-1CZ schema customizations, 10-22dependencies, 10-2functionality, 3-9import Container Models into, 10-5key functionality, 3-2launch, 3-5map Line Type, 5-4reference material, 10-1setup, 10-1specify window for, 12-4validate changed configuration, 2-9
Configurator ExtensionIBAttribute, about, 10-20IBAttribute, effects of, 11-10, 11-25IBAttribute, modify, 11-26IBAttribute, recommended, 11-21IBAttribute, setup, 11-22Line Type, about, 10-20Line Type, modify, 11-11, 11-21Line Type, setup, 11-12Line Type, solution, 11-3Line Type, specify, 11-11Line Types, effects of, 11-21Location, 10-20modify or update, 11-2purpose of Line Type, 11-11
configure, new items, 2-6connected-to option, enable, 12-16connected-to relationships, 3-13connected-to relationships of configured instance,
view, 3-13Connection List buttons, 10-19connection rule, adding, deleting, or changing, A-4

Index-5
Connectordefine rules for, 10-11define rules using, 10-15in Container Model, 10-10node, delete, 15-2, A-4reasons not to create, 10-11requirements to create, 10-11
Connector node, 10-3contact name, specify for quote, HTML
Quoting, 14-5container BOM Model
See also Container Model.import, 10-6tracking for components, specify, 6-3
container functionality, determine if enabled, 12-5Container Model
about rules when revalidating, 15-2add items from Install Base to, HTML
Quoting, 14-11configuration rule requirements, 10-15Connector requirements, 10-10create, 6-6define, 7-2define as PTO BOM Model requirement, 10-4description, 10-3entire line, remove, Forms Quoting, 14-26entire line, remove, HTML Quoting, 14-14error when trackable, 6-7flag as, 6-3import, 10-19import into Configurator, 10-5installed configurations, revalidate, 15-2node, 10-17node from non-trackable child, 10-18product included in, HTML Quoting, 14-7PTO (pick-to-order), 7-2publish, 10-20, 10-21refresh error, 10-6refresh warning, 10-6requirements not to define, 10-4requirements, verify, 6-4root node, 10-11settings and structure, 10-4specify, 6-6specify item as, 6-6
store, 3-12structure, 10-7structure requirements, 10-6tracking for component item, specify, 6-3valid and invalid examples of, 10-8valid structure of, verify, 10-19
contract template, for quote, HTML Quoting, 14-6convert
cannot create order from quote, A-3quote to order, what happens, 14-14, 14-28quote to sales order, 2-4, 2-10
coordinate, attributes and extended attributes, 8-7cost, after reconfiguration see difference in, 14-13create
configuration Model, 10-18Container Model, 6-6PL/SQL procedure, 13-6quote, 2-3, 2-4quote, Forms Quoting, 14-19quote, HTML Quoting, 14-2, 14-4workflow process, 13-7
CSI_T_TRANSACTION_LINES, mapping to CZ for configuration updates, 10-26
CSI_T_TXN_LINE_DETAILS, mapping to CZ for configuration updates, 10-26
currency, for quote, HTML Quoting, 14-5current selections, view option, 2-9custom code
derive attribute, 9-3Get_Custom_Price, 9-7
custom columns, 12-10customer, updating, when selecting item
instance, A-3customize
Actions menu, 12-14buttons, 12-14code, 11-15files, 11-6forms, 12-19Line Types, 12-2Quote Lines tab, 12-17solutions, 11-3TSO, 11-3user interface, 10-19workflow, 5-2, 13-4

Index-6
CZ: Auto-Expire Discontinued IB Trackable Items, profile option, 10-21
CZ: Configurator Install Base, profile option, 10-21CZ: Include Unchanged Install Base Items, profile
option, 10-21CZ: Only Create CZ Config Items for Selected
Nodes, profile option, 10-21CZ: Report All Baseline Conflicts, profile
option, 10-21CZ: Suppress Baseline Errors, profile option, 10-21CZ_CONFIG_EXT_ATTRIBUTES, Table in CZ
schema, 10-23CZ_CONFIG_ITEMS, mapping to the Install Base
schema, 10-26CZ_DB_SETTINGS
DISPLAY_SUMMARY_FULFILLMENT_ACTION, 10-23
CZ_DB_SETTINGS, DISPLAY_SUMMARY_FULFILLMENT_ACTION, 10-23
Ddata, out of synchronization, 15-2default
Install Base relationship, 12-4Line Type, 12-21status of new quote, 12-5value, change a quote, HTML Quoting, 14-4
Default Quote Status, profile option, 12-2, 12-5, 12-7
defineapproved rules, 2-12configuration Model, 10-18Container Model, 7-2Container Model as PTO BOM Model
requirement, 10-4Container Model as untrackable, 10-3Container Model do not, 10-4extended attributes, 8-4items as link items, 3-13Line Types, 10-20, 11-12, 15-3profile options, 10-21, 12-3rules for Connectors, 10-11rules using Connectors, 10-15service items, 6-3
work item, 13-9delete
Connector node, 15-2, A-4trackable child Model, impact of, 15-2trackable multiple instantiable child Model, A-4
dependency setup, 4-2disable
Add Service action, 12-16line-level action, 12-14Split Line action, 12-16table-level button, 12-14
Disable/Enable Refresh of a Configuration Model concurrent program, 10-6
discontinued, items, access, 11-29discounts
on one-time charges, 3-8on recurring charges, 3-7
discounts, change price of item, 2-11DISPLAY_SUMMARY_FULFILLMENT_ACTION
CZ_DB_SETTING for UISERVER, 10-23DISPLAY_SUMMARY_FULFILLMENT_ACTION,
CZ_DB_SETTINGS, 10-23
Eedit, See change or modify.enable
Connected-To option, 12-16line-level action, 12-14Reconfigure action, 12-16Remove Product action, 12-16table-level button, 12-14
Entered statuschange order while in, 2-10creating an order in, 2-10if placing order in, 2-13
Error Item Type, map, 13-8Error Process, map, 13-8errors
attempt to copy, 10-36Container Model marked as trackable, 6-7copy failure, 10-34generate logic in Configurator Developer, 10-6Install Base update failure, 15-4manage failure notification, 15-7

Index-7
manage notification, 15-3message, failure to accept order, 13-14no configuration, 10-34notification related, 15-4Provisioning Failed, 13-14retry failed action, 15-4retry failed outgoing messages, 15-5sales order notification, 15-4troubleshooting copy failure, 10-36update configuration when re-validating, 15-3view notification, 13-5when generating logic, 10-7, 10-11, 10-12, 10-17when importing Container Model, 6-7with child BOM Models, 10-6with Option Feature maximum, 10-14
eventsfor Configurator Extensions, 11-30onInstanceLoad, 11-31postInstanceLoad, 11-31related to TSO, 11-30
existing services, reconfigure, 2-4expiration
of quote, 2-12specify quote’s date of, HTML Quoting, 14-5
expiration date, change, HTML Quoting, 14-5extended attributes
create, 8-3define, 8-4global level, 8-3instance levels, 8-4inventory item levels, 8-3item category levels, 8-3map to SFM items, 8-6search by, 14-8set up pools of, 8-4verify coordination of, 8-7what are, 13-14
Ffailed action, 15-3, 15-5, 15-7find
item instances, A-3order, 15-4
flag, item as Container Model, 6-6
flowsbusiness, 2-2setup, 4-2TSO functionality, Forms Quoting, 14-16TSO functionality, HTML Quoting, 14-2
forms, customize, 12-19formula_id, attribute value, 9-8FREIGHT_CHARGES_TYPE lookup type, B-2Fulfilled status, change to, 2-13fulfillment
action, 11-13actions apply, 11-12activation and modifications during, 2-13based on actions, 3-11based on user-defined actions, 3-11building workflows, A-4change user attribute values, A-2creating attribute data, 11-32date, 5-3date of order lines, 2-13date required, 5-3Line Type activities, 10-20map transient attributes, 10-25node, 5-3of provisionable items, 5-2one-time, 10-13order, upon completion, 14-4persistence of user-defined values, 3-11persistence of values, 3-11quantity, 5-3restoring attribute data after, 11-32sequence of, A-4set Location and Location Type Code, 3-13synchronization of attributes, 11-31synchronization of instance names, 11-32update of Install Base, 5-3validating status, 10-31validating status of, 10-37verify, 2-10workflow item, 13-3
Ggenerate user interface, 10-19Get_Custom_Price code, 9-8

Index-8
global extended attribute levels, 8-3Global, extended attributes, 8-3graphics, add to UI, 10-19
Hhosting application, specify, 10-20
IIBAttribute
Configurator Extension, 10-20, 11-21effects of, 11-10, 11-25modify, 11-26setup, 11-22
identification, based on actions, 3-11identify, current baseline configuration, 3-12import
container BOM Model, 10-6Container Model, 10-19create child Model structure, 10-6data with Populate and Refresh Configuration
Models, 10-5Populate Configuration Models, 10-5refresh BOM with sub-models, 10-6
Import Configuration Models concurrent program, 10-19
indirection, for specifying Line Type data, 11-18initialization parameters
about, 10-29instance, 10-29multiple times, specify, 10-29validation_context, 10-30
Install Baseadd items to Container Model from, HTML
Quoting, 14-11add services from, 14-11add to Model from, HTML Quoting, 14-11configuration attributes with, 11-21default relationship, 12-4dependencies, 8-1, 9-1design tips, 8-7enable network configurations, 8-3functionality, 3-12integration with, 3-10
item, track in, 6-3key functionality, 3-3reconfigure, 2-7reference material, 8-1, 9-1remove changed lines, 14-11retry updates to, 15-4schema, 10-26search, 3-5setup, 8-1split line, 14-11update failure, 15-4
Install Base schemaCSI_T_TRANSACTION_LINES, 10-26CSI_T_TXN_LINE_DETAILS, 10-26
Installed BaseSee also Install Base.Tracking check box, 6-4
installed configuration, reconfigure, 10-21Instance Class, set to Link, 6-4instance extended attribute levels, 8-4Instance Name or Description, suggested renaming
of column, 12-8instance names
column attribute mapping, 12-10optional seeded column, 12-11set up Lines page, 12-8suggested name for column, 12-8synchronization after fulfillment, 11-32
instancesaccess to, 11-29appear by default in search results, 12-4component, 11-27description of, 10-29minimum and maximum, PTO
(pick-to-order), 10-8multiples of configurable components, 11-27number to appear, 12-5reconfigure, A-1trackable, 10-7
instantiability maximum, 10-7, 10-8instantiable child Model
delete trackable multiple, A-4track multiple, A-4
integration, with Install Base, 3-10Interactive Location Search Functional Companion

Index-9
source code, 11-6Inventory
category, HTML Quoting, 14-6Container Model, 6-6Container Models, 6-6define items as link items, 3-13reference material, 6-1setup, 6-1tracking for component item, specify, 6-3
inventory item extended attribute levels, 8-3item category extended attribute levels, 8-3Item Instance Query window, about, 3-13item instances
attribute values, A-2configurable, 2-7define extended attributes, 8-4find, A-3Global extended attributes, 8-3life cycle of, 1-2querying, 3-13reconfigure, 2-7reconfigured, copying booked order, A-3reconfigured, copying order lines, A-3removing order lines, A-2revision of, A-3saved configuration appears as, 3-12selected for reconfiguration, A-2selected from Oracle Install Base, 2-8updating a customer, A-3view, 2-8view or reconfigure configured, 3-12
itemsSee also products.apply pricing agreement to, 2-12apply promotion to price of, 2-12change price of, 2-11configure new, 2-6manual discount, 2-11view changed, 3-5
Kkey business flows, 2-1
Llaunch, Configurator, 3-5life cycle, of item instance, 1-2Line Category, 12-11Line Discount, 12-10, 12-11Line Number, 12-11Line Price List, HTML Quoting, 14-6Line Type
additional, for reconfiguration, 12-2column attribute mapping, 12-10column, determine display of, 10-23Configurator Extension, 10-20, 11-3, 11-11customized, 12-2default, 12-21define, 10-20, 11-12, 15-3effects of, 11-21known as action, 3-4map action and, 5-4modify, 11-11, 11-21No Action, 15-3optional seeded columns, 12-11Order Management, 5-4pricing dependency on action or, 10-22provisionable item includes mapped, 13-14purpose of Configurator Extension, 11-11Reprice, 15-3set up, 11-12set up Lines page, 12-8suggested renaming of column, 12-8type of change, 2-9
Line Type Configurator Extension, 11-21Line Type Functional Companion, 5-4Line Type Functional Companion code, 11-12line-level actions, enable or disable, 12-14lines
remove from Install Base, HTML Quoting, 14-11
remove, Forms Quoting, 14-26remove, HTML Quoting, 14-14split, add from Install Base, HTML
Quoting, 14-11Lines page
action or Line Type, 12-8column, display, 12-10

Index-10
column, hide, 12-10instance name, 12-8recurring adjustment, 12-8recurring list, 12-8seeded column, hide, 12-11setup, 12-7suggested column names, 12-8unit of measure (UOM), 12-8
link flag, schema change, 10-28Link to Customer Page, 12-11link, specify service item as, 6-3, 6-5location
background, 11-5Configurator Extension, 10-20for quote, HTML Quoting, 14-4
Location and Location Type Code, 3-13Location Type Code, 10-27, 11-4, 11-5logic
error when generating, 10-7, 10-11, 10-17generating, 10-19no error when generating, 10-12
lookup codesadd new, 12-14add to lookup types, 12-14disable, 12-16enter new, 8-6SFM Lookup, 13-8what are, 12-15, 12-20
lookup typesadd lookup codes to, 12-14for action menus and buttons, 12-15, 12-20FREIGHT_CHARGES_TYPE, B-2
Mmaintain, current baseline configuration, 3-12manage, failure notifications, 15-7mandatory attribute, 13-14map
CZ tables to Install Base tables, 10-26extended attributes to SFM items, 8-6item and Line Type combinations to work
item, 13-14provisionable item to Line Type, 13-14
marketing source, about, HTML Quoting, 14-5
menu notification, add function for, 13-5menus
customize, 12-14lookup type for, 12-15, 12-20
message code, 15-5, 15-6messages
failure to send, 15-6monitor and verify sending of, 15-6retry failed outgoing, 15-5
minus indicator, view of model, HTML Quoting, 14-7
model data, out of synchronization, 15-2Model structure, 10-3model, container, 10-3modify
See also change and reconfigure.Configurator Extensions, 11-2IBAttribute, 11-26Line Type, 11-11, 11-21
multiple instantiation, 3-4
Nname, for quote, HTML Quoting, 14-4Negotiation phase, converting an order in, A-3network configuration models
See also Container Model.storing, 3-12
network containers, view the components of, 14-10network links
service item, 6-5service item as, specify, 6-3
networksconfiguration, enable, 8-3partial reconfiguration and validation, 3-10storing configuration model, 3-12supporting models of, 3-4
No Action Line Type, 15-3nodes
about deleting a Connector, 15-2added to session, 11-28BOM Model, 10-12changed configuration attributes, 11-28changed descendant, 11-28changed location or location type code, 11-28

Index-11
Container Model, 10-17Container Model’s root, 10-11deleted from session, 11-28from non-trackable child, 10-18in Configurator, creation of model, 10-6in parent model, reference, 10-6replace fulfill, 5-3value change, 11-28
notificationsadd function for menu, 13-5errors, manage, 15-3manage failure, 15-7retry failed action, 15-4retry failed outgoing messages, 15-5retry Install Base updates, 15-4sales order error, 15-4view error, 13-5with Open status, 15-5
OOM. See Order Management.OM Sequential Numbering profile option, 12-6one-time charges
discount, B-7discounts on, 3-8enter code, B-2suggested renaming of column, 12-9what are, 3-6
onInstanceLoad (event), 11-31Open status, 15-5Oracle Advanced Pricing. See Advanced Pricing.Oracle Bill of Materials. See Bill of Materials.Oracle Configuration Interface Object, about, 11-27Oracle Configurator. See Configurator.Oracle Install Base. See Install Base.Oracle Inventory. See Inventory.Oracle Order Management. See Order Management.Oracle Quoting. See Quoting.Oracle Sales, task, HTML Quoting, 14-4, 14-6, 14-7,
14-10, 14-12, 14-13, 14-14, 14-18Oracle Service Fulfillment Manager. See Service
Fulfillment Manager.Order Capture, profile option, 12-3Order Flow-Through area, 15-4
order fulfillmentSee also fulfillment and provisioning.process, 2-4verify, 2-10
order linesabout copying, A-3removing, A-2status of provisionable, 13-14
Order Managementabout changing status in, 2-13create header and line workflows, 5-2dependencies, 5-1design tips, 5-4map Line Type, 5-4profile option, 12-3publication available to, 10-21reference material, 5-1replace fulfill node, 5-3setup, 5-1Workflow Header Process, SFM enabled, 13-3Workflow Line Process, 5-2, 13-4
order numbers, automatically generated, 12-6Order Type, for quote, HTML Quoting, 14-4orders
after placing in Booked status, 2-13booked, about copying, A-3cannot convert quotes to, A-3change while in Entered status, 2-10convert in Negotiation phase, A-3convert quote to, 14-14, 14-28create in Entered or Booked status, 2-10find, 15-4fulfillment, 2-4place, 2-12place a sales, Forms Quoting, 14-27place sales, HTML Quoting, 14-14place while in Booked status, 2-10search, 15-4sequence of fulfilling, A-4verifying fulfillment, 2-10
Outbound Message Queue, 15-6
Pparameters, batch validation, 10-30

Index-12
part numbers, add product, HTML Quoting, 14-6passive Components, 3-10pick-to-order. See PTO.place orders
about, 2-12about placing in Entered status, 2-13afterward, 2-13Booked status, 2-13configured or reconfigured item, 2-4Forms Quoting, 14-27HTML Quoting, 14-14in Booked status, 2-10
PL/SQL procedure, create, 13-6plus indicator, view of model, HTML
Quoting, 14-7pools, set up extended attribute, 8-4Populate and Refresh Configuration Models
concurrent programs, 10-5import data with, 10-5
Populate Configuration Models concurrent program, 10-5, 10-7
postInstanceLoad (event), 11-31prevent
changing quantity of component items, 12-3configuration model refreshing, 10-6
price listsadjust price of quote line, 2-12default, 2-12determine which to use, 9-3for quote, HTML Quoting, 14-6includes recurring price of service, 12-9line, 14-9source of pricing attributes, 9-2
pricingapply a promotional, 2-12apply manual discount, 2-11apply pricing agreement to, 2-12attributes and sourcing rules, 9-2based on attribute value, 9-3change item, 2-11define modifier for item or service, B-3define qualifiers on modifier, B-6dependency on Line Type or action, 10-22disable, 10-22discount to one-time charges, B-7
freeze, 2-12get custom price, 9-7items, 2-11view, for configuration, 2-9
pricing agreements, apply to item price, 2-12pricing attributes, through price lists, 9-2primary sales group, quote, HTML Quoting, 14-5primary salesperson, for quote, HTML
Quoting, 14-5processes
See also flows and workflows.business, 2-2
product catalog source, HTML Quoting, 14-6product description, HTML Quoting, 14-6product details, view, 14-9, 14-21Product Inventory category, HTML Quoting, 14-6product names, add product, HTML Quoting, 14-6products
See also items.add to Container Model, HTML Quoting, 14-11attribute value, B-4complete configuration, HTML Quoting, 14-7existing service, reconfigure, HTML
Quoting, 14-7included in Container Model, HTML
Quoting, 14-7incomplete configuration, HTML Quoting, 14-7name, add, HTML Quoting, 14-6part number, HTML Quoting, 14-6removed unchanged, Forms Quoting, 14-26removed unchanged, HTML Quoting, 14-12to quote, add, Forms Quoting, 14-21to quote, add, HTML Quoting, 14-6unchanged, remove, Forms Quoting, 14-26unchanged, remove, HTML Quoting, 14-12unit of measure, HTML Quoting, 14-6
profile optionASO Allow Quantity Updates for Component
Item, 12-3ASO Allow Quantity Updates for Top Level
Model Item, 12-3ASO Automatic Numbering, 14-5ASO Default IB Search Results, 12-4ASO Default Install Base Relationship, 12-4ASO Default Order Quantity, 12-4

Index-13
ASO Default Salesrep, HTML Quoting, 14-5ASO Max Number of IB Search Results, 12-5ASO Use Network Container, 12-5BOM Configurator URL of UI Manager, 12-6CZ
Include Unchanged Install Base Items, 10-21CZ: Auto-Expire Discontinued IB Trackable
Items, 10-21CZ: Configurator Install Base, 10-21CZ: Only Create CZ Config Items for Selected
Nodes, 10-21CZ: Report All Baseline Conflicts, 10-21CZ: Suppress Baseline Errors, 10-21default status of new quote, 12-5define, 10-21, 12-3OM Sequential Numbering, 12-6Order Capture, 12-3Order Management, 12-3Quoting setup, 12-2reconfiguration setup, 12-2
progress, an order, 13-14promotions, apply to item price, 2-12proposals, create from quote, 2-12provisionable
item, includes mapped Line Type, 13-14item, set service item as, 6-4item, specify service item as, 6-3order line, status of, 13-14
Provisionable, check box, 6-4provisioning
See also fulfillment.action, for each quote, 2-9sales order, 2-10status change after, 2-13
Provisioning Failedstatus, 13-14status on sales order form, 15-5
Provisioning Successful statuschange to, 2-13
Provisioning Successful status, about, 2-13PTO (pick-to-order)
BOM Model, 6-7Container Model, 7-2minimum and maximum instances, 10-8
publication, available to Order Management, 10-21
publish, Container Model, 10-20, 10-21
Qquantity
determine default, 12-4prevent changing quantity of component
items, 12-3quantity, change model product, 12-3quote lines
view item instances, 2-8Quote Lines tab, customize, 12-17quotes
See also Quoting.address for, HTML Quoting, 14-4agreement, 14-5automatic numbering, HTML Quoting, 14-5change, 2-11contract template, HTML Quoting, 14-6convert to order, 14-14, 14-28convert to sales order, 2-4, 2-10convert to sales order, Forms Quoting, 14-27convert to sales order, HTML Quoting, 14-14create, 2-3, 2-4create new version, 2-12create, Forms Quoting, 14-19create, HTML Quoting, 14-2, 14-4currency, HTML Quoting, 14-5default status of new, 12-5expiration date, HTML Quoting, 14-5expiration of, 2-12name for, HTML Quoting, 14-4Oracle Sales, HTML Quoting, 14-4, 14-6, 14-7,
14-10, 14-12, 14-13, 14-14, 14-18Order Type, HTML Quoting, 14-4price list, HTML Quoting, 14-6pricing items in, 2-11primary sales group, HTML Quoting, 14-5primary salesperson, HTML Quoting, 14-5print, 2-12products, add to Forms Quoting, 14-21products, add to, HTML Quoting, 14-6proposal from, 2-12remove unchanged components, Forms
Quoting, 14-26
Index-14
remove unchanged components, HTML Quoting, 14-12
sales channel, HTML Quoting, 14-5source for, HTML Quoting, 14-5specify contact name, HTML Quoting, 14-5submit for approval, 2-12working with, Forms version, 14-15
QuotingSee also quotes.additional Line Type setup, 12-2change default number of rows, 12-16dependencies, 12-1design tips, 12-21existing service, reconfigure, Forms, 14-18,
14-24existing service, reconfigure, HTML, 14-10functionality, 3-3key functionality, 3-2launch Configurator from, 3-5Lines page setup, 12-7profile options for reconfiguring services, 12-2profile options, define, 12-3reconfiguration setup, 12-2reference material, 12-1setup, 12-1TSO functionality flow, Forms, 14-16TSO functionality flow, HTML, 14-2
Rreconfiguration
See also reconfigure.term used, 2-4
reconfigureSee also change and configuration and update.action, enable, 12-16additional Line Type setup, 12-2existing items, 2-7existing service, 2-4existing service, Forms Quoting, 14-18, 14-24existing service, HTML Quoting, 14-10installed configurations, 10-21instance, A-1item instances, 2-7, 3-12partial network, 3-10
profile options, 12-2Quoting setup, 12-2remove unchanged components, HTML
Quoting, 14-12reconfigured item instances
copying booked orders, A-3copying order lines, A-3
recurring adjustmenton Lines page, 12-8suggested renaming of column, 12-9
recurring chargesdiscounts on, 3-7what are, 3-6
recurring listset up Lines page, 12-8suggested renaming of column, 12-9
recurring netset up Lines page, 12-8suggested renaming of column, 12-9
recurring price list, 12-9recurring totals
about, 3-8Reference node, 10-3refresh
instantiable models, 10-6models with references, 10-6prevent configuration model, 10-6
Refresh a Configuration Model concurrent program, 10-5, 10-6
Refresh all Imported Configuration Models concurrent program, 10-5, 10-6
relationships, connected-to, 3-13remove
changed lines from Install Base, 14-11unchanged components, Forms Quoting, 14-26unchanged components, HTML Quoting, 14-12
Remove Product, enable, 12-16rename, columns on the Lines page, 12-8Reprice Line Type, 15-3responses, view approver, 2-12restrictions, about, A-1return status, 10-34revalidate, installed configurations, 15-2revision of item instance, A-3row, change default number of, 12-16

Index-15
rulecontaining participants, 15-2define approved, 2-12in Container Models, 10-15invalid configuration combinations, 10-17valid configuration combinations, 10-16when re-validating Container Model, 15-2
Ssales channel, for quote, HTML Quoting, 14-5sales orders
See also orders.convert from quote, 2-10convert from quote, Forms Quoting, 14-27convert from quote, HTML Quoting, 14-14convert quote to, 2-4, 2-10monitor for error notifications, 15-4place, 2-4place, Forms Quoting, 14-27place, HTML Quoting, 14-14provisioning, 2-10
scope, provisioned items, A-1search
by extended attribute values, 14-8for order, 15-4Install Base, 3-5
search resultschange number of rows in, 12-16instances by default, 12-4
seeded columns, optional, 12-11seeded value, change, 12-9Service Fulfillment Manager
change to user attribute, A-2dependencies, 13-2design tips, 13-14fails to accept order, 13-14functionality, 3-14key functionality, 3-3map extended attributes to, 8-6map work item, 13-10PL/SQL Procedure, create, 13-6provisioning in, 2-10reference material, 13-1setup, 13-1
work item, define, 13-9Workflow Header Process, 13-3workflow process, create, 13-7
Service Fulfillment Order, verify order type, in flow, 2-5
service itemsnetwork link, 6-3provisionable items, 6-3set provisionable, 6-4
servicesadd from Install Base, HTML Quoting, 14-11add new, 2-4add telecommunication, Forms Quoting, 14-22as Container Model, flag, 6-3existing, reconfigure, Forms Quoting, 14-18,
14-24existing, reconfigure, HTML Quoting, 14-7,
14-10setup
about, 4-2Bill of Materials (BOM), 7-1checklist, 4-4configurable items, 6-3Configurator, 10-1dependencies, 4-2flow, 4-2Install Base, 8-1Inventory, 6-1Order Management, 5-1overview, 4-2Quoting, 12-1sequence, 4-2Service Fulfillment Manager, 13-1
SFM Lookup Codes, 13-8SFM. See Service Fulfillment Manager.shipping information, change, 2-12short names, of Oracle Applications, 10-21solutions, customize, 11-3source
for quote, HTML Quoting, 14-5Interactive Location Search Functional
Companion, 11-6product catalog, HTML Quoting, 14-6
specify URL for Configurator window, 12-4split line

Index-16
disable action, 12-16perform from Install Base, 14-11
statusafter provisioning, 2-13baseline configuration, 2-9Booked, need to change, 2-13change, 2-13change manually, 2-13change order in Entered, 2-10create order in Entered or Booked, 2-10default of new quote, 12-5Default Quote Status profile option, 12-2, 12-5Entered, 2-13Fulfilled, change to, 2-13monitor area, 15-7of provisionable order line, 13-14Open, 15-5Provisioning Failed, 13-14provisioning failure on sales order form, 15-5record, 10-3return, 10-34track item instance, 1-2valid transition defined from current, 14-15,
14-27validating fulfillment, 10-31, 10-37
Status Monitor area, 15-7substantial change, required revalidation, A-4Summary window, about, 2-9synchronization, data, out of, 15-2
Ttable-level buttons, enable or disable, 12-14Tax Details, 12-10, 12-11telecommunications service ordering. See TSO
functionality or specific topic.Test Model button, 11-10, 11-20, 11-24Total Price, 12-10track, life cycle of item instance, 1-2trackable
delete trackable child Model, 15-2instance, 10-7make child Model non-trackable, 15-2
transaction type, about, 10-20transient attributes
definition, 10-14flagging, 10-14values, 10-14
transient flagsdesignate items in configuration model, 10-13schema change, 10-29setting, 10-19
transient itemsdefinition, 10-13flagging, 10-13what are, 3-7
triangle icon, HTML Quoting, 14-7triangle indicator, 14-13TSO functionality
about, 1-2flow, Forms Quoting, 14-16flows, HTML Quoting, 14-2
Uunchanged components
cost difference, 14-13remove, 3-5remove, Forms Quoting, 14-26remove, HTML Quoting, 14-12
Unit Adjustment Percentcolumn and attribute mapping, 12-10optional seeded column, 12-11suggested renaming of column, 12-9
Unit List Pricecolumn and attribute mapping, 12-10optional seeded column, 12-11suggested renaming of column, 12-9
unit price, view, 14-22Unit Selling Price
column and attribute mapping, 12-10option seeded column, 12-11suggested column renaming, 12-9
units of measurement (UOM)add product to quote, HTML Quoting, 14-6code, 10-27column and attribute mapping, 12-10set up lines page, 12-8
updateSee also change, modify and reconfigure.

Index-17
customer when selecting item instance, A-3distinguished from upgrade, 2-4installed configurations, 11-27
upgradesSee also reconfigure.distinguished from update, 2-4
URLspecify Configurator window for, 12-4specify for Configurator window, 12-6
user interfacecustomize, 10-19generate, 10-19
user tasks, 14-1
Vvalid transition, defined from current status, 14-15,
14-27validating fulfillment status, 10-37validation, partial network, 3-10validation_context, description of, 10-30verify
Container Model requirements, 6-4coordination of attributes, 8-7invalid items within configuration, 15-3Line Type, 15-3order fulfillment, 2-10order type, in flow, 2-5sending of messages, 15-6valid Container Model structure, 10-19
viewattributes of telecommunications service, 14-24changed items, 3-5chosen item instances, 2-8components of network container, 14-10configurations, 3-13configured model, 14-7connected-to relationships of configured
instance, 3-13error notifications in HTML, 13-5expanded diagram, 2-4messages, 15-6of model, 14-7only changes of service, 14-26order details, 14-15, 14-28
prices for configuration, 2-9product details, 14-9, 14-21response of each approver, 2-12Service Fulfillment lines, 15-4unit price, 14-22
Wwork items
define, 13-9item and Line Type combinations map to, 13-14map to action combination, 13-10parameter, correct, 15-7
Workflow Header Process, create SFM Enabled OM, 13-3
workflow line process, create, 5-2, 13-4workflows
change access level, 5-2, 13-4create header and line, 5-2customize, 5-2, 13-4process, create, 13-7
XXDP Resubmit Failed Message concurrent
program, 15-5

Index-18