technical - sportsengine
TRANSCRIPT

TECHNICALTeaching Skills
REVISED 2/19

GROWTH AND DEVELOPMENTYou will be dealing with very young players so it is important to realize that the teaching of basic hockey skills must be tempered by the age of the players, their early stage of physical development and the amount of work they are equipped to handle.
What this means is that instructional sessions on the ice should contain the following three things to ensure your players’ bodies work properly:
1. a good warm-up2. a positive, non-threatening atmosphere that
avoids high tension and anxiety3. work appropriate to the strength and
muscular development of the players
There are two different types of changes that are happening in the body of the younger player:
1. changes due to normal physical growth2. changes due to the demands made from
physical activity
Here are a few assumptions and sport specific implications related to growth and development in childhood years:
PHYSICAL GROWTH & DEVELOPMENT ASSUMPTIONS IMPLICATIONS
Basic movement patterns Use simple activities that are already learned yet in continue to develop basic most children are not very fundamental skills with a refined. Development at minimum of pressure on this stage is instrumental performance. Provide for all other levels. instruction to refine skills.
Aerobic capacity is ade- Provide lots of opportunity quate for most activities. to participate.
Right/left handedness is Encourage the use of the determined at this stage. non-dominant side.
MENTAL GROWTH & DEVELOPMENT ASSUMPTIONS IMPLICATIONS
Reasoning skills in Play simple games with concrete situations are simple rules and strategies improving. – avoid complicated rules.
Attention span is Give short, clear and increasing but is still simple instructions. Use short. demonstrations. Drills and activities should be changed frequently within one practice but repeated over consecutive practices until players experience success.
OBJECTIVES
• To understand the basic principles of human growth and development as they relate to the teaching of basic skills
• To understand the factors affecting learning and some techniques to improve the learning environment
• To understand he basic teaching progressions to follow and how to plan explanations and demonstrations of skills
• To understand the whole – part – whole method of skill instruction
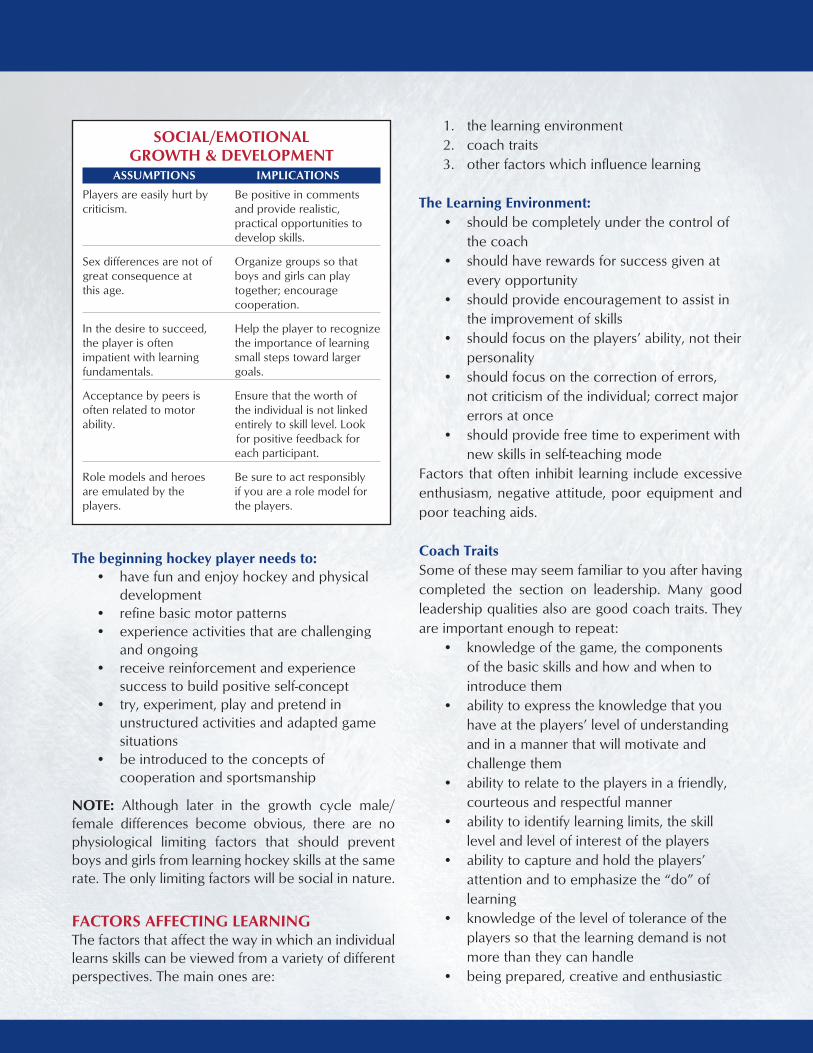
SOCIAL/EMOTIONAL GROWTH & DEVELOPMENT
ASSUMPTIONS IMPLICATIONS
Players are easily hurt by Be positive in comments criticism. and provide realistic, practical opportunities to develop skills.
Sex differences are not of Organize groups so that great consequence at boys and girls can play this age. together; encourage cooperation.
In the desire to succeed, Help the player to recognize the player is often the importance of learning impatient with learning small steps toward larger fundamentals. goals.
Acceptance by peers is Ensure that the worth of often related to motor the individual is not linked ability. entirely to skill level. Look for positive feedback for each participant.
Role models and heroes Be sure to act responsibly are emulated by the if you are a role model for players. the players.
The beginning hockey player needs to:• have fun and enjoy hockey and physical
development• refine basic motor patterns• experience activities that are challenging
and ongoing• receive reinforcement and experience
success to build positive self-concept• try, experiment, play and pretend in
unstructured activities and adapted game situations
• be introduced to the concepts of cooperation and sportsmanship
NOTE: Although later in the growth cycle male/female differences become obvious, there are no physiological limiting factors that should prevent boys and girls from learning hockey skills at the same rate. The only limiting factors will be social in nature.
FACTORS AFFECTING LEARNINGThe factors that affect the way in which an individual learns skills can be viewed from a variety of different perspectives. The main ones are:
1. the learning environment2. coach traits3. other factors which influence learning
The Learning Environment:• should be completely under the control of
the coach• should have rewards for success given at
every opportunity• should provide encouragement to assist in
the improvement of skills• should focus on the players’ ability, not their
personality• should focus on the correction of errors,
not criticism of the individual; correct major errors at once
• should provide free time to experiment with new skills in self-teaching mode
Factors that often inhibit learning include excessive enthusiasm, negative attitude, poor equipment and poor teaching aids.
Coach TraitsSome of these may seem familiar to you after having completed the section on leadership. Many good leadership qualities also are good coach traits. They are important enough to repeat:
• knowledge of the game, the components of the basic skills and how and when to introduce them
• ability to express the knowledge that you have at the players’ level of understanding and in a manner that will motivate and challenge them
• ability to relate to the players in a friendly, courteous and respectful manner
• ability to identify learning limits, the skill level and level of interest of the players
• ability to capture and hold the players’ attention and to emphasize the “do” of learning
• knowledge of the level of tolerance of the players so that the learning demand is not more than they can handle
• being prepared, creative and enthusiastic

Other Factors• Guide and monitor the learning process. Be
aware of progressions in learning – work from the simple to the difficult
• New skills should be introduced on a solid basis, for example at the beginning of a lesson. They should be built on previous lessons and should be emphasized until mastered.
• Ice sessions should be planned around the level of competence and interest of the players, their ability to understand instructions and their attention span and capability to learn new skills as well as master old ones.
• Repeat drills for short periods of time over a large number of ice sessions and, wherever possible, praise good performance.
TEACHING PROGRESSIONSTeaching physical skills and technique involves a chain of events. There are four main links in this chain:
1. Select the Skill – Select a basic skill to be learned and identify what you want them to learn.
2. Plan the Demonstration – Plan the explanation and demonstration; determine what to say and how to say it.
3. Plan the Practice – Plan how the players will practice the skill.
4. Provide Feedback – Provide feedback during practice; make constructive corrections and help the players maintain realistic goals.
SELECT THE BASIC SKILL TO BE LEARNEDBasic skills are not always simple to learn. In hockey, the basic skill is skating but it is a complex and difficult skill. Passing or shooting the puck is actually easier, but skating is the more basic skill.
Plan the Explanation and DemonstrationThis is the planning you do to organize what you want to teach. Although most of this has been done for you in the lesson plans, it is important you understand the sequence of events to follow in conducting a lesson.
STEP 1– Select a skill and write down why it is important.Name the skill and, if possible, explain briefly and in simple words what the name means — how the skill is used in the sport, and where and when it is used. Keep the explanation simple and brief. Total time for the demonstration should be 30-45 seconds duration.
STEP 2 – Select four or five main teaching points to emphasize. Each may be made up of two or three closely related ideas. If your participants are young, inexperienced, or have special learning problems, then select only one or two teaching points and keep the points as simple as possible. Select short, descriptive key words or phrases to highlight the teaching points during the demonstration. Rehearse the demonstration and use the key words until you know them well. Don’t overload the learner by giving too many key words at the same time.
STEP 3 – Decide if an aid would help. An aid is a chart, diagram, model of some kind, picture or video. Do not use an aid unless you feel it will add something important to the demonstration. Good aids are most useful if they are posted on a wall or bulletin board so players can refer to them after the skill has been taught. Aids will help them recall details of the demonstration. If an aid is to be used, rehearse with it until you feel comfortable.
STEP 4 – Select an effective formation. Consider the number of learners present and decide in what formation to put them where all will be able to see and hear clearly.
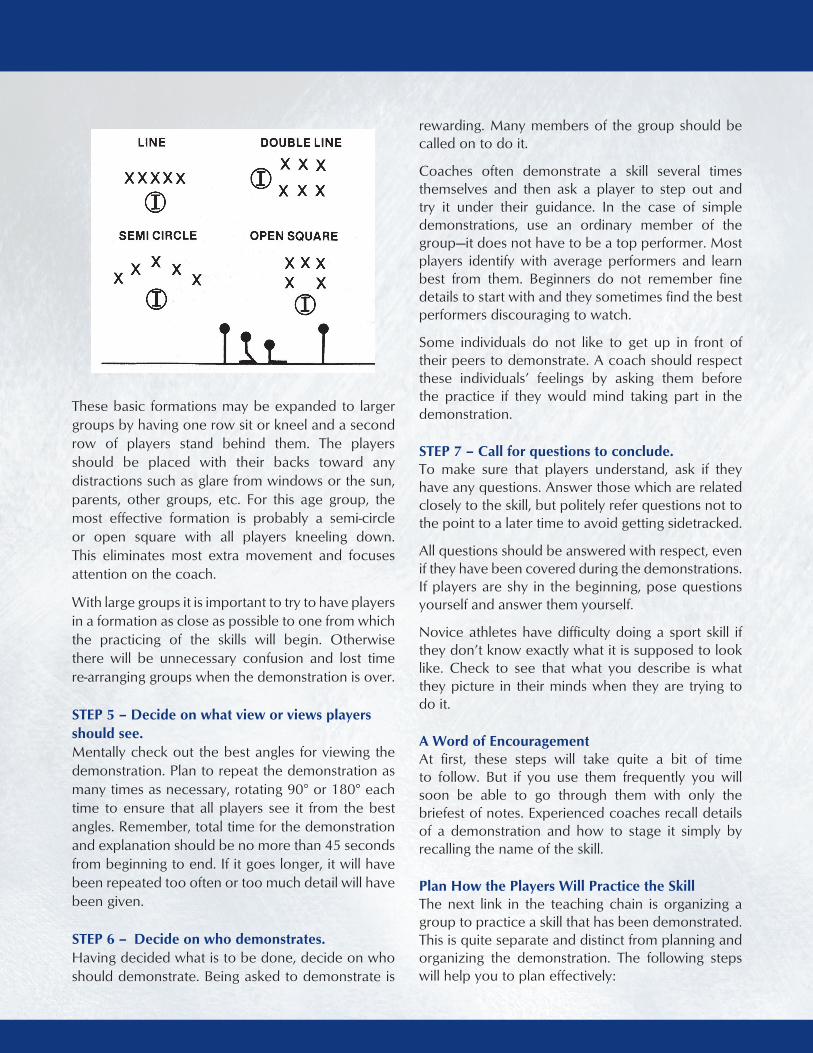
These basic formations may be expanded to larger groups by having one row sit or kneel and a second row of players stand behind them. The players should be placed with their backs toward any distractions such as glare from windows or the sun, parents, other groups, etc. For this age group, the most effective formation is probably a semi-circle or open square with all players kneeling down. This eliminates most extra movement and focuses attention on the coach.
With large groups it is important to try to have players in a formation as close as possible to one from which the practicing of the skills will begin. Otherwise there will be unnecessary confusion and lost time re-arranging groups when the demonstration is over.
STEP 5 – Decide on what view or views players should see.Mentally check out the best angles for viewing the demonstration. Plan to repeat the demonstration as many times as necessary, rotating 90° or 180° each time to ensure that all players see it from the best angles. Remember, total time for the demonstration and explanation should be no more than 45 seconds from beginning to end. If it goes longer, it will have been repeated too often or too much detail will have been given.
STEP 6 – Decide on who demonstrates. Having decided what is to be done, decide on who should demonstrate. Being asked to demonstrate is
rewarding. Many members of the group should be called on to do it.
Coaches often demonstrate a skill several times themselves and then ask a player to step out and try it under their guidance. In the case of simple demonstrations, use an ordinary member of the group—it does not have to be a top performer. Most players identify with average performers and learn best from them. Beginners do not remember fine details to start with and they sometimes find the best performers discouraging to watch.
Some individuals do not like to get up in front of their peers to demonstrate. A coach should respect these individuals’ feelings by asking them before the practice if they would mind taking part in the demonstration.
STEP 7 – Call for questions to conclude. To make sure that players understand, ask if they have any questions. Answer those which are related closely to the skill, but politely refer questions not to the point to a later time to avoid getting sidetracked.
All questions should be answered with respect, even if they have been covered during the demonstrations. If players are shy in the beginning, pose questions yourself and answer them yourself.
Novice athletes have difficulty doing a sport skill if they don’t know exactly what it is supposed to look like. Check to see that what you describe is what they picture in their minds when they are trying to do it.
A Word of EncouragementAt first, these steps will take quite a bit of time to follow. But if you use them frequently you will soon be able to go through them with only the briefest of notes. Experienced coaches recall details of a demonstration and how to stage it simply by recalling the name of the skill.
Plan How the Players Will Practice the SkillThe next link in the teaching chain is organizing a group to practice a skill that has been demonstrated. This is quite separate and distinct from planning and organizing the demonstration. The following steps will help you to plan effectively:
STEP 1 – Take stock of the practice environment. Answer the following questions as a basis for your planning:
• How many players are there?• How much area is there available in which
to work?• How much fixed equipment is available?• How much small equipment is available?• What special dangers exist in the practice
area that must be guarded against?
STEP 2 – Maximize activity. The object is to use as much of the space and as much of the time as possible. Plan the practice activity so there is as little unnecessary waiting time as possible.
Use your best judgment to answer the following questions in planning the practice activity:
• Will it be best to start participants working alone, in pairs or in small groups?
• Do learners need to be moving or can they practice in one place? If they are moving, where should they start from so there will be enough clear area in which to move?
• Should players be paired off or grouped by size, experience or aggressiveness in order to minimize chances of injury and equalize competition among and between learners?
• Will players have to be grouped and take turns sharing because there is not enough area or fixed or moveable equipment?
• How can you make the groups as small as is practical and as active as possible?
• How can dangers in the area be removed, covered or otherwise decreased or avoided by careful placing of players and their patterns of movement?
Some breaks in activity can be constructive—here are a few reasons:
• if time is needed to rest in vigorous practice• when space available is too small for all to
be active• when the amount of equipment is limited• when it is not safe for everyone to be active
at the same time• if time is required to correct, re-teach or
give further instruction
STEP 3 – Plan to move learners into practice activity quickly. Where possible, the formation used to observe the demonstration should be as much like the practice formation as possible. If groups or squads are to be used regularly, then players should be assigned to specific groups. Membership of the groups should be changed from time to time.
The coach must take care to maintain the attention and control of learners during the time between the demonstration and the beginning of practice.
Require attention, give simple, clear instructions and plan a simple, efficient method of distributing equipment if that is necessary.
STEP 4 – Use clear, precise instructions. As soon as players are in position and ready to begin the practice of the demonstrated skill, explain simply what is to be done. Watch their faces for signs that they understand or are puzzled. Re-explain in the same or different words as necessary.
Use simple key words or key phrases to drive home the main points of instruction. Repeat one or two key words at appropriate times during and after demonstrations.
Carefully point out any special safety precautions and pause to see that your orders have been heard and understood.
STEP 5 – Check and correct the practice pattern first, then check technique. When practice begins, your attention should be on the pattern of activity. That is, are groups spaced properly so they have enough room? Are they skating far enough and turning at the place you asked them to? Are safety precautions being observed? Did they understand the instructions?
If any of these things need attention, correct them as the players practice. If this is impossible, stop the group, get their attention and make corrections.
Once the practice pattern is well established, begin to check technique and details of the skill as players perform. This is an extremely important point. Get the practice pattern going smoothly first. Then and only then, begin to check the technique of players. Stand or move around so you can see or scan the

whole group. If all is going well, let them proceed for a while.
Provide Feedback During PracticeFeedback during learning involves feeding back information to the players about their efforts to learn. It serves three important functions in learning:
1. to guide improvement2. to measure progress 3. to provide encouragement
Give Feedback to Guide ImprovementLearning skills can be very confusing. There are many things to think about. First the player needs to know what is being done correctly so that he or she will know what parts of the skill are under control. This is not a matter of being nice to the learner by being positive. This is based strictly on sound principles of skill learning.
If players are not clear on what parts of the skill are being done correctly, they may change some of those things for the worse as they try to correct other parts of the skill.
Use Feedback as a Measure of ProgressIf an athlete knows that his/her list of questions about how to do a skill is getting shorter, it will be easy for him or her to recognize improvement.
Often a player will recognize increased skill as a new feeling of naturalness and smooth action that replaces stiff, unnatural action (“it feels much better now”), and this is another kind of important evidence or improved quality.
Use Feedback as Reward or PunishmentWhile knowledge of improvement rewards us, so does approval or recognition: words of encouragement from people important to us, family members, friends and coaches in particular. “Well done!”; “Yes, excellent.”; “Good work.”; “Charlie, I’m proud of you.”
Punishment is the opposite of reward.
Physical punishment is not acceptable nor is extra strenuous, physical work an advisable form of punishment.
TWO TEACHING APPROACHESThere are two approaches commonly used in teaching simple skills:
1) imitation2) demonstration/explanation followed by
practice and feedback
The Imitation MethodSimple imitation is often the best way for players to learn. It requires them to focus on what is to be imitated or copied. “Watch this … Try it.” Often the imitation is as accurate as it needs to be. You should then confirm it: “Yes. That’s it. Now remember that.” If necessary, have it practiced several times.
When minor corrections are required, point them out in a clear, matter-of-fact way. If players have trouble picking up the correct action or movement, then you should realize that, for some reason, it is not as simple as expected.
The Demonstration/Explanation/ Practice/Correction Method This method is used extensively. It involves these steps:
• Demonstrate first with minimal explanation: “Watch this. Be careful to stand like this, and then shoot the puck. Try it.”
• Allow for practice. Observe carefully, looking for correct features and common errors.
• Provide feedback while practice continues, if possible. If you must, stop practice and confirm correct actions and, if necessary, make suggestions to correct errors.
• Allow further practice and correct in more detail, if necessary.

This may be illustrated with the following diagram:
QUESTIONS TO PONDER1. Recall three teachers who had a great
influence on you. What did you learn from the way these people taught that you could apply to instructing?
2. Can you make up a catchy three or four word sequence to use as an aid in explaining and demonstrating a skill?
3. If you were given $1,000, what could you do to improve your practice environment?
4. What do you feel is your greatest strength as a teacher?
EXAMPLES OF INEFFECTIVE LISTENING
Player: “Mr. Brown, I’m a bit worried about the skill we are going to be learning today.”
Coach: “Okay guys, let’s get ready for warm-up.”
Player: “Mr. Brown, I’d like to talk …” Coach: “Okay guys, let’s go.”
Player: “Mr. Brown, could I …” Coach: “What is it?”
Player: “I’m worried about learning how to …” Coach: “Don’t worry, Johnny …”
SIMPLE SKILL LEARNING DIAGRAM
2 Practice
1 Demonstrate/
Explain
3 Confirm Correct
Parts
4 Identify Errors

Player: Silence Coach: “Okay guys, let’s get out there.”
Player: “Mr. Brown, I’m a bit worried about the skill we are going to be learning today.”
Coach: “I see.” (bridging)
Player: “Yeah, I have a scared feeling since I talked to some of the guys.”
Coach: “The guys?” (restating)
Player: “Thanks, Mr. Brown. I feel a bit better now.”
Coach: “Good, I know you’ll be okay Johnny … Okay guys, let’s get ready for the warm-up.”
SUMMARY
There are four links in teaching skills:1. Select a basic skill to be learned.2. Plan the explanation and demonstration.
a. Select a skill and write down why it is important.
b. Select four or five main teaching points and key words.
c. Decide if an aid would help.d. Decide on what views a player should
see.e. Decide on who demonstrates.f. Call for questions to conclude.
3. Plan how the players will practice the skill.a. Take stock of the practice environment.b. Maximize activity.c. Move the learners into practice quickly.d. Use clear, precise instructions.e. Check and correct practice pattern first,
then check technique.4. Provide feedback during practice.
a. Give feedback to guide improvement.b. Use feedback as a measure of progress.c. Use feedback as reward or punishment.