technical instructions - toyotachile.cl · discharge static electricity charged on your body. ......
TRANSCRIPT
1
TECHNICAL INSTRUCTIONS
PASSENGER SIDE AIRBAG MODULE
YARIS/ VIOS
1. OPERATION FLOWCHART ····················································································· 3
2. IDENTIFICATION OF AFFECTED VEHICLES ····························································· 4
3. PREPARATON ······································································································· 5
4. GENERAL WORK PROCEDURES ············································································ 6
5. PRECAUTIONS FOR AIRBAG REMOVAL/INSTALLATION ··········································· 7
6. PRECAUTIONS FOR ENTIRE WORK ········································································ 9
7. COMPONENTS ······································································································ 11
8. WORK PROCEDURES ···························································································· 12
8.1 REMOVAL OF PASSENGER SIDE AIRBAG MODULE ·············································· 12
8.2 INSTALLATION OF A NEW PASSENGER SIDE AIRBAG MODULE (LHD) ··················· 15
8.3 INSTALLATION OF A NEW PASSENGER SIDE AIRBAG MODULE (RHD) ·················· 17
2
<<SAFETY PRECAUTIONS>>
A. Be sure to observe the following precautions to prevent accidents and
injuries.
Park the vehicle and chock the wheels.
If it is necessary to start the engine, perform the operation in a well ventilated area.
Before removing and reinstalling heavy parts such as the engine, transmission and
differential using lifting equipment, check that there are no problems with the
equipment.
When working in a group of 2 or more, each person must work to ensure the safety of all
team members.
To prevent burns and other injuries, use extra caution when handling parts that are
subject to high temperatures, as well as rotating, sliding, or vibrating parts.
When lifting the vehicle using a jack, support it in the specified location using a rigid
rack.
When lifting the vehicle using a lift, lock the lift for safety.
B. Also perform the following operation with care.
Use of auto lift
Make absolutely certain that there are no other workers and no tools, parts, or other
objects within the movable range of the lift. Also, be sure to announce all lift operations
out loud (such as “Raising the lift!” and “Lowering the lift!”) to alert other workers.
When raising or lowering the lift to adjust the vehicle position, etc., pay attention to the
positions of your arms, legs, and other body parts, and be extremely careful to prevent
them from being caught in the lift.
Use of brake cleaner
Use brake cleaner for appropriate purposes in accordance with instructions in the
manual.
Do not use brake cleaner to remove dirt or stains from work clothes, etc. It can catch on
fire and cause serious burns.
<Precautions>
Do not use brake cleaner near flame or fire.
Do not use large amounts of brake cleaner in a room where a fire is burning.
Do not keep brake cleaner in a place subject to high temperatures exceeding 40° C ,
such as a place subject to direct sunlight or near fire.
Do not put brake cleaner in fire.
Edges
When handling the edges of parts and panels, wear protective gloves or apply
protective tape to the edges to prevent injuries to your hands and fingers.
3
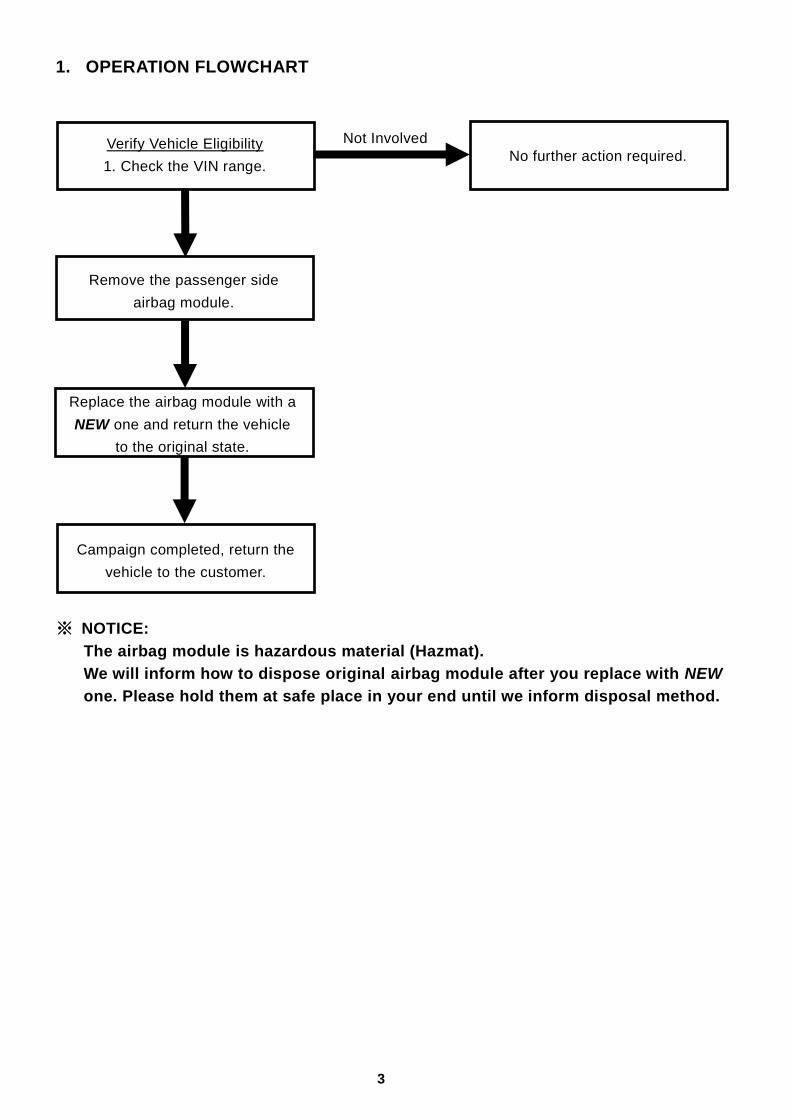
Verify Vehicle Eligibility
1. Check the VIN range.
Verify Vehicle Eligibility
1. Check the VIN range.
No further action required.
Remove the passenger side
airbag module.
Campaign completed, return the
vehicle to the customer.
Replace the airbag module with a
NEW one and return the vehicle
to the original state.
1. OPERATION FLOWCHART
※ NOTICE:
The airbag module is hazardous material (Hazmat).
We will inform how to dispose original airbag module after you replace with NEW
one. Please hold them at safe place in your end until we inform disposal method.
Not Involved
Not Involved

4
2. IDENTIFICATION OF AFFECTED VEHICLES
AFFECTED VEHICLE IDENTIFICATION NUMBER
Model Model Code WMI VDS Frame Range Production period
BELT/YARIS
NCP92 JTD
BW903# 1000114-4030710 20051021-20081225
BW923# 1000106-4033044 20051005-20081225
BW933# 1000113-1000113 20051007-20051007
NCP93 JTD
BT903# 1000114-1337991 20050927-20081225
BT923# 1000126-4060410 20051003-20081225
BT933# 1000131-1000131 20051007-20051007
NBC5
NCP92 LFM AU92A# 0002000-0016829 20080218-20081224
NCP93
MR0 53HY9# 5000001-9018874 20061031-20081227
PN1 53HY9# 7000021-7041143 20070927-20081224
RL4 BT913# 9500496-9500496 20071112-20071112
BT923# 9500001-9503810 20070913-20081231
ZSP92 LFM AP90A# 0019335-0022724 20081008-20081224
AP92A# 0002000-0022276 20080219-20081208
Model Model Code Frame range Production period
NBC5 NCP93 8000000-9001948 20070508-20081219
NCP93L 8000002-8000002 20070601-20070601
NOTE: # indicates that various characters may occupy that position. As for the total number of
affected vehicles shipped to your country, please refer to the attached VIN-list.
1. CHECK THE VEHICLE IDENTIFICATION NUMBER
(a) Confirm that the VIN is within the range shown in the table above.
HINT:
The Vehicle Identification Number (VIN) is stamped on location A and B shown in the illustration.
China: Thailand: Indonesia:
Malaysia: Philippines:
Vietnam:
5
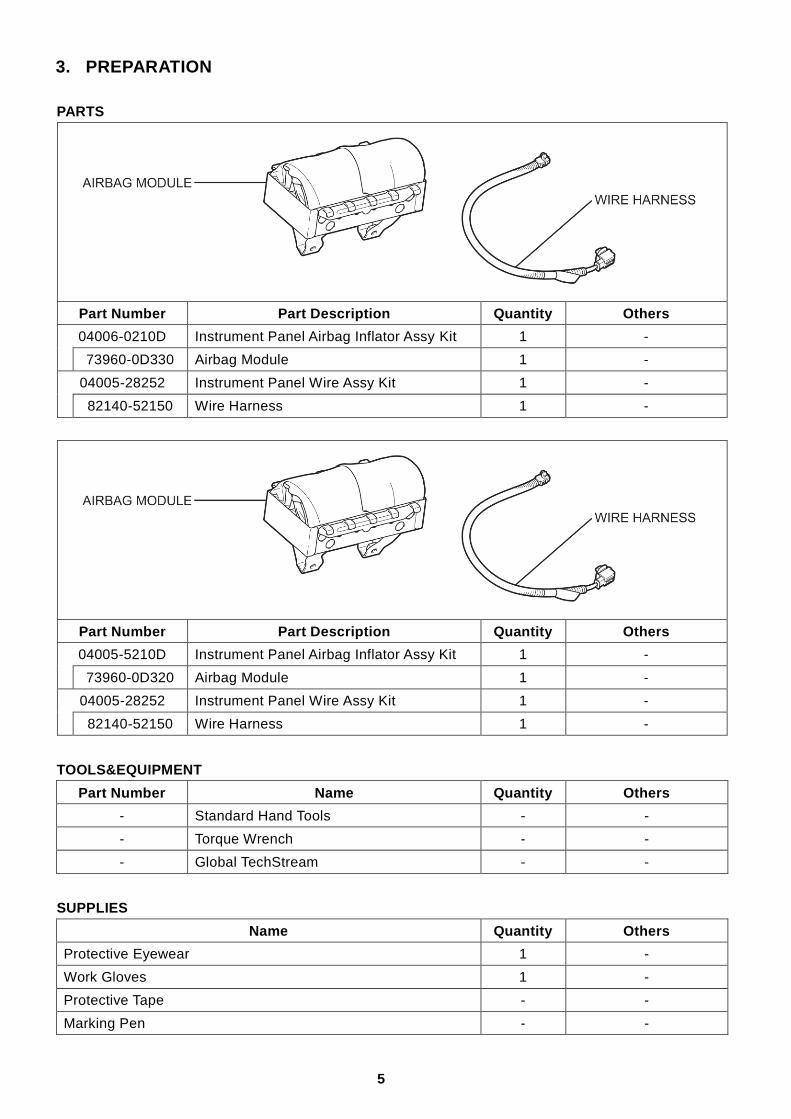
3. PREPARATION
PARTS
Part Number Part Description Quantity Others
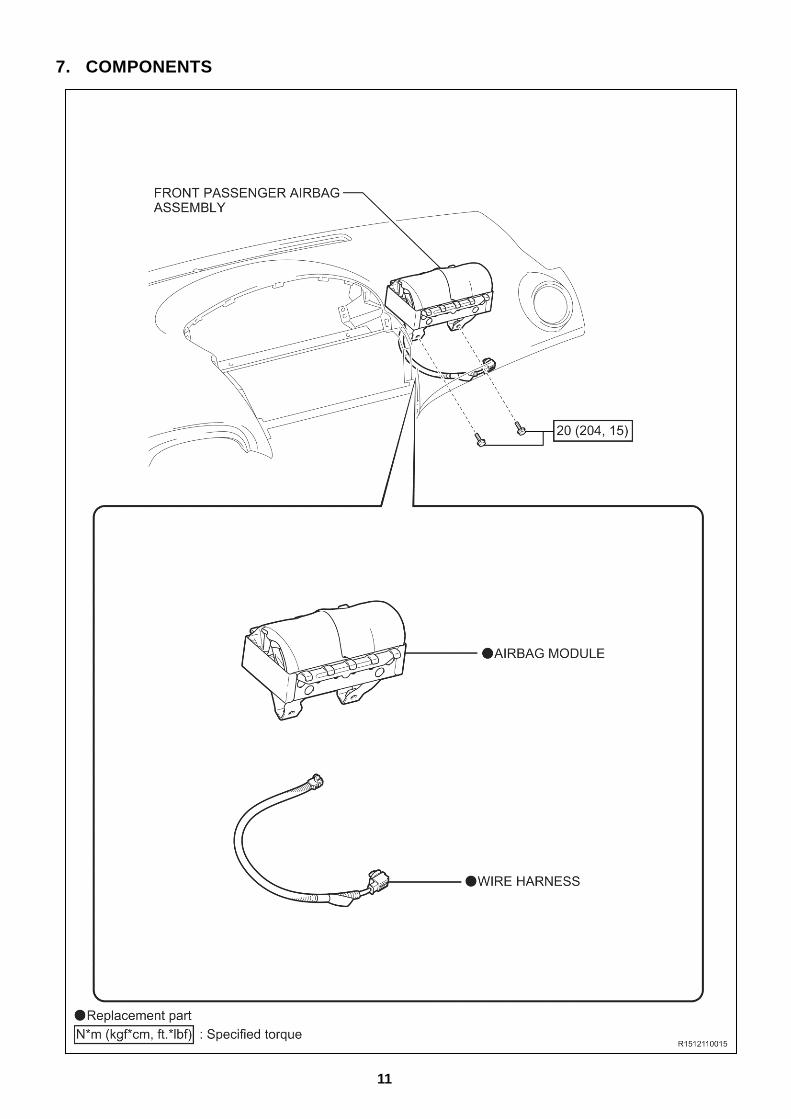
04006-0210D Instrument Panel Airbag Inflator Assy Kit 1 -
73960-0D330 Airbag Module 1 -
04005-28252 Instrument Panel Wire Assy Kit 1 -
82140-52150 Wire Harness 1 -
Part Number Part Description Quantity Others
04005-5210D Instrument Panel Airbag Inflator Assy Kit 1 -
73960-0D320 Airbag Module 1 -
04005-28252 Instrument Panel Wire Assy Kit 1 -
82140-52150 Wire Harness 1 -
TOOLS&EQUIPMENT
Part Number Name Quantity Others
- Standard Hand Tools - -
- Torque Wrench - -
- Global TechStream - -
SUPPLIES
Name Quantity Others
Protective Eyewear 1 -
Work Gloves 1 -
Protective Tape - -
Marking Pen - -
6
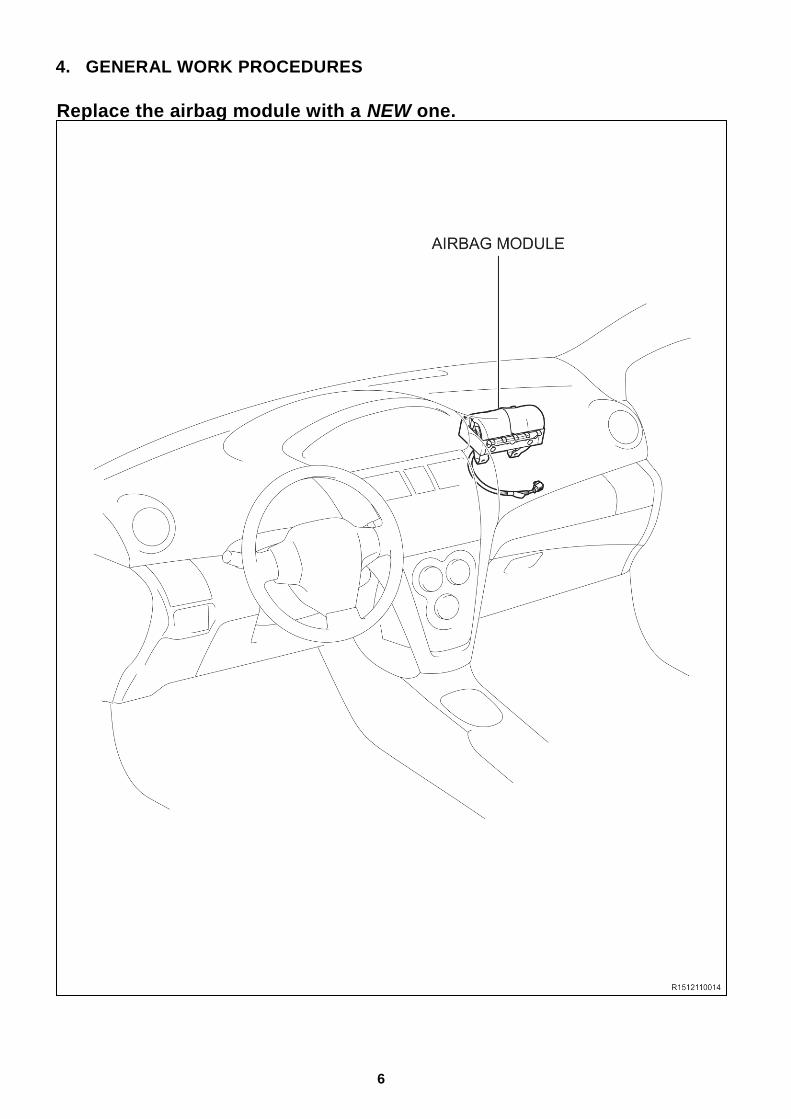
4. GENERAL WORK PROCEDURES
Replace the airbag module with a NEW one.
7
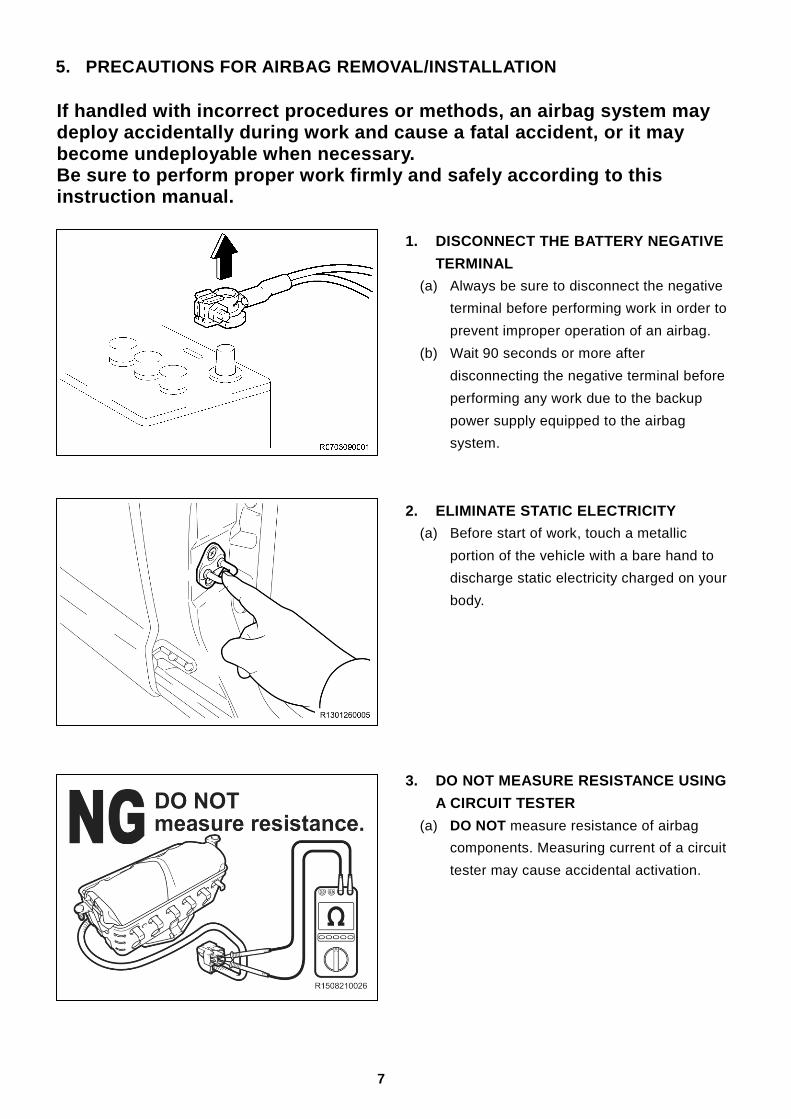
5. PRECAUTIONS FOR AIRBAG REMOVAL/INSTALLATION
If handled with incorrect procedures or methods, an airbag system may deploy accidentally during work and cause a fatal accident, or it may become undeployable when necessary. Be sure to perform proper work firmly and safely according to this instruction manual.
1. DISCONNECT THE BATTERY NEGATIVE
TERMINAL
(a) Always be sure to disconnect the negative
terminal before performing work in order to
prevent improper operation of an airbag.
(b) Wait 90 seconds or more after
disconnecting the negative terminal before
performing any work due to the backup
power supply equipped to the airbag
system.
2. ELIMINATE STATIC ELECTRICITY
(a) Before start of work, touch a metallic
portion of the vehicle with a bare hand to
discharge static electricity charged on your
body.
3. DO NOT MEASURE RESISTANCE USING
A CIRCUIT TESTER
(a) DO NOT measure resistance of airbag
components. Measuring current of a circuit
tester may cause accidental activation.
8
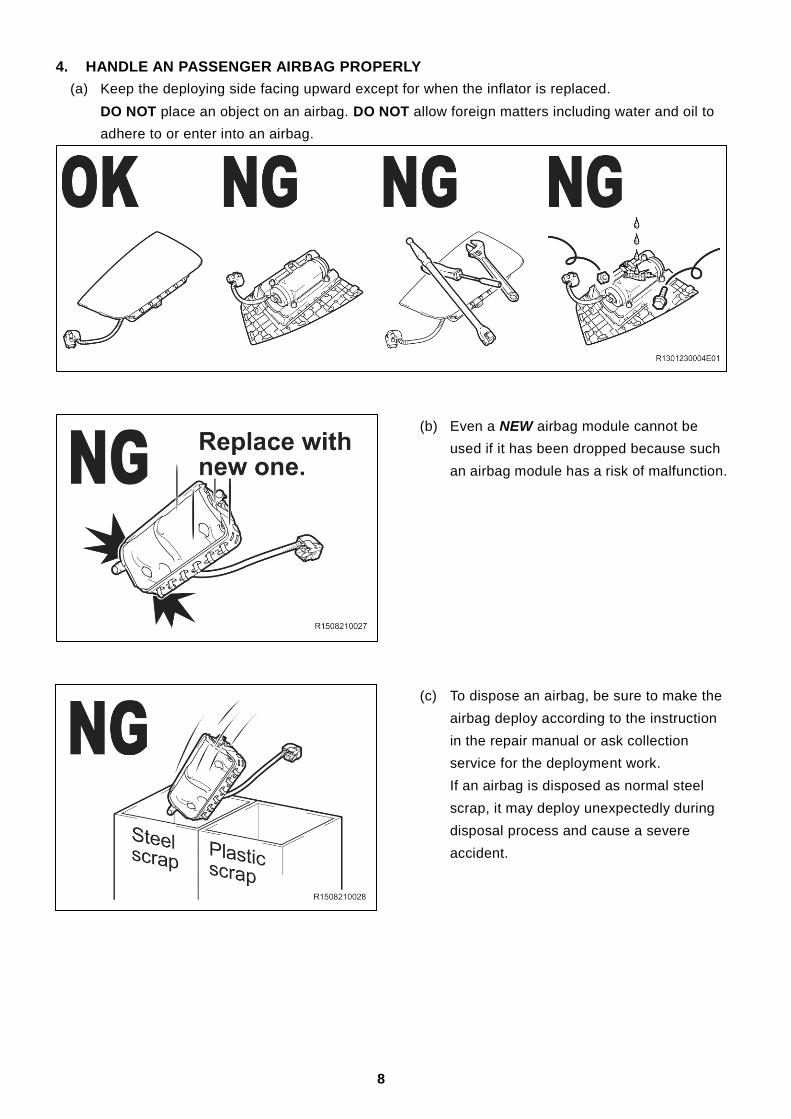
4. HANDLE AN PASSENGER AIRBAG PROPERLY
(a) Keep the deploying side facing upward except for when the inflator is replaced.
DO NOT place an object on an airbag. DO NOT allow foreign matters including water and oil to
adhere to or enter into an airbag.
(b) Even a NEW airbag module cannot be
used if it has been dropped because such
an airbag module has a risk of malfunction.
(c) To dispose an airbag, be sure to make the
airbag deploy according to the instruction
in the repair manual or ask collection
service for the deployment work.
If an airbag is disposed as normal steel
scrap, it may deploy unexpectedly during
disposal process and cause a severe
accident.
9
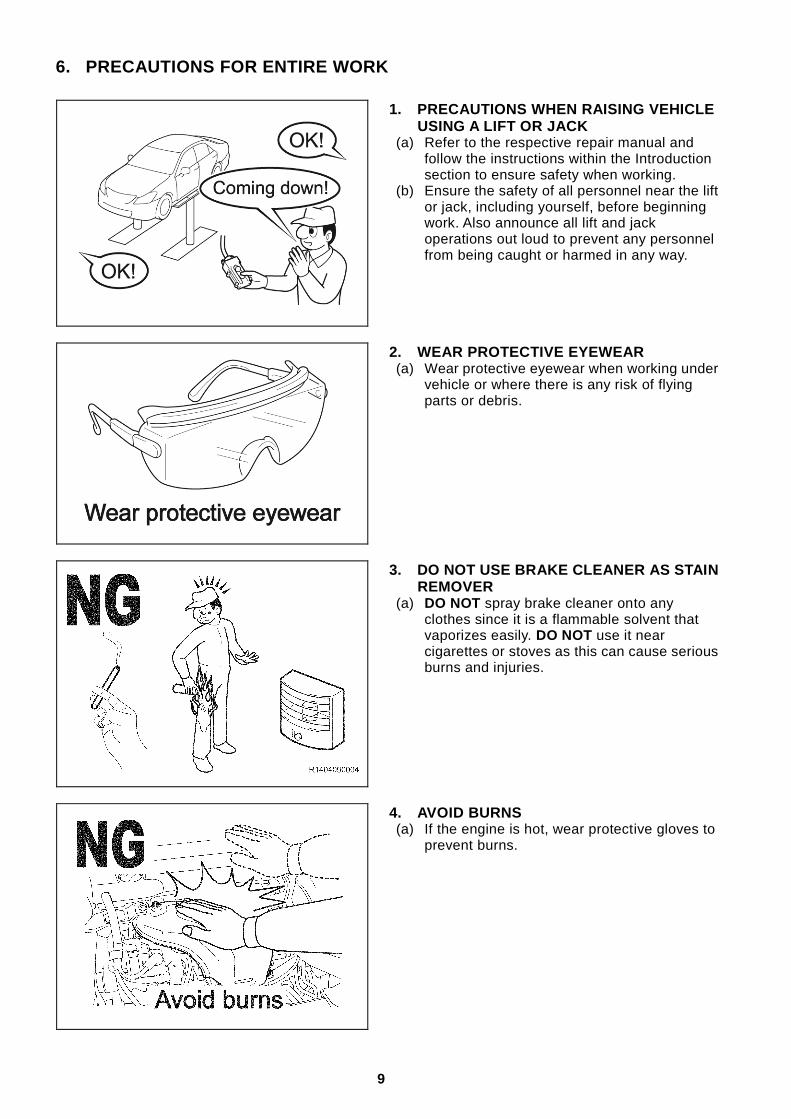
6. PRECAUTIONS FOR ENTIRE WORK
1. PRECAUTIONS WHEN RAISING VEHICLE USING A LIFT OR JACK
(a) Refer to the respective repair manual and follow the instructions within the Introduction section to ensure safety when working.
(b) Ensure the safety of all personnel near the lift or jack, including yourself, before beginning work. Also announce all lift and jack operations out loud to prevent any personnel from being caught or harmed in any way.
2. WEAR PROTECTIVE EYEWEAR (a) Wear protective eyewear when working under
vehicle or where there is any risk of flying parts or debris.
3. DO NOT USE BRAKE CLEANER AS STAIN REMOVER
(a) DO NOT spray brake cleaner onto any clothes since it is a flammable solvent that vaporizes easily. DO NOT use it near cigarettes or stoves as this can cause serious burns and injuries.
4. AVOID BURNS (a) If the engine is hot, wear protective gloves to
prevent burns.

10
5. PROTECT THE VEHICLE (a) A fender cover, a grill cover, seat covers tape
etc. must be used to protect the vehicle from dirt or scratches.
NOTICE: The protective measures listed above may not be shown in some illustrations to allow easy identification simple and easy to read.
6. HANDLING OF REMOVED PARTS (a) Destroy or mark and then store removed
parts in a separate container so as to not be assembled again in error.
(b) Check the removed parts when performing the completion inspection.
NOTICE: The parts shown in the illustration to the left are examples only and differ from the actual replacement parts.
7. DO NOT BREAK PARTS WHEN WORKING INSIDE ENGINE COMPARTMENT
(a) DO NOT break parts by carelessly placing hands inside and leaning on the engine compartment while being preoccupied by work.
8. CHECK INSIDE ENGINE COMPARTMENT BEFORE ENGINE START-UP
(a) Check that all necessary parts are installed. (b) Check that no tools or pieces of cloth are left
inside the engine compartment.
11
7. COMPONENTS
12
8. WORK PROCEDURES
8.1 REMOVAL OF PASSENGER SIDE AIRBAG MODULE
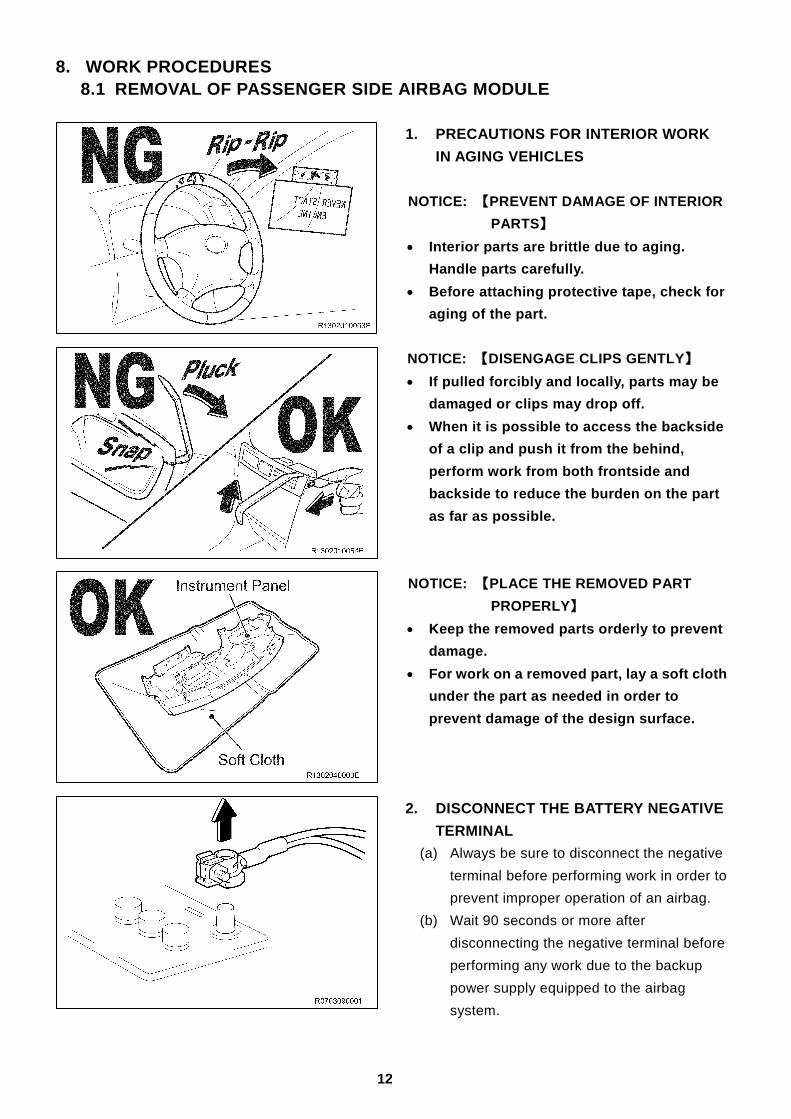
1. PRECAUTIONS FOR INTERIOR WORK
IN AGING VEHICLES
NOTICE: 【PREVENT DAMAGE OF INTERIOR
PARTS】
Interior parts are brittle due to aging.
Handle parts carefully.
Before attaching protective tape, check for
aging of the part.
NOTICE: 【DISENGAGE CLIPS GENTLY】
If pulled forcibly and locally, parts may be
damaged or clips may drop off.
When it is possible to access the backside
of a clip and push it from the behind,
perform work from both frontside and
backside to reduce the burden on the part
as far as possible.
NOTICE: 【PLACE THE REMOVED PART
PROPERLY】
Keep the removed parts orderly to prevent
damage.
For work on a removed part, lay a soft cloth
under the part as needed in order to
prevent damage of the design surface.
2. DISCONNECT THE BATTERY NEGATIVE
TERMINAL
(a) Always be sure to disconnect the negative
terminal before performing work in order to
prevent improper operation of an airbag.
(b) Wait 90 seconds or more after
disconnecting the negative terminal before
performing any work due to the backup
power supply equipped to the airbag
system.
13
3. REMOVE THE FRONT PASSENGER AIRBAG ASSEMBLY
HINT:
For removal of the front passenger airbag assembly and instrument panel wire assembly, refer to the
VIOS repair manual.
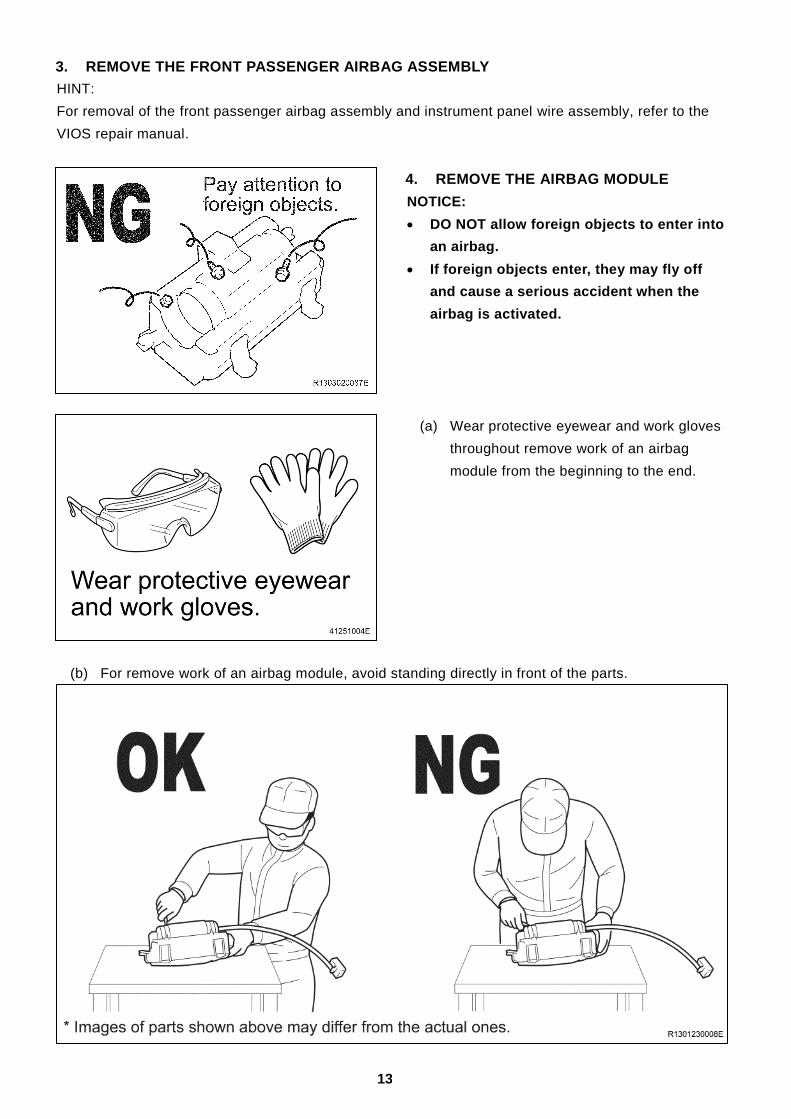
4. REMOVE THE AIRBAG MODULE
NOTICE:
DO NOT allow foreign objects to enter into
an airbag.
If foreign objects enter, they may fly off
and cause a serious accident when the
airbag is activated.
(a) Wear protective eyewear and work gloves
throughout remove work of an airbag
module from the beginning to the end.
(b) For remove work of an airbag module, avoid standing directly in front of the parts.
14
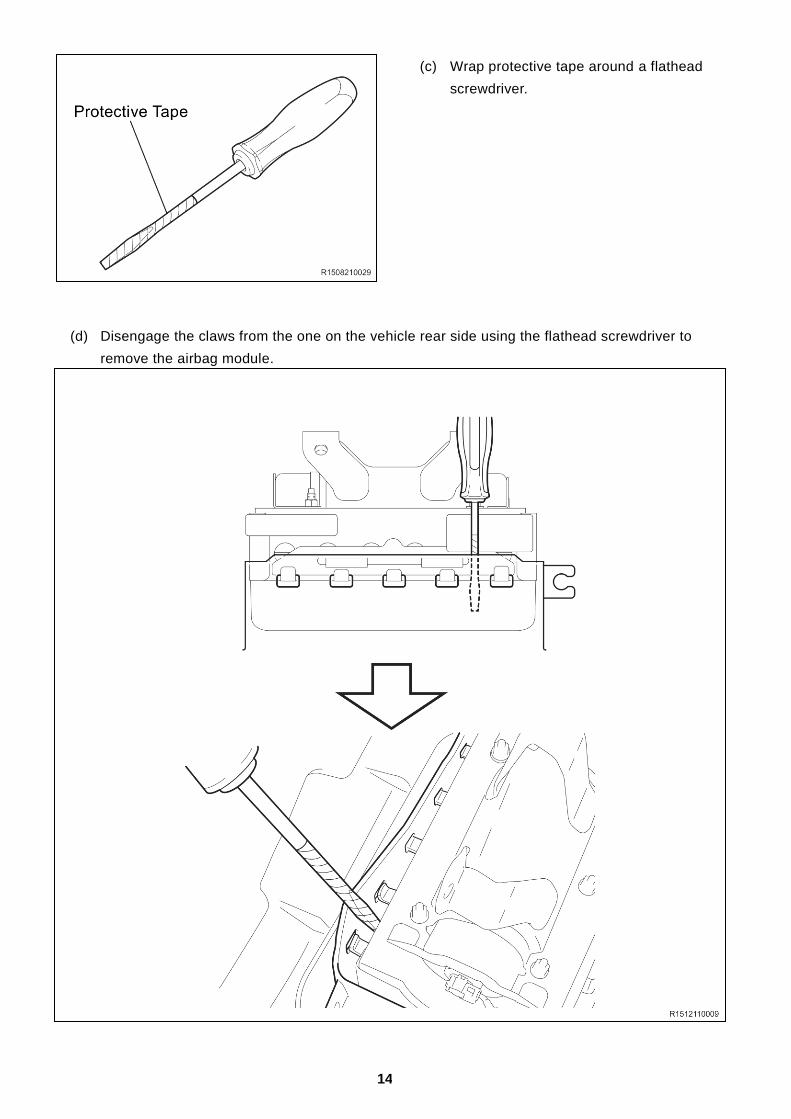
(c) Wrap protective tape around a flathead
screwdriver.
(d) Disengage the claws from the one on the vehicle rear side using the flathead screwdriver to
remove the airbag module.

15
8.2 INSTALLATION OF A NEW PASSENGER SIDE AIRBAG MODULE (LHD)
1. INSERT THE AIRBAG MODULE
(a) Install the NEW airbag module taking care not to mistake the mounting direction.
(b) Check that the 10 claws of the airbag
module have engaged securely.
16
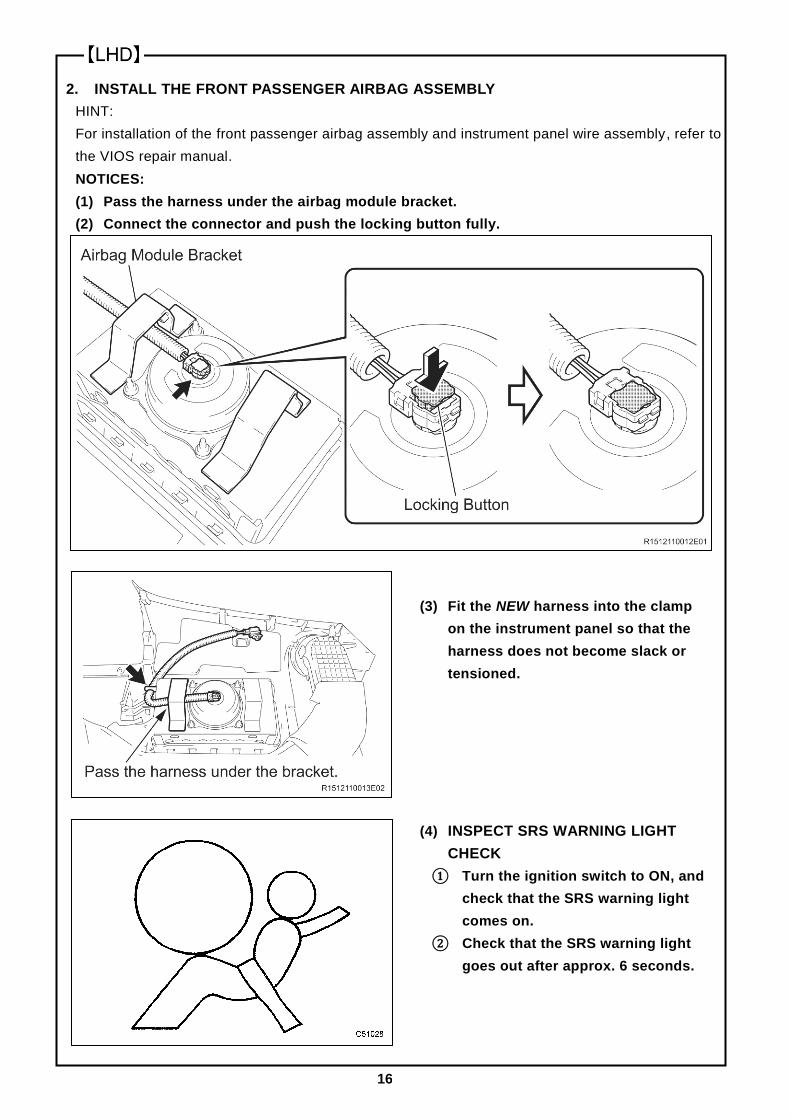
2. INSTALL THE FRONT PASSENGER AIRBAG ASSEMBLY
HINT:
For installation of the front passenger airbag assembly and instrument panel wire assembly, refer to
the VIOS repair manual.
NOTICES:
(1) Pass the harness under the airbag module bracket.
(2) Connect the connector and push the locking button fully.
(3) Fit the NEW harness into the clamp
on the instrument panel so that the
harness does not become slack or
tensioned.
(4) INSPECT SRS WARNING LIGHT
CHECK
① Turn the ignition switch to ON, and
check that the SRS warning light
comes on.
② Check that the SRS warning light
goes out after approx. 6 seconds.
17
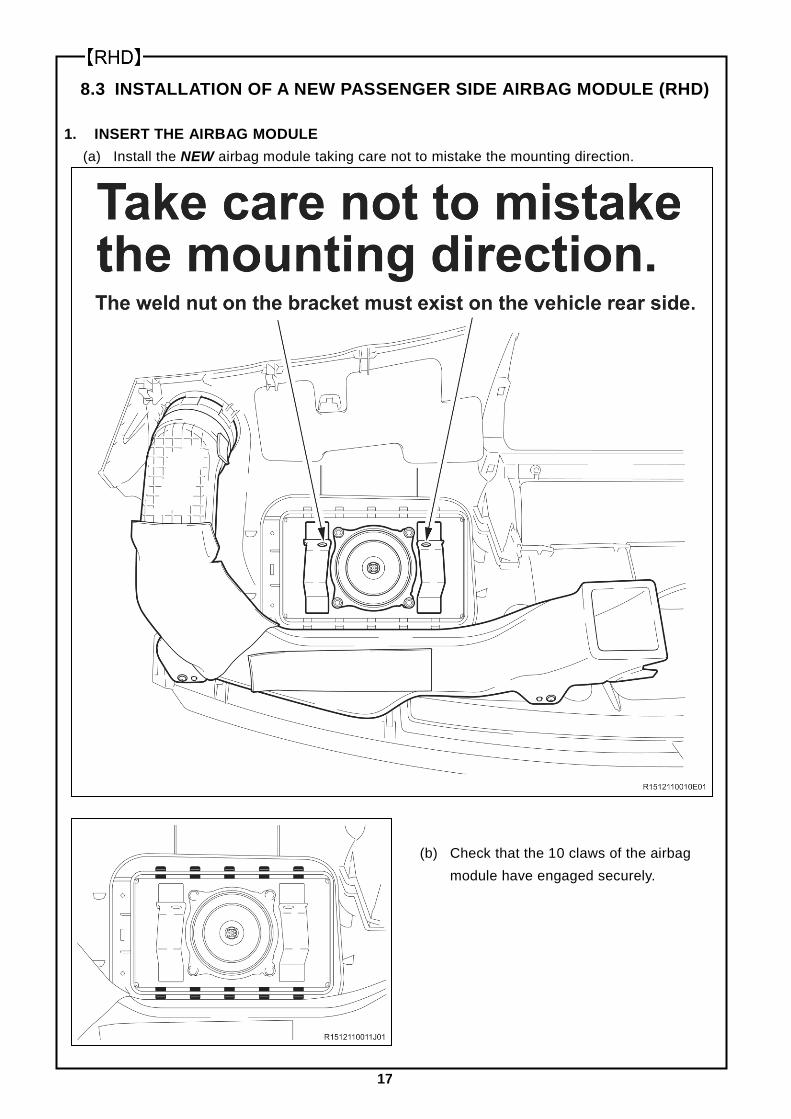
8.3 INSTALLATION OF A NEW PASSENGER SIDE AIRBAG MODULE (RHD)
1. INSERT THE AIRBAG MODULE
(a) Install the NEW airbag module taking care not to mistake the mounting direction.
(b) Check that the 10 claws of the airbag
module have engaged securely.
18
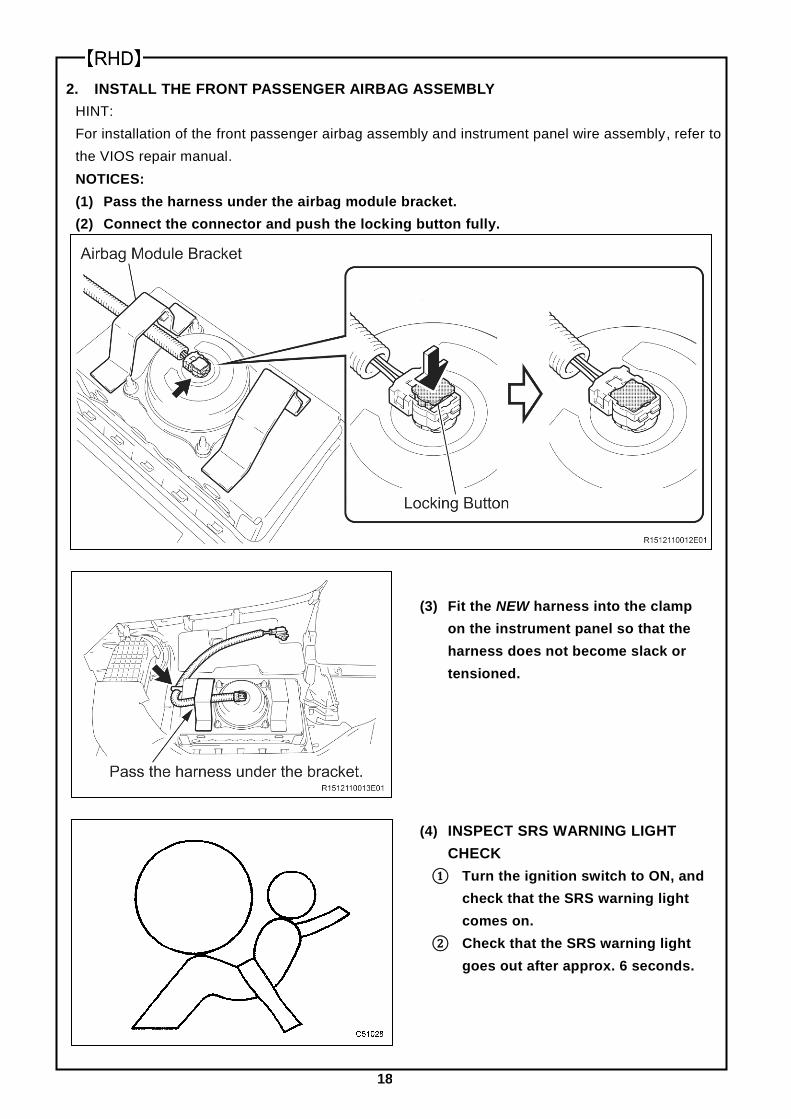
2. INSTALL THE FRONT PASSENGER AIRBAG ASSEMBLY
HINT:
For installation of the front passenger airbag assembly and instrument panel wire assembly, refer to
the VIOS repair manual.
NOTICES:
(1) Pass the harness under the airbag module bracket.
(2) Connect the connector and push the locking button fully.
(3) Fit the NEW harness into the clamp
on the instrument panel so that the
harness does not become slack or
tensioned.
(4) INSPECT SRS WARNING LIGHT
CHECK
① Turn the ignition switch to ON, and
check that the SRS warning light
comes on.
② Check that the SRS warning light
goes out after approx. 6 seconds.