table of contents - pizarras interactivas táctiles q-brite | or the secured dongle is not plugged...
TRANSCRIPT

1
Table of Contents
PART I FUNDAMENTAL KNOWLEDGE ∙∙∙∙∙∙∙∙∙∙∙∙∙∙∙∙∙∙∙∙∙∙∙∙∙∙∙∙∙∙∙∙∙∙∙∙∙∙∙∙∙∙∙∙∙∙∙∙∙∙∙∙∙∙∙∙∙∙∙∙∙∙∙∙∙∙∙∙∙∙∙∙∙∙∙∙∙∙∙∙∙∙∙∙∙∙∙∙∙∙∙∙∙∙∙∙∙∙∙∙∙∙ 4
1.1 SYSTEM REQUIREMENTS ∙∙∙∙∙∙∙∙∙∙∙∙∙∙∙∙∙∙∙∙∙∙∙∙∙∙∙∙∙∙∙∙∙∙∙∙∙∙∙∙∙∙∙∙∙∙∙∙∙∙∙∙∙∙∙∙∙∙∙∙∙∙∙∙∙∙∙∙∙∙∙∙∙∙∙∙∙∙∙∙∙∙∙∙∙∙∙∙∙∙∙∙∙∙∙∙∙∙∙∙∙∙∙∙∙∙∙∙∙∙∙∙∙∙∙∙∙∙∙∙∙∙∙∙ 4
1.2 PREPARATION BEFORE YOU BEGIN ∙∙∙∙∙∙∙∙∙∙∙∙∙∙∙∙∙∙∙∙∙∙∙∙∙∙∙∙∙∙∙∙∙∙∙∙∙∙∙∙∙∙∙∙∙∙∙∙∙∙∙∙∙∙∙∙∙∙∙∙∙∙∙∙∙∙∙∙∙∙∙∙∙∙∙∙∙∙∙∙∙∙∙∙∙∙∙∙∙∙∙∙∙∙∙∙∙∙∙∙∙∙∙∙∙∙∙∙∙∙∙ 4
1.2.1 Inspecting Connection ∙∙∙∙∙∙∙∙∙∙∙∙∙∙∙∙∙∙∙∙∙∙∙∙∙∙∙∙∙∙∙∙∙∙∙∙∙∙∙∙∙∙∙∙∙∙∙∙∙∙∙∙∙∙∙∙∙∙∙∙∙∙∙∙∙∙∙∙∙∙∙∙∙∙∙∙∙∙∙∙∙∙∙∙∙∙∙∙∙∙∙∙∙∙∙∙∙∙∙∙∙∙∙∙∙∙∙∙∙∙∙∙∙∙ 4
1.2.2 Calibrating ∙∙∙∙∙∙∙∙∙∙∙∙∙∙∙∙∙∙∙∙∙∙∙∙∙∙∙∙∙∙∙∙∙∙∙∙∙∙∙∙∙∙∙∙∙∙∙∙∙∙∙∙∙∙∙∙∙∙∙∙∙∙∙∙∙∙∙∙∙∙∙∙∙∙∙∙∙∙∙∙∙∙∙∙∙∙∙∙∙∙∙∙∙∙∙∙∙∙∙∙∙∙∙∙∙∙∙∙∙∙∙∙∙∙∙∙∙∙∙∙∙∙∙∙∙∙∙∙∙∙∙∙∙ 4
1.2.3 Checking the Calibration Accuracy∙∙∙∙∙∙∙∙∙∙∙∙∙∙∙∙∙∙∙∙∙∙∙∙∙∙∙∙∙∙∙∙∙∙∙∙∙∙∙∙∙∙∙∙∙∙∙∙∙∙∙∙∙∙∙∙∙∙∙∙∙∙∙∙∙∙∙∙∙∙∙∙∙∙∙∙∙∙∙∙∙∙∙∙∙∙∙∙∙∙∙∙∙∙∙∙ 5
1.2.4 Starting the Software ∙∙∙∙∙∙∙∙∙∙∙∙∙∙∙∙∙∙∙∙∙∙∙∙∙∙∙∙∙∙∙∙∙∙∙∙∙∙∙∙∙∙∙∙∙∙∙∙∙∙∙∙∙∙∙∙∙∙∙∙∙∙∙∙∙∙∙∙∙∙∙∙∙∙∙∙∙∙∙∙∙∙∙∙∙∙∙∙∙∙∙∙∙∙∙∙∙∙∙∙∙∙∙∙∙∙∙∙∙∙∙∙∙∙∙∙ 5
1.3 SETTINGS ∙∙∙∙∙∙∙∙∙∙∙∙∙∙∙∙∙∙∙∙∙∙∙∙∙∙∙∙∙∙∙∙∙∙∙∙∙∙∙∙∙∙∙∙∙∙∙∙∙∙∙∙∙∙∙∙∙∙∙∙∙∙∙∙∙∙∙∙∙∙∙∙∙∙∙∙∙∙∙∙∙∙∙∙∙∙∙∙∙∙∙∙∙∙∙∙∙∙∙∙∙∙∙∙∙∙∙∙∙∙∙∙∙∙∙∙∙∙∙∙∙∙∙∙∙∙∙∙∙∙∙∙∙∙∙∙∙∙∙∙∙∙∙∙ 5
1.3.1 User Management ∙∙∙∙∙∙∙∙∙∙∙∙∙∙∙∙∙∙∙∙∙∙∙∙∙∙∙∙∙∙∙∙∙∙∙∙∙∙∙∙∙∙∙∙∙∙∙∙∙∙∙∙∙∙∙∙∙∙∙∙∙∙∙∙∙∙∙∙∙∙∙∙∙∙∙∙∙∙∙∙∙∙∙∙∙∙∙∙∙∙∙∙∙∙∙∙∙∙∙∙∙∙∙∙∙∙∙∙∙∙∙∙∙∙∙∙∙∙∙∙ 5
1.3.2 Define the Default Settings of Pen Size and Highlighter Styles ∙∙∙∙∙∙∙∙∙∙∙∙∙∙∙∙∙∙∙∙∙∙∙∙∙∙∙∙∙∙∙∙∙∙∙∙∙∙∙∙∙∙∙∙∙∙∙∙∙∙∙∙∙ 6
1.3.3 Handwriting Recognition Settings ∙∙∙∙∙∙∙∙∙∙∙∙∙∙∙∙∙∙∙∙∙∙∙∙∙∙∙∙∙∙∙∙∙∙∙∙∙∙∙∙∙∙∙∙∙∙∙∙∙∙∙∙∙∙∙∙∙∙∙∙∙∙∙∙∙∙∙∙∙∙∙∙∙∙∙∙∙∙∙∙∙∙∙∙∙∙∙∙∙∙∙∙∙∙∙∙ 6
1.3.4 Hardware Customization ∙∙∙∙∙∙∙∙∙∙∙∙∙∙∙∙∙∙∙∙∙∙∙∙∙∙∙∙∙∙∙∙∙∙∙∙∙∙∙∙∙∙∙∙∙∙∙∙∙∙∙∙∙∙∙∙∙∙∙∙∙∙∙∙∙∙∙∙∙∙∙∙∙∙∙∙∙∙∙∙∙∙∙∙∙∙∙∙∙∙∙∙∙∙∙∙∙∙∙∙∙∙∙∙∙∙∙∙∙∙ 6
1.3.5 Interface Settings ∙∙∙∙∙∙∙∙∙∙∙∙∙∙∙∙∙∙∙∙∙∙∙∙∙∙∙∙∙∙∙∙∙∙∙∙∙∙∙∙∙∙∙∙∙∙∙∙∙∙∙∙∙∙∙∙∙∙∙∙∙∙∙∙∙∙∙∙∙∙∙∙∙∙∙∙∙∙∙∙∙∙∙∙∙∙∙∙∙∙∙∙∙∙∙∙∙∙∙∙∙∙∙∙∙∙∙∙∙∙∙∙∙∙∙∙∙∙∙∙∙∙ 6
1.3.6 Automatic File Saving ∙∙∙∙∙∙∙∙∙∙∙∙∙∙∙∙∙∙∙∙∙∙∙∙∙∙∙∙∙∙∙∙∙∙∙∙∙∙∙∙∙∙∙∙∙∙∙∙∙∙∙∙∙∙∙∙∙∙∙∙∙∙∙∙∙∙∙∙∙∙∙∙∙∙∙∙∙∙∙∙∙∙∙∙∙∙∙∙∙∙∙∙∙∙∙∙∙∙∙∙∙∙∙∙∙∙∙∙∙∙∙∙∙∙∙ 6
PART II SOFTWARE OVERVIEW ∙∙∙∙∙∙∙∙∙∙∙∙∙∙∙∙∙∙∙∙∙∙∙∙∙∙∙∙∙∙∙∙∙∙∙∙∙∙∙∙∙∙∙∙∙∙∙∙∙∙∙∙∙∙∙∙∙∙∙∙∙∙∙∙∙∙∙∙∙∙∙∙∙∙∙∙∙∙∙∙∙∙∙∙∙∙∙∙∙∙∙∙∙∙∙∙∙∙∙∙∙∙∙∙∙∙∙∙∙∙∙∙∙∙∙ 7
2.1 DESIGN MODE ∙∙∙∙∙∙∙∙∙∙∙∙∙∙∙∙∙∙∙∙∙∙∙∙∙∙∙∙∙∙∙∙∙∙∙∙∙∙∙∙∙∙∙∙∙∙∙∙∙∙∙∙∙∙∙∙∙∙∙∙∙∙∙∙∙∙∙∙∙∙∙∙∙∙∙∙∙∙∙∙∙∙∙∙∙∙∙∙∙∙∙∙∙∙∙∙∙∙∙∙∙∙∙∙∙∙∙∙∙∙∙∙∙∙∙∙∙∙∙∙∙∙∙∙∙∙∙∙∙∙∙∙∙∙∙∙∙ 7
2.2 TEACHING MODE ∙∙∙∙∙∙∙∙∙∙∙∙∙∙∙∙∙∙∙∙∙∙∙∙∙∙∙∙∙∙∙∙∙∙∙∙∙∙∙∙∙∙∙∙∙∙∙∙∙∙∙∙∙∙∙∙∙∙∙∙∙∙∙∙∙∙∙∙∙∙∙∙∙∙∙∙∙∙∙∙∙∙∙∙∙∙∙∙∙∙∙∙∙∙∙∙∙∙∙∙∙∙∙∙∙∙∙∙∙∙∙∙∙∙∙∙∙∙∙∙∙∙∙∙∙∙∙∙∙∙∙∙∙∙ 7
PART III DESIGN MODE ∙∙∙∙∙∙∙∙∙∙∙∙∙∙∙∙∙∙∙∙∙∙∙∙∙∙∙∙∙∙∙∙∙∙∙∙∙∙∙∙∙∙∙∙∙∙∙∙∙∙∙∙∙∙∙∙∙∙∙∙∙∙∙∙∙∙∙∙∙∙∙∙∙∙∙∙∙∙∙∙∙∙∙∙∙∙∙∙∙∙∙∙∙∙∙∙∙∙∙∙∙∙∙∙∙∙∙∙∙∙∙∙∙∙∙∙∙∙∙∙∙∙∙ 9
3.1 MENU BAR ∙∙∙∙∙∙∙∙∙∙∙∙∙∙∙∙∙∙∙∙∙∙∙∙∙∙∙∙∙∙∙∙∙∙∙∙∙∙∙∙∙∙∙∙∙∙∙∙∙∙∙∙∙∙∙∙∙∙∙∙∙∙∙∙∙∙∙∙∙∙∙∙∙∙∙∙∙∙∙∙∙∙∙∙∙∙∙∙∙∙∙∙∙∙∙∙∙∙∙∙∙∙∙∙∙∙∙∙∙∙∙∙∙∙∙∙∙∙∙∙∙∙∙∙∙∙∙∙∙∙∙∙∙∙∙∙∙∙∙∙∙∙ 9
3.1.1 File menu ∙∙∙∙∙∙∙∙∙∙∙∙∙∙∙∙∙∙∙∙∙∙∙∙∙∙∙∙∙∙∙∙∙∙∙∙∙∙∙∙∙∙∙∙∙∙∙∙∙∙∙∙∙∙∙∙∙∙∙∙∙∙∙∙∙∙∙∙∙∙∙∙∙∙∙∙∙∙∙∙∙∙∙∙∙∙∙∙∙∙∙∙∙∙∙∙∙∙∙∙∙∙∙∙∙∙∙∙∙∙∙∙∙∙∙∙∙∙∙∙∙∙∙∙∙∙∙∙∙∙∙∙∙∙ 9
3.1.2 Edit menu ∙∙∙∙∙∙∙∙∙∙∙∙∙∙∙∙∙∙∙∙∙∙∙∙∙∙∙∙∙∙∙∙∙∙∙∙∙∙∙∙∙∙∙∙∙∙∙∙∙∙∙∙∙∙∙∙∙∙∙∙∙∙∙∙∙∙∙∙∙∙∙∙∙∙∙∙∙∙∙∙∙∙∙∙∙∙∙∙∙∙∙∙∙∙∙∙∙∙∙∙∙∙∙∙∙∙∙∙∙∙∙∙∙∙∙∙∙∙∙∙∙∙∙∙∙∙∙∙∙∙∙∙ 10
3.1.3 Page menu ∙∙∙∙∙∙∙∙∙∙∙∙∙∙∙∙∙∙∙∙∙∙∙∙∙∙∙∙∙∙∙∙∙∙∙∙∙∙∙∙∙∙∙∙∙∙∙∙∙∙∙∙∙∙∙∙∙∙∙∙∙∙∙∙∙∙∙∙∙∙∙∙∙∙∙∙∙∙∙∙∙∙∙∙∙∙∙∙∙∙∙∙∙∙∙∙∙∙∙∙∙∙∙∙∙∙∙∙∙∙∙∙∙∙∙∙∙∙∙∙∙∙∙∙∙∙∙∙∙∙ 11
3.1.4 Insert menu ∙∙∙∙∙∙∙∙∙∙∙∙∙∙∙∙∙∙∙∙∙∙∙∙∙∙∙∙∙∙∙∙∙∙∙∙∙∙∙∙∙∙∙∙∙∙∙∙∙∙∙∙∙∙∙∙∙∙∙∙∙∙∙∙∙∙∙∙∙∙∙∙∙∙∙∙∙∙∙∙∙∙∙∙∙∙∙∙∙∙∙∙∙∙∙∙∙∙∙∙∙∙∙∙∙∙∙∙∙∙∙∙∙∙∙∙∙∙∙∙∙∙∙∙∙∙∙∙∙ 12
3.1.5 Academic Subject menu ∙∙∙∙∙∙∙∙∙∙∙∙∙∙∙∙∙∙∙∙∙∙∙∙∙∙∙∙∙∙∙∙∙∙∙∙∙∙∙∙∙∙∙∙∙∙∙∙∙∙∙∙∙∙∙∙∙∙∙∙∙∙∙∙∙∙∙∙∙∙∙∙∙∙∙∙∙∙∙∙∙∙∙∙∙∙∙∙∙∙∙∙∙∙∙∙∙∙∙∙∙∙∙∙∙∙∙∙∙ 12
3.1.6 Drawing menu ∙∙∙∙∙∙∙∙∙∙∙∙∙∙∙∙∙∙∙∙∙∙∙∙∙∙∙∙∙∙∙∙∙∙∙∙∙∙∙∙∙∙∙∙∙∙∙∙∙∙∙∙∙∙∙∙∙∙∙∙∙∙∙∙∙∙∙∙∙∙∙∙∙∙∙∙∙∙∙∙∙∙∙∙∙∙∙∙∙∙∙∙∙∙∙∙∙∙∙∙∙∙∙∙∙∙∙∙∙∙∙∙∙∙∙∙∙∙∙∙∙∙∙∙∙ 13
3.1.7 Tool menu ∙∙∙∙∙∙∙∙∙∙∙∙∙∙∙∙∙∙∙∙∙∙∙∙∙∙∙∙∙∙∙∙∙∙∙∙∙∙∙∙∙∙∙∙∙∙∙∙∙∙∙∙∙∙∙∙∙∙∙∙∙∙∙∙∙∙∙∙∙∙∙∙∙∙∙∙∙∙∙∙∙∙∙∙∙∙∙∙∙∙∙∙∙∙∙∙∙∙∙∙∙∙∙∙∙∙∙∙∙∙∙∙∙∙∙∙∙∙∙∙∙∙∙∙∙∙∙∙∙∙∙ 14
3.1.8 Cloud Platform menu ∙∙∙∙∙∙∙∙∙∙∙∙∙∙∙∙∙∙∙∙∙∙∙∙∙∙∙∙∙∙∙∙∙∙∙∙∙∙∙∙∙∙∙∙∙∙∙∙∙∙∙∙∙∙∙∙∙∙∙∙∙∙∙∙∙∙∙∙∙∙∙∙∙∙∙∙∙∙∙∙∙∙∙∙∙∙∙∙∙∙∙∙∙∙∙∙∙∙∙∙∙∙∙∙∙∙∙∙∙∙∙∙∙∙ 15
3.1.9 Help menu ∙∙∙∙∙∙∙∙∙∙∙∙∙∙∙∙∙∙∙∙∙∙∙∙∙∙∙∙∙∙∙∙∙∙∙∙∙∙∙∙∙∙∙∙∙∙∙∙∙∙∙∙∙∙∙∙∙∙∙∙∙∙∙∙∙∙∙∙∙∙∙∙∙∙∙∙∙∙∙∙∙∙∙∙∙∙∙∙∙∙∙∙∙∙∙∙∙∙∙∙∙∙∙∙∙∙∙∙∙∙∙∙∙∙∙∙∙∙∙∙∙∙∙∙∙∙∙∙∙∙ 15
3.2 PANEL ∙∙∙∙∙∙∙∙∙∙∙∙∙∙∙∙∙∙∙∙∙∙∙∙∙∙∙∙∙∙∙∙∙∙∙∙∙∙∙∙∙∙∙∙∙∙∙∙∙∙∙∙∙∙∙∙∙∙∙∙∙∙∙∙∙∙∙∙∙∙∙∙∙∙∙∙∙∙∙∙∙∙∙∙∙∙∙∙∙∙∙∙∙∙∙∙∙∙∙∙∙∙∙∙∙∙∙∙∙∙∙∙∙∙∙∙∙∙∙∙∙∙∙∙∙∙∙∙∙∙∙∙∙∙∙∙∙∙∙∙∙∙∙∙∙∙∙ 16
3.2.1 Index Bar Panel ∙∙∙∙∙∙∙∙∙∙∙∙∙∙∙∙∙∙∙∙∙∙∙∙∙∙∙∙∙∙∙∙∙∙∙∙∙∙∙∙∙∙∙∙∙∙∙∙∙∙∙∙∙∙∙∙∙∙∙∙∙∙∙∙∙∙∙∙∙∙∙∙∙∙∙∙∙∙∙∙∙∙∙∙∙∙∙∙∙∙∙∙∙∙∙∙∙∙∙∙∙∙∙∙∙∙∙∙∙∙∙∙∙∙∙∙∙∙∙∙∙∙∙ 16
3.2.2 Property Panel ∙∙∙∙∙∙∙∙∙∙∙∙∙∙∙∙∙∙∙∙∙∙∙∙∙∙∙∙∙∙∙∙∙∙∙∙∙∙∙∙∙∙∙∙∙∙∙∙∙∙∙∙∙∙∙∙∙∙∙∙∙∙∙∙∙∙∙∙∙∙∙∙∙∙∙∙∙∙∙∙∙∙∙∙∙∙∙∙∙∙∙∙∙∙∙∙∙∙∙∙∙∙∙∙∙∙∙∙∙∙∙∙∙∙∙∙∙∙∙∙∙∙∙∙ 16
3.2.3 Academic Subject Panel ∙∙∙∙∙∙∙∙∙∙∙∙∙∙∙∙∙∙∙∙∙∙∙∙∙∙∙∙∙∙∙∙∙∙∙∙∙∙∙∙∙∙∙∙∙∙∙∙∙∙∙∙∙∙∙∙∙∙∙∙∙∙∙∙∙∙∙∙∙∙∙∙∙∙∙∙∙∙∙∙∙∙∙∙∙∙∙∙∙∙∙∙∙∙∙∙∙∙∙∙∙∙∙∙∙∙∙∙∙∙ 16
3.2.4 Page Panel ∙∙∙∙∙∙∙∙∙∙∙∙∙∙∙∙∙∙∙∙∙∙∙∙∙∙∙∙∙∙∙∙∙∙∙∙∙∙∙∙∙∙∙∙∙∙∙∙∙∙∙∙∙∙∙∙∙∙∙∙∙∙∙∙∙∙∙∙∙∙∙∙∙∙∙∙∙∙∙∙∙∙∙∙∙∙∙∙∙∙∙∙∙∙∙∙∙∙∙∙∙∙∙∙∙∙∙∙∙∙∙∙∙∙∙∙∙∙∙∙∙∙∙∙∙∙∙∙∙∙∙ 17
3.2.5 Internet Class Panel ∙∙∙∙∙∙∙∙∙∙∙∙∙∙∙∙∙∙∙∙∙∙∙∙∙∙∙∙∙∙∙∙∙∙∙∙∙∙∙∙∙∙∙∙∙∙∙∙∙∙∙∙∙∙∙∙∙∙∙∙∙∙∙∙∙∙∙∙∙∙∙∙∙∙∙∙∙∙∙∙∙∙∙∙∙∙∙∙∙∙∙∙∙∙∙∙∙∙∙∙∙∙∙∙∙∙∙∙∙∙∙∙∙∙∙∙ 17
3.2.6 Special Effect Interactive Panel ∙∙∙∙∙∙∙∙∙∙∙∙∙∙∙∙∙∙∙∙∙∙∙∙∙∙∙∙∙∙∙∙∙∙∙∙∙∙∙∙∙∙∙∙∙∙∙∙∙∙∙∙∙∙∙∙∙∙∙∙∙∙∙∙∙∙∙∙∙∙∙∙∙∙∙∙∙∙∙∙∙∙∙∙∙∙∙∙∙∙∙∙∙∙∙∙∙∙∙ 19
PART IV COMMON OPERATIONS ∙∙∙∙∙∙∙∙∙∙∙∙∙∙∙∙∙∙∙∙∙∙∙∙∙∙∙∙∙∙∙∙∙∙∙∙∙∙∙∙∙∙∙∙∙∙∙∙∙∙∙∙∙∙∙∙∙∙∙∙∙∙∙∙∙∙∙∙∙∙∙∙∙∙∙∙∙∙∙∙∙∙∙∙∙∙∙∙∙∙∙∙∙∙∙∙∙∙∙∙∙∙∙∙∙∙ 21
4.1 PEN TOOL ∙∙∙∙∙∙∙∙∙∙∙∙∙∙∙∙∙∙∙∙∙∙∙∙∙∙∙∙∙∙∙∙∙∙∙∙∙∙∙∙∙∙∙∙∙∙∙∙∙∙∙∙∙∙∙∙∙∙∙∙∙∙∙∙∙∙∙∙∙∙∙∙∙∙∙∙∙∙∙∙∙∙∙∙∙∙∙∙∙∙∙∙∙∙∙∙∙∙∙∙∙∙∙∙∙∙∙∙∙∙∙∙∙∙∙∙∙∙∙∙∙∙∙∙∙∙∙∙∙∙∙∙∙∙∙∙∙∙∙∙∙ 21

2
4.2 BASIC OPERATIONS OF THE OBJECTS ∙∙∙∙∙∙∙∙∙∙∙∙∙∙∙∙∙∙∙∙∙∙∙∙∙∙∙∙∙∙∙∙∙∙∙∙∙∙∙∙∙∙∙∙∙∙∙∙∙∙∙∙∙∙∙∙∙∙∙∙∙∙∙∙∙∙∙∙∙∙∙∙∙∙∙∙∙∙∙∙∙∙∙∙∙∙∙∙∙∙∙∙∙∙∙∙∙∙∙∙∙∙∙∙∙∙∙ 22
4.2.1 Select the Objects ∙∙∙∙∙∙∙∙∙∙∙∙∙∙∙∙∙∙∙∙∙∙∙∙∙∙∙∙∙∙∙∙∙∙∙∙∙∙∙∙∙∙∙∙∙∙∙∙∙∙∙∙∙∙∙∙∙∙∙∙∙∙∙∙∙∙∙∙∙∙∙∙∙∙∙∙∙∙∙∙∙∙∙∙∙∙∙∙∙∙∙∙∙∙∙∙∙∙∙∙∙∙∙∙∙∙∙∙∙∙∙∙∙∙∙∙∙∙∙ 22
4.2.2 Moving the Objects ∙∙∙∙∙∙∙∙∙∙∙∙∙∙∙∙∙∙∙∙∙∙∙∙∙∙∙∙∙∙∙∙∙∙∙∙∙∙∙∙∙∙∙∙∙∙∙∙∙∙∙∙∙∙∙∙∙∙∙∙∙∙∙∙∙∙∙∙∙∙∙∙∙∙∙∙∙∙∙∙∙∙∙∙∙∙∙∙∙∙∙∙∙∙∙∙∙∙∙∙∙∙∙∙∙∙∙∙∙∙∙∙∙∙∙∙∙ 23
4.2.3 Rotating and Scaling the Objects ∙∙∙∙∙∙∙∙∙∙∙∙∙∙∙∙∙∙∙∙∙∙∙∙∙∙∙∙∙∙∙∙∙∙∙∙∙∙∙∙∙∙∙∙∙∙∙∙∙∙∙∙∙∙∙∙∙∙∙∙∙∙∙∙∙∙∙∙∙∙∙∙∙∙∙∙∙∙∙∙∙∙∙∙∙∙∙∙∙∙∙∙∙∙∙∙ 23
4.2.4 Object Property ∙∙∙∙∙∙∙∙∙∙∙∙∙∙∙∙∙∙∙∙∙∙∙∙∙∙∙∙∙∙∙∙∙∙∙∙∙∙∙∙∙∙∙∙∙∙∙∙∙∙∙∙∙∙∙∙∙∙∙∙∙∙∙∙∙∙∙∙∙∙∙∙∙∙∙∙∙∙∙∙∙∙∙∙∙∙∙∙∙∙∙∙∙∙∙∙∙∙∙∙∙∙∙∙∙∙∙∙∙∙∙∙∙∙∙∙∙∙∙∙∙∙∙ 23
4.2.5 Grouping the Objects ∙∙∙∙∙∙∙∙∙∙∙∙∙∙∙∙∙∙∙∙∙∙∙∙∙∙∙∙∙∙∙∙∙∙∙∙∙∙∙∙∙∙∙∙∙∙∙∙∙∙∙∙∙∙∙∙∙∙∙∙∙∙∙∙∙∙∙∙∙∙∙∙∙∙∙∙∙∙∙∙∙∙∙∙∙∙∙∙∙∙∙∙∙∙∙∙∙∙∙∙∙∙∙∙∙∙∙∙∙∙∙∙∙∙ 24
4.2.6 Locking the Objects ∙∙∙∙∙∙∙∙∙∙∙∙∙∙∙∙∙∙∙∙∙∙∙∙∙∙∙∙∙∙∙∙∙∙∙∙∙∙∙∙∙∙∙∙∙∙∙∙∙∙∙∙∙∙∙∙∙∙∙∙∙∙∙∙∙∙∙∙∙∙∙∙∙∙∙∙∙∙∙∙∙∙∙∙∙∙∙∙∙∙∙∙∙∙∙∙∙∙∙∙∙∙∙∙∙∙∙∙∙∙∙∙∙∙∙∙∙ 24
4.2.7 Cloning the Objects ∙∙∙∙∙∙∙∙∙∙∙∙∙∙∙∙∙∙∙∙∙∙∙∙∙∙∙∙∙∙∙∙∙∙∙∙∙∙∙∙∙∙∙∙∙∙∙∙∙∙∙∙∙∙∙∙∙∙∙∙∙∙∙∙∙∙∙∙∙∙∙∙∙∙∙∙∙∙∙∙∙∙∙∙∙∙∙∙∙∙∙∙∙∙∙∙∙∙∙∙∙∙∙∙∙∙∙∙∙∙∙∙∙∙∙∙∙ 24
4.2.8 Layer Order of the Objects ∙∙∙∙∙∙∙∙∙∙∙∙∙∙∙∙∙∙∙∙∙∙∙∙∙∙∙∙∙∙∙∙∙∙∙∙∙∙∙∙∙∙∙∙∙∙∙∙∙∙∙∙∙∙∙∙∙∙∙∙∙∙∙∙∙∙∙∙∙∙∙∙∙∙∙∙∙∙∙∙∙∙∙∙∙∙∙∙∙∙∙∙∙∙∙∙∙∙∙∙∙∙∙∙∙∙ 24
4.2.9 Editing the Objects ∙∙∙∙∙∙∙∙∙∙∙∙∙∙∙∙∙∙∙∙∙∙∙∙∙∙∙∙∙∙∙∙∙∙∙∙∙∙∙∙∙∙∙∙∙∙∙∙∙∙∙∙∙∙∙∙∙∙∙∙∙∙∙∙∙∙∙∙∙∙∙∙∙∙∙∙∙∙∙∙∙∙∙∙∙∙∙∙∙∙∙∙∙∙∙∙∙∙∙∙∙∙∙∙∙∙∙∙∙∙∙∙∙∙∙∙∙∙ 24
4.2.10 Aligning the Objects ∙∙∙∙∙∙∙∙∙∙∙∙∙∙∙∙∙∙∙∙∙∙∙∙∙∙∙∙∙∙∙∙∙∙∙∙∙∙∙∙∙∙∙∙∙∙∙∙∙∙∙∙∙∙∙∙∙∙∙∙∙∙∙∙∙∙∙∙∙∙∙∙∙∙∙∙∙∙∙∙∙∙∙∙∙∙∙∙∙∙∙∙∙∙∙∙∙∙∙∙∙∙∙∙∙∙∙∙∙∙∙∙∙∙ 25
4.2.11 Object Playback ∙∙∙∙∙∙∙∙∙∙∙∙∙∙∙∙∙∙∙∙∙∙∙∙∙∙∙∙∙∙∙∙∙∙∙∙∙∙∙∙∙∙∙∙∙∙∙∙∙∙∙∙∙∙∙∙∙∙∙∙∙∙∙∙∙∙∙∙∙∙∙∙∙∙∙∙∙∙∙∙∙∙∙∙∙∙∙∙∙∙∙∙∙∙∙∙∙∙∙∙∙∙∙∙∙∙∙∙∙∙∙∙∙∙∙∙∙∙∙∙ 25
4.2.12 Filling the Objects ∙∙∙∙∙∙∙∙∙∙∙∙∙∙∙∙∙∙∙∙∙∙∙∙∙∙∙∙∙∙∙∙∙∙∙∙∙∙∙∙∙∙∙∙∙∙∙∙∙∙∙∙∙∙∙∙∙∙∙∙∙∙∙∙∙∙∙∙∙∙∙∙∙∙∙∙∙∙∙∙∙∙∙∙∙∙∙∙∙∙∙∙∙∙∙∙∙∙∙∙∙∙∙∙∙∙∙∙∙∙∙∙∙∙∙∙∙ 25
4.2.13 Sound of the Objects ∙∙∙∙∙∙∙∙∙∙∙∙∙∙∙∙∙∙∙∙∙∙∙∙∙∙∙∙∙∙∙∙∙∙∙∙∙∙∙∙∙∙∙∙∙∙∙∙∙∙∙∙∙∙∙∙∙∙∙∙∙∙∙∙∙∙∙∙∙∙∙∙∙∙∙∙∙∙∙∙∙∙∙∙∙∙∙∙∙∙∙∙∙∙∙∙∙∙∙∙∙∙∙∙∙∙∙∙∙∙∙∙ 25
4.2.14 Duplicating the External Images and Text ∙∙∙∙∙∙∙∙∙∙∙∙∙∙∙∙∙∙∙∙∙∙∙∙∙∙∙∙∙∙∙∙∙∙∙∙∙∙∙∙∙∙∙∙∙∙∙∙∙∙∙∙∙∙∙∙∙∙∙∙∙∙∙∙∙∙∙∙∙∙∙∙∙∙∙∙∙∙∙∙∙ 25
4.2.15 Saving the Images ∙∙∙∙∙∙∙∙∙∙∙∙∙∙∙∙∙∙∙∙∙∙∙∙∙∙∙∙∙∙∙∙∙∙∙∙∙∙∙∙∙∙∙∙∙∙∙∙∙∙∙∙∙∙∙∙∙∙∙∙∙∙∙∙∙∙∙∙∙∙∙∙∙∙∙∙∙∙∙∙∙∙∙∙∙∙∙∙∙∙∙∙∙∙∙∙∙∙∙∙∙∙∙∙∙∙∙∙∙∙∙∙∙∙∙∙∙ 25
4.3 TEXT INPUT ∙∙∙∙∙∙∙∙∙∙∙∙∙∙∙∙∙∙∙∙∙∙∙∙∙∙∙∙∙∙∙∙∙∙∙∙∙∙∙∙∙∙∙∙∙∙∙∙∙∙∙∙∙∙∙∙∙∙∙∙∙∙∙∙∙∙∙∙∙∙∙∙∙∙∙∙∙∙∙∙∙∙∙∙∙∙∙∙∙∙∙∙∙∙∙∙∙∙∙∙∙∙∙∙∙∙∙∙∙∙∙∙∙∙∙∙∙∙∙∙∙∙∙∙∙∙∙∙∙∙∙∙∙∙∙∙∙∙∙ 25
4.3.1 Keyboard Input ∙∙∙∙∙∙∙∙∙∙∙∙∙∙∙∙∙∙∙∙∙∙∙∙∙∙∙∙∙∙∙∙∙∙∙∙∙∙∙∙∙∙∙∙∙∙∙∙∙∙∙∙∙∙∙∙∙∙∙∙∙∙∙∙∙∙∙∙∙∙∙∙∙∙∙∙∙∙∙∙∙∙∙∙∙∙∙∙∙∙∙∙∙∙∙∙∙∙∙∙∙∙∙∙∙∙∙∙∙∙∙∙∙∙∙∙∙∙∙∙∙∙∙ 25
4.3.2 Handwriting Recognition Input ∙∙∙∙∙∙∙∙∙∙∙∙∙∙∙∙∙∙∙∙∙∙∙∙∙∙∙∙∙∙∙∙∙∙∙∙∙∙∙∙∙∙∙∙∙∙∙∙∙∙∙∙∙∙∙∙∙∙∙∙∙∙∙∙∙∙∙∙∙∙∙∙∙∙∙∙∙∙∙∙∙∙∙∙∙∙∙∙∙∙∙∙∙∙∙∙∙∙∙ 26
4.3.3 Third Option of Text Input ∙∙∙∙∙∙∙∙∙∙∙∙∙∙∙∙∙∙∙∙∙∙∙∙∙∙∙∙∙∙∙∙∙∙∙∙∙∙∙∙∙∙∙∙∙∙∙∙∙∙∙∙∙∙∙∙∙∙∙∙∙∙∙∙∙∙∙∙∙∙∙∙∙∙∙∙∙∙∙∙∙∙∙∙∙∙∙∙∙∙∙∙∙∙∙∙∙∙∙∙∙∙∙∙∙∙∙ 26
4.4 IMPORTING THE MULTIMEDIA FILES ∙∙∙∙∙∙∙∙∙∙∙∙∙∙∙∙∙∙∙∙∙∙∙∙∙∙∙∙∙∙∙∙∙∙∙∙∙∙∙∙∙∙∙∙∙∙∙∙∙∙∙∙∙∙∙∙∙∙∙∙∙∙∙∙∙∙∙∙∙∙∙∙∙∙∙∙∙∙∙∙∙∙∙∙∙∙∙∙∙∙∙∙∙∙∙∙∙∙∙∙∙∙∙∙∙∙∙ 26
4.5 IMPORTING THE PPT FILES ∙∙∙∙∙∙∙∙∙∙∙∙∙∙∙∙∙∙∙∙∙∙∙∙∙∙∙∙∙∙∙∙∙∙∙∙∙∙∙∙∙∙∙∙∙∙∙∙∙∙∙∙∙∙∙∙∙∙∙∙∙∙∙∙∙∙∙∙∙∙∙∙∙∙∙∙∙∙∙∙∙∙∙∙∙∙∙∙∙∙∙∙∙∙∙∙∙∙∙∙∙∙∙∙∙∙∙∙∙∙∙∙∙∙∙∙∙∙∙ 27
PART V MULTIDISCIPLINARY SUBJECTS ∙∙∙∙∙∙∙∙∙∙∙∙∙∙∙∙∙∙∙∙∙∙∙∙∙∙∙∙∙∙∙∙∙∙∙∙∙∙∙∙∙∙∙∙∙∙∙∙∙∙∙∙∙∙∙∙∙∙∙∙∙∙∙∙∙∙∙∙∙∙∙∙∙∙∙∙∙∙∙∙∙∙∙∙∙∙∙∙∙∙∙∙∙∙∙∙∙ 28
5.1 LANGUAGE ∙∙∙∙∙∙∙∙∙∙∙∙∙∙∙∙∙∙∙∙∙∙∙∙∙∙∙∙∙∙∙∙∙∙∙∙∙∙∙∙∙∙∙∙∙∙∙∙∙∙∙∙∙∙∙∙∙∙∙∙∙∙∙∙∙∙∙∙∙∙∙∙∙∙∙∙∙∙∙∙∙∙∙∙∙∙∙∙∙∙∙∙∙∙∙∙∙∙∙∙∙∙∙∙∙∙∙∙∙∙∙∙∙∙∙∙∙∙∙∙∙∙∙∙∙∙∙∙∙∙∙∙∙∙∙∙∙∙∙∙ 28
5.1.1 Phonetic Tips ∙∙∙∙∙∙∙∙∙∙∙∙∙∙∙∙∙∙∙∙∙∙∙∙∙∙∙∙∙∙∙∙∙∙∙∙∙∙∙∙∙∙∙∙∙∙∙∙∙∙∙∙∙∙∙∙∙∙∙∙∙∙∙∙∙∙∙∙∙∙∙∙∙∙∙∙∙∙∙∙∙∙∙∙∙∙∙∙∙∙∙∙∙∙∙∙∙∙∙∙∙∙∙∙∙∙∙∙∙∙∙∙∙∙∙∙∙∙∙∙∙∙∙∙∙∙ 28
5.1.2 Chinese Stroke ∙∙∙∙∙∙∙∙∙∙∙∙∙∙∙∙∙∙∙∙∙∙∙∙∙∙∙∙∙∙∙∙∙∙∙∙∙∙∙∙∙∙∙∙∙∙∙∙∙∙∙∙∙∙∙∙∙∙∙∙∙∙∙∙∙∙∙∙∙∙∙∙∙∙∙∙∙∙∙∙∙∙∙∙∙∙∙∙∙∙∙∙∙∙∙∙∙∙∙∙∙∙∙∙∙∙∙∙∙∙∙∙∙∙∙∙∙∙∙∙∙∙∙∙ 28
5.1.3 Learning Tool ∙∙∙∙∙∙∙∙∙∙∙∙∙∙∙∙∙∙∙∙∙∙∙∙∙∙∙∙∙∙∙∙∙∙∙∙∙∙∙∙∙∙∙∙∙∙∙∙∙∙∙∙∙∙∙∙∙∙∙∙∙∙∙∙∙∙∙∙∙∙∙∙∙∙∙∙∙∙∙∙∙∙∙∙∙∙∙∙∙∙∙∙∙∙∙∙∙∙∙∙∙∙∙∙∙∙∙∙∙∙∙∙∙∙∙∙∙∙∙∙∙∙∙∙∙∙∙ 29
5.2 MATHEMATICS ∙∙∙∙∙∙∙∙∙∙∙∙∙∙∙∙∙∙∙∙∙∙∙∙∙∙∙∙∙∙∙∙∙∙∙∙∙∙∙∙∙∙∙∙∙∙∙∙∙∙∙∙∙∙∙∙∙∙∙∙∙∙∙∙∙∙∙∙∙∙∙∙∙∙∙∙∙∙∙∙∙∙∙∙∙∙∙∙∙∙∙∙∙∙∙∙∙∙∙∙∙∙∙∙∙∙∙∙∙∙∙∙∙∙∙∙∙∙∙∙∙∙∙∙∙∙∙∙∙∙∙∙∙∙∙ 29
5.2.1 Hand‐sketched Equations ∙∙∙∙∙∙∙∙∙∙∙∙∙∙∙∙∙∙∙∙∙∙∙∙∙∙∙∙∙∙∙∙∙∙∙∙∙∙∙∙∙∙∙∙∙∙∙∙∙∙∙∙∙∙∙∙∙∙∙∙∙∙∙∙∙∙∙∙∙∙∙∙∙∙∙∙∙∙∙∙∙∙∙∙∙∙∙∙∙∙∙∙∙∙∙∙∙∙∙∙∙∙∙∙∙∙∙ 29
5.2.2 Equation Editor ∙∙∙∙∙∙∙∙∙∙∙∙∙∙∙∙∙∙∙∙∙∙∙∙∙∙∙∙∙∙∙∙∙∙∙∙∙∙∙∙∙∙∙∙∙∙∙∙∙∙∙∙∙∙∙∙∙∙∙∙∙∙∙∙∙∙∙∙∙∙∙∙∙∙∙∙∙∙∙∙∙∙∙∙∙∙∙∙∙∙∙∙∙∙∙∙∙∙∙∙∙∙∙∙∙∙∙∙∙∙∙∙∙∙∙∙∙∙∙∙∙∙∙ 34
5.2.3 Functional Equations ∙∙∙∙∙∙∙∙∙∙∙∙∙∙∙∙∙∙∙∙∙∙∙∙∙∙∙∙∙∙∙∙∙∙∙∙∙∙∙∙∙∙∙∙∙∙∙∙∙∙∙∙∙∙∙∙∙∙∙∙∙∙∙∙∙∙∙∙∙∙∙∙∙∙∙∙∙∙∙∙∙∙∙∙∙∙∙∙∙∙∙∙∙∙∙∙∙∙∙∙∙∙∙∙∙∙∙∙∙∙∙∙∙∙ 35
5.2.4 Drawing Graphs ∙∙∙∙∙∙∙∙∙∙∙∙∙∙∙∙∙∙∙∙∙∙∙∙∙∙∙∙∙∙∙∙∙∙∙∙∙∙∙∙∙∙∙∙∙∙∙∙∙∙∙∙∙∙∙∙∙∙∙∙∙∙∙∙∙∙∙∙∙∙∙∙∙∙∙∙∙∙∙∙∙∙∙∙∙∙∙∙∙∙∙∙∙∙∙∙∙∙∙∙∙∙∙∙∙∙∙∙∙∙∙∙∙∙∙∙∙∙∙∙∙∙ 37
5.2.5 Measurement Tool ∙∙∙∙∙∙∙∙∙∙∙∙∙∙∙∙∙∙∙∙∙∙∙∙∙∙∙∙∙∙∙∙∙∙∙∙∙∙∙∙∙∙∙∙∙∙∙∙∙∙∙∙∙∙∙∙∙∙∙∙∙∙∙∙∙∙∙∙∙∙∙∙∙∙∙∙∙∙∙∙∙∙∙∙∙∙∙∙∙∙∙∙∙∙∙∙∙∙∙∙∙∙∙∙∙∙∙∙∙∙∙∙∙∙∙∙∙∙ 39
5.3 ENGLISH ∙∙∙∙∙∙∙∙∙∙∙∙∙∙∙∙∙∙∙∙∙∙∙∙∙∙∙∙∙∙∙∙∙∙∙∙∙∙∙∙∙∙∙∙∙∙∙∙∙∙∙∙∙∙∙∙∙∙∙∙∙∙∙∙∙∙∙∙∙∙∙∙∙∙∙∙∙∙∙∙∙∙∙∙∙∙∙∙∙∙∙∙∙∙∙∙∙∙∙∙∙∙∙∙∙∙∙∙∙∙∙∙∙∙∙∙∙∙∙∙∙∙∙∙∙∙∙∙∙∙∙∙∙∙∙∙∙∙∙∙∙∙∙∙ 41
5.3.1 Phonics tips ∙∙∙∙∙∙∙∙∙∙∙∙∙∙∙∙∙∙∙∙∙∙∙∙∙∙∙∙∙∙∙∙∙∙∙∙∙∙∙∙∙∙∙∙∙∙∙∙∙∙∙∙∙∙∙∙∙∙∙∙∙∙∙∙∙∙∙∙∙∙∙∙∙∙∙∙∙∙∙∙∙∙∙∙∙∙∙∙∙∙∙∙∙∙∙∙∙∙∙∙∙∙∙∙∙∙∙∙∙∙∙∙∙∙∙∙∙∙∙∙∙∙∙∙∙∙∙∙∙ 41
5.4 PHYSICS ∙∙∙∙∙∙∙∙∙∙∙∙∙∙∙∙∙∙∙∙∙∙∙∙∙∙∙∙∙∙∙∙∙∙∙∙∙∙∙∙∙∙∙∙∙∙∙∙∙∙∙∙∙∙∙∙∙∙∙∙∙∙∙∙∙∙∙∙∙∙∙∙∙∙∙∙∙∙∙∙∙∙∙∙∙∙∙∙∙∙∙∙∙∙∙∙∙∙∙∙∙∙∙∙∙∙∙∙∙∙∙∙∙∙∙∙∙∙∙∙∙∙∙∙∙∙∙∙∙∙∙∙∙∙∙∙∙∙∙∙∙∙∙∙ 41
5.4.1 Mechanical Symbols ∙∙∙∙∙∙∙∙∙∙∙∙∙∙∙∙∙∙∙∙∙∙∙∙∙∙∙∙∙∙∙∙∙∙∙∙∙∙∙∙∙∙∙∙∙∙∙∙∙∙∙∙∙∙∙∙∙∙∙∙∙∙∙∙∙∙∙∙∙∙∙∙∙∙∙∙∙∙∙∙∙∙∙∙∙∙∙∙∙∙∙∙∙∙∙∙∙∙∙∙∙∙∙∙∙∙∙∙∙∙∙∙∙∙∙ 41
5.4.2 Electrical Symbols ∙∙∙∙∙∙∙∙∙∙∙∙∙∙∙∙∙∙∙∙∙∙∙∙∙∙∙∙∙∙∙∙∙∙∙∙∙∙∙∙∙∙∙∙∙∙∙∙∙∙∙∙∙∙∙∙∙∙∙∙∙∙∙∙∙∙∙∙∙∙∙∙∙∙∙∙∙∙∙∙∙∙∙∙∙∙∙∙∙∙∙∙∙∙∙∙∙∙∙∙∙∙∙∙∙∙∙∙∙∙∙∙∙∙∙∙∙∙∙ 43
5.4.3 Electrical Magnetism Symbols ∙∙∙∙∙∙∙∙∙∙∙∙∙∙∙∙∙∙∙∙∙∙∙∙∙∙∙∙∙∙∙∙∙∙∙∙∙∙∙∙∙∙∙∙∙∙∙∙∙∙∙∙∙∙∙∙∙∙∙∙∙∙∙∙∙∙∙∙∙∙∙∙∙∙∙∙∙∙∙∙∙∙∙∙∙∙∙∙∙∙∙∙∙∙∙∙∙∙∙∙ 44
5.4.4 Optical Symbols ∙∙∙∙∙∙∙∙∙∙∙∙∙∙∙∙∙∙∙∙∙∙∙∙∙∙∙∙∙∙∙∙∙∙∙∙∙∙∙∙∙∙∙∙∙∙∙∙∙∙∙∙∙∙∙∙∙∙∙∙∙∙∙∙∙∙∙∙∙∙∙∙∙∙∙∙∙∙∙∙∙∙∙∙∙∙∙∙∙∙∙∙∙∙∙∙∙∙∙∙∙∙∙∙∙∙∙∙∙∙∙∙∙∙∙∙∙∙∙∙∙∙ 45
5.5 CHEMISTRY ∙∙∙∙∙∙∙∙∙∙∙∙∙∙∙∙∙∙∙∙∙∙∙∙∙∙∙∙∙∙∙∙∙∙∙∙∙∙∙∙∙∙∙∙∙∙∙∙∙∙∙∙∙∙∙∙∙∙∙∙∙∙∙∙∙∙∙∙∙∙∙∙∙∙∙∙∙∙∙∙∙∙∙∙∙∙∙∙∙∙∙∙∙∙∙∙∙∙∙∙∙∙∙∙∙∙∙∙∙∙∙∙∙∙∙∙∙∙∙∙∙∙∙∙∙∙∙∙∙∙∙∙∙∙∙∙∙∙∙∙ 45
5.5.1 Hand‐sketched Equation ∙∙∙∙∙∙∙∙∙∙∙∙∙∙∙∙∙∙∙∙∙∙∙∙∙∙∙∙∙∙∙∙∙∙∙∙∙∙∙∙∙∙∙∙∙∙∙∙∙∙∙∙∙∙∙∙∙∙∙∙∙∙∙∙∙∙∙∙∙∙∙∙∙∙∙∙∙∙∙∙∙∙∙∙∙∙∙∙∙∙∙∙∙∙∙∙∙∙∙∙∙∙∙∙∙∙∙∙∙ 46
5.5.2 Equation Editor ∙∙∙∙∙∙∙∙∙∙∙∙∙∙∙∙∙∙∙∙∙∙∙∙∙∙∙∙∙∙∙∙∙∙∙∙∙∙∙∙∙∙∙∙∙∙∙∙∙∙∙∙∙∙∙∙∙∙∙∙∙∙∙∙∙∙∙∙∙∙∙∙∙∙∙∙∙∙∙∙∙∙∙∙∙∙∙∙∙∙∙∙∙∙∙∙∙∙∙∙∙∙∙∙∙∙∙∙∙∙∙∙∙∙∙∙∙∙∙∙∙∙∙ 46
5.5.3 Double‐line Bridge ∙∙∙∙∙∙∙∙∙∙∙∙∙∙∙∙∙∙∙∙∙∙∙∙∙∙∙∙∙∙∙∙∙∙∙∙∙∙∙∙∙∙∙∙∙∙∙∙∙∙∙∙∙∙∙∙∙∙∙∙∙∙∙∙∙∙∙∙∙∙∙∙∙∙∙∙∙∙∙∙∙∙∙∙∙∙∙∙∙∙∙∙∙∙∙∙∙∙∙∙∙∙∙∙∙∙∙∙∙∙∙∙∙∙∙∙∙∙ 47

3
5.5.4 Benzene Function ∙∙∙∙∙∙∙∙∙∙∙∙∙∙∙∙∙∙∙∙∙∙∙∙∙∙∙∙∙∙∙∙∙∙∙∙∙∙∙∙∙∙∙∙∙∙∙∙∙∙∙∙∙∙∙∙∙∙∙∙∙∙∙∙∙∙∙∙∙∙∙∙∙∙∙∙∙∙∙∙∙∙∙∙∙∙∙∙∙∙∙∙∙∙∙∙∙∙∙∙∙∙∙∙∙∙∙∙∙∙∙∙∙∙∙∙∙∙∙ 47
5.5.5 Chemical Bonding ∙∙∙∙∙∙∙∙∙∙∙∙∙∙∙∙∙∙∙∙∙∙∙∙∙∙∙∙∙∙∙∙∙∙∙∙∙∙∙∙∙∙∙∙∙∙∙∙∙∙∙∙∙∙∙∙∙∙∙∙∙∙∙∙∙∙∙∙∙∙∙∙∙∙∙∙∙∙∙∙∙∙∙∙∙∙∙∙∙∙∙∙∙∙∙∙∙∙∙∙∙∙∙∙∙∙∙∙∙∙∙∙∙∙∙∙∙∙∙ 47
5.5.6 Chemical Element Table ∙∙∙∙∙∙∙∙∙∙∙∙∙∙∙∙∙∙∙∙∙∙∙∙∙∙∙∙∙∙∙∙∙∙∙∙∙∙∙∙∙∙∙∙∙∙∙∙∙∙∙∙∙∙∙∙∙∙∙∙∙∙∙∙∙∙∙∙∙∙∙∙∙∙∙∙∙∙∙∙∙∙∙∙∙∙∙∙∙∙∙∙∙∙∙∙∙∙∙∙∙∙∙∙∙∙∙∙∙∙ 47
5.5.7 Diagram of the Atomic Structure ∙∙∙∙∙∙∙∙∙∙∙∙∙∙∙∙∙∙∙∙∙∙∙∙∙∙∙∙∙∙∙∙∙∙∙∙∙∙∙∙∙∙∙∙∙∙∙∙∙∙∙∙∙∙∙∙∙∙∙∙∙∙∙∙∙∙∙∙∙∙∙∙∙∙∙∙∙∙∙∙∙∙∙∙∙∙∙∙∙∙∙∙∙∙∙∙ 48
5.5.8 Chemical Diagram ∙∙∙∙∙∙∙∙∙∙∙∙∙∙∙∙∙∙∙∙∙∙∙∙∙∙∙∙∙∙∙∙∙∙∙∙∙∙∙∙∙∙∙∙∙∙∙∙∙∙∙∙∙∙∙∙∙∙∙∙∙∙∙∙∙∙∙∙∙∙∙∙∙∙∙∙∙∙∙∙∙∙∙∙∙∙∙∙∙∙∙∙∙∙∙∙∙∙∙∙∙∙∙∙∙∙∙∙∙∙∙∙∙∙∙∙∙∙∙ 49
5.6 BIOLOGY ∙∙∙∙∙∙∙∙∙∙∙∙∙∙∙∙∙∙∙∙∙∙∙∙∙∙∙∙∙∙∙∙∙∙∙∙∙∙∙∙∙∙∙∙∙∙∙∙∙∙∙∙∙∙∙∙∙∙∙∙∙∙∙∙∙∙∙∙∙∙∙∙∙∙∙∙∙∙∙∙∙∙∙∙∙∙∙∙∙∙∙∙∙∙∙∙∙∙∙∙∙∙∙∙∙∙∙∙∙∙∙∙∙∙∙∙∙∙∙∙∙∙∙∙∙∙∙∙∙∙∙∙∙∙∙∙∙∙∙∙∙∙∙ 52
5.7 GEOGRAPHY ∙∙∙∙∙∙∙∙∙∙∙∙∙∙∙∙∙∙∙∙∙∙∙∙∙∙∙∙∙∙∙∙∙∙∙∙∙∙∙∙∙∙∙∙∙∙∙∙∙∙∙∙∙∙∙∙∙∙∙∙∙∙∙∙∙∙∙∙∙∙∙∙∙∙∙∙∙∙∙∙∙∙∙∙∙∙∙∙∙∙∙∙∙∙∙∙∙∙∙∙∙∙∙∙∙∙∙∙∙∙∙∙∙∙∙∙∙∙∙∙∙∙∙∙∙∙∙∙∙∙∙∙∙∙∙∙∙∙ 53
5.8 MUSIC ∙∙∙∙∙∙∙∙∙∙∙∙∙∙∙∙∙∙∙∙∙∙∙∙∙∙∙∙∙∙∙∙∙∙∙∙∙∙∙∙∙∙∙∙∙∙∙∙∙∙∙∙∙∙∙∙∙∙∙∙∙∙∙∙∙∙∙∙∙∙∙∙∙∙∙∙∙∙∙∙∙∙∙∙∙∙∙∙∙∙∙∙∙∙∙∙∙∙∙∙∙∙∙∙∙∙∙∙∙∙∙∙∙∙∙∙∙∙∙∙∙∙∙∙∙∙∙∙∙∙∙∙∙∙∙∙∙∙∙∙∙∙∙∙∙∙ 53
PART VI TEACHING MODE ∙∙∙∙∙∙∙∙∙∙∙∙∙∙∙∙∙∙∙∙∙∙∙∙∙∙∙∙∙∙∙∙∙∙∙∙∙∙∙∙∙∙∙∙∙∙∙∙∙∙∙∙∙∙∙∙∙∙∙∙∙∙∙∙∙∙∙∙∙∙∙∙∙∙∙∙∙∙∙∙∙∙∙∙∙∙∙∙∙∙∙∙∙∙∙∙∙∙∙∙∙∙∙∙∙∙∙∙∙∙∙∙∙∙∙∙∙ 55
6.1 INTRODUCTION OF THE FUNCTIONS OF THE PALETTE ∙∙∙∙∙∙∙∙∙∙∙∙∙∙∙∙∙∙∙∙∙∙∙∙∙∙∙∙∙∙∙∙∙∙∙∙∙∙∙∙∙∙∙∙∙∙∙∙∙∙∙∙∙∙∙∙∙∙∙∙∙∙∙∙∙∙∙∙∙∙∙∙∙∙∙∙∙∙∙∙∙∙∙∙∙∙ 55
6.1.1 Palette Toolbar ∙∙∙∙∙∙∙∙∙∙∙∙∙∙∙∙∙∙∙∙∙∙∙∙∙∙∙∙∙∙∙∙∙∙∙∙∙∙∙∙∙∙∙∙∙∙∙∙∙∙∙∙∙∙∙∙∙∙∙∙∙∙∙∙∙∙∙∙∙∙∙∙∙∙∙∙∙∙∙∙∙∙∙∙∙∙∙∙∙∙∙∙∙∙∙∙∙∙∙∙∙∙∙∙∙∙∙∙∙∙∙∙∙∙∙∙∙∙∙∙∙∙∙∙ 55
6.1.2 Page Adjustment ∙∙∙∙∙∙∙∙∙∙∙∙∙∙∙∙∙∙∙∙∙∙∙∙∙∙∙∙∙∙∙∙∙∙∙∙∙∙∙∙∙∙∙∙∙∙∙∙∙∙∙∙∙∙∙∙∙∙∙∙∙∙∙∙∙∙∙∙∙∙∙∙∙∙∙∙∙∙∙∙∙∙∙∙∙∙∙∙∙∙∙∙∙∙∙∙∙∙∙∙∙∙∙∙∙∙∙∙∙∙∙∙∙∙∙∙∙∙∙∙∙ 57
6.1.3 Screen Annotation ∙∙∙∙∙∙∙∙∙∙∙∙∙∙∙∙∙∙∙∙∙∙∙∙∙∙∙∙∙∙∙∙∙∙∙∙∙∙∙∙∙∙∙∙∙∙∙∙∙∙∙∙∙∙∙∙∙∙∙∙∙∙∙∙∙∙∙∙∙∙∙∙∙∙∙∙∙∙∙∙∙∙∙∙∙∙∙∙∙∙∙∙∙∙∙∙∙∙∙∙∙∙∙∙∙∙∙∙∙∙∙∙∙∙∙∙∙∙ 58
PART VII SOFTWARE EXTENSION ∙∙∙∙∙∙∙∙∙∙∙∙∙∙∙∙∙∙∙∙∙∙∙∙∙∙∙∙∙∙∙∙∙∙∙∙∙∙∙∙∙∙∙∙∙∙∙∙∙∙∙∙∙∙∙∙∙∙∙∙∙∙∙∙∙∙∙∙∙∙∙∙∙∙∙∙∙∙∙∙∙∙∙∙∙∙∙∙∙∙∙∙∙∙∙∙∙∙∙∙∙∙∙∙∙∙ 61
7.1 PROJECTOR FUNCTION ∙∙∙∙∙∙∙∙∙∙∙∙∙∙∙∙∙∙∙∙∙∙∙∙∙∙∙∙∙∙∙∙∙∙∙∙∙∙∙∙∙∙∙∙∙∙∙∙∙∙∙∙∙∙∙∙∙∙∙∙∙∙∙∙∙∙∙∙∙∙∙∙∙∙∙∙∙∙∙∙∙∙∙∙∙∙∙∙∙∙∙∙∙∙∙∙∙∙∙∙∙∙∙∙∙∙∙∙∙∙∙∙∙∙∙∙∙∙∙∙∙∙∙∙∙ 61
7.2 CLOUD PLATFORM ∙∙∙∙∙∙∙∙∙∙∙∙∙∙∙∙∙∙∙∙∙∙∙∙∙∙∙∙∙∙∙∙∙∙∙∙∙∙∙∙∙∙∙∙∙∙∙∙∙∙∙∙∙∙∙∙∙∙∙∙∙∙∙∙∙∙∙∙∙∙∙∙∙∙∙∙∙∙∙∙∙∙∙∙∙∙∙∙∙∙∙∙∙∙∙∙∙∙∙∙∙∙∙∙∙∙∙∙∙∙∙∙∙∙∙∙∙∙∙∙∙∙∙∙∙∙∙∙∙∙ 62
7.2.1 Log in Cloud Platform ∙∙∙∙∙∙∙∙∙∙∙∙∙∙∙∙∙∙∙∙∙∙∙∙∙∙∙∙∙∙∙∙∙∙∙∙∙∙∙∙∙∙∙∙∙∙∙∙∙∙∙∙∙∙∙∙∙∙∙∙∙∙∙∙∙∙∙∙∙∙∙∙∙∙∙∙∙∙∙∙∙∙∙∙∙∙∙∙∙∙∙∙∙∙∙∙∙∙∙∙∙∙∙∙∙∙∙∙∙∙∙∙∙∙ 62
7.2.2 Upload Documents ∙∙∙∙∙∙∙∙∙∙∙∙∙∙∙∙∙∙∙∙∙∙∙∙∙∙∙∙∙∙∙∙∙∙∙∙∙∙∙∙∙∙∙∙∙∙∙∙∙∙∙∙∙∙∙∙∙∙∙∙∙∙∙∙∙∙∙∙∙∙∙∙∙∙∙∙∙∙∙∙∙∙∙∙∙∙∙∙∙∙∙∙∙∙∙∙∙∙∙∙∙∙∙∙∙∙∙∙∙∙∙∙∙∙∙∙∙ 62
7.2.3 Download Class Materials ∙∙∙∙∙∙∙∙∙∙∙∙∙∙∙∙∙∙∙∙∙∙∙∙∙∙∙∙∙∙∙∙∙∙∙∙∙∙∙∙∙∙∙∙∙∙∙∙∙∙∙∙∙∙∙∙∙∙∙∙∙∙∙∙∙∙∙∙∙∙∙∙∙∙∙∙∙∙∙∙∙∙∙∙∙∙∙∙∙∙∙∙∙∙∙∙∙∙∙∙∙∙∙∙∙∙∙ 62
7.2.4 Visit HiteCloud ∙∙∙∙∙∙∙∙∙∙∙∙∙∙∙∙∙∙∙∙∙∙∙∙∙∙∙∙∙∙∙∙∙∙∙∙∙∙∙∙∙∙∙∙∙∙∙∙∙∙∙∙∙∙∙∙∙∙∙∙∙∙∙∙∙∙∙∙∙∙∙∙∙∙∙∙∙∙∙∙∙∙∙∙∙∙∙∙∙∙∙∙∙∙∙∙∙∙∙∙∙∙∙∙∙∙∙∙∙∙∙∙∙∙∙∙∙∙∙∙∙∙∙∙ 62
7.3 WIN8 OPERATING SYSTEM ∙∙∙∙∙∙∙∙∙∙∙∙∙∙∙∙∙∙∙∙∙∙∙∙∙∙∙∙∙∙∙∙∙∙∙∙∙∙∙∙∙∙∙∙∙∙∙∙∙∙∙∙∙∙∙∙∙∙∙∙∙∙∙∙∙∙∙∙∙∙∙∙∙∙∙∙∙∙∙∙∙∙∙∙∙∙∙∙∙∙∙∙∙∙∙∙∙∙∙∙∙∙∙∙∙∙∙∙∙∙∙∙∙∙∙∙∙∙ 62

4
Part I Fundamental Knowledge
1.1 System Requirements
● Pentium dual‐processor or above
● 2GB internal memory
● Windows XP SP3, Windows Vista SP2, Windows 7 及Windows 8 operating system
● Adobe Flash Player
● Adobe Reader
● FinalCodecs or other decoding software (video player functions are required in some cases)
1.2 Preparation Before You Begin
1.2.1 Inspecting Connection
icon indicates that the interactive whiteboard and the PC are not connected or the connection is lost;
icon indicates the connection is on.
1.2.2 Calibrating
A 9‐point calibration is usually used.
Calibration method: Touch the “Calibration” button from the connection menu. Figure 1‐1 shows the pop‐up
menu after right click the connection icon.
Fig. 1‐1 The pop‐up menu after right click the connection icon
(Calibration, Remote diagnosis, Configuration, About, Exit)
Touch 1 to 9 numbers that appear on the screen to perform the calibration process and a calibration quick key
window will appear afterward (displayed in Fig. 1‐2). Users simply follow the signals on the screen to touch the
center part of the upper left, lower left, upper right, and lower right quick keys to complete the calibration.

5
Fig. 1‐2 A calibration quick key
1.2.3 Checking the Calibration Accuracy
Move the pen around and check if the target on the interactive whiteboard tracks the position of the pen
preciously. If so, it is highly accurate.
1.2.4 Starting the Software
Users can start the software doing one of the following three methods:
Start the programs via the software shortcut on the desktop.
Touch any quick key on the whiteboard.
Pick up any pen from the pen tray in the lower part of the whiteboard.
1.3 Settings
This software supports multiple user settings similar to the Windows system. Each user can define his own
settings.
1.3.1 User Management
Path: File ‐‐‐ Settings ‐‐‐ User Management.
The user icon marked with a red square indicates that the account is activated. Figure 1‐3 is an example of a
“Default User” already being activated. User icons marked with [ ] are in use of the system currently. User 1 is
currently using the system as illustrated in Fig. 1‐3.
Fig. 1‐3 User management windows

6
1.3.2 Define the Default Settings of Pen Size and Highlighter Styles
Path: File ‐‐‐ Settings ‐‐‐ System Settings ‐‐‐ Pen Configuration
1.3.3 Handwriting Recognition Settings
Path: File ‐‐‐ Settings ‐‐‐ System Settings ‐‐‐ Handwriting Recognition Settings
1.3.4 Hardware Customization
Some of the hardware have a list of function keys appearing on both sides of the screen. These function keys
can be customized with specific functions by the following steps.
Path: File ‐‐‐ Settings ‐‐‐ System Settings ‐‐‐ Hardware Customization
1.3.5 Interface Settings
Edit the function keys in the menu bar and the toolbar.
For example, Fig. 1‐4 is the default settings of the menu bar and the toolbar prior to user’s modifications; Fig.
1‐5 shows the customized menu bar and the toolbar after the configuration.
Path: File ‐‐‐ Settings ‐‐‐ Set Settings ‐‐‐ Interface Settings
Fig. 1‐4 Default settings of the menu bar and the toolbar
Fig. 1‐5 The customized menu bar and the toolbar after the configuration
1.3.6 Automatic File Saving
Once the function of automatic file saving is activated, when the software is unexpectedly shut down and
restarted again, the damages is minimal.
Path: File ‐‐‐ Settings ‐‐‐ System Settings ‐‐‐ others

7
Part II Software Overview
The software can be operated in two modes, design mode and teaching mode. The design mode allows users to
prepare class materials, while the teaching mode is for demonstration and lecture.
2.1 Design Mode
The design mode is similar to the Windows operation environment. Users may perform functions by selecting
commands from the menu bar and the toolbar. When users’ computers are not connected to the whiteboard
equipments or the secured dongle is not plugged in, a watermark will appear in the writing area. However,
users can continue working on the software disregard the watermark. It is common to prepare the class
materials in the design mode.
2.2 Teaching Mode
Click the “Play” button in the design mode will change to the teaching mode. In the teaching mode,
the writing area is set to be full‐screen to make writing easier. Teaching mode is mainly used in the classroom
teaching, the tool palette shown in Fig. 2‐1 is available in the teaching mode.
Fig. 2‐1 The tool palette in the teaching mode
Button Function
minimize tool
palette
Select this button will minimize the tool palette; selecting the button again will restore
the tool palette on the screen.
When users are using the screen annotation, a “Mouse” button will appear in the center
of the tool palette. Select “Mouse” to aid operative advantages on Windows related

8
mouse operations.
The “Mouse Button” function switches you from annotating your desktop to navigating
your desktop.
Minimize
software
window
Select this button will minimize the software window.
Exit teaching
mode
Select this button will change from the teaching mode to the design mode.

9
Part III Design Mode
The software provides two operating modes for users to use in different requirements. This chapter describes
the menu bar, the toolbar, and academic tools in the design mode. Figure 3‐1 is the screen interface of the
design mode which comprises four major parts, namely the menu bar, the toolbar, the writing area and the
function panel (including index bar, property viewer, object, page, online class, and special effect interactive
panel)
Fig. 3‐1 Interface of the design mode
(panel, menu bar, toolbar, writing area, play toolbar)
3.1 Menu bar
3.1.1 File menu
Button Function
New
Create a new HHT file.
Open
Open a HHT file

10
recently used
Open a recently used HHT file.
Save
Save the current HHT file.
Save as
Save the current HHT file under a different path and name.
Import
Import an external file in the formats supported by the software to the
current HHT file.
Export
Export the content in the current page document in a format supported by the
software.
Mail to
Email the file as an attachment.
Print the content of the file.
Settings
Define the software settings.
Language
Select the language of the software.
Close
Close the current file.
Exit
Exit the software.
3.1.2 Edit menu
Button Function
Undo the previous action.

11
Undo
Redo
Redo the previous action.
Cut
Cut the selected objects.
Copy
Copy the selected objects.
Paste
Paste selected objects that have been copied or cut.
Delete
Delete the selected objects.
Clone
Clone the selected objects.
Drag to Clone
Drag to clone the selected objects.
Clear Page
Clear all the objects other than the settings of the page grid and the ruler.
3.1.3 Page menu
Button Function
New Page
Create new white page, screen page and black page.
Delete Page
Delete the current page.
Previous Page
Go to the previous page.
Next Page
Go to the next page.
Page Roaming
Activate unlimited page roaming to allow larger screen space for writing.
When touch the screen using three or more finger tips at the same time, the
page will switch to page roaming style.

12
Page Playback
Playback the process of operation on the current page.
Background Color
Set up the background color of the selected page.
Background Image
Set up the background image of the selected page.
Background Texture
Set up the textures of the selected page.
Delete Background Image
Delete the background image of the selected page.
Recognition Percentage
Set up the recognition percentage of the selected page.
3.1.4 Insert menu
Button Function
Video
Insert multimedia files, for example, image, flash, audio and video.
Text Box
Insert a text box in the selected page and edit the text.
Vector Graphic
Insert vector graphics.
User‐defined Graph
Insert user‐defined graphs.
Artc word
Insert artistic words.
Projector
Combine with the projector to display contents in the page.
3.1.5 Academic Subject menu
Button Function

13
Mathematics
Insert mathematical subjects.
Language
Insert language subjects.
English
Insert English subjects.
Physics
Insert physical subjects.
Chemistry
Insert chemical subjects.
Biology
Insert biological subjects.
Geography
Insert geographical subjects.
Music
Insert music subjects.
3.1.6 Drawing menu
Button Function
Select
Select an object.
Delete
Delete an object.
Pen Tray
Select different types of pen
Texture
Define the color of the texture pen.
Color
Define the color of pens other than the texture pen.

14
Size
Define the size of the pen.
Style
Define the line style of the pen.
Line Header
Define the style of the line header.
Line End
Define the style of the line end.
Fill
Select a closed area to fill color, image, or texture a wanted color from the
pull‐down menu to fill the selected area
Fill Settings
Define color, image, and texture settings of the “Color Fill” function.
3.1.7 Tool menu
Button Function
Spotlight
The tool provides the spotlight effect only on a specific area to be visible.
Curtain
The function of Curtain is to block part of the screen.
Screen Capture Tool
The tool can capture the current screen image.
Screen Recorder
The tool can record and save the steps and operations appear on the screen.
Record Settings
The “Record Settings” can record and save the software operations in .dpf
format according to user‐defined settings.
On‐screen Keyboard
This function features an on‐screen keyboard.
Handwriting Recognition
The tool performs handwriting recognition and converts handwritings to
printed characters.

15
Writing Window
The tool creates a new window in the current screen for users to input
writings.
Display Window
The tool create a display window specifically to play videos, powerpoints and
other demonstration files.
Clock/Timer
There are two functions, timer and clock, in this tool.
Calculator
The tool is a calculator.
Magnifier
The tool is a magnifier for zooming.
Lock
The tool blocks the page with an opaque layer to avoid unwanted software
functions performed on it.
Shortcut
The tool stores shortcuts to all the user‐defined resources for faster and
easier retrieval.
3.1.8 Cloud Platform menu
Button Function
Log in
Log in to HiteCloud cloud platform.
Exit
Exit HiteCloud cloud platform.
Upload
Upload files to HiteCloud cloud platform.
Download
Download files from HiteCloud cloud platform.
Visit
Visit HiteCloud.
3.1.9 Help menu
Button Function
Provide online explanation.

16
Help
Update
Check whether the software is the latest version or not, and update the
program if needed.
About
Display the version of the software presently in use.
3.2 Panel
Click the button to show the panel. Click the button in the right upper corner of the panel to hide/lock
the panel.
3.2.1 Index Bar Panel
The index bar panel provides the page index function. The index bar allows users to cut, copy, paste, delete and
move the pages.
3.2.2 Property Panel
Use the property panel to view and change the detailed properties of the objects in the page.
There are three methods to open the property panel:
Method 1: Click the button to open (expend) the panel, and switch to “Property Viewer”.
Method 2: Select an object; click at the lower left corner and select “Property Viewer”.
Method 3: Select an object; right click the object to open the shortcut menu, and select “Property Viewer”.
3.2.3 Academic Subject Panel
The academic subject panel consists of three parts, the subject tool, subject resource and subject template.
Subject Tool
The subject tool includes tools for language, mathematics, English, physics, chemistry, biology, geography, and
music. Further descriptions will be provided in the multidisciplinary section.
Subject Resource
The subject resource consists of two parts, the local resource and internet resource. The local resource includes
the default resource, system resource, and storage folder; users can easily place the resource from HiteCloud in
the page via internet resource.
Subject Template
Subject Template is composed of the system‐oriented template and user‐oriented template.
The system‐oriented template is provided by the software and can not be added, deleted, and modified by the
users; however, users can add, delete and modify the user‐oriented template according to their needs.

17
3.2.4 Page Panel
The Page Panel has two parts, the page template and page special effect.
Page Template
The page template includes system page template and user page template. Define the area of application in the
page template; then drag the page template into the page. The system page template is provided by the
software and can not be added, deleted and modified; however, users can add, delete, and modify the user
page templates.
Page Special Effect
Use “Page Special Effect” to perform the animated page effect similar to that in the powerpoint illustrated in
the class.
3.2.5 Internet Class Panel
Use the internet class panel to conduct remote teaching.
The presenter starts the software; click the button in the left side of the screen to open the panel; then
select “Internet Class Panel”. Click the “Create the Internet Class”” button, a pop‐up window as shown in Fig.
3‐2 will appear.
Fig. 3‐2 The pop‐up window to create an internet class panel
For a first time user, once the password is entered, a window displayed in Fig. 3‐3 will appear.

18
Fig. 3‐3 The pop‐up windows for the first time users.
The functions available in the internet class are extended from those of VNC, including VNC basic features of VNC
server for win32, distributor, RemoteAccess; MediaServer for audio and video service; and IP address of 172.21.99.26
reserved for the class presenter. Set all services to be “Access Allowed” and click “OK”, as displayed in Fig. 3‐4, to
complete the preparation that is done by the presenter.
Fig. 3‐4 The presenter in the user list.
The attendees start the software; click the button in the left side of the screen to open the panel; then
select “Internet Class Panel”. Click the “Enter the Internet Class”” button, a pop‐up window as shown in Fig.
3‐5 will appear.

19
Enter the presenter’s IP address and log in password; then click “OK” to enter the internet class. Figure 3‐6 is the
interface after attendees log in to the internet class.
Fig. 3‐6 is the interface after attendees log in to the internet class.
The presenter can grant access rights to attendees on using “Software Function Button ” and “Audio Button ”.
The “Show/Hide Video Button “ controls the video conference function between the presenter and the attendees.
Attendees can click to exit from the internet class.
3.2.6 Special Effect Interactive Panel
The “ special effect interactive panel” enriches the interactive features of the software.
Users can drag the “Trigger Object” and “Result Object” to the “Trigger Object” window and “Result Object” window
respectively; define the interactive effect with respect to each trigger action to complete the process, as displayed in
Fig. 3‐7.

20
Fig. 3‐7 The screen of the special interactive effect.
Drag an object to the center of a trigger table cell and a result table cell. When the symbol appears, release the
mouse click and the existing trigger object will be replaced. When the symbol appears, release the mouse click
and the a new trigger object is added.
The special interactive effect can only be previewed in the working mode and is executable with special effects in
the teaching mode.

21
Part IV Common Operations
4.1 Pen Tool
Button Function
Hard pen
The hard pen stimulates the writing effect
of a fountain pen, bal pen and chalk pen.
Brush pen
The bBrush pen stimulates the writing of a
brush pen with the effect of sharpness,
weight and brush of the pen.
Bamboo pen
The bamboo pen expresses the writing
effect of Tibetan, Arabic characters.
Highlight pen
The highlight pen stimulates the effects of a
bright highlighter with choices of different
colors.
Flash pen
The flash pen attracts attention by varying its
color between actions. Once an action is
performed, the colorful trace of pointer
disappears.
Texture pen
The texture pen displays the effect of
texture in writing.
Smart pen
The smart pen can recognize the shapes of
a line, angle, and triangle drawn by users.
Smart pen also creates different control
points for different drawings allowing
users to adjust the drawings as shown to
the right.
The graph before
the recognition
The graph after the
recognition

22
Hand Signal pen
The hand signal pen performs different
functions on the page, including turning to
next/previous page, erasing selected
contents, and selecting objects.
Hand signal Function
Next page
Previous page
Erase the
selected area
Select an object
4.2 Basic Operations of the Objects
4.2.1 Select the Objects
To select an object, click a target item, among the “polygon”, “smiling face”, or “3”, as shown in Fig. 4‐1.
Fig. 4‐1 The selection of a single object.
To select multiple objects, click the button first; then drag the mouse pointer around the selected objects.
Figure 4‐2 shows how to select three lines by dragging the mouse point to draw a circle around.
Fig. 4‐2 The selection of multiple objects.
23
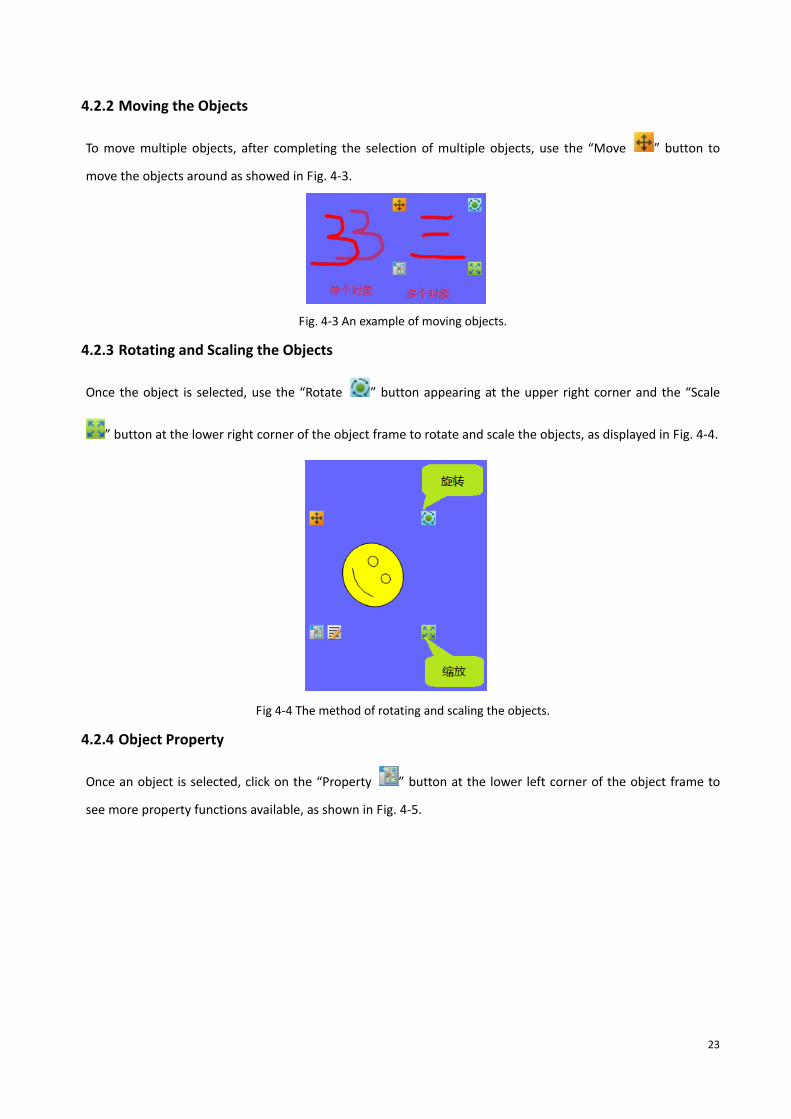
4.2.2 Moving the Objects
To move multiple objects, after completing the selection of multiple objects, use the “Move ” button to
move the objects around as showed in Fig. 4‐3.
Fig. 4‐3 An example of moving objects.
4.2.3 Rotating and Scaling the Objects
Once the object is selected, use the “Rotate ” button appearing at the upper right corner and the “Scale
” button at the lower right corner of the object frame to rotate and scale the objects, as displayed in Fig. 4‐4.
Fig 4‐4 The method of rotating and scaling the objects.
4.2.4 Object Property
Once an object is selected, click on the “Property ” button at the lower left corner of the object frame to
see more property functions available, as shown in Fig. 4‐5.

24
Fig. 4‐5 The property menu
4.2.5 Grouping the Objects
Once a set of objects is selected, click on the “Group ” button from the property menu to make
them to be viewed as an object. Any operation applied to the grouped objects will treat the grouped objects
as if a single object.
4.2.6 Locking the Objects
Upon an object or multiple objects being selected, click on the “Lock ” button from the property
menu to lock the object. The locked objects can not be moved, rotated and affected by the operations.
4.2.7 Cloning the Objects
Upon an object or multiple objects being selected, click on the “Clone ” button from the property
menu to produce a clone of the object. Use the “Drag to Clone “ to drag and produce
unlimited copied of the object.
4.2.8 Layer Order of the Objects
Upon an object or multiple objects being selected, click on the “Layer Order ” button from the
property menu to define the layer order and display of the objects.
4.2.9 Editing the Objects
When a text object is selected, click the “Edit ” button that appears at the lower left corner of the object
frame, and begin to edit the text box, hand‐sketched mathematic equations, hand‐sketched chemical equations,
and English phrases, as illustrated in Fig. 4‐6.

25
Fig. 4‐6 Editing the Objects
4.2.10 Aligning the Objects
Upon an object or multiple objects being selected, use the “Align” button in the property menu to align the
objects.
4.2.11 Object Playback
Upon an object or multiple objects being selected, use the “Playback ” button or “Repeat
Playback “ button in the property menu to replay the objects.
4.2.12 Filling the Objects
Use the paint bucket to fill the closed object with colors, images or textures.
4.2.13 Sound of the Objects
Upon an object or multiple objects of Chinese or English words being selected, use the “Sound
” button in the property menu to pronounce. The effect of this function depends on the
operating system and appears to be excellent in WIN7 operating system.
4.2.14 Duplicating the External Images and Text
The software supports the copy and paste functions by using“Ctrl+C”、 ”Ctrl+V” to input external images and
text to the page.
4.2.15 Saving the Images
The software supports the “Save As” function on the images. External images pasted in the page can be stored
in the local folders by “Save As” function.
4.3 Text Input
4.3.1 Keyboard Input
Select the “Text Box ” button from the toolbar and click once or hold and drag the mouse pointer to create
a text box, as shown in Fig. 4‐7.

26
Fig. 4‐7 The text box editor.
4.3.2 Handwriting Recognition Input
Select the “Handwriting Recognition “ button from the toolbar, the software will converts handwritings to
printed characters.
4.3.3 Third Option of Text Input
Use the hard pen, brush pen and highlight pen to write the contents; then click the “Recognition
” button in the property menu to convert the handwritings to printed characters.
4.4 Importing the Multimedia Files
Select the “Multimedia “ button from the toolbar to open the multimedia files in the format supported by
the software. (The software supports most formats of the multimedia file. If the software suggests that you
need to have a specific decoding program, please install “FinalCodecs” or other decoding software first.) To
import the multimedia file, drag the file to the text box.
Fig. 4‐8 The display of a multimedia file.

27
4.5 Importing the PPT Files
Path: File ‐‐‐ Import
The function of importing the PPT files places the powerpoint files in the page; the text in the PPT files remains
as a text in the page.

28
Part V Multidisciplinary Subjects
The subject tool consists of application tools for language, mathematics, English, physics, chemistry, biology,
geography and music.
5.1 Language
The language subject tool provides commonly used functions of Chinese phonetics, Chinese stroke, and learning
tool. Select the “Language “ button in the toolbar to access the language subject.
5.1.1 Phonetic Tips
Click the “Phonetics “ button in the language subject tool; then click in the writing area or drag it to the
writing area to create the Chinese phonetics information . A pop‐up dialog window of Chinese
phonetics will appear as well.
Fig. 5‐1 A pop‐up dialog window of Chinese phonetics.
The language phonetics supports "pronunciation" feature.
5.1.2 Chinese Stroke
Click the “Chinese Stroke “ button in the language subject tool; then click in the writing area or drag it to
the writing area to create the Chinese stroke for“三”, the default setting. Click on the stroke in the sequence of
the writing, as shown in Fig. 5‐2.

29
Fig. 5‐2 The setting of the Chinese Stroke
5.1.3 Learning Tool
Click the “Learning Tool “ button in the language subject tool to see the pop‐up window of the learning
tool containing information of the Chinese stroke, pronunciation, translation in Chinese and English, and
composing sentences.
5.2 Mathematics
The mathematic subject tool provides commonly used mathematic functions. Select the “Mathematics “ button in the toolbar to access the mathematic subject as shown in Fig. 5‐3.
Fig. 5‐3 The mathematic subject tool
5.2.1 Hand‐sketched Equations
The function of the hand‐sketched equations converts hand written equations to printed characters. Click the
symbol after open the mathematic subject tool; then click in the writing area or drag it to the writing area
to create the editing window of hand‐sketched equation where users write mathematic equations as illustrated
in Fig. 5‐4.

30
Fig. 5‐4 A hand‐sketched mathematic equation
The correct way of writing equations:
The variations in handwriting styles among users may cause errors in the recognizing process. Currently, the
overall recognition percentage of the system is 90 percentages. The time required to recognize a hand‐sketched
equation depends on the number of stroke in an equation. The more strokes, the more time it takes to convert
into a printed form. The current version allows a maximum of 35 strokes in a single hand‐sketched equation.
Therefore, hand‐sketched equations which are complied the following requirements, can be recognized and
converted more correctly.
● Follow the formal sequence and form of stroke strictly while writing the equations.
● Write neatly and specification clearly.
● To delete the handwriting contents: Whenever an error occurs while using the hand‐sketched equations
feature, erase the selected area by smudging the pointer and re‐draw the contents.
● Special conditions: For example, to recognize a "radical" symbol, the system needs a combination of a
radical symbol and a number in order to convert correctly. A radical symbol without a number in it will be
expressed as“.”. There are three types of mathematical formulas can be recognized by the hand‐sketched
equations function: the number signs, basic operators and special operators. The supported inputs of each
category are listed in the following table.
Category Symbol
Number Sign
Digit 0~9
English alphabet a~z lower case
Greek letter α,β,γ,δ,ε,θ,λ,ω,σ,π,П,Σ,!
Math symbol +,‐,x ,*,/,−,÷, =,.,√,%
Other character (,),[,],{,}
Basic Operator
Power a3
Fraction -
Radical √

31
Category Symbol
Decimal .
Special Operator
Trigonometric function sin, cos, tg, ctg
Inverse trigonometric
function sin‐1, cos‐1, tg‐1, ctg‐1
Logarithm lg, ln
Fractorial, sum, modulo,
round !,Σ, mod(),int()
When users input hand‐sketched math formulas, there are different ways of inputting different characters or
symbols as illustrated in the table below. The handwritten note is shown right below the converted outputs in
the diagram.
Input Input method Image output
a,b,c,d,e,f,g,h Input neatly according to the normal
specifications and sequence of writing.
i
The character “i” consists of two parts.
Write it according to the order shown.
j
The character “i” consists of two parts.
Write it according to the order shown.
k
The character “k” shall be drawn in 1
stroke according to the order shown.

32
l,m,n
Write the characters “l, m, n” neatly
according to their writing
specifications.
o Write the character “o” neatly
according to its writing specification.
p,q,r,s,t,u,v,w
Write the characters “p, q, r, s, t, u, v,
w” neatly according to their writing
specifications.
x
The character “x” shall be drawn
according to the order shown.
y
The character “y” shall be drawn
according to the order shown.
α,β,γ,δ,ε,θ,λ,
ω,σ,π,!
α, β, γ, δ, ε, θ, λ, ω, σ,
π,!
Write the symbols “α, β, γ, δ, ε, θ, λ,
ω, σ, π,!” neatly according to their
writing specifications.
П,Σ
Write the symbols “П, Σ” neatly
according to their writing
specifications.

33
+,‐, *,/,=,%
Write the symbols “+, ‐ , *, /, =, %”
neatly according to their writing
specifications.
x , ÷
Write the symbols “x, ÷” neatly
according to their writing
specifications.
√
Write the "radical" symbol along with
a number in order to convert
correctly. A radical symbol without a
number in it will be expressed as“.”
(,), [,], {,}
Write the symbols “(,),[,],{,}” neatly
according to their writing
specifications.
Addition: +
Subtract: –
Multiply:
Write the symbols of the “addition,
subtract, multiply” functions neatly
according to their writing
specifications.
Division: /, −, ÷
Write the symbols of the “division”
function neatly according to its writing
specifications.
Decimal
Write the “decimal according to the
formal input.

34
Power Expression:
Fraction
Radical
For the radical expression, write the
base values with a fractional power,
decimal power, radical power, and
integer power, according to their
formal inputs.
Trigonometric functions:
sin, cos, tg, ctg
Trigonometric functions:
sin, cos, tg, ctg
Inverse trigonometric
functions: sin‐1,cos‐1,
tg‐1, ctg‐1
Logarithm: lg, ln
Input the handwriting expressions of
the trigonometric functions, inverse
trigonometric functions, and
logarithmic functions according to
their formal forms.
Fractorial
Logarithm
Modulo: MOD ()
Rounding: int ()
Percentage: %
Write the “Fractorial, logarithm,
modulo: MOD () , rounding: int (),
percentage: % ” functions neatly
according to their writing
specifications.
5.2.2 Equation Editor
Click the “ “ button in the mathematic subject tool; then click in the writing area or drag it to the writing
area to create the dialog window of the equation editor, as shown in Fig. 5‐5.
Fig. 5‐5 Mathematic equation editor
An example of using the equation editor to compose a mathematic equation sin(A) + cos(B) = tan(C) is
presented below.

35
Analysis of Mathematic Equations
Each edit box represents an object in the equation. There are three objects in the example, namely sin(A),
cos(B) and tan(C). The equation is composed of two operators "+" and "=" and three objects. To edit an
equation, define the objects and the operators first according to the following steps. Select the edit box ;
click“+”from the “Operative Symbol”. Next, select the second edit box ; click“=”from the “Operative
Symbol”, as illustrated in Fig. 5‐6.
圖 5‐ 1添加符號 Fig. 5‐6 Adding symbols
Editing the Mathematic Equations
Select the edit box in the left side; then select “sina” from the “Function” pull‐down list. Repeat the same
step to other edit boxes from left to right sides and the outcome is shown in Fig. 5‐7.
Fig. 5‐7 The addition of trigonometric functions.
Tips:
Prior to composing a mathematic equation, be sure to have a clear understanding of the overall structure
of the mathematic equation, including the number of components and the arithmetic operators involved.
During the process of editing a mathematic equation, follow an important principle, "from overall to
individual parts, from the outside to the inside structure."
After breaking down the component list of the mathematic equation to the very basic level, it is time to
input the equation in the edit box.
5.2.3 Functional Equations

36
Three types of functional procedures are supported in the mathematic subject tool, including the explicit
functional equation, polar coordinates functional equation, and parametric functional equation. The steps to
insert the functional equations are explained as follows:
Select a functional graph icon as shown in Fig. 5‐8; then click in the writing area or drag it to the writing area.
Fig. 5‐8 The graph icons of different functional equations
Select the functional object and click the property menu to open the property viewer. Compose the
functional equation by editing formulas and adjusting the coordinates as illustrated in Fig. 5‐9.
Fig. 5‐9 The interface of the functional equation editor
The software requires that the functional equations to be input correctly according to their writing
specifications. Currently, the functional equations supported by the software are listed as follows:
●Sine function: y=sin (x)
●Sine hyperbolic function: y=sh (x)
●Cosine function: y=cos (x)
●Cotangent function: y=ctg (x)
●Cosine hyperbolic function: y=ch (x)
●Tangent: y=tan (x)

37
●Tangent of hyperbolic function: y=th (x)
●Ln: exponential function with the natural number e as the base
●Log: logarithm function with the natural number e as the base
●Inverse sine function: y=arcsin (x)
●Inverse cosine function: y=arccos (x)
●Inverse tangent function: y=arctg (x)
●Quadratic equation ^: y=X2, enter it as y=x^ (2)
5.2.4 Drawing Graphs
Two Dimensional Graphs
Button Function
Point Click this button to draw a point in the page. (The point marked with A in the default
setting. To remove the remark, set the marking to be BLANK in the property viewer.)
Line segment Click this button to draw a line segment in the page. (The line segment is marked
with A and B as the line header and end respectively in the default setting. To
remove the remarks, set the marking to be BLANK in the property viewer. )
Single‐arrow Click this button to draw a single‐arrow in the page.
Double‐arrow Click this button to draw a double‐arrow in the page.
Geometric segment Click this button to draw a geometric segment in the page.
Angle Click this button to draw an angle in the page. (The default angle is 45 degrees.)
Arc, Pie Click this button to draw an arc, curve and pie in the page. (The default is an arc
sharp.)
Circle Click this button to draw a circle in the page.
Oval Click this button to draw an oval in the page.
Arbitrary triangle Click this button to draw an arbitrary triangle in the page.
Geometric triangle Click this button to draw a geometric triangle in the page. (The lengths, angles are
measured and marked. To remove the remarks, de‐select the marking in the

38
property viewer.)
Square, Rectangle Click this button to draw a square and a rectangle in the page.
Arbitrary
quadrilateral Click this button to draw an arbitrary quadrilateral in the page.
Parallelogram,
Diamond Click this button to draw a parallelogram and a diamond in the page.
Diamond Click this button to draw a diamond in the page.
Isosceles
trapezoid Click this button to draw an isosceles trapezoid in the page.
Arbitrary pentagon Click this button to draw an arbitrary pentagon in the page.
Isosceles triangle Click this button to draw an isosceles triangle in the page.
Isosceles
quadrilateral Click this button to draw an isosceles quadrilateral in the page.
Isosceles pentagon Click this button to draw an isosceles pentagon in the page.
Isosceles hexagon Click this button to draw an isosceles hexagon in the page.
Isosceles heptagon Click this button to draw an isosceles heptagon in the page.
Isosceles octagon Click this button to draw an isosceles octagon in the page.
Three Dimensional Graphs
Button Function
Sphere Click this button to draw a sphere in the page.
Spherical cap Click this button to draw a spherical cap in the page.
Cone Click this button to draw a cone in the page.
Vertical cone Click this button to draw a vertical cone in the page.
Cylinder Click this button to draw a cylinder in the page.
Cone with flat top Click this button to draw a cone with flat top in the page.

39
Cuboid Click this button to draw a cuboid in the page.
Bevel Click this button to draw a bevel in the page.
Dihedral angle Click this button to draw a dihedral angle in the page.
Pentagonal pyramid Click this button to draw a pentagonal pyramid in the page.
Pentagonal bevel Click this button to draw a pentagonal bevel in the page.
Pentagonal prism Click this button to draw a pentagonal prism in the page.
Cube Click this button to draw a cube in the page.
Plane Click this button to draw a plane in the page.
Triangular pyramid Click this button to draw a triangular pyramid in the page.
5.2.5 Measurement Tool
Triangular Plate
The software has two built‐in triangular plates, 30‐60 degree triangular plate and 45‐45 degree triangular
plate, as shown in Fig. 5‐10. Users can use these tools to draw lines and to measure the distance. Drag the
edge of the triangular plate where the tick‐mark is, to draw a line. The tool can be moved along the horizontal
direction or rotated. Click any area of the triangular plate to hold and move it around. Right click any area of
the triangular plate to see a pop‐up menu that allows users to change the size or exit the
operation.
Fig. 5‐10 Triangular plates
Compass

40
The compass tool can draw curves, fan or pie graphs. Figure 5‐11 is a compass symbol show in the page. Click on different spots of the compass to use the corresponding functions, such as to moving in the horizontal direction and rotating.
Fig. 5‐11 A compass
Protractor
The protractor provides few functions for users to measure the angle and to draw an angle, a arc, fan and pie.
Fig. 5‐12 A protractor
Ruler
Use the ruler to draw lines and to measure the distance. Drag the edge of the ruler where the tick‐mark is, to
draw a line. Right click any area of the ruler to see a pop‐up menu that allows users to change the size or exit
the operation. The ruler can be moved along the horizontal direction or rotated.
Fig. 5‐13 A ruler.

41
5.3 English
The English subject tool provides functions commonly used in an English class. Click on the “English
“ button to open the English object tool in the object panel.
5.3.1 Phonics tips
Click the “Phonetics “ button in the language subject tool; then click in the writing area or drag it to the
writing area to create the phonetics information or words. More functions are available through editor and
property viewer.
5.4 Physics
The physics subject tool provides functions commonly used in a physics class. Click on the “Physics
“ button to open the Physics object tool in the tool menu or use the object path ‐‐‐ physics to do so. Figure 5‐14
displays the physics subject panel of the physics subject tool.
Fig. 5‐14 The physics subject tool
5.4.1 Mechanical Symbols
Linear Motion
The mechanical component functions related to the linear motion are as follows:
Button Function Example
Plane Create the plane of the linear motion.

42
Inclined plane Create the inclined plane of the linear motion.
Triangular beveled plane Create the triangular beveled plane of the
linear motion.
Conveyor belt Create the conveyor belt of the linear motion.
Small ball Create the small ball of the linear motion.
Trolley Create the trolley of the linear motion.
Wood block Create the wood block of the linear motion.
Wood stick Create the wood stick of the linear motion.
Level Create the level of the linear motion.
Ruler Create the ruler of the linear motion.
Vernier caliper Create the vernier caliper of the linear
motion.
Scale viewer Create the plane of the linear motion.
Round groove Create the round groove of the linear motion.
Groove Create the groove of the linear motion.
Arc skatboard Create the arc skatboard of the linear motion.
Newton Law
A list of mechanical symbols that function according to the Newton Law, is listed in the following table.
Button Function Example
Force Create the force of the Newton Law.
Distance expression
Create the distance expression of the Newton
Law.
Spring Create the spring of the Newton Law.
Spring scale Create the spring scale of the Newton Law.
Pulley Create the pulley of the Newton Law.

43
Pulley (two wheels)
Create the pulley (two wheels) of the Newton
Law.
Pulley (three wheels)
Create the pulley (three wheels) of the
Newton Law.
hooked weight Create the hooked weight of the Newton Law.
Solid State, Liquid State, Gas State
A list of mechanical components related to the use of solid, liquid, and gas.
Button Function Example
Propeller
Create the propeller established for solid,
liquid, and gas media
Pressure gauge
Create the pressure gauge established for
solid, liquid, and gas media
Gas Chamber
Create the gas chamber established for
solid, liquid, and gas media
5.4.2 Electrical Symbols
The frequently used mechanical diagrams (such as ammeters, voltmeters, sliding rheostats, etc) and electrical
diagrams (for instance, batteries, bi‐directional switches, and switches) are displayed below.
Button Function Example
Switch
Create the electrical switch of the electrical
components
knob Create the knob of the electrical components
light bulb
Create the light bulb of the electrical
components
Ammeter symbol
Create the ammeter symbol of the electrical
components
voltmeter symbol
Create the voltmeter symbol of the electrical
components
Sensitive galvanometer
Create the sensitive galvanometer of the
electrical components
User‐defined meter
Create the user‐defined meter of the electrical
components
Sliding rheostat
Create the sliding rheostat of the electrical
components
Battery
Create the battery of the electrical
components

44
Battery pack
Create the battery pack of the electrical
components
Two‐directional switch
Create the two‐directional switch of the
electrical components
Switch Create the switch of the electrical components
Light bulb
Create the Light bulb of the electrical
components
Bell
Create the Bell of the electrical components
DC motor
Create the DC motor of the electrical
components
AC motor
Create the AC motor of the electrical
components
Ammeter
Create the Ammeter of the electrical
components
Voltmeter
Create the voltmeter of the electrical
components
Resistor
Create the Resistor of the electrical
components
Slide rheostat
Create the Slide rheostat of the electrical
components
Grounding
Create the Grounding of the electrical
components
Capacitor
Create the Capacitor of the electrical
components
Horn Create the Horn of the electrical components
5.4.3 Electrical Magnetism Symbols
The frequently used electrical magnetism diagrams (such as wires, coils, electric field, positive and negative
electrons) are displayed below.
Button Function Example
connecting wire
Create a connecting wire of the electrical
magnetism
coil Create a coil of the electrical magnetism
coil A Create a coil A of the electrical magnetism
Core Create a core of the electrical magnetism
Bar‐shaped magnet
Create a Bbar‐shaped magnet of the electrical
magnetism
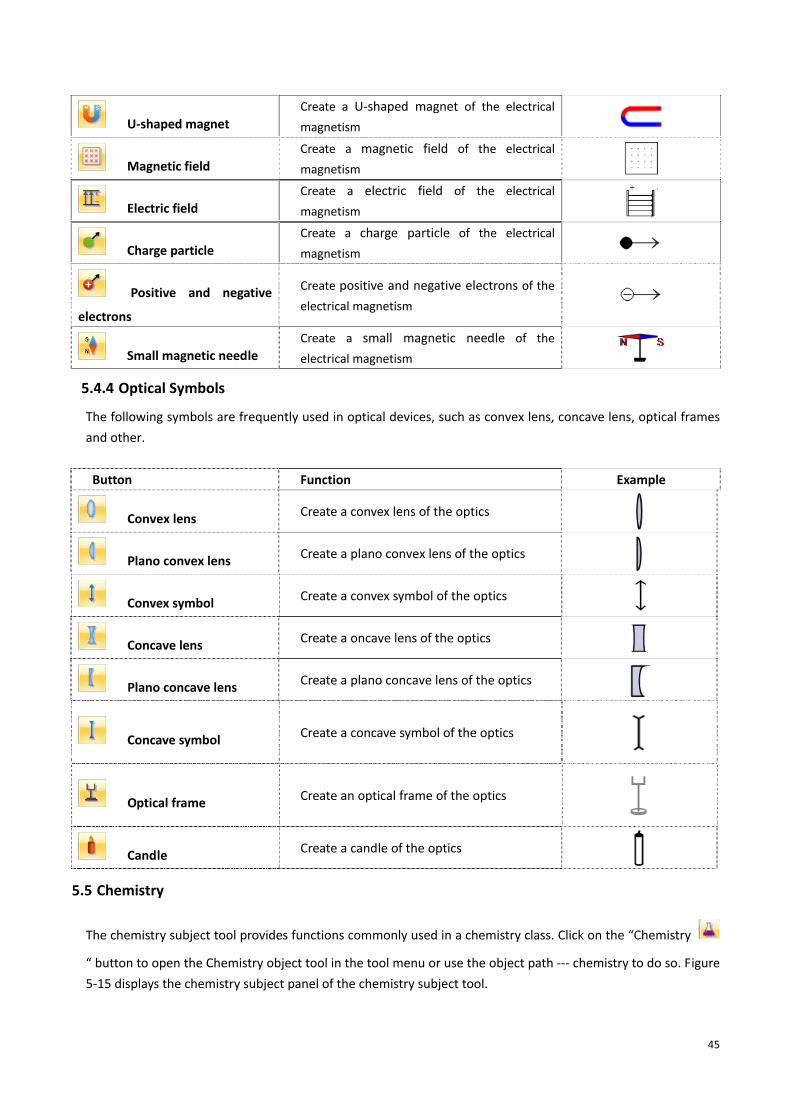
45
U‐shaped magnet
Create a U‐shaped magnet of the electrical
magnetism
Magnetic field
Create a magnetic field of the electrical
magnetism
Electric field
Create a electric field of the electrical
magnetism
Charge particle
Create a charge particle of the electrical
magnetism
Positive and negative
electrons
Create positive and negative electrons of the
electrical magnetism
Small magnetic needle
Create a small magnetic needle of the
electrical magnetism
5.4.4 Optical Symbols
The following symbols are frequently used in optical devices, such as convex lens, concave lens, optical frames
and other.
Button Function Example
Convex lens Create a convex lens of the optics
Plano convex lens Create a plano convex lens of the optics
Convex symbol Create a convex symbol of the optics
Concave lens Create a oncave lens of the optics
Plano concave lens Create a plano concave lens of the optics
Concave symbol Create a concave symbol of the optics
Optical frame Create an optical frame of the optics
Candle Create a candle of the optics
5.5 Chemistry
The chemistry subject tool provides functions commonly used in a chemistry class. Click on the “Chemistry
“ button to open the Chemistry object tool in the tool menu or use the object path ‐‐‐ chemistry to do so. Figure
5‐15 displays the chemistry subject panel of the chemistry subject tool.

46
ig. 5‐15 The chemistry subject tool
5.5.1 Hand‐sketched Equation
The function of the hand‐sketched equations converts hand written chemistry equations to printed characters.
Click the symbol after open the chemistry subject tool; then click in the writing area or drag it to the
writing area to create the editing window of hand‐sketched equations where users write chemistry equations.
The method is similar to that of the hand‐sketched mathematic equations and will not provide further details
here.
5.5.2 Equation Editor
The equation editor is to provide an editing function for chemistry equations. Click the symbol after open
the chemistry subject tool; then drag it to the writing area to create the editing windows of hand‐sketched
equation, as shown in Fig. 5‐16.
Fig. 5‐16 Editing Chemistry equations.

47
5.5.3 Double‐line Bridge
Double‐line bridge can represent the transfer direction of an atomic electron and information of the combining
power ratio in a chemical reaction process. Select the double‐line bridge symbol after open the
chemistry subject tool; then drag it to the writing area, as shown in Figure 5‐17 double‐lane bridge. Users can
drag the green symbols on the double‐line bridge to adjust the length and height.
Fig. 5‐17 The double‐lane bridge
5.5.4 Benzene Function
The benzene structure tool can quickly draw the structure diagram of a benzene. Select after open the
chemistry subject tool; then drag it to the writing area. The benzene object will appear in the writing area;
change the benzene structure by adjusting its object property, as shown in Figure 5‐18.
Fig. 5‐18 Benzene
5.5.5 Chemical Bonding
The Chemical bonding expresses the structure of the material. Select after open the chemistry subject
tool; then drag it to the writing area. The chemical bonding object will appear in the writing area; change the
chemical bonding structure by adjusting its object property.
5.5.6 Chemical Element Table
Select the symbol after open the chemistry subject tool to see the chemical element table. Click each
element to see its detailed information, as shown in Fig. 5‐19.

48
Fig. 5‐19 The chemical element table.
5.5.7 Diagram of the Atomic Structure
The diagram of the atomic structure illustrates the number of protons in the nucleus and the number of
electrons in different layer around the protons. Users can easily understand the structure of an atom. Select
after open the chemistry subject tool; then drag it to the writing area. The structure of the atom will be
displayed in the writing area as shown in Fig. 5‐20.
Fig. 5‐20 A diagram of atomic structure
49
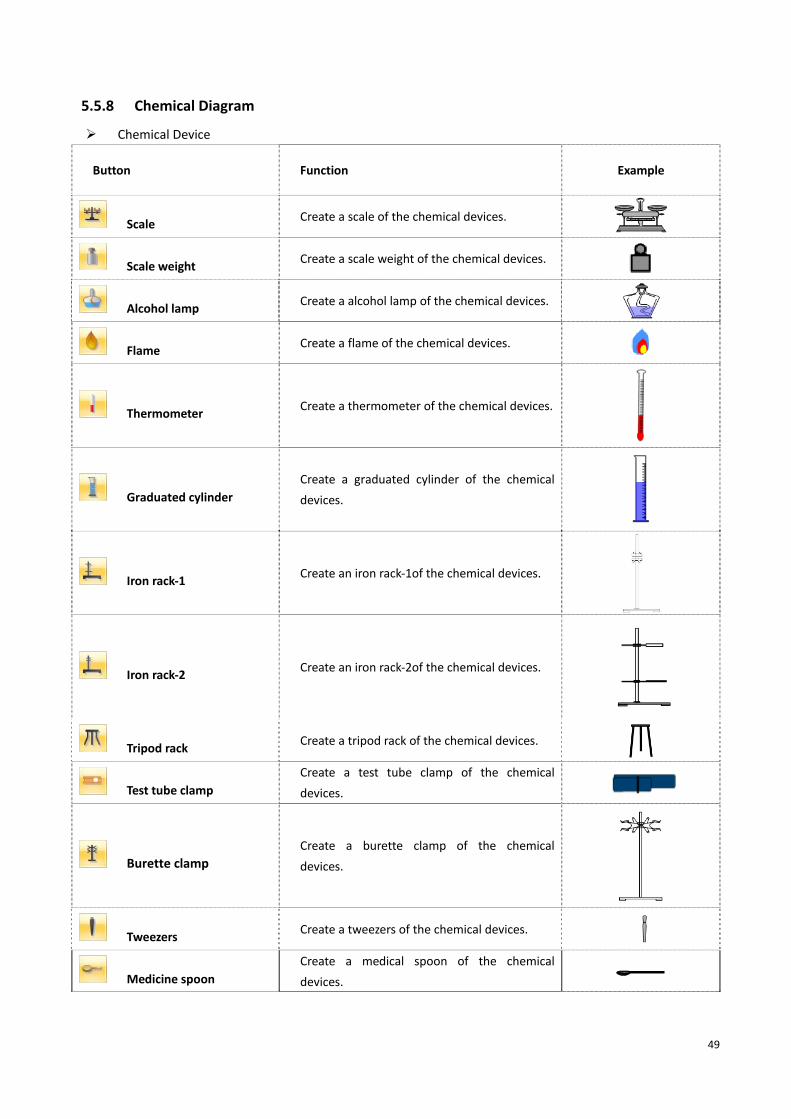
5.5.8 Chemical Diagram
Chemical Device
Button Function Example
Scale Create a scale of the chemical devices.
Scale weight Create a scale weight of the chemical devices.
Alcohol lamp Create a alcohol lamp of the chemical devices.
Flame Create a flame of the chemical devices.
Thermometer Create a thermometer of the chemical devices.
Graduated cylinder
Create a graduated cylinder of the chemical
devices.
Iron rack‐1 Create an iron rack‐1of the chemical devices.
Iron rack‐2 Create an iron rack‐2of the chemical devices.
Tripod rack Create a tripod rack of the chemical devices.
Test tube clamp
Create a test tube clamp of the chemical
devices.
Burette clamp
Create a burette clamp of the chemical
devices.
Tweezers Create a tweezers of the chemical devices.
Medicine spoon
Create a medical spoon of the chemical
devices.

50
Heating spoon
Create a heating spoon of the chemical
devices.
Wood block Create a wood block of the chemical devices.
Stopper Create a stopper of the chemical devices.
Glass stopper Create a glass stopper of the chemical devices.
Glass stick Create a glass stick of the chemical devices.
Asbestos screen
Create a asbestos screen of the chemical
devices.
Pan Create a pan of the chemical devices.
Glass tube Create a glass tube of the chemical devices.
Free‐form glass catheter
Create a free‐form glass catheter of the
chemical devices.
Glass catheter Create a catheter of the chemical devices.
Rubber tube Create a rubber tube of the chemical devices.
U‐shaped tube
Create a U‐shaped tube of the chemical
devices.
Condensation tube
Create a condensation tube of the chemical
devices.
Rubber head dropper
Create a rubber head dropper of the chemical
devices.
Drying tube Create a drying tube of the chemical devices.
Acid burette Create an acid burette of the chemical devices.
Alkali burette
Create an alkali burette of the chemical
devices.
Funnel Create a funnel of the chemical devices.
51
Long tube funnel
Create a long tube funnel of the chemical
devices.
Spherical separating funnel
Create a spherical separating funnelof the
chemical devices.
Separating funnel
Create a separating funnel of the chemical
devices.
Kipp's apparatus
Create a Kipp's apparatus of the chemical
devices.
Chemical Container
The followings are the chemical container buttons and their functions.
Button Function Example
Test tube
Create a test tube of the chemical
containers.
Flask Create a flask of the chemical containers.
Distillation flask
Create a distillation flask of the chemical
containers.
Beaker Create a beaker of the chemical containers.
Sink Create a sink of the chemical containers.
Set cylinder
Create a set cylinder of the chemical
containers.
Tapered bottle
Create a Tapered bottle of the chemical
containers.
graduated flask Create a graduated flask of the chemical
containers.
bottle with curved neck
Create a bottle with curved neck of the
chemical containers.
Reagent bottle
Create a reagent bottle of the chemical
containers.
Drainage tube
Create a Drainage tube of the chemical
containers.
Others

52
Other chemical functions include the following items.
Button Function Example
Solid material Create a solid material of the chemical objects.
Gas bubble Create a gas bubble of the chemical objects.
Water drop Create a water drop of the chemical objects.
5.6 Biology
The biology subject tool provides functions commonly used in a biology class. Click on the “Biology
“ button to open the Biology object tool in the tool menu or use the object path ‐‐‐ biology to do so. The
following symbols and models are commonly used in the biology.
Button Function Example
Amino acids
Create a demo diagram of the amino acids.
Nucleotide
Create a demo diagram of the nucleotide.
Chromosome
Create a demo diagram of the chromosome.
Cell structure
Create a demo diagram of the cell structure.
Microscope
Create a demo diagram of the microscope.
Information transfer
Create a demo diagram of the information
transfer.

53
5.7 Geography
The geography subject tool provides functions commonly used in a geography class. Click on the “Geography
“ button to open the geography object tool in the tool menu or use the object path ‐‐‐ geography to do so.
The followings are commonly used geography symbols and their functions.
Button Function Example
Terrestrial globe
Create the demo diagram of the terrestrial
globe.
Dust prevention
Create the demo diagram of the dust
prevention.
precipitation and rain
Create the demo diagram of the
precipitation and rain.
Solar system
Create the demo diagram of the solar
system.
Light effect
Create the demo diagram of the light effect.
Map
Create the demo diagram of the map.
5.8 Music
commonly used in a music class. Click on the “Music “ button to open the music object tool in the tool
menu or use the object path ‐‐‐ music to do so.
The followings are commonly used music symbols and their functions.
Button Function Example
Electric piano
Create the demo diagram of an electric piano.

54
Drum set
Create the demo diagram of a drum set.
Organ
Create the demo diagram of an organ.
Guitar
Create the demo diagram of a guitar.
Bass drum
Create the demo diagram of a bass drum.

55
Part VI Teaching Mode
6.1 Introduction of the Functions of the Palette
In the teaching mode, all the function keys are available in the palette. Users can click on the functions on the
palette to add elements, if needed, to complete a specific operation. All the functions of the palette in the
teaching mode are labeled with remarks and are identical to those in the design mode.
6.1.1 Palette Toolbar
Palette ‐ Main page
All the buttons of the basic operations are place in the palette main page , such as pointer 、pen
、delete and more. Users can apply these functions to perform basic operations, as show in Fig. 6‐1.
Fig. 6‐1 Main page of the palette
Palette – Page
The buttons available in the page screen of the palette toolbar including buttons of new page , new
screen page , screen annotation and more. Users can conduct tasks on the page using functions on
the palette quickly, as shown in Fig. 6‐2.

56
Fig. 6‐2 The palette page
Palette – Tool Page
The buttons available in the tool page of the palette toolbar including buttons of flash light , curtain
, screen capture and more. Users can conduct tasks on the page using functions on the palette
quickly, as shown in Fig. 6‐3.
Fig. 6‐3 The palette tool page
Palette – object page
The buttons available in the object page of the palette toolbar including buttons of mathematics ,
language , English and more. Users can conduct tasks on the page using functions on the palette
quickly, as shown in Fig. 6‐4.

57
Fig. 6‐4 The palette object page
Palette – Customized Page
The buttons available in the customized page of the palette toolbar stores all customized tool buttons;
Select the tool box and drag the desired tool into the palette as shown in Fig. 6‐5.
Fig. 6‐5 The palette customized page
Of course, users can also drag the buttons from the tool box to other palette pages for easy operations.
6.1.2 Page Adjustment
If you concern about the incompatibility between different screen settings of the computers for preparing tasks
and whiteboard equipments, the feature of the “Adjustable Page” is the answer. For example, the resolution
of the main projector is 1024*768 (the teaching system), while the resolution of the main computer is
1280*800 (the preparing system). Adjust the resolution of the main computer to be 1024*768 in design mode
and place all the elements and objects within the page boundary. By doing so, when the contents are projected
in the projector, the system will automatically adjust and maximize the page to fit the projector screen, as
displayed in Fig. 6‐6.
Path: Page ‐‐‐ Page Setting

58
Fig. 6‐6 The Adjustable Page on the projector
6.1.3 Screen Annotation
Design mode >> Teaching mode

59
The function of screen annotation is mainly to add remarks in the OFFICE files. When users want to add
remarks, click any pen in the toolbar to proceed. To open a document file, click the mouse pointer on the
palette and switch the function mode. The OFFICE remark toolbar is shown in Fig. 6‐7.
Fig. 6‐7 The PPT annotation toolbar
Insert annotation: Click the button and begin to input annotation to the OFFICE document.
Previous page: Click the button to go to the previous powerpoint slide during the play mode. At the
same time, the screen annotation can be added as well.
Next page: Click the button to go to the next powerpoint slide during the playing mode. At the same
time, the screen annotation can be added as well.
Terminate the play mode: Click the button to terminate the play mode. Prior to the termination, the
system will confirm with users whether to save all annotations to the powerpoint file and covert the annotation
to standard page.
An example of screen annotation in a powerpoint file
Open a powerpoint file in the computer standard mode, and switch to the play mode to play the powerpoint
file. Select the pen tool from the toolbar; click the button and begin to write screen annotations, as
shown in Fig. 6‐8.
Fig. 6‐8 The screen annotation on the powerpoint file

60
If users plan to save the annotations, user the pen to click ; or click when the play mode ends. The
system will prompt with a message “Embed the annotation in the PPT document?”. Select “Yes” to save the
annotation.

61
Part VII Software Extension
7.1 Projector Function
Select the projector function button from the “Insert” option; drag it to the page and the screen of Fig.
7‐1 will appear.
Fig. 7‐1 The projector
Functions of the projector are listed below.
Button Function
Start
Initiate the review function of the projector.
Stop Stop the preview function of the projector.
Switch between
equipments
Switch the operations between different equipments. When the computer is
connected to the projector and the camera, if the software is inserted with the
projector function, the system will display the projector as the default setting when
it is initiated. Use the “Switch between equipment” button to switch to camera,
when needed.
Photo shot
Perform snapshot of the screen of the projector.
Zoom in
Enlarge the image on the projector.

62
Zoom out
Reduce the scale of the image on the projector.
Auto focus
Perform automatically focusing on the image of the projector.
Turn on the lower
light
Turn on the lower light in the projector.
Turn on the upper
light
Turn on the upper light in the projector arm above the projector panel screen.
Turn off the light
Turn off the projector light.
Text mode
Switch to the text mode and edit the text contents.
Graphic mode
Switch to the graphic mode and process the graphics.
7.2 Cloud Platform
7.2.1 Log in Cloud Platform
Path: select the cloud platform ‐‐‐ log in. Visit the cloud platform log in page; enter user name and password
to log in.
7.2.2 Upload Documents
After log in to the system, select the cloud platform ‐‐‐ upload documents. Select the files to be uploaded and
the path to be saved.
7.2.3 Download Class Materials
Select the cloud platform ‐‐‐ download class materials. Select the files to be downloaded and the path to be
saved.
7.2.4 Visit HiteCloud
Select the cloud platform ‐‐‐ visit HiteCloud to connect to HongHe Educational websites via the cloud Platform
for more functions and resources.
7.3 WIN8 Operating System
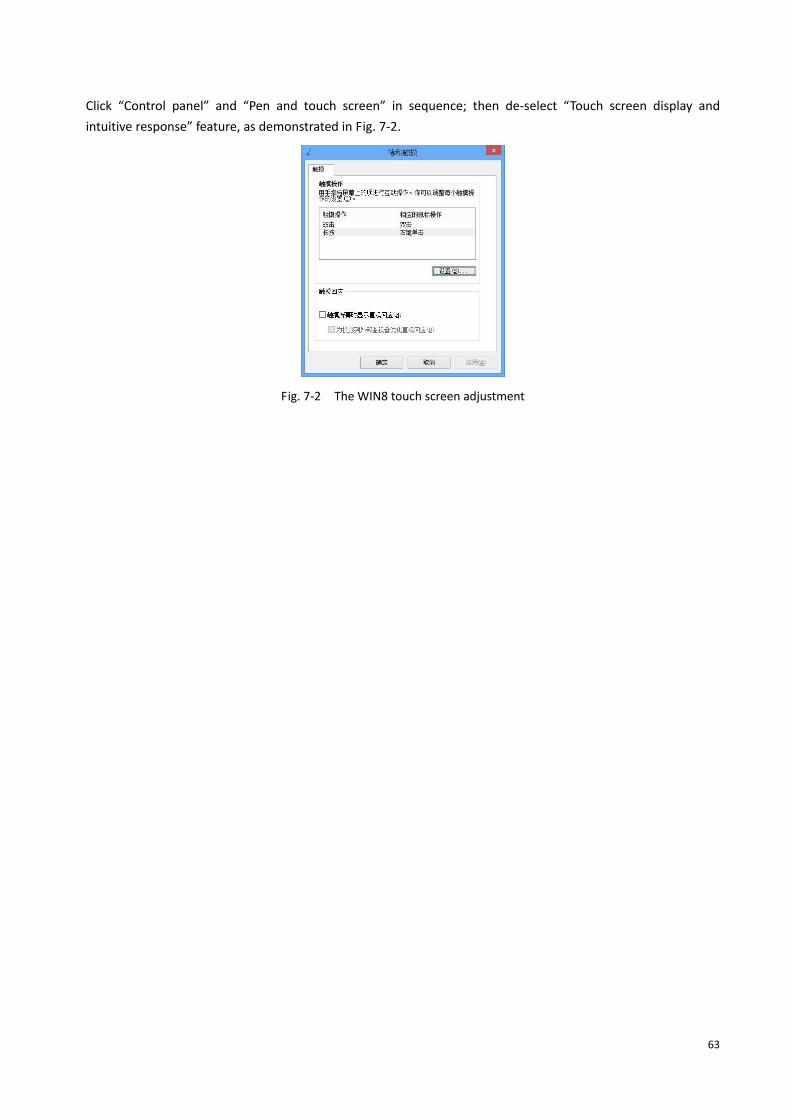
In order to optimize the software performance in the WIN8 operating system, conduct the following steps:
63
Click “Control panel” and “Pen and touch screen” in sequence; then de‐select “Touch screen display and
intuitive response” feature, as demonstrated in Fig. 7‐2.
Fig. 7‐2 The WIN8 touch screen adjustment