table of contents - giant bicycles · table of contents introduction ... bicycle for specific...
TRANSCRIPT


TABLE OF CONTENTS
Introduction....................................................................pg.4
Basic Terms & Shock Set-up Overview........................pg.6
General Maintenance.....................................................pg.9
Coil Shock Set-up...........................................................pg.10 Setting and adjusting sag................................pg.11
Suspension Settings Faith.................................................................pg.13-14 DH....................................................................pg.14-15 AC.....................................................................pg.15-16 Warp DS/MTX 260 ............................................pg.17-18

Air Shock Set-up............................................................pg.19 Setting and adjusting sag................................pg.20
Suspension Settings Trance..............................................................pg.20 Reign................................................................pg.20 NRS..................................................................pg.21
Setting and Adjusting Rebound Damping.....................pg.22
Front Suspension Travel & Sag Guide..........................pg.24 Suggested Front Suspension Sag Chart.........pg.26
Giant Bicycle Limited Lifetime Warranty.....................pg.27
Contact Info....................................................................pg.30

4
INTRODUCTION
This booklet is intended as a quick-start reference guide to help familiarize you with your new Giant full-suspension mountain bike. It is not meant to replace the general bicycle owner’s manual or the shock and suspension fork manufacturer’s technical manuals that also came with your bicycle. If you did not receive these manuals, please contact your Authorized Giant Retailer. We encourage you to read all manuals relating to your bicycle and its suspension components before your first ride. All manuals contain important information regarding the safety and operation of your bicycle.
CAUTION Please refer to the manufacturer’s technical information that came with your bicycle for specific details regarding shock function and set-up prior to riding your Giant bi-cycle. If you did not receive these technical booklets, contact your Authorized Giant Retailer.
CAUTION If you do not understand the quick-start instructions or have difficulty withset-up, please see your Authorized Giant Retailer before riding your Giant bicycle.

5
WARNING Only Giant DH, Faith, and AC model bicycles are engineered for use with dual crown suspension forks. Use of dual crown suspension forks on any Giant bicycle other than these models will void the warranty and may result in frame failure, which can cause injury or death. Giant Bicycle, Inc. is not responsible for damages to the bike and rider resulting from the use of dual crown forks.

6
Basic Terms & Shock Set-Up Overview
TERMS
Bottomed Out: When a shock absorber or suspension fork (herein after referred to as “shock”) is compressed completely and all the suspension travel has been used.Compression Stroke: The motion of the shock in response to an impact.Damping: Internal mechanism to control the speed of compression or rebound.psi: Pounds per square inchRebound: The extension or return stroke of the shock.Sag: Compression of the shock caused by the rider’s weight.Spring Rate: The amount of force required to compress the spring.Topped Out: When all the suspension travel is available (shock is fully extended).
SET-UP
Please refer to the individual shock manufacturer’s technical manuals for specific information on how to adjust the shocks on your Giant dual suspension bicycle.
7
The shocks on your Giant dual suspension bicycle can be adjusted to meet your riding style and weight. This booklet is intended as a quick-start guide to help you get started. It may take a few rides to find your preferred settings.
Platform Valve
On bikes equipped with a Stable Platform Valve (SPV) rear shock, you can adjust the bike’s pedaling efficiency by increasing the air pressure in the SPV air cartridge. Increasing the air pressure will resist pedal-induced bobbing. Decreasing the air pressure will make the suspen-sion more sensitive to small bump forces. Please refer to the individual shock manufacturer’s technical manual for specific information on how to adjust your SPV shock.
Sag
All Giant dual suspension bikes except the No Resonance System (NRS) rely on sag for their suspensions to work efficiently. Please take a few moments to read through this guide to understand sag as it applies to your bicycle (pgs. 11, 20). Setting your bike’s sag will greatly enhance your riding experience and the performance of your bicycle.

8
Rebound Damping Rebound damping controls the rate of speed at which the shock returns to its original position after responding to a bump force. Rebound damping prevents the shock from springing back too quickly. This is desirable because it improves the rear suspension’s sensitivity to small bumps and the tire’s ability to stay in contact with the ground. It also helps reduce the “pogo stick” motion from the rear suspension when the bike encounters a bump while the rider is seated. Typically, the heavier the rider, the more rebound damping is required. Please refer to this guide for details on how to set rebound damping speed. You should also refer to the indi-vidual shock manufacturer’s technical manual for specific information.

9
GENERAL MAINTENANCE
1) Inspect all suspension bolts and tighten if necessary to required torque settings. If unsure, take your bicycle to your Authorized Giant Retailer immediately for inspection.
2) Do not use high-pressure water sources to wash or rinse your bicycle. Doing so can displace any lubricants that are present, as well as possibly forcing water and/or contaminants into the bearing that can harm the pivot and bearing, reduce performance, and cause premature wear. Use only water at low pressure, or fill a bucket with water and use a soft nylon bristle brush and mild dish soap to clean the frame and components.

10
COIL SHOCK SET-UP
FaithDownhill (DH)All Conditions (AC)Warp DSMTX 260 DS
All coil shock-equipped Giant bicycles use the same formula to determine “sag” and “rebound damping” (see Basic Terms & Shock Set-Up Overview for definition of sag and rebound damp-ing).
WARNING Please refer to the manufacturer’s technical information for specific details regarding shock function and set-up prior to riding your Giant bicycle. If you have difficulty with set-up, please see your Authorized Giant Retailer.

11
SETTING AND ADJUSTING SAG (coil shocks)
1. Turn the spring’s tension collar counter clockwise until there is minimal tension on the spring (figure 1).
2. With a felt-tip marker, place a dot on the edge of the collar so you can measure full rotations of the shock collar.
Spring tension collar

12
3. With no load on the bike, measure the distance between the two fixing bolts (eye-to-eye distance) at the top and bottom of the shock (figure 2).
4. Position your bicycle next to a wall so that you can sit on the bike with both feet on the pedals while steadying yourself with one arm. Gently sit on the saddle without bouncing. Have a part-ner measure the eye-to-eye distance while the rider is seated on the bike (figure 3). Dismount gently.
5. Subtract the weighted eye-to-eye distance from the unweighted eye-to-eye distance to determine sag. See Sag Recommendations charts for sag distances. For your convenience, compressed shock measurements have been provided.
6. For general purpose riding, the shock should compress approximately one quarter of its travel. Turn the shock’s tension collar clockwise to increase spring tension/decrease shock sag.
7. If you sit on the bike with minimal tension on the spring and there is less than one quar-ter shock travel, a lighter weight spring is needed. If you turn the shock tension collar three turns and the shock compresses more than a quarter of the shock’s travel, a heavier spring is needed. Consult your Authorized Giant Retailer for replacement springs.
13
CAUTION Never tighten the spring tension collar past three turns from minimum tension as doing so can cause damage to the spring and internal workings of the shock.
Suspension Settings and Recommendations (coil shock-equipped bikes)Faith with Maestro™ (8” rear suspension travel)
Giant’s Maestro rear suspension design precisely positions the pivots and linkages to give you efficient pedaling and small bump compliance. Maestro’s pivot placement allows the rear suspension to be completely active under braking, allowing the rear wheel to react constantly to the terrain.
Maestro-equipped mountain bikes rely on rear suspension “sag”. Sag (see Basic Terms & Shock Set-Up Overview on page 6) is a critical performance component and is relative to the individual rider’s weight. See previous sag setting instructions on page 11 for details.
Faith’s frame design and travel is intended for aggressive freeriding and recreational/competi-tive downhill riding. The sag range can accommodate a wide variety of riding styles and terrain.
14
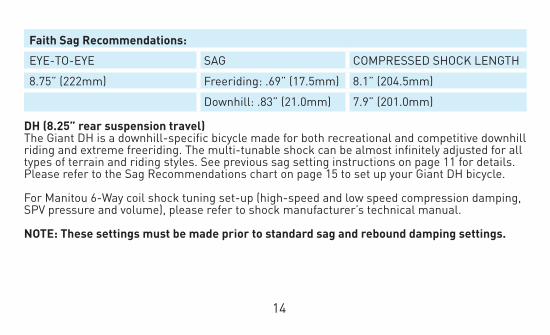
Faith Sag Recommendations:
EYE-TO-EYE SAG COMPRESSED SHOCK LENGTH
8.75” (222mm) Freeriding: .69” (17.5mm) 8.1” (204.5mm)
Downhill: .83” (21.0mm) 7.9” (201.0mm)
DH (8.25” rear suspension travel)The Giant DH is a downhill-specific bicycle made for both recreational and competitive downhill riding and extreme freeriding. The multi-tunable shock can be almost infinitely adjusted for all types of terrain and riding styles. See previous sag setting instructions on page 11 for details. Please refer to the Sag Recommendations chart on page 15 to set up your Giant DH bicycle.
For Manitou 6-Way coil shock tuning set-up (high-speed and low speed compression damping, SPV pressure and volume), please refer to shock manufacturer’s technical manual.
NOTE: These settings must be made prior to standard sag and rebound damping settings.
15
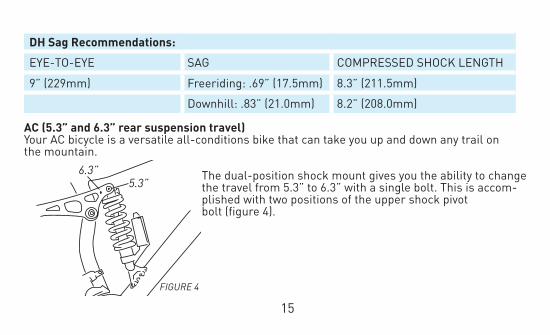
DH Sag Recommendations:
EYE-TO-EYE SAG COMPRESSED SHOCK LENGTH
9” (229mm) Freeriding: .69” (17.5mm) 8.3” (211.5mm)
Downhill: .83” (21.0mm) 8.2” (208.0mm)
AC (5.3” and 6.3” rear suspension travel)Your AC bicycle is a versatile all-conditions bike that can take you up and down any trail on the mountain.
The dual-position shock mount gives you the ability to change the travel from 5.3” to 6.3” with a single bolt. This is accom-plished with two positions of the upper shock pivot bolt (figure 4).

16
To Change the AC’s Travel:
1. Using a 6mm Allen wrench, remove the upper shock mounting bolt.
2. Pivot the shock backward or forward to align the eyelet with one of the two holes. The forward most position is 5.3” travel and the rear position is 6.3” travel.
3. Install the bolt and tighten to the proper torque of 100-120 Kgf/cm (86-95 in.-lbs.).
4. After any adjustment is made to travel, readjust sag/spring tension and damping. See previous sag setting instructions on page 11 for details. Please refer to the Sag Recommendations chart below to set up your Giant AC bicycle.
AC Sag Recommendations:
EYE-TO-EYE SAG COMPRESSED SHOCK LENGTH
7.5” (190mm) Freeriding (5.3”): .49” (12.5mm) 7.0” (177.5mm)
Downhill: (6.3”): .69” (17.5mm) 6.8” (172.5mm)

17
WARP DS/MTX 260 DS
The Warp DS and MTX 260 DS are great all-purpose dual suspension cross country mountain bikes that can also take on the urban landscape with equal agility. Their single-pivot swing-arms are strong and efficient with minimal moving parts for durability. The Warp DS offers four or five inches of adjustable rear wheel travel that works equally well on climbs and descents. Please follow the guidelines below in setting up your Warp DS or MTX 260 DS.
To Change Warp DS Travel (See figure 5):1. Using a 5mm Allen wrench, remove the rear shock mounting bolt (rear position attached to swingarm).
2. Pivot the shock up or down to align the eyelet with one of the two holes. The upper position is 4” travel and the lower position is 5” travel (figure 5).
3. Install the bolt and tighten to the proper torque of 90-110 Kgf/cm. (78-95 in-lbs.).

18
4. After any adjustment is made to travel, readjust sag/spring tension setting. See previous sag setting instructions on page 11 for details. Please refer to the Sag Recommendations chart below to set up your Giant Warp bicycle.
Warp DS Sag Recommendations:
EYE-TO-EYE SAG COMPRESSED SHOCK LENGTH
7.5” (190mm) XC/urban (4”): .49” (12.5mm) 7.0” (177.5mm)
Aggressive XC (5”): .69” (17.5mm) 6.8” (172.5mm)
MTX 260 DS Sag Recommendation:
EYE-TO-EYE SAG COMPRESSED SHOCK LENGTH
5.5” (140mm) XC/urban: .30” (7.3mm) 5.2” (132.8mm)
19
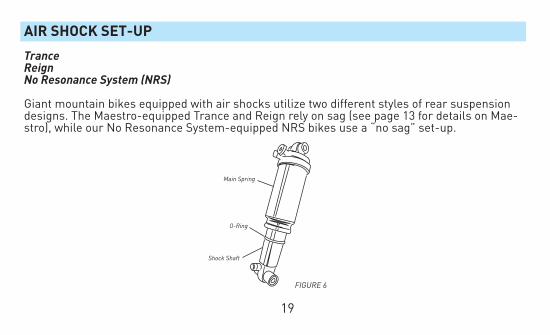
AIR SHOCK SET-UP
Trance ReignNo Resonance System (NRS)
Giant mountain bikes equipped with air shocks utilize two different styles of rear suspension designs. The Maestro-equipped Trance and Reign rely on sag (see page 13 for details on Mae-stro), while our No Resonance System-equipped NRS bikes use a “no sag” set-up.

20
SETTING AND ADJUSTING MAESTRO (TRANCE, REIGN) SAG (air shock)
1. Pump the main air chamber to a psi (pounds per square inch) equivalent to rider’s body weight .
2. Push the rubber O-ring that is around the shock’s shaft all the way against the base of shaft (closest to shock body).
3. Position your bicycle next to a wall so that you can sit on the bike with both feet on the pedals while steadying yourself with one arm. Gently sit on the saddle without bouncing. Dismount gently and look at how far the O-ring has moved down the shaft. Measure distance O-ring has moved (figure 6).
4. Add or remove air until desired shock movement is obtained. Refer to the Sag Recommenda-tion Guide below for proper sag measurements.
Maestro Sag Recommendations:
Trance: 3/8” (9mm) O-ring movement
Reign: 1/2” (12mm) O-ring movement

21
SETTING AND ADJUSTING NRS SAG (air shock)
1. As a starting point, set the air chamber’s pressure at the rider’s body weight. For example, if the body weight is 160 lbs., set the shock at 160 psi.
2. To check sag, position the rubber “O” ring located on the shock’s shaft all the way against the base of shaft (closest to the shock body). (see figure 6 pg.19)
3. Position your bicycle next to a wall so that you can sit on the bike with both feet on the pedals while steadying yourself with one arm. Gently sit on the bicycle without bouncing. Dismount gently. The shock should compress/move the rubber O-ring approximately one millimeter. If the shock compresses more than two millimeters, add 5 psi to the air chamber and re-mea-sure sag distance.

22
SETTING AND ADJUSTING REBOUND DAMPING
(See Basic Terms and Shock Set-up Overview for definition of rebound damping).
1. If you are unfamiliar with rebound damping, perform this procedure: With full body weight, push down on the saddle forcefully to compress the shock. Watch (and feel) how the shock rebounds from compression.
2. Next, turn the rebound damping knob clockwise until it stops and compress the shock under full body weight. Note that the shock rebounds very slowly. Next, turn the damping knob coun-terclockwise a few turns and re-perform your compression testing until the shock rebounds just slightly more slowly than with no damping.

23
3. To check the rebound damping rate while riding, ride off a curb while seated. The rear suspension should bounce only once upon rebound (the heavier the rider, the more damping will be required). Adjust accordingly to accomplish this motion. If the suspension bounces more than once, turn the damping knob clockwise until one bounce is achieved.
24
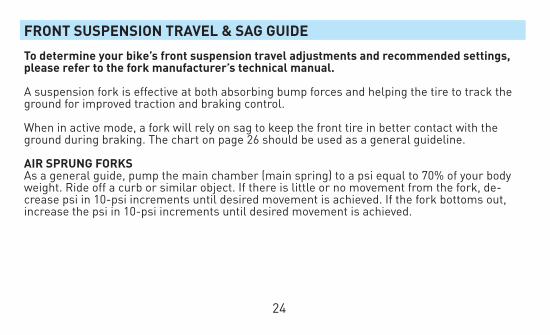
FRONT SUSPENSION TRAVEL & SAG GUIDE
To determine your bike’s front suspension travel adjustments and recommended settings, please refer to the fork manufacturer’s technical manual.
A suspension fork is effective at both absorbing bump forces and helping the tire to track the ground for improved traction and braking control.
When in active mode, a fork will rely on sag to keep the front tire in better contact with the ground during braking. The chart on page 26 should be used as a general guideline.
AIR SPRUNG FORKSAs a general guide, pump the main chamber (main spring) to a psi equal to 70% of your body weight. Ride off a curb or similar object. If there is little or no movement from the fork, de-crease psi in 10-psi increments until desired movement is achieved. If the fork bottoms out, increase the psi in 10-psi increments until desired movement is achieved.

25
To check rebound, turn the rebound damping knob (if applicable) counter clockwise until it stops. With full body weight, push down on the fork forcefully with the front brake on and watch (and feel) how the fork rebounds. Turn the rebound damping knob clockwise until the fork rebounds slightly slower than with no damping (the heavier the rider, the more damping will be required).
SPRING AND ELASTOMER SPRUNG FORKSSprings on these types of forks are set at the factory. Most have a simple adjuster that allows the rider to make the fork firmer or softer depending on rider weight. The heavier the rider, the firmer the spring setting should be.

26
SUGGESTED FRONT SUSPENSION SAG GUIDE (ALL TYPES)
FORK TRAVEL (mm) SAG* (mm)
75 12-15
80 12-16
100 15-20
120 18-30
145 29-37
170 34-50
180 36-54
200 40-60 *Manitou Forks with SPV may not sag upon initial rider weight. To check sag on an SPV fork, inflate the main spring cartridge to 70% of rider’s weight, and the SPV cartridge to 30% of rider’s weight (check the manufacturer’s technical info for details).

27
GIANT BICYCLE LIMITED LIFETIME WARRANTY
Giant Bicycle, Inc. (“Giant”) warrants the frame and rigid fork of each new Giant brand bicycle and Giant brand frameset to be free from defects in material and workmanship for as long as the original purchaser owns the bicycle. Paint finish and all other original components, and all Giant brand repair parts, replacement parts, and accessories, are warranted to be free from defects in material or workmanship for a period of one year from the original date of purchase. This warranty applies only to bicycles and framesets purchased new from, and assembled by, an Authorized Giant Dealer.
REQUIRED ASSEMBLY WHEN PURCHASED
An Authorized Giant Dealer is required to assemble your Giant brand bicycle, without charge, at the time of purchase.
FREE 60-DAY REPAIR LABOR
If your Giant brand bicycle is found to be defective in materials, workmanship, or assembly within 60 days of purchase, it will be repaired for you without charge for labor or materials. To receive this service, simply bring your Giant brand bicycle to the Authorized Giant Dealer from whom it was purchased.

28
LIMITED REMEDY
Unless otherwise provided, the sole remedy under the above warranty, or any implied warran-ty, is limited to the replacement of defective parts with those of equal or greater value at the sole discretion of Giant. Unless within the free 60-day repair labor period, you will be respon-sible for labor costs associated with warranty replacements. IN NO EVENT SHALL GIANT BE RESPONSIBLE FOR DIRECT, INCIDENTAL OR CONSEQUENTIAL DAMAGES, INCLUDING, WITH-OUT LIMITATION, DAMAGES FOR PERSONAL INJURY, PROPERTY DAMAGE, OR ECONOMIC LOSSES, WHETHER BASED ON CONTRACT, WARRANTY, NEGLIGENCE, PRODUCT LIABILITY, OR ANY OTHER THEORY. Some states do not allow the exclusion or limitation of damages, so the above limitation or exclusion may not apply to you.
EXCLUSIONS
THE ABOVE WARRANTY, OR ANY IMPLIED WARRANTY, DOES NOT COVER NORMAL WEAR AND TEAR. ALL WARRANTIES ARE VOID IF THE BICYCLE IS MODIFIED FROM ITS ORIGINAL CONDITION OR THE BICYCLE IS USED FOR OTHER THAN NORMAL ACTIVITIES, INCLUDING, BUT NOT LIMITED TO, FAILING TO FOLLOW THE OWNER’S MANUAL OR USING THE BICYCLE FOR COMMERCIAL ACTIVITIES OR IN COMPETITIVE EVENTS, INCLUDING BUT NOT LIMITED TO BICYCLE RACING, BICYCLE MOTORCROSS RACING, STUNT RIDING, RAMP JUMPING OR SIMILAR ACTIVITIES, AND TRAINING FOR SUCH ACTIVITIES OR EVENTS, GIANT MAKES NO

29
OTHER WARRANTIES, EXPRESS OR IMPLIED. ALL IMPLIED WARRANTIES, INCLUDING THE WARRANTIES OF MERCHANTABILITY AND FITNESS FOR A PARTICULAR PURPOSE, ARE LIMITED IN DURATION TO THAT OF THE EXPRESS WARRANTIES STATED ABOVE. Some states do not allow limitations on how long an implied warranty lasts, so the above limitation may not apply to you.
This warranty gives you specific legal rights, and you may also have other rights which vary from state to state.
WHAT YOU SHOULD DO
Bring your bicycle, along with a purchase receipt or other proof of the date of purchase, to an Authorized Giant Dealer, or write to the Customer Service Department at: Giant Bicycle, Inc., 3587 Old Conejo Road, Newbury Park, CA 91320

30
CONTACT INFO
Fox Racing Shox 831-274-6500 www.foxracingshox.com
Manitou 800-423-0273 www.answerproducts.com
RockShox 800-677-7177 www.rockshox.com
Marzocchi 661-257-6630 www.marzocchi.com


©2004 Giant Bicycle, Inc. Giant and its symbol are trademarks of Giant Bicycle, Inc. All rights reserved. Printed in Taiwan. www.giantbicycle.com