supplementary materials for - harvard university · 2019-07-12 · wall-membrane assembly, present...
TRANSCRIPT

S-1
Supplementary Materials for
A Soft Ring Oscillator
Daniel J. Preston1,2, Haihui Joy Jiang1,3, Vanessa Sanchez2,4, Philipp Rothemund1,2,4,
Jeff Rawson1, Markus P. Nemitz1,2, Won-Kyu Lee1, Zhigang Suo4,5, Conor J. Walsh2,4, and George M. Whitesides1,2,5,*
1Department of Chemistry and Chemical Biology, Harvard University, 12 Oxford St., Cambridge, MA 02138, USA.
2Wyss Institute for Biologically Inspired Engineering, 3 Blackfan Circle, Boston, MA 02115, USA.
3School of Chemistry and Sydney Nano Institute, The University of Sydney, NSW 2006, Australia.
4School of Engineering and Applied Sciences, Harvard University, 29 Oxford St, Cambridge, MA 02138, USA.
5Kavli Institute for Bionano Science and Technology, Harvard University, 29 Oxford Street, Cambridge, MA 02138, USA.
*Correspondence to: [email protected].
This PDF file includes:
Materials and Methods Supplementary Text Figs. S1 to S17 Captions for Movies S1 to S6
Other Supplementary Materials for this manuscript include the following:
Data file S1 Movies S1 to S6

S-2
Materials and Methods
Soft, Pneumatic Inverter Fabrication
We used two different commercially-available elastomers manufactured by Smooth-On: Dragon
Skin 10NV (semi-transparent) and Smooth-Sil 950 (blue) (except in the case of the ring
oscillator for the mechanotherapeutic device, for which Dragon Skin 30 was used in place of
Dragon Skin 10NV throughout the entire fabrication process; Smooth-Sil 950 was still used as
described). Their prepolymer mixtures were prepared in three steps: (i) adding the two
components, A and B, (ii) mixing the components by manually stirring them, and (iii) degassing
the mixture under vacuum. The prepolymer mixture of Dragon Skin 10NV was prepared by
mixing its two components in a 1:1 ratio, stirring the mixture manually for ~ 2 min, and
degassing for ~ 5 min. The pre-polymer mixture of Smooth-Sil 950 was prepared by mixing its
components in a 10:1 ratio, stirring the mixture for ~ 5 min, and degassing for ~ 10 min.
The degassed prepolymer elastomers were filled into 3D-printed molds and cured to create the
inverter components (input files for the 3D-printer for all molds are uploaded as Data File S1 to
the auxiliary supplementary materials). To fabricate the tubing inside the inverter, we filled a
syringe with the prepolymer mixture of Smooth-Sil 950 and degassed it inside the syringe for an
additional 10 min before injecting the contents of the syringe into the assembled mold (Fig. S1)
through an opening at the bottom. The conical tip (Dragon Skin 10NV) and the component used
to connect the tubing to the conical tip (Smooth-Sil 950) were made with two separate molds
(Fig. S1). These two components were fabricated by pouring the pre-polymer mixture into their
molds, allowing any air bubbles to rise to the surface and pop, and covering the molds with a
microscope cover slip to ensure a homogenous thickness. We cured the pieces for 24 hours at

S-3
room temperature before demolding. After demolding, the tubes were cut to the desired length
(two 11 mm tubes and two 20 mm tubes per inverter). We attached the pieces together (Fig. S2)
using a thin layer of Dragon Skin 10 NV on the faces shaded in gray, and we cured the tubing
assembly at 60 °C for 10 min.
To fabricate the flat faces, cylindrical walls, and membrane of the inverter, we filled molds with
prepolymer Dragon Skin 10NV (Fig. S3) and waited until all the air bubbles in the mixture
disappeared. For the horizontal channels in the flat faces, we inserted 16-gauge needles into the
molds through openings in their sides before filling the molds with the prepolymer mixture of
Dragon Skin 10NV. The molds for the flat face were covered with flat acrylic sheets to ensure a
homogenous thickness, while the lid of the mold for the combined cylindrical wall-membrane
assembly of the devices contains small holes so that excess material is squeezed out when the lid
is placed onto the mold. We cured the elastomers in these molds for two hours at room
temperature before demolding. After demolding, we cut off the excess material on the cylindrical
wall-membrane assembly, present due to the small holes, with scissors. At each end of the
cylindrical wall-membrane assembly, we punched out a hole of 3 mm diameter to connect tubing
to the inner chambers of the inverter (~ 5 mm from the end) (Fig. S3).
The tubing was attached, using uncured Dragon Skin 10NV, to the top flat face (11-mm long,
fabricated as above) and bottom flat face (20-mm long) (Fig. S4). We also attached the tip of the
bottom tubing onto the bottom of the membrane. Finally, we attached the flat faces to the
cylindrical walls of the inverter (Fig. S4). For the attachment process, we used Dragon Skin
10NV as adhesive, and cured the adhesive after each step for 10 min at 60°.

S-4
Soft Ball-Rolling Track
A circular undulating ball roller consists of two components: a curved lid that deforms to push
the ball, and a bottom plate with pneumatic chambers, fabricated from the molds shown in
Figure S5. The lid is made with EcoFlex 30, which has a higher elasticity than Dragon Skin
products. The bottom plate with chambers is made with Dragon Skin 30, which has a lower
elasticity than both the EcoFlex line of products and Dragon Skin 10. Both materials are PDMS-
based, commercially available, and manufactured by Smooth-On. Mixing and casting procedures
are identical to those used for Dragon Skin 10NV, as described above.
Cast elastomeric components were removed from the molds after 80% of their complete curing
time (as suggested by the manufacturer). Curing at room temperature over a shorter period
improves the adhesion between components with negligible shape deformation. Within the
bottom plate, each internal chamber was punched to yield a 3 mm diameter hole, and each hole
was connected to the ring oscillator via a soft tube (~1 mm radius, < 20 cm length) press-fit
inside of the hole and sealed with additional uncured elastomer. The curved lid was adhered to
the bottom plate using an evenly-spread layer of EcoFlex 30, as shown in Fig. S5B. After the
adhesion layer of EcoFlex cured, individual chambers were inflated to test for leakage. As shown
in Figs. 4 and S14, chambers were connected to ring-oscillator inverters in a serial arrangement
(e.g. ABC-ABC-ABC, or vice-versa). The curved lid is made of a more flexible material than the
bottom plate; therefore, the volume expansion of the curved lid is more significant. The top
surface of the circular track undulates peristaltically as the ring oscillator operates.

S-5
In Figure 4 in the main text, the circular ball roller transports a squash ball around the track as
the ring oscillator operates, with an angular velocity of 4.5 degrees per second. Alternatively, a
linear ball-rolling track was fabricated following similar procedures, as shown in Fig. S14. These
tracks can transport spherical objects of different sizes. The direction of movement depends on
the arrangement of inverters of the ring oscillator.
Hexagonal Rolling Soft Robot
The hexagonal rolling soft robot consists of a foam frame, six sets of “double balloons,” and soft
tubing, as well as the internally-mounted ring oscillator comprised of three soft inverters. The
frame is made of a polyurethane-based polymer, FlexFoam-iT V, which is commercially
manufactured by Smooth-On. Figure S6A shows 3-D printed molds used for the fabrication of
the frame. A hexagonal assembly includes one bottom plate and three sets of inserts. An anti-
adhesive spray for polyurethane was used on the assembly. FlexiFoam-iT prepolymers A and B
were stirred for 20 seconds upon adding both to a plastic cup. The mixture was then poured into
the mold assembly and cured for 1 hour at room temperature. The foam frame was removed from
the assembly, shown in Figure S6B, and one cylindrical opening with a 20-mm radius was cut on
each side.
Each balloon set contains an inner balloon and an outer balloon, as discussed in the main text
(Fig. 3 B-C). The inner, extensible balloon was inserted inside of the outer, stiffer balloon, and
the two balloons were attached, as assembled, to elastomeric tubing using a heat-shrinkable
wrap. Glycerol (2-3 drops) was used as a lubricant between the inner and outer balloons.

S-6
Six sets of balloons were fitted into the six cylindrical openings in the hexagonal frame; each
opening constrains a balloon’s volume of expansion and leads to a predictable direction of
inflation. A three-inverter ring oscillator was embedded in the middle of the hexagonal frame to
operate as its “engine.” The six sets of balloons were connected to outputs of the inverters of the
ring oscillator using elastomeric tubing. Two sets of balloons that are opposite each other on the
hexagon operate as a pair, as they are attached to the same inverter. This device moves forward
with a constant input pressure applied to the single pneumatic input. Each balloon holds
approximately 80 mL at inverter actuation, and two balloons are attached to each inverter. The
analytical model predicts an oscillation period of 15 seconds (Psupp = 14 kPa), which accurately
describes the roller’s behavior (Fig. 5E).
Soft, Pneumatic Undulating Stage
Figure S7 shows the design and the assembly of a soft undulating stage, which consists of an
elastomeric plate and three linear actuators made of Dragon Skin 10. The design of the linear
actuator is based on half of inverter described previously. The linear actuator is cast from the
same molds for making the chamber of the inverter. Modifications include blocking the outlets
on the lid, eliminating the internal tubing, adding a supporting rod, and trimming additional
materials. The snap-through pressure of the membrane (Psnap-thru) was tested and found to be the
same as the original inverter. Figure S7B shows two states of the linear actuator: when the
supply pressure is lower than Psnap-thru, the device is unactuated, the membrane is at its default
downward position, and vice versa. The elastomeric plate is cast from a petri dish (diameter = 10
cm) covered by a watch glass. We adjusted the size, curvature, and elasticity of the plate by
using different molds and materials to suit different applications of the undulating stage.

S-7
Figure S7C shows supporting rods acting as joints between the plate and the actuators. Chambers
of the actuators were connected to outputs from a three-component ring oscillator. When the ring
oscillator is operating, actuators of the undulating stage actuate in a serial arrangement (e.g.
ABC-ABC-ABC). Either one or two out of the three supporting rods push the plate upwards at a
given time. As a result, the stage tilts with an undulating wave-like motion at the same frequency
of the ring oscillator.
Supplementary Text
Resistance, Capacitance, and RC Circuit Model The pneumatic resistance R of the tubing between an inverter chamber and reservoir (at either
Patm or Psupp) is composed of the internal resistance of the inverter Rinv (Pa-s/kg), and the
resistance of the added tubing Rtube (Pa-s/kg), with R = Rtube + Rinv. Because the tubing volume is
much smaller than the internal volume of the inverters, we neglect compressibility along the
tubing. We estimated a Reynolds number of Re ~ 10-100, much smaller than the critical
Reynolds number Re ~ 2,300 for transition to turbulent flow. We therefore modeled Rtube with
the Darcy–Weisbach equation (37) for laminar flow (Eq. S1):
𝑅𝑡𝑢𝑏𝑒 =∆𝑃
�̇�=
128𝜇𝐿
𝜋𝜌𝐷4 (S1)
In Eq. S1, ΔP (kPa) is the pressure difference between the ends of the tubing, �̇� (kg/s) the mass
flow rate of air, µ (Pa-s) is the dynamic viscosity of air, ρ is the density of air at standard
pressure and temperature, and D and L are the inner diameter and the length of the added tubing.

S-8
Meanwhile, the shape of the tubing inside of the inverter is complex and depends on its
deformation in the open state. We therefore determine Rinv by fitting the final equation to the
experimental data without added tubing.
Neglecting the flow resistance between the added volume reservoir and the second inverter, the
pneumatic capacitance of the reservoir Cres (kg/Pa) and the internal pneumatic capacitance of the
inverter Cinv (kg/Pa) can be combined to a total capacitance C = Cinv+ Cres. We modeled Cres with
the ideal gas law under the assumption that the air remains isothermal (Eq. S2); this assumption
is valid because the thermal mass of the inverters and tubing is much greater than that of the
internal air, providing effective temperature regulation during compression and expansion.
𝐶𝑟𝑒𝑠 =𝑑𝑚
𝑑𝑃=
𝑉0M
R𝑇 (S2)
In Eq. S2, V0 is the volume of the gas reservoir, M is the molar mass of the gas (29 g/mol for air),
R (J/mol-K) is the universal gas constant, and T (K) is the gas temperature. We determine the
internal capacitance of the inverter, Cinv, from the experimental data.
To derive an equation for the oscillation period as a function of the pneumatic capacitance C, the
flow resistance R, the supply pressure Psupp, and the number of inverters in the ring n, we
modeled the airflow between two adjacent inverters that are in the same state of actuation, during
both inflation and deflation (Figs. S12A and S12B, respectively), and extended the result to the
entire ring oscillator. The oscillation period of a ring oscillator containing n inverters is therefore
the sum of the rise times and fall times of all n inverters.

S-9
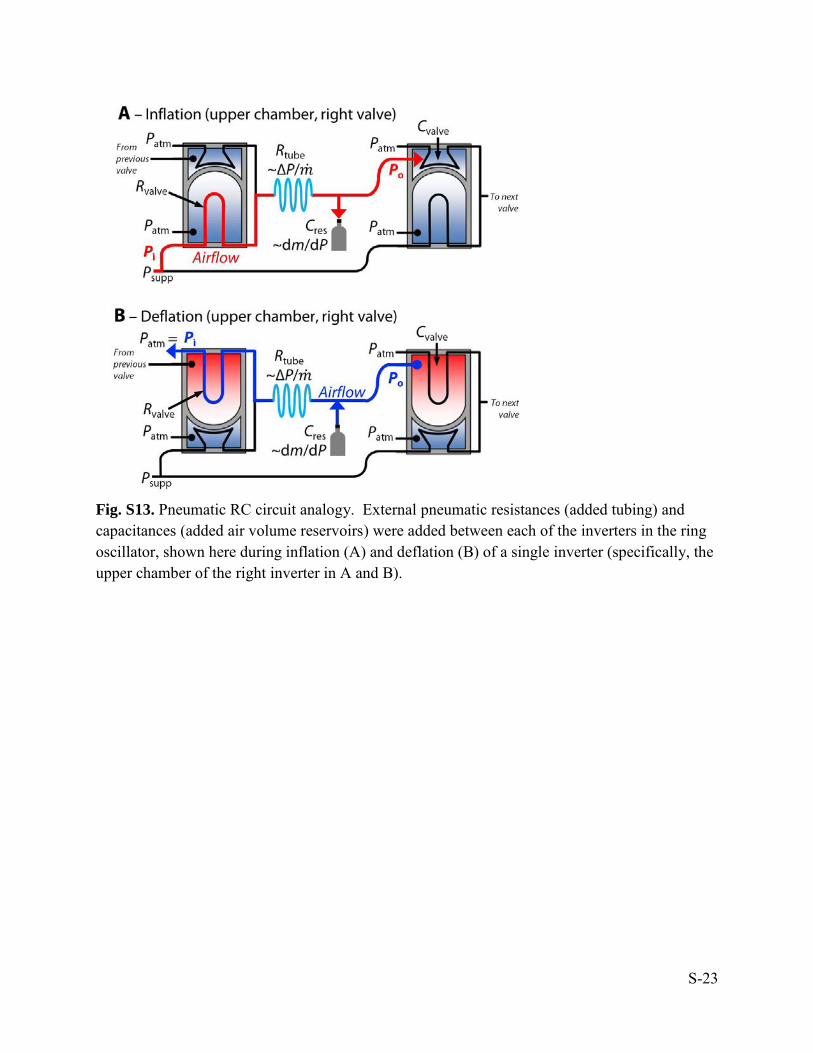
During inflation (Fig. S12A), air flows from the pressure supply through the resistor to the
reservoir and inverter chamber, and during deflation (Fig. S12B), from the reservoir and inverter
chamber through the resistor to the atmosphere. Equation S3 describes the change of the pressure
P inside the capacitor:
𝑑𝑃
𝑑𝑡=
1
𝑅𝐶(𝑃𝑖 − 𝑃) (S3)
In Eq. (S3), 𝑑𝑃/𝑑𝑡 is the derivative of P with respect to time, during inflation Pi = Psupp and
during deflation Pi = Patm. With the initial condition P(t = 0) = P0, the general solution to Eq.
(S3) is:
𝑃 = 𝑃𝑖 + (𝑃𝑜 − 𝑃𝑖)𝑒−𝑡/𝑅𝐶 (S4)
At the beginning of inflation (Fig. S13A), the capacitor is at approximately atmospheric pressure
(P0 = Patm). The time required for the capacitor to inflate with an input pressure Pi = Psupp to the
critical pressure P = Psnap-thru can be calculated from Eq. (S4). When the pressure in the capacitor
reaches Psnap-thru, the inverter switches, and connects the next capacitor to atmosphere (Pi = Patm)
(Fig. S13B). At the beginning of deflation, this capacitor is approximately at pressure P0 = Psupp.
The time for the pressure in the capacitor to reach P = Psnap-back is described by Eq. (S4). During
one period of oscillation, each capacitor must both inflate until the critical snap-through pressure
(Fig. S13A) and deflate until snap-back (Fig. S13B). The oscillation period of a ring oscillator

S-10
containing n inverters is therefore the sum of the rise times and fall of times of all n inverters
(Eq. (S5), which is Eq. (1) in the main text).
𝑡𝑝𝑒𝑟𝑖𝑜𝑑 = 𝑛 𝑅 𝐶 [𝑙𝑛 (𝑃𝑎𝑡𝑚 − 𝑃𝑠𝑢𝑝𝑝
𝑃𝑠𝑛𝑎𝑝−𝑡ℎ𝑟𝑢 − 𝑃𝑠𝑢𝑝𝑝) + 𝑙𝑛 (
𝑃𝑠𝑢𝑝𝑝 − 𝑃𝑎𝑡𝑚
𝑃𝑠𝑛𝑎𝑝−𝑏𝑎𝑐𝑘 − 𝑃𝑎𝑡𝑚)] (S5)
The internal resistance and capacitance for the inverter were calculated from the x-intercept of a
linear fit to the experimental data, obtained by varying the added resistance (Fig. 3C) and
capacitance (Fig. 3D). Rinv is 5.1x10⁸ Pa-s/kg (equivalent to 73 cm of added 0.97-mm inner
diameter tubing), Cinv is 8.8x10⁻¹⁰ kg/Pa (equivalent to 76 mL of added volume), and the intrinsic
time constant for either inflation or deflation of the inverter, (RC)inv, is 0.45 seconds.
With these parameters, the calculated period agreed well with those plotted in Figure 3B-D. Eq.
(S5) also explains the sharp decrease of tperiod with the supply pressure close to Psnap-thru: the first
term of Eq. (S5), which corresponds to the rise time of a capacitor, becomes infinitely large
when Psupp approaches Psnap-thru. The agreement between model and experiment demonstrates that
the ring oscillator can be considered a ring of pneumatic RC circuits for system design purposes.

S-11
Fig. S1. Design of the molds for the tubing used inside the chambers of the inverter. (A) Assembly of the mold to fabricate six tubes, simultaneously. (B) Mold for the connecting junction that attaches two tubes (between the tubing and the conical tip). (C) Mold for the conical tip that serves as a cap for the two-tube junction in (B).

S-12
Fig. S2. Assembly of the tubing used inside the chambers of the inverter. (A) The gray areas mark the locations where uncured elastomer was applied as an adhesive between parts. Alignment of the tubes with the connector is facilitated by keeping syringe needles in the tubes during the assembly. (B) Photograph of the assembled tubing.
S-13
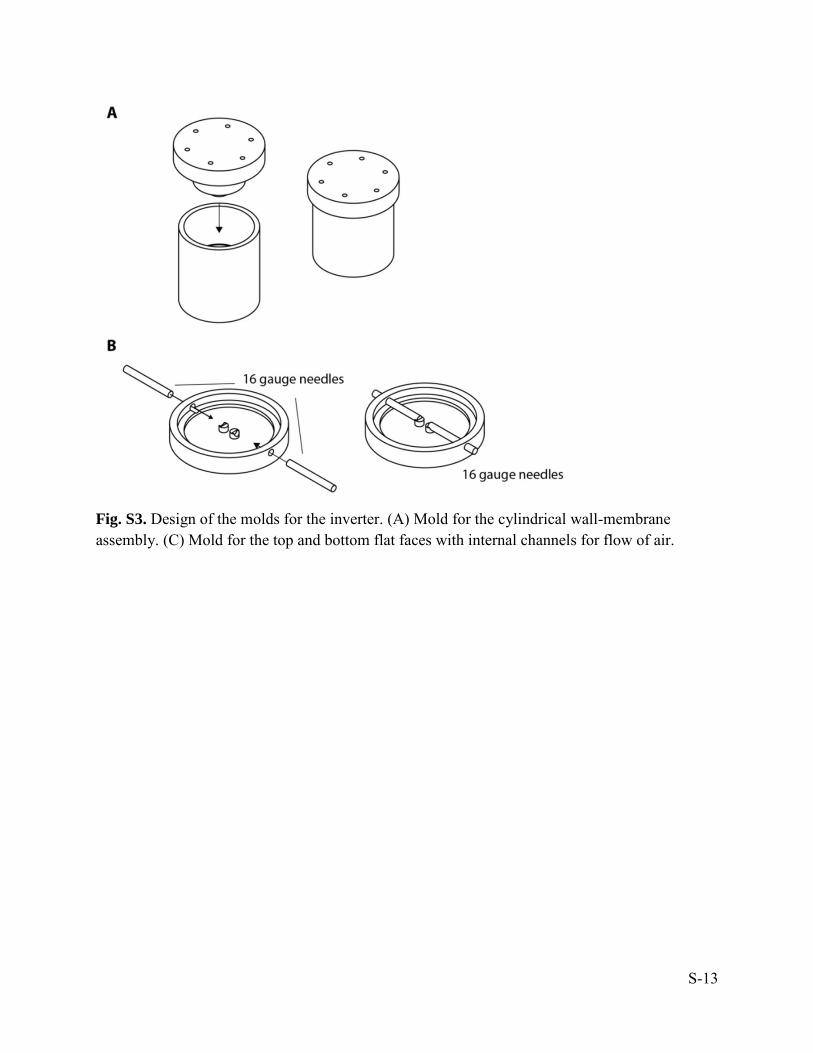
Fig. S3. Design of the molds for the inverter. (A) Mold for the cylindrical wall-membrane assembly. (C) Mold for the top and bottom flat faces with internal channels for flow of air.

S-14
Fig. S4. Assembly of the inverter. The gray areas mark locations where uncured elastomer was applied, as an adhesive, and the elastomeric sections were bonded.

S-15
Fig. S5. Design of the molds, and assembly, for the ball roller (circular track). (A) Molds for a curved lid and a bottom plate with 30 air chambers. (B) Devices cast from molds. The curved side of the lid faces up and the flat side of the lid is adhered (shown in grey), using uncured elastomer as adhesive, onto the bottom plate.

S-16
Fig. S6. Design of the molds, and assembly, for the rolling hexagonal frame. (A) Molds for a bottom plate and a set of inserts. (B) A hexagon frame casted from molds with six cylindrical openings added asymmetrically (closer to one vertex of the hexagon’s face than the other).

S-17
Fig. S7. Design and assembly of the soft, undulating stage. (A) The assembly of the linear actuator, which is made from half of an inverter without internal tubing. An elastomeric rod was attached to the membrane. (B) Two states of the soft actuator states are: retracted, and extended (as a function of the input pressure to the actuator, Pin). (C) Assembly of the undulating stage with three linear actuators connected to outputs of a three-component ring oscillator (PA, PB and PC). Elastomeric rods support linear movements, acting as joints between an elastomeric plate and the actuators. The dark-gray areas mark locations where uncured elastomer was applied as an adhesive.

S-18
Fig. S8. Unactuated and actuated inverter schematics, with labels, alongside photographs. The side view of the inverter formed from the soft, pneumatic inverter (A and B, upper photos) shows the internal tubes for airflow, with the upper tube kinked by the membrane in A and the lower tube kinked in B. Schematics illustrate the inverter operating between these two distinct states.

S-19
Fig. S9. Membrane snap-through hysteresis. The membrane undergoes a forward snap-through at pressure difference Psnap-thru, and a backwards snap-through (back to its resting state) at pressure difference Psnap-back.

S-20
Fig. S10. Experimental setup for characterization of the soft, pneumatic inverter. The inverter was tested in this configuration to generate the data in main text Figure 1C. We varied input pressure with a voltage-controlled pressure regulator interfaced to a computer and characterized and recorded input, output, and supply pressures with electronic pressure sensors connected to a DAQ.

S-21
Fig. S11. Schmitt-trigger-like behavior of the inverter. The output pressure, Pout, is an inverted signal of the input pressure, Pin, with hysteresis due to the difference in the pressures required to snap the membrane from its initial state (Psnap-thru) and allow the membrane to return to its initial state (Psnap-back); this behavior exemplifies a Schmitt inverter, with the hysteresis loop indicated by black arrows. A constant supply pressure, Psupp, powers the Schmitt inverter. The inset shows a schematic representation of the Schmitt inverter.
S-22
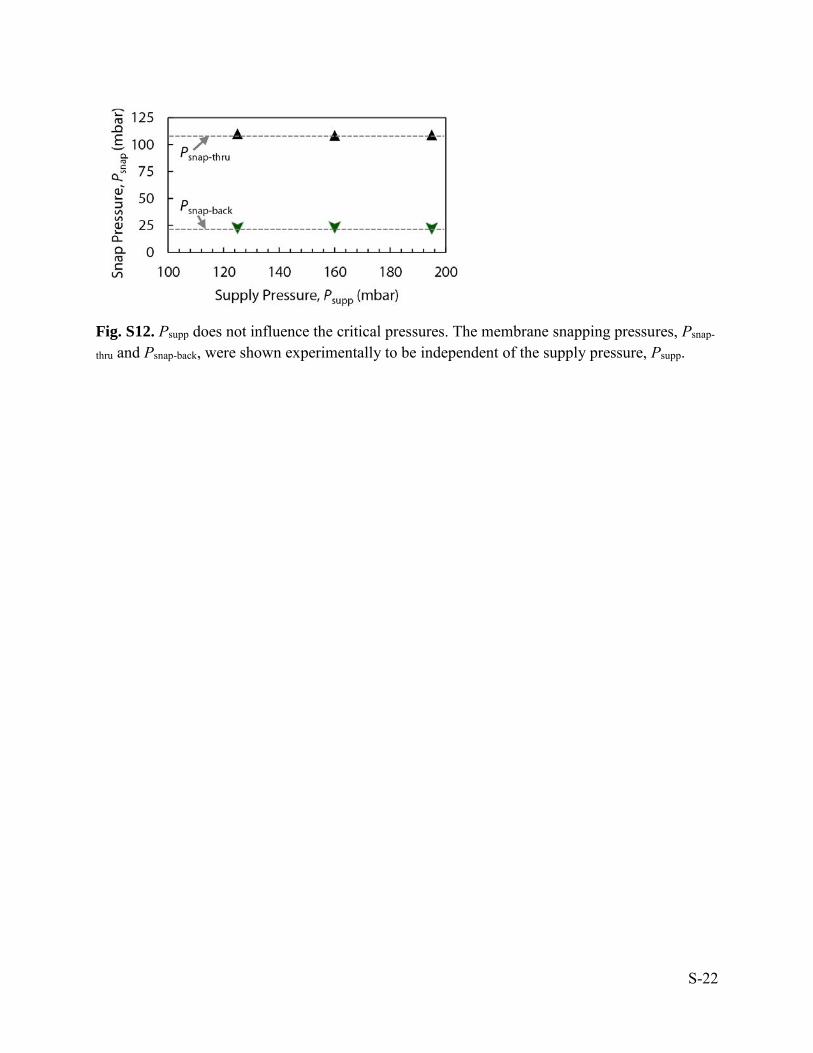
Fig. S12. Psupp does not influence the critical pressures. The membrane snapping pressures, Psnap-
thru and Psnap-back, were shown experimentally to be independent of the supply pressure, Psupp.
S-23
Fig. S13. Pneumatic RC circuit analogy. External pneumatic resistances (added tubing) and capacitances (added air volume reservoirs) were added between each of the inverters in the ring oscillator, shown here during inflation (A) and deflation (B) of a single inverter (specifically, the upper chamber of the right inverter in A and B).

S-24
Fig. S14. A soft linear ball roller connected to the ring oscillator. The ball roller, shown schematically in (A), moves the ball either forwards or backwards depending on the order of the connections of the ring oscillator outputs (outputs B and C were switched in this case), shown in (B) and (C); the peristaltic device can also roll larger, heavier objects, including a golf ball (D).

S-25
Fig. S15. Soft stage mounted on three linear actuators connected to the ring oscillator. When a soft stage is mounted on three linear actuators, and the actuators’ inputs are connected to the three pneumatic outputs of the ring oscillator (i.e., PA, PB, and PC), the stage tilts in a circularly-undulating pattern. This stage motion can and separate particles of different sizes when a size-selective gate is used on an exterior wall of the stage; the entire setup is shown here, driven by a single, constant input pressure.

S-26
Fig. S16. The soft ring oscillator can control and meter fluid flows (A). We configured the inverter as a fluid-metering valve (B), where the input pressure either opens (high Pin) or closes (low Pin) a tube governing the flow of fluid; then, by attaching the ring oscillator pressure outputs to the inputs of three of these fluid-metering valves, we sequentially dispensed blue, red, and green fluids (C).
S-27
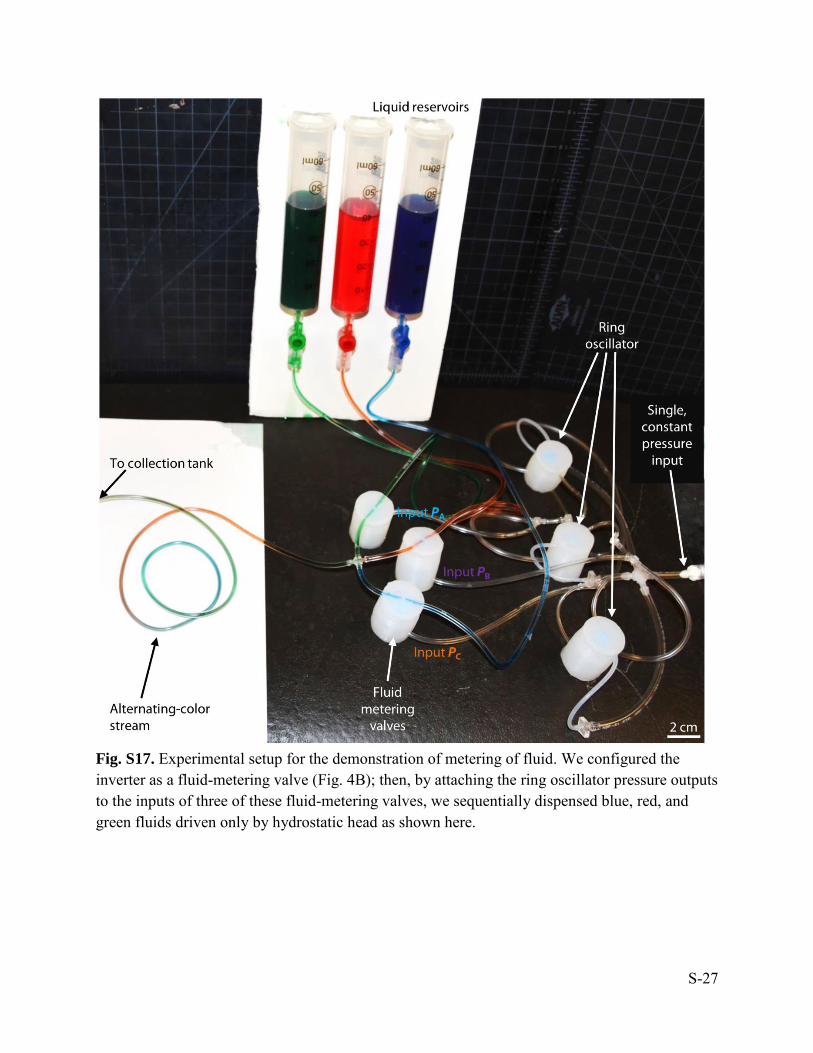
Fig. S17. Experimental setup for the demonstration of metering of fluid. We configured the inverter as a fluid-metering valve (Fig. 4B); then, by attaching the ring oscillator pressure outputs to the inputs of three of these fluid-metering valves, we sequentially dispensed blue, red, and green fluids driven only by hydrostatic head as shown here.

S-28
Movie S1.
Single inerter demonstration: when the input is off (0), the output is on (1), and vice versa.
Movie S2.
High-strain deformation test: the ring oscillator is manually compressed to 25% of its initial size, after which it resumes operation.
Movie S3.
Translation of spherical object around a circular elastomeric track.
Movie S4.
Actuation of a rolling soft robot with an integrated soft ring oscillator.
Movie S5.
Separation using an elastomeric stage driven by the soft ring oscillator.
Movie S6.
Fluid-metering valves controlled by the soft ring oscillator.