step by step process: agreements and coverage analyses
TRANSCRIPT

Step by Step Process: Agreements and Coverage Analyses
Author: Anthony Dames Revised: June 24th, 2019 Version: 1

Page ii
InfoEd Global | Step by Step Process | Error! Reference source not found.
Contents
INTRODUCTION ...................................................................................................................................................................... 1 AGREEMENT TYPES ................................................................................................................................................................ 2 PROCESS ................................................................................................................................................................................ 4

Page 1
Step by Step PD Process | Error! Reference source not found.
Introduction
This document addresses how to create and submit monetary and non-monetary agreements and coverage analyses within the UTHealth START (“START”) Agreements (AG) module. It generally assumes that the reader (“you”) is the actual PI; exceptions to this rule will be described as needed. Please note that the screenshots in this document may not exactly match what you see. This may be due to a variety of reasons: software updates, differing browsers and/or window sizes, the user having more or less security than assumed here, etc. The Agreements Module is used for: - submitting and processing all non-monetary agreements for sponsored projects:
- Material Transfer Agreements - Confidentiality/Non-Disclosure Agreements - Data Use/Business Associate Agreement - Collaborative Research Agreements - Master Agreements
- processing monetary agreements in tandem with the submission and approval of the project through the Proposal Development Module.
- Incoming Subawards (where UTHealth is the subrecipient) - Clinical Trial Agreements - Sponsored Research Agreements - Collaborative Research Agreements - Consulting/Professional Services Agreements (Incoming) - Fee for Laboratory Services
- processing outgoing agreements (UTHealth paying another party)Salary reimbursement
- Consulting - Clinical Trial Site - Fee for Service
- processing grant agreements that require review and negotiation prior to signing.
Note: Grant Terms and conditions that are non-negotiable (e.g. American Heart Association Grant Activation Forms) are processed through Proposal Tracking as part of the Notice of Award and are just attached to the record.
- processing coverage analyses for clinical trials
- Coverage Analysis for patient care billing - Internal, detailed study budgets
System Support Contact Information: For Technical Support: [email protected] For Functional Support: your SPA Specialist

Page 2
Step by Step PD Process | Error! Reference source not found.
Agreement Types
Non-Monetary Agreements Non-Monetary agreements reside solely in the Agreements Module. They can stand alone or be linked to any other record in the system. For example, a MTA in Agreements can be linked to and associated with a grant award. There are four types of non-monetary agreements.
Monetary Agreements Monetary agreements can be submitted via the agreements module but must have a Proposal record (Sponsored Projects Tab) and obtain budget approval. A Monetary agreement can also be submitted as an attachment to the Proposal record. There are six types of Monetary Agreements
Outgoing Agreements Outgoing Agreements are when UTHealth is paying another party for work. Non-Monetary agreements reside solely in the Agreements Module. They can stand alone or be linked to any other record in the system. For example, a Services Out agreement can be linked to a grant award. There are five types of outgoing agreements:
Grant Agreements
Grant agreements are generally associated with non-federal grant awards. Certain sponsors require grant recipients to sign grant agreements (or grant terms and conditions) in order to accept the award. Any grant agreements that requires negotiation and institutional signature will be processed under an agreement record. Non-negotiable grant agreements and forms (such as AHA’s grant activation forms) will only be attached to the grant record.

Page 3
Step by Step PD Process | Error! Reference source not found.
Coverage Analysis and Budget Forms (for Clinical Research/Trials Only) A Coverage Analysis is an internal, Excel file that is required for all clinical trials that will generate patient bills. The coverage analysis describes patient visits and procedures that will be conducted during the study and who will pay the hosipital/clinic bills generated as a result. A detailed budget (completed as part of the coverage analysis Excel file) is required for all externally funded clinical research projects that pay UTHealth on a “per” basis; per patient, per sample, per chart review, etc. The budget is required regardless of the need for a coverage analysis. Coverage Analyses and Budget Forms are processed within the Agreements Module.
Page 4
Step by Step PD Process | Error! Reference source not found.
Process
The process described here assumes that you already plan to submit an agreement and have the basic information available. There are two ways to initiate an agreement within START; in the Agreements Module and There are two ways to initiate an agreement within START system: 1) directly within the Agreements Module and 2) within the Proposal Tracking record.
Initiating a New Agreement – within the Agreements Module
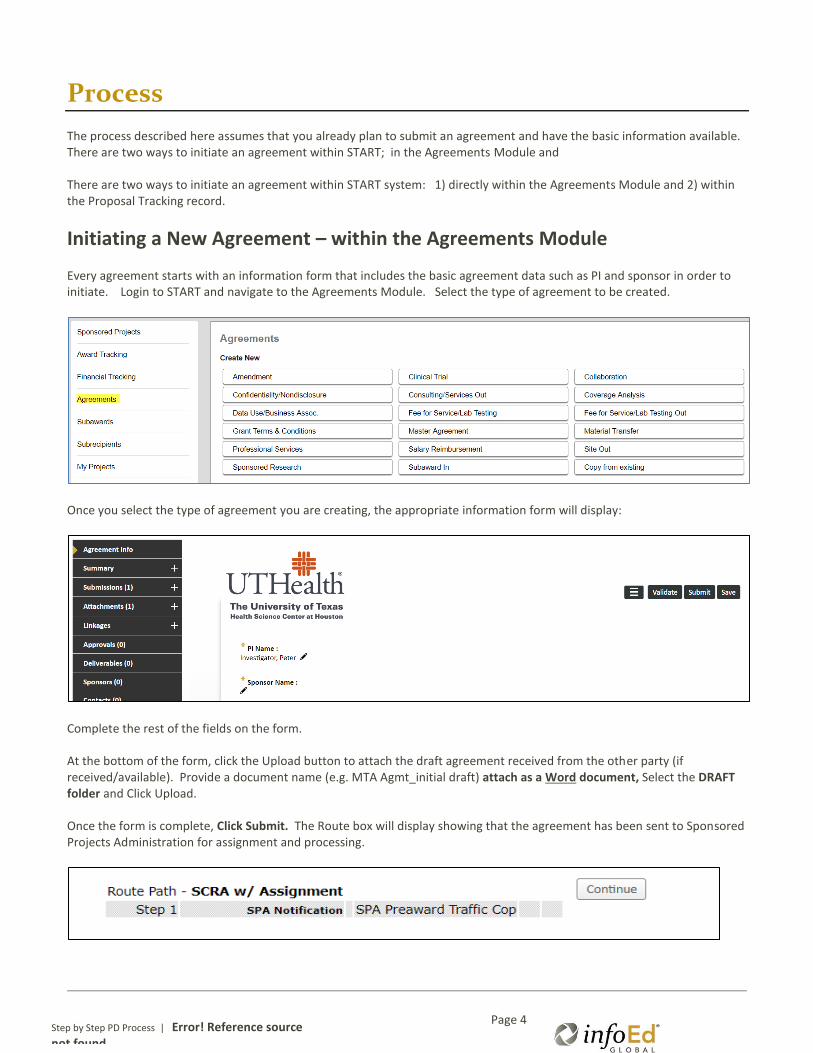
Every agreement starts with an information form that includes the basic agreement data such as PI and sponsor in order to initiate. Login to START and navigate to the Agreements Module. Select the type of agreement to be created.
Once you select the type of agreement you are creating, the appropriate information form will display:
Complete the rest of the fields on the form. At the bottom of the form, click the Upload button to attach the draft agreement received from the other party (if received/available). Provide a document name (e.g. MTA Agmt_initial draft) attach as a Word document, Select the DRAFT folder and Click Upload. Once the form is complete, Click Submit. The Route box will display showing that the agreement has been sent to Sponsored Projects Administration for assignment and processing.
Page 5
Step by Step PD Process | Error! Reference source not found.
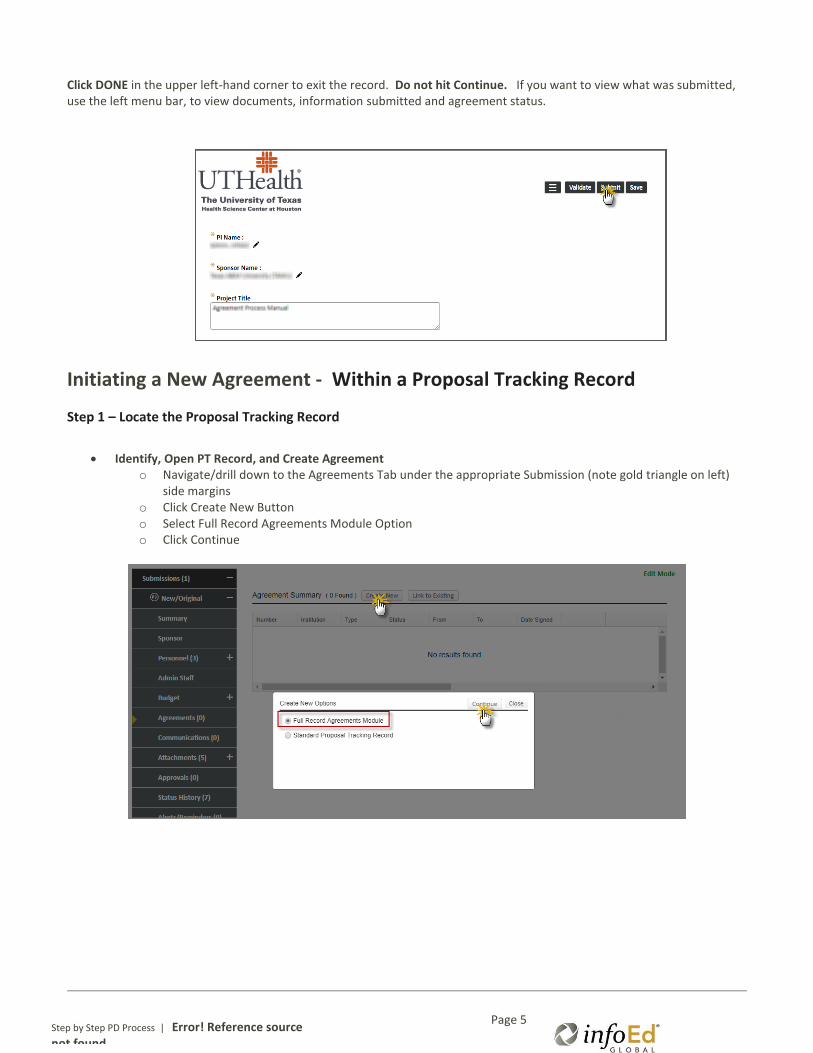
Click DONE in the upper left-hand corner to exit the record. Do not hit Continue. If you want to view what was submitted, use the left menu bar, to view documents, information submitted and agreement status.
Initiating a New Agreement - Within a Proposal Tracking Record
Step 1 – Locate the Proposal Tracking Record
Identify, Open PT Record, and Create Agreement o Navigate/drill down to the Agreements Tab under the appropriate Submission (note gold triangle on left)
side margins o Click Create New Button o Select Full Record Agreements Module Option o Click Continue
Page 6
Step by Step PD Process | Error! Reference source not found.
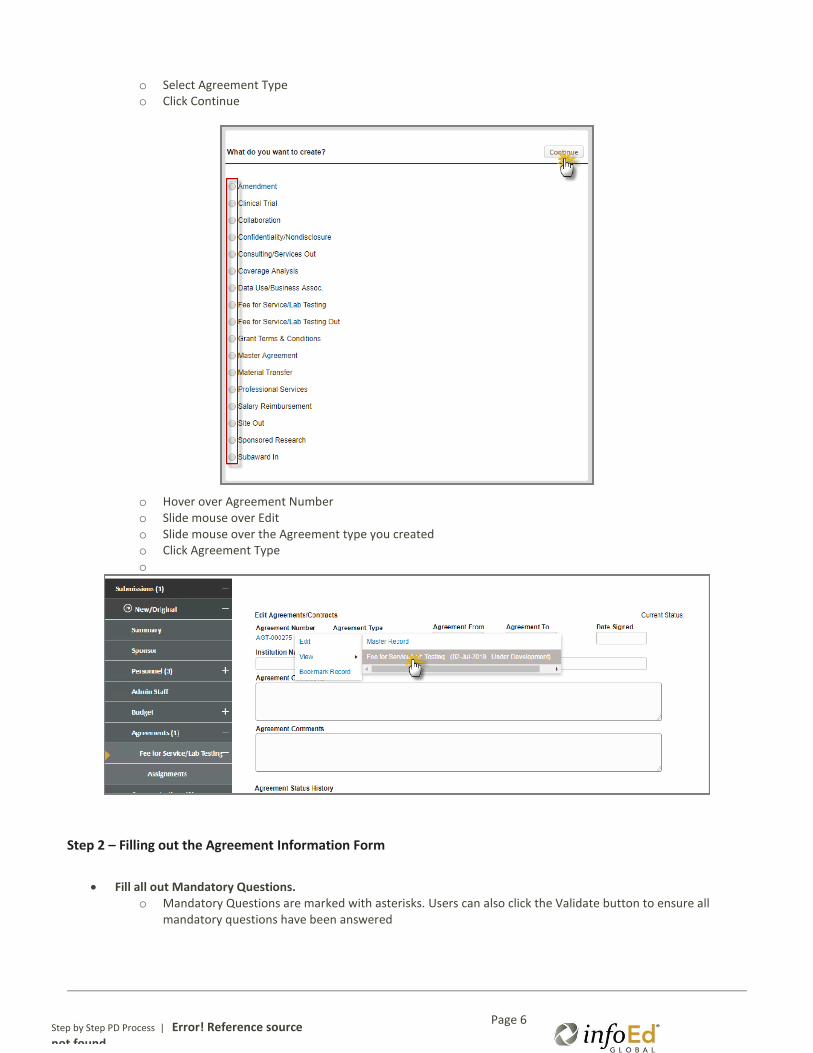
o Select Agreement Type o Click Continue
o Hover over Agreement Number o Slide mouse over Edit o Slide mouse over the Agreement type you created o Click Agreement Type o
Step 2 – Filling out the Agreement Information Form
Fill all out Mandatory Questions. o Mandatory Questions are marked with asterisks. Users can also click the Validate button to ensure all
mandatory questions have been answered

Page 7
Step by Step PD Process | Error! Reference source not found.
Uploading Draft Document when applicable o Click Upload Icon o Enter Document Name o Click Choose File o Browse for Draft Agreement Document o Select Document o Click Upload o Wait for the screen to refresh and the document has been uploaded.
Step 3 – Submitting the Agreement
Click the Submit Button o Ensure the screen finishes reloading before closing the agreement
Page 8
Step by Step PD Process | Error! Reference source not found.
Agreement Tabs and Status History
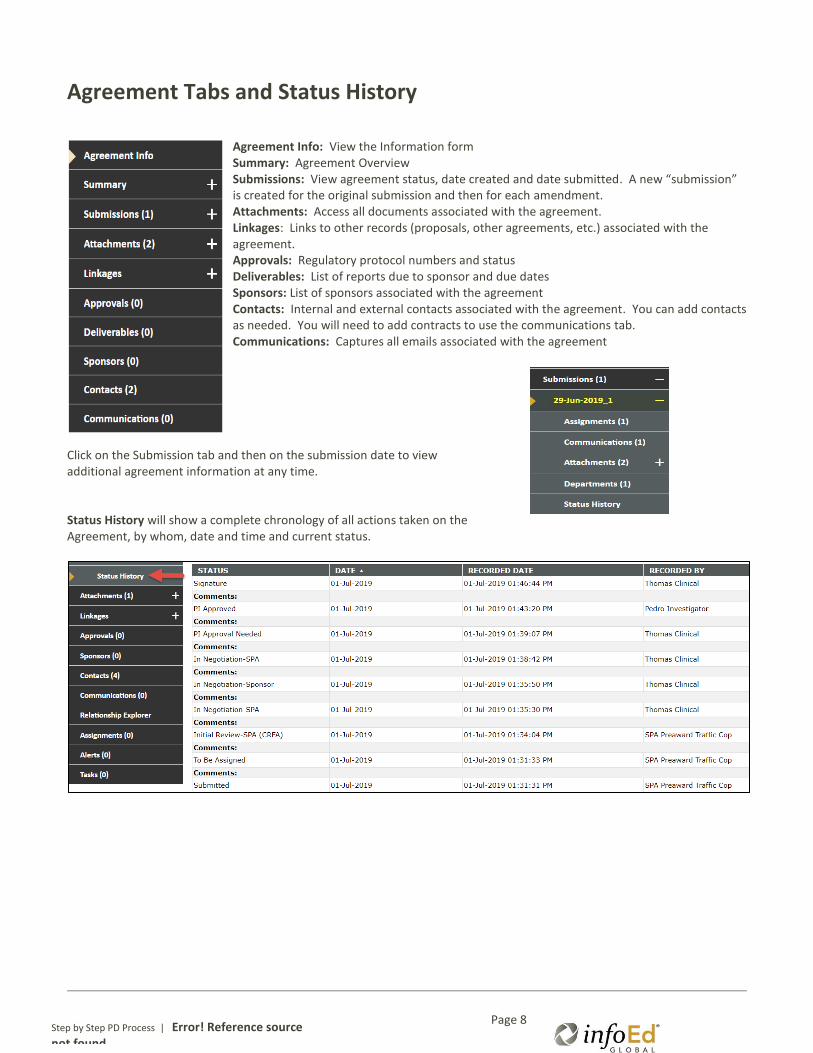
Agreement Info: View the Information form Summary: Agreement Overview Submissions: View agreement status, date created and date submitted. A new “submission” is created for the original submission and then for each amendment. Attachments: Access all documents associated with the agreement. Linkages: Links to other records (proposals, other agreements, etc.) associated with the agreement. Approvals: Regulatory protocol numbers and status Deliverables: List of reports due to sponsor and due dates Sponsors: List of sponsors associated with the agreement Contacts: Internal and external contacts associated with the agreement. You can add contacts as needed. You will need to add contracts to use the communications tab. Communications: Captures all emails associated with the agreement
Click on the Submission tab and then on the submission date to view additional agreement information at any time. Status History will show a complete chronology of all actions taken on the Agreement, by whom, date and time and current status.
Page 9
Step by Step PD Process | Error! Reference source not found.
Linking an agreement to another record
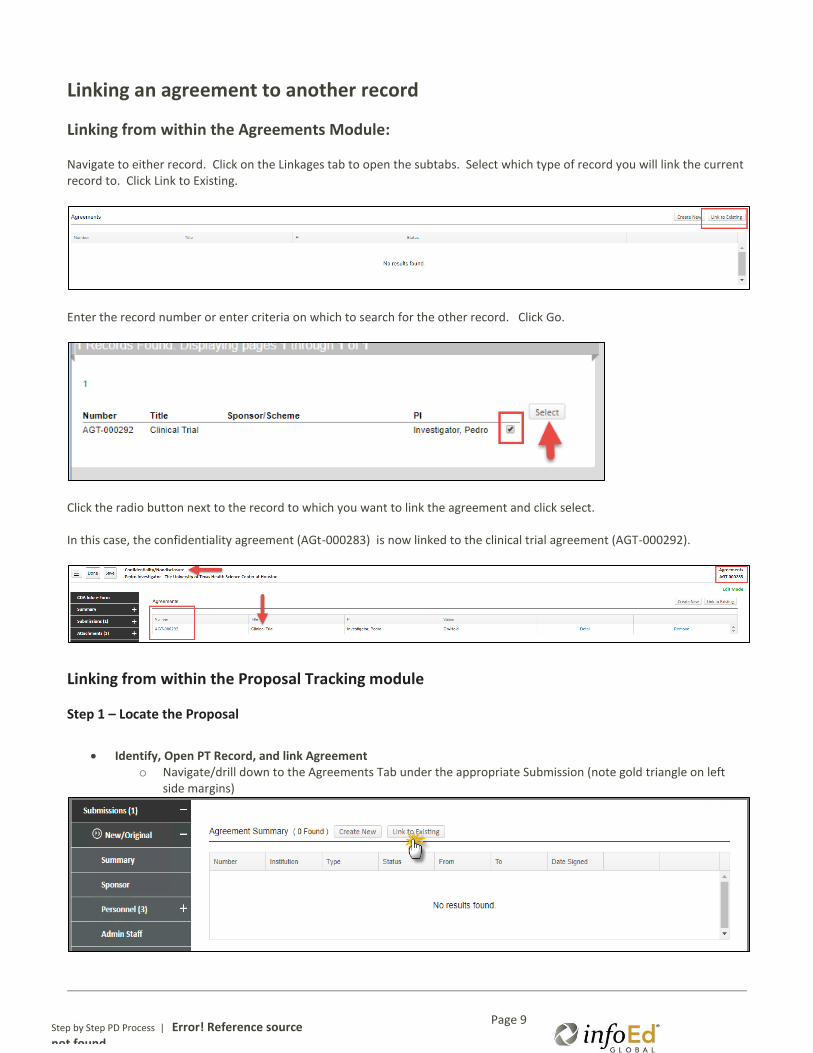
Linking from within the Agreements Module: Navigate to either record. Click on the Linkages tab to open the subtabs. Select which type of record you will link the current record to. Click Link to Existing.
Enter the record number or enter criteria on which to search for the other record. Click Go.
Click the radio button next to the record to which you want to link the agreement and click select. In this case, the confidentiality agreement (AGt-000283) is now linked to the clinical trial agreement (AGT-000292).
Linking from within the Proposal Tracking module
Step 1 – Locate the Proposal
Identify, Open PT Record, and link Agreement o Navigate/drill down to the Agreements Tab under the appropriate Submission (note gold triangle on left
side margins)
Page 10
Step by Step PD Process | Error! Reference source not found.
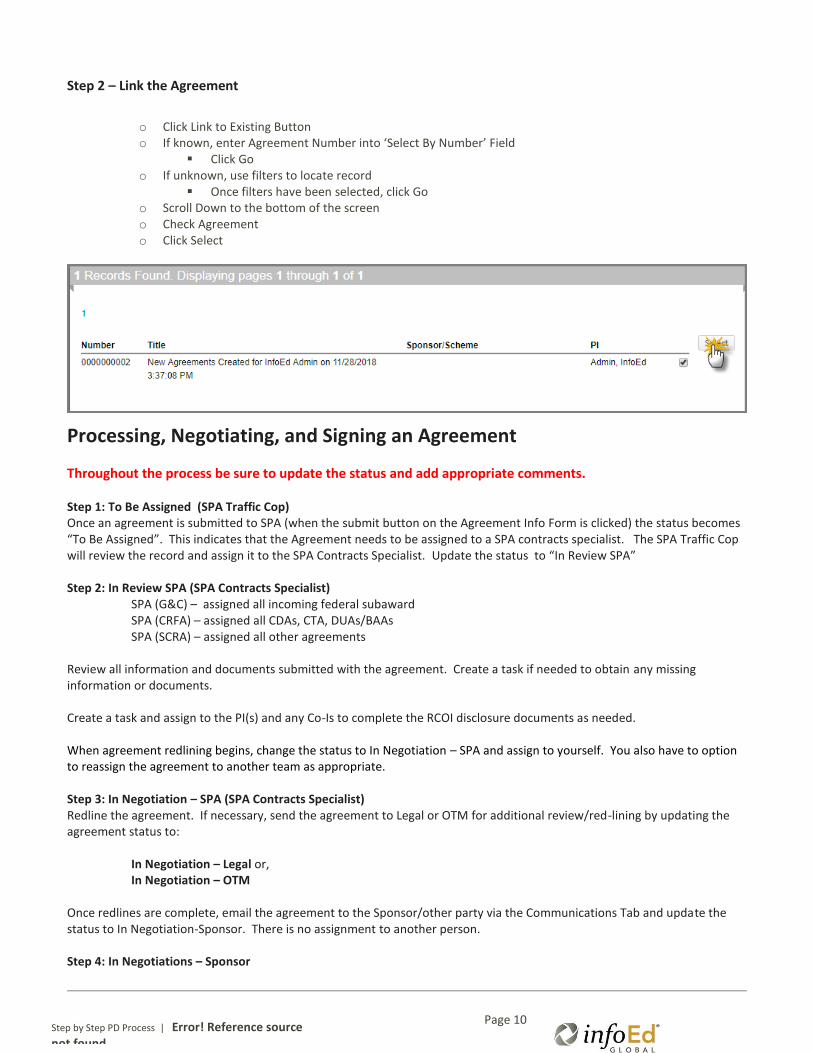
Step 2 – Link the Agreement
o Click Link to Existing Button o If known, enter Agreement Number into ‘Select By Number’ Field
Click Go o If unknown, use filters to locate record
Once filters have been selected, click Go o Scroll Down to the bottom of the screen o Check Agreement o Click Select
Processing, Negotiating, and Signing an Agreement
Throughout the process be sure to update the status and add appropriate comments. Step 1: To Be Assigned (SPA Traffic Cop) Once an agreement is submitted to SPA (when the submit button on the Agreement Info Form is clicked) the status becomes “To Be Assigned”. This indicates that the Agreement needs to be assigned to a SPA contracts specialist. The SPA Traffic Cop will review the record and assign it to the SPA Contracts Specialist. Update the status to “In Review SPA” Step 2: In Review SPA (SPA Contracts Specialist)
SPA (G&C) – assigned all incoming federal subaward SPA (CRFA) – assigned all CDAs, CTA, DUAs/BAAs SPA (SCRA) – assigned all other agreements
Review all information and documents submitted with the agreement. Create a task if needed to obtain any missing information or documents. Create a task and assign to the PI(s) and any Co-Is to complete the RCOI disclosure documents as needed. When agreement redlining begins, change the status to In Negotiation – SPA and assign to yourself. You also have to option to reassign the agreement to another team as appropriate. Step 3: In Negotiation – SPA (SPA Contracts Specialist) Redline the agreement. If necessary, send the agreement to Legal or OTM for additional review/red-lining by updating the agreement status to: In Negotiation – Legal or, In Negotiation – OTM Once redlines are complete, email the agreement to the Sponsor/other party via the Communications Tab and update the status to In Negotiation-Sponsor. There is no assignment to another person. Step 4: In Negotiations – Sponsor
Page 11
Step by Step PD Process | Error! Reference source not found.
The agreement will remain in this status until it is returned to UTHealth by the Sponsor with acceptance or requested revisions. When the agreement is returned, it will likely be returned to the contract specialist who will change the status changed back to In Negotiation – SPA and assign back to themselves. Steps 2 – 4 can repeat and the agreement can go back and forth between In Negotitiation statuses until the terms are finalized. You can attach multiple versions of the agreement to the agreement record. When uploading a version, always select the DRAFT folder. The FINAL folder is only for fully executed agreements and documents. Step 5: PI Read and Undeterstood Task Assign a task to the PI with copy to the Department administrator for “Read and Understood”/Acceptance and approval of the contract terms. PI must provide R&U prior to signature by signing official. Step 6: Signature The agreement has moved to the signature process. Once the R&U is received:
Page 12
Step by Step PD Process | Error! Reference source not found.
If UTHealth initiated the agreement – send to other party via email from the communications tab for 1st signature
If sponsor/other party initiated agreement – send to UTHealth Signing Official for signature. o The Signing Official can return the agreement back to In Negotiation – SPA if any issues are identified with
the agreement. o Signing Official will sign and re-attach the agreement. o The Status will remain in Partially executed regardless, to be sent back to the SPA specialist. The SPA
specialist can either send it to the other party or change the status to Fully Executed. Step 7 : Partially Executed Change the agreement status to Partially Executed as soon as one party signs the agreement. Send to the other party as outlined in step 6. Step 8: Fully Executed Upon receipt of the fully executed agreement. Update the status to Fully Executed. (And send to the sponsor/other party via the communications tab if UTHealth signed last.) This will trigger a notification automatically to the PI and Department Administrator. Upload the fully executed agreement with the Agreement Name (Initial_FX). Select the FINAL folder when uploading and name. Update Record Tabs in START
Summary Tab – Add start and end dates and the date the agreement was fully executed. Add any final comments to explain the agreement as necessary.
Sponsor Tab - Add sponsors, CRO’s etc. to this tab. They do not map from the information form.
Contacts Tab – Contacts will be added through the email fetching proess. Edit the list to include only the primary SPA contact, the primary Department contact, and the Sponsor contracts. Delete the rest (such as SPA traffic cop).
Other Agreement Statuses:
On-Hold o SPA may place the agreement in this status pending receipt of additional items from the department. For
example, SPA received the Clinical Trial Agreement but does not have a Coverage Analysis and no PD record has been started.
o Agreement is ready for signature but regulatory approval is needed. o Agreement negotiations are halted temporarily by sponsor or PI.
Cancelled o Project stopped by sponsor or PI for any reason.
Terminated o Contract executed but project terminated by sponsor or UTHealth prior to completion of the project.
Expired o Contract end date has passed. There may be final reports/deliverables still pending
Be sure to add a comment to all of these to explain why the agreement is in the
selected status.
Page 13
Step by Step PD Process | Error! Reference source not found.
Amending an Existing Agreement – In Agreements Module Agt000000206

Page 14
Step by Step PD Process | Error! Reference source not found.
Coverage Analysis and Budget
Coverage Analyses are processed within the Agreements module.
The Clinical Research Finance and Administration (CRFA) team will build out the draft Coverage Analysis on the Clinical Trial Budget Template with Coverage Analysis Grid (Excel File)
The Coverage Analysis routing, approval, and qualifying questions/billing certification will be assigned and tracked within the module.
The Coverage Analysis will be linked to the funding agreement record, as well as the Confidently Agreement record. Note internally funded studies will not have an agreement linked.
Getting Started Begin the Coverage Analysis (CA) by navigating to the Agreements Module and clicking the Coverage Analysis button. The Department or SPA can initiate a Coverage Analysis.
This opens the CA Info Form. Fill in all fields and click Submit. This will send the CA request to SPA CRFA team with the status of To Be Assigned.
Page 15
Step by Step PD Process | Error! Reference source not found.
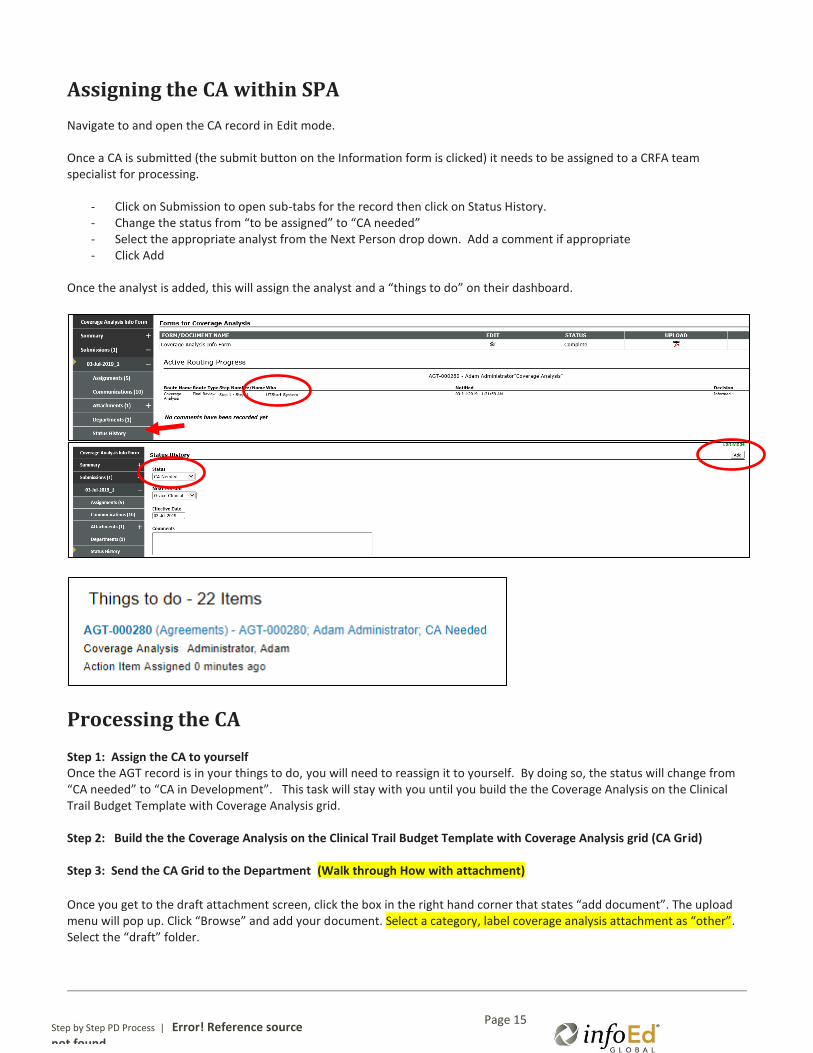
Assigning the CA within SPA Navigate to and open the CA record in Edit mode. Once a CA is submitted (the submit button on the Information form is clicked) it needs to be assigned to a CRFA team specialist for processing.
- Click on Submission to open sub-tabs for the record then click on Status History. - Change the status from “to be assigned” to “CA needed” - Select the appropriate analyst from the Next Person drop down. Add a comment if appropriate - Click Add
Once the analyst is added, this will assign the analyst and a “things to do” on their dashboard.
Processing the CA Step 1: Assign the CA to yourself Once the AGT record is in your things to do, you will need to reassign it to yourself. By doing so, the status will change from “CA needed” to “CA in Development”. This task will stay with you until you build the the Coverage Analysis on the Clinical Trail Budget Template with Coverage Analysis grid. Step 2: Build the the Coverage Analysis on the Clinical Trail Budget Template with Coverage Analysis grid (CA Grid) Step 3: Send the CA Grid to the Department (Walk through How with attachment)
Once you get to the draft attachment screen, click the box in the right hand corner that states “add document”. The upload menu will pop up. Click “Browse” and add your document. Select a category, label coverage analysis attachment as “other”. Select the “draft” folder.

Page 16
Step by Step PD Process | Error! Reference source not found.
Once the document is uploaded, save the tab. Click done. Your window should close. Now you coverage analysis is uploaded into the record. Next action item is to route to the department for review. Open your task from your “things to do” widget. Next Step, CA-department review. Kathy, I’m not exactly sure how this will route when we go live. In the testing environment its automatically assigned. KJ Step 4: Department Review Department Admin will have a task in their “things to do” . Open the task. Then open the AGT record on the top left side. Click the Attachments +. Click Draft +. Click the attachment. The below screen will generate. Click the glasses under the view function. This will pop open a window that allows you to download the attached coverage analysis . Save the file to your computer and update the necessary information. Make sure you clearly label the revision as draft2
The next couple of steps will be similar to the above section, Adding Attachments. The department administrator will take updated coverage analysis template that was previously downloaded and add it back into the AGT record. Open the record. Click the Attachments +. Click Draft. From this screen you will click “Add Document”. Browse files, click document. Category “Other”. Folder “Draft”. By completing the above, you have uploaded the first round of CA edits into the record.
The next step would be to route the AGT record back to Sponsored Projects. Verify the new attachment is uploaded, then save and close the record. From your “things to do” widget, open the task and select the appropriate CRFA analyst. Once the analyst is selected, click I am done on the top right corner. This is where I had the issue in the email where it give you the option to route to CRFA but only has assign to self, then you can click I AM DONE to actually route it.
Receipt of Department Review On your “things to do widget”, open the record. Click the attachments +, click the draft +, click the new attachment with revisions. Click the glasses under view. Then download the new attachments for review.
If the updated document provided by the department is ready for approval, continue. If you need return for corrections, please repeat the about steps for adding attachments and routing the coverage analysis.
Routing CA for PI approval

Page 17
Step by Step PD Process | Error! Reference source not found.
Assuming you have checked the updated coverage analysis and its ready for approval. Click the task in your “things to do” widget. Select the next step that states, “CA for PI approval and QQBR”. Click the link, “I am done” The assign to option does not let the CRFA admin route to the PI, it only allows them to route to the department admin. As of now, its letter the department admin approve for the PI. Which should not be the case . Once the deparemtn admin approved the CA. It didn’t notify the CRFA, Dept Admin, or the PI. Not sure what to do from here. This was AGT 000280 Form here I still need to add the PI screen shots for approval, then moving the draft CA attachment to Final. Then linking
Additional Information Eg account info, NCT, etc.. Summary portion of the record

Page 18
Step by Step PD Process | Error! Reference source not found.
Coverage Analysis Agreements
CA Needed
Dr. XXX requires a coverage Analysis
CA In Development
Dr XXX Requires a coverage Analysis
CA - Department Review
Dr XXX study has been identified as having a potential billing risk. The CRFA team has created the draft coverage Analysis and budget. Log in to XXX download and complete the tabs for coverage analysis, study summary, effort. Once completed, upload, and route the form back to your CRFA analyst by Selecting CA-SPA review.
CA - SPA Review
Dr. XXX has returned the CA and Budget
CA-Department Review with SPA revisions
This coverage analysis has been reviewed by SPA and requires some corrections. Please review the comments for details, revise, and route the form back to your CRFA analyst.
CA - For PI Approval & QQBR
Sponsored Projects Administration has marked this coverage analysis as final. This coverage analysis requires your review and approval as well as the completing of the Qualified Question Billing Risk certification page. The coverage analysis is available here : XXX. If you require any changes to the Coverage Analysis , write those changes in the comment.
CA- Approved
CA - Cancelled
CA - On Hold
This coverage analysis is on hold. It can be accessed here if further changes are needed : XXX

Page 19
Step by Step PD Process | Error! Reference source not found.