stc magnets & motors kit
TRANSCRIPT

Magnets & Motors – 6th Grade NGSS Curriculum Redesign
6th magnets and motors - UNIT GUIDE 1 3/30/2015 11:40 PM
STC MAGNETS & MOTORS KIT
TEACHER GUIDE REVISIONS
Junkyard Magnets & Shake Flashlights Exploring the relationship between electricity and magnetism
Magnets & Motors – 6th Grade NGSS Curriculum Redesign
6th magnets and motors - UNIT GUIDE 2 3/30/2015 11:40 PM
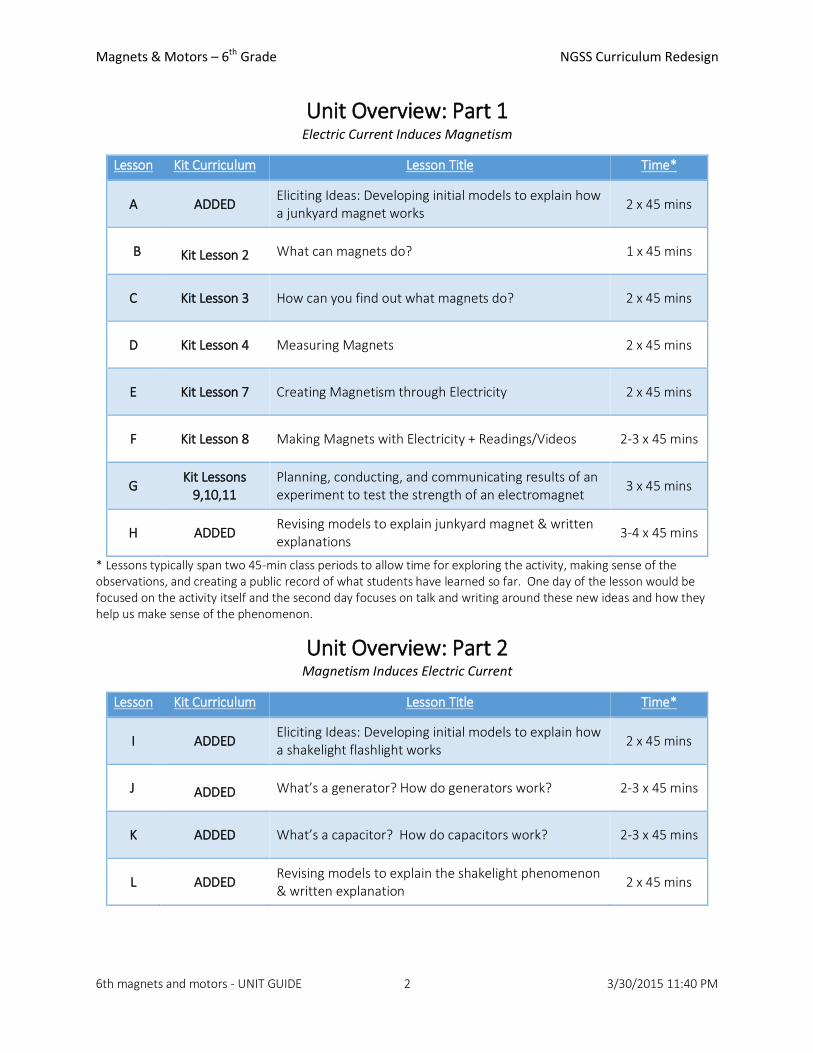
Unit Overview: Part 1 Electric Current Induces Magnetism
Lesson Kit Curriculum Lesson Title Time*
A ADDED Eliciting Ideas: Developing initial models to explain how a junkyard magnet works
2 x 45 mins
B
Kit Lesson 2 What can magnets do? 1 x 45 mins
C Kit Lesson 3 How can you find out what magnets do? 2 x 45 mins
D Kit Lesson 4 Measuring Magnets 2 x 45 mins
E Kit Lesson 7 Creating Magnetism through Electricity 2 x 45 mins
F Kit Lesson 8 Making Magnets with Electricity + Readings/Videos 2-3 x 45 mins
G Kit Lessons
9,10,11 Planning, conducting, and communicating results of an experiment to test the strength of an electromagnet
3 x 45 mins
H ADDED Revising models to explain junkyard magnet & written explanations
3-4 x 45 mins
* Lessons typically span two 45-min class periods to allow time for exploring the activity, making sense of the observations, and creating a public record of what students have learned so far. One day of the lesson would be focused on the activity itself and the second day focuses on talk and writing around these new ideas and how they help us make sense of the phenomenon.
Unit Overview: Part 2 Magnetism Induces Electric Current
Lesson Kit Curriculum Lesson Title Time*
I ADDED Eliciting Ideas: Developing initial models to explain how a shakelight flashlight works
2 x 45 mins
J
ADDED What’s a generator? How do generators work? 2-3 x 45 mins
K ADDED What’s a capacitor? How do capacitors work? 2-3 x 45 mins
L ADDED Revising models to explain the shakelight phenomenon & written explanation
2 x 45 mins

Magnets & Motors – 6th Grade NGSS Curriculum Redesign
6th magnets and motors - UNIT GUIDE 3 3/30/2015 11:40 PM

Magnets & Motors – 6th Grade NGSS Curriculum Redesign
6th magnets and motors - UNIT GUIDE 4 3/30/2015 11:40 PM
PART 1 - UNIT PHENOMENON – Why does a junkyard magnet work? TEACHER BACKGROUND
Information from: http://www.answerbag.com/q_view/1905700
Electromagnets are used in many ways for many everyday activities. Some electromagnets are
used in household devices while others have more heavy-duty jobs. One heavy-duty way we use
electromagnets is in junkyards.
Uses Electromagnets are used in junkyards to move large amounts of scrap metal, such
as iron and steel. No natural magnet could ever lift such heavy scrap metal, but
electromagnets are made to be strong enough with the help of electricity.
How Electromagnets Work An electromagnet works like a regular magnet, but it is
controlled by an electric force. The amount of electricity applied to the magnet
determines the magnet's strength. Electricity is pushed into the magnet through coiled
wire around the magnet's core. Stronger magnets have more electric wire.
Controlling the Magnet Because electricity is utilized to control an electromagnet's
strength, the user can switch the electricity on to make the magnet pick up junk and turn
it off to make the magnet drop the junk.
Appearance Electromagnets are made of iron. They are very large and generally circular.
They hang from a crane.
Cranes In a junkyard, a crane with a giant electromagnet hanging from it is lowered near
junk until the force of the magnet picks up the junk. The crane is then lifted, and the junk
is driven to the desired location.
Information from: http://electromagneticcrane.com/
An electromagnetic crane is a type of crane with an electromagnetic lift. Electromagnetic cranes
are commonly utilized in lifting and moving various scrap metals. It does not have the
mechanical 'pincers' of a regular crane, instead, it has a large flat magnet which draws the
metallic materials to it. Using the principle of electromagnetic induction, these large machines
are used to handle scrap ferrous metals, such as iron and steel, which can be found in junk yards
and recycling plants. Beyond the area of lifting magnetic materials, another use of an
electromagnetic crane is that it makes for smooth and safe stops due to its solenoid brakes
(electrically controlled brakes which can be turned on and off by a solenoid). These brakes are
the ones being used on movable bridges as it allows the passage of boats and barges.
How The Electromagnetic Crane Works:
An electromagnet is a type of magnet wherein the magnetic field is produced by electric current,
and the field disappears whenever the current is turned off. Electromagnets are being utilized in
everyday items, just like loudspeakers and doorbells. An electromagnetic crane has a large
electromagnet which can be turned on and off. The electromagnet contains an iron core with a
wire around it, and this wire is the medium by which the current travels. The magnetic strength
Magnets & Motors – 6th Grade NGSS Curriculum Redesign
6th magnets and motors - UNIT GUIDE 5 3/30/2015 11:40 PM
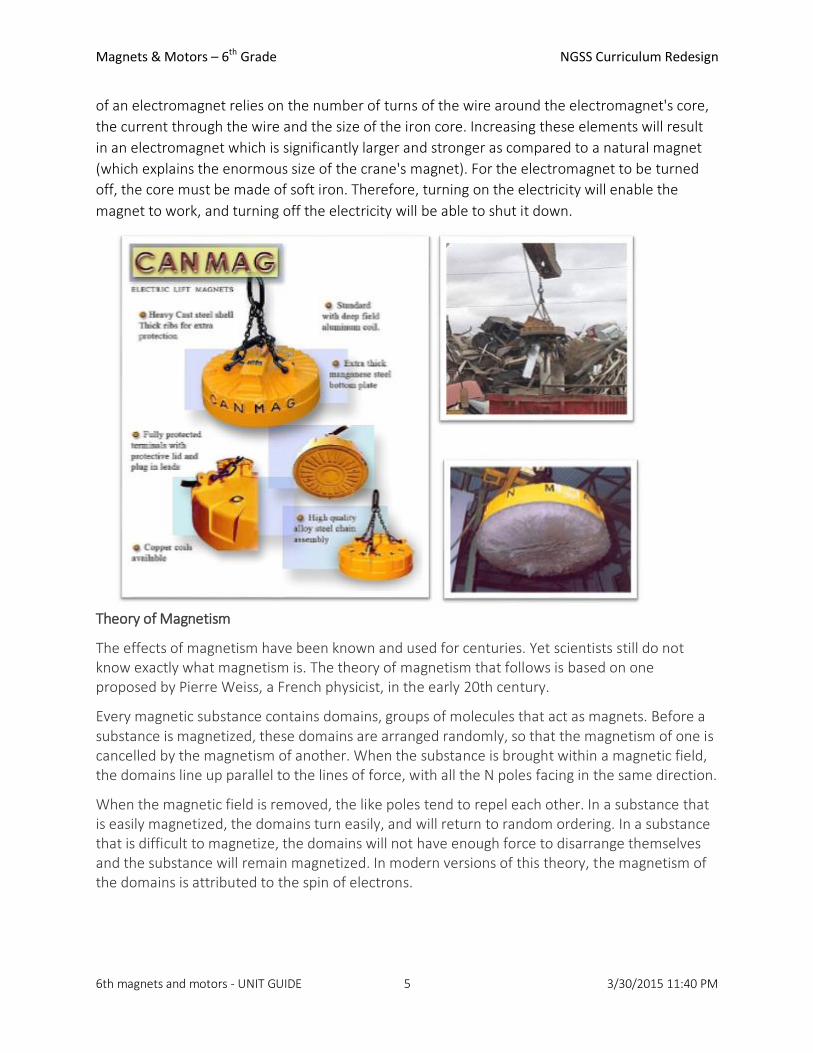
of an electromagnet relies on the number of turns of the wire around the electromagnet's core,
the current through the wire and the size of the iron core. Increasing these elements will result
in an electromagnet which is significantly larger and stronger as compared to a natural magnet
(which explains the enormous size of the crane's magnet). For the electromagnet to be turned
off, the core must be made of soft iron. Therefore, turning on the electricity will enable the
magnet to work, and turning off the electricity will be able to shut it down.
Theory of Magnetism
The effects of magnetism have been known and used for centuries. Yet scientists still do not know exactly what magnetism is. The theory of magnetism that follows is based on one proposed by Pierre Weiss, a French physicist, in the early 20th century.
Every magnetic substance contains domains, groups of molecules that act as magnets. Before a substance is magnetized, these domains are arranged randomly, so that the magnetism of one is cancelled by the magnetism of another. When the substance is brought within a magnetic field, the domains line up parallel to the lines of force, with all the N poles facing in the same direction.
When the magnetic field is removed, the like poles tend to repel each other. In a substance that is easily magnetized, the domains turn easily, and will return to random ordering. In a substance that is difficult to magnetize, the domains will not have enough force to disarrange themselves and the substance will remain magnetized. In modern versions of this theory, the magnetism of the domains is attributed to the spin of electrons.

Magnets & Motors – 6th Grade NGSS Curriculum Redesign
6th magnets and motors - UNIT GUIDE 6 3/30/2015 11:40 PM
How Magnets Are Made
There are four main ways to magnetize a magnetic substance: (1) bringing the substance near a magnet; (2) using electric current; (3) stroking the substance with a magnet; and (4) striking a blow to the substance while it is in a magnetic field. The first two methods were discussed above in “temporary magnets” section.
A permanent magnet can be made by stroking a magnetic substance with either the N or the S pole of a magnet. Stroking lines up the domains in the material. A piece of iron can be magnetized by holding it parallel to a compass needle (along the lines of force in the earth's field) and hitting the piece of iron with a hammer. The blow will overcome the resistance of the domains to movement, and they will line up parallel to the earth's field. To demagnetize an object, a strong magnetic field is used. In one method, the magnetic field is made to fluctuate very rapidly. In another method, the magnetized object is placed so that a line drawn between its poles would be at right angles to the field. The object is then tapped or hit until its domains are no longer lined up magnetically.
Information from: http://science.howstuffworks.com/magnetism-info2.htm
Permanent and Temporary Magnets
There are two basic kinds of magnets—permanent and temporary. A permanent magnet retains its magnetic properties for a long time. A temporary magnet acts as a magnet only as long as it is in the magnetic field produced by a permanent magnet or an electric current. Magnetic materials from which permanent magnets are made are called hard magnetic materials and those from which temporary magnets are made are called soft magnetic materials.
Permanent Magnets
A lodestone is a naturally occurring permanent magnet composed of magnetite, an iron-bearing mineral. Such magnets have been known since ancient times. Virtually all magnets used commercially today are made from synthetic magnetic materials. The most common such materials are alnicos—iron alloys containing aluminum, nickel, and cobalt. Magnetic materials containing such rare-earth elements as samarium or neodymium form very strong permanent magnets. Ferrites, which consist of ferric oxide (an oxide of iron) combined with the oxides of one or more other metals, are widely used in electronic devices. Flexible magnets are made by combining magnetic materials with plastics. Permanent magnets are typically made into U-shaped horseshoe magnets, with the poles side by side; and bar magnets, with the poles at opposite ends.
Temporary Magnets
Every object that is lifted or moved by a magnet acts as a temporary magnet. Such an object ordinarily loses its magnetism when the permanent magnet is removed, although in certain cases it will retain weak magnetic properties. An electromagnet is a temporary magnet that is magnetized by the magnetic field produced by an electric current in a wire. Electromagnets have magnetic properties only while the current is flowing.

Magnets & Motors – 6th Grade NGSS Curriculum Redesign
6th magnets and motors - UNIT GUIDE 7 3/30/2015 11:40 PM
SCIENCE BACKGROUND FOR TEACHERS – GENERAL CONTENT KNOWLEDGE (from free, online e-book A Framework for K-12 Education www.nap.edu) Forces of Magnetism & Electromagnetism
All forces between objects arise from a few types of interactions: gravity, electromagnetism, and strong and weak nuclear interactions. Collisions between objects involve forces between them that can change their motion. Any two objects in contact also exert forces on each other that are electromagnetic in origin. These forces result from deformations of the objects’ substructures and the electric charges of the particles that form those substructures (e.g., a table supporting a book, friction forces).
Forces that act at a distance (gravitational, electric, and magnetic) can be explained by force fields that extend through space and can be mapped by their effect on a test object (a ball, a charged object, or a magnet, respectively). Gravitational, electric, and magnetic forces between a pair of objects do not require that they be in contact. These forces are explained by force fields that contain energy and can transfer energy through space. These fields can be mapped by their effect on a test object (mass, charge, or magnet, respectively). Electric forces and magnetic forces are different aspects of a single electromagnetic interaction. Such forces can be attractive or repulsive, depending on the relative sign of the electric charges involved, the direction of current flow, and the orientation of magnets. The forces’ magnitudes depend on the magnitudes of the charges, currents, and magnetic strengths as well as on the distances between the interacting objects. All objects with electrical charge or magnetization are sources of electric or magnetic fields and can be affected by the electric or magnetic fields of other such objects. Attraction and repulsion of electric charges at the atomic scale explain the structure, properties, and transformations of matter and the contact forces between material objects (link to PS1.A and PS1.B). Coulomb’s law provides the mathematical model to describe and predict the effects of electrostatic forces (relating to stationary electric charges or fields) between distant objects.

Magnets & Motors – 6th Grade NGSS Curriculum Redesign
6th magnets and motors - UNIT GUIDE 8 3/30/2015 11:40 PM
Objects in contact exert forces on each other (friction, elastic pushes and pulls). Electric, magnetic, and gravitational forces between a pair of objects do not require that the objects be in contact—for example, magnets push or pull at a distance. The sizes of the forces in each situation depend on the properties of the objects and their distances apart and, for forces between two magnets, on their orientation relative to each other. Electric and magnetic (electromagnetic) forces can be attractive or repulsive, and their sizes depend on the magnitudes of the charges, currents, or magnetic strengths involved and on the distances between the interacting objects.
Energy Story related to Magnetism & Electromagnetism
At the macroscopic scale, energy manifests itself in multiple phenomena, such as motion, light, sound, electrical and magnetic fields, and thermal energy. Historically, different units were introduced for the energy present in these different phenomena, and it took some time before the relationships among them were recognized. Energy is best understood at the microscopic scale, at which it can be modeled as either motions of particles or as stored in force fields (electric, magnetic, gravitational) that mediate interactions between particles. This last concept includes electromagnetic radiation, a phenomenon in which energy stored in fields moves across space (light, radio waves) with no supporting matter medium.
Electric and magnetic fields also contain energy; any change in the relative positions of charged objects (or in the positions or orientations of magnets) changes the fields between them and thus the amount of energy stored in those fields. When a particle in a molecule of solid matter vibrates, energy is continually being transformed back and forth between the energy of motion and the energy stored in the electric and magnetic fields within the matter. Matter in a stable form minimizes the stored energy in the electric and magnetic fields within it; this defines the equilibrium positions and spacing of the atomic nuclei in a molecule or an extended solid and the form of their combined electron charge distributions (e.g., chemical bonds, metals).
Energy stored in fields within a system can also be described as potential energy. For any system where the stored energy depends only on the spatial configuration of the system and not on its history, potential energy is a useful concept (e.g., a massive object above Earth’s surface, a compressed or stretched spring). It is defined as a difference in energy compared to some arbitrary reference configuration of a system. Any change in potential energy is accompanied by changes in other forms of energy within the system, or by energy transfers into or out of the system.
At the macroscopic scale, energy manifests itself in multiple phenomena, such as motion, light, sound, electrical and magnetic fields, and thermal energy. Energy is also stored in the electric fields between charged particles and the magnetic fields between magnets, and it changes when these objects are moved relative to one another. Stored energy is decreased in some chemical reactions and increased in others.

Magnets & Motors – 6th Grade NGSS Curriculum Redesign
6th magnets and motors - UNIT GUIDE 9 3/30/2015 11:40 PM
A. ELICITING IDEAS & INITIAL MODELS (added lesson, not in TG)
Focus Question
What will students observe? What will students learn?
Connection to Phenomenon?
NGSS* (See below)
Why can the magnet start and stop working?
Junkyard magnets picks up hub caps. The hub caps stick to each other. The junkyard magnet can drop the hubcaps. Magnet will pick up washers. The magnet can’t drop the washers.
Magnets attract objects.
(Initial models & hypotheses about the causes of the phenomenon)
MS – PS2-5: Fields exist between objects exerting forces on each other even though the objects are not in contact MS-PS2-3: Factors that affect the strength of magnetic forces
Teacher Background For the explanation of the junkyard magnet, see the teacher explanation pages. Briefly, there are key science ideas students will develop an understanding of in this unit beginning today:
1. Forces, such as magnetism, act at a distance. These forces fields that extend from an object and can be mapped and represented.
2. Non-magnetic metals can temporarily become magnetic if an electric current is passed through
them. When the current stops, the metal loses its temporary magnetic properties. This can be partially explained using the idea of energy transfer and the particulate nature of matter.
Next Generation Science Standards (NGSS) Performance Standards MS-PS2-5: Fields exist bet. objects exerting forces on each other even though the objects are not in contact MS-PS2-3: Factors that affect the strength of magnetic force
Science & Engineering practices: Developing and Using Models -
Develop a model to predict and/or describe phenomena.
Develop a model to describe unobservable mechanisms.
Disciplinary Core Ideas: PS2.B: Types of Interactions
Electric and magnetic (electromagnetic) forces can be attractive or repulsive, and their sizes depend on the magnitudes of the charges, currents, or magnetic strengths involved and on the distances between the interacting objects. (MS-PS2-3)
Forces that act at a distance (electric, magnetic, and gravitational) can be explained by fields that extend through space and can be mapped by their effect on a test object (a charged object, or a ball, respectively). (MS-PS2-5)
Cross-cutting concepts:
Cause and effect relationships may be used to predict phenomena in natural or designed systems. (MS-PS2-3),(MS-PS2-5)

Magnets & Motors – 6th Grade NGSS Curriculum Redesign
6th magnets and motors - UNIT GUIDE 10 3/30/2015 11:40 PM
Materials
Junkyard magnet Video clip #1 https://www.youtube.com/watch?v=XBWy9gzGGd4 (found also at http://goo.gl/aXnN8P)
Junkyard magnet video clip #2 https://www.youtube.com/watch?v=N9XoUGxM2h0 (found also at http://goo.gl/qCUXAK)
Model scaffold sheet (1 copy per student or per partner pair)
Pencils (colored pencils optional)
Chart paper and markers (for recording initial observations and ideas)
magnets and washers per pair
Procedure – Day 1
1. Opening – Whole Group (5 minutes) a. Introduce the new unit using the junkyard magnet video #2 explaining that in this unit we
will be exploring and testing different ideas to explain how this junkyard magnet works. b. Play video clip and have students write down 2 things they observe about the junkyard
magnet in their notebook and any questions they have.
2. Phenomenon Observations – Whole Group (10 mins) a. Next play video clip #1. Give students time to make specific observations. Pair-share
observations in partners before sharing out to create a list. b. On chart paper, create a class list of observations from the video (things students can
directly see or hear). Option: Have students come up and write on the chart (instead of the teacher leading the writing). A student recorder can write the whole list or students can take turns.
3. Initial Observations – Partner (15 minutes)
a. Pass out magnets and washers per pair of students.
b. Have students make some observations about how many washers they can pick up and how this is similar or different than the junkyard magnet they observed in the video.
c. As students work, teacher circulates and asks any of the following questions:
i. What do you notice about the washers near the magnet? Why do you think they do that? How far away from the washers can the magnet be to still work?
ii. What do you think is making the washers stick together? Why do you think they won’t stick to each other when the magnet isn’t there?
iii. What is similar to the video? Different?
Junkyard Magnet Observations
The magnet picks up the metal hubcaps.
The hub caps stick to each other when they
are touching the magnet
The junkyard magnet can drop the hubcaps.
Magnet & Washer Observations
Magnet will pick up washers.
The magnet can’t drop the washers unless
we pull them off.
Questions
The small magnet can’t drop the washers but
the junkyard magnet can, how come? How
can a magnet stop pulling?
What makes something magnetic?
Why aren’t all metals magnetic?
Why do magnets mess up computers?

Magnets & Motors – 6th Grade NGSS Curriculum Redesign
6th magnets and motors - UNIT GUIDE 11 3/30/2015 11:40 PM
4. Individual Ideas – Science Notebook Entry (10 minutes) a. Students write about what they observed today with the magnets and washers and how
it is similar or different to the junkyard magnet video. Many students may be beginning their personal theories of how the junkyard magnet works and how it can seemingly turn on and off even though the magnets they explored with are only “on”.
b. Encourage students to make a sketch and complete a few sentences about today’s introduction to the unit in their science notebook. Sentence starters for notebook entry:
i. The magnet caused the washers to ________ because…. ii. The junkyard magnet caused the metal to __________ because… iii. These two magnets are similar when they… iv. These two magnets are different because….
Procedure – Day 2
1. Opening – Whole Group (5 minutes)
a. Reintroduce junkyard magnet video clip http://goo.gl/aXnN8P and have students read over their notebook entry from part 1 of this lesson. Refer to the list of observations and questions from the previous day.
2. Recording Initial Hypotheses – Whole Group (15 mins)
a. Think-Pair-Share: Why can the junkyard magnet start and stop working? What’s happening that we can’t see that could cause this? Set a timer for 3 or 4 minutes and have the video replaying during this time. Students watch, think, and partner share about this question.
b. Listen in as students share to hear the different kinds of ideas or hypotheses. Think about who you want to call on to share out in whole group – look for a variety of ideas even if they are opposing or different.
c. Have students share their ideas and create a list. Students may find it helpful to refer to this list and the list of observations created in Part 1 as they get to work on their models in the next step.
3. Developing Models (25 minutes)
a. Pass out model scaffold sheets (1 per student or 1 per pair). b. Explain to students that their job is to show what they can observe from the video on
their paper and label the parts they draw. More importantly, it’s to somehow represent or draw what they can’t see that they think is causing the magnet to work this way. How can the junkyard magnet pick up and drop off metal pieces with our little magnet could only pick them up?
Our Initial Ideas How does a junkyard magnet work?
The magnet can pick up some metals and
this magnetism must go through them to
grab more and more hubcaps.
Unlike the small magnet, the junkyard
magnet can drop the hubcaps, maybe the
magnet has a switch to turn it on and off?
It has to be a really big magnet because a
bigger magnet would be strong enough to
lift cars and scrap and other junkyard stuff
The junkyard magnet has to move down
near the pile of metal to pick it up - it has
to be close to the metal.

Magnets & Motors – 6th Grade NGSS Curriculum Redesign
6th magnets and motors - UNIT GUIDE 12 3/30/2015 11:40 PM
c. As students discuss and work in pairs, circulate and observe the different hypotheses students have, encouraging students to represent what they can’t see but they think is happening.
d. Midway through this time, select 2 pairs or students to share one specific piece (not the whole thing) of their model with the class under the doc cam. Have a reason for the student(s) to share. For example, maybe two different students/pairs did clear representations of magnetism since it’s not something we can directly observe and their representations are different. Another example could be how students are explaining causes in words and in their model. This sharing step mid-point during model development helps students see each other’s’ work and perhaps get some ideas or questions they have to add to their own models.
Public Record from Activity
4. Review and Complete Public Records a. Ask for any final ideas to add to the list of initial ideas. b. Create a list of questions students have about this junkyard magnet or magnets in
general. Students can put up sticky notes with their questions on a question chart or they can come up and write the question. This list of question can serve as a place to frame future activities as they find evidence and answers to their questions.
Planning for Future Instruction After this lesson, use student work and what you remember from student talk during the lesson to fill out a Rapid Survey of Student Thinking (RSST). This tool helps teachers keep track of the partial ideas, alternative understanding, everyday language, and experiences that students have and which can be used in future lesson s to help students make changes to their understanding over time.

Magnets & Motors – 6th Grade NGSS Curriculum Redesign
6th magnets and motors - UNIT GUIDE 13 3/30/2015 11:40 PM

Magnets & Motors – 6th Grade NGSS Curriculum Redesign
6th magnets and motors - UNIT GUIDE 14 3/30/2015 11:40 PM
B. LESSON TWO: WHAT CAN MAGNETS DO? (TG pp 11 -14)
Focus Question
What will students observe? What will students learn?
Connection to Phenomenon?
NGSS
What can magnets do?
Magnets stick together. Magnets can also push each other. Magnets even stick together when they are inside and outside the sides of the plastic cup. The magnets can stay on the string when it is vertical. It matters which ends of the magnets you put together.
Magnetic forces can be attractive or repulsive Magnets have two poles. Like poles attract and opposite poles repel.
Objects in the junkyard are attracted to the large magnet
MS – PS2-5: Fields exist between objects exerting forces on each other even though the objects are not in contact
Next Generation Science Standards (NGSS) Performance Standards MS-PS2-5: Fields exist bet. objects exerting forces on each other even though the objects are not in contact
Science & Engineering practices: Asking Questions
Ask questions that can be investigated within the scope of the classroom with available resources and, when appropriate, frame a hypothesis based on observations and scientific principles.
Disciplinary Core Ideas: PS2.B: Types of Interactions
Forces that act at a distance (electric, magnetic, and gravitational) can be explained by fields that extend through space and can be mapped by their effect on a test object (a charged object, or a ball, respectively). (MS-PS2-5)
Cross-cutting concepts:
Cause and effect relationships may be used to predict phenomena in natural or designed systems. (MS-PS2-5)
INTRODUCING THE LESSON:
In today’s lesson students will explore properties of magnets by manipulating them along with other
materials (plastic cup, string, straw, etc.) to see what magnets can do. You may wish to replay the
junkyard magnet video clip to re-orient students to the phenomenon and explain that in the prior lesson
many students were thinking about how to draw magnetism and how magnets work so today we will
have time together to explore magnets.
OBSERVING:
In pairs or groups: Students explore and record their
observations of magnets. Each group of students is
provided with magnets, wooden stick, piece of string
and a plastic cup with lid. Each group should record
at least five observations. As students are exploring
circulate among the groups and ask questions that
assess and advance their thinking.
Whole class: Record one observation on a class
summary chart. Ask for a second observation that is
Questions to ask students as they explore
magnets in partners/groups:
What are you noticing?
Would it still work if…? Why/why not?
Where have you seen magnets used?
How could you use a magnet to keep a
cabinet door closed?

Magnets & Motors – 6th Grade NGSS Curriculum Redesign
6th magnets and motors - UNIT GUIDE 15 3/30/2015 11:40 PM
similar to the first; i.e. demonstrates magnets pushing, pulling or poles and continue recording similar
observations. Ask for a new observation that shows something different magnets can do and continue
recording related observations. Add a third column on the chart for the remaining observations.
LEARNING:
Think, Pair, Share – What can magnets do? Ask the students to use the observations on the chart to
summarize what they have learned about magnets. Have students complete one of the short ½ page
reading (copies can be taped into their science notebook – decide which reading you prefer students to
have). Record the students’ learning from observations and reading on the class summary chart. Record
the students’ learning on a class summary chart.
(OPTIONAL: Make observations of a magnetic field in this video: https://www.youtube.com/watch?v=CgDYx3B8c_I
or this video https://www.youtube.com/watch?v=snNG481SYJw . Preview these videos and decide if you think this
is just enough information or too much information right now. You can use these videos later on as well.)
CONNECTING:
A/B Partners – How does our learning help us understand the junkyard magnet phenomena? Partner A
shares their ideas and Partner B responds by agreeing disagreeing or adding on to their idea. Partner B
shares their ideas and Partner B responds. Ask students to share their partner’s thinking and record their
connections on the class summary chart.
Summary table row displayed in the classroom may look something like this…
Activity Observations Learning Connection
Exploring Magnets Question: What can magnets do?
Pull: Magnets stick together Magnets pull even if there is
plastic between them Push: Magnets push each other. Magnets stay in place on the
string even if you hold it up by one end
Poles: You can make two magnets pull
or push if flip around the magnet that is touching the other magnet
Magnets can push and pull other objects that are magnets. Magnets have poles that will pull (attract) together or push (repel) apart. Magnets have north and south poles
The junkyard magnet has a magnet that can pull on the metal hubcaps to pick them up.
Planning for Future Instruction After this lesson, use student work and what you remember from student talk during the lesson to fill out a Rapid Survey of Student Thinking (RSST). This tool helps teachers keep track of the partial ideas, alternative understanding, everyday language, and experiences that students have and which can be used in future lesson s to help students make changes to their understanding over time. This RSST will be more focused around student understanding of magnets and the properties of magnets. You may also want to note questions students have that could relate to one of the next few lessons on magnets and magnetism.

Magnets & Motors – 6th Grade NGSS Curriculum Redesign
6th magnets and motors - UNIT GUIDE 16 3/30/2015 11:40 PM

Magnets & Motors – 6th Grade NGSS Curriculum Redesign
6th magnets and motors - UNIT GUIDE 17 3/30/2015 11:40 PM

MAGNETS AND MOTORS
6th magnets and motors - UNIT GUIDE 18 3/30/2015 11:40 PM
C: LESSON THREE: HOW CAN YOU FIND OUT WHAT MAGNETS CAN DO? (TG pp15 – 19)
Focus Question
What will students observe?
What will students learn?
Connection to Phenomenon?
NGSS
What are the characteristics of materials attracted to magnets?
None of the non-metal objects are attracted to the magnet. Some of the metals are attracted to the magnet. Some of the metals aren’t attracted to the magnet.
A magnet attracts and repels. Magnetic materials attract. Some metals are attracted to a magnet.
The junkyard magnet picks up metals that are attracted to a magnet and won’t pick up other objects.
MS – PS2-5: Fields exist between objects exerting forces on each other even though the objects are not in contact
Next Generation Science Standards (NGSS) Performance Standards MS-PS2-5: Fields exist bet. objects exerting forces on each other even though the objects are not in contact Science & Engineering practices: Asking Questions
Ask questions that can be investigated within the scope of the classroom with available resources and, when appropriate, frame a hypothesis based on observations and scientific principles.
Disciplinary Core Ideas: PS2.B: Types of Interactions
Forces that act at a distance (electric, magnetic, and gravitational) can be explained by fields that extend through space and can be mapped by their effect on a test object (a charged object, or a ball, respectively). (MS-PS2-5)
Cross-cutting concepts:
Cause and effect relationships may be used to predict phenomena in natural or designed systems. (MS-PS2-5)
INTRODUCING THE LESSON:
In today’s lesson students will test various materials to see if they are attracted by magnets (magnetic) or
not (non-magnetic). Students may be surprised to find out that some metals are not magnetic. Use a few
student ideas or question they have from lesson one to introduce today’s lesson. Some students may
have asked “Why are somethings magnetic?” or “Are all metals magnetic?” which would be good intro
questions for today’s lesson. The purpose of these investigations is to show students that they relate to
their own ideas and questions and can help us understand a part of the explanation for the phenomenon.
OBSERVING:
Students predict and test which
materials are attracted to a
magnet and record their results
on a data table. As students
are exploring circulate among
the groups and ask questions
that assess and advance their
thinking.
Questions to ask students as they explore magnets in partners/groups:
What similarities do you notice among the magnetic objects?
What do you think makes an object magnetic?
How can you use magnets to help find out what certain things are made of?
Why would you want some things nonmagnetic?
Why would you want some things magnetic?

MAGNETS AND MOTORS
6th magnets and motors - UNIT GUIDE 19 3/30/2015 11:40 PM
LEARNING:
Think, Pair, Share – What do you think makes an object magnetic? Ask the students to use the data they
collected to summarize what they have learned about which objects are attracted to magnets.
CONNECTING:
A/B Partners – How does our learning today help us understand the junkyard magnet phenomena?
Partner A shares their ideas and Partner B responds by agreeing disagreeing or adding on to their idea.
Partner B shares their ideas and Partner B responds. Ask students to share their partner’s thinking and
record their connections on the class summary chart.
Summary table row displayed in the classroom may look something like this (lesson 2 shown as well) …
Activity Observations Learning Connection to Phenomenon
Exploring Magnets
Question: What can magnets do?
Pull: Magnets stick together Magnets pull even if there is plastic between them
Push: Magnets push each other. Magnets stay in place on the string even if you hold it up by one end
Poles: You can make two magnets pull or push if flip around the magnet that is touching the other magnet
Magnets can push and pull other objects that are magnets. Magnets have poles that will pull (attract) together or push (repel) apart. Magnets have north and south poles
The junkyard magnet has a magnet that can pull on the metal hubcaps to pick them up.
Testing Materials
Question: Which materials are magnetic?
Magnetic Non-Magnetic Recording tape Steel nail Steel washer Twist-tie (metal)
Aluminum foil, wire Brass brad, washer Copper wire Golf tee
Not all objects were magnetic. We thought more of the metals would be magnetic but they were not.
Some metals are magnetic but other metals are not magnetic. A magnet attracts and repels. Magnetic materials attract. Some metals are attracted to a magnet.
The junkyard magnet picks up metals that are attracted to a magnet and won’t pick up other objects. (Maybe they use a crane with a claw to pick up non-magnetic scrap?)
Planning for Future Instruction This RSST will be more focused around student understanding of magnets and the properties of magnets. You may also want to note questions students have that could relate to one of the next few lessons on magnets and magnetism. How are students’ ideas changing? What ideas are they wrestling with? What questions do they have? What are you wondering about student understanding?
Magnets & Motors – 6th Grade NGSS Curriculum Redesign
6th magnets and motors - UNIT GUIDE 20 3/30/2015 11:40 PM
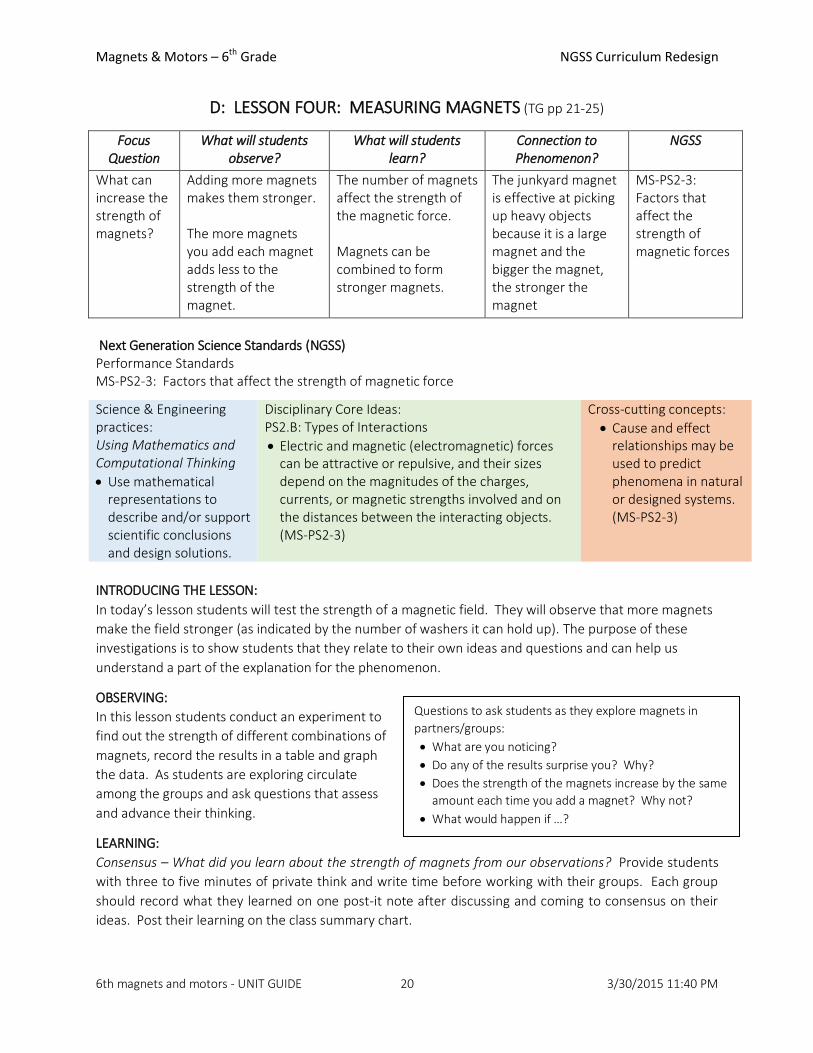
D: LESSON FOUR: MEASURING MAGNETS (TG pp 21-25)
Focus Question
What will students observe?
What will students learn?
Connection to Phenomenon?
NGSS
What can increase the strength of magnets?
Adding more magnets makes them stronger. The more magnets you add each magnet adds less to the strength of the magnet.
The number of magnets affect the strength of the magnetic force. Magnets can be combined to form stronger magnets.
The junkyard magnet is effective at picking up heavy objects because it is a large magnet and the bigger the magnet, the stronger the magnet
MS-PS2-3: Factors that affect the strength of magnetic forces
Next Generation Science Standards (NGSS) Performance Standards MS-PS2-3: Factors that affect the strength of magnetic force
Science & Engineering practices: Using Mathematics and Computational Thinking
Use mathematical representations to describe and/or support scientific conclusions and design solutions.
Disciplinary Core Ideas: PS2.B: Types of Interactions
Electric and magnetic (electromagnetic) forces can be attractive or repulsive, and their sizes depend on the magnitudes of the charges, currents, or magnetic strengths involved and on the distances between the interacting objects. (MS-PS2-3)
Cross-cutting concepts:
Cause and effect relationships may be used to predict phenomena in natural or designed systems. (MS-PS2-3)
INTRODUCING THE LESSON:
In today’s lesson students will test the strength of a magnetic field. They will observe that more magnets
make the field stronger (as indicated by the number of washers it can hold up). The purpose of these
investigations is to show students that they relate to their own ideas and questions and can help us
understand a part of the explanation for the phenomenon.
OBSERVING:
In this lesson students conduct an experiment to
find out the strength of different combinations of
magnets, record the results in a table and graph
the data. As students are exploring circulate
among the groups and ask questions that assess
and advance their thinking.
LEARNING:
Consensus – What did you learn about the strength of magnets from our observations? Provide students
with three to five minutes of private think and write time before working with their groups. Each group
should record what they learned on one post-it note after discussing and coming to consensus on their
ideas. Post their learning on the class summary chart.
Questions to ask students as they explore magnets in
partners/groups:
What are you noticing?
Do any of the results surprise you? Why?
Does the strength of the magnets increase by the same
amount each time you add a magnet? Why not?
What would happen if …?

Magnets & Motors – 6th Grade NGSS Curriculum Redesign
6th magnets and motors - UNIT GUIDE 21 3/30/2015 11:40 PM
CONNECTING:
Post the chart of student ideas about the junkyard magnet phenomena in front of the class. In pairs
students should select one idea from the chart that they agree with and have evidence to support from
the last three lessons and one idea they now disagree with supported by evidence. During the student
discussions, listen to the students’ thinking and select three to four productive ideas to bring forward in a
large group discussion. Add these ideas to the class summary chart.
Summary table row displayed in the classroom may look something like this (lessons B & C shown also):
Activity Observations Learning Connection to Phenomenon
Exploring Magnets
Question: What can magnets do?
Pull: Magnets stick together Magnets pull even if there is plastic between them
Push: Magnets push each other. Magnets stay in place on the string even if you hold it up by one end
Poles: You can make two magnets pull or push if flip around the magnet that is touching the other magnet
Magnets can push and pull other objects that are magnets. Magnets have poles that will pull (attract) together or push (repel) apart. Magnets have north and south poles
The junkyard magnet has a magnet that can pull on the metal hubcaps to pick them up.
Testing Materials
Question: Which materials are magnetic?
Magnetic Non-Magnetic
Recording tape Steel nail Steel washer Twist-tie (metal)
Aluminum foil, wire Brass brad, washer Copper wire Golf tee (wood)
Not all objects were magnetic. We thought more of the metals would be magnetic but they were not.
Some metals are magnetic but other metals are not magnetic. A magnet attracts and repels. Magnetic materials attract. Some metals are attracted to a magnet.
The junkyard magnet picks up metals that are attracted to a magnet and won’t pick up other objects. (Maybe they use a crane with a claw to pick up non-magnetic scrap?)
Measuring Magnets
Question: How can we make
magnets stronger?
(sketch of activity here)
Adding more magnets makes them stronger – For example 1 magnet held __ washers but 4 magnets held __ washers. (tape graph from student here to remind students what they graphed – student graph sheet in TG pp 25)
The number of magnets affect the strength of the magnetic force. Magnets can be combined to form stronger magnets.
The junkyard magnet is effective at picking up heavy objects because it is a large magnet and the bigger the magnet, the stronger the magnet
Planning for Future Instruction This RSST will be more focused around student understanding of magnets and the properties of magnets. You may also want to note questions students have that could relate to one of the next few lessons on magnets and magnetism. How are students’ ideas changing? What ideas are they wrestling with? What questions do they have? What are you wondering about student understanding?

Magnets & Motors – 6th Grade NGSS Curriculum Redesign
6th magnets and motors - UNIT GUIDE 22 3/30/2015 11:40 PM
E: LESSON SEVEN: CREATING MAGNETISM THROUGH ELECTRICITY (TG pp 43 – 47)
Focus Question What will students observe?
What will students learn?
Connection to Phenomenon?
NGSS
How can you use electricity to make a magnet?
The compass needle moves when it is near an electric circuit.
When a current flows through an electric circuit it causes magnetism. Before the circuit is closed it is not magnetic.
The junkyard magnet is a temporary magnet. It can pick up and drop objects that are attracted to a magnet.
MS – PS2-5: Fields exist between objects exerting forces on each other even though the objects are not in contact
Next Generation Science Standards (NGSS) Performance Standards MS-PS2-5: Fields exist between objects exerting forces on each other even though the objects are not in contact Science & Engineering practices: Developing and Using Models -
Develop a model to describe unobservable mechanisms.
Disciplinary Core Ideas: PS2.B: Types of Interactions
Forces that act at a distance (electric, magnetic, and gravitational) can be explained by fields that extend through space and can be mapped by their effect on a test object (a charged object, or a ball, respectively). (MS-PS2-5)
Cross-cutting concepts:
Cause and effect relationships may be used to predict phenomena in natural or designed systems. (MS-PS2-5)
INTRODUCING THE LESSON:
In today’s lesson students will observe that an electric current induces a magnetic field as indicated by
the motion of the needle on a compass. The purpose of these investigations is to show students that
they relate to their own ideas and questions and can help us understand a part of the explanation for the
phenomenon. Lessons E and F give students information to understand how the junkyard magnet can
“turn on” and “turn off”. Introduce this lesson using a student question about how the junkyard magnet
can turn on/off and/or student model(s) that attempt to explain this unobservable mechanism.
OBSERVING:
In this lesson students build an electric circuit, which lights a bulb and
causes a compass needle to move. As students are exploring circulate
among the groups and ask questions that assess and advance their
thinking. Have magnets on hand to have students explore how
magnets influence a compass so they see that a compass is an
indicator for a magnetic field.
Ask the students to write in their notebooks what they observed while
working with the circuits and compasses. After drawing what they
OBSERVE, then add in what they can’t see that they think might be
making the compass needle move (developing a model).
Questions to ask students as they
explore magnets in partners/groups:
What are you noticing?
Why does the compass move
when it is near the electric circuit?
What happens with the compass
when you turn the circuit off with
the switch?
What would happen if …?

Magnets & Motors – 6th Grade NGSS Curriculum Redesign
6th magnets and motors - UNIT GUIDE 23 3/30/2015 11:40 PM
After groups/pairs have explored making a circuit and how a compass needle is affected when the circuit
is turned on and off, try a demonstration with multiple compasses arranged around a wire in a circuit
under a doc cam. See what happens to the compass needles. Do they all move together in the same
direction and at the same angle? Why or why not would this happen? (Use the reading from the prior
lesson about magnetic fields.)
LEARNING:
Think, Pair, Share – How can you use electricity to make a magnet? Ask the students to use the
observations on the chart to summarize what they have learned about magnets. Record the students’
learning on a class summary chart.
CONNECTING:
A/B Partners – How does our learning help us understand the junkyard magnet phenomena? Partner A
shares their ideas and Partner B responds by agreeing disagreeing or adding on to their idea. Partner B
shares their ideas and Partner B responds. Ask students to share their partner’s thinking and record their
connections on the class summary chart.
Planning for Future Instruction: This RSST will be more focused around student understanding of circuits and the relationship between electric current and magnetism. How are students’ ideas changing? What ideas are they wrestling with? What are they surprised by? What questions do they have? What are you wondering about student understanding? What do you think students need more information about? (And will they get it in an upcoming lesson or should a new lesson be added?)

Magnets & Motors – 6th Grade NGSS Curriculum Redesign
6th magnets and motors - UNIT GUIDE 24 3/30/2015 11:40 PM
Summary table row displayed may look something like this (lessons B, C, & D shown also):
Activity Observations Learning Connection
Exploring Magnets Question: What can magnets do?
Pull: Magnets stick together Magnets pull even if there is plastic between them
Push: Magnets push each other. Magnets stay in place on the string even if you hold it up by one end
Poles: You can make two magnets pull or push if flip around the magnet that is touching the other magnet
Magnets can push and pull other objects that are magnets. Magnets have poles that will pull (attract) together or push (repel) apart. Magnets have north and south poles
The junkyard magnet has a magnet that can pull on the metal hubcaps to pick them up.
Testing Materials Question: Which materials are magnetic?
Magnetic Non-Magnetic
Recording tape Steel nail Steel washer Twist-tie (metal)
Aluminum foil, wire Brass brad, washer Copper wire Golf tee (wood)
Not all objects were magnetic. We thought more of the metals would be magnetic but they were not.
Some metals are magnetic but other metals are not magnetic. A magnet attracts and repels. Magnetic materials attract. Some metals are attracted to a magnet.
The junkyard magnet picks up metals that are attracted to a magnet and won’t pick up other objects. (Maybe they use a crane with a claw to pick up non-magnetic scrap?)
Measuring Magnets Question: How can we make magnets
stronger?
(sketch activity here)
Adding more magnets makes them stronger – For example 1 magnet held __ washers but 4 magnets held __ washers. (tape graph from student here to remind students what they graphed – student graph sheet in TG pp 25)
The number of magnets affect the strength of the magnetic force. Magnets can be combined to form stronger magnets.
The junkyard magnet is effective at picking up heavy objects because it is a large magnet and the bigger the magnet, the stronger the magnet
Creating magnetism with electricity
Question: How can you use electricity to make a magnet? (sketch activity here)
When we move a magnet near a compass, the compass needle moves. The compass needle moves when it is near an electric circuit. The compass needle is shows magnetism.
When a current flows through an electric circuit it causes magnetism. Before the circuit is closed it is not magnetic. Circuits cause a magnetic field when it is turned on.
The junkyard magnet is a temporary magnet. It can pick up and drop objects that are attracted to a magnet.

Magnets & Motors – 6th Grade NGSS Curriculum Redesign
6th magnets and motors - UNIT GUIDE 25 3/30/2015 11:40 PM
F: LESSON EIGHT: MAKING MAGNETS WITH ELECTRICITY (TG pp 49 – 55)
Focus Question
What will students observe? What will students learn?
Connection to Phenomenon?
NGSS
How can you use electricity to make a magnet?
The electromagnet will pick up paper clips like a magnet. The compass shows the magnetic poles of the coiled wire. The magnetic poles reverse when the direction of the current being pushed through the coil is changed by reversing the battery.
When a current flows through an electric circuit it causes magnetism. When the circuit is open it is not magnetic.
The junkyard magnet is a temporary magnet. It can pick up and drop objects that are attracted to a magnet
MS – PS2-5: Fields exist between objects exerting forces on each other even though the objects are not in contact
Next Generation Science Standards (NGSS) Performance Standards MS-PS2-5: Fields exist between objects exerting forces on each other even though the objects are not in contact Science & Engineering practices: Developing and Using Models -
Develop a model to describe unobservable mechanisms.
Disciplinary Core Ideas: PS2.B: Types of Interactions
Forces that act at a distance (electric, magnetic, and gravitational) can be explained by fields that extend through space and can be mapped by their effect on a test object (a charged object, or a ball, respectively). (MS-PS2-5)
Cross-cutting concepts:
Cause and effect relationships may be used to predict phenomena in natural or designed systems. (MS-PS2-5)
INTRODUCING THE LESSON:
In today’s lesson students will observe that an electric current induces a magnetic field as indicated by
the motion of the needle on a compass AND they build two different kinds of electromagnets (open coil
and a coil around a steel bolt). The purpose of these investigations is to show students that they relate to
their own ideas and questions and can help us understand a part of the explanation for the phenomenon.
Lessons E and F give students information to understand how the junkyard magnet can “turn on” and
“turn off”. Introduce this lesson using a student question about how the junkyard magnet can turn on/off
and/or student model(s) that attempt to explain this unobservable mechanism.
OBSERVING:
Have students follow the task cards on pgs 52-55. These
tasks may take 2 class periods. In this lesson students build
on their experiences from the previous lesson and build an
electromagnet. As students are exploring circulate among
the groups and ask questions that assess and advance their
thinking. Ask the students to write in their notebooks what
they observed while working with the electromagnet.
Notebook task: Draw a model of an electromagnet of your
choice. Include things we can’t see such as magnetic fields
and explain how an electromagnet works using this model.
Questions to ask students as they explore
magnets in partners/groups:
What do you notice?
What would happen if …?
How do you know it is a magnet?
What happens with the compass
when it is moved to different ends of
the coil? Why?
What happens with the compass
when you reverse the battery? Why?

Magnets & Motors – 6th Grade NGSS Curriculum Redesign
6th magnets and motors - UNIT GUIDE 26 3/30/2015 11:40 PM
LEARNING:
Think, Pair, Share – How can you use electricity to make a magnet? Ask the students to use the
observations in their notebooks to summarize what they have learned about electromagnets. Record the
students’ learning on a class summary chart.
Engaging in one or both of the options below may add an additional day to the lesson to engage with the
readings and/or video and make sense of them with the tasks students completed.
Optional: After completing observations and talking about tasks on pg 52-55, you may have students
read one of the following articles from the readers that come with the kit:
“The Story of Electromagnets” pp 28-29
“The Case of the Coiled Wire” pp 30-32
Optional: After completing observations and some science talk about the tasks on pgs 52-55, you may
want students to watch some related video clips.
30 second video clip describing how a circuit induces a magnetic field and moves a compass
needle (similar to task 5/6 on pg 54) https://www.youtube.com/watch?v=AgZHqfIBkUI
1-minute video clip describing and showing an electromagnet that picks up paperclips (similar to
task #7 on pg 55) https://www.youtube.com/watch?v=vrNvsDPJ98E
4 min 57 sec video about electromagnets https://www.youtube.com/watch?v=emlzh9XXWgQ
CONNECTING:
A/B Partners – How does our learning help us understand the junkyard magnet phenomena? Partner A
shares their ideas and Partner B responds by agreeing disagreeing or adding on to their idea. Partner B
shares their ideas and Partner B responds. Ask students to share their partner’s thinking and record their
connections on the class summary chart. You may wish to rewatch either of the junkyard magnet
phenomena videos http://goo.gl/aXnN8P or http://goo.gl/qCUXAK.
Planning for Future Instruction: This RSST will be more focused around student understanding of circuits and the relationship between electric current and magnetism. How are students’ ideas changing? What ideas are they wrestling with? What are they surprised by? What questions do they have? What are you wondering about student understanding? What do you think students need more information about? (And will they get it in an upcoming lesson or should a new lesson be added?)

Magnets & Motors – 6th Grade NGSS Curriculum Redesign
6th magnets and motors - UNIT GUIDE 27 3/30/2015 11:40 PM
Summary table row displayed may look something like this (lessons B, C, D, & E shown also):
Activity Observations Learning Connection
Exploring Magnets Question: What can magnets do?
Pull: Magnets stick together Magnets pull even if there is plastic between them
Push: Magnets push each other. Magnets stay in place on the string even if you hold it up by one end
Poles: You can make two magnets pull or push if flip around the magnet that is touching the other magnet
Magnets can push and pull other objects that are magnets. Magnets have poles that will pull (attract) together or push (repel) apart. Magnets have north and south poles
The junkyard magnet has a magnet that can pull on the metal hubcaps to pick them up.
Testing Materials Question: Which materials are magnetic?
Magnetic Non-Magnetic
Recording tape Steel nail Steel washer Twist-tie (metal)
Aluminum foil, wire Brass brad, washer Copper wire Golf tee (wood)
Not all objects were magnetic. We thought more of the metals would be magnetic but they were not.
Some metals are magnetic but other metals are not magnetic. A magnet attracts and repels. Magnetic materials attract. Some metals are attracted to a magnet.
The junkyard magnet picks up metals that are attracted to a magnet and won’t pick up other objects. (Maybe they use a crane with a claw to pick up non-magnetic scrap?)
Measuring Magnets Question: How can we make magnets
stronger?
(sketch activity here)
Adding more magnets makes them stronger – For example 1 magnet held __ washers but 4 magnets held __ washers. (tape graph from student here to remind students what they graphed – student graph sheet in TG pp 25)
The number of magnets affect the strength of the magnetic force. Magnets can be combined to form stronger magnets.
The junkyard magnet is effective at picking up heavy objects because it is a large magnet and the bigger the magnet, the stronger the magnet
Creating magnetism with electricity
Question: How can you use electricity to make a magnet? (sketch activity here)
When we move a magnet near a compass, the compass needle moves. The compass needle moves when it is near an electric circuit. The compass needle is shows magnetism.
When a current flows through an electric circuit it causes magnetism. Before the circuit is closed it is not magnetic. Circuits cause a magnetic field when it is turned on.
The junkyard magnet is a temporary magnet. It can pick up and drop objects that are attracted to a magnet.
Making magnets with electricity
Question: How can you use electricity
to make a magnet?
(sketch activity here)
The electromagnet will pick up paper clips like a magnet. The compass shows the magnetic poles of the coiled wire. The magnetic poles reverse when the direction of the current being pushed through the coil is changed by reversing the battery.
When a current flows through an electric circuit it causes magnetism. When the circuit is open it is not magnetic. When the circuit is closed, the wire coil becomes a magnet.
The junkyard magnet is a temporary magnet. It can pick up and drop objects that are attracted to a magnet

Magnets & Motors – 6th Grade NGSS Curriculum Redesign
6th magnets and motors - UNIT GUIDE 28 3/30/2015 11:40 PM
G: LESSONS NINE/TEN/ELEVEN – PLANNING, CONDUCTING AND COMMUNICATING
RESULTS OF AN EXPERIMENT TO TEST THE STRENGTH OF AN ELECTROMAGNET(TG pp 57 – 76)
Focus Question What will students observe?
What will students learn?
Connection to Phenomenon?
NGSS
How can you change the strength of electromagnetic force?
Cores that contain iron make better magnets. The more turns of the wire around the core results in greater magnetic strength. The more batteries used results in a stronger electromagnet.
Factors that affect the strength of an electromagnet include the material making up the core, the length of the wire carrying the current and the amount of electricity powering the magnet.
The cranes have an electric generator connected to a wire coil in the large round lifting disc. When the power is on, its magnetic field attracts heavy iron and steel to it. When the scrap is positioned where they want it, they cut the power to the electromagnet and the scrap drops.
MS-PS2-3: Factors that affect the strength of magnetic forces
Next Generation Science Standards (NGSS) Performance Standards MS-PS2-3: Ask questions about data to determine factors that affect the strength of magnetic force Science & Engineering practices: Planning and Carrying Out Investigations
Plan an investigation individually and collaboratively, and in the design: identify independent and dependent variables and controls, what tools are needed to do the gathering, how measurements will be recorded, and how many data are needed to support a claim.
Disciplinary Core Ideas: PS2.B: Types of Interactions
Electric and magnetic (electromagnetic) forces can be attractive or repulsive, and their sizes depend on the magnitudes of the charges, currents, or magnetic strengths involved and on the distances between the interacting objects. (MS-PS2-3)
Cross-cutting concepts:
Cause and effect relationships may be used to predict phenomena in natural or designed systems. (MS-PS2-3)
OBSERVING: Students will plan, conduct and communicate the results of a controlled experiment that will investigate how changes in some variables affect electromagnetic force. As groups plan, conduct and communicate the results of their investigation circulate among the groups and ask questions that advance and assess their thinking.
Planning Questions Conducting the Experiment Questions
Communicating Ideas
What variables do you think would change the strength of the electromagnetic force? Why?
What variable did you select to manipulate in your experiment? How do you think it will affect the strength of the electromagnetic force? Why?
How is your experiment fair?
What are you noticing?
Are any of your results surprising? Why?
How can you make an electromagnet weaker? Stronger?
How can you make an electromagnet weaker? Stronger?
If you conducted this experiment again how would you change it? Why?
Magnets & Motors – 6th Grade NGSS Curriculum Redesign
6th magnets and motors - UNIT GUIDE 29 3/30/2015 11:40 PM
LEARNING:
Consensus – What did you learn about how to change the strength of an electromagnetic force? Provide
students with three to five minutes of private think and write time before working with their groups.
Each group should record what they learned on one post-it note after discussing and coming to
consensus on their ideas. Post their learning on the class summary chart.
CONNECTING:
Post the chart of student ideas about the junkyard magnet phenomena in front of the class. In pairs
students should select one idea from the chart that they agree with and have evidence to support from
the last three lessons and one idea they now disagree with supported by evidence. During the student
discussions, listen to the students’ thinking and select three to four productive ideas to bring forward in a
large group discussion. Add these ideas to the class summary chart.
Planning for Future Instruction: This RSST will be more focused around student understanding of circuits and the relationship between electric current and magnetism. How are students’ ideas changing? What ideas are they wrestling with? What are they surprised by? What questions do they have? What are you wondering about student understanding? What do you think students need more information about? (And will they get it in an upcoming lesson or should a new lesson be added?

Magnets & Motors – 6th Grade NGSS Curriculum Redesign
6th magnets and motors - UNIT GUIDE 30 3/30/2015 11:40 PM
H. Model Revisions & Pressing for Evidence-based Explanations (added lesson, not in TG)
Focus Question NGSS
How can we use evidence from activities to explain our phenomenon?
Use the summary table with information from each of the activities to find evidence to explain how a junkyard magnet works.
MS – PS2-5: Fields exist between objects exerting forces on each other even though the objects are not in contact MS-PS2-3: Factors that affect the strength of magnetic forces
Teacher Background For the explanation of the junkyard magnet, see the teacher explanation pages. Briefly, there are key science ideas students will develop an understanding of in this unit beginning today:
1. Forces, such as magnetism, act at a distance. These forces fields that extend from an object and can be mapped and represented.
2. Non-magnetic metals can temporarily become magnetic if an electric current is passed through them. When the current stops, the metal loses its temporary magnetic properties. This can be partially explained using the idea of energy transfer and the particulate nature of matter.
Next Generation Science Standards (NGSS) Performance Standards MS-PS2-5: Conduct an investigation and evaluate the experimental design to provide evidence that fields exist between objects exerting forces on each other even though the objects are not in contact MS-PS2-3: Determine the factors that affect the strength of magnetic force Science & Engineering practices: Developing and Using Models -
Develop a model to predict and/or describe phenomena.
Develop a model to describe unobservable mechanisms.
Disciplinary Core Ideas: PS2.B: Types of Interactions
Electric and magnetic (electromagnetic) forces can be attractive or repulsive, and their sizes depend on the magnitudes of the charges, currents, or magnetic strengths involved and on the distances between the interacting objects. (MS-PS2-3)
Forces that act at a distance (electric, magnetic, and gravitational) can be explained by fields that extend through space and can be mapped by their effect on a test object (a charged object, or a ball, respectively). (MS-PS2-5)
Cross-cutting concepts:
Cause and effect relationships may be used to predict phenomena in natural or designed systems. (MS-PS2-3),(MS-PS2-5)
Materials
Junkyard magnet Video clip #1 https://www.youtube.com/watch?v=XBWy9gzGGd4 (found also at http://goo.gl/aXnN8P)
Junkyard magnet video clip #2 https://www.youtube.com/watch?v=N9XoUGxM2h0 (found also at http://goo.gl/qCUXAK)
Model scaffold sheet (1 copy per student or per partner pair)
Pencils (colored pencils optional)
Summary table with list of activities and what we learned and connection to phenomenon

Magnets & Motors – 6th Grade NGSS Curriculum Redesign
6th magnets and motors - UNIT GUIDE 31 3/30/2015 11:40 PM
Procedure – Day 1
1. Opening – Whole Group (5 minutes) a. Reintroduce/review the phenomenon: junkyard magnet video #2 to remind students
what they will need to explain.
2. Developing Models (25 minutes) a. Pass out model scaffold sheets (1 per student or 1 per pair). b. Explain to students that their job is to show what they can observe from the video on
their paper and label the parts they draw. More importantly, it’s to somehow represent or draw what they can’t see that they think is causing the magnet to work this way. How can the junkyard magnet pick up and drop off metal pieces with our little magnet could only pick them up?
c. As students discuss and work in pairs, circulate and observe the different hypotheses students have, encouraging students to represent what they can’t see but they think is happening AND relate it back to activities students have done so far this unit.
d. Midway through this time, select 2 pairs or students to share one specific piece (not the whole thing) of their model with the class under the doc cam. Have a reason for the student(s) to share. For example, maybe two different students/pairs did clear representations of magnetism since it’s not something we can directly observe and their representations are different. Another example could be how students are explaining causes in words and in their model. This sharing step mid-point during model development helps students see each other’s’ work and perhaps get some ideas or questions they have to add to their own models.
3. Review Public Records (Summary Table) (10 minutes)
a. Close this science time by referring back to the summary table and encouraging students to take one activity and think about what evidence that has and how it connects to the phenomenon – Did they include that idea on their model?
Procedure – Day 2 Using their revised models and the summary table, students will write an evidence-based explanation of the junkyard magnet phenomenon. Sentence starters are provided to help students connect what they did in activities with parts of the phenomenon. OPTIONAL: Work with students to create a “gotta have” checklist of science ideas or relationships that students have to include in their writing. Procedure – Day 3 Students peer conference in pairs with a short rubric or checklist to provide feedback about what to add or clarify in their partners’ writing. Models and writing can be displayed. You can develop your own simple rubric or checklist or use the checklist of 4 ideas provided on the next page. OPTIONAL: Get students’ feedback on how they think their thinking has changed over this unit so far (written or in pair-share).

Magnets & Motors – 6th Grade NGSS Curriculum Redesign
6th magnets and motors - UNIT GUIDE 32 3/30/2015 11:40 PM
CLAIMS:
The junkyard magnet can pick up scraps because…
The junkyard magnet can drop scraps because…
It is important that a junkyard magnet is really big because…
It is likely that the junkyard magnet is part of a circuit because…
EVIDENCE:
In the “Making Magnets with Electricity” investigation, we observed that…. This relates to the junkyard magnet because… In the “Measuring Magnets” investigation, we found out that… This is important to know because it explains why the junkyard magnet…. In the “What magnets do” activity, we noticed that magnets attract… Therefore, we know that the junkyard magnet can only attract scraps made of… CHECKLIST OF WHAT IDEAS TO INCLUDE:
Describe the properties of magnets and the objects they attract
What makes a magnet temporary
Relationship between strength of magnet and size of magnet
Relationship between electricity and magnetism

Magnets & Motors – 6th Grade NGSS Curriculum Redesign
6th magnets and motors - UNIT GUIDE 33 3/30/2015 11:40 PM
Unit Overview: Part 2
Lesson Kit Curriculum Lesson Title Time*
I ADDED Eliciting Ideas: Developing initial models to explain how a shakelight flashlight works
2 x 45 mins
J
ADDED What’s a generator? How do generators work? 2 x 45 mins
K ADDED What’s a capacitor? How do capacitors work? 2 x 45 mins
L ADDED Making a Sun Clock 2 x 45 mins
PART 2 - UNIT PHENOMENON – Why does the shake flashlight work? TEACHER BACKGROUND KNOWLEDGE: A shake flashlight (also known as a Faraday Flashlight) works without batteries because by shaking it a magnet slides back and forth inside a coil of copper wire inducing an electric current which lights an LED. This energy is stored in a capacitor in order to be used later. Through investigations in this unit, students will gather evidence about magnets, electromagnets, electrical circuits, energy transfer and transformation in order to explain how this flashlight works and apply it to a similar invention, a socket ball.
What is a shake flashlight?
In 1819 Hans Christian Oersted discovered that an electric current creates a magnetic field. Just over ten years later the English scientist Michael Faraday demonstrated the reverse effect. He showed how a magnetic field could be used to generate electricity. In the early 1830s, Faraday designed an experiment to observe that by passing a magnet through a coil of wire, a small electrical current is created. The same thing happens when a person charges a shake flashlight. A magnet passes back and forth through a coil of wire and creates an electrical current that is then stored in a capacitor. When the flashlight is turned on, the capacitor supplies the stored energy to the bulb much like a battery-powered light.

Magnets & Motors – 6th Grade NGSS Curriculum Redesign
6th magnets and motors - UNIT GUIDE 34 3/30/2015 11:40 PM
Components:
Magnet: The magnet is what generates the power as it passes through the wire coil. The stronger the magnet, the more power is generated with each shake.
Coil: The size of the wire coil (i.e. the number of windings) will also determine how much power is generated on each pass of the magnet.
Capacitor: The capacitor stores the power that you generate while shaking the flashlight. The higher the quality and larger the size of the capacitor, the longer the light output.
Switch and body: The primary considerations here are the sturdiness and waterproofness of the flashlight.
Bulb: Generally this will be an LED due to their reduced power consumption and durability. Factors include the color of the light and its brightness.
How does it work?
How does passing a magnet through a copper coil induce an electrical current?
To use a typical Faraday flashlight, you first shake it for 30 to 60 seconds depending on the model (or up to 3 minutes if the capacitor is fully discharged). This builds up energy in the capacitor. Now turn the flashlight on and use it like a typical flashlight until its lighting power is diminished. Then simply shake it up again and repeat the process as often as needed. By how does this work?
Magnets can exert a force at a distance and opposite magnetic poles repel and like poles attract. Electric charges can also experience a magnetic force if the charge moves through a magnetic field. Current is induced in the coil of wire because of Faraday’s Law of Induction. In Faraday's first experimental demonstration of electromagnetic induction (August 29, 1831), he wrapped two wires around opposite sides of an iron ring (see figure below, at left). Based on his assessment of recently discovered properties of electromagnets, he expected that when current started to flow in one wire, a sort of wave would travel through the ring and cause some electrical effect on the opposite side. Indeed, he saw a transient current (which he called a "wave of electricity") when he connected the wire to the battery, and another when he disconnected it.

Magnets & Motors – 6th Grade NGSS Curriculum Redesign
6th magnets and motors - UNIT GUIDE 35 3/30/2015 11:40 PM
When a current flows in the wire, we say that the current has been induced. A current is only induced in the wire when it cuts across the magnetic field lines (see above, right). In figure 1 above, as the wire is moved down between the magnetic poles, electric current flows through the wire perpendicular to the magnets (shown by the arrow). When the wire stops moving, there is no current. No current is induced when the wire moves along the magnetic field lines (left and right, rather than up and down, in the example in Figure 1). This is an effect called electromagnetic induction.
For figure 1 animation, visit: http://www.absorblearning.com/physics/demo/units/DJFPh055.html#Amovingwire
What does a capacitor do? Capacitors generally are two metal plates with equal and opposite electric charges separated by a non-conductive substance. Basically, it can be thought of as a simple rechargeable battery; however, a rechargeable battery would be described as stored chemical energy, whereas a capacitor would be described as stored electrical energy. A capacitor can discharge the stored voltage much faster (seconds) compared to a battery discharging (minutes or longer). So devices such as camera flash which need to discharge quickly are governed by a capacitor. So why does a shake light need a capacitor? It uses the capacitor to store electrical energy – since this energy is now stored, it can also be described as potential electrical energy, until the switch is turned on. How a Capacitor Works Electric current is the flow of electric charge, which is what electrical components harness to light up, or spin, or do whatever they do. When current flows into a capacitor, the charges get “stuck” on the plates because they can’t get past the insulating dielectric. Electrons – negatively charged particles – are sucked into one of the plates, and it becomes overall negatively charged. The large mass of negative charges on one plate pushes away like charges on the other plate, making it positively charged.
The positive and negative charges on each of these plates attract each other, because that’s what opposite charges do. But, with the dielectric (insulator) sitting between them, as much as they want to come together, the charges will forever be stuck on the plate (until they have somewhere else to go). The stationary charges on these plates create an electric field, which influence electric potential energy and voltage. When charges group together on a capacitor like this, the cap is storing electric energy just as a battery might store chemical energy. Charging and Discharging - When positive and negative charges coalesce on the capacitor plates, the capacitor becomes charged. A capacitor can retain its electric field – hold its charge – because the positive and negative charges on each of the plates attract each other but never reach each other. At some point the capacitor plates will be so full of charges that they just can’t accept any more. There are enough

Magnets & Motors – 6th Grade NGSS Curriculum Redesign
6th magnets and motors - UNIT GUIDE 36 3/30/2015 11:40 PM
negative charges on one plate that they can repel any others that try to join. This is where the capacitance (farads) of a capacitor comes into play, which tells you the maximum amount of charge the capacitor can store. If a path in the circuit is created, which allows the charges to find another path to each other, they’ll leave the capacitor, and it will discharge.
Why does the bulb need to be an LED rather than a regular flashlight bulb? A light emitting diode. They replace traditional incandescent bulbs and aren't actually bulbs at all, but rather a type of semiconductor diode that produces electroluminescence. LEDs are used in shake flashlights because they don’t require as much voltage to work as regular flashlight bulbs. Since the user is creating the current by shaking, it makes sense to have a lightbulb that wouldn’t need as much voltage (to save our muscles!).
What is the Energy Story? Our muscles transfer motion (kinetic) energy from shaking our arm/hand holding the flashlight into motion (kinetic) energy inside the flashlight (where the magnet is moving back and forth within the coil). The motion of the magnet inside the coil is motion (kinetic) energy. This motion energy is transformed into electrical energy through the process of induction – whereby the moving magnet induces an electrical current. In the circuit wires, the electrical energy is transferred into the capacitor and stored (potential energy) until it is used and transformed into light energy when the switch is turned on. Key Disciplinary Core Ideas about Energy:
Definitions of Energy (PS3.A): A system of objects may contain stored (potential) energy. Relationship between Energy and Forces (PS3.C): When two objects interact, each one
exerts a force on the other that can cause energy to be transferred to or from the object. References What is a shake-flashlight? http://www.shake-flashlights.com/how-they-work.html Wikipedia https://en.wikipedia.org/wiki/Mechanically_powered_flashlight https://en.wikipedia.org/wiki/Faraday%27s_law_of_induction http://en.wikipedia.org/wiki/Applications_of_capacitors

Magnets & Motors – 6th Grade NGSS Curriculum Redesign
6th magnets and motors - UNIT GUIDE 37 3/30/2015 11:40 PM
I: ELICITING IDEAS & INITIAL MODELS (added lesson, not in TG)
Focus Question
What will students observe? What will students
learn?
Connection to Phenomenon?
NGSS* (See below)
How does this flashlight work without needing batteries?
Shakelight must be shaken before it will turn on.
If it doesn’t work, shake it again and then it will work.
It has a switch to turn it on/off. Inside it has a magnet and a coil
of copper wire. It does not have batteries. It has a light bulb, tiny ones (LEDs)
Moving a magnet through a coil of wire makes the flashlight work
(Initial models & hypotheses about the causes of the phenomenon)
MS – PS2-5: Fields exist between objects exerting forces on each other even though the objects are not in contact MS-PS2-3: Factors that affect the strength of magnetic forces
Teacher Background For the explanation of the shakelight, see the teacher explanation pages. Briefly, there are key science ideas students will develop an understanding of in this unit beginning today:
1. Magnetic fields can induce an electric current by moving or spinning a magnet near a coil of wire. This principle is behind how all generators work.
2. This idea that magnetism can induce electric current is the inverse of the pattern observed in Part I of the unit that electric current can induce magnetism (electromagnets). This relationship works both ways.
Next Generation Science Standards (NGSS) Performance Standards MS-PS2-5: Fields exist bet. objects exerting forces on each other even though the objects are not in contact MS-PS2-3: Factors that affect the strength of magnetic force
Science & Engineering practices: Developing and Using Models -
Develop a model to predict and/or describe phenomena.
Develop a model to describe unobservable mechanisms.
Disciplinary Core Ideas: PS2.B: Types of Interactions
Electric and magnetic (electromagnetic) forces can be attractive or repulsive, and their sizes depend on the magnitudes of the charges, currents, or magnetic strengths involved and on the distances between the interacting objects. (MS-PS2-3)
Forces that act at a distance (electric, magnetic, and gravitational) can be explained by fields that extend through space and can be mapped by their effect on a test object (a charged object, or a ball, respectively). (MS-PS2-5)
Cross-cutting concepts:
Cause and effect relationships may be used to predict phenomena in natural or designed systems. (MS-PS2-3),(MS-PS2-5)
Materials
Shakelight Video clip #1 https://www.youtube.com/watch?v=X9MYhChHBME found also at
http://goo.gl/woinYp (Play on MUTE, music doesn’t lend much to making observations)
Shakelight video clip #2 https://www.youtube.com/watch?v=KxxgfkPhrmo found also at
http://goo.gl/FGe9KA (Turn sound ON to hear the narration)
Model scaffold sheet (1 copy per student or per partner pair)

Magnets & Motors – 6th Grade NGSS Curriculum Redesign
6th magnets and motors - UNIT GUIDE 38 3/30/2015 11:40 PM
Pencils (colored pencils optional)
Chart paper and markers (for recording initial observations and ideas)
Shake flashlight
OPTIONAL: a typical battery-powered flashlight, as a comparison
Procedure – Day 1 1. Opening – Whole Group (5 minutes)
a. Introduce the new phenomenon using the flashlight and video clips explaining that in this next part of the unit we will be exploring and testing different ideas to explain how this flashlight works without needing batteries.
b. Pass around the flashlight and have students make observations. OPTIONAL: Bring in a typical flashlight and have students do a quick sketch of each and identify the similarities and differences (the main difference being that the shakelight has no batteries).
c. Play video clip and have students write down 2 things they observe in their notebook and any questions they have.
2. Observations – Whole Group (10 mins)
a. Both video clips and allow students to make observations using the flashlight or photograph of the flashlight. Give students time to make specific observations. Pair-share observations in partners before sharing out to create a list.
b. On chart paper, create a class list of observations from the video and manipulating/observing the shakelight itself (things students can directly see or hear). Also, note any student questions. Option: Have students come up and write on the chart (instead of the teacher leading the writing). A student recorder can write the whole list or students can take turns.
3. Recording Initial Hypotheses – Whole Group (15 mins)
a. Think-Pair-Share: Why can the shakelight work without batteries? What’s happening that we can’t see that could cause this? Set a timer for 3 or 4 minutes and have the video replaying during this time. Students watch, think, and partner share about this question.
b. Listen in as students share to hear the different kinds of ideas or hypotheses. Think about who you want to call on to share out in whole group – look for a variety of ideas even if they are opposing or different.
c. Have students share ideas and create a list. Students can refer to this list as they get to work on their models in the next step.
Shakelight Observations
Shakelight must be shaken before it will turn on.
If it doesn’t work, shake it again and then it will work.
It has a switch to turn it on/off. Inside it has a magnet and a coil of
copper wire. It does not have batteries. It has a light bulb, tiny ones (LEDs)
Questions
How can it work without a battery?
Why does it flicker if the switch is on
when we shake it?
Is the magnet like a battery?
Our Initial Ideas How does a shakelight work?
The shaking gives the magnet energy.
The magnet energy powers the light.
If you shake it and don’t turn it on, the
energy would not have anywhere to go.
If there were more coils it would be a
brighter light, kind of like the
electromagnet we made where it was
stronger.
The magnet is a battery, like the + and –
is like N and S which would make a
circuit attract or repel electrons.

Magnets & Motors – 6th Grade NGSS Curriculum Redesign
6th magnets and motors - UNIT GUIDE 39 3/30/2015 11:40 PM
4. Individual Ideas – Science Notebook Entry (10 minutes) c. Students write about what they observed today. Many students may be beginning their
personal theories of how the shakelight works and how it can work without a battery and why shaking it is important.
d. Encourage students to make a sketch and complete a few sentences about today’s introduction to the unit in their science notebook. Sentence starters for notebook entry:
i. The shakelight has a magnet and a coil of wire because…. ii. You have to shake the shakelight so that… iii. I know the metal cylinder inside the shakelight is a magnet because… iv. I think that the shakelight can work without batteries because….
Procedure – Day 2
5. Opening – Whole Group (5 minutes) a. Reintroduce shakelight video clip and have students read over their notebook entry from
part 1 of this lesson. Refer to the list of observations and hypotheses from previous day.
6. Developing Models (30 minutes) a. Pass out model scaffold sheets (1 per student or 1 per pair, teacher’s choice). b. Explain to students that their job is to show what they can observe from the video on
their paper and label the parts they draw. More importantly, it’s to somehow represent or draw what they can’t see that they think is causing the flashlight to work this way. How can the shakelight work without batteries? Why is the magnet important?
c. As students work, circulate and observe the different hypotheses students have, encouraging students to represent what they can’t see but think is happening.
d. Midway through this time, select 2-3 pairs or students to share one specific piece (not the whole thing) of their model with the class under the doc cam. Have a reason for the student(s) to share. For example, maybe two different students/pairs did clear representations of magnetism or electromagnetism since it’s not something we can directly observe and their representations are different. Another example could be how students are explaining causes in words and in their model. Another pair/individual could have made connections to prior activities from Part 1 of the unit. This sharing step mid-point during model development helps students see each other’s’ work and perhaps get some ideas or questions they have to add to their own models.
7. Review and Complete Public Records
e. Ask for any final ideas to add to the list of initial ideas now that students have talked in a pairs/groups, written and drawn then ideas, and heard from their peers
f. Add to the list of questions students have about this shakelight device. Students can put up sticky notes with their questions on a question chart or they can come up and write the question. This list of question can serve as a place to frame future activities as they find evidence and answers to their questions.
Planning for Future Instruction After this lesson, use student work and what you remember from student talk during the lesson to fill out a Rapid Survey of Student Thinking (RSST). This tool helps teachers keep track of the partial ideas, alternative understanding, everyday language, and experiences that students have and which can be used in future lesson s to help students make changes to their understanding over time.

Magnets & Motors – 6th Grade NGSS Curriculum Redesign
6th magnets and motors - UNIT GUIDE 40 3/30/2015 11:40 PM
Photo and Diagram of Shake Flashlight

Magnets & Motors – 6th Grade NGSS Curriculum Redesign
6th magnets and motors - UNIT GUIDE 41 3/30/2015 11:40 PM

Magnets & Motors – 6th Grade NGSS Curriculum Redesign
6th magnets and motors - UNIT GUIDE 42 3/30/2015 11:40 PM
J: ALL ABOUT GENERATORS (added lesson, not in TG)
Focus Question
What will students observe?
What will students learn?
Connection to Phenomenon?
NGSS* (See below)
Can electricity be made using magnets?
Spinning a magnet in a coil of wire can create an electric current. The electric current is stronger (i.e. bulb brighter) if there are more coils, more magnets, and/or the magnet is moved more quickly.
Generators contain a magnet & coil of wire. A force spins the magnet inside the coil of wire. A magnet moving in and out of a coil of wire will generate electricity
The shake flashlight doesn’t need a battery because the magnet moving through the coils of wire generates electricity
MS – PS2-5: Fields exist between objects exerting forces on each other even though the objects are not in contact
Next Generation Science Standards (NGSS) Performance Standards MS-PS2-5: Fields exist bet. objects exerting forces on each other even though the objects are not in contact
Science & Engineering practices: Obtain, Evaluate, and Communicate Information
Integrate qualitative and/or quantitative scientific and/or technical information in written text with that contained in media and visual displays to clarify claims and findings
Disciplinary Core Ideas: PS2.B: Types of Interactions
Forces that act at a distance (electric, magnetic, and gravitational) can be explained by fields that extend through space and can be mapped by their effect on a test object (a charged object, or a ball, respectively). (MS-PS2-5)
Cross-cutting concepts:
Cause and effect relationships may be used to predict phenomena in natural or designed systems.(MS-PS2-5)
Lesson Objective In this lesson students will observe that moving magnets can create an electric current – this is an opposite idea to the one they observed using electric current to create magnetic fields by creating their own electromagnets in earlier lessons. Students will make observations using 2 video clips and one homemade demonstration generator made by the teacher. (Optional: Students could create their own generator in pairs given enough materials). Materials For learning about generators:
Video of how a generator works: https://www.youtube.com/watch?v=BKXw2OjuPpY
Student Readings (1 copy per student)
Video of hydroelectric generator: https://www.youtube.com/watch?v=rnPEtwQtmGQ For creating demonstration generator:
Spool of magnet wire
Cardboard piece about 8cm x 30 cm
xacto knife (for scoring cardboard to make the box)
2-4 rectangular magnets
4” or longer nail
Small light bulb (1.5v/25mA)
Volt meter (optional, but will register small changes in current if not strong enough to light bulb)
Video of how to make a generator: http://www.amasci.com/amateur/coilgen.html
Written directions: http://www.discoverthis.com/project-simple-electric-generator.html

Magnets & Motors – 6th Grade NGSS Curriculum Redesign
6th magnets and motors - UNIT GUIDE 43 3/30/2015 11:40 PM
Procedure Day 1
1. Orientation to the concepts (5 minutes) a. Select a student’s question or idea from the initial charts that relates to “Why doesn’t the
flashlight need batteries?” or “The magnet is like a battery” or similar idea that can be an entry point into today’s lesson where students will learn about the power source for this shake flashlight.
b. Today’s question we will try to answer is: Can electricity be made using magnets? And how does this help us understand out shake flashlight? Remind students (or ask students to describe) the parts inside the shakelight (i.e. magnet, coil of wire).
2. Making Observations (10 minutes)
a. Use the homemade demonstration generator to show students that by spinning the nail (with magnets stuck to the nail inside the box) that the lightbulb lights or flickers. Have students make
observations or turn-and-talk to a partner about what they see happening. (If homemade generator is unavailable, use video clip: http://www.amasci.com/amateur/coilgen.html
b. Begin to fill in “observations” box on the summary table row with what students observe about what key parts are moving and what happens.
c. Introduce the word “generator” – create a class definition using what they know so far from the demo generator.
3. Making Connections (30 minutes)
a. Play the video clip
https://www.youtube.com/watch?v=BKXw2OjuPpY. As students watch, ask them to try to answer the following two questions:
i. What parts are needed in a generator to make the bulb light up?
ii. What is the energy story that makes the lightbulb light up? Where does the energy come from?
b. Replay video as needed to find answers to these questions. Record responses in science notebooks to the two questions above along with labeled sketch of a generator (either the demo generator or the one in the video).
c. Read one or more of the articles about electric generators. Read to find out what a generator is, how it works, and what parts it needs.
d. As students to work in partners to come up with a connection between what we’ve seen and learned about generators today and our shakelight. Have pairs write one connection on a sticky-note and post it on the summary table in the “connections” box.
If students are going to create their own homemade generators in partners or groups, do this here and push steps 4 and 5 until day 2 of the lesson.
Day 2 4. Whole class coordination of ideas (15 mins)
a. Use the sticky notes to help the whole class come up with a summary statement to put in the “connections” box. There are multiple ways to coordinate this conversation. One
Questions to ask students as
they explore and learn about
generators:
What are you noticing?
What happens if we spin
the magnets slower?
What happens if we spin
the magnets faster?
Why is the coil of wire
important?
How is our homemade
generator similar or
different to the one shown
in the video?
What would happen if …?

Magnets & Motors – 6th Grade NGSS Curriculum Redesign
6th magnets and motors - UNIT GUIDE 44 3/30/2015 11:40 PM
way could be to begin with one sticky note and read it aloud (also post it under the doc cam if convenient) and ask other pairs to publicly agree, disagree, or add on with their idea on their sticky note.
b. Come to a consensus about what to write as a connection from this lesson.
5. Creating or revising a public record (15 mins) a. Check in on the observation, learning, and connection boxes of the summary table row
for this activity and ask students if they would like to nominate anything to be added. b. Revisit the list of initial hypotheses and/or questions and see if this lesson helps answer a
question or revise an idea. Also, what additional question do students have? (Use these questions to decide to add in a lesson before moving to lesson K).
Extension Play the video clip about how hydroelectric generators work and look for similarities between the shakelight, homemade demo generator, and hydroelectric generator https://www.youtube.com/watch?v=rnPEtwQtmGQ Planning for Future Instruction After this lesson, use student work and what you remember from student talk during the lesson to fill out a Rapid Survey of Student Thinking (RSST). This tool helps teachers keep track of the partial ideas, alternative understanding, everyday language, and experiences that students have and which can be used in future lesson s to help students make changes to their understanding over time. Use the list of questions and/or ideas you heard students begin to discuss in today’s lesson to decide if additional lessons about generators and how they work should be added.

Magnets & Motors – 6th Grade NGSS Curriculum Redesign
6th magnets and motors - UNIT GUIDE 45 3/30/2015 11:40 PM
How does a generator work? Most metals have electrons that can move around freely.
These electrons allow electricity to move through the metal,
transmitting electrical energy from one place to another.
These metals are called electrical conductors. A generator is
a device that is used to move electrons through a conductor
to give electric power. It does this by using a magnet that
forces electrons to move along a wire at a steady rate while
putting pressure on them.
With the help of a generator, the electrons can transmit
electric energy from one point to another. The difference in
the number of electrons and the pressure that the generator
applies is what creates the different electric currents. The generator spins at a certain number of
rotations per minute. The number of electrons that move is measured in amps. The pressure is
measured in volts. In the United States, the electric current in the power outlets is 120 volts.
Source: http://discoverykids.com/articles/how-does-a-generator-work/
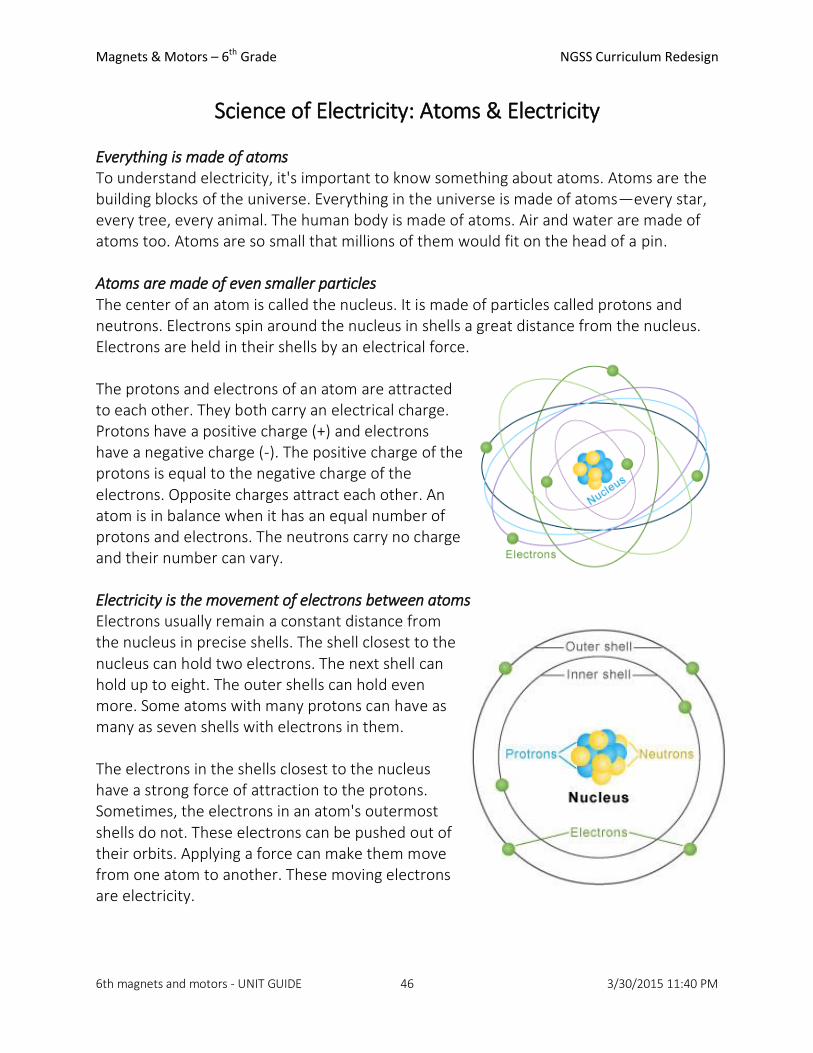
Magnets & Motors – 6th Grade NGSS Curriculum Redesign
6th magnets and motors - UNIT GUIDE 46 3/30/2015 11:40 PM
Science of Electricity: Atoms & Electricity Everything is made of atoms To understand electricity, it's important to know something about atoms. Atoms are the building blocks of the universe. Everything in the universe is made of atoms—every star, every tree, every animal. The human body is made of atoms. Air and water are made of atoms too. Atoms are so small that millions of them would fit on the head of a pin. Atoms are made of even smaller particles The center of an atom is called the nucleus. It is made of particles called protons and neutrons. Electrons spin around the nucleus in shells a great distance from the nucleus. Electrons are held in their shells by an electrical force. The protons and electrons of an atom are attracted to each other. They both carry an electrical charge. Protons have a positive charge (+) and electrons have a negative charge (-). The positive charge of the protons is equal to the negative charge of the electrons. Opposite charges attract each other. An atom is in balance when it has an equal number of protons and electrons. The neutrons carry no charge and their number can vary. Electricity is the movement of electrons between atoms Electrons usually remain a constant distance from the nucleus in precise shells. The shell closest to the nucleus can hold two electrons. The next shell can hold up to eight. The outer shells can hold even more. Some atoms with many protons can have as many as seven shells with electrons in them. The electrons in the shells closest to the nucleus have a strong force of attraction to the protons. Sometimes, the electrons in an atom's outermost shells do not. These electrons can be pushed out of their orbits. Applying a force can make them move from one atom to another. These moving electrons are electricity.

Magnets & Motors – 6th Grade NGSS Curriculum Redesign
6th magnets and motors - UNIT GUIDE 47 3/30/2015 11:40 PM
Science of Electricity: Magnetism & Electricity
Magnets and Electricity Have you ever held two magnets close to each other? They don't act like most objects. If you try to push the same poles together, they repel each other. But if you put different poles together, the magnets will stick together because the north and south poles are attracted to each other. Just like protons and electrons—opposites attract with magnets. The spinning of the electrons around the nucleus of an atom creates a tiny magnetic field. The electrons in most objects spin in random directions, and their magnetic forces cancel out each other. Magnets are different because the molecules in magnets are arranged so that their electrons spin in the same direction. This arrangement and movement creates a magnetic force that flows from a north-seeking pole and a south-seeking pole. The magnetic force creates a magnetic field around a magnet. Magnetic fields can be used to make electricity The properties of magnets can be used to make electricity. Moving magnetic fields can pull and push electrons. Metals such as copper have electrons that are loosely held, so the electrons in copper wires can easily be pushed from their shells by moving magnets. By using moving magnets and copper wire together, electric generators create electricity. Electric generators essentially convert kinetic energy (the energy of motion) into electrical energy. How Electricity is Generated A generator can be broadly defined as a device that changes a form of energy into electricity. Generators operate because of the relationship between magnetism and electricity. In 1831, scientist Michael Faraday discovered that when a magnet is moved inside a coil of wire, an electric current flows in the wire. The most widely used method of producing electricity uses generators with an electromagnet—a magnet produced by electricity—not a traditional magnet. The generator has a series of coils of wire. This wire surrounds an electromagnet that rotates. As it spins, it induces an electric current in the wire. An electric power plant uses a turbine or other similar machine to drive these types of generators.

Magnets & Motors – 6th Grade NGSS Curriculum Redesign
6th magnets and motors - UNIT GUIDE 48 3/30/2015 11:40 PM
K: WHAT ARE CAPACITORS? (added lesson, not in TG)
Focus Question
What will students observe?
What will students learn?
Connection to Phenomenon?
NGSS* (See below)
What are capacitors? How are they used?
The light flickers with each shake or motion of the magnets.
Capacitors store electric charge/energy temporarily and can discharge or release the energy quickly
The shakelight has a capacitor in it near the switch. This stores the charge/energy
MS – PS2-5: Fields exist between objects exerting forces on each other even though the objects are not in contact Next Generation Science Standards (NGSS)
Performance Standards MS-PS2-5: Fields exist bet. objects exerting forces on each other even though the objects are not in contact
Science & Engineering practices: Obtain, Evaluate, and Communicate Information
Communicate scientific and/or technical information (e.g. about a proposed object, tool, process, system) in writing and/or through oral presentations.
Disciplinary Core Ideas: PS2.B: Types of Interactions
Forces that act at a distance (electric, magnetic, and gravitational) can be explained by fields that extend through space and can be mapped by their effect on a test object (a charged object, or a ball, respectively). (MS-PS2-5)
Cross-cutting concepts:
Cause and effect relationships may be used to predict phenomena in natural or designed systems.(MS-PS2-5)
Lesson Objective In this lesson, students learn some information about what capacitors are and their function in a circuit. In the generator lesson, students observed that in the homemade generator the electricity flickered with each spin. With the shakelight, if shaken with the switch in the “on” position, the light will flicker. But how do we get a steady beam of light? For this we need a special part called a capacitor. Materials
Shakelight
Shakelight photo with diagram
Video clips: o What is a capacitor? https://www.youtube.com/watch?v=B-m78bU-xxc (2 m 26 s)
o How Capacitors work https://www.youtube.com/watch?v=SvqvRNt4fBU (3 minutes)
Procedure 1. Orientation to the concepts & Making Observations (10 minutes)
a. Show students the shakelight but this time turn the switch “on” when shaking. Observe and share what happens.
b. Remind students what they saw with the homemade generator and how the light flickered with each motion. This is like how the shakelight flickers with each shake.
c. Today’s question is: How can the flashlight make a steady beam of light when we aren’t shaking it? Record observations about flickering shakelight in “observation” box.

Magnets & Motors – 6th Grade NGSS Curriculum Redesign
6th magnets and motors - UNIT GUIDE 49 3/30/2015 11:40 PM
2. Information from Videos (15 mins) a. Introduce the videos by using the color photo with diagram of the shakelight. Point out
the part of the shakelight by the switch called the “Capacitor”. b. Watch each video clip, pausing for questions and to highlight key information. By
watching these clips students should be able to answer “What does a capacitor do?” i. What is a capacitor? https://www.youtube.com/watch?v=B-m78bU-xxc (2 m 26 s)
ii. How Capacitors work https://www.youtube.com/watch?v=SvqvRNt4fBU (3 minutes)
c. Fill in the “Learning box” on the summary table row.
3. Making Connections (10 minutes) a. Ask students to work in partners to come up with
a connection between what we’ve seen and learned about capacitors today and our shakelight. Why do they think a shakelight or other generator needs a capacitor? Have pairs write one connection on a sticky-note and post it on the summary table in the “connections” box.
4. Whole class coordination of ideas (5 mins)
a. Use the sticky notes to help the whole class come up with a summary statement to put in the “connections” box. There are multiple ways to coordinate this conversation. One way could be to begin with one sticky note and read it aloud (also post it under the doc cam if convenient) and ask other pairs to publicly agree, disagree, or add on with their idea on their sticky note.
b. Come to a consensus about what to write as a connection from this lesson.
5. Creating or revising a public record (5 mins) a. Check in on the observation, learning, and connection boxes of the summary table row
for this activity and ask students if they would like to nominate anything to be added. b. Revisit the list of initial hypotheses and/or questions and see if this lesson helps answer a
question or revise an idea. Also, what additional question do students have? (Use these questions to decide to add in a lesson before moving to lesson L).
Planning for Future Instruction After this lesson, use student work and what you remember from student talk during the lesson to fill out a Rapid Survey of Student Thinking (RSST). This tool helps teachers keep track of the partial ideas, alternative understanding, everyday language, and experiences that students have and which can be used in future lesson s to help students make changes to their understanding over time. Use the list of questions and/or ideas you heard students begin to discuss in today’s lesson to decide if additional lessons about capacitors and how they work should be added. That being said, the capacitor is a relatively small part of the shakelight system. Its purpose is to store the electric current created by shaking the light so that the user doesn’t have to continually shake it to use the flashlight.
Questions to ask students as they
explore and learn about
generators:
What are you noticing?
What does a capacitor do?
Why do you think the shake
flashlight needs a capacitor?

Magnets & Motors – 6th Grade NGSS Curriculum Redesign
6th magnets and motors - UNIT GUIDE 50 3/30/2015 11:40 PM
L. Model Revisions & Pressing for Evidence-based Explanations (added lesson, not in TG)
Focus Question NGSS
How can we use evidence from activities to explain our phenomenon?
Use the summary table with information from each of the activities to find evidence to explain how a shake flashlight works.
MS – PS2-5: Fields exist between objects exerting forces on each other even though the objects are not in contact MS-PS2-3: Factors that affect the strength of magnetic forces
Next Generation Science Standards (NGSS) Performance Standards MS-PS2-5: Conduct an investigation and evaluate the experimental design to provide evidence that fields exist between objects exerting forces on each other even though the objects are not in contact MS-PS2-3: Determine the factors that affect the strength of magnetic force Science & Engineering practices:
Constructing Explanations
Construct a scientific explanation based on valid and reliable evidence obtained from sources (including the students’ own experiments) and the assumption that theories and laws that describe the natural world operate today as they did in the past and will continue to do so in the future.
Disciplinary Core Ideas: PS2.B: Types of Interactions
Electric and magnetic (electromagnetic) forces can be attractive or repulsive, and their sizes depend on the magnitudes of the charges, currents, or magnetic strengths involved and on the distances between the interacting objects. (MS-PS2-3)
Forces that act at a distance (electric, magnetic, and gravitational) can be explained by fields that extend through space and can be mapped by their effect on a test object (a charged object, or a ball, respectively). (MS-PS2-5)
Cross-cutting concepts:
Cause and effect relationships may be used to predict phenomena in natural or designed systems. (MS-PS2-3),(MS-PS2-5)
Materials
Shakelight
Pencils (colored pencils optional)
Summary table with list of activities and what we learned and connection to phenomenon
Procedure – Day 1
1. Opening – Whole Group (5 minutes) a. Reintroduce/review the phenomenon: Show the shakelight and/or shakelight videos to
remind students what they will need to explain. Point out resources that will help students such as the summary table and notes/readings in their notebooks.
2. Writing an explanation (40 minutes)
a. Explain to students that their job is to explain how the shake flashlight works and why it doesn’t need batteries. More importantly, it’s to somehow represent or draw what they can’t see that they think is causing the flashlight to work this way.
b. Before sending students to write, generate a list of key ideas they think they should include in their explanation.
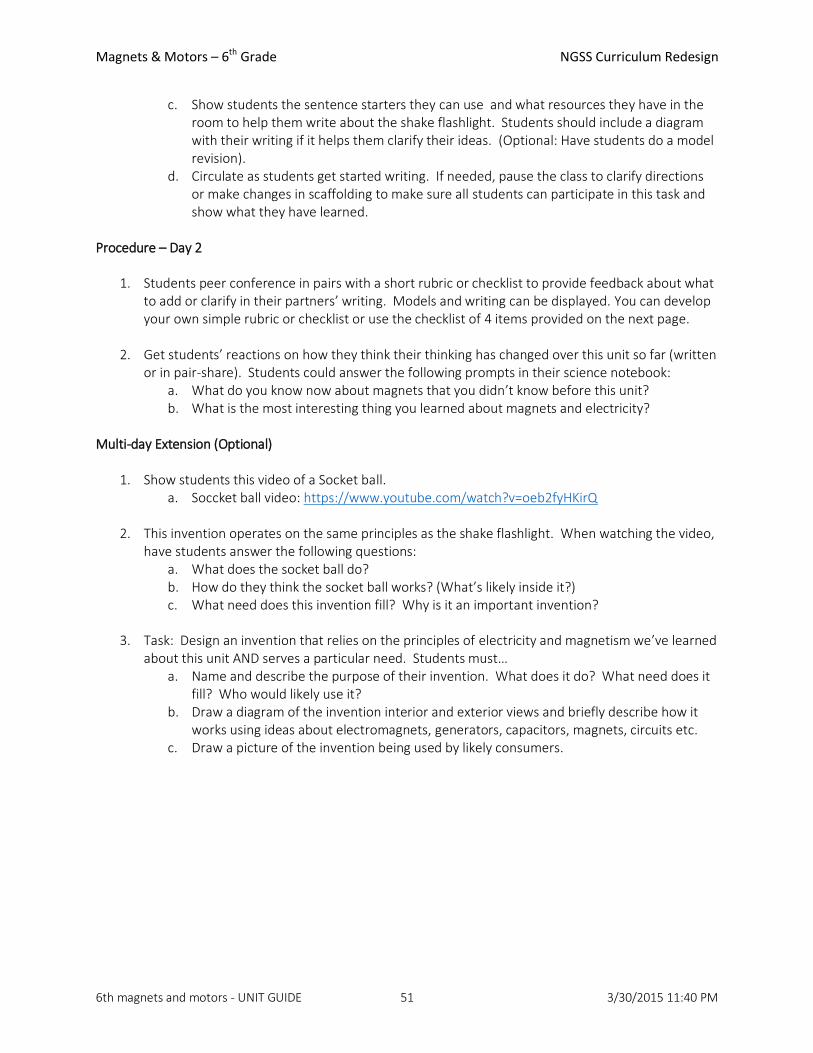
Magnets & Motors – 6th Grade NGSS Curriculum Redesign
6th magnets and motors - UNIT GUIDE 51 3/30/2015 11:40 PM
c. Show students the sentence starters they can use and what resources they have in the room to help them write about the shake flashlight. Students should include a diagram with their writing if it helps them clarify their ideas. (Optional: Have students do a model revision).
d. Circulate as students get started writing. If needed, pause the class to clarify directions or make changes in scaffolding to make sure all students can participate in this task and show what they have learned.
Procedure – Day 2
1. Students peer conference in pairs with a short rubric or checklist to provide feedback about what to add or clarify in their partners’ writing. Models and writing can be displayed. You can develop your own simple rubric or checklist or use the checklist of 4 items provided on the next page.
2. Get students’ reactions on how they think their thinking has changed over this unit so far (written or in pair-share). Students could answer the following prompts in their science notebook:
a. What do you know now about magnets that you didn’t know before this unit? b. What is the most interesting thing you learned about magnets and electricity?
Multi-day Extension (Optional)
1. Show students this video of a Socket ball. a. Soccket ball video: https://www.youtube.com/watch?v=oeb2fyHKirQ
2. This invention operates on the same principles as the shake flashlight. When watching the video,
have students answer the following questions: a. What does the socket ball do? b. How do they think the socket ball works? (What’s likely inside it?) c. What need does this invention fill? Why is it an important invention?
3. Task: Design an invention that relies on the principles of electricity and magnetism we’ve learned
about this unit AND serves a particular need. Students must… a. Name and describe the purpose of their invention. What does it do? What need does it
fill? Who would likely use it? b. Draw a diagram of the invention interior and exterior views and briefly describe how it
works using ideas about electromagnets, generators, capacitors, magnets, circuits etc. c. Draw a picture of the invention being used by likely consumers.

Magnets & Motors – 6th Grade NGSS Curriculum Redesign
6th magnets and motors - UNIT GUIDE 52 3/30/2015 11:40 PM
CLAIMS:
The shake flashlight does not need batteries because…
The shake flashlight has a magnet and a coil of wire because…
A capacitor in the shake flashlight is helpful because…
To make the shake flashlight brighter or more powerful, the manufacturer should…
EVIDENCE:
In the “All about Generators” lesson, we learned that…. This relates to the shake flashlight because… In the “What are capacitors?” lesson, we found out that… This is important to know because it explains why the shake flashlight…. From the homemade generator demonstration we observed that magnets … Therefore, we know that the shake flashlight… CHECKLIST OF WHAT TO INCLUDE or EXPLAIN:
How a generator works
The role of the capacitor
Relationship between electricity and magnetism
Evidence from activities and lessons