standard task narratives preventive maintenance of ...prgroup.com/emark/kiewit/preventive...
TRANSCRIPT

Preventive Maintenance Task Narratives
STANDARD TASK NARRATIVES
PREVENTIVE MAINTENANCE OF
BUILDING MECHANICAL EQUIPMENT (BME) SYSTEMS
Pacific Realty, LLC.

Preventive Maintenance Task Narratives
2
TABLE OF CONTENTS
PAGE
INTRODUCTION TO NARRATIVES 6
01 ENVIRONMENTAL COOLING SYSTEMS 7
0101: Inspection of Central Cooling Systems 7
0102: Inspection and Maintenance of Humidifiers 8
0103: Minor Inspection and Maintenance of Central Cooling Systems 9
0104: Minor Inspection and Maintenance of Packaged and Split Systems 10
0105: Inspection and Maintenance of Absorption Machines 11
0106: Start-up of Central Cooling Systems 12
0107: Shutdown of Central Cooling Systems and Evaporative Coolers 15
0108: Major Inspection and Maintenance of Central Cooling Systems 16
0109: Start-up of Package and Split System Cooling Systems 18
0110: Major Inspection and Maintenance of Packaged and Split Systems 21
0111: Inspection and Maintenance of Evaporative Coolers 24 (Window, console, through the wall units, and under 3 tons)
0112: Inspection and Maintenance of Fire Dampers 25
0113: Inspection and Maintenance of Hot Air Furnaces 26 (Split Systems with Compressors under 15 tons)
02 CONDENSER WATER SYSTEMS 27 0201: Minor Inspection and Maintenance 27 (Cooling Towers and Evaporative Condensers)
0202: Minor Inspection and Maintenance of Condenser Water Systems 28
0203: Start-up of Condenser Water Systems 29
0204: Shutdown of Condenser Water Systems 30
0205: Major Inspection and Maintenance of Condenser Water Systems 31
03 CHILLED WATER SYSTEMS 33
0301: Minor Inspection and Maintenance of Chilled Water Systems 33
0302: Major Inspection/ Maintenance/Start-up of Chilled Water Systems 34
0303: Shutdown of Chilled Water Systems 37
Preventive Maintenance Task Narratives
3
04 AIR HANDLING SYSTEMS 38
0401: Minor Inspection and Maintenance of Air Handling Systems 38
0402: Inspection and Maintenance of Air Handling Systems 39
0403: Major Inspection and Maintenance of Air Handling Systems 40
0404: Fire/Smoke Damper Inspection and Maintenance 43
0405: Visual Inspection of Induction Units 44
0406: Inspection and Maintenance of Emergency Generator Air Intake 45 (Dampers and Filters)
05 HEATING SYSTEMS 46
0501: Inspection and Maintenance of Steam Boilers 46
0502: Inspection and Maintenance of Steam/Hot Water Boilers 47
0503: Waterside Inspection and Maintenance of Heating Boilers 53
0504: Fireside and Accessory Inspection/Maintenance of Heating Boilers 54
0505: Start-up and Operational Check of Heating Boilers 56
0506: Shutdown of Heating Boilers 57
0507: Inspection and Maintenance of Hot Air Furnaces and Space Heaters 58
0508: Inspection and Maintenance of Electric Heaters 59
06 DOMESTIC WATER SYSTEMS 60
0601: Inspection and Maintenance of Domestic Water Systems 60
0602: Start-up of Lawn Sprinklers 64
0603: Shutdown of Lawn Sprinklers 65
0604: Maintenance of Plumbing Fixtures 66
07 SANITARY PLUMBING SYSTEMS 67
0701: Inspection and Maintenance of Sanitary Plumbing Systems 67
0702: Inspection and Maintenance of Sanitary Systems 68
0703: Inspection and Maintenance of Portable Toilets 69
0704: Winterization of Chemical Toilets 70

Preventive Maintenance Task Narratives
4
08 STANDBY POWER/UPS SYSTEMS 71
0801: Inspection of Batteries for Standby Power Systems 71
0802: Standby Power Systems Test 72
0803: Inspection and Maintenance of Batteries for Standby Systems 73 (Includes emergency lighting systems with multiple batteries)
0804: Inspection and Maintenance of Standby Power Systems 74 (Diesels and Turbines)
0805: Emergency/Egress Lighting 75
09 FIRE PROTECTION SYSTEMS 76
0901: Inspection and Maintenance of Fire Protection Systems (weekly) 78
0902: Inspection and Maintenance of Fire Protection Systems (monthly) 80
0903: Inspection and Maintenance of Fire Protection Systems (quarterly) 82
0904: Inspection and Maintenance/Fire Protection System (semi-annual) 85
0905: Inspection and Maintenance of Fire Protection Systems (annually) 86
10 FIRE DETECTION SYSTEMS 95
1001: Inspection and Maintenance of Fire Detection System (quarterly) 95
1002: Inspection and Maintenance of Fire Detection System (semi-annual) 96
1003: System Function Test (annual) 98
1004: Maintenance, Security Testing. Calibration of Devices 100
11 ELECTRICAL DISTRIBUTION SYSTEMS 102
1101: Electrical Inspection, General 104
1102: Thermo Graphic Scanning 105
1103: Electrical Power Distribution and Maintenance Tests 109
12 VERTICAL TRANSPORTATION SYSTEMS 111
1201: Inspection and Maintenance of Mail Lifts/Conveyors 111
1202: Elevator Inspection and Maintenance 112
1203: Escalator Inspection and Maintenance 114

Preventive Maintenance Task Narratives
5
13 BUILD. CONTROLS/AUTOMATION/ALARM SYSTEMS 117
1301: Building Alarm/Automation Systems 117
1302: Building Automation Systems 119
14 MISCELLANEOUS SYSTEMS 120
1401: Inspection and Maintenance of Roof Systems 120
1402: Gas Leak Detection 125
1403: Inspection of Lighting Arrestors 127
1404: Computer Room Particle Count 128
1405: Exterior Security Review 129
1406: Inspection and Maintenance of Hydraulic Dock Lifts 131
1407: Asbestos Inspection 132
1408: Building Card Access Controls/Backup Battery Test 133
1409: Building Card Access Controls/Nickel Battery Test 135
1410: Vacant Spaces 137
1411: Inspection and Maintenance of Air Compressors 139
1412: Exterior Lighting 141
1413: Building Structural Inspection 142
1414: Common Area Restroom 143
1415: Common Area Hallway and Entryways 144
1416: Mechanical and Janitorial Room 145
1417: Building Caulking 146
1418: Landscaping 147
1419: Vehicular Systems 148
15 ADMINISTRATIVE 149
1501: Validation of Inventory for Building Equipment Systems 149
1502: Inventory Checklists for Building Equipment Systems 150
1503: Standard Checklists for New Properties 151

Preventive Maintenance Task Narratives
6
INTRODUCTION TO NARRATIVES: A. PURPOSE: The purpose of the Standard Task Narrative is to provide Preventive Maintenance requirements for Building Maintenance Equipment. The Preventive Maintenance Tasks assist in outage prevention, protection of equipment and prolonged equipment life span. NOTE: This is a general overview of Building Maintenance Requirements. Equipment that is site specific or require a more detailed sequence must be annotated in the comments section of the specified asset. (For example: A computer room air conditioner supplying a server room may require important phone numbers, points of contact, steps to shut down the unit, etc.) B. OVERVIEW: The Preventive Maintenance Standard Task Narratives work in conjunction with another process that is outlined in a document called the "Inventory Instructions". These two processes work together to form the program and both must be utilized. The Narratives describe what preventive maintenance "task" is needed for building equipment systems. The Inventory Instructions describe how to complete equipment inventory, preventive maintenance task frequency, and skill levels necessary to complete the task. Accurate inventory generates accurate preventive maintenance. C. SCOPE: The Standard Task Narratives should be utilized in most facilities. However, Property Management will determine whether or not a facility is excluded (example triple net lease where the landlord maintains building needs). If a preventive maintenance task has been vended to an external supplier, the supplier is required to follow the Standard Task Narratives. D. INTRODUCTION TO FORMAT: It is important to read all information in a task before starting the task. If significant repairs are discovered while doing a preventive maintenance task, follow guidance provided by the Property Manager, and/or as outlined in a service agreement. E. APPROVAL/CHANGES: The Director of Property Management must approve changes to this document. F. DISTRIBUTION: This document and all subsequent issues will be distributed to Property Managers and Directors.

Preventive Maintenance Task Narratives
7
01 ENVIRONMENTAL COOLING SYSTEMS: CAUTION: FOLLOW LOCKOUT/TAGOUT PROCEDURES. TASK 0101: INSPECTION OF CENTRAL COOLING SYSTEMS: A. SYSTEM: Check for proper operating temperatures, general condition and indications of trouble in the system. B. COMPRESSOR OIL LEVEL: Check compressor lubricating oil level and visually inspect for leaks. If evidence of leakage is found, initiate complete leakage testing procedure. See CFC guidelines. C. OILERS: Check automatic oilers for proper level and operation. D. PURGE, UNIT: Check for proper operation. E. SIGHT GLASS/MOISTURE INDICATOR: Check sight glass for indication of moisture or proper charge (as appropriate). F. Log: Make entries on compressor log sheet and compare to previous readings. This may be accomplished through an automation system and alarmed when out of parameters. NOTE: Logs are only needed on systems with compressors 100 tons or larger.

Preventive Maintenance Task Narratives
8
TASK 0102: INSPECTION AND MAINTENANCE OF HUMIDIFIERS: A. GENERAL: Check for corrosion and proper operation, scale, and general condition. This could include floats, float valves, spray heads and strainer elements. Check the controlling humidistat for proper operation, calibration and set point. Clean pan, spray heads, and/or other parts as required.

Preventive Maintenance Task Narratives
9
TASK 0103: MINOR INSPECTION AND MAINTENANCE OF CENTRAL COOLING SYSTEMS: A. COMPLETE TASK 0101: Complete work indicated in Task 0101 A through F as required. B. BEARINGS: Check all bearings for unusual noise, vibration or excessive operating temperature. Add small amount of proper type lubricant only if required. DO NOT OVER LUBRICATE! C. AIR-COOLED CONDENSER/DRYER COOLER: Inspect and clean air-cooled condenser or dry-cooler coil surfaces. NOTE: Due to coil construction and design, care must be taken to ensure that the coils are actually being cleaned and that the dirt and debris is not being driven deeper into the coil. If local conditions exist -such as Cottonwood trees, extremely dirty environment etc., which requires the condenser to be cleaned more frequently, open a work order through the main call center. D. BELTS: Adjust the tension and the alignment of the drive belts and sheaves as required. Check the condition of the belts and sheaves. IT IS IMPORTANT TO REPLACE THE BELTS BEFORE THEY FAIL, signs of impending failure can include glazing, cracks or unusual noises. Check the belt guard for condition and proper mounting.

Preventive Maintenance Task Narratives
10
TASK 0104: MINOR INSPECTION AND MAINTENANCE OF PACKAGED AND SPLIT SYSTEM COOLING SYSTEMS: A. COMPLETE TASK 0102: Complete work indicated in Task 0102 if system is equipped with a humidifier. B. GENERAL: Listen for unusual noise or vibration. C. BELTS: Adjust the tension and the alignment of the drive belts and sheaves as required. Check the condition of the belts and sheaves. IT IS IMPORT ANT TO REPLACE THE BELTS BEFORE THEY FAIL, signs of impending failure can include glazing, cracks or unusual noises. Check the belt guard for condition and proper mounting. D. AIR FILTERS: NOTE: Since it is difficult to visually determine whether high efficiency filters are dirty, it is recommended that all high efficiency filter banks (65% and higher) be equipped with draft gauges to determine when the filters require changing.
1. With system in operation, read filter draft gauge to determine the condition of the filters or visually inspect the filters for excessive accumulations of dirt, dust and combustible accumulations. Check air filter seal at filter bank for leakage. Avoid unfiltered by-pass air. Replace the filters as required.
2. If the system is not equipped with a draft gauge the length of time the filters have been in service combined with the time until the next scheduled P.M. should be taken into account to determine if the filters need to be changed, regardless of the appearance of the filters.
E. CONTROLS:
1. Determine that the system is operating according to the sequence of operation. Care should be given that the energy guidelines are followed so that excess energy is not being expended in heating or cooling the space.
2. Adjust or calibrate controls as required. F. CONDENSATE PUMPS AND DRAINS: Clean and inspect the condensate pan, drain and pump to assure they are working properly. Inspect for rust and general condition. G. AIR-COOLED CONDENSER/DRYER COOLER: Inspect and clean air-cooled condenser or dry-cooler coil surfaces.

Preventive Maintenance Task Narratives
11
TASK 0105: INSPECTION AND MAINTENANCE OF ABSORPTION MACHINES: A. GENERAL: Perform inspection and maintenance in accordance with the manufacturer or local company's instructions.

Preventive Maintenance Task Narratives
12
TASK 0106: START-UP OF CENTRAL COOLING SYSTEMS: A. SYSTEM: NOTE: It may be helpful to use a locally devised checklist describing the location and proper position of each valve, switch, etc.
1. Determine that appropriate condenser water, chilled water and chemical water treatment systems are in the proper operational mode.
2. Determine that all appropriate valves (water and refrigerant), switches, controls, etc.,
are in the correct position/setting to allow proper operation of equipment.
3. Check lubricating oil temperature to ensure that it is within the proper range according to the manufacturer's specifications. Check crankcase and oil sump heater to determine that it is operating properly.
4. Start the compressor and listen for unusual noises or vibrations. Observe all gauges
for proper readings. NOTE: If compressor has been disassembled during the shutdown period, the bolts (head, access covers, etc.) should be re-torque to manufacturer's specifications after approximately 24 hours of running time. B. COMPLETE TASK 0103 C. SAFETIES: Check the operation, calibration and setting of all safety shut down controls. These would include some or all of the following and may include controls that do not appear in this list:
- Oil pressure switch - Oil temperature switch - High-pressure switch (limit -usually manual reset) - Low-pressure switch (limit) - Low refrigerant temperature switch - Motor/bearing temperature sensor - Chiller freeze-stat - Flow switches (chilled and condenser water) - Appropriate electric motor starter interlocks - Time delay-relay (start circuit) - Emergency disconnect switches and related equipment room exhaust systems

Preventive Maintenance Task Narratives
13
TASK 0106: START-UP OF CENTRAL COOLING SYSTEMS: (Continued) D. OPERATING CONTROLS: NOTE: It may be helpful to use a locally devised checklist identifying each control installed on the specific system that is being started up. Determine that the system is operating according to the sequence of operation. Care should be given that the energy guidelines are followed so that excess energy is not being expended in heating or cooling the space. Check the operations, calibration and setting of all operating controls. These would include some or all of the following and may include controls that do not appear in this list:
- Control Thermostat - Low-pressure switch (automatic reset) - Compressor unloaded devices on reciprocating compressors or vane operators on
centrifugal compressors. - Chilled water temperature sensing device(s) - Conditioned space, return air and supply air temperature or relative humidity sensing
devices - Outside temperature and humidity - Condenser control
E LOG: Make entries on compressor log sheet and compare to previous readings. This log is recommended on all units’ 100 tons or over. This may be accomplished through an automation system and alarmed when out of parameters. F. START UP OF AIR COOLED CONDENSER OR DRY-COOLER:
1. Prior to starting the associated compressor(s), observe that the condenser fans are not obstructed, the condenser coil is clean, refrigerant valves are positioned properly and general conditions appear acceptable for operation. Turn on electric power to the condenser. Verify crankcase heaters have been operating for the recommended length of time prior to starting the compressor.
2. Adjust the tension and the alignment of the drive belts and sheaves as required.
Check the condition of the belts and sheaves. IT IS IMPORTANT TO REPLACE THE BELTS BEFORE THEY FAIL, signs of impending failure can include glazing, cracks or unusual noises. Check the belt guard for condition and proper mounting.
3. After the associated compressor(s) has been started, check to determine that the
condenser fan(s) are operating properly. Listen for unusual noise or vibration.

Preventive Maintenance Task Narratives
14
TASK 0106: START-UP OF CENTRAL COOLING SYSTEMS: (Continued)
4. Determine that fan cycling (head pressure) controls are set correctly and operating at their settings.
5. Determine that condenser dampers (head pressure) and their operating controls are
operating properly.
Preventive Maintenance Task Narratives
15
TASK 0107: SHUTDOWN OF CENTRAL COOLING SYSTEMS AND EVAPORATIVE COOLERS (SWAMP): A. EVAPORATIVE COOLERS (SWAMP): Turn off power and water supplies to the unit. Clean and drain sump and drain water make-up line. B. CRANKCASE HEATER: Determine that crankcase/oil sump heater is operating properly. C. SYSTEM: NOTE: It may be helpful to use a locally devised checklist describing the location and proper position of each valve, switch, etc.
1. Determine that appropriate condenser water, chilled water and chemical water treatment shutdown routines are/ or will be done in conjunction with this routine.
2. Leave all valves (water and refrigerant), switches, controls, etc., in the proper position for the shutdown period.
D. CONDENSER. AIR COOLED: Determine that associated cooling equipment has been shut down prior to performing this task. Turn electrical power to fan(s) and controls off.

Preventive Maintenance Task Narratives
16
TASK 0108: MAJOR INSPECTION AND MAINTENANCE OF CENTRAL COOLING SYSTEMS: A. MOTOR. ELECTRIC. COMPRESSOR (OPEN DRIVE): Clean external surfaces, as well as design permits, visually inspect internal surfaces for dirt accumulations, bearing lubricant overflow and general condition. Check security of mounting. B. BELTS: Adjust the tension and the alignment of the drive belts and sheaves as required. Check the condition of the belts and sheaves. IT IS IMPORTANT TO REPLACE THE BELTS BEFORE THEY FAIL, signs of impending failure can include glazing, cracks or unusual noises. Check the belt guard for condition and proper mounting. C. DRIVE COUPLING: Inspect for defects and wear. Check alignment. Check for tightness. Check lubrication if applicable. D. DISCONNECT SWITCH/STARTER/CONTACTOR: Check for tightness of connections, evidence of overheating, general condition and proper manual operation. Lubricate with proper lubrication if required. Check condition of contacts. Check overload heater and fuse size. Check security of mounting. E. OIL SAMPLE/OIL CHANGE: 1. (Optional) Take lubricating oil sample, in an approved container, for analysis of acidity and wear metal content.
2. If an oil change is required, drain oil in a manner approved for this type of system.
Clean compressor self-cleaning oil filter if applicable. Change cartridge-type oil filter element if applicable. Refill with the proper type of uncontaminated refrigerant compressor oil in the manner approved for this type of system.
3.Properly dispose of used oil and filter cores.
F. COMPRESSOR: Check compressor heads, access plates, fittings, etc., for tightness, apparent leaks and general condition. On reciprocating type compressors, close suction service valve and allow system to "pump down". Open disconnect switch. When compressor stops, check equalization time between suction and discharge pressures. Schedule repairs if rapid equalization occurs. Warning: Do Not Pump Down a scroll compressor system with a suction service valve, as this could cause damage to the compressor.

Preventive Maintenance Task Narratives
17
TASK 0108: MAJOR INSPECTION AND MAINTENANCE OF CENTRAL COOLING SYSTEMS (CONTINUED): G. REFRIGERANT PIPING: Leak test refrigerant circuit. Inspect piping for general condition taking special notice at hangers (supports) to determine that no wear to the piping is taking place. Replace the liquid line filter drier element if system indicates moisture is present. Clean the suction line strainer if applicable. H. GEAR REDUCER/SPEED INCREASER: Drain oil and remove inspection covers. Inspect gears, shaft box and bearings for wear and general condition. Clean and inspect sump, using lint free rags, with particular attention to metal particle deposits. Replace inspection covers, using new gaskets. Refill with correct amount of proper lubricant. Check for leaks. I. PURGE UNIT: Perform inspection and maintenance on the purge compressor, motor and accessories as prescribed by the manufacturer's instructions. J. AIR COOLED CONDENSER/DRY COOLER:
1. Clean coil using locally prescribed method. Visually inspect the unit to identify repair work, including broken or loose sheet metal or fan guards, rust, etc.
2. Check condition of fan motors and their associated fans and drives for security of
mounting, general condition, etc. Lubricate bearings with small amount of proper lubricant, if applicable. DO NOT OVER LUBRICATE!
3. Inspect piping for proper support and condition Assure that hot gas line is
adequately covered to protect personnel from being burned when unit is operating.
4. If applicable, lubricate damper pivot points and assure that dampers move freely. K. DRY COOLERS ONLY:
1. Check strength of propylene glycol solution. Local conditions will dictate the degree of protection required. Check pH of the solution. A pH of 8.0 to 9.0 should be maintained to avoid damage to the system.
2. Check the condition of the glycol solution pump and its associated motor, drive and accessories. On closed systems, determine that the relief valve is operable. If applicable, add a small amount of the proper lubricant to the motor and pump bearings. DO NOT OVER LUBRICATE!

Preventive Maintenance Task Narratives
18
TASK 0109: START-UP OF PACKAGE AND SPLIT SYSTEM COOLING SYSTEMS: A. COMPLETE TASK 0104: B. LUBRICATING OIL TEMPERATURE: If equipped with a thermometer or gauge, check lubricating oil temperature to ensure it is within the proper range according to the manufacturer's specifications. C. SYSTEM: NOTE: It may be helpful to use a locally devised checklist describing the location and proper position of each valve, switch, etc.
1. Determine that appropriate condenser water, chilled water and chemical water treatment systems are in proper operational mode.
2. Determine that all appropriate valves (water and refrigerant), switches, controls, etc.,
are in the correct position/setting to allow proper operation of equipment. Determine that condensate pan (and pump) drains are operating properly.
3. Start the compressor and listen for unusual noises or vibrations. Observe all gauges
for proper readings. NOTE: If the compressor has been disassembled during the shutdown period, the bolts (head, access covers, etc.) should be re-torque to manufacturer's specification after approximately 24 hours of running time. D. SAFETIES: Check the operation, calibration and setting of all safety shutdown controls. These would include some or all of the following and may include controls that do not appear in this list:
- Oil pressure switch - Oil temperature switch - High-pressure switch (limit -usually manual reset) - Low-pressure switch (limit) - Low refrigerant temperature switch - Motor/bearing temperature sensor - Chiller Freeze stat - Flow switches (chilled and condenser water) - Appropriate electric motor starter interlocks - Time delay-relay (start circuit) - Emergency disconnect switches and related equipment room exhaust systems - Fire stat/ Freeze stat

Preventive Maintenance Task Narratives
19
TASK 0109: START-UP OF PACKAGE AND SPLIT SYSTEM COOLING SYSTEMS (CONTINUED): E. OPERATING CONTROLS: Determine that the system is operating according to the sequence of operation. Care should be given that the energy guidelines are followed so that excess energy is not being expended in heating or cooling the space. NOTE: It may be helpful to use a locally devised checklist identifying each control installed on the specific system that is being started up. Check the operations, calibration and setting of all operating controls. These would include some or all of the following and may include controls that do not appear in this list:
- Control Thermostat - Low-pressure switch (automatic reset) - Compressor unloaded devices on reciprocating compressors or vane operators on
centrifugal compressors - Chilled water temperature sensing device(s) - Conditioned space, return air and supply air temperature or relative humidity sensing
devices - Outside temperature and humidity
F. FAN AND MOTOR. INDOOR AIR: (On all package units and on split systems with compressors under15 tons):
1. Assure that fan; fan motor and drive belts or couplings are operating properly.
2. Adjust the tension and the alignment of the drive belts and sheaves as required. Check the condition of the belts and sheaves. IT IS IMPORTANT TO REPLACE THE BELTS BEFORE THEY FAIL, signs of impending failure can include glazing, cracks or unusual noises. Check the belt guard for condition and proper mounting.
G. DAMPERS: Simulate conditions to assure that all modulating dampers are working properly. Check operation of gravity dampers, if applicable. H. START UP OF AIR COOLED CONDENSER OR DRY-COOLER:
1. Prior to starting the associated compressor(s), observe that the condenser fans are not obstructed, the condenser coil is clean, refrigerant valves are positioned properly and the general condition appears acceptable for operation. Turn on electric power to the condenser.

Preventive Maintenance Task Narratives
20
TASK 0109: START-UP OF PACKAGE AND SPLIT SYSTEM COOLING SYSTEMS (CONTINUED): 2. Adjust the tension and the alignment of the drive belts and sheaves as required. Check
the condition of the belts and sheaves. IT IS IMPORTANT TO REPLACE THE BELTS BEFORE THEY FAIL, signs of impending failure can include glazing, cracks or unusual noises. Check the belt guard for condition and proper mounting.
3. After the associated compressor(s) has been started, check to determine that the
condenser fan(s) are operating properly. Listen for unusual noise or vibration.
4. Determine that fan cycling controls (head pressure) are set correctly and operating at their settings.
5. Determine that the condenser dampers (head pressure) and their operating controls are
operating properly. I. REFRIGERANT PIPING: Inspect piping for general condition taking special notice at hangers (supports) to determine that no wear to the piping is taking place.

Preventive Maintenance Task Narratives
21
TASK 0110: MAJOR INSPECTION AND MAINTENANCE OF PACKAGED AND SPLIT SYSTEM COOLING SYSTEMS: A. SYSTEM: Remove covers, vacuum internal areas and wipe down as required. Visually inspect for oil, refrigerant or water leaks. Check compressor lubricating oil level and visually inspect for leaks. If evidence of leakage is found, initiate complete leakage testing procedure. See CFC guidelines. B. FILTERS, AIR: (All package units and all split systems w/compressors under15tons): NOTE: Since it is difficult to determine visually whether high efficiency filters are dirty, it is recommended that all high efficiency filter banks (65% and higher) be equipped with draft gauges to determine when the filters require changing.
1. With system in operation, read filter draft gauge to determine the condition of the filters or visually inspect the filters for excessive accumulations of dirt, dust and combustible accumulations. Check air filter seal at filter bank for leakage. A void unfiltered by-pass air. Replace the filters as required.
2. If the system is not equipped with a draft gauge the length of time the filters have been
in service combined with the time until the next scheduled P.M. should be taken into account to determine if the filters need to be changed, regardless of the appearance of the filters.
C. DRAIN, CONDENSATE: Clean and inspect the condensate pan, drain and pump to assure they are working properly. Inspect for rust and general condition. D. COILS, HEATING/COOLING: Clean and inspect the heating and/or cooling coils. E. COMPRESSOR: Check the compressor oil level. Assure that compressor is properly mounted and appears to be in good condition. F. MOTOR, ELECTRIC: Clean external surfaces of electric motors (fan and external compressor). As well as design permits, visually inspect internal surfaces for dirt accumulations, bearing lubricant overflow and general condition. Check motor mounts for security of mounting. G. SWITCH. ELECTRIC DISCONNECT: Check the disconnect switch and motor starter for signs of overheating, tightness of connections, security of mounting, condition of contacts and general condition. Tighten connections as required. Check overload heater and fuse size. Check manual operation and lubricate with proper lubricant if required.

Preventive Maintenance Task Narratives
22
TASK 0110: MAJOR INSPECTION AND MAINTENANCE OF PACKAGED AND SPLIT SYSTEM COOLING SYSTEMS (CONTINUED): H. FAN AND MOTOR, INDOOR AIR:
1. Assure that fan; fan motor and drive belts or couplings are operating properly. 2. Adjust the tension and the alignment of the drive belts and sheaves as required. Check
the condition of the belts and sheaves. IT IS IMPORTANT TO REPLACE THE BELTS BEFORE THEY FAIL, signs of impending failure can include glazing, cracks or unusual noises. Check the belt guard for condition and proper mounting.
3. Determine that the system is operating according to the sequence of operation. Care
should be given that the IAQ guidelines are followed. In addition to determining that there is the proper amount of outside air intake the following items should be noted.
a. Check for dust or dirt in ductwork or other components. b. Check for microbiological growth (green slime} in drip pans, humidifiers,
ductwork and coils.
c. Care should be given in the use of biocides, sealant, and cleaning compounds. As an approximation, the percent of outside air intake may be calculated by measuring the temperature in the return air, the outside air and the air at the filter section (mixed air} and using the temperature readings in the following equation. %, Ventilation air = 100 x (Tma- Tra} / (Toa- Tra} Where: Tma = temperature of the mixed air Tra = temperature of return air Toa = temperature of outside air Example: Tma = 83 degrees F Tra = 78 degrees F Toa = 100 degrees F % Ventilation air = 100 x (83-78} /(100-78} = 100x5/22 = 22.7% I. INTAKE, OUTSIDE AIR: To meet IAQ guidelines check that the outside air intake minimum position setting agrees with the design standards in the sequence of operations. Cause dampers/actuators to go to minimum position. Ensure linkages have not been moved and that the dampers in fact maintain a minimum position. J. BEARINGS. ALL: If appropriate, add a small amount of proper lubricant to all bearings. DO NOT OVER LUBRICATE!

Preventive Maintenance Task Narratives
23
TASK 0110: MAJOR INSPECTION AND MAINTENANCE OF PACKAGED AND SPLIT SYSTEM COOLING SYSTEMS (CONTINUED): K. DUCT HEATERS. ELECTRIC: Clean and inspect electric duct heater(s) for general condition and security of mounting. L. VALVES. POWER OPERATED: If applicable, inspect power-operated valves for visual signs of leakage and general condition. M. AIR COOLED CONDENSER/DRY COOLER: 1. Clean coil, inspect for general conditions (including broken or loose sheet metal or fan
guards, rust, etc. 2.Check condition of fan motors and their associated fans and drives for security of
mounting, general condition, etc. Lubricate bearings with small amount of proper lubricant, if applicable. DO NOT OVER LUBRICATE!
3.Inspect piping for proper support and condition.
CAUTION: Assure that hot gas line is adequately covered to protect personnel from being burned when unit is operating.
4. If applicable, lubricate damper pivot points and assure that the dampers move freely.
N. DRY COOLERS ONLY:
1. Check strength of propylene glycol solution. Local conditions will dictate the degree of protection required. Check pH of the solution. A pH of 8.0 to 9.0 should be maintained to avoid damage to the system.
2. Check the condition of the glycol solution pump and its associated motor, drive and
accessories. On closed systems, determine that the relief valve is operable. If applicable, add a small amount of the proper lubricant to the motor and pump bearings. DO NOT OVER.LUBRICATE!
Preventive Maintenance Task Narratives
24
TASK 0111: INSPECTION AND MAINTENANCE OF EVAPORATIVE COOLERS. WINDOW/CONSOLE UNITS. THROUGH THE WALL UNITS AND UNDER 3 TONS HEAT PUMPS: A. GENERAL (Applies to window/console units. through 3 tons units): Remove covers, clean internal areas, including evaporator and condenser coils. Change filters. Check for general condition and proper operation. Check controls for proper temperature setting. B. EVAPORATIVE COOLERS (SWAMP): Clean sump and pump. Replace pads. Turn on water supply. Check float valve. Turn on power supply. Check spray nozzles and operation of unit.

Preventive Maintenance Task Narratives
25
TASK 0112: INSPECTION AND MAINTENANCE OF FIRE DAMPERS: A. GENERAL:
1. Fire/smoke dampers should be maintained according to manufacturers instructions and frequency recommendations.
2. Proper testing of smoke dampers requires an understanding of the smoke control
strategy and sequence of operation in that facility.
3. It is recommended that dampers normally be tested with fan system airflow to ensure they close and are not held open by the air stream. Care should be taken to ensure that tests are performed safely and do not cause damage. Use of a MOP could be required.
4. The use of an inspection form is required. The form should show the equipment
location, inspection frequency, test date, inspector, and record of discrepancies found. B. DAMPER TESTING:
1. Follow manufacturer's recommendations to activate the device. If no frequency recommendation exists you should follow recommendations in NFPA 90A including:
a. Examine each damper every 2 years to ensure that it is not rusted or blocked;
giving attention to hinges and other moving parts and operate the damper to ensure proper closing.
b. Every 4 years fire damper fusible links shall be removed; all dampers shall be
operated to verify that they fully close. The latch, if provided, shall be checked and moving parts lubricated as necessary.
Summary: If manufacturer's recommendations are not available follow NFPA 90A maintenance recommendations for fire/smoke/floor dampers. Normally this would be 2-year maintenance on dampers without fusible links and 4-year maintenance on dampers with fusible links.

Preventive Maintenance Task Narratives
26
TASK 0113: INSPECTION AND MAINTENANCE OF HOT AIR FURNACES {That are part of split systems with compressors under15 tons): A. GENERAL: Inspect and clean filter plenum, burners and pans. Change air filter. Clean and lubricate the motor and fan. Inspect the general condition of the motor and fan, repair as required. Check atmospheric burners for general condition. Inspect heat exchanger for cracks to the extent possible without removing burners. B. BELTS: Adjust the tension and the alignment of the drive belts and sheaves as required. Check the condition of the belts and sheaves. IT IS IMPORTANT TO REPLACE THE BELTS BEFORE THEY FAIL, signs of impending failure can include glazing, cracks or unusual noises. Check the belt guard for condition and proper mounting. C. OPERATION: Start unit and check for proper operation. Check operation of all safety controls and the operating control. D. HIGH EFFICIENCY UNITS: In addition to the items above, special consideration should be given to systems that have high efficiency burners. Some items that should be considered are:
1. Check and seal, as needed the connections on the PVC vent piping. 2. 2. Clean and flush the condensate drain with water to assure that it is draining properly.

Preventive Maintenance Task Narratives
27
02 CONDENSER WATER SYSTEMS: CAUTION: FOLLOW LOCKOUT/TAGOUT PROCEDURES. TASK 0201: MINOR INSPECTION AND MAINTENANCE OF COOLING TOWERS AND EVAPORATIVE CONDENSERS: A. TOWER:
1. Inspect and clean as necessary the tower pan/sump/louvers. Ensure that eliminators are working with no carryover.
2. Inspect and clean as necessary the distribution pans or spray heads for clogging and
proper spray patterns.
3. Determine the sump level is correct. B. EQUIPMENT, WATER TREATMENT: Test water samples to assure that chemical treatment system is operating properly. Add chemical and/or adjust bleed rate as required. CAUTION: Always wear appropriate safety gear (i.e. Goggles, Rubber Apron, Rubber Gloves and Face Shield.) C. SAND SEPARATORS: Open flush valve and let run until water is clear. Shut valve.

Preventive Maintenance Task Narratives
28
TASK 0202: MINOR INSPECTION AND MAINTENANCE OF CONDENSER WATER SYSTEMS: A. COMPLETE TASK 0201: Complete work indicated in task 0201 A through C as required. B. PUMPS/FANS: Listen to pumps and fans for unusual noises. C. CONTROLS: Determine that all controls that automatically cycle the system are working correctly. D. SYSTEM: Inspect system for leaks. E. GEAR REDUCER/SPEED INCREASER: Check for proper operation, absence of oil leaks and proper oil levels. F. VALVE, WATER RELIEF: Operate lift lever on water relief valves. Assure that valve reseats properly. G. BELTS: Adjust the tension and the alignment of the drive belts and sheaves as required. Check the condition of the belts and sheaves. IT IS IMPORTANT TO REPLACE THE BELTS BEFORE THEY FAIL, signs of impending failure can include glazing, cracks or unusual noises. Check the belt guard for condition and proper mounting. H. BEARINGS: Listen to bearings for unusual noises. Hand check bearing housing for excessive heat. Add small amount of proper lubricant to oil bearings if required. I. FLOATS: See that correct water level is being maintained in sump or tank. Adjust as needed.

Preventive Maintenance Task Narratives
29
TASK 0203: START-UP OF CONDENSER WATER SYSTEMS: A. COMPLETE TASK 0202: Complete work indicated in task 0202, A through I as required. B. TOWER, WATER FILL:
1. Clean the tower sump; check that all strainer bodies are closed and that all valves are in their proper position in preparation for filling the system with water.
2. Open tower make up valve and assure that the float and/or solenoid valve is working
properly and shuts off when proper sump level is attained. Bleed air from system as required.
3. Visually inspect all valves and pump packing/seals for leakage. Repair as needed.
Check pumps, pump motors, couplings and bearings to assure they are in an operative condition.
4. Check fan(s), fan motor(s) and bearings to assure they are in an operative condition.
5. Start pumps in manual mode.
a. Listen for unusual noises from pumps and fans. b. Check spray heads for clogged nozzles and proper spray pattern.
c. Check entire system again for leaks.
d. Put system into its automatic mode and determine that all controls that start and
stop fans and pumps are correctly calibrated, set and operating. Check appropriate starter interlocks for correct operation.
C. DAMPERS/MOTORIZED VALVES: Assure that all dampers and motorized valves are working properly.

Preventive Maintenance Task Narratives
30
TASK 0204: SHUTDOWN OF CONDENSER WATER SYSTEMS: A. SYSTEM:
1. Assure that all associated refrigeration equipment is shut down. Open disconnect switches for tower fan(s) and condenser water pump(s). Note: If system has variable drive, make sure you shut down the VFD before opening the fan disconnect.
2. Close cooling tower make-up valve, drain tower and sand separator.
3. Clean and power/pressure wash tower louvers, drift eliminators, and fill.
4. Clean tower sump. Inspect condition of entire tower, inside and outside, as well as its
supporting structure for needed repairs, condition of paint, etc.
5. Drain all water lines as required to prevent damage from freezing. Check sump heaters and/or heat tape if applicable. If possible leave condensers full of water to prevent any scale from drying on the condenser surfaces. If the system is shut down dry, allow for special chemical treatment if conditions warrant.
B. BELTS: Follow local practices as to treatment of fan belts, i.e., remove belts, coat sheaves, tie down fan, etc. Caution: Tower fan and motor bearings can be destroyed during the winter if fans are left to windmill. C. TANK. WATER STORAGE: If provided, drain inside water storage tank. Flush and clean tank interior and inspect for rusting. Clean gauge glass and replace gauge glass washers.
Preventive Maintenance Task Narratives
31
TASK 0205: MAJOR INSPECTION AND MAINTENANCE OF CONDENSER WATER SYSTEM: A. CONDENSER CLEANING:
1. REMOVABLE HEAD CONDENSERS: Drain condenser. Remove heads and clean tubes with a nylon brush. Visually inspect condition of tubes and tube sheets. Re-install heads using new gaskets.
2. WELDED HEAD CONDENSERS OR OPTIONAL METHOD FOR REMOVABLE
HEAD CONDENSERS: CAUTION: USE SPLASH GOGGLES. PROTECTIVE APRONS AND GLOVES WHEN USING ACID SOLUTION. Isolate and drain condenser. Clean condenser with an inhibited acid solution following locally dictated procedures. Flush condenser with fresh water and assure that water left in condenser is neutralized. NOTE: This task should be applied to conventional condenser water systems as well as evaporative type systems. B. MOTORS, ELECTRIC: As well as design permits, visually inspect internal surfaces for dirt accumulations, bearing lubricant overflow and general condition. Check security of mounting. C. BELTS: Adjust the tension and the alignment of the drive belts and sheaves as required. Check the condition of the belts and sheaves. IT IS IMPORTANT TO REPLACE THE BELTS BEFORE THEY FAIL, signs of impending failure can include glazing, cracks or unusual noises. Check the belt guard for condition and proper mounting. D. GEAR REDUCER/SPEED INCREASER: Check for proper operation, absence of oil leaks and proper oil levels. E. COUPLINGS: Check drive coupling for defects, wear, alignment and tightness. Check lubrication, if applicable. F. DISCONNECT SWITCH/STARTER: Inspect disconnect switch and motor starter for tightness of connections, evidence of overheating, general condition and proper manual operation. Tighten connections as required. Lubricate with proper lubrication, if required. Check condition of contacts. Check overload heater and fuse size. Check security of mounting.

Preventive Maintenance Task Narratives
32
TASK 0205: MAJOR INSPECTION AND MAINTENANCE OF CONDENSER WATER SYSTEM (CONTINUED): G. BEARINGS: Visually inspect motor, pump and fan bearings for indications of wear, over-lubrication, seal deterioration, and general condition. Add small amount of proper lubricant to grease bearings, if appropriate. DO NOT OVER LUBRICATE! H. STRAINERS. WATER: Disassemble water strainers, clean strainer basket and re-assemble. I. VALVES: Operate all manual\-motorized valves through their full range of travel. Observe for signs of stem packing leakage. Repack and lubricate them as required. J. CONTROLS: Visually check condition of operating controls such as flow switches, temperature controls, etc. Check wire termination for tightness. Clean out pressure-troll and pressure gauge pipe connections, if applicable. K. DAMPERS: Inspect modulating dampers for general condition. Assure that dampers are closed tightly during shutdown period. L. HEAT TAPE AND SUBMERSIBLE HEATERS: Check to see that heat tape and/or submersible heaters and their associated controls operate properly.

Preventive Maintenance Task Narratives
33
03 CHILLED WATER SYSTEMS: CAUTION: FOLLOW LOCKOUT/TAGOUT PROCEDURES. TASK 0301: MINOR INSPECTION AND MAINTENANCE OF CHILLED WATER SYSTEMS: A. PUMP:
1. Observe the chilled water pump and motor for correct operation and pressures and for absence of leaks. Listen to the motor and pump bearings for unusual noises.
2. On packed type pumps observe for the proper amount of water leaking past the
packing. Hand-check the packing glands to check for over heating.
3. Hand check bearing housings for excessive heat. Add small amount of proper lubricant to bearings if required. DO NOT OVER LUBRICATE!
B. EXPANSION TANK: Check expansion tank sight glass for proper water level. C. STRAINER CYCLE: Check operation of strainer cycle and its associated controls. D. WATER FEEDER/PRESSURE REDUCING VALVE:
1.Check for proper operation. 2. See Task 0601 L for backflow preventer detail.

Preventive Maintenance Task Narratives
34
TASK 0302: MAJOR INSPECTION AND MAINTENANCE PLUS STARTUP OF CHILLED WATER SYSTEMS: A. PRESSURETROL: Remove pressuretrol and clean sampling tube. Reinstall control and assure that electrical connections are tight and setting is proper. B. FLOW SWITCH: Remove flow switch and assure that the activating paddle is in good condition. Reinstall switch and assure that electrical connections are tight. C. TANK, EXPANSION: Inspect inside of expansion tank for rust, corrosion, etc. as well as construction permits. Wipe down outside of tank and check for security of mounting and general condition. Clean inside of sight glass and reassemble using new gauge glass washers. D. WATER FEEDER/PRESSURE REDUCING VALVE: Clean water inlet strainer on the automatic water feeder and/or the pressure-reducing valve. Assure that device operates properly and closes at appropriate level/pressure. E. PACKING, PUMP: On pumps with packing glands (as opposed to those with mechanical seals) remove the packing. Inspect the surface the packing rides on, (either the shaft or sleeves) and assure that all water passages to the packing gland are open. Repack the pump with the proper type packing and according to the pump manufacturer's specifications. CAUTION: Do not over torque the packing gland nuts. F. EQUIPMENT. WATER TREATMENT: Clean and inspect chemical water treatment devices and equipment. Check tanks and equipment for general condition. Inspect testing apparatus. CAUTION: Always wear appropriate safety gear, i.e. Goggles, Rubber Apron, Rubber Gloves and Face Shield. G. STRAINERS: Remove each water strainer cover, clean strainer basket and inside of strainer body. Inspect strainer basket for condition. Re-assemble strainer. H. STRAINER CYCLE: Remove cover from strainer cycle equipment. Clean, inspect and re-assemble according to manufacturer's instructions.

Preventive Maintenance Task Narratives
35
TASK 0302: MAJOR INSPECTION AND MAINTENANCE PLUS STARTUP OF CHILLED WATER SYSTEMS (CONTINUED): I. MOTOR, ELECTRIC: As well as design permits, visually inspect internal motor surfaces for dirt accumulations, bearing lubricant overflow and general condition. Check pump, motor and coupling guard for security of mounting and general condition. J. COUPLING. DRIVE: Inspect the drive coupling for defects and wear. Check alignment and tightness. Check lubrication if applicable. K. SWITCH. ELECTRIC DISCONNECT: Check the disconnect switch and starter for tight electrical connections, signs of overheating, general condition and proper manual operation. Tighten connections as required. Lubricate with proper lubrication if required. Check condition of contacts. Check overload heater and fuse size. Check security of mounting. L. SYSTEM:
1. Assure that related refrigeration and condensing systems are in an operational mode. 2. 2. Determine that all valves in the system are in their proper position for filling with
water. Assure that all strainer bodies have been closed.
3. Start filling system with water, observing for leaks and bleeding air as necessary as the system fills.
4. Check that air vents are working properly.
5. When filled and in conjunction with the related refrigeration and condensing system,
turn the chilled water pump(s) on. Again, check the entire system for leaks. Observe that the proper pressures are being maintained.
6. Initiate water treatment following locally prescribed method.
M. CONTROLS:
1. Check the operation of all automatic control equipment such as pressuretrol, flow switches, water treatment equipment, chilled water valves, etc.
2. Set controls for unattended operation as locally prescribed.
N. VALVES: Operate all manual/motorized valves on the system from full open to full closed. Adjust packing and lubricate stems as required. Return valve to its appropriate position.

Preventive Maintenance Task Narratives
36
TASK 0302: MAJOR INSPECTION AND MAINTENANCE PLUS STARTUP OF CHILLED WATER SYSTEMS (CONTINUED): O. VALVE. RELIEF: Manually operate the water relief valve. Assure valve reseats properly.

Preventive Maintenance Task Narratives
37
TASK 0303: SHUT DOWN OF CHILLED WATER SYSTEMS: NOTE: A locally devised checklist that lists the proper position for each valve for shut down and start up can be helpful. A. PUMP: Before shutting system down, observe the operation of the pump and motor to identify the need for major maintenance or repairs during the shut down period, such as disassembly of the pump or motor. B. SWITCH. ELECTRIC DISCONNECT:
1. Turn electrical power off to all chilled water pumps and related chemical treatment equipment.
2. Check the disconnect switch and starter for tight electrical connections, signs of
overheating, general condition and proper manual operation. Tighten connections as required. Lubricate with proper lubrication if required. Check condition of contacts. Check overload heater and fuse size. Check security of mounting.
C. COIL. CHILLED WATER: Where there is a possibility of freezing the coils during the shut down period, they should be flushed with an anti-freeze solution. D. SYSTEM: All components that are not subject to freezing temperatures should be left filled with water. E. VALVES: All valves should be left in the appropriate position for the particular system.

Preventive Maintenance Task Narratives
38
04 AIR HANDLING SYSTEMS: CAUTION: FOLLOW LOCKOUT/TAGOUT PROCEDURES. TASK 0401: MINOR INSPECTION AND MAINTENANCE OF AIR HANDLING SYSTEM A. HUMIDIFIER: Check humidifier for proper operation, scale, corrosion and general condition. This could include floats, float valves, spray heads and strainer elements. Check the controlling humidistat for proper operation, calibration and set point. Clean pan, spray heads, and/or other parts as required. B. COMPRESSOR, CONTROL AIR: Check oil level, inspect for oil leaks. Check operation of operating control and visually inspect relief valve. Operate relief valve manually. Drain accumulated water from bottom drain valve on tank, filter and condenser. Check operation of automatic drain. C. DRIER, CONTROL AIR, FILTER TYPE: Remove old drier core and inspect shell for cleanliness and moisture. Install new drier core. D. AIR FILTERS: NOTE: Since it is difficult to determine visually whether high efficiency filters are dirty it is recommended that all high efficiency filter banks (65% and higher) be equipped with draft gauges to determine when the filters require changing.
1. With system in operation, read filter draft gauge to determine the condition of the filters or visually inspect the filters for excessive accumulations of dirt, dust and combustible accumulations. Check air filter seal at filter bank for leakage. Avoid unfiltered by-pass air. Replace the filters as required.
2. If the system is not equipped with a draft gauge the length of time the filters have been
in service combined with the time until the next scheduled P.M. should be taken into account to determine if the filters need to be changed, regardless of the appearance of the filters.
E. PAN AND DRAIN: Clean the condensate pan and drain, determine that the drain and pump are working properly. Inspect for rust and general condition.

Preventive Maintenance Task Narratives
39
TASK 0402: INSPECTION AND MAINTENANCE OF AIR HANDLING SYSTEMS: A. COMPLETE TASK 0401: B. BEARINGS, FAN AND MOTOR: Listen to fan and motor bearings for unusual noise. Hand check bearing housings for excessive heat. Add a small amount of proper lubricant, if required. DO NOT OVER LUBRICATE! C. BELTS: Adjust the tension and the alignment of the drive belts and sheaves as required. Check the condition of the belts and sheaves. IT IS IMPORTANT TO REPLACE THE BELTS BEFORE THEY FAIL, signs of impending failure can include glazing, cracks or unusual noises. Check the belt guard for condition and proper mounting.

Preventive Maintenance Task Narratives
40
TASK 0403: MAJOR INSPECTION AND MAINTENANCE OF AIR HANDLING SYSTEMS: A. COMPLETE TASK 0402: Complete work indicated in task 0402, A through C as required. B. FAN, ALL TYPES: Inspect for cleanliness and general condition. Clean and inspect interior portion of fan coil units. C. MOTOR, ELECTRIC FAN: Clean all external surfaces. As well as design permits, visually inspect internal surfaces for dirt accumulations, bearing lubricant overflow and general condition. Check the security of mounting. Inspect the starter and/or disconnect switch for tightness of connections, evidence of overheating, general condition and proper manual operation. Tighten connections as required. Check condition of contacts. Check overloads heaters and fuses for proper size. D. BEARINGS, FAN AND MOTOR: Listen to fan and motor bearings for unusual noise. Hand check bearing housings for excessive heat. Add a small amount of proper lubricant, if required. DO NOT OVER LUBRICATE! E. COUPLING, DRIVE: Check drive coupling for defects, wear alignment and tightness. Check lubrication, if applicable. F. PLENUM, AIR HANDLING AND DUCT WORK:
1. Inspect for dirt accumulation, general condition and excessive air leaks. Inspect for unintentional openings, all ceiling tiles in place, proper layout for air distribution, supply diffuser open and balanced. Check for short-circuiting or other air distribution problems. Inspect internal sheet metal, filter frames and cooling and heating coils for rust, corrosion, cleanliness and general condition. Inspect plenum doors, gaskets and hardware.
2. Determine that the system is operating according to the sequence of operation. Care
should be given that the IAQ guidelines are followed. In addition to determining that there is the proper amount of outside air intake the following items should be noted:
a. Check for dust or dirt in ductwork or other components.
b. Check for microbiological growth (green slime) in drip pans, humidifiers,
ductwork and coils.
c. Care should be given in the use of biocides, sealants and cleaning compounds.

Preventive Maintenance Task Narratives
41
TASK 0403: MAJOR INSPECTION AND MAINTENANCE OF AIR HANDLING SYSTEMS (CONTINUED): As an approximation, the percent of outside air intake may be calculated by measuring the temperature in the return air, the outside air and the air at the filter section (mixed air) and using the temperature readings in the following equation. %, Ventilation air = 100 x (Tma- Tra) / (Toa- Tra) Where: Tma = temperature of the mixed air Tra = temperature of return air Toa = temperature of outside air Example: Tma = 83 degrees F Tra = 78 degrees F Toa = 100 degrees F % Ventilation air = 100 x (83-78)/ (100-78) = 100x5/22 = 22.7% G. INTAKE. OUTSIDE AIR: To meet IAQ guidelines check that the outside air intake minimum position setting agrees with the design standards in the sequence of operations. Cause dampers/actuators to go to minimum position. Ensure linkages have not been moved and that the dampers in fact maintain a minimum position. H. HUMIDIFIER. SPRAY TYPE: Add small amount of proper lubricant to pump and motor bearings, if required. DO NOT OVER LUBRICATE! Inspect pump, motor and associated starter equipment for general condition and tight electrical connection. Inspect drive coupling for tightness and alignment. I. COMPRESSOR. CONTROL AIR:
1. Observe operation of compressor, check for overheating and/or exceptional cycle time, (i.e. 1/3 ON -2/3 OFF). Check operation of relief valve.
CAUTION: DO NOT ALLOW PRESSURE TO EXCEED THE MAXIMUM ALLOW ABLE WORKING PRESSURE MARKED ON THE A.S.M.E. DATA PLATE.
2. Change compressor oil. Clean or replace air intake filter/strainer. Check operation of automatic start/stop control and/or alternator switch. Clean external surfaces of compressor, motor and tank. As well as design permits, visually inspect the internal surfaces of the drive motor for dirt accumulations, bearing lubricant overflow and general condition. Check inside of air storage tank as well as construction allows. Visually inspect control air dryer.

Preventive Maintenance Task Narratives
42
TASK 0403: MAJOR INSPECTION AND MAINTENANCE OF AIR HANDLING SYSTEMS (CONTINUED):
3. Inspect the starter and/or disconnect switch for tightness of connections, signs of
overheating, general condition and proper manual operation. Tighten connections as required. Check condition of contacts. Check overload heaters and fuses for proper size. Lubricate operating linkage with proper lubricant, if required.
4. Adjust the tension and the alignment of the drive belts and sheaves as required. Check
the condition of the belts and sheaves. IT IS IMPORTANT TO REPLACE THE BELTS BEFORE THEY FAIL, signs of impending failure can include glazing, cracks or unusual noises. Check the belt guard for condition and proper mounting.
J. CONTROLS. TEMPERATURE OR HUMIDITY: NOTE: It may be helpful to use a locally devised checklist identifying each control installed on the specific system that is being started up. Determine that the system is operating according to the sequence of operation. Care should be given that the energy guidelines are followed so that excess energy is not being expended in heating or cooling the space. Check the operations, calibration and setting of all operating controls. These would include some or all of the following and may include controls that do not appear in this list:
- Control Thermostat - Static Thermostat - Chilled water temperature sensing device(s) - Conditioned space, return air and supply air temperature or relative humidity sensing
devices - Outside temperature and humidity
K. DAMPER. MOTORIZED: Disconnect damper linkage. Assure that dampers move freely by hand. Lubricate pivot points with a dry type lubricant that will not rust. Reconnect damper linkage and assure that dampers operate properly. Test the thermostat or control device to ensure that the motorized damper works. L. FIRESTATS/FREEZESTATS: Check for security of mounting, proper operation and set point. M. SYSTEM. SMOKE CONTROL AND/OR EVACUATION: Simulate conditions to operate purge system. Observe that all dampers and fans operate properly. N. DRIER. REFRIGERATED. CONTROL AIR: Clean condenser coil. Check for proper operation. Clean, drain, and/or replace filters, etc.

Preventive Maintenance Task Narratives
43
TASK 0404: FIRE/SMOKE DAMPER INSPECTION AND MAINTENANCE: A. GENERAL:
1. Fire/smoke dampers should be maintained according to manufacturer's instructions and frequency recommendations.
2. Proper testing of smoke dampers requires an understanding of the smoke control
strategy and sequence of operation in that facility.
3. It is recommended that dampers normally be tested with fan system airflow to ensure they close and are not held open by the air stream. Care should be taken to ensure that tests are performed safely and do not cause damage. Use of an MOP could be required.
4. The use of an inspection form is required. The form should show the equipment
location, inspection frequency, test date, inspector, and record of discrepancies found. B. DAMPER TESTING:
1. Follow manufacturer's recommendations to activate the device. If no frequency recommendation exists you should follow recommendations in NFPA 90A including:
a. Examine each damper every 2 years to ensure that it is not rusted or blocked;
giving attention to hinges and other moving parts and operate the damper to ensure proper closing.
b. Every 4 years Fire Damper fusible links shall be removed; all dampers shall be
operated to verify that they fully close. The latch, if provided, shall be checked and moving parts lubricated as necessary.
Summary: If manufacturer's recommendations are not available follow NFPA 90A maintenance recommendations for fire/smoke/floor dampers. Normally this would be 2-year maintenance on dampers without fusible links and 4 year maintenance on dampers with fusible links.

Preventive Maintenance Task Narratives
44
TASK 0405: VISUAL INSPECTION OF INDUCTION UNIT: A. GENERAL: Visually inspect the filters (Replace filters as needed), motorized dampers and coils for maintenance needs. Check for proper operation.

Preventive Maintenance Task Narratives
45
TASK 0406: INSPECTION AND MAINTENANCE OF EMERGENCY GENERATOR AIR INTAKE DAMPERS AND FILTERS: A. GENERAL: Visually inspect the filters and motorized dampers. Clean and replace as needed.

Preventive Maintenance Task Narratives
46
05 HEATING SYSTEMS: CAUTION: FOLLOW LOCKOUT/TAGOUT PROCEDURES. TASK 0501: INSPECTION AND MAINTENANCE OF STEAM BOILERS: NOTE: LOCAL CODE REQUIREMENTS SUPERSEDE THESE INSTRUCTIONS. A. BOILER. CAST IRON OR STEEL: Observe flame and operating conditions. Check for oil, water and steam leaks. Check for proper water level. Observe system pressure gauge to determine that the system is within the normal pressure range. Check oil reservoir for proper level. Drain mud legs until water runs clear. Log steam boiler blow down in the equipment logbook. The equipment logbook should be on site. B. LOW WATER CUT-OFF: With the burner running, open the quick opening valve until water runs clear. Check to see that burner shuts down. NOTE: If this control is also an automatic water feeder, listen to hear make up water feeding into boiler and then shutting off as the float rises. Re-set the control, if applicable. C. AUTOMATIC WATER FEEDER: Operate the quick opening valve open, then closed and listen to hear the make up water feeding into the boiler and then shutting off as the float rises. D. GAUGE GLASS. BOILER WATER: Test water column and gauge glass by opening drain quickly to void small quantity of water. Open tri-valve on column and flush out sediment. E. EQUIPMENT. WATER TREATMENT: Take sample of water from system with boiler at operating temperature and after letting water run for fifteen (15) seconds. Test water sample using appropriate test kit(s). Add chemicals as needed. Log steam boiler water testing in the equipment logbook. CAUTION: Always use appropriate safety gear, (i.e. Goggles, Face Shield Rubber Apron and Gloves) F. VALVE. SAFETY: Open valve for 2-3 seconds. Let valve snap closed. Do not operate valve when boiler is cold. Leaking valves must be replaced. Check that properly sized valve is installed. NOTE: Safety valves for steam boilers are rated in Pounds/Hour. The valve must be sized to exceed the rated capacity of the boiler and not exceed the allowable working pressure of the boiler.

Preventive Maintenance Task Narratives
47
TASK 0502: INSPECTION AND MAINTENANCE OF STEAM AND HOT WATER BOILERS: NOTE: LOCAL CODE REQUIREMENTS SUPERSEDE THESE INSTRUCTIONS. A. COMPLETE TASK 0501 (steam boilers only): Complete only if required by local code. Copy of code must be provided and kept on file. B. VALVE, SAFETY RELIEF (hot water boilers): Operate lift lever to see that valve operates and reseats without leaking. Boiler should be at normal operating temperature and/or pressure. Leaking valves must be replaced immediately. Check that properly sized valve is installed. NOTE: Safety relief valves for hot water boilers are rated in BTU/Hour. The valve must be sized to exceed the rated capacity of the boiler and not exceed the allowable working pressure. C. VALVE, SAFETY SHUTOFF. FUEL OIL/GAS: With burners firing, trip each safety shutoff valve by cutting off its holding medium (electricity or pressure) to determine whether it closes tightly within the normal time (usually within five (5) seconds). See that covers on main safety shutoff valves are properly installed and sealed in place. D. TIGHTNESS TEST: VALVE. GAS. SINGLE SAFETY SHUTOFF: (Tightness testing procedures may differ from these depending on gas train components and configuration). To conduct this test, there must be a valve downstream from the safety valve with a test valve between the two. 1. Trip safety shutoff valve.
2. Close valve. 3. Remove pipe cap from test valve and install a rubber hose.
4. Open test valve to vent trapped gas.
5. Hold rubber hose just barely under the surface of some water in a small container.
6. If no bubbling occurs, the safety shutoff valve is tight.
7. If there are bubbles, the safety valve is leaking and must immediately be cleaned,
overhauled or replaced as required.
Preventive Maintenance Task Narratives
48
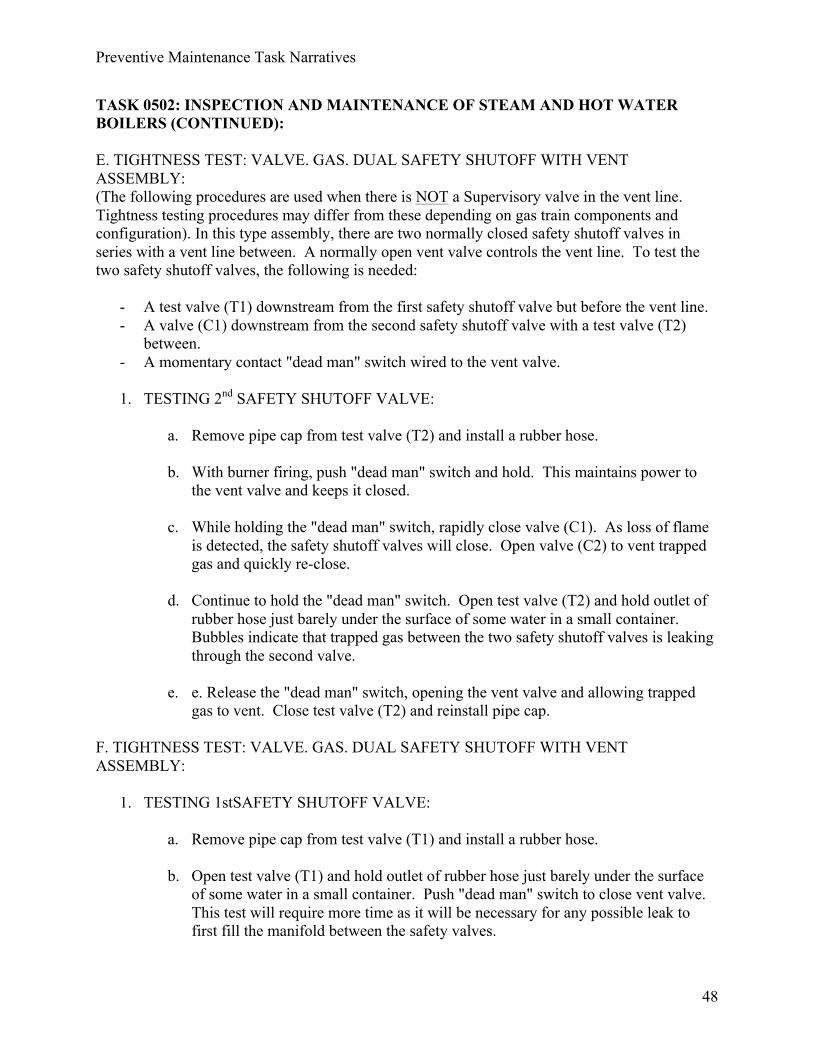
TASK 0502: INSPECTION AND MAINTENANCE OF STEAM AND HOT WATER BOILERS (CONTINUED): E. TIGHTNESS TEST: VALVE. GAS. DUAL SAFETY SHUTOFF WITH VENT ASSEMBLY: (The following procedures are used when there is NOT a Supervisory valve in the vent line. Tightness testing procedures may differ from these depending on gas train components and configuration). In this type assembly, there are two normally closed safety shutoff valves in series with a vent line between. A normally open vent valve controls the vent line. To test the two safety shutoff valves, the following is needed:
- A test valve (T1) downstream from the first safety shutoff valve but before the vent line. - A valve (C1) downstream from the second safety shutoff valve with a test valve (T2)
between. - A momentary contact "dead man" switch wired to the vent valve.
1. TESTING 2nd SAFETY SHUTOFF VALVE:
a. Remove pipe cap from test valve (T2) and install a rubber hose. b. With burner firing, push "dead man" switch and hold. This maintains power to
the vent valve and keeps it closed.
c. While holding the "dead man" switch, rapidly close valve (C1). As loss of flame is detected, the safety shutoff valves will close. Open valve (C2) to vent trapped gas and quickly re-close.
d. Continue to hold the "dead man" switch. Open test valve (T2) and hold outlet of
rubber hose just barely under the surface of some water in a small container. Bubbles indicate that trapped gas between the two safety shutoff valves is leaking through the second valve.
e. e. Release the "dead man" switch, opening the vent valve and allowing trapped
gas to vent. Close test valve (T2) and reinstall pipe cap.
F. TIGHTNESS TEST: VALVE. GAS. DUAL SAFETY SHUTOFF WITH VENT ASSEMBLY:
1. TESTING 1stSAFETY SHUTOFF VALVE:
a. Remove pipe cap from test valve (T1) and install a rubber hose. b. Open test valve (T1) and hold outlet of rubber hose just barely under the surface
of some water in a small container. Push "dead man" switch to close vent valve. This test will require more time as it will be necessary for any possible leak to first fill the manifold between the safety valves.

Preventive Maintenance Task Narratives
49
TASK 0502: INSPECTION AND MAINTENANCE OF STEAM AND HOT WATER BOILERS (CONTINUED):
c. Bubbles indicate the first safety shutoff valve is leaking.
d. Close test valve (T1) and reinstall pipe cap. 2.TESTING OF VENT VALVE:
a. To test the vent valve, a Supervisor valve is needed downstream from the vent
valve with a test valve between. The supervisory valve needs to have D.P.D.T contacts. With the valve in the open position, the N.C. contacts allow normal operation of the safety and vent valves. When closed, the boiler combustion control panel power is disconnected from the valves and the N.O. contacts, using a power source independent from the boiler control panel, opens the first safety valve and closes the vent valve. The second safety valve stays closed.
b. Remove pipe cap from test valve and install a rubber hose. Open test valve and
hold outlet of rubber hose just barely under the surface of some water in a small container.
c. Bubbles indicate a leaking vent valve.
Leaking valves must immediately be cleaned, overhauled or replaced. G. CONTROL. BOILER HIGH-LIMIT (PRESSURETROL OR AQUASTAT): With electric power turned off, install a "dead man" type shunt cord across the terminals of the boiler operating controls. Turn power on and observe that the burner stops when the pressure or temperature reaches the set point of the manual reset high limit control. Allow the pressure or temperature to go below the set point of the operating control. With power off, remove the shunt cord. Turn power on and check to see that the high limit control is still locked out. Reset the high limit control and observe that the burner shuts down when the pressure or temperature reaches the set point of the operating control. Visually inspect for leaks and general conditions. H. CONTROL. COMBUSTION SAFEGUARDS: With burners firing, institute flame failure by closing burner valves, or simulate failure by disconnecting or shielding the flame sensor. The safety valves should close within four (4) seconds of flame failure. Clean and inspect flame-sensing devices for needed replacement. Also check the installation dates on electronic vacuum tubes to assure the replacement program is being followed.

Preventive Maintenance Task Narratives
50
TASK 0502: INSPECTION AND MAINTENANCE OF STEAM AND HOT WATER BOILERS (CONTINUED): I. SWITCH. FUEL OIL TEMPERATURE: Simulate an unsafe fuel oil temperature condition and see that the safety shutoff valve closes. For high temperature switches, adjust the switch setting down until the load contact opens. For low temperature switches, adjust the switch setting upwards until the load contact opens. Reset switch to proper cut-in and cutout. J. SWITCH. FUEL OIL PRESSURE: Simulate an unsafe fuel oil pressure condition and see that the safety shutoff valve closes. For high pressure switches, adjust the switch setting down until the load contact opens. For low pressure switches, turn the supervised pressure medium off and on, and observe that the load contacts open and close properly. Reset switch to proper cut-in and cutout. K. SWITCH. COMBUSTION AIR PROVING: With fans operating, open switch contact by either removing fan shaft rotation sensing contact or air pressure sensing probe. Verify that the safety shutoff valve closes within approximately five (5) seconds after switch opens. NOTE: Shutting off the fan to test this function should be avoided as it places the firebox in a dangerous condition susceptible to explosion. L. SWITCH. LOW GAS PRESSURE: Check that cut-in and cutout settings of the switch are within manufacturer's suggested limits for this burner. Turn the supervised pressure medium off and on and observe that the load contact opens and closes properly and that the burner shuts down. M. SWITCH. HIGH GAS PRESSURE: Check that cut-in and cutout settings of the switch are within manufacturer's suggested limits for this burner. Adjust switch setting down until the load contact opens and the burner shuts down. Reset the switch to proper cut-in and cutout. N. RELAY. NON-RECYCLING IGNITION: With burner running, de-energize the safety shutoff valve(s). After the fire goes out and the flame relay drops out, immediately re-energize the safety shutoff valve(s) and observe that the fire does NOT re-ignite. O. DETECTOR, FLAME: With the burners firing, disconnect or shield the flame sensor and observe that the failure response time to close the safety shutoff valve(s) is within five (5) seconds.

Preventive Maintenance Task Narratives
51
TASK 0502: INSPECTION AND MAINTENANCE OF STEAM AND HOT WATER BOILERS (CONTINUED): P. BURNER. LOW PRESSURE ATOMIZING:
1. Check oil reservoir for proper level. Inspect burner nozzle assembly, air intake damper, air nozzle and air filter. Wipe down burner.
2. Clean and inspect the primary air fan housing and primary air inlet ports. Clean,
inspect and adjust ignition electrodes and their high voltage wiring. Clean oil strainers. Q.BURNER. ROTARY CUP: Check lubricating oil level. Clean cup and air diffuser. Check modulating fire operation (if applicable). Wipe down burner and drip pan. R. PUMP. FUEL OIL RECIRCULATING: Inspect packing or seal for leakage. Inspect pump and shaft for wear and condition. Check pump for proper operation. Check float assembly and/or relief valve, if applicable. Inspect base and mountings. S. BELTS. DRIVE (PUMP. BURNER OR FAN): Adjust the tension and the alignment of the drive belts and sheaves as required. Check the condition of the belts and sheaves. IT IS IMPORTANT TO REPLACE THE BELTS BEFORE THEY FAIL, signs of impending failure can include glazing, cracks or unusual noises. Check the belt guard for condition and proper mounting. T. STRAINER. HEAVY OIL (#4 and higher): Remove cover and strainer element. Clean strainer and reassemble. U. TANK. CONDENSATE RETURN: (Steam Boilers Only) Check float and linkage for condition and operation. Check contact, float or vacuum switch for operation. V. PUMP. CONDENSATE RETURN: (Steam Boilers Only) Inspect packing or seal for leakage. Inspect pump and shaft for wear and condition. Check pump for proper operation. W. INTAKE. BOILER ROOM AIR: Check for obstructions, clean screening. (Screening shall be one-half inch minimum mesh, free of any filters). X. FAN. DRAFT: Check fan for proper operation.

Preventive Maintenance Task Narratives
52
TASK 0502: INSPECTION AND MAINTENANCE OF STEAM AND HOT WATER BOILERS (CONTINUED): Y. PUMP, HOT WATER CIRCULATING: Inspect packing or seal for leakage. Inspect pump coupling and shaft for wear and condition. Check pump and controls for proper operation. Z. TANK. EXPANSION: Check gauge glass for proper water level. If level is high, bleed off. Check for leaks. Za. TANK. FUEL OIL STORAGE: Check fuel oil tank for adequate oil supply. Zb. SWITCH/CONTROL (OTHER): Check for proper operation and setting. Zc. EQUIPMENT. WATER TREATMENT (hot water boilers): Take sample of water with boiler at operating temperature and after letting water run for fifteen (15) seconds. Test water samples using appropriate test kit(s). Add chemicals as needed. Always wear appropriate safety gear, i.e. Goggles, Face Shield Rubber Apron and Gloves. Zd. BEARINGS. ALL TYPES: Check all bearings for unusual noise, vibration or excessive operating temperature. Add small amount of proper lubricant only if required. DO NOT OVER LUBRICATE!

Preventive Maintenance Task Narratives
53
TASK 0503: WATERSIDE INSPECTION AND MAINTENANCE OF HEATING BOILERS: NOTE: This Work operation should be coordinated with the annual Insurance Carrier Inspection, Local or State inspections. A. BOILER, STEEL: Drain boiler; remove all access covers, and any other means of access to the waterside. Remove all plugs from the piping to the water level controls. Remove pressuretrol from pigtails. Clean and inspect the piping to all controls. Flush the waterside to remove all mud and other solids. Determine that all pigtails are made of nonferrous metal (brass or copper) and reinstall pressuretrol with the mercury tube at right angles to the pigtail loop. Close up boiler using new gaskets and pipe dope as required. Fill boiler to proper water level. After boiler is filled, water should be circulated, and if water treatment is required water should be tested as necessary. B. BOILER, CAST IRON: Check all external header nipples for signs of leakage. Drain a small amount of water from mud legs or low point of boiler. If an accumulation of dirt or other solid matter is present this may indicate a leak in the system. Determine that all pigtails are made of non-ferrous metal (brass or copper) tube and should be at right angles to the pigtail loop. Close up the boiler using new gaskets and pipe dope as required. Check for leaks. C. LWCO OR COMBINATION LWCO/AUTO WATER FEED: Remove head assembly and float and/or electrodes. Clean and inspect the inside of the housing and all internal parts. Remove and clean the strainer. Reassemble using new gaskets. D. WATER PRESSURE REDUCING VALVE: Dismantle and clean internal parts. Inspect valve disc and seat for corrosion. Reassemble. E. MANUAL VAL VES (OVER 2 INCH): Operate fully to open and closed position, check stem, lubricate if necessary. Check packing, restore to normal position. Install new seal on special valves, which are required to be sealed in a given position. F. TRAP, BOILER RETURN: Disassemble, clean and check for proper manual operation. Clean mud leg if one is installed in piping. G. STRAINER. CONDENSATE. STEAM OR WATER: Remove cap, Remove and clean basket. Reassemble. H. ANODE INSPECTION / REPLACEMENT Check anodes for signs of deterioration. Replace as required.

Preventive Maintenance Task Narratives
54
TASK 0504: FIRESIDE AND ACCESSORY INSPECTION AND MAINTENANCE OF HEATING BOILERS: NOTE: This work operation should be coordinated with Task 0503 and the Local and State Inspection A. BOILER: Clean and inspect the tubes, combustion chamber, checker board, breaching, stack and any other flue gas passes. Clean and inspect the barometric, secondary air and breaching dampers. Clean sampling tube to draft switch/control. B. BURNER. LOW PRESSURE ATOMIZING OR ROTARY CUP: Clean and inspect the primary air fan housing and primary air inlet ports. Clean, inspect and adjust ignition electrodes and their high voltage wiring. C. BURNER. HIGH PRESSURE ATOMIZING OR GUN TYPE: Replace nozzle(s) and oil filter cartridge (No.2 oil only). Clean fan and air passages. D. BURNER. POWER. GAS: Inspect for cleanliness and general condition. Inspect, clean and adjust ignition electrodes. Lubricate linkage if required. E. BURNER. ATMOSPHERIC. GAS: Clean and inspect, for rust, cracks, etc. F. FAN. DRAFT. FORCED OR INDUCED: Clean and inspect for general condition. G. PUMP. FUEL OIL (NOT INTEGRAL TO BURNER): Inspect shaft and pump for wear and corrosion. Check gear reducer. Check operation of relief valves. Clean base and inspect for general condition. H. DETECTOR. FLAME: With the burners firing, disconnect or shield the flame sensor and observe that the failure response time to close the safety shutoff valve(s) is within five (5) seconds. I. MOTOR. ELECTRIC. ALL: Clean external surfaces and inspect internal surfaces. Check the disconnect switch and starter for tight electrical connections, signs of overheating, general condition and proper manual operation. Tighten connections as required. Lubricate with proper lubrication if required. Check condition of contacts. Check overload heater and fuse size. Check security of mounting. J. COUPLING. DRIVE: Check drive coupling for defects, wear alignment and tightness. Check lubrication, if applicable.

Preventive Maintenance Task Narratives
55
TASK 0504: FIRESIDE AND ACCESSORY INSPECTION AND MAINTENANCE OF HEATING BOILERS (CONTINUED): K. TANK. STORAGE. FUEL OIL: Check for water and/or sludge accumulation. 1. For No.2 fuel oil use a paste indicator on a dipstick.
2. For No.4 fuel oil, use the tank bomb method.
L. VALVE. SAFETY SHUTOFF. FUELOIL NO. 4 OIL ONLY): Remove, dismantle and clean internal parts following the manufacturer's recommendations. Reassemble. M. CONTROL. COMBUSTION SAFEGUARD: With burners firing, institute flame failure by closing burner valves, or simulate failure by disconnecting or shielding the flame sensor. The safety valves should close within four (4) seconds of flame failure. Clean and inspect flame-sensing devices for needed replacement. Also check the installation dates on electronic vacuum tubes to assure the replacement program is being followed.

Preventive Maintenance Task Narratives
56
TASK 0505: START UP AND OPERATIONAL CHECK OF HEATING BOILERS: A. BOILER:
1. Determine that water level is sufficient, all valves and switches are in their proper
position and all local safety precautions have been observed. 2. Start the burner.
B. COMPETE TASK 0502: Complete work indicated in task 0502, A through Zc as required. C. BURNER EFFICIENCY: 0, Perform a combustion efficiency test including the following: 1. Net stack temperature 2. Flue gas CO2 or 02 3. Over-fire draft
4.Smoke spot test
Calculate efficiency and record as required by local jurisdiction. D. ELECTRIC BOILERS:
1. Check electrical connections for tightness and sign of over-heat discoloration. Tighten connections as required.
2. Use an ohmmeter to verify proper resistance and /or conductivity of heating elements. 3. Verify proper operation of element staging controller.

Preventive Maintenance Task Narratives
57
TASK 0506: SHUTDOWN OF HEATING BOILERS: A. BOILER. GAS/OIL: Shut down and secure boilers/burners and associated equipment as directed by local practice. NOTE: Due to the corrosive damage that can occur with soot left in a cold boiler, Task 0504 should have been scheduled in conjunction with this Task or very soon thereafter. B. BOILER. ELECTRIC: Shut down of electric boilers. Secure electrical power, lockout and tag out power source controls and components. Repair or replace as needed.

Preventive Maintenance Task Narratives
58
TASK 0507: INSPECTION AND MAINTENANCE OF HOT AIR FURNACES AND FIRED SPACE HEATERS: A. GENERAL: Inspect and clean filter plenum, burners and pans. Change air filter. Clean and lubricate the motor and fan. Inspect the general condition of the motor and fan, repair as required. Check atmospheric burners for general condition. Inspect heat exchanger for cracks to the extent possible without removing burners. B. BELTS: Adjust the tension and the alignment of the drive belts and sheaves as required. Check the condition of the belts and sheaves. IT IS IMPORTANT TO REPLACE THE BELTS BEFORE THEY FAIL, signs of impending failure can include glazing, cracks or unusual noises. Check the belt guard for condition and proper mounting. C. OPERATION: Start unit and check for proper operation. Check operation of all safety controls and the operating control. D. HIGH EFFICIENCY UNITS: In addition to the items above, special consideration should be given to systems that have high efficiency burners. Some items that should be considered are.
1. Check and seal, as needed the connections on the PVC vent piping. 2. Clean and flush the condensate drain with water to assure that it is draining properly.

Preventive Maintenance Task Narratives
59
TASK 0508: INSPECTION AND MAINTENANCE OF ELECTRIC HEATERS: A. GENERAL: Check general operation of suspended, baseboard and radiant electric heaters, including all associated safety switches, controls and cutoffs. Repair or replace as needed.

Preventive Maintenance Task Narratives
60
06 DOMESTIC WATER SYSTEMS: CAUTION: FOLLOW LOCKOUT/TAGOUT PROCEDURES. TASK 0601: INSPECTION AND MAINTENANCE OF DOMESTIC WATER SYSTEMS: A. HEATER. WATER (GAS. OIL OR ELECTRIC): Clean and inspect for general condition. Blow down from bottom valve until water runs clear. Check flame adjustment on gas fired units. B. SWITCH. ELECTRIC DISCONNECT: Clean and inspect for proper operation. Check condition of contacts and wiring. Check for tightness of electrical connections. Tighten connections as required. Check fuse and/or heater size, if applicable. Note: This task is for heavy-duty knife switch disconnects, not toggle or light switch type disconnects. C. POWER BURNER. OIL:
1. Check oil reservoir for proper level. Clean and inspect burner nozzle assembly, air intake damper, air nozzle and replace air filter. Wipe down burner.
2. Clean and inspect the primary air fan housing and primary air inlet ports. Clean,
inspect and adjust ignition electrodes and their high voltage wiring. Clean oil strainers.
D. BEARINGS. ALL TYPES: Check for proper operation, excess vibration, high temperature or unusual noise. Wipe bearing areas and add a small amount of the proper lubricant. DO NOT OVER LUBRICATE! E. MOTOR. ELECTRIC:
1. Clean external surfaces. As well as design permits, visually inspect internal surfaces for dirt accumulations, bearing lubricant overflow and general condition. Check security of mounting. Check drive coupling for defects, wear alignment and tightness. Check lubrication, if applicable.
2. Check associated starter for condition of contacts, tightness of electrical connections
and proper manual operation. Tighten connections as required. Add small amount of proper lubricant to linkage, if required. Check heater and fuse sizes, if appropriate.
3. After starting motor listen for unusual noises and indications of overheating.
F. STRAINER, WATER: Remove cover and strainer element. Clean strainer and reassemble.

Preventive Maintenance Task Narratives
61
TASK 0601: INSPECTION AND MAINTENANCE OF DOMESTIC WATER SYSTEMS (CONTINUED): G. PRESSURETROL (OR SIMILAR DEVICE): Disconnect control, clean out feed line, replace control and check for proper operation. H. TANK, WATER/AIR STORAGE: As well as construction permits, inspect inside of tank for rust, corrosion or oil accumulations. Check general condition. I. VALVE, MIXING: Check to determine that control operates at correct pressure and/or temperature. Assure that setting meets energy conservation guidelines where applicable. J. COOLER, DRINKING WATER:
1. Vacuum clean condenser coil and inside of cabinet. Check buttons or pedal and linkage, bubbler and throw of bubbler unit. Check drain to see that water drains properly. Check operation.
2. Replace filter element or clean strainer, if applicable.
K. FLOAT. PUMP CONTROL (OR OTHER TYPES): Inspect for holes, corrosion, proper adjustment and operation. Check float rods and guides. L. BACK-FLOW PREVENTER: Perform annual testing (state codes generally require certified technicians to complete this work). M. COMPRESSOR, AIR: Dismantle and clean compressor head. Inspect valve disc and seat for wear and corrosion. Re-assemble. Change oil. Clean air intake strainer. Inspect for oil and air leaks. Check operating control. Drain accumulated water from bottom valve on filter and condenser. Check for proper operation. N. VALVE. AIR COMPRESSOR RELIEF: Shunt the electric controls and allow the compressor to build up pressure to the relief valve set point. Check to see that the valve opens within 10 PSI of its setting. CAUTION: DO NOT ALLOW PRESSURE TO EXCEED THE MAXIMUM ALLOWABLE WORKING PRESSURE MARKED ON THE A.S.M.E. DATA PLATE. O. BELTS: Adjust the tension and the alignment of the drive belts and sheaves as required. Check the condition of the belts and sheaves. IT IS IMPORTANT TO REPLACE THE BELTS BEFORE THEY FAIL, signs of impending failure can include glazing, cracks or unusual noises. Check the belt guard for condition and proper mounting.

Preventive Maintenance Task Narratives
62
TASK 0601: INSPECTION AND MAINTENANCE OF DOMESTIC WATER SYSTEMS (CONTINUED): P. CONDITIONER. WATER:
1. Clean and inspect feed devices and equipment. Check tanks and gauges for general condition.
2. Observe for proper operation. Add salt or proper chemical as required.
Always wear appropriate safety gear, i.e. goggles, face shield rubber apron and gloves. Q. VALVE. MANUAL & AUTOMATIC {OVER 2 INCH): Operate fully to open and closed position, check stem, lubricate if necessary. Check packing, restore to normal position. Install new seal on special valves, which are required to be sealed in a given position. R. VALVE. WATER RELIEF: Operate lift lever to see that valve operates properly and reseats without leaking. Check that properly sized valve is installed. Hot water relief valves are rated in BTU/Hour and must be sized to exceed the rated capacity of the heater and not to exceed the allowable working pressure. S. SAFETY, GAS PILOT: NOTE: These instructions are for single standing (constant) pilots only. Other ignition systems should be checked for proper (safe) operation according to manufacturer's or local instructions.
1. Extinguish pilot. 2. Pilot safety control should close within two and one-half (2-1/2) minutes.
3. Check for proper closure and seating by attempting to light the pilot without touching
any of the pilot safety controls. PILOT SHOULD NOT RE-LIGHT.
T. THERMOSTAT. WATER TEMPERATURE: Check the water temperature to determine that whatever type control is used to start and stop the heating medium is working properly. U. PUMP. HOT WATER CIRCULATOR: 1. Determine that pump seal is not leaking and pump is properly operating. 2. Determine that the pump control and time clock are set and operating properly.

Preventive Maintenance Task Narratives
63
TASK 0601: INSPECTION AND MAINTENANCE OF DOMESTIC WATER SYSTEMS (CONTINUED): V. PUMP, WATER SUPPLY: 1. Determine the pump seal is not leaking and pump is properly operating. 2. Determine that all pressure and level controls are operating properly. W. DOMESTIC EYEWASH/SHOWER STATION: 1. Open the valve, and run eye wash water until it is clear. 2. Complete the same operation for the shower. 3. Remove the caps, and check strainers for condition. 4. Replace as needed.

Preventive Maintenance Task Narratives
64
TASK 0602: STARTUP OF LAWN SPRINKLER SYSTEMS: A. GENERAL: Open zone water valves. Turn on power to time clock and set at proper time and day. Check watering frequency and length. Check operation of time clock. Run each zone to verify proper operation. Adjust heads as required. Check for any evidence of underground piping water leak. Repair as needed.

Preventive Maintenance Task Narratives
65
TASK 0603: SHUTDOWN OF LAWN SPRINKLER SYSTEMS: A. GENERAL: Turn off power to time clock. Shut zone water valves. Open drain valves if applicable. Blow water out of sprinkler lines.

Preventive Maintenance Task Narratives
66
TASK 0604: MAINTENANCE OF PLUMBING FIXTURES: A. GENERAL: Restroom fixtures and other plumbing fixtures such as break room sinks and janitorial sinks are both a source of customer complaints and a water hazard to the buildings and their contents, especially telephone equipment and other electronic equipment. The intent of this task is to reduce both. The scope of this task covers the inspection and minor repairs of the fixtures and plumbing associated with them. Minor repairs are those repairs not requiring over fifteen minutes to complete. Major repairs will require a Work Order from the MAIN OFFICE. B. RESTROOM FIXTURES:
1. Inspect the toilets and urinals for proper operation, i.e. flush the toilets and urinals to ensure they flush properly and do not run continuously, inspect for leaks. Repair fixtures that do not flush properly or that leak.
2. Inspect the sinks for proper operation of faucets and drains, turn on and off the hot and
cold water to ensure that they operate smoothly and that the water turns off quickly and without excessive pressure, make sure the drains flow freely. Repair or replace faucets or drains that do not operate correctly or that leak.
3. Inspect the stalls and doors to ensure they operate correctly and that the mountings are
secure, check that the hinges and locks are in good shape repair as needed.
4. Pour a minimum of a gallon of water into each floor drain to ensure that the drain is not plugged and to replenish the water in the drain trap. Repair as required.
5. Inspect the general condition of the dispensers, i.e. are they mounted securely, do they
function properly. Check the lights in the restroom. If any problems are noted, report them to the MAIN OFFICE for correction.
C. BREAK ROOM AND JANITORIAL FIXTURES: Inspect the sinks for proper operation of faucets and drains, turn on and off the hot and cold water to ensure they operate smoothly and that the water turns off quickly and without excessive pressure, make sure the drains flow freely. Repair or replace faucets or drains that do not operate correctly or that leak.

Preventive Maintenance Task Narratives
67
07 SANITARY PLUMBING SYSTEMS: CAUTION: FOLLOW LOCKOUT/TAGOUT PROCEDURES. TASK 0701: INSPECTION AND MAINTENANCE OF SANITARY PLUMBING SYSTEMS A. PUMPS, SEWAGE EJECTOR OR SUMP: Inspect packing or seal for leakage. Inspect pump and shaft for wear and condition. Check pump for proper operation. Check float assembly and/or relief valve if applicable. Inspect base and mountings. Remove cover and strainer element. Clean strainer and re-assemble if applicable. B. BEARINGS, OIL: Check for proper operation, excess vibration, high temperature or unusual noise. Wipe bearing areas and add oil.

Preventive Maintenance Task Narratives
68
TASK 0702: INSPECTION AND MAINTENANCE OF SANITARY PLUMBING SYSTEMS: A. COMPLETE TASK 0701: B. MOTOR, ELECTRIC PUMP:
1. Check for proper operating temperature and clean external surfaces. Check associated starter, contactor and/or disconnect switch for tightness of connections and proper operating condition and operation. Tighten connections as required. Check contacts. Check heater and fuse sizes. Check security of mounting.
2. Inspect couplings for defects and wear. Check alignment. Check lubrication. Check
for proper clearance between couplings and re-tighten. C. BEARINGS, ALL:
1. OIL TYPE: Check for proper operation, excess vibration, high temperature and unusual noise. Wipe bearing areas and add oil.
2. GREASE TYPE: Check for proper operation and temperature. Check seals. Add
small amount of proper lubrication. Bearings submersed in water should be lubricated with Lubriplate 1200-2 or Marine type grease.
D. TANK. STORAGE: If hand hole is available, inspect inside of tank for rust, corrosion or oil accumulations. Check general condition and wipe down. Replace gauge glass and washers if applicable. E. PIT. SUMP: Inspect pit for dirt and sludge accumulations. Inspect covers for corrosion and general condition. CAUTION: This is a confined space; do not enter without taking proper precautions. F. SWITCH. ELECTRIC FLOAT: Clean switch assembly. Check condition of contacts and wiring. Check fuse and/or heater size if applicable. G. FLOAT. WATER: Inspect for holes, corrosion, proper adjustment and operation. Check float rods and guides. H. CHECK VALVE: Check for proper operation. (Check Manufacturer's Instructions, if required).

Preventive Maintenance Task Narratives
69
TASK 0703: INSPECTION AND MAINTENANCE OF PORTABLE TOILETS: A. GENERAL: Check condition of structure. B. CHEMICAL TOILETS: Check to see if sump needs pumped out. Check for proper fluid levels. Add as needed. Check for proper operation. C. ELECTRIC TOILETS: Check for proper operation. D. OUTHOUSES: Add lime or some other suitable chemical to control odor.

Preventive Maintenance Task Narratives
70
TASK 0704: WINTERIZATION OF CHEMICAL TOILETS: A. GENERAL: Add two (2) gallons of propylene glycol antifreeze to the chemical sump.

Preventive Maintenance Task Narratives
71
08 STANDBY POWER/UPS SYSTEMS: CAUTION: FOLLOW LOCKOUT/TAGOUT PROCEDURES. TASK 0801: INSPECTION OF BATTERIES FOR STANDBY (UPS) POWER SYSTEM CAUTION: Always wear appropriate safety gear, i.e. face shield, rubber apron and rubber gloves, due to potential hazards from battery acid and high current amperage levels. A. PILOT READINGS: Measure pilot cells and meter voltage. Check specific gravity and level of fluids. B. INSPECTION: Visually inspect for any damage, i.e., leaks, cracks, corrosion. C. FLUID LEVELS: Check fluid levels. Add fluids as required.

Preventive Maintenance Task Narratives
72
TASK 0802: STANDBY POWER SYSTEMS TEST: A. RUN ENGINE: Run emergency engine and generator for 30 minutes to ensure proper operation of Standby System. Take readings and log. Follow local instructions for "load" or "no load" tests. Check associated equipment (exhaust fans, batteries, etc.). B. START BATTERIES: Check engine start batteries for corrosion (clean as needed) and tighten terminals. Check fluid and refill as necessary. Check and log specific gravity. Replace batteries per manufacturer's specifications.

Preventive Maintenance Task Narratives
73
TASK 0803: INSPECTION AND MAINTENANCE OF BATTERIES FOR STANDBY POWER SYSTEMS: (Includes emergency lighting systems with multiple wet cell batteries.) A. COMPLETE TASK 0801: Complete work indicated in task 0801, A through C as required. B. BATTERY. SPECIFIC GRAVITY: Log specific gravity readings on the battery itself. (Follow appropriate safety procedures.) C. CONNECTIONS: Tighten all connections. (Follow appropriate safety procedures.)

Preventive Maintenance Task Narratives
74
TASK 0804: INSPECTION AND MAINTENANCE OF STANDBY POWER SYSTEMS (DIESELS AND TURBINES): A. COMPLETE TASK 0802: Complete work indicated in task 0802, A through B as required. B. SYSTEM: The following should be done on this equipment if applicable:
1. Test lubrication speed adjusting motor. Verify proper operation. 2. Sample and analyze lubrication oil. Replace oil as per manufacturer's
recommendations. 3. Inspect turbine nozzles.
4. Drain and clean fuel oil strainer. Replace oil filter. Check operation of fuel pump.
Inspect leaks and vibration.
5. Tighten all terminals. Remove and clean each battery connection.
6. Inspect air intake filters for cleanliness. Replace as required.
7. Check engine fan belts. Do not use belt dressing. It is important to replace belts before they fail. Evidence of wearing can include glazing, cracks or unusual noises. Check for pulley/sheaves alignment and condition. Check belt guard for proper mounting.
8. Check anti-freeze, condition and level.
9. Check all motors.
10. Check all safety devices as appropriate.
C. TANK, STORAGE, FUEL OIL: Check for water and/or sludge accumulation.
1. For No. 2 fuel oil, use a paste indicator on a dipstick. 2. For No. 4 fuel oil, use the tank bomb method.
3. Check Veeder Root systems for leaks and fuel levels.
D. TANK, DAY, FUEL OIL: Check the day tank for leaks. Check containment enclosure for cracks or damage that would jeopardize the effectiveness of the enclosure.
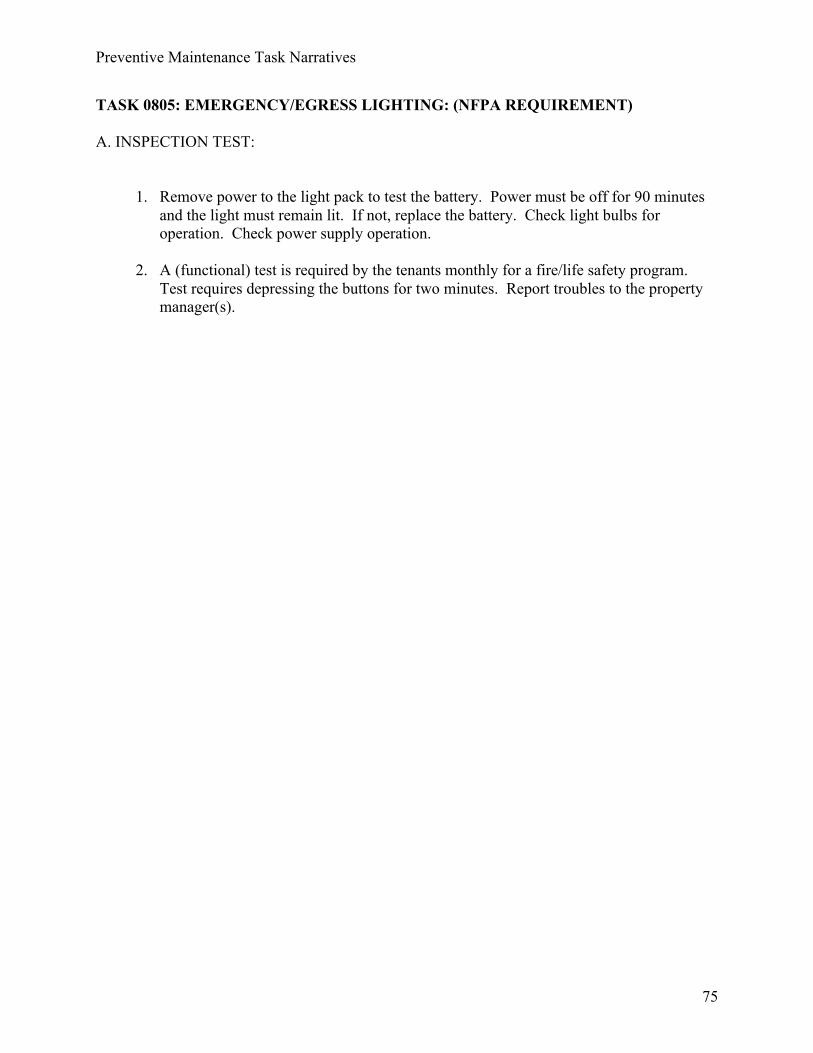
Preventive Maintenance Task Narratives
75
TASK 0805: EMERGENCY/EGRESS LIGHTING: (NFPA REQUIREMENT) A. INSPECTION TEST:
1. Remove power to the light pack to test the battery. Power must be off for 90 minutes and the light must remain lit. If not, replace the battery. Check light bulbs for operation. Check power supply operation.
2. A (functional) test is required by the tenants monthly for a fire/life safety program.
Test requires depressing the buttons for two minutes. Report troubles to the property manager(s).
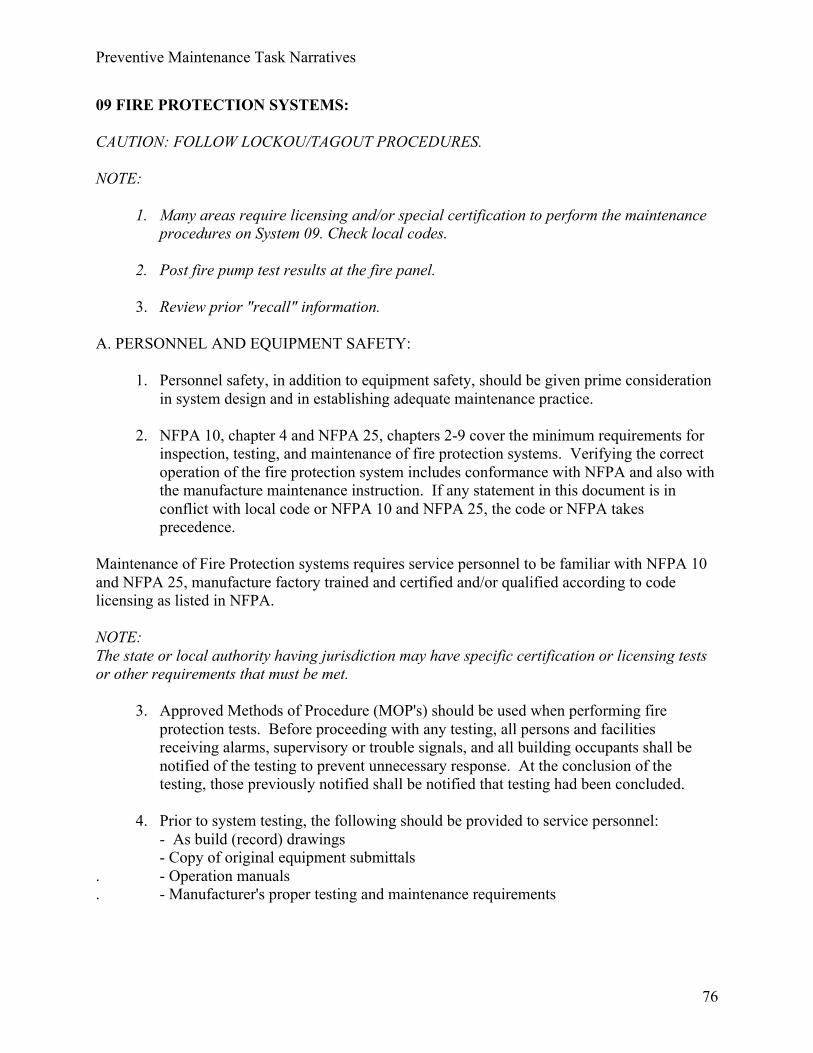
Preventive Maintenance Task Narratives
76
09 FIRE PROTECTION SYSTEMS: CAUTION: FOLLOW LOCKOU/TAGOUT PROCEDURES. NOTE:
1. Many areas require licensing and/or special certification to perform the maintenance procedures on System 09. Check local codes.
2. Post fire pump test results at the fire panel.
3. Review prior "recall" information.
A. PERSONNEL AND EQUIPMENT SAFETY:
1. Personnel safety, in addition to equipment safety, should be given prime consideration in system design and in establishing adequate maintenance practice.
2. NFPA 10, chapter 4 and NFPA 25, chapters 2-9 cover the minimum requirements for
inspection, testing, and maintenance of fire protection systems. Verifying the correct operation of the fire protection system includes conformance with NFPA and also with the manufacture maintenance instruction. If any statement in this document is in conflict with local code or NFPA 10 and NFPA 25, the code or NFPA takes precedence.
Maintenance of Fire Protection systems requires service personnel to be familiar with NFPA 10 and NFPA 25, manufacture factory trained and certified and/or qualified according to code licensing as listed in NFPA. NOTE: The state or local authority having jurisdiction may have specific certification or licensing tests or other requirements that must be met.
3. Approved Methods of Procedure (MOP's) should be used when performing fire protection tests. Before proceeding with any testing, all persons and facilities receiving alarms, supervisory or trouble signals, and all building occupants shall be notified of the testing to prevent unnecessary response. At the conclusion of the testing, those previously notified shall be notified that testing had been concluded.
4. Prior to system testing, the following should be provided to service personnel:
- As build (record) drawings - Copy of original equipment submittals
. - Operation manuals
. - Manufacturer's proper testing and maintenance requirements

Preventive Maintenance Task Narratives
77
09 FIRE PROTECTION SYSTEMS (CONTINUED):
5. Document all tests, and keep documentation on site in the Fire Safety Binder. Appropriate testing documentation should be kept on site; so historical trends can be evaluated. This should include the original acceptance documentation.
6. This document does not cover fire protection systems discussed in NFPA 12, 13, 17,
and 17a, which are normally found in kitchens. If any such fire protection equipment is encountered, it should be tested, inspected, and maintained in accordance with NFPA 96.
B. FREQUENCY OF MAINTENANCE: Recommended frequency of maintenance depends on environmental and operating conditions, so that no fixed rule can govern all applications. The following tasks fulfill the minimum requirements. If environmental and operating conditions require more frequent maintenance of certain systems, then it shall be done in accordance with the needs of the equipment. C. APPLICABLE CODES AND STANDARDS: All inspections and tests shall be in accordance with ASTM, state and local codes, OSHA, and applicable ANSI/NFPA codes.

Preventive Maintenance Task Narratives
78
TASK 0901: INSPECTION AND MAINTENANCE OF FIRE PROTECTION SYSTEMS: (WEEKLY): A. FIRE PROTECTION WATER STORAGE TANKS:
1. Heating systems, where provided, shall be inspected weekly during the heating season (40 degrees F {4 degrees C]) except when the tank heating system is not equipped with a supervised low water temperature alarm that is connected to a constantly attended location. It then shall be inspected daily.
2. Where the tank is subject to freezing, the water temperature shall be inspected weekly.
The coldest water temperature shall not be less than 40 degrees F (4 degrees C). If the tank is not equipped with a low water temperature alarm that is connected to a constantly attended location, it shall be inspected daily and have the results recorded.
B. FIRE PUMPS: The pertinent visual observations specified in the following checklists shall be performed weekly. 1. PUMP HOUSE CONDITIONS -CHECKLIST:
- Heat is adequate, not less than 40 degrees F (4.4 degrees C) {70 degrees F (21 degrees C) for pump room with diesel pumps without engine heaters.
- Ventilating louvers are free to operate. - Pump suction and discharge and bypass valves are fully open - Piping is free of leaks - Suction line pressure gauge is reading normal - System line pressure gauge is reading normal - Suction reservoir is full
2. ELECTRICAL SYSTEM CONDITIONS -CHECKLIST:
- Controller pilot light (power on) is illuminated - Transfer switch normal pilot light is illuminated - Isolating switch is closed- standby (emergency) source - Reverse phase alarm pilot light is off or normal phase rotation pilot light is on - Oil level in vertical motor sight glass is normal
3. DIESEL ENGINE SYSTEM CONDITIONS -CHECKLIST:
- The pertinent weekly visual observations for diesel pumps shall be performed in accordance with NFPA 25, chapter 5, and section 2.2.4
C. FIRE PUMP RUN TEST:
1. A weekly test of electric motor-driven pump assemblies shall be conducted without flowing water. This test shall be conducted by starting the pump automatically. The PUMP shall run a minimum of 10 minutes.

Preventive Maintenance Task Narratives
79
TASK 0901: INSPECTION AND MAINTENANCE OF FIRE PROTECTION SYSTEMS: (WEEKLY) (CONTINUED):
2. A weekly test of diesel engine-driven pump assemblies shall be conducted without
flowing water. This test shall be conducted by starting the pump automatically, and the PUMP shall run a minimum of 30 minutes.
The following run tests shall be performed weekly. Using the following checklist: 1. PUMP SYSTEM -CHECKLIST:
- Record the system suction and discharge pressure gauge readings - Check the pump packing glands for slight discharge - Adjust gland nuts if necessary - Check for unusual noise or vibration - Check for packing boxes, bearings, or pump casing for overheating - Record the pump starting pressure
2. ELECTRICAL SYSTEM -CHECKLIST:
- Observe the time for motor to accelerate to full speed - Record the time controller is on the first step (for reduced voltage or reduced current
starting) - Record the time pump runs after starting (for automatic stop controllers)
3. DIESEL ENGINE SYSTEM -CHECKLIST:
- Observe the time for engine to crank - Observe the time for engine to reach running speed - Observe the engine oil pressure gauge, speed indicator, water and oil temperature
indicators periodically while engine is running - Record any abnormalities - Check the heat exchanger for cooling water flow
D. VALVES:
1. All control valves shall be inspected weekly. If they are secured with locks, they shall be inspected monthly. The valve inspection shall verify that the valves are in the following condition:
- In the normal open or closed condition - Property sealed, locked, or supervised - Accessible - Provided with appropriate wrenches - Free from external leaks - Provided with appropriate identification
2. All fire pump circulation relief valves shall be inspected weekly. 3. All fire pump pressure relief valves shall be inspected weekly.

Preventive Maintenance Task Narratives
80
TASK 0902: INSPECTION AND MAINTENANCE OF FIRE PROTECTION SYSTEMS (MONTHLY): A. SPRINKLER SYTEMS:
1. Gauges on wet pipe sprinkler systems shall be inspected monthly to ensure that they are in good condition and that normal water pressure is being maintained.
2. Gauges on dry, pre-action, and deluge systems shall be inspected monthly to ensure
that normal air and water pressures are being maintained. Where air pressure supervision is not connected to a constantly attended location, the frequency of inspection shall be weekly.
B. FIRE PUMPS:
1. Monthly inspection, testing, and maintenance of electrical systems shall consist of the following: Exercise isolating switch and circuit breaker
2. Monthly inspection, testing, and maintenance of diesel engine systems shall be done
in accordance with NFPA 25, chapter 5, table 5.1, section D. C. FIRE PROTECTION WATER STORAGE TANKS:
1. Low water temperature alarms, where provided, shall be tested monthly (cold weather only).
2. High water temperature limit switches on tank heating systems, where provided, shall
be tested monthly whenever the heating system is in service. D. VALVES:
1. Alarm valves shall be inspected monthly. The valve inspection shall verify the following:
- The gauges indicate normal supply water pressure is being maintained - The valve is free of physical damage - All valves are in the appropriate open or closed position - There is no leakage from the retarding chamber or alarm drains
2. The pre-action or deluge valve shall be externally inspected monthly to verify the
following:
- The valve is free from physical damage - All trim valves are in the appropriate open or closed position - There is no leakage from the valve seat - Electrical components are in service

Preventive Maintenance Task Narratives
81
TASK 0902: INSPECTION AND MAINTENANCE OF FIRE PROTECTION SYSTEMS (MONTHLY) (CONTINUED):
3. The double check assembly (DCA) valves and double check detector assembly (DCDA) valve shall be inspected monthly to ensure that the OS& Y isolation valves are in the normal open position. Valves not secured with locks or electronically supervised in accordance with the applicable NFPA standards shall be inspected weekly.
4. Reduced pressure assemblies (RPA) and reduced pressure detector assemblies
(RPDA) shall be inspected monthly to ensure that the differential-sensing valve relief port is not continuously discharging and the OS& Y isolation valves are in the normal open position. Valves not secured with locks or electronically supervised in accordance with the applicable NFPA standards shall be inspected weekly.
E. COMPRESSOR. CONTROL AIR: Check oil level, inspect for oil leaks. Check operation of operating control and visually inspect relief valve. Operate relief valve manually. Drain accumulated water from bottom drain valve on tank, filter and condenser. Check operation of automatic drain.

Preventive Maintenance Task Narratives
82
TASK 0903: INSPECTION AND MAINTENANCE OF FIRE PROTECTION SYSTEMS (QUARTERLY): A. SPRINKLER SYSTEMS:
1. Alarm devices shall be inspected quarterly to verify that they are free from physical damage.
2. The hydraulic nameplate, if provided, shall be inspected quarterly to verify that it is
securely attached to the sprinkler riser and is legible.
3. Water flow alarm devices including, but not limited to, mechanical water motor gongs, vane-type water flow devices, and pressure switches that provide audible or visual signals shall be tested quarterly.
B. STANDPIPE AND HOSE SYSTEM: The pressure regulating devices, piping, hose connections, and alarms device components of the standpipe and hose system shall be visually inspected quarterly. The checkpoints and corrective actions outlined in NFPA 25, chapter 3, table 3-2.3 shall be followed to determine that components are free of corrosion, foreign material, physical damage, tampering, or other conditions that could prevent operation. C. FIRE PUMPS: Quarterly inspection, testing, and maintenance of diesel engine systems shall be done in accordance with NFP A 25, chapter 5, table 5.1, section D. D. FIRE PROTECTION WATER STORAGE TANKS:
1. The exterior of the tank, supporting structure, vents, foundation, condition of the water in the tank, and catwalks or ladders, where provided, shall be inspected quarterly for signs of obvious damage or weakening.
2. The area surrounding the tank and supporting structure, where provided, shall be
inspected quarterly to ensure that the following conditions are met:
- The area is free of combustible storage, trash, debris, brush, or material that could present a fire exposure hazard
- The area is free of the accumulation of material on or near parts that could result in accelerated corrosion or rot
- The tank and support are free of ice buildup - The exterior sides and top of similar walls are free of erosion (embankment-
supported, coated-fabric tanks only)
3. The water level and condition of the water shall he inspected quarterly except tanks not equipped with supervised alarms that are connected to a constantly attended location, which shall be inspected monthly.

Preventive Maintenance Task Narratives
83
TASK 0903: INSPECTION AND MAINTENANCE OF FIRE PROTECTION SYSTEMS (QUARTERLY)(CONTINUED):
4. The air pressure in pressure tanks shall be inspected quarterly. If the pressure tanks do not have their air pressure source supervised in accordance with NFPA 72, they shall be required to be inspected monthly.
E. VALVES: 1. All sprinkler pressure-reducing control valves shall be inspected quarterly. The inspection shall verify that the valves are in the following condition:
- In the open position - Not leaking - Maintaining downstream pressures in accordance with the design criteria - In good condition, with hand wheels installed and unbroken
2.All hose connection pressure-reducing valves shall be inspected quarterly. The inspection shall verify the following:
- The hand wheel is not broken or missing - The outlet hose threads are not damaged - There are no leaks - The reducer and the cap are not missing
3. All hose rack assembly pressure-reducing valves shall be inspected quarterly. The
inspection shall verify the following:
- The hand wheel is not missing or broken - There are no leaks
4. Fire department connections shall be inspected quarterly. The inspection shall verify
the following:
- The fire department connections are visible and accessible - Couplings or swivels are not damaged and rotate smoothly - Plugs or caps are in place and undamaged - Gaskets are in place and in good condition - Identification signs are in place - The check valve is not leaking - The automatic drain valve is in place and operating properly
5. All water flow alarms shall be tested quarterly in accordance with the manufacturer's
instructions.

Preventive Maintenance Task Narratives
84
TASK 0903: INSPECTION AND MAINTENANCE OF FIRE PROTECTION SYSTEMS (QUARTERLY)(CONTINUED):
6. The priming water level in supervised pre-action systems shall be tested quarterly for
compliance with the manufacturer's instructions.
7. Low air pressure alarms for pre-action/deluge valves and dry pipe valves/quick opening devices, if provided, shall be tested quarterly in accordance with the manufacturer's instruction.
8. The priming water level for dry pipe valves and quick opening devices shall be tested
quarterly.
9. Quick-opening devices, if provided, shall be tested quarterly.
10. Tamper switches shall be tested, by closing the control valve to check that the tamper alarm is functioning properly.

Preventive Maintenance Task Narratives
85
TASK 0904: INSPECTION AND MAINTENANCE OF FIRE PROTECTION SYSTEMS (SEMI-ANNUAL): A. FIRE PUMPS:
1. Semi-annual inspection, testing, and maintenance of electrical systems shall consist of the following:
- Operate manual starting means (electrical)
2. Semi-annual inspection, testing, and maintenance of diesel engine systems shall be
done in accordance with NFPA 25, chapter5, table 5.1, section D.
B. FIRE PROTECTION WATER STORAGE TANKS:
1. High and low water level alarms shall be tested semiannually.
2. Sediment shall be drained or flushed from the tank semiannually.

Preventive Maintenance Task Narratives
86
TASK 0905: INSPECTION AND MAINTENANCE OF FIRE PROTECTION SYSTEMS (ANNUAL): A. FIRE EXTINGUISHERS -GENERAL: (local jurisdiction might require license’s) Detailed instructions on fire extinguisher maintenance can be found in the NFPA 10. Validate proper spacing of fire extinguishers. CO2 and water are normally hung in tandem to met 2A 10BC requirements. Dry Chemical extinguishers shall never be used in Network Equipment Facilities.
1. Fire extinguishers shall be subjected to maintenance at intervals of not more than 1 year, at the time of hydrostatic test, or when specifically indicated by a monthly inspection. Maintenance procedures shall include a thorough examination of the exterior mechanical parts of a fire extinguisher. See NFPA 10, appendix A, table A-4-4.2 (a) for a complete listing of mechanical parts to be inspected along with the corrective action required when a deficiency is discovered.
2. Hydrostatic testing dates for CO2 and water extinguishers shall be inspected annually.
If the date of the last hydrostatic test conducted will expire before the next annual inspection, a hydrostatic test shall be conducted on that extinguisher at the time of the inspection. Testing shall be done in accordance with NFPA 10, chapter 5. A permanent record shall be maintained for each cylinder tested.
3. Dry chemical and other stored pressure extinguishers shall have the date of their 6-year
maintenance and 12-year hydrostatic test inspected annually. If the date of the last maintenance or hydrostatic test will expire before the next annual inspection, the appropriate maintenance and/or hydrostatic test shall be performed at the time of inspection.
B. SPRINKLER SYSTEMS:
1. Annually, prior to the onset of freezing weather, buildings with wet pipe systems shall be inspected to verify those windows, skylights, doors, ventilators, other openings and closures, blind spaces, unused attics, stair towers, roof houses, and low spaces under buildings do not expose water-filled sprinkler piping to freezing and to verify that adequate heat [minimum 40 degrees F (4.4 degrees C)] is available.
2. Sprinkler pipe hangers and seismic braces shall be inspected annually from the floor
level to verify that they are not loose or damaged. Hangers and seismic braces that are damaged or lose shall be replaced or refastened. Hangers and seismic braces installed in concealed spaces such as suspended ceilings shall not require inspection.

Preventive Maintenance Task Narratives
87
TASK 0905: INSPECTION AND MAINTENANCE OF FIRE PROTECTION SYSTEMS (ANNUAL)(CONTINUED):
3. Sprinkler pipe and fittings shall be inspected annually from the floor level. Pipe and fittings shall be in good condition and free of mechanical damage, leakage, corrosion, and misalignment. Sprinkler piping shall not be subjected to external loads by materials either resting on the pipe or hung from the pipe. Pipe and fittings installed in concealed locations such as above a suspended ceiling shall not require inspection.
4. Sprinklers shall be inspected annually from the floor level. Sprinklers shall be free of
corrosion, foreign materials, paint, and physical damage and shall be installed in the proper orientation (e.g., upright, pendant, or sidewall). Any sprinkler shall be replaced that is painted, corroded, damaged, loaded, or in the improper position. Sprinklers installed in concealed spaces such as above suspended ceilings shall not require inspection.
5. The supply of spare sprinklers shall be inspected annually for the following:
- The proper number and type of sprinklers - A sprinkler wrench for each type of sprinkler
6. The freezing point of solutions in antifreeze shall be tested annually by measuring the specific gravity with a hydrometer or refractometer and adjusting the solutions if necessary. Solutions shall be in accordance with NFPA 25, chapter 2, tables 2-3.4(a) and (b).
7. The testing date of sprinkler system gauges shall be inspected annually. If the date of
the next inspection will exceed 5 years from the time of the last test, the gauges shall be retested at the time of the current date inspection. The testing shall be done in accordance with NFPA 25, chapter 2, and section 3.2. If there are no records available, the test shall be performed and documented at the time of the current inspection.
8. The installation date of sprinkler heads shall be inspected annually. If the date of the
next inspection will exceed 50 years from the date the sprinkler heads were installed, they shall be replaced or representative samples shall be submitted to a recognized testing laboratory acceptable to the authority having jurisdiction for field service testing at the time of the current inspection. Test procedures shall be repeated at 10-year intervals.
9. The installation date of sprinklers manufactured using the fast response elements shall
be inspected annually. If the date of the next inspection will exceed 20 years from the date the sprinkler heads were installed, they shall be tested at the time of the current inspection. They shall be retested at 10-year intervals.

Preventive Maintenance Task Narratives
88
TASK 0905: INSPECTION AND MAINTENANCE OF FIRE PROTECTION SYSTEMS (ANNUAL)(CONTINUED):
10. The testing date of solder-type sprinklers with a temperature classification of extra high [325 degrees F (163 degrees C) J or greater that are exposed to semi continuous to continuous maximum ambient temperature conditions shall be inspected annually. If the date of the next inspection will exceed 5 years from the time of the last test, the gauges shall be retested at the time of the current date inspection. The testing shall be done in accordance with NFP A 25, chapter 2, section 3.1.1, exception # 3. If there are no records available, the test shall be performed and documented at the time of the current inspection.
C. STANDPIPE AND HOSE SYSTEM: NOTE: If hoses have been removed, verify that the local fire jurisdiction has given written permission, and that letter is posted on site in the Fire Life Safety Binder.
1. If attached, supply hose shall be inspected and service tested annually as specified in NFPA 1962, chapter 5.
2. Occupant-use hose shall be un-racked, unreeled, or unrolled, and physically inspected
to determine that the hose, couplings, and any nozzle have not been vandalized; are free of debris; and exhibit no evidence of mildew, rot, or damage by chemicals, burns, cuts, abrasion, and vermin.
3. Nozzles shall be inspected after each use and at least annually. The nozzle inspection
shall include verification of the following: - Waterway clear of obstructions - No damage to tip - Full operation of adjustments such as pattern selection and so forth - Proper operation of shutoff valve if so equipped - No missing parts - Thread gaskets in good condition in accordance with NFPA 1962, chapter 4-3.1
4. Couplings shall be inspected after each use and at least annually during each service
test. The couplings shall be visually inspected for the following: - Damaged threads - Corrosion - Slippage on the hose - Out-of-round - Swivel not rotating freely - Missing Lugs - Loose external collar - Internal gasket in accordance with NFPA 1962, chapter 4-3 - Other defects that impair operation

Preventive Maintenance Task Narratives
89
TASK 0905: INSPECTION AND MAINTENANCE OF FIRE PROTECTION SYSTEMS (ANNUAL)(CONTINUED):
5. The date of the last flow test shall be inspected annually. If the date of the next inspection will exceed 5 years from the time of the last flow test, the flow test shall be conducted at the hydraulically most remote hose connection of each zone of a standpipe system to verify the water supply still adequately provides the design pressure at the required flow. If there are no records available, the test shall be performed and documented at the time of the current inspection.
6. The date of the last hydrostatic test at shall be inspected annually. If the date of the
next inspection will exceed 5 years from the last hydrostatic test, the hydrostatic test shall be conducted in accordance with NFPA 25, chapter 3, and section 3.2. If there are no records available, the test shall be performed and documented at the time of the current inspection.
7. The date of the last service test of the in-service occupant-use hose shall be inspected
annually. If the date of the next inspection will exceed 5 years from the installation of the hose or 3 years from the last service test, the service test shall be performed in accordance with NFPA 1962. If there are no records available, the test shall be performed and documented at the time of the current inspection.
D. FIRE PUMPS:
1. An annual test of each pump assembly shall be conducted under minimum, rated, and peak flows of the fire pump by controlling the quantity of water discharged through the approved test devices. This test shall be conducted as described in NFPA 25, chapter 5, section 3.3. 1 (a), (b), or (c).
NOTE: This task is normally vended. The pertinent visual observations, measurements, and adjustments specified in NFPA 25, chapter 5, section 3.3.2.1 and 3.3.2.2 shall be conducted annually while the pump is running and flowing water under the specified output condition.
2 Annual inspection, testing, and maintenance of fire pump systems shall consist of the following:
- Lubricate pump bearings - Check pump shaft end play - Check accuracy of pressure gauges and sensors - Check pump coupling alignment

Preventive Maintenance Task Narratives
90
TASK 0905: INSPECTION AND MAINTENANCE OF FIRE PROTECTION SYSTEMS (ANNUAL)(CONTINUED):
3. Annual inspection, testing, and maintenance of mechanical transmissions shall consist of the following:
- Lubricate coupling - Lubricate right-angle gear drive
4. Annual inspection, testing, and maintenance of electrical systems shall consist of the
following:
- Trip circuit breaker (if mechanism provided) - Inspect and operate emergency manual starting means (without power) - Tighten electrical connections as necessary - Lubricate mechanical moving parts (excluding starters and relays) - Calibrate pressure switch settings - Grease motor bearings
5. Annual inspection, testing, and maintenance of diesel engine systems shall be done in
accordance with NFPA 25, chapter 5, table 5.1, section D.
E. FIRE PROTECTION WATER STORAGE TANKS:
1. The hoops and grillage of wooden tanks shall be inspected annually.
2. Exterior painted, coated, or insulated surfaces of the tank and supporting structure, where provided, shall be inspected annually for signs of degradation.
3. Expansion joints, where provided, shall be inspected annually for leaks and cracks.
4. Cathodic protection, where provided, shall be maintained annually in accordance with
the manufacturer's instructions.
5. All tank drain valves shall be opened fully and closed annually.
6. Tank vents shall be cleaned at least annually or more frequently as necessary. Mesh screens shall be replaced when cleaning or inspection reveals holes.
7. The date of inspection of the interior of the tank shall be checked annually. If the date
of the next check will exceed 5 years or 3 years for steel tanks without corrosion protection and pressure tanks, the interior inspection shall be performed at the time of the current annual date check in accordance with NFPA 25, chapter 6, section 2.4.1. If there are no dates available, the test shall be performed at the time of the current annual date check and documented.

Preventive Maintenance Task Narratives
91
TASK 0905: INSPECTION AND MAINTENANCE OF FIRE PROTECTION SYSTEMS (ANNUAL)(CONTINUED):
8. The date of the last test of the level indicators shall be inspected annually. If the date of the next inspection will exceed 5 years from the date of the last test, the test shall be performed in accordance with NFPA 25, chapter 6, section, 3.1. If there are no dates available, the test shall be performed at the time of the current annual date inspection.
9. The testing date of water storage tank pressure gauges shall be inspected annually. If
the date of the next inspection will exceed 5 years from the time of the last test, the gauges shall be retested at the time of the current date inspection. The testing shall be done in accordance with NFPA 25, chapter 6, section 3.6. If there are no records available, the test shall be performed and documented at the time of the current annual inspection.
F. VALVES:
1. The interior of the preaction or deluge valve and the condition of the detection devices shall be inspected annually when the trip test is conducted. Internal inspection of valves that can be reset without removal of the faceplate shall be permitted to be conducted every 5 years.
2. The interior of the dry pipe valve shall be inspected annually when the trip test is
conducted.
3. A main drain test shall be conducted annually and any time the valve is closed at each system after the control valve has been closed to determine whether there has been a change in the condition of the water supply piping and control valves.
4. Each deluge or preaction valve shall be trip tested annually at full flow in warm
weather and in accordance with the manufacturer's instructions.
5. Each dry pipe valve shall be trip tested annually during warm weather.
6. A partial flow test adequate to move the sprinkler pressure reducing control valve from its seat shall be conducted annually.
7. During the annual fire pump test, it shall be verified that the circulation relief valve
closes in accordance with the manufacturer's specifications.
8. During the annual fire pump flow test, it shall be verified that the pressure relief valve is correctly adjusted and set to relieve at the appropriate pressure and to close below that pressure setting.

Preventive Maintenance Task Narratives
92
TASK 0905: INSPECTION AND MAINTENANCE OF FIRE PROTECTION SYSTEMS (ANNUAL)(CONTINUED):
9. All backflow preventer’s installed in fire protection system piping shall be tested annually in accordance with the following:
- A forward flow test shall be conducted at the system demand, including hose stream
demand, where hydrants or inside hose stations are located downstream of the backflow preventer.
- A backflow performance test, as required by the authority having jurisdiction, shall be conducted at the completion of the forward test flow.
10. All backflow devices installed in fire protection water supply shall be tested annually
at the designed flow rate of the fire protection system, including hose stream demands if possible.
11. The operating stems of outside screw and yoke valves shall be lubricated annually.
The valve shall be closed and reopened to test its operation and distribute the lubricant.
12. During the annual trip test, the interior of the preaction or deluge valve shall be cleaned thoroughly and the parts replaced or repaired as necessary.
13. During the annual trip test, the interior of the dry pipe valve shall be cleaned
thoroughly and the parts replaced or repaired as necessary.
14. The date of the last internal inspection of alarm valves and their associated strainers, filters, and restricted orifices shall be inspected annually. If the date of the next annual inspection will exceed 5 years from the time of the last internal inspection, the valves shall be re-inspected internally at the time of the current annual date inspection. The testing shall be done in accordance with NFP A 25, chapter 9, section 4.1.2. If there are no records available, the test shall be performed and documented at the time of the current annual inspection.
15. The date of the last internal inspection of the strainers, filters, restricted orifices, and
diaphragm chambers of preaction and deluge valves shall be inspected annually. If the date of the next annual inspection will exceed 5 years from the time of the last internal inspection, the strainers, filters, restricted orifices and diaphragm chambers shall be inspected in accordance with NFP A 25, chapter 9, section 4.3.1.4. If there are no records available, the test shall be performed and documented at the time of the current annual inspection.

Preventive Maintenance Task Narratives
93
TASK 0905: INSPECTION AND MAINTENANCE OF FIRE PROTECTION SYSTEMS (ANNUAL)(CONTINUED):
16. The date of the last internal inspection of the strainers, filters, restricted orifices, and diaphragm chambers of dry pipe valves and quick-opening devices shall be inspected annually. If the date of the next annual inspection will exceed 5 years from the time of the last internal inspection, the valves shall be re-inspected internally at the time of the current annual date inspection. The testing shall be done in accordance with NFPA 25, Chapter 9, section 4.4.1.5. If there are no records available, the test shall be performed and documented at the time of the current annual inspection.
17. The date of the last trip test of the dry pipe valves shall be inspected annually. If the
date of the next annual inspection will exceed 3 years from the time of the last trip test, the valves shall be retested at the time of the current annual date inspection. The testing shall be done in accordance with NFPA 25, chapter 9, section 4.4.2.2.1. If there are no records available, the test shall be performed and documented at the time of the current annual inspection.
18. The date of the last full flow test conducted on each pressure reducing and relief valve
shall be inspected annually. If the date of the next annual inspection will exceed 5 years from the time of the last full flow test, the valves shall be retested at the time of the current annual date inspection. The testing shall be done in accordance with NFPA 25, chapter 9, section 5.1.2. If there are no records available, the test shall be performed and documented at the time of the current annual inspection.
19. The date of the last full flow test conducted on each hose connection pressure reducing
valve shall be inspected annually. If the date of the next annual inspection will exceed 5 years from the time of the last full flow test, the valves shall be retested at the time of the current annual date inspection. The testing shall be done in accordance with NFPA 25, chapter 9, section 5.2.2. If there are no records available, the test shall be performed and documented at the time of the current annual inspection.
20. The date of the last full flow test conducted on each hose rack assembly pressure
reducing valve shall be inspected annually. If the date of the next annual inspection will exceed 5 years from the time of the last full flow test, the valves shall be retested at the time of the current annual date inspection. The testing shall be done in accordance with NFPA 25, chapter 9, section 5.3.2. If there are no records available, the test shall be performed and documented at the time of the current annual inspection.
G. COMPRESSOR. CONTROL AIR:
1. Observe operation of compressor, check for overheating and/or exceptional cycle time, (i.e. 1/3 ON- 2/3 OFF). Check operation of relief valve.

Preventive Maintenance Task Narratives
94
TASK 0905: INSPECTION AND MAINTENANCE OF FIRE PROTECTION SYSTEMS (ANNUAL)(CONTINUED): CAUTION: DO NOT ALLOW PRESSURE TO EXCEED THE MAXIMUM ALLOWAL PRESSURE MARKED ON THE A.S.M.E. DATA PLATE.
2. Change compressor oil. Clean or replace air intake filter/strainer. Check operation of automatic start/stop control and/or alternator switch. Clean external surfaces of compressor, motor and tank. As well as design permits, visually inspect the internal surfaces of the drive motor for dirt accumulations, bearing lubricant overflow and general condition. Check inside of air storage tank as well as construction allows. Visually inspect control air dryer.
3. Inspect the starter and/or disconnect switch for tightness of connections, signs of
overheating, general condition and proper manual operation. Tighten connections as required. Check condition of contacts. Check overload heaters and fuses for proper size. Lubricate operating linkage with proper lubricant, if required.
4. Adjust the tension and the alignment of the drive belts and sheaves as required. Check
the condition of the belts and sheaves. IT IS IMPORTANT TO REPLACE THE BELTS BEFORE THEY FAIL, signs of impending failure can include glazing, cracks or unusual noises. Check the belt guard for condition and proper mounting
H. SYSTEMS. FIRE EXTINGUISHING: 1. HALON 1301 FLOODING:
Follow manufacturer's instructions. Due to the technical nature of the work, it should be vended.
2. FM 200:
Follow manufacturer's instructions. Due to the technical nature of the work, it should be vended.
3. KITCHEN FIXED PIPE:
Follow manufacturer's instructions. Due to the technical nature of the work, it should be vended.
4. CARBON DIOXIDE FLOODING:
Follow manufacturer's instructions. Due to the technical nature of the work, it should be vended.

Preventive Maintenance Task Narratives
95
10 FIRE DETECTION SYSTEMS: CAUTION: FOLLOW LOCKOUT/TAGOUT PROCEDURES. TASK 1001: INSPECTION AND MAINTENANCE OF FIRE DETECTION SYSTEMS -(QUARTERLY): A. GENERAL:
1. NFPA 72, Chapter 7 covers minimum requirements for inspection, testing and maintenance of fire alarm systems. Verifying the correct operation of the fire alarm system includes conformance with NFPA 72 and also with the manufacture maintenance instruction. If any statement in this document conflicts with local code or NFPA 72, the local code or NFPA takes precedence. Maintenance of Fire Detection systems requires service personnel to be familiar with NFPA 72, manufacture factory trained and certified and/or qualified according to code licensing as listed in NFPA 72,
NOTE: The state or local authority having jurisdiction may have specific certification or licensing tests or other requirements that must be met.
2. Approved Methods of Procedure (MOP's) should be used when performing fire detection tests. Before proceeding with any testing, all persons and facilities receiving alarm, supervisory or trouble signals, and all building occupants shall be notified of the testing to prevent unnecessary response. At the conclusion of testing, those previously notified shall be notified that testing has been concluded.
3. Prior to system testing, the following should be provided to service personnel:
- Fire alarm system record of completion - Point to point wiring diagrams - Individual device interconnection drawings - As build (record) drawings - Copy of original equipment submittals - Operational Manuals - Manufacturer's proper testing and maintenance requirements
4. Document all tests and keep documentation at the control panel. Appropriate testing
documentation should be kept on site so that historical trends or changes in sensitivity can be evaluated. This should include the original acceptance documentation and for Task 1004 up to 10 years additional testing documentation.
B. FLAME DETECTORS: Visually inspect all detectors quarterly for evidence of physical damage or tampering.

Preventive Maintenance Task Narratives
96
TASK 1002: INSPECTION AND MAINTENANCE OF FIRE DETECTION SYSTEM (SEMI ANNUAL): A. COMPLETE TASK 1001: B. BATTERIES AND STANDBY POWER All secondary (stand by) power shall be disconnected and tested under maximum load. Replace batteries as required that do not pass load test. See manufacturer's recommendations and NFPA 72 for specific requirements. Follow Risk Management Guidelines for proper disposal of batteries. Battery Visual Charger Discharge Load Specific Type Insp. Test e Test Volt. Test Gravity Lead Acid M* A SA SA SA Ni Cad SA A A SA N/A Primary M* N/A N/A M* N/A Dry Cell Sealed SA A A SA N/ A Lead Acid N/A = Not Applicable M = Monthly SA = Semi Annual A = Annual * Because of these frequencies, consideration should be given to replace this type of battery. 1. Batteries- General Tests:
Prior to conducting any battery testing, the person conducting the test shall ensure that all system software stored in volatile memory is protected from loss.
a. Visual Inspection: Batteries shall be inspected for corrosion or leakage.
Tightness of connections shall be checked and ensured. If necessary, battery terminals or connections shall be cleaned and coated Electrolyte level in lead acid batteries shall be visually inspected.
b. Battery Replacement: Batteries shall be replaced in accordance with the
recommendations of the alarm equipment manufacturer or when the recharged battery voltage or current falls below the manufacturer's recommendations.
c. Charger Test: Operation of battery charger shall be checked in accordance with
charger test for the specific type of battery.

Preventive Maintenance Task Narratives
97
TASK 1002: INSPECTION AND MAINTENANCE OF FIRE DETECTION SYSTEM (SEMI ANNUAL)(CONTINTUED):
d. Discharge Test: With the battery charger disconnected, the batteries shall be load tested following the manufacturer's recommendations. The voltage level shall not fall below the levels specified.
Exception: An artificial load equal to the full fire alarm load connected to the battery shall be permitted to be used in conducting this test.
e. Load Voltage Test: With the battery charger disconnected, the terminal voltage shall be measured while supplying the maximum load required by its application. The voltage level shall not fall below the levels specified for the specific type of battery. If the voltage falls below the level specified, corrective action shall be taken and the batteries shall be retested.
Exception: An artificial load equal to the full fire alarm load connected to the battery shall be permitted to be used in conducting this test.
f. Specific Gravity Test: The specific gravity of the liquid in the pilot cell or all of the cells shall be measured as required. The specific gravity shall be within the range specified by the manufacturer. Although the specified specific gravity varies from manufacturer to manufacturer, a range of 1.205- 1.220 is typical for regular lead acid batteries, while 1.240 -1.260 is typical for high-performance batteries. A hydrometer that shows only a pass or fail condition of the battery and does not indicate the specific gravity shall not be used, because such a reading does not give a true indication of the battery condition.
C. INSPECTION OF DEVICES: NOTE: Time delay maximum for fire trouble is 90 seconds.
1. Alarm Devices -semi-annually make a visual inspection of each alarm device for
evidence of physical damage or tampering.
2. Ionization Detectors -visually inspect all detectors.
3. Photo Electric Detectors -visually inspect all detectors.
4. Ventilation Duct Detectors -visually inspect all detectors.
5. Thermal Detectors -visually inspect all detectors.
6. Emergency Voice/Alarm Communicator Equipment –visually inspect all devices.
7. Flame Detectors -perform testing in accordance with NFPA 72.

Preventive Maintenance Task Narratives
98
TASK 1003: SYSTEM FUNCTION TESTS (ANNUAL): A. GENERAL:
1. Annually, all detectors (including duct detectors) shall be activated to assure that they respond and an alarm is initiated. The base lamp light on the detector and the proper alarm (and zone) indications on associated panels shall also be checked.
2. A detector tester (available from the system manufacturer) may be used for performance
on this test. For ionization detectors, an inert gas is used as a substitute for combustible gases. For photoelectric detectors, a magnetic obstruction device is used that interferes with normal signaling.
3. In large systems where frequent testing could affect prompt response to alarms by
building occupants, at least one test per floor shall be conducted under normal fire detection system operating conditions. Further testing of zones on each floor may be conducted with audible alarms silenced and fan shutdowns deactivated. (A system equipped with these features shall also provide trouble indication when operating in this mode.) Following reactivation of audible alarms, the system shall be checked for proper operation.
B. COMPLETE TASKS 1001 AND 1002: C. INSPECTION. TESTING. AND MAINTENANCE -DEVICES:
1. Alarm Devices -perform testing in accordance with NFPA 72. 2. Ionization Detectors -perform testing in accordance with NFPA 72.
3. Thermal Detectors -perform testing in accordance with NFPA 72.
4. Photoelectric Detectors -perform testing in accordance with NFPA 72.
5. Ventilation Duct Detectors -perform testing in accordance with NFPA 72.
6. Pull Boxes -Test.
D. PANEL. CONTROL. AND ANNUNCIA TOR TESTING:
1. Control equipment shall be tested to verify correct receipt of alarm, supervisory, and trouble signals (inputs) operation of evacuation signals and auxiliary functions (outputs). This includes NROC or other alarm monitoring centers.
2. The rating and supervision of fuses shall be verified.

Preventive Maintenance Task Narratives
99
TASK 1003: SYSTEM FUNCTION TESTS (ANNUAL)(CONTINUED):
3. Interfaced equipment (including fan shut downs, elevator recall, enunciators’, etc.) shall be tested. Signals, required to be transmitted, shall be verified at the control panel.
4. Lamps and LED's shall be checked for proper illumination.

Preventive Maintenance Task Narratives
100
TASK 1004: MAINTENANCE. SECURITY TESTING. AND CALIBRATION OF DEVICES: A. GENERAL:
1. Follow manufacturer's recommendations and procedures as outlined in NFPA 72 to ensure that each smoke detector is within its listed and marked sensitivity range, it shall be tested using any of the following methods:
a. Calibrated test method b. Manufacturer's calibrated sensitivity test instrument
c. Listed control equipment arranged for the purpose
d. Smoke detector/control unit arrangement whereby the detector causes a signal
at the control unit where its sensitivity is outside its listed sensitivity test
e. Other calibrated sensitivity test methods approved by the authority having jurisdiction
2. Detectors found to have sensitivity outside the listed or marked range shall be cleaned
and recalibrated or be replaced. 3. The detector sensitivity shall not be tested or measured using any device that
administers an unmeasured concentration of smoke or other aerosol into the detector.
4. Detector sensitivity shall be checked within one year after installation and every alternate year thereafter. After the second required calibration test, if sensitivity tests indicate that the detector has remained within it’s listed and marked sensitivity range, the length of time between calibrations tests shall be permitted to be extended to a maximum of 5 years 5. If the frequency of sensitivity testing is extended beyond alternate years, records of detector caused nuisance alarms and subsequent trends of these alarms shall be maintained. In zones or areas where nuisance alarms show any increase over the previous year, calibration tests shall be performed.
NOTE: Re-acceptance testing is required if any of the following repairs or modifications are performed:
a. Added or deleted system components b. Any modification, repair of adjustment to system hardware or wiring

Preventive Maintenance Task Narratives
101
TASK 1004: MAINTENANCE. SECURITY TESTING. AND CALIBRATION OF DEVICES (CONTINUED):
c. Any changes or site-specific software all components impaired by the above shall be 100% tested. In addition 10% of initiating devices not directly affected by the change, up to a maximum of 50 devices shall also be tested and correct system operation shall be verified. The 10% sample should be randomly selected and include one initiating device per circuit to ensure correct operation, or if on a single circuit the 10% should be tested in different sections of the circuit.

Preventive Maintenance Task Narratives
102
11 ELECTRICAL DISTRIBUTION SYSTEMS: A. GENERAL --PERSONNEL AND EQUIPMENT SAFETY:
1. Personnel safety, in addition to equipment safety, should be given prime consideration in system design and in establishing adequate maintenance practice. The principal personnel danger from electricity is that of shock, electrocution, and/or severe burns from the electrical arc or its effects, which can be similar to that of an explosion. It should be of interest to know that the small current drawn by a 7.5-watt, 120-volt lamp, if passed from hand to hand or hand to foot, could be fatal.
2. Personnel safety should be an integral part of electrical maintenance practices. As a
general rule, no electrical apparatus should be worked on while it is energized. When it is necessary to work in the vicinity of energized equipment, all safety precautions should be followed, such as roping off the dangerous area, using rubber blankets for isolation, and using rubber gloves and properly insulated tools and equipment. All insulating tools such as rubber gloves and blankets should be periodically tested.
B. FREQUENCY OF MAINTENANCE:
1. Recommended frequency of maintenance depends on environmental and operating conditions, so that no fixed rule can govern all applications. The following factors will affect the decision of when to inspect and test:
a. Cleanliness of the environment or exposure to water b. Periods of sustained unusual or abnormal operating conditions (for example,
switching or lightening surges and substantial overloads.)
c. Feeder, bus, or system fault occurrence.
d. Scheduled shutdowns (ease of coordinating the work.)
e. Manufacturer's recommendations.
f. Age of the equipment.
2. The evidence of thermal damage can also impact the inspection frequency. 3. Localized heating (hot spots) can sometimes occur but be masked because the overall
temperature of the surroundings is not raised appreciably. Loosely bolted connections in a bus-bar splice or void spaces (dead air) in a taped assembly are examples of this difficult problem.

Preventive Maintenance Task Narratives
103
11 ELECTRICAL DISTRIBUTION SYSTEMS (CONTINUED:
4. Since power should be removed prior to all inspections except visual and thermal scanning, it is relatively unlikely that temperature itself can be relied on to signal potentially damaging heat. Other external conditions, therefore, form the basis for detecting heat damage:
a. Discoloration -usually a darkening -of materials or finishes b. Crazing, cracking, and flaking of varnish coatings
c. Brittle tape and cable insulation
d. De-lamination
e. Generalized carbonization of materials or finishes
f. Melting, oozing, or exuding of substances from within an insulating assembly.
Insulating materials that have been physically damaged should be replaced. Mild discoloration is permissible if the cause of overheating is corrected. In summary, there are two important things to remember in maintenance of insulation: KEEP IT CLEAN and KEEP IT DRY.
5. MOP's are required anytime physical work on electrical switchgear is performed. Coordination is required with the building occupants and stakeholders for this work.
C. APPLICABLE CODES AND STANDARDS:
1. All inspections and tests shall be in accordance with NEMA, ASTM, IEEE, state and local codes, OSHA and applicable ANSI/NFPA codes.
2. Specifications for full switchgear mechanical and electrical tests should conform to
NETA Maintenance Testing Specification current standard.

Preventive Maintenance Task Narratives
104
TASK 1101: ELECTRICAL INSPECTION GENERAL: NOTE: Use of an approved MOP (Method Of Procedure) is required.
A. Validate that a current one-line diagram is posted. Compare equipment nameplate information with the latest one-line diagram. Report any discrepancies to the Property Manager for corrective action to update the one-line diagram. If the posted one line diagram is not current "Red Line" the existing drawing to use until a permanent corrected drawing is provided.
B. Inspect all main and branch circuit panels to assure that all circuits are
(labeled and that the panel directory is correct. Trace any unmarked circuits and update the panel directory. Initial and date the panel directory card.
NOTE: If the unlabeled circuit is providing power for telephone equipment, the cost of tracing that circuit should be charged back to that equipment account, not the building account.
C. Check the voltages at each panel to verify that they are within the correct voltage standards. If the voltage is not correct the problem must be investigated and corrected.
D. Check the amperage load on the feeds and the neutrals to 3-phase panels to
verify that the load is balanced between the three phases and that the neutral is not overloaded. Amperage readings should be taken with maximum electrical load whenever possible. If there is a large imbalance, the cause should be determined and action taken to correct the problem. As this will change some of the circuit assignments you must involve both the Property Manager and the Project Manager. If the circuits involved are for telephone equipment the correction of the problem must also involve the Central Office Manager. Update the panel directory card as needed.

Preventive Maintenance Task Narratives
105
TASK 1102: THERMOGRAPHIC SCANNING: A. GENERAL:
1. Heat is a major enemy of electrical conductors, insulators and components. Thermo graphic scanning is a supplemental, low risk, lower cost alternative to reduce the need or frequency of full switchgear mechanical and electrical tests. This should be supplemented with visual inspections for other evidence of heat damage at the time covers and inspection plates are removed.
2. Definitions:
a. Thermo graphic Imaging Camera -Is a camera that looks much like your
camcorder. This camera detects heat that could be caused by loose connections, improper connections, or unbalanced loads.
b. Hand Held Pyrometer -Is very similar in shape and size to a large handgun. Its
purpose is the same as the thermo graphic imaging camera, but it is limited in its use because it only detects temperature at one point and it does not pin point where the heat is coming from like the thermo graphic imaging camera. It is much less expensive than the thermo graphic imaging camera and can be used effectively on floor switchboards, small switchgear and for spot checks.
B. VISUAL INSPECTION AND THERMOGRAPHIC SCANNING:
1. Scanning will be done with either a hand held pyrometer or thermo graphic imaging camera. The use of either of these devices would normally be limited to buildings with three phase electrical systems with service entrance facilities equal to or greater than 400 amps.
2. The size and critical nature of the facility will dictate which heat-sensing device is used
and the extent of the review.
3. The review shall consist of: STAGE 1: Guidelines for An Electrical Thermo graphic Inspection Determining the scope of the project. What do you want to inspect? (Major conductors/buss, large breakers, electrical panels, etc.) The following areas should be considered at this stage.
a. Review the one line diagram of the system b. Review any switch gear equipment history

Preventive Maintenance Task Narratives
106
TASK 1102: THERMOGRAPHIC SCANNING (CONTINUED):
c. Determine the extent of the inspection Level one (critical equipment only) Level two (critical equipment and high voltage [277 volt or more]) Level three (critical equipment, high voltage and low voltage) d. Determine the methods of documentation that will be used. Simple written note, Picture/digital picture, detailed report
e. Determine accessibility of the equipment f. Determine what safety concerns need to be addressed
g. Review the safety equipment that is required and its availability h. Review the hand tools that are required and their availability
i. Decide where you want to start, there are several items that may be considered to determine the sequence of scanning the equipment. Evaluate the following considerations to decide where to start.
- Start with the highest voltage equipment and work towards the lowest voltage equipment. - Start with the switchgear that serves the most critical equipment in the building and then
work to the least critical. - Start with the switchgear that serves equipment that cycles and then do the switchgear
that serves equipment that is on constantly. - Go by the physical location of the switchgear, start at the bottom or the top of the
building and go up or down.
j. Prepare the MOP (Method Of Procedure) and obtain all the required approvals. STAGE 2: Conducting the Thermo graphic Scan
a. Follow the approved MOP; this is the document that will ensure that the inspection is done safely, correctly and without loss of critical services.
b. Prior to inspection, remove the appropriate component covers and have
equipment ready for inspection (follow safety procedures)
c. Components to inspect and items of interest include, but are not limited to:

Preventive Maintenance Task Narratives
107
TASK 1102: THERMOGRAPHIC SCANNING (CONTINUED): Main switchgear -caution must be exercised when opening the panels and inspection covers of energized switchgear. Scan fuse and breaker connections, bus connections etc. Bus duct -joints (look for temperature differences) temperature will normally decrease as you scan further from the source and the load drops on the bus duct. Motor control center -Make sure the motor being supplied from the section being scanned is actually running (there must be a load on the circuit for the thermo graphic scan to work). Scan the contactors for loose connections and faulty components. There are many connections in a motor control center so be systematic about scanning to prevent missing any. Disconnects fused/non-fused- Scan all the connections. Fuse clips are the most common problem. You can compare similar components from different disconnects for temperature. Distribution/breaker panel -On 3 phase panels compare the phases. CAUTION: Some phases will appear warmer due to load imbalance. Use amp meter to verify loads if a difference in temperature is noticed between phases. Splices/fire clamps/bolt connections -are generally a high problem area, do not miss scanning any. Transformer (oil/liquid filled) -Inspect bushings, primary and secondary, taps, fluid levels, fins. d. Document anomalies Document the peak temperature View the component from several angles Account for reflectivity (if using thermo graphic camera) Document the location and identity of components in problem areas Document the amperage load reading if conditions suggest an overload. Document the ambient temperature reading. Document any observations and comments from your visual inspection. Gather and record any other data needed to prioritize the problem. STAGE 3: Reporting and Documenting
a. Prepare the necessary reports, including all required documentation and recommendations to correct any problems that were found.
NOTE: Documentation should include: written notes, pictures/digital pictures, detailed report.

Preventive Maintenance Task Narratives
108
TASK 1102: THERMOGRAPHIC SCANNING (CONTINUED): b. Submit the report and the recommendations to the Property Manager. STAGE 4: Follow up Once the repairs have been completed the following steps are needed to close out the project.
a. Confirm that repairs have been made properly (use pyrometer). b. Document the action taken and the costs of the repairs.
c. Submit the follow up documentation to the Property Manager
Helpful Hints in Electrical Inspections:
1. Whenever possible compare similar components. Generally 3-phase equipment should be balanced.
2. Since neither you nor the camera can see through, you must have a visual line of sight
in order to properly scan a component. The infrared camera can only detect surface temperatures that it can "see". If the covers cannot be removed to allow the camera to "see" the component safely you cannot scan that area.
3. The temperature of any component will change as the load that it is conducting
changes the greater the current load through the component the higher the temperature reading will be. The significance of a temperature difference is related to the current load on the circuit. A small temperature difference on a lightly loaded circuit may be an indication of a serious problem. Scanning should be performed under conditions of maximum load whenever possible.

Preventive Maintenance Task Narratives
109
TASK 1103: ELECTRICAL POWER DISTRIBUTION MAINTENANCE TESTS: (Always follow an approved MOP.) A. GENERAL: Electrical maintenance tests for full switchgear maintenance should always be vended to qualified vendors. The testing firm shall:
1. Be a corporately independent testing organization that can function as an unbiased authority, professionally independent of the manufacturers, suppliers, and installers of equipment or systems evaluated by the testing firm.
2. The testing firm shall regularly engage in the testing of electrical equipment devices,
installations, and systems.
3. The testing firm shall meet OSHA criteria for testing laboratories, Title 29, Part 1907, or be a "Full Member Company" of the International Electrical Testing Association (NETA).
4. The lead, on site technical person doing the testing, shall be currently certified by
NETA or National Institute for Certification in Engineering Technologies (NICET) in electrical power distribution system testing.
5. The testing firm shall utilize technicians who are regularly employed by the firm for
testing services.
6. The testing firm shall submit proof of the above qualifications. B. FOLLOW ALL INSTRUCTIONS IN THE GENERAL AREA AND TASK 1101 and 1102. C. TESTING SHOULD INCLUDE:
1. Short Circuit Analysis and Coordination Study in accordance with ANSI and IEEE Standards.
2. Inspect switchgear and switchboard assemblies for physical, electrical, and mechanical
condition for proper operation.
3. Check tightness of appropriate bolts and connections.
4. Clean and lubricate switchgear according to manufacturer recommendations.
5. Exercise components (circuit breakers, switches, etc.) Turn off and on to determine that components operate. MOP's are required to ensure potential service impacts are addressed.

Preventive Maintenance Task Narratives
110
TASK 1103: ELECTRICAL POWER DISTRIBUTION MAINTENANCE TESTS (CONTINUED):
6. Perform electrical tests including ground resistance test, insulation resistance test, and other tests as appropriate.
7. Perform inspection and tests on appropriate circuit breakers and switch gear as outlined
in NET A Maintenance and Testing specifications, Section 7 and according to manufacturer's recommendations.
8. 8. Inspect and test other electrical components (such as transformers, surge arrestors,
major motors, etc.) as appropriate. D. TEST REPORT: 1. Provide a test report that includes: a. Summary of project b. Description of equipment tested c. Description of tests d. Results of tests e. Recommendations f. Costs/budgets

Preventive Maintenance Task Narratives
111
12 VERTICAL TRANSPORTATION SYSTEMS: CAUTION: FOLLOW LOCKOUT/TAGOUT PROCEDURES. TASK 1201: INSPECTION AND MAINTENANCE OF MAIL LIFTS/CONVEYORS: A. MAIL CONVEYOR: Check station lights on each floor. Observe operation of all limit switches. Check overload device, solenoid should be floating. Check for soft start and smooth acceleration. Check each car for smooth operation and smooth transfer to load and unload rails (check at drive). Check drives motor and gearbox for overheating after one hour of operation. Check dispatch and receive station at each floor for smooth operation.

Preventive Maintenance Task Narratives
112
TASK 1202: ELEVATOR INSPECTION AND MAINTENANCE: A. GENERAL: Elevators are an important part of our facilities. They are the most visible, evaluated, and physically utilized asset you manage. The activities performed in the following Tasks will assist you with monitoring of performance and maintenance issues that can adversely affect their operation and performance quality. This task should be coordinated with the elevator maintenance contractor and scheduled when they perform periodic maintenance. This task is to verify the quality and service provided by the elevator contractors. B. INSPECTION AND MAINTENANCE OF ELEVATORS: 1. Customers' satisfaction related to the elevator is based primarily on:
a. The smooth operation of the doors and ride of the car. b. The car stops (levels) accurately (within less than ~ inch of corridor
floor).
c. The wait time and travel time of the elevator.
d. The general condition and cleanliness of the elevator.
2.Verify that items "a" through "c" above function correctly. If a problem is identified with either item, call your Elevator Maintenance Contractor to rectify the situation immediately. 3. Verify item "d" above. If a problem exists, determine if it is a janitorial issue or an
elevator contract related issue and call the appropriate contractor for corrective action. C. ELEVATOR DOOR SAFETY DEVICES: 1. Mechanical Safety Device:
If a retractable, mechanical safety device is installed on the elevator car /doors, test the operation of these devices as follows:
- Let the doors begin the closing sequence, then as the doors begin to close touch the edge of the retractable safety device to see if it retracts back towards the leading edge of the door and that the door returns to the open position.
- If the safety device does not retract or the doors do not reopen, call your Elevator Maintenance Contractor to rectify the situation immediately.

Preventive Maintenance Task Narratives
113
TASK 1202: ELEVATOR INSPECTION AND MAINTENANCE (CONTINUED): 2. Photo-eye Safety Devices: If single or dual photo-eyes are installed, check the operation of these devices as follows:
- Locate the height of the beam(s) across the door opening, and then let the doors begin the closing sequence. As the doors begin to close, pass a solid object (manila folder/note pad) between the doors and across the beam path of each beam, one beam at a time. When any of the beam paths are obstructed, the doors should return to the full open position.
- If any of the beams are inoperative and the doors do not reopen when they are obstructed, call your Elevator Maintenance Contractor to rectify the situation immediately.
3. Infrared Safety Devices: If infrared safety devices are installed, check the operation of these devices as follows:
- Let the doors begin the closing sequence. As the doors begin to close, pass a small solid object (12" ruler) between the doors in numerous locations between 5 inches and 6 feet above the floor, the doors should return to the full open position.
- If the doors do not reopen when the solid object is passed between the doors within the 5 inch and 6 feet area, call your Elevator Maintenance Contractor to rectify the situation immediately.
D. MECHANICAL/EQUIPMENT ROOM:
1. Check to see that the floor is clean. (The preferred floor surface for this area is painted and the paint is in good condition.)
2. Check the Hoist machines/power units for leaking oil.
3. Check for accumulation of debris, carbon dust, used rags, etc. and overall cleanliness.
E. SIGNAL AND OPERATING FIXTURES:
1. Check car interior lighting. Refer to House Service Supplier if lights are not working. 2. Check car operating panel lights, buttons, lenses, etc. Call your Elevator Maintenance
Contractor to replace damaged buttons, lenses, and lights.
3. Check corridor call buttons and floor indicator lights.
4. Check to ensure direction indicator tones/gongs, etc. sound correctly on each floor when the car is in operation.
5. Check to ensure that the alarm and stop buttons operates and that the alarm bell/buzzer
sounds and that the car stops.

Preventive Maintenance Task Narratives
114
TASK 1202: ELEVATOR INSPECTION AND MAINTENANCE (CONTINUED):
6. Check for proper fit of all panels, compartment and access doors. Refer to your Elevator Maintenance Contractor to correct the problem.
7. Emergency Two-way communications systems should be checked for proper
operation. They should be answered at a point outside the hoist way. NOTE: Any damage resulting from misuse or vandalism may be Real Estate's responsibility to pay for based on your specific maintenance contract. F. CAR EXTERIOR CONDITION: Have your Maintenance Contractor lower the elevator car so the car top and equipment can be observed from the corridor.
- Check to see that the car top light is on or will turn on. - Check to see that the car top is clean and equipment does not have an accumulation of
debris, lint, grease, oil, etc. G. SHAFT, PIT and PIT EQUIPMENT CONDITION: Have your Maintenance Contractor raise the elevator car from the lowest floor position so the pit and pit equipment can be observed from the corridor.
- Check to see that the pit light is on or will turn on - Check to see that the pit is clean and pit equipment does not have an accumulation of
debris, lint, grease, oil, etc. - Inspect to see that a fluid loss log is maintained. Any loss of fluid that cannot be
accounted for should be investigated. Oil leaking from a hydraulic cylinder or associated oil lines can present a potential safety issue.
Evidence of this type of leakage should be reviewed with the Elevator Contractor and referred to the Property Manager for action. NOTE: Housekeeping items generally require the major portion of your maintenance contractors' time; you should question their maintenance program if components and areas are not clean. If this work is not done, other maintenance areas may not be adequately covered. H. ELEVATOR INSPECTION AND MAINTENANCE EVALUA TION:
- Complete the Elevator Inspection and Maintenance Evaluation From and submit to the Property Manager for file or corrective action.
- Verify that current "operating certificate" is posted inside each elevator or on file in the building office.

Preventive Maintenance Task Narratives
115
TASK 1202: ELEVATOR INSPECTION AND MAINTENANCE (CONTINUED):
- Verify that all annual and 5-year full load safety tests required by code are current. - Review summary of repair and trouble call log supplied by the elevator contractor. The
Property Manager will determine whether or not an action plan, or Procurement's involvement is necessary.
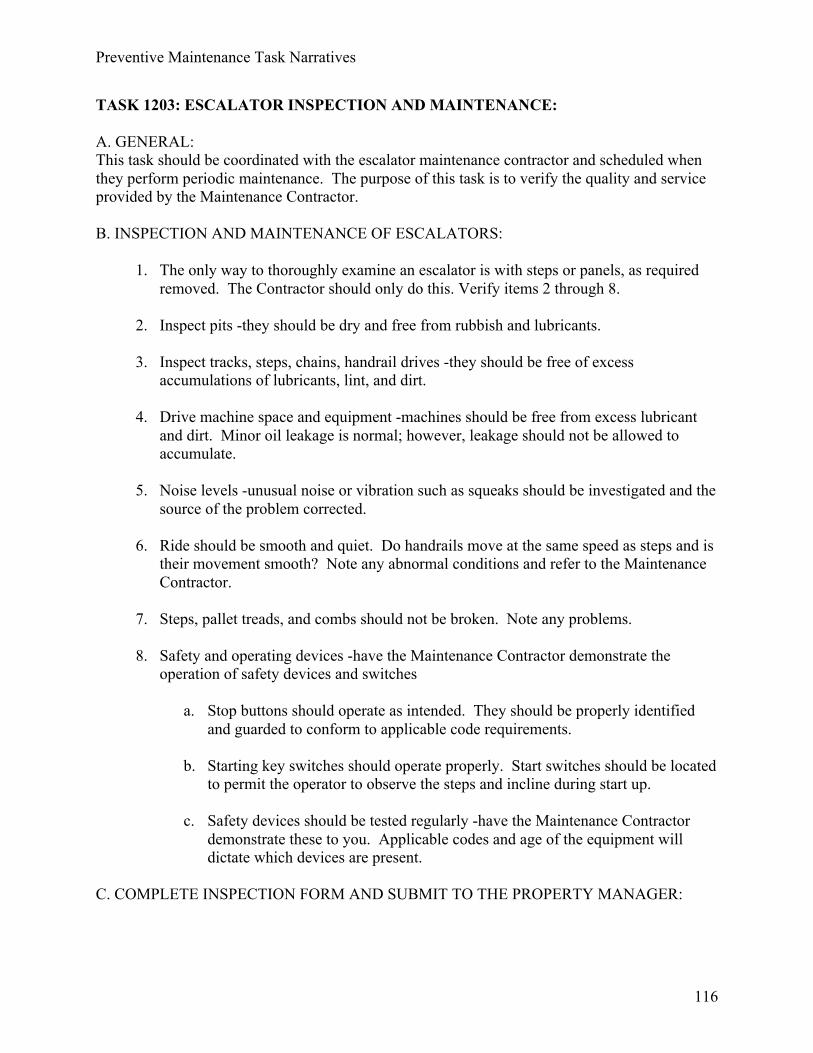
Preventive Maintenance Task Narratives
116
TASK 1203: ESCALATOR INSPECTION AND MAINTENANCE: A. GENERAL: This task should be coordinated with the escalator maintenance contractor and scheduled when they perform periodic maintenance. The purpose of this task is to verify the quality and service provided by the Maintenance Contractor. B. INSPECTION AND MAINTENANCE OF ESCALATORS:
1. The only way to thoroughly examine an escalator is with steps or panels, as required removed. The Contractor should only do this. Verify items 2 through 8.
2. Inspect pits -they should be dry and free from rubbish and lubricants.
3. Inspect tracks, steps, chains, handrail drives -they should be free of excess
accumulations of lubricants, lint, and dirt.
4. Drive machine space and equipment -machines should be free from excess lubricant and dirt. Minor oil leakage is normal; however, leakage should not be allowed to accumulate.
5. Noise levels -unusual noise or vibration such as squeaks should be investigated and the
source of the problem corrected.
6. Ride should be smooth and quiet. Do handrails move at the same speed as steps and is their movement smooth? Note any abnormal conditions and refer to the Maintenance Contractor.
7. Steps, pallet treads, and combs should not be broken. Note any problems.
8. Safety and operating devices -have the Maintenance Contractor demonstrate the
operation of safety devices and switches
a. Stop buttons should operate as intended. They should be properly identified and guarded to conform to applicable code requirements.
b. Starting key switches should operate properly. Start switches should be located
to permit the operator to observe the steps and incline during start up.
c. Safety devices should be tested regularly -have the Maintenance Contractor demonstrate these to you. Applicable codes and age of the equipment will dictate which devices are present.
C. COMPLETE INSPECTION FORM AND SUBMIT TO THE PROPERTY MANAGER:

Preventive Maintenance Task Narratives
117
13 BUILDING CONTROLS/AUTOMATION/ALARM SYSTEMS: CAUTION: FOLLOW LOCKOUT/TAGOUT PROCEDURES. TASK 1301: BUILDING ALARM/AUTOMATION SYSTEMS: NOTE:
1. Use building inventory checklist to determine which alarms are to be tested. 2. During this task changing the set point of the alarm device should be used to simulate
the conditions that activate the alarm. Under no circumstances should the actual condition be caused to activate the alarm, (i.e. do not turn off the power to the building to check the commercial power alarm), unless causing this condition will NOT affect the operation of the building or the telephone equipment i.e. opening the door to activate the open door alarm. If it is impossible to simulate the alarm by varying the alarm device either jumping across the terminals of the device, to cause a short or removing one connection of the device, to cause an open, can simulate the alarm. If the alarm device cannot be varied to simulate an alarm inspect the device carefully to ensure that it will operate in case of an alarm condition.
3. Some alarms, such as open door alarms, may have multiple points that activate one
alarm; all points must be tested to ensure that the alarms are operating properly.
4. After there is a major retrofit of the building, or the telephone equipment within the building, all building alarms must be tested to assure that they are still operating properly.
5. Log test and date number on the alarm log and maintain the documentation at the alarm
panel or other designated location in the building. A. BUILDING ALARM DEVICES: Activate sensing device(s) for Critical Alarms and for Early Warning Indicators to simulate an alarm condition. Verify that any Telephone Equipment Space alarm is received at the appropriate emergency call number and that any other alarm when tested is received at the Center appropriate for the space the alarm is in. Adjust or calibrate as required to ensure proper operation. B. CRITICAL ALARMS: The following are the Critical Alarms that may exist in all Data Centers and Network Equipment Facilities. Test and verify only those alarms that apply to the space. 1. High Temperature 2. Low Temperature 3. High Humidity 4. Low Humidity 5. Fire Trouble

Preventive Maintenance Task Narratives
118
13 BUILDING CONTROLS/AUTOMATION/ALARM SYSTEMS (CONTINUED): 6. Fire Alarm 7. Sump Pump High Water Level 8. Commercial Power Failure 9. Intrusion/Open Door Alarm (Normally Exterior Doors) C. ALARM COVERAGE: Validate that all critical areas of the building are covered by alarms, generally there should be a least one set of environmental alarms for each floor of a building, and this includes basement areas that have telephone equipment in them. On floors that are served by more than one HVAC system or where critical equipment areas are partitioned off from each other more alarms may be required to provide adequate coverage. If coverage is not adequate inform the Property Manager who will then submit a proposal to have the additional alarms added.

Preventive Maintenance Task Narratives
119
TASK 1302: BUILDING AUTOMATION SYSTEMS: NOTE: The Automation systems need to be maintained in the automatic mode. A thorough operational check of the control sensors and output devices are performed when other annual Preventive Maintenance Plan’s are completed. (For example 0106 C and 0109 F.) A. INSPECTION AND DOCUMENTION: Make a backup copy of all input/output points and program. Follow manufacturer's instructions for making backups and for performing inspections of system components. B. REPORTS: Although the systems vary in report names and types, they all are similar in function. Check each cabinet by pulling the appropriate report to determine: 1. Failed points 2. Alarms 3. Overridden points (in hand) Repair points as required, verify equipment is operating properly and return points identified in report to normal building automation control. C. BATTERY REPLACEMENT: Battery replacement should be performed as required by manufacturer's recommendation. Batteries may be replaced more frequently based on cost and criticality of the specific location. When the batteries are replaced the date should be written in permanent marker on the new battery. Follow Management Guidelines for proper disposal of batteries. D. PHYSICAL CONDITIONS: Check physical conditions of the automation cabinets; include immediate surroundings for potential failures. Check inside for cleanliness, dead wire or any condition that could disrupt service and report to the Property Manager. E. TEST MODEM: Test modem for incoming and outgoing operation.

Preventive Maintenance Task Narratives
120
14 MISCELLANEOUS SYSTEMS: CAUTION: FOLLOW LOCKOUT/TAGOUT PROCEDURES. TASK 1401: INSPECTION AND MAINTENANCE OF ROOF SYSTEMS: A. GENERAL:
1. Effective roof maintenance starts with REGULAR inspection of all roof surfaces. This is essential in order to gain the maximum length of service from the roof assembly. This means that a roof designed for a 20-years or longer life will only last that long if proper inspection and maintenance are done.
2. It is recommended that comprehensive inspections be made at the following intervals:
a. Early spring to detect any damage form the winter conditions. b. Early fall to detect any damage or deterioration from the summer.
c. Special inspections should be made after any unusual weather conditions such
as heavy winds or rains, hail, or extreme ice conditions. Also, at times of building remodeling or when any type of work has been done where penetrations in the existing roof were necessary.
3. There are two main areas to be covered in your inspection. They are the perimeter
gravel stops, base flashings and other terminations of the roof membrane. The general field of the roof is also included. Base flashings are found at parapets, walls, curbs around large and small mechanical equipment, skylights and pitch pockets around support legs for equipment. The large open areas of the roof should be carefully inspected in order to check for blisters, splits, cracks, ridges and bare spots. Be careful not to step on any blisters or wrinkles.
BLISTERS AND WRINKLES DO NOT LEAK UNTIL THEY ARE STEPPED ON AND BROKEN; HOWEVER THEY DO NEED TO BE REPORTED. B. ALL ROOFS: NOTE: The inspection shall be made using the Roof Inspection Check list; a separate inspection form shall be used for each section of roof. In addition to the Checklist a diagram of the roof shall be drawn that shows the perimeter of the roof and the different sections and/or levels of the roof.

Preventive Maintenance Task Narratives
121
1401: INSPECTION AND MAINTENANCE OF ROOF SYSTEMS (CONTIUED): NOTE: The locations of any discrepancies shall be indicated on the diagram of the roof. When the inspection is completed a copy of the Checklist and the diagram will be sent to the Property Manager and the Inspector retains a copy. 1. INTERIOR INSPECTION: Inspect the interior of the building, making note of any evidence of roof leakage such as: a. Stained ceiling tile. b. Water marks on the ceiling or walls. c. Discolored paint on the ceiling or walls. d. Mineral deposits. Any evidence of leakage should be corrected to return the surface to its original condition. This will not only improve the looks of the building, but if evidence of a leak is found on a subsequent inspection the inspector will know that it is from an existing leak. 2. PERIMETER INSPECTION:
Walk the perimeter of roof and inspect the condition of the roof edges, the parapet walls for damage or signs of leakage, and the condition of the coping, the counter flashing, and the base flashing. This is also a good time to observe whether a single ply roof is shrinking, one that is shrinking will have bridging (voids under the membrane) around the edges of the roof membrane. Note your findings on the inspection sheet and indicate the location of any discrepancies on the roof diagram.
3. DRAINS AND SCUPPERS:
Inspect all drains, scuppers and gutters to ensure that they drain properly, they are not leaking and there is an adequate number in the proper locations. Inspect heat tapes/cables in rain gutters and down spouts (if applicable) for proper installation and operation. Note your findings on the inspection sheet and indicate the location of any discrepancies on the roof diagram.
4. ROOF MOUNTED EQUIPMENT:
Inspect all pitch pockets, curbs and other areas where the equipment is attached to or bearing on the roof for overall condition and serviceability. Note your findings on the inspection sheet and indicate the location of any discrepancies on the roof diagram.
5. MEMBRANE CONDITIONS: Test -walk the field area of the roof looking for blisters, splits, cracks, voids, ridges, bare spots etc. Check the single ply roofs for shrinkage of the membrane, scaling on the surface, lack of flexibility or chalking. Note your findings on the inspection sheet and indicate the location of any discrepancies on the roof diagram.

Preventive Maintenance Task Narratives
122
1401: INSPECTION AND MAINTENANCE OF ROOF SYSTEMS (CONTIUED): C. MAINTENANCE: Remove all debris from roof, drains and scuppers. Sweep roofs as needed. Repair all items noted in the Immediate Repair Recommendations section of the Inspection Check list. Repair work of an emergency nature should be done immediately. Initiate a work order for all required repair work that is of a non-emergency nature. Report all defects over critical equipment to the Property Manager. D. ROOFS UNDER WARRANTEE: If there are roof problems, check to see if a warrantee is still in effect. This is especially important on single ply roofs as they come with extended warranties for up to twenty (20) years. If the roof is still under warrantee, the ONLY repairs we should make are those emergency ones needed to stop actual water leaks into the building and those that are not covered by the warrantee. Notify Property Manager. All manufacturers require written reports of roof problems. E. LOW SLOPE. BUILT -UP ROOFS: 1. GENERAL INSPECTION:
Walk roof lap seams and look for fish mouths, damage, etc. Completely inspect all other items such as equipment pads and supports, roof projections, and roof penetrations.
2. ROOF CONSTRUCTION: In the construction of built-up roofs, three types of bitumen’s are used: a. Asphalt -A petroleum based product. b. Coal Tar Pitch -A coal tar based product.
c. Modified Asphalt -An asphalt modified with polymer and elasto-meric materials to give high performance characteristics.
Asphalt and coal tar pitch are not compatible and it is important to find out and remember which bitumen was used on the roof. If recoating of a roof section were necessary, it should be done with a material compatible with what is on the roof surface. It can be determined what kind of roof you have by soaking a small amount of black bitumen material in mineral spirits. 1. Tar will turn the mineral spirits yellow or pea green. 2. Asphalt will turn the mineral spirits to dark brown.

Preventive Maintenance Task Narratives
123
1401: INSPECTION AND MAINTENANCE OF ROOF SYSTEMS (CONTIUED): F. SINGLE PLY ROOFS: 1. GENERAL INSPECTION:
Inspect general condition of roof, paying particular attention to membrane seams (on non-ballasted systems). Look for curled seam edges, splits and loose fasteners. Check the single ply roofs for shrinkage of the membrane, scaling on the surface, lack of flexibility or chalking. Completely inspect all other items such as equipment pads and supports, roof projections, and roof penetrations.
2. ROOF CONSTRUCTION: A single ply roof system is composed of only one layer of membrane such as EPDM, Hypalon or PVC. There are many other types of single ply membranes and because each type has different repair methods it is important to identify the membrane and find out if the roof is under warranty. These systems may be either mechanically attached to the roof deck or ballasted with large rocks (1.5-3.0 inches in diameter) or concrete pavers. The type of material used can usually be identified by its color and texture.
a. EPDM roofs are typically black and look like a big inner tube. They can however have some reinforcing fabric with the membrane and can be white in color. Any type of oils, solvents or animal fats can damage this roof membrane.
b. Hypalon roofs are typically white in color and have a reinforcing scrim within
the membrane. One particular item to watch for on this roof system is chalking. This means you can see a white chalk like substance on the surface and your hand becomes white when rubbed over the surface. This item is an advance warning concerning the condition of the roof membrane.
c. PVC roofs are generally grey or beige in color. This membrane mayor may not
have reinforcing mesh within the membrane. There are two conditions that this membrane exhibits that can lead to failure of the roof system. One is that the material becomes quite brittle with age; therefore check the membrane to see that it is still flexible. The other condition is that of the surface scaling. Also this membrane is extremely sensitive to any type of contamination.
G. METAL ROOFS: 1. GENERAL INSPECTION: Inspect general condition of roof, standing seams, joints, flashings, soffits, fasteners etc. 2. ROOF CONSTRUCTION:
On metal roofs it is extremely important to note the slope. Metal roofs can be "Delta Rib", "Standing Seam" or other special types. They can be galvanize, pre-painted steel or aluminum.

Preventive Maintenance Task Narratives
124
1401: INSPECTION AND MAINTENANCE OF ROOF SYSTEMS (CONTIUED): H. MODIFIED BITUMEN ROOFS: 1. GENERAL INSPECTION:
Walk roof lap seams and look for fish mouths, damage, etc. Completely inspect all other items such as equipment pads and supports, roof projections, and roof penetrations. The roofs will be either smooth surfaced or granular surfaced, if the surface is smooth is extremely important to keep a coating on the top of this membrane to prevent premature failure. One sign of failure is a cracking, crazing or a brittle surface.
2. ROOF CONSTRUCTION:
This roof is basically a cap sheet roof that is installed in only one or two layers. These systems are 3 ft. wide and can be either smooth or granular surfaced. This roof is installed by various methods such as torch, cold adhesive, hot asphalt or even a peel and stick. It is important to find out what type of a system it is and who the manufacturer is. These membranes are either denoted as APP Modified or SBS Modified membranes.

Preventive Maintenance Task Narratives
125
TASK 1402: GAS LEAK INSPECTION: A. GENERAL: This task outlines the methods and procedures for inspecting and testing piping used for the distribution of natural, manufactured and liquefied gas. If escaped gas is detected anywhere within a building, all gas appliances should be shut off in the area where the odor of gas is detected. The area should be immediately ventilated by opening windows, exterior doors or by other means. ELECTRIC FANS OR APPLIANCES SHALL NOT BE BROUGHT INTO THE AREA. The area should be continuously ventilated until the source of the leak is located and repaired. During this period, electric lights or other electric apparatus shall not be turned off or on. If illumination is required, a flashlight, which has been switched on while in a safe area, should be used. SMOKING OR USE OF AN OPEN FLAME IS PROHIBITED IN ANY AREA WHERE THERE MAY BE ESCAPED GAS. A SUITABLE COMBUSTIBLE GAS DETECTOR/INDICATOR should be used for detecting combustible gases [natural gas, liquefied petroleum gas (Propane), manufactured gas, gasoline vapors, etc.] at all utility service entrances, curb boxes, utility holes, cable entrance facilities, or other confined space. B. TEST FOR COMBUSTIBLE GAS: Test for the presence of combustible gases at these locations:
1. Test at the curb valve box by removing the cover and lowering the sample hose into the curb box to test the atmosphere.
2. Company Utility Holes -Insert the sampling hose into the Utility Hole, you may have to
remove the cover, test the atmosphere.
3. Test for the presence of combustible gas where other underground utilities (including telephone cable ducts) enter the building.
4. Test for combustible gas at any breaks or cracks in the basement walls or floor slabs.
C. GAS PIPE SHUTDOWN: A gas piping shutdown test should be conducted as follows:
1. Shut off pilot burners on all appliances. Shut off the main gas valves to the boilers, hot water heaters and all other gas-fired equipment.
2. Leave the emergency curb valve and the building main shutoff valve in the OPEN
position.

Preventive Maintenance Task Narratives
126
TASK 1402: GAS LEAK INSPECTION (CONTINUED):
3. With the valve setting as indicated in (2) above mark the consumption indicator on the gas meter.
4. Observe the consumption indicator on the gas meter for 10 minutes. One revolution of
the smallest indicator will usually register a flow of 1/2 to 1 cubic foot of gas. Any movement indicates a leak that must be located and repaired.
NOTE: If a leak is suspected or detected in concealed piping, the system should be shut off at the meter.
5. Open the main gas valves to the boilers, hot water heaters and to all other gas-fired equipment.
6. Using either a soap solution or leak detector, check all fittings, flanges, piping and
valves of each appliance between the shutoff and the burner tip to assure that no leakage exists.
7. Repair any leaks found and retest to make sure that the repairs have been made
satisfactorily.
8. Restore all gas-fired equipment (including heating equipment) by opening the valves and lighting the pilot lights. This equipment needs to be operated only long enough to ensure that it is functioning properly.
D. INSPECTION CERTIFICATE: When the annual tests are completed, the Inspection Certificate shall be signed, dated and posted by the inspector. 1. The certificate shall be displayed in a readily accessible location.

Preventive Maintenance Task Narratives
127
TASK 1403: INSPECTION OF LIGHTNING ARRESTORS: A. GENERAL: Check to see that pilot light(s) on arrestors are lit. If lights are not installed, initiate a work order to get them installed. An unlit light indicates that either (1) the bulb is burnt out or that (2) the arrestor has been damaged. An operational arrestor has a very high resistance while a failed one has zero resistance. Replace failed arrestors ASAP using exact replacement type.

Preventive Maintenance Task Narratives
128
TASK 1404: COMPUTER ROOM PARTICLE COUNT: A. GENERAL: Take particle count readings as required by service agreements with customer. Document readings on appropriate form. Readings should be taken quarterly unless otherwise specified in the service agreement.

Preventive Maintenance Task Narratives
129
TASK 1405: EXTERIOR SECURITY REVIEW: NOTE: When this review is being done at a location that has alarms, this review should be coordinated with Task 1301. A. GENERAL: The purpose of this task is to improve both the security of the facility and the tenant satisfaction. Care should be used when assigning this task, as it will not be used at all locations, it should be used at major Central Offices and garages that have storage yards. If problems are found during a review, initiate corrective action(s) as required, or submit major issues to Property Manager. B. FENCES: Inspect fences for holes, broken wires, loose wire fabric, broken posts and items stored near the fence that would allow someone to climb over the fence. C. GATES: 1. MANUAL GATES:
Inspect for condition, function and that necessary items (locks, chains, etc.) are there to properly secure the gate. Lubricate wheels and rollers.
2. ELECTRIC GATES:
a. Inspect the condition of the gate and the operating function. Grease wheels and operator shaft bearings. Visually inspect the Cog belts and pulleys in the operators.
b. Clean cam drives chain and inspect drive sprocket for tightness and excessive
wear.
c. Check time clock schedules. Check conditions of the gate lock and chain for wear and damage.
d. Check to ensure manual override works in case of power loss.
D. DOORS/HATCHES: Inspect all exterior doors and hatches for function; this includes operation of door closer, hardware operation, door not rubbing on frame and check that the door can be opened with a key or the access card if applicable. E. OVERHEAD DOORS:
1. Check condition of bearings, belts, chains, hinges, rollers, and sheaves. 2. Adjust belts and chains to proper tension. Do not use belt dressing. It is important to
replace belts before they fail. Evidence of wearing can include glazing, cracks, or unusual noises. Check for pulley/sheaves alignment and condition. Check belt guard.

Preventive Maintenance Task Narratives
130
TASK 1405: EXTERIOR SECURITY REVIEW (CONTINUED):
3. Tighten all loose hardware (hinges, rollers, guides, locks, etc.) 4. Lubricate rollers, hinges and chains using-appropriate lubricant and wipe off excess
lubricant.
5. Check weather stripping and glass for damage.
6. Check operation of automatic system (doors may be equipped with systems that may automatically close or open doors).
7. Verify, by manually opening and closing the doors, that in the event of a power failure
the doors can be operated by hand. Doors that do not have the option of being opened manually should be reported to your Property Manager. If the system is in place but does not work it must be repaired.
F. WINDOWS:
1. Inspect all windows for leaks, cracks or broken panes. Check that the windows are locked shut.
2. Check the location of the window to ensure that it is not a security risk, i.e., the window
is not on the ground floor of a telephone equipment area, or that there are not bushes or trees that conceal the window or the area around it.
G. LIGHTS: During the Security Review, note where there are lights that are burned out or otherwise not functioning. They should be reported to the Work Order Center for repair.

Preventive Maintenance Task Narratives
131
TASK 1406: INSPECTION AND MAINTENANCE OF HYDRAULIC DOCK LIFTS: A. GENERAL- ENGAGE ALL SAFETY APPARATUS:
1. Drain reservoir at hydraulic fluid, check reservoir for build up of residue. Check for metallic particles, moisture. Etc. Clean reservoir.
2. Replace throwaway filters; clean re-useable filters per manufacturer's instructions.
3. Check hydraulic lines for leaks, cracks or wear, tighten all fittings as needed.
4. Check seals on pump and cylinder check cylinder for scratches or roughness.
5. Visually inspect electrical controls (Motor starter and contacts, push buttons stations,
etc.) Tighten electrical connections as needed.
6. Check pump motor, lubricate as needed per manufacturer's instructions.
7. Clean under lift or pit area, wipe down all equipment.
8. Pump and filter hydraulic fluid or replenish reservoir with new fluid as Manufacturers recommends.
9. Operate lift system, check for smoothness at operation.

Preventive Maintenance Task Narratives
132
TASK 1407: ASBESTOS INSPECTION: A. GENERAL: Visually inspect Asbestos identified areas for damage. Certified/qualified vendors must perform repairs. Verify that proper asbestos notification signage is posted.

Preventive Maintenance Task Narratives
133
TASK 1408: BUILDING CARD ACCESS CONTROLS BACKUP BATTERY TEST: A. BATTERY BACKUP: This task should be performed every 6 months. Batteries should not be expected to last more than 3 years from original installation date. Follow Management Guidelines for proper disposal of batteries. 1. Measure batteries in power supplies for equipment and power supplies for electric locks for card access doors. Voltage should be no less than 12VDC. If voltage is less than 12VDC, replace with new batteries immediately. A load test is required in order to ensure the functionality of the batteries under an actual power loss. B. LOAD TEST: Perform the following steps to run the load test:
1. Notify the Property Manager at least 24 hours in advance of the scheduled test. Advise them that if the load test fails card access may be interrupted for up to 10 minutes while the system performs a database download.
2. Notify the Work Order Desk and ask them to advise the appropriate personnel.
3. Remove the AC power leads from the power supply input terminals.
4. Wait 10 minutes and then test a previously proven good ID card on a random group of
card access doors.
5. If any component fails to operate properly due to power loss replace the batteries in the appropriate power supply for that device and perform another load test immediately to ensure full functionality.
6. If all operations are normal reapply the AC power input to all power supplies.
7. When the batteries are replaced record the installation date on the battery.
8. Perform functionality check of the card access system in the facility. Test all exterior
doors and a sample of interior doors to ensure that the doors are locked and that they can be opened using a valid access card. You should try your own card and one other if available. A non-valid access card should be tried to make sure that the system is not operating in the facility mode. If any problems are observed call the Property Manager for technical support.

Preventive Maintenance Task Narratives
134
TASK 1408: BUILDING CARD ACCESS CONTROLS BACKUP BATTERY TEST (CONTINUED): NOTE: There are two modes that a card access system can run in: Facility Mode -This is where the system will allow any access card to unlock the door for entry. This is the least secure mode and should only be used for start up, or emergencies. Card Mode -This is where the system will only allow those cards that are programmed for that building and that door to unlock the door for entry. This is the standard operating mode and buildings should normally be in this mode.

Preventive Maintenance Task Narratives
135
TASK 1409: BUILDING CARD ACCESS CONTROLS BACKUP BATTERY TEST: A. NICKEL CADMIUM MEMORY BATTERY REPLACEMENT: This task should be performed every twelve months. Follow Management Guidelines for proper disposal of batteries. Notify Property Management prior to performing this replacement. No systems interruptions should be caused by this task. This battery is only utilized during full power losses. Power is provided to the memory components by the main power input. Perform the following steps to run the battery replacement:
1. Locate the battery in each controller module. 2. Replace the existing battery with a new battery. Write date of installation on the
battery.
3. Perform functionality check of the card access in the facility. Test all exterior doors and a sample of interior doors to ensure that the doors are locked and that they can be opened using a valid access card. You should try your own card and at least one other if available. A non-valid access card should be tried to make sure that the system is not operating in the facility mode. If any problems are observed call the Property Manager technical support.
NOTE: There are two modes that a card access system can run in: Facility Mode -This is where the system will allow ANY access card to unlock the door for entry. This is the least secure mode and should only be used for start up, or emergencies. Card Mode -This is where the system will only allow those cards that are programmed for that building and that door to unlock the door for entry. This is the standard operating mode and buildings should normally be in this mode.

Preventive Maintenance Task Narratives
136
TASK 1410: VACANT SPACES A. GENERAL: Vacant spaces and the necessity to maintain standards of appearance are both a source of generating future customers as well as preventing a hazard to the buildings and their contents. The intent of this task is to increase future tenant occupancies while protecting owner assets. The scope of this task covers the inspection and minor repairs of the vacant space and associated equipment. Minor repairs are those repairs not requiring over fifteen minutes completing. Major repairs will require a Work Order from the MAIN OFFICE. B. PURPOSE:
1. The intent of applying this preventative maintenance schedule has two main purposes. The first purpose is to verify all vacant spaces are readily available for potential showing(s) to prospective clients.
First impressions of this space may determine whether a customer chooses to lease or buy a space. All vacant spaces will have an initial walk through with the designated building engineer, the assigned property manger and the leasing agent. Any questions or concerns with the appearance of the space will be directed to ownership to determine the scope of repairs required for future tenant showings. Additionally, all vacant spaces will have an inventory of the spaces HVAC system (make, model and serial numbers). This information will be added into the Colonial vacant space information.
2. The second purpose of applying this preventative maintenance schedule is to protect the
owner’s assets, which may include the following: HVAC, gas, electrical, and water, while in the unoccupied mode as well as conserving utility expenses. It is imperative to reduce utility consumption. Report any discrepancies to the assigned property immediately for corrective actions.
3. Maintenance personnel will check the following on a monthly basis:
In winter, to eliminate wasted energy and prevent freezing, verify thermostats are set at 60 degrees In summer, to eliminate wasted energy and high humidity, verify thermostats are set at 80 degrees Ensure all HVAC filters, coils, etc are clean and inspected. This includes the condenser coils which may be located on the roof or around the outside of the space.
Manually turn off the hot water tank’s electrical or gas to conserve utility consumption.
Turn off all unnecessary electrical devises. This may include clocks, marquee signs, garage door openers, and other non essential items.
Clean all windows, window sills and check weather-stripping for damages

Preventive Maintenance Task Narratives
137
TASK 1410: VACANT SPACES (Continued)
Place all blinds in an equal and uniform position.
a. Blinds will be pulled up to mid-window level. b. Tie all cords in an equal and uniform manner and so that they don’t hang below
the blind level.
Replace all damaged and stained ceiling tiles
Check and repair all kitchens, break areas and kitchenettes.
a. Wipe down all counter tops and cabinet shelves b. Verify correct operation of all cabinet doors c. Verify correct operation of faucets, garbage disposals. Ensure no faucets are
dripping after the water is shut off.
Vacuum or mop floors (no bugs, mud, dust, dirt, etc.). Report any stains or damages to the carpeting to the property manager. Remove all trash and debris
Flush toilets, add water to floor drains and turn water on in the sinks for approximately 5 minutes Check and replace burnt out bulbs
Check exterior entryways, lighting, etc.
Check for vandalism, security breaches, broken doors, etc.
Locks and keys work accordingly
Report any problems or discrepancies to Property Management immediately

Preventive Maintenance Task Narratives
138

Preventive Maintenance Task Narratives
139
TASK 1411: INSPECTION AND MAINTENANCE OF AIR COMPRESSORS: CAUTION: FOLLOW LOCKOUT/TAGOUT PROCEDURES. A. GENERAL: Few pieces of shop equipment are used as regularly as air compressors. In order to ensure that your air compressor continues to run smoothly day after day, technicians need to know how to properly maintain this vital piece of equipment. It’s important to keep the entire air compressor clean as dirt acts as an insulator and will cause the unit to run hotter than necessary. Under normal use, temperatures inside an air compressor can exceed 450° F. Anything you can do keep this temperature from climbing even higher, will help your air compressor last longer. B. DAILY MAINTENANCE
1. For proper maintenance, the main air tank on the compressor should be drained on a daily basis. This can be done manually or there are automatic devices available that open the bottom drain for a specified period of time each day.
2. In addition, daily maintenance, at least during the warmer months (at least once a week
during cooler months) should include draining the moisture traps and opening the air valve on the drain legs to remove the liquid water that’s already trapped. Compressed air creates condensation and condensation is water.
C. IN-LINE FILTER, REGULATOR, LUBRICATOR & GAUGE As a safety precaution to protect your equipment that is run off the air compressor, it’s wise to install a filter, regulator, lubricator and/or gauge in the air line. These units come in various combinations so be sure to ask the manufacturer or supplier what they would recommend based on your compressor, climate and what equipment you will be running off the air compressor. The filter will also eliminate any solid particles that may be in the air line. Having a pressure gauge is essential for maintaining pressure that falls within manufacturers’ calculated and recommended levels. Incorrect levels can cause safety hazards and impair performance. The pressure gauge can also help detect any leaks that may be in the lines. If there are any leaks, you are wasting money in electricity to replenish the air supply. D. CHANGING THE OIL
1. It’s important to change the oil in an air compressor on a regular basis. A low oil level can cause the pump to work harder and run hotter. The oil should be changed at least every year. The owner’s manual that came with the air compressor will include service

Preventive Maintenance Task Narratives
140
interval guidelines as well as recommend a specific weight of oil to use. Simply changing the oil at regular intervals helps keep the internal parts well lubricated. As an additional safeguard, you may also want to consider using a “compressor cool” additive to keep the oil at a cooler temperature and minimize condensation in the pump. E. INSPECT THE DRIVE BELTS While performing a safety inspection on your shop’s air compressor, check the drive belts for any signs of wear. If you find damage to either belt, always replace both belts at the same time. Replacing the belts as a matched set will maintain balanced tension from the drive to the pulley. While checking the belts, also check the belt guard to make sure it is doing its job. If it’s loose, take the time to properly attach it to the machine. F. AIR DRYERS Air dryers, or extractors, are often used to help cool the compressed air after it leaves the compressor on its way to your power tools. This cooling of the air lowers the dew point, which turns any water vapor in the air into liquid. The moisture is then removed from the air line as it passes through the dryer/extractor. There are a few different types of dryers/extractors on the market today, so be sure to discuss with your supplier which one best fits your shop’s needs based on what you will be using the compressed air for on a daily basis. A few minutes of preventive maintenance can go far to extend the life of your air compressor.

Preventive Maintenance Task Narratives
141
TASK 1412: INSPECT EXTERIOR LIGHTING A. GENERAL: Check all photo cells and timers for proper operation and settings. Complete exterior lighting inspection.

Preventive Maintenance Task Narratives
142
TASK 1413: BUILDING STRUCTUAL INSPECTION A. GENERAL: Inspect the parking lot, curbs, sidewalks and building structure for any hazards.

Preventive Maintenance Task Narratives
143
TASK 1414: COMMON AREA RESTROOMS A. GENERAL: Inspect all doors, plumbing fixtures, toilet seat tightness, lights and ensure exhaust fans are clean and operational.
Preventive Maintenance Task Narratives
144
TASK 1415: COMMON AREA HALLWAYS AND ENTRYWAYS A. GENERAL: Inspect all doors, lights, etc… for proper operation and ensure no safety hazards are present.

Preventive Maintenance Task Narratives
145
TASK 1416: MECHANICAL AND JANITORIAL ROOMS A. GENERAL: Inspect all mechanical and janitorial rooms for cleanliness. Inspect lights for proper operation and ensure no safety hazards are present.

Preventive Maintenance Task Narratives
146
TASK 1417: BUILDING CAULKING A. GENERAL: Inspect all sidewalk and building caulking for failure.

Preventive Maintenance Task Narratives
147
TASK 1418: Landscaping A. GENERAL: Inspect all irrigated areas for moisture content of the tree, shrub, flower beds and turf/lawn., adjust irrigation as needed for proper growth. Identify any areas that may need attention due to weed content, insect infiltration and mowing condition. Include the inspection of the walks/plaza in the area.
Preventive Maintenance Task Narratives
148
TASK 1419: Vehicular System A. GENERAL: Inspect all parking lots, roads/drives, curbs and fire lane for erosion, cracks and potholes. Check for storm water management of drains and sediment traps. Remove any trash buildup in catch basins and other portions of the storm water drainage system.

Preventive Maintenance Task Narratives
149
15 ADMINISTRATIVE: TASK 1501: VALIDATION OF INVENTORY FOR BUILDING EQUIPMENT SYSTEMS: A. GENERAL: Existing inventories become inaccurate, as new equipment is installed and/or old equipment is removed. It is important to maintain the accuracy of the equipment inventory. Every other year, validation of inventory needs to be completed. New equipment should still be inventoried when installed. Use this task as an opportunity to make changes to the current scheduling of tasks, where appropriate. Complete all required paperwork to make the inventory accurate and forward to the Operations Manager for review and concurrence. This task is done in addition to the inventory on new equipment. As new equipment moves into a facility the inventory process and forms should continue to be utilized. Follow the Inventory Instruction Guidelines. B. GENERAL VALIDATION OF INVENTORY: Validate that all equipment in the building has been inventoried and that the report is accurate. The report should be taken to the facility and is needed to complete this task. 1. Equipment Removal:
Equipment that has been removed from the facility should be noted. Make a handwritten note for all equipment removal directly on the report. Submit paperwork to the Property Manager for review and concurrence.
2. New Equipment:
Equipment that is discovered at the facility but isn't on report must be added. Use good judgment to determine whether inventory can be done at the time of discovery, or if a subsequent visit is needed.
Follow ALL inventory instructions and complete the appropriate inventory form. The schedule will also need to be updated. All completed paperwork needs to be forwarded to the Operations Manager before submittal to the database.

Preventive Maintenance Task Narratives
150
TASK 1502: INVENTORY CHECKLISTS FOR BUILDING EQUIPMENT SYSTEMS: A: GENERAL All items that need regular maintenance should be included in this program. This not only includes mechanical equipment like pumps and motors but tasks such as cleaning gutters or cleaning out the mechanical room floor. Equipment serviced by vendors under preventive maintenance contracts should be included in this program. Please fill out the information on this form and return it to the appropriate Operations Manager. Below is a more detailed format, which we would need to update for records. Only include information on one asset per sheet. If an asset has different levels of preventive maintenance, use more that one sheet. (IE: An HVAC unit may need the filters changed quarterly but the motors greased annually). Follow the Inventory Instruction Guidelines.
c. Name of the Property. d. Check the appropriate box for the asset category.
e. Manufacturer name as it appears on the asset. Do not use generic names.
f. Model # of the asset.
g. Serial # of the asset.
h. Warrantee information of the item. For example state if a pump has a 5-year
warrantee, include the date acquired so management can track when the warrantee will expire.
i. Include date of the last time preventive maintenance was performed on the unit.
Leave the space blank if no maintenance has been completed.
j. State the location of the asset. The location should be specific enough so an engineer not familiar with the property could locate the asset.
k. Provide a brief description of the asset. For example: Chilled Water Pump #1
or 3rd floor Hot Water Heater.
l. Provide details of PM needed for the equipment. Include copy of owner’s manual if possible.
m. Additional comments can be added. If a vendor currently services the asset,
include their name.
n. Check the box that corresponds with the frequency level of maintenance for the asset.

Preventive Maintenance Task Narratives
151
TASK 1503: STANDARD CHECKLISTS FOR NEW PROPERTIES: A: GENERAL When Pacific Realty begins management/maintenance on new properties, the work order center will generate standard preventive maintenance checklists. They include the following:
1. Retail/ Industrial
a. Roof Inspection- Semi-Annually b. Lighting Inspection- Quarterly c. Complete Structural inspection. “Looking at the concrete, parking lot and
building structure.” Semi-Annually d. Vacant Space Check -monthly
2. Commercial Office Spaces/Condominiums
a. Complete Test of Elevator Fire Service and log- Monthly “Phase 1 and Phase 2 tests should be done monthly. Ensure inspection report is accessible to the fire marshal, elevator inspector and maintenance technicians.”
b. Roof Inspection- Semi-Annually “Complete roof inspection. Turn in roof diagram and report annotating any discrepancies.”
c. Lighting Inspection- Quarterly “Complete exterior light inspection. Turn in diagram and report annotating any discrepancies.”
d. Restroom checks-Monthly “Complete check sheet of restroom conditions and repair any deficiencies.” e. Mechanical, electrical and janitorial rooms-monthly
“Check all mechanical, electrical and janitorial rooms for cleanliness. Verify all lights work. Ensure no safety hazards exists”
f. Check all Security and Exit lights for operation- Quarterly g. Inspect all Fire Extinguishers per code- Annually h. Inspect Fire Alarm System per code- Annually i. Inspect Fire Sprinkler System per code- Annually j. Inspect Backflow preventer per code- Annually k. Vacant Space Check-monthly
“Check all Lights, Ceiling Tiles, General Cleaning, HVAC. Ensure the space is ready for potential show and report any problems to management

Preventive Maintenance Task Narratives
152
TASK 1503: STANDARD CHECKLISTS FOR NEW PROPERTIES (CONTINUED): 3. Associations:
d. Lighting Inspection- Quarterly “Complete exterior light inspection. Turn in diagram and report annotating any discrepancies.” e. Inspect Backflow preventer’s per code- Annually f. Complete Structural inspection. “Looking at the concrete, parking lot and
building structure.” Semi-Annually 4. Parking Garages:
a. Roof Inspection- Semi-Annually b. Lighting Inspection- Quarterly c. Complete Structural inspection. “Looking at the concrete, parking lot and
building structure.” Semi-Annually d. Complete Test of Elevator Fire Service and log- Monthly
“Phase 1 and Phase 2 tests should be done monthly. Ensure inspection report is accessible to the fire marshal, elevator inspector and maintenance technicians.”
e. Check all Security and Exit lights for operation- Quarterly f. Inspect all Fire Extinguishers per code- Annually g. Inspect Fire Alarm System per code- Annually h. Inspect Fire Sprinkler System per code- Annually i. Inspect Backflow preventer’s per code-Annually