spreadsheets in finance and forecasting presentation 11 visual basic
TRANSCRIPT

Spreadsheets in Finance and Forecasting
Presentation 11Visual Basic

Objectives After studying this week’s work you will
be able to: Use the Visual Basic Editor to examine and
interpret VB Code Modify Macros in order to extend their role Communicate with the user via input and
message boxes Allow the user to choose courses of actions
Introduction

VB Examples We will use a spreadsheet to examine the process
of creating Visual Basic code via a macro. The example is a simple situation where we have
new data to be used to update a total.
Today's Sales Total so far this month:
Fruit and Veg £135.56 Fruit and Veg £5,082.95Baked Goods £476.89 Baked Goods £7,890.66Groceries £1,249.98 Groceries £23,911.85Stationery £56.76 Stationery £1,688.92Miscellaneous £198.06 Miscellaneous £4,511.61
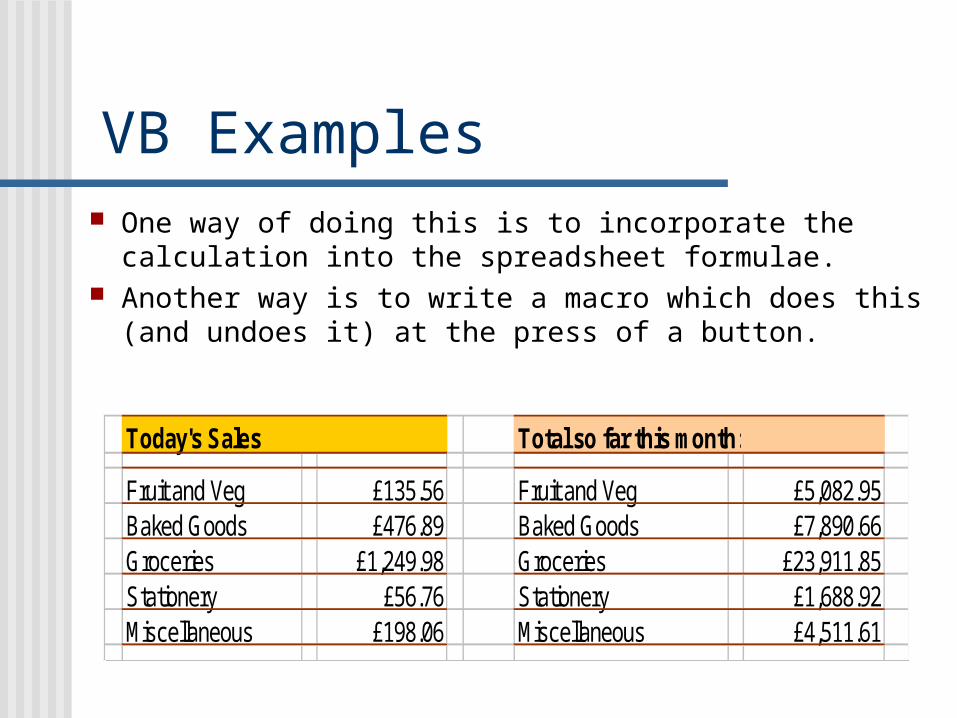
VB Examples One way of doing this is to incorporate the
calculation into the spreadsheet formulae. Another way is to write a macro which does this
(and undoes it) at the press of a button.
Today's Sales Total so far this month:
Fruit and Veg £135.56 Fruit and Veg £5,082.95Baked Goods £476.89 Baked Goods £7,890.66Groceries £1,249.98 Groceries £23,911.85Stationery £56.76 Stationery £1,688.92Miscellaneous £198.06 Miscellaneous £4,511.61
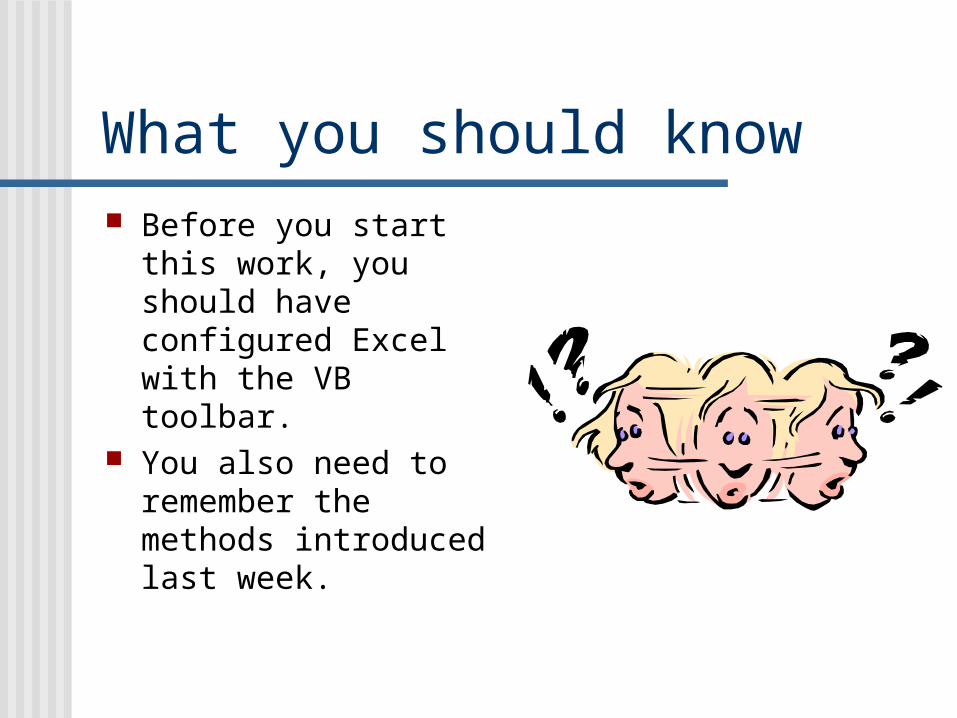
What you should know Before you start this
work, you should have configured Excel with the VB toolbar.
You also need to remember the methods introduced last week.
Section 1
UnderstandingVB Code
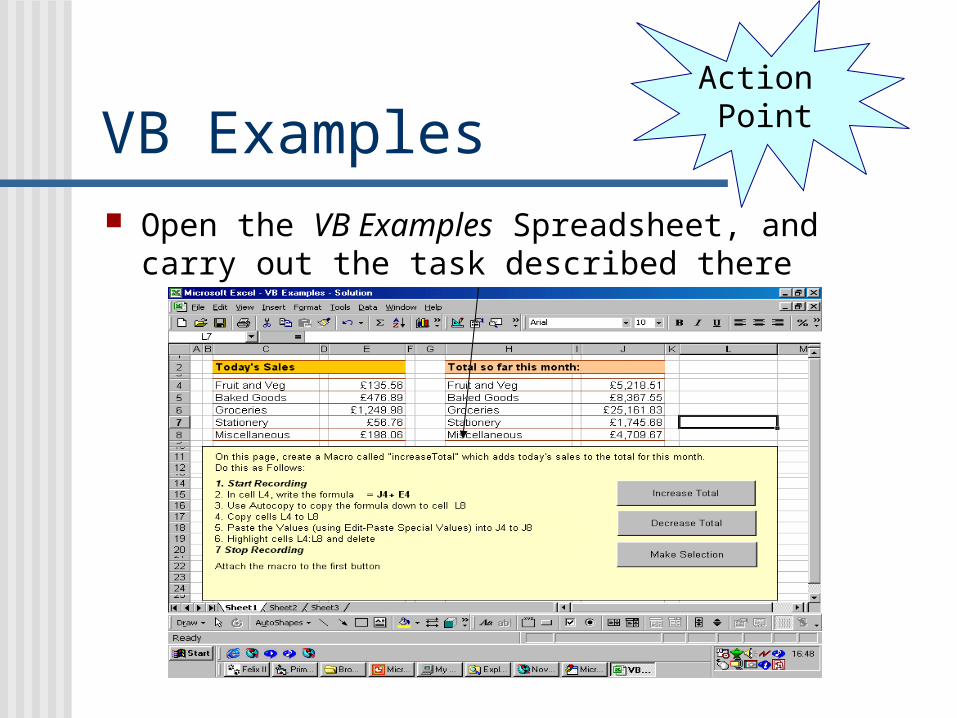
VB Examples Open the VB Examples Spreadsheet, and
carry out the task described there
Action Point
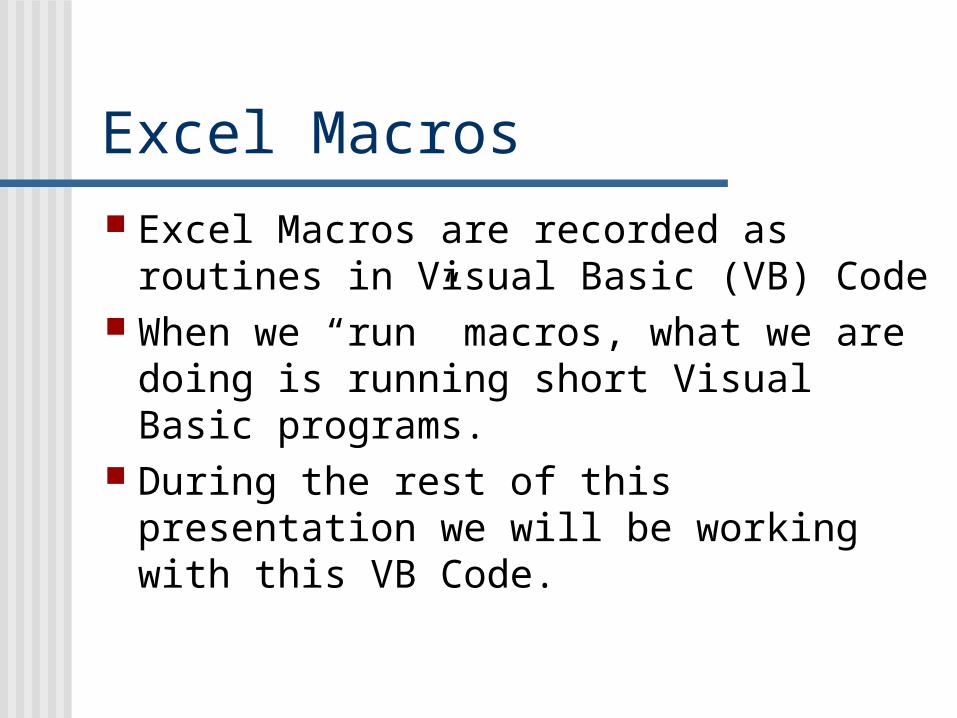
Excel Macros Excel Macros are recorded as
routines in Visual Basic (VB) Code When we “run” macros, what we are
doing is running short Visual Basic programs.
During the rest of this presentation we will be working with this VB Code.

The Visual Basic Editor
Click on: Tools – Macro- Visual Basic Editor
The Folders The Visual Basic Code
Action Point

Visual Basic Code -FeaturesTitle of the macro Comments are
prefaced with a single quote mark, and appear in green
End of macro
Visual Basic Commands
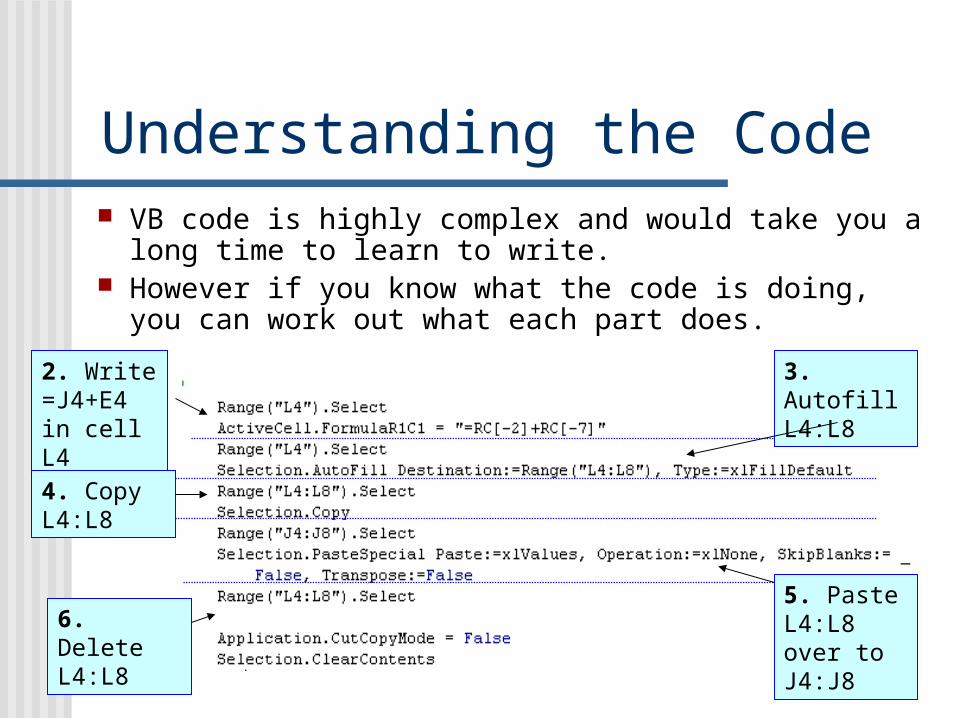
Understanding the Code VB code is highly complex and would take you a long
time to learn to write. However if you know what the code is doing, you can
work out what each part does.
2. Write =J4+E4 in cell L4
3. Autofill L4:L8
4. Copy L4:L8
6. Delete L4:L8
5. Paste L4:L8 over to J4:J8
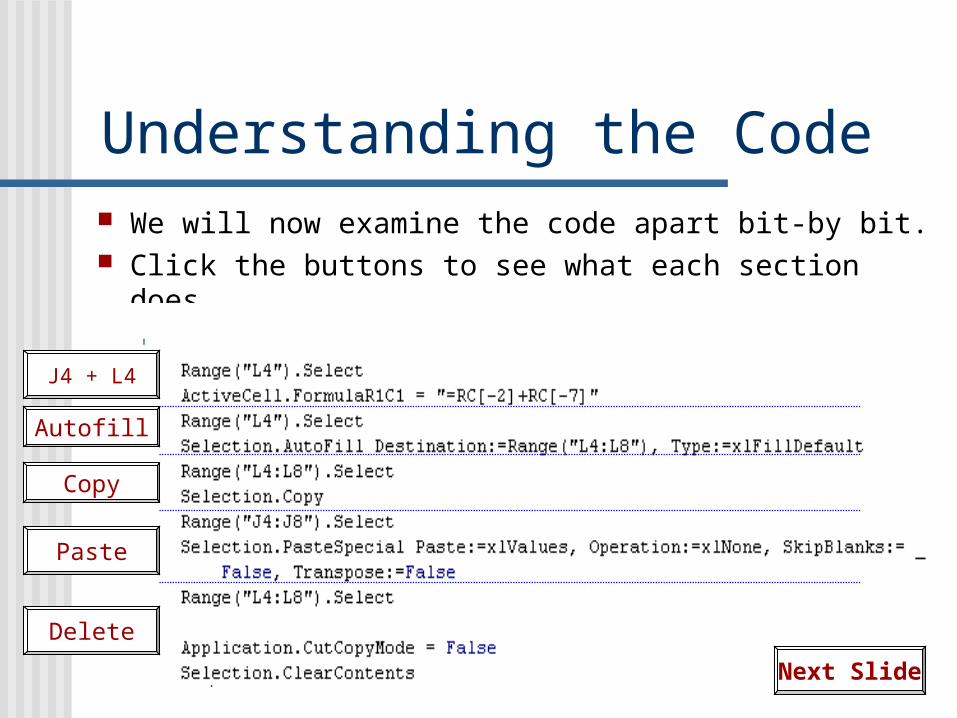
Understanding the Code We will now examine the code apart bit-by bit. Click the buttons to see what each section does
J4 + L4
Autofill
Copy
Paste
Delete
Next Slide
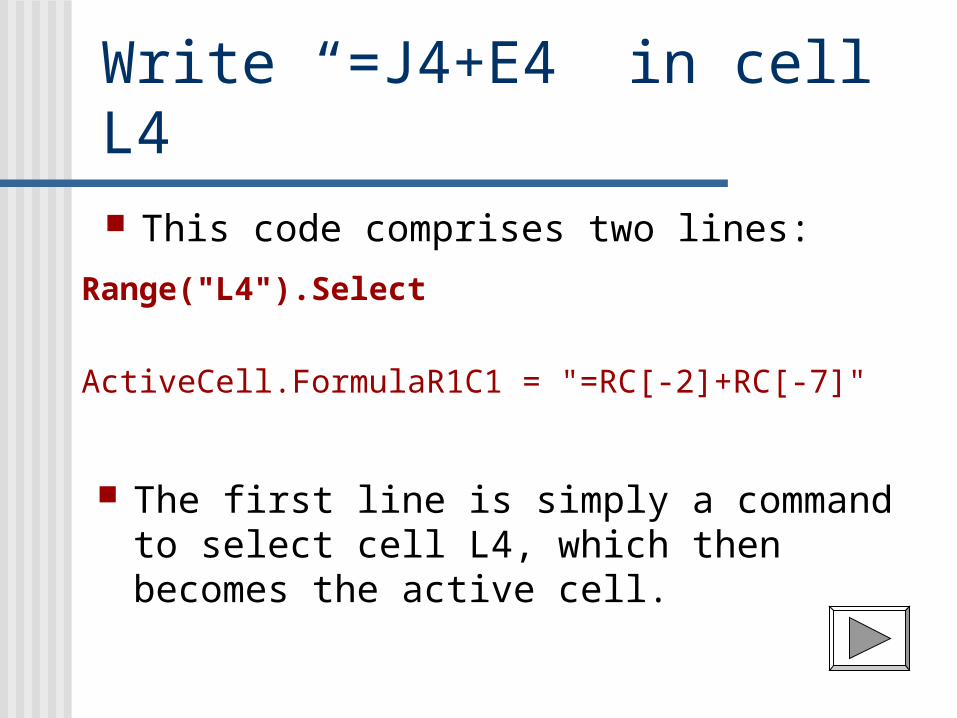
Write “=J4+E4” in cell L4 This code comprises two lines:
Range("L4").Select
ActiveCell.FormulaR1C1 = "=RC[-2]+RC[-7]"
The first line is simply a command to select cell L4, which then becomes the active cell.
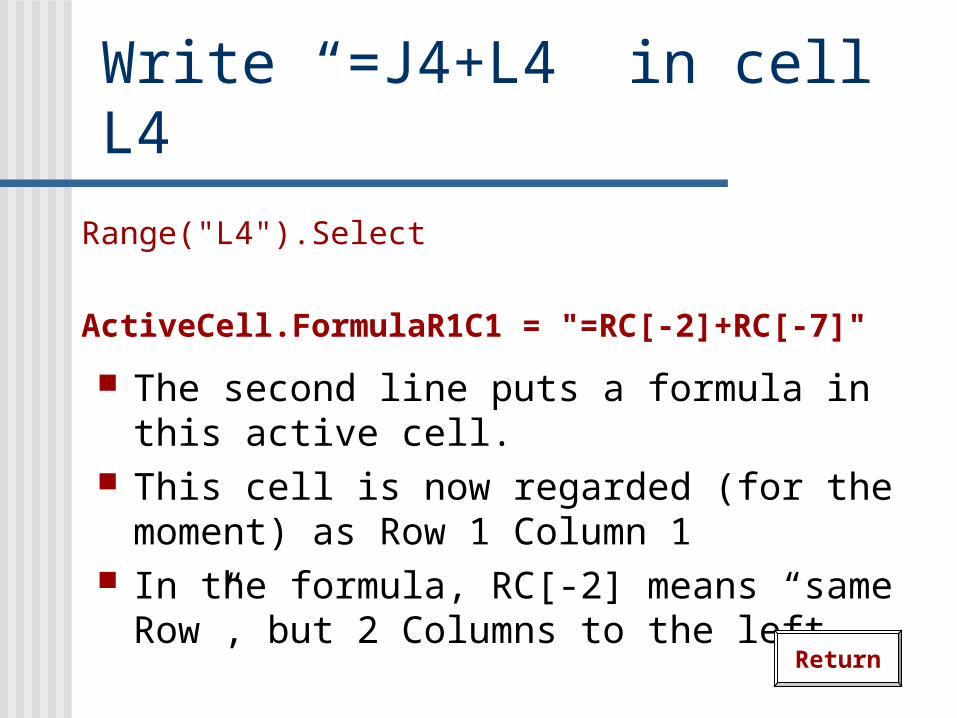
Write “=J4+L4” in cell L4
Range("L4").Select
ActiveCell.FormulaR1C1 = "=RC[-2]+RC[-7]"
The second line puts a formula in this active cell.
This cell is now regarded (for the moment) as Row 1 Column 1
In the formula, RC[-2] means “same Row”, but 2 Columns to the left
Return
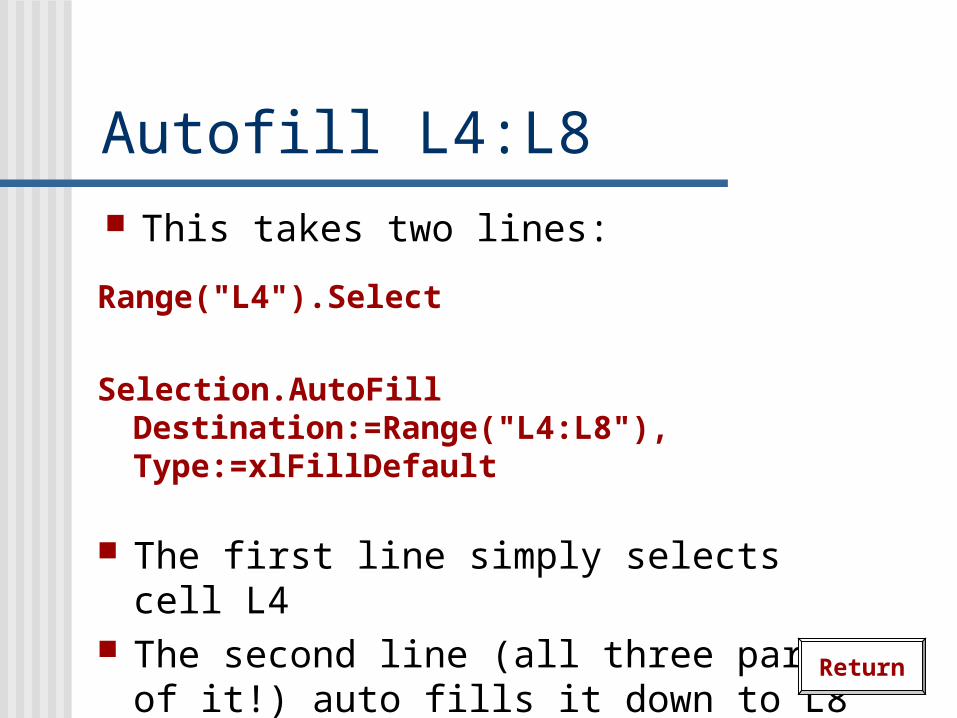
Autofill L4:L8 This takes two lines:
Range("L4").Select
Selection.AutoFill Destination:=Range("L4:L8"), Type:=xlFillDefault
The first line simply selects cell L4 The second line (all three parts of it!)
auto fills it down to L8 Return

Copy cells L4:L8 This takes two lines:
Range("L4:L8").Select
Selection.Copy
The first line selects the range of cells from L4 to L8
The second line is an instruction to copy this selection.
Return
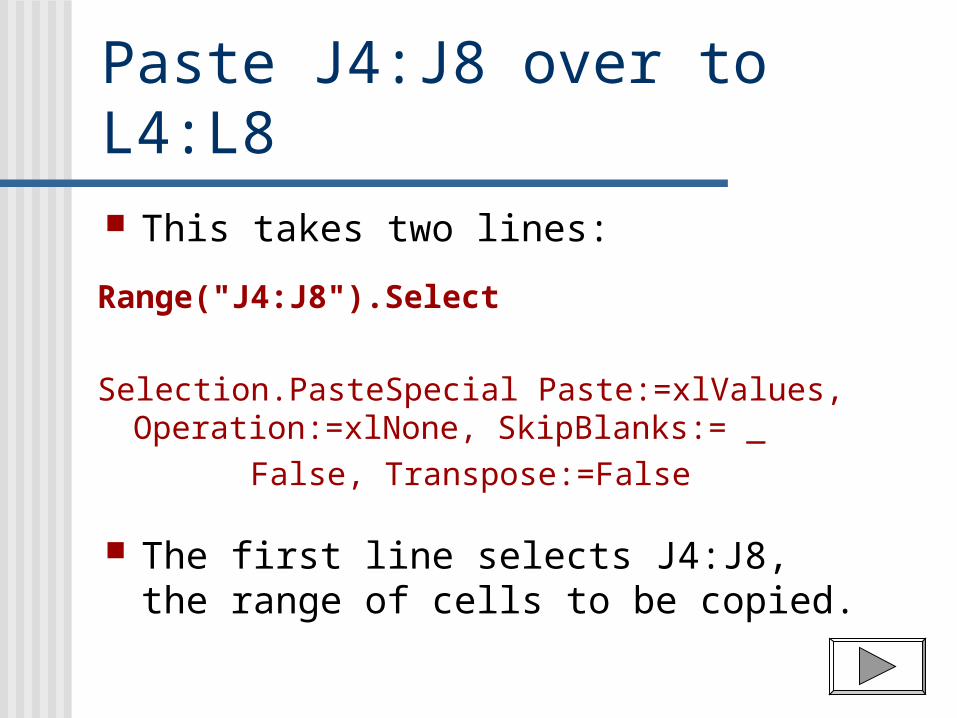
Paste J4:J8 over to L4:L8 This takes two lines:
Range("J4:J8").Select
Selection.PasteSpecial Paste:=xlValues, Operation:=xlNone, SkipBlanks:= _
False, Transpose:=False
The first line selects J4:J8, the range of cells to be copied.
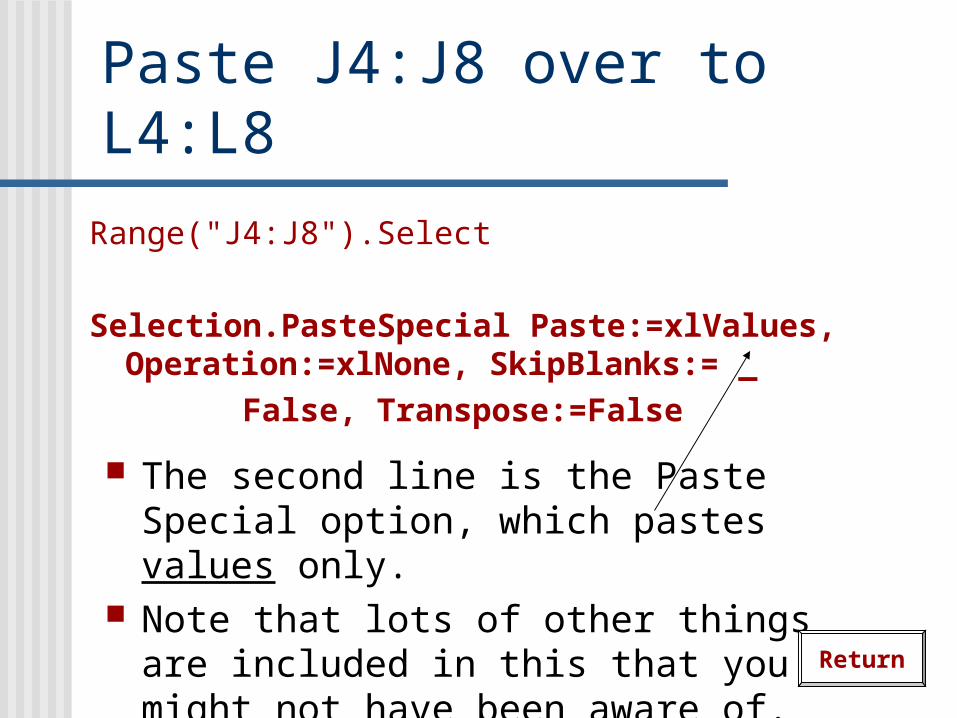
Paste J4:J8 over to L4:L8
Range("J4:J8").Select
Selection.PasteSpecial Paste:=xlValues, Operation:=xlNone, SkipBlanks:= _
False, Transpose:=False
The second line is the Paste Special option, which pastes values only.
Note that lots of other things are included in this that you might not have been aware of. Return
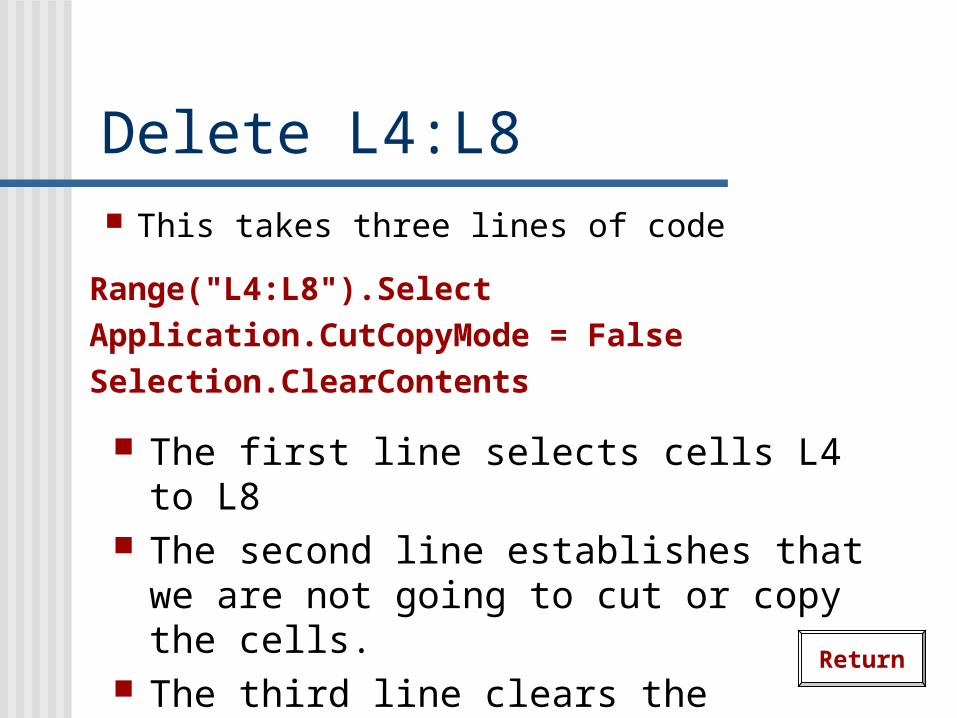
Delete L4:L8 This takes three lines of code
Range("L4:L8").Select Application.CutCopyMode = FalseSelection.ClearContents
The first line selects cells L4 to L8 The second line establishes that we
are not going to cut or copy the cells. The third line clears the contents.
Return

Working in Visual Basic As you can see, VB is not
a simple language, and not something that you can immediately use.
However, the usual way that people work is to record macros and use the code as a basis for what they want to do.

Section 2
Modifying VB Code

Your first Original Macro! Return to Sheet 1 of the VB Examples
spreadsheet. You are going to write a macro which
will subtract “Today’s Sales” from the “Total so far this month”.
Today's Sales Total so far this month:
Fruit and Veg £135.56 Fruit and Veg £5,218.51Baked Goods £476.89 Baked Goods £8,367.55Groceries £1,249.98 Groceries £25,161.83Stationery £56.76 Stationery £1,745.68Miscellaneous £198.06 Miscellaneous £4,709.67

Step 1: Copy and Rename Switch to VB Editor mode, and copy the entire
“increaseTotal” macro
Underneath the original, paste a second version, but change the title to “decreaseTotal”
Action Point
Your first Original Macro!
Today's Sales
Fruit and Veg £135.56Baked Goods £476.89Groceries £1,249.98Stationery £56.76Miscellaneous £198.06
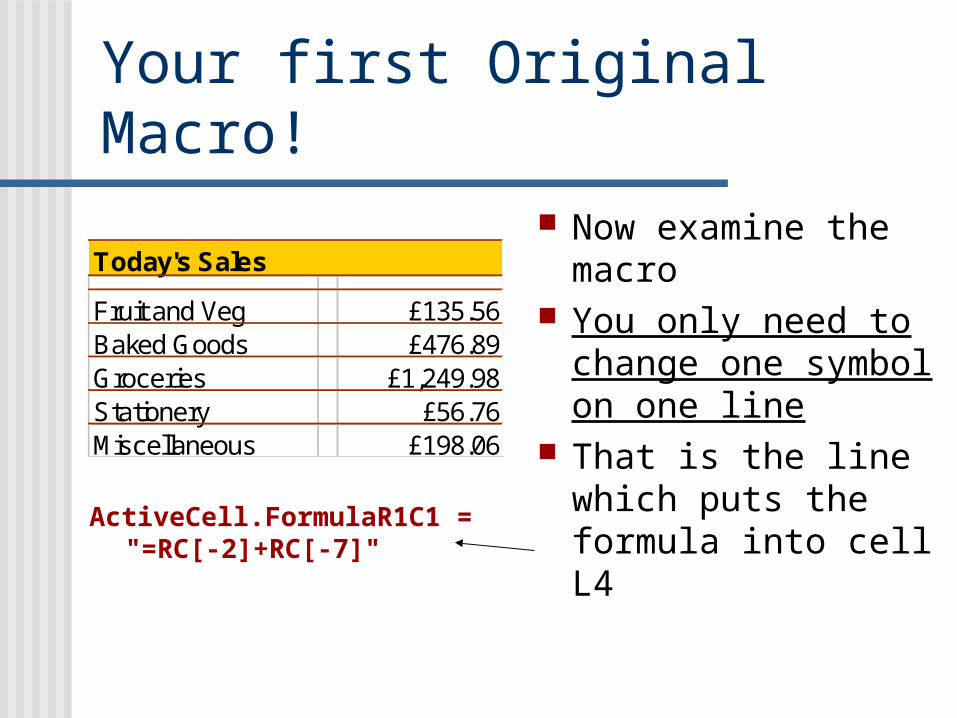
Now examine the macro
You only need to change one symbol on one line
That is the line which puts the formula into cell L4
ActiveCell.FormulaR1C1 = "=RC[-2]+RC[-7]"

Your first Original Macro!
Today's Sales
Fruit and Veg £135.56Baked Goods £476.89Groceries £1,249.98Stationery £56.76Miscellaneous £198.06
Make the change to the macro and assign it to the second button on the sheet. Check that it works.
The line should read:
ActiveCell.FormulaR1C1 = "=RC[-2]- RC[-7]"
Instead of writing “=J4+L4”,
we need to have this say “=J4-E4”
Section 3
Communicating with the User
Amending Macros It is often useful to
send a message to the user to say that a macro has been completed.
There is a simple piece of coding which allows you to do this
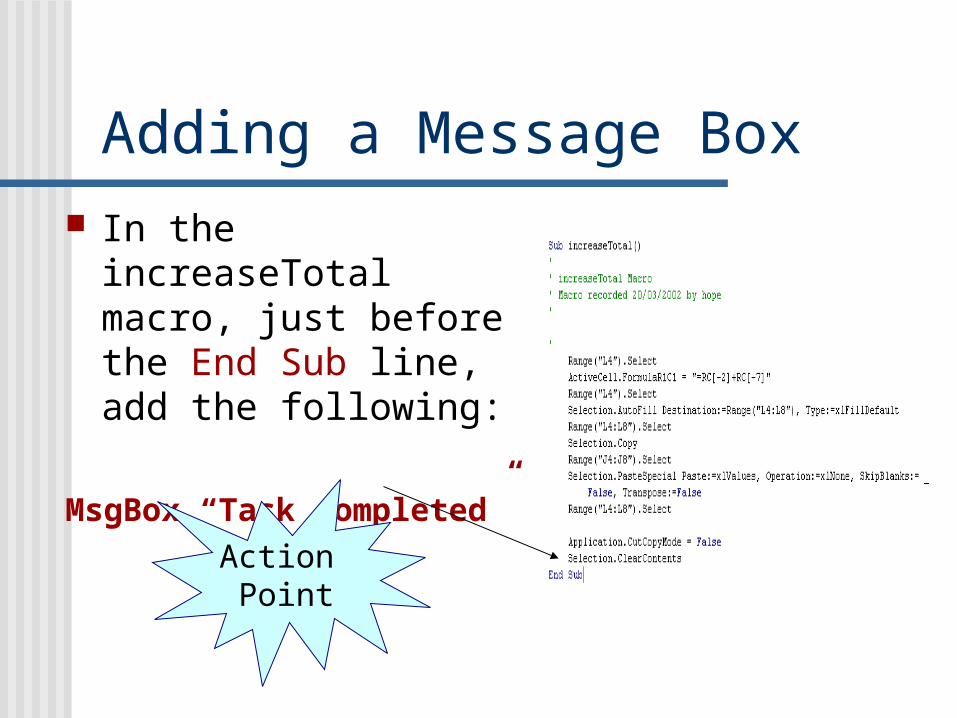
Adding a Message Box In the increaseTotal
macro, just before the End Sub line, add the following:
MsgBox “Task completed”
Action Point
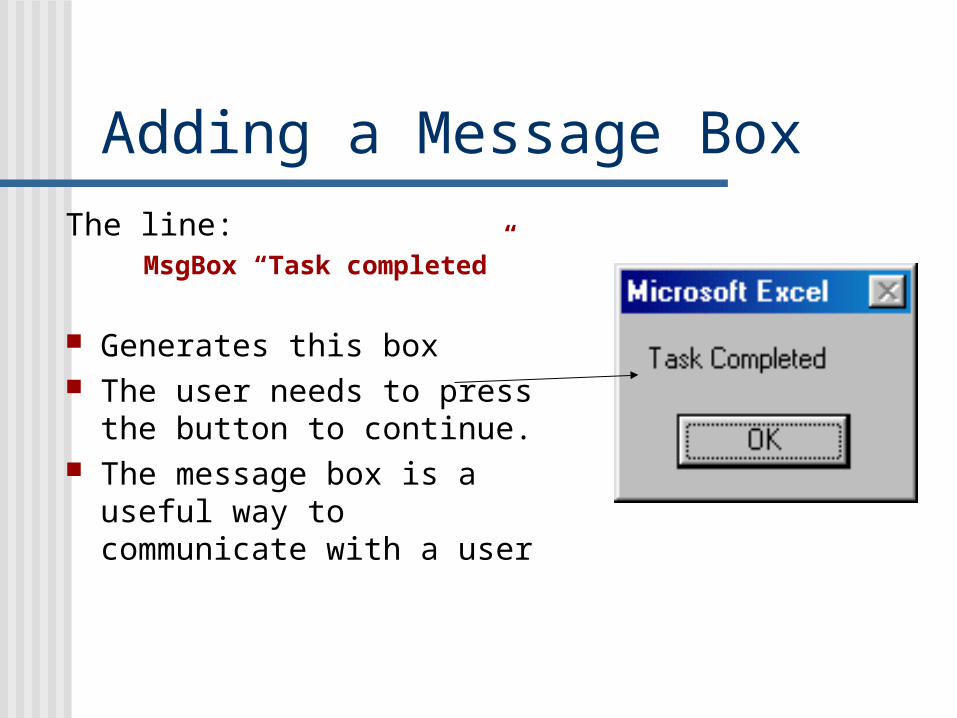
Adding a Message BoxThe line: MsgBox “Task completed”
Generates this box The user needs to press
the button to continue. The message box is a
useful way to communicate with a user
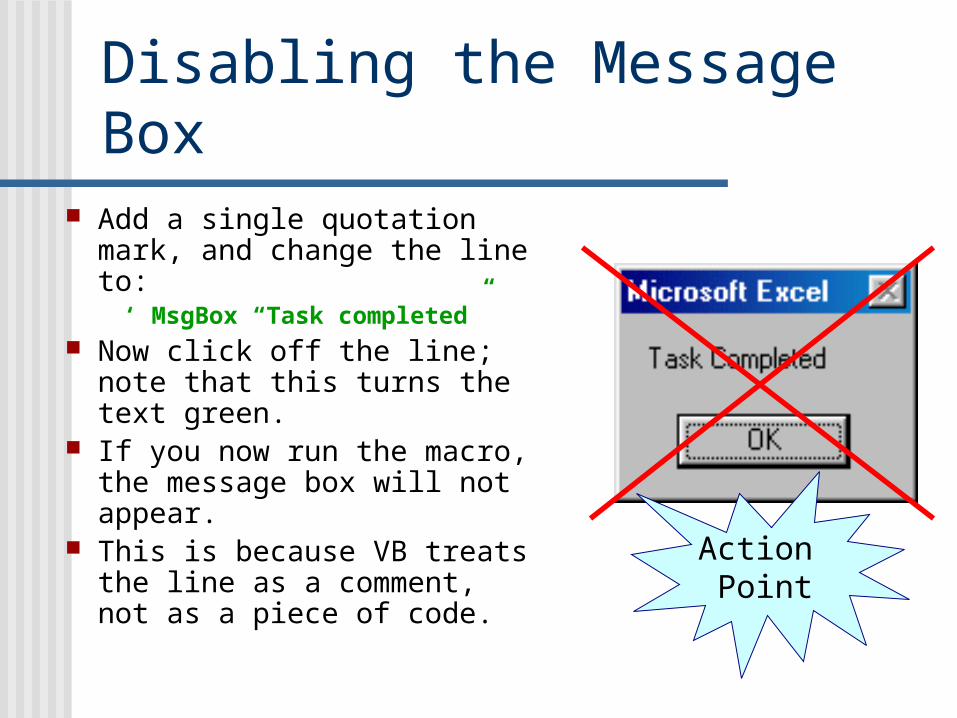
Disabling the Message Box Add a single quotation mark,
and change the line to: ‘ MsgBox “Task completed” Now click off the line; note
that this turns the text green. If you now run the macro, the
message box will not appear. This is because VB treats the
line as a comment, not as a piece of code. Action
Point
Section 4
Giving the user Choice

Giving the User Choice We will now write a
completely new macro which will allow the user to choose whether to increase or decrease the “total so far”
In doing this you will see how macros can be developed.

Recording a New Macro
Record a macro called makeSelection
This macro will consist of two button presses: Increase Total Decrease Total
Increase Total
Decrease Total
Make Selection
Action Point

The New Macro
Sub makeSelection()'' makeSelection Macro' Macro recorded 20/03/2002 by User
Application.Run "'VB Examples - Solution.xls'!increaseTotal"Application.Run "'VB Examples - Solution.xls'!decreaseTotal"End Sub
The macro simply consists of a title, an end, some comments in green, and two lines of code.
Increase Total button
Decrease Total button
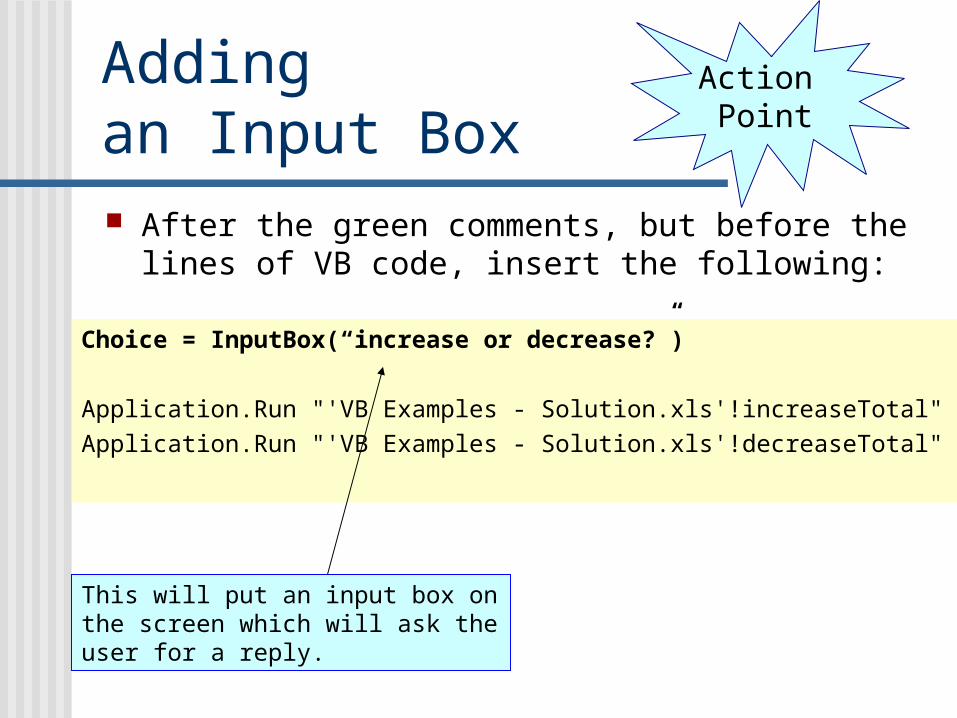
Adding an Input Box
Choice = InputBox(“increase or decrease?”)
Application.Run "'VB Examples - Solution.xls'!increaseTotal"Application.Run "'VB Examples - Solution.xls'!decreaseTotal"
After the green comments, but before the lines of VB code, insert the following:
This will put an input box on the screen which will ask the user for a reply.
Action Point
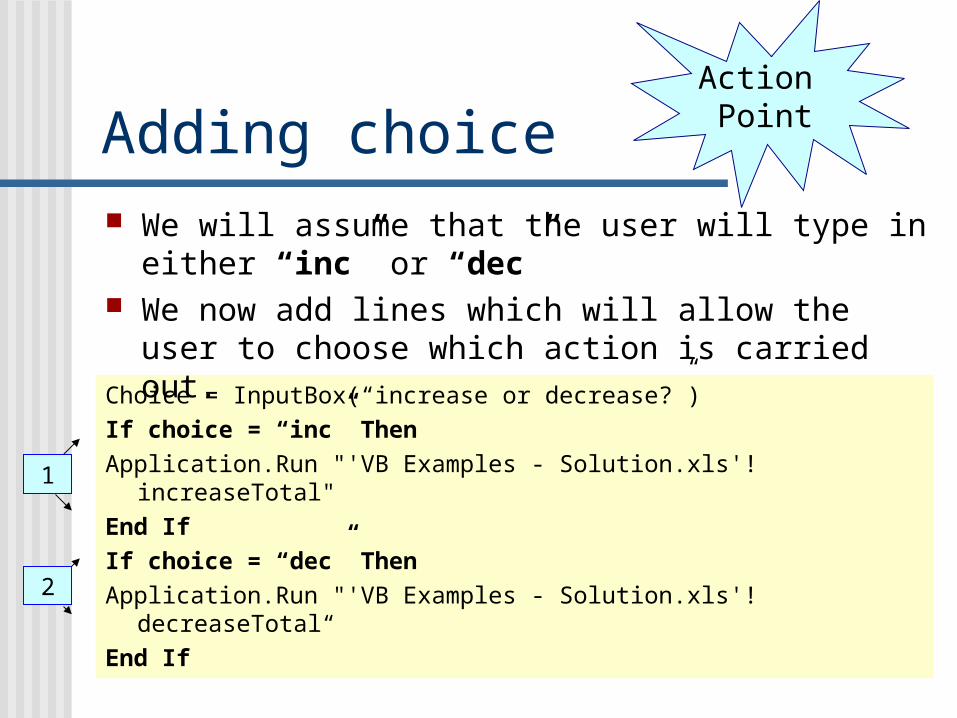
Adding choice
Choice = InputBox(“increase or decrease?”)If choice = “inc” ThenApplication.Run "'VB Examples - Solution.xls'!increaseTotal"End IfIf choice = “dec” Then Application.Run "'VB Examples - Solution.xls'!decreaseTotal“End If
We will assume that the user will type in either “inc” or “dec”
We now add lines which will allow the user to choose which action is carried out.
1
2
Action Point
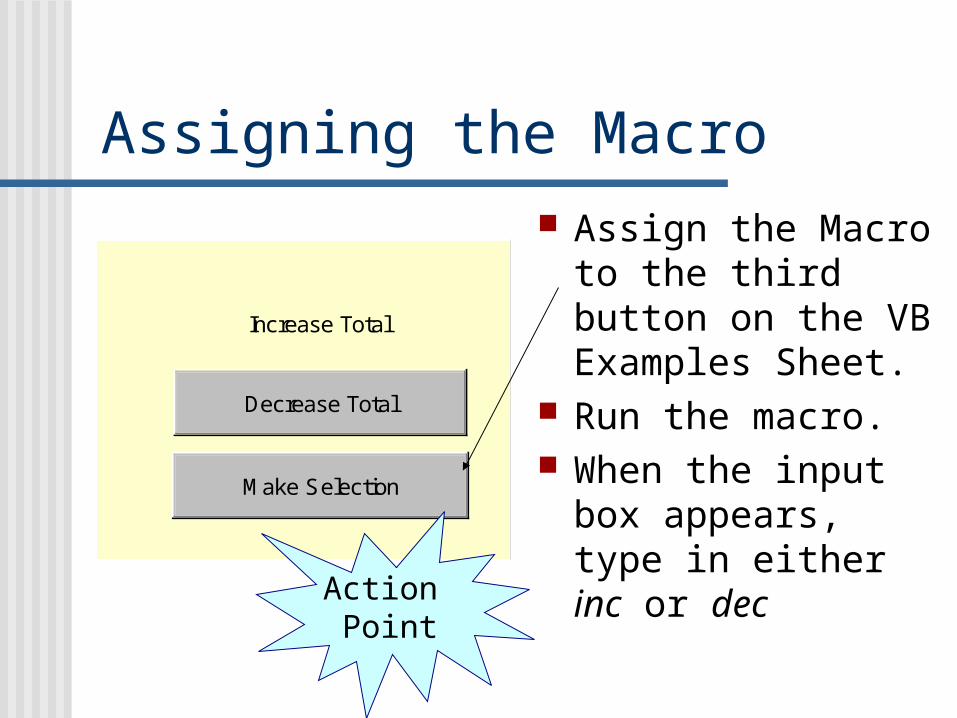
Assigning the Macro
Increase Total
Decrease Total
Make Selection
Assign the Macro to the third button on the VB Examples Sheet.
Run the macro. When the input
box appears, type in either inc or dec
Action Point
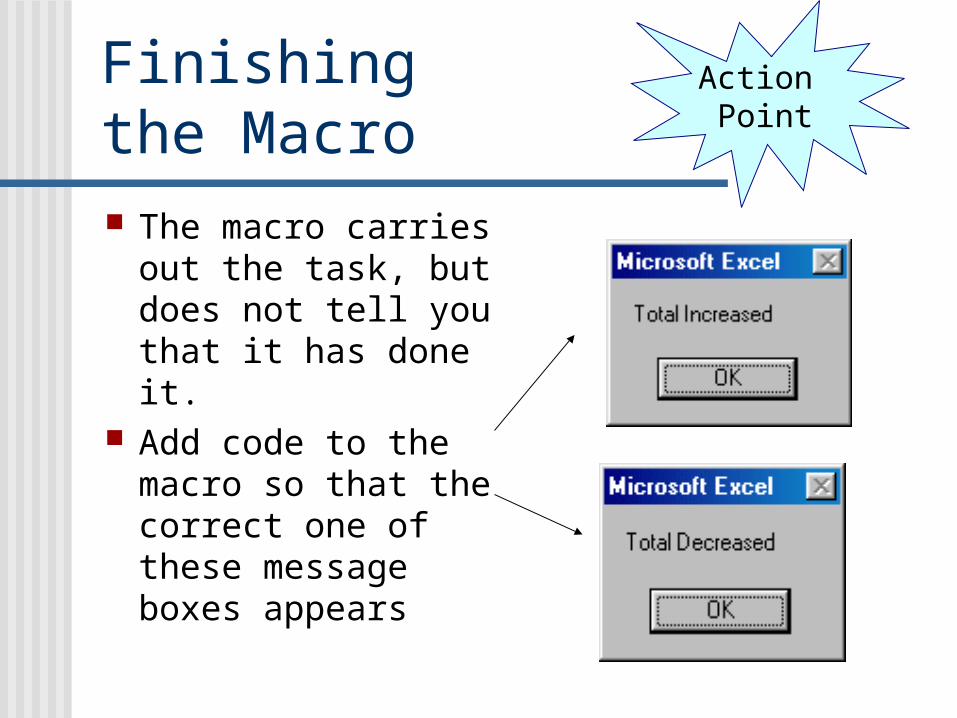
Finishingthe Macro The macro carries
out the task, but does not tell you that it has done it.
Add code to the macro so that the correct one of these message boxes appears
Action Point
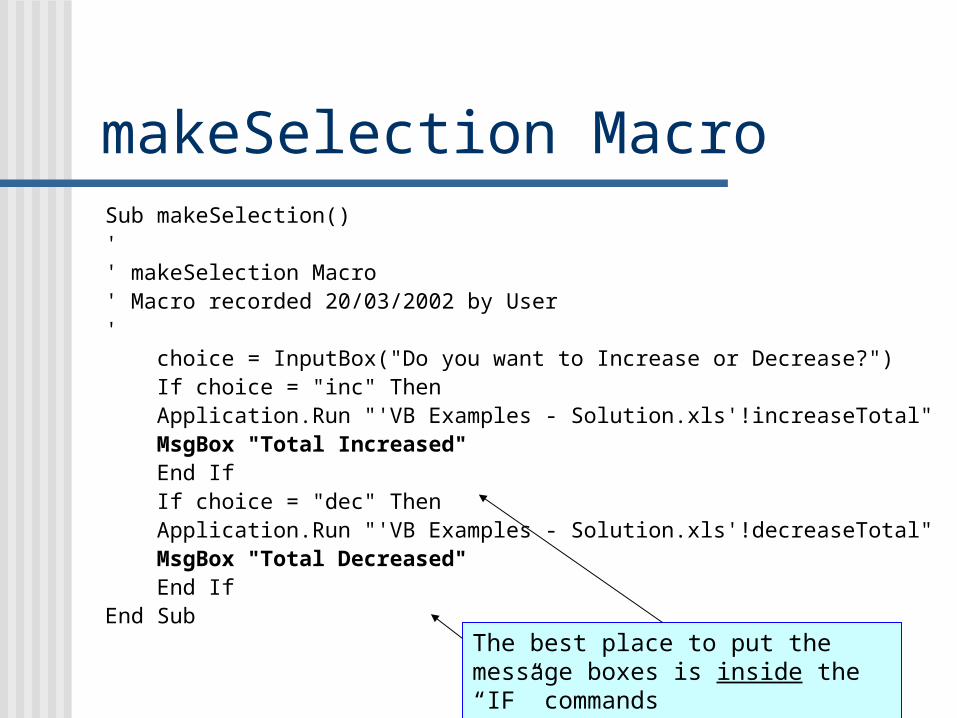
makeSelection MacroSub makeSelection()'' makeSelection Macro' Macro recorded 20/03/2002 by User' choice = InputBox("Do you want to Increase or Decrease?") If choice = "inc" Then Application.Run "'VB Examples - Solution.xls'!increaseTotal" MsgBox "Total Increased" End If If choice = "dec" Then Application.Run "'VB Examples - Solution.xls'!decreaseTotal" MsgBox "Total Decreased" End IfEnd Sub The best place to put the message
boxes is inside the “IF” commands

What have we learned? The macro we have just
written is not all that useful, since we could just have pressed the buttons.
However, suppose that we wanted to update one line selectively.
With the commands, we could do this.
Section 5
Using Selections

Selective Updating
Today's Sales
1 Fruit and Veg £135.562 Baked Goods £476.893 Groceries £1,249.984 Stationery £56.765 Miscellaneous £198.06
Firstly, add numbers 1-5 to each of the type of item
This will allow us to use a number rather than the name
Action Point

Recording the initial macro Record a new
macro called selectLine.
This should: Put the formula
=L4+E4 in cell L4 Copy L4 and Paste
Values into K4 Delete L4
Sub selectLine()'' selectLine Macro' Macro recorded 20/03/2002 by User'Range("L4").SelectActiveCell.FormulaR1C1 = "=RC[-2]+RC[-7]"Range("L4").SelectSelection.CopyRange("J4").SelectSelection.PasteSpecial Paste:=xlValuesOperation:=xlNone, SkipBlanks:= _ False, Transpose:=False Range("L4").Select Application.CutCopyMode = False Selection.ClearContentsEnd Sub
Action Point

Adding New Lines (1) At the beginning of
the macro add these lines:
The first asks the user which line is to be updated.
The second identifies which cells will be modified.
Line = InputBox("Which Line do you wish to update: 1,2,3,4,or 5")
If Line = 1 Thencell1 = "L4"cell2 = "J4"End If
Action Point
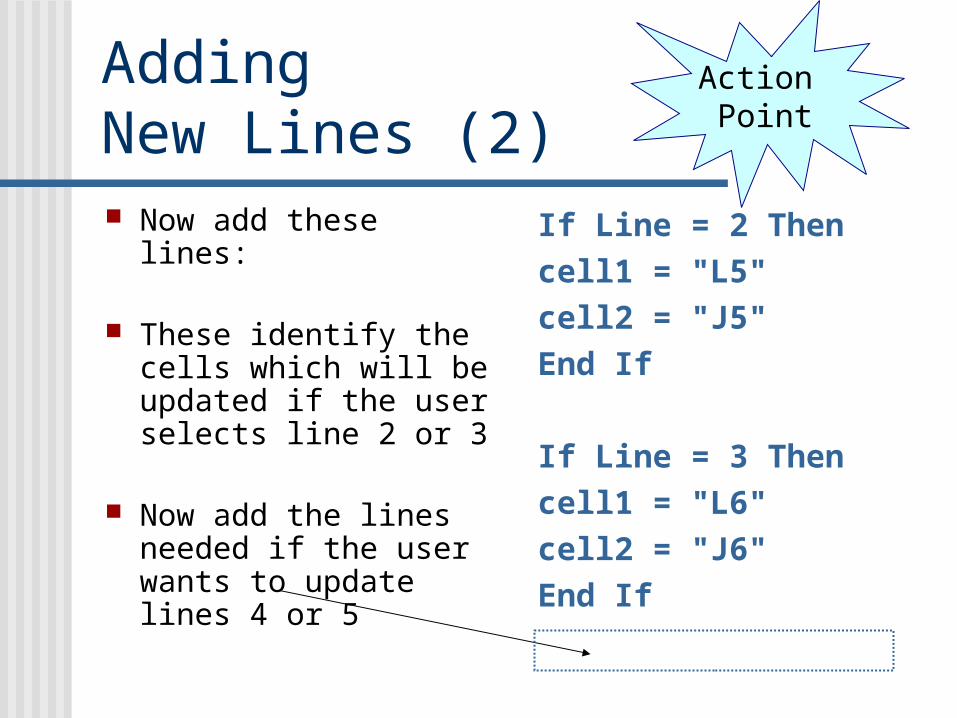
Adding New Lines (2) Now add these lines:
These identify the cells which will be updated if the user selects line 2 or 3
Now add the lines needed if the user wants to update lines 4 or 5
If Line = 2 Thencell1 = "L5"cell2 = "J5"End If
If Line = 3 Thencell1 = "L6"cell2 = "J6"End If
Action Point
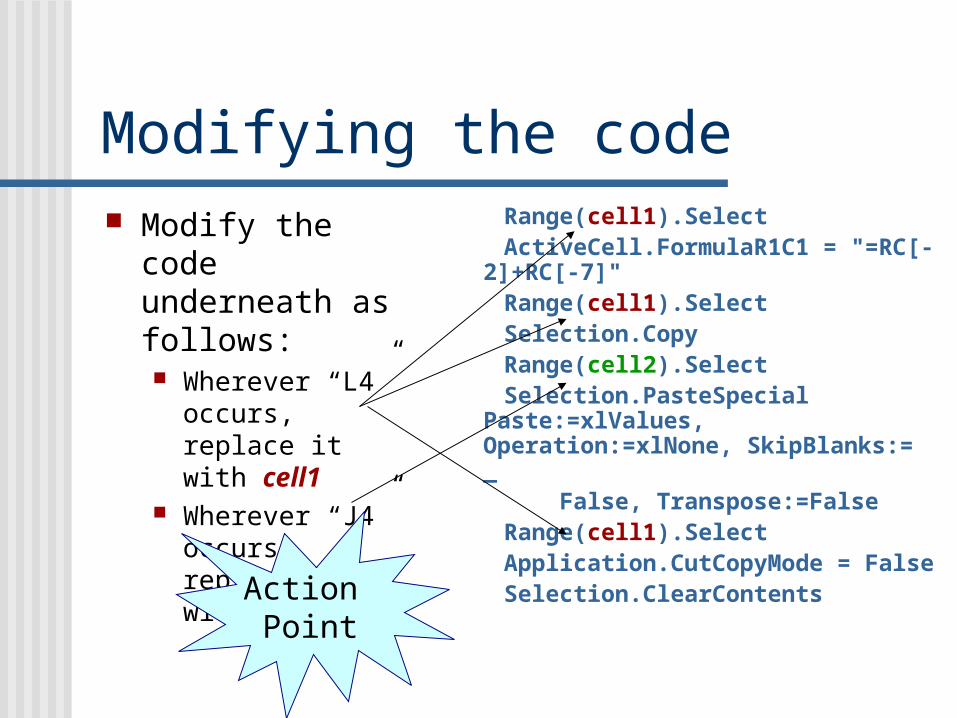
Modifying the code Modify the code
underneath as follows: Wherever “L4”
occurs, replace it with cell1
Wherever “J4” occurs, replace it with cell2
Range(cell1).Select ActiveCell.FormulaR1C1 = "=RC[-
2]+RC[-7]" Range(cell1).Select Selection.Copy Range(cell2).Select Selection.PasteSpecial
Paste:=xlValues, Operation:=xlNone, SkipBlanks:= _
False, Transpose:=False Range(cell1).Select Application.CutCopyMode =
False Selection.ClearContents
Action Point

Finishing off Finally, add a line just
before the end:MsgBox "Line " & Line & "
updated“
This will add a message box to say which line has been updated.
Now, reassign the “Make Selection” button to the selectLine macro and test it out.
Action Point

What Next? There are two
separate Activity Sheets which follow up this work: Activity Sheet 10a
creates macros which draw charts for selected lines of data
Activity Sheet 10b explores how to update and interrogate a database