special team rules special teams encompasses 1/3 of the...
TRANSCRIPT

•Special Teams encompasses 1/3 of the game. Furthermore, it generally sets the tempo for the entire half (kickoff at the onset and after the half). Therefore, all 11 participants must hustle every play in order to be successful. We are only as strong as our weakest link! •Maintaining Lane Responsibility on kickoff coverage is critical. •For our kicking and punting game, we will always directionally kick. We must compress the field in order to adequately cover. •The specialists must execute every time. No bad snaps, shanked kicks, or missed holds. We must relentlessly practice these skills. •Communication is a must as in all aspects of football. On every special team, we must communicate clearly, effectively, and often.
Special Team Rules

Kickoff Return
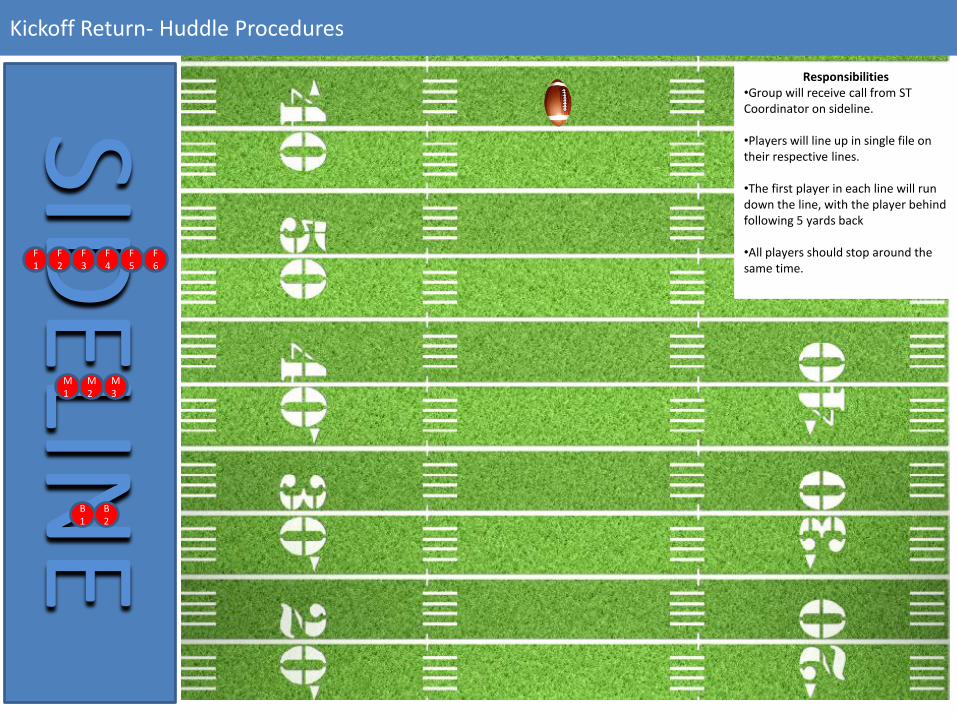
Kickoff Return- Huddle Procedures
SIDELIN
E
F1
F2
F3
F4
F5
F6
B1
B2
M1
M2
M3
Responsibilities •Group will receive call from ST Coordinator on sideline. •Players will line up in single file on their respective lines. •The first player in each line will run down the line, with the player behind following 5 yards back •All players should stop around the same time.

Kickoff Return- Formation
F1
F2
F3
F4
F5
F6
B1
B2
M1
M2
M3
Responsibilities •“F” Line steps behind the 50 yd line, evenly spaced with F1 & F6 10 yards from the sideline. •“M” Line on the 40 yd line with M1 behind F2, M2 behind the ball, and M3 behind F5. •“B” Line on the 30 yd line split evenly between the “M” Line.

Kickoff Return- Middle Return
F1
F2
F3
F4 F
5 F6
B1
B2
M1
M2 M
3
Responsibilities •When the ball is kicked, the “F” Line runs back at an angle to the middle of the field until the ball is caught or hits the ground. Then, the line moves in one piece forward shoulder to shoulder to take on any defender trying to break the wall. If the ball is onside kicked to the “F” Line, the player should secure the ball and drop to the ground. •After the ball is kicked, the “M” Line runs back at an angle to the middle of the field until the ball is caught or hits the ground. Then, the line moves forward to support the “’F” Line with any breaches. If the ball is caught by someone in the “M” Line, that player should fall in behind the other two who should be shoulder to shoulder. •If the ball is fielded by the “B” Line, the non-fielding back should back up the receiver, then get in front to block. If the “F” or “M” Line fields the ball, the “B” Line should rush up to offer blocking support.
Rules:
1. No player in the first two lines should turn to chase the ball. Leave it to the line behind.
2. The fielding back should always trust the hole to hit. Never deviate on a middle return by going right or left.
3. In a deep return fielded by the “B” Line, the backs should make a brief move to the sideline to attempt to coax the defenders from breaking lanes to the sideline.
4. If the ball goes 10 yards, it is live. GET ON IT!!!

Kickoff Return- Right Return (Wall Right)
F1
F2
F3
F4
F5
F6
B1
B2
M1
M2
M3
Responsibilities •When the ball is kicked, the “F” Line players 3 through 6 runs back at an angle to the Right of the field until the ball is caught or hits the ground. Then, the line forms a wall shoulder to shoulder (looking to the inside of the field) to take on any defender trying to break the wall. The “F1” and “F2” player torpedo’s to the playside and “Headhunts” the most aggressive defenders. Make sure to not BLOCK IN THE BACK!! If the ball is onside kicked to the “F” Line, the player should secure the ball and drop to the ground. •After the ball is kicked, the “M” Line runs back at an angle to the Right of the field until the ball is caught or hits the ground. Then, the line sets up a wall to support the “’F” Line. If the ball is caught by someone in the “M” Line, that player should head toward the lane. The other two “M” players should be shoulder to shoulder. •If the ball is fielded by the “B” Line, the non-fielding back should back up the receiver, then get in front to block. If the “F” or “M” Line fields the ball, the “B” Line should rush up to offer blocking support.
Rules:
1. No player in the first two lines should turn to chase the ball. Leave it to the line behind.
2. The fielding back should always head to the running lane. Never deviate by heading to the middle of the field or the opposite sideline.
3. In a deep return fielded by the “B” Line, the backs should make a brief move to the middle to attempt to coax the defenders from cheating to the playside.
4. If the ball goes 10 yards, it is live. GET ON IT!!!
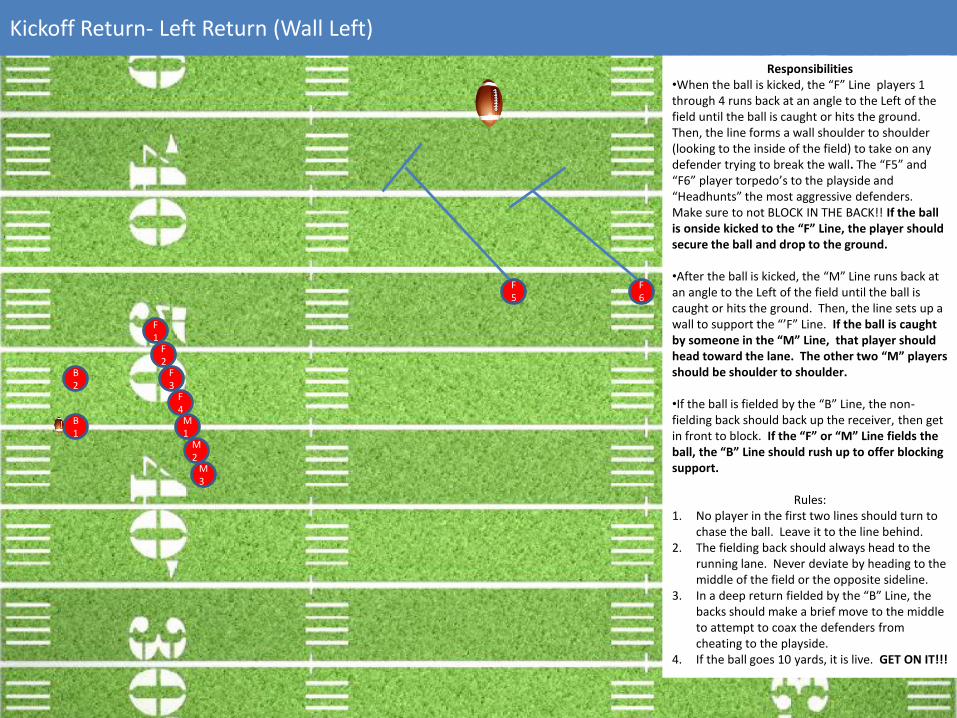
Kickoff Return- Left Return (Wall Left)
F1
F2
F3
F4
F5
F6
B1
B2
M1
M2
M3
Responsibilities •When the ball is kicked, the “F” Line players 1 through 4 runs back at an angle to the Left of the field until the ball is caught or hits the ground. Then, the line forms a wall shoulder to shoulder (looking to the inside of the field) to take on any defender trying to break the wall. The “F5” and “F6” player torpedo’s to the playside and “Headhunts” the most aggressive defenders. Make sure to not BLOCK IN THE BACK!! If the ball is onside kicked to the “F” Line, the player should secure the ball and drop to the ground. •After the ball is kicked, the “M” Line runs back at an angle to the Left of the field until the ball is caught or hits the ground. Then, the line sets up a wall to support the “’F” Line. If the ball is caught by someone in the “M” Line, that player should head toward the lane. The other two “M” players should be shoulder to shoulder. •If the ball is fielded by the “B” Line, the non-fielding back should back up the receiver, then get in front to block. If the “F” or “M” Line fields the ball, the “B” Line should rush up to offer blocking support.
Rules:
1. No player in the first two lines should turn to chase the ball. Leave it to the line behind.
2. The fielding back should always head to the running lane. Never deviate by heading to the middle of the field or the opposite sideline.
3. In a deep return fielded by the “B” Line, the backs should make a brief move to the middle to attempt to coax the defenders from cheating to the playside.
4. If the ball goes 10 yards, it is live. GET ON IT!!!

Kickoff Cover

Kickoff Coverage- Huddle Procedures
SIDELIN
E
L1
L2
L3
L4
L5
K
R4 R5
R1 R2 R3
Responsibilities •Group will receive call from ST Coordinator on sideline. •Players will line up in single file from the “R5” to the “L5” position. •On the signal, players begin to run out along the 30 yard line, staying about 5 yards apart. •We should look crisp here. Looking crisp projects confidence and preparedness.

Kickoff Coverage- Formation
L1
L2
L3
L4
L5
K
R4
R5
R1
R2
R3
Responsibilities •“L5” & “R5” will line up 8-10 yards from the sideline. All other players will equally disperse across the field. •All players except the kicker will straddle the 30 yard line facing the kicker. •The kicker will be greater than 10 yards back shaded to the opposite side of his kicking foot.

Kickoff Coverage- Kick Right
L1
L2
L3
L4
L5
K
R4
R5
R1
R2
R3
Responsibilities L5- Gunner, must not get any closer to the right sideline than the widest opposing back. L4- Short contain. Should run half speed about 8 yards and ensure that no play breaks to his side. L3- Torpedo to left edge of ball landing zone. This edge should be about 10 yards to the left of the landing point. L2- Torpedo to the left of the ball landing zone. The lane should be about 7 yards to the left of the landing point. L1- Torpedo to the left of the ball landing zone. The lane should be about 4 yards to the left of the landing point. K- Kick the ball and contain Right, mirroring the ball carrier. R1- Torpedo just to the left of the ball landing zone. The lane should be about 1 yard to the left of the landing point. R2- Torpedo just right of the ball landing zone. The lane should be about 1 yard to the right of the landing point. R3- Torpedo right of the ball landing zone. The lane should be 4 yards to the right of the landing point. R4- Contain right. Make sure the ball carrier does not get behind you. R5- Gunner– Must take a lane about 7 yards to the right of the ball landing point, then crash the ball carrier.

Kickoff Coverage- Kick Left
L1
L2
L3
L4
L5
K
R4
R5
R1
R2
R3
Responsibilities L5- Gunner– Must take a lane about 7 yards to the left of the ball landing point, then crash the ball carrier. L4- Contain left. Make sure the ball carrier does not get behind you. L3- Torpedo left of the ball landing zone. The lane should be 4 yards to the left of the landing point. L2- Torpedo just left of the ball landing zone. The lane should be about 1 yard to the left of the landing point. L1- Torpedo just to the right of the ball landing zone. The lane should be about 1 yard to the right of the landing point. K- Kick the ball and contain Left, mirroring the ball carrier. R1- Torpedo to the right of the ball landing zone. The lane should be about 4 yards to the right of the landing point. R2- Torpedo to the right of the ball landing zone. The lane should be about 7 yards to the right of the landing point. R3- Torpedo to right edge of ball landing zone. This edge should be about 10 yards to the right of the landing point. R4- Short contain. Should run half speed about 8 yards and ensure that no play breaks to his side. R5- Gunner, must not get any closer to the right sideline than the widest opposing back.

Kickoff Coverage- Onside Kick Right
L1
L2
L3
L4
L5
K
R4
R5
R1
R2
R3
Responsibilities L5- Gunner, must not get any closer to the right sideline than the widest opposing back. L4- Short contain. Should run half speed about 8 yards and ensure that no play breaks to his side. L3- Angle right hard towards the ball. L2- Angle right hard towards the ball. L1- Angle right hard towards the ball. K- Kick the ball and contain Right, mirroring the ball carrier. R1- Angle right hard towards the ball. R2- Angle right behind R4 looking to recover the ball. R3- Angle right behind R5 looking to recover the ball. R4- Crash through the front line. Ideally the R3 or R2 will recover ball. R5- Crash through the front line. Ideally the R3 or R2 will recover ball.

Kickoff Coverage- Onside Kick Left
L1
L2
L3
L4
L5
K
R4
R5
R1
R2
R3
Responsibilities L5- Crash through the front line. Ideally, the L3 or L2 will recover the ball. L4- Crash through the front line. Ideally, the L3 or L2 will recover the ball. L3- Angle left behind L5 looking to recover the ball. L2- Angle left behind L4 looking to recover ball. L1- Angle left hard towards the ball K- Kick the ball and contain Left, mirroring the ball carrier. R1- Angle left hard towards the ball. R2- Angle left hard towards the ball R3- Angle left hard towards the ball R4- Short contain. Should run half speed about 8 yards and ensure that no play breaks to his side. R5- Gunner, must not get any closer to the right sideline than the widest opposing back.

Field Goal/Point After Touchdown

Field Goal/PAT-Huddle Procedure
C G T G T
X F
K
H Y Z
Responsibilities Huddle is identical to offensive huddle. Fullback position is the holder

Field Goal/PAT-Formation
C LG
LT
RG
RT
X
F
K
H
Y
Z
Responsibilities •Ball is placed on the 3 yard line. •Holder sets up on the 10 yard line. •All players on the line except the center are in a 2 pt. stance. •Guards, Tackles, and WR’s interlink their inside feet to create a wall. •Once kicker signals he is ready, holder will signal to the center to snap the ball. •Once the ball is snapped, the front line will lean in towards the center and create a solid wall to prevent defensive penetration. •The H and Z backs will prevent any outside penetration.

Punt

Punt- Huddle
Responsibilities Huddle is identical to offensive huddle. Center calls huddle 12 yards away from the ball.
C G T G T
X F
P
H Y Z

Punt-Formation
Responsibilities P- Line up 10 yards behind the center. Cadence is “Down, Set, Hut 1, Hut 2…”. The C will snap when he is ready. Line- Standard formation in a 2 pt. stance. Blocking pass Pro. Center releases downfield at the snap. X & Z- Wide out with Z off the LOS H- 7 yards back shaded between RG and RT F – 7 yards back shaded between LG and LT
C G T G T X
F
P
Y
Z
H

Punt-Punt Right
Responsibilities X- Gunner right to ball. Release to ball at the snap. LT- Release when the ball is kicked. Take a lane angle 7 yards to the left of the ball landing point. LG- Release when the ball is kicked. Take a lane angle 4 yard to the left of the ball landing point. C- Release when the ball is kicked. Take a lane angle 1 yard to the left of the ball landing point. RG- Release when the ball is kicked. Take a lane angle 1 yard to the right of the ball landing point. RT- Release when the ball is kicked. Take a lane angle 4 yards to the right of the ball landing point. Y- Release when the ball is kicked. Take a lane angle 7 yards to the right of the ball landing point. Z- Gunner right to the ball. Release to the ball at snap. H- Release when the ball is kicked. Stay back and contain entire right side of the field. F – Contain Left. No one gets outside of you!!! P- Attempt to directionally kick the ball to the left no more than 10 yards from the sideline. Mirror the ball carrier across the field.
C G T G T X
F
P
Y
Z
H

Punt-Punt Left
Responsibilities X- Gunner right to ball. Release to ball at the snap. LT- Release when the ball is kicked. Take a lane angle 7 yards to the left of the ball landing point. LG- Release when the ball is kicked. Take a lane angle 4 yard to the left of the ball landing point. C- Release when the ball is kicked. Take a lane angle 1 yard to the left of the ball landing point. RG- Release when the ball is kicked. Take a lane angle 1 yard to the right of the ball landing point. RT- Release when the ball is kicked. Take a lane angle 4 yards to the right of the ball landing point. Y- Release when the ball is kicked. Take a lane angle 7 yards to the right of the ball landing point. Z- Gunner right to the ball. Release to the ball at snap. H- Contain Right. No one gets outside of you!!! F – Release when the ball is kicked. Stay back and contain entire left side of the field. P- Attempt to directionally kick the ball to the left no more than 10 yards from the sideline. Mirror the ball carrier across the field.
C G T G T X
F
P
Y
Z
H

Punt Return

Punt Return-Huddle
T
M
T E
C
E
W FS
C $
S
Responsibilities Huddle is identical to defensive huddle. Sam LB calls huddle 3 Yards from ball.

Punt Return-Formation
Formation Will use called defense and bring the FS to return the punt
Responsibilities
FS- The safety is responsible to catch the ball. Beware of any fakes and provide support if one occurs. All Other Positions-. When ball is kicked, release backward until safety catches ball. Turn and block. IF SAFETY SOUNDS “PETER” CALL, ALL PLAYERS SHOULD IMMEDIATELY RUN AWAY FROM THE BALL!!!
T
M
T E
C
E
W
FS
C
$ S

Punt Return-Punt Return
Responsibilities S- The safety is responsible to catch the ball. Blocking support will be in the middle of the field. Pick a hole and hit it. Try to go North/South as much as possible. Beware of any fakes and provide support if one occurs. All Other Positions- Stand up defenders. When ball is kicked, release backward until safety catches ball. Turn and block. Keep an eye on the defender that you were originally blocking. This will likely be the opponent you block once the ball is kicked. IF SAFETY SOUNDS “PETER” CALL, ALL PLAYERS SHOULD IMMEDIATELY RUN AWAY FROM THE BALL!!!
T
M
T E
C
E
W
FS
C
$ S

Punt Return-Punt BLOCK
Responsibilities
The block will be called via a defensive blitz call. The blitzer should attempt to block the punt. ALWAYS AIM AT THE POINT OF THE KICK, NOT THE PUNTER. DO NOT ROUGH THE PUNTER!!!