software instalation guide
TRANSCRIPT

8/9/2019 Software Instalation Guide
http://slidepdf.com/reader/full/software-instalation-guide 1/172

8/9/2019 Software Instalation Guide
http://slidepdf.com/reader/full/software-instalation-guide 2/172
©2008, 2009 TOSHIBA TEC CORPORATION All rights reservedUnder the copyright laws, this manual cannot be reproduced in any form without prior written permission of TTEC. No patent liabilityis assumed, however, with respect to the use of the information contained herein.

8/9/2019 Software Instalation Guide
http://slidepdf.com/reader/full/software-instalation-guide 3/172Preface 1
Preface
Thank you for purchasing TOSHIBA Multifunctional Digital Systems or Multifunctional Digital Color Systems. This manualexplains the instructions for installing client software. Read this manual before using your Multifunctional Digital Systemsor Multifunctional Digital Color Systems. Keep this manual within easy reach, and use it to configure an environment thatmakes best use of the e-STUDIO’s functions.
How to read this manual
Symbols in this manualIn this manual, some important items are described with the symbols shown below. Be sure to read these items beforeusing this equipment.
Other than the above, this manual also describes information that may be useful for the operation of this equipment withthe following signage:
Model and series names in this manualIn this manual, each model name is replaced with the series name as shown below.
ScreensScreens on this manual may differ from the actual ones depending on how the equipment is used, such as the statusof the installed options.The illustration screens used in this manual are for paper in the A/B format. If you use paper in the LT format, thedisplay or the order of buttons in the illustrations may differ from that of your equipment.
Indicates a potentially hazardous situation which, if not avoided, could result in death, seriousinjury, or serious damage, or fire in the equipment or surrounding objects.
Indicates a potentially hazardous situation which, if not avoided, may result in minor or moderateinjury, partial damage to the equipment or surrounding objects, or loss of data.
Indicates information to which you should pay attention when operating the equipment.
Describes handy information that is useful to know when operating the equipment.
Pages describing items related to what you are currently doing. See these pages as required.
Model name Series name in this manuale-STUDIO5520C/6520C/6530C e-STUDIO6530C Series
e-STUDIO2330C/2820C/2830C/3520C/3530C/4520C e-STUDIO4520C Series
e-STUDIO205L/255/305/355/455 e-STUDIO455 Series
e-STUDIO555/655/755/855 e-STUDIO855 Series

8/9/2019 Software Instalation Guide
http://slidepdf.com/reader/full/software-instalation-guide 4/1722 Preface
TrademarksThe official name of Windows 2000 is Microsoft Windows 2000 Operating System.The official name of Windows XP is Microsoft Windows XP Operating System.The official name of Windows Vista is Microsoft Windows Vista Operating System.The official name of Windows Server 2003 is Microsoft Windows Server 2003 Operating System.The official name of Windows Server 2008 is Microsoft Windows Server 2008 Operating System.
Microsoft, Windows, Windows NT, and the brand names and product names of other Microsoft products aretrademarks of Microsoft Corporation in the US and other countries. Apple, AppleTalk, Macintosh, Mac, Mac OS, Safari, TrueType, and LaserWriter are trademarks of Apple Inc. in the USand other countries.
Adobe, Adobe Acrobat, Adobe Reader, Adobe Acrobat Reader, and PostScript are trademarks of Adobe SystemsIncorporated.Mozilla, Firefox and the Firefox logo are trademarks or registered trademarks of Mozilla Foundation in the U.S. andother countries.IBM, AT and AIX are trademarks of International Business Machines Corporation.NOVELL, NetWare, and NDS are trademarks of Novell, Inc.TopAccess is a trademark of Toshiba Tec Corporation.Other company names and product names in this manual are the trademarks of their respective companies.
8/9/2019 Software Instalation Guide
http://slidepdf.com/reader/full/software-instalation-guide 5/172CONTENTS 3
CONTENTS
Preface............................... .......................................................................... .............................. 1
Chapter 1 OVERVIEW
About the Client CD-ROM .......................................................... .............................................. 8
For Windows...................................................................... .................................................... 8For Macintosh.......................... ....................................................................... ....................... 9For UNIX/Linux ............................................................... ....................................................... 9
Contents of Installer .......................................................... ..................................................... 10
Precautions for using Firewall Software ...................................................... ........................ 11
Downloading Software from TopAccess............................... ............................................... 12Downloading installer for Windows.......................................................... ............................ 12Downloading Macintosh PPD files.................................................. ..................................... 13Downloading UNIX/Linux filters ............................................................ ............................... 15
Setting up NetWare Print Server ............................................................... ............................ 16
Setting up the NetWare print server in NDS mode..... ......................................................... 17Setting up the NetWare print server in NDPS mode ........................................................... 18Setting up the Novell iPrint ............................................................. ..................................... 27
Chapter 2 RECOMMENDED INSTALLATION
Procedure for Recommended Installation ......................................................................... .. 30
Chapter 3 INSTALLING PRINTER DRIVERS FOR WINDOWS
Before Installation ...................................................................... ............................................ 34Type of printer drivers..................................................................... ..................................... 34System requirements.................................................................. ......................................... 34
About installation procedure................................................. ............................................... 34
Installing the Printer Drivers ............................................................... .................................. 36Raw TCP/LPR printing ............................................................ ............................................ 37SMB printing ...................................................... .................................................................. 46Novell printing................... ................................................................. .................................. 51
Other Installations ......................................................... ......................................................... 53USB printing ...................................................................... .................................................. 53Point and Print ............................................................ ......................................................... 61IPP printing ........................................................................ .................................................. 62Novell iPrint ............................................................. ............................................................ 73Web Service Print............. .................................................................... ............................... 74
Uninstalling Printer Drivers ................................................................. .................................. 78Windows Vista/Server 2008 ....................................................... ......................................... 78Windows 2000/XP/Server 2003......................................................... .................................. 80
Chapter 4 INSTALLING PRINTER DRIVERS FOR MACINTOSH
About the Installation ........................................................ ..................................................... 82
About client software for Macintosh................................................ ..................................... 82Planning for installation ..................................................... .................................................. 82
Installing the Printer on Mac OS X 10.2.4 to Mac OS X 10.5.x............................. ............... 83Installing the Macintosh PPD file .................................................... ..................................... 83

8/9/2019 Software Instalation Guide
http://slidepdf.com/reader/full/software-instalation-guide 6/1724 CONTENTS
Configuring the printer on Mac OS X 10.5.x................................... ..................................... 86Configuring the printer on Mac OS X 10.4.x................................... ..................................... 95Configuring the printer on Mac OS X 10.2.4 to 10.3.x.................................................... ... 105
Uninstalling the Macintosh PPD File .................................................................. ................ 114
Chapter 5 INSTALLING PRINTER DRIVERS FOR UNIX/Linux
Setting Up the UNIX/Linux Filters .................................................................... ................... 116 About UNIX/Linux filters ....................................................... ............................................. 116System requirements......................................................... ................................................ 117Configuring UNIX/Linux printing using UNIX/Linux filters.................................................. 117
Setting Up the CUPS ......................................................... ................................................... 125 About CUPS ......................................................................... ............................................. 125Configuring UNIX/Linux printing using CUPS.............................................. ...................... 126
Chapter 6 INSTALLING SCAN DRIVER AND UTILITIES
Before Installation ...................................................................... .......................................... 142Type of scan driver and utilities ...................................................... ................................... 142System requirements............................................................... .......................................... 142
Installing Scan Driver and Utilities .................................................................. ................... 143Installing the scan driver and utilities using the installer............. ....................................... 143Installing WIA driver to Windows Vista / Windows Server 2008..................................... ... 145
Uninstalling Scan Driver and Utilities.................................... ............................................. 147
Chapter 7 INSTALLING NETWORK FAX UTILITIES
Before Installation ...................................................................... .......................................... 150Type of network fax utilities ..................................................... .......................................... 150System requirements......................................................... ................................................ 150
Installing Network Fax Utilities ................................................. .......................................... 151
Installing Web Service Print ......................................................... ....................................... 153
Uninstalling the Network Fax Software ........................................................ ...................... 154Uninstalling N/W-Fax driver..... .................................................................... ...................... 154Uninstalling AddressBook Viewer...................................... ................................................ 154
Chapter 8 INSTALLING e-Filing BACKUP/RESTORE UTILITIES
Before Installation ...................................................................... .......................................... 156System requirements............................................................... .......................................... 156
Installing e-Filing Backup/Restore Utilities........... ............................................................. 157
Uninstalling e-Filing Backup/Restore Utilities ......................................................... .......... 160
Chapter 9 INSTALLATION MAINTENANCE
Uninstalling Client Software ......................................................... ....................................... 162
Repairing Client Software .................................................................... ................................ 164

8/9/2019 Software Instalation Guide
http://slidepdf.com/reader/full/software-instalation-guide 7/172CONTENTS 5
INDEX ............................................................................ ....................................................................................... 167

8/9/2019 Software Instalation Guide
http://slidepdf.com/reader/full/software-instalation-guide 8/1726 CONTENTS

8/9/2019 Software Instalation Guide
http://slidepdf.com/reader/full/software-instalation-guide 9/172
1.OVERVIEW
This chapter describes the overview of the software installation.
About the Client CD-ROM.................... ....................................... ...................................... ....... 8For Windows ..........................................................................................................................................................8For Macintosh.........................................................................................................................................................9For UNIX/Linux.......................................................................................................................................................9
Contents of Installer................................ ................................... ................................... ......... 10
Precautions for using Firewall Software................ ........................................ ...................... 11
Downloading Software from TopAccess................................ .................................. ............ 12Downloading installer for Windows.......................................................................................................................12Downloading Macintosh PPD files .......................................................................................................................13Downloading UNIX/Linux filters ............................................................................................................................15
Setting up NetWare Print Server........................................ ...................................... ............. 16Setting up the NetWare print server in NDS mode ...............................................................................................17Setting up the NetWare print server in NDPS mode ............................................................................................18Setting up the Novell iPrint ...................................................................................................................................27

8/9/2019 Software Instalation Guide
http://slidepdf.com/reader/full/software-instalation-guide 10/172
1 OVERVIEW
8 About the Client CD-ROM
About the Client CD-ROM
For WindowsThe contents of the Client Utilities CD-ROM:
Client software installer [Client Utilities CD-ROM]:\e-STUDIO\Setup.exeThis is the setup program to install the printer drivers on your computer.
PCL6 printer drivers[Client Utilities CD-ROM]:\Client\Drivers\PCL6\W2K_XP_VISTA\<language>\This includes the setup files to install the PCL6 printer driver on the Windows 2000/XP/Vista/Server 2003/Server 2008for each language version by Add Printer Wizard or Plug and Play.[Client Utilities CD-ROM]:\Client\Drivers\PCL6\XP_VISTA_X64\<language>\This includes the setup files to install the PCL6 printer driver on the Windows XP/Vista/Server 2003/Server 2008 64-bitedition for each language version by Add Printer Wizard or Plug and Play.
PS3 printer drivers (PostScript)[Client Utilities CD-ROM]:\Client\Drivers\PS\W2K_XP_VISTA\<language>\This includes the setup files to install the PS3 printer driver on the Windows 2000/XP/Vista/Server 2003/Server 2008for each language version by Add Printer Wizard or Plug and Play.
[Client Utilities CD-ROM]:\Client\Drivers\PS\XP_VISTA_X64\<language>\This includes the setup files to install the PS3 printer driver on the Windows XP/Vista/Server 2003/Server 2008 64-bitedition for each language version by Add Printer Wizard or Plug and Play.
XPS printer drivers[Client Utilities CD-ROM]:\Client\Drivers\XPS\W2K_XP_VISTA\<language>\This includes the setup files to install the XPS printer driver on the Windows XP/Vista/Server 2003/Server 2008 foreach language version by Add Printer Wizard or Plug and Play.[Client Utilities CD-ROM]:\Client\Drivers\XPS\XP_VISTA_X64\<language>\This includes the setup files to install the XPS printer driver on the Windows XP/Vista/Server 2003/Server 2008 64-bitedition for each language version by Add Printer Wizard or Plug and Play.
The XPS printer driver can be installed on Windows Vista/Server 2008 computers, or those of Windows XP SP2,Windows Server 2003 SP1 or later versions with XPS Essentials Pack installed.
N/W-Fax drivers[Client Utilities CD-ROM]:\Client\Drivers\FAX\W2K_XP_VISTA\<language>\This includes the setup files to install the N/W-Fax driver on the Windows 2000/XP/Vista/Server 2003/Server 2008 foreach language version by Add Printer Wizard or Plug and Play.[Client Utilities CD-ROM]:\Client\Drivers\FAX\XP_VISTA_X64\<language>\This includes the setup files to install the N/W-Fax driver on the Windows XP/Vista/Server 2003/Server 2008 64-bitedition for each language version by Add Printer Wizard or Plug and Play.
AddressBook Viewer [Client Utilities CD-ROM]:\Client\ADRBK\32\This includes the setup files to install the AddressBook Viewer on the Windows 2000/XP/Vista/Server 2003/Server2008.[Client Utilities CD-ROM]:\Client\ADRBK\64\This includes the setup files to install the AddressBook Viewer on the Windows XP/Vista/Server 2003/Server 2008 64-bit edition.
Remote Scan drivers[Client Utilities CD-ROM]:\Client\RS\This includes the setup files to install the Remote Scan driver.
TWAIN drivers[Client Utilities CD-ROM]:\Client\TWAIN\This includes the setup files to install the TWAIN driver.
File Downloader [Client Utilities CD-ROM]:\Client\FD\This includes the setup files to install the File Downloader.

8/9/2019 Software Instalation Guide
http://slidepdf.com/reader/full/software-instalation-guide 11/172
1.OVERVIEW
About the Client CD-ROM 9
1 OVERVIEW
WIA drivers[Client Utilities CD-ROM]:\Client\WIAThis includes the setup files to install the WIA driver on the Windows XP/Vista/Server 2003/Server 2008.
TOSHIBA NDPS Gateway[Client Utilities CD-ROM]:\Admin\NDPS Gateway\TOSHIBA NDPS Gateway enable to configure the NDPS objects in servers running NetWare 5.1 with Support Pack 7or higher, or NetWare 6.0/6.5.
For MacintoshThe contents of the Client Utilities CD-ROM:
Macintosh PPD files[Client Utilities CD-ROM]:MacPPD:OSXThis includes the PPD file to enable printing from Macintosh on the Mac OS X 10.2.4 to Mac OS X 10.5.x.
For UNIX/Linux
The contents of the Client Utilities CD-ROM:
Solaris filter [Client Utilities CD-ROM]/Admin/SolarisFilter/Usa/This includes the tar file for Solaris v2.6/2.7/7.8/8/9.
HP-UX filter [Client Utilities CD-ROM]/Admin/HP-UXFilter/Usa/This includes the tar file for HP-UX ver.10.20/11.x and HP-UX64 ver.11.31.
AIX filter [Client Utilities CD-ROM]/Admin/AIXFilter/Usa/This includes the tar file for AIX 4.3.3.
Linux filter [Client Utilities CD-ROM]/Admin/LinuxFilter/Usa/This includes the tar file for Red Hat 7.x/8.x/9.x, Red Hat Enterprise WS2, SuSE Linux 7.x/8.x/9.x, Mandrake Linux 7.x/8.x/9.x and Turbolinux 8/10.
SCO UNIX filter [Client Utilities CD-ROM]/Admin/OpenUnixFilter/Usa/This includes the tar file for SCO UnixWare 7 and SCO Open UNIX 8.
CUPS PPD file[Client Utilities CD-ROM]/Admin/CUPS/Usa/This includes the PPD file to enable printing from CUPS.

8/9/2019 Software Instalation Guide
http://slidepdf.com/reader/full/software-instalation-guide 12/172
1 OVERVIEW
10 Contents of Installer
Contents of Installer
The following software can be installed by the Installer in the Client Utilities CD-ROM.
Printer drivers (Printing function)Printer drivers are software components that enable application programs to interact with the TOSHIBA MFP. TheTOSHIBA MFP comes with three printer drivers, PCL6, PS3 (PostScript) and XPS printer drivers. These printer driversoffer document print, layout and assembly functions that are not available with many applications.
The XPS printer driver can be installed on Windows Vista/Server 2008 computers, or those of Windows XP SP2,Windows Server 2003 SP1 or later versions with XPS Essentials Pack installed.
TWAIN driver (Scanning function)This software component enables you to import e-Filing documents into TWAIN-compliant applications.
File Downloader This software component enables you to import e-Filing documents into your hard disk.
Remote Scan driver (Scanning function)This software allows you to perform scanning the originals set in the equipment remotely from a client computer andacquire the image into the TWAIN-compliant application.
WIA driver (Scanning function)This software allows you to perform scanning the originals set in the equipment remotely from a client computer andacquire the image into the WIA-compliant application.
N/W-Fax driver (Printing function)The N/W-Fax driver enables you to set up send lists and send electronic documents from your client computer to one ormore destinations. You print to the fax much the same way you would choose to print to a designated printer that makesusing the N/W-Fax driver quick and simple. You can select the fax properties.
AddressBook Viewer With the AddressBook Viewer you can easily add or modify fax recipient names, fax numbers, and Internet Fax address(Email address) to the address book. This utility allows you to manage recipients of the fax, select and display faxrecipients from the address book, as well as recipient fax numbers and other contact information.
To use various drivers, the scanning function or printing function is required.The e-STUDIO455 Series and the e-STUDIO855 Series provide the scanning function and printing function as options. However,these optional functions are already installed in some models.

8/9/2019 Software Instalation Guide
http://slidepdf.com/reader/full/software-instalation-guide 13/172
1 OVERVIEW
Precautions for using Firewall Software 11
Precautions for using Firewall Software
When firewall software is used on Windows computers, installation may not be performed since network communicationbetween this equipment and the computers is blocked by firewall software.Check if firewall software is used before installation, and follow the directions of your network administrator if it is used.
Client software required for network communications and the execution files are given as follows. Use this information forthe exception setting of the firewall software.
Individual installer: setup.exeLauncher installer: Setup.exePrinter driver, N/W-FAX driver: printui.exeFile Downloader: ESFileDL.exeAddressBook Viewer: ABVExe.exe (for 32-bit edition), ABVExe6.exe (for 64-bit edition)Backup/Restore Utility: ESeFBKRT.exe
For a TWAIN driver, Remote Scan driver and WIA driver, the execution files of the corresponding applicationsoftware need to be set as exceptions.When Individual installer or Launcher installer is set as an exception, release the exception setting after installation.

8/9/2019 Software Instalation Guide
http://slidepdf.com/reader/full/software-instalation-guide 14/172

8/9/2019 Software Instalation Guide
http://slidepdf.com/reader/full/software-instalation-guide 15/172
1.OVERVIEW
Downloading Software from TopAccess 13
1 OVERVIEW
4 Double-click the downloaded file to extract the installer files. After extracting the downloaded file, the folders that includes WebInstaller.exe are created. In order to installsoftware using these files, you must run the WebInstaller.exe with an “Administrators” privilege. If you do nothave the “Administrators” privilege, you can install by entering the Administrator password.The names of folders that include WebInstaller.exe are as follows:- ABV32 — contains the installer for AddressBook Viewer.- ABV64 — contains the installer for AddressBook Viewer for Windows 64-bit edition OSs.- FD — contains the installer for File Downloader.- RS — contains the installer for Remote Scan driver.- XPS — contains the installer for XPS printer driver.- NWFAX — contains the installer for N/W-Fax driver.- PCL6 — contains the installer for PLC6 printer driver.- PS3 — contains the installer for PS3 (PostScript) printer driver.- TWAIN — contains the installer for TWAIN driver.- WIA — contains the installer for WIA driver.
Downloading Macintosh PPD files
1 In TopAccess, click the [Install Software] link at the bottom of the screen.
The Install Client Software page opens.
2 Click the [Macintosh PPD Files] link.
The software components list is displayed.

8/9/2019 Software Instalation Guide
http://slidepdf.com/reader/full/software-instalation-guide 16/172
1 OVERVIEW
14 Downloading Software from TopAccess
3 Click the File Name link that you want to download.
TOSHIBAeSTXXXXCSrs.dmg.gz — Click this link to download the PPD file for Mac OS X 10.2.4 to Mac OS X10.5.x.* “XXXX” is the model number of the TOSHIBA MFP.
4 Download the PPD file of your Mac OS version on your desktop by following theprompts.

8/9/2019 Software Instalation Guide
http://slidepdf.com/reader/full/software-instalation-guide 17/172
1.OVERVIEW
Downloading Software from TopAccess 15
1 OVERVIEW
Downloading UNIX/Linux filters
1 In TopAccess, click the [Install Software] link at the bottom of the screen.
The Install Client Software page opens.
2 Click the [Unix Filters] link.
The software components list is displayed.
3 Click the UNIX/Linux filter link that you want to install.
4 Download the UNIX/Linux tar file containing the UNIX/Linux filters on your desktop byfollowing the prompts.

8/9/2019 Software Instalation Guide
http://slidepdf.com/reader/full/software-instalation-guide 18/172
1 OVERVIEW
16 Setting up NetWare Print Server
Setting up NetWare Print Server
This equipment supports the following Novell printing services:NetWare 6.0/6.5 NDS mode (over IPX/SPX only)NetWare 6.0/6.5 NDPS modeNetWare 6.0/6.5 iPrint mode
This chapter provides an overview of how to set up this equipment as a Novell Network Printer, Print Server, or NDPSPrinter Agent. For more detailed information, refer to your Novell documentation.

8/9/2019 Software Instalation Guide
http://slidepdf.com/reader/full/software-instalation-guide 19/172
1.OVERVIEW
Setting up NetWare Print Server 17
1 OVERVIEW
Setting up the NetWare print server in NDS modeThe following explains how to set up a NetWare print server with NDS so that network users can print to this equipmentfrom their computers, and this equipment can obtain print jobs from the NetWare print server. More detail is provided inyour NetWare documentation.
1 In NetWare Administrator, select the container object to create the printer and click the
[Object] menu and select [Create].The [New Object] dialog box appears.
2 In the [Class of new object] list, select [Print Queue] and click [OK].The [Create Print Queue] dialog box appears.
3 Select [Directory Service Queue] and enter the name of the print queue in the [PrintQueue name] box.
4 Click the [browse] at the next to the [Print Queue Volume] box.The [Select Object] dialog box appears.
5 Select the volume to create a print queue and click [OK].
6Click [Create].The print queue is created.
7 Click the [Object] menu and select [Create].The [New Object] dialog box appears.
8 In the [Class of new object] list, select [Printer] and click [OK].The [Create Printer] dialog box appears.
9 Enter the printer name, select the [Define additional properties] check box and click[Create].
10 Display the Assignments window and click [Add].The [Select Object] dialog box appears.
11 Select a created queue and click [OK].12 Display the Configuration window, select [Other/Unknown] at the Printer Type drop
down box and click [OK].The printer is created.
13 Click the [Object] menu and select [Create].The [New Object] dialog box appears.
14 In the [Class of new object] list, select [Print Server] and click [OK].The [Create Print Server] dialog box appears.
15 Enter the print server name, select the [Define additional properties] check box andclick [Create].The print server name must be “MFP_[NIC Serial Number]”. You can find the Unit Serial Number of the equipmenton the NIC Configuration page that can be printed from the control panel.
16 Display the Assignments window and click [Add].The [Select Object] dialog box appears.
17 Select a created printer and click [OK].
18 Click [OK] to close Assignments window for the print server.The print server is created.

8/9/2019 Software Instalation Guide
http://slidepdf.com/reader/full/software-instalation-guide 20/172
1 OVERVIEW
18 Setting up NetWare Print Server
Setting up the NetWare print server in NDPS modeThis equipment supports printing over NetWare 6.0/6.5 networks running either the TCP/IP protocols or the IPX protocol.For pure IP printing, this equipment takes advantage of features in NDPS (Novell Distributed Print Services).
An administrator can use either Novell Printer Gateway or TOSHIBA NDPS Gateway to set up the NetWare server inNDPS mode.
P.18 “Setting up NDPS using Novell Printer Gateway”
P.22 “Setting up NDPS using TOSHIBA NDPS Gateway”
Setting up a NetWare environment correctly requires the presence and active cooperation of the Novell networkadministrator. You must have administrator privileges on the network to create new NDPS objects.
Setting up NDPS using Novell Printer GatewayNDPS is not like the earlier queue-based versions of NetWare printing. Instead, you use an NDPS Manager and a Printer
Agent, which control the tasks previously handled by a print queue, print server, and spooler. You can also make theprinter driver available for clients to download from Windows client computers.
Before configuring the NetWare print server in NDPS mode, confirm the following:For NetWare 6.5, the Support Pack 5 and Novell Gateway version 3.00 or later with ndps3sp2c are installed.Make sure you have a valid IP address for this equipment and for any computers that will print to it (when used in theTCP/IP network).In the equipment setup, enable TCP/IP and enter the IP address, Subnet mask, and Gateway address for thisequipment (when used in the TCP/IP network).
Setting up the NDPS
1 In NetWare Administrator, select the container object to create the printer and click the[Object] menu and select [Create].The [New Object] dialog box appears.
2 Select [NDPS Broker] and click [OK].The [Create NDPS Broker Object] dialog box appears.
If the NetWare print server has been installed as supporting the NDPS service, the NDPS Broker is created asdefault. In this case, you can use the default NDPS Broker.
3 Specify the [NDPS Broker Name] and [RMS Volume] options, and click [Create].The NDPS Broker is created.
4 Click the [Object] menu and select [Create].The [New Object] dialog box appears.
5 Select [NDPS Manager] and click [OK].The [Create NDPS Manager Object] dialog box appears.
6 Specify the [NDPS Manager Name], [Resident Server], and [Database Volume] option,and click [Create].The NDPS Manager is created.
7 After creating the NDPS Broker and NDPS Manager, load the NDPS Broker and NDPSManager by entering the following commands in the Console screen of the NetWareprint server.load broker [Created NDPS Broker Name]load NDPSM [Created NDPS Manager Name]
8 Double-click the NDPS Broker object that you created.The [NDPS Broker] dialog box appears.
9 Click [Resource Management (RMS)].

8/9/2019 Software Instalation Guide
http://slidepdf.com/reader/full/software-instalation-guide 21/172
1.OVERVIEW
Setting up NetWare Print Server 19
1 OVERVIEW
10 Click [Add Resources].The [Manage Resources] dialog box appears.
If the [Add Resources] button is disabled, make sure that the broker is loaded. This button will be enabled onlywhen the broker is loaded.
11 Select the applicable OS icon in the [Resource Types] list, and click [Add].The [Add Resources] dialog box appears.
12 Click [Browse].The [Select Printer Driver] dialog box appears.
The [Browse] button may not be available according to the Support Pack version. If the [Browse] button isdisabled, specify “/DISABLETLSMGR” option when starting the nwadmin32.exe.
13 Insert the Client Utilities CD-ROM into the CD-ROM drive.When inserting the Client Utilities CD-ROM, the installer may automatically start. Click [Cancel] to exit the installerand continue the operation.
14 Locate the directory where the printer driver for your Windows version is located,select the INF file.
To install the PCL6 printer driver, locate“[Client Utilities CD-ROM]:\Client\Drivers\PCL6\W2K_XP_VISTA\<language>”.To install the PS3 printer driver, locate“[Client Utilities CD-ROM]:\Client\Drivers\PS\W2K_XP_VISTA\<language>”.
When using 64-bit edition of each Windows XP/Vista/Server 2003/Server 2008, select the following folder.- To install the PCL6 printer driver, locate
“[Client Utilities CD-ROM]:\Client\Drivers\PCL6\XP_VISTA_X64\<language>”.- To install the PS3 printer driver, locate
“[Client Utilities CD-ROM]:\Client\Drivers\PS\XP_VISTA_X64\<language>”.
15 Click [OK].Returns to the [Add Resources] dialog box.
16 Click [OK].Returns to the [Manage Resources] dialog box.
17 Repeat the procedure from Step 10 to Step 15 to add all printer drivers for theapplicable OS.
18 Click [OK] to close the [Manage Resources] dialog box.Returns to the [NDPS Broker] dialog box.
19 Click [OK] to close the [NDPS Broker] dialog box.
20 Click the [Object] menu and select [Create].The [New Object dialog] box appears.
21 Select [NDPS Printer] and click [OK].The [Create NDPS Printer Object] dialog box appears.
22 Specify the [NDPS Printer Name] option, select [Create a New Printer Agent], and click[Create].The [Create Printer Agent] dialog box appears.
23Specify the [Printer Agent (PA) Name] and [NDPS Manager Name] option. Then select[Novell Printer Gateway] in the [Gateway Types] list and click [OK].The [Warning] dialog box appears.

8/9/2019 Software Instalation Guide
http://slidepdf.com/reader/full/software-instalation-guide 22/172
1 OVERVIEW
20 Setting up NetWare Print Server
24 Click [OK].When it finishes initializing, the [Information] dialog box appears.
25 Click [OK].The [Configure Novell PDS for Printer Agent] dialog box appears.
26 Select [((NONE))] in the [Printer Type] list and select [Novell Port Handler] in the [Port
Handler Type] list. Then click [OK].The [Configure Port Handler for Printer Agent] dialog box appears.
27 Continue the procedure according to which connection type to be used. P.20 “Configuring the LPR connection in the TCP/IP network” P.21 “Configuring the queue based connection in the IPX/SPX network”
Configuring the LPR connection in the TCP/IP network
1 In the [Configure Port Handler for Printer Agent] dialog box, select [Novell LPR PrinterGateway (SNMP)] (or [Remote (LPR on IP)]) and click [Next].
2Enter the IP address of this equipment in the [Host Address] box, and click [Finish].It takes about 60 seconds to load the Printer Agent. After it finishes loading the Printer Agent, the Select PrinterDrivers dialog box appears.
3 Select the printer drivers to be installed in the [Printer Drivers] list at each OS tab, andclick [Continue].The [Information] dialog box appears.
4 Click [OK].It takes about 60 seconds to complete the creation of the NDPS Printer object.
5 Double-click the NDPS Printer object that you created.The [NDPS Printer] dialog box appears.
6 Click [NDPS Remote Printer Management].
7 Select the [Install to workstation in this container] and click [Update driver].
8 Click [OK] to close the [NDPS Printer] dialog box.

8/9/2019 Software Instalation Guide
http://slidepdf.com/reader/full/software-instalation-guide 23/172
1.OVERVIEW
Setting up NetWare Print Server 21
1 OVERVIEW
Configuring the queue based connection in the IPX/SPX network
1 In the [Configure Port Handler for Printer Agent] dialog box, select [Forward Jobs to aQueue] and click [Next].
2 Enter the NDS queue name in the [Queue Name] box and the user name in the [QueueUser Name] box. Then click [Finish].The [Select Printer Drivers] dialog box appears.
The NDS queue must be created.
3 Select the printer drivers to be installed in the [Printer Drivers] list at each OS tab, andclick [Continue].The [Information] dialog box appears.
4 Click [OK].It takes about 60 seconds to complete the creation of the NDPS Printer object.
5 Double-click the NDPS Printer object that you created.The [NDPS Printer] dialog box appears.
6 Click [NDPS Remote Printer Management].
7 Select the [Install to workstation in this container] and click [Update].
8 Click [OK] to close the [NDPS Printer] dialog box.

8/9/2019 Software Instalation Guide
http://slidepdf.com/reader/full/software-instalation-guide 24/172
1 OVERVIEW
22 Setting up NetWare Print Server
Setting up NDPS using TOSHIBA NDPS GatewayThe TOSHIBA NDPS Gateway mechanism employs several components, notably the NDPS Manager, NDPS Broker, andNDPS Printer Agent. The following figure illustrates the communication flow between these objects.
When the TOSHIBA NDPS Gateway is used with the e-STUDIO455 Series / e-STUDIO855 Series, the equipmententers into the Sleep mode, though the Super Sleep mode is enabled in the Energy Saver function.
* The TOSHIBA e-STUDIO Series is used in the illustration above. It may be different with your system.
1 The NetWare printer can be discovered in two ways:The printer is automatically discovered by the TOSHIBA NDPS Gateway.You add it manually to the NDPS Manager, which resides on the same NetWare file server as the TOSHIBA NDPSGateway.
2 When an end-user attempts to add a NDPS printer, the client queries the NDPS Brokersto identify all available NDPS printers.
3 The NDPS Broker responds with a list of NDPS Printer Agents. The user selects aPrinter Agent and the TOSHIBA NDPS Gateway downloads the appropriate driver to theuser’s desktop.
4 When the client workstation is ready to print, it sends the print job to the Printer Agent,which is a virtual printer image created in the NDPS network.
5 The NDPS Manager then passes the print jobs to the TOSHIBA NDPS Gateway.
6 The TOSHIBA NDPS Gateway issues the printing commands to the printer.
NetWare Print Server
End User Administrator
1
1
6
NDPS Broker
Printer Agent
NDPS Manager 5
2
3
4

8/9/2019 Software Instalation Guide
http://slidepdf.com/reader/full/software-instalation-guide 25/172
1.OVERVIEW
Setting up NetWare Print Server 23
1 OVERVIEW
Installing the TOSHIBA NDPS Gateway
Considerations and limitationsThe TOSHIBA NDPS Gateway can be installed in servers running NetWare 5.1 with Support Pack 7 or higher orNetWare 6.0/6.5. A self-extracting executable file contains both the TOSHIBA NDPS Gateway and a NetWare AdminSnap-in component that are necessary to support NDPS printing on the equipment.The NDPS Manager can drive several Gateways simultaneously. The TOSHIBA NDPS Gateway does not interferewith other manufacturer’s Gateways.The TOSHIBA NDPS Gateway supports multiple printers; one printer can also be split between several Gateways tobalance the work load.Both NDPS and non-NDPS users can share the same printer.The TOSHIBA NDPS Gateway supports network configurations that are based on both a server and the Windowsoperating system.
PrerequisitesInstall NDPS in the NetWare servers. NDPS comes with NetWare 5.1, but it is not installed automatically. The NDPS installprogram extends the NDS schema for three NDS objects:
NDPS Manager NDPS Broker NDPS Printer Agent
1 Insert the Client Utilities CD-ROM into the CD-ROM drive on the administrativeworkstation.
2 Copy “Tandps.exe”, the self extracting executable file from the CD-ROM to theworkstation. Double-click the file to launch the InstallShield setup program.
3 Follow the Setup Wizard’s prompt to supply the server volume or Browse to select amapped drive.
4 Click [Next] to proceed with installation. When the NDPS Gateway and NetWare snap-incomponents have been installed, you can configure the equipment as an NDPS object.

8/9/2019 Software Instalation Guide
http://slidepdf.com/reader/full/software-instalation-guide 26/172
1 OVERVIEW
24 Setting up NetWare Print Server
Setting up the equipment as an NDPS Object
Considerations and limitationsThis equipment should be automatically discovered by the TOSHIBA NDPS Gateway. If not, manually create a new NDPSPrinter Agent. ( P.24 “Create a Printer Agent” )
Prerequisites
1 Load “NWADMN32.EXE” on the administrator workstation to launch the NetWareadministration program.
2 Determine the Tree or Context under which to install the NDPS printer agent.
3 Verify that both a NDPS Manager and Broker object exist at this level. If not, createthem.
4 Add drivers to the NDPS Broker. They can then be selected from the drivers list andassociated with the Printer Agent.
Add drivers to the NDPS Broker
1 Launch NWAdmin.
2 Double-click the Broker icon.
3 Click [Resource Management (RMS)].
4 Click [Add Resources].
5 Select the applicable system: the Windows 2000 or Windows XP operating system.Click [Add].
6 Click [Browse] to locate the driver's .inf file on either the distribution CD-ROM or a
shared network location.
7 Click [OK].Now, when you create a Printer Agent, you can associate the drivers by selecting them from the list of driversmanaged by the broker.
Create a Printer Agent
1 Right-click anywhere within the Parent Level (Tree or Context under which the NDPSPrinter Agent is to be installed) and then choose [Create].The [New Object] dialog box appears.
2From the [Class of New Object] list box, select [NDPS Printer] and click [OK].The [Create NDPS Printer] dialog box appears.
3 Enter the NDPS Printer Name, then click [Create].The [Create Printer Agent] dialog box appears.
4 Enter the NDPS Manager name or click [Browse] to locate it.
5 Select [TOSHIBA NDPS Gateway Configuration] in the [Gateway types] list, then click[OK].The [Gateway Configuration] dialog box appears.
6 Select the NDPS Gateway Printing Mechanism and click [Next].The configuration dialog that appears depends on the printing mechanism you choose. A description of theconfiguration settings for each option follows. When you finish configuring the Printer Agent, proceed to “Selectdrivers” on page 26 .
P.25 “LPR on IP” P.25 “Queue-Based (NDS Printer Agent)”

8/9/2019 Software Instalation Guide
http://slidepdf.com/reader/full/software-instalation-guide 27/172
1.OVERVIEW
Setting up NetWare Print Server 25
1 OVERVIEW
LPR on IP
If you select the LPR Gateway configuration option, the Remote-LPR Printer Configuration dialog box opens:
1 Enter the IP Address of the equipment and then click [Finish].
2 To confirm your choice, click [Yes].
When the update is complete, you can proceed to “Select drivers” on page 26 .
Queue-Based (NDS Printer Agent)
If you select the Queue-based (NDS Printer Agent) option, the Configure Printer Agent dialog box opens:
1 Either type in the Advertising Print Server name, or click [Search] to automaticallylocate print server information and choose a device name from the drop-down list.Once a server is selected, the remaining fields are populated with the associated data.
2 Select the [Manual Configuration] check box to edit the default data or if the device isnot automatically located.IPX Address — Enter the 8 digit IPX Network Address (NET) of the Novell network in the first field, and enter the
MAC Address of the device in the second field.Print Server Name — Enter the Novell Network Print Server Name of the device.Password — Enter the password for the Novell Network Print Server if required.Printer Name — Enter the “< Novell Network Print Server Name of the device >_PTR”.NDS Volume for the Print Queue — Enter the “< Novell Server Name >_< Volume >.< Context >” of the object.
3 Click [Finish].
4 To confirm your choice, click [Yes].When the update is complete, proceed to “Select drivers” on page 26 .

8/9/2019 Software Instalation Guide
http://slidepdf.com/reader/full/software-instalation-guide 28/172
1 OVERVIEW
26 Setting up NetWare Print Server
Select drivers
After you create a Printer Agent, configure the options. When the update completes, the [Select Printer Drivers] dialog boxopens:
1 Select the appropriate operating system tab.
2 Select the printer drivers to be automatically downloaded to users’ workstations whenthey select the new Printer Agent.
3 Select all desired drivers and then click [Continue]. A message box opens, listing the selected drivers:
4 Click [OK] if the selections are correct or click [Cancel] to return to the Select PrinterDrivers dialog and modify your selections.NDPS Printer Agent setup is complete. The new Printer Agent now appears in the list of NDPS objects.
Removing NDPS components
1 Use the NWADMIN utility to delete all TOSHIBA NDPS printer and print agents you
created.2 Delete the following files using either Windows Explorer or MS-DOS operating system
commands. Check that the files are not in use before deleting them.SYS:\SYSTEM\TAGATE.NLMSYS:\SYSTEM\TAPAP.NLMSYS:\SYSTEM\TACON.NLMSYS:\SYSTEM\TALIB.NLMSYS:\SYSTEM\TACFG.PD0SYS:\SYSTEM\NLS\4\TAGATE.MSGSYS:\SYSTEM\NLS\4\TACON.MSGSYS:\SYSTEM\NLS\4\TALIB.MSGSYS:\SYSTEM\NLS\4\TACFG.MSGSYS:\SYSTEM\NLS\4\TAPAP.MSGSYS:\SYSTEM\NLS\4\TACFG.HLPSYS:\SYSTEM\NLS\4\TACON.HLPSYS:\SYSTEM\NLS\4\TALIB.HLPSYS:\PUBLIC\WIN32\TASNAPIN.PC2SYS:\PUBLIC\WIN32\TACFG.PD2SYS:\PUBLIC\WIN32\TOSHIBA.INISYS:\PUBLIC\WIN32\TASNMP.DLLSYS:\PUBLIC\WIN32\NLS\ENGLISH\TARES.DLLSYS:\PUBLIC\WIN32\NLS\ENGLISH\TACFGRES.DLLSYS:\PUBLIC\WIN32\NLS\ENGLISH\SC2_MSG.DLLSYS:\PUBLIC\WIN32\NLS\ENGLISH\HLP25632.DLLSYS:\PUBLIC\WIN32\NLS\ENGLISH\ROBOEX32.DLLSYS:\PUBLIC\WIN32\NLS\ENGLISH\SC3_MSG.DLL

8/9/2019 Software Instalation Guide
http://slidepdf.com/reader/full/software-instalation-guide 29/172
1.OVERVIEW
Setting up NetWare Print Server 27
1 OVERVIEW
Setting up the Novell iPrintThis equipment also supports the Novell iPrint. Using the Novell iPrint, you can set up the printer that can be accessedusing URL from client computers. The Novell iPrint is based on the NDPS architecture so that you must have NDPSinstalled and configured in the NetWare print server.
Before setting up the Novell iPrint, confirm the following:The NDPS Broker, NDPS Manager, and NDPS Printer must be created. P.18 “Setting up the NDPS”
The Novell iManager must be installed.For more information to install the Novell iManager, see the documentation for the Novell iManager that is provided byNovell, Inc.
In order to set up the iPrint system, the network administrator must do the following:1. Installing Novell iPrint
P.27 “Installing Novell iPrint”2. Enabling the DNS on the Printer Services Manager
P.27 “Enabling DNS”3. Enabling iPrint service
P.28 “Enabling Novell iPrint”
Installing Novell iPrint
1 Click [Novell] in the GUI screen of NetWare and select [Install].
2 Click [Add].
If the iPrint/NDPS is displayed in the list, Novell iPrint has already been installed during the installation ofNetWare. In that case, you do not have to operate the installation for Novell iPrint.
3Insert the NetWare Operating System CD-ROM into your CD-ROM drive.
4 Select the “PRODUCT.Nl” file that is located in the root of the CD-ROM, and click [OK].
5 Follow the prompts to install iPrint/NDPS.
Enabling DNSBefore enabling DNS for the Printer Services Manager, you should add the DNS name for the Printer Services Manager tothe DNS server.
After you add the DNS to the DNS server, follow the steps below to enable the DNS on the Printer Services Manager.
1 At the server console, enter the following syntax.NDPSM <NDPS Manager Name> /dnsname=<NDPS Manager DNS Name>

8/9/2019 Software Instalation Guide
http://slidepdf.com/reader/full/software-instalation-guide 30/172

8/9/2019 Software Instalation Guide
http://slidepdf.com/reader/full/software-instalation-guide 31/172
2.RECOMMENDED INSTALLATION
This chapter describes about the recommended installation of the Installer.
Procedure for Recommended Installation.............................. ................................. ............ 30

8/9/2019 Software Instalation Guide
http://slidepdf.com/reader/full/software-instalation-guide 32/172
2 RECOMMENDED INSTALLATION
30 Procedure for Recommended Installation
Procedure for Recommended Installation
Install the software by the recommended installation when you want to install all software on a Windows computer.The following describes an installation on Windows Vista. The procedure is the same when other versions of Windows areused.
To perform installation, you must log onto Windows with a user account, which enables the installation and
uninstallation of client software, such as “Administrators” or “Power Users”.If Windows Vista/Server 2008 is used, you can perform the installation by temporarily changing the user accountfollowing the procedure below.- Open the “e-STUDIO” folder in a CD-ROM, and then double-click “Setup.exe”.- When the [User Account Control] dialog box is displayed, enter the password of “Administrators”, and then click
[OK].
1 Insert the Client Utilities CD-ROM into the CD-ROM drive.If the installer does not automatically start, use the Explorer to open the “e-STUDIO” folder in the Client Utilities CD-ROM and double-click “Setup.exe”.
2 Select [I agree to the terms of the License Agreement.] and click [Next].
To change the display language, select a desired language from the [Select Language] box.The main menu is displayed.
3 Click [Recommended].
8/9/2019 Software Instalation Guide
http://slidepdf.com/reader/full/software-instalation-guide 33/172
2.RECOMMENDED INSTALLATION
Procedure for Recommended Installation 31
2 RECOMMENDED INSTALLATION
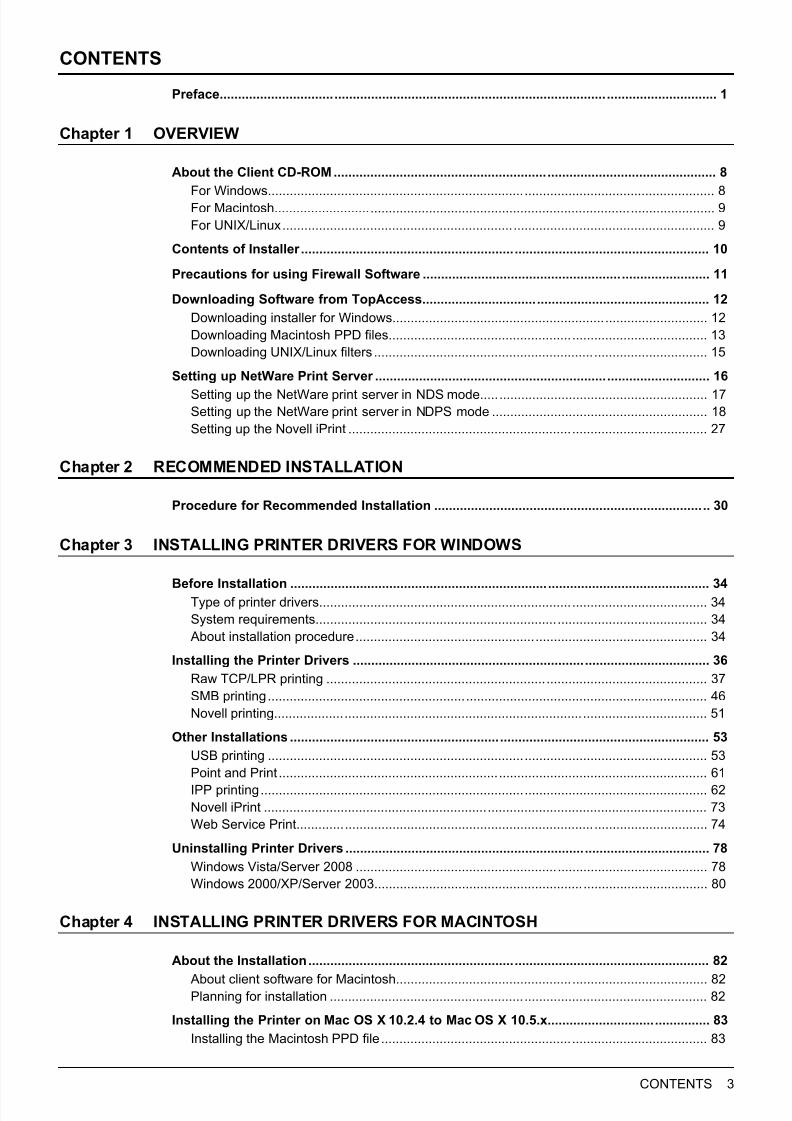
4 Confirm the list of the software to install and click [Install].
You can change the folder where AddressBook Viewer and File Downloader are installed. Click [Browse] and,
when the [Browse for folder] dialog box appears, select a folder and click [OK].
If the following message appears, click [Continue] to proceed with the operation.
5 Configure the printer port and click [OK].
For instructions on how to configure the printer port, see step 6 and later in the following section. P.36 “Installing the Printer Drivers”

8/9/2019 Software Instalation Guide
http://slidepdf.com/reader/full/software-instalation-guide 34/172
2 RECOMMENDED INSTALLATION
32 Procedure for Recommended Installation
6 The installation starts.
If the following message appears, click [Yes] to set the indicated printer driver to be the default printer driver,or click [No] to not change the default printer driver.
If the following message appears, click [Install this driver software anyway] to proceed with the installation.
7 When the installation is complete, click [Finish].
The main menu is displayed.
The Installer may ask you to restart your computer. If it does, select “Yes, I want to restart my computer now.”and click [Finish] to restart your computer.
8 Click [Exit].When a message “Do you want to close TOSHIBA e-STUDIO Software Installer?” appears asking whether to finishthe installation, click [Yes].
Before using the printer driver for printing, configure the installed options of the equipment and departmentcode (if required) on the printer driver. Refer to the Printing Guide for the instructions.

8/9/2019 Software Instalation Guide
http://slidepdf.com/reader/full/software-instalation-guide 35/172
3.INSTALLING PRINTER DRIVERS FORWINDOWS
This chapter describes the instructions on how to install the printer drivers on Windows.
Before Installation.................................... ................................... .................................. ......... 34Type of printer drivers...........................................................................................................................................34System requirements............................................................................................................................................34
About installation procedure.................................................................................................................................34
Installing the Printer Drivers .................................... ...................................... ....................... 36Raw TCP/LPR printing .........................................................................................................................................37SMB printing .........................................................................................................................................................46Novell printing .......................................................................................................................................................51
Other Installations........................ ................................... .................................. ..................... 53USB printing .........................................................................................................................................................53Point and Print......................................................................................................................................................61IPP printing...........................................................................................................................................................62Novell iPrint ..........................................................................................................................................................73Web Service Print .................................................................................................................................................74
Uninstalling Printer Drivers........... .................................... ....................................... ............. 78Windows Vista/Server 2008 .................................................................................................................................78Windows 2000/XP/Server 2003 ...........................................................................................................................80

8/9/2019 Software Instalation Guide
http://slidepdf.com/reader/full/software-instalation-guide 36/172
3 INSTALLING PRINTER DRIVERS FOR WINDOWS
34 Before Installation
Before Installation
This section will help you to plan an installation suited to your environment. Before installing the printer driver, read thissection.
When same printer drivers have been installed previouslyBefore updating the printer drivers, delete the existing printer drivers.
P.78 “Uninstalling Printer Drivers”
Type of printer driversPCL6 printer driver — This printer driver is suitable for printing from a general application, such as word processingor calculation.PS3 printer driver — This printer driver is suitable for printing from a general application, such as word processing orcalculation, and a DTP application supporting PostScript.XPS printer driver — This printer driver is suitable for printing from an application developed exclusively for WindowsVista, such as Windows Presentation Foundation (WPF).
The XPS printer driver can be installed on Windows Vista/Server 2008 computers, or those of Windows XP SP2,Windows Server 2003 SP1 or later versions with XPS Essentials Pack installed.
System requirementsTo install the printer drivers and other client software on a Windows computer, the following is required. Display resolution
1024 x 768 dots or more Display color
High Color (16bit) or higher is recommended
CPUPentium 133 MHz minimum (Pentium 266 MHz or faster recommended) Memory
The required memory size for OS. OS
Windows 2000 Service Pack 4Windows XP Service Pack 1/Service Pack 2/Service Pack 3Windows Vista Service Pack 1Windows Server 2003 Service Pack 1/Service Pack 2Windows Server 2008 Service Pack 1
About installation procedureFind the installation procedure suited to your environment from the following:
USB connectionThis equipment supports the USB2.0 Hi-Speed connection. When this equipment is connected to your computer with theUSB cable, you must install the printer drivers using the Windows Plug and Play functions.
P.53 “USB printing”
Raw TCP/LPR printingThis equipment supports the Raw TCP and LPR printing via TCP/IP. When this equipment is connected to your computerin a TCP/IP network, Raw TCP/LPR printing may be most suitable.
P.36 “Installing the Printer Drivers”
To print with a Raw TCP connection, this equipment must be configured to enable Raw TCP Print Service. Askyour administrator if the Raw TCP Print Service is enabled.To print with a LPR connection, this equipment must be configured to enable LPD Print Service. Ask youradministrator if the LPD Print Service is enabled.
To use printer drivers, the printing function is required.The e-STUDIO455 Series and the e-STUDIO855 Series provide the printing function as an option. However, this optional function isalready installed in some models.

8/9/2019 Software Instalation Guide
http://slidepdf.com/reader/full/software-instalation-guide 37/172
3.INSTALLING PRINTER DRIVERS FOR WINDOWS
Before Installation 35
3 INSTALLING PRINTER DRIVERS FOR WINDOWS
SMB printingThis equipment can be used with an SMB printer connection that allows you to connect to this equipment using File andPrinter Sharing for Microsoft Networks service. SMB printing is the common method used to set up the printer. However,SMB printing is not suitable for printing a large amount of documents.SMB printing can be set up by installing the printer drivers using the Installer, and also by Point and Print.
P.36 “Installing the Printer Drivers” P.61 “Point and Print”
It assumes using SMB printing in a small network. If you can use the Windows 2000, Windows XP, Windows Vista,Windows Server 2003, or Windows Server 2008 as a print server, it is recommended to set up for printing via Windowsprint server.
Internet printingIf you print to this equipment over the Internet, you can use IPP printing under Windows 2000, Windows XP, WindowsVista, and Windows Server 2003. This allows you to print to this equipment from anywhere on the Internet.
P.62 “IPP printing”
To print with an IPP connection, this equipment must be configured to enable the IPP Print Service and must beconnected to the Internet. Ask your administrator if the IPP Print Service is enabled.
Novell printingWhen this equipment is configured to manage printing with NetWare 5.1/6.0/6.5 over TCP/IP or IPX/SPX, you can printthrough the NetWare print server from Windows 2000, Windows XP, and Windows Server 2003. In this case, install theprinter driver and set up the SMB printer connection to a print queue created in the NetWare print server.
P.36 “Installing the Printer Drivers”
To print with a Novell connection, the NetWare server must be configured for printing and this equipment must beconfigured to enable NetWare Print Service. Ask your administrator if the NetWare Print Service is enabled.
Novell iPrintWhen this equipment is configured to manage Novell iPrint with NetWare 6.0/6.5 over TCP/IP, you can print through theNetWare print server from Windows 2000, Windows XP, and Windows Server 2003. In this case, install the printer driverusing iPrint Client from the NetWare server.
P.73 “Novell iPrint”
To print with a Novell iPrint, the NetWare server must be configured for iPrint and this equipment must be configured toenable NetWare Print Service. Ask your administrator if the NetWare Print Service is enabled.
Web Service Print
When this equipment is connected in a TCP/IP network, Web Services Print can be operated at the client computer usingthe function of Windows Vista.
P.74 “Web Service Print”
Web Services Print is the function of Windows Vista.

8/9/2019 Software Instalation Guide
http://slidepdf.com/reader/full/software-instalation-guide 38/172
3 INSTALLING PRINTER DRIVERS FOR WINDOWS
36 Installing the Printer Drivers
Installing the Printer Drivers
This section describes how to install a printer driver to a computer with a Windows OS.The following describes an installation on Windows Vista. The procedure is the same when other versions of Windows areused.
To perform installation, you must log onto Windows with a user account, which enables the installation and
uninstallation of client software, such as “Administrators” or “Power Users”.If Windows Vista/Server 2008 is used, you can perform the installation by temporarily changing the user accountfollowing the procedure below.- Open the “e-STUDIO” folder in a CD-ROM, and then double-click “Setup.exe”.- When the [User Account Control] dialog box is displayed, enter the password of “Administrators”, and then click
[OK].
1 Insert the Client Utilities CD-ROM into the CD-ROM drive.If the installer does not automatically start, use the Explorer to open the “e-STUDIO” folder in the Client Utilities CD-ROM and double-click “Setup.exe”.
2 Select [I agree to the terms of the License Agreement.] and click [Next].
To change the display language, select a desired language from the [Select Language] box.The main menu is displayed.
3 Click [Printer Driver].
A list for software to be installed is displayed.

8/9/2019 Software Instalation Guide
http://slidepdf.com/reader/full/software-instalation-guide 39/172
3.INSTALLING PRINTER DRIVERS FOR WINDOWS
Installing the Printer Drivers 37
3 INSTALLING PRINTER DRIVERS FOR WINDOWS
4 Confirm the list of the software to install and click [Install].
Installation starts.
The XPS printer driver can be installed on Windows Vista/Server 2008 computers, or those of Windows XPSP2, Windows Server 2003 SP1 or later versions with XPS Essentials Pack installed.
5 Configure the printer port.The procedure for configuring the printer port varies depending on the connection. Go to the steps suited to yourconnection.
P.37 “Raw TCP/LPR printing” P.46 “SMB printing” P.51 “Novell printing”
Raw TCP/LPR printingThe procedure for configuring the Raw TCP/LPR port varies depending on the model. See the following pages accordingto the model.
P.37 “e-STUDIO4520C Series / e-STUDIO6530C Series (Raw TCP/LPR printing)” P.44 “e-STUDIO455 Series / e-STUDIO855 Series (Raw TCP/LPR printing)”
Confirm the following before starting the configuration:- This equipment is connected to the network and turned on.- The TCP/IP setting is correct on this equipment and your computer.
e-STUDIO4520C Series / e-STUDIO6530C Series (Raw TCP/LPR printing)The procedure below is for configuring the Raw TCP/LPR port for the e-STUDIO4520C Series / e-STUDIO6530C Series.In this case, you must first install the printer driver by temporarily selecting a local port and then configuring the Raw TCP/LPR port.
If this equipment is not discovered over the network after the installation is started, a dialog box indicating this appears.Click [Continue] to continue the configuration.

8/9/2019 Software Instalation Guide
http://slidepdf.com/reader/full/software-instalation-guide 40/172
3 INSTALLING PRINTER DRIVERS FOR WINDOWS
38 Installing the Printer Drivers
6 Select [Local Port] and then select “LPT1: ”. Then click [OK].
If a dialog box prompting you to confirm the setting of a printer for nomal use appears, click [Yes] or [No].
If the [Windows Security] dialog box appears, click [Install this driver software anyway].

8/9/2019 Software Instalation Guide
http://slidepdf.com/reader/full/software-instalation-guide 41/172
3.INSTALLING PRINTER DRIVERS FOR WINDOWS
Installing the Printer Drivers 39
3 INSTALLING PRINTER DRIVERS FOR WINDOWS
7 Confirm that the installation is completed, and then click [Finish].
The Installer may ask you to restart your computer. If it does, select “Yes, I want to restart my computer now.”and click [Finish] to restart your computer.
8 Click [Exit].When a message appears asking whether to finish the installation, click [Yes].
9 Click as follows: start button → [Control Panel] → [Hardware and Sound] → [Printer].Then open the Printers folder.
If you are using the Windows 2000, click [Start], select [Settings], and click [Printers] to open the [Printers]folder.If you are using the Windows XP/2003 Server, click [Start] and click [Printers and Faxes] to open the [Printersand Faxes] folder.

8/9/2019 Software Instalation Guide
http://slidepdf.com/reader/full/software-instalation-guide 42/172

8/9/2019 Software Instalation Guide
http://slidepdf.com/reader/full/software-instalation-guide 43/172
3.INSTALLING PRINTER DRIVERS FOR WINDOWS
Installing the Printer Drivers 41
3 INSTALLING PRINTER DRIVERS FOR WINDOWS
13 Click [Next].
14 Enter the IP address of this equipment in the [Printer Name or IP Address] box andclick [Next].
If your network uses a DNS or WINS server, enter the printer name of this equipment provided from DNS orWINS in the [Printer Name or IP Address] box.In the [Port Name] box, the port name is automatically entered according to the IP address or DNS nameentered in the [Printer Name or IP Address] box. When installing on Windows 2000/XP/Server 2003, “IP_” isadded in front of the IP address that is displayed in the [Port Name] box.Enter the IPv6 address in the [Printer Name or IP Address] box when the MFP is connected in an IPv6 network.

8/9/2019 Software Instalation Guide
http://slidepdf.com/reader/full/software-instalation-guide 44/172
3 INSTALLING PRINTER DRIVERS FOR WINDOWS
42 Installing the Printer Drivers
When the following dialog box is displayed on Windows 2000/XP/Server 2003, select [Standard] and click[Next].
When the following dialog box is displayed on Windows Vista/Server 2008, select [Standard] and click[Next].
15 Click [Finish].
The screen returns to the [Printer Ports] dialog box.
16 Click [Close] to close the [Printer Ports] dialog box.

8/9/2019 Software Instalation Guide
http://slidepdf.com/reader/full/software-instalation-guide 45/172
3.INSTALLING PRINTER DRIVERS FOR WINDOWS
Installing the Printer Drivers 43
3 INSTALLING PRINTER DRIVERS FOR WINDOWS
17 Make sure the created Raw TCP or LPR port is checked in the [Print to the followingport(s)] list.
When the LPD Print setting is enabled, you can also configure LPR printing. When you want to configure LPRprinting, follow the procedure below.1. Click [Configure Port].
2. Select [LPR] at the [Protocol] group, enter “print” in the [Queue Name] box at the [LPR Settings] group, andthen click [OK].

8/9/2019 Software Instalation Guide
http://slidepdf.com/reader/full/software-instalation-guide 46/172
3 INSTALLING PRINTER DRIVERS FOR WINDOWS
44 Installing the Printer Drivers
18 Click [Close] to save the setting.
Before using the printer driver for printing, configure the installed options of the equipment and departmentcode (if required) on the printer driver. Refer to the Printing Guide for the instructions.
e-STUDIO455 Series / e-STUDIO855 Series (Raw TCP/LPR printing)The procedure below is for configuring the Raw TCP/LPR port for the e-STUDIO455 Series / e-STUDIO855 Series. In thiscase, this equipment is automatically discovered over the network. Then you can install printer driver so as to configurethe Raw TCP/LPR port.
If this equipment is not discovered over the network after the installation is started, a dialog box indicating this appears.Follow the procedure below to continue the configuration.- To search this equipment over the network again, click [Retry].- To select a temporary local port and then configure the Raw TCP/LPR port, click [Continue]. Then follow the same
procedure as that for the e-STUDIO4520C Series / e-STUDIO6530C Series. See the following page:
P.37 “e-STUDIO4520C Series / e-STUDIO6530C Series (Raw TCP/LPR printing)”
6 A list for the discovered printers is displayed. Then select this equipment on the listand then click [OK].

8/9/2019 Software Instalation Guide
http://slidepdf.com/reader/full/software-instalation-guide 47/172
3.INSTALLING PRINTER DRIVERS FOR WINDOWS
Installing the Printer Drivers 45
3 INSTALLING PRINTER DRIVERS FOR WINDOWS
Searching may take a while depending on the Windows OS or network environment.If a dialog box prompting you to confirm the setting of a printer for normal use appears, click [Yes] or [No].
If the [Windows Security] dialog box appears, click [Install this driver software anyway].
7 Confirm that the installation is completed, and then click [Finish].
The Installer may ask you to restart your computer. If it does, select “Yes, I want to restart my computer now.”and click [Finish] to restart your computer.
8 Click [Exit].When a message appears asking whether to finish the installation, click [Yes].
Before using the printer driver for printing, configure the installed options of the equipment and departmentcode (if required) on the printer driver. Refer to the Printing Guide for the instructions.

8/9/2019 Software Instalation Guide
http://slidepdf.com/reader/full/software-instalation-guide 48/172
3 INSTALLING PRINTER DRIVERS FOR WINDOWS
46 Installing the Printer Drivers
SMB printingThe procedure for configuring the SMB port varies depending on a model. See the following pages according to the modelof the equipment:
P.46 “e-STUDIO4520C Series / e-STUDIO6530C Series (SMB printing)” P.48 “e-STUDIO455 Series / e-STUDIO855 Series (SMB printing)”
It assumes using SMB printing in a small network. If you can use the Windows 2000, Windows XP, Windows Vista,Windows Server 2003, or Windows Server 2008 as a print server, it is recommended to set up for printing viaWindows print server.Before starting the configuration, make sure that this equipment is connected to a network and also that i ts poweris turned ON.
e-STUDIO4520C Series / e-STUDIO6530C Series (SMB printing)The procedure below is for configuring the SMB port for the e-STUDIO4520C Series / e-STUDIO6530C Series. In thiscase, this equipment is automatically discovered over the network. Then you can install printer driver so as to configurethe SMB port.
If this equipment is not discovered over the network after the installation is started, a dialog box indicating this appears.Follow the procedure below to continue the configuration.- To search this equipment over the network again, click [Retry].- To specify a printer port manually, click [Continue]. Then follow the same procedure as that for the e-STUDIO455
Series / e-STUDIO855 Series. See the following page: P.48 “e-STUDIO455 Series / e-STUDIO855 Series (SMB printing)”
6 A list for the discovered printers is displayed. Then select this equipment on the listand then click [OK].

8/9/2019 Software Instalation Guide
http://slidepdf.com/reader/full/software-instalation-guide 49/172
3.INSTALLING PRINTER DRIVERS FOR WINDOWS
Installing the Printer Drivers 47
3 INSTALLING PRINTER DRIVERS FOR WINDOWS
Searching may take a while depending on the Windows OS or network environment.If a dialog box prompting you to confirm the setting of a printer for normal use appears, click [Yes] or [No].
If the [Windows Security] dialog box appears, click [Install this driver software anyway].
7 Confirm that the installation is completed, and then click [Finish].
The Installer may ask you to restart your computer. If it does, select “Yes, I want to restart my computer now.”and click [Finish] to restart your computer.
8 Click [Exit].When a message appears asking whether to finish the installation, click [Yes].
Before using the printer driver for printing, configure the installed options of the equipment and departmentcode (if required) on the printer driver. Refer to the Printing Guide for the instructions.

8/9/2019 Software Instalation Guide
http://slidepdf.com/reader/full/software-instalation-guide 50/172
3 INSTALLING PRINTER DRIVERS FOR WINDOWS
48 Installing the Printer Drivers
e-STUDIO455 Series / e-STUDIO855 Series (SMB printing)The procedure below is for configuring the SMB port for the e-STUDIO455 Series / e-STUDIO855 Series. In this case,install a printer driver by your specifying the SMB port manually.
If this equipment is not discovered over the network after the installation is started, a dialog box indicating this appears.Click [Continue] to continue the configuration.
6 Click [Browse].
The [Browse for Printer] dialog box appears.
If you know the IP address or the host name of this equipment, you can specify a printer port with the directentry from the keyboard instead of clicking [Browse]. Enter a network path shown below in [Selected printerport], and then go to step 8.\\<IP address or host name>\print
7 Select “print” for this equipment and then click [OK].
Do not select “pc3” or “ps3”. Otherwise print jobs may fail.

8/9/2019 Software Instalation Guide
http://slidepdf.com/reader/full/software-instalation-guide 51/172
3.INSTALLING PRINTER DRIVERS FOR WINDOWS
Installing the Printer Drivers 49
3 INSTALLING PRINTER DRIVERS FOR WINDOWS
8 Click [OK].
If a dialog box prompting you to confirm the setting of a printer to be used normally appears, click [Yes] or[No].
If the [Windows Security] dialog box appears, click [Install this driver software anyway].

8/9/2019 Software Instalation Guide
http://slidepdf.com/reader/full/software-instalation-guide 52/172
3 INSTALLING PRINTER DRIVERS FOR WINDOWS
50 Installing the Printer Drivers
9 Confirm that the installation is completed, and then click [Finish].
The Installer may ask you to restart your computer. If it does, select “Yes, I want to restart my computer now.”and click [Finish] to restart your computer.
10 Click [Exit].When a message appears asking whether to finish the installation, click [Yes].
Before using the printer driver for printing, configure the installed options of the equipment and departmentcode (if required) on the printer driver. Refer to the Printing Guide for the instructions.

8/9/2019 Software Instalation Guide
http://slidepdf.com/reader/full/software-instalation-guide 53/172
3.INSTALLING PRINTER DRIVERS FOR WINDOWS
Installing the Printer Drivers 51
3 INSTALLING PRINTER DRIVERS FOR WINDOWS
Novell printingConfigure the printer port for Novell printing.
The information for connecting the NetWare print server will be required.
If this equipment is not discovered over the network after the installation is started, a dialog box indicating thisappears. Click [Next] to continue the configuration.
6 Enter the queue name in the [Network path or Queue name] box, and click [OK].For NDS/NDPS modeExample: Root=Org, Context=dept1, queue name=mfp_queue
\\Org\mfp_queue.dept1
For Bindery modeExample: NetWare print server name=Nwsrv, queue name=mfp_queue
\\Nwsrv\mfp_queue
The queue for this equipment should be set up by an administrator. If you do not know the queue for thisequipment, ask your administrator.

8/9/2019 Software Instalation Guide
http://slidepdf.com/reader/full/software-instalation-guide 54/172
3 INSTALLING PRINTER DRIVERS FOR WINDOWS
52 Installing the Printer Drivers
If the following message appears, click [Yes] to set the indicated printer driver to be the default printer driver, orclick [No] to not change the default printer driver.
7 When the installation is complete, click [Finish].
The main menu is displayed.
The Installer may ask you to restart your computer. If it does, select “Yes, I want to restart my computer now.”and click [Finish] to restart your computer.
8 Click [Exit].When a message appears asking whether to finish the installation, click [OK].
Before using the printer driver for printing, configure the installed options of the equipment and departmentcode (if required) on the printer driver. Refer to the Printing Guide for the instructions.

8/9/2019 Software Instalation Guide
http://slidepdf.com/reader/full/software-instalation-guide 55/172
3 INSTALLING PRINTER DRIVERS FOR WINDOWS
Other Installations 53
Other Installations
The following printing environments cannot be configured by installation using the Installer. When you want to configurethe following printing environments, see the following pages for each procedure.
P.53 “USB printing” P.61 “Point and Print” P.62 “IPP printing” P.73 “Novell iPrint” P.74 “Web Service Print”
USB printingThis section describes how to set up the printer drivers when this equipment is connected with USB cable.To set up the printer drivers for USB printing, you must install the printer drivers by Plug and Play functions instead ofinstalling the client software using the installer in the Client Utilities CD-ROM.The procedure to install the printer driver for USB printing by Plug and Play differs depending on the version of Windowsused.
P.53 “Windows Vista/Server 2008” P.56 “Windows XP/Server 2003” P.58 “Windows 2000”
Use a USB2.0 Hi-Speed certified cable: USB cable supporting the USB2.0 Hi-Speed mode (480 Mbps of transferspeed) certified by the USB Implementers Forum.Connect the equipment with a PC directly by the USB cable. When it is connected with a PC via a USB hub, theequipment may not be recognized.
Windows Vista/Server 2008You can install a printer driver for USB printing in Windows Vista/Server 2008 by Plug and Play.
To perform installation, you must log onto Windows with a user account of “Administrators”. However, even if you havelogged on with a user account other than “Administrators”, entering the password of “Administrators” upon display ofthe [User Account Control] dialog box enables you to perform the installation by temporarily changing the useraccount.
1 Power on this equipment and your computer.
2 Connect the USB cable to this equipment and your computer.The [Found New Hardware] dialog box appears.
3 Click [Locate and install driver software (recommended)].
The [User Account Control] dialog box appears.
4 Click [Continue] in the [User Account Control] dialog box.If you have logged on with a user account other than “Administrators”, enter the password of “Administrators”and then click [OK].When the confirmation dialog box for online search is displayed, click [Don’t search online].

8/9/2019 Software Instalation Guide
http://slidepdf.com/reader/full/software-instalation-guide 56/172

8/9/2019 Software Instalation Guide
http://slidepdf.com/reader/full/software-instalation-guide 57/172
3.INSTALLING PRINTER DRIVERS FOR WINDOWS
Other Installations 55
3 INSTALLING PRINTER DRIVERS FOR WINDOWS
All available drivers are listed. If a wrong driver is installed, printing may not be performed properly.- PCL6 printer driver
[Client Utilities CD-ROM]: \Client\Drivers\PCL6\W2K_XP_VISTA\<language>\- PS3 printer driver
[Client Utilities CD-ROM]: \Client\Drivers\PS\W2K_XP_VISTA\<language>\
- XPS printer driver [Client Utilities CD-ROM]: \Client\Drivers\XPS\W2K_XP_VISTA\<language>\
When using Windows Vista/Server 2008 64-bit edition, select the following folder:- PCL6 printer driver
[Client Utilities CD-ROM]: \Client\Drivers\PCL6\XP_VISTA_X64\<language>\- PS3 printer driver
[Client Utilities CD-ROM]: \Client\Drivers\PS\XP_VISTA_X64\<language>\- XPS printer driver
[Client Utilities CD-ROM]: \Client\Drivers\XPS\XP_VISTA_X64\<language>\If the following message appears, click [Install this driver software anyway] to proceed with the installation.
7 Click [Close].
8The installation is completed.
Before using the printer driver for printing, configure the installed options of the equipment and departmentcode (if required) on the printer driver. Refer to the Printing Guide for the instructions.

8/9/2019 Software Instalation Guide
http://slidepdf.com/reader/full/software-instalation-guide 58/172
3 INSTALLING PRINTER DRIVERS FOR WINDOWS
56 Other Installations
Windows XP/Server 2003You can install a printer driver for USB printing in Windows XP/Server 2003 by Plug and Play.
To perform installation, you must log onto Windows with a user account, which enables the installation and
uninstallation of client software, such as “Administrators” or “Power Users”.
1 Power on this equipment and your computer.
2 Connect the USB cable to this equipment and your computer.The [Found New Hardware Wizard] dialog box appears.
3 Select [Install from a list or specific location (Advanced)] and click [Next].
4 Select [Search for the best driver in these locations.] and select only the [Include thislocation in the search] check box. Then click [Browse].
The [Browse For Folder] dialog box appears.
5 Insert the Client Utilities CD-ROM into the CD-ROM drive.When inserting the Client Utilities CD-ROM, the installer may automatically start. Click [Exit] to exit the installer andcontinue the operation.

8/9/2019 Software Instalation Guide
http://slidepdf.com/reader/full/software-instalation-guide 59/172
3.INSTALLING PRINTER DRIVERS FOR WINDOWS
Other Installations 57
3 INSTALLING PRINTER DRIVERS FOR WINDOWS
6 Locate the directory where the printer driver for Windows XP or Server 2003 is locatedand click [OK].
To install the PCL6 printer driver, locate“[Client Utilities CD-ROM]:\Client\Drivers\PCL6\W2K_XP_VISTA\<language>”.To install the PS3 printer driver, locate“[Client Utilities CD-ROM]:\Client\Drivers\PS\W2K_XP_VISTA\<language>”.To install the XPS printer driver, locate“[Client Utilities CD-ROM]:\Client\Drivers\XPS\W2K_XP_VISTA\<language>”.
When using Windows XP 64-bit edition or Windows Server 2003 64-bit edition, select the following folder.- To install the PCL6 printer driver, locate
“[Client Utilities CD-ROM]:\Client\Drivers\PCL6\XP_VISTA_X64\<language>”.- To install the PS3 printer driver, locate
“[Client Utilities CD-ROM]:\Client\Drivers\PS\XP_VISTA_X64\<language>”.- To install the XPS printer driver, locate
“[Client Utilities CD-ROM]:\Client\Drivers\XPS\XP_VISTA_X64\<language>”.
7 Click [Next].
If following message appears, click [Continue Anyway] to proceed with the installation.
It starts copying files.

8/9/2019 Software Instalation Guide
http://slidepdf.com/reader/full/software-instalation-guide 60/172

8/9/2019 Software Instalation Guide
http://slidepdf.com/reader/full/software-instalation-guide 61/172
3.INSTALLING PRINTER DRIVERS FOR WINDOWS
Other Installations 59
3 INSTALLING PRINTER DRIVERS FOR WINDOWS
4 Select [Search for a suitable driver for my device (recommended)] and click [Next].
5 Insert the Client Utilities CD-ROM into the CD-ROM drive.When inserting the Client Utilities CD-ROM, the installer may automatically start. Click [Exit] to exit the installer andcontinue the operation.
6Select only [Specify a location] check box and click [Next].
7 Click [Browse].
8 Locate the directory where the printer driver for Windows 2000 is located, select a inffile, and click [Open].
To install the PCL6 printer driver, locate
“[Client Utilities CD-ROM]:\Client\Drivers\PCL6\W2K_XP_VISTA\<language>”.To install the PS3 printer driver, locate“[Client Utilities CD-ROM]:\Client\Drivers\PS\W2K_XP_VISTA\<language>”.

8/9/2019 Software Instalation Guide
http://slidepdf.com/reader/full/software-instalation-guide 62/172
3 INSTALLING PRINTER DRIVERS FOR WINDOWS
60 Other Installations
9 Click [OK].
10 Click [Next].
It starts copying files.
11 Click [Finish].
12 The installation is completed.
Before using the printer driver for printing, configure the installed options of the equipment and departmentcode (if required) on the printer driver. Refer to the Printing Guide for the instructions.

8/9/2019 Software Instalation Guide
http://slidepdf.com/reader/full/software-instalation-guide 63/172
3.INSTALLING PRINTER DRIVERS FOR WINDOWS
Other Installations 61
3 INSTALLING PRINTER DRIVERS FOR WINDOWS
Point and PrintThis section describes how to set up the printer drivers by Point and Print.The following describes an installation on Windows Vista. The procedure is the same when other versions of Windows areused.
It assumes using SMB printing by Point and Print in a small network. If you can use the Windows 2000, WindowsXP, Windows Vista, Windows Server 2003, or Windows Server 2008 as a print server, it is recommended to set upfor printing via Windows print server.For installing the printer driver by Point and Print, the printer driver files for Point and Print must be uploaded in theTOSHIBA MFP. The printer driver files can be uploaded in the TOSHIBA MFP using the administrative function ofTopAccess. For more information about Point and Print, ask your network administrator.To perform installation, you must log onto Windows with a user account, which enables the installation anduninstallation of client software, such as “Administrators” or “Power Users”. However, if you have logged ontoWindows Vista/Server 2008 with a user account other than “Administrators”, entering the password of“Administrators” upon display of the [User Account Control] dialog box enables you to perform the installation bytemporarily changing the user account.
1 Open this equipment in the network with Windows Explorer, and double-click a queuein which the printer driver should be installed (see below).
pcl6 — Double-click this queue to install the PCL6 printer driver.ps3 — Double-click this queue to install the PS3 printer driver.
The XPS printer driver cannot be installed using Point and Print from this equipment.Configure the SMB settings and the NetBIOS name on TopAccess when using the computer name of theMFP.- When the SMB settings are set using IPv4: Configure the WINS server addresses and DNS settings on
TopAccess.- When the SMB settings are set using IPv6: Enable the LLMNR setting or configure the DNS settings on
TopAccess.For instructions on how to set them on TopAccess, refer to TopAccess Guide .

8/9/2019 Software Instalation Guide
http://slidepdf.com/reader/full/software-instalation-guide 64/172
3 INSTALLING PRINTER DRIVERS FOR WINDOWS
62 Other Installations
When you are installing the printer driver on Windows Vista/Server 2008, the [Printers] dialog box mayappear. In that case, click [Install driver].When the [User Account Control] dialog box is displayed, click [Continue] to continue the installation.However, if you have logged on with a user account other than “Administrators”, enter the password of“Administrators” and then click [OK].
When you are installing the printer driver on Windows XP/Server 2003, the Connect to [Printers] dialog boxappears. In that case, click [Yes].
When you are installing the printer driver on Windows 2000, the [Printers] dialog box appears. In that case,click [Yes].
2 The printer driver is installed and the print queue window appears.
Before using the printer driver for printing, configure the installed options of the equipment and departmentcode (if required) on the printer driver. Refer to the Printing Guide for the instructions.
IPP printingThis section describes how to set up the printer drivers for IPP printing which is available for Internet connection.
To set up the printer drivers for IPP printing, install the printer drivers by Add Printer Wizard.
Before installing the printer driver for IPP printing, check with your system administrator to make sure of the following:- This equipment is connected to the network and turned on.- The TCP/IP setting is correct on this equipment and your computer.
The procedure to install the printer driver for IPP printing differs depending on the version of Windows used. P.63 “Windows Vista/Server 2008” P.68 “Windows 2000/XP/Server 2003”

8/9/2019 Software Instalation Guide
http://slidepdf.com/reader/full/software-instalation-guide 65/172
3.INSTALLING PRINTER DRIVERS FOR WINDOWS
Other Installations 63
3 INSTALLING PRINTER DRIVERS FOR WINDOWS
Windows Vista/Server 2008You can install a printer driver for IPP printing in Windows Vista/Server 2008 using the Add Printer Wizard.
To perform installation, you must log onto Windows with a user account of “Administrators”. However, even if you
have logged on with a user account other than “Administrators”, entering the password of “Administrators” upondisplay of the [User Account Control] dialog box enables you to perform the installation by temporarily changing theuser account.The certificate must be installed on both MFP and Windows Vista to perform IPP SSL printing from Windows Vista.For instructions on how to install the certificate, refer to TopAccess Guide .
1 Click the start button, select [Control Panel] and click [Printer] under [Hardware andSound] to open the [Printers] folder.
2 Click [Add a printer].
The [Add Printer] dialog box appears.

8/9/2019 Software Instalation Guide
http://slidepdf.com/reader/full/software-instalation-guide 66/172
3 INSTALLING PRINTER DRIVERS FOR WINDOWS
64 Other Installations
3 Select [Add a network, wireless or Bluetooth printer].
4 Select [The Printer that I want isn't listed].
5 Select the [Select a shared printer by name] check box, enter “http://[IP address]:631/Print” in the edit box in [Find by printer name or TCP/IP address] screen.
Enter the IP address of this equipment instead of [IP address]. Example: IP address = 192.168.1.2
http://192.168.1.2:631/PrintEnter the IPv6 address in the [Printer Name or IP Address] box when the MFP is connected in an IPv6 network.If your network uses a DNS or WINS server, enter the printer name of this equipment provided from DNS orWINS instead of [IP address]. Example: Print Server Name = Mfp-05212774
http://Mfp-05212774:631/PrintWhen you connect from the Internet, enter the FQDN of this equipment provided from DNS instead of [IPaddress]. Example: URL = mfp_05212774.toshibatec.com
http://mfp_05212774.toshibatec.com:631/Print

8/9/2019 Software Instalation Guide
http://slidepdf.com/reader/full/software-instalation-guide 67/172
3.INSTALLING PRINTER DRIVERS FOR WINDOWS
Other Installations 65
3 INSTALLING PRINTER DRIVERS FOR WINDOWS
“P” for “Print” in the IPP URL must be capitalized. When you are using on Windows Vista/Server 2008, the IPPport can be created by entering “print” (non-capitalized) in the IPP URL, but the print job cannot be sent to theequipment. In that case, delete the IPP port and then create the IPP port correctly again.
If the IPP Port80 Enabled option is enabled on this equipment, you can exclude the port number from theURL. (i.e. “http://192.168.1.2/Print”)If the Enable SSL option for IPP Print is enabled, you must enter “https://[IP address]:[SSL port number]/Print” in the “URL” field. (i.e. “https://192.168.1.2:443/Print”)
6 Click [Next]. A dialog box appears to confirm the connection with the specified MFP. Wait until completion.
When the Authentication setting for IPP Print is enabled, the dialog box to enter a user name and passwordappears. If this dialog box appears, enter the user name and password and click [OK]. For user name andpassword, ask your administrator.
7 Click [Have Disk].
The [Install From Disk] dialog box appears.
8 Click [Browse].
The [Locate File] dialog box appears.

8/9/2019 Software Instalation Guide
http://slidepdf.com/reader/full/software-instalation-guide 68/172
3 INSTALLING PRINTER DRIVERS FOR WINDOWS
66 Other Installations
9 Insert the Client Utilities CD-ROM into the CD-ROM drive.When inserting the Client Utilities CD-ROM, the installer may automatically start. Click [Exit] to exit the installer andcontinue the operation.
10 Locate the directory where the printer driver for your Windows version is located,select the inf file, and click [Open].
To install the PCL6 printer driver for Windows Vista/Server 2008,locate “[Client Utilities CD-ROM]:\Client\Drivers\PCL6\W2K_XP_VISTA\<language>”.To install the PS3 printer driver for Windows Vista/Server 2008,locate “[Client Utilities CD-ROM]:\Client\Drivers\PS\W2K_XP_VISTA\<language>”.
When using Windows Vista/Server 2008 64-bit edition, select the following folder.- To install the PCL6 printer driver, locate
“[Client Utilities CD-ROM]:\Client\Drivers\PCL6\XP_VISTA_X64\<language>”.- To install the PS3 printer driver, locate
“[Client Utilities CD-ROM]:\Client\Drivers\PS\XP_VISTA_X64\<language>”.
11Click [OK].
12 Select the printer driver and click [OK].
The [User Account Control] dialog box is displayed.
13 Click [Continue] in the [User Account Control] dialog box.If you have logged on with a user account other than “Administrators”, enter the password of “Administrators”and then click [OK].When the [Windows Security] dialog box is displayed, click [Install this driver software anyway] to continue theinstallation.

8/9/2019 Software Instalation Guide
http://slidepdf.com/reader/full/software-instalation-guide 69/172

8/9/2019 Software Instalation Guide
http://slidepdf.com/reader/full/software-instalation-guide 70/172
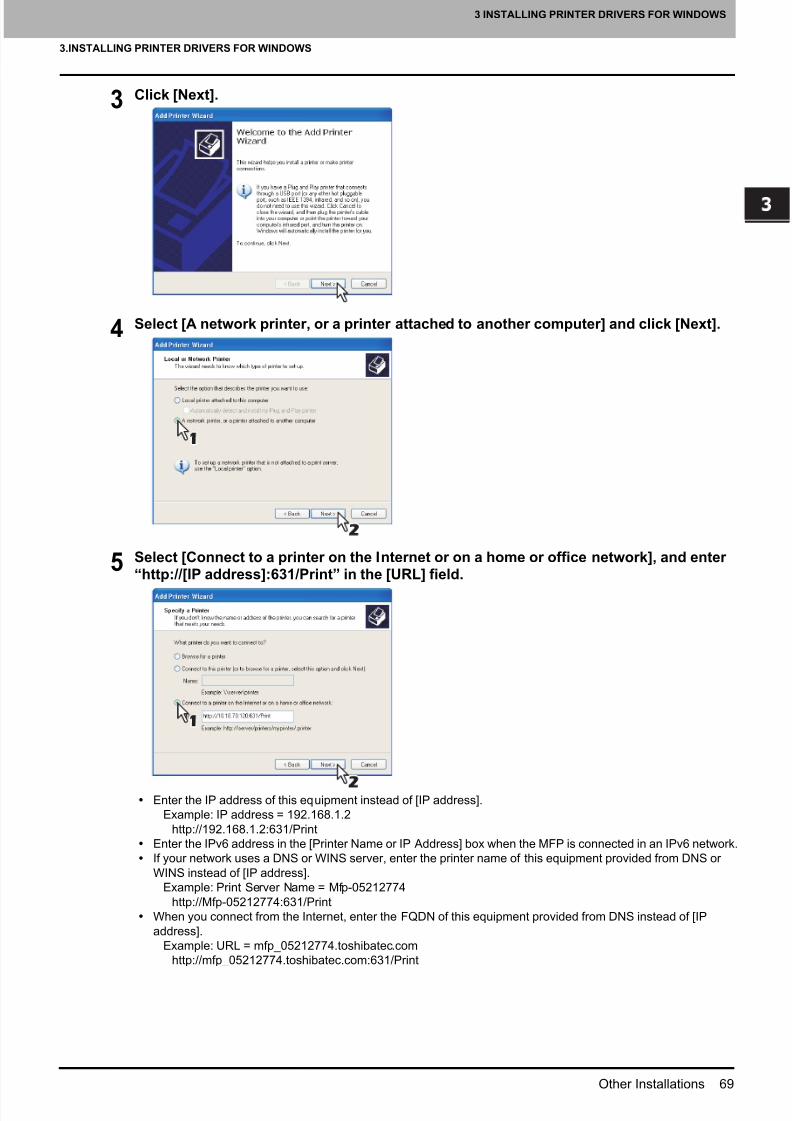
8/9/2019 Software Instalation Guide
http://slidepdf.com/reader/full/software-instalation-guide 71/172
3.INSTALLING PRINTER DRIVERS FOR WINDOWS
Other Installations 69
3 INSTALLING PRINTER DRIVERS FOR WINDOWS
3 Click [Next].
4 Select [A network printer, or a printer attached to another computer] and click [Next].
5 Select [Connect to a printer on the Internet or on a home or office network], and enter“http://[IP address]:631/Print” in the [URL] field.
Enter the IP address of this equipment instead of [IP address]. Example: IP address = 192.168.1.2
http://192.168.1.2:631/PrintEnter the IPv6 address in the [Printer Name or IP Address] box when the MFP is connected in an IPv6 network.If your network uses a DNS or WINS server, enter the printer name of this equipment provided from DNS orWINS instead of [IP address]. Example: Print Server Name = Mfp-05212774
http://Mfp-05212774:631/PrintWhen you connect from the Internet, enter the FQDN of this equipment provided from DNS instead of [IPaddress]. Example: URL = mfp_05212774.toshibatec.com
http://mfp_05212774.toshibatec.com:631/Print

8/9/2019 Software Instalation Guide
http://slidepdf.com/reader/full/software-instalation-guide 72/172

8/9/2019 Software Instalation Guide
http://slidepdf.com/reader/full/software-instalation-guide 73/172
3.INSTALLING PRINTER DRIVERS FOR WINDOWS
Other Installations 71
3 INSTALLING PRINTER DRIVERS FOR WINDOWS
9 Insert the Client Utilities CD-ROM into the CD-ROM drive.When inserting the Client Utilities CD-ROM, the installer may automatically start. Click [Exit] to exit the installer andcontinue the operation.
10 Locate the directory where the printer driver for your Windows version is located,select the inf file, and click [Open].
To install the PCL6 printer driver for Windows 2000/XP/Server 2003locate “[Client Utilities CD-ROM]:\Client\Drivers\PCL6\W2K_XP_VISTA\<language>”.To install the PS3 printer driver for Windows 2000/XP/ Server 2003,locate “[Client Utilities CD-ROM]:\Client\Drivers\PS\W2K_XP_VISTA\<language>”.
When using Windows XP/Server 2003 64-bit edition, select the following folder.- To install the PCL6 printer driver, locate
“[Client Utilities CD-ROM]:\Client\Drivers\PCL6\XP_VISTA_X64\<language>”.- To install the PS3 printer driver, locate
“[Client Utilities CD-ROM]:\Client\Drivers\PS\XP_VISTA_X64\<language>”.
11 Click [OK].
12 Select the printer driver and click [OK].
If any other printer driver(s) had already been installed on your computer, the Default Printer screen isdisplayed. Continue to next step.If no printer driver had been installed on your computer, the complete screen is displayed. Skip to step 14.

8/9/2019 Software Instalation Guide
http://slidepdf.com/reader/full/software-instalation-guide 74/172

8/9/2019 Software Instalation Guide
http://slidepdf.com/reader/full/software-instalation-guide 75/172
3.INSTALLING PRINTER DRIVERS FOR WINDOWS
Other Installations 73
3 INSTALLING PRINTER DRIVERS FOR WINDOWS
Novell iPrintThis section describes how to install the printer drivers for Novell iPrint.To install the printer driver for Novell iPrint on the client computer, download and install the Novell iPrint Client and printerdriver from the NetWare print server.
To set up the Novell iPrint in the client computers, the NetWare print server must be configured for iPrint first.Before installing the printer driver for Novell iPrint, the printer driver for Novell iPrint, make sure the followingenvironments are satisfied in your computer.- Microsoft Internet Explorer 5.0 or later or Netscape 4.76 is installed (Novell iPrint is not supported on Netscape
6)- JavaScript must be enabled on the web browser.
The certificate is required to login during the Novell iPrint installation when the SSL security is enabled on theNetWare print server.
1 Start the your web browser and enter the following URL in the address bar.http://<IP address or DNS for NDPS Manager>/ipp
If you do not know the IP address or DNS for NDPS Manager, ask your network administrator.If the IP address or DNS is secured using SSL, enter the URL address as following:https://<IP address or DNS for NDPS Manager>/ipps
2 If the iPrint Client is not installed on your computer, you are prompted to install it.
3 Click the printer that you want to install from the list of available printers that isdisplayed in the iPrint web page.The selected printer driver is installed on your computer.

8/9/2019 Software Instalation Guide
http://slidepdf.com/reader/full/software-instalation-guide 76/172
3 INSTALLING PRINTER DRIVERS FOR WINDOWS
74 Other Installations
Web Service PrintThis equipment supports the WSD (Web Services on Devices) protocol installed in Windows Vista/Server 2008. Thefollowing descries how to install a printer driver using the WSD protocol.
To perform installation, you must log onto Windows with a user account of “Administrators”. However, even if youhave logged on with a user account other than “Administrators”, entering the password of “Administrators” upondisplay of the [User Account Control] dialog box enables you to perform the installation by temporarily changing theuser account.Web Services Print is the function of Windows Vista/Server 2008.
A driver for Web Services Scanning is automatically installed as well as the client software.
Once the printer driver is installed from the Client Utilities CD-ROM, you will no longer need the CD-ROM for theinstallation of the Web Service Print because the printer driver data will remain.For the uninstallation procedure of the printer driver, see the following:
P.78 “Uninstalling Printer Drivers”
1 Click the start button and click [Network]
The [Network] screen is displayed.Go to Step 5 if the Network discovery is enabled.
2 Click [Network discovery is turned off. Network computers and devices are not visible.
Click to change]. Then select [Turn on network discovery and file sharing].
The [User Account Control] dialog box appears.If User Account Control is disabled, the Network discovery and file sharing screen is displayed. Go to Step 4.
3 Click [Continue] in the [User Account Control] dialog box.If you have logged on with a user account other than “Administrators”, enter the password of “Administrators”and then click [OK].
After the Network discovery is enabled, go to step 5.

8/9/2019 Software Instalation Guide
http://slidepdf.com/reader/full/software-instalation-guide 77/172
3.INSTALLING PRINTER DRIVERS FOR WINDOWS
Other Installations 75
3 INSTALLING PRINTER DRIVERS FOR WINDOWS
4 Click [Yes, turn on network discovery and file sharing for all public networks].
Connected computers and icons of the multifunction devices are displayed in the [Network] screen.
This procedure must be performed only when User Account Control is disabled. Operation cannot be madewith a user account other than “Administrators”.
5 Select the icon of the multifunction device of the equipment and right-click to make the
menu appear, then click [Install].
You can display only the multifunction devices by checking [Multifunction Devices] on the [Category] box.
[PnPX Device Association] is displayed on the task bar.If User Account Control is disabled, [Found New Hardware] is displayed on the task bar.Go to Step 8.
6Click [PnPX Device Association] on the task bar.
The [User Account Control] dialog box appears.
7 Click [Continue] in the [User Account Control] dialog box.If you have logged on with a user account other than “Administrators”, enter the password of “Administrators”and then click [OK].The [Found New Hardware] dialog box appears.
You can check the current installing status by clicking a balloon message at the bottom right of the screen.

8/9/2019 Software Instalation Guide
http://slidepdf.com/reader/full/software-instalation-guide 78/172
3 INSTALLING PRINTER DRIVERS FOR WINDOWS
76 Other Installations
8 Click [Locate and install driver software (recommended)].
The [Found New Hardware - Unknown Device] dialog box appears.
When the [User Account Control] dialog box is displayed, click [Continue] to continue the installation.However, if you have logged on with a user account other than “Administrators”, enter the password of“Administrators” and then click [OK].
When the confirmation dialog box for online search is displayed, click [Don’t search online].
9 Click [Browse my computer for driver software (advanced)].
10 Set the Client Utilities CD-ROM to the CD-ROM drive, click [Browse] to specify theposition of the CD-ROM drive and then click [Next].
When inserting the Client Utilities CD-ROM, the installer may automatically start. Click [Exit] to exit the installer andcontinue the operation.

8/9/2019 Software Instalation Guide
http://slidepdf.com/reader/full/software-instalation-guide 79/172
3.INSTALLING PRINTER DRIVERS FOR WINDOWS
Other Installations 77
3 INSTALLING PRINTER DRIVERS FOR WINDOWS
11 Select the printer driver (each language) to be installed, and then click [Next].
When the [Windows Security] dialog box is displayed, click [Install this driver software anyway] to continue theinstallation.
12 The installation is completed.

8/9/2019 Software Instalation Guide
http://slidepdf.com/reader/full/software-instalation-guide 80/172
3 INSTALLING PRINTER DRIVERS FOR WINDOWS
78 Uninstalling Printer Drivers
Uninstalling Printer Drivers
The following instructions describe how to uninstall the client software.The procedure to uninstall the printer driver differs depending on the version of Windows used.
P.78 “Windows Vista/Server 2008” P.80 “Windows 2000/XP/Server 2003”
Windows Vista/Server 2008You can uninstall a printer driver from Windows Vista/Server 2008.
1 Open the [Printers] folder, right click on the printer to be deleted and select [Delete]from the menu displayed.When the confirmation dialog box for deletion is displayed, click [Yes].
2 Right click in the blank area in the [Printers] window and click [Run as administrator]and then [Server Properties] in the menu displayed.
The [User Account Control] dialog box appears.
3 Click [Continue] in the [User Account Control] dialog box.If you have logged on with a user account other than “Administrators”, enter the password of “Administrators”and then click [OK].The [Print Server Properties] dialog box appears.
4 Display the [Drivers] tab and select the printer drivers to be deleted. Then click[Remove].
The [Remove Driver And Package] dialog box appears.

8/9/2019 Software Instalation Guide
http://slidepdf.com/reader/full/software-instalation-guide 81/172
3.INSTALLING PRINTER DRIVERS FOR WINDOWS
Uninstalling Printer Drivers 79
3 INSTALLING PRINTER DRIVERS FOR WINDOWS
5 Select [Remove driver and driver package] and click [OK].
The [Print Server Properties] dialog box appears.
6 Click [Yes].
The “Driver package information collected.” message is displayed.
7 Click [Delete].
The “Driver package deleted.” message is displayed.
8 Click [OK].
9 Close the [Print Server Properties] dialog box.

8/9/2019 Software Instalation Guide
http://slidepdf.com/reader/full/software-instalation-guide 82/172
3 INSTALLING PRINTER DRIVERS FOR WINDOWS
80 Uninstalling Printer Drivers
Windows 2000/XP/Server 2003You can uninstall a printer driver from Windows 2000/XP/Server 2003.The following describes an uninstallation on Windows XP. The procedure is the same when Windows 2000 or WindowsServer 2003 is used.
1 Open the [Printers] folder or [Printers and Faxes] folder, right click on the printer to be
deleted and select [Delete] from the menu displayed.When the confirmation dialog box for deletion is displayed, click [Yes].
2 Click the [File] menu and select [Server Properties].
The [Print Server Properties] dialog box appears.
3 Select the [Drivers] tab. Select the printer drivers that you want to delete, and click[Remove].
The Print Server Properties dialog box appears.
4Click [Yes].
The printer drivers are completely deleted.

8/9/2019 Software Instalation Guide
http://slidepdf.com/reader/full/software-instalation-guide 83/172
4.INSTALLING PRINTER DRIVERS FORMACINTOSH
This chapter describes the instructions on how to install the client software on Macintosh.
About the Installation......................................... ................................... ................................. 82 About client software for Macintosh......................................................................................................................82Planning for installation ........................................................................................................................................82
Installing the Printer on Mac OS X 10.2.4 to Mac OS X 10.5.x............................................ 83Installing the Macintosh PPD file..........................................................................................................................83Configuring the printer on Mac OS X 10.5.x.........................................................................................................86Configuring the printer on Mac OS X 10.4.x.........................................................................................................95Configuring the printer on Mac OS X 10.2.4 to 10.3.x........................................................................................105
Uninstalling the Macintosh PPD File .................................... ................................... ........... 114

8/9/2019 Software Instalation Guide
http://slidepdf.com/reader/full/software-instalation-guide 84/172
4 INSTALLING PRINTER DRIVERS FOR MACINTOSH
82 About the Installation
About the Installation
Refer to following instructions for configuring printing systems on Macintosh computers. P.82 “About client software for Macintosh” P.82 “Planning for installation” P.83 “Installing the Printer on Mac OS X 10.2.4 to Mac OS X 10.5.x”
About client software for Macintosh
PostScript Printer Description fileThe Macintosh PPD (PostScript Printer Description) file contains information about controller-specific features.Information within the PPD file for Mac OS X works in conjunction with the Print Center (Mac OS X 10.2.4 to 10.2.8) orPrinter Setup Utility (Mac OS X 10.3.x to Mac OS X 10.5.x) on Mac OS X 10.2.4 to Mac OS X 10.5.x.
Planning for installation
System requirementsTo install the printer drivers on a Mac OS computer, the following environment is required.Display resolution: 1028 x 768 dots or moreOS: Mac OS X 10.2.4 to Mac OS X 10.5.xProtocol: TCP/IP, AppleTalk (Ethernet), Bonjour
To use printer drivers, the printing function is required.The e-STUDIO455 Series and the e-STUDIO855 Series provide the printing function as an option. However, this optional function isalready installed in some models.

8/9/2019 Software Instalation Guide
http://slidepdf.com/reader/full/software-instalation-guide 85/172
4 INSTALLING PRINTER DRIVERS FOR MACINTOSH
Installing the Printer on Mac OS X 10.2.4 to Mac OS X 10.5.x 83
Installing the Printer on Mac OS X 10.2.4 to Mac OS X 10.5.x
Install and configure the printer by the following pages: P.83 “Installing the Macintosh PPD file” P.86 “Configuring the printer on Mac OS X 10.5.x” P.95 “Configuring the printer on Mac OS X 10.4.x” P.105 “Configuring the printer on Mac OS X 10.2.4 to 10.3.x” P.112 “Configuring the installable options”
Installing the Macintosh PPD fileThis equipment supports printing from Mac OS X 10.2.4 to Mac OS X 10.5.x.The following describes an installation on Mac OS X 10.5.x. The procedure is the same when Mac OS X 10.2.4 to 10.5.xis used.
1 Insert the Client Utilities CD-ROM into the CD-ROM drive and open the “MacPPD:OSX”folder.
2 Copy the GZIP file (TOSHIBA_e-STxxxxSrs.dmg.gz) to the desktop.* “xxxx” is the model name of the TOSHIBA MFP.
3 Double-click the GZIP file on the desktop.The Disk Image file (TOSHIBA_e-STxxxxSrs.dmg) is extracted on the desktop.If the installer window appears, go to step 5.
4 Double-click the Disk Image file (TOSHIBA_e-SxxxxSrs.dmg).The installer window appears.* “xxxx” is the model name of the TOSHIBA MFP.
5 Double-click the icon in the installer window.
The installer is starts.
When you install the PPD file to Mac OS X 10.2.4 to 10.2.8, the [Authenticate] dialog box appears. In thatcase, enter the name and password and click [OK].When you start up the installer, be sure that Mac OS Printer Setup Utility is not operating. If a PPD file isinstalled while the Mac OS Printer Setup Utility is operating, the printer may not be normally recognized.
6 Click [Continue].
The [Software License Agreement] window is displayed.

8/9/2019 Software Instalation Guide
http://slidepdf.com/reader/full/software-instalation-guide 86/172
4 INSTALLING PRINTER DRIVERS FOR MACINTOSH
84 Installing the Printer on Mac OS X 10.2.4 to Mac OS X 10.5.x
7 Click [Continue].
8 Click [Agree].
The [Standard Install] window is displayed.
9 Click [Install] (or [Upgrade]).
The [Authenticate dialog] box appears.
The Select a Destination dialog box appears by clicking [Change Install Location]. Select the boot disk for MacOS X and click [Continue].

8/9/2019 Software Instalation Guide
http://slidepdf.com/reader/full/software-instalation-guide 87/172
4.INSTALLING PRINTER DRIVERS FOR MACINTOSH
Installing the Printer on Mac OS X 10.2.4 to Mac OS X 10.5.x 85
4 INSTALLING PRINTER DRIVERS FOR MACINTOSH
10 Enter the name and password, and click [OK].
It starts copying the PPD files for each language.
When you install the PPD file to Mac OS X 10.2.4 to 10.2.8, the [Authenticate] dialog box does not appear inthis step.
11 Click [Close] to close the installer window.
12 Delete the GZIP files and Installer files created on the desktop.
13 Continue the procedure for configuring the printer. P.86 “Configuring the printer on Mac OS X 10.5.x” P.95 “Configuring the printer on Mac OS X 10.4.x” P.105 “Configuring the printer on Mac OS X 10.2.4 to 10.3.x”

8/9/2019 Software Instalation Guide
http://slidepdf.com/reader/full/software-instalation-guide 88/172

8/9/2019 Software Instalation Guide
http://slidepdf.com/reader/full/software-instalation-guide 89/172
4.INSTALLING PRINTER DRIVERS FOR MACINTOSH
Installing the Printer on Mac OS X 10.2.4 to Mac OS X 10.5.x 87
4 INSTALLING PRINTER DRIVERS FOR MACINTOSH
3 Click [IP] and specify the items as described below.
Protocol : Line Printer Daemon - LPDAddress : <IP address or DNS name of this equipment>Queue : printName : <Any Name>Location : <Any Name>Print Using : TOSHIBA e-STxxxx Series (or UK)* “xxxx” is the model name of the TOSHIBA MFP.
In the [Name] box, the name that is entered in the [Address] box is automatically displayed.When you enter the IP address or DNS name of this equipment in the [Address] box, the correct PPD file isautomatically selected in the [Print Using] box. If the correct PPD is not automatically selected, select[Select a driver to use] and select the PPD file displayed in the list.
4 Click [Add].The [Installable Options] window appears.
5Set the following options.
Model Selection (Only for the e-STUDIO455 Series and e-STUDIO855 Series)TOSHIBA e-STUDIO855Series — Select this when the e-STUDIO555/655/755/855 is used.TOSHIBA e-STUDIO455Series — Select this when the e-STUDIO205L/255/305/355/455 is used.

8/9/2019 Software Instalation Guide
http://slidepdf.com/reader/full/software-instalation-guide 90/172
4 INSTALLING PRINTER DRIVERS FOR MACINTOSH
88 Installing the Printer on Mac OS X 10.2.4 to Mac OS X 10.5.x
Finisher Not Installed — Select this if a finisher is not installed.Single Position Stapler — Select this when the Hanging Finisher is installed. (Only for the e-STUDIO4520CSeries)Multi-Position Stapler — Select this when the Finisher or Saddle Stitch Finisher is installed. (Only for the e-STUDIO4520C Series / e-STUDIO6530C Series)Multi-Position Stapler and Hole Punch — Select this when the Finisher or Saddle Stitch Finisher and Hole Punch
unit are installed. (Only for the e-STUDIO4520C Series / e-STUDIO6530C Series)Hanging Finisher — Select this when the Hanging Finisher is installed. (Only for the e-STUDIO455 Series)Saddle Stitch Finisher — Select this when the Finisher or Saddle Stitch Finisher is installed. (Only for the e-STUDIO455 Series / e-STUDIO855 Series)Saddle Stitch Finisher and Hole Punch — Select this when the Finisher or Saddle Stitch Finisher and HolePunch unit are installed. (Only for the e-STUDIO455 Series / e-STUDIO855 Series)
Even if you select [Not Installed] for the Finisher option during print settings, the finisher options such asstapling and hole punching can be selected. If you select the finisher options for printing but the finisher is notinstalled, finisher settings will be ignored and printing will be performed correctly.
DrawersNot Installed — Select this when no optional drawer is installed.Drawer 3 — Select this when the drawer 3 is installed.Drawer 3 and 4 — Select this when the drawer 3 and 4 are installed.LCF — Select this when the LCF is installed.
LCF is not available for some countries or regions.
External LCF (Only for the e-STUDIO6530C Series / e-STUDIO855 Series)Not Installed — Select this when no external LCF is installed.Installed — Select this when the external LCF is installed.
6 Click [Continue].The printer is added to the Printer List.
Configuring AppleTalk printing (Mac OS X 10.5.x)
1 Open System Preferences and click [Print & Fax].

8/9/2019 Software Instalation Guide
http://slidepdf.com/reader/full/software-instalation-guide 91/172
4.INSTALLING PRINTER DRIVERS FOR MACINTOSH
Installing the Printer on Mac OS X 10.2.4 to Mac OS X 10.5.x 89
4 INSTALLING PRINTER DRIVERS FOR MACINTOSH
2 Click [+].
3Click [Default] and select the TOSHIBA MFP of the AppleTalk connection displayed inthe list.
In the [Name] box, the device name that you selected in the list is automatically displayed.When you select this equipment from the list, the correct PPD file is automatically selected in the [PrintUsing] box. If the correct PPD is not automatically selected, select [Select a driver to use] and select thePPD file displayed in the list.
4 Click [Add].The [Installable Options] window appears.

8/9/2019 Software Instalation Guide
http://slidepdf.com/reader/full/software-instalation-guide 92/172
4 INSTALLING PRINTER DRIVERS FOR MACINTOSH
90 Installing the Printer on Mac OS X 10.2.4 to Mac OS X 10.5.x
5 Set the following options.
Model Selection (Only for the e-STUDIO455 Series and e-STUDIO855 Series)TOSHIBA e-STUDIO855Series — Select this when the e-STUDIO555/655/755/855 is used.TOSHIBA e-STUDIO455Series — Select this when the e-STUDIO205L/255/305/355/455 is used.
Finisher Not Installed — Select this if a finisher is not installed.Single Position Stapler — Select this when the Hanging Finisher is installed. (Only for the e-STUDIO4520CSeries)Multi-Position Stapler — Select this when the Finisher or Saddle Stitch Finisher is installed. (Only for the e-STUDIO4520C Series / e-STUDIO6530C Series)Multi-Position Stapler and Hole Punch — Select this when the Finisher or Saddle Stitch Finisher and Hole Punchunit are installed. (Only for the e-STUDIO4520C Series / e-STUDIO6530C Series)Hanging Finisher — Select this when the Hanging Finisher is installed. (Only for the e-STUDIO455 Series)Saddle Stitch Finisher — Select this when the Finisher or Saddle Stitch Finisher is installed. (Only for the e-STUDIO455 Series / e-STUDIO855 Series)Saddle Stitch Finisher and Hole Punch — Select this when the Finisher or Saddle Stitch Finisher and HolePunch unit are installed. (Only for the e-STUDIO455 Series / e-STUDIO855 Series)
Even if you select [Not Installed] for the Finisher option during print settings, the finisher options such asstapling and hole punching can be selected. If you select the finisher options for printing but the finisher is notinstalled, finisher settings will be ignored and printing will be performed correctly.
DrawersNot Installed — Select this when no optional drawer is installed.Drawer 3 — Select this when the drawer 3 is installed.Drawer 3 and 4 — Select this when the drawer 3 and 4 are installed.LCF — Select this when the LCF is installed.
LCF is not available for some countries or regions.
External LCF (Only for the e-STUDIO6530C Series / e-STUDIO855 Series)Not Installed — Select this when no external LCF is installed.Installed — Select this when the external LCF is installed.
6 Click [Continue].The printer is added to the Printer List.

8/9/2019 Software Instalation Guide
http://slidepdf.com/reader/full/software-instalation-guide 93/172
4.INSTALLING PRINTER DRIVERS FOR MACINTOSH
Installing the Printer on Mac OS X 10.2.4 to Mac OS X 10.5.x 91
4 INSTALLING PRINTER DRIVERS FOR MACINTOSH
Configuring IPP printing (Mac OS X 10.5.x)When you want to setup IPP print queue in the Mac OS X, follow the procedures below.
1 Open System Preferences and click [Print & Fax].
2 Click [+].
3 Click [IP] and specify the items as described below.
Protocol : Internet Printing Protocol - IPPAddress : <IP address or DNS name of this equipment>Queue : PrintName : <Any Name>Location : <Any Name>Print Using : TOSHIBA e-STxxxx Series (or UK)* “xxxx” is the model name of the TOSHIBA MFP.

8/9/2019 Software Instalation Guide
http://slidepdf.com/reader/full/software-instalation-guide 94/172
4 INSTALLING PRINTER DRIVERS FOR MACINTOSH
92 Installing the Printer on Mac OS X 10.2.4 to Mac OS X 10.5.x
In the [Name] box, the name that is entered in the [Address] box is automatically displayed.When you enter the IP address or DNS name of this equipment in the [Address] box, the correct PPD file isautomatically selected in the [Print Using] box. If the correct PPD is not automatically selected, select[Select a driver to use] and select the PPD file displayed in the list.
4 Click [Add].The Installable Options window appears.
5 Set the following options.
Model Selection (Only for the e-STUDIO455 Series and e-STUDIO855 Series)TOSHIBA e-STUDIO855Series — Select this when the e-STUDIO555/655/755/855 is used.TOSHIBA e-STUDIO455Series — Select this when the e-STUDIO205L/255/305/355/455 is used.
Finisher Not Installed — Select this if a finisher is not installed.Single Position Stapler — Select this when the Hanging Finisher is installed. (Only for the e-STUDIO4520CSeries)
Multi-Position Stapler — Select this when the Finisher or Saddle Stitch Finisher is installed. (Only for the e-STUDIO4520C Series / e-STUDIO6530C Series)Multi-Position Stapler and Hole Punch — Select this when the Finisher or Saddle Stitch Finisher and Hole Punchunit are installed. (Only for the e-STUDIO4520C Series / e-STUDIO6530C Series)Hanging Finisher — Select this when the Hanging Finisher is installed. (Only for the e-STUDIO455 Series)Saddle Stitch Finisher — Select this when the Finisher or Saddle Stitch Finisher is installed. (Only for the e-STUDIO455 Series / e-STUDIO855 Series)Saddle Stitch Finisher and Hole Punch — Select this when the Finisher or Saddle Stitch Finisher and HolePunch unit are installed. (Only for the e-STUDIO455 Series / e-STUDIO855 Series)
Even if you select [Not Installed] for the Finisher option during print settings, the finisher options such asstapling and hole punching can be selected. If you select the finisher options for printing but the finisher is not
installed, finisher settings will be ignored and printing will be performed correctly.
DrawersNot Installed — Select this when no optional drawer is installed.Drawer 3 — Select this when the drawer 3 is installed.Drawer 3 and 4 — Select this when the drawer 3 and 4 are installed.LCF — Select this when the LCF is installed.
LCF is not available for some countries or regions.
External LCF (Only for the e-STUDIO6530C Series / e-STUDIO855 Series)Not Installed — Select this when no external LCF is installed.
Installed — Select this when the external LCF is installed.
6 Click [Continue].The printer is added to the Printer List.

8/9/2019 Software Instalation Guide
http://slidepdf.com/reader/full/software-instalation-guide 95/172
4.INSTALLING PRINTER DRIVERS FOR MACINTOSH
Installing the Printer on Mac OS X 10.2.4 to Mac OS X 10.5.x 93
4 INSTALLING PRINTER DRIVERS FOR MACINTOSH
Configuring Bonjour printing (Mac OS X 10.5.x)
1 Open System Preferences and click [Print & Fax].
2 Click [+].
3 Click [Default] and select the TOSHIBA MFP of the Bonjour connection displayed in thelist.
In the [Name] box, the device name that you selected in the list is automatically displayed.When you select the equipment from the list, the correct PPD file is automatically selected in the [PrintUsing] box. If the correct PPD is not automatically selected, select [Select a driver to use] and select thePPD file displayed in the list.
4 Click [Add].The [Installable Options] window appears.

8/9/2019 Software Instalation Guide
http://slidepdf.com/reader/full/software-instalation-guide 96/172
4 INSTALLING PRINTER DRIVERS FOR MACINTOSH
94 Installing the Printer on Mac OS X 10.2.4 to Mac OS X 10.5.x
5 Set the following options.
Model Selection (Only for the e-STUDIO455 Series and e-STUDIO855 Series)TOSHIBA e-STUDIO855Series — Select this when the e-STUDIO555/655/755/855 is used.TOSHIBA e-STUDIO455Series — Select this when the e-STUDIO205L/255/305/355/455 is used.
Finisher Not Installed — Select this if a finisher is not installed.Single Position Stapler — Select this when the Hanging Finisher is installed. (Only for the e-STUDIO4520CSeries)Multi-Position Stapler — Select this when the Finisher or Saddle Stitch Finisher is installed. (Only for the e-STUDIO4520C Series / e-STUDIO6530C Series)Multi-Position Stapler and Hole Punch — Select this when the Finisher or Saddle Stitch Finisher and Hole Punchunit are installed. (Only for the e-STUDIO4520C Series / e-STUDIO6530C Series)Hanging Finisher — Select this when the Hanging Finisher is installed. (Only for the e-STUDIO455 Series)Saddle Stitch Finisher — Select this when the Finisher or Saddle Stitch Finisher is installed. (Only for the e-STUDIO455 Series / e-STUDIO855 Series)Saddle Stitch Finisher and Hole Punch — Select this when the Finisher or Saddle Stitch Finisher and HolePunch unit are installed. (Only for the e-STUDIO455 Series / e-STUDIO855 Series)
Even if you select [Not Installed] for the Finisher option during print settings, the finisher options such asstapling and hole punching can be selected. If you select the finisher options for printing but the finisher is notinstalled, finisher settings will be ignored and printing will be performed correctly.
DrawersNot Installed — Select this when no optional drawer is installed.Drawer 3 — Select this when the drawer 3 is installed.Drawer 3 and 4 — Select this when the drawer 3 and 4 are installed.LCF — Select this when the LCF is installed.
LCF is not available for some countries or regions.
External LCF (Only for the e-STUDIO6530C Series / e-STUDIO855 Series)Not Installed — Select this when no external LCF is installed.Installed — Select this when the external LCF is installed.
6 Click [Continue].The printer is added to the Printer List.

8/9/2019 Software Instalation Guide
http://slidepdf.com/reader/full/software-instalation-guide 97/172
4.INSTALLING PRINTER DRIVERS FOR MACINTOSH
Installing the Printer on Mac OS X 10.2.4 to Mac OS X 10.5.x 95
4 INSTALLING PRINTER DRIVERS FOR MACINTOSH
Configuring the printer on Mac OS X 10.4.x After you copy the PPD file to the library folder in the System Folder, you can configure the printer.This equipment supports the following Macintosh Printing Services: LPR Printing, AppleTalk Printing, IPP Printing, andBonjour Printing. LPR printing
When this equipment and your computer are connected over TCP/IP network, you can perform LPR printing from
Macintosh computer. AppleTalk printingWhen this equipment and your computer are connected over AppleTalk network, you can perform AppleTalk printingfrom Macintosh computer.
IPP printingWhen this equipment and your computer are connected over TCP/IP network, you can perform IPP printing fromMacintosh computer.
Bonjour printingWhen this equipment and your computer are connected over TCP/IP network, you can perform Bonjour printing fromMacintosh computer.
Configuring LPR printing (Mac OS X 10.4.x)
1 Start the Printer Setup Utility located in the “Applications:Utilities” folder in the BootDisk.
The [Printer List] dialog box appears.
2 Click [Add].

8/9/2019 Software Instalation Guide
http://slidepdf.com/reader/full/software-instalation-guide 98/172

8/9/2019 Software Instalation Guide
http://slidepdf.com/reader/full/software-instalation-guide 99/172
4.INSTALLING PRINTER DRIVERS FOR MACINTOSH
Installing the Printer on Mac OS X 10.2.4 to Mac OS X 10.5.x 97
4 INSTALLING PRINTER DRIVERS FOR MACINTOSH
Finisher Not Installed — Select this if a finisher is not installed.Single Position Stapler — Select this when the Hanging Finisher is installed. (Only for the e-STUDIO4520CSeries)Multi-Position Stapler — Select this when the Finisher or Saddle Stitch Finisher is installed. (Only for the e-STUDIO4520C Series / e-STUDIO6530C Series)Multi-Position Stapler and Hole Punch — Select this when the Finisher or Saddle Stitch Finisher and Hole Punch
unit are installed. (Only for the e-STUDIO4520C Series / e-STUDIO6530C Series)Hanging Finisher — Select this when the Hanging Finisher is installed. (Only for the e-STUDIO455 Series)Saddle Stitch Finisher — Select this when the Finisher or Saddle Stitch Finisher is installed. (Only for the e-STUDIO455 Series / e-STUDIO855 Series)Saddle Stitch Finisher and Hole Punch — Select this when the Finisher or Saddle Stitch Finisher and HolePunch unit are installed. (Only for the e-STUDIO455 Series / e-STUDIO855 Series)
Even if you select [Not Installed] for the Finisher option during print settings, the finisher options such asstapling and hole punching can be selected. If you select the finisher options for printing but the finisher is notinstalled, finisher settings will be ignored and printing will be performed correctly.
DrawersNot Installed — Select this when no optional drawer is installed.Drawer 3 — Select this when the drawer 3 is installed.Drawer 3 and 4 — Select this when the drawer 3 and 4 are installed.LCF — Select this when the LCF is installed.
LCF is not available for some countries or regions.
External LCF (Only for the e-STUDIO6530C Series / e-STUDIO855 Series)Not Installed — Select this when no external LCF is installed.Installed — Select this when the external LCF is installed.
6 Click [Continue].The printer is added to the Printer List.
Configuring AppleTalk printing (Mac OS X 10.4.x)
1 Start the Printer Setup Utility located in the “Applications:Utilities” folder in the BootDisk.
The [Printer List] dialog box appears.

8/9/2019 Software Instalation Guide
http://slidepdf.com/reader/full/software-instalation-guide 100/172
4 INSTALLING PRINTER DRIVERS FOR MACINTOSH
98 Installing the Printer on Mac OS X 10.2.4 to Mac OS X 10.5.x
2 Click [Add].
3 Click [Default Browser] and select the equipment of the AppleTalk connectiondisplayed in the list.
In the [Name] box, the name that is entered in the [Address] box is automatically displayed.
When you select the equipment in the list, the correct PPD file is automatically selected in the [Print Using]box. If the correct PPD is not automatically selected, select [TOSHIBA] in the [Print Using] box and selectthe PPD file displayed in the list.
4 Click [Add].The [Determining Installable Options] window appears.
5 Click [Configure] while the window is displayed.
The [Installable Options] window appears.

8/9/2019 Software Instalation Guide
http://slidepdf.com/reader/full/software-instalation-guide 101/172
4.INSTALLING PRINTER DRIVERS FOR MACINTOSH
Installing the Printer on Mac OS X 10.2.4 to Mac OS X 10.5.x 99
4 INSTALLING PRINTER DRIVERS FOR MACINTOSH
6 Set the following options.
Model Selection (Only for the e-STUDIO455 Series and e-STUDIO855 Series)TOSHIBA e-STUDIO855Series — Select this when the e-STUDIO555/655/755/855 is used.TOSHIBA e-STUDIO455Series — Select this when the e-STUDIO205L/255/305/355/455 is used.
Finisher Not Installed — Select this if a finisher is not installed.Single Position Stapler — Select this when the Hanging Finisher is installed. (Only for the e-STUDIO4520CSeries)Multi-Position Stapler — Select this when the Finisher or Saddle Stitch Finisher is installed. (Only for the e-STUDIO4520C Series / e-STUDIO6530C Series)Multi-Position Stapler and Hole Punch — Select this when the Finisher or Saddle Stitch Finisher and Hole Punchunit are installed. (Only for the e-STUDIO4520C Series / e-STUDIO6530C Series)Hanging Finisher — Select this when the Hanging Finisher is installed. (Only for the e-STUDIO455 Series)Saddle Stitch Finisher — Select this when the Finisher or Saddle Stitch Finisher is installed. (Only for the e-STUDIO455 Series / e-STUDIO855 Series)Saddle Stitch Finisher and Hole Punch — Select this when the Finisher or Saddle Stitch Finisher and HolePunch unit are installed. (Only for the e-STUDIO455 Series / e-STUDIO855 Series)
Even if you select [Not Installed] for the Finisher option during print settings, the finisher options such asstapling and hole punching can be selected. If you select the finisher options for printing but the finisher is notinstalled, finisher settings will be ignored and printing will be performed correctly.
DrawersNot Installed — Select this when no optional drawer is installed.Drawer 3 — Select this when the drawer 3 is installed.Drawer 3 and 4 — Select this when the drawer 3 and 4 are installed.LCF — Select this when the LCF is installed.
LCF is not available for some countries or regions.
External LCF (Only for the e-STUDIO6530C Series / e-STUDIO855 Series)Not Installed — Select this when no external LCF is installed.Installed — Select this when the external LCF is installed.
7 Click [Continue].The printer is added to the Printer List.

8/9/2019 Software Instalation Guide
http://slidepdf.com/reader/full/software-instalation-guide 102/172
4 INSTALLING PRINTER DRIVERS FOR MACINTOSH
100 Installing the Printer on Mac OS X 10.2.4 to Mac OS X 10.5.x
Configuring IPP printing (Mac OS X 10.4.x)When you want to setup IPP print queue in the Mac OS X, follow the procedures below.
1 Start the Printer Setup Utility located in the “Applications:Utilities” folder in the BootDisk.
The [Printer List] dialog box appears.
2 Click [Add].
3Click [IP Printer] and specify the items as described below.
Protocol : Internet Printing Protocol - IPPAddress : <IP address or DNS name of this equipment>Queue : PrintName : <Any Name>Location : <Any Name>Print Using : TOSHIBA e-STxxxx Series (or UK)* “xxxx” is the model name of the TOSHIBA MFP.
In the [Name] box, the name that is entered in the [Address] box is automatically displayed.When you enter the IP address or DNS name of this equipment in the [Address] box, the correct PPD file isautomatically selected in the [Print Using] box. If the correct PPD is not automatically selected, select[TOSHIBA] in the [Print Using] box and select the PPD file displayed in the list.

8/9/2019 Software Instalation Guide
http://slidepdf.com/reader/full/software-instalation-guide 103/172
4.INSTALLING PRINTER DRIVERS FOR MACINTOSH
Installing the Printer on Mac OS X 10.2.4 to Mac OS X 10.5.x 101
4 INSTALLING PRINTER DRIVERS FOR MACINTOSH
If you delete a self-signed certificate registered to this equipment while SSL for HTTP network service isenabled, access to the TopAccess is refused. In this case, temporarily disable SSL for HTTP networkservice on the control panel and then access the TopAccess. Then enable SSL again.For HTTP network service, refer to the TopAccess Guide . For instructions on how to set it on the control
panel, refer to the MFP Management Guide .
When IPP/SSL is enabled, click [More Printers] while pressing the [option] key. In the displayed dialog box,select “Advanced” in the drop down menu and specify as follows:
- Device : Internet Printing Protocol using HTTP- Device Name : <Any Name>- Device URI : http://<IP address>:443/Print- Printer Model : TOSHIBA- PPD : TOSHIBA e-STxxxx Series (or UK)
* “xxxx” is the model name of the TOSHIBA MFP.
4 Click [Add].The [Installable Options] window appears.
5 Set the following options.
Model Selection (Only for the e-STUDIO455 Series and e-STUDIO855 Series)TOSHIBA e-STUDIO855Series — Select this when the e-STUDIO555/655/755/855 is used.TOSHIBA e-STUDIO455Series — Select this when the e-STUDIO205L/255/305/355/455 is used.
Finisher Not Installed — Select this if a finisher is not installed.Single Position Stapler — Select this when the Hanging Finisher is installed. (Only for the e-STUDIO4520CSeries)Multi-Position Stapler — Select this when the Finisher or Saddle Stitch Finisher is installed. (Only for the e-STUDIO4520C Series / e-STUDIO6530C Series)Multi-Position Stapler and Hole Punch — Select this when the Finisher or Saddle Stitch Finisher and Hole Punchunit are installed. (Only for the e-STUDIO4520C Series / e-STUDIO6530C Series)Hanging Finisher — Select this when the Hanging Finisher is installed. (Only for the e-STUDIO455 Series)Saddle Stitch Finisher — Select this when the Finisher or Saddle Stitch Finisher is installed. (Only for the e-STUDIO455 Series / e-STUDIO855 Series)Saddle Stitch Finisher and Hole Punch — Select this when the Finisher or Saddle Stitch Finisher and HolePunch unit are installed. (Only for the e-STUDIO455 Series / e-STUDIO855 Series)

8/9/2019 Software Instalation Guide
http://slidepdf.com/reader/full/software-instalation-guide 104/172

8/9/2019 Software Instalation Guide
http://slidepdf.com/reader/full/software-instalation-guide 105/172
4.INSTALLING PRINTER DRIVERS FOR MACINTOSH
Installing the Printer on Mac OS X 10.2.4 to Mac OS X 10.5.x 103
4 INSTALLING PRINTER DRIVERS FOR MACINTOSH
3 Click [Default Browser] and select the equipment of the Bonjour connection displayedin the list.
In the [Name] box, the device name that you selected in the list is automatically displayed.When you select the equipment in the list, the correct PPD file is automatically selected in the [Print Using]box. If the correct PPD is not automatically selected, select [TOSHIBA] in the “Print Using” drop down menuand select the PPD file displayed in the list.
4 Click [Add].The [Installable Options] window appears.
5 Set the following options.
Model Selection (Only for the e-STUDIO455 Series and e-STUDIO855 Series)
TOSHIBA e-STUDIO855Series — Select this when the e-STUDIO555/655/755/855 is used.TOSHIBA e-STUDIO455Series — Select this when the e-STUDIO205L/255/305/355/455 is used. Finisher
Not Installed — Select this if a finisher is not installed.Single Position Stapler — Select this when the Hanging Finisher is installed. (Only for the e-STUDIO4520CSeries)Multi-Position Stapler — Select this when the Finisher or Saddle Stitch Finisher is installed. (Only for the e-STUDIO4520C Series / e-STUDIO6530C Series)Multi-Position Stapler and Hole Punch — Select this when the Finisher or Saddle Stitch Finisher and Hole Punchunit are installed. (Only for the e-STUDIO4520C Series / e-STUDIO6530C Series)Hanging Finisher — Select this when the Hanging Finisher is installed. (Only for the e-STUDIO455 Series)Saddle Stitch Finisher — Select this when the Finisher or Saddle Stitch Finisher is installed. (Only for the e-STUDIO455 Series / e-STUDIO855 Series)Saddle Stitch Finisher and Hole Punch — Select this when the Finisher or Saddle Stitch Finisher and HolePunch unit are installed. (Only for the e-STUDIO455 Series / e-STUDIO855 Series)

8/9/2019 Software Instalation Guide
http://slidepdf.com/reader/full/software-instalation-guide 106/172
4 INSTALLING PRINTER DRIVERS FOR MACINTOSH
104 Installing the Printer on Mac OS X 10.2.4 to Mac OS X 10.5.x
Even if you select [Not Installed] for the Finisher option during print settings, the finisher options such asstapling and hole punching can be selected. If you select the finisher options for printing but the finisher is notinstalled, finisher settings will be ignored and printing will be performed correctly.
Drawers
Not Installed — Select this when no optional drawer is installed.Drawer 3 — Select this when the drawer 3 is installed.Drawer 3 and 4 — Select this when the drawer 3 and 4 are installed.LCF — Select this when the LCF is installed.
LCF is not available for some countries or regions.
External LCF (Only for the e-STUDIO6530C Series / e-STUDIO855 Series)Not Installed — Select this when no external LCF is installed.Installed — Select this when the external LCF is installed.
6 Click [Continue].
The printer is added to the Printer List.

8/9/2019 Software Instalation Guide
http://slidepdf.com/reader/full/software-instalation-guide 107/172
4.INSTALLING PRINTER DRIVERS FOR MACINTOSH
Installing the Printer on Mac OS X 10.2.4 to Mac OS X 10.5.x 105
4 INSTALLING PRINTER DRIVERS FOR MACINTOSH
Configuring the printer on Mac OS X 10.2.4 to 10.3.x After you copy the PPD file to the library folder in the System Folder, you can configure the printer.This equipment supports the following Macintosh Printing Services: LPR Printing, AppleTalk Printing, IPP Printing, andBonjour Printing. LPR printing
When this equipment and your computer are connected over TCP/IP network, you can perform LPR printing from
Macintosh computer. AppleTalk printingWhen this equipment and your computer are connected over AppleTalk network, you can perform AppleTalk printingfrom Macintosh computer.
IPP printingWhen this equipment and your computer are connected over TCP/IP network, you can perform IPP printing fromMacintosh computer.
Bonjour printingWhen this equipment and your computer are connected over TCP/IP network, you can perform Bonjour printing fromMacintosh computer.
Configuring LPR printing (Mac OS X 10.2.4 to 10.3.x)
The following describes an operation on Mac OS X 10.3.x. The procedure is the same when Mac OS X 10.2.4 to 10.2.8 isused.
1 Start the Print Center (for Mac OS X 10.2.4 to 10.2.8) or Printer Setup Utility (for Mac OSX 10.3.x) located in the “Applications:Utilities” folder in the Boot Disk.Mac OS X 10.2.4 to 10.2.8
Mac OS X 10.3.x
The [Printer List] dialog box appears.
2 Click [Add].

8/9/2019 Software Instalation Guide
http://slidepdf.com/reader/full/software-instalation-guide 108/172
4 INSTALLING PRINTER DRIVERS FOR MACINTOSH
106 Installing the Printer on Mac OS X 10.2.4 to Mac OS X 10.5.x
3 Select [IP Printing] in the drop down list box and specify the items as described below.
Printer Type : LPD/LPRPrinter’s Address : <IP address or DNS name of this equipment>Queue Name : printPrinter Model : TOSHIBAPPD : TOSHIBA e-STxxxx Series (or UK)* “xxxx” is the model name of the TOSHIBA MFP.
For Mac OS X 10.2.4 to 10.2.8, the [Printer Type] drop down list box is not displayed.For Mac OS X 10.2.4 to 10.2.8, please uncheck the [Use default queue on server] box.
4 Click [Add].The printer is added to the Printer List.
5 Continue the procedure to configure the installable options. P.112 “Configuring the installable options”

8/9/2019 Software Instalation Guide
http://slidepdf.com/reader/full/software-instalation-guide 109/172
4.INSTALLING PRINTER DRIVERS FOR MACINTOSH
Installing the Printer on Mac OS X 10.2.4 to Mac OS X 10.5.x 107
4 INSTALLING PRINTER DRIVERS FOR MACINTOSH
Configuringh AppleTalk printing (Mac OS X 10.2.4 to 10.3.x)The following describes an operation on Mac OS X 10.3.x. The procedure is the same when Mac OS X 10.2.4 to 10.2.8 isused.
1 Start the Print Center (for Mac OS X 10.2.4 to 10.2.8) or Printer Setup Utility (for Mac OSX 10.3.x) located in the “Applications:Utilities” folder in the Boot Disk.
Mac OS X 10.2.4 to 10.2.8
Mac OS X 10.3.x
The [Printer List] dialog box appears.
2 Click [Add].
3 Select [AppleTalk] in the drop down list box and select the zone name that thisequipment is located. Then select the equipment displayed in the list.
If the AppleTalk network is not configured with a zone, select [Local AppleTalk zone].

8/9/2019 Software Instalation Guide
http://slidepdf.com/reader/full/software-instalation-guide 110/172
4 INSTALLING PRINTER DRIVERS FOR MACINTOSH
108 Installing the Printer on Mac OS X 10.2.4 to Mac OS X 10.5.x
4 Select [TOSHIBA] at the [Printer Model] box, and select the PPD file.
5 Click [Add].The printer is added to the Printer List.
6 Continue the procedure to configure the installable options. P.112 “Configuring the installable options”

8/9/2019 Software Instalation Guide
http://slidepdf.com/reader/full/software-instalation-guide 111/172
4.INSTALLING PRINTER DRIVERS FOR MACINTOSH
Installing the Printer on Mac OS X 10.2.4 to Mac OS X 10.5.x 109
4 INSTALLING PRINTER DRIVERS FOR MACINTOSH
Configuring IPP printing (Mac OS X 10.2.4 to 10.3.x)When you want to setup IPP print queue in the Mac OS X, follow the procedures below.The following describes an operation on Mac OS X 10.3.x. The procedure is the same when Mac OS X 10.2.4 to 10.2.8 isused.
1 Start the Print Center (for Mac OS X 10.2.4 to 10.2.8) or Printer Setup Utility (for Mac OS
X 10.3.x) located in the “Applications:Utilities” folder in the Boot Disk.Mac OS X 10.2.4 to 10.2.8
Mac OS X 10.3.x
The [Printer List] dialog box appears.
2 Press and hold the [option] key in the keyboard and click [Add] in the Printer ListWindow.
The print list is displayed with all the print options.

8/9/2019 Software Instalation Guide
http://slidepdf.com/reader/full/software-instalation-guide 112/172
4 INSTALLING PRINTER DRIVERS FOR MACINTOSH
110 Installing the Printer on Mac OS X 10.2.4 to Mac OS X 10.5.x
3 Select [Advanced] in the drop down list box and specify the items as described below.
Device : Mac OS X 10.2.x: Internet Printing Protocol (http)Mac OS X 10.3.x: Internet Printing Protocol using HTTP
Device Name : <Any Name>Device URI : http://<IP address>:631/PrintPrinter Model : TOSHIBA
PPD : TOSHIBA e-STxxxx Series (or UK)* “xxxx” is the model name of the TOSHIBA MFP.
If you delete a self-signed certificate registered to this equipment while SSL for HTTP network service isenabled, access to the TopAccess is refused. In this case, temporarily disable SSL for HTTP networkservice on the control panel and then access the TopAccess. Then enable SSL again.For HTTP network service, refer to the TopAccess Guide . For instructions on how to set it on the control
panel, refer to the MFP Management Guide .When IPP/SSL is enabled, specify as follows:- Device : Internet Printing Protocol (http)- Device URI : http://<IP address>:443/Print
4 Click [Add].The printer is added to the Printer List.
5 Continue the procedure to configure the installable options. P.112 “Configuring the installable options”

8/9/2019 Software Instalation Guide
http://slidepdf.com/reader/full/software-instalation-guide 113/172
4.INSTALLING PRINTER DRIVERS FOR MACINTOSH
Installing the Printer on Mac OS X 10.2.4 to Mac OS X 10.5.x 111
4 INSTALLING PRINTER DRIVERS FOR MACINTOSH
Configuring Bonjour printing (Mac OS X 10.2.4 to 10.3.x)The following describes an operation on Mac OS X 10.3.x. The procedure is the same when Mac OS X 10.2.4 to 10.2.8 isused.
1 Start the Print Center (for Mac OS X 10.2.4 to 10.2.8) or Printer Setup Utility (for Mac OSX 10.3.x) located in the “Applications:Utilities” folder in the Boot Disk.
Mac OS X 10.2.4 to 10.2.8
Mac OS X 10.3.x
The [Printer List] dialog box appears.
2 Click [Add].
This is mandatory to show all the advanced print options in the drop down list box in the [Printer List] window.

8/9/2019 Software Instalation Guide
http://slidepdf.com/reader/full/software-instalation-guide 114/172
4 INSTALLING PRINTER DRIVERS FOR MACINTOSH
112 Installing the Printer on Mac OS X 10.2.4 to Mac OS X 10.5.x
3 Select [Rendezvous] in the drop down list box and select the equipment displayed inthe list.
When you select the equipment in the name list, the correct PPD file is automatically selected. If the correctPPD is not automatically selected, select [TOSHIBA] in the “Printer Model” drop down menu and select thePPD file displayed in the list.
In Mac OS X 10.2.4 to 10.3.x, the [Bonjour] is named as [Rendezvous].
4 Click [Add].The printer is added to the Printer List.
5 Continue the procedure to configure the installable options. P.112 “Configuring the installable options”
Configuring the installable optionsThe following describes an operation on Mac OS X 10.3.x. The procedure is the same when Mac OS X 10.2.4 to 10.2.8 isused.
1 In the [Printer List] dialog box, select the printer and then select [Show Info] in the[Printers] menu.
The [Printer Info] dialog box appears.
2 Select [Installable Options] in the drop down list box.
The [Installable Options] window is displayed.

8/9/2019 Software Instalation Guide
http://slidepdf.com/reader/full/software-instalation-guide 115/172
4.INSTALLING PRINTER DRIVERS FOR MACINTOSH
Installing the Printer on Mac OS X 10.2.4 to Mac OS X 10.5.x 113
4 INSTALLING PRINTER DRIVERS FOR MACINTOSH
3 Set the following options.
Model Selection (Only for the e-STUDIO455 Series and e-STUDIO855 Series)TOSHIBA e-STUDIO855Series — Select this when the e-STUDIO555/655/755/855 is used.TOSHIBA e-STUDIO455Series — Select this when the e-STUDIO205L/255/305/355/455 is used.
Finisher
Not Installed — Select this if a finisher is not installed.Single Position Stapler — Select this when the Hanging Finisher is installed. (Only for the e-STUDIO4520CSeries)Multi-Position Stapler — Select this when the Finisher or Saddle Stitch Finisher is installed. (Only for the e-STUDIO4520C Series / e-STUDIO6530C Series)Multi-Position Stapler and Hole Punch — Select this when the Finisher or Saddle Stitch Finisher and Hole Punchunit are installed. (Only for the e-STUDIO4520C Series / e-STUDIO6530C Series)Hanging Finisher — Select this when the Hanging Finisher is installed. (Only for the e-STUDIO455 Series)Saddle Stitch Finisher — Select this when the Finisher or Saddle Stitch Finisher is installed. (Only for the e-STUDIO455 Series / e-STUDIO855 Series)Saddle Stitch Finisher and Hole Punch — Select this when the Finisher or Saddle Stitch Finisher and HolePunch unit are installed. (Only for the e-STUDIO455 Series / e-STUDIO855 Series)
Even if you select [Not Installed] for the Finisher option during print settings, the finisher options such asstapling and hole punching can be selected. If you select the finisher options for printing but the finisher is notinstalled, finisher settings will be ignored and printing will be performed correctly.
DrawersNot Installed — Select this when no optional drawer is installed.Drawer 3 — Select this when the drawer 3 is installed.Drawer 3 and 4 — Select this when the drawer 3 and 4 are installed.LCF — Select this when the LCF is installed.
LCF is not available for some countries or regions.
External LCF (Only for the e-STUDIO6530C Series / e-STUDIO855 Series)Not Installed — Select this when no external LCF is installed.Installed — Select this when the external LCF is installed.
4 Click [Apply Changes] and close the window.

8/9/2019 Software Instalation Guide
http://slidepdf.com/reader/full/software-instalation-guide 116/172
4 INSTALLING PRINTER DRIVERS FOR MACINTOSH
114 Uninstalling the Macintosh PPD File
Uninstalling the Macintosh PPD File
In order to uninstall the Macintosh PPD file, delete the PPD file in the following folder.
Library/Printers/PPDs/Contents/Resources/<language>.lproj/TOSHIBA_e-STxxxxCSrs.gzLibrary/Printers/Toshiba/filter Library/Printers/Toshiba/IconsLibrary/Printers/Toshiba/PDEsLibrary/Receipts

8/9/2019 Software Instalation Guide
http://slidepdf.com/reader/full/software-instalation-guide 117/172
5.INSTALLING PRINTER DRIVERS FORUNIX/Linux
This chapter describes the instructions on how to install the client software on UNIX/Linux.
Setting Up the UNIX/Linux Filters ................................. ................................... ................... 116 About UNIX/Linux filters .....................................................................................................................................116System requirements.......................................................................................................................................... 117Configuring UNIX/Linux printing using UNIX/Linux filters...................................................................................117
Setting Up the CUPS............................................................................................................125 About CUPS .......................................................................................................................................................125Configuring UNIX/Linux printing using CUPS ....................................................................................................126

8/9/2019 Software Instalation Guide
http://slidepdf.com/reader/full/software-instalation-guide 118/172
5 INSTALLING PRINTER DRIVERS FOR UNIX/Linux
116 Setting Up the UNIX/Linux Filters
Setting Up the UNIX/Linux Filters
About UNIX/Linux filtersIn the Client Utilities CD-ROM, the following filters for UNIX/Linux workstations are included:
net_estcolor (For the e-STUDIO4520C Series / e-STUDIO6530C Series)net_estbw (For the e-STUDIO455 Series / e-STUDIO855 Series)This file is a shell script that will be installed in “/usr/lib/lp/model”. It contains all the parsing for the printer specificcommands and it generates all the output code. Being a shell script, a system administrator can modify it if a site requiresany custom options or if other components are installed in non-standard locations.
IpdsendThis is an executable program that is called by net_estcolor to send the print file to the system using the LPD protocol.This program will be installed in “/opt/toshiba/tap/bin”.
lpLinux.sh (For the Linux filter)This file is a shell script that simulates the command line functions of lp. After processing the command line options, the e-STUDIO filter is invoked in the same way as a System V print filter. This file is installed in “/opt/toshiba/tap/bin”. A symboliclink to this file will be installed in the “/usr/local/bin” directory as lptap.
estcolorBackend (For the e-STUDIO4520C Series / e-STUDIO6530C Series and its AIX filter)estbwBackend (For the e-STUDIO455 Series / e-STUDIO855 Series and its AIX filter)This is an executable program that is called by the AIX qdaemon. It receives the arguments from the qdaemon,interrogates it for copy information etc. then calls the queues' copy of net_estcolor to run the print. This program will beinstalled in “/opt/toshiba/tap/bin”.
estcoloradd (For the e-STUDIO4520C Series / e-STUDIO6530C Series)estbwadd (For the e-STUDIO455 Series / e-STUDIO855 Series)This file is a shell script that is used to create a printer description. This file will be installed in “/opt/toshiba/tap/bin”. A
symbolic link will be installed in the “/bin” directory that will point to the actual location of this file.
estcolorrm (For the e-STUDIO4520C Series / e-STUDIO6530C Series)estbwrm (For the e-STUDIO455 Series / e-STUDIO855 Series)This file is a shell script that is used to remove a printer description. This file will be installed in “/opt/toshiba/tap/bin”. Asymbolic link will be installed in the “/bin” directory that will point to the actual location of this file.
net_estcolor.1 (For the e-STUDIO4520C Series / e-STUDIO6530C Series)net_estbw.1 (For the e-STUDIO455 Series / e-STUDIO855 Series)This is an input file for the man command that supplies online documentation for the printer specific options. This file willbe installed in “/opt/toshiba/tap/man/man1”. A symbolic link will be installed in the /usr/man/man1 directory that will point tothe actual location of this file.
To use printer drivers, the printing function is required.The e-STUDIO455 Series and the e-STUDIO855 Series provide the printing function as an option. However, this optional function isalready installed in some models.

8/9/2019 Software Instalation Guide
http://slidepdf.com/reader/full/software-instalation-guide 119/172
5.INSTALLING PRINTER DRIVERS FOR UNIX/Linux
Setting Up the UNIX/Linux Filters 117
5 INSTALLING PRINTER DRIVERS FOR UNIX/Linux
System requirementsFor UNIX/Linux workstation, the following environment is required.OS: Sun Solaris v2.6/2.7/7.8/8/9
HP-UX ver.10.20/11.xIBM AIX 4.3.3SCO UnixWare 7
SCO Open UNIX 8Red Hat Linux 7.x/8.0/9.xRed Hat Linux Enterprise WS2SuSE Linux ver.7.x/8.x/9.xMandrake Linux ver.7.x./8.x/9.xTurbolinux 8/10
Protocol: TCP/IPModule: Python must be installed.
The “Python” module must be installed on your UNIX/Linux workstation to enable printing. The “Python” module isusually installed in the “/usr/bin/” directory. Check this directory whether the “Python” module is installed.The lpd service must be running on Linux system.Printing using local port is provided via Samba. Printing via Samba is performed through either IPv4 or IPv6. Toperform printing by using a local port that specifies IPv6, IPv6 should be selected on Samba.
Configuring UNIX/Linux printing using UNIX/Linux filtersWhen you want to configure the UNIX/Linux printing using the UNIX/Linux filters, install the UNIX/Linux filters andconfigure the LPR queue.
Installing the UNIX/Linux filtersUNIX/Linux Filters are provided as tar files for each Operating System. You can install them by copying the tar file into theroot directory and extract the file.
1 Insert the Client Utilities CD-ROM into the CD-ROM drive.
2 Log on to the root account.
3 Enter the following command and check the output: For Solaris:
unameOutput on screen should be:
SunOS For HP-UX:
unameOutput on screen should be:
HP-UX
For IBM AIX:uname
Output on screen should be:AIX
For Linux:uname
Output on screen should be:Linux
For Open UNIX:uname
Output on screen should be:OpenUNIX
If the output is not as above, ask your administrator.

8/9/2019 Software Instalation Guide
http://slidepdf.com/reader/full/software-instalation-guide 120/172
5 INSTALLING PRINTER DRIVERS FOR UNIX/Linux
118 Setting Up the UNIX/Linux Filters
4 Copy the tar file onto the root. A tar file for each operating system is included in following folders:For Solaris: [Client Utilities CD-ROM]/Admin/SolarisFilter/Usa/For HP-UX: [Client Utilities CD-ROM]/Admin/HP-UXFilter/Usa/For AIX: [Client Utilities CD-ROM]/Admin/AIXFilter/Usa/For Linux: [Client Utilities CD-ROM]/Admin/LinuxFilter/Usa/For Open UNIX: [Client Utilities CD-ROM]/Admin/OpenUnixFilter/Usa/
5 Change to the root (/) directory.
6 Enter the following command: For Solaris:
tar xvf solaris.tar For HP-UX:
tar xvf hpux.tartar xvf hpux64.tar (for 64-bit edition)
For IBM AIX:tar xvf aix.tar
For Linux:tar xvf linux.tar
For Open UNIX:tar xvf openunix.tar
7 The command extracts all the required files and installs them in the correct locations.Continue the procedure for configuring the print queue.
P.118 “Configuring the print queue”
Configuring the print queue After you copy UNIX/Linux Filters, you can configure the print queue.There are two ways to configure the print queue: one is creating a print queue using estcoloradd/estbwadd, and the otheris creating a print queue manually without using estcoloradd/estbwadd.
P.118 “Creating a print queue using estcoloradd/estbwadd” P.119 “Creating a Print Queue Manually”
Creating a print queue using estcoloradd/estbwaddYou can create a print queue using estcoloradd/estbwadd.
1 Log on to the root account.
2 Enter the following command:e-STUDIO4520C Series / e-STUDIO6530C Series:
estcoloradd <queue name> <host name or IP address>e-STUDIO455 Series / e-STUDIO855 Series:
estbwadd <queue name> <host name or IP address>
This command creates a print queue using the system’s lpadmin command. It also creates a configurationfile that has the destination IP address or host name. Use the configuration file to change print queueparameters.The lpadmin command saves a printer interface file as the print queue name, and the configuration file isstored in a file named <queue name>.conf. The interface file and configuration file is saved in followingdirectory.- Solaris: /etc/lp/interfaces- HP-UX: /etc/lp/interface- IBM AIX: /opt/toshiba/tap/filter - Linux: /opt/toshiba/tap/interface- Open UNIX: /usr/spool/lp/admins/lp/interfaces
Under Linux, the printtool (or equivalent) utility must be used to add the printer into the lp printing systemafter executing the estcoloradd/estbwadd command. For printtool utility, refer to the manual of the OS.

8/9/2019 Software Instalation Guide
http://slidepdf.com/reader/full/software-instalation-guide 121/172
5.INSTALLING PRINTER DRIVERS FOR UNIX/Linux
Setting Up the UNIX/Linux Filters 119
5 INSTALLING PRINTER DRIVERS FOR UNIX/Linux
Creating a Print Queue ManuallyYou can also configure the print queue by adding a remote printer manually.The procedure varies depending on the operating systems.
P.119 “Creating a print queue manually on Solaris” P.119 “Creating a print queue manually on HP-UX” P.120 “Creating a print queue manually on IBM AIX”
P.121 “Creating a print queue manually on Linux” P.122 “Creating a print queue manually on Open UNIX”
Use Bourne Shell(sh) to create a print queue manually.
Creating a print queue manually on Solaris
1 Log on to the root account.
2 Open your UNIX/Linux editor.
3Create the following file.
/etc/lp/interfaces/<queue name>.conf
4 Add a line as below in the <queue name>.conf.dest=<IP address>
5 Save the file.
6 Enter the following command:chmod +x <queue name>.conf
7 Enter the following command:chown lp:lp <queue name>.conf
8 Enter the following command:e-STUDIO4520C Series / e-STUDIO6530C Series:
lpadmin -p <queue name> -v /dev/null -I any \-i /usr/lib/lp/model/net_estcolor
e-STUDIO455 Series / e-STUDIO855 Series:lpadmin -p <queue name> -v /dev/null -I any \-i /usr/lib/lp/model/net_estbw
9 Enter the following command:accept <queue name>
10 Enter the following command:enable <queue name>
Creating a print queue manually on HP-UX
1 Log on to the root account.
2 Open your UNIX/Linux editor.
3 Create the following file./etc/lp/interface/<queue name>.conf
4 Add a line as below in the <queue name>.conf.dest=<IP address>
5 Save the file.
6Enter the following command:
chmod +x <queue name>.conf
7 Enter the following command:chown lp:lp <queue name>.conf

8/9/2019 Software Instalation Guide
http://slidepdf.com/reader/full/software-instalation-guide 122/172
5 INSTALLING PRINTER DRIVERS FOR UNIX/Linux
120 Setting Up the UNIX/Linux Filters
8 Enter the following command:ps -ef | grep lpsched | grep -iv grep > /dev/null 2>&1
9 Enter the following command:echo $?
10 If “0” is outputted on the screen, turn the scheduler OFF. Enter the following
command:/usr/sbin/lpshut > /dev/null 2>&1
11 Enter the following command:e-STUDIO4520C Series / e-STUDIO6530C Series:
/usr/sbin/lpadmin –p <queue name> -v/dev/null \-mnet_estcolor –orm <queue name> -orpprint -ob3
e-STUDIO455 Series / e-STUDIO855 Series:/usr/sbin/lpadmin –p <queue name> -v/dev/null \-mnet_estbw –orm <queue name> -orpprint -ob3
12 Enter the following command:/usr/sbin/accept <queue name>
13 Enter the following command:enable <queue name>
14 If you turn OFF the scheduler in step 10, turn the scheduler ON. Enter the followingcommand:
/usr/sbin/lpsched > /dev/null 2>&1
Creating a print queue manually on IBM AIX
1 Enter the following command:ls /opt/toshiba/tap/filter
2If the above directory does not exist, enter the following command:
mkdir /opt/toshiba/tap/filter
3 Log on to the root account.
4 Open your UNIX/Linux editor.
5 Create the following file./opt/toshiba/tap/filter/<queue name>.conf
6 Add a line as below in the <queue name>.conf.dest=<IP address>
7 Save the file.
8Enter the following command:
mkque -q<queue name> \-a ‘s_statfilter = /usr/lib/lpd/bsdshort’ \-a ‘up = TRUE’ -a ‘host = <IP address>’ -a ‘rq = print’
9 Enter the following command:e-STUDIO4520C Series / e-STUDIO6530C Series:
mkquedev –q <queue name> -ddev_<queue name> \-a 'backend = /opt/toshiba/tap/bin/estcolorBackend'
e-STUDIO455 Series / e-STUDIO855 Series:mkquedev –q <queue name> -ddev_<queue name> \-a 'backend = /opt/toshiba/tap/bin/estbwBackend'

8/9/2019 Software Instalation Guide
http://slidepdf.com/reader/full/software-instalation-guide 123/172
5.INSTALLING PRINTER DRIVERS FOR UNIX/Linux
Setting Up the UNIX/Linux Filters 121
5 INSTALLING PRINTER DRIVERS FOR UNIX/Linux
10 Enter the following command:e-STUDIO4520C Series / e-STUDIO6530C Series:
cp /usr/lib/lpd/pio/predef/net_estcolor \/opt/Toshiba/tap/filter/<queue name>
e-STUDIO455 Series / e-STUDIO855 Series:cp /usr/lib/lpd/pio/predef/net_estbw \/opt/Toshiba/tap/filter/<queue name>
Creating a print queue manually on Linux
1 Enter the following command:ls /opt/toshiba/tap/interface
2 If the above directory does not exist, enter the following command:mkdir /opt/toshiba/tap/interface
3 Log on to the root account.
4 Open your UNIX/Linux editor.
5 Create the following file./opt/toshiba/tap/interface/<queue name>.conf
6 Add a line as below in the <queue name>.conf.dest=<IP address>
7 Save the file.
8 Enter the following command:e-STUDIO4520C Series / e-STUDIO6530C Series:
cp /opt/toshiba/tap/model/net_estcolor \/opt/toshiba/tap/interface/<queue name>
e-STUDIO455 Series / e-STUDIO855 Series:cp /opt/toshiba/tap/model/net_estbw \
/opt/toshiba/tap/interface/<queue name>
9 Enter the following command:/opt/toshiba/tap/bin/modPrintcap \-a <queue name> <IP address>
10 Enter the following command:ls /opt/toshiba/tap/bin/flag_<queue name>
The file in step 10 does not exist when the operations from step 1 to 9 are correctly performed. In that case, theoperation of step 11 is not required to be performed. Skip to step 12.
11 If the above file exists, enter the following command./opt/toshiba/tap/bin/printconf_import \-a <queue name> <IP_ADDRESS>rm /opt/toshiba/tap/bin/flag_<queue name>
12 Restart your lpd.

8/9/2019 Software Instalation Guide
http://slidepdf.com/reader/full/software-instalation-guide 124/172
5 INSTALLING PRINTER DRIVERS FOR UNIX/Linux
122 Setting Up the UNIX/Linux Filters
Creating a print queue manually on Open UNIX
1 Log on to the root account.
2 Open your UNIX/Linux editor.
3 Create the following file.
/usr/spool/lp/admins/lp/interfaces/<queue name>.conf
4 Add a line as below in the <queue name>.conf.dest=<IP address>
5 Save the file.
6 Enter the following command:chmod +x <queue name>.conf
7 Enter the following command:chown lp:lp <queue name>.conf
8 Enter the following command:e-STUDIO4520C Series / e-STUDIO6530C Series:
lpadmin -p <queue name> -v /dev/null -I any \-i /usr/lib/lp/model/net_estcolor
e-STUDIO455 Series / e-STUDIO855 Series:lpadmin -p <queue name> -v /dev/null -I any \-i /usr/lib/lp/model/net_estbw
9 Enter the following command:accept <queue name>
10 Enter the following command:enable <queue name>
Changing the default valuesYou can change the default values of a print queue by the following procedure.
1 Confirm the interface file of which name is same as the print queue.This file contains all of the default settings and values that can be set. These values are case sensitive andmust conform to the /bin/sh variable format. The interface file is saved in the following directory.- Solaris: /etc/lp/interfaces- HP-UX: /etc/lp/interface- IBM AIX: /opt/toshiba/tap/filter - Linux: /opt/toshiba/tap/interface- Open UNIX: /usr/spool/lp/admins/lp/interfaces
2 To edit the configuration file manually, add a line that include parameters and value.The configuration file is saved in following directory.- Solaris: /etc/lp/interfaces- HP-UX: /etc/lp/interface- IBM AIX: /opt/toshiba/tap/filter - Linux: /opt/toshiba/tap/interface- Open UNIX: /usr/spool/lp/admins/lp/interfacesFor example, to change the default orientation to Landscape, add the following line:
orient= “LANDSCAPE”

8/9/2019 Software Instalation Guide
http://slidepdf.com/reader/full/software-instalation-guide 125/172
5.INSTALLING PRINTER DRIVERS FOR UNIX/Linux
Setting Up the UNIX/Linux Filters 123
5 INSTALLING PRINTER DRIVERS FOR UNIX/Linux
Deleting the print queueThere are two ways to delete the print queue: one is deleting a print queue using estcolorrm/estbwrm, and the other isdeleting a print queue manually without using estcolorrm/estbwrm.
P.123 “Deleting a print queue using estcolorrm/estbwrm” P.123 “Deleting a Print Queue Manually”
Deleting a print queue using estcolorrm/estbwrmWhen you want to delete the queue using estcolorrm/estbwrm, perform the following procedure.
1 Log on to the root account.
2 Enter the following command:e-STUDIO4520C Series / e-STUDIO6530C Series:
estcolorrm <queue name>e-STUDIO455 Series / e-STUDIO855 Series:
estbwrm <queue name>
This command uses the system’s lpadmin command to delete the print queue and configuration file.Restart the lpd under Linux.
Deleting a Print Queue ManuallyYou can also configure the print queue by deleting a print queue manually.The procedure varies depending on the operating systems.
P.123 “Deleting a print queue manually on Solaris” P.123 “Deleting a print queue manually on HP-UX” P.124 “Deleting a print queue manually on IBM AIX” P.124 “Deleting a print queue manually on Linux” P.124 “Deleting a print queue manually on Open UNIX”
Deleting a print queue manually on Solaris
1 Log on to the root account.
2 Enter the following command:lpadmin -x <queue name>
3 Enter the following command:rm /etc/lp/interfaces/<queue name>.conf
Deleting a print queue manually on HP-UX
1 Log on to the root account.
2 Enter the following command:ps -ef | grep lpsched | grep -iv grep > /dev/null 2>&1
3 Enter the following command:echo $?
4 If “0” outputted on the screen, turn the scheduler OFF. Enter the following command:/usr/sbin/lpshut > /dev/null 2>&1
5 Enter the following command:/usr/sbin/lpadmin -x<queue name>
6 Enter the following command:
rm /etc/lp/interface/<queue name>.conf
7 If “0” was outputted on the screen in step 3, turn the scheduler ON. Enter the followingcommand:
/usr/sbin/lpsched > /dev/null 2>&1

8/9/2019 Software Instalation Guide
http://slidepdf.com/reader/full/software-instalation-guide 126/172
5 INSTALLING PRINTER DRIVERS FOR UNIX/Linux
124 Setting Up the UNIX/Linux Filters
Deleting a print queue manually on IBM AIX
1 Log on to the root account.
2 Enter the following command:rm /opt/toshiba/tap/filter/<queue name>
3 Enter the following command:rm /opt/toshiba/tap/filter/<queue name>.conf
4 Enter the following command:rmquedev -q<queue name> -ddev_<queue name>
5 Enter the following command:rmque -q<queue name>
Deleting a print queue manually on Linux
1 Log on to the root account.
2 Enter the following command:rm /opt/toshiba/tap/interface/<queue name>
3 Enter the following command:rm /opt/toshiba/tap/interface/<queue name>.conf
4 Enter the following command:/opt/toshiba/tap/bin/modPrintcap -d <queue name>
5 Enter the following command:ls /opt/toshiba/tap/bin/flag_<queue name>
6 If the above file exists, enter the following command:/opt/toshiba/tap/bin/printconf_import \
-d <queue name>rm /opt/toshiba/tap/bin/flag_<queue name>
7 Restart your lpd.
Deleting a print queue manually on Open UNIX
1 Log on to the root account.
2 Enter the following command:lpadmin -x <queue name>
3 Enter the following command:rm /usr/spool/lp/admins/lp/interfaces/<queue name>.conf
8/9/2019 Software Instalation Guide
http://slidepdf.com/reader/full/software-instalation-guide 127/172
5 INSTALLING PRINTER DRIVERS FOR UNIX/Linux
Setting Up the CUPS 125
Setting Up the CUPS
When you want to configure the UNIX/Linux printing using CUPS, you can use LPR printing or IPP printing.
When printing using CUPS, the output paper size cannot be specified. If you want to specify the output paper size, usethe UNIX/Linux filter.
About CUPSThis section describes the behavior, options, and installation method of the CUPS printer driver for the equipment. Thebehavior of the printer driver presented in this specification is consistent with CUPS v1.1.15. The driver may appear and/or operate slightly differently in the different versions.
In the CUPS environment, use a PostScript Printer Description (PPD) file, not a printer driver to configure the printing .The PPD file is included in this package.
Development EnvironmentThe provided CUPS printer driver is supported on the following UNIX/Linux workstation.
Red Hat 8.0 CUPS 1.1.18
Implementation MethodThis driver consists of a PPD file that works in conjunction with an interface like XPP, KPrinter, etc. It can also be used onOSX in the same way that it is used on Linux, but this is not recommended.
Supplied ComponentsThere is one supplied component, a PPD file called “TOSHIBA_EST4520C_CUPS.gz” (e-STUDIO4520C Series),“TOSHIBA_EST6530C_CUPS.gz” (e-STUDIO6530C Series) or “TOSHIBA_EST455_855_CUPS.gz” (e-STUDIO455Series / e-STUDIO855 Series). It has been compressed using gzip. It does not need to be uncompressed for Linux to usethe PPD file and so it should be left compressed.
The user needs root privileges to place the PPD file in the default location. The default location for the standard CUPSPPD files is:
/usr/share/cups/model/Toshiba

8/9/2019 Software Instalation Guide
http://slidepdf.com/reader/full/software-instalation-guide 128/172
5 INSTALLING PRINTER DRIVERS FOR UNIX/Linux
126 Setting Up the CUPS
Configuring UNIX/Linux printing using CUPSYou can configure the CUPS for LPR printing or IPP printing.
Installing the CUPS for LPR printingThe PPD must first be copied onto the local machine, the printer installed, and then the PPD configured. The printer isthen installed and configured using CUPS via the browser.
The PPD is placed in the “/usr/share/cups/model/Toshiba” directory (which will require root privileges and the Toshibadirectory may need to be created). The PPD can be simply copied to the appropriate directory and the CUPS daemon re-started.
1 Insert the Client Utilities CD-ROM into the CD-ROM drive.
2 Log on to the root account and create “Toshiba” directory in the“/usr/share/cups/model” directory.
3 Copy the GZIP file into the “/usr/share/cups/model/Toshiba” directory or enter thefollowing command:
cp TOSHIBA_ESTxxxx_CUPS.gz /usr/share/cups/model/Toshiba* “xxxx” is the model name of the TOSHIBA MFP.
A GZIP file is included in the “Admin/CUPS/Usa” folder in the CD-ROM.
4 Enter the following command:service lpd stop
If lpd is already stopped, “Failed” will be displayed.
When using the Red Hat Linux, continue to the next step.When using other than the Red Hat Linux, skip to step 10.
5 When using the Red Hat Linux, enter the following command:/usr/bin/redhat-switch-printer
The [redhat-switch-printer] dialog box appears.
6 Select [CUPS] and click [OK].The [information] dialog box appears.
7 Click [OK].
8 Enter the following command:service cups start
If the CUPS has already been started, stop the CUPS service once by entering “service cups stop” command,and then enter the above command to restart the CUPS service.
9 Enter the following command:/usr/bin/cupsconfig
The Common UNIX Printing System page appears. Skip to step 11.
10 Open the browser and locate CUPS by typing“http://localhost:631/” in the address box.The Common UNIX Printing System page appears.

8/9/2019 Software Instalation Guide
http://slidepdf.com/reader/full/software-instalation-guide 129/172
5.INSTALLING PRINTER DRIVERS FOR UNIX/Linux
Setting Up the CUPS 127
5 INSTALLING PRINTER DRIVERS FOR UNIX/Linux
11 Click the [Manage Printers] link.
The Printer page is displayed.
12 Click [Add Printer].
The Admin page is displayed.
13 Enter the printer name, location, and description of the printer in each box and click[Continue].
If a new printer name is a duplicate of a name already in the printer list, the new printer will replace the originalprinter.
14 Select [LPD/LPR Host or Printer] at the [Device] box and click [Continue].

8/9/2019 Software Instalation Guide
http://slidepdf.com/reader/full/software-instalation-guide 130/172

8/9/2019 Software Instalation Guide
http://slidepdf.com/reader/full/software-instalation-guide 131/172

8/9/2019 Software Instalation Guide
http://slidepdf.com/reader/full/software-instalation-guide 132/172
5 INSTALLING PRINTER DRIVERS FOR UNIX/Linux
130 Setting Up the CUPS
1 Insert the Client Utilities CD-ROM into the CD-ROM drive.
2 Log on to the root account and create “Toshiba” directory in the “/usr/share/cups/model” directory.
3 Copy the GZIP file into the “/usr/share/cups/model/Toshiba” directory or enter thefollowing command:
cp TOSHIBA_ESTxxxx_CUPS.gz /usr/share/cups/model/Toshiba* “xxxx” is the model name of the TOSHIBA MFP.
A GZIP file is included in the “Admin/CUPS/Usa” folder in the CD-ROM.
4 Enter the following command:service lpd stop
If lpd is already stopped, “Failed” will be displayed.
When using the Red Hat Linux, continue to the next step.When using other than the Red Hat Linux, skip to step 10.
5 When using the Red Hat Linux, enter the following command:/usr/bin/redhat-switch-printer
The [redhat-switch-printer] dialog box appears.
6 Select [CUPS] and click [OK].The [information] dialog box appears.
7 Click [OK].
8 Enter the following command:service cups start
If the CUPS has already been started, stop the CUPS service once by entering “service cups stop” command,and then enter the above command to restart the CUPS service.
9 Enter the following command:/usr/bin/cupsconfig
The Common UNIX Printing System page appears. Skip to step 11.
10 Open the browser and locate CUPS by typing“http://localhost:631/” in the address box.The Common UNIX Printing System page appears.
When IPP/SSL is enabled, specify “https://local host:443/” in the address field to access the Common UNIXPrinting System.

8/9/2019 Software Instalation Guide
http://slidepdf.com/reader/full/software-instalation-guide 133/172
5.INSTALLING PRINTER DRIVERS FOR UNIX/Linux
Setting Up the CUPS 131
5 INSTALLING PRINTER DRIVERS FOR UNIX/Linux
11 Add a new https printer by clicking [Add Printer].Configure the parameters as:Name : <Any Name>Location : <Optional>Description : <Optional>Device : Internet Printing Protocol (http)Device URI : http://<IP address>:631/PrintModel/Driver : TOSHIBA
When IPP/SSL is enabled, specify as follows:- Device : Internet Printing Protocol (https)- Device URI : https://<IP address>:443/Print
Using CUPS Client (print commands lp, lpr, etc.) with -e option, the connection can be encrypted and printingcan be done in the above configured printer.
12Confirm that the message notifying that the new printer has been properly addedappears.
13 Go to the following page for configuring the print options: P.132 “Configuring print options”

8/9/2019 Software Instalation Guide
http://slidepdf.com/reader/full/software-instalation-guide 134/172
5 INSTALLING PRINTER DRIVERS FOR UNIX/Linux
132 Setting Up the CUPS
Configuring print optionsYou can set the print options that are applied to the print jobs using CUPS.
1 Click the [Manage Printers] link on the startup page.
The Printer page is displayed.
2 Select this equipment and then click [Configure Printer].
3 Configure the print options on the displayed page.The underscored items are set by default.

8/9/2019 Software Instalation Guide
http://slidepdf.com/reader/full/software-instalation-guide 135/172
5.INSTALLING PRINTER DRIVERS FOR UNIX/Linux
Setting Up the CUPS 133
5 INSTALLING PRINTER DRIVERS FOR UNIX/Linux
Booklet
Color Settings 1 (For the e-STUDIO4520C Series / e-STUDIO6530C Series)
Option Value Alternative Value Description
Booklet Center Margin 0 to 36 (in unit of 3 points) Select the center margin.
Booklet Outer Margin 0 to 72 (in unit of 6 points) Select the outer margin.
Booklet Paper Size None (Off)Letter
A4LegalStatementLedger Folio
A3 A5B4B5Computer 13” LG8.5” SQ8K16K
Select a paper size for the booklet. Each two pages are printed onboth sides of a sheet which is then folded. The booklet size will bethe half size of the paper size that you specify.
Left to Right PageLayout
Right to LeftLeft to Right
Select whether the booklet can be read from right to left or left toright.
[Continue] button Determines the selected items.
Option Value Alternative Value DescriptionColor Type Auto
Color MonoBlack and RedBlack and GreenBlack and Blue
Black and CyanBlack and MagentaBlack and YellowBlack and White
Select whether a print job is printed in color, mono, or twin color.
Resolution 600dpi, 1200dpi Select a print resolution.
“Resolution” can be selected only for the e-STUDIO6530CSeries.
Distinguish Thin Lines Off, On Select whether to distinguish thin lines or not.
Halftone AutoDetailSmooth
Select the appropriate processing on halftone images among“Auto”, “Detail (high density)” and “Smooth (smooth tonereproduction)”.
[Continue] button Determines the selected items.

8/9/2019 Software Instalation Guide
http://slidepdf.com/reader/full/software-instalation-guide 136/172
5 INSTALLING PRINTER DRIVERS FOR UNIX/Linux
134 Setting Up the CUPS
Color Settings 2 (For the e-STUDIO4520C Series / e-STUDIO6530C Series)
Color Settings 3 (For the e-STUDIO4520C Series / e-STUDIO6530C Series)
Color Settings 4 (For the e-STUDIO4520C Series / e-STUDIO6530C Series)
Option Value Alternative Value DescriptionBlack Over Print Off,
TextText and Graphics
Select whether printing background content that has black textoverlayed on it.
Image Type GeneralPhotoPresentationLine Art
Select how colors are printed. The printer driver automaticallyapplies proper image quality for selected job type.
Pure Black and Gray Black - AutoBlack - TextBlack - Text and GraphicBlack - Text, Graphic and ImageBlack and Gray - AutoBlack and Gray - TextBlack and Gray - Text and GraphicBlack and Gray - Text, Graphic andImage
Select whether printing the black and gray scale contents in adocument using the black toner.
[Continue] button Determines the selected items.
Option Value Alternative Value DescriptionColor Balance - Black -4, -3, -2, -1, 0, 1, 2, 3, 4 Select the density for black toner.
Color Balance - Cyan -4, -3, -2, -1, 0, 1, 2, 3, 4 Select the density for cyan toner.
Color Balance - Magenta -4, -3, -2, -1, 0, 1, 2, 3, 4 Select the densi ty for magenta toner.
Color Balance - Yellow -4, -3, -2, -1, 0, 1, 2, 3, 4 Select the density for yellow toner.
[Continue] button Determines the selected items.
Option Value Alternative Value Description
Brightness -4, -3, -2, -1, 0, 1, 2, 3, 4 Select the brightness.Contrast -4, -3, -2, -1, 0, 1, 2, 3, 4 Select the contrast.
Saturation -4, -3, -2, -1, 0, 1, 2, 3, 4 Select the saturation.
Sharpness -4, -3, -2, -1, 0, 1, 2, 3, 4 Select the sharpness.
Background Adjustment -4, -3, -2, -1, 0, 1, 2, 3, 4 Select the density level of the background.
[Continue] button Determines the selected items.

8/9/2019 Software Instalation Guide
http://slidepdf.com/reader/full/software-instalation-guide 137/172
5.INSTALLING PRINTER DRIVERS FOR UNIX/Linux
Setting Up the CUPS 135
5 INSTALLING PRINTER DRIVERS FOR UNIX/Linux
Finishing
Option Value Alternative Value Description
Destination e-STUDIO4520C SeriesPrinter’s DefaultInner TrayTray 1Tray 2e-STUDIO455 SeriesPrinter's DefaultExit TrayJob Separator Upper Job Separator Lower Tray 1Tray 2e-STUDIO855 SeriesPrinter’s DefaultExit TrayTray 1Tray 2e-STUDIO6530C SeriesPrinter’s Default
Upper Exit TraySide Exit TrayTray 1Tray 2
Select a destination.
Hole Punch Off Long Edge Punch without rotationShort Edge Punch without rotationLong Edge Punch with 180 degree rotationShort Edge Punch with 180 degree rotation
Select the hole punch option.
Stapling Off Upper Left (Portrait)/Upper Right (Landscape)Middle Left (Portrait)/Middle Top (Landscape)Lower Left (Portrait)/Upper Left (Landscape)Upper Right (Portrait)/Lower Right(Landscape)Middle Right (Portrait)/Middle Bottom(Landscape)Lower Right (Portrait)/Lower Left (Landscape)Middle Top (Portrait)/Middle Right (Landscape)Middle Bottom (Portrait)/Middle Left(Landscape)Saddle Stitch (Portrait)/Saddle Stitch(Landscape)
Select whether a print job is stapled or its locations.
“Saddle Stitch (Portrait)/Saddle Stitch (Landscape)” can be
selected only when the Saddle Stitch Finisher is installed.
[Continue] button Determines the selected items.

8/9/2019 Software Instalation Guide
http://slidepdf.com/reader/full/software-instalation-guide 138/172
5 INSTALLING PRINTER DRIVERS FOR UNIX/Linux
136 Setting Up the CUPS
General
Option Value Alternative Value Description
Collate Yes, No Select whether to collate exited paper.
Duplex 1-Sided 1-sided printing
2-Sided, No Tumble (Long-Edge Binding) 2-sided printing (Long-edge binding)
2-Sided, Tumble(Short-Edge Binding) 2-sided printing (Short-edge binding)
Media Size A3, A4, A5, A6, B4, B5, Ledger, Legal, Letter,Statement, Folio, Computer, 13” LG, 8.5” SQ,12 x 18”, 305 x 457 mm, 8K, 16K, 320 x 450mm, 320 x 460 mm, 13x 19”
Select the paper size.
13 x 19” can be selected only for the e-STUDIO6530CSeries.“12 x 18", 305 x 457 mm, 320 x 450 mm, 320 x 460mm” can be selected only for the e-STUDIO4520CSeries / e-STUDIO6530C Series.
Media Source Auto (Default)Drawer 1Drawer 2LCF
External LCFDrawer 3Drawer 4Bypass TrayPlainPlain (Auto)Plain 1Plain 2Thick 1Thick 1 (Back)Thick 2Thick 2 (Back)Thick 3Thick 3 (Back)Thick 4
Thick 4 (Back)TransparencyRecycledSpecial 1Special 1 (Back)Special 2Special 2 (Back)Thin
Select the paper source.
“Plain (Auto), Plain 1, Plain 2” can be selected only e-STUDIO6530C Series.“External LCF” can be selected only e-STUDIO6530CSeries / e-STUDIO855 Series.“Plain” can be selected only e-STUDIO4520C Series /e-STUDIO455 Series / e-STUDIO855 Series.“Thick 1 (Back), Thick 2 (Back), Thick 3 (Back), Thick 4(Back), Recycled, Special 1, Special 1 (Back), Special2, Special 2 (Back)” can be selected only for the e-STUDIO4520C Series / e-STUDIO6530C Series.“Thin” can be selected only for the e-STUDIO455Series.
[Continue] button Determines the selected items.

8/9/2019 Software Instalation Guide
http://slidepdf.com/reader/full/software-instalation-guide 139/172
5.INSTALLING PRINTER DRIVERS FOR UNIX/Linux
Setting Up the CUPS 137
5 INSTALLING PRINTER DRIVERS FOR UNIX/Linux
Options Installed
Printing Modes
Printing Modes DC
Option Value Alternative Value Description
Model Selection TOSHIBA e-STUDIO855SeriesTOSHIBA e-STUDIO455Series
Select the model name when the e-STUDIO455 Series / e-STUDIO855 Series is used.
Drawers Not InstalledDrawer 3
Drawer 3 and 4LCF
Select an optional drawer.
Finisher e-STUDIO4520C SeriesNot InstalledSingle Position Stapler Multi-Position Stapler Multi-Position Stapler and Hole Punche-STUDIO455 SeriesNot InstalledHanging Finisher Saddle Stitch Finisher Saddle Stitch Finisher and HolePunche-STUDIO6530C SeriesNot InstalledMulti-Position Stapler Multi-Position Stapler and Hole Punche-STUDIO855 SeriesNot InstalledSaddle Stitch Finisher Saddle Stitch Finisher and HolePunch
Select a finishing option.
External LCF Not InstalledInstalled
Select an External LCF option.
“External LCF” can be selected only for the e-STUDIO6530CSeries / e-STUDIO855 Series.
[Continue] button Determines the selected items.
Option Value Alternative Value Description
Department Code DisabledEnabled
Select whether or not to use the department codes for printing.When this equipment is managed under the department codes,this option should be enabled.
Distinguish Thin Lines Off, On Select whether to distinguish thin lines or not.
Do not Print BlankPages
Off, On Select whether or not a blank page is printed.
Print Mode NormalProof
Private - PasswordHold
Select a print mode.
“Hold” can be selected only for the e-STUDIO455 Series / e-STUDIO855 Series.
[Continue] button Determines the selected items.
Option Value Alternative Value Description
Department Code (DC) -Digit 1 to Digit 5
0 to 9 Specify the 5-digit department code when “Department Code” of“Printing Modes” is enabled.For the appropriate department code, ask your systemadministrator.
[Continue] button Determines the selected items.

8/9/2019 Software Instalation Guide
http://slidepdf.com/reader/full/software-instalation-guide 140/172
5 INSTALLING PRINTER DRIVERS FOR UNIX/Linux
138 Setting Up the CUPS
Private Document Password
Quality (For the e-STUDIO455 Series / e-STUDIO855 Series)
Banners
PS Binary Protocol
Option Value Alternative Value Description
Password - Digit 1 toDigit 5
0 to 9 Specify the 5-digit document password when “Private - Password”is selected for “Print Modes”.
[Continue] button Determines the selected items.
Option Value Alternative Value Description
Halftone AutoDetailSmooth
Select a processing method for halftone image.
Smoothing Off, On Select whether On or Off for printing text or graphics smoothly.
Toner Save Off, On Select whether On or Off for the toner saving function.
[Continue] button Determines the selected items.
Option Value Alternative Value Description
Starting Banner none Select whether to print banner pages before printing documents. Ifyou want to print them, select a banner type.
classified Classified information
confidential Confidential information
secret Secret information
standard Standard information
topsecret Top secret
unclassified Unclassified information
Ending Banner none Select whether to print banner pages after printing documents. If
you want to print them, select a banner type.classified Classified information
confidential Confidential information
secret Secret information
standard Standard information
topsecret Top secret
unclassified Unclassified information
[Continue] button Determines the selected items.
Option Value Alternative Value DescriptionPS Binary Protocol None, TBCP Select whether to process print data in a binary format using
PostScript and using TBCP protocol.
[Continue] button Determines the selected items.

8/9/2019 Software Instalation Guide
http://slidepdf.com/reader/full/software-instalation-guide 141/172
5.INSTALLING PRINTER DRIVERS FOR UNIX/Linux
Setting Up the CUPS 139
5 INSTALLING PRINTER DRIVERS FOR UNIX/Linux
Modifying printer You can modify the printer that you create.
1 Click the [Manage Printers] link on the startup page.
The Printer page is displayed.
2 Click [Modify Printer].
3 Modify the location and description in each box and click [Continue].

8/9/2019 Software Instalation Guide
http://slidepdf.com/reader/full/software-instalation-guide 142/172

8/9/2019 Software Instalation Guide
http://slidepdf.com/reader/full/software-instalation-guide 143/172
6.INSTALLING SCAN DRIVER ANDUTILITIES
This chapter describes about installing the scan driver and scan utilities.
Before Installation.................................... ................................... .................................. ....... 142Type of scan driver and utilities ..........................................................................................................................142System requirements..........................................................................................................................................142
Installing Scan Driver and Utilities ................................ ................................... .................. 143Installing the scan driver and utilities using the installer.....................................................................................143Installing WIA driver to Windows Vista / Windows Server 2008 .........................................................................145
Uninstalling Scan Driver and Utilities .................................... ................................... ......... 147

8/9/2019 Software Instalation Guide
http://slidepdf.com/reader/full/software-instalation-guide 144/172
6 INSTALLING SCAN DRIVER AND UTILITIES
142 Before Installation
Before Installation
This section describes about the installation of the scan driver and utilities. Before installing them, read this section.
Type of scan driver and utilitiesInstall the following utilities to use the network scan functions.
TWAIN driver This software component enables you to import e-Filing documents into TWAIN-compliant applications.
File Downloader This software component enables you to import e-Filing documents into your hard disk.
Remote Scan driver You can use Remote Scan driver to import the scanned images into your TWAIN-compliant application.
WIA driver You can use Remote Scan driver to import the scanned images into your WIA-compliant application.
System requirementsThe scan driver and utilities are available for following environments: Display resolution
1024 x 768 dots or more Display color
High Color (16 bit) or higher is recommended CPU
Pentium 133 MHz minimum (Pentium 266 MHz or faster recommended) OS
Windows 2000 Service Pack 4Windows XP Service Pack 1 / Service Pack 2 / Service Pack 3Windows Vista Service Pack 1Windows Server 2003 Service Pack 1/Service Pack 2Windows Server 2008 Service Pack 1
WIA driver is not supported by Windows 2000 and 64-bit edition of each Windows XP and Windows Server 2003.
When scan driver and utilities have been installedIf the scan driver and utilities have been installed from other e-STUDIO Client Utilities CD-ROM, uninstall them then installagain from the Client Utilities CD-ROM.When you uninstall the software, click [No] at the dialog box that displays the message to delete the settings for the scandriver and utilities so that you can restore the settings after installing new one.
To use scan drivers, the scanning function is required.The e-STUDIO455 Series and the e-STUDIO855 Series provide the scanning function as an option. However, this optional functionis already installed in some models.

8/9/2019 Software Instalation Guide
http://slidepdf.com/reader/full/software-instalation-guide 145/172
6 INSTALLING SCAN DRIVER AND UTILITIES
Installing Scan Driver and Utilities 143
Installing Scan Driver and Utilities
This section describes how to install the scan driver and utilities.
Installing the scan driver and utilities using the installer This procedure describes an installation on Windows Vista. The procedure is the same when other versions of Windowsare used. However, you need to follow a different procedure when you install WIA driver into Windows Vista or WindowsServer 2008. For the installation procedure for these office systems, see the following page:
P.145 “Installing WIA driver to Windows Vista / Windows Server 2008”
To perform installation, you must log onto Windows with a user account, which enables the installation anduninstallation of client software, such as “Administrators” or “Power Users”.If Windows Vista/Server 2008 is used, you can perform the installation by temporarily changing the user accountfollowing the procedure below.- Open the “e-STUDIO” folder in a CD-ROM, and then double-click “Setup.exe”.- When the [User Account Control] dialog box is displayed, enter the password of “Administrators”, and then click
[OK].
1 Insert the Client Utilities CD-ROM into the CD-ROM drive.
If the installer does not automatically start, use the Explorer to open the “e-STUDIO” folder in the Client UtilitiesCD-ROM and double-click “Setup.exe”.
2 Select [I agree to the terms of the License Agreement.] and click [Next].
To change the display language, select a desired language from the [Select Language] box.The main menu is displayed.
3 Click [Scan Utility].

8/9/2019 Software Instalation Guide
http://slidepdf.com/reader/full/software-instalation-guide 146/172
6 INSTALLING SCAN DRIVER AND UTILITIES
144 Installing Scan Driver and Utilities
4 Confirm the list of the software to install and click [Install].
You can change the folder where these programs are installed. Click [Browse] and, when the [Browse For
Folder] dialog box appears, select a folder and click [OK].The installation starts.
5 When the installation is complete, click [Finish].
The main menu is displayed.
The Installer may ask you to restart your computer. If it does, select “Yes, I want to restart my computer now.”and click [Finish] to restart your computer.
6 Click [Exit].When a message appears asking whether to finish the installation, click [Yes].

8/9/2019 Software Instalation Guide
http://slidepdf.com/reader/full/software-instalation-guide 147/172
6.INSTALLING SCAN DRIVER AND UTILITIES
Installing Scan Driver and Utilities 145
6 INSTALLING SCAN DRIVER AND UTILITIES
Installing WIA driver to Windows Vista / Windows Server 2008
1 Click the start button and select [Network].
2 Select this equipment and right-click its name. Then click [Install].
[PnPX Device Association] is displayed on the task bar.
3 Click [PnPX Device Association] displayed on the task bar.
The [User Account Control] dialog box is displayed.
4 Click [Continue] in the [User Account Control] dialog box.If you have logged on with a user account other than “Administrators”, enter the password of “Administrators” andthen click [OK].
5 Click [Locate and install driver software].
The confirmation dialog box is displayed.
When the [User Account Control] dialog box is displayed, click [Continue] to continue the installation.However, if you have logged on with a user account other than “Administrators”, enter the password of“Administrators” and then click [OK].When the confirmation dialog box for online search is displayed, click [Don’t search online].When the dialog box for prompting users to insert a disk is displayed, click [I don’t have the disc. Show meother options].

8/9/2019 Software Instalation Guide
http://slidepdf.com/reader/full/software-instalation-guide 148/172
6 INSTALLING SCAN DRIVER AND UTILITIES
146 Installing Scan Driver and Utilities
6 Click [Browse my computer for driver software].
A dialog box for searching driver software is displayed.
7 Insert the Client Utilities CD-ROM to the CD-ROM drive of your computer. Then click[Browse] to specify a directory for WIA driver. Then click [Next].<If your OS is 32-bit edition>[Client Utilities CD-ROM]: \Client\WIA\VISTA\32\<language><If your OS is 64-bit edition>[Client Utilities CD-ROM]: \Client\WIA\VISTA\64\<language>
The installation starts.
8 Follow the instructions shown on the monitor and then finish the installation.

8/9/2019 Software Instalation Guide
http://slidepdf.com/reader/full/software-instalation-guide 149/172

8/9/2019 Software Instalation Guide
http://slidepdf.com/reader/full/software-instalation-guide 150/172

8/9/2019 Software Instalation Guide
http://slidepdf.com/reader/full/software-instalation-guide 151/172
7.INSTALLING NETWORK FAX UTILITIES
This chapter describes about installing the network fax utilities.
Before Installation.................................... ................................... .................................. ....... 150Type of network fax utilities ................................................................................................................................150System requirements..........................................................................................................................................150
Installing Network Fax Utilities ............................... ..................................... ....................... 151
Installing Web Service Print ................................... .................................. ........................... 153
Uninstalling the Network Fax Software....................................... ...................................... . 154Uninstalling N/W-Fax driver ................................................................................................................................154Uninstalling AddressBook Viewer.......................................................................................................................154

8/9/2019 Software Instalation Guide
http://slidepdf.com/reader/full/software-instalation-guide 152/172
7 INSTALLING NETWORK FAX UTILITIES
150 Before Installation
Before Installation
This section describes about the installation of the network fax utilities. Before installing them, read this section.
Type of network fax utilitiesInstall the following utilities to use the network fax functions.
N/W-Fax driver The N/W-Fax driver enables you to set up send lists and send electronic documents from your client computer to one ormore destinations. You print to the fax much the same way you would choose to print to a designated printer that makesusing the N/W-Fax driver quick and simple. You can select the fax properties. Fax properties are the attributes you can setto define sender and recipient information for processing fax jobs such as dialing options, sender information, faxresolution and page layout.Other features include an easy to use fax scheduler that allows you to set up a date and time to transmit your fax. Coverpage options are also provided. You can include a customized cover page with your fax transmission that can includesender and recipient fax information and a detailed message. You can easily maintain sender and contact information thatcan be printed on the cover pages.
AddressBook Viewer With the AddressBook Viewer you can easily add or modify fax recipient names, fax numbers, and Email address (Emailaddress) to the Address Book. This utility allows you to manage recipients of the fax, select and display fax recipients fromthe Address Book, as well as recipient fax numbers and other contact information.
Additionally, AddressBook Viewer allows you to import or export address book data to or from other address bookprograms compatible to this equipment.
System requirementsThe N/W-Fax driver and AddressBook Viewer are available for following environments: Display resolution
1024 x 768 dots or more Display color
High Color (16 bit) or higher is recommended CPU
Pentium 133 MHz minimum (Pentium 266 MHz or faster recommended) Memory
The required memory size for OS OS
Windows 2000 Service Pack 4Windows XP Service Pack 1/Service Pack 2/Service Pack 3Windows Vista Service Pack 1Windows Server 2003 Service Pack 1/Service Pack 2Windows Server 2008 Service Pack 1
When network fax utilities and AddressBook Viewer have been installedIf the N/W-Fax driver and AddressBook Viewer have been installed from other e-STUDIO Client Utilities CD-ROM,uninstall them then install again from the Client Utilities CD-ROM.When you uninstall the AddressBook Viewer, click [No] at the dialog box that displays the message to delete the settingsfor the AddressBook Viewer so that you can restore the settings after installing new one.
To use N/W-Fax drivers, the printing function is required.The e-STUDIO455 Series and the e-STUDIO855 Series provide the printing function as an option. However, this optional function isalready installed in some models.

8/9/2019 Software Instalation Guide
http://slidepdf.com/reader/full/software-instalation-guide 153/172

8/9/2019 Software Instalation Guide
http://slidepdf.com/reader/full/software-instalation-guide 154/172
7 INSTALLING NETWORK FAX UTILITIES
152 Installing Network Fax Utilities
4 Confirm the list of the software to install and click [Install].
You can change the folder where these programs are installed. Click [Browse] and, when the [Browse For Folder]
dialog box appears, select a folder and click [OK].
Since the subsequent procedure is the same as that for printer driver installation, the steps are omitted. See the followingpages according to the connection environment.
P.37 “Raw TCP/LPR printing” P.46 “SMB printing”

8/9/2019 Software Instalation Guide
http://slidepdf.com/reader/full/software-instalation-guide 155/172
7 INSTALLING NETWORK FAX UTILITIES
Installing Web Service Print 153
Installing Web Service Print
You can install a N/W-Fax driver in Windows Vista/Server 2008 using the WSD (Web Services on Devices) protocol. Sincethe installation procedure is the same as that for printer driver installation, it is omitted. When performing installation, seethe following page:
P.74 “Web Service Print”

8/9/2019 Software Instalation Guide
http://slidepdf.com/reader/full/software-instalation-guide 156/172
7 INSTALLING NETWORK FAX UTILITIES
154 Uninstalling the Network Fax Software
Uninstalling the Network Fax Software
The following instructions describe how to uninstall the N/W-Fax driver and AddressBook Viewer.
Uninstalling N/W-Fax driver You can uninstall a N/W-Fax driver. Since the uninstallation procedure is the same as that for printer driver uninstallation,it is omitted. When performing uninstallation, see the following page:
P.78 “Uninstalling Printer Drivers”
Uninstalling AddressBook Viewer You can uninstall AddressBook Viewer using Add or Remove Programs function in Control Panel. For instructions onhow to uninstall them, refer to the following section.
P.162 “Uninstalling Client Software”

8/9/2019 Software Instalation Guide
http://slidepdf.com/reader/full/software-instalation-guide 157/172
8.INSTALLING e-Filing BACKUP/RESTOREUTILITIES
This chapter describes about installing the e-Filing Backup/Restore utilities.
Before Installation.................................... ................................... .................................. ....... 156System requirements..........................................................................................................................................156
Installing e-Filing Backup/Restore Utilities ..................................... .................................. 157
Uninstalling e-Filing Backup/Restore Utilities......................... ................................... ....... 160

8/9/2019 Software Instalation Guide
http://slidepdf.com/reader/full/software-instalation-guide 158/172
8 INSTALLING e-Filing BACKUP/RESTORE UTILITIES
156 Before Installation
Before Installation
This section describes about the installation of the e-Filing Backup/Restore utilities. Before installing them, read thissection.
System requirementsThe e-Filing Backup/Restore Utility is available for following environments: Display resolution
1024 x 768 dots or more Display color
High Color (16 bit) or higher is recommended CPU
Pentium 133 MHz minimum (Pentium 266 MHz or faster recommended) Memory
The required memory size for OS OS
Windows 2000 Service Pack 4Windows XP Service Pack 1/Service Pack 2/Service Pack 3Windows Vista Service Pack 1Windows Server 2003 Service Pack 1/Service Pack 2Windows Server 2008 Service Pack 1
Required softwareMicrosoft Internet Explorer 5.5 Service Pack 2 or later (Internet Explorer 7.0 or later when IPv6 is used)Microsoft Internet Explorer is enabled to access the e-Filing web utility on this equipment.- The proxy settings must be configured correctly to enable the access.- The browser must not be offline.
To backup/restore e-Filing data using e-Filing Backup/Restore utility, the FTP server option that can be set in thenetwork settings of TopAccess must be enabled.

8/9/2019 Software Instalation Guide
http://slidepdf.com/reader/full/software-instalation-guide 159/172
8 INSTALLING e-Filing BACKUP/RESTORE UTILITIES
Installing e-Filing Backup/Restore Utilities 157
Installing e-Filing Backup/Restore Utilities
This section describes how to install the e-Filing Backup/Restore utilities.The following describes an installation on Windows Vista. The procedure is the same when other versions of Windows areused.
To perform installation, you must log onto Windows with a user account, which enables the installation and
uninstallation of client software, such as “Administrators” or “Power Users”.If Windows Vista/Server 2008 is used, you can perform the installation by temporarily changing the user accountfollowing the procedure below.- Open the “e-STUDIO” folder in a CD-ROM, and then double-click “Setup.exe”.- When the [User Account Control] dialog box is displayed, enter the password of “Administrators”, and then click
[OK].
1 Insert the Client Utilities CD-ROM into the CD-ROM drive.When inserting the Client Utilities CD-ROM, the installer may automatically start. Click [Exit] to exit the installer andcontinue the operation.
2 Open “Admin\e-FilingUtility” folder and double-click “setup.exe”.
The [Choose Setup Language] dialog box appears.
3 Select your language and click [OK].
The [InstallShield Wizard] dialog box appears.
4 Click [Next].
The [License Agreement] dialog box appears.

8/9/2019 Software Instalation Guide
http://slidepdf.com/reader/full/software-instalation-guide 160/172
8 INSTALLING e-Filing BACKUP/RESTORE UTILITIES
158 Installing e-Filing Backup/Restore Utilities
5 Select “I accept the terms in the license agreement” and click [Next].
The [Destination Folder] dialog box appears.
6 Click [Next].
If you want to change where the programs are installed, click [Change]. In the dialog box appears, select thefolder and click [OK].[Ready to Install Program] dialog box appears.
7 Click [Install].
Starts copying files and the InstallShield Wizard Completed screen displayed when copying is completed.

8/9/2019 Software Instalation Guide
http://slidepdf.com/reader/full/software-instalation-guide 161/172
8.INSTALLING e-Filing BACKUP/RESTORE UTILITIES
Installing e-Filing Backup/Restore Utilities 159
8 INSTALLING e-Filing BACKUP/RESTORE UTILITIES
8 Click [Finish].
The installation is completed.
The Installer may ask you to restart your computer. If it does, select “Yes”, I want to restart my computer now.”and click [Finish] to restart your computer.

8/9/2019 Software Instalation Guide
http://slidepdf.com/reader/full/software-instalation-guide 162/172
8 INSTALLING e-Filing BACKUP/RESTORE UTILITIES
160 Uninstalling e-Filing Backup/Restore Utilities
Uninstalling e-Filing Backup/Restore Utilities
You can uninstall e-Filing Backup/Restore utilities using Add or Remove Programs function in Control Panel. Forinstructions on how to uninstall them, refer to the following section.
P.162 “Uninstalling Client Software”

8/9/2019 Software Instalation Guide
http://slidepdf.com/reader/full/software-instalation-guide 163/172
9.INSTALLATION MAINTENANCE
This chapter describes how to uninstall and repair the client software using the setup program.
Uninstalling Client Software................................... .................................. ........................... 162
Repairing Client Software................................... .................................... ............................. 164

8/9/2019 Software Instalation Guide
http://slidepdf.com/reader/full/software-instalation-guide 164/172
9 INSTALLATION MAINTENANCE
162 Uninstalling Client Software
Uninstalling Client Software
The following describes how to uninstall client software.The following describes an uninstallation on Windows Vista. The procedure is the same when other versions of Windowsare used.
The printer drivers and N/W-Fax driver cannot be uninstalled by the setup program. For instructions on how to
uninstall them, refer to the following section. P.78 “Uninstalling Printer Drivers”
1 Select [Start] - [Control Panel] - [Programs] and click [Uninstall a program].
The [Uninstall or change a Program] dialog box appears.When using Windows 2000/XP/Server 2003, open “Control Panel” and click the “Add or Remove Programs”icon.
2 From the list, select the software you want to remove and click [Uninstall].

8/9/2019 Software Instalation Guide
http://slidepdf.com/reader/full/software-instalation-guide 165/172
9.INSTALLATION MAINTENANCE
Uninstalling Client Software 163
9 INSTALLATION MAINTENANCE
3 Click [Yes].
When the [User Account Control] dialog box is displayed, click [Continue] to continue the installation. However,if you have logged on with a user account other than “Administrators”, enter the password of “Administrators”and then click [OK].
4 Click [Allow].
5 Click [Yes] to delete the setting files.
Deleting files starts.
If you want to re-install the client software later, click [No] to remain the setting files. You can restore the dataand settings when you re-install the client software.

8/9/2019 Software Instalation Guide
http://slidepdf.com/reader/full/software-instalation-guide 166/172
9 INSTALLATION MAINTENANCE
164 Repairing Client Software
Repairing Client Software
When the client software will not work correctly, you can repair the client software.The following describes an installation on Windows Vista. The procedure is the same when other versions of Windows areused.
The printer drivers and N/W-Fax driver cannot be repaired by the setup program. To repair them, uninstall them and
install again.Do not perform repairing the client software on Windows XP in which the Service Pack 2 is not installed. In thatcase, uninstall the client software and then install again to repair the client software.
1 Insert the Client Utilities CD-ROM into the CD-ROM drive.When inserting the Client Utilities CD-ROM, the Auto Play menu appears. Click [Open folder to view files] toopen the software folder.
2 Open the software folder that you want to repair and double click the [setup.exe] icon.To repair TWAIN Driver, locate“[Client Utilities CD-ROM]:\Client\TWAIN”.To repair File Downloader, locate“[Client Utilities CD-ROM]:\Client\FD”.To repair Remote Scan Diver, locate“[Client Utilities CD-ROM]:\Client\RS”.To repair AddressBook Viewer, locate“[Client Utilities CD-ROM]:\Client\ADRBK\32”.To repair AddressBook Viewer (for Windows 64-bit edition OSs), locate“[Client Utilities CD-ROM]:\Client\ADRBK\64”.
When the [User Account Control] dialog box is displayed, click [Continue] to continue the installation. However,if you have logged on with a user account other than “Administrators”, enter the password of “Administrators”and then click [OK].
3 Select the language and click [OK].
4 Click [Next].

8/9/2019 Software Instalation Guide
http://slidepdf.com/reader/full/software-instalation-guide 167/172
9.INSTALLATION MAINTENANCE
Repairing Client Software 165
9 INSTALLATION MAINTENANCE
5 Select [Repair] and click [Next].
6 Click [Install].
Repairing files starts.
7 Click [Finish] to close the wizard.
8 The installer ask you to restart your computer. Click [Yes] to restart your computer.

8/9/2019 Software Instalation Guide
http://slidepdf.com/reader/full/software-instalation-guide 168/172

8/9/2019 Software Instalation Guide
http://slidepdf.com/reader/full/software-instalation-guide 169/172INDEX 167
INDEX
A AddressBook Viewer ......................................... 10 , 150
CClient CD-ROM ............................................................8CUPS .....................................................................125
FFile Downloader ................................................ 10 , 142
IInstall So ftware link ....................................................12Installer ........... ............................................................8Internet print ing ..........................................................35IPP printing ...............................................................62
MMacintosh PPD ..........................................................82
N
N/W-Fax driver .............................. ................... 10 , 150NetWare print server in NDPS Mode ............................18NetWare prin t server in NDS Mode ............................ ..17Novell iPrint ... ..................................................... 27 , 35Novell Printing ...........................................................35
PPostS cript ...................................................................8PPD ............. .................................................... .. .... .. ..9Printer Drivers ................................................8 , 10 , 34
RRaw TCP/LPR Printin g ........................................... .. ..34Remote Scan Driver .......................................... 10 , 142
SSMB environm ent ....................................................151SMB Printing .............................................................35System Re quirements
Mac OS .... .............................................................82UNIX/Linux ...........................................................117Windows ................................................................34
TTWAIN Driver ................................................... 10 , 142
U
Uninstalling ......... ............................................. 78 , 154UNIX/Linux Filter s ....................................................116USB Connect ion ........................................................34USB printing ..............................................................53
WWeb Servic e Print .................................................. .. ..35WIA driver ........................................................ 10 , 142

8/9/2019 Software Instalation Guide
http://slidepdf.com/reader/full/software-instalation-guide 170/172168 INDEX

8/9/2019 Software Instalation Guide
http://slidepdf.com/reader/full/software-instalation-guide 171/172
FC-5520C/6520C/6530CFC-2330C/2820C/2830C/3520C/3530C/4520C
DP-2090/2520/3000/3570/4570DP-5550/6550/7550/8550
OME080012C0

8/9/2019 Software Instalation Guide
http://slidepdf.com/reader/full/software-instalation-guide 172/172
MULTIFUNCTIONAL DIGITAL SYSTEMSSoftware Installation Guide