contentssnap2007.emcp.com/snap/student_users_guide.pdf2 snap training and assessment user guide 3...
TRANSCRIPT

ISBN-10: 0-7638-3508-0ISBN-13: 978-0-76383-508-8
SNAP END USER LICENSE AGREEMENT
Paradigm Publishing, Inc. (“Paradigm”) grants the “End User” (herein defined as any person who downloads the files associated with SNAP Training and Assessment product, hereafter referred to as the “Program”) permission to use both the files and content of the Program. By doing so the End User acknowledges that Paradigm holds all benefits of copyright in the aforementioned Product. The End User further agrees that the Product will not be copied, sold for profit, or redistributed in any manner to any third party for any reason whatsoever without the express written consent of Paradigm. The End User agrees that Paradigm, at its sole discretion, with or without cause, may revoke this permission at any time. By using the enclosed password to enter SNAP, the End User acknowledges having read and understood the terms of the User License and hereby agrees that they will comply with the terms of the End User License.
©2008 by Paradigm Publishing, Inc.
MLB000442
16 15 14 13 12 11 10 XXX 6 7 8 9 10
2 SNAPTrainingandAssessmentUserGuide 3
Contents
What You Need on Your Computer to Run SNAP .....................4
Preparing Internet Explorer for SNAP ........................................4
Installing the SNAP Player ............................................................6
Using Your SNAP Account ............................................................7
Launching a Skill Exam .................................................................8
Taking a Skill Exam .....................................................................10
Navigating within a Skill Exam .................................................12
Taking a Skill Exam Without Feedback ....................................13
Taking a Skill Exam When You Lose Your Internet Connection ....................................................................13
Exiting a Skill Exam ..................................................................14
Launching a Concept Exam .........................................................14
Taking a Concept Exam ...............................................................15
Downloading and Completing a Document Assessment ...........17
Uploading a Document Assessment and Viewing Scores and Results .......................................................18
Launching a Tutorial ....................................................................20
Viewing a Tutorial ........................................................................22
Viewing the Tutorial Introduction..............................................22
Navigating within a Tutorial ......................................................22
Viewing a Skill Explore .............................................................24
Doing a Skill Practice Exercise ..................................................24
Viewing Alternative Methods ....................................................25
Taking the Concepts Review Quiz .............................................26
Taking the Skills Review ...........................................................27
Viewing Other Tutorials ..............................................................27
Tutorial Results .............................................................................28
Viewing and Editing Your SNAP Profile ...................................28
Getting and Using Help ................................................................28

SNAPTrainingandAssessmentUserGuide 5
Welcome to SNAP! With SNAP, you will get the chance to both demonstrate and enhance the computer skills you are learning in your course. This User Guide serves as an introduction to the SNAP interface and features.
For Technical Support, first go to our webpage at www.snap2007.emcp.com and click the FAQ button. You may also email us at [email protected] or call 800-328-1452 (press 2 for technical support).
What You Need on Your Computer to Run SNAP
The following are the minimum system requirements for using SNAP on your computer:
• Operating Systems: Windows XP, Windows Vista, Windows 7
• Web Browsers: Internet Explorer 6, 7, or 8 (not compatible with 64-bit Internet Explorer)
0 Any pop-up blocking software disabled
0 Flash 7 or higher plug-in installed
0 Scripting and cookies enabled
0 Configured to download and run signed ActiveX controls and plug-ins
• Security: Firewall(s) must be configured to allow data transfer to and from http://www.snap2007.emcp.com
• Screen Resolution: 1024 by 768 (or higher) with 16-bit color
• Audio: Any Windows-compatible soundcard for audio during tutorials
• Document Assessments: Requires Microsoft Office 2007
Preparing Internet Explorer for SNAP
In order to view SNAP in Internet Explorer 8, complete the following steps:
1. Open Internet Explorer. 2. Click Tools.
4 SNAPTrainingandAssessmentUserGuide
3. Click Compatibility View Settings. 4. Type http://emcp.com in the Add the website text box. 5. Click Add. 6. Click Close.
In order to view SNAP in Internet Explorer 6, 7, or 8, you must:
1. Disable pop-up blocking software. 2. Allow any firewalls installed on your computer to transfer
data between your computer and http://snap2007.emcp. com.
3. Enable scripts and cookies. 4. Enable ActiveX controls and plug-ins.
Note: The following steps are for Internet Explorer 7 and 8. They will vary somewhat for Internet Explorer 6.
To enable scripts and cookies, complete the following steps:
1. In Internet Explorer, click Tools and then click Internet Options.
2. Click the Privacy tab. 3. Select Medium on the Privacy slider. 4. Click OK.
To ensure that SNAP can communicate with your computer:
1. Click Tools and then click Internet Options. 2. Click the Security tab. 3. Click Trusted Sites. 4. Uncheck the Require server verification (https:) for all sites
in this zone checkbox. Then add http://www.snap2007.emcp.com/ as a trusted site via the Sites button.
Note: If you have a third-party firewall software program, such as Norton Protection Center, you will need to set it to allow data transfer between http://www.snap2007.emcp.com and your computer. Consult your product’s Help menu for instructions.

SNAPTrainingandAssessmentUserGuide 76 SNAPTrainingandAssessmentUserGuide
7. Start Internet Explorer, go to http://snap2007.emcp.com, and log in.
8. You may be prompted by the Information Bar located at the top of the webpage stating “The previous webpage might require the following add-on: ‘Xstream Media Player’ from ‘Knowledge Quest’. Click here to allow it to run…”. Click this bar and select Allow to run on this website to complete the installation.
Using Your SNAP Account
To set up your SNAP account, complete the following steps:
1. Go to www.snap2007.emcp.com.2. Click Sign Up in the New Student? section.3. At the New Account page that appears, create a username
and password for yourself.4. In the More details section, enter the required information.5. In the Course Enrollment section, enter the following
information:
•Enrollment Key: You will receive this from your course instructor.
•Activation Code: You will find this printed on the inside front cover of this User Guide.
Note: You will only need to enter the Enrollment Key and Activation Code this one time.
6. Click the Create my new account button.
7. A Confirm Course Account page appears, listing your
To ensure that ActiveX controls and plug-ins are enabled, complete the following steps:
1. Click Tools and then click Internet Options. 2. Click the Security tab. 3. Set Security level for this zone to Medium.4. Click the Custom level button and verify the following
settings in the ActiveX controls and plug-ins section:
• Allow Previously unused ActiveX controls to run w/oprompt: Enable
• AllowScriptlets:Disable• AutomaticPromptingforActiveXcontrols:Disable • Binaryandscriptbehaviors:Enable • DownloadsignedActiveXcontrols:Prompt• InitializeandscriptActiveXcontrolsnotmarkedassafe
for scripting: Disable • RunActiveXcontrolsandplug-ins:Enable• Script ActiveX controls marked safe for scripting:
Enable
Installing the SNAP Player In order to view and use SNAP tutorials and skill exams, you must install the Xstream Media Player. Complete the following steps:
1. Start Internet Explorer, go to http://snap2007.emcp.com, and click Downloads in the upper right corner of the SNAP home page.
2. Click the Download the XStream Media Player link.3. Save the xstream.exe file to your desktop. 4. IMPORTANT: Close Internet Explorer when done
downloading.5. Go to your desktop, double-click on the Xstream.exe icon,
and click Run.6. At the Xstream Media License Agreement, click Agree.
When the install window disappears, the installation is complete. (Some users may have to “allow” the install, others may need to close the message box titled “The program has installed successfully.”)

appears shows the type, name, scheduled time, best grade (if attempted), and teacher feedback for each scheduled skill exam.
To go to a specific skill exam, click the name of the skill exam in the list on the exams page or click the name of the skill exam on the Assignments page.
The skill exam introduction page that appears when you click a skill exam shows the exam type, exam name, instructor comments (if any), attempts allowed (if set), grading method, and time limit (if set). If the skill exam can still be taken, you can go to the Launch Exam page from here.
If you have previously attempted the skill exam, you will see a list of attempts and when they were completed. You will also see grading information (if allowed) and re-attempt information (if allowed).
To launch a skill exam complete the following steps:
1. Install the SNAP player. (see page 6).2. If you have not yet attempted the exam, click the Attempt
exam now button.3. If you have already attempted the exam and would like to
re-attempt it, click the Re-attempt exam button.
8 SNAPTrainingandAssessmentUserGuide SNAPTrainingandAssessmentUserGuide 9
course and section names. If the information is correct, click Confirm Account. If it is not correct, click Go Back to return to the New Account page, or click Cancel to return to the SNAP home page.
8. At the page indicating that an email has been sent to your email account confirming your registration, click Continue to return to the SNAP home page.
9. Enter the user name and password you created in Step 3. This will bring up your course’s Assignments page.
It is from the Assignments page that you will use your SNAP account.
Launching a Skill Exam
With SNAP, your instructor can assign you skill exams with which to test your comprehension and skills. Skill exams are made up of interactive questions in which you perform a task using a simulation of one of the applications in Microsoft Office 2007.
To see a list of all scheduled exams, click Exams in the Activities section of the Assignments page sidebar. The Exams page that
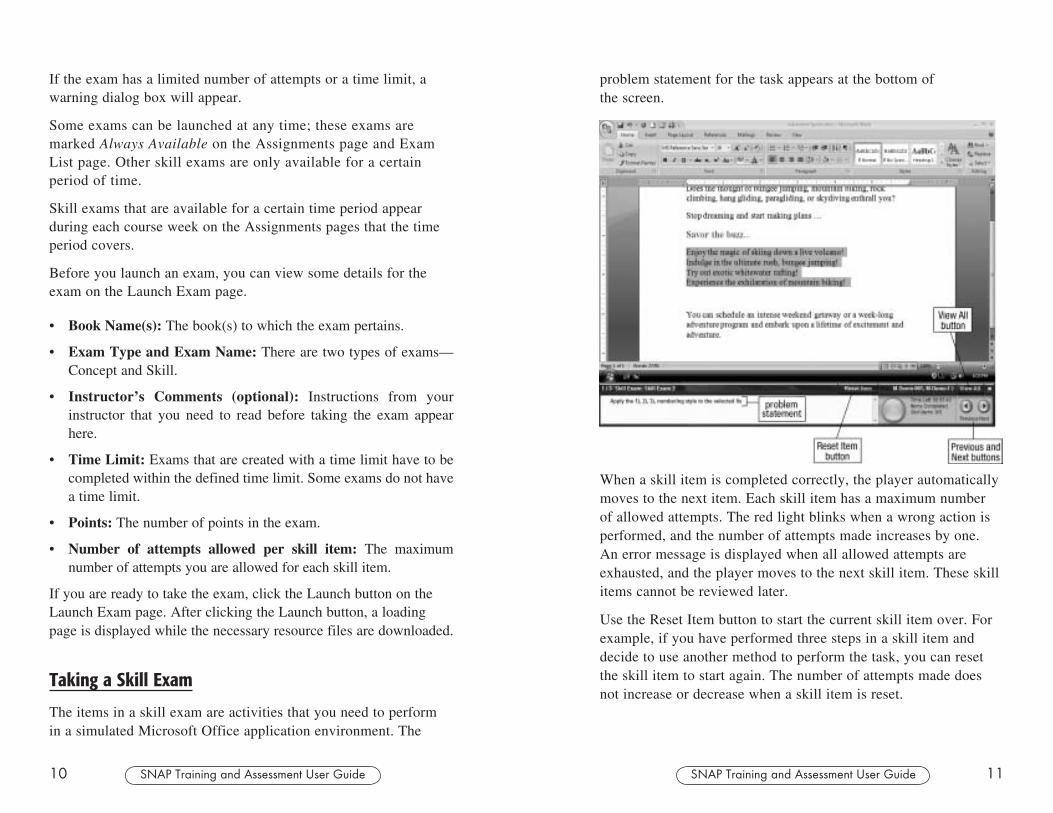
problem statement for the task appears at the bottom of the screen.
When a skill item is completed correctly, the player automatically moves to the next item. Each skill item has a maximum number of allowed attempts. The red light blinks when a wrong action is performed, and the number of attempts made increases by one. An error message is displayed when all allowed attempts are exhausted, and the player moves to the next skill item. These skill items cannot be reviewed later.
Use the Reset Item button to start the current skill item over. For example, if you have performed three steps in a skill item and decide to use another method to perform the task, you can reset the skill item to start again. The number of attempts made does not increase or decrease when a skill item is reset.
SNAPTrainingandAssessmentUserGuide 1110 SNAPTrainingandAssessmentUserGuide
If the exam has a limited number of attempts or a time limit, a warning dialog box will appear.
Some exams can be launched at any time; these exams are marked Always Available on the Assignments page and Exam List page. Other skill exams are only available for a certain period of time.
Skill exams that are available for a certain time period appear during each course week on the Assignments pages that the time period covers.
Before you launch an exam, you can view some details for the exam on the Launch Exam page.
• Book Name(s): The book(s) to which the exam pertains.
• Exam Type and Exam Name: There are two types of exams—Concept and Skill.
• Instructor’s Comments (optional): Instructions from your instructor that you need to read before taking the exam appear here.
• Time Limit: Exams that are created with a time limit have to be completed within the defined time limit. Some exams do not have a time limit.
• Points: The number of points in the exam.
• Number of attempts allowed per skill item: The maximum number of attempts you are allowed for each skill item.
If you are ready to take the exam, click the Launch button on the Launch Exam page. After clicking the Launch button, a loading page is displayed while the necessary resource files are downloaded.
Taking a Skill Exam
The items in a skill exam are activities that you need to perform in a simulated Microsoft Office application environment. The

2. Click the hyperlink in the Sr. No, Status, or Question column of any item to launch that item.
You can sort skill items within an application by Sr. No or Status by clicking the column heading.
• Sr. No sorts items by sequence number.
• Status sorts items in the following order:
0 Attempted
0 Currently On
0 Skipped
0 Not Seen
The screen below shows items sorted by Status. Note that items are only sorted within each application.
Taking a Skill Exam without Feedback
Your instructor may set some exams in a no-feedback mode. When attempting skill items in an exam without feedback, the number of attempts is not displayed, and the red light at the bottom of the screen does not blink when you perform an incorrect action.
Taking a Skill Exam When You Lose YourInternet Connection
If you are taking a skill exam and your Internet connection is broken, you can still continue to attempt skill items in the exam. The program will not interrupt you and it will still record your actions (though they will not be uploaded to the database). When you complete the exam or decide to exit it, if the Internet connection is not present you will get a warning message.
SNAPTrainingandAssessmentUserGuide 13
Navigating within a Skill Exam
You are automatically taken to the next skill item in an exam when–
• Youcorrectlycompleteaskillitem
• Youexhaustallattemptsforaskillitem
You can use one of the following two ways to navigate within an exam:
• TheNextandPreviousbuttons
• TheViewAllwindow
Using the Next and Previous Buttons
To move to another skill item without completing the current one, use the Previous and Next buttons. You can even skip a skill item without performing any actions.
• UsetheNextbuttontomovetothenextskillitemthatstillhasattempts left.
• UsethePreviousbuttontomovetothepreviousskillitemthatstill has attempts left.
Using the View All Window
The View All window allows you to jump between skill items in any order. The View All window shows items that are incomplete, not seen, or skipped, and the one that is currently on.
Skill items where all attempts are exhausted, or those that have been completed correctly, are not shown in the View All window.
To use the View All window, complete the following steps:
1. Click the View All button.
12 SNAPTrainingandAssessmentUserGuide

SNAPTrainingandAssessmentUserGuide 15
At this time you can reconnect to the Internet and then click OK to up-load your results to the skill exam. Note: You must reconnect to the Internet BEFORE clicking OK, or your skill exam results will not load.
If on clicking OK the Internet connection is found, the results will be uploaded. If the Internet connection is not found, you will get a message alerting you to this. If you are unable to connect to the Internet after being told that the Internet connection has been broken, the score data for the skill exam will be lost.
Exiting a Skill Exam
You can exit a skill exam at any time by clicking the Exit button. Click Yes at the SNAP message box to exit.The player will alert you automatically when you have completed all the skill exam items or when the allotted time for the skill exam is over.
Launching a Concept Exam
Concept exams are made up of true/false, multiple-choice, or other kinds of objective questions testing your knowledge of computer concepts and the specific program you are learning.
To see a list of all scheduled concept exams you can click Exams in the Activities section of the Assignments page sidebar. The Exams page that appears shows the type, name, scheduled time, best grade (if attempted), and teacher feedback for each scheduled concept exam.
14 SNAPTrainingandAssessmentUserGuide
To go to a specific concept exam, either click the name of the concept exam in the list on the Exams page, or click the name of the concept exam on the Assignments page.
The page that appears when you click a concept exam shows the exam type, exam name, instructor comments (if any), attempts allowed (if set), grading method, and time limit (if set). If the concept exam can still be taken, you can launch the exam from here.
If you have previously attempted the concept exam, you will see a list of attempts and when they were completed. You will also see grading information (if allowed) and re-attempt information (if allowed).
To launch a concept exam complete the following steps:
1. If you have not yet attempted the exam, click the Attempt exam now button.
2. If you have already attempted the exam and would like to re-attempt it, click the Re-attempt exam button.
3. If you would like to continue an attempt that you had previously started, click the Continue the last attempt button.
If the exam has a limited number of attempts or a time limit, a warning dialog box will appear. If you are ready to take the exam, click the OK button to launch.
Some exams can be launched at any time; these exams are marked Always Available on the Assignments page and Exam List page. Other concept exams are only available for a certain period of time.
Concept exams that are available for a certain time period appear during each course week on the Assignments page that the time period covers.
Taking a Concept ExamWhen you launch a concept exam, the exam items appear on the screen, sometimes covering several pages. Read each item and select the answer you believe is correct. You can change your
Downloading and Completing a Document Assessment
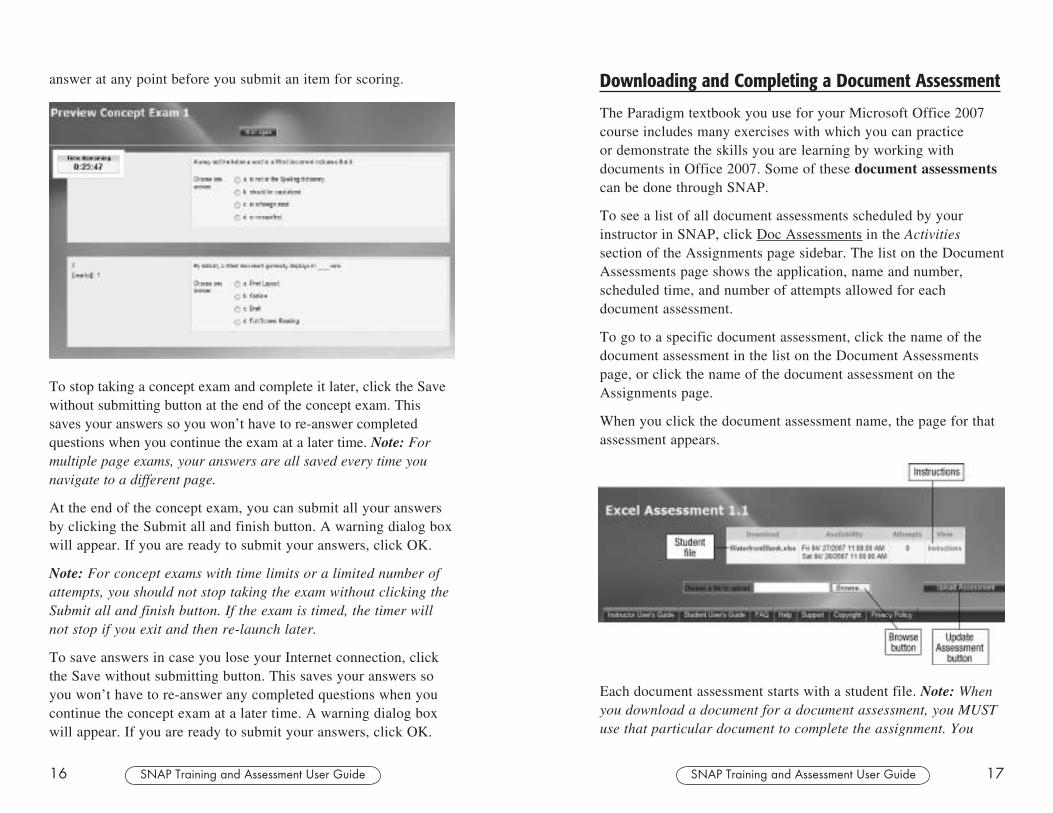
The Paradigm textbook you use for your Microsoft Office 2007 course includes many exercises with which you can practice or demonstrate the skills you are learning by working with documents in Office 2007. Some of these document assessments can be done through SNAP.
To see a list of all document assessments scheduled by your instructor in SNAP, click Doc Assessments in the Activities section of the Assignments page sidebar. The list on the Document Assessments page shows the application, name and number, scheduled time, and number of attempts allowed for each document assessment.
To go to a specific document assessment, click the name of the document assessment in the list on the Document Assessments page, or click the name of the document assessment on the Assignments page.
When you click the document assessment name, the page for that assessment appears.
Each document assessment starts with a student file. Note: When you download a document for a document assessment, you MUST use that particular document to complete the assignment. You
SNAPTrainingandAssessmentUserGuide 17
answer at any point before you submit an item for scoring.
To stop taking a concept exam and complete it later, click the Save without submitting button at the end of the concept exam. This saves your answers so you won’t have to re-answer completed questions when you continue the exam at a later time. Note: For multiple page exams, your answers are all saved every time you navigate to a different page.
At the end of the concept exam, you can submit all your answers by clicking the Submit all and finish button. A warning dialog box will appear. If you are ready to submit your answers, click OK.
Note: For concept exams with time limits or a limited number of attempts, you should not stop taking the exam without clicking the Submit all and finish button. If the exam is timed, the timer will not stop if you exit and then re-launch later.
To save answers in case you lose your Internet connection, click the Save without submitting button. This saves your answers so you won’t have to re-answer any completed questions when you continue the concept exam at a later time. A warning dialog box will appear. If you are ready to submit your answers, click OK.
16 SNAPTrainingandAssessmentUserGuide

Your score, shown as a percentage, is shown in the Score column. If allowed by your instructor, the Download column lists several documents that help you interpret your results.
• Result: To view the Result document, click Result and then click either Open or Save. This file is an annotated version of your document assessment, showing what you did correctly and what you did wrong. How this is shown depends on the application used.
0 For Word document assessments, text shown without any color background is prepared correctly. Text shown with a light red background is incorrect in some way. In that instance, the document also shows what the correct text would look like, shown with a light green background.
0 For Excel document assessments, cells that contain incorrect content are shaded in light red. The correct contents for the cell are shown as a comment, which you can view by clicking the color triangle in the upper-right corner of the cell.
0 For PowerPoint document assessments, slides that contain incorrect text or formatting will show the incorrect material highlighted in red, with the correct text or formatting information appearing in a comment.
• Answer Key: Your instructor may give you access to an annotated model answer, called an Answer Key, for the document assessment, which shows exactly what changes were called for in creating the finished document. To view the Answer Key file, click Answer Key and then either click Open
SNAPTrainingandAssessmentUserGuide 19
cannot use a document downloaded by someone else in SNAP or a document from the student CD that came with your book.
To complete the document assessment, complete the following steps:
1. Click the name of the student file in the Download column.
2. Save the file to your computer.3. Click Instructions in the View column.4. Either open the Instructions file or save it to your
computer and then open it.5. Open the student document in the appropriate Microsoft
Office 2007 application.6. Re-name the document and edit it following the steps in
the Instructions file and then save and close the document.
Uploading a Document Assessment and ViewingScores and Results
When you have finished your document assessment, you can submit it to SNAP for scoring and correcting. To submit a document assessment for scoring and results, complete the following steps:
1. Click the name of the document assessment in the document assessment list or click the name of the document assessment on the Assignments page.
2. At the document assessment page, click the Browse button next to the Choose a file to upload text box.
3. At the Choose File to Upload window, navigate to your renamed and completed assessment file so that the name appears in the File name text box and then click the Open button. This will place the file’s path and name in the Choose a file upload text box on the document assessment page.
4. Click the Upload Assessment button to upload your completed assessment file. The Document Assessment results page appears, as shown on next page.
18 SNAPTrainingandAssessmentUserGuide

In the Launch Tutorial dialog box you can choose to launch a tutorial with or without audio. Audio files constitute approximately 95% of a tutorial’s download size. It is recommended that you launch tutorials without audio if you have a slow Internet connection. You also can choose either an English or Spanish introduction to the tutorial.
To launch a tutorial complete the following steps:1. If you have not yet done so, install the SNAP player (see
page 6).2. To launch a tutorial with audio, click the Launch this
Tutorial with Audio check box. Note: If you choose to launch a tutorial with audio, a control on the player lets you turn on and off the volume at any time.
3. Click either the English, Spanish, or Skip Introduction radio button after Play tutorial introduction in.
4. Click the Launch button.
Once you click the Launch button, a progress bar is displayed, similar to the one you see when launching an exam, while the necessary resource files are downloaded.
SNAPTrainingandAssessmentUserGuide 21
or Save. Note: You will need Adobe Acrobat Reader installed on your computer to open this document.
• Submitted File: Clicking Submitted File allows you to open the file that you submitted to SNAP.
Launching a Tutorial
Tutorials are interactive, on-screen lessons linked to corresponding chapters of your Paradigm Microsoft Office 2007 textbook. They are meant to supplement what you read in your book through audio-enhanced, hands-on demonstrations, and through review exercises that give you a chance to apply the skills demonstrated in the tutorial.
Tutorials can be launched at any time, even before or after their scheduled date(s). To see a list of all tutorials scheduled by your instructor in SNAP, click Tutorials in the Activities section of the Assignments page sidebar.
The list on the Tutorials page shows the specific tutorials assigned by your instructor at the top, with the application, name and number, and scheduled time. You can also access unscheduled tutorials for your course, which are listed below the scheduled ones.
To go to a specific tutorial, click the name of the tutorial in the tutorial list on the Tutorials page or click the name of the tutorial on the Assignments page.
When you click a tutorial or skill link, the Launch Tutorial dialog box appears as shown on the next page.
20 SNAPTrainingandAssessmentUserGuide

on the lower right corner of your screen. You will use the player to read the tutorial text and to navigate within the tutorial.
There are three controls on the tutorial player that help you navigate within a tutorial:
• TheNextFrameandPreviousFramebuttons
• TheNextModuleandPreviousModulebuttons
• TheSkillstab
Using the Next Frame and Previous Frame Buttons
Use the Next Frame and Previous Frame buttons to move frame-by-frame through a module. Clicking the Next Frame button on the last frame of the Explore section takes you to the Practice section. Clicking the Next Frame button after completing the Practice section takes you to the Alternative Methods section.
SNAPTrainingandAssessmentUserGuide 23
Viewing a Tutorial
The main sections of a tutorial are called modules. Every tutorial has the following modules:
• Introduction.A Flash animation that visually demonstrates the skills you will learn in the tutorial
• Skills.
0 Explore. Learn a skill
0 Practice. Practice the skill
0 Alternative Methods. Learn other ways to perform the same skill
• TutorialSummary.Restates what you learned
• Concepts Review. A five-question quiz that tests your conceptual understanding
• SkillsReview.Simulation that tests some of the important skills you learned in the tutorial
Viewing the Tutorial Introduction The Tutorial Introduction is a Flash animation (in either English or Spanish) that summarizes the skills you will learn in the tutorial. If you choose to launch the tutorial without audio, the animation plays in silent mode. Note: You must have the Flash 7 (or higher) browser plug-in for Internet Explorer to view this animated introduction.
A text screen appears after the animation, displaying a text introduction (in either English or Spanish) to the tutorial. When you are finished with this screen, click the double, right-pointing arrow button at the bottom of the tutorial window. After reading the summary text, click the double, right-pointing button. This will launch the tutorial.
Navigating within a TutorialA few seconds after launching a tutorial, a simulation of the application taught by the tutorial appears, with the tutorial player
22 SNAPTrainingandAssessmentUserGuide
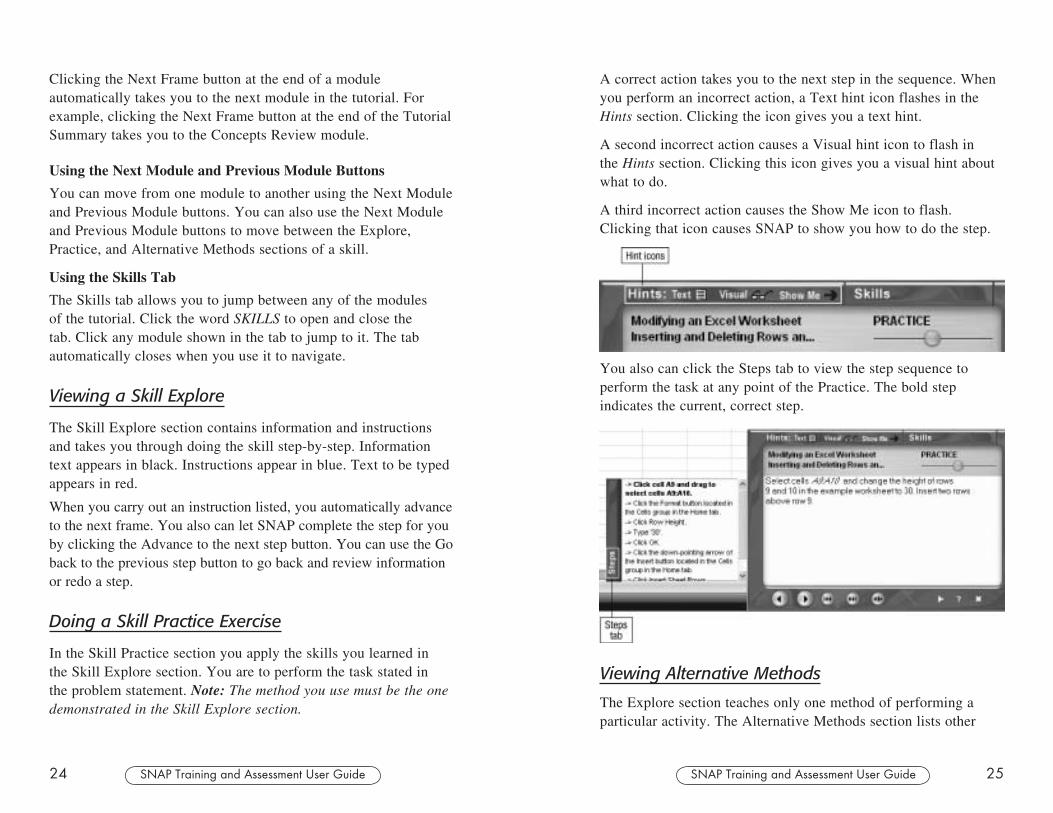
A correct action takes you to the next step in the sequence. When you perform an incorrect action, a Text hint icon flashes in the Hints section. Clicking the icon gives you a text hint.
A second incorrect action causes a Visual hint icon to flash in the Hints section. Clicking this icon gives you a visual hint about what to do.
A third incorrect action causes the Show Me icon to flash. Clicking that icon causes SNAP to show you how to do the step.
You also can click the Steps tab to view the step sequence to perform the task at any point of the Practice. The bold step indicates the current, correct step.
Viewing Alternative Methods
The Explore section teaches only one method of performing a particular activity. The Alternative Methods section lists other
SNAPTrainingandAssessmentUserGuide 25
Clicking the Next Frame button at the end of a module automatically takes you to the next module in the tutorial. For example, clicking the Next Frame button at the end of the Tutorial Summary takes you to the Concepts Review module.
Using the Next Module and Previous Module Buttons
You can move from one module to another using the Next Module and Previous Module buttons. You can also use the Next Module and Previous Module buttons to move between the Explore, Practice, and Alternative Methods sections of a skill.
Using the Skills Tab
The Skills tab allows you to jump between any of the modules of the tutorial. Click the word SKILLS to open and close the tab. Click any module shown in the tab to jump to it. The tab automatically closes when you use it to navigate.
Viewing a Skill Explore
The Skill Explore section contains information and instructions and takes you through doing the skill step-by-step. Information text appears in black. Instructions appear in blue. Text to be typed appears in red.
When you carry out an instruction listed, you automatically advance to the next frame. You also can let SNAP complete the step for you by clicking the Advance to the next step button. You can use the Go back to the previous step button to go back and review information or redo a step.
Doing a Skill Practice Exercise
In the Skill Practice section you apply the skills you learned in the Skill Explore section. You are to perform the task stated in the problem statement. Note: The method you use must be the one demonstrated in the Skill Explore section.
24 SNAPTrainingandAssessmentUserGuide

Advance to the next step buttons to move between concept items without attempting them.
Taking the Skills Review
The Skills Review module tests your ability to apply the skills you have learned. Unlike in the Practice sections, in a Skill Review there are no hints available. Also unlike the Practice sections, you can use more than one method to accomplish a task.
A maximum of five incorrect actions is allowed while performing the task. After each incorrect action, an error message is displayed.
When you complete the Skill Review or run out of attempts, click the Restart button to review the tutorial or click the Finish button to leave the tutorial.
Viewing Other Tutorials
You can view tutorials you haven’t completed by clicking Tutorials in the Activities section of the Assignments page sidebar. You can launch and complete a tutorial that has not been completed by clicking the hyperlink in the list on the Tutorials page. The Show Skills button allows you to see the skills covered in each tutorial.
SNAPTrainingandAssessmentUserGuide 27
possible ways of performing the activities taught in a skill. Unless otherwise noted, you can use these alternative methods when performing the Skill Review at the end of the tutorial.
Click the Print button at the top of the Alternative Methods window to print out the step-by-step listing.
Taking the Concepts Review Quiz
The Concepts Review module tests your understanding of the skills covered in the tutorial. You will see five multiple-choice questions. For each question, select an option and click the Check my answer button. If your choice is incorrect, you can try another selection, or click the Show answers button to see the correct choice. You also can use the Go back to the previous step and
26 SNAPTrainingandAssessmentUserGuide

• YoucanviewtheHelpmenuforSNAPbyclickingHelp in the upper right corner of the SNAP interface.
• Inmanycases,youcanviewHelpinformationaboutaparticular section or function on the page by clicking the question mark icon.
• YoucanviewacomprehensivestudentUser Guide by clicking the User’s Guide button at the bottom of the page.
• You can view a list of Frequently Asked Questions for the product by clicking the FAQ button at the bottom of the page.
• YoucanviewHelpvideosshowingbasicoperationsofSNAP by clicking the Help button at the bottom of the page.
SNAPTrainingandAssessmentUserGuide 29
(Once clicked, the Show Skills button becomes a Hide Skills button.) If you already started a tutorial earlier, you can begin at a particular skill by clicking that skill hyperlink.
Tutorial Results
SNAP notes your work on a tutorial in a report that shows a percentage score. This percentage is determined by two things: 1) the amount of time you have spent during your first viewing of the tutorial compared to the average amount of time it has taken SNAP users to complete the tutorial; and 2) the number of slides/activities that you have viewed and completed. It is an estimate of how much of the tutorial you completed.
Your instructor may include this percentage toward your grade. You have the option of re-doing a tutorial, after your initial attempt, to improve your percentage score.
Viewing and Editing Your SNAP Profile
You can change your SNAP profile information by clicking View Profile in the Administration section of the Assignments page sidebar.
At the profile page that appears, click the Change password button at the bottom of the page to change your SNAP password.
Click the Edit profile tab on the profile page to change your personal information. Click Update profile when you are finished.
Getting and Using Help
SNAP provides a variety of sources from which to get help and information. Access to these resources is provided on the SNAP interface, shown on the next page.
28 SNAPTrainingandAssessmentUserGuide

NOTES
SNAPTrainingandAssessmentUserGuide 3130 SNAPTrainingandAssessmentUserGuide
NOTES

32 SNAPTrainingandAssessmentUserGuide
NOTES