smart mcc communications manual - siemens industry, inc
TRANSCRIPT

User Manual
Connectivity to Industrial Networks
Third Party Compatible
PROFIBUS Solutions
smart mccCOMMUNICATIONS

Unless otherwise noted, all names identified by ® are registered trademarks of Siemens AG or Siemens Energy & Automation, Inc.
The remaining trademarks in this publication may be trademarks whose use by third parties for their own purposescould violate the rights of the owner, including but not limited to the following trademarks and products:
Rockwell Software RSLogix5000®Rockwell Software RSNetworx for Devicenet®Rockwell Automation ControlLogix® Rockwell Automation CompactLogix PLC®
Group Schneider Modicon Quantum® PLCGroup Schneider Concept 2.6 XL Programming Software®
Prosoft Technologies MVI56-PDPMV1 PROFIBUS Scanner Card for ControlLogix PLC®Prosoft Technologies PTQ-PDPMV1 PROFIBUS Scanner Card for Quantum PLC®
Hilscher RIF 1769 for CompactLogix PLC®
HMS Anybus Gateway-X PROFIBUS Master®HMS Anybus NetTool®
WARNINGThis instruction manual contains procedures for commissioning industrial control networks. These procedures must be performed on systems that are not in operation. That is to say, all required equipment for the procedure must be operational, but not in a state of active use with “live” or running equipment.
While following these instructions you may have to either:A. Cycle power to the devicesB. Cycle between the “RUN” and “PROGRAMMING” modes
CAUTIONOnly qualified personnel with proper training on PLC programming maintenance, and full access to the required equipmentshould perform these procedures. Within the context of this manual, qualified persons are defined as persons who have theskills and knowledge related to the construction and operation of the equipment and the equipment on which it is installed,and have received safety training to recognize and avoid any hazards involved.
These procedures assume technical skill and familiarity with Rockwell Automation ControlLogix PLC, Rockwell SoftwareRSLogix5000, Rockwell Software RSNetworx for Devicenet, Modicon Quantum PLC, Concept 2.6XL programming software, Windows Hyperterminal software, Ethernet wiring practices, and Ethernet IP/Subnet addressing ranges available for the installation.
Lack of knowledge or experience with these programming environments may create potentially unsafe operating conditions,which may result in death, severe personal injury or serious property damage.
NOTETHESE INSTRUCTIONS DO NOT PURPORT TO COVER ALL DETAILS OR VARIATIONS IN EQUIPMENT, OR TO PROVIDE FOR EVERY POSSIBLE CONTINGENCY TO BE MET IN CONNECTION WITH INSTALLATION, OPERATION OR MAINTENANCE. SHOULD FURTHERINFORMATION BE DESIRED OR SHOULD PARTICULAR PROBLEMS ARISE, WHICH ARE NOT COVERED SUFFICIENTLY FOR THE PURCHASER’S PURPOSES, THE MATTER SHOULD BE REFERRED TO THE LOCAL SIEMENS SALES OFFICE. THE CONTENTS OF THISINSTRUCTION MANUAL SHALL NOT BECOME PART OF OR MODIFY ANY PRIOR OR EXISTING AGREEMENT, COMMITMENT OR RELATIONSHIP. THE SALES CONTRACT CONTAINS THE ENTIRE OBLIGATION OF SIEMENS. THE WARRANTY CONTAINED IN THE CONTRACT BETWEEN THE PARTIES IS THE SOLE WARRANTY OF SIEMENS. ANY STATEMENTS CONTAINED HEREIN DO NOT CREATE NEW WARRANTIES OR MODIFY THE EXISTING WARRANTY.
TrademarksSmart MCC Network Communications

Table of ContentsSmart MCC Network Communications
1. Introduction. . . . . . . . . . . . . . . . . . . . . . . . . . . . . . . . . . . . . . . . . . . . . . . . . . . . . . . . . . . . . . . . . . . . . . . . . . . . . . . . . . . . . . 11.1. TIAStar MCC . . . . . . . . . . . . . . . . . . . . . . . . . . . . . . . . . . . . . . . . . . . . . . . . . . . . . . . . . . . . . . . . . . . . . . . . . . . . . . . . . . . 11.2. TIAStar MCC Overview . . . . . . . . . . . . . . . . . . . . . . . . . . . . . . . . . . . . . . . . . . . . . . . . . . . . . . . . . . . . . . . . . . . . . . . . . . . 2
1.2.1 MCC Design . . . . . . . . . . . . . . . . . . . . . . . . . . . . . . . . . . . . . . . . . . . . . . . . . . . . . . . . . . . . . . . . . . . . . . . . . . . . . . . 21.2.2. MCC Network Installation . . . . . . . . . . . . . . . . . . . . . . . . . . . . . . . . . . . . . . . . . . . . . . . . . . . . . . . . . . . . . . . . . . . . 31.2.3. Default Configuration . . . . . . . . . . . . . . . . . . . . . . . . . . . . . . . . . . . . . . . . . . . . . . . . . . . . . . . . . . . . . . . . . . . . . . . 4
1.3 Communication to a TIAStar MCC . . . . . . . . . . . . . . . . . . . . . . . . . . . . . . . . . . . . . . . . . . . . . . . . . . . . . . . . . . . . . . . . . . 51.3.1. Siemens PLC or PCS System. . . . . . . . . . . . . . . . . . . . . . . . . . . . . . . . . . . . . . . . . . . . . . . . . . . . . . . . . . . . . . . . . . . 51.3.2. Recommended PLC Cards . . . . . . . . . . . . . . . . . . . . . . . . . . . . . . . . . . . . . . . . . . . . . . . . . . . . . . . . . . . . . . . . . . . . 61.3.3. Recommended Gateways . . . . . . . . . . . . . . . . . . . . . . . . . . . . . . . . . . . . . . . . . . . . . . . . . . . . . . . . . . . . . . . . . . . . 7
1.4 Scope of Responsibility . . . . . . . . . . . . . . . . . . . . . . . . . . . . . . . . . . . . . . . . . . . . . . . . . . . . . . . . . . . . . . . . . . . . . . . . . . 81.5 Fieldbus Definitions . . . . . . . . . . . . . . . . . . . . . . . . . . . . . . . . . . . . . . . . . . . . . . . . . . . . . . . . . . . . . . . . . . . . . . . . . . . . . 9
1.5.1. Devicenet, Controlnet, Ethernet/IP . . . . . . . . . . . . . . . . . . . . . . . . . . . . . . . . . . . . . . . . . . . . . . . . . . . . . . . . . . . . . 91.5.2. Modbus . . . . . . . . . . . . . . . . . . . . . . . . . . . . . . . . . . . . . . . . . . . . . . . . . . . . . . . . . . . . . . . . . . . . . . . . . . . . . . . . . . 91.5.3. PROFIBUS . . . . . . . . . . . . . . . . . . . . . . . . . . . . . . . . . . . . . . . . . . . . . . . . . . . . . . . . . . . . . . . . . . . . . . . . . . . . . . . . . 9
2. PROFIBUS Integration Overview . . . . . . . . . . . . . . . . . . . . . . . . . . . . . . . . . . . . . . . . . . . . . . . . . . . . . . . . . . . . . . . . . . . . . 102.1. PROFIBUS Network Basics . . . . . . . . . . . . . . . . . . . . . . . . . . . . . . . . . . . . . . . . . . . . . . . . . . . . . . . . . . . . . . . . . . . . . . . 102.2. Default Cyclic Interface . . . . . . . . . . . . . . . . . . . . . . . . . . . . . . . . . . . . . . . . . . . . . . . . . . . . . . . . . . . . . . . . . . . . . . . . . 11
2.2.1. Default SIMOCODE Cyclic Interface . . . . . . . . . . . . . . . . . . . . . . . . . . . . . . . . . . . . . . . . . . . . . . . . . . . . . . . 11 – 122.2.2. MM440 VFD Cyclic Interface . . . . . . . . . . . . . . . . . . . . . . . . . . . . . . . . . . . . . . . . . . . . . . . . . . . . . . . . . . . . . . . . . 132.2.3. 3RW44 Soft Starter . . . . . . . . . . . . . . . . . . . . . . . . . . . . . . . . . . . . . . . . . . . . . . . . . . . . . . . . . . . . . . . . . . . . . . . . 142.2.4. 9300 Power Meter. . . . . . . . . . . . . . . . . . . . . . . . . . . . . . . . . . . . . . . . . . . . . . . . . . . . . . . . . . . . . . . . . . . . . 15 – 16
2.3. ProSoft and HUMS PROFIBUS Network Configuration . . . . . . . . . . . . . . . . . . . . . . . . . . . . . . . . . . . . . . . . . . . . . . . . . 172.3.1. Install GSD Files. . . . . . . . . . . . . . . . . . . . . . . . . . . . . . . . . . . . . . . . . . . . . . . . . . . . . . . . . . . . . . . . . . . . . . . 18 – 192.3.2. Add Devices to Network Configuration. . . . . . . . . . . . . . . . . . . . . . . . . . . . . . . . . . . . . . . . . . . . . . . . . . . . . . . . . 202.3.3. Setting Network Configuration . . . . . . . . . . . . . . . . . . . . . . . . . . . . . . . . . . . . . . . . . . . . . . . . . . . . . . . . . . . . . . . 212.3.4. Setting Device Node Number . . . . . . . . . . . . . . . . . . . . . . . . . . . . . . . . . . . . . . . . . . . . . . . . . . . . . . . . . . . . . . . . 222.3.5. Setting Device Cyclic Data . . . . . . . . . . . . . . . . . . . . . . . . . . . . . . . . . . . . . . . . . . . . . . . . . . . . . . . . . . . . . . . . . . . 232.3.6. Download/Monitor PROFIBUS Network Configuration . . . . . . . . . . . . . . . . . . . . . . . . . . . . . . . . . . . . . . . . . . . . . 24
3. Modicon Quantum PLC . . . . . . . . . . . . . . . . . . . . . . . . . . . . . . . . . . . . . . . . . . . . . . . . . . . . . . . . . . . . . . . . . . . . . . . . . . . . 253.1. Introduction . . . . . . . . . . . . . . . . . . . . . . . . . . . . . . . . . . . . . . . . . . . . . . . . . . . . . . . . . . . . . . . . . . . . . . . . . . . . . . 253.2. PTQ to Quantum Integration. . . . . . . . . . . . . . . . . . . . . . . . . . . . . . . . . . . . . . . . . . . . . . . . . . . . . . . . . . . . . . . . . 26
3.2.1. Setup Concept Software . . . . . . . . . . . . . . . . . . . . . . . . . . . . . . . . . . . . . . . . . . . . . . . . . . . . . . . . . . . . . . . . . . . . 273.2.2. Create Project. . . . . . . . . . . . . . . . . . . . . . . . . . . . . . . . . . . . . . . . . . . . . . . . . . . . . . . . . . . . . . . . . . . . . . . . . . . . . 28
3.3. ProSoft and PROFIBUS Configuration Software. . . . . . . . . . . . . . . . . . . . . . . . . . . . . . . . . . . . . . . . . . . . . . . . . . . . . . . 293.3.1. Create a New Configuration . . . . . . . . . . . . . . . . . . . . . . . . . . . . . . . . . . . . . . . . . . . . . . . . . . . . . . . . . . . . . . . . . 293.3.2. Configure the Ethernet Port . . . . . . . . . . . . . . . . . . . . . . . . . . . . . . . . . . . . . . . . . . . . . . . . . . . . . . . . . . . . . . . . . 303.3.3. Edit Quantum Chassis Slot Number . . . . . . . . . . . . . . . . . . . . . . . . . . . . . . . . . . . . . . . . . . . . . . . . . . . . . . . . . . . 313.3.4. Initial Configuration Download. . . . . . . . . . . . . . . . . . . . . . . . . . . . . . . . . . . . . . . . . . . . . . . . . . . . . . . . . . . . . . . 323.3.5. Module Debug Mode. . . . . . . . . . . . . . . . . . . . . . . . . . . . . . . . . . . . . . . . . . . . . . . . . . . . . . . . . . . . . . . . . . . . . . . 333.3.6. Configure the PROFIBUS Network. . . . . . . . . . . . . . . . . . . . . . . . . . . . . . . . . . . . . . . . . . . . . . . . . . . . . . . . . 34 – 353.3.7. Export Files for Concept . . . . . . . . . . . . . . . . . . . . . . . . . . . . . . . . . . . . . . . . . . . . . . . . . . . . . . . . . . . . . . . . 36 – 373.3.8. Import Files to Concept DFB . . . . . . . . . . . . . . . . . . . . . . . . . . . . . . . . . . . . . . . . . . . . . . . . . . . . . . . . . . . . . 38 – 423.3.9. Add DFB Routines to Program . . . . . . . . . . . . . . . . . . . . . . . . . . . . . . . . . . . . . . . . . . . . . . . . . . . . . . . . . . . . . . . . 43
3.4. MODICON ETHERNET (140NOE77111) to MODBUS TCP Gateway . . . . . . . . . . . . . . . . . . . . . . . . . . . . . . . . . . . . . . . . 443.4.1. Add the Ethernet Module . . . . . . . . . . . . . . . . . . . . . . . . . . . . . . . . . . . . . . . . . . . . . . . . . . . . . . . . . . . . . . . . . . . 453.4.2. Configure the Ethernet Module . . . . . . . . . . . . . . . . . . . . . . . . . . . . . . . . . . . . . . . . . . . . . . . . . . . . . . . . . . . . . . 463.4.3. Configure the Ethernet Gateway IP Address. . . . . . . . . . . . . . . . . . . . . . . . . . . . . . . . . . . . . . . . . . . . . . . . . 47 – 493.4.4. Configure the Ethernet Gateway Fieldbus . . . . . . . . . . . . . . . . . . . . . . . . . . . . . . . . . . . . . . . . . . . . . . . . . . . . . . 503.4.5. Configure the Ethernet Module Commands. . . . . . . . . . . . . . . . . . . . . . . . . . . . . . . . . . . . . . . . . . . . . . . . . . . . . 51
3.5. Modbus RTU Gateway . . . . . . . . . . . . . . . . . . . . . . . . . . . . . . . . . . . . . . . . . . . . . . . . . . . . . . . . . . . . . . . . . . . . . . . . . . 523.5.1. Modbus Addressing for Gateway . . . . . . . . . . . . . . . . . . . . . . . . . . . . . . . . . . . . . . . . . . . . . . . . . . . . . . . . . 53 – 543.5.2. Modbus RTU Gateway Switch Configuration . . . . . . . . . . . . . . . . . . . . . . . . . . . . . . . . . . . . . . . . . . . . . . . . . . . . 553.5.3. Modbus Message commands via the XXMIT block. . . . . . . . . . . . . . . . . . . . . . . . . . . . . . . . . . . . . . . . . . . . . . . . 55

Table of ContentsSmart MCC Network Communications
4. Rockwell Automation . . . . . . . . . . . . . . . . . . . . . . . . . . . . . . . . . . . . . . . . . . . . . . . . . . . . . . . . . . . . . . . . . . . . . . . . . . . . . 564.1. ProSoft MV156-PDPMVI (ControlLogix) . . . . . . . . . . . . . . . . . . . . . . . . . . . . . . . . . . . . . . . . . . . . . . . . . . . . . . . . . . . . . 56
4.1.1. ProSoft PROFIBUS Configuration Software . . . . . . . . . . . . . . . . . . . . . . . . . . . . . . . . . . . . . . . . . . . . . . . . . . . . . . 574.1.2. Create a New Configuration . . . . . . . . . . . . . . . . . . . . . . . . . . . . . . . . . . . . . . . . . . . . . . . . . . . . . . . . . . . . . . . . . 574.1.3. Configure the PROFIBUS Network . . . . . . . . . . . . . . . . . . . . . . . . . . . . . . . . . . . . . . . . . . . . . . . . . . . . . . . . . . . . . 584.1.4. Export Files for ControlLogix . . . . . . . . . . . . . . . . . . . . . . . . . . . . . . . . . . . . . . . . . . . . . . . . . . . . . . . . . . . . . . . . . 594.1.5. Add MV156-PDPMV1 to I/O Configuration . . . . . . . . . . . . . . . . . . . . . . . . . . . . . . . . . . . . . . . . . . . . . . . . . . . . . . 604.1.6. Import PROFIBUS Configuration Files . . . . . . . . . . . . . . . . . . . . . . . . . . . . . . . . . . . . . . . . . . . . . . . . . . . . . . . . . . 61
4.2. Hilscher 1769-DPM (CompactLogix) . . . . . . . . . . . . . . . . . . . . . . . . . . . . . . . . . . . . . . . . . . . . . . . . . . . . . . . . . . . . . . . 624.2.1. Default PLC Configuration for 1769-DPM Module . . . . . . . . . . . . . . . . . . . . . . . . . . . . . . . . . . . . . . . . . . . . . . . . 634.2.2. Example PROFIBUS Configuration for 1769-DM Module . . . . . . . . . . . . . . . . . . . . . . . . . . . . . . . . . . . . . . . 64 – 67
4.3. Devicenet Gateway. . . . . . . . . . . . . . . . . . . . . . . . . . . . . . . . . . . . . . . . . . . . . . . . . . . . . . . . . . . . . . . . . . . . . . . . . . . . . 684.3.1. Gateway Configuration Process Overview . . . . . . . . . . . . . . . . . . . . . . . . . . . . . . . . . . . . . . . . . . . . . . . . . . . . . . 684.3.2. Configure Devicenet Scanner . . . . . . . . . . . . . . . . . . . . . . . . . . . . . . . . . . . . . . . . . . . . . . . . . . . . . . . . . . . . 69 – 71
4.4. Ethernet/IP Gateway . . . . . . . . . . . . . . . . . . . . . . . . . . . . . . . . . . . . . . . . . . . . . . . . . . . . . . . . . . . . . . . . . . . . . . . . . . . . . . 724.4.1. Configure Ethernet Gateway IP Address. . . . . . . . . . . . . . . . . . . . . . . . . . . . . . . . . . . . . . . . . . . . . . . . . . . . 73 – 764.4.2. Configure Ethernet Gateway Fieldbus . . . . . . . . . . . . . . . . . . . . . . . . . . . . . . . . . . . . . . . . . . . . . . . . . . . . . . . . . 774.4.3. Add Ethernet/IP Gateway to I/O Configuration . . . . . . . . . . . . . . . . . . . . . . . . . . . . . . . . . . . . . . . . . . . . . . . . . . . 784.4.4. Add PLC Program MSG Instructions . . . . . . . . . . . . . . . . . . . . . . . . . . . . . . . . . . . . . . . . . . . . . . . . . . . . . . . 79 – 814.4.5. Ethernet/IP Interface Notes . . . . . . . . . . . . . . . . . . . . . . . . . . . . . . . . . . . . . . . . . . . . . . . . . . . . . . . . . . . . . . . . . . 82
Introduction Smart MCC Network Communications
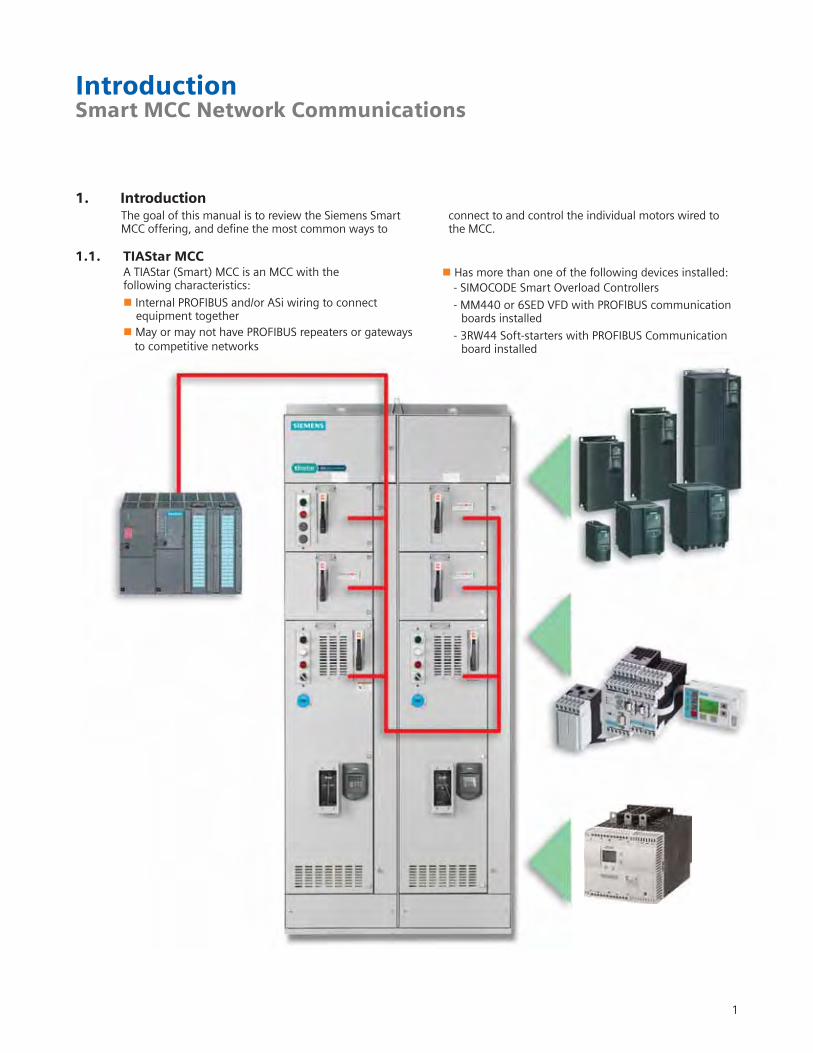
1. IntroductionThe goal of this manual is to review the Siemens SmartMCC offering, and define the most common ways to
connect to and control the individual motors wired to the MCC.
1
1.1. TIAStar MCCA TIAStar (Smart) MCC is an MCC with the following characteristics:
� Internal PROFIBUS and/or ASi wiring to connect equipment together
� May or may not have PROFIBUS repeaters or gateways to competitive networks
� Has more than one of the following devices installed:- SIMOCODE Smart Overload Controllers
- MM440 or 6SED VFD with PROFIBUS communication boards installed
- 3RW44 Soft-starters with PROFIBUS Communication board installed

Introduction Smart MCC Network Communications
2
1.2 TIAStar MCC Overview
Top:Allows access to cross-sectional wiring and horizontal power busway.
Section:May contain up to six 12-inch buckets or twelve 6-inch buckets.
Bottom:Allows access to cross-sectional wiring and ground bus
Unit or Bucket:Contains a starter,feeder breaker,variable frequencydrive, or soft-starter
Network Wiring:PROFIBUS wiring from each networked device in the section to the previous and next sections
1.2.1. MCC DesignThe MCC will be designed as a series of sections, eachsection containing individual units, or “buckets.”

Introduction Smart MCC Network Communications
3
Variable frequency drive installed in an MCC bucket
Simocode smart overloadinstalled in an MCC bucket
Previous Node
PROFIBUS NetworkWiring
Next Node
A PROFIBUS repeater will be installed at the start of the MCC network if configured in order
A PROFIBUS network terminator will always be installed at the end of network in the MCC
1.2.2. MCC Network InstallationThe basic communication backbone for the Smart MCC is Siemens PROFIBUS Network. This is a high-speed, two-wire network capable of delivering deterministicdata and control to the controlling processor. You may get additional information on PROFIBUS atwww.pto.com
This network is used to connect all of the devices in theMCC. Each device in the MCC has its own node numberon the network.

Introduction Smart MCC Network Communications
4
1.2.3. Default ConfigurationThe following network testing and configuration will be completed prior to shipment:
� Setting of the node address for every device. The node address is determined from the starting address of 2, unless specified differently by the customer, and then incremented by one for every node attached to the network. The node number is incremented in the order that it is attached to the network cable starting from the first node beginning in the upper left of the first MCC section in the order.
� A VFD drive is set to the default settings with the following exceptions:
- Node number
- Speed command source (from communications network)
- Start / Stop command source (from communications network)
� A SIMOCODE overload is set to the default settings with the following exceptions:
- Node number
- Motor overload is set to maximum value
� A 3RW44 soft-start is set to the default settings with the following exceptions:
- Node number
� Verification that the network itself is properly installed and all devices connected to the network are powered and active on the network.
Please note that these default configuration commentsare not true for all configurations that are available, and may be changed at any time by the production engineering group to facilitate production or field requests.
Introduction Smart MCC Network Communications
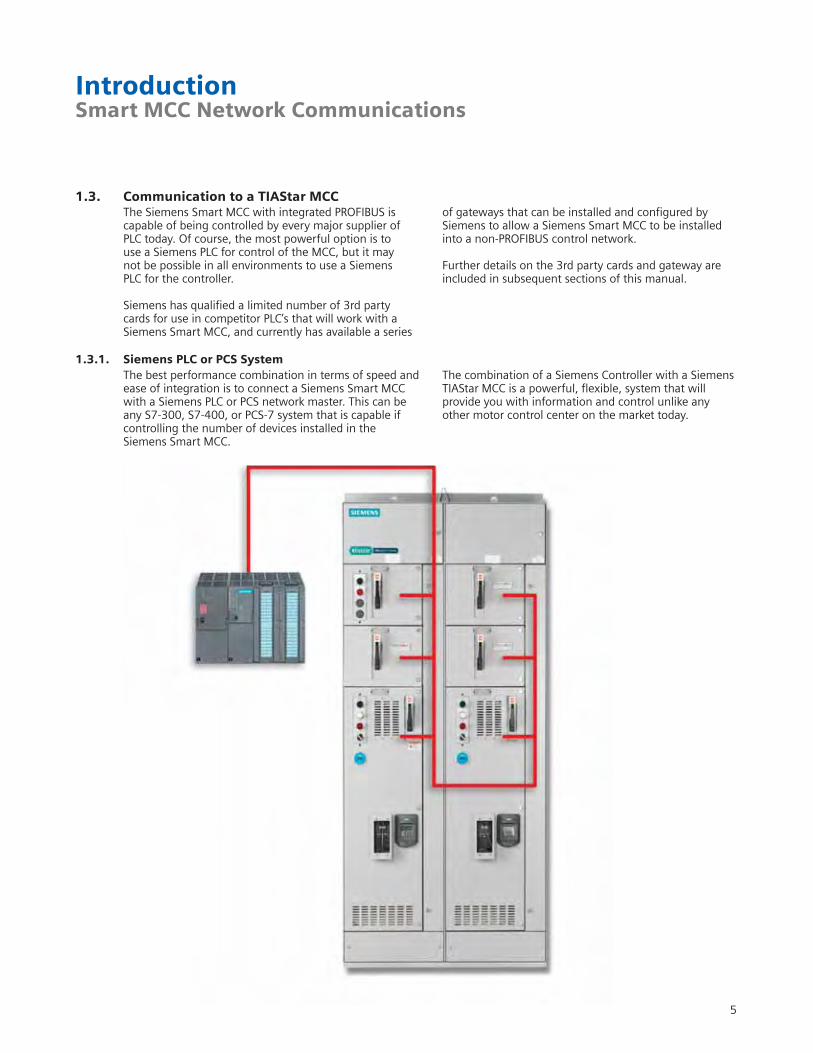
1.3. Communication to a TIAStar MCCThe Siemens Smart MCC with integrated PROFIBUS is capable of being controlled by every major supplier ofPLC today. Of course, the most powerful option is to use a Siemens PLC for control of the MCC, but it may not be possible in all environments to use a Siemens PLC for the controller.
Siemens has qualified a limited number of 3rd partycards for use in competitor PLC’s that will work with aSiemens Smart MCC, and currently has available a series
of gateways that can be installed and configured bySiemens to allow a Siemens Smart MCC to be installedinto a non-PROFIBUS control network.
Further details on the 3rd party cards and gateway areincluded in subsequent sections of this manual.
1.3.1. Siemens PLC or PCS SystemThe best performance combination in terms of speed andease of integration is to connect a Siemens Smart MCCwith a Siemens PLC or PCS network master. This can beany S7-300, S7-400, or PCS-7 system that is capable ifcontrolling the number of devices installed in theSiemens Smart MCC.
The combination of a Siemens Controller with a SiemensTIAStar MCC is a powerful, flexible, system that will provide you with information and control unlike anyother motor control center on the market today.
5
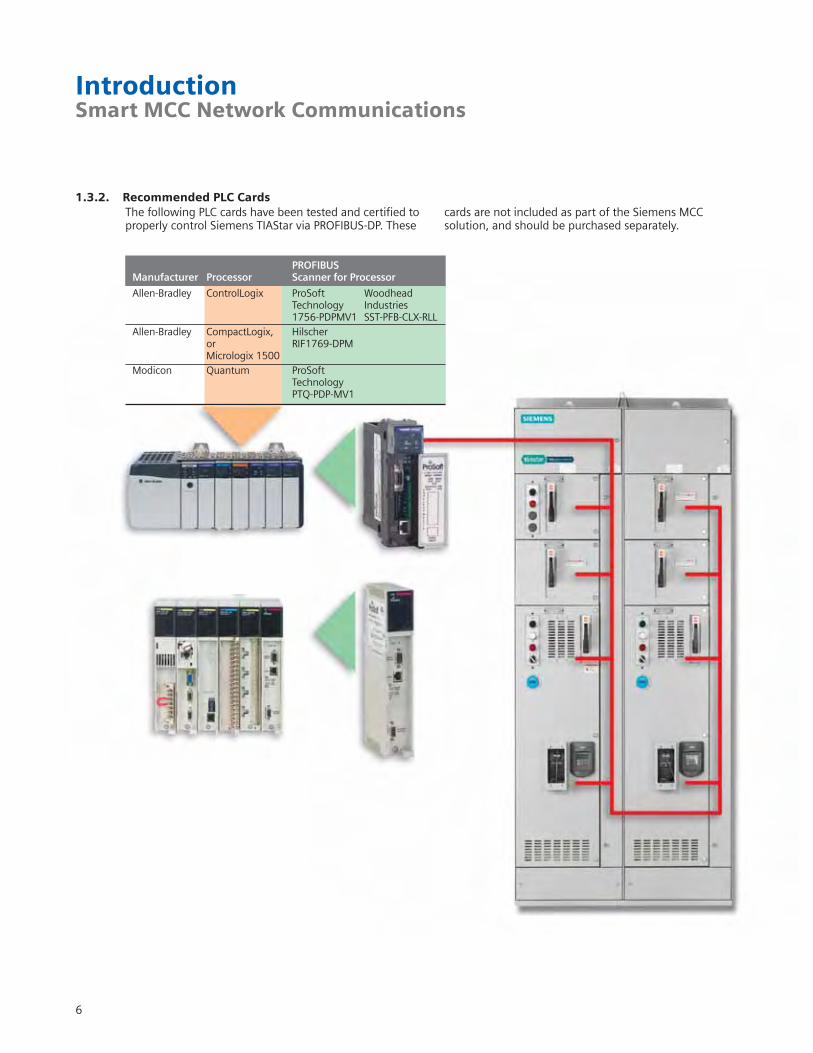
1.3.2. Recommended PLC CardsThe following PLC cards have been tested and certified toproperly control Siemens TIAStar via PROFIBUS-DP. These
cards are not included as part of the Siemens MCC solution, and should be purchased separately.
PROFIBUSManufacturer Processor Scanner for Processor
Allen-Bradley ControlLogix ProSoft Woodhead Technology Industries1756-PDPMV1 SST-PFB-CLX-RLL
Allen-Bradley CompactLogix, Hilscheror RIF1769-DPMMicrologix 1500
Modicon Quantum ProSoft TechnologyPTQ-PDP-MV1
Introduction Smart MCC Network Communications
6
7
Introduction Smart MCC Network Communications
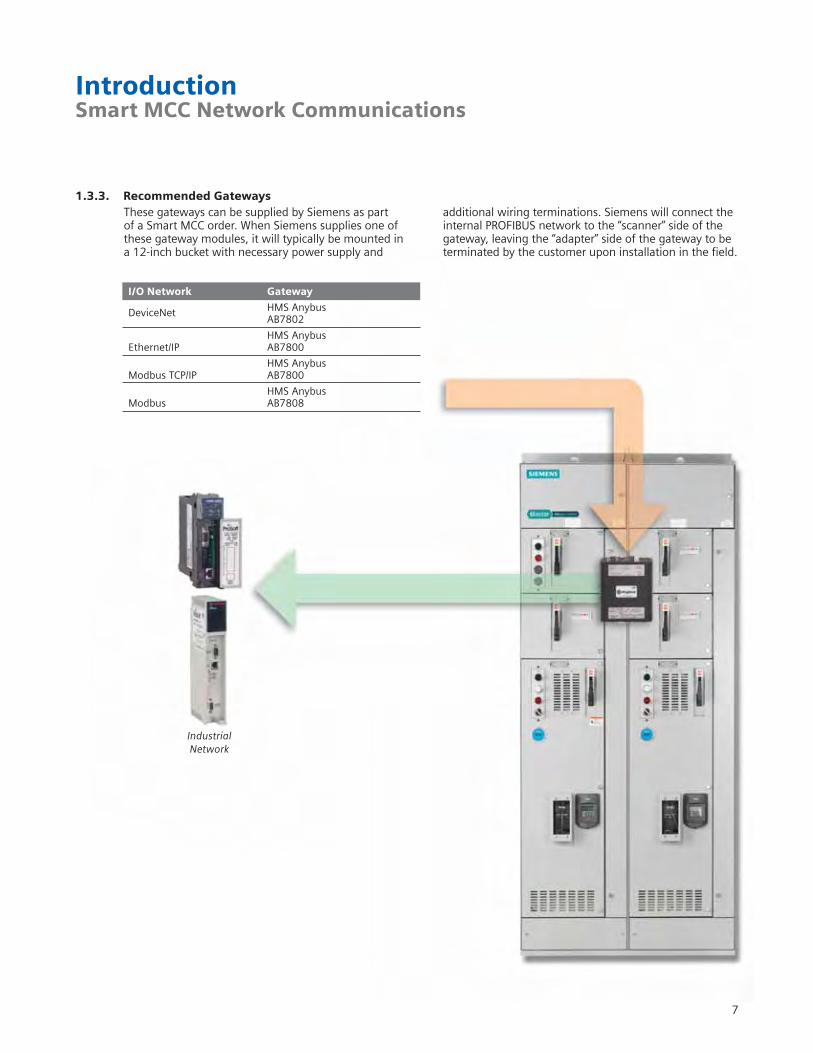
1.3.3. Recommended GatewaysThese gateways can be supplied by Siemens as part of a Smart MCC order. When Siemens supplies one ofthese gateway modules, it will typically be mounted in a 12-inch bucket with necessary power supply and
additional wiring terminations. Siemens will connect theinternal PROFIBUS network to the “scanner” side of thegateway, leaving the “adapter” side of the gateway to be terminated by the customer upon installation in the field.
I/O Network Gateway
DeviceNet HMS AnybusAB7802
HMS AnybusEthernet/IP AB7800
HMS AnybusModbus TCP/IP AB7800
HMS AnybusModbus AB7808
IndustrialNetwork

Introduction Smart MCC Network Communications
8
1.4. Scope of Responsibilities
Customer Scope of SupplyCustomer responsible for:
Installation of PROFIBUS or competitor network from MCC to PLC
Installation, programming, and configuration of PLC network card
Programming of PLC and competitor network connectedto gateway
Siemens Scope of Supply
Siemens responsible for:
Hardware supply of the gateway, MCC buckets, and all network wiring inside the MCC
Configuration of the gateway to control the MCC network
Issuing default gateway software configuration and wiring at time of shipment
Smart MCC Network
Competitor Network
Competitor PLC’s

9
Introduction Smart MCC Network Communications
1.5. Fieldbus Definitions
1.5.1. Devicenet, Controlnet, Ethernet/IP
Devicenet, Controlnet, Ethernet/IPDeviceNet, ControlNet, Ethernet/IP, which are based on Common Industrial Protocol (CIP) upper-layer protocol Developer/ support organizations: ODVA (Open DeviceNet Vendor Association) and ControlNet International (CI), which co-manage EtherNet/IP Installed base: approximately 3.5 million nodes, total for all CIP networks Topology: linear (trunkline/dropline) for DeviceNet; linear, tree, star or combination (ControlNet); active star with devices connected to an Ethernet switch (Ethernet/IP) Physical media: twisted-pair for signal and power (DeviceNet); coaxial or fiber (ControlNet); 10/100-base T twisted-pair Cat 5E (Ethernet/IP) Max. devices: 64 nodes (DeviceNet); 99 nodes (ControlNet), no limit (EtherNet/IP) Max. distance: 500 meters at 125 kbps, depending on data rate (DeviceNet); 1 km via coax with two nodes, 3 km over fiber with 99 nodes, 30 km over fiber or coax with repeaters up to 99 nodes (ControlNet); no limit (EtherNet/IP) Communication method: producer/consumer with peer-to-peer and master/slave option for DeviceNet and ControlNet Data Rate: 500 kbps, 250 kbps or 125 kbps (DeviceNet); 5 Mbps (ControlNet); 10/100 Mbps (Ethernet/IP) Data packet size: 0-8 bytes variable (DeviceNet); 0-510 bytes variable (ControlNet); 0 to 65,511 bytes variable (Ethernet/IP)
1.5.2. Modbus
Modbus
Modbus RTU/ASCII, Modbus Plus, Modbus TCP/IP
Developer/originator: Modicon, Schneider Electric
Support organization: Modbus-IDA
Topology: linear; line, star, tree with segments
Physical media: twisted-pair; RS-232 and RS-485
Max devices: 32 nodes per segment and 64 segments for Modbus Plus; 250 nodes per segment for RTU/ASCII
Max distance: 500 meters per segment for Modbus Plus; 350 m for RTU/ASCII; 100 m for TCP/IP between switches
Communication method: master/slave or client/server
Transmission properties: 1 Mbps for Modbus Plus; 300 bps-38.4 kbps for RTU/ASCII; 100 Mbps for TCP/IP
Data packet size: variable for Modbus Plus; 0-254 bytes for RTU/ASCII; 1,500 bytes for TCP/IP
1.5.3. PROFIBUS
PROFIBUS
Name: PROFIBUS-PA, PROFIBUS-DP, Profinet, ProfiSafe
Developer/originator: Siemens AG
Support organization: PROFIBUS Nutzerorganisation e.V. (PNO) and the PROFIBUS Trade Organization (PTO)
Installed base: more than 10 million nodes
Topology: line, star, ring, or bus
Physical media: twisted-pair or fiber
Max devices: 127 nodes in four segments with three repeaters, plus three masters
Max distance: 100 meters between segments at 12 Mbps, or 12 km with fiber
Communication method: master/slave, peer-to-peer
Transmission properties: 500 kbps, 1.5 or 12, Mbps for PROFIBUS DP; 31.25 kbps for PROFIBUS PA
Data packet size: 256 bytes
Cycle time: configuration dependent, less than 2 msec
10
PROFIBUS Integration OverviewSmart MCC Network Communications
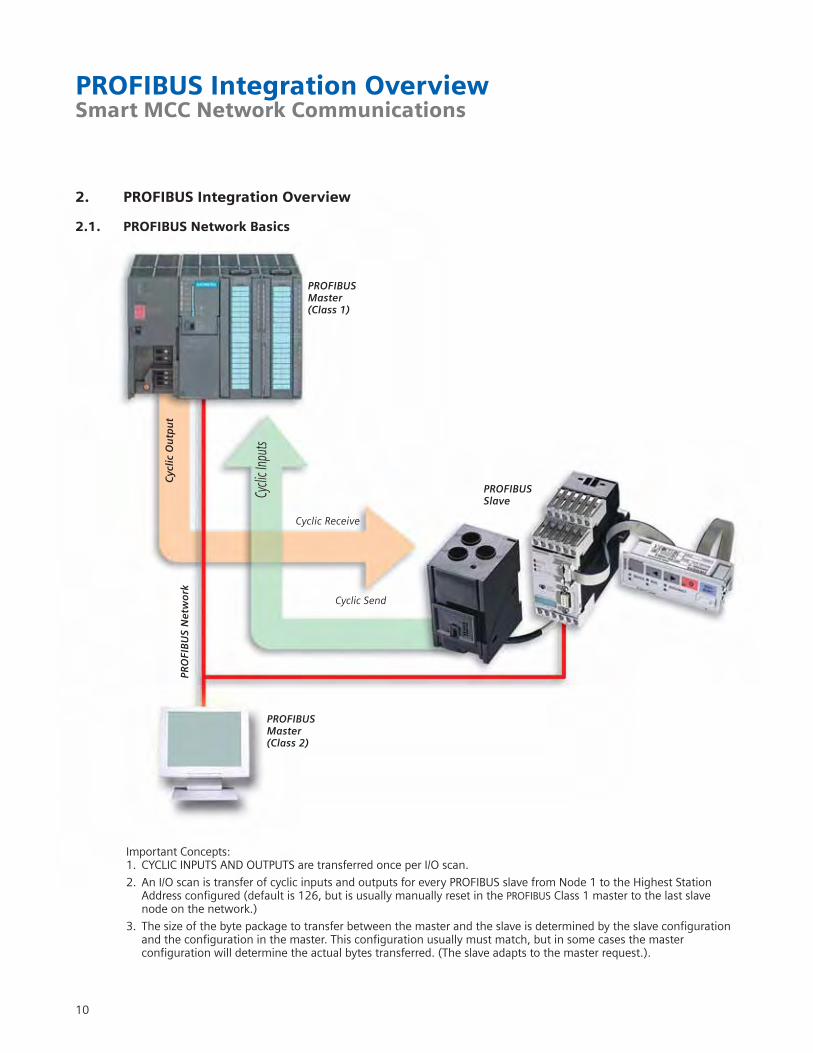
2. PROFIBUS Integration Overview
2.1. PROFIBUS Network Basics
PROFIBUSMaster(Class 1)
PROFIBUSSlave
PROFIBUS Master (Class 2)
Cyc
lic O
utp
ut
Cycli
c Inp
uts
Cyclic Send
PRO
FIB
US
Net
wo
rk
Cyclic Receive
Important Concepts:1. CYCLIC INPUTS AND OUTPUTS are transferred once per I/O scan.
2. An I/O scan is transfer of cyclic inputs and outputs for every PROFIBUS slave from Node 1 to the Highest Station Address configured (default is 126, but is usually manually reset in the PROFIBUS Class 1 master to the last slave node on the network.)
3. The size of the byte package to transfer between the master and the slave is determined by the slave configuration and the configuration in the master. This configuration usually must match, but in some cases the master configuration will determine the actual bytes transferred. (The slave adapts to the master request.).
PROFIBUS Integration OverviewSmart MCC Network Communications
11
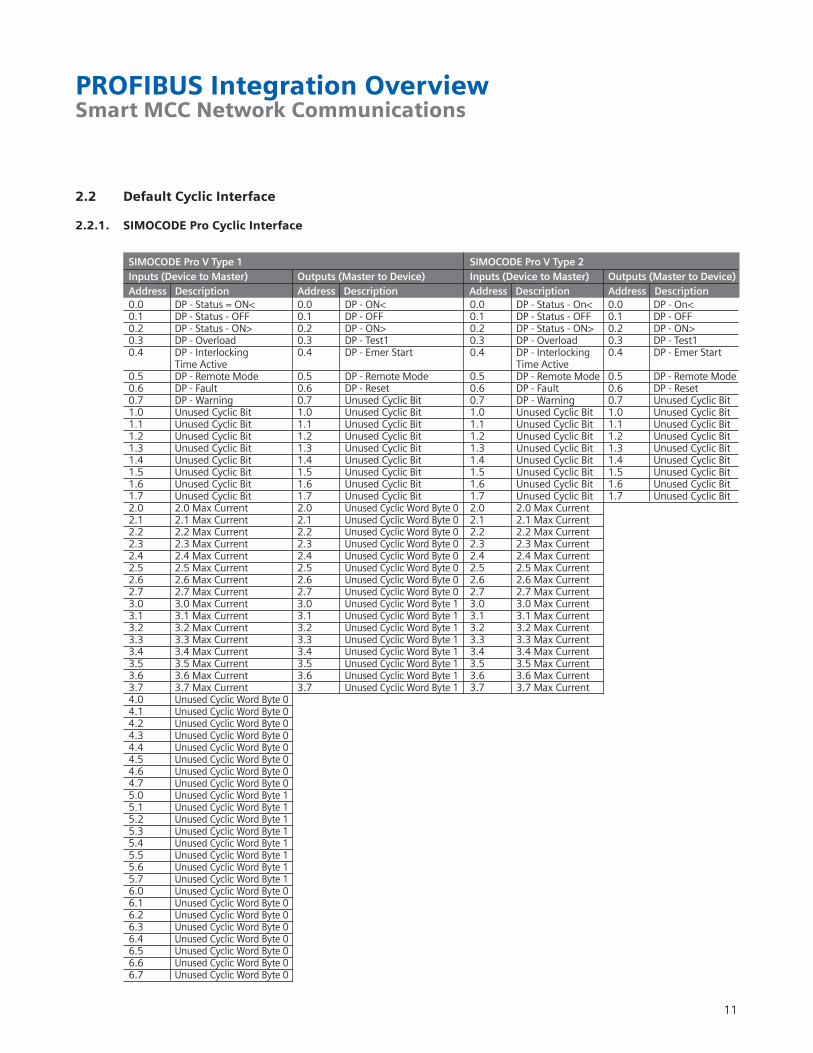
2.2 Default Cyclic Interface
2.2.1. SIMOCODE Pro Cyclic Interface
SIMOCODE Pro V Type 1 SIMOCODE Pro V Type 2Inputs (Device to Master) Outputs (Master to Device) Inputs (Device to Master) Outputs (Master to Device)Address Description Address Description Address Description Address Description0.0 DP - Status = ON< 0.0 DP - ON< 0.0 DP - Status - On< 0.0 DP - On<0.1 DP - Status - OFF 0.1 DP - OFF 0.1 DP - Status - OFF 0.1 DP - OFF0.2 DP - Status - ON> 0.2 DP - ON> 0.2 DP - Status - ON> 0.2 DP - ON>0.3 DP - Overload 0.3 DP - Test1 0.3 DP - Overload 0.3 DP - Test10.4 DP - Interlocking 0.4 DP - Emer Start 0.4 DP - Interlocking 0.4 DP - Emer Start
Time Active Time Active0.5 DP - Remote Mode 0.5 DP - Remote Mode 0.5 DP - Remote Mode 0.5 DP - Remote Mode0.6 DP - Fault 0.6 DP - Reset 0.6 DP - Fault 0.6 DP - Reset0.7 DP - Warning 0.7 Unused Cyclic Bit 0.7 DP - Warning 0.7 Unused Cyclic Bit1.0 Unused Cyclic Bit 1.0 Unused Cyclic Bit 1.0 Unused Cyclic Bit 1.0 Unused Cyclic Bit1.1 Unused Cyclic Bit 1.1 Unused Cyclic Bit 1.1 Unused Cyclic Bit 1.1 Unused Cyclic Bit1.2 Unused Cyclic Bit 1.2 Unused Cyclic Bit 1.2 Unused Cyclic Bit 1.2 Unused Cyclic Bit1.3 Unused Cyclic Bit 1.3 Unused Cyclic Bit 1.3 Unused Cyclic Bit 1.3 Unused Cyclic Bit1.4 Unused Cyclic Bit 1.4 Unused Cyclic Bit 1.4 Unused Cyclic Bit 1.4 Unused Cyclic Bit1.5 Unused Cyclic Bit 1.5 Unused Cyclic Bit 1.5 Unused Cyclic Bit 1.5 Unused Cyclic Bit1.6 Unused Cyclic Bit 1.6 Unused Cyclic Bit 1.6 Unused Cyclic Bit 1.6 Unused Cyclic Bit1.7 Unused Cyclic Bit 1.7 Unused Cyclic Bit 1.7 Unused Cyclic Bit 1.7 Unused Cyclic Bit2.0 2.0 Max Current 2.0 Unused Cyclic Word Byte 0 2.0 2.0 Max Current2.1 2.1 Max Current 2.1 Unused Cyclic Word Byte 0 2.1 2.1 Max Current2.2 2.2 Max Current 2.2 Unused Cyclic Word Byte 0 2.2 2.2 Max Current2.3 2.3 Max Current 2.3 Unused Cyclic Word Byte 0 2.3 2.3 Max Current2.4 2.4 Max Current 2.4 Unused Cyclic Word Byte 0 2.4 2.4 Max Current2.5 2.5 Max Current 2.5 Unused Cyclic Word Byte 0 2.5 2.5 Max Current2.6 2.6 Max Current 2.6 Unused Cyclic Word Byte 0 2.6 2.6 Max Current2.7 2.7 Max Current 2.7 Unused Cyclic Word Byte 0 2.7 2.7 Max Current3.0 3.0 Max Current 3.0 Unused Cyclic Word Byte 1 3.0 3.0 Max Current3.1 3.1 Max Current 3.1 Unused Cyclic Word Byte 1 3.1 3.1 Max Current3.2 3.2 Max Current 3.2 Unused Cyclic Word Byte 1 3.2 3.2 Max Current3.3 3.3 Max Current 3.3 Unused Cyclic Word Byte 1 3.3 3.3 Max Current3.4 3.4 Max Current 3.4 Unused Cyclic Word Byte 1 3.4 3.4 Max Current3.5 3.5 Max Current 3.5 Unused Cyclic Word Byte 1 3.5 3.5 Max Current3.6 3.6 Max Current 3.6 Unused Cyclic Word Byte 1 3.6 3.6 Max Current3.7 3.7 Max Current 3.7 Unused Cyclic Word Byte 1 3.7 3.7 Max Current4.0 Unused Cyclic Word Byte 04.1 Unused Cyclic Word Byte 04.2 Unused Cyclic Word Byte 04.3 Unused Cyclic Word Byte 04.4 Unused Cyclic Word Byte 04.5 Unused Cyclic Word Byte 04.6 Unused Cyclic Word Byte 04.7 Unused Cyclic Word Byte 05.0 Unused Cyclic Word Byte 15.1 Unused Cyclic Word Byte 15.2 Unused Cyclic Word Byte 15.3 Unused Cyclic Word Byte 15.4 Unused Cyclic Word Byte 15.5 Unused Cyclic Word Byte 15.6 Unused Cyclic Word Byte 15.7 Unused Cyclic Word Byte 16.0 Unused Cyclic Word Byte 06.1 Unused Cyclic Word Byte 06.2 Unused Cyclic Word Byte 06.3 Unused Cyclic Word Byte 06.4 Unused Cyclic Word Byte 06.5 Unused Cyclic Word Byte 06.6 Unused Cyclic Word Byte 06.7 Unused Cyclic Word Byte 0

PROFIBUS Integration OverviewSmart MCC Network Communications
12
2.2.1. SIMOCODE Pro Cyclic Interface (cont’d)
SIMOCODE Pro V Type 1Inputs (Device to Master)Address Description 7.0 Unused Cyclic Word Byte 17.1 Unused Cyclic Word Byte 17.2 Unused Cyclic Word Byte 17.3 Unused Cyclic Word Byte 17.4 Unused Cyclic Word Byte 17.5 Unused Cyclic Word Byte 17.6 Unused Cyclic Word Byte 17.7 Unused Cyclic Word Byte 18.0 Unused Cyclic Word Byte 08.1 Unused Cyclic Word Byte 08.2 Unused Cyclic Word Byte 08.3 Unused Cyclic Word Byte 08.4 Unused Cyclic Word Byte 08.5 Unused Cyclic Word Byte 08.6 Unused Cyclic Word Byte 08.7 Unused Cyclic Word Byte 09.0 Unused Cyclic Word Byte 19.1 Unused Cyclic Word Byte 19.2 Unused Cyclic Word Byte 19.3 Unused Cyclic Word Byte 19.4 Unused Cyclic Word Byte 19.5 Unused Cyclic Word Byte 19.6 Unused Cyclic Word Byte 19.7 Unused Cyclic Word Byte 1

PROFIBUS Integration OverviewSmart MCC Network Communications
13
Inputs (Device to Master) Outputs (Master to Device)
Address Description Address Description
0.0 PWK Input 0.0 0.0 PWK Output 0.00.1 PWK Input 0.1 0.1 PWK Output 0.10.2 PWK Input 0.2 0.2 PWK Output 0.20.3 PWK Input 0.3 0.3 PWK Output 0.30.4 PWK Input 0.4 0.4 PWK Output 0.40.5 PWK Input 0.5 0.5 PWK Output 0.50.6 PWK Input 0.6 0.6 PWK Output 0.60.7 PWK Input 0.7 0.7 PWK Output 0.71.0 PWK Input 1.0 1.0 PWK Output 1.01.1 PWK Input 1.1 1.1 PWK Output 1.11.2 PWK Input 1.2 1.2 PWK Output 1.21.3 PWK Input 1.3 1.3 PWK Output 1.31.4 PWK Input 1.4 1.4 PWK Output 1.41.5 PWK Input 1.5 1.5 PWK Output 1.51.6 PWK Input 1.6 1.6 PWK Output 1.61.7 PWK Input 1.7 1.7 PWK Output 1.72.0 PWK Input 2.0 2.0 PWK Output 2.02.1 PWK Input 2.1 2.1 PWK Output 2.12.2 PWK Input 2.2 2.2 PWK Output 2.22.3 PWK Input 2.3 2.3 PWK Output 2.32.4 PWK Input 2.4 2.4 PWK Output 2.42.5 PWK Input 2.5 2.5 PWK Output 2.52.6 PWK Input 2.6 2.6 PWK Output 2.62.7 PWK Input 2.7 2.7 PWK Output 2.73.0 PWK Input 3.0 3.0 PWK Output 3.03.1 PWK Input 3.1 3.1 PWK Output 3.13.2 PWK Input 3.2 3.2 PWK Output 3.23.3 PWK Input 3.3 3.3 PWK Output 3.33.4 PWK Input 3.4 3.4 PWK Output 3.43.5 PWK Input 3.5 3.5 PWK Output 3.53.6 PWK Input 3.6 3.6 PWK Output 3.63.7 PWK Input 3.7 3.7 PWK Output 3.74.0 PWK Input 4.0 4.0 PWK Output 4.04.1 PWK Input 4.1 4.1 PWK Output 4.14.2 PWK Input 4.2 4.2 PWK Output 4.24.3 PWK Input 4.3 4.3 PWK Output 4.34.4 PWK Input 4.4 4.4 PWK Output 4.44.5 PWK Input 4.5 4.5 PWK Output 4.54.6 PWK Input 4.6 4.6 PWK Output 4.64.7 PWK Input 4.7 4.7 PWK Output 4.75.0 PWK Input 5.0 5.0 PWK Output 5.05.1 PWK Input 5.1 5.1 PWK Output 5.15.2 PWK Input 5.2 5.2 PWK Output 5.25.3 PWK Input 5.3 5.3 PWK Output 5.35.4 PWK Input 5.4 5.4 PWK Output 5.45.5 PWK Input 5.5 5.5 PWK Output 5.55.6 PWK Input 5.6 5.6 PWK Output 5.65.7 PWK Input 5.7 5.7 PWK Output 5.76.0 PWK Input 6.0 6.0 PWK Output 6.06.1 PWK Input 6.1 6.1 PWK Output 6.16.2 PWK Input 6.2 6.2 PWK Output 6.26.3 PWK Input 6.3 6.3 PWK Output 6.36.4 PWK Input 6.4 6.4 PWK Output 6.46.5 PWK Input 6.5 6.5 PWK Output 6.56.6 PWK Input 6.6 6.6 PWK Output 6.66.7 PWK Input 6.7 6.7 PWK Output 6.77.0 PWK Input 7.0 7.0 PWK Output 7.07.1 PWK Input 7.1 7.1 PWK Output 7.17.2 PWK Input 7.2 7.2 PWK Output 7.2
2.2.2. MM440 VFD Cyclic Interface
Inputs (Device to Master) Outputs (Master to Device)
Address Description Address Description
7.3 PWK Input 7.3 7.3 PWK Output 7.37.4 PWK Input 7.4 7.4 PWK Output 7.47.5 PWK Input 7.5 7.5 PWK Output 7.57.6 PWK Input 7.6 7.6 PWK Output 7.67.7 PWK Input 7.7 7.7 PWK Output 7.78.0 Ready for ON=1 8.0 1=ON 0=OFF18.1 Ready for Run=1 8.1 1=Operate 0=0FF28.2 Operation 8.2 1=Operate 0=OFF3
Enabled=18.3 Fault is Active=1 8.3 1=Enable8.4 OFF Command 8.4 1=Operate
Applied=08.5 OFF Command 8.5 1=Ramp
Applied=0 0=Ramp Hold8.6 Starting Lockout=1 8.6 1=Enable Support8.7 Alarm Is Active=1 8.7 1=Ack Fault9.0 Setpoint Reached=1 9.0 1=CW Inching9.1 Local Control 9.1 1=CCW Inching
Active=09.2 Max Freq=1 9.2 1=Setpoint Valid9.3 Current Limit 9.3 1=Setpoint
Alarm=1 Inverted 9.4 Motor Brake 9.4
Enabled=19.5 Motor Overload=1 9.5 1=Motor Pot Up9.6 CW Rotation=1 9.6 1=Motor Pot Down9.7 Converter 9.7 1=Remote
Overload=1 Operation10.0 Speed Feedback 10.0 Speed Command10.1 Speed Feedback 10.1 Speed Command10.2 Speed Feedback 10.2 Speed Command10.3 Speed Feedback 10.3 Speed Command10.4 Speed Feedback 10.4 Speed Command10.5 Speed Feedback 10.5 Speed Command10.6 Speed Feedback 10.6 Speed Command10.7 Speed Feedback 10.7 Speed Command11.0 Speed Feedback 11.0 Speed Command11.1 Speed Feedback 11.1 Speed Command11.2 Speed Feedback 11.2 Speed Command11.3 Speed Feedback 11.3 Speed Command11.4 Speed Feedback 11.4 Speed Command11.5 Speed Feedback 11.5 Speed Command11.6 Speed Feedback 11.6 Speed Command11.7 Speed Feedback 11.7 Speed Command
PROFIBUS Integration OverviewSmart MCC Network Communications
14
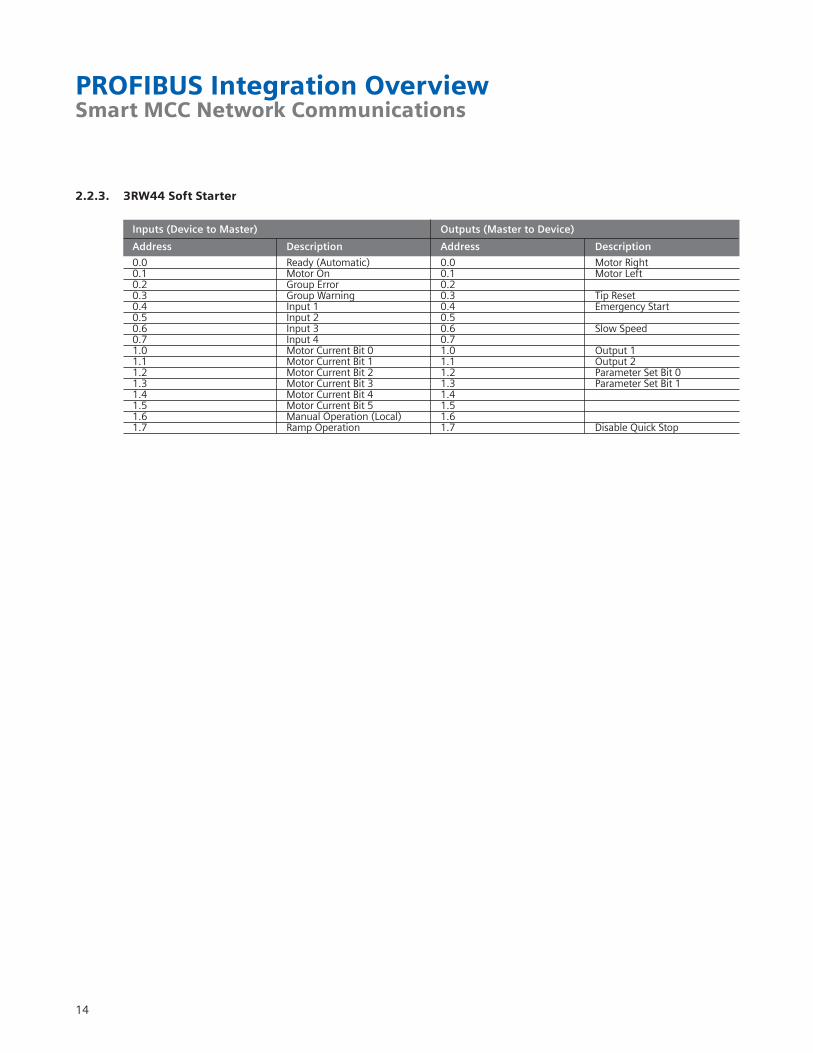
Inputs (Device to Master) Outputs (Master to Device)
Address Description Address Description
0.0 Ready (Automatic) 0.0 Motor Right0.1 Motor On 0.1 Motor Left0.2 Group Error 0.20.3 Group Warning 0.3 Tip Reset0.4 Input 1 0.4 Emergency Start0.5 Input 2 0.50.6 Input 3 0.6 Slow Speed0.7 Input 4 0.71.0 Motor Current Bit 0 1.0 Output 11.1 Motor Current Bit 1 1.1 Output 21.2 Motor Current Bit 2 1.2 Parameter Set Bit 01.3 Motor Current Bit 3 1.3 Parameter Set Bit 11.4 Motor Current Bit 4 1.41.5 Motor Current Bit 5 1.51.6 Manual Operation (Local) 1.61.7 Ramp Operation 1.7 Disable Quick Stop
2.2.3. 3RW44 Soft Starter
PROFIBUS Integration OverviewSmart MCC Network Communications
15
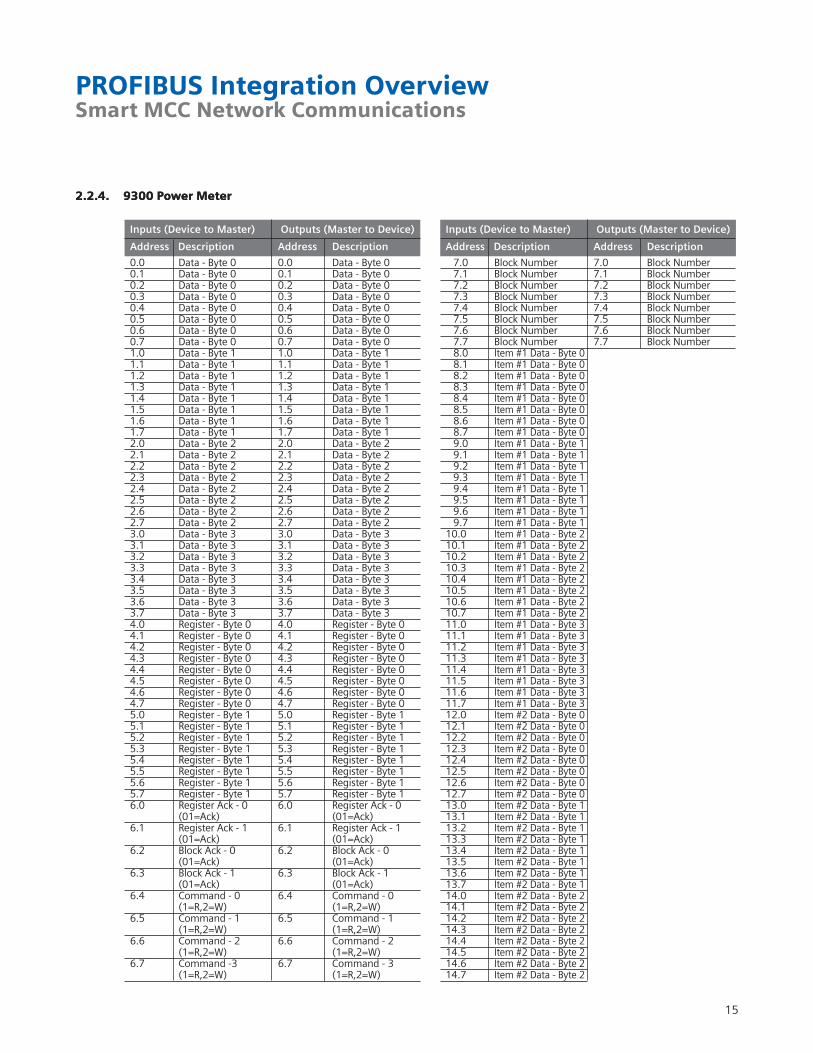
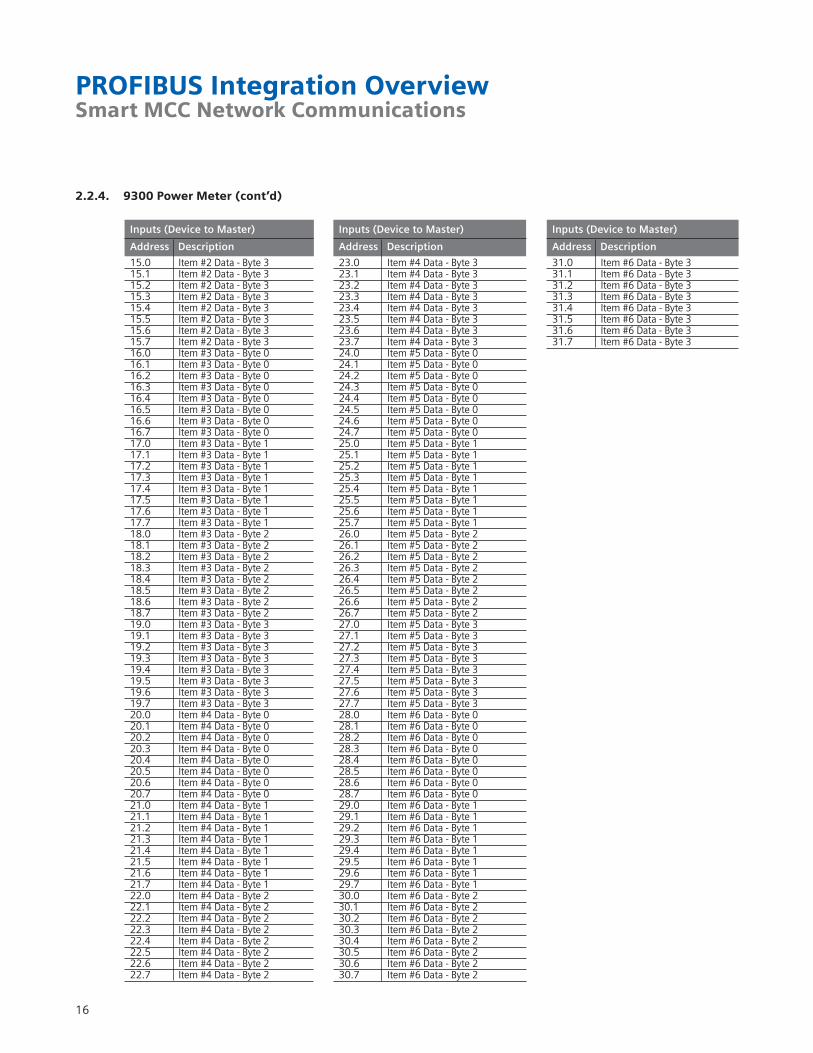
2.2.4. 9300 Power Meter2.2.4. 9300 Power Meter
Inputs (Device to Master) Outputs (Master to Device)
Address Description Address Description
0.0 Data - Byte 0 0.0 Data - Byte 00.1 Data - Byte 0 0.1 Data - Byte 00.2 Data - Byte 0 0.2 Data - Byte 00.3 Data - Byte 0 0.3 Data - Byte 00.4 Data - Byte 0 0.4 Data - Byte 00.5 Data - Byte 0 0.5 Data - Byte 00.6 Data - Byte 0 0.6 Data - Byte 00.7 Data - Byte 0 0.7 Data - Byte 01.0 Data - Byte 1 1.0 Data - Byte 11.1 Data - Byte 1 1.1 Data - Byte 11.2 Data - Byte 1 1.2 Data - Byte 11.3 Data - Byte 1 1.3 Data - Byte 11.4 Data - Byte 1 1.4 Data - Byte 11.5 Data - Byte 1 1.5 Data - Byte 11.6 Data - Byte 1 1.6 Data - Byte 11.7 Data - Byte 1 1.7 Data - Byte 12.0 Data - Byte 2 2.0 Data - Byte 22.1 Data - Byte 2 2.1 Data - Byte 22.2 Data - Byte 2 2.2 Data - Byte 22.3 Data - Byte 2 2.3 Data - Byte 22.4 Data - Byte 2 2.4 Data - Byte 22.5 Data - Byte 2 2.5 Data - Byte 22.6 Data - Byte 2 2.6 Data - Byte 22.7 Data - Byte 2 2.7 Data - Byte 23.0 Data - Byte 3 3.0 Data - Byte 33.1 Data - Byte 3 3.1 Data - Byte 33.2 Data - Byte 3 3.2 Data - Byte 33.3 Data - Byte 3 3.3 Data - Byte 33.4 Data - Byte 3 3.4 Data - Byte 33.5 Data - Byte 3 3.5 Data - Byte 33.6 Data - Byte 3 3.6 Data - Byte 33.7 Data - Byte 3 3.7 Data - Byte 34.0 Register - Byte 0 4.0 Register - Byte 04.1 Register - Byte 0 4.1 Register - Byte 04.2 Register - Byte 0 4.2 Register - Byte 04.3 Register - Byte 0 4.3 Register - Byte 04.4 Register - Byte 0 4.4 Register - Byte 04.5 Register - Byte 0 4.5 Register - Byte 04.6 Register - Byte 0 4.6 Register - Byte 04.7 Register - Byte 0 4.7 Register - Byte 05.0 Register - Byte 1 5.0 Register - Byte 15.1 Register - Byte 1 5.1 Register - Byte 15.2 Register - Byte 1 5.2 Register - Byte 15.3 Register - Byte 1 5.3 Register - Byte 15.4 Register - Byte 1 5.4 Register - Byte 15.5 Register - Byte 1 5.5 Register - Byte 15.6 Register - Byte 1 5.6 Register - Byte 15.7 Register - Byte 1 5.7 Register - Byte 16.0 Register Ack - 0 6.0 Register Ack - 0
(01=Ack) (01=Ack)6.1 Register Ack - 1 6.1 Register Ack - 1
(01=Ack) (01=Ack)6.2 Block Ack - 0 6.2 Block Ack - 0
(01=Ack) (01=Ack)6.3 Block Ack - 1 6.3 Block Ack - 1
(01=Ack) (01=Ack)6.4 Command - 0 6.4 Command - 0
(1=R,2=W) (1=R,2=W)6.5 Command - 1 6.5 Command - 1
(1=R,2=W) (1=R,2=W)6.6 Command - 2 6.6 Command - 2
(1=R,2=W) (1=R,2=W)6.7 Command -3 6.7 Command - 3
(1=R,2=W) (1=R,2=W)
Inputs (Device to Master) Outputs (Master to Device)
Address Description Address Description
7.0 Block Number 7.0 Block Number7.1 Block Number 7.1 Block Number7.2 Block Number 7.2 Block Number7.3 Block Number 7.3 Block Number7.4 Block Number 7.4 Block Number7.5 Block Number 7.5 Block Number7.6 Block Number 7.6 Block Number7.7 Block Number 7.7 Block Number8.0 Item #1 Data - Byte 08.1 Item #1 Data - Byte 08.2 Item #1 Data - Byte 08.3 Item #1 Data - Byte 08.4 Item #1 Data - Byte 08.5 Item #1 Data - Byte 08.6 Item #1 Data - Byte 08.7 Item #1 Data - Byte 09.0 Item #1 Data - Byte 19.1 Item #1 Data - Byte 19.2 Item #1 Data - Byte 19.3 Item #1 Data - Byte 19.4 Item #1 Data - Byte 19.5 Item #1 Data - Byte 19.6 Item #1 Data - Byte 19.7 Item #1 Data - Byte 1
10.0 Item #1 Data - Byte 210.1 Item #1 Data - Byte 210.2 Item #1 Data - Byte 210.3 Item #1 Data - Byte 210.4 Item #1 Data - Byte 210.5 Item #1 Data - Byte 210.6 Item #1 Data - Byte 210.7 Item #1 Data - Byte 211.0 Item #1 Data - Byte 311.1 Item #1 Data - Byte 311.2 Item #1 Data - Byte 311.3 Item #1 Data - Byte 311.4 Item #1 Data - Byte 311.5 Item #1 Data - Byte 311.6 Item #1 Data - Byte 311.7 Item #1 Data - Byte 312.0 Item #2 Data - Byte 012.1 Item #2 Data - Byte 012.2 Item #2 Data - Byte 012.3 Item #2 Data - Byte 012.4 Item #2 Data - Byte 012.5 Item #2 Data - Byte 012.6 Item #2 Data - Byte 012.7 Item #2 Data - Byte 013.0 Item #2 Data - Byte 113.1 Item #2 Data - Byte 113.2 Item #2 Data - Byte 113.3 Item #2 Data - Byte 113.4 Item #2 Data - Byte 113.5 Item #2 Data - Byte 113.6 Item #2 Data - Byte 113.7 Item #2 Data - Byte 114.0 Item #2 Data - Byte 214.1 Item #2 Data - Byte 214.2 Item #2 Data - Byte 214.3 Item #2 Data - Byte 214.4 Item #2 Data - Byte 214.5 Item #2 Data - Byte 214.6 Item #2 Data - Byte 214.7 Item #2 Data - Byte 2
PROFIBUS Integration OverviewSmart MCC Network Communications
16
2.2.4. 9300 Power Meter (cont’d)
Inputs (Device to Master)
Address Description
15.0 Item #2 Data - Byte 315.1 Item #2 Data - Byte 315.2 Item #2 Data - Byte 315.3 Item #2 Data - Byte 315.4 Item #2 Data - Byte 315.5 Item #2 Data - Byte 315.6 Item #2 Data - Byte 315.7 Item #2 Data - Byte 316.0 Item #3 Data - Byte 016.1 Item #3 Data - Byte 016.2 Item #3 Data - Byte 016.3 Item #3 Data - Byte 016.4 Item #3 Data - Byte 016.5 Item #3 Data - Byte 016.6 Item #3 Data - Byte 016.7 Item #3 Data - Byte 017.0 Item #3 Data - Byte 117.1 Item #3 Data - Byte 117.2 Item #3 Data - Byte 117.3 Item #3 Data - Byte 117.4 Item #3 Data - Byte 117.5 Item #3 Data - Byte 117.6 Item #3 Data - Byte 117.7 Item #3 Data - Byte 118.0 Item #3 Data - Byte 218.1 Item #3 Data - Byte 218.2 Item #3 Data - Byte 218.3 Item #3 Data - Byte 218.4 Item #3 Data - Byte 218.5 Item #3 Data - Byte 218.6 Item #3 Data - Byte 218.7 Item #3 Data - Byte 219.0 Item #3 Data - Byte 319.1 Item #3 Data - Byte 319.2 Item #3 Data - Byte 319.3 Item #3 Data - Byte 319.4 Item #3 Data - Byte 319.5 Item #3 Data - Byte 319.6 Item #3 Data - Byte 319.7 Item #3 Data - Byte 320.0 Item #4 Data - Byte 020.1 Item #4 Data - Byte 020.2 Item #4 Data - Byte 020.3 Item #4 Data - Byte 020.4 Item #4 Data - Byte 020.5 Item #4 Data - Byte 020.6 Item #4 Data - Byte 020.7 Item #4 Data - Byte 021.0 Item #4 Data - Byte 121.1 Item #4 Data - Byte 121.2 Item #4 Data - Byte 121.3 Item #4 Data - Byte 121.4 Item #4 Data - Byte 121.5 Item #4 Data - Byte 121.6 Item #4 Data - Byte 121.7 Item #4 Data - Byte 122.0 Item #4 Data - Byte 222.1 Item #4 Data - Byte 222.2 Item #4 Data - Byte 222.3 Item #4 Data - Byte 222.4 Item #4 Data - Byte 222.5 Item #4 Data - Byte 222.6 Item #4 Data - Byte 222.7 Item #4 Data - Byte 2
Inputs (Device to Master)
Address Description
23.0 Item #4 Data - Byte 323.1 Item #4 Data - Byte 323.2 Item #4 Data - Byte 323.3 Item #4 Data - Byte 323.4 Item #4 Data - Byte 323.5 Item #4 Data - Byte 323.6 Item #4 Data - Byte 323.7 Item #4 Data - Byte 324.0 Item #5 Data - Byte 024.1 Item #5 Data - Byte 024.2 Item #5 Data - Byte 024.3 Item #5 Data - Byte 024.4 Item #5 Data - Byte 024.5 Item #5 Data - Byte 024.6 Item #5 Data - Byte 024.7 Item #5 Data - Byte 025.0 Item #5 Data - Byte 125.1 Item #5 Data - Byte 125.2 Item #5 Data - Byte 125.3 Item #5 Data - Byte 125.4 Item #5 Data - Byte 125.5 Item #5 Data - Byte 125.6 Item #5 Data - Byte 125.7 Item #5 Data - Byte 126.0 Item #5 Data - Byte 226.1 Item #5 Data - Byte 226.2 Item #5 Data - Byte 226.3 Item #5 Data - Byte 226.4 Item #5 Data - Byte 226.5 Item #5 Data - Byte 226.6 Item #5 Data - Byte 226.7 Item #5 Data - Byte 227.0 Item #5 Data - Byte 327.1 Item #5 Data - Byte 327.2 Item #5 Data - Byte 327.3 Item #5 Data - Byte 327.4 Item #5 Data - Byte 327.5 Item #5 Data - Byte 327.6 Item #5 Data - Byte 327.7 Item #5 Data - Byte 328.0 Item #6 Data - Byte 028.1 Item #6 Data - Byte 028.2 Item #6 Data - Byte 028.3 Item #6 Data - Byte 028.4 Item #6 Data - Byte 028.5 Item #6 Data - Byte 028.6 Item #6 Data - Byte 028.7 Item #6 Data - Byte 029.0 Item #6 Data - Byte 129.1 Item #6 Data - Byte 129.2 Item #6 Data - Byte 129.3 Item #6 Data - Byte 129.4 Item #6 Data - Byte 129.5 Item #6 Data - Byte 129.6 Item #6 Data - Byte 129.7 Item #6 Data - Byte 130.0 Item #6 Data - Byte 230.1 Item #6 Data - Byte 230.2 Item #6 Data - Byte 230.3 Item #6 Data - Byte 230.4 Item #6 Data - Byte 230.5 Item #6 Data - Byte 230.6 Item #6 Data - Byte 230.7 Item #6 Data - Byte 2
Inputs (Device to Master)
Address Description
31.0 Item #6 Data - Byte 331.1 Item #6 Data - Byte 331.2 Item #6 Data - Byte 331.3 Item #6 Data - Byte 331.4 Item #6 Data - Byte 331.5 Item #6 Data - Byte 331.6 Item #6 Data - Byte 331.7 Item #6 Data - Byte 3

2.3. ProSoft and HMS PROFIBUS Network Configuration
PROFIBUS Integration OverviewSmart MCC Network Communications
17
This configuration process can be used for the ProSoftPROFIBUS Master cards, and the HMS Anybus PROFIBUS gateways.
Add Devices toNetwork
Configuration
Set Network Master (Scanner)
Configuration
InstallGSD Files
if RequitedSection 2.3.1
Section 2.3.2
Section 2.3.3
Download NetworkConfiguration to
MasterSection 2.3.6
PROFIBUS Integration OverviewSmart MCC Network Communications
18
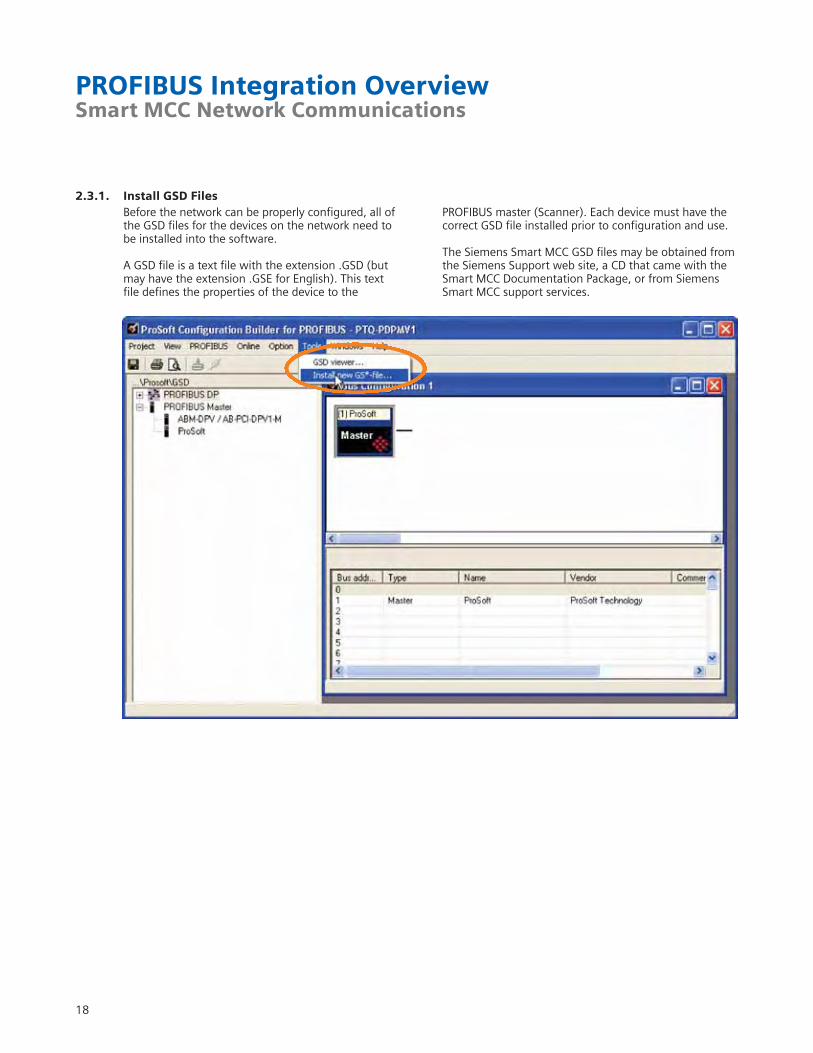
2.3.1. Install GSD FilesBefore the network can be properly configured, all of the GSD files for the devices on the network need to be installed into the software.
A GSD file is a text file with the extension .GSD (but may have the extension .GSE for English). This text file defines the properties of the device to the
PROFIBUS master (Scanner). Each device must have the correct GSD file installed prior to configuration and use.
The Siemens Smart MCC GSD files may be obtained from the Siemens Support web site, a CD that came with the Smart MCC Documentation Package, or from Siemens Smart MCC support services.
PROFIBUS Integration OverviewSmart MCC Network Communications
19
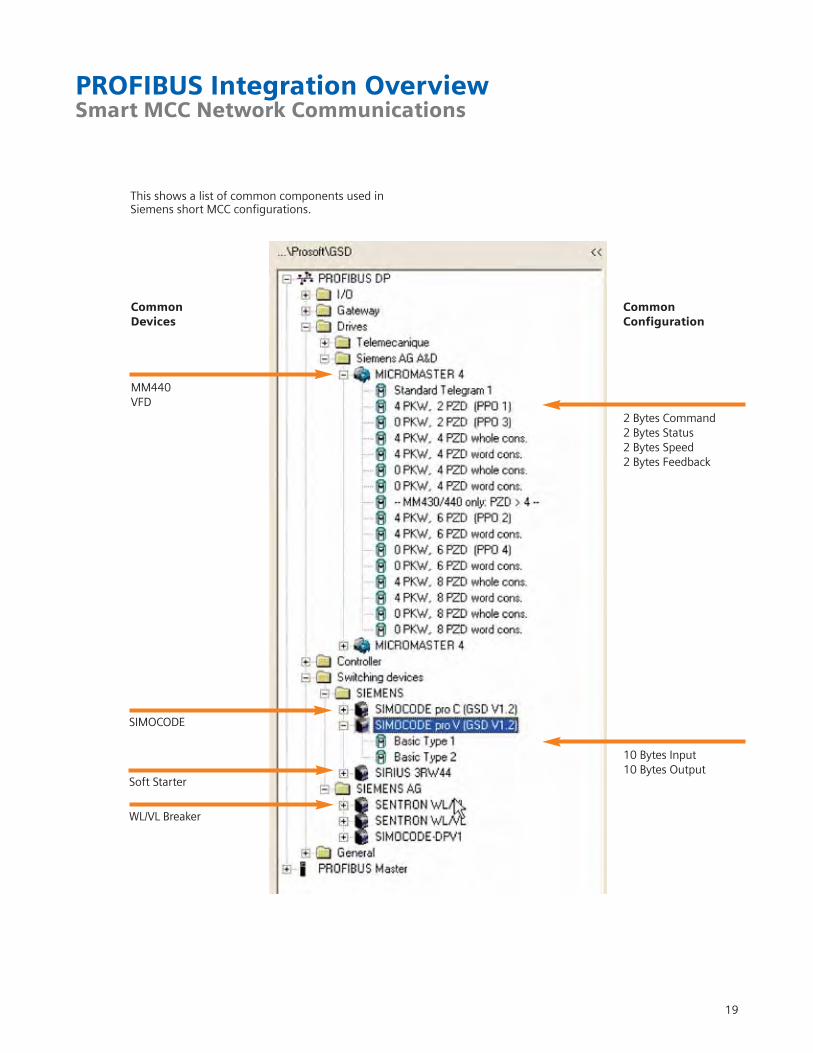
Common Devices
Common Configuration
This shows a list of common components used inSiemens short MCC configurations.
MM440VFD
2 Bytes Command2 Bytes Status2 Bytes Speed2 Bytes Feedback
10 Bytes Input10 Bytes Output
SIMOCODE
Soft Starter
WL/VL Breaker
20
PROFIBUS Integration OverviewSmart MCC Network Communications
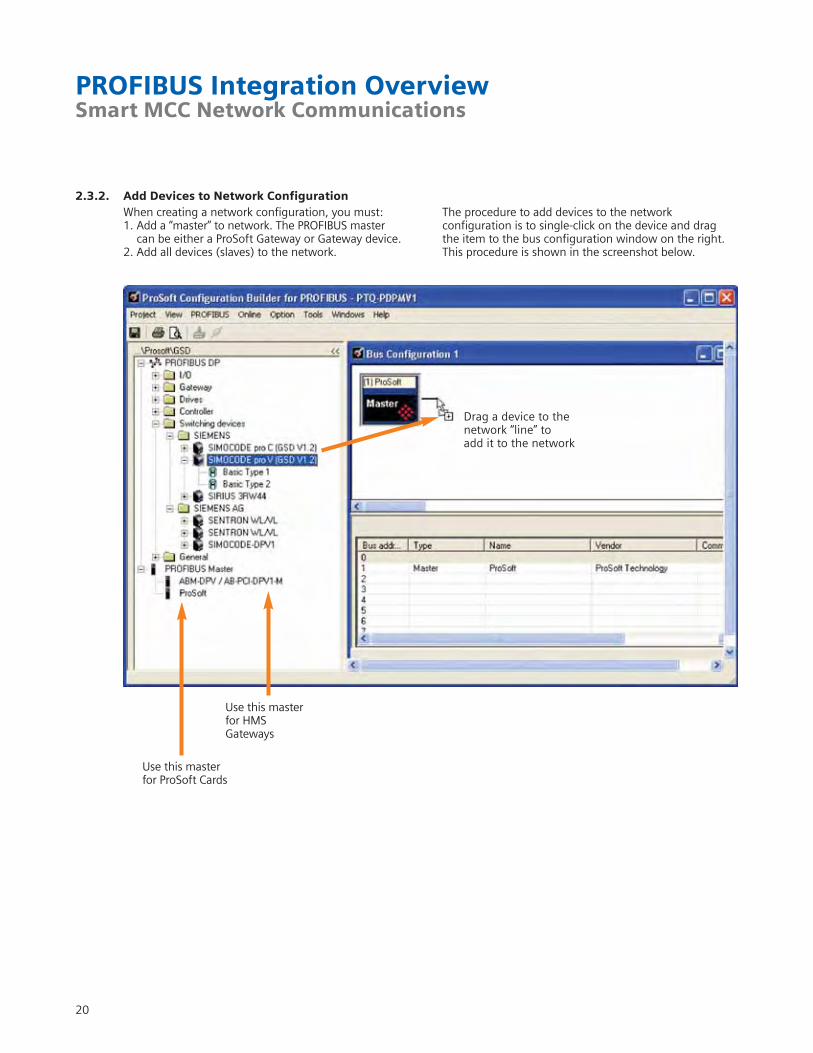
2.3.2. Add Devices to Network Configuration
Drag a device to thenetwork “line” to add it to the network
Use this master for ProSoft Cards
Use this master for HMSGateways
When creating a network configuration, you must:1. Add a “master” to network. The PROFIBUS master
can be either a ProSoft Gateway or Gateway device.2. Add all devices (slaves) to the network.
The procedure to add devices to the network configuration is to single-click on the device and drag the item to the bus configuration window on the right.This procedure is shown in the screenshot below.

2.3.3. Setting Network Master (Scanner) Configuration
PROFIBUS Integration OverviewSmart MCC Network Communications
21
The master node is usually node 1The default baud rate is 1500 Kbit/secThese values may be user adjusted
Double-click on MasterICON to set the masternode number and network baud rate
Each profile defines a bus timing calculation for transmitting and receiving messages between the master and all slaves. Due to limitations on some slaves, not all profiles will work with all baud rates and all slaves. To most closely mimic the bus bit timingused by Siemens S7 PLC's, select the Multi-Master DPprofile. This will allow the widest selection of baud rates for most slaves, and still allow programming stations to be connected to the PROFIBUS-DP network.

22
PROFIBUS Integration OverviewSmart MCC Network Communications
Each device will automatically be given a node address.This node number may be manually reset.
2.3.4. Setting Device Properties
Double-click on the deviceicon to set the node number
Set name, if desired Set node number

2.3.5. Setting Device Cyclic DataMost devices have a net number of cyclic bytes that are exchanged with the master.
However, there are two devices that have adjustable number of bytes: MM440 VFD and SIMOCODE PRO V
MM440 VFD� Chose setting PP01 for the device configuration� Choosing something other than PP01, will require
reconfiguring the VFD. i.e., PP01 is a VFD default setting� PP01 allocates 12 bytes input and 12 bytes output
data to and from the PROFIBUS master
� The first 8 bytes of input and output can effectively be ignored for basic configuration. Refer to the PROFIBUS Manual for the MM440 for more information� The last 4 bytes of input and output are used for
network control of the drive. Refer to Section 2.2 for data breakdown.
SIMOCODE PRO V� Type 1 is 10 bytes of input and 4 bytes of output� Type 2 is 4 bytes of input and 2 bytes of output� Refer to Section 2.2 for data breakdown
PROFIBUS Integration OverviewSmart MCC Network Communications
23
Single-click on icon to select
Drag the data type from thedevice to the slot number
Procedure to set the cyclic data type for the device:1. Single-click on the device icon to select2. Drag the data type to the slot number
24
PROFIBUS Integration OverviewSmart MCC Network Communications
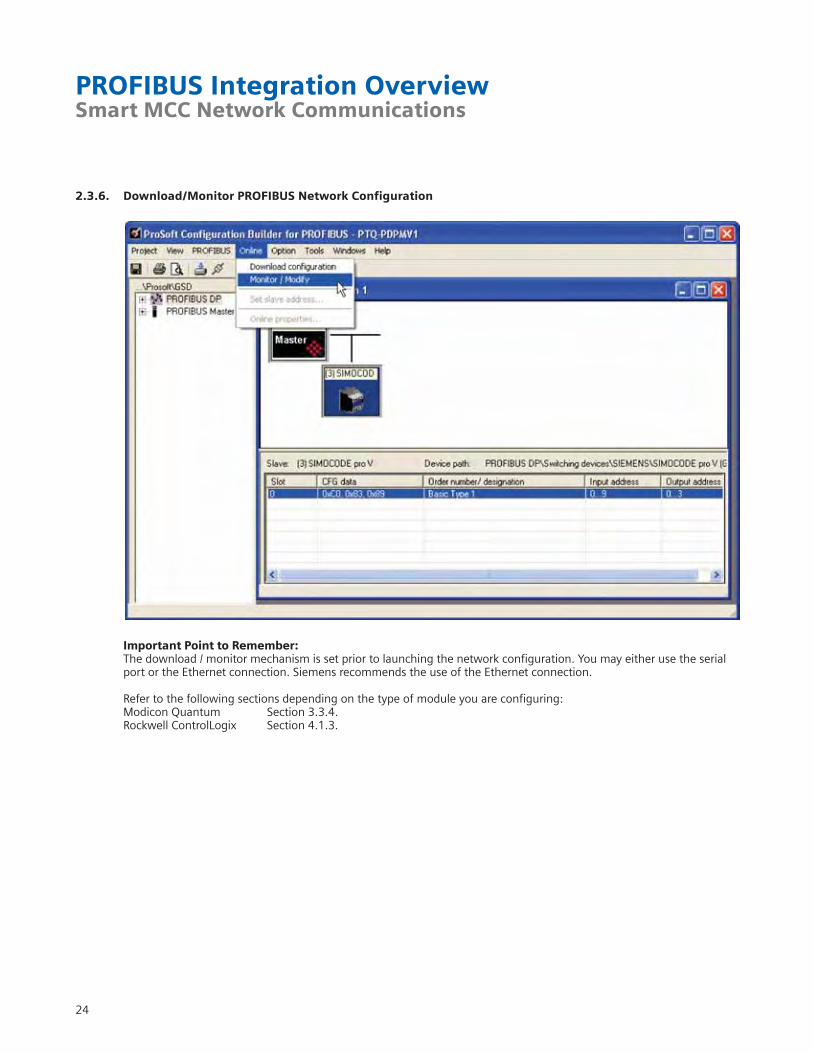
2.3.6. Download/Monitor PROFIBUS Network Configuration
Important Point to Remember:The download / monitor mechanism is set prior to launching the network configuration. You may either use the serialport or the Ethernet connection. Siemens recommends the use of the Ethernet connection.
Refer to the following sections depending on the type of module you are configuring:Modicon Quantum Section 3.3.4.Rockwell ControlLogix Section 4.1.3.
Modicon Quantum PLCSmart MCC Network Communications
25
3. Modicon Quantum PLC
3.1. Introduction
The modicon PLC in this section contains integrationexamples for the ProSoft PTQ-PDPM card (which is aPROFIBUS Scanner for the Quantum PLC), a Modbus TCP gateway, and a Modbus RTU gateway.
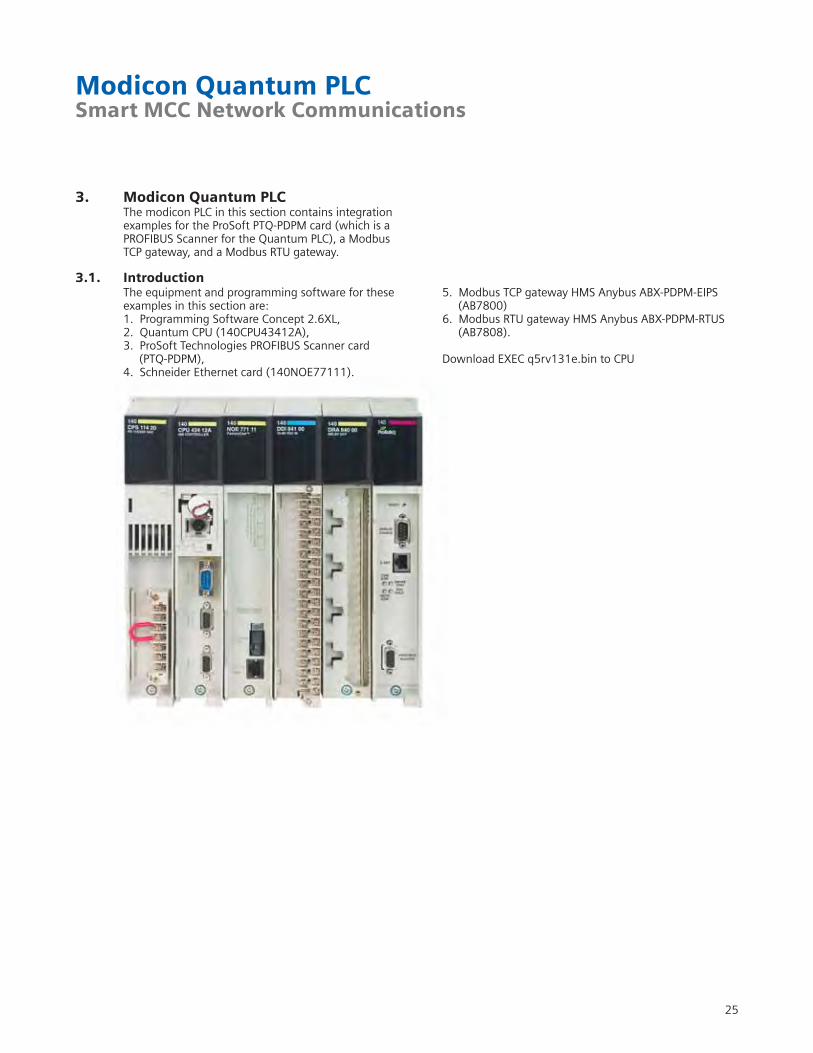
The equipment and programming software for theseexamples in this section are:1. Programming Software Concept 2.6XL, 2. Quantum CPU (140CPU43412A), 3. ProSoft Technologies PROFIBUS Scanner card
(PTQ-PDPM), 4. Schneider Ethernet card (140NOE77111).
5. Modbus TCP gateway HMS Anybus ABX-PDPM-EIPS (AB7800)
6. Modbus RTU gateway HMS Anybus ABX-PDPM-RTUS(AB7808).
Download EXEC q5rv131e.bin to CPU
Double click on the “Default Module” toset the module type.
26
Modicon Quantum PLCSmart MCC Network Communications
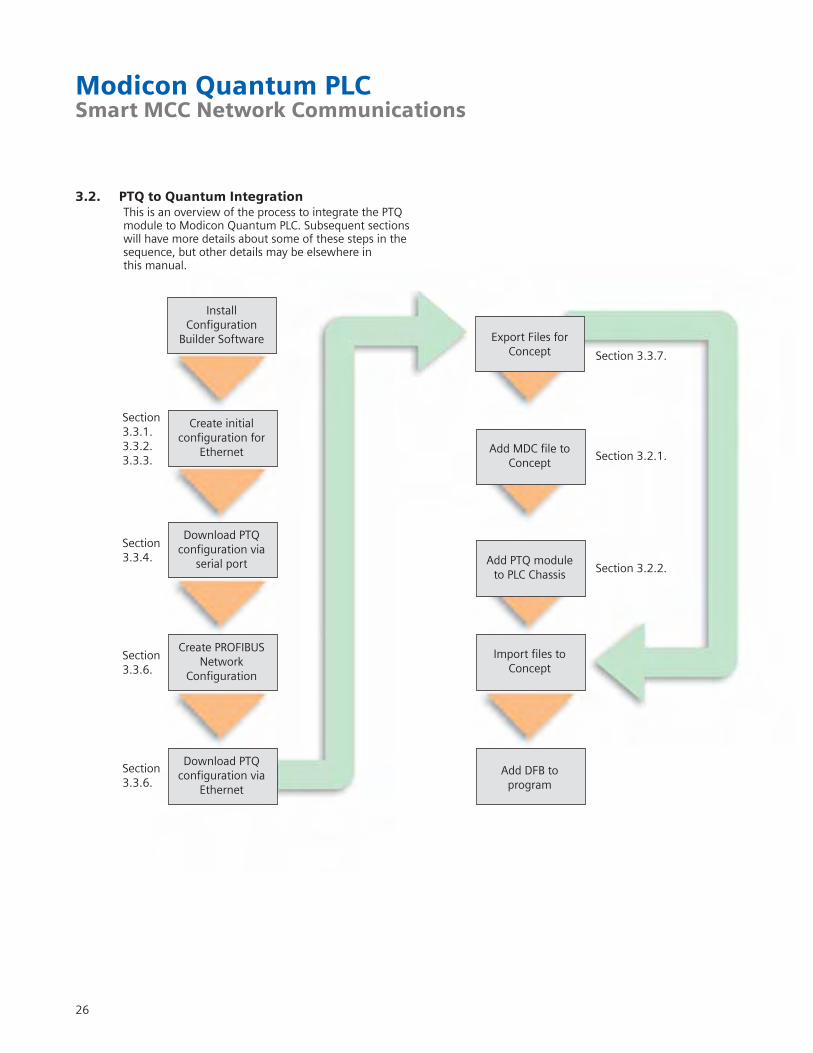
3.2. PTQ to Quantum Integration
Create initialconfiguration for
Ethernet
Download PTQconfiguration via
serial port
Create PROFIBUSNetwork
Configuration
Download PTQconfiguration via
Ethernet
InstallConfiguration
Builder Software
Add MDC file toConcept
Add PTQ module to PLC Chassis
Import files to Concept
Add DFB toprogram
Export Files forConcept Section 3.3.7.
Section 3.3.1.3.3.2.3.3.3. Section 3.2.1.
Section 3.2.2.
Section 3.3.4.
Section 3.3.6.
Section 3.3.6.
This is an overview of the process to integrate the PTQmodule to Modicon Quantum PLC. Subsequent sectionswill have more details about some of these steps in thesequence, but other details may be elsewhere in this manual.
Modicon Quantum PLCSmart MCC Network Communications
27
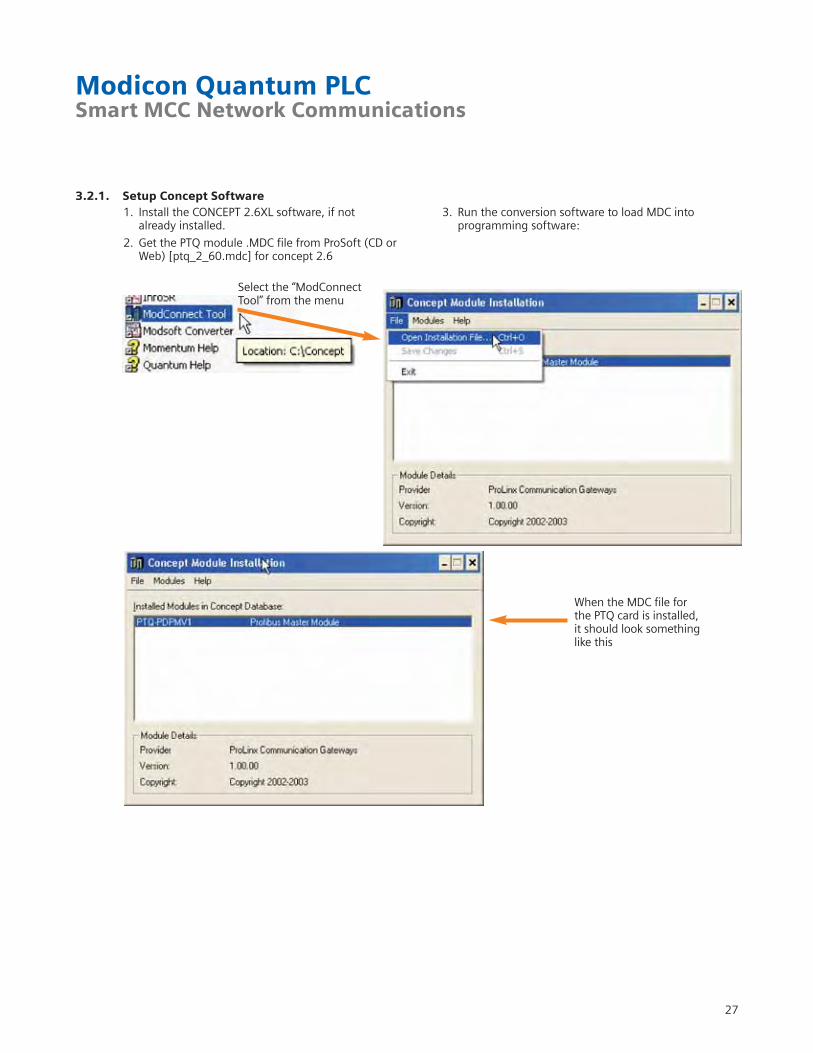
3.2.1. Setup Concept Software1. Install the CONCEPT 2.6XL software, if not
already installed.
2. Get the PTQ module .MDC file from ProSoft (CD or Web) [ptq_2_60.mdc] for concept 2.6
3. Run the conversion software to load MDC into programming software:
When the MDC file for the PTQ card is installed, it should look something like this
Select the “ModConnectTool” from the menu

Modicon Quantum PLCSmart MCC Network Communications
28
3.2.2. Create ProjectUsing CONCEPT 2.6XL programming software, create theproject you want to use with the PTQ module. For ourexample, we will create
Then create the rest of the chassis details for the project.
Create new project
Set up modulesin chassis
Set up memory

Modicon Quantum PLCSmart MCC Network Communications
3.3. ProSoft and PROFIBUS Configuration Software
3.3.1. Create a new configuration
Double click on the “Default Module” to set the module type.
Install the ProSoft Configuration Builder for the PTQ module. This software will come on a CD with module, or may be downloaded from the web.
29
30
Modicon Quantum PLCSmart MCC Network Communications
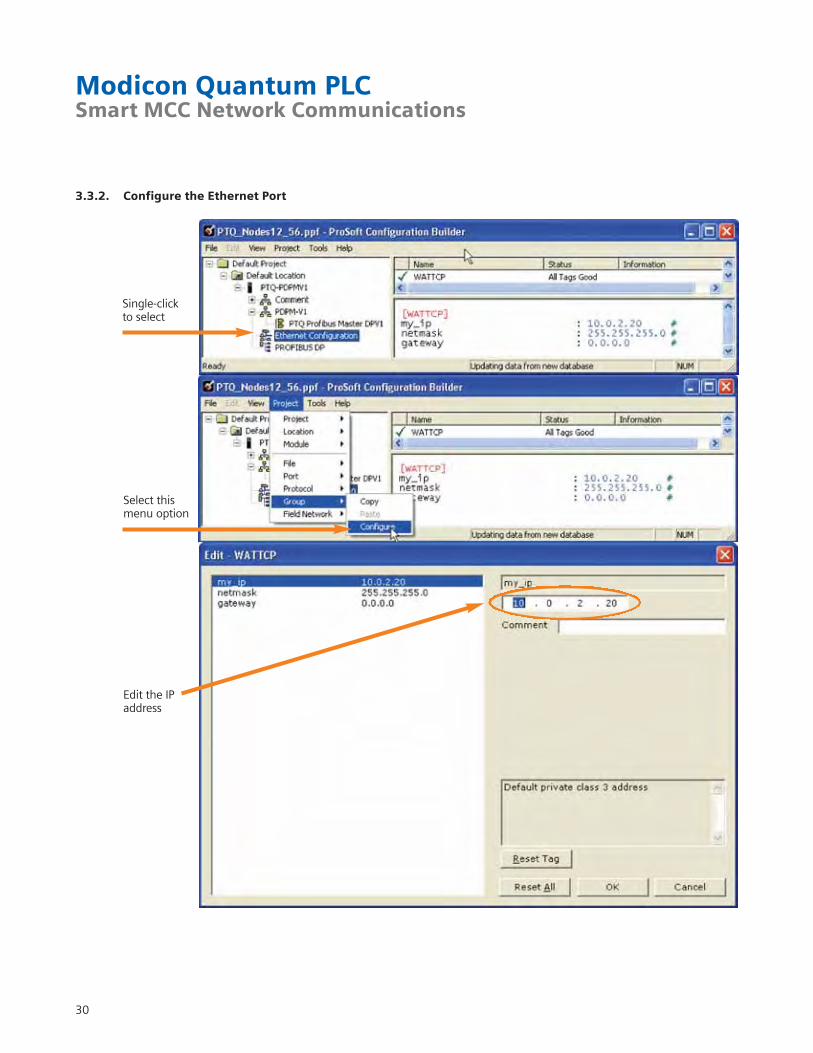
3.3.2. Configure the Ethernet Port
Single-clickto select
Select this menu option
Edit the IPaddress

Modicon Quantum PLCSmart MCC Network Communications
31
3.3.3. Edit Quantum Chassis Slot Number
Must match chassis slot that module is actuallyinstalled into
Single-clickto select
Select this parameterto edit
(Slot Number)
Select thismenu option
Modicon Quantum PLCSmart MCC Network Communications
32
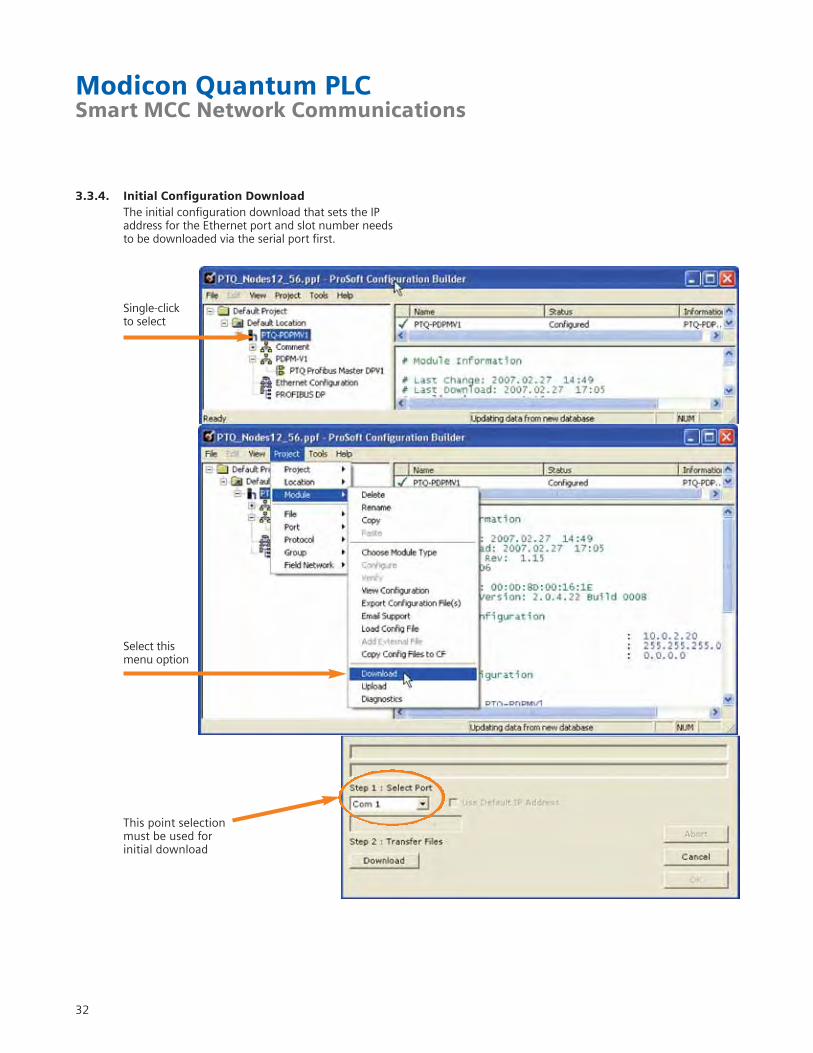
3.3.4. Initial Configuration DownloadThe initial configuration download that sets the IPaddress for the Ethernet port and slot number needs to be downloaded via the serial port first.
Single-clickto select
Select thismenu option
This point selection must be used for initial download

Modicon Quantum PLCSmart MCC Network Communications
33
3.3.5. Module Debug ModeAfter the initial configuration download to the PTQ module, you can use hyperterminal to create a TCP connection to the module. The module has a series of debug screens for configuration, testing, and
troubleshooting the operation of the module. Thesescreens and their functions are documented in the user manual for the module.
Must match IP address setin Section 3.3.2.
34
Modicon Quantum PLCSmart MCC Network Communications
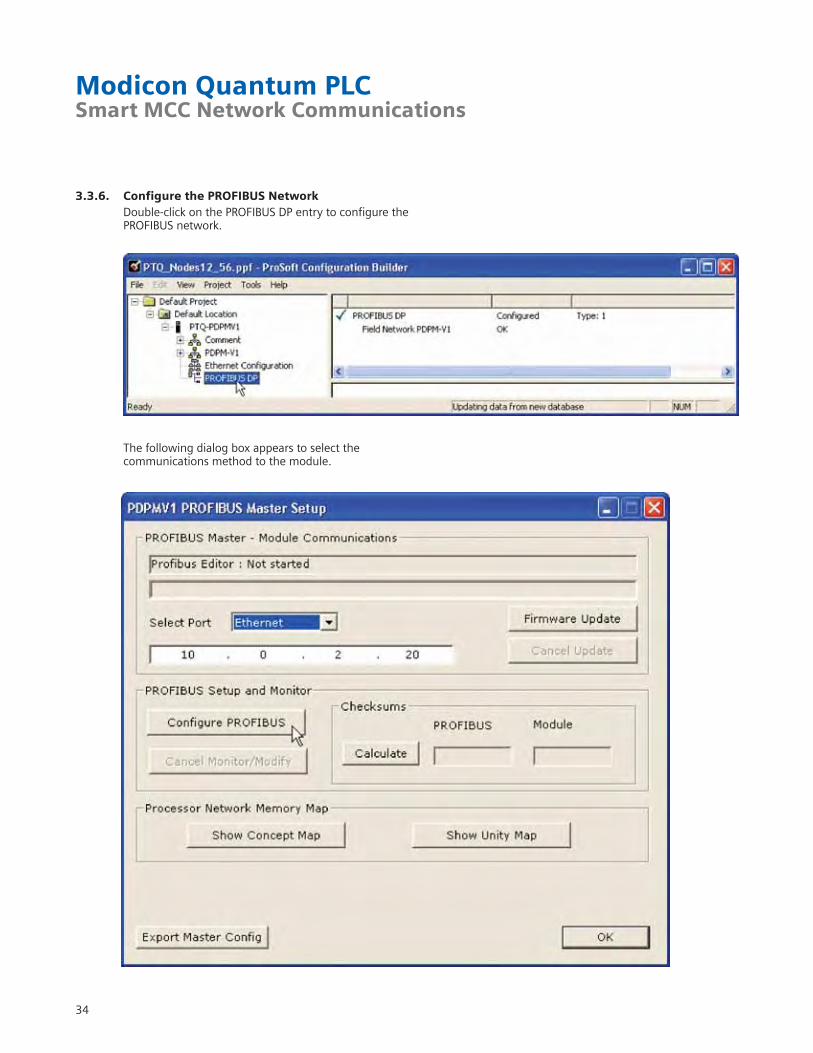
3.3.6. Configure the PROFIBUS NetworkDouble-click on the PROFIBUS DP entry to configure thePROFIBUS network.
The following dialog box appears to select the communications method to the module.
Modicon Quantum PLCSmart MCC Network Communications
35
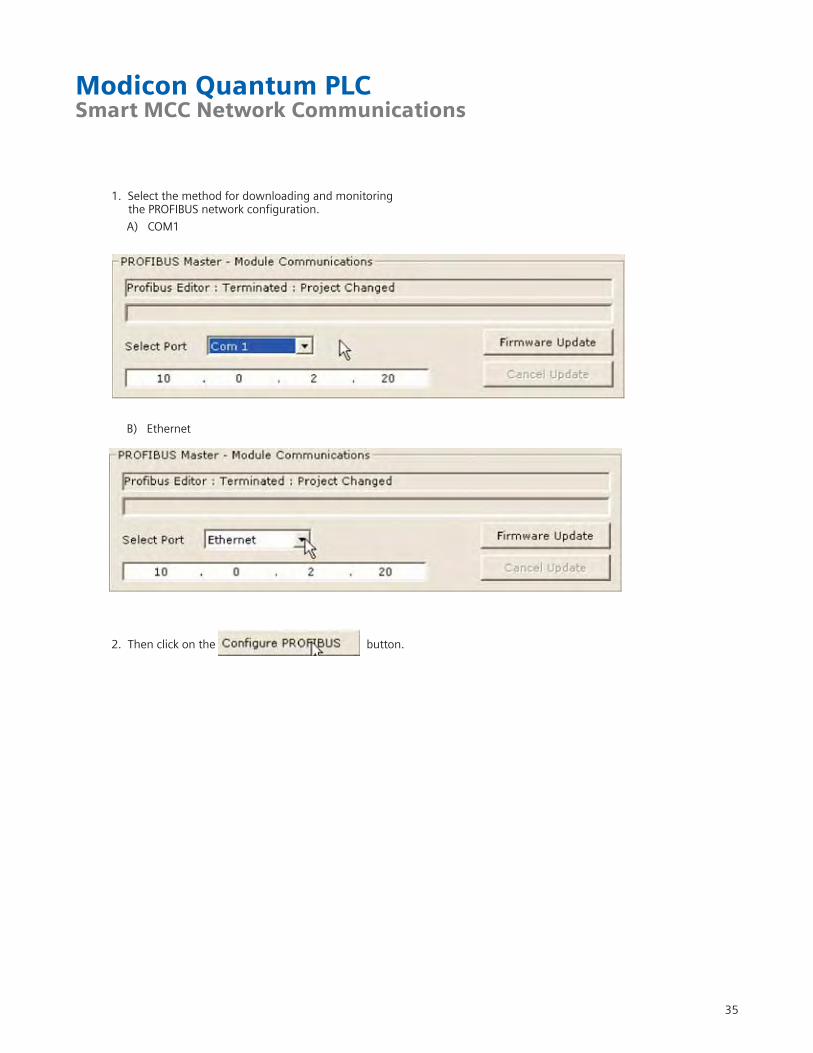
1. Select the method for downloading and monitoring the PROFIBUS network configuration.
A) COM1
B) Ethernet
2. Then click on the button.

36
Modicon Quantum PLCSmart MCC Network Communications
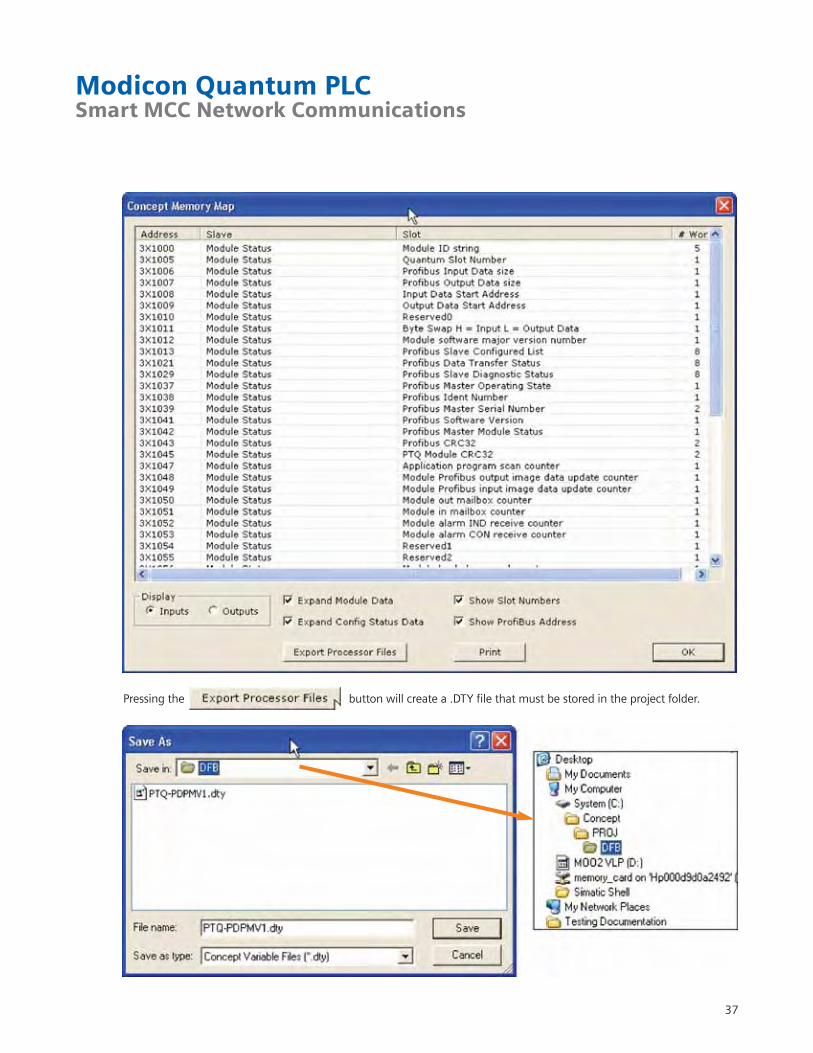
3.3.7. Export Files for ConceptImportant Note:The PROFIBUS Network configuration must havebeen created prior to this step, and downloaded to the PTQ card.
Modicon Quantum PLCSmart MCC Network Communications
Pressing the button will create a .DTY file that must be stored in the project folder.
37
Modicon Quantum PLCSmart MCC Network Communications
38
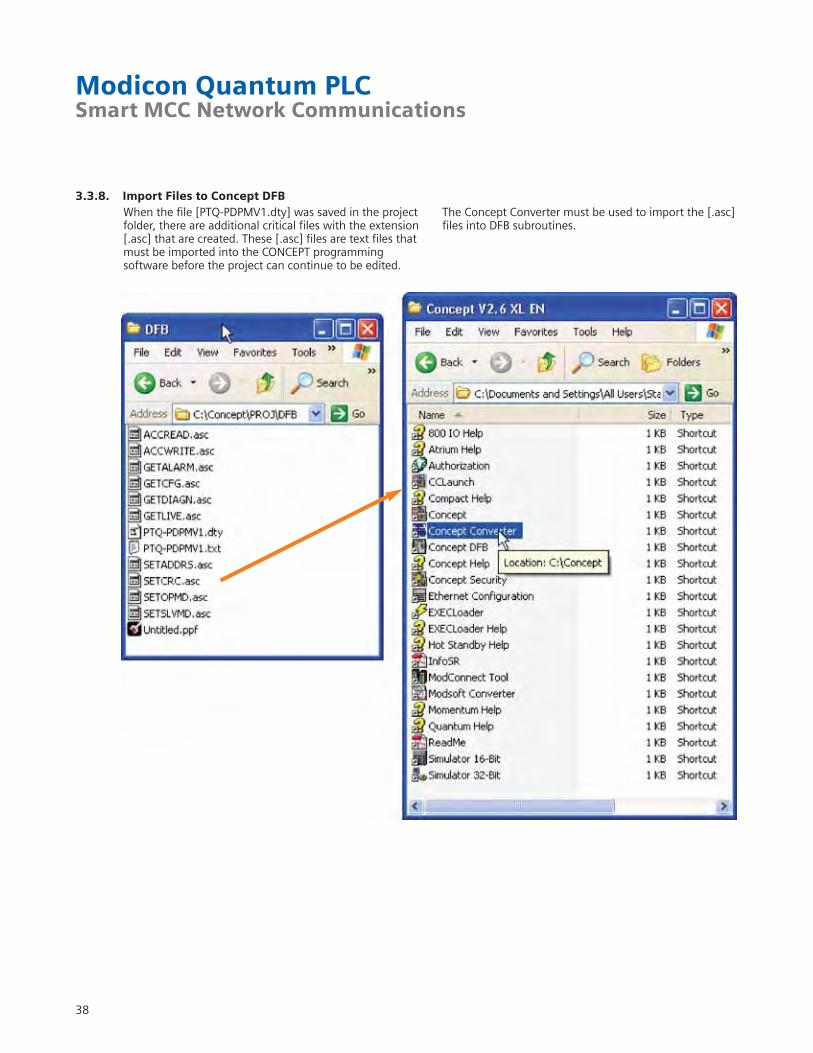
3.3.8. Import Files to Concept DFBWhen the file [PTQ-PDPMV1.dty] was saved in the projectfolder, there are additional critical files with the extension[.asc] that are created. These [.asc] files are text files thatmust be imported into the CONCEPT programming software before the project can continue to be edited.
The Concept Converter must be used to import the [.asc]files into DFB subroutines.

Modicon Quantum PLCSmart MCC Network Communications
39
Running the concept converter, then selecting import function.
When “Import” is selected, then a list of available function to import will appear. Double-clicking on the [.asc] file will start the import process.
40
Modicon Quantum PLCSmart MCC Network Communications
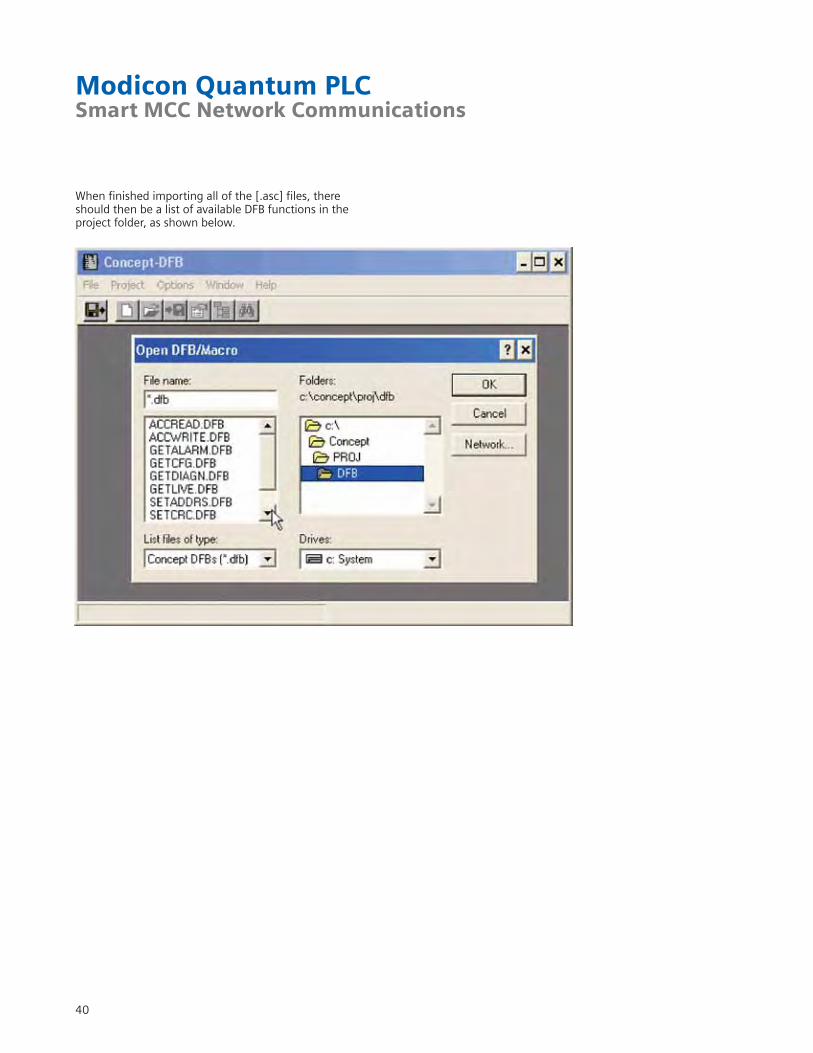
When finished importing all of the [.asc] files, thereshould then be a list of available DFB functions in theproject folder, as shown below.
Modicon Quantum PLCSmart MCC Network Communications
41
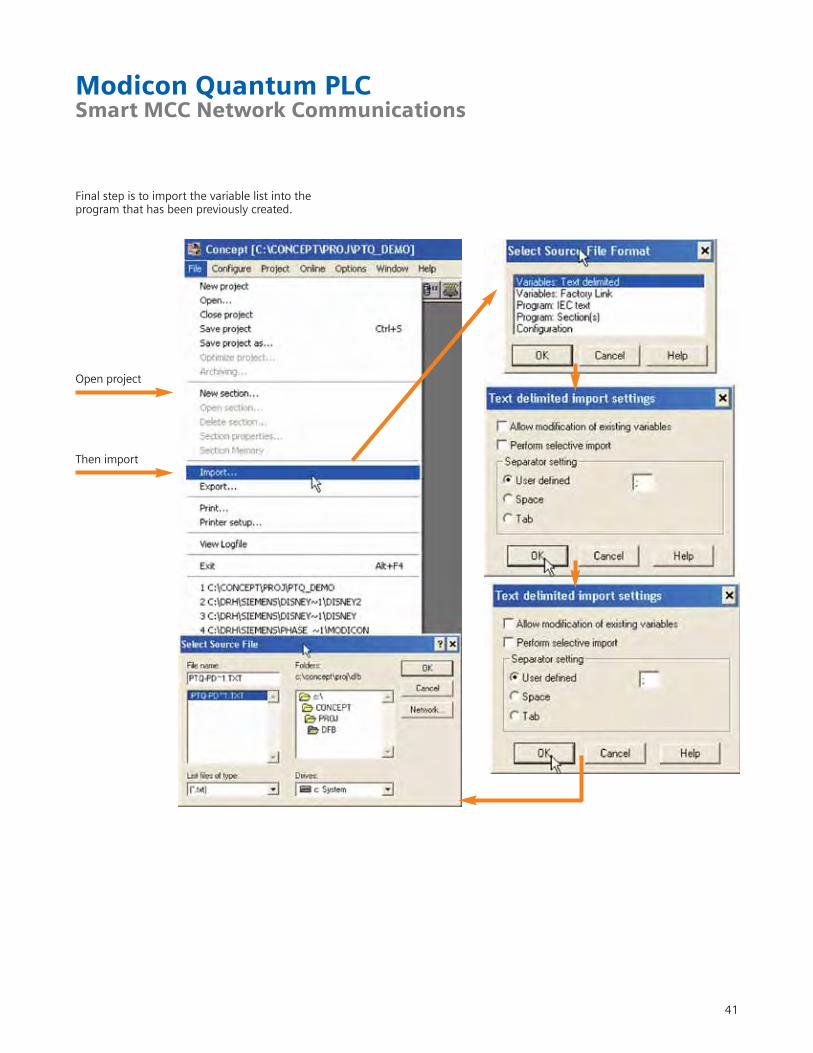
Final step is to import the variable list into the program that has been previously created.
Open project
Then import

42
Modicon Quantum PLCSmart MCC Network Communications
After importing the variable list ([.txt]) file, then the following variables will be created in the PLC program.
Modicon Quantum PLCSmart MCC Network Communications
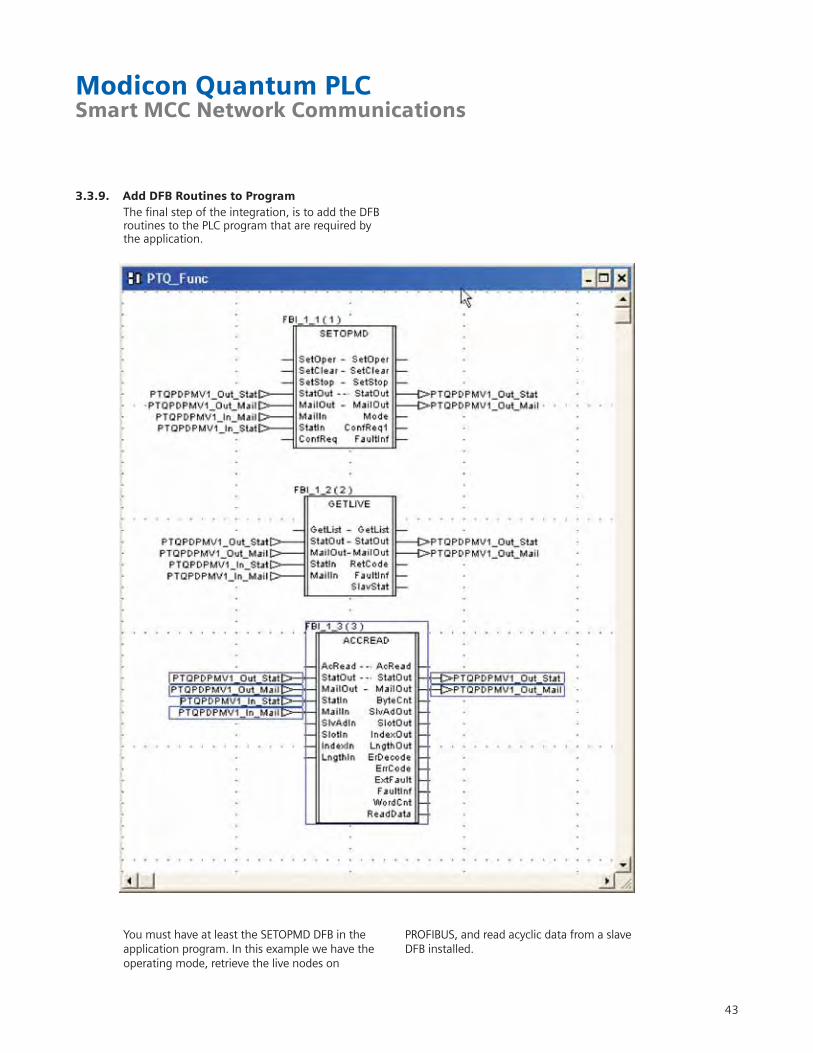
43
3.3.9. Add DFB Routines to ProgramThe final step of the integration, is to add the DFB routines to the PLC program that are required by the application.
You must have at least the SETOPMD DFB in the application program. In this example we have the operating mode, retrieve the live nodes on
PROFIBUS, and read acyclic data from a slave DFB installed.

Modicon Quantum PLCSmart MCC Network Communications
3.4 MODICON Ethernet (140NOE77111) to MODBUS TCP Gateway
Slave(PROFIBUS)
Slave(PROFIBUS)
Slave(PROFIBUS)
Slave(PROFIBUS)
Slave(PROFIBUS)
Master Interface(PROFIBUS)
Slave Interface (Other)
PROFIBUSConfig Interface
Gateway Config Interface
Master(Other)
Slave(Other)
Slave(Other)
Slave(Other)
Slave(Other)
LED State Indication
MS Green Operate modeGreen, flashing Clear modeRed Stop modeOff Offline
DB Green Database OKGreen, flashing Database download in progressRed Database invalid
COM Green Data exchange with all configured slavesGreen, flashing Data exchange with at least one slaveRed Bus control error
TOK Green The Master Interface has the token
PROFIBUS Status LED’s
44
Ethernet Network
ModiconEthernetCard

Modicon Quantum PLCSmart MCC Network Communications
45
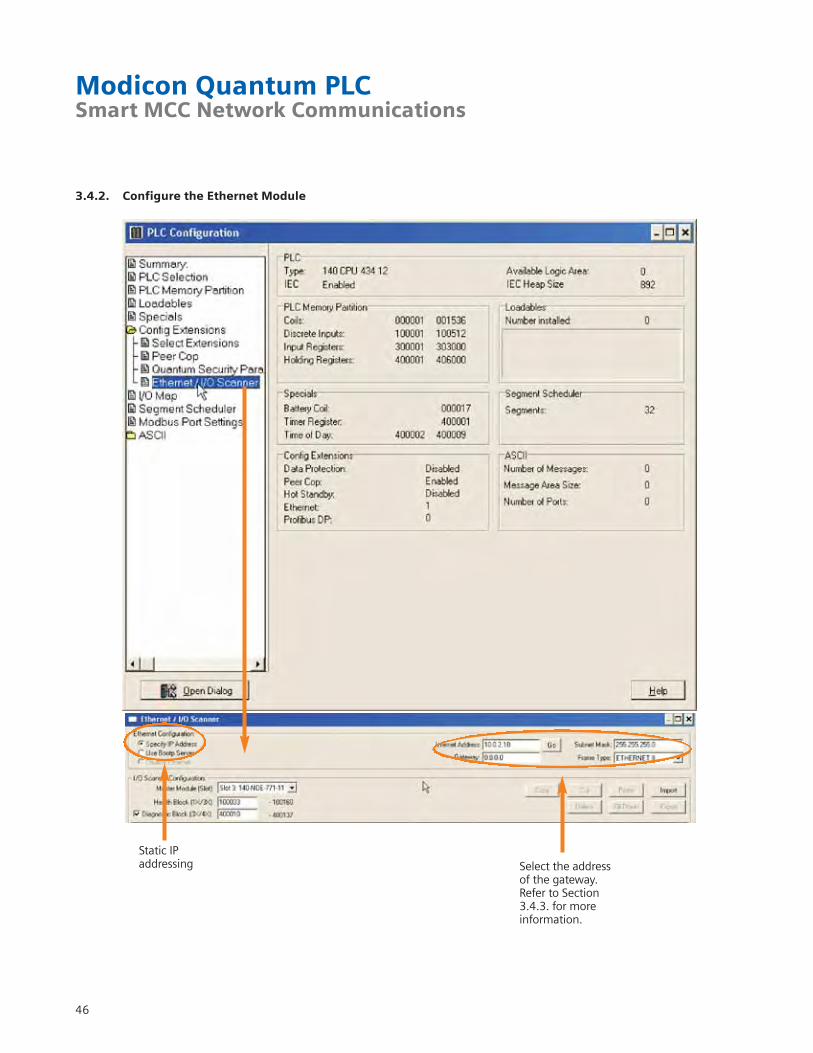
3.4.1. Add the Ethernet ModuleThe ethernet module needs to be added to the currentPLC chassis by opening the dialog box PLC configuration.
Double-click
Must set the TCP/IP Ethernetnumeric selection to 1. Thisis the number of Ethernetcards (Optional NOE cards)that have been installed inthe chassis. In this example,we have only installed onecard, so we set this value to one.
46
Modicon Quantum PLCSmart MCC Network Communications
3.4.2. Configure the Ethernet Module
Static IPaddressing Select the address
of the gateway.Refer to Section3.4.3. for moreinformation.
Modicon Quantum PLCSmart MCC Network Communications
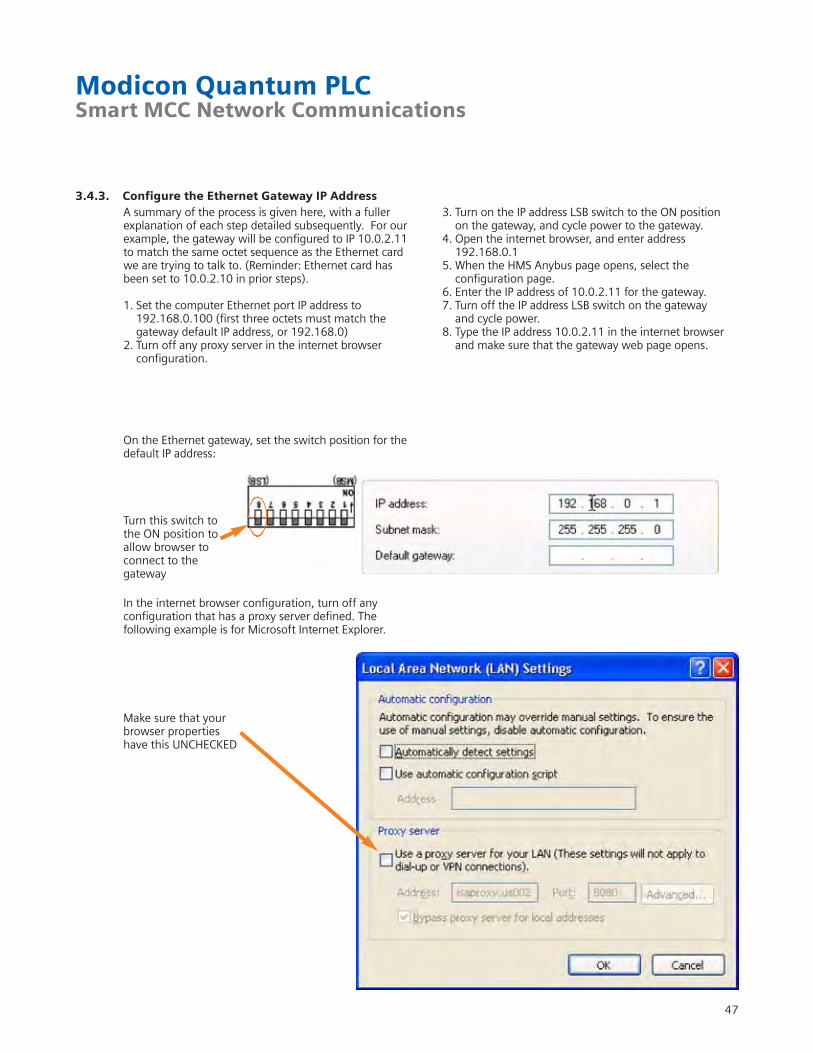
3.4.3. Configure the Ethernet Gateway IP AddressA summary of the process is given here, with a fullerexplanation of each step detailed subsequently. For ourexample, the gateway will be configured to IP 10.0.2.11to match the same octet sequence as the Ethernet cardwe are trying to talk to. (Reminder: Ethernet card hasbeen set to 10.0.2.10 in prior steps).
1. Set the computer Ethernet port IP address to 192.168.0.100 (first three octets must match the gateway default IP address, or 192.168.0)
2. Turn off any proxy server in the internet browser configuration.
3. Turn on the IP address LSB switch to the ON position on the gateway, and cycle power to the gateway.
4. Open the internet browser, and enter address 192.168.0.1
5. When the HMS Anybus page opens, select the configuration page.
6. Enter the IP address of 10.0.2.11 for the gateway.7. Turn off the IP address LSB switch on the gateway
and cycle power.8. Type the IP address 10.0.2.11 in the internet browser
and make sure that the gateway web page opens.
On the Ethernet gateway, set the switch position for thedefault IP address:
In the internet browser configuration, turn off any configuration that has a proxy server defined. Thefollowing example is for Microsoft Internet Explorer.
Turn this switch tothe ON position toallow browser to connect to the gateway
Make sure that your browser properties have this UNCHECKED
47

Modicon Quantum PLCSmart MCC Network Communications
48
On the computer used for programming the Ethernet gateway,set the computer IP address to talk to the gateway.
Initial gateway configuration IP address
Set the IP address tomatch the first 3 octets of the gateway (10.0.2) in this example, when the gateway has already been configured

Modicon Quantum PLCSmart MCC Network Communications
49
For initial configuration, type 192.168.0.1 (default gateway configuration) in the browser address window.
For all subsequent access to the gateway, type in the gateway IP address. In this example 10.0.2.11.
Type 192.168.0.1 as an address if:1. The IP properties are set to 192.168.0. 2. The configuration switch LSB in ON.
Type the address configured in the gateway if:1. The IP properties are set to match the gateway.2. All configuration switches are OFF.

50
Modicon Quantum PLCSmart MCC Network Communications
3.4.4. Configure the Ethernet Gateway FieldbusUsing hyperterminal (for windows), and connect to thegateway configuration port with a null modem cable.
Press <ESC> to display the configuration menu interfacefor the gateway. Sometimes it may be necessary to cyclepower to the gateway to allow hyperterminal to properlywork with the gateway.
Press option 4 to get the PROFIBUS configuration size,then press 6 to set the I/O size to the same values for the Ethernet interface, as shown in the example below.
After pressing “6” for changing the configuration, andentering the I/O size as shown in the example above, it isimportant to keep the “Modbus Address Mode“as“Disabled“
Record these values
Enter the values here
Important:Swap input andoutput byte size
Press 4
Press 6
Modicon Quantum PLCSmart MCC Network Communications
51
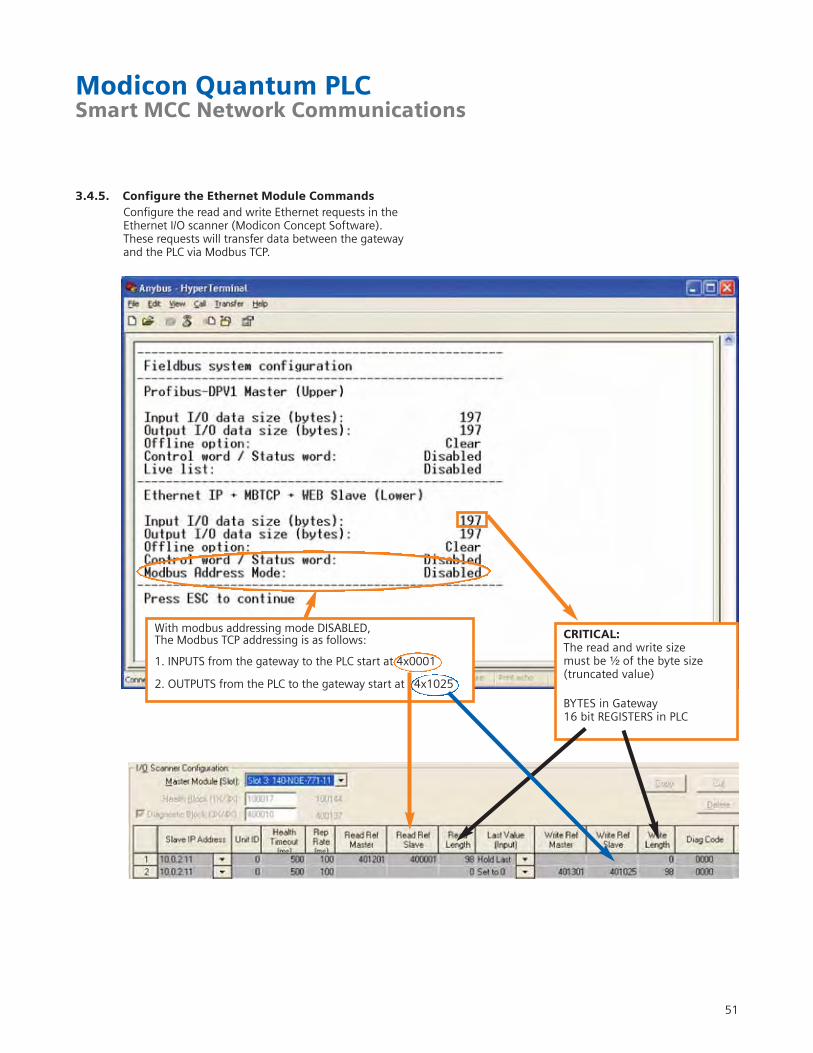
3.4.5. Configure the Ethernet Module CommandsConfigure the read and write Ethernet requests in theEthernet I/O scanner (Modicon Concept Software). These requests will transfer data between the gatewayand the PLC via Modbus TCP.
With modbus addressing mode DISABLED, The Modbus TCP addressing is as follows:
1. INPUTS from the gateway to the PLC start at 4x0001
2. OUTPUTS from the PLC to the gateway start at 4x1025
CRITICAL:The read and write size must be ¹⁄₂ of the byte size (truncated value)
BYTES in Gateway16 bit REGISTERS in PLC
Modicon Quantum PLCSmart MCC Network Communications
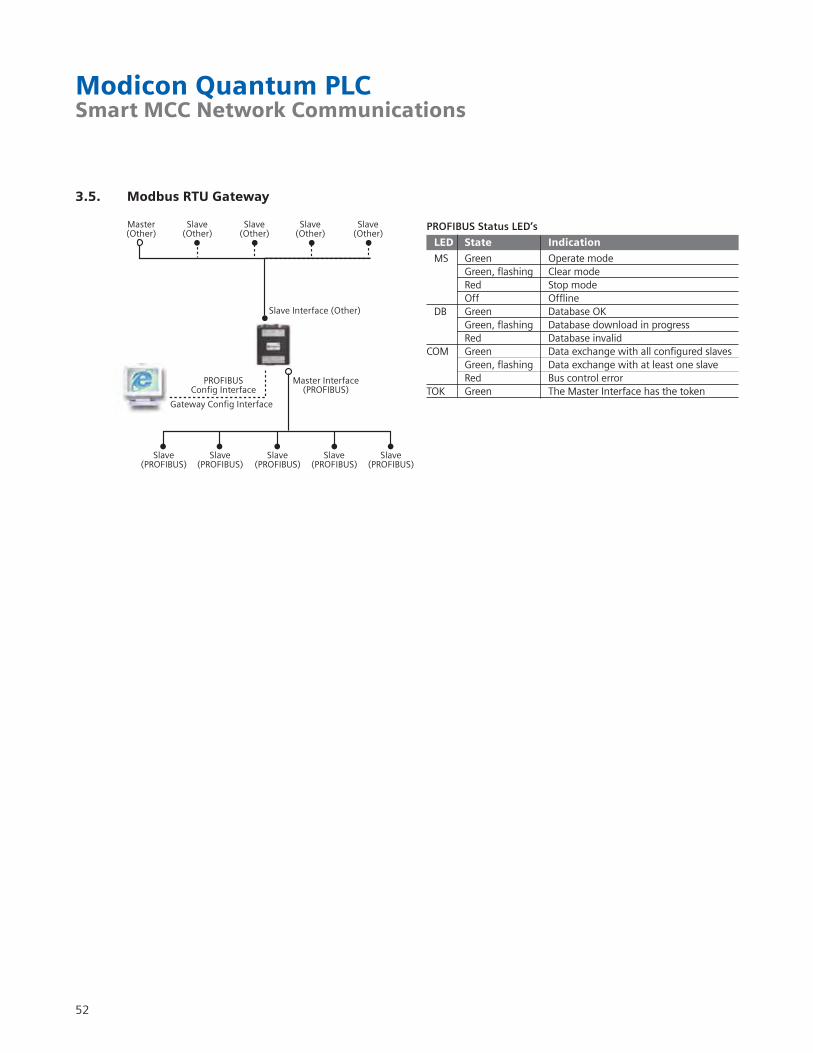
3.5. Modbus RTU Gateway
LED State Indication
MS Green Operate modeGreen, flashing Clear modeRed Stop modeOff Offline
DB Green Database OKGreen, flashing Database download in progressRed Database invalid
COM Green Data exchange with all configured slavesGreen, flashing Data exchange with at least one slaveRed Bus control error
TOK Green The Master Interface has the token
PROFIBUS Status LED’s
Slave(PROFIBUS)
Slave(PROFIBUS)
Slave(PROFIBUS)
Slave(PROFIBUS)
Slave(PROFIBUS)
Master Interface(PROFIBUS)
Slave Interface (Other)
PROFIBUSConfig Interface
Gateway Config Interface
Master(Other)
Slave(Other)
Slave(Other)
Slave(Other)
Slave(Other)
52
53
Modicon Quantum PLCSmart MCC Network Communications
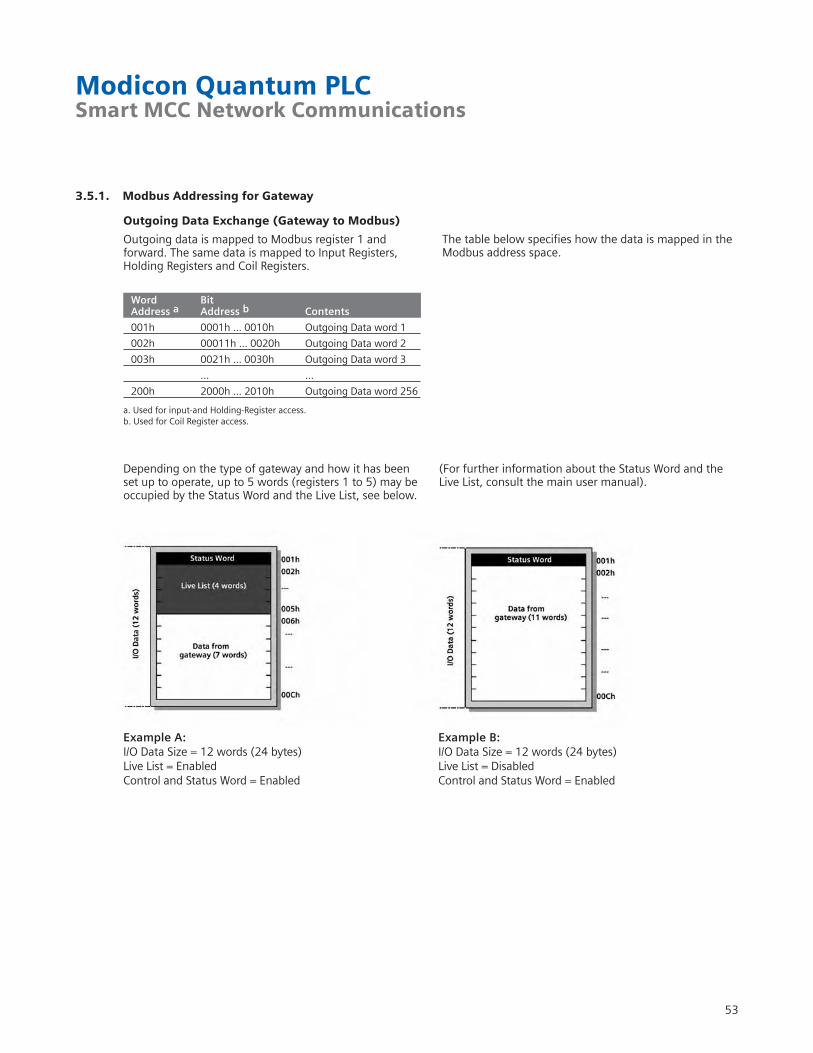
3.5.1. Modbus Addressing for Gateway
Depending on the type of gateway and how it has beenset up to operate, up to 5 words (registers 1 to 5) may be occupied by the Status Word and the Live List, see below.
(For further information about the Status Word and theLive List, consult the main user manual).
Word BitAddress a Address b Contents
001h 0001h ... 0010h Outgoing Data word 1
002h 00011h ... 0020h Outgoing Data word 2
003h 0021h ... 0030h Outgoing Data word 3
... ...
200h 2000h ... 2010h Outgoing Data word 256
a. Used for input-and Holding-Register access.b. Used for Coil Register access.
Example A:I/O Data Size = 12 words (24 bytes)Live List = EnabledControl and Status Word = Enabled
Example B:I/O Data Size = 12 words (24 bytes)Live List = DisabledControl and Status Word = Enabled
Outgoing Data Exchange (Gateway to Modbus)
Outgoing data is mapped to Modbus register 1 and forward. The same data is mapped to Input Registers,Holding Registers and Coil Registers.
The table below specifies how the data is mapped in theModbus address space.
Modicon Quantum PLCSmart MCC Network Communications
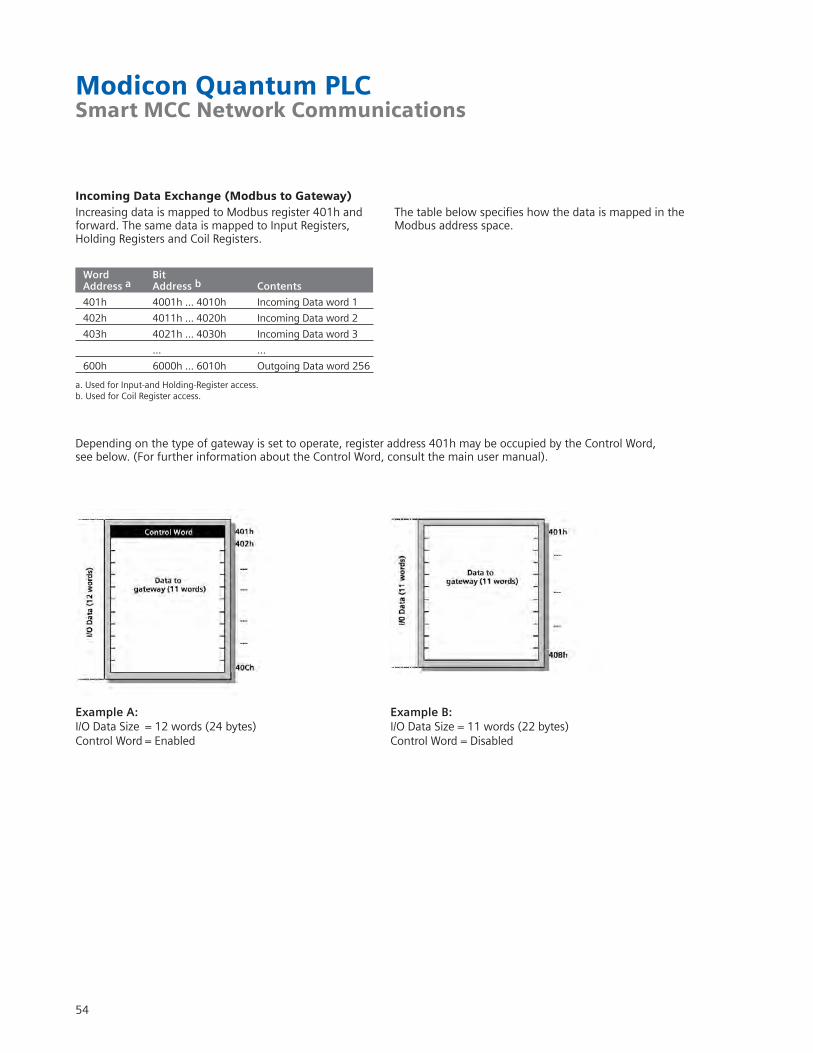
Incoming Data Exchange (Modbus to Gateway)
Depending on the type of gateway is set to operate, register address 401h may be occupied by the Control Word,see below. (For further information about the Control Word, consult the main user manual).
a. Used for Input-and Holding-Register access.b. Used for Coil Register access.
Example A:I/O Data Size = 12 words (24 bytes)Control Word = Enabled
Example B:I/O Data Size = 11 words (22 bytes)Control Word = Disabled
Word BitAddress a Address b Contents
401h 4001h ... 4010h Incoming Data word 1
402h 4011h ... 4020h Incoming Data word 2
403h 4021h ... 4030h Incoming Data word 3
... ...
600h 6000h ... 6010h Outgoing Data word 256
Increasing data is mapped to Modbus register 401h andforward. The same data is mapped to Input Registers, Holding Registers and Coil Registers.
The table below specifies how the data is mapped in theModbus address space.
54

55
Modicon Quantum PLCSmart MCC Network Communications
3.5.2. Modbus RTU Gateway Switch Configuration
3.5.3. Modbus Message Commands Via the XXMIT Block
Slave Node 119200 BaudNo Parity
RS232 Mode
Important note:Slave address in HEX (401)
Master address in decimal (1501 using the DEC display in the reference data editor)
Important note:The slave address must be in HEX, but the master PLC address must be entered in DECIMAL. Please note how the values are shown in the variable initial values table, versus the display in the reference data editor. (RFD Template Window).
Rockwell AutomationSmart MCC Network Communications
Create PROFIBUSNetwork
Configuration
Download configuration via serial port
InstallConfiguration
Builder Software
Add module to PLC Chassis
Import files toRockwell Software
Export Files forRockwell Software
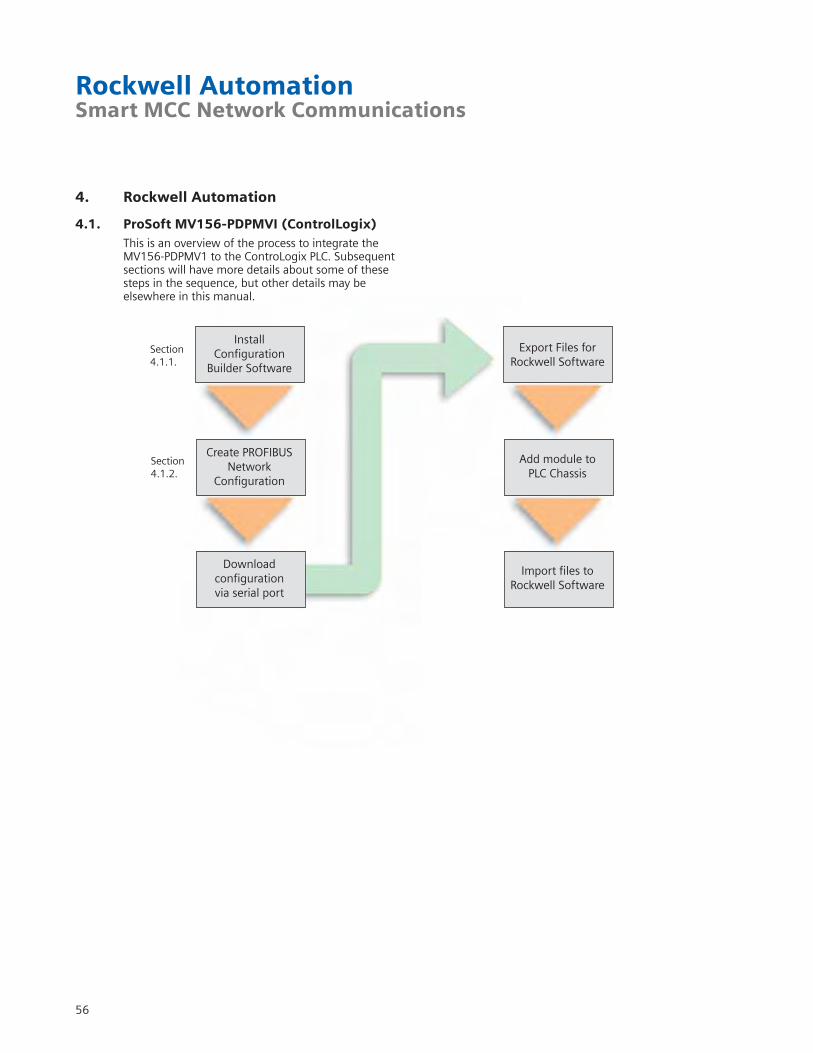
4. Rockwell Automation
4.1. ProSoft MV156-PDPMVI (ControlLogix)This is an overview of the process to integrate the MV156-PDPMV1 to the ControLogix PLC. Subsequentsections will have more details about some of these steps in the sequence, but other details may be elsewhere in this manual.
56
Section4.1.1.
Section4.1.2.

57
Rockwell AutomationSmart MCC Network Communications
4.1.1. ProSoft PROFIBUS Configuration SoftwareInstall the ProSoft Configuration Builder for the PTQ module. This software will come on a CD with the module, or may be downloaded from the web.
4.1.2. Create a New Configuration
Double click on the “Default Module” to set the module type.
Rockwell AutomationSmart MCC Network Communications
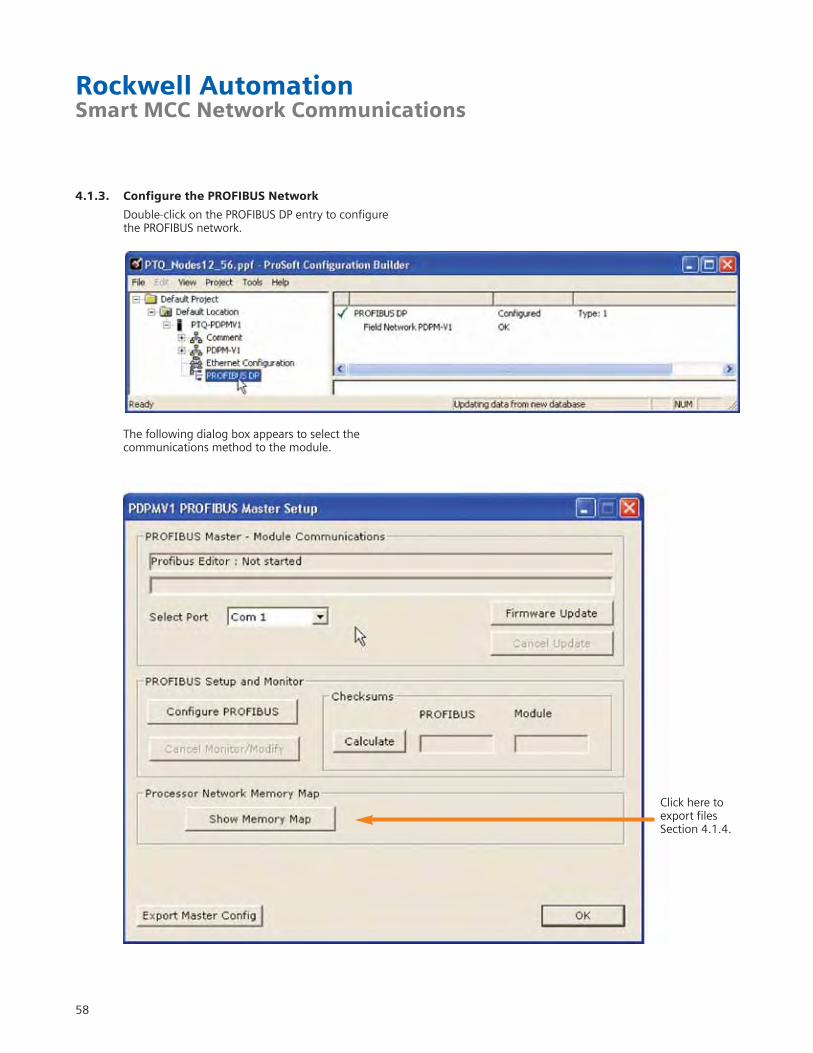
4.1.3. Configure the PROFIBUS Network
Double-click on the PROFIBUS DP entry to configure the PROFIBUS network.
The following dialog box appears to select the communications method to the module.
Click here toexport filesSection 4.1.4.
58
59
Rockwell AutomationSmart MCC Network Communications
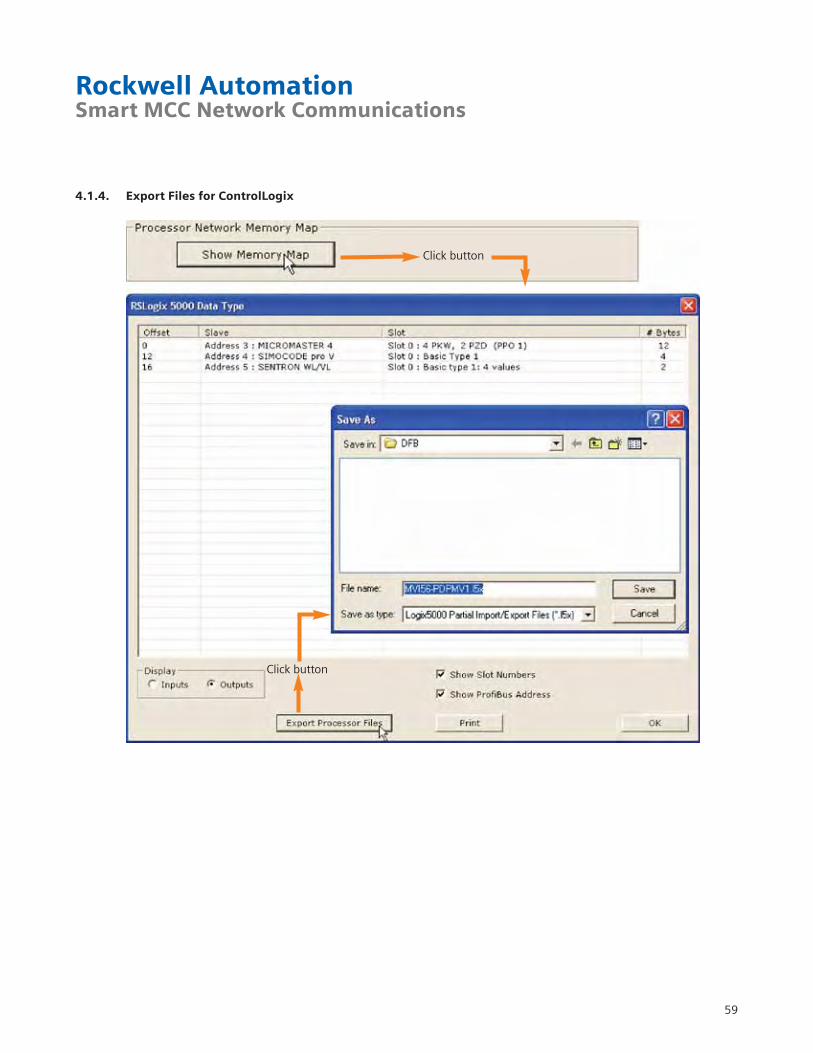
4.1.4. Export Files for ControlLogix
Click button
Click button
Rockwell AutomationSmart MCC Network Communications
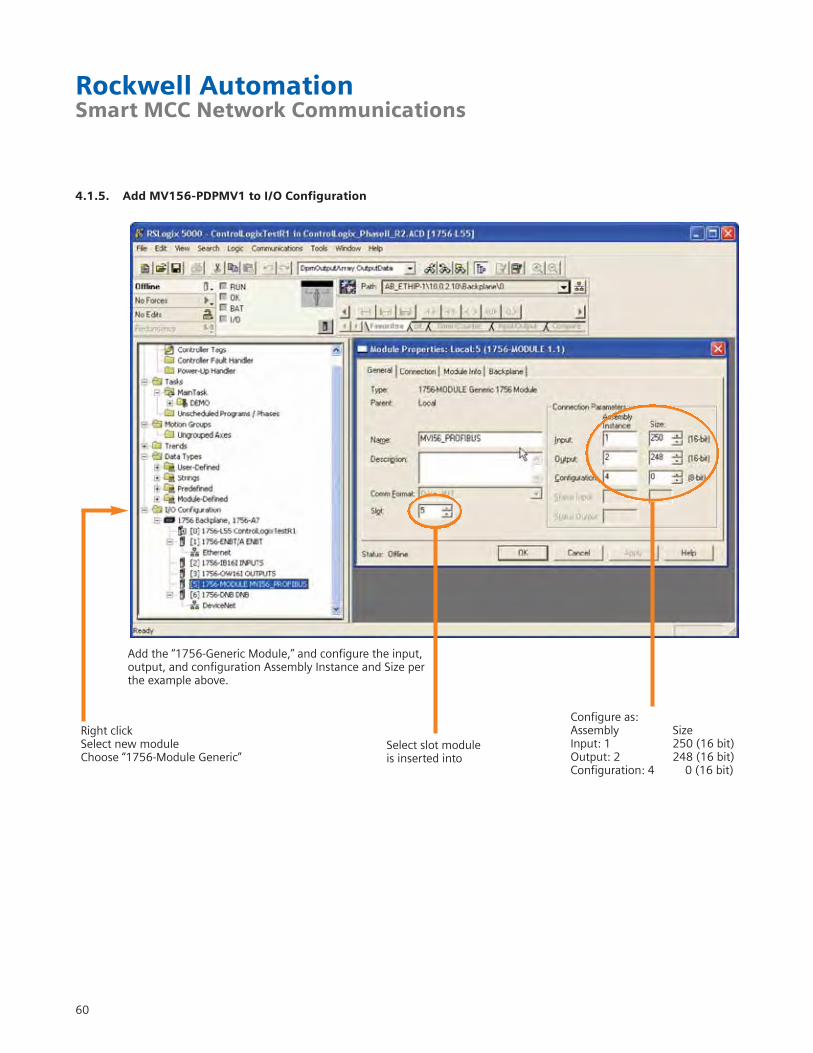
4.1.5. Add MV156-PDPMV1 to I/O Configuration
Add the “1756-Generic Module,” and configure the input,output, and configuration Assembly Instance and Size perthe example above.
60
Right clickSelect new moduleChoose “1756-Module Generic”
Select slot module is inserted into
Configure as:Assembly SizeInput: 1 250 (16 bit)Output: 2 248 (16 bit) Configuration: 4 0 (16 bit)

61
Rockwell AutomationSmart MCC Network Communications
4.1.6. Import PROFIBUS Configuration Files
Right clickSelect Add routine
ChooseImport Rung
Select RungRight click to get menu
Select fileexported inSection 4.1.4.
Rockwell AutomationSmart MCC Network Communications
4.2. Hilscher 1769-DPM (CompactLogix)An overview of the process to follow for installation, configuration, and operation of the Hilscher PROFIBUSScanner module is:A. Install the PROFIBUS configuration software.B. Download the template PLC program from the
Hilscher web site.C. Install the module in the PLC.D. Create the module configuration in the PLC program.
There are two key manuals to get from Hilscher:A. RIF1769DPM….PDF
This is the manual on the module itself. Section 4.1 contains the process to configure the module in the I/O configuration of the PLC program.
B. DTMMPD….PDFThis manual is on the software used to configure the PROFIBUS network. This software is critical to the operation of the scanner module.
62
63
Rockwell AutomationSmart MCC Network Communications
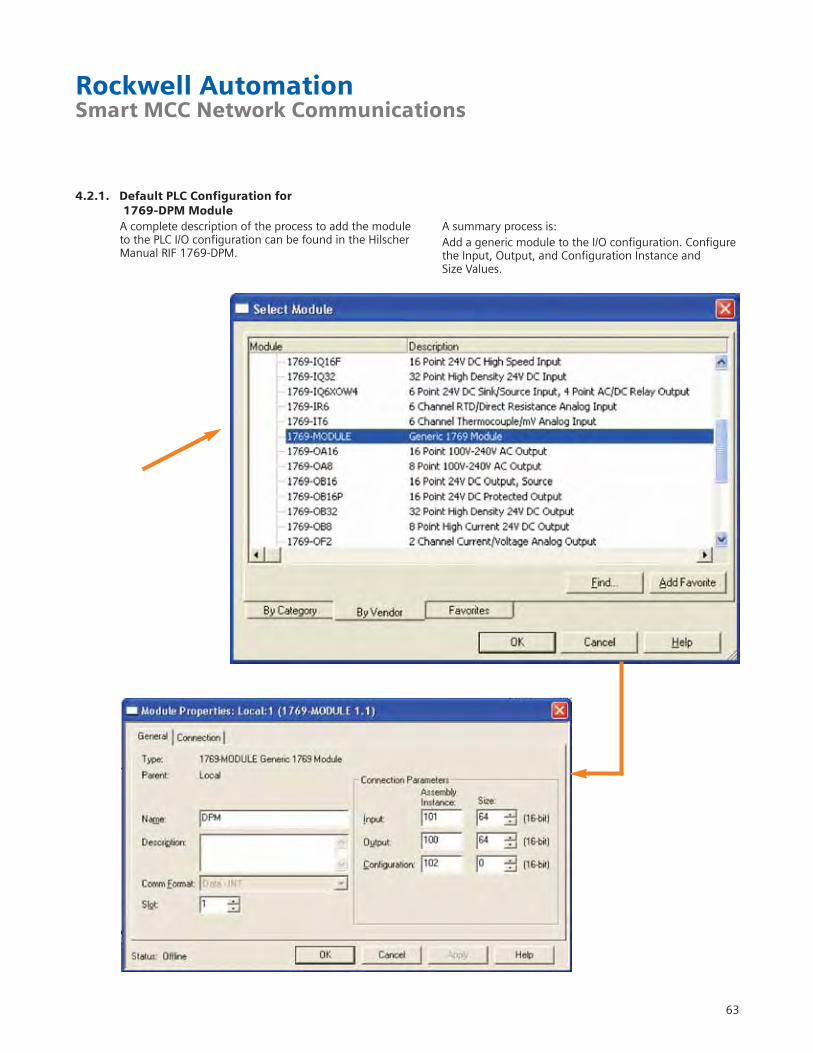
4.2.1. Default PLC Configuration for 1769-DPM Module
A complete description of the process to add the moduleto the PLC I/O configuration can be found in the HilscherManual RIF 1769-DPM.
A summary process is:Add a generic module to the I/O configuration. Configurethe Input, Output, and Configuration Instance and Size Values.
Rockwell AutomationSmart MCC Network Communications
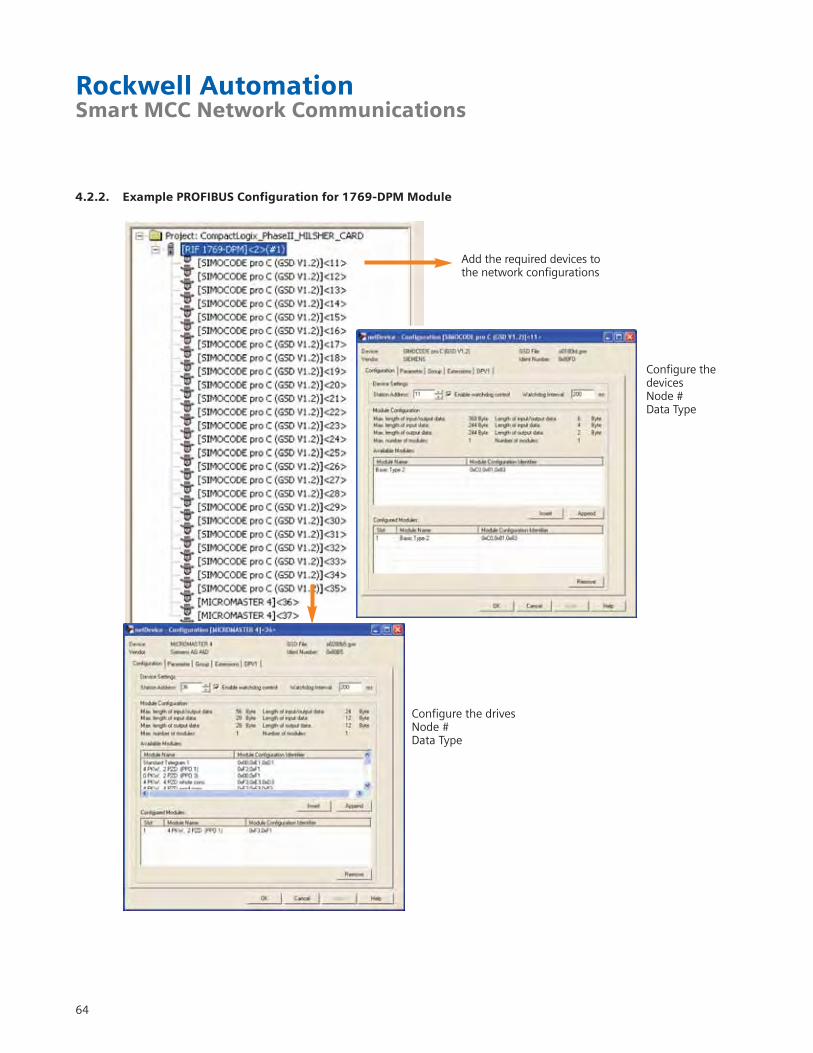
4.2.2. Example PROFIBUS Configuration for 1769-DPM Module
Add the required devices to the network configurations
Configure the devices Node #Data Type
Configure the drivesNode #Data Type
64

65
Rockwell AutomationSmart MCC Network Communications
The input and output sizes need to be adjusted to match thePROFIBUS input and output address space defined in the module configuration software.
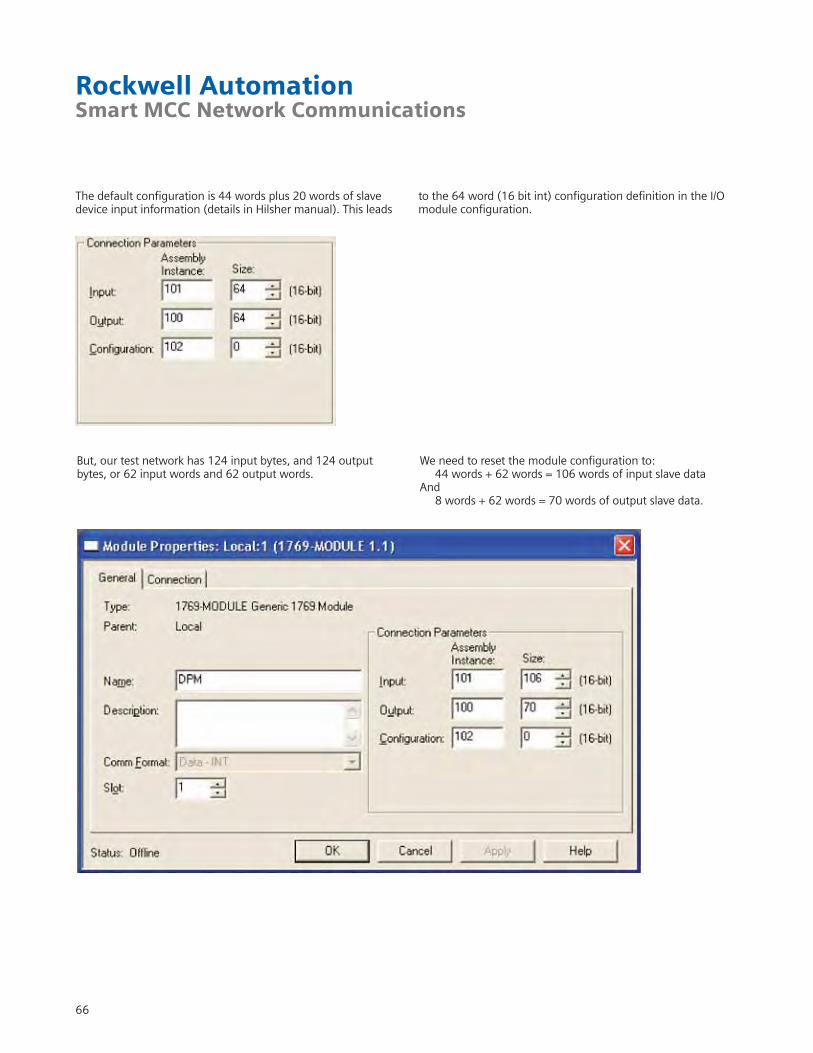
Rockwell AutomationSmart MCC Network Communications
The default configuration is 44 words plus 20 words of slavedevice input information (details in Hilsher manual). This leads
to the 64 word (16 bit int) configuration definition in the I/Omodule configuration.
But, our test network has 124 input bytes, and 124 outputbytes, or 62 input words and 62 output words.
We need to reset the module configuration to: 44 words + 62 words = 106 words of input slave data
And8 words + 62 words = 70 words of output slave data.
66

67
Rockwell AutomationSmart MCC Network Communications
For the output data, you also need to change the output copy rung in file SR_Copy_Output:
You also need to readjust the input and output data space in the data type in the PLC.
Rockwell AutomationSmart MCC Network Communications
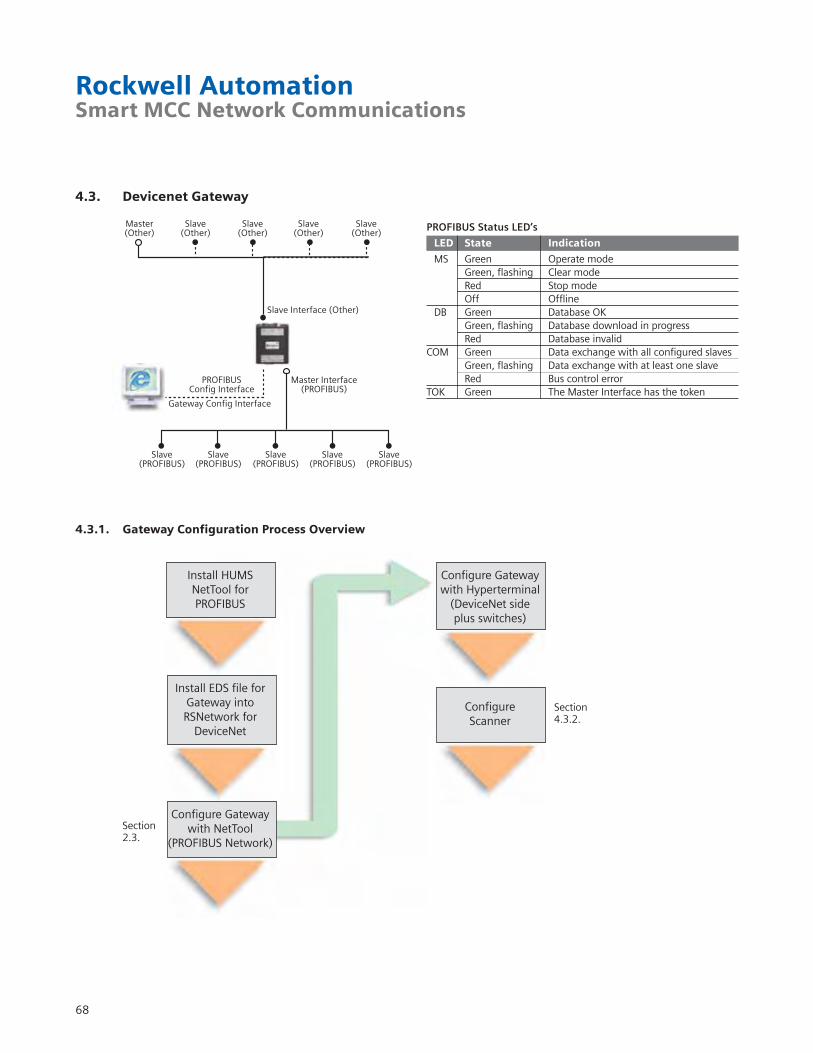
4.3. Devicenet Gateway
LED State Indication
MS Green Operate modeGreen, flashing Clear modeRed Stop modeOff Offline
DB Green Database OKGreen, flashing Database download in progressRed Database invalid
COM Green Data exchange with all configured slavesGreen, flashing Data exchange with at least one slaveRed Bus control error
TOK Green The Master Interface has the token
PROFIBUS Status LED’s
Install EDS file forGateway intoRSNetwork for
DeviceNet
Configure Gatewaywith NetTool
(PROFIBUS Network)
Install HUMSNetTool forPROFIBUS
ConfigureScanner
Configure Gatewaywith Hyperterminal
(DeviceNet side plus switches)
Slave(PROFIBUS)
Slave(PROFIBUS)
Slave(PROFIBUS)
Slave(PROFIBUS)
Slave(PROFIBUS)
Master Interface(PROFIBUS)
Slave Interface (Other)
PROFIBUSConfig Interface
Gateway Config Interface
Master(Other)
Slave(Other)
Slave(Other)
Slave(Other)
Slave(Other)
4.3.1. Gateway Configuration Process Overview
68
Section2.3.
Section4.3.2.
69
Rockwell AutomationSmart MCC Network Communications
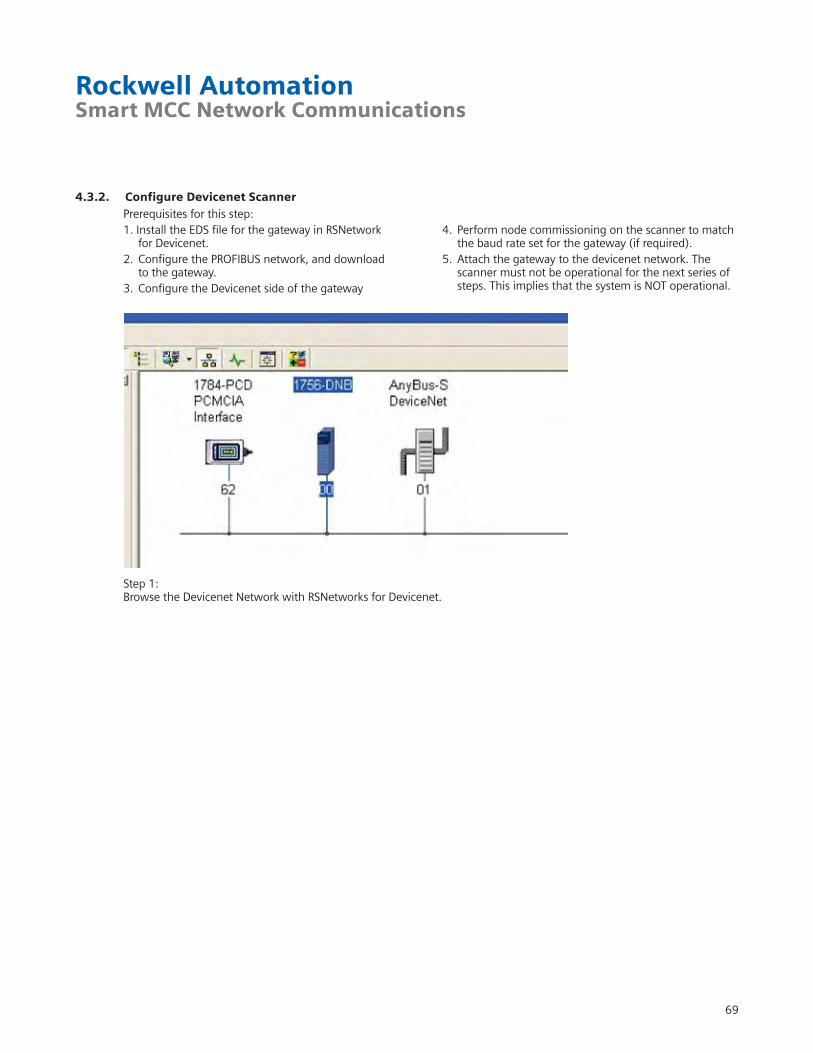
4.3.2. Configure Devicenet ScannerPrerequisites for this step: 1. Install the EDS file for the gateway in RSNetwork
for Devicenet.2. Configure the PROFIBUS network, and download
to the gateway.3. Configure the Devicenet side of the gateway
4. Perform node commissioning on the scanner to match the baud rate set for the gateway (if required).
5. Attach the gateway to the devicenet network. The scanner must not be operational for the next series of steps. This implies that the system is NOT operational.
Step 1: Browse the Devicenet Network with RSNetworks for Devicenet.

70
Rockwell AutomationSmart MCC Network Communications
Step 2: Record the number of input and output bytes.
Double-click on the AnyBus icon to get the parameter list.
Record the Input 1length and Output 1length
Rockwell AutomationSmart MCC Network Communications
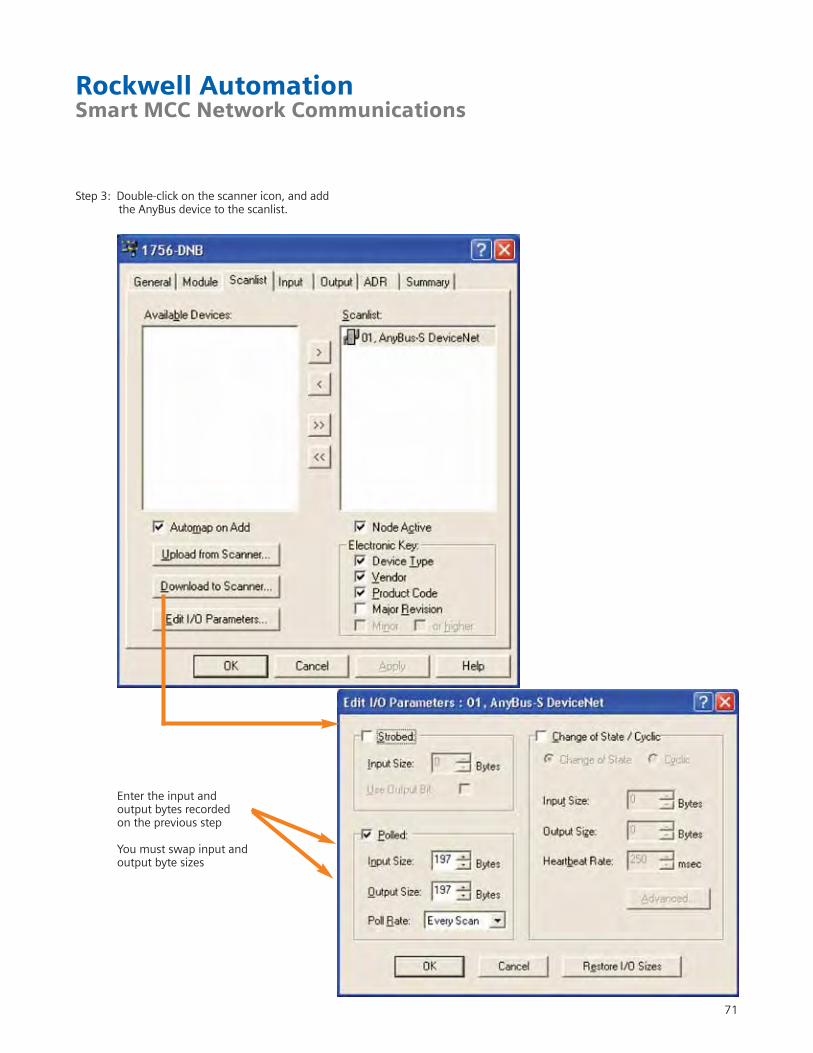
Step 3: Double-click on the scanner icon, and add the AnyBus device to the scanlist.
Enter the input andoutput bytes recordedon the previous step
You must swap input andoutput byte sizes
71

72
Rockwell AutomationSmart MCC Network Communications
4.4. Ethernet/IP Gateway
LED State Indication
MS Green Operate modeGreen, flashing Clear modeRed Stop modeOff Offline
DB Green Database OKGreen, flashing Database download in progressRed Database invalid
COM Green Data exchange with all configured slavesGreen, flashing Data exchange with at least one slaveRed Bus control error
TOK Green The Master Interface has the token
PROFIBUS Status LED’s
Slave(PROFIBUS)
Slave(PROFIBUS)
Slave(PROFIBUS)
Slave(PROFIBUS)
Slave(PROFIBUS)
Master Interface(PROFIBUS)
Slave Interface (Other)
PROFIBUSConfig Interface
Gateway Config Interface
Master(Other)
Slave(Other)
Slave(Other)
Slave(Other)
Slave(Other)

73
Rockwell AutomationSmart MCC Network Communications
4.4.1. Configure the Ethernet Gateway IP Address
A summary of the process is given here, with a fuller explanation of each step detailed subsequently. For our example, the gateway will be configured to IP 10.0.2.11 to match the same octet sequence as the Ethernet card we are trying to talk to. (Reminder: Ethernet card has been set to 10.0.2.10 in prior steps)
1. Set the computer Ethernet port IP address to 192.168.0.100 (first three octets must match the gateway default IP address, or 192.168.0)
2. Turn off any proxy server in the internet browser configuration.
3. Turn on the IP address LSB switch to the ON position on the gateway, and cycle power to the gateway.
4. Open the internet browser, and enter address 192.168.0.1
5. When the HMS Anybus page opens, select the configuration page.
6. Enter the IP address of 10.0.2.11 for the gateway.7. Turn off the IP address LSB switch on the gateway
and cycle power.8. Type the IP address 10.0.2.11 in the internet browser
and make sure that the gateway web page opens.

74
Rockwell AutomationSmart MCC Network Communications
On the Ethernet gateway, set the switch position for thedefault IP address:
In the internet browser configuration, turn off any configuration that has a proxy server defined. The following example is for Microsoft Internet Explorer.
Make sure that your browser properties have this UNCHECKED
Turn this switch to the ONposition to allow browserto connect to the gateway

75
Rockwell AutomationSmart MCC Network Communications
On the computer used for programming the Ethernet gateway, set the computer IP address to talk to the gateway.
Initial gatewayconfiguration IP address
Set the IP address to match the first 3 octets of the gateway (10.0.2) in thisexample, when the gatewayhas already been configured.
76
Rockwell AutomationSmart MCC Network Communications
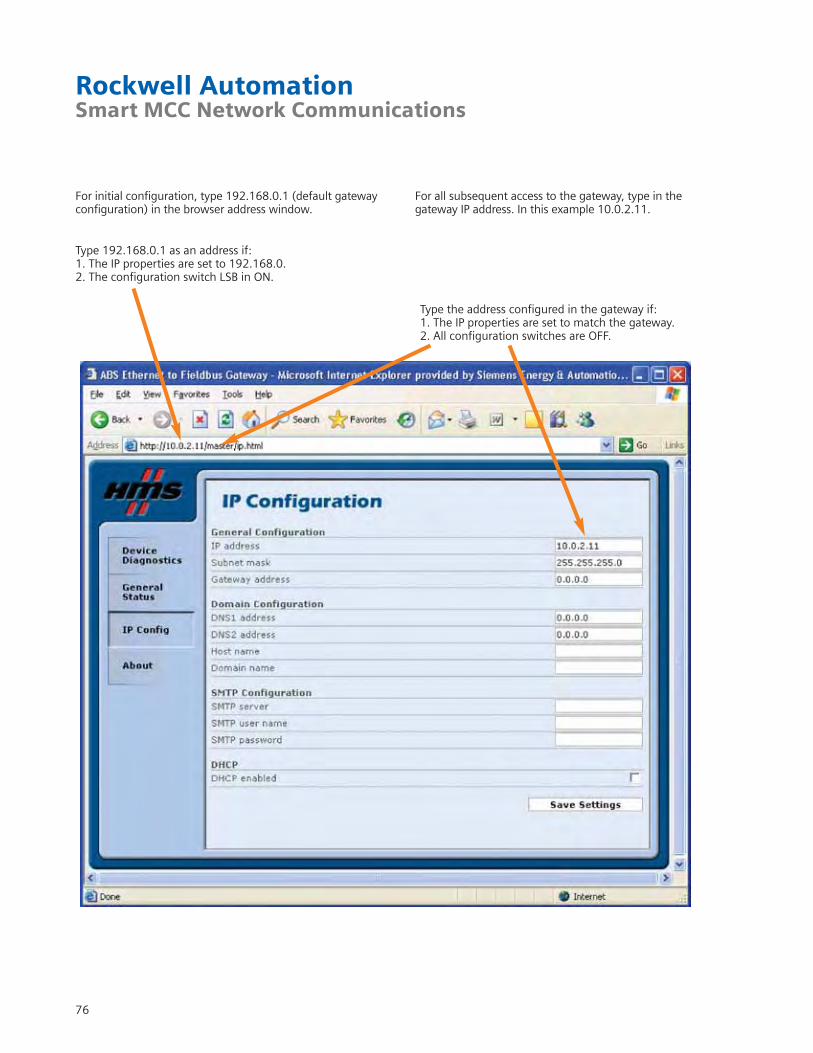
For initial configuration, type 192.168.0.1 (default gateway configuration) in the browser address window.
For all subsequent access to the gateway, type in the gateway IP address. In this example 10.0.2.11.
Type 192.168.0.1 as an address if:1. The IP properties are set to 192.168.0. 2. The configuration switch LSB in ON.
Type the address configured in the gateway if:1. The IP properties are set to match the gateway.2. All configuration switches are OFF.
77
Rockwell AutomationSmart MCC Network Communications
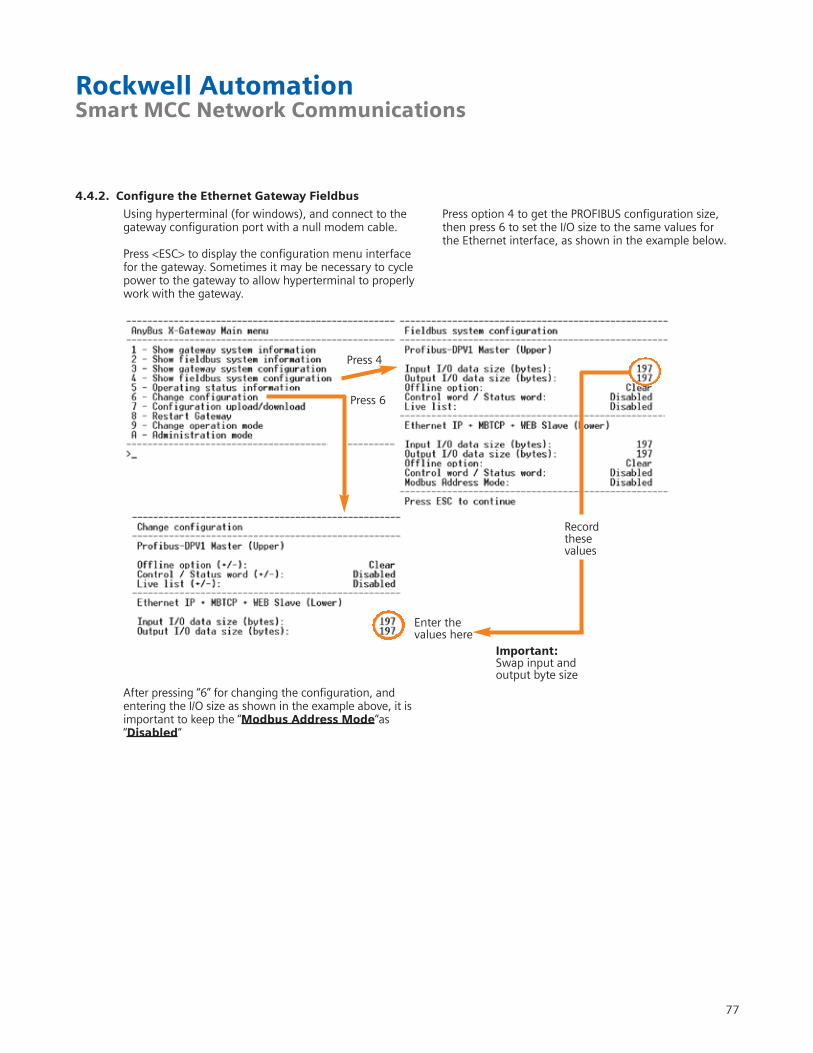
4.4.2. Configure the Ethernet Gateway Fieldbus
Using hyperterminal (for windows), and connect to thegateway configuration port with a null modem cable.
Press <ESC> to display the configuration menu interfacefor the gateway. Sometimes it may be necessary to cyclepower to the gateway to allow hyperterminal to properlywork with the gateway.
Press option 4 to get the PROFIBUS configuration size,then press 6 to set the I/O size to the same values for the Ethernet interface, as shown in the example below.
After pressing “6” for changing the configuration, andentering the I/O size as shown in the example above, it isimportant to keep the “Modbus Address Mode“as“Disabled“
Record these values
Enter the values here
Important:Swap input andoutput byte size
Press 4
Press 6
78
Rockwell AutomationSmart MCC Network Communications
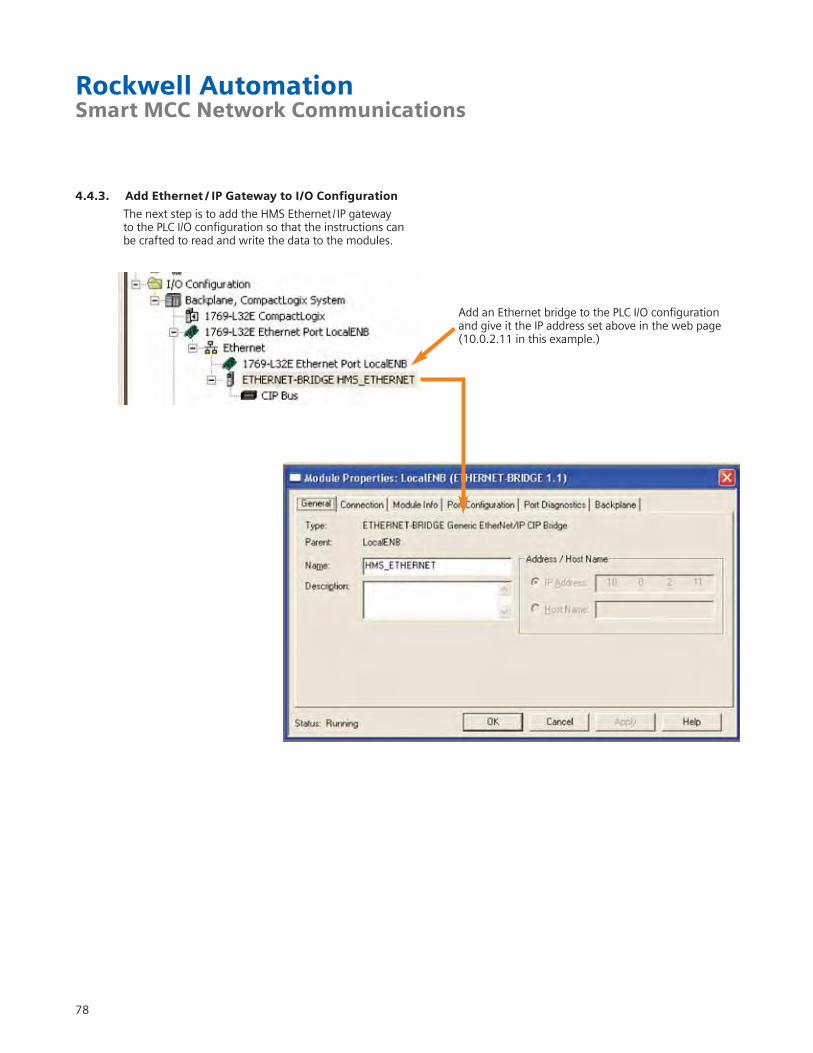
4.4.3. Add Ethernet / IP Gateway to I/O Configuration
Add an Ethernet bridge to the PLC I/O configuration and give it the IP address set above in the web page (10.0.2.11 in this example.)
The next step is to add the HMS Ethernet/ IP gateway to the PLC I/O configuration so that the instructions can be crafted to read and write the data to the modules.
79
Rockwell AutomationSmart MCC Network Communications
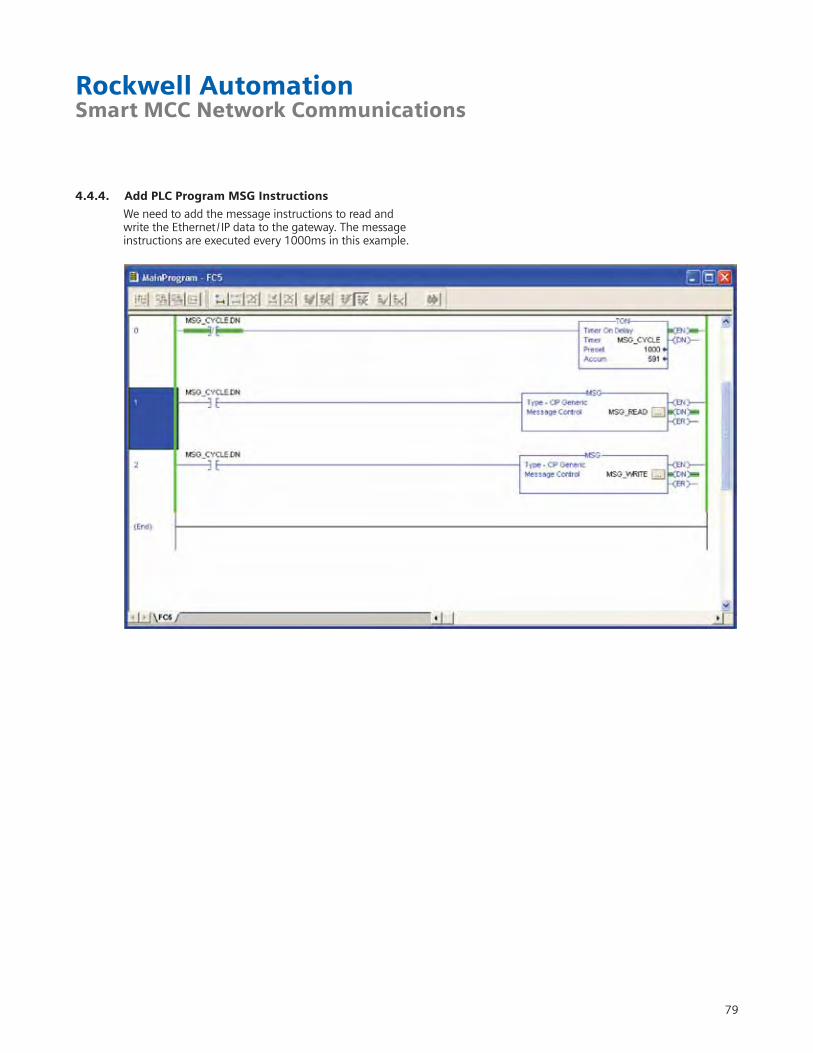
4.4.4. Add PLC Program MSG Instructions
We need to add the message instructions to read andwrite the Ethernet/ IP data to the gateway. The messageinstructions are executed every 1000ms in this example.
80
Rockwell AutomationSmart MCC Network Communications
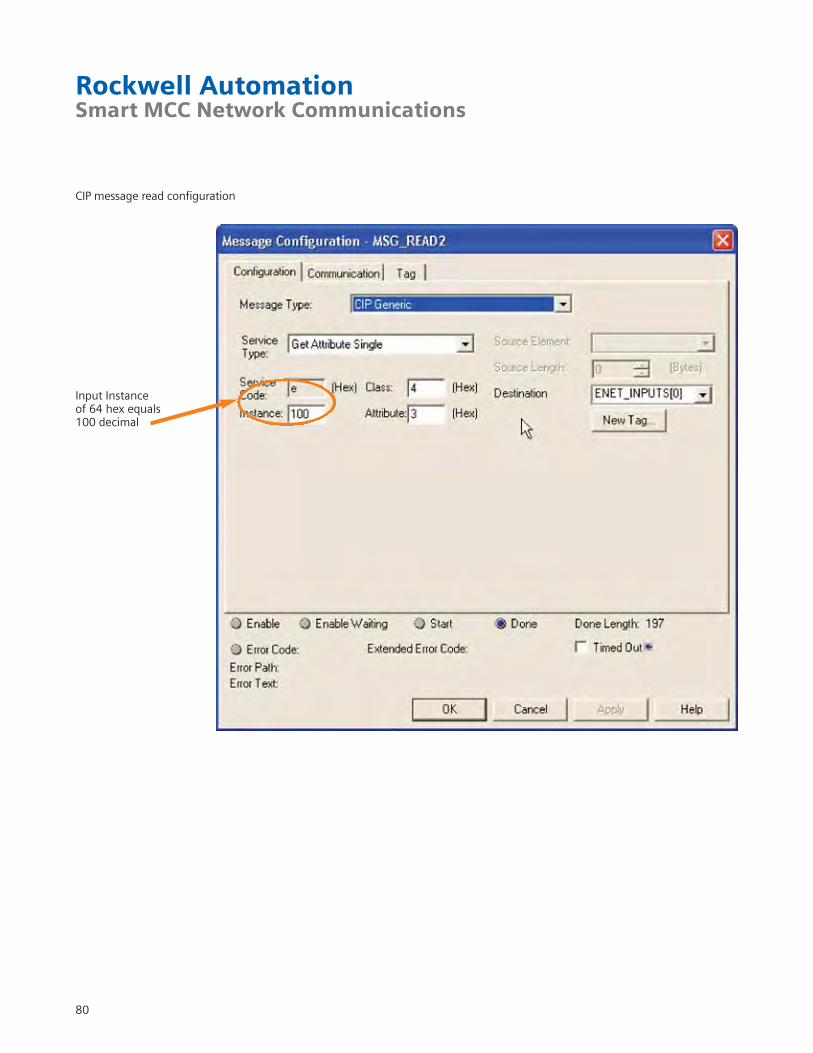
CIP message read configuration
Input Instance of 64 hex equals 100 decimal

81
Rockwell AutomationSmart MCC Network Communications
CIP message write configuration
Output Instance of 96 hex equals 150 decimal
82
Rockwell AutomationSmart MCC Network Communications
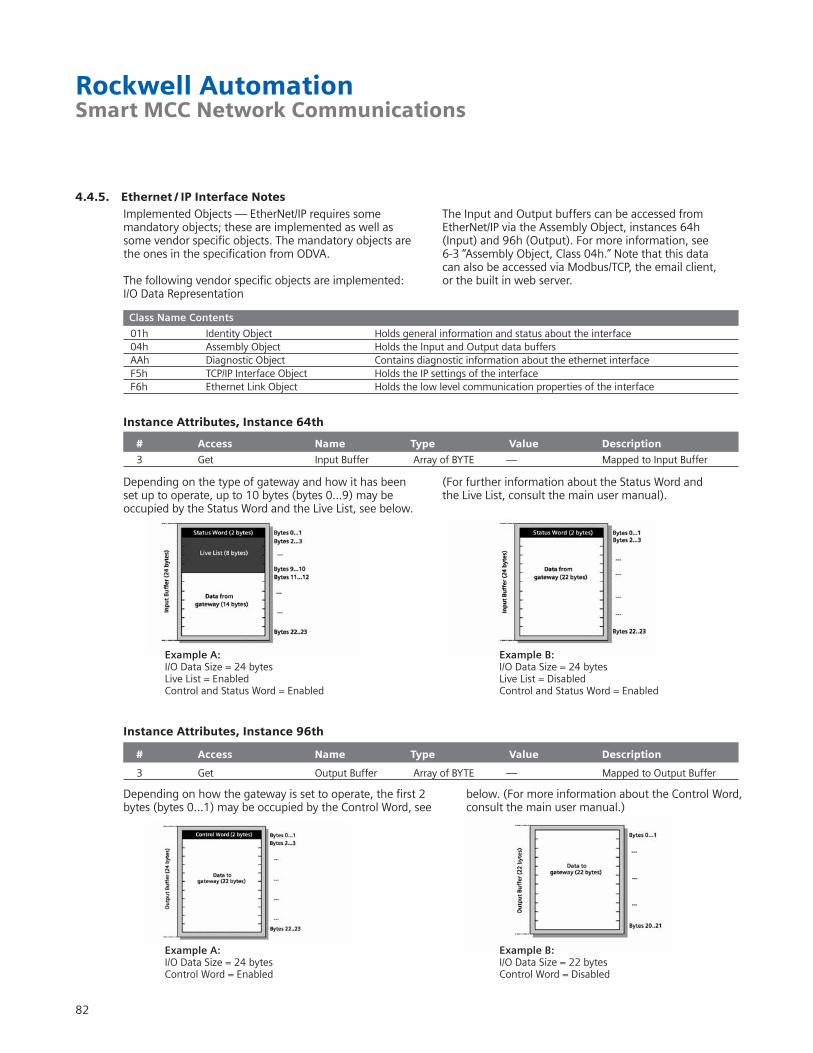
4.4.5. Ethernet / IP Interface NotesImplemented Objects — EtherNet/IP requires somemandatory objects; these are implemented as well assome vendor specific objects. The mandatory objects arethe ones in the specification from ODVA.
The following vendor specific objects are implemented:I/O Data Representation
The Input and Output buffers can be accessed fromEtherNet/IP via the Assembly Object, instances 64h (Input) and 96h (Output). For more information, see 6-3 “Assembly Object, Class 04h.” Note that this data can also be accessed via Modbus/TCP, the email client, or the built in web server.
Class Name Contents
01h Identity Object Holds general information and status about the interface04h Assembly Object Holds the Input and Output data buffersAAh Diagnostic Object Contains diagnostic information about the ethernet interfaceF5h TCP/IP Interface Object Holds the IP settings of the interfaceF6h Ethernet Link Object Holds the low level communication properties of the interface
Instance Attributes, Instance 64th
Depending on the type of gateway and how it has beenset up to operate, up to 10 bytes (bytes 0...9) may beoccupied by the Status Word and the Live List, see below.
(For further information about the Status Word and the Live List, consult the main user manual).
Example A:I/O Data Size = 24 bytesLive List = EnabledControl and Status Word = Enabled
Example B:I/O Data Size = 24 bytesLive List = DisabledControl and Status Word = Enabled
# Access Name Type Value Description
3 Get Input Buffer Array of BYTE — Mapped to Input Buffer
Instance Attributes, Instance 96th
Depending on how the gateway is set to operate, the first 2bytes (bytes 0...1) may be occupied by the Control Word, see
below. (For more information about the Control Word, consult the main user manual.)
Example A:I/O Data Size = 24 bytesControl Word = Enabled
Example B:I/O Data Size = 22 bytesControl Word = Disabled
# Access Name Type Value Description
3 Get Output Buffer Array of BYTE — Mapped to Output Buffer

Siemens Energy & Automation, Inc.3333 Old Milton ParkwayAlpharetta, GA 30005
1-800-964-4114 [email protected]
www.sea.siemens.com/power
©2007 Siemens Energy & Automation, Inc. All Rights Reserved.Siemens is a registered trademark of Siemens AG. Product names mentioned may be trademarks or registered trademarks of their respectivecompanies. Specifications are subject to change without notice.
CCIM-SMCCM-1107 New 5C1107CP Printed in USA