slsa advanced resuscitation techniques certificate -...
TRANSCRIPT

July 2017
ADVANCED RESUSCITATION TECHNIQUES CERTIFICATE
HOUSE KEEPING
Timing
Facilities
Phones
Questions
Emergency exits and evacuation point

COURSE OVERVIEW
Course structure
Course outcomes
Assessment

Advanced Resuscitation and First aid
By the end of this training session you will know:
• what are the principles of first aid
• what are the responsibilities of a first responder
• what are the legal and social issues with first aid
• how to identify hazards and manage risks
• how to conduct a primary and secondary assessment
• how to provide ongoing victim management
• what are the capabilities of emergency services.
TOPIC 1
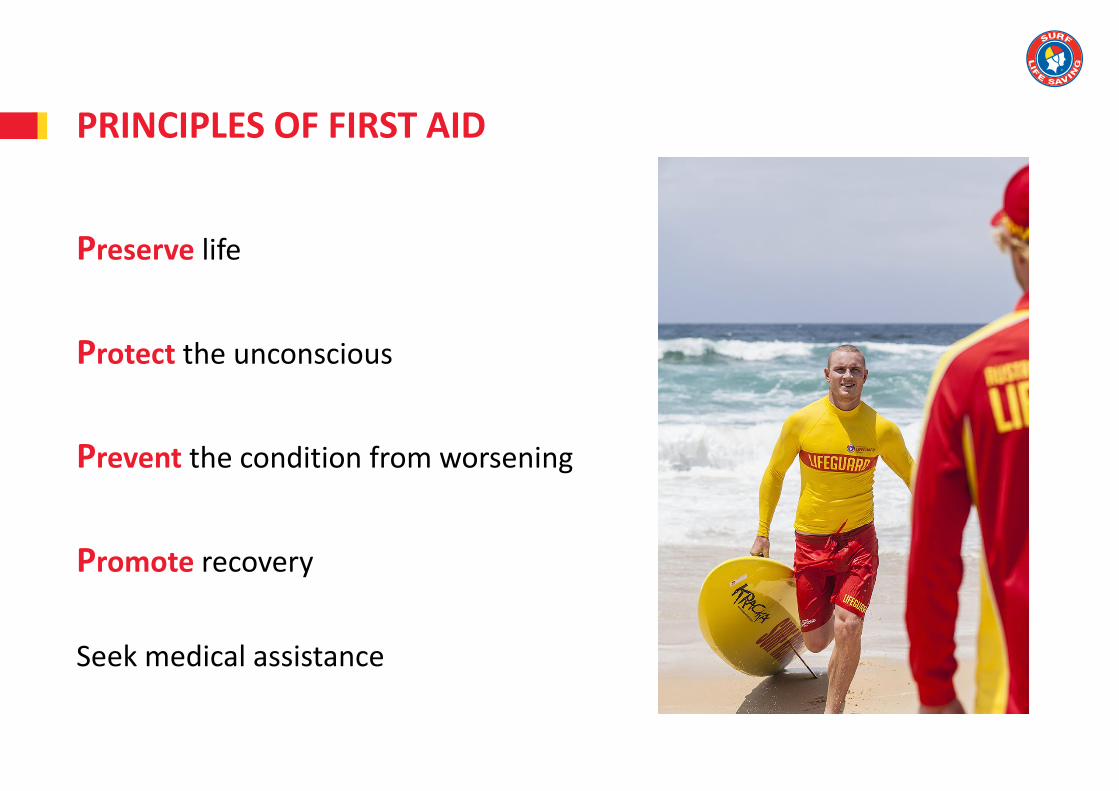
Preserve life
Protect the unconscious
Prevent the condition from worsening
Promote recovery
Seek medical assistance
PRINCIPLES OF FIRST AID

CHAIN OF SURVIVAL

www.resus.org.au
THE AUSTRALIAN RESUSCITATION COUNCIL (ARC)
The Australian Resuscitation Council (ARC) recommends that:• resuscitation skills including CPR be refreshed annually
• first aid skills be refreshed every three (3) years.
This is aligned with SLSA skills maintenance requirements

Legal responsibilities to ensure the physical and mental health and safety of workers, including volunteers, in the workplace
Safe Work Australia developed a single set of WHS laws to be implemented across Australia. These are known as 'model' laws as legislation varies across Australia.
www.safeworkaustralia.gov.au
WORK HEALTH AND SAFETY (WHS)

Legal obligation of one person to care for another in a certain way e.g., provide first aid
Workplace first aid officers have an automatic duty of care to their workers, including volunteers
A duty of care is established when you begin to provide first aid treatment as ‘a Good Samaritan’ (Civil Liability legislation)
Having a duty of care does not mean that you have an automatic duty to rescue
DUTY OF CARE
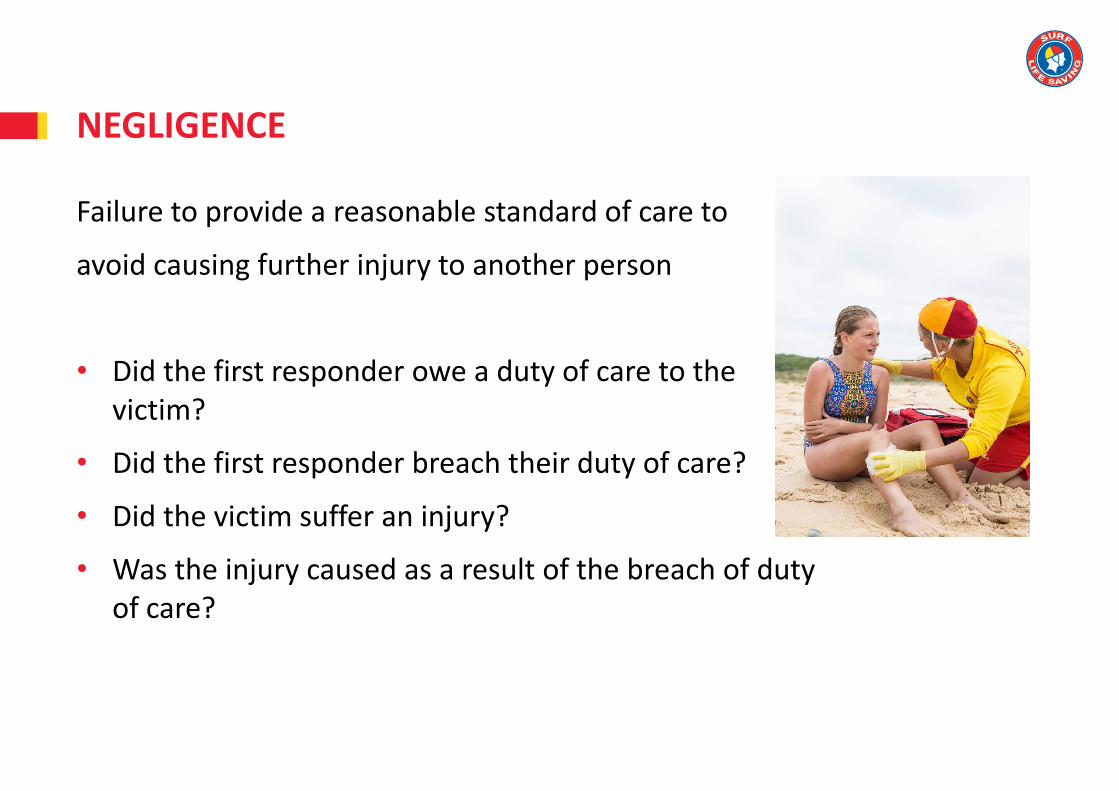
Failure to provide a reasonable standard of care to
avoid causing further injury to another person
• Did the first responder owe a duty of care to the victim?
• Did the first responder breach their duty of care?
• Did the victim suffer an injury?
• Was the injury caused as a result of the breach of duty of care?
NEGLIGENCE
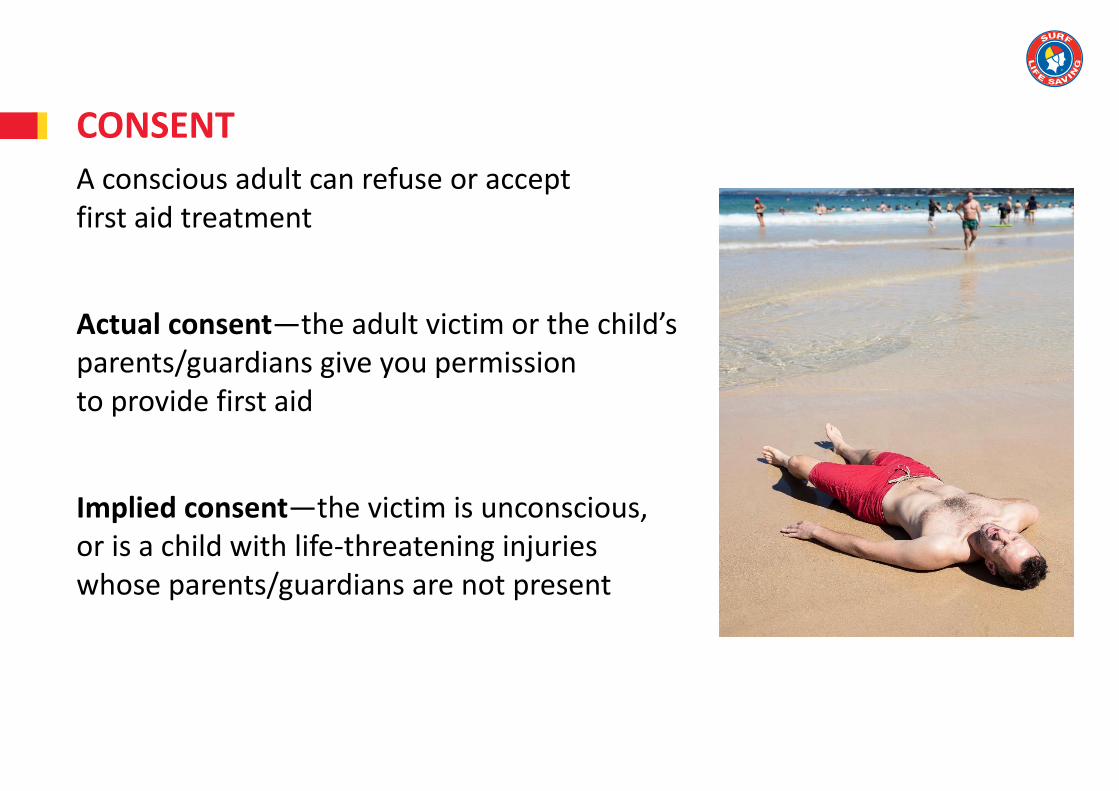
A conscious adult can refuse or accept first aid treatment
Actual consent—the adult victim or the child’s parents/guardians give you permission to provide first aid
Implied consent—the victim is unconscious, or is a child with life-threatening injuries whose parents/guardians are not present
CONSENT

Respect the values of different cultures and treat them with sensitivity to avoid conflict and misunderstandings
Common cultural differences
• Personal space and boundaries
• Verbal and non-verbal communication
• Clothing
• Cause for embarrassment
• Accepted medical treatments
CULTURAL AWARENESS AND SENSITIVITY
Unwelcome and unreciprocated behaviour
Harassment that contravenes anti-discrimination law
e.g., discrimination based on age, gender, race, religion, politics
Harassment based on unwelcome verbal or physical actionse.g., bullying and sexual harassment
UNLAWFUL HARASSMENT
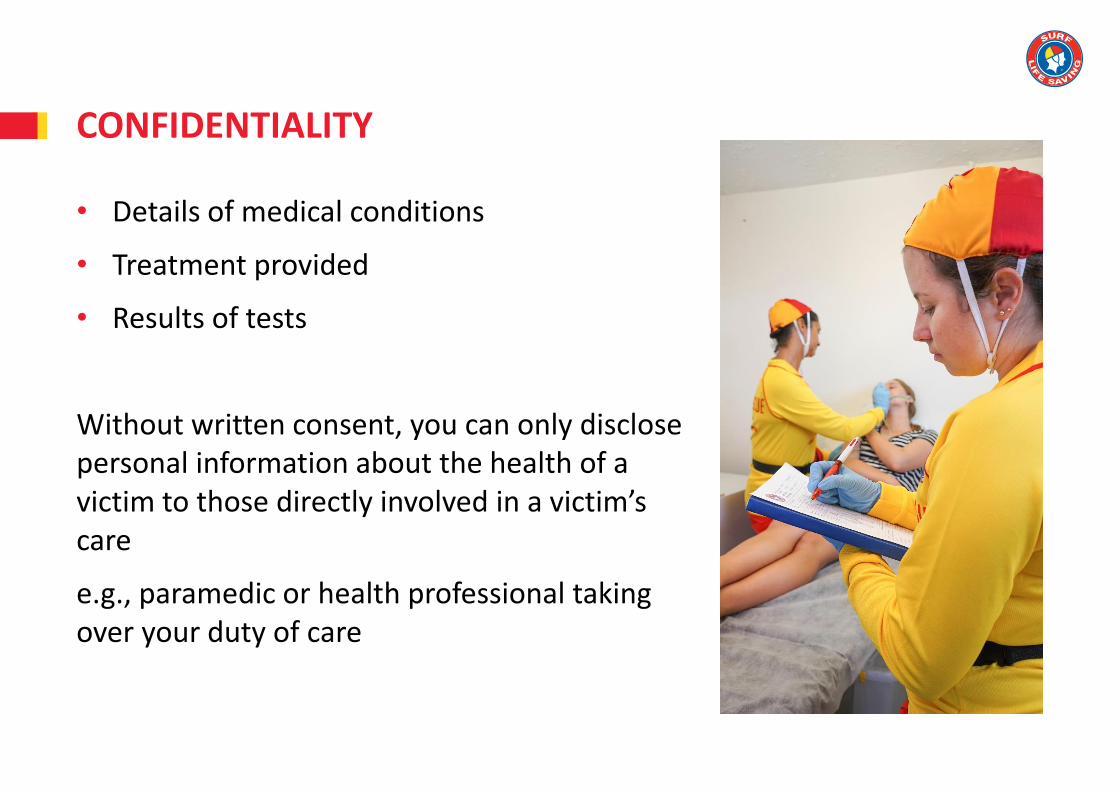
• Details of medical conditions
• Treatment provided
• Results of tests
Without written consent, you can only disclose personal information about the health of a victim to those directly involved in a victim’s care
e.g., paramedic or health professional taking over your duty of care
CONFIDENTIALITY

Verbal report to parents/guardians, work supervisors, emergency service personnel
Written report completed in accordance with workplace policies, SOPs, state/territory legislations
Clear and accurate statement of facts:
• time of incident
• what happened
• treatment provided
• victim’s response to treatment.
RECORD KEEPING

ASSISTING WITH MEDICATION

DEBRIEFING
• Evaluate your own performance
• Identify your own skills and limits
• Discuss ways to improve future performance
• Recognise signs and symptoms of critical incident stress
• Know where to seek or refer assistance to get help e.g., counselling
More information available in Volume one (1) of the Guidelines for Safer Surf Clubs
www.portal.sls.com.au > Library > Administration and I.T. > W H and S > SLSA

What are SOPs?
What should SOPs include?
Are SOPs workplace specific?
Where can I find them?
STANDARD OPERATING PROCEDURES (SOPS)

• Communicable diseases
• Universal precautions
• Needlestick injury
INFECTION CONTROL

A hazard is something with the potential to cause harm. They can be:
• obvious
• hidden
• developing
Some common hazards include:
• manual handling
• hazardous substances
• dangerous goods and chemicals
HAZARDS
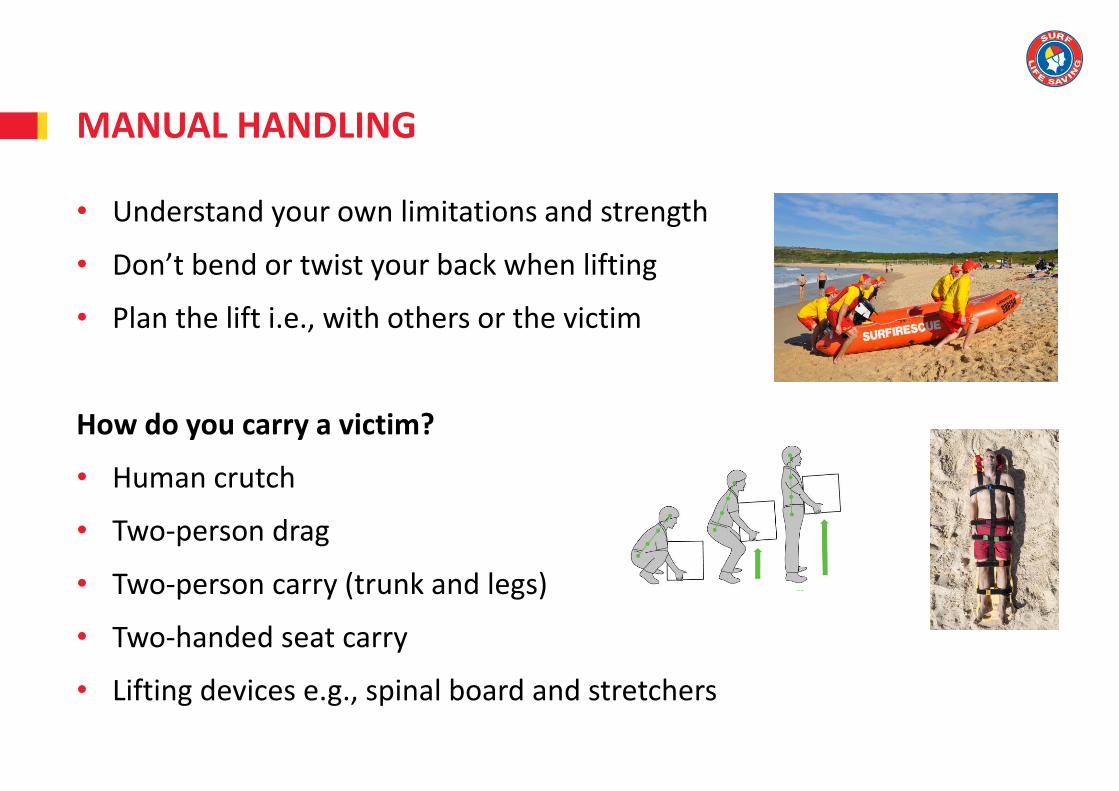
• Understand your own limitations and strength
• Don’t bend or twist your back when lifting
• Plan the lift i.e., with others or the victim
How do you carry a victim?
• Human crutch
• Two-person drag
• Two-person carry (trunk and legs)
• Two-handed seat carry
• Lifting devices e.g., spinal board and stretchers
MANUAL HANDLING
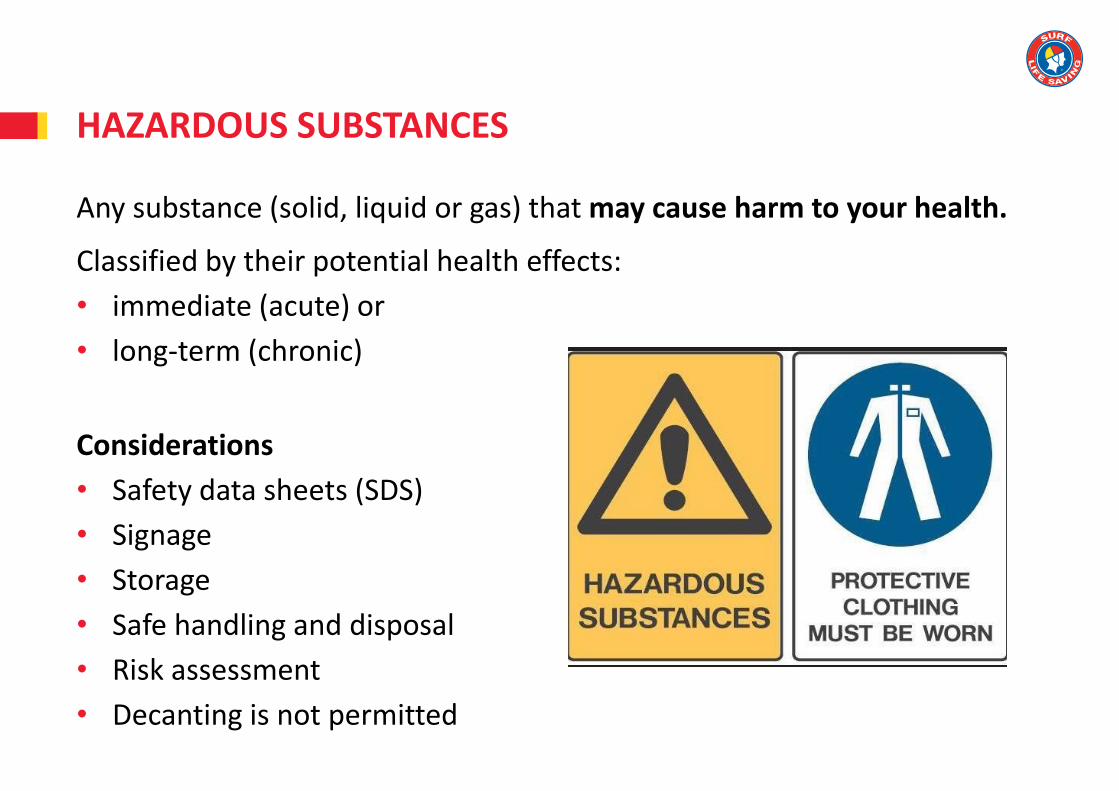
Any substance (solid, liquid or gas) that may cause harm to your health.
Classified by their potential health effects:
• immediate (acute) or
• long-term (chronic)
Considerations
• Safety data sheets (SDS)
• Signage
• Storage
• Safe handling and disposal
• Risk assessment
• Decanting is not permitted
HAZARDOUS SUBSTANCES
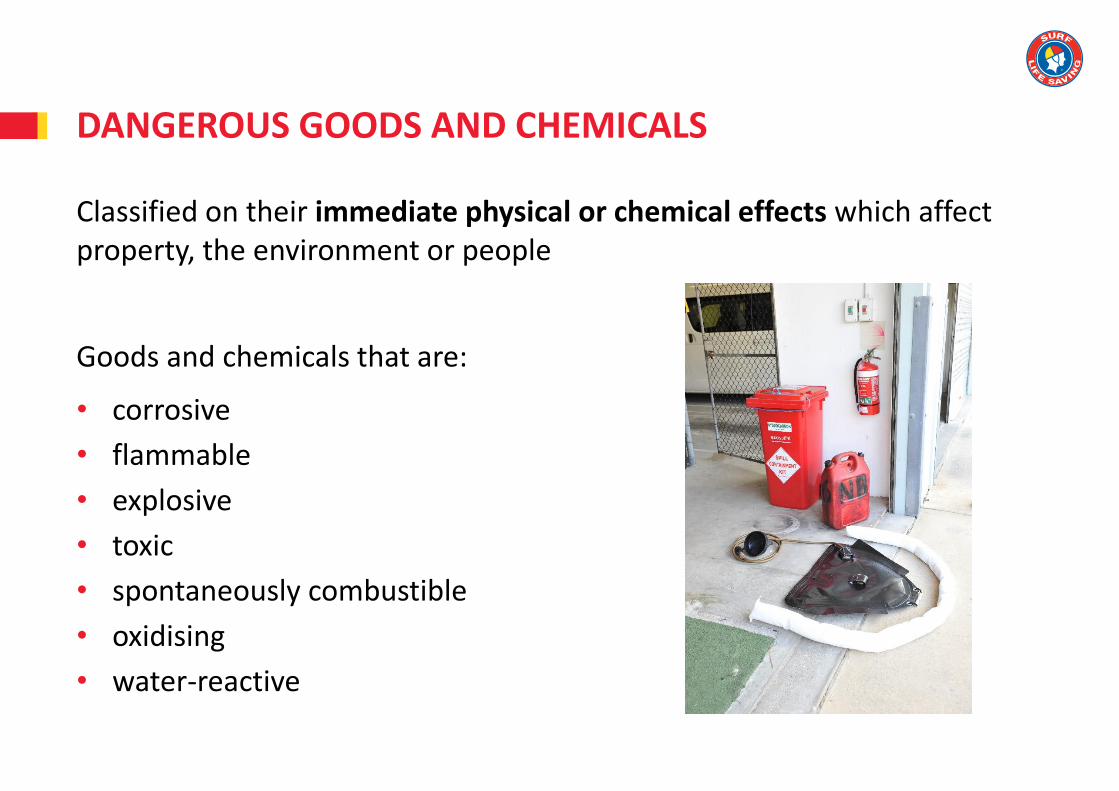
Classified on their immediate physical or chemical effects which affect property, the environment or people
Goods and chemicals that are:
• corrosive
• flammable
• explosive
• toxic
• spontaneously combustible
• oxidising
• water-reactive
DANGEROUS GOODS AND CHEMICALS
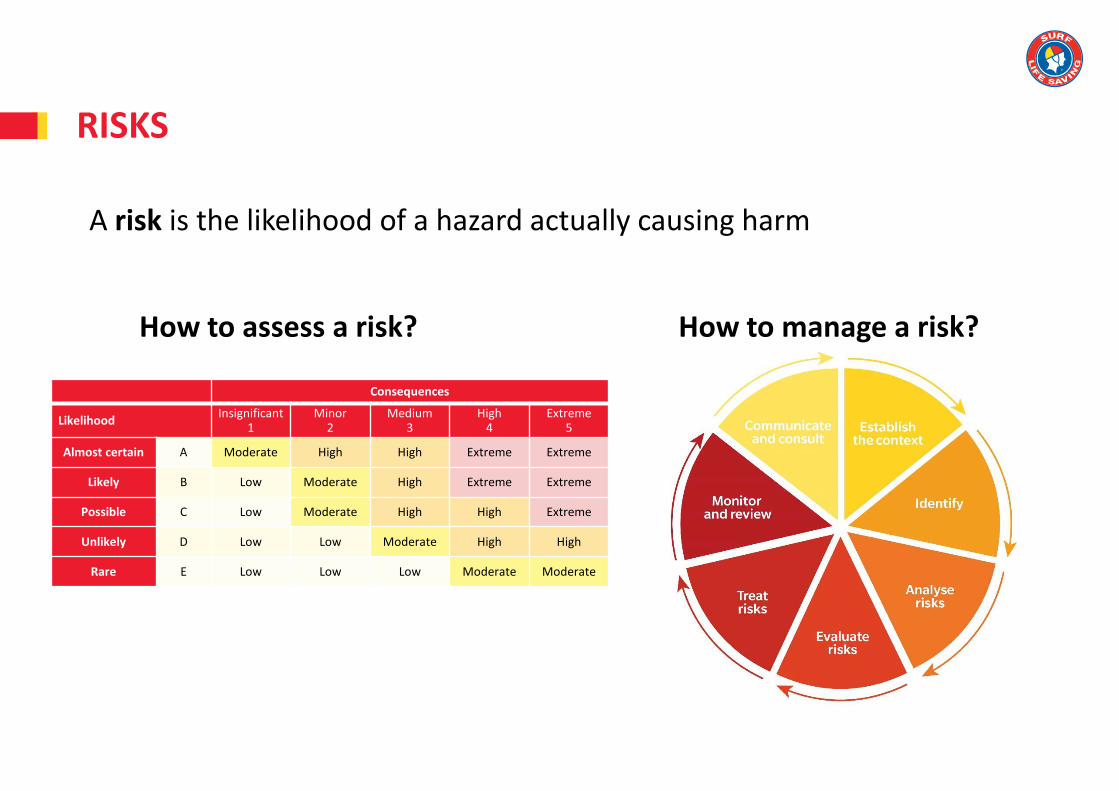
A risk is the likelihood of a hazard actually causing harm
How to assess a risk? How to manage a risk?
RISKS
Consequences
LikelihoodInsignificant
1Minor
2Medium
3High
4Extreme
5
Almost certain A Moderate High High Extreme Extreme
Likely B Low Moderate High Extreme Extreme
Possible C Low Moderate High High Extreme
Unlikely D Low Low Moderate High High
Rare E Low Low Low Moderate Moderate

A control measure is the action you take to reduce or eliminate a risk
Hierarchy of hazard controls is the order of priority given to actions when dealing with risks presented by hazards
CONTROL MEASURES
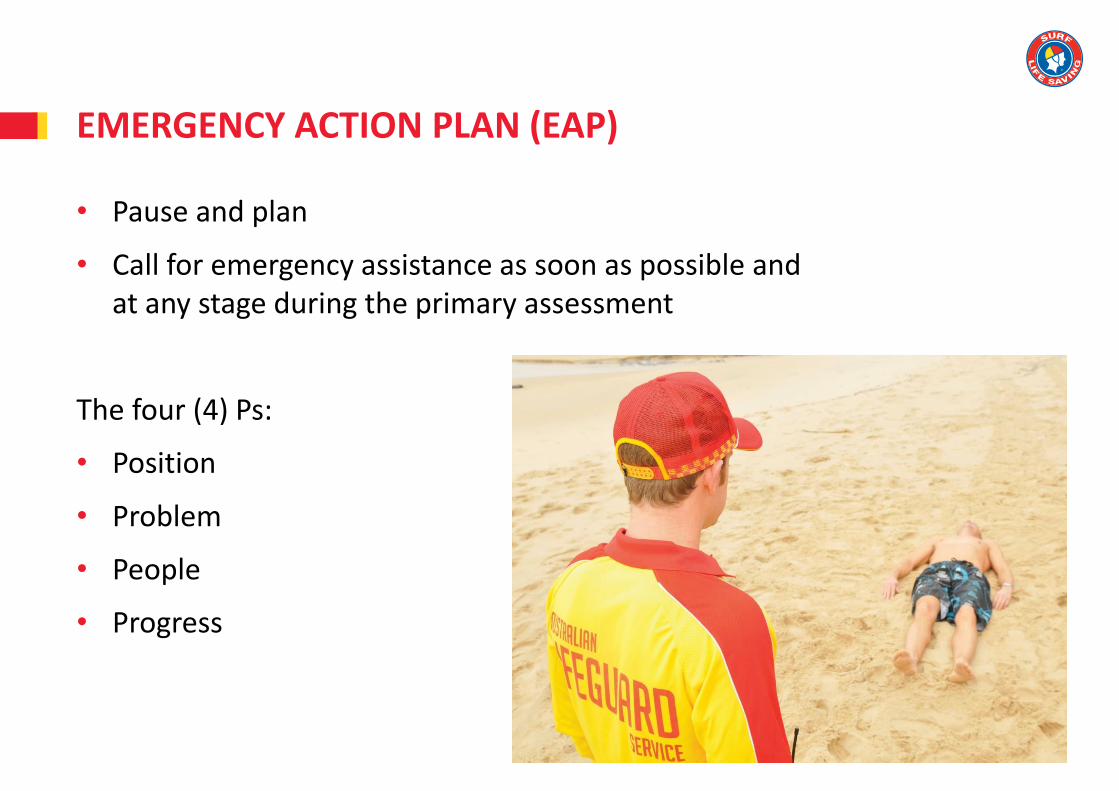
• Pause and plan
• Call for emergency assistance as soon as possible and at any stage during the primary assessment
The four (4) Ps:
• Position
• Problem
• People
• Progress
EMERGENCY ACTION PLAN (EAP)

Dangers to:
1. Yourself
2. Bystanders
3. The victim
Check for a response
C Can you hear me?
O Open your eyes
W What’s your name?
S Squeeze my hands
EAP—PRIMARY ASSESSMENT

• Triple Zero (000) + AED
• International standard emergency number (112)
• Emergency+ app
• Use a teletypewriter (TTY) to connect with the Australian 106 Text Emergency Relay Service
When sending someone for help, make sure they come back to you and confirm emergency services will arrive
SEND FOR HELP

Airways
• Clear and maintain airway
• Jaw thrust
• Chin lift-head tilt
• Oropharyngeal airways
• Monitor closely
Breathing
• Look
• Listen
• Feel
PRIMARY ASSESSMENT
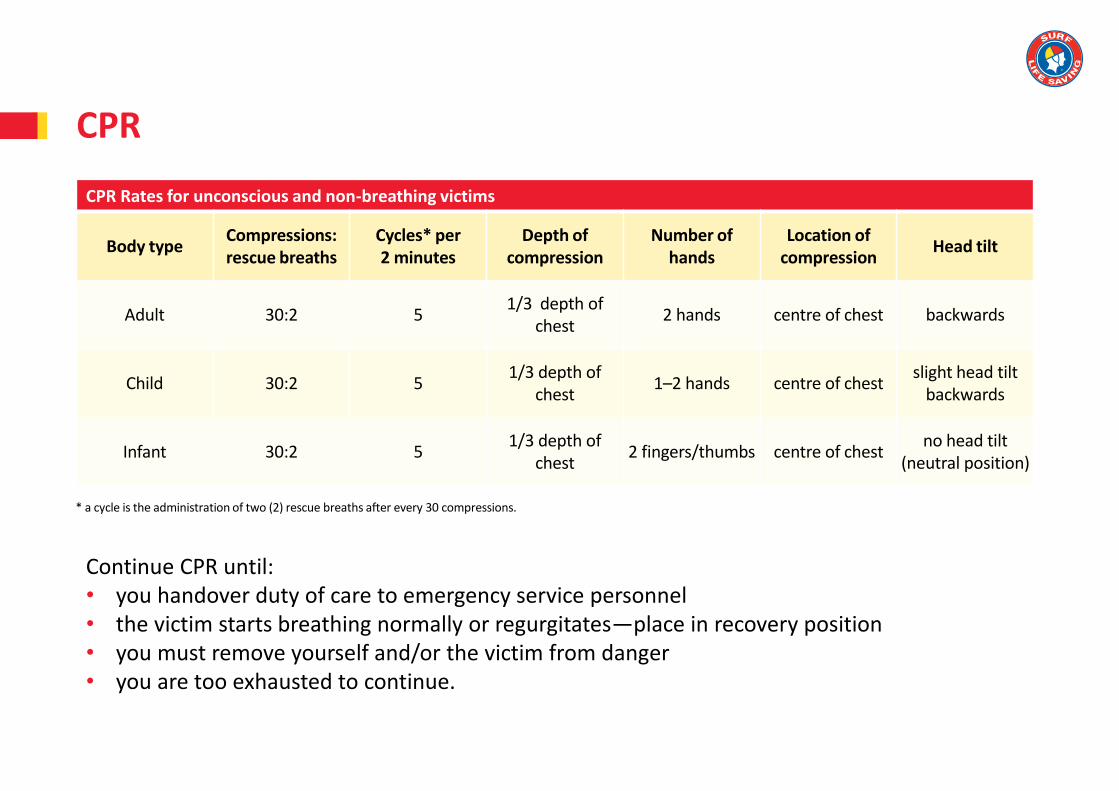
* a cycle is the administration of two (2) rescue breaths after every 30 compressions.
CPR
CPR Rates for unconscious and non-breathing victims
Body typeCompressions: rescue breaths
Cycles* per 2 minutes
Depth of compression
Number of hands
Location of compression
Head tilt
Adult 30:2 51/3 depth of
chest2 hands centre of chest backwards
Child 30:2 51/3 depth of
chest1–2 hands centre of chest
slight head tilt backwards
Infant 30:2 51/3 depth of
chest2 fingers/thumbs centre of chest
no head tilt (neutral position)
Continue CPR until:• you handover duty of care to emergency service personnel• the victim starts breathing normally or regurgitates—place in recovery position• you must remove yourself and/or the victim from danger• you are too exhausted to continue.

Defibrillation
• Obtain a defibrillator
• Take safety precautions
• Prepare victim
• Apply electrode pads
• Turn on
• Follow prompts
Do not remove pads after applied to unconscious and non-breathing victims
PRIMARY ASSESSMENT
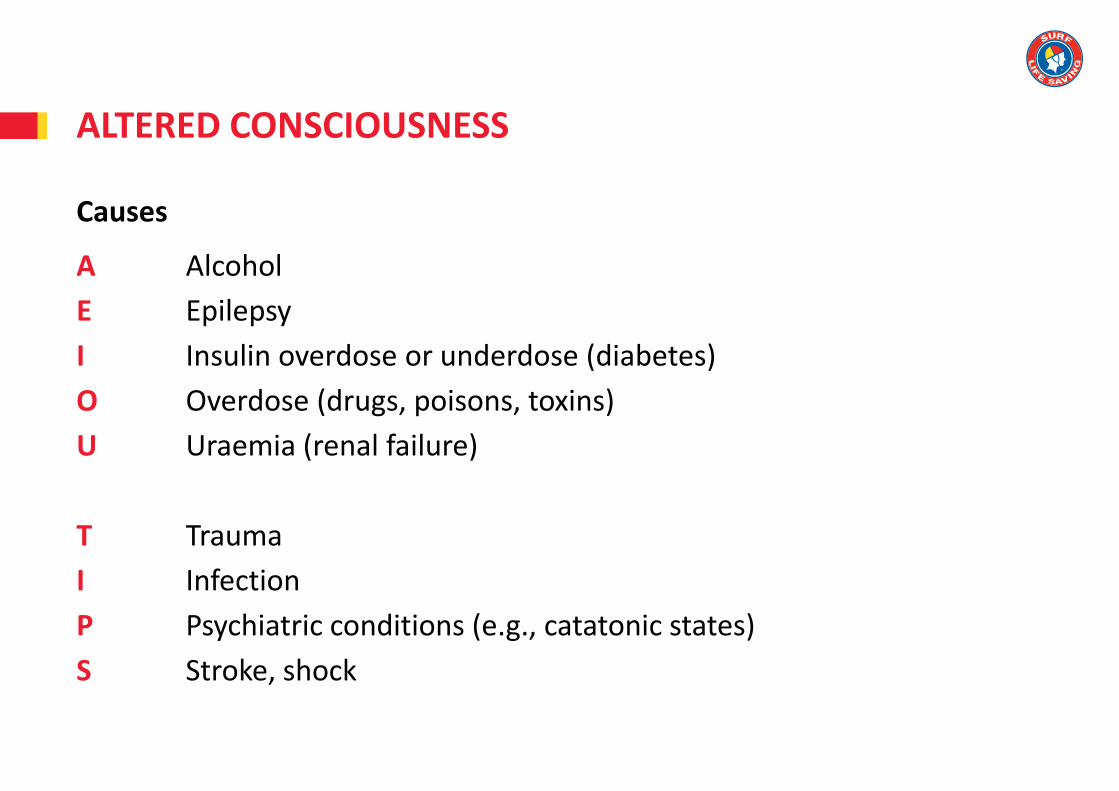
Causes
A Alcohol
E Epilepsy
I Insulin overdose or underdose (diabetes)
O Overdose (drugs, poisons, toxins)
U Uraemia (renal failure)
T Trauma
I Infection
P Psychiatric conditions (e.g., catatonic states)
S Stroke, shock
ALTERED CONSCIOUSNESS

ALTERED CONSCIOUSNESS
Assessing Consciousness
The AVPU scale outlines four (4) general levels of consciousness from ‘Alert’ to ‘Unconscious’
Alert Voice Pain Unconscious
Eyes open Responds to voice Responds purposefully Maintain victim airways
Speech clear Eyes open at request Eyes open – pain stimulus Does not meet above criteria
Moving Clear responses to questions
Victim withdraws from pain
Orientated Moving Comprehensible or non-comprehensible noises
Remains awake/alert
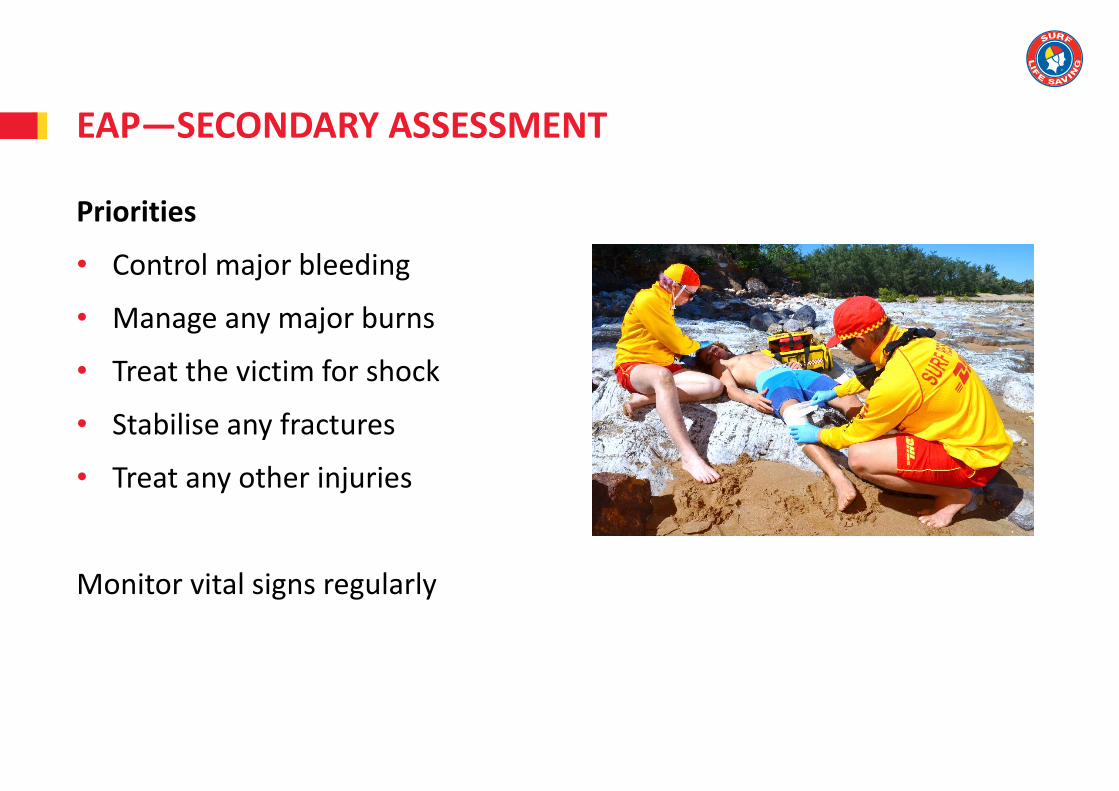
Priorities
• Control major bleeding
• Manage any major burns
• Treat the victim for shock
• Stabilise any fractures
• Treat any other injuries
Monitor vital signs regularly
EAP—SECONDARY ASSESSMENT
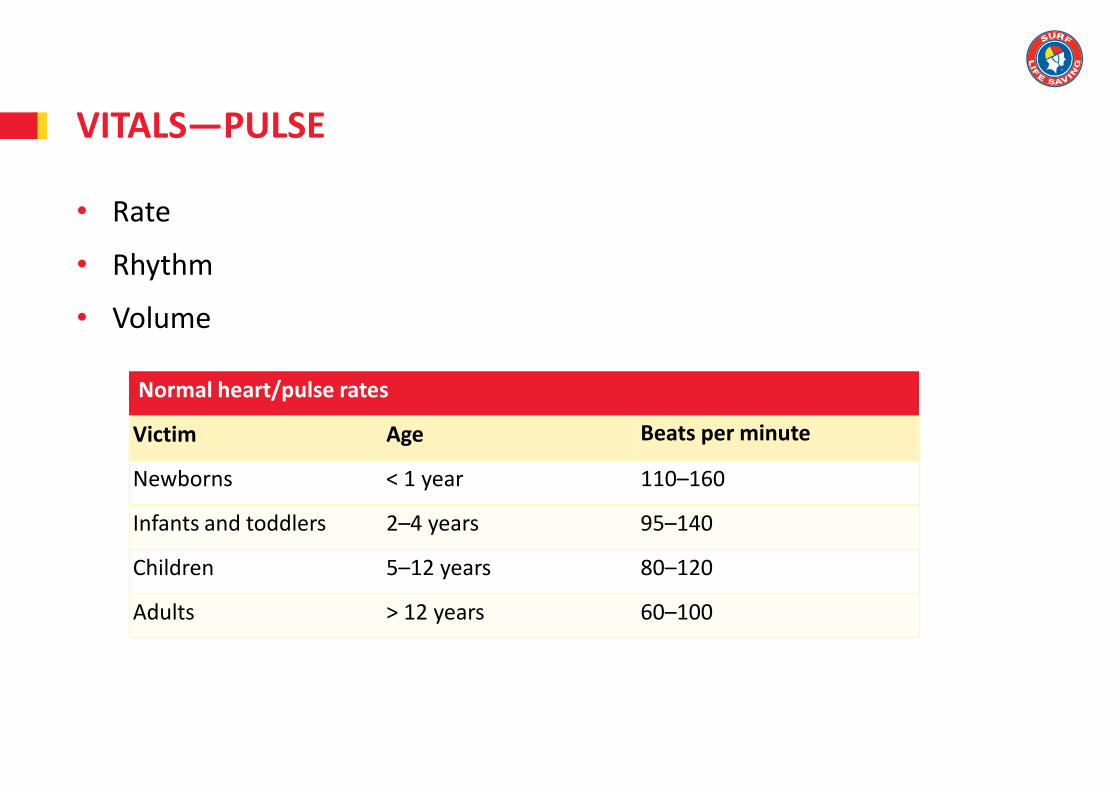
• Rate
• Rhythm
• Volume
VITALS—PULSE
Normal heart/pulse rates
Victim Age Beats per minute
Newborns < 1 year 110–160
Infants and toddlers 2–4 years 95–140
Children 5–12 years 80–120
Adults > 12 years 60–100

• Rate
• Rhythm
• Sounds
VITALS—RESPIRATION (BREATHING)
Normal heart/pulse rates
Victim Age Breaths per minute
Newborns < 1 year 30–40
Infants and toddlers 2–4 years 25–30
Children 5–12 years 20–25
Adults > 12 years 15–20

Temperature Is the skin warm or cool to the touch?
Condition Is the skin dry or wet?
Colour Check the colour of the skin in the mouth and lips. Is it red, pink, pale or blue?
VITALS—SKIN APPEARANCE

Thermometers measure internal body temperature.
A fever is a higher than normal temperature and may indicate an infection or an illness. Normal body temperature ranges from 36-37 degrees Celsius.
Using a thermometer
• Oral—under the tongue
• Axillary—under the arm
• Tympanic—in the ear
• Temporal—on the forehead
• Rectal—in the anus
VITALS—TEMPERATURE

History
• Observe the scene
• Listen to what is said by the victim and bystanders
• Ask questions
S Signs and symptoms
A Allergies
M Medication
P Previous medical history
L Last oral intake
E Event (what happened?)
SECONDARY ASSESSMENT

Body check
1. Head and neck
2. Shoulders and chest
3. Abdomen
4. Pelvis
5. Arms and hands
6. Legs and feet
7. Back.
Look and feel for signs of injury
SECONDARY ASSESSMENT

Ongoing monitoring and management while waiting for medical assistance should include:
• reassessing the victim’s vital signs at regular intervals
• continuing to identify actual or potential problems and plan appropriate care
• notifying the ambulance service of victim status updates
• victim handover to ambulance personnel.
EAP—ONGOING MANAGEMENT

Anyone who:
• was unconscious at any moment
• required initial rescue breathing or CPR
• may have a secondary condition
• has a persistent cough
• has abnormal skin colour
• may have inhaled any amount of fluid or gas.
WHO SHOULD GO TO HOSPITAL?
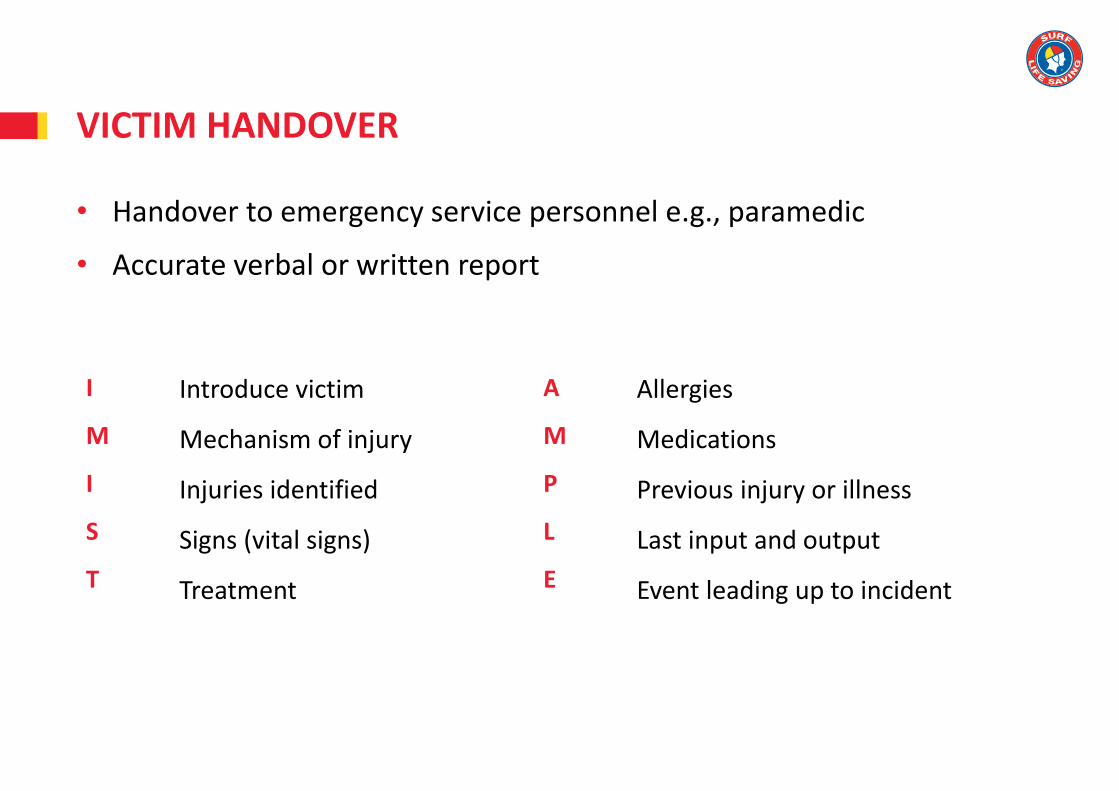
• Handover to emergency service personnel e.g., paramedic
• Accurate verbal or written report
VICTIM HANDOVER
I
M
I
S
T
Introduce victim
Mechanism of injury
Injuries identified
Signs (vital signs)
Treatment
A
M
P
L
E
Allergies
Medications
Previous injury or illness
Last input and output
Event leading up to incident

CAPABILITIES OF EMERGENCY SERVICES
Considerations
• Which emergency service is best to call and why?
• How long will it take for them to arrive?
• What on-site resources can support their response?
• How will you explain your worksite emergency response plans?
• How you can help them optimise the effectiveness of their services?
See Appendix 5 in the ARTC Learner Guide v4.0 for examples of emergency services

TOPIC REVIEW
Let’s review your understanding of this topic then answer the assessment written questions for Topic 1 in your assessment portfolio.
What’s next?
Topic 2—Advanced Resuscitation and Oxygen Administration

Advanced Resuscitation and Oxygen Administration
By the end of this training session you will know:
• why the body needs oxygen
• the parts and functions of the respiratory system
• how to identify and use oxygen resuscitation kit equipment, including
oropharyngeal airways
• considerations when providing supplementary oxygen
• how to perform routine maintenance and checks on oxygen resuscitation
equipment.
TOPIC 2

• Invisible, odourless and tasteless gas
• Essential for the production of cellular energy
• Makes up 21 per cent of the atmosphere
Use supplemental oxygen to reduce any risk of lasting brain damage and increase a victim’s chances of survival when breathing stops
OXYGEN
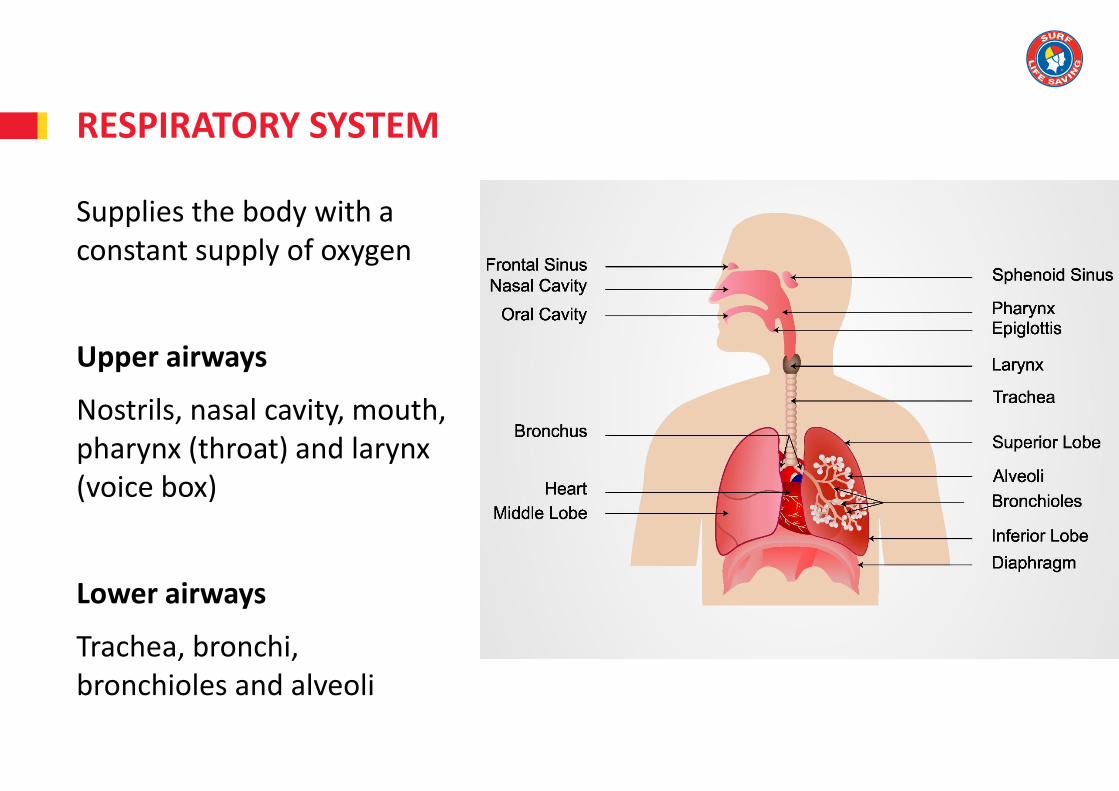
RESPIRATORY SYSTEM
Supplies the body with a constant supply of oxygen
Upper airways
Nostrils, nasal cavity, mouth, pharynx (throat) and larynx (voice box)
Lower airways
Trachea, bronchi, bronchioles and alveoli

Inhale approximately 21 percent oxygen
Exhale carbon dioxide and approximately 16 percent oxygen
Normal adult breathing rate is 10 –20 breaths per minute
Faster breathing rate for children
BREATHING

Respiratory noises can be a sign of abnormal breathing due to a partial airway obstruction
Examples are:
ABNORMAL BREATHING
A victim with a complete airway obstruction or very severe asthma may make no sound
• Cough• Wheeze
• Stridor • Gurgling

AIRWAY OBSTRUCTION

MEDICAL OXYGEN CYLINDERS

Safety Data Sheet
• Oxygen must be used with care and respect at all times
• Never use oxygen near an open flame
• Never use oxygen near cigarettes
• Never use grease or oil with oxygen equipment
• Never use oxygen when delivering a shock via a defibrillator
Storage
• Cylinders should be laid flat or secured upright when in storage
• Separate new and used cylinders
SAFETY PRECAUTIONS

Approximate operational times for a full C cylinder (440–490 L)
OPERATIONAL TIMES
L / min Minutes
Oxygen therapy mask 8 50
Resuscitation using bag-vale-mask
15 30

RESUSCITATION KITS
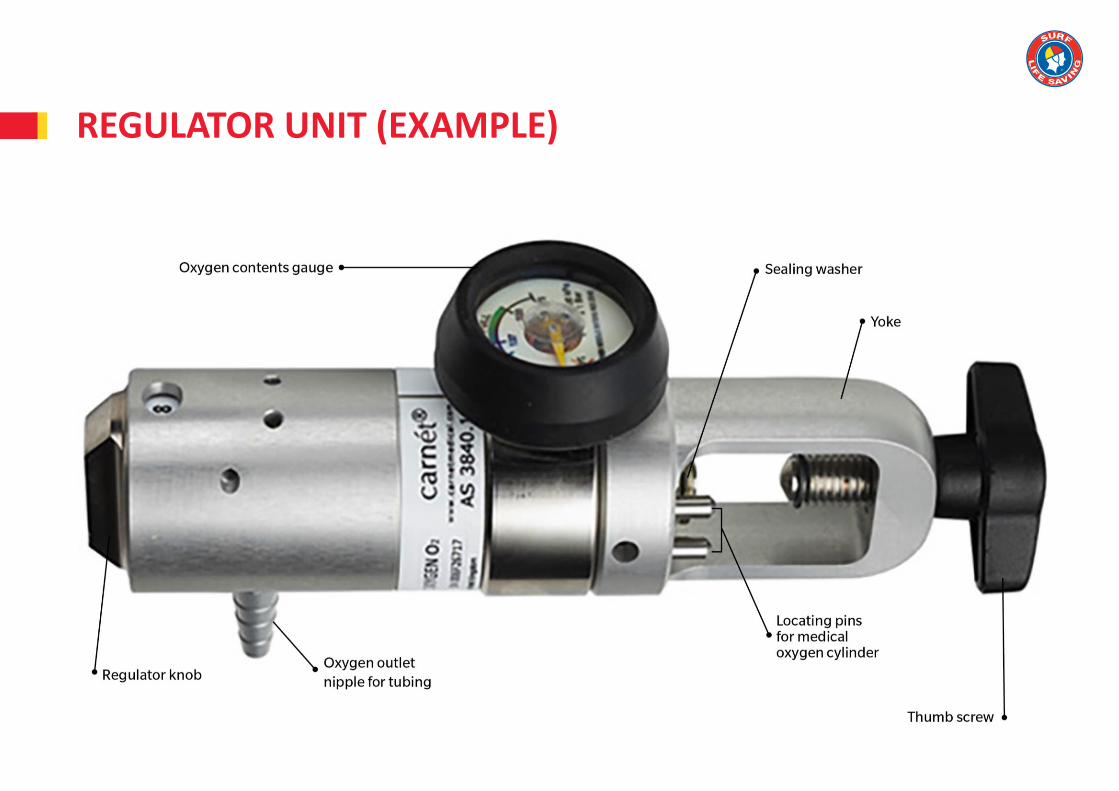
REGULATOR UNIT (EXAMPLE)

RESUSCITATION KIT COMPONENTS (EXAMPLES)
Protective case
Airbag
Reservoir bag
Contents gauge
Control valve(s)
Cylinder key wheel
Cylinder yoke
Resuscitation masks (adult and child)
Masks—therapy or non-rebreather
(adult and child)
Medical oxygen cylinder
Gloves
OP airways (oropharyngeal airways)
Regulator
Sealing washer
Thumbscrew
Tubing
Marker
Pen/pencil and paper
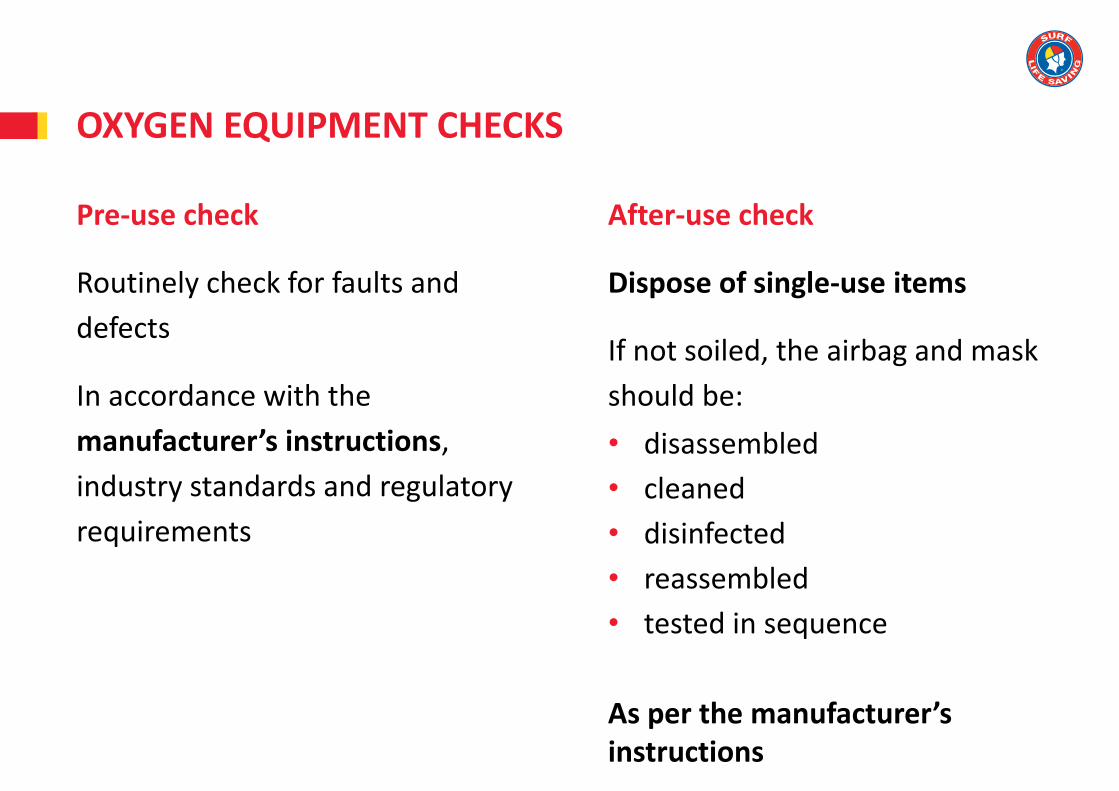
OXYGEN EQUIPMENT CHECKS
Pre-use check
Routinely check for faults and
defects
In accordance with the
manufacturer’s instructions,
industry standards and regulatory
requirements
After-use check
Dispose of single-use items
If not soiled, the airbag and mask
should be:
• disassembled
• cleaned
• disinfected
• reassembled
• tested in sequence
As per the manufacturer’s instructions

OXYGEN EQUIPMENT MAINTENANCE
• General care
• Care after use
• Servicing equipment
• Major faults
Any equipment that is to be re-used should be cleaned and serviced as per the manufacturer’s guidelines
The equipment technical inspection tag/sticker should be affixed to the equipment
Equipment with a major fault must be immediately removed from service and replaced or repaired by the manufacturer. All major faults should be logged in the appropriate organisational logs
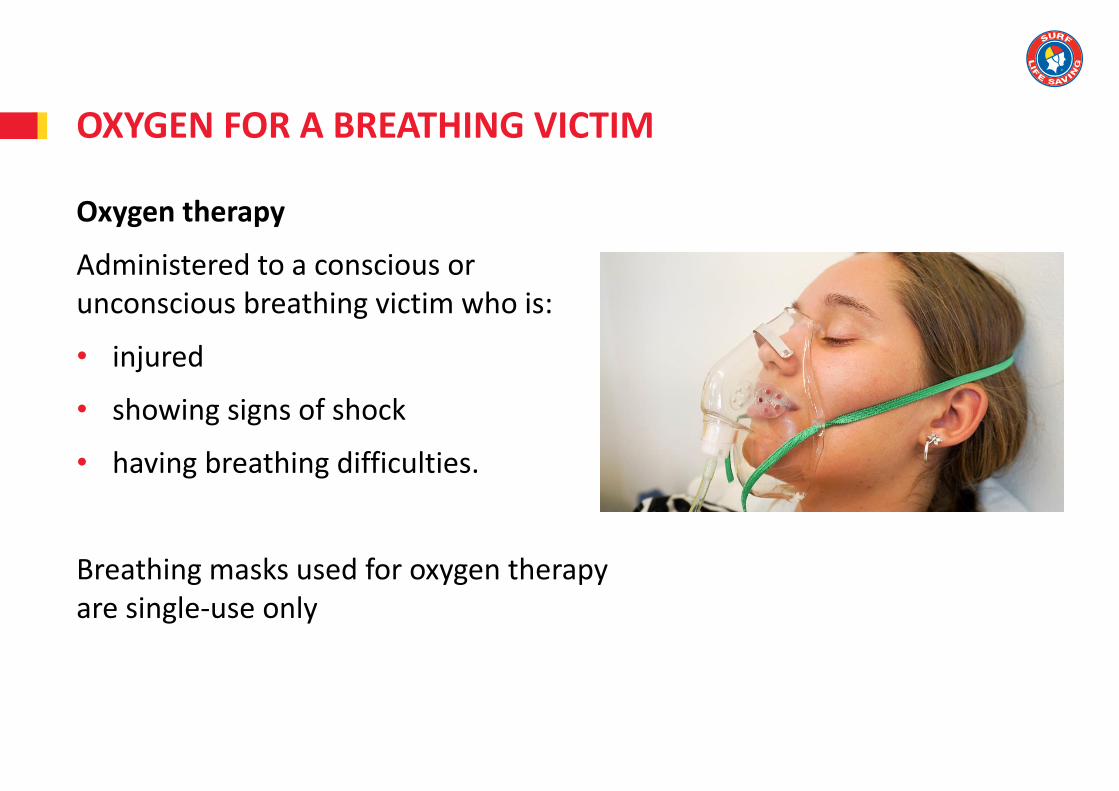
Oxygen therapy
Administered to a conscious or unconscious breathing victim who is:
• injured
• showing signs of shock
• having breathing difficulties.
Breathing masks used for oxygen therapy are single-use only
OXYGEN FOR A BREATHING VICTIM

OXYGEN FOR A BREATHING VICTIM
Therapy Mask
Designed to deliver up to 60 percent oxygen
Flow rate 8–15 L/min
Victim receives approximately 45 per cent oxygen at 8 L/min
A new mask should be used for each victim

OXYGEN FOR A BREATHING VICTIM
Non-rebreather Mask
Designed to deliver 60–90 percent oxygen
Flow rate 10–15 L /min
Victim receives approximately 65 percent oxygen at 15 L/min
Multiple one-way valves in the side ports makes oxygen collect in the reservoir bag for the victim to inhale more oxygen

OXYGEN FOR A BREATHING VICTIM
Cannula
Designed to deliver 30–40 percent oxygen
Flow rate up to 6 L /min (max)
Plastic tubing with two (2) plastic tips that sit at the base of the nostrils
Mainly used for chronic obstructive pulmonary disease (COPD) victims

OXYGEN FOR A NON-BREATHING VICTIM
Mouth-to-mask resuscitation
Oxygen being delivered directly into the resuscitation mask
Adding medical oxygen from a cylinder can increase the oxygen volume received by a victim from 16 percent to 50 percent
Flow rate of 15 L/min recommended
Disposable resuscitation masks recommended

OXYGEN FOR A NON-BREATHING VICTIM
Bag-valve-mask (BVM) resuscitation systems
Designed to deliver up to 95 percent oxygen
Flow rate of 15 L/min recommended
May be used with or without medical oxygen cylinder
Components vary between manufacturers, and between models from the same manufacturer
Some are single-use units

BAG-VALVE-MASK (BVM) COMPONENTS
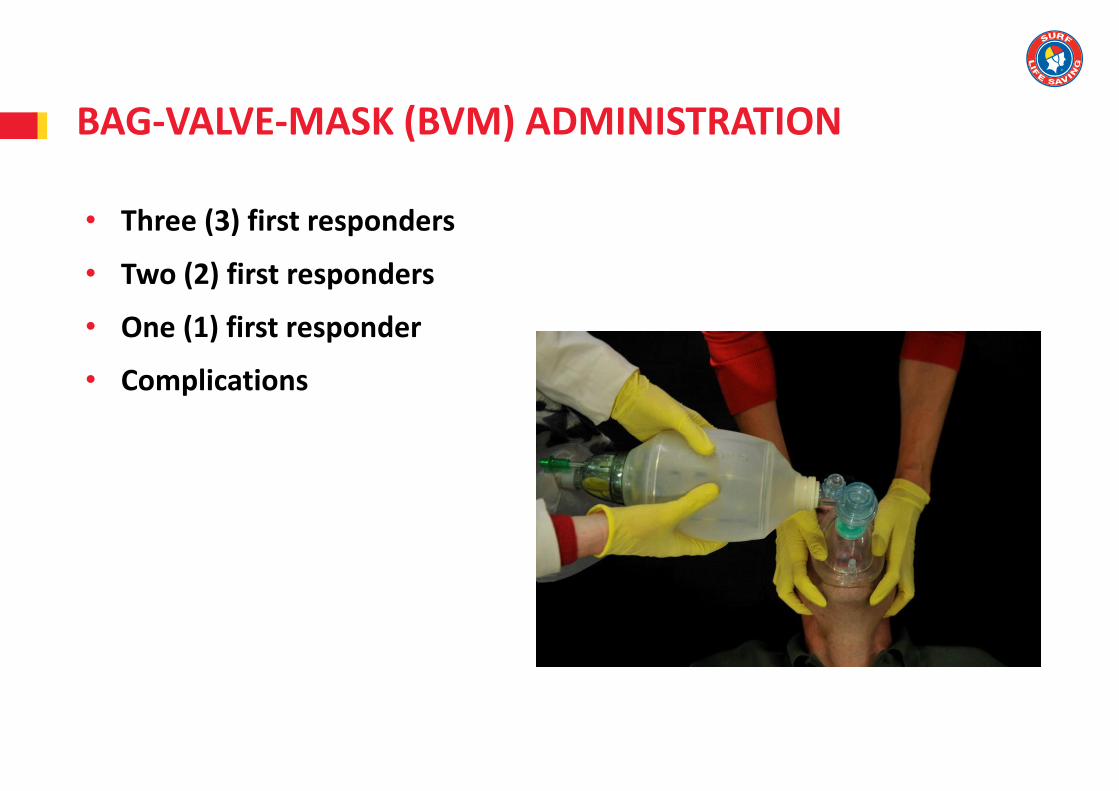
BAG-VALVE-MASK (BVM) ADMINISTRATION
• Three (3) first responders
• Two (2) first responders
• One (1) first responder
• Complications

TOPIC REVIEW
Let’s review your understanding of this topic so far then answer the assessment written questions 2.1—2.21 for Topic 2 in your assessment portfolio.
What’s next?
Oropharyngeal (OP) airways

OROPHARYNGEAL (OP) AIRWAYS
• Keep in original packaging• Discard if cracked or scratched

MEASURING OP AIRWAYS

WHEN TO INSERT AN OP AIRWAY
• Victim is unconscious
• Correct size is available and removed from packaging
• Victim has adequate head tilt and their mouth is open
• Victim’s airway is cleared and free of vomit and broken teeth
• Victim is on their back or in the lateral position

INSERTING AN OP AIRWAY
Rotation method
• Lubricate OP airway—victim lips, water
• Hold the OP airway by the flange and point tip towards the roof of the victim’s mouth
• Insert the OP airway to approximately one-third of its length
• Then slide OP airway over victim’s tongue as you rotate it 180 degrees
• Stop when flange touches the lips
Do not force the OP airway into the mouth

Slide the OP airway out of the mouth following its natural curve
If the victim shows any signs of rejecting an OP airway, remove it immediately
The victim may spit it out
REMOVING AN OP AIRWAY

TOPIC REVIEW
Let’s review your understanding of this topic then answer the assessment written questions 2.22—2.25 for Topic 2 in your assessment portfolio.
What’s next?
Topic 3—Advanced Resuscitation and Suction

Advanced Resuscitation and Suction
By the end of this training session you will know:
• what types of suction equipment are available
• how to administer and restore suction equipment.
TOPIC 3
Suction devices help to safely remove secretions from a victim’s mouth and upper airway
They should be used only in an unconscious victim or a semiconscious victim who cannot cough or swallow
Do not use on infants (0-12 months)
Put on PPE before administering suction e.g., gloves, safety glasses
WHY USE SUCTION?
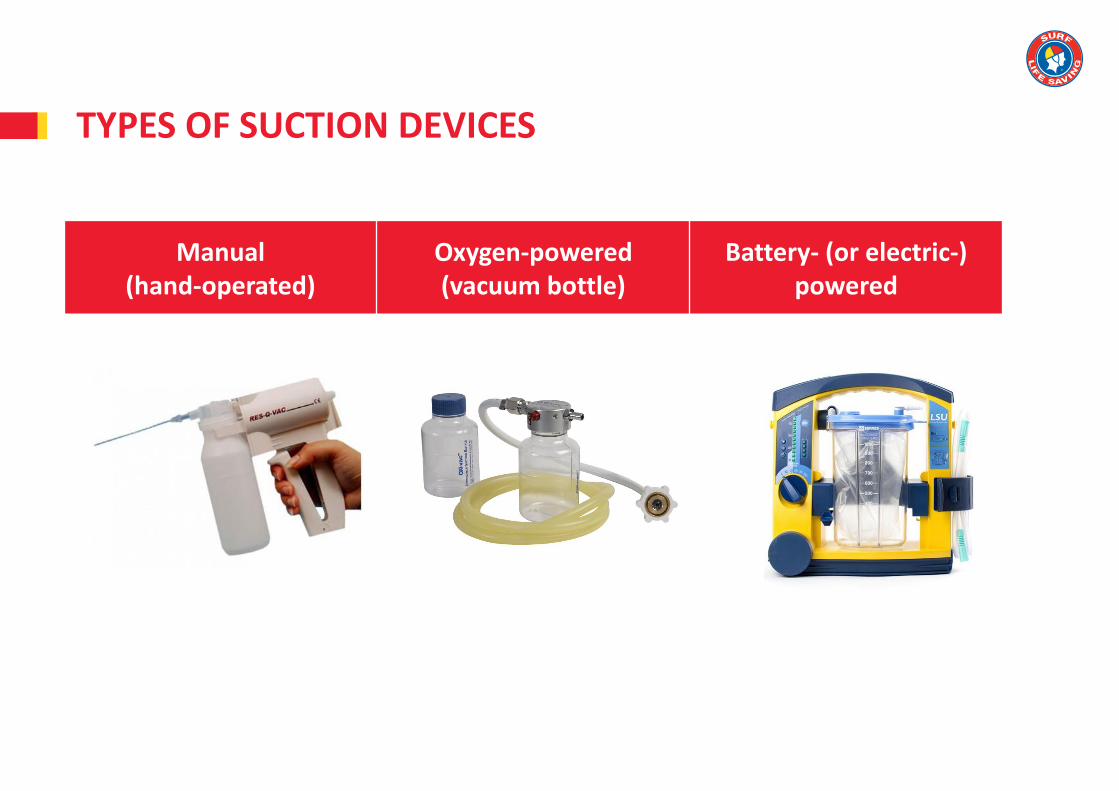
TYPES OF SUCTION DEVICES
Manual (hand-operated)
Oxygen-powered (vacuum bottle)
Battery- (or electric-) powered

COMPONENTS OF SUCTION DEVICES
There are four (4) components that are common to most suction devices:
1. Suction catheter
2. Collection jar
3. Jar cap and connection port
4. Suction device e.g., pump handle.
SLSA currently approves the use of manual suction devices only during surf lifesaving operations
• Ensure that the device is clean and that all components are available
• Operate the manual suction device
• Test for suction against thumb or finger by placing it over the vacuum port
• When you are finished, turn the suction device off if electric
• Return the device to its case and original position
PRE-USE CHECKS

Measure insertion length to ensure you insert the suction catheter no further than the victim’s back teeth
• Place the tip of the suction catheter at the corner of the victim’s jaw and measure it to the centre of the lips
• Mark this point with a finger
• Insert the suction catheter no further than the point marked by your finger
MEASURING SUCTION CATHETER INSERTION LENGTH

Manual suction should be applied for only 15 seconds at a time with a break for at least 5 seconds in between operations
Powered suctioning devices should be used for only 5 seconds before a 5-second break
ADMINISTERING SUCTION
Avoid stimulating the vagus nerve in the back of the throat which can cause bradycardia (slow pulse)

ADMINISTERING MANUAL SUCTION
1. Partially remove suction catheter from its sealed packaging
2. Connect it to the connection port
3. Then completely remove suction catheter from packaging
4. Measure the maximum length of insertion
5. Open the victim’s mouth
6. Insert the catheter into the lower cheek of the victim (in the lateral position)
7. Rotate the catheter within the victim’s lower cheek
8. Use the suction device repeatedly
9. Stop when collection jar is two-thirds full
10. Dispose of the catheter in the appropriate manner (as per SOPs)

• Dispose of and replace single-use items
• Re-usable items can be flushed with clean, cold water and rinsed with antiseptic solution
• Ensure that all unit components are disassembled and thoroughly cleaned as per ARC guidelines
• Report and manage faults as per SOPs
Single-use items will depend upon the type and manufacturer of the suction device
POST-USE CHECKS AND MAINTENANCE

Troubleshooting
• Is the suction tubing blocked?
• Is the seal missing or perished?
• Is the unit not turned on?
• Is the oxygen supply exhausted (for oxygen-powered units)?
• Is the battery flat (if battery-powered unit)?
RESTORING EQUIPMENT
TOPIC REVIEW
Let’s review your understanding of this topic then answer the assessment written questions for Topic 3 in your assessment portfolio.
What’s next?
Topic 4—Advanced Resuscitation and Defibrillation

Advanced Resuscitation and Defibrillation
By the end of this training session you will know:
• what conditions benefit from defibrillation
• the parts and functions of the cardiopulmonary system
• when and how to operate an automated external defibrillator (AED)
• considerations when operating an AED
• how to perform routine maintenance and checks on defibrillation equipment.
TOPIC 4
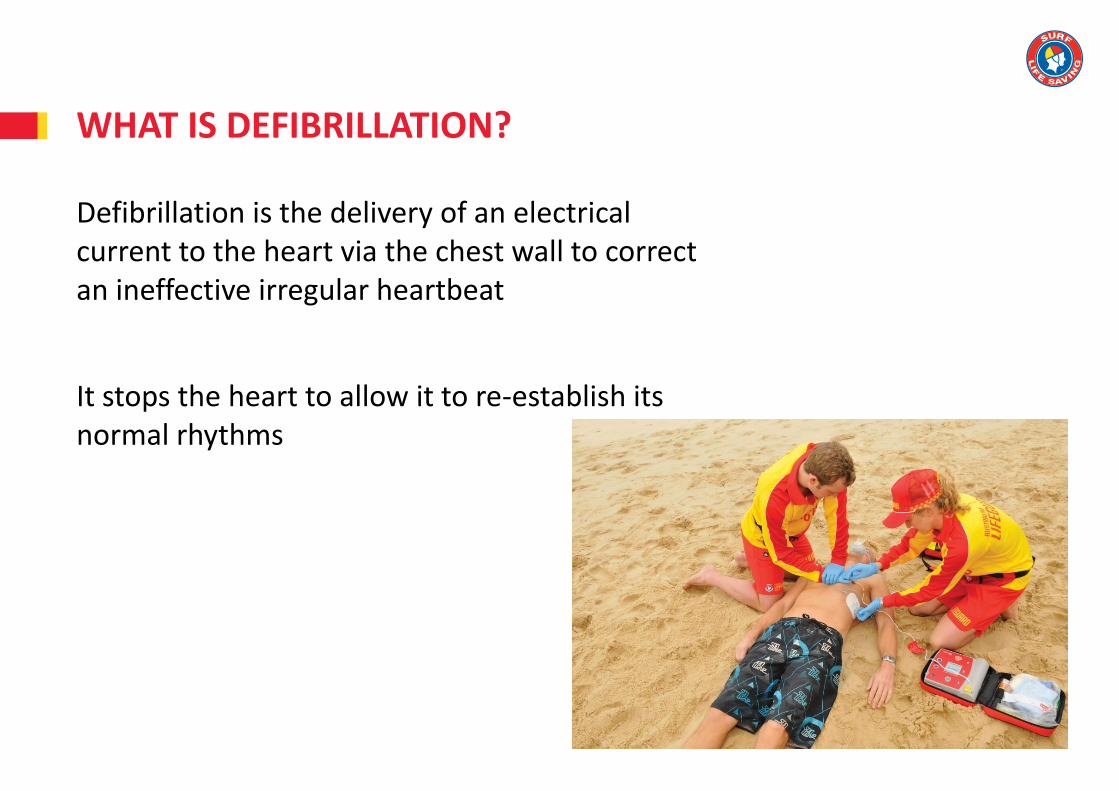
WHAT IS DEFIBRILLATION?
Defibrillation is the delivery of an electrical current to the heart via the chest wall to correct an ineffective irregular heartbeat
It stops the heart to allow it to re-establish its normal rhythms

CARDIOVASCULAR SYSTEM
The delivery of oxygen to the body can be threatened by the following cardiovascular conditions:• blood loss caused by severe bleeding (internal or external)• impaired circulation• failure of the heart to pump adequately.

THE HEART
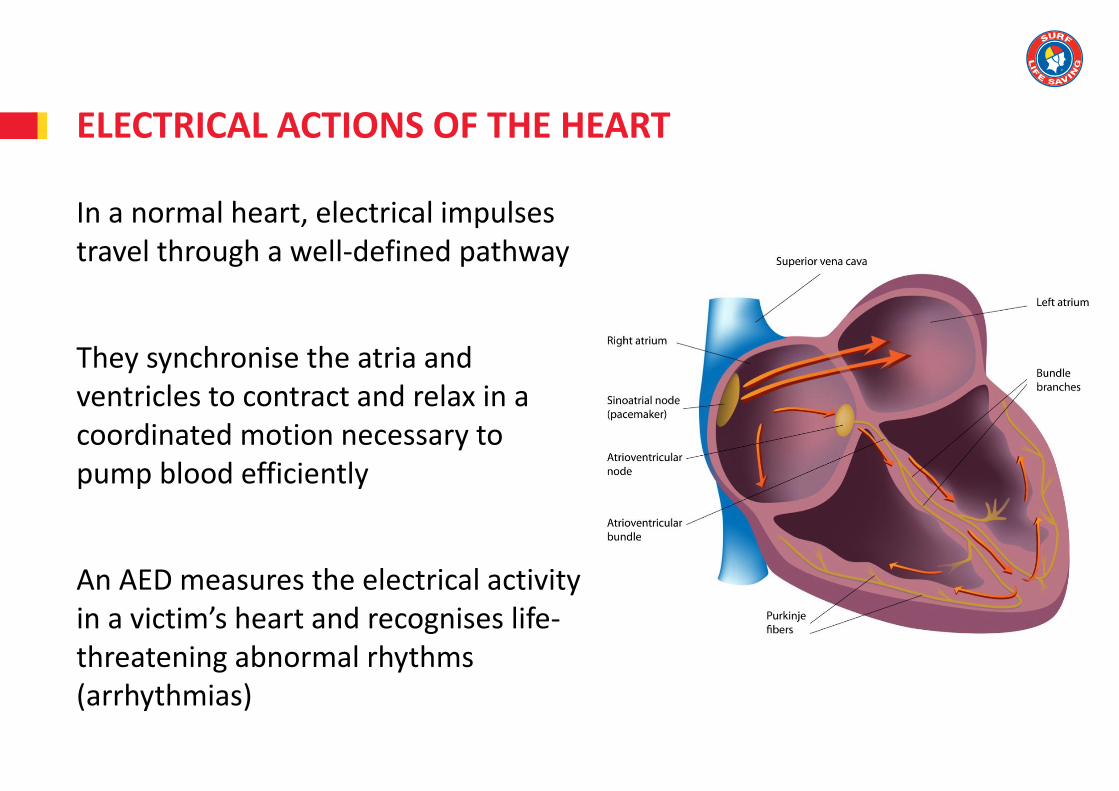
ELECTRICAL ACTIONS OF THE HEART
In a normal heart, electrical impulses travel through a well-defined pathway
They synchronise the atria and ventricles to contract and relax in a coordinated motion necessary to pump blood efficiently
An AED measures the electrical activity in a victim’s heart and recognises life-threatening abnormal rhythms (arrhythmias)

HEART RHYTHMS – SHOCK ADVISED
Ventricular fibrillation (VF)
Ventricular tachycardia (VT)

HEART RHYTHMS – SHOCK NOT ADVISED
Sinus rhythm
Asystole

Implanted under the skin of the chest to treat slow heart rates
Roughly the size of a 50-cent piece, and approximately three (3) times as thick
Position external defibrillator pads at least 5cm from a pacemaker to avoid damaging it or causing internal burns
IMPLANTED DEFIBRILLATORS (PACEMAKERS)

AUTOMATED EXTERNAL DEFIBRILLATOR (AED)
Electrode pads applied onto the skin of the chest
Only for victims who are unconscious and not breathing
Restores VF and VT rhythm to sinus rhythm
Public access defibrillation programs
Q: Where is your nearest AED located?

Contact
No person should come into direct or indirect contact with the victim when shock delivered
Conductive materials
Have no conductive items near or on the casualty
• Water e.g., surf, rain
• Metal e.g., jewellery, grates
• Moisture e.g., vomit, blood, perspiration
Explosive substances
Do not defibrillate near explosive substances e.g., medical grade oxygen, gases, fumes, naked flames
AED SAFETY
Pre-operation checks
• Run the AED self-check
• Electrode pads are current and sealed in packaging
• Components and accessories required by your state or service, are included and in an operational condition
e.g., gloves, razors, scissors, spare pads, spare battery, pen and paper, chamois, blanket
PRE-USE CHECKS
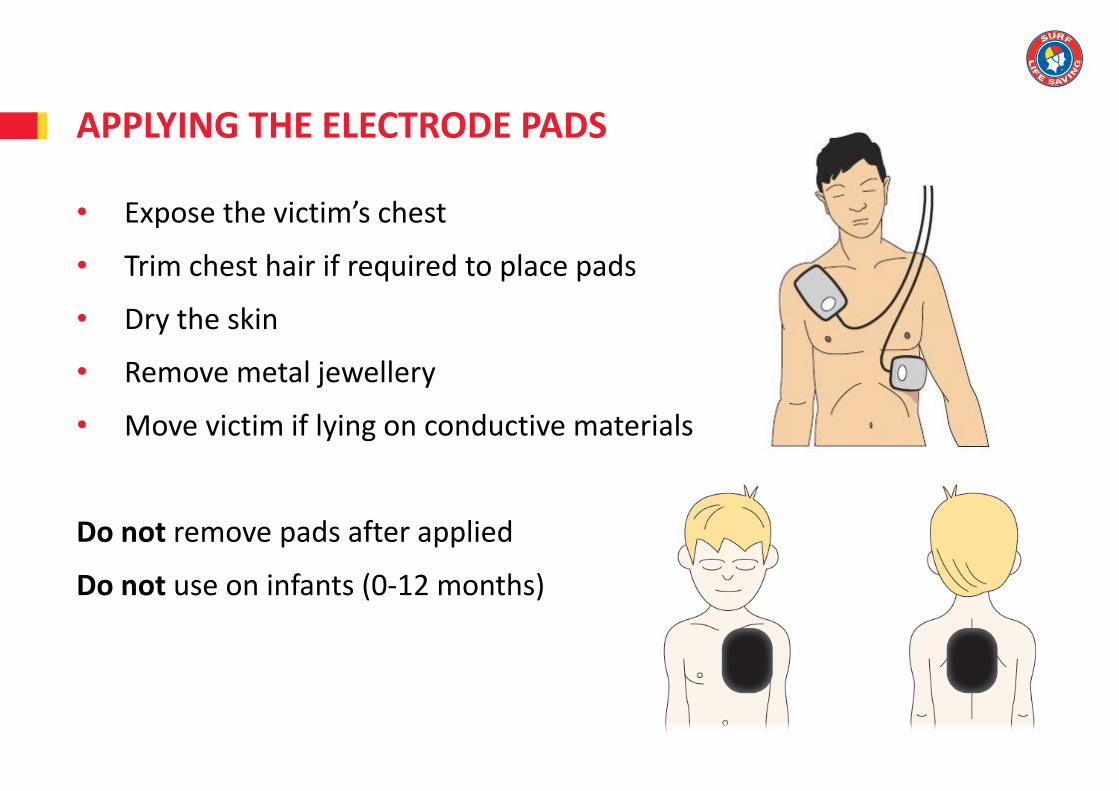
APPLYING THE ELECTRODE PADS
• Expose the victim’s chest
• Trim chest hair if required to place pads
• Dry the skin
• Remove metal jewellery
• Move victim if lying on conductive materials
Do not remove pads after applied
Do not use on infants (0-12 months)

OPERATING AN AED
1. Turn the machine on
2. Apply the pads
3. Respond to the prompts within safety constraints
Prompt Action
‘Attach pads’ Attach electrode pads to victim
‘Analysing’ Do not touch the victim
‘Charging’ Stand clear. Check again for conductive materials
‘Stand clear’, ‘Do not touch the victim’ Stand clear
‘Shock advised’, ‘Press to shock’, ‘Push flashing button’ Warn team members then push the shock button if safe to do so
‘No shock advised’, ‘If needed continue CPR’ Continue CPR if needed
‘Poor pad connection’ Attach pads firmly to bare skin
‘Motion detected’ Stop motion

EQUIPMENT STORAGE AND MAINTENANCE
Post-defibrillation maintenance
• Parts should be cleaned and tested as per manufacturer’s instructions
• Dispose of and replace single-use items
Ongoing maintenance
• Check regularly e.g., weekly
• Replace low batteries
• Replace faulty, out-of-date and unsealed pads
• Report and manage faults as per SOPs
• Confirm AED passes self-check

TOPIC REVIEW
Let’s review your understanding of this topic then answer the assessment written questions for Topic 4 in your assessment portfolio.
What’s next?
Assessment
Task 1: Written questions (if not completed already)
Task 2: Practical scenario—CPR on an infant
Task 3: Practical scenario—Airway management and oxygen use
Task 4: Practical scenario—Full resuscitation
ASSESSMENT SESSION

THANK YOU