sirtec bus - manuale unico rel. 1.2 - tecnoalarm.gr · remoto, tramite pc e il software...
TRANSCRIPT

SIRTEC BUS Rel. 1.2 - 06/2016
1A
JP1 SW11 2 3 4
A - +B
2B
B
C
1 2 3 4
A - +SW1
B
1 2 3 4
3
D
D
ED
D
1 2 3 4
A - +JP1 SW1
B
4
F
3
-
SW1JP1
5
G H
1 2 3 4
A - +B
6
IL L
1A
JP1 SW11 2 3 4
A - +B
2B
B
C
1 2 3 4
A - +SW1
B
1 2 3 4
3
D
D
ED
D
1 2 3 4
A - +JP1 SW1
B
4
F
SW1JP1
5
G H
1 2 3 4
A - +B
6
IL L
SIRTEC BUS - Sirena per interni autoalimentata SIRTEC BUS - Sirène auto-alimentée pour intérieur
INSTALLAZIONE INSTALLATION
Caratteristiche generali• Sirena RSC collegabile su BUS Siren bus• Tipo suono e modalità di allarme programmabili• Libero abbinamento ai programmi di funzionamento• Segnalazione acustica di ON/OFF sistema• Autoalimentata• Protetta dall’inversioni di polarità• Time-out tempo max. di suonata programmabile• Protezione anti-apertura ed anti-asportazione• Ricarica batteria garantita con 10,5V di alimentazione• Funzioni di auto test automatici per: tensione di
alimentazione, tensione batteria e funzionalità tromba.
ProgrammazioneLa programmazione può essere effettuata, in locale o da remoto, tramite PC e il software “Centro”.
Caractéristiques générales• Sirène RSC raccordable sur Siren Bus• Type de sonnerie d’alarme programmable• Libre association aux programmes• Signalisation acoustique d’état du système• Auto-alimentée• Protection contre les inversions de polarité• Temps max. de sonnerie programmable• Auto-protection à l’ouverture et à l’arrachement• Recharge batterie garantie avec 10,5V• Fonction auto-test pour tension d’alimentation, batterie et
cloche
ProgrammationLa programmation peut être effectuée, en locale ou à distance, par PC avec le logiciel Tecnoalarm.
3 - Fissaggio a muroFissare il contenitore su una superfi cie rigida.Praticare sulla superfi cie di installazione i fori di fi ssaggio in corrispondenza delle asole D e del foro per la protezione anti-rimozione E .
2 - Posiziona il cavoIntroduci il cavo di collegamento all’interno del contenitore attraverso la canalina B oppure utilizza la fessura C .
1 - Apri il contenitoreSvita con una chiave a brugola da 3mm la vite Apoi solleva il coperchio ruotandolo verso destra.
6 - Collegamento batteriaAlloggia la batteria e bloccala con il gancio I . Collega i faston della sirena alla batteria L .
5 - ProgrammazioneEffettuare la programmazione del ponticello G JP1 e del Dip H SW1.
4 - CollegamentoEffettuare il collegamento elettrico della sirena morsettiera F .
1 B Canale B linea seriale2 A Canale A linea seriale3 - Negativo di alimentazione4 + Positivo di alimentazione
JP1 - Terminazione linea serialeChiudere il ponticello solo se la sirena è l’ultimo dispositivo collegato alla linea Siren BUS
SW1 Switch 1 2 3 4 Switch 1 2 3 4
ON
2 3 41
0 OFF OFF OFF OFF 8 OFF OFF OFF ON1 ON OFF OFF OFF 9 ON OFF OFF ON2 OFF ON OFF OFF 10 OFF ON OFF ON3 ON ON OFF OFF 11 ON ON OFF ON4 OFF OFF ON OFF 12 OFF OFF ON ON5 ON OFF ON OFF 13 ON OFF ON ON6 OFF ON ON OFF 14 OFF OFF ON ON7 ON ON ON OFF 15 ON OFF ON ON
5 - ProgrammationEffectuer la programmation du cavalier G JP1 et dudip-switch SW1 H .
4 - RaccordementEffectuer le raccordement électrique de la sirène en utilisant le bornier F .
3 - F ixation au murFixer le boîtier sur une surface solide en correspondancedes œillets D et du trou de fi xation pour la protectionanti-arrachement E .
2 - Positionnement du câbleIntroduire le câble de raccordement à l’intérieur du boîtierà travers le passe-câble B ou en utilisant la rainure C .
1 - Ouverture du boîtierDévisser la vis de blocage A avec une clé Allen de 3mm, puis soulever le couvercle en le tournant vers la droite.
6 - Raccordement batteriePlacer la batterie et la bloquer avec le crochet I .Raccorder les cosses faston à la batterie L .
1 B Canal B ligne sérielle2 A Canal A ligne sérielle3 - Negatif d’alimentation4 + Positif d’alimentation
SW1 Switch 1 2 3 4 Switch 1 2 3 4
ON
2 3 41
0 OFF OFF OFF OFF 8 OFF OFF OFF ON1 ON OFF OFF OFF 9 ON OFF OFF ON2 OFF ON OFF OFF 10 OFF ON OFF ON3 ON ON OFF OFF 11 ON ON OFF ON4 OFF OFF ON OFF 12 OFF OFF ON ON5 ON OFF ON OFF 13 ON OFF ON ON6 OFF ON ON OFF 14 OFF OFF ON ON7 ON ON ON OFF 15 ON OFF ON ON
JP1 - Fin ligne sérielle
Insérer le cavalier seulement sur le dernier dispositif de la ligne sérielle
CARATTERISTICHE TECNICHE E FUNZIONI - CARACTÉRISTIQUES TECHNIQUES ET FONCTIONS - TECHNICAL AND FUNCTIONAL SPECIFICATIONS - CARACTERÍSTICAS TÉCNICAS Y FUNCIONES - TECHNISCHE DATEN UND FUNKTIONEN
CARATTERISTICHE ACUSTICHE CARACTÉRISTIQUES ACOUSTIQUES ACOUSTIC SPECIFICATIONS CARACTERÍSTICAS ACÚSTICAS AKUSTISCHE EIGENSCHAFTENPressione acustica Pression sonore Sound level Potencia acústica Schalldruck >112dB[A] @ 1mFrequenza di funzionamento Fréquence Frequency Frecuencia de funcionamiento Betriebsfrequenz 2400-3550HzVolume preallarme/segnalazione programmabile Volume programmable Volume programmable Volumen programable Lautstärke programmierbar 4 settingsTipo suono programmabile Type de sonnerie programmable Sound type programmable Tipo de sonido programable Signalton programmierbar 3 typesTempo massimo di suonata programmabile Temps maximum de sonnerie programmable Max. sound time programmable Tiempo máx. de sonido programable Max. Signalzeit programmierbar ✔
Allarme per assenza comunicazione (taglio fi li) Alarme pour perte communication Alarm for communication loss Alarma por pérdida de comunicación Alarm bei Verlust der Kommunikation 3 min. (2400-3500 Hz)
ALIMENTAZIONE ALIMENTATION POWER SUPPLY ALIMENTACIÓN STROMVERSORGUNGTensione nominale Tension nominale Rated voltage Tensión nominal Nennspannung 12V DCTensione di alimentazione Tension d’alimentation Operating voltage Tensión de trabajo Betriebsspannung 10.5…14.5V DCTensione di ricarica batteria Tension de recharge batterie Battery recharge voltage Tensión de recarga batería Batterieladespannung 13.5…13.8V DC
CONSUMO CONSOMMATION CONSUMPTION CONSUMO STROMAUFNAHMEConsumo a riposo Au repos Stand-by En reposo Ruhezustand 8mA @ 12V DCConsumo in allarme En alarme Alarm En alarma Alarm 1.8A @ 12V DC (Sweep)Corrente di carica Courant de recharge Recharge current Corriente de recarga Ladestrom max. 120 mAAutonomia garantita a riposo (con batteria 2,1Ah) Autonomie au repos (avec batterie 2,1Ah) Autonomy in stand-by (with 2.1Ah battery) Autonomía en reposo (con batería de 2,1Ah) Autonomie im Ruhezustand (mit 2,1Ah Batterie) >60 hours Autonomia garantita in allarme (con batteria 2,1Ah) Autonomie en alarme (avec batterie 2,1Ah) Autonomy in alarm (with 2.1Ah battery) Autonomía en alarma (con batería de 2,1Ah) Autonomie im Alarmzustand (mit 2,1Ah Batterie) >30 min.
TAMPER AUTO-PROTECTION ANTI-TAMPER PROTECTION PROTECCIÓN DE TAMPER SABOTAGESCHUTZAnti apertura/rimozione À l’ouverture/arrachement Against opening/detachment Antiaperura y antiarranque Öffnungs-/Abhebeschutz Micro-switch
CARATTERISTICHE FISICHE CARACTÉRISTIQUES PHYSIQUES PHYSICAL SPECIFICATIONS CARACTERÍSTICAS FÍSICAS PHYSIKALISCHE EIGENSCHAFTENAlloggiamento batteria Batterie Battery Batería Batterie 12V/2.1AhTemperatura di funzionamento Température de fonctionnement Operating temperature Temperatura de funcionamiento Betriebstemperatur -10°C ... +55°CGrado di protezione involucro Indice de protection Protection class Clase de protección Schutzklasse IP41-IK07Classe ambientale Classe environnementale Environmental class Clase ambiental Umweltklasse IIContenitore Boîtier Casing Caja Gehäuse ABS V0Dimensioni (L x A x P) Dimensions (L x H x P) Dimensions (L x H x D) Dimensiones (L x A x P) Abmessungen (L x H x B) 290 x 95 x 70mmPeso Poids Weight Peso Gewicht 780g
CONFORMITÀ CONFORMITÉ CONFORMITY CONFORMIDAD KONFORMITÄTNorma Norme Norm Norma Norm EN 50131-4Grado di prestazione Niveau de sécurité Security grade Grado de seguridad Sicherheitsgrad 3
N.B. La dichiarazione di conformità è disponibile sul sito: www.tecnoalarm.com / N.B. La déclaration de conformité est disponible sur le site web: www.tecnoalarm.com / N.B. The declaration of conformity is available on the website: www.tecnoalarm.com N.B. La declaración de conformidad está disponible a la página web: www.tecnoalarm.com / N.B. Die Konformitätserklärung steht auf folgender Webseite zur Verfügung: www.tecnoalarm.com.
Le caratteristiche del prodotto possono essere soggette a modifi che senza alcun preavviso / Les caractéristiques de ce produit peuvent être sujettes à modifi cations sans préavis /The product features can be subject to change without notice / Las funciones del producto pueden estar sujetas a modifi caciones sin previo aviso. Die Charakteristika des Produktes können jederzeit ohne vorherige Ankündigung geändert werden.
Compatibilità
TP8-28 - TP8-28 GSM ver. 0.8.08 TP8-64 BUS ver. 3.5.00 TP8-88 ver. 0.8.08
TP8-96 VIDEO ver. 2.1.07 TP16-256 ver. 7.4 TP16-512 ver. 2.1.07
Compatibilité
TP8-28 - TP8-28 GSM ver. 0.8.08 TP8-64 BUS ver. 3.5.00 TP8-88 ver. 0.8.08
TP8-96 VIDEO ver. 2.1.07 TP16-256 ver. 7.4 TP16-512 ver. 2.1.07
SIRTEC BUS Rel. 1.2 - 06/2016
21ISTR10391
Via Ciriè 38 - 10099 San Mauro T.se - Torino (Italy)tel +390112235410 - fax +390112735590tecnoalarm@ tecnoalarm.comwww.tecnoalarm.com
Lead free
compliantRoHS
Pb
1A
JP1 SW11 2 3 4
A - +B
2B
B
C
1 2 3 4
A - +SW1
B
1 2 3 4
3
D
D
ED
D
1 2 3 4
A - +JP1 SW1
B
4
F
SW1JP1
5
G H
1 2 3 4
A - +B
6
I LL
1A
JP1 SW11 2 3 4
A - +B
2B
B
C
1 2 3 4
A - +SW1
B
1 2 3 4
3
D
D
ED
D
1 2 3 4
A - +JP1 SW1
B
4
F
3
-
SW1JP1
5
G H
1 2 3 4
A - +B
6
I LL
1A
JP1 SW11 2 3 4
A - +B
2B
B
C
1 2 3 4
A - +SW1
B
1 2 3 4
3
D
D
ED
D
1 2 3 4
A - +JP1 SW1
B
4
F
SW1JP1
5
G H
1 2 3 4
A - +B
6
I LL
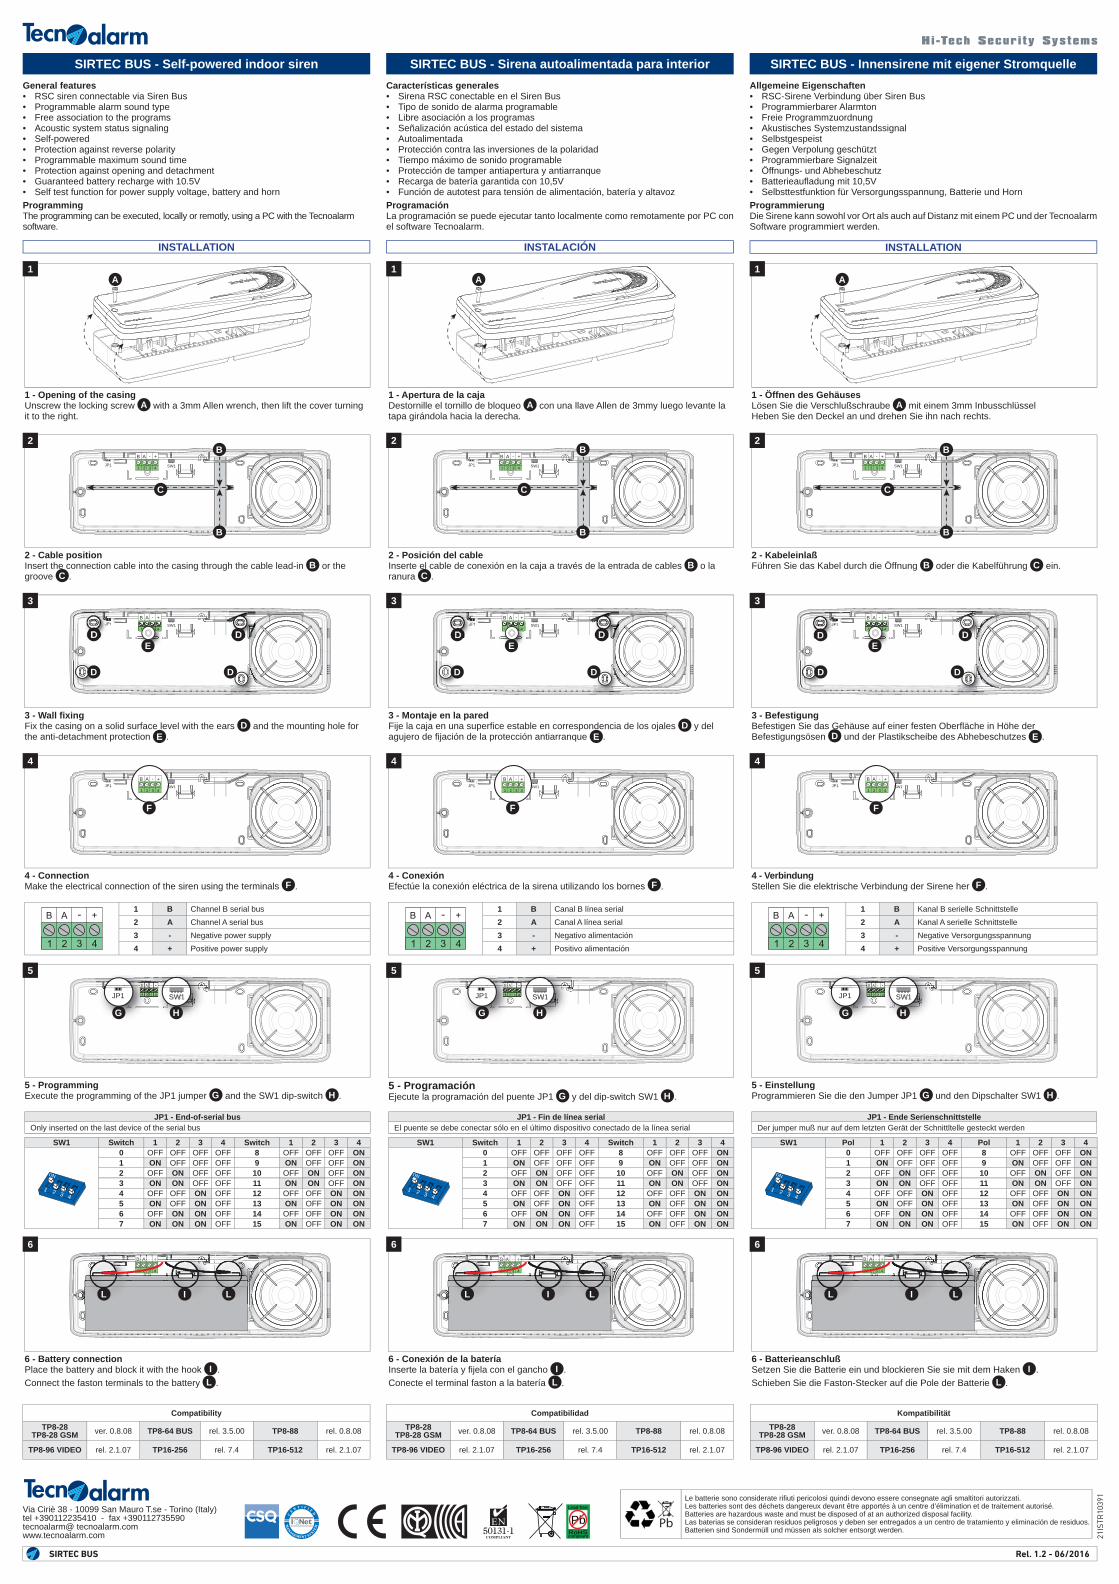
General features• RSC siren connectable via Siren Bus• Programmable alarm sound type• Free association to the programs• Acoustic system status signaling• Self-powered• Protection against reverse polarity• Programmable maximum sound time• Protection against opening and detachment • Guaranteed battery recharge with 10.5V• Self test function for power supply voltage, battery and hornProgrammingThe programming can be executed, locally or remotly, using a PC with the Tecnoalarm software.
Características generales• Sirena RSC conectable en el Siren Bus• Tipo de sonido de alarma programable• Libre asociación a los programas• Señalización acústica del estado del sistema• Autoalimentada• Protección contra las inversiones de la polaridad• Tiempo máximo de sonido programable• Protección de tamper antiapertura y antiarranque• Recarga de batería garantida con 10,5V• Función de autotest para tensión de alimentación, batería y altavozProgramaciónLa programación se puede ejecutar tanto localmente como remotamente por PC con el software Tecnoalarm.
Allgemeine Eigenschaften• RSC-Sirene Verbindung über Siren Bus• Programmierbarer Alarmton• Freie Programmzuordnung• Akustisches Systemzustandssignal• Selbstgespeist• Gegen Verpolung geschützt• Programmierbare Signalzeit• Öffnungs- und Abhebeschutz• Batterieaufl adung mit 10,5V• Selbsttestfunktion für Versorgungsspannung, Batterie und HornProgrammierungDie Sirene kann sowohl vor Ort als auch auf Distanz mit einem PC und der Tecnoalarm Software programmiert werden.
SIRTEC BUS - Self-powered indoor siren SIRTEC BUS - Sirena autoalimentada para interior SIRTEC BUS - Innensirene mit eigener Stromquelle
INSTALLATION INSTALACIÓN INSTALLATION
Pb
Le batterie sono considerate rifi uti pericolosi quindi devono essere consegnate agli smaltitori autorizzati.Les batteries sont des déchets dangereux devant être apportés à un centre d’élimination et de traitement autorisé.Batteries are hazardous waste and must be disposed of at an authorized disposal facility.Las baterias se consideran residuos peligrosos y deben ser entregados a un centro de tratamiento y eliminación de residuos.Batterien sind Sondermüll und müssen als solcher entsorgt werden.
1 - Opening of the casingUnscrew the locking screw A with a 3mm Allen wrench, then lift the cover turning it to the right.
1 - Apertura de la cajaDestornille el tornillo de bloqueo A con una llave Allen de 3mmy luego levante la tapa girándola hacia la derecha.
1 - Öffnen des GehäusesLösen Sie die Verschlußschraube A mit einem 3mm Inbusschlüssel Heben Sie den Deckel an und drehen Sie ihn nach rechts.
3 - Wall fi xingFix the casing on a solid surface level with the ears D and the mounting hole for the anti-detachment protection E .
3 - Montaje en la paredFije la caja en una superfi ce estable en correspondencia de los ojales D y delagujero de fi jación de la protección antiarranque E .
3 - BefestigungBefestigen Sie das Gehäuse auf einer festen Oberfl äche in Höhe der Befestigungsösen D und der Plastikscheibe des Abhebeschutzes E .
2 - Cable positionInsert the connection cable into the casing through the cable lead-in B or the groove C .
2 - Posición del cableInserte el cable de conexión en la caja a través de la entrada de cables B o la ranura C .
2 - KabeleinlaßFühren Sie das Kabel durch die Öffnung B oder die Kabelführung C ein.
4 - VerbindungStellen Sie die elektrische Verbindung der Sirene her F .
4 - ConexiónEfectúe la conexión eléctrica de la sirena utilizando los bornes F .
4 - ConnectionMake the electrical connection of the siren using the terminals F .
6 - Conexión de la bateríaInserte la batería y fi jela con el gancho I .Conecte el terminal faston a la batería L .
6 - BatterieanschlußSetzen Sie die Batterie ein und blockieren Sie sie mit dem Haken I .Schieben Sie die Faston-Stecker auf die Pole der Batterie L .
6 - Battery connectionPlace the battery and block it with the hook I .Connect the faston terminals to the battery L .
1 B Channel B serial bus2 A Channel A serial bus3 - Negative power supply4 + Positive power supply
1 B Canal B línea serial2 A Canal A línea serial3 - Negativo alimentación4 + Positivo alimentación
1 B Kanal B serielle Schnittstelle2 A Kanal A serielle Schnittstelle3 - Negative Versorgungsspannung4 + Positive Versorgungsspannung
5 - ProgramaciónEjecute la programación del puente JP1 G y del dip-switch SW1 H .
5 - EinstellungProgrammieren Sie die den Jumper JP1 G und den Dipschalter SW1 H .
5 - ProgrammingExecute the programming of the JP1 jumper G and the SW1 dip-switch H .
JP1 - End-of-serial busOnly inserted on the last device of the serial bus
SW1 Switch 1 2 3 4 Switch 1 2 3 4
ON
2 3 41
0 OFF OFF OFF OFF 8 OFF OFF OFF ON1 ON OFF OFF OFF 9 ON OFF OFF ON2 OFF ON OFF OFF 10 OFF ON OFF ON3 ON ON OFF OFF 11 ON ON OFF ON4 OFF OFF ON OFF 12 OFF OFF ON ON5 ON OFF ON OFF 13 ON OFF ON ON6 OFF ON ON OFF 14 OFF OFF ON ON7 ON ON ON OFF 15 ON OFF ON ON
JP1 - Fin de línea serialEl puente se debe conectar sólo en el último dispositivo conectado de la línea serial
SW1 Switch 1 2 3 4 Switch 1 2 3 4
ON
2 3 41
0 OFF OFF OFF OFF 8 OFF OFF OFF ON1 ON OFF OFF OFF 9 ON OFF OFF ON2 OFF ON OFF OFF 10 OFF ON OFF ON3 ON ON OFF OFF 11 ON ON OFF ON4 OFF OFF ON OFF 12 OFF OFF ON ON5 ON OFF ON OFF 13 ON OFF ON ON6 OFF ON ON OFF 14 OFF OFF ON ON7 ON ON ON OFF 15 ON OFF ON ON
JP1 - Ende SerienschnittstelleDer jumper muß nur auf dem letzten Gerät der Schnittltelle gesteckt werden
SW1 Pol 1 2 3 4 Pol 1 2 3 4
ON
2 3 41
0 OFF OFF OFF OFF 8 OFF OFF OFF ON1 ON OFF OFF OFF 9 ON OFF OFF ON2 OFF ON OFF OFF 10 OFF ON OFF ON3 ON ON OFF OFF 11 ON ON OFF ON4 OFF OFF ON OFF 12 OFF OFF ON ON5 ON OFF ON OFF 13 ON OFF ON ON6 OFF ON ON OFF 14 OFF OFF ON ON7 ON ON ON OFF 15 ON OFF ON ON
Compatibility
TP8-28TP8-28 GSM ver. 0.8.08 TP8-64 BUS rel. 3.5.00 TP8-88 rel. 0.8.08
TP8-96 VIDEO rel. 2.1.07 TP16-256 rel. 7.4 TP16-512 rel. 2.1.07
Compatibilidad
TP8-28TP8-28 GSM ver. 0.8.08 TP8-64 BUS rel. 3.5.00 TP8-88 rel. 0.8.08
TP8-96 VIDEO rel. 2.1.07 TP16-256 rel. 7.4 TP16-512 rel. 2.1.07
Kompatibilität
TP8-28TP8-28 GSM ver. 0.8.08 TP8-64 BUS rel. 3.5.00 TP8-88 rel. 0.8.08
TP8-96 VIDEO rel. 2.1.07 TP16-256 rel. 7.4 TP16-512 rel. 2.1.07