shoretel dial plans - business telephone exchangecustomers.btxchange.com/manuals/shoretel/dial...
TRANSCRIPT
KB12996 ShoreTel Dial Plans This document is targeted for the ShoreTel Advanced Certified Engineer who has worked with dial plans previously and has obtained the knowledge and skill set to perform custom configurations. It should be noted that without fully understanding the concepts and ideas behind ShoreTel dial plans that a person can put the system in a state where it is unable to properly route calls. Any changes to the dial plan should only be carried out by qualified individuals.
The ShoreTel Technical Assistance Center will assist with any break/fix items that deal with dial plans; however any custom dial plan work will be referred to ShoreTel's Implementation Services as billable work.
If you are unsure whether your request is billable please contact the ShoreTel Technical Assistance Center.

Table of Contents
1) Understanding ShoreTel Dial Plans
2) What Dial Plan work is Covered by ShoreTel TAC, and what Dial Plan work will be sent to Implementation Services
3) How to Set Trunk Prioritization for a Single Site
4) Modifying ShoreTel Default Least Cost Routing
5) Outbound Caller ID is seen as Unknown
6) How to Send E.164 called number to the Telco
7) Remove waiting for CallerID on analog loop start
8) Don’t send outgoing CallerID
9) Removing Glare or Inhibiting Outgoing Digits
10) Forcing 911/emergency calls out on a specific trunk
11) Removing 1 from Calling Party number on SIP Trunks
12) PSTN Short Circuit - Changing the routing of a DID Number to an Extension
13) Local Long distance calls being placed even though Account Codes are forced
14) How to send Billing number and DID numbers out on a PRI when a call is being rejected due to ShoreTel sending the calling party number
15) 7 Digit Dialing of Additional Local Area Codes
16) How to disable least cost routing
17) AT&T and routing International calls
18) Block an outbound call to specific number for a trunk group
19) Can 411 calls be redirect to dial a different number?

1) Understanding ShoreTel Dial Plans
The ShoreTel system has a total of 3 dial plans built into it. This can be very confusing if you have never worked with a dial plan before. What is the purpose of each dial plan, and why is it that the number that I dial on my phone is not necessarily what is pulsed out to the carrier?
Call Manager Dial Plan
First, you have a dial plan for your call manager. This takes what is dialed and puts it into an appropriate format. This is what is in effect when in call manager you put in 1-800-SHORETEL, and it converts it automatically to 9 +1 (800) 74673835. The 9 being an access code, and the +1 (800) 356-9977 being canonical format. Canonical format is + followed by country code (In the US this is 1) followed by a subscriber number.
There is a way to bypass Personal Call Manager's dial plan. You can put in "9+18003569977" and include the quotes. This will send the full string without formatting to the next dial plan, which is the site plan. Additionally, dialing direct from your phone bypasses the Personal Call Manager dial plan.
Site Dial Plan
The site plan has two main jobs. First, it marks all calls with the correct permissions, be it local, long distance, or international. Second, it converts all numbers into canonical format. This means that whether you are using PCM or on your phone, if you dial seven digits, the site plan inserts a + 1 (country code) and local area code before sent to the trunk. This means that no matter how you place a number in PCM or your phone, it will get formatted into canonical format before being sent to the trunks.
Trunk Dial Plan
The third dial plan is the trunk dial plan. This takes the canonical format, and converts it to a form the carrier wants to receive it. This is most useful when a site has multiple carriers. A site might have multiple trunks, perhaps a SIP trunk, and a PRI. The SIP line may simply want all calls in a 10 digit format while the PRI provider may want 11 digit dialing for long distance calls and 7 digits for local calls.

2) What Dial Plan work is Covered by ShoreTel TAC, and what Dial Plan work will be sent to Implementation Services
What is billable, and what is covered under the normal TAC support function.
The ShoreTel TAC is a break/fix organization. This means that if it is in fact broken, we will fix it. The ShoreTel implementations team will assist with any billable items for custom dial plan work that are not break/fix work.
How does ShoreTel define broken? If you can pick up your phone, and/or use Call Manager and are unable to complete the call to the other party because of the ShoreTel system this is considered broken.
How does ShoreTel define custom billable work? If calls will complete normally but the customer wants to define or create rule sets to reroute, block, or alter the call flow. If the customer has decided to alter or create any custom dial strings on their own that put the system in a state where calls will not complete.
Example of a non billable item:
If the Telco requires a ;2E dial string to make an outbound call, we will consider this "Broke" and therefore TAC will resolve it because call cannot be completed.
Examples of billable items:
1) If calls from a remote site are completing normally through local trunks at the remote site but the customer wants all calls to route to the HQ and use trunks at the HQ site.
2) If custom modifications have been made to the Dial plan which result in call being unable to complete and customer or partner is calling in for assistance to correct.
3) If the customer has a specific requirement on how to route 911 calls
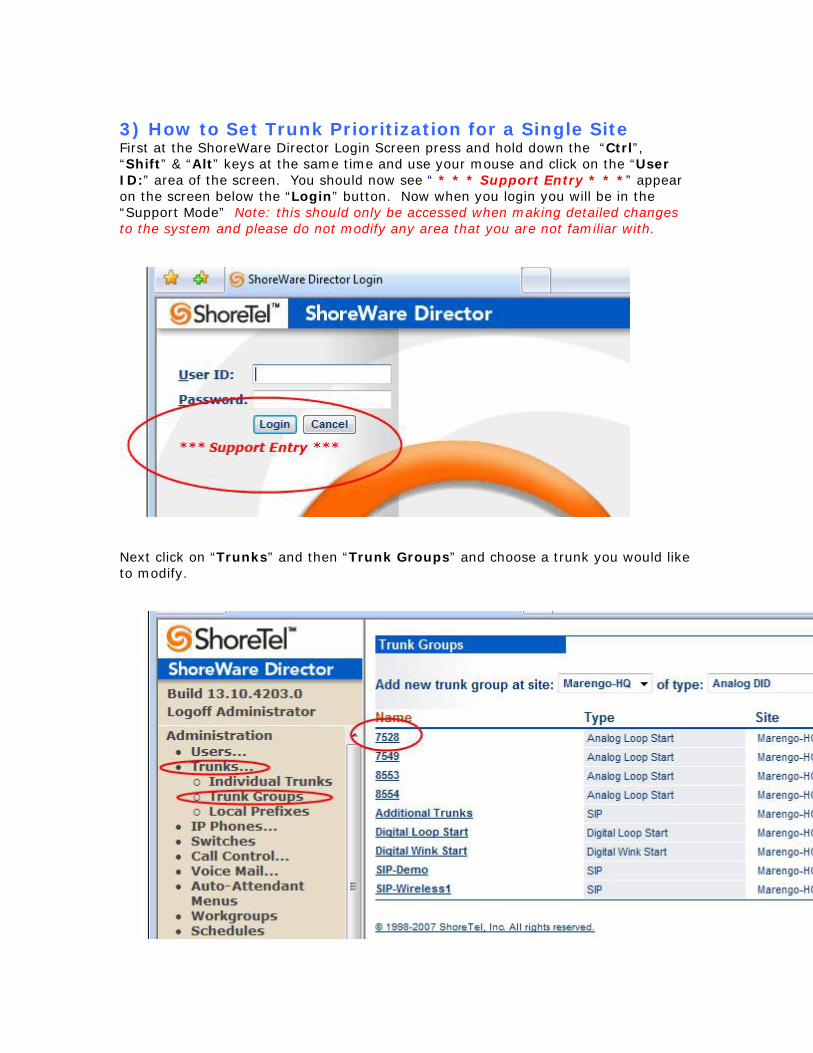
3) How to Set Trunk Prioritization for a Single Site First at the ShoreWare Director Login Screen press and hold down the “Ctrl”, “Shift” & “Alt” keys at the same time and use your mouse and click on the “User ID:” area of the screen. You should now see “ * * * Support Entry * * *” appear on the screen below the “Login” button. Now when you login you will be in the “Support Mode” Note: this should only be accessed when making detailed changes to the system and please do not modify any area that you are not familiar with.
Next click on “Trunks” and then “Trunk Groups” and choose a trunk you would like to modify.

Next scroll down to the bottom of the page and click on the “View” button under “Trunk Group Dialing Rules”. You can look in each trunk group's generated dialing rules. The first entry you'll see is ;xA (where x equals a number). That's the default preference value for the trunk group. Analog trunks will typically show ;1A while T1s will show ;-1A. So all things being equal, a T1 will always be used before an analog trunk. Do not make any changes to this window.
If you want to add your own rule to prioritize a trunk group even more like for example: (you wanted to use an at&t T1 before a Verizon T1 in the same site) first close the “Trunk Groups Dialing Rules” window and click on the “Edit” button under “Trunk Group Dialing Rules”.

A small edit window will appear that will allow you to add your modification. You can add your own trunk group rule by adding your own value like -2 or -10 so its "cheaper" than the other T1. The rule would look like this: ;-10a. After adding your modification click on the “Save” button and logout of director. I would test the trunk to make sure your modification has taken affect.
4) Modifying ShoreTel Default Least Cost Routing
ShoreTel has a very specific Least Cost Routing Plan. This plan is designed to reduce the total cost of ownership by routing calls in such a way as to reduce the actual cost (in terms of dollars) for the end customer. Due to the fact that ShoreTel cannot possibly know every cost of every phone plan, ShoreTel assigns generic costs to different types of trunks, as well as to different types of connections between sites. This document is written to both help you understand call routing costs, and how to modify them. You should familiarize yourself with the attached site costs exhibit at the end of this article. It will be referred to many times, and should make it much easier to understand the concepts.
When a number is dialed, the ShoreTel system first determines the cost type of the call, and if the user has the required permissions to make such a call. What this means is that ShoreTel determines if the call is local, long distance, or international.
For example a call is made at site A. The first thing that will be determined is whether it is a local call at any site. If it is a local call, (let’s say it’s a 408 area code) the call will be made out of the Headquarters site. If the call is long distance call for all the sites, ShoreTel will then use trunk weighting. By default the different trunk types have different costs associated with them. A PRI will have a cost of -1, an analog trunk a cost of +1, a digital trunk, such as a wink start, will have a cost of 0, and a sip trunk will have a cost of -2. If you had all these trunks within one site, and all the trunks had the same local are code(s) a local call would first be attempted on the SIP trunk, then the PRI, then the digital trunk, and then finally the analog trunk. If you want to modify the default trunk used, and you only have one site, weighting trunks is very simple. Just make the trunk you want to use the least expensive. Let’s say all you had was the Headquarters site, and for some reason you wanted to use the analog lines before using any of my other trunks. You would simply log into director using support entry mode, click on the analog trunk group, click on the custom dial plan, and enter ;-3A , and click save. That’s semi-colon, negative three, capital A. The change will be updated in a few minutes, or you can update the trunk and save the changes (the easiest way to do this is to change the name, ie from analog to analog1) and then click save. By making the analog trunk group the least expensive, you would first use the analog line, then the SIP, then the PRI, and finally the digital. Now for a different example. Instead of making the analog trunk the first trunk group, suppose that you wanted to make sure that the SIP trunk is the last one used. In the SIP trunk group you could simply enter in ;2A in the custom dial plan. This would make the SIP trunk have a cost of +2 instead of -2. In this scenario you would first go out the PRI, then the digital, then the analog, and finally use the SIP trunk. Now, this is all fine and good, but many customers have multiple sites, so these small cost changes may not have the desired effect. There are two costs connections between sites. The first and most common is just a standard site. The second scenario is a connection to a Parent as Proxy site. This setting is applied by selecting the “Use Parent as Proxy” checkbox under the site page. If you are not using parent as proxy, the wan link adds +25 between sites. If you are instead using parent as proxy, the wan links only adds +10. This means that in the site cost exhibit at the end of this article, from the perspective of Site A, the Headquarters site trunks have the following costs. The PRI is 24 (-1+25) The analog trunk is 26 (+1+25) The digital trunk is 25 (0+25) The SIP is 23 (-2+25.) From the perspective of Site B Headquarters site trunks have the following costs. The PRI is 9 (-1+10) The analog trunk is 11 (+1+10) The digital trunk is 10 (0+10) The sip is 8 (-2+10.) It is very important to understand all the costs in a multi-site system when trying to

change the trunk costs. The reason is that changing a trunk cost can have effects you did not intend. Let’s say for example you want all the users at Site A to first use the PRI at the Headquarters site. To accomplish this you change the cost of the Headquarters PRI to ;-28A. This changes the cost at Headquarters to -28, and changes the cost perspective from Site A from 24 to -3. As desired all calls made from Site A will go out of Headquarters first, however, there is another problem. All the calls from Site B will now go out of the Headquarters site as well since the perceived cost of the Headquarters PRI has now changed from 9 to -18. If this is not the desired result you will have to do some math to discover how to route the calls correctly without causing incorrect call routing. In this scenario it will mean a need to lower the cost slightly of the Headquarters PRI (to make it have a lower cost than the SIP trunk, and an increase of all the local trunks. You would probably want to make: The Headquarters PRI ;-3A Site A make the PRI ;24A, The analog ;26A, The digital ;25A The Sip ;23A. This will make the calls from site A go out the PRI first, and then maintain the standard order of SIP, PRI, digital, analog, if the Headquarters PRI is full. Additionally you may notice that even though you made these changes, when you dial a 510 area code number from Site A it continues to go out the local trunks. This is due to the fact that ShoreTel first determines if the call is local, long distance, or international, as discussed in section 1 of this document, understanding ShoreTel Dial plans. If the call can be made locally at any site, it will apply cost inhibition and require the call to be made as a local call. There are two ways to get around this. The first and easiest way is to add the local area code as an additional local area code. This means that on the Headquarters PRI trunk group you would add the area code 510 as an additional local area code. ShoreTel would then see that the 510 area code call was local for both Site A and Headquarters, and would then just determine the call routing based on trunk weighting. The second way to implement this is to log in with support entry mode, click on the sites, and add ;5a to the site plan at both Headquarters and Site A. That’s semi-colon five lower-case a. This inhibits least cost promotion which basically means it will ignore the fact that there is a local trunk available and use the trunk costs to route the call. The next scenario we will discuss is local and long distance trunks. If you look at the generated dial plan on a trunk you will see a lot that may look foreign to you. Most of what you will see begins with a < and ends with either a G for good or on occasion a F for fail. We want to look at the strings that begin with < and end with either 540G or 740G. These strings denote long distance (540G) and international (740G) calls. The 540 and the 740 are default costs associated with these particular calls. Let’s say your Headquarters site wants to use analog for all local calls, but we want the

PRI to take precedence on long distance calls. Let’s also in this example pretend that the SIP and digital trunks are not there. For this you would either adjust the analog trunk to ;-2A or increase the PRI with ;2A. Next you would copy the two strings from the generated trunk rules, and lower the cost. So instead of 540G and 740G you now have 535G and 735G. You would then put these in the custom PRI trunk dial plan. As before if you wanted it to be applied immediately we would need to make a change on the trunk and click save. Please see below for an example of the rules and how you might change it. Generated PRI dial plan rules: ;-1A<Y.>X.%40G<+X.>x011X.%740G<+MX.>xm1X.%540G<+MNX.>xm1X.%140G <+M8(00|22|33|44|55|66|77|88)X.>xm1X.%140G<*(67|82)X.>xxxX.%40G Putting in bold the strings You need to change: ;-1A<Y.>X.%40G<+X.>x011X.%740G<+MX.>xm1X.%540G <+MNX.>xm1X.%140G<+M8(00|22|33|44|55|66|77|88)X.>xm1X.%140G<*(67|82)X.>x xxX.%40G New String that you are placing in the PRI custom dial plan: ;2A<+X.>x011X.%735G<+MX.>xm1X.%535G Finally it is important to note that custom routing changes can and usually will effect the way a 911 call is routed. It is vital that you test 911 calls after making any changes to the dial plan. Always test this before completing the changes. If by following the preceding steps you are unable to get the calls to route as desired, you will need to contact implementation services who for a fee will customize and test a dial plan for your specific needs. Site Costs Exhibit

5) Outbound Caller ID is seen as Unknown
There can be a few different reasons why this may occur. The main reason is the Carrier is requiring a specific format from ShoreTel, in this case National E.164 Format. Some Telco’s will reject calls if the calling party number is not in E.164 format. Sometimes they will only reject certain classes of calls, such as national calls are optional, but international calls require it.
To correct this:
o Turn on Support Entry Mode before login into ShoreTel Director
o In the Trunk group (PRI Normally) add the following string in the custom Field at the bottom of the Page ;2E
o Make an outbound call.
o If this does not correct the issue, please call into TAC for further trouble shooting with a PRI trace.

6) How to Send E.164 called number to the Telco
A Telco may require digits be sent to them in E.164 format. This is different then E.164 callerID outlined in the previous item. If the numbers are not sent in E.164 format, the Telco will simply drop the call. The Telco may want it for a specific class as well. There are basically three classes of numbers:
o Local
o National Long Distance
o International
Therefore, we have three custom trunk plans.
<+MNX.>xmnX.%41140G for local E.164
<+MX.>xmX.%21540G for national long distance E.164
<+X.>xX.%11740G for international E.164
If for example the Telco required all three, we would log into support entry mode, click on edit under Trunk Group Dialing Rules, and enter in the following.
<+X.>xX.%11740G<+MX.>xmX.%21540G<+MNX.>xmnX.%41140 G
We would then make a change such as changing the name from pri to pri1 and click save to force the change immediately. If we do not make this additional change, it will take up to 5 minutes for the change to take effect.
7) Remove waiting for callerID on analog loop start
This custom string is most often used in small offices where calls are going to a workgroup or hunt group. Some customers don’t like that it takes two rings for the ShoreTel system to answer and then another 1 or 2 more rings for the call to be answered by a user. With this you will sacrifice callerID, but calls will be able to be answered more quickly.
How to remove waiting for callerID on analog loop starts on ShoreTel side after Telco disables?
1. Enable support entry mode
2. Login as admin to Director
3. Go to analog loop start trunk group
4. Edit custom Trunk Group Dialing Rules
5. Add string ";1L" without quotation marks and save.
8) Don’t send outgoing CallerID
This custom string is used when a customer would like to block outgoing callerID
1. Enable support entry mode
2. Login as admin to Director
3. Go to the trunk group for which you wish to block outgoing callerID
4. Edit custom Trunk Group Dialing Rules
5. Add string ";16F without quotation marks and save.
9) Removing Glare or Inhibiting Outgoing Digits Removing Glare ;XG Most commonly used in a paging extension or ring-down device. On a paging device or a ring down device, there is no dial tone, so we do not want to check for glare. If we check for glare, calls to either device won’t work Inhibit outgoing digits ;1I Most commonly used in a paging extension or ring-down device. On a paging device or a ring down device we do not want to send any digits, but ShoreTel requires that there be digits before it will access the trunk. This will allow us to go off hook on that trunk, but not send any digits. Example: What would the string ;1G;1I do when adding into the paging trunk group? The first three characters ;1G tells the system to wait 1 second after going off hook and presume a connection even if dials tone is not heard. The second three characters ;1I tells the system not to out pulse the off system extension (e.g. 199) after the trunk is seized.

10) Forcing 911/emergency calls out on a specific trunk
On older releases of ShoreTel (7.0 and prior) forcing 911 (or other emergency call) out a specific trunk was done the following way.
1. Log into ShoreTel Director using support entry mode
2. Click on trunks
3. Click on the trunk group you want to force the 911 call out on
4. Click on Edit under Trunk Group Dialing Rules
5. Enter in the following without the quotes "<911>X.%4G"
6. Restart TMS or wait 5 minutes for the trunk groups to update
In ShoreTel 7.5 and on we introduced Multiple Emergency Numbers. This means that you are now able to define a long distance number as an emergency number, and have multiple emergency numbers. These additional features also meant that using <911>X.%4G may not work correctly. In ShoreTel 7.5 and newer you want to follow the following steps.
1. Log into ShoreTel Director using support entry mode
2. Click on trunks
3. Click on the trunk group you want to force the emergency call out on
4. Click on Edit under Trunk Group Dialing Rules
5. Enter the following without the quotes ";25M"
6. Restart TMS or wait 5 minutes for the trunk groups to update
****************************************
As always, after performing an upgrade, you always want to make a test 911/emergency call to verify that it is calling out, that it uses the correct trunk, that it is sending the correct calling party number, and that your emergency service has the correct address on file.
****************************************
11) Removing 1 from Calling Party number on SIP Trunks
Some ITSP providers require that the calling party number (outbound callerID number) be sent without a 1. When they receive a 1 their soft switch has trouble parsing the number, and can result in an incorrect outbound callerID. To correct this and set ShoreTel to not send the 1, take the following steps.
1. Log in to Director using support entry mode (See KB12659 for Instructions)
2. Click on Trunks
3. Click on Trunk Groups
4. Click on the SIP trunk group you wish to modify
5. Click Edit under Trunk Group Dialing Rules:
6. A text box will open. Enter in ";10E" without the quotes
7. Click Save
8. Make a change on the trunk group, such as changing the name from SIP Trunk to SIP Trunk1
9. Click Save on the top of the Trunk Group Page
ShoreTel will now no longer send the 1 in the Calling Party number field.
12) PSTN Short Circuit - Changing the routing of a DID Number to an Extension
Applicable to only ShoreTel 7.0 Build 12.4.900.0 and above
Some customers want to allow their users to dial other users with their DID number. To allow this option as well as reduce toll charge and trunk circuits, this call should automatically be turned into an extension to extension call.
When a user dials an external number that matches a DID number on the system, this feature will place the call across the IP network rather than placed out the PSTN and back.
PSTN Short Circuit will allow one trunk access code to be specified via a custom site plan with the string ";9d", where 9 is an example trunk access code and can be replaced with the trunk access code desired to be subject to PSTN Short Circuit. As a custom code, this needs to be entered at every site, using Support Mode Director.
If you have other numbers you want to "short circuit", you can create fake DID ranges and associated fake users (or menus, route points, etc.) to handle non-DID numbers. For instance, if you have an 800 number for human resources, you can create a fake DID number and user to save on toll charges.
13) Local Long distance calls placed even though Account Codes are forced
SUMMARY:
Local Long distance calls are placed even though Account Code Collection is "forced" for Long distance calls
SCENARIO:
A customer uses ShoreTel's Account Code Collection service for restricting Long Distance (LD) calls. When a local area-code LD call is placed from a ShoreTel user they're not prompted for an account code. Also described as: when trying to limit users to 'local calls only', but they are able to make Long Distance calls within their local area code. There are two ways to accomplish this. The simplest way only requires editing user groups, and we will discuss that way first. They second way requires a custom site plan.
DETAILS & DESCRIPTION of editing via user permissions:
To allow for the ShoreTel system to enforce Account Code Collection (ACC) restrictions when dialing local area-code Long Distance (LD) numbers by editing user group permissions, first go to the User Groups Page. Next select the Call Permissions Class of service. At this point, you have two options, and what option you choose is generally identified by the number of prefixes you are working with. If there are only a few long distance prefixes within the local area code, you would select the scope to be Local Only, and then you would put in restrictions on the long distance prefixes. If you had only a few local prefixes you would select a scope of Internal Only and add the local prefixes to the permissions line. Please keep in mind that the restrictions and permissions fields currently have a limit of 255 characters. If the number of prefixes is to great to fit within this character restriction, you will need to create a custom dial plan.
DETAILS & DESCRIPTION of editing via a custom dial plan:
To allow for the ShoreTel system to enforce Account Code Collection (ACC) restrictions when dialing local area-code Long Distance (LD) numbers, a custom dial string has to be added to the 'Site' edit page. This custom string is necessary to identify and separate the local numbers from the long distance numbers within the same area code. This is necessary for the ShoreTel account code collection service to determine that numbers not in the prefix list will be considered LD in the site dial plan. This separation is not performed by default by the ShoreTel system.
After entering the custom dial string the ACC process will now prompt for an Account code when dialing a local area-code LD number.
This string needs to be added in the custom tab on the "Site" edit page. The contents of the custom string can be obtained, in part, by copying from the "Trunk-group" edit page upon which the Prefix list has been applied.

Note - if a new prefix is add to the prefix list at a later time, the same prefix will need to be manually added to the custom string, though at that point it may be simpler to just add the one prefix to the user permission call permissions class of service.
STEPS TO IMPLEMENT:
STEP 1: Gather Prefix info from Trunk Group Page:
o Log into ShoreWare Director using the support entry mode (Please note: You should be very familiar with Support Entry mode prior to implementing these steps)
o Verify that all the proper local prefixes are entered correctly within the Prefix List
o Verify that the prefix list has been applied to the proper Trunk Group
o Within the Trunk Group edit page click "View" on "Generated" Trunk Group Dialing Rules
o Copy everything into a text editor such as NOTEPAD.EXE NOTE: A custom dial string always begins with a '<' and ends with either a 'G' or an 'F'. There are commonly MANY such dial string entry "pairs" ("<...G") in each Trunk Group and/or Site
o Within NOTEPAD, find the one, single part of the string that includes all the prefixes. It will begin with a "<" and end with a "xmnX.%140G"
o Remove all other text with the exception of this string
o Delete the "xmn" (or the "xm") and delete the "40".
o The string that previously ended with something like "xmnX.%140G" should now end with only "X.%1G"
STEP 2: Gather Dial String info from the Site Page:
o Navigate to the "Site" edit page
o Click "View" on "Generated" Site Dialing Rules
o As before, copy the complete text from this area into NOTEPAD placing this new text BELOW the previously edited text
o Remove ALL the content from this new text EXCEPT for any dial string "pairs" that end in %1G
o Also remove all string pair(s) that include 8(00|22|33|44|55|66|77|88)
o Also remove all string pair(s) that include <911>
o Change any remaining instances of "1G" to "5G"
STEP 3: Merge the Trunk and Site info:

o Combine the Trunk Group string and Site string together; Trunk Group string first followed immediately by the Site string
o Be sure to removing any spaces between the strings
STEP 4: Apply the new custom dial plan to the Site edit page:
o Within the Site edit page click "Edit" under "Custom" Site Dialing Rules
o Copy the new, combined text into the "Custom" Site Dialing Rules
o Click "Save"
o Restart the ShoreWare Telephony Management Service from with the Maintenance pages of ShoreWare Director
SAMPLES & EXAMPLES:
This is a sample of a complete string copied directly from a Trunk Group configured with a prefix list for all local numbers in the (253) area code using a 589 prefix. There are several 360-area code/prefixes and a whole lot of 253-area code prefixes:
;-1AX.%40G<+X.>x011X.%740G<+MX.>xm1X.%540G<+M(360(400|446|458|[69]55|8[37]2|8[78]9|89[347]|960))X.>xmX.%140G<+MN(20[0237-9]|21[0259]|22[1-9]|23[0-358]|24[128]|25[0-24-6]|26[2578]|27[1-4689]|28[0246]|29[12578]|30[1-79]|31[02-48]|32[02-47]|3[39]0|34[145]|35[359]|36[59]|37[015-7]|38[0-379]|39[69]|40[3-5]|4[14][4-6]|42[236-8]|43[159]|441|[457]59|46[01568]|47[1-7]|484|49[58]|50[2379]|51[247]|53[014-9]|54[0189]|55[02]|56[4-68]|57[1-369]|58[1-489]|59[0-7]|60[46]|61[79]|62[07]|64[059]|65[015]|66[0369]|67[17-9]|68[02367]|69[1-37]|719|72[02]|7[39]2|75[1-6]|[7-9]61|77[07-9]|780|79[89]|820|8[34][01]|84[35-8]|85[1378]|[89]64|87[589]|88[1-4]|896|90[3-6]|9[15]2|92[124-8]|9[35]4|94[2-48]|96[6-8]|97[03]|98[2-58])X.>xmX.%140G<(14|[2-8])11>X.%40G<+M8(00|22|33|44|55|66|77|88)X.>xm1X.%140G<+M[2-79](00|22|33|44|55|66|77|88)X.>xm1X.%540G<101X.>X.%40G<0Y.>X.%40G<*(67|82)X.>xxxX.%40G;40M
This is the part containing just the prefix info that needs to be extracted:
<+M(360(400|446|458|[69]55|8[37]2|8[78]9|89[347]|960))X.>xmX.%140G<+MN(20[0237-9]|21[0259]|22[1-9]|23[0-358]|24[128]|25[0-24-6]|26[2578]|27[1-4689]|28[0246]|29[12578]|30[1-79]|31[02-48]|32[02-47]|3[39]0|34[145]|35[359]|36[59]|37[015-7]|38[0-379]|39[69]|40[3-5]|4[14][4-6]|42[236-8]|43[159]|441|[457]59|46[01568]|47[1-7]|484|49[58]|50[2379]|51[247]|53[014-9]|54[0189]|55[02]|56[4-68]|57[1-369]|58[1-489]|59[0-7]|60[46]|61[79]|62[07]|64[059]|65[015]|66[0369]|67[17-9]|68[02367]|69[1-37]|719|72[02]|7[39]2|75[1-6]|[7-9]61|77[07-9]|780|79[89]|820|8[34][01]|84[35-8]|85[1378]|[89]64|87[589]|88[1-

4]|896|90[3-6]|9[15]2|92[124-8]|9[35]4|94[2-48]|96[6-8]|97[03]|98[2-58])X.>xmX.%140G
This is the complete text copied from the Site page:
<011X.>xxx+X.%7G<01X.>X.%7G<1XXXXXXXXXX>x+MX.%5G<[2-9]XXXXXXXXX>+MX.%5G<1NXXXXXXX>x+MX.%1G+MX.%1G<[2-9]XXXXXX>+MNX.%1G<18(00|22|33|44|55|66|77|88)XXXXXXX>x+MX.%1G<(1411|[2-7]11|811YXXX)>X.%1G<911>X.%1G<1900XXXXXXX>x+MX.%9G<0Y.>X.%9G<101X.>X.%9G<*X.>X.%9G<(010|10[02-9]|11)>F<+X.>X.%7G<+MX.>X.%5G<+MNX.>X.%1G<+M8(00|22|33|44|55|66|77|88)X.>X.%1G<+M900X.>X.%9Gxm(XXX)XXX-XXXX%999G<911>X.%0G
This is the text we needed to retain from the site page info:
<1NXXXXXXX>x+MX.%1G+MX.%1G<[2-9]XXXXXX>+MNX.%1G<(1411|[2-7]11|811YXXX)>X.%1G<+MNX.>X.%1G
This is the text after all the 1Gs were converted to 5Gs:
<1NXXXXXXX>x+MX.%5G+MX.%5G<[2-9]XXXXXX>+MNX.%5G<(1411|[2-7]11|811YXXX)>X.%5G<+MNX.>X.%5G
This is the final, completed custom dial string after merging the strings from above. This finished string was created for a site located in the (253) area code using a 589 prefix:
<+M(360(400|446|458|[69]55|8[37]2|8[78]9|89[347]|960))X.>xmX.%140G<+MN(20[0237-9]|21[0259]|22[1-9]|23[0-358]|24[128]|25[0-24-6]|26[2578]|27[1-4689]|28[0246]|29[12578]|30[1-79]|31[02-48]|32[02-47]|3[39]0|34[145]|35[359]|36[59]|37[015-7]|38[0-379]|39[69]|40[3-5]|4[14][4-6]|42[236-8]|43[159]|441|[457]59|46[01568]|47[1-7]|484|49[58]|50[2379]|51[247]|53[014-9]|54[0189]|55[02]|56[4-68]|57[1-369]|58[1-489]|59[0-7]|60[46]|61[79]|62[07]|64[059]|65[015]|66[0369]|67[17-9]|68[02367]|69[1-37]|719|72[02]|7[39]2|75[1-6]|[7-9]61|77[07-9]|780|79[89]|820|8[34][01]|84[35-8]|85[1378]|[89]64|87[589]|88[1-4]|896|90[3-6]|9[15]2|92[124-8]|9[35]4|94[2-48]|96[6-8]|97[03]|98[2-58])X.>X.%1G<1NXXXXXXX>x+MX.%5G+MX.%5G<[2-9]XXXXXX>+MNX.%5G<(1411|[2-7]11|811YXXX)>X.%5G<+MNX.>X.%5G
14) Sending BTN and DID's on Find Me and External Assignment Calls
Many Telco’s are dropping calls when the calling party number is not owned by the customer. This comes up often with Find me and External Assignment features
How to send Billing number and DID numbers out on a PRI when a call is being rejected due to ShoreTel sending the calling party number when placing the call out the PRI trunk group.
1. Determine your BTN number
2. Determine your DID range(s)
3. Log into Shoreware Director in support entry mode
4. Select Trunks, and then your trunk group
5. Under Custom Dialing Rules place your custom BTN string (to be discussed further)
6. Add your custom DID string(s)
7. Click Save
8. Restart the Shoreware Telephony Management Service
We will now run through an example with the BTN being (408) 555-1234 with DID ranges of (408) 555-1200 through (408) 555-1299 and an additional DID of (408) 555-5555.
In support entry we will add the following:
;16E<E'+MX.>4085551234x.%999G<E'+140855512XX>xmX.%999G<E'+14085555555>4085555555x.%999G
In this string:
;16E enables the Calling Party Replacement.
<E'+MX.>4085551234x.%999G will cause ShoreTel to send 4085551234 if no other match can be found.
<E'+140855512XX>xmX.%999G Matches the DID range so that users with DID will send their DID when they call out
<E'+14085555555>4085555555x.%999G Will send out 4085555555 when that specific user call out.
It is also important to note that this assumes the telco wants the Calling Party number in a 10 digit format. Some telco's may want 11 digits (sending the 1) and if this is the case, the string would be the following:
;16E<E'+MX.>14085551234x.%999G<E'+140855512XX>xX.%999G<E'+14085555555>14085555555x.%999G
This can be determined either by running a PRI trace, or by simple trial and error.
Finally, it must be stated that you should not create the strings in Microsoft Word, or any advanced word processor, but only in plain text files. The reason being that in their format they can add hidden symbols that will be placed into the custom dialing rules when you do a copy and paste, but will not be visable.
15) 7 Digit Dialing of Additional Local Area Codes
ShoreTel allows 7 digit dialing, but by default it only allows this for your local area code. The reason for this is that part of the job of the site dial plan is to put all numbers into canonical format as discussed in section 1 of this document, Understanding ShoreTel dial plans. Canonical format is + followed by country code (In the US this is 1) followed by a subscriber number. This means that if my local area code is 555 and I dial 123-4567 the site plan will add a + and area code and it will send +15551234567 to the trunks. This is not a problem if all my 7 digit dialing is within my local area code. If however I have a second area code, 999 for example, I need to do some custom work to allow it to dial the additional local area codes.
First we will need a list of the prefixes in the second area code. In my example we will have prefixes of 888, 777, and 666. So then the numbers we want to be able to 7 digit dial are (999) 777-XXXX, (999) 888-XXXX, (999) 666-XXXX.
I would then log in with the support entry login.
On my Trunk Group page I would verify that the additional local area code or codes are entered into the Trunk group plan. I would check this by clicking the edit button next to "Additional local area codes" and adding any necessary area codes.
On my sites page, I would first verify that my secondary local area code or codes are entered into the site plan. I would check this by clicking the edit button next to "Additional local area codes" and adding any necessary area codes.
Next, at the bottom of the page we will click the edit the custom dialing rules button, and add the following:
<(666|777|888)XXXX>+M999X.G
the (666|777|888) Mark the prefixes I want to match. The XXXX matches the rest of the digits. The +M999X. inserts the country and correct area code (in this case area code 999), and the G marks it as a good match
After restarting TMS you should now be able to 7 digit dial your additional local area code. All numbers not found in your prefix string will be assumed to be within your main local area code as listed in the "Local Area Code" field on the site page.
16) How to disable least cost routing
How to disable least cost routing
Some customers prevent least cost routing by associating user groups to trunk groups. This is an easy solution, but in the event all trunks are down / unavailable at the site, this will not allow use of trunks at another site. By changing the trunk group dial plan, you can modify this behavior so calls will always use the local trunk groups unless all trunks at the site are unavailable.
To disable least cost routing:
1. Configure the system normally including sites, trunk groups, trunks, etc.
2. Login to ShoreWare Director using the Support Mode to get to the special dial plan strings. To do this, go to the ShoreWare Director Login page, hold down the "shift" and "control" buttons and click on "User ID". The special "support entry" indication will display and then just login as normal. This will expose some extra controls on the trunk group edit page.
3. For all trunk groups at every site, visit the trunk group edit page and scroll to the bottom:
a. "View" the generated plan. Copy the plan into a text editor.
b. Modify any "hundreds" digits in each number after a % to be one (1) hundred other than any numbers with "999" as that is a special rule. This effectively makes all calls "local" from a cost point of view.
c. Paste the resulting string into the "Edit" plan override.
You will find the trunk group dial string will vary by country and sometimes even by site (i.e. Germany is different than Australia). Make sure to implement this across ALL trunk groups at EVERY site otherwise calls from unmodified sites will begin using the trunks at modified sites. If you make any changes to trunk group (area codes, 10 digit dialing, etc.), make sure to update the custom dial plan string.
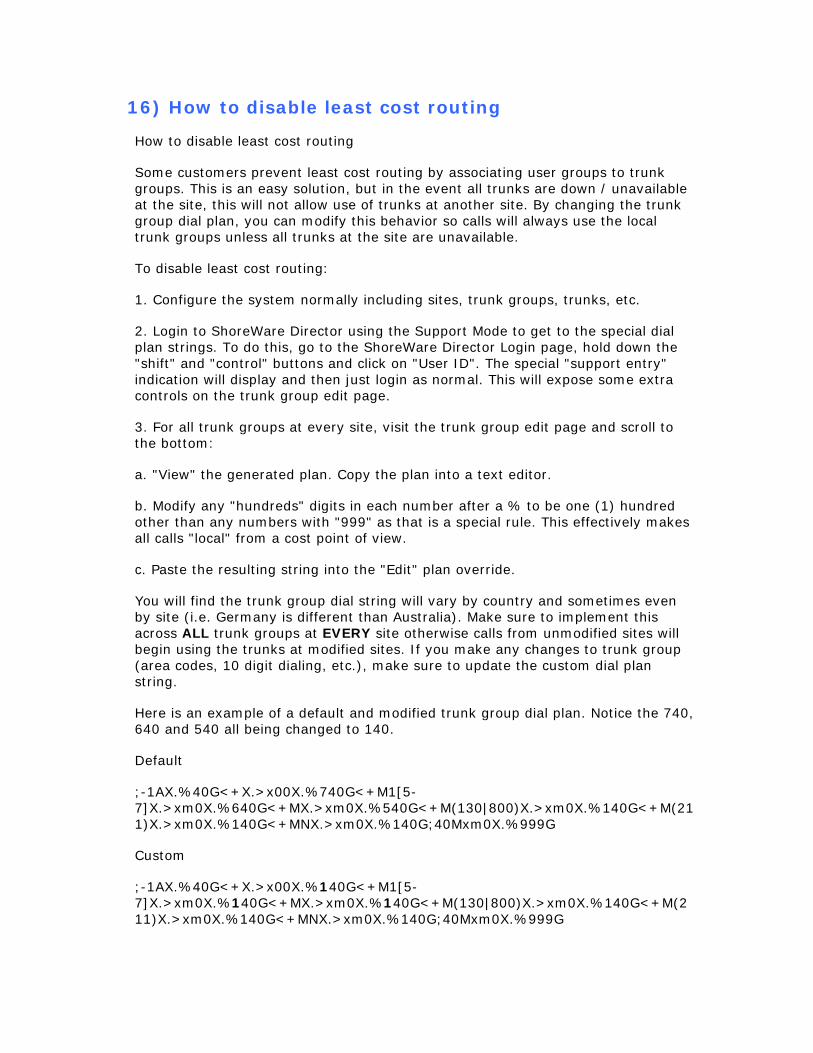
Here is an example of a default and modified trunk group dial plan. Notice the 740, 640 and 540 all being changed to 140.
Default
;-1AX.%40G<+X.>x00X.%740G<+M1[5-7]X.>xm0X.%640G<+MX.>xm0X.%540G<+M(130|800)X.>xm0X.%140G<+M(211)X.>xm0X.%140G<+MNX.>xm0X.%140G;40Mxm0X.%999G
Custom
;-1AX.%40G<+X.>x00X.%140G<+M1[5-7]X.>xm0X.%140G<+MX.>xm0X.%140G<+M(130|800)X.>xm0X.%140G<+M(211)X.>xm0X.%140G<+MNX.>xm0X.%140G;40Mxm0X.%999G

17) AT&T and routing International calls
AT&T require the called party number (CPN) to be tagged as "International" to route International
Add the following to the Trunk Group's Custom Dial Plan table; (Support Entry required to SWD)
<+X.>xX.%11740G this will send out the Called Party Number as "international/E.164"
18) Block an outbound call to specific number for a trunk group
After logging in via support entry mode, under custom trunk dial plan add:
<+15555555555>X.%4F
Where 1 (555) 555-5555 is the number you wish to block.
19) Can 411 calls be redirect to dial a different number?
A customer may want to send anyone who dials 411 to a different number such as a no fee based 411 so they do not have to pay the typical 1 to 2 dollar charge for each call.
FYI - trunk digit manipulation table will not work for this scenario.
Here are the steps using 1-800-GOOG-411 (18004664411) as the translation for outbound 411 calls:
1.Log in to Director using the "Support Entry" mode.
2. Add a site plan override string: <411>xxx+18004664411G to the current site under Custom / Edit.

