sgi confidential 3 - 1 platform service manager. sgi confidential 3 - 2 psm front chassis view two...
TRANSCRIPT

SGI Confidential 3 - 1
Platform ServiceManager

SGI Confidential 3 - 2
PSM Front Chassis View
Two 2.0 USB Ports, one of whichconnects to the front chassis by theKVM
PowerButton
ResetButton
PSM Status LEDs (Left to Right)- Temperature Warning (Red)- Ethernet Port em0 Link (Green)- Ethernet Port em1 Link (Green)- HDD Activity (Amber)- PSM Power (Green)
The Platform Service Manager (PSM) is a 1U SuperMicro SuperServer Model 5115B-MR The PSM Web Manager provides administration and monitoring tools for the major cabinetassemblies such as the shelves, application processors, and power bay. The PSM runs FreeBSD OS and the COPAN PSM software suite.
Note: There is no CDROM on the production PSM

SGI Confidential 3 - 3
PSM Rear Chassis View
AC Power Cord
Chassis Cooling Fan
PS2 Keyboard Port
PS2 Mouse Port
Two 2.0 USB Ports
RS232 Port
VGAPort
em0Port
em1Port
PCI-X Port(not used)
Ethernet Port LEDS- Left is Link Rate- Right is Link Activity
• em0 connects to the public network• em1 connects to the private network

SGI Confidential 3 - 4
PSM LogsTo collect information on your system, view the following logs: Xorg, dmesg, debug,last, local, maillog, messages, psm, slip, snmd, xdm, and xfer.

SGI Confidential 3 - 5
Shelf Local Log
Note: Good search terms are POST, failed, Failed, failure, Failure, error, Error, and online
Each Shelf writes a log on the PSM. This is the localxxx.log were xxx is the lastthree digits of the shelf's IP address.

SGI Confidential 3 - 6
PSMWEBService GUI

SGI Confidential 3 - 7
Logging On pre 2.2.3 Build 36 (1 of 3)The Platform Service Manager is an administrative tool for service personnel that allows the subsystem operation to be monitored, events to be viewed, and Field Replaceable Units (FRU's) to be identified for replacement. It is a web-based application accessible from a web-browser. Logging In from the KVM in the Cabinet1. Open the front cabinet.2. Pull out and open the KVM.3. Double-click the icon to open.4. When prompted, enter your username and password: • User Name (default root) • Password (default CPN200t) Logging In from a Web-browser1. Open a web-browser.2. Enter the following in the address bar of the browser: • http://<IP_address>:8180/psmweb/copanSystem/copanSystemView/ where <IP_address> is the IP address of the SGI PSM server
Note: The Service GUI is located at /usr/local/copan/bin/psmweb on the PSM

SGI Confidential 3 - 8
Logging On 2.2.3 Build 36 and later (2 of 3)Logging In from the KVM in the Cabinet1. Open the front cabinet.2. Pull out and open the KVM.3. Double-click the icon to open.4. When prompted, enter your username and password: • User Name (default admin) • Password (default CPN200tx) Logging In from a Web-browser1. Open a web-browser.2. Enter the following in the address bar of the browser: • http://<IP_address>:8180/psmweb/copanSystem/copanSystemView/ where <IP_address> is the IP address of the SGI PSM server
Note: The Service GUI is located at /usr/local/copan/bin/psmweb on the PSM

SGI Confidential 3 - 9
Logging On remote Session (3 of 3)From a remote workstation prior to 2.2.3 Build 361. ssh to the psm2. When prompted, enter your username and password: • User Name (default root) • Password (default CPN200t)
From a remote workstation 2.2.3 Build 36 and later:1. ssh to the psm2. When prompted, enter your username and password: • User Name (default psm) • Password (default psm) 3. To obtain root access • Switch user (su -) • Password (default CPN200t)
From a remote workstation 2.2.3 Build 36 and later:1. ssh to the Application processor2. When prompted, enter your username and password: • User Name (default root) • Password (default sgisgi)

SGI Confidential3 -
10
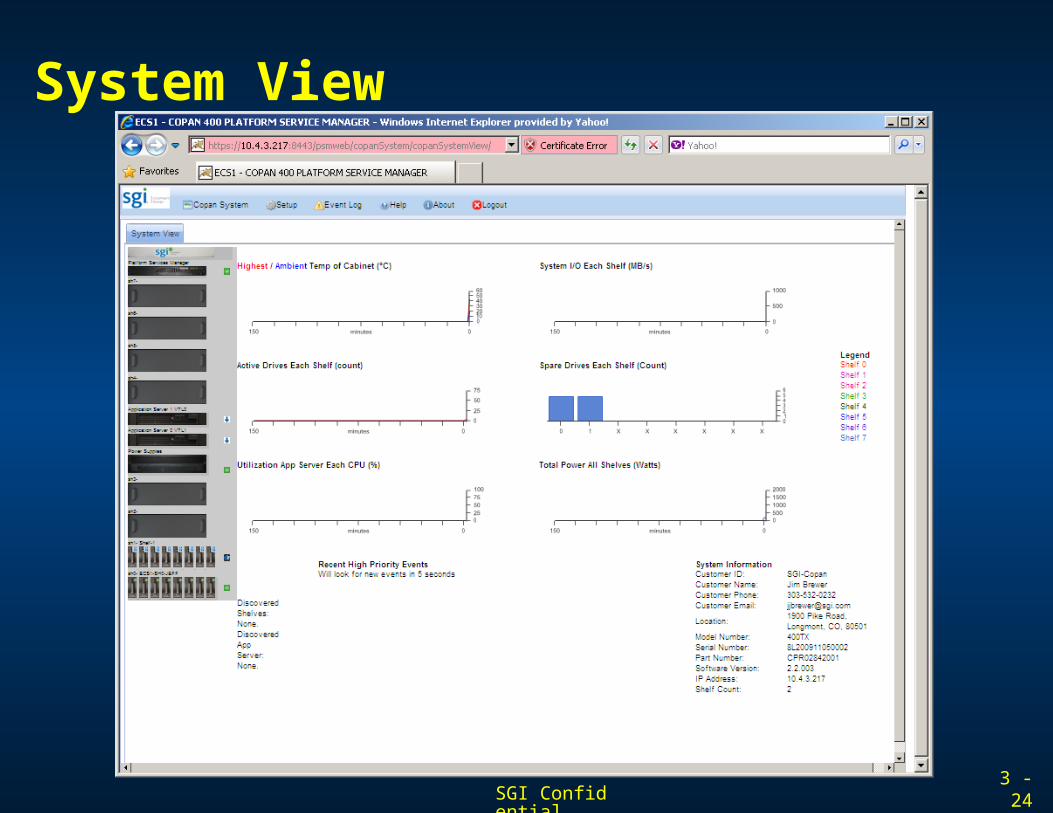
System View Many component icons can be clicked for further actions and you can hover the cursor over and icon for status information.

SGI Confidential3 -
11
Setup Step 1: Enter System Information
Enter general information about the cabinet. This information will be displayed on the Dashboard: System Info page and will be emailed in the HealthChecks.

SGI Confidential3 -
12
Setup Step 2: Configure Network Settings
Enter general information and network settings for the PSM.

SGI Confidential3 -
13
Setup Step 3: Configure Email Alerts The system can be configured to send Emails to the customer support center or support person which will allow for prompt service when a problem is detected.

SGI Confidential3 -
14
Setup Step 4: Configure Email SettingsThe software can be configured to send e-mail alerts to a contact at the customer’s site and/or to SGI support.

SGI Confidential3 -
15
Setup Step 5: Configure FTP Settings (1 of 2)
You can specify an FTP server to be used to upload diagnostic files, such as Trace files, when SGI support requests them.

SGI Confidential3 -
16
Setup Step 5: Configure FTP Settings (2 of 2)
The ftp server has an internal 172.16.1.183 and external 204.132.96.33 IP address.
A unique directory is created for all Copan customers which is passed along to the customer so they can upload and download files as necessary without seeing othercustomer directories and files. A unique login and password will be provided to thecustomer.
A unique SGI directory for SSEs is to use to get software and code updates as needed. Login credentials for the SGI folder is user name sgi with password sgi4copan
If needed, a freeware ftp client, FileZilla (http://sourceforge.net/projects/filezilla/) can be downloaded to a laptop to allow an easy exchange to and from the ftp server.If you use FileZilla, set the timeout retry value to 120 seconds. You can find this option under edit then setting in FileZilla. Leave the port settings blank and use the quick connect button.

SGI Confidential3 -
17
Executing a TraceExecuting a trace will record the system configuration of the COPAN 400 Series. This file can be used by technical support to diagnose and troubleshoot hardware errors.
A trace should be executed:• After initial installation• Before servicing the system• After servicing the system• When powering the system off and on

SGI Confidential3 -
18
Setup Step 6: Configure SNMP Settings
You have the option to send SNMP logs and traps a SNMP trap host.

SGI Confidential3 -
19
Setup Step 7: Set HealthCheck ScheduleA HealthCheck is a set of files that are automatically generated by the software and can be used to evaluate the “health” of the SGI COPAN cabinet. These files can be emailed to a SGI Service Engineer and/or a customer contact on a set schedule.

SGI Confidential3 -
20
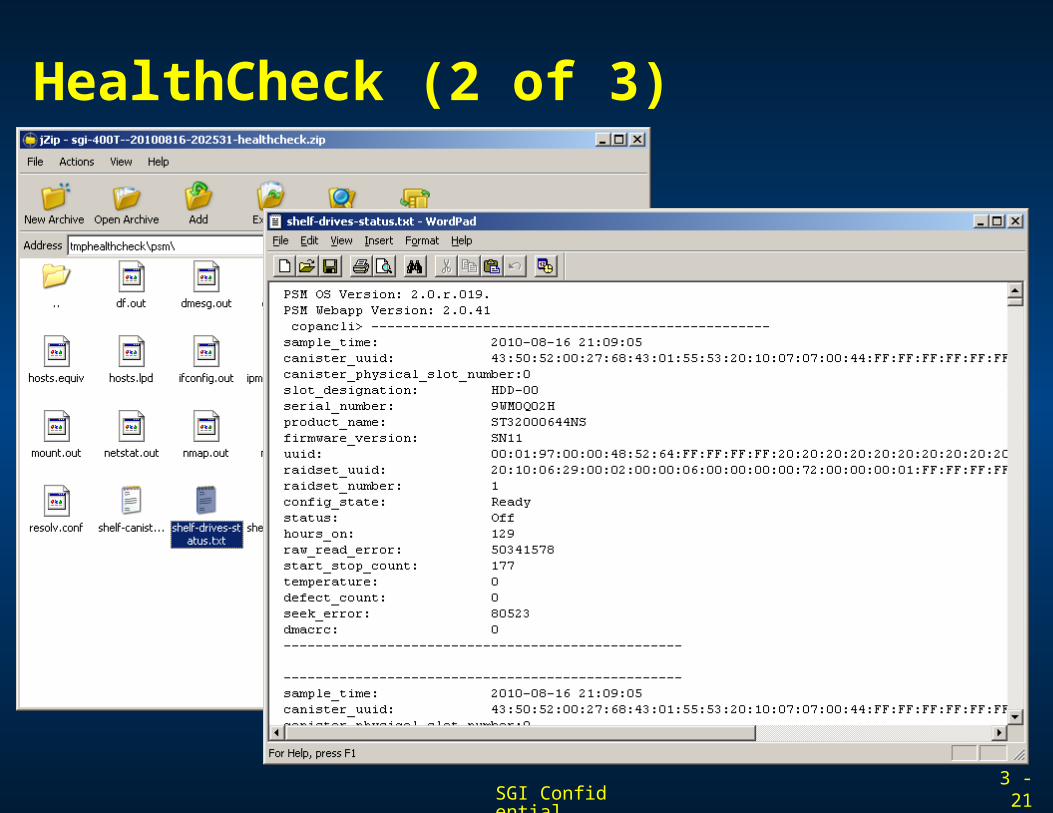
HealthCheck (1 of 3)The HealthCheck is a zip file contains various status and diagnostic files, including text files, output files, configuration files and AOR files. A HealthCheck includes drive status files, canister status files, shelf status files, and other files that provide the “health” of cabinet subcomponents.
SGI Confidential3 -
21
HealthCheck (2 of 3)

SGI Confidential3 -
22
HealthCheck (3 of 3)

SGI Confidential3 -
23
Setup Step 8: Change PasswordThis tab allows the administrator to change the default password.
SGI Confidential3 -
24
System View

SGI Confidential3 -
25
Shelf View
SGI Confidential3 -
26
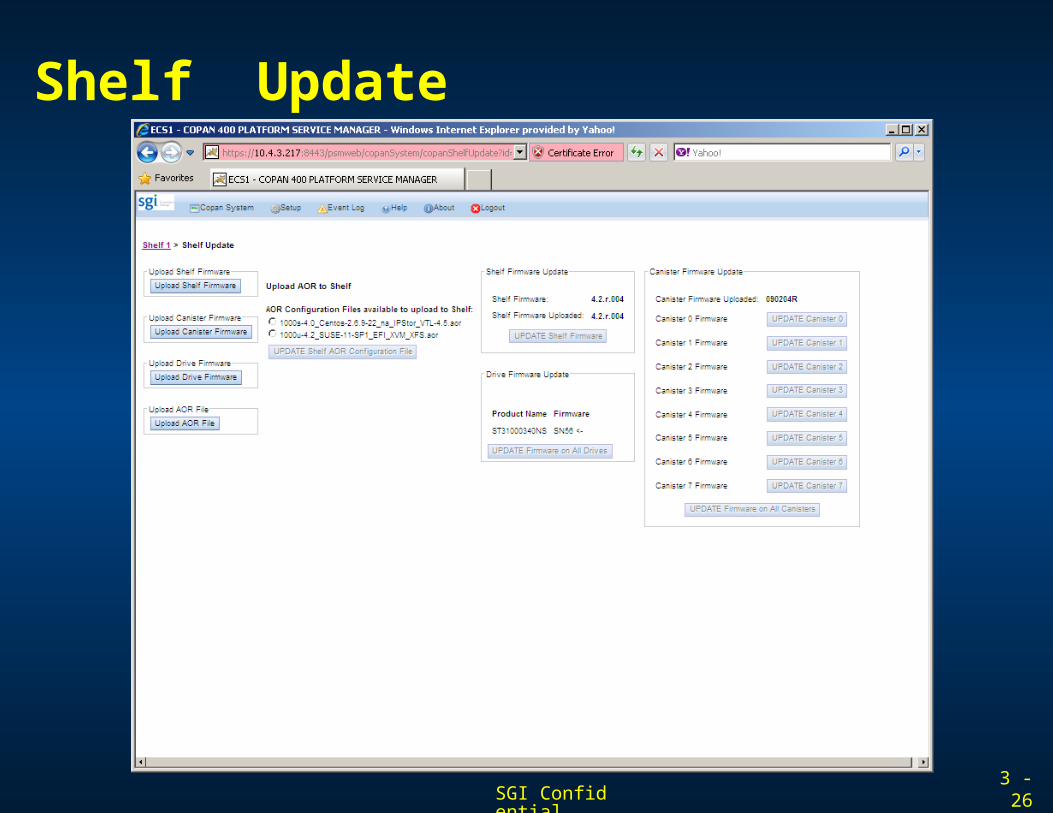
Shelf Update

SGI Confidential3 -
27
Shelf FRU Information

SGI Confidential3 -
28
Shelf Information

SGI Confidential3 -
29
RAIDsets and Drive View

SGI Confidential3 -
30
Canister View

SGI Confidential3 -
31
PSM View (1 of 2)

SGI Confidential3 -
32
PSM View (2 of 2)

SGI Confidential3 -
33
Power Supply View

SGI Confidential3 -
34
Application Server View

SGI Confidential3 -
35
Event Log (1 of 3)

SGI Confidential3 -
36
Service Log (2 of 3)

SGI Confidential3 -
37
Action Log (3 of 3)

SGI Confidential3 -
38
Help

SGI Confidential3 -
39
About

SGI Confidential3 -
40
Logout

SGI Confidential3 -
41
psmcli (1 of 2)
The command line interface is located at /usr/local/copan/bin/psmcli

SGI Confidential3 -
42
psmcli (2 of 2)

SGI Confidential3 -
43
Module Review QuestionsThis completes the PSM and PSMWEB module. Answer the review questions before proceeding.
01. What is the purpose of the PSM and is it system critical?02. How is the PSM OS and/or PSM software suite updated?03. What is the default root login password?04. What is the directory and executable to run the PSM GUI?05. What is the browser entry made to connect a remote client to the PSM GUI?06. What are the commands to start and stop the PSM GUI agent?07. When should a trace be made? What about a healthcheck?08. The PSM GUI allows you to upgrade which parts of the Copan system?09. Where are trace and healthcheck files saved?10. Will a new trace or healthcheck over-write a previously saved trace or healthcheck?11. List the directory and name a few useful logs you can collect system status on.12. When connecting to the browser interface, are you prompted for a password?

SGI Confidential3 -
44
Lab ProjectUsing applicable service documentation, you will be given 120 minutes (optionally 180 minutes) to:
• Perform FRU replacement procedures• Login and connect to the PSM• Determine IPs of the components on the private PSM network• View PSM logs that were discussed in this lecture• Access the PSM GUI and perform a set-up of a new system• Explore all the various pages that comprise the PSM GUI• Perform a trace and a healthcheck then view the output files• View the PSM GUI action and service logs• Explore the PSM CLI by running various commands• Flash components such as AOR, shelf and disk code.• Perform the power on and power off procedures• (optionally) upgrade the PSM software• (optionally) Perform the config112 to convert between MAID and VTL and set the power budget accordingly.

SGI Confidential3 -
4545