servo manual ds2 - electricas bogota · a the following defines the symbols used in this manual to...
TRANSCRIPT

DS2 series servo drive User manual
Xinje Electronic Co., Ltd. Serial No. SC02 20101119 1.0

All copyrights reserved by Xinje Electronic Co., Ltd. Any copying, transferring or any other usage is pro hibited. Otherwise Xinje will have the right to pursue legal responsibilities. All rights including patent and pemission of modules and designs are reserved.
January, 2010

a
The following defines the symbols used in this manual to indicate varying degrees of safety precautions and to identify the corresponding level of hazard inherent to each. Failure to follow precautions provided in this manual can result in serious, possibly even fatal, injury, and/or damage to the persons, products, or related equipment and systems.
CAUTION Indicates a potentially hazardous situation, which, if not heeded, could result in death or serious injury
WARNING Indicates a potentially hazardous situation, which, if not avoided, may result in minor or moderate injury.
Checking Products upon Delivery
CAUTION
1. DO NOT install any driver which is damaged, lack of accessories or not the same with the model ordered.
Doing so may result in electric shock.
Installation
WARNING
1. Cut off external power supply before installation. Not doing so may result in electric shock.
CAUTION
1. Always use the servomotor and servo amplifier in one of the specified combinations. Never use the products in an environment subject to water, corrosive gases, inflammable gases, or combustibles. Doing so may result in electric shock, fire or malfunction.
2. DO NOT touch any metallic part. Doing so may result in malfunction.
Wiring
WARNING
1. Cut off external power supply before wiring. Not doing so may result in electric shock.
2. Connect AC power supply to the corresponding terminals. Faulty wiring may result in fire.
Be sure to review this section carefully before use this product. In precondition of security, wire the product correctly.
Safety Precautions

b
CAUTION
1. Do not connect a three-phase power supply to the U, V, or W output terminals. Doing so may result in injury or fire.
2. Use 2mm2 wire to grounding the groud terminals. Not doing so may result in electric shock.
3. Securely fasten the power supply terminal screws and motor output terminal screws. Not doing so may result in fire.
Operation
WARNING
1. Never touch any rotating motor parts while the motor is running. Doing so may result in injury.
2. DO NOT touch the inside the driver. Doing so may result in electric shock.
3. Do not remove the panel cover while the power is ON. Doing so may result in electric shock.
4. Do not touch terminals for five minutes after the power has been turned OFF. Residual voltage may cause electric shock.
CAUTION
1. Conduct trial operation on the servomotor alone with the motor shaft disconnected from machine to avoid any unexpected accidents.
Not doing so may result in injury. 2. Before starting operation with a machine connected, change the settings to match the parameters of the machine.
Starting operation without matching the proper settings may cause the machine to run out of control or malfunction. 3. Before starting operation with a machine connected, make sure that an emergency stop can be applied at any time.
Not doing so may result in injury. 4. Do not touch the heat sinks during operation. Not doing so may result in burns due to high temperatures. 5. Do not attempt to change wiring while the power is ON. Doing so may result in electric shock or injury

i
Catalog Preface............................................................................................................................. I 1 Checking Product and Part Names ................................................................................2
1-1.Checking Products on Delivery .......................................................................2 1-1-1. Servomotors ...........................................................................................2 1-1-2.Servo Drivers .......................................................................................3 1-1-3.Adaptation table of servo drive and motor ............................................4
1-2.Product Part Names .........................................................................................4 1-2-1.Servomotors .........................................................................................4 1-2-2.Servo Drivers .......................................................................................5
2-1.Servomotor .....................................................................................................7 2-1-1.Storage Temperature ............................................................................7 2-1-2.Installation Site ....................................................................................7 2-1-3.Concentricity ........................................................................................7 2-1-4.Orientation ...........................................................................................8 2-1-5.Handling Oil and Water .......................................................................8 2-1-6.Cable Stress .........................................................................................8
2-2.Servo Drivers ..................................................................................................8 2-2-1.Storage Conditions ...............................................................................8 2-2-2.Installation Site ....................................................................................8 2-2-3.Orientation ...........................................................................................9 2-2-4.Installation ...........................................................................................9
3 Wiring ........................................................................................................................ 11 3-1.Main Circuit Wiring ...................................................................................... 11
3-1-1.Names and Descriptions of Main Circuit Terminal ............................. 11 3-1-2.Typical Wiring Example .................................................................... 12 3-1-3.Winding Terminals on Servo motor .................................................... 13
3-2.I/O Signals .................................................................................................... 13 3-2-1.Layout of CN0/CN1 Terminals .......................................................... 13 3-2-2. CN0 and CN1 ...................................................................................... 13 3-2-3.I/O Signal Names and Functions ........................................................ 15 3-2-4.Interface Circuits ................................................................................ 15
3-3.Wiring Encoders ........................................................................................... 17 3-3-1.Encoder Connections.......................................................................... 17 3-3-2.CN2 Encoder Connector Terminal Layout .......................................... 18
3-4.Standard connection examples ...................................................................... 18 3-4-1.Position Control Mode ....................................................................... 19
3-5.Communication Port ..................................................................................... 21 3-5-1.Serial Port 1(COM1) .......................................................................... 21 3-5-2.Serial Port 2(COM2) .......................................................................... 22
3-6.Regenerative Resistor.................................................................................... 22 4 Use the operate panel .................................................................................................. 24
4-1.Basic Operation............................................................................................. 24 4-1-1. Functions of operate panel.................................................................... 24 4-1-2. Basic Mode Switching ......................................................................... 24
ii
4-2.Running status mode ..................................................................................... 25 4-3.Monitoring Mode .......................................................................................... 26 4-4.Auxiliary Function ........................................................................................ 28
4-4-1.Check System Infomation .................................................................. 29 4-4-2. Auxiliary Run Mode ............................................................................ 29 4-4-3. Change the motor type ......................................................................... 30 4-4-4.Check Alarm Information ................................................................... 31 4-4-5.Reset Parameters to Default ............................................................... 31 4-4-6. External monitoring ............................................................................. 31
4-5.Parameter Setting .......................................................................................... 31 4-6.Alarm ............................................................................................................ 32
5 Run the servo system .................................................................................................. 33 5-1.Control mode selection.................................................................................. 33 5-2.Basic function setting .................................................................................... 33
5-2-1. Servo ON setting .................................................................................. 34 5-2-2. Switch the motor rotate direction .......................................................... 34 5-2-3. Overtravel Limit (P-OT & N-OT) ........................................................ 34 5-2-4. Motor stop mode when servo OFF ....................................................... 36 5-2-5. Power-off Brake (BK) .......................................................................... 36
5-3.Position mode (external pulse command) ...................................................... 38 5-3-1. Control mode selection......................................................................... 39 5-3-2. Pulse command .................................................................................... 39 5-3-2-1. Pulse mode selection ......................................................................... 39 5-3-2-2. Explanation of command pulse ......................................................... 39 5-3-2-3. Signal connection.............................................................................. 40 5-3-3. Electronic gear ratio ............................................................................. 40 5-3-3-1. Parameter .......................................................................................... 40 5-3-3-2. Set the electronic gear ....................................................................... 40 5-3-3-3. Example of setting the electronic gear ............................................... 41 5-3-4. Position command filter ....................................................................... 41 5-3-5. Pulse error clear (/CLR) ....................................................................... 42 5-3-6. Positioning complete (/COIN) .............................................................. 42 5-3-7. Positioning near (/NEAR) .................................................................... 43 5-3-8. Command pulse prohibition (/INHIBIT) .............................................. 43
5-4.Position mode (internal position mode) ......................................................... 44 5-4-1. Control mode selection......................................................................... 44 5-4-2. Internal position given mode ................................................................ 44 5-4-3. Position parameters from segment 1 to 16 ............................................ 47 5-4-4. Change step (/CHGSTP) ...................................................................... 47 5-4-5. Pause current signal (/INHIBIT)........................................................... 47 5-4-6. Skip current signal (/ZCLAMP) ........................................................... 48 5-4-7. Reference origin ................................................................................... 48
5-5.Speed control (analog voltage command) ...................................................... 50 5-5-1. Control mode selection......................................................................... 50 5-5-2. Analog value of rated speed ................................................................. 50 5-5-3. Speed command offset auto-adjustment (F1-03) ................................... 51 5-5-4. Proportion action command (/P-CON) ................................................. 51 5-5-5. Zero clamp (/ZCLAMP) ....................................................................... 51 5-5-6. Speed coincidence checking (/V-CMP) ................................................ 52 5-5-7. Torque limit ......................................................................................... 52 5-5-7-1. Internal torque limit (output torque max value limit) ......................... 52

iii
5-5-7-2. External torque limit (via input signal) .............................................. 52 5-5-7-3. External torque limit (via analog voltage command) ......................... 53 5-5-7-4. External torque limit (via external input + analog voltage) ................ 53 5-5-7-5. Output torque up to limit value signal ............................................... 54 5-5-8. Soft start .............................................................................................. 54 5-5-9. Filter .................................................................................................... 54 5-5-10. Speed command input dead voltage .................................................... 55
5-6.Speed control (internal speed) ....................................................................... 55 5-6-1. Control mode selection......................................................................... 56 5-6-2. Internal speed setting............................................................................ 56 5-6-3. Input signal setting ............................................................................... 56
5-7.Speed control (pulse frequency command) .................................................... 57 5-7-1. Control mode selection......................................................................... 58 5-7-2. Pulse frequency command .................................................................... 58 5-7-3. Command pulse frequency at rated speed ............................................. 58 5-7-4. Speed command pulse filter time .......................................................... 58
5-8.Torque control (analog voltage command) .................................................... 58 5-8-1. Control mode selection......................................................................... 59 5-8-2. The analog value of rated torque .......................................................... 59 5-8-3. Torque command offset autoadjustment (F1-04) .................................. 59 5-8-4. Torque command filter time ................................................................. 59 5-8-5. Torque limit ......................................................................................... 60 5-8-5-1. Internal speed limit ........................................................................... 60 5-8-5-2. External speed limit .......................................................................... 60 5-8-5-3. Speed up to limit value output ........................................................... 60 5-8-6. Torque command input dead area voltage ............................................ 60
5-9.Torque control (internal setting) .................................................................... 61 5-9-1. Control mode selection......................................................................... 61 5-9-2. Internal torque command...................................................................... 61
5-10.Switch the control mode .............................................................................. 61 5-11.Other output signals .................................................................................... 62
5-11-1. /ALM and /ALM-RST ....................................................................... 62 5-11-2. /WARN .............................................................................................. 62 5-11-3. Rotation checking (/TGON) ............................................................... 62 5-11-4. Servo ready (/S-RDY) ........................................................................ 62 5-11-5. Encoder Z phase output (/Z) ............................................................... 63 5-11-6. AB phase feedback signal of encoder ................................................. 63
5-12. I/O signal distribution ................................................................................... 63 5-12-1. Input signal distribution...................................................................... 63 5-12-2. Default setting of input terminal ......................................................... 64 5-12-3. Output terminal distribution ............................................................... 65 5-12-4. Default setting of output terminal ....................................................... 65
6 Servo gain adjustment ................................................................................................. 66 6-1.Servo gain setting .......................................................................................... 66
6-1-1.Gain setting of speed loop .................................................................. 66 6-1-2.Gain setting of position loop............................................................... 66 6-1-2-1.Position loop proportion gain .......................................................... 66 6-1-2-2.Position loop feedforward gain........................................................ 67 6-1-3.The experience of parameter adjustment ............................................. 67 6-1-4.Proportion action command (P-CON)................................................. 67 6-1-5.Gain switch (G-SEL) .......................................................................... 68

iv
7 Specification and dimension ....................................................................................... 69 7-1.Servo motor .................................................................................................. 69
7-1-1.Servo motor specification ................................................................... 69 7-1-2.Torque-Speed Feature ........................................................................ 71 7-1-3.Servo motor dimensions ..................................................................... 72
7-2.Servo drivers ................................................................................................. 75 7-2-1.General specification .......................................................................... 75 7-2-2.Performance specification .................................................................. 76 7-2-3.Servo driver dimensions ..................................................................... 77
8 Alarm Information ...................................................................................................... 79 Appendix 1 Parameter list .............................................................................................. 81 Appendix 2 Application ................................................................................................. 87

v

Preface
I
Preface
Constitution of This Manual This manual is divided into 7 chapters.
1. Checking Product and Part Names This chapter describes the procedure for checking products upon delivery as well as names for product parts. 2. Installation
This chapter describes precautions for servomotor and servo driver installation. 3. Wiring
This chapter describes the procedure used to connect DS2 Series products to peripheral devices and gives typical examples of main circuit wiring as well as I/O signal connections. 4. Parameter Settings and Functions
This chapter describes the procedure for setting and applying parameters. 5. Use Digital Panel
This chapter describes the basic operation of the digital panel and the features it offers. 6. Ratings and Characteristics
This chapter provides the ratings, torque-speed characteristics diagrams, and dimensional drawings of the DS2 series servo drives and MS series servomotors.
7. Alarm Information This chapter describes the alarm information of DS2 series servo drivers. Intended User This manual is intended for the following users. Those designing DS2 Series servodrive systems.
Those installing or wiring DS2 Series servodrives. Those performing trial operation or adjustments of DS2 Series servodrives.
Those maintaining or inspecting DS2 Series servodrives. How to AcquireThis Manual
1.Electrical Manual (1) Log on Xinje official website www.xinje.com to download. (2) Acquire this manual on a CD from an authorized distributor.
This chapter describes the constitution of this manual, the intended user, and how to acquire this manual.
Preface

2
1 Checking Product and Part Names
This chapter describes the procedure for checking products upon delivery as well as names for product parts.
1-1.Checking Products on Delivery Use the following checklist when products are delivered.
Items Comments Are the delivered products the ones that were ordered?
Check the model numbers marked on the nameplates of the servomotor and servo driver.
Does the servomotor shaft rotate smoothly?
The servomotor shaft is normal if it can be turned smoothly by hand. Servomotors with brakes, however, cannot be turned manually.
Is there any damage? Check the overall appearance, and check for damage or scratches that may have occurred during shipping.
Are there any loose screws? Check screws for looseness using a screwdriver. Is the motor code the same with the code in driver?
Check the motor code marked on the nameplates of the servomotor and the parameter F0-00 on the servo driver.
If any of the above is faulty or incorrect, contact Xinje or an authorized distributor.
1-1-1. Servomotors External Appearance
Nameplate
MS -80 ST - M 02430 A Z- 2 0P7 Capacity Rated Voltage Power-loss brake Shaft Specifications Performance Specifications
Feedback Component Sinewave-drive Motors
Base Size Motor Series Name
Base number 60, 80, 90, 110, 130,180 Feedback
component no. M Optical pulse encoder

3
Performance parameter no.
First 3 bits mean rated torque, last 2 bits mean rated speed Such as: 00630: rated torque 0.6N.m, rated speed 3000rpm 06025: rated torque 6.0N.m, rated speed 2500rpm 19015: rated torque 19.0N.m, rated speed 1500rpm
Shaft spec A No bond B With bond
Power-loss brake
Vacant No Z With DC99V power-off brake
Voltage level 2 220V 4 380V
Power Such as: 0P4: 0.4kW 0P7: 0.75kW 3P0: 3.0kW
1-1-2.Servo Drivers External Appearance
DS2-20P2 DS2-20P4 DS2-20P7
DS2-21P5
DS2-2□P□-A DS2-2□P□-B
Nameplate
DS2 – 2 1P5 - A
Configure type A Open collector mode AB phase feedback B Difference mode AB phase feedback
suitable motor capacity
0P2 0.2KW 0P4 0.4KW 0P7 0.75KW 1P5 1.5KW
PUL-
P+
PB
L1
L2
L3
PE
U
V
W
PUL+
V1+
DIR-
DIR+
V2+
SI1
SI2
+24V
SO1
SO2
COM
CN1
CN2
POWER
CHARGE
STA/ESC INC DEC ENTER
Configure type
Series name
Suitable motor capacity
Voltage level
4
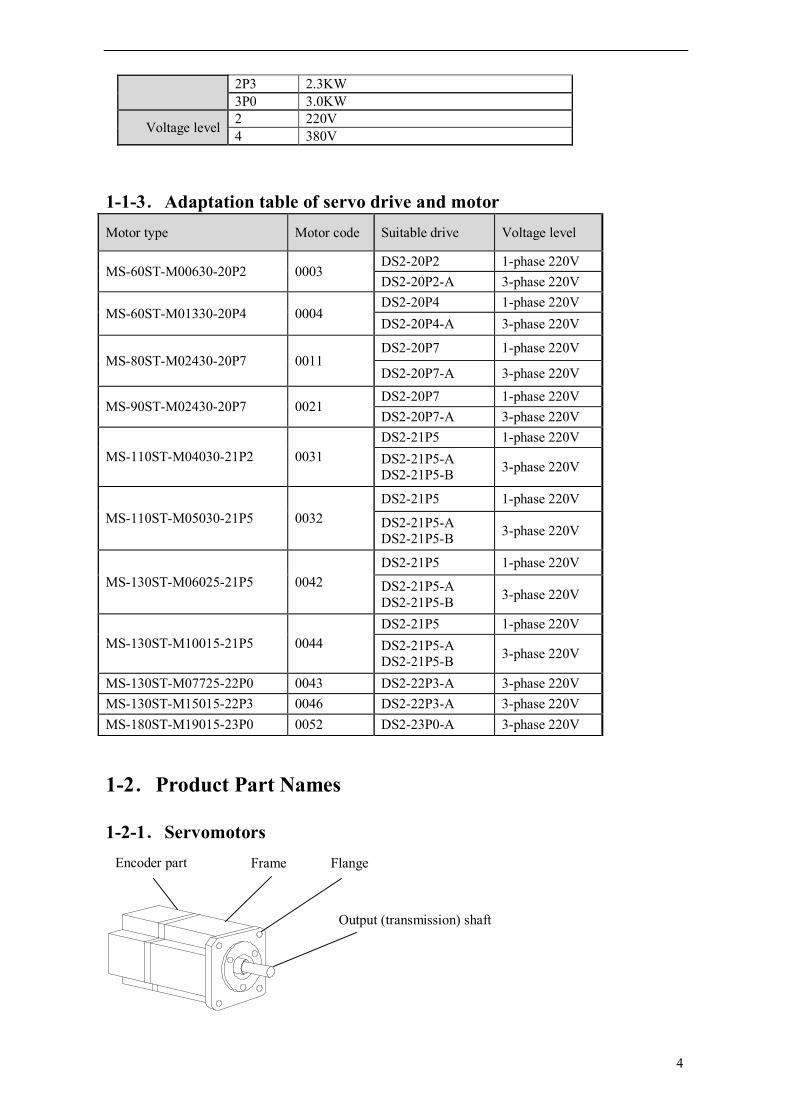
2P3 2.3KW 3P0 3.0KW
Voltage level 2 220V 4 380V
1-1-3.Adaptation table of servo drive and motor Motor type Motor code Suitable drive Voltage level
MS-60ST-M00630-20P2 0003 DS2-20P2 1-phase 220V DS2-20P2-A 3-phase 220V
MS-60ST-M01330-20P4 0004 DS2-20P4 1-phase 220V DS2-20P4-A 3-phase 220V
MS-80ST-M02430-20P7 0011 DS2-20P7 1-phase 220V
DS2-20P7-A 3-phase 220V
MS-90ST-M02430-20P7 0021 DS2-20P7 1-phase 220V DS2-20P7-A 3-phase 220V
MS-110ST-M04030-21P2 0031 DS2-21P5 1-phase 220V DS2-21P5-A DS2-21P5-B 3-phase 220V
MS-110ST-M05030-21P5 0032 DS2-21P5 1-phase 220V
DS2-21P5-A DS2-21P5-B 3-phase 220V
MS-130ST-M06025-21P5 0042 DS2-21P5 1-phase 220V
DS2-21P5-A DS2-21P5-B 3-phase 220V
MS-130ST-M10015-21P5 0044 DS2-21P5 1-phase 220V DS2-21P5-A DS2-21P5-B 3-phase 220V
MS-130ST-M07725-22P0 0043 DS2-22P3-A 3-phase 220V MS-130ST-M15015-22P3 0046 DS2-22P3-A 3-phase 220V MS-180ST-M19015-23P0 0052 DS2-23P0-A 3-phase 220V
1-2.Product Part Names
1-2-1.Servomotors
Encoder part Frame Flange
Output (transmission) shaft

5
1-2-2.Servo Drivers DS2-20P2, DS2-20P4, DS2-20P7
DS2-21P5
CHARGE LED Turn on when main circuit power on. Do not touch the servo when LED is ON after power off because there are charges in the capacitance. Panel display To show the servo state, alarm, parameters Panel keys To set the parameters
POWER LEDTurn on when the drive power on
COM2 Connect to PC, HMI, PLC… CN0 Command and sequence output
To connect the encoder on the servo motor CN2 Power supply input, servo motor terminals
Power supply and servo motor terminals Command and sequence input CN1
Panel displayShow the servo state, alarm and parameters
CHARGE LED Turn on when main circuit power on. Do not touch the servo when LED is ONafter power off because there are charges in the capacitance.
POWER LED Turn on when the drive power on
Power supply input, servo motor terminals Power supply and servo motor terminalsCommand and sequence input signal, RS485 communication
To connect the encoder on the servo motor
COM1 5-pin port, for RS232 communication
CN1
CN2To set the parameters Panel keys

6
DS2-2□P□-A, DS2-2□P□-B
12
COM1 5-pin port, debug with PC, communicate with HMI, PLC and other devices
DIP switch For internal updating
CN2
CN1
COM SO2 SO1 +24V
SI2 SI1 V2+ DIR+
DIR-
V1+ PUL+
W V U PE L3 L2 L1 PB P+
PUL-
ENTERDECINC STA/ESC
CHARGE
POWER
POWER LED Turn on when the drive power on
CHARGE LED Turn on when main circuit power on.
Do not touch the servo when LED is ON after power off because there are charges in the capacitance.
Panel keys To set the parameters CN1 Command and sequence input To connect the encoder on the servo motor
CN2
Output terminal
Command or sequence output
Panel display To show the servo state, alarm, parameters
Power supply and motor power
Power supply input and servo motor power terminal
7
2 Installations This chapter describes precautions for servomotor and servo driver installation.
2-1.Servomotor MS series servomotors can be installed either horizontally or vertically. The service life of the servomotor can be shortened or unexpected problems might occur if it is installed incorrectly or in an inappropriate location. Follow these installation instructions carefully.
CAUTION
1. The end of the motor shaft is coated with antirust. Before installing, carefully remove all of the paint using a cloth moistened with paint thinner.
2. Avoid getting thinner on other parts of the servomotor.
2-1-1.Storage Temperature Store the servomotor within -20~+60 ℃ as long as it is stored with the power cable disconnected.
2-1-2.Installation Site MS series servomotors are designed for indoor use. Install the servomotor in environments that satisfy the following conditions. Free of corrosive or explosive gases. Well-ventilated and free of dust and moisture. Ambient temperature of 0° to 50°C. Relative humidity (r.h.) of 20 to 80% with no condensation. Accessible for inspection and cleaning.
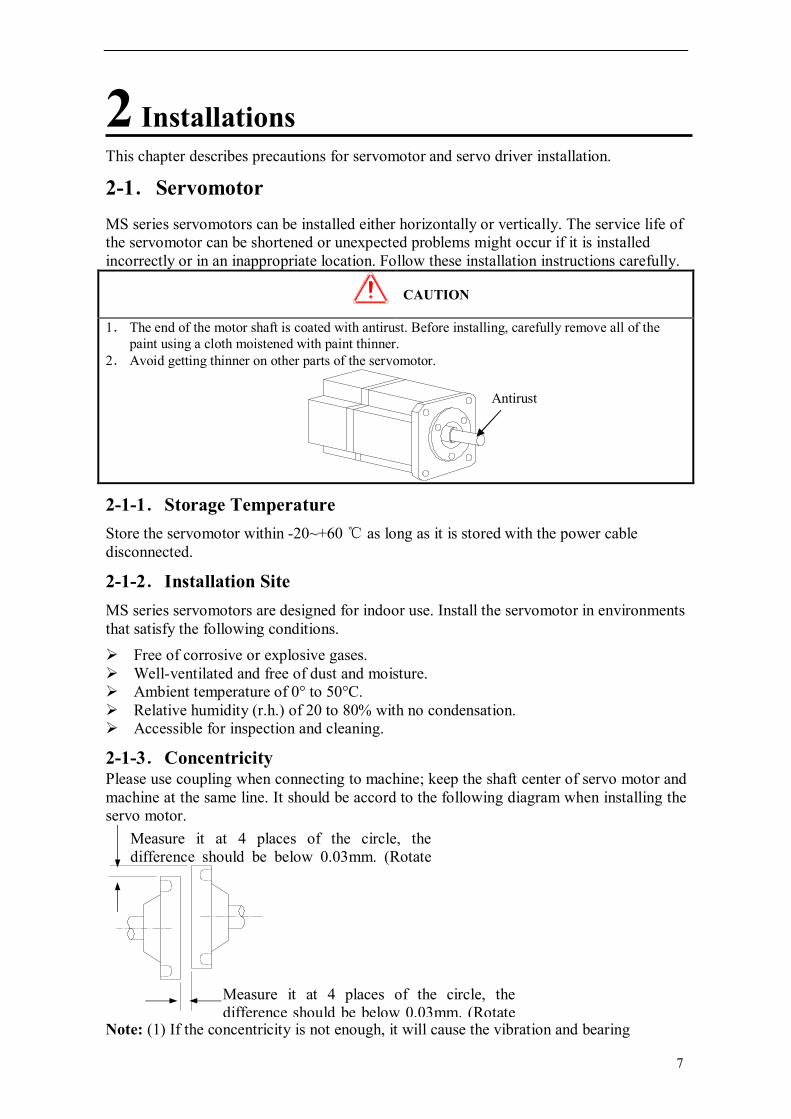
2-1-3.Concentricity Please use coupling when connecting to machine; keep the shaft center of servo motor and machine at the same line. It should be accord to the following diagram when installing the servo motor.
Note: (1) If the concentricity is not enough, it will cause the vibration and bearing
Antirust
Measure it at 4 places of the circle, the difference should be below 0.03mm. (Rotate
Measure it at 4 places of the circle, the difference should be below 0.03mm. (Rotate
8
damage. (2) When installing the coupler, prevent direct impact to the shaft. This can damage the encoder mounted on the shaft end at the opposite side of the load.
2-1-4.Orientation MS series servomotors can be installed either horizontally or vertically.
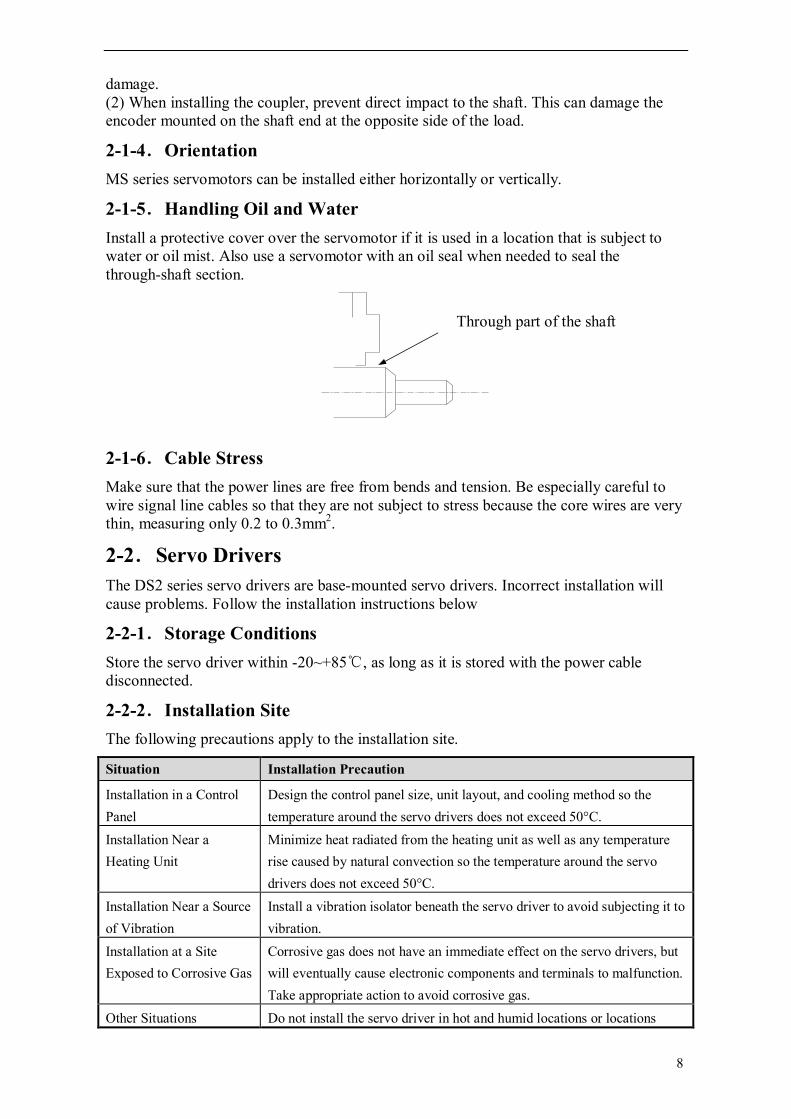
2-1-5.Handling Oil and Water Install a protective cover over the servomotor if it is used in a location that is subject to water or oil mist. Also use a servomotor with an oil seal when needed to seal the through-shaft section.
2-1-6.Cable Stress Make sure that the power lines are free from bends and tension. Be especially careful to wire signal line cables so that they are not subject to stress because the core wires are very thin, measuring only 0.2 to 0.3mm2.
2-2.Servo Drivers The DS2 series servo drivers are base-mounted servo drivers. Incorrect installation will cause problems. Follow the installation instructions below
2-2-1.Storage Conditions Store the servo driver within -20~+85 , as long as it is stored with the power cable ℃disconnected.
2-2-2.Installation Site The following precautions apply to the installation site.
Situation Installation Precaution
Installation in a Control Panel
Design the control panel size, unit layout, and cooling method so the temperature around the servo drivers does not exceed 50°C.
Installation Near a Heating Unit
Minimize heat radiated from the heating unit as well as any temperature rise caused by natural convection so the temperature around the servo drivers does not exceed 50°C.
Installation Near a Source of Vibration
Install a vibration isolator beneath the servo driver to avoid subjecting it to vibration.
Installation at a Site Exposed to Corrosive Gas
Corrosive gas does not have an immediate effect on the servo drivers, but will eventually cause electronic components and terminals to malfunction. Take appropriate action to avoid corrosive gas.
Other Situations Do not install the servo driver in hot and humid locations or locations
Through part of the shaft

9
subject to excessive dust or iron powder in the air.
2-2-3.Orientation Install the servo driver perpendicular to the wall as shown in the figure. The servo driver must be oriented this way because it is designed to be cooled by natural convection or by a cooling fan.
2-2-4.Installation Follow the procedure below to install multiple servo drivers side by side in a control panel.
Servo Driver Orientation Install the servo driver perpendicular to the wall so the front panel containing connectors faces outward.
Cooling As shown in the figure above, allow sufficient space around each servo driver for cooling by cooling fans or natural convection.
Side-by-side Installation

10
When install servo drivers side by side as shown in the figure above, make at least 10mm between and at least 50mm above and below each servo driver. Install cooling fans above the servo drivers to avoid excessive temperature rise and to maintain even temperature inside the control panel.
Environmental Conditions in the Control Panel Ambient Temperature: 0~50 ℃ Humidity: 90%RH or less Vibration: 4.9m/s2 Condensation and Freezing: None Ambient Temperature for Long-term Reliability: 50°C maximum

11
3 Wiring
This chapter describes the procedure used to connect DS2 Series products to peripheral devices and gives typical examples of main circuit wiring as well as I/O signal connections.
3-1.Main Circuit Wiring This section shows typical examples of main circuit wiring for DS2 Series servo products, functions of main circuit terminals, and the power ON sequence. Observe the following precautions when wiring.
Caution
1. Do not bundle or run power and signal lines together in the same duct. Keep power and signal lines separated by at least 11.81inch(30cm)
2. Use twisted pair wires or multi-core shielded-pair wires for signal and encoder (PG) feedback lines. The maximum length is 118.11inch(3m) for reference input lines and is 787.40inch(20m) for encoder(PG) feedback lines.
3. Do not touch the power terminals for 5 minutes after turning power OFF because high voltage may still remain in the servo amplifier.
Please make sure to check the wiring after the CHARGE light is going off. 4. Avoid frequently turning power ON and OFF. Do not turn power ON or OFF more than once per
minute. Since the servo amplifier has a capacitor in the power supply, a high charging current flows for 0.2s when power is turned ON. Frequently turning power ON and OFF causes main power devices like capacitors and fuses to deteriorate, resulting in unexpected problems.
3-1-1.Names and Descriptions of Main Circuit Terminal
DS2-20P2, DS2-20P4, DS2-20P7
Terminal Function Explanation P+, PB Regenerative braking
resistor connection Connect regenerative braking resistor between P+ and PB
U, V, W Motor connection Connect to the motor Ground Connect to the ground terminal of
motor, to be grounded L, N Power supply for main
circuit Single-phase AC 200~240V,50/60Hz
Ground Connect to the ground terminal of power, to be grounded
PB
P+
W
V
U
N
L

12
DS2-21P5
Terminal Function Explanation
Suppress current high harmonics, to connect DC reactor
1 and 2 is short when out of factory. Connect DC reactor between 1 and 2 to suppress current high harmonics.
L, N Power input of main circuit
Single-phase AC 200~240V, 50/60Hz
Ground Connect to the ground terminal of motor, to be grounded
U, V, W Motor connection Connect to the motor Ground Connect to the ground terminal of power,
to be grounded P+, PB Regenerative braking
resistor connection Connect regenerative braking resistor between P+ and PB
DS2-2□P□-A, DS2-21P5-B
Terminal Function Explanation P+, PB Regenerative braking
resistor connection Connect regenerative braking resistor between P+ and PB
L1, L2, L3 Power input of main circuit
3-phase AC 200~240V, 50/60Hz
(PE) Ground Connect to the ground terminal of power, to be grounded
U, V, W Motor connection Connect to the motor
3-1-2.Typical Wiring Example
1
L
N
U
V
W
P+
PB
2
1
2
L2
U
V
W
P+
PB
L1
L3
FIL
N
L CN2
M
PG
UVW
P+
PB Braking resistor
Servo drive
1MCCB
1MCCB : breaker for inverter
FIL: noise filter
1
2

13
3-1-3.Winding Terminals on Servo motor Symbol 60, 80, 90 Series 110, 130, 180 Series
PE 4 1 U 1 2 V 3 3 W 2 4
3-2.I/O Signals
This section describes I/O signals for the DS2 series servo driver.
3-2-1.Layout of CN0/CN1 Terminals The diagram shows the solder side:
DS2-20P2 DS2-20P4 DS2-20P7
DS2-21P5 DS2-2□P□-A DS2-2□P□-B
CN1 CN0 CN1 CN0 CN1(DB15)
3-2-2. CN0 and CN1 DS2-20P2 DS2-20P4 DS2-20P7
CN1
No. Name Description No. Name Description 1 A RS485+ 6 SI2 Input terminal 2 2 B RS485- 7 +24V +24V for input 3 PUL Pulse A, pulse signal 8 SO1 Output terminal 1 4 DIR Pulse B, direction signal 9 SO2 Output terminal 2 5 SI1 Input terminal 1 10 COM Ground of output
DS2-21P5 CN0
No. Name Description No. Name Description 1 SO1 Output terminal 1 4 COM Ground of output 2 SO2 Output terminal 2 5 A RS485+ 3 SO3 Output terminal 3 6 B RS485-
CN1
No. Name Description No. Name Description 1 PUL Pulse A, pulse signal 5 SI2 Input terminal 2
10
1
COM
SO2
SO1
V+
SI2
SI1
DIR
PUL
B
A SO1
SO2
SO3
COM
A
B
1
6
V+
SI4
SI3
SI2
SI1
V+
DIR
PUL
8
1 1
SO1
+24V
SI2
SI1
V2+
DIR+
DIR-
V1+
PUL+
PUL-
12SO2COM
1
5
6
10
11
15

14
2 DIR Pulse B, pulse signal 6 SI3 Input terminal 3 3 V+ +24V for pulse terminal 7 SI4 Input terminal 4 4 SI1 Input terminal 1 8 +24V +24V for input
DS2-2□P□-A DS2-2□P□-B
CN0
No. Name Description No. Name Description 1 PUL- Pulse input PUL- 7 SI1 Input terminal 1
2 PUL+ Differential input PUL+ 8 SI2 Input terminal 2
3 V1+ +24V for open collector 9 +24V +24V input
4 DIR- Direction input DUL- 10 SO1 Output terminal 1
5 DIR+ Differential input DIR+ 11 SO2 Output terminal 2
6 V2+ +24V for open collector 12 COM Ground of output
terminal
DS2-2□P□-A CN1(DB15)
No. Name Description No. Name Description
1 SI3 Input terminal 3 9 BO Encoder output B
2 SI4 Input terminal 4 10 ZO Encoder output Z
3 SI5 Input terminal 5 11 T-REF Torque analog input
4 SI6 Input terminal 6 12 V-REF Speed analog input
5 +24V +24V input 13 GND Ground for analog input
6 SO3 Output terminal 3 14 A RS485+
7 COM Ground for output terminal
15 B RS485-
8 AO Encoder output A
DS2-2□P□-B
CN1 (DB15)
No. Name Description No. Name Description
1 SI3 Input terminal 3 9 Z- Encoder output Z-
2 SI4 Input terminal 4 10 B+ Encoder output B+
3 SI5 Input terminal 5 11 T-RE
F Torque analog input
4 SO3 Output terminal 3 12 V-RE
F Speed analog input
5 B- Encoder output B- 13 GND GND for analog
input
6 A+ Encoder output A+ 14 A RS485+
7 A- Encoder output A- 15 B RS485-
8 Z+ Encoder output Z+
15
3-2-3.I/O Signal Names and Functions The following section describes servo driver I/O signal names and functions.
Input Signals Item Input Function Reference chapter
Digital input SI1~SI6 Multi-functional input terminal 5-12-1
Pulse input
PUL PUL- PUL+
P2-00=1:A-phase pulse P2-00=2:pulse
5-3-2
DIR DIR- DIR+
P2-00=1:B-phase pulse P2-00=2:pusle direction (sign)
5-3-2
Output Signals Class Name Functions Reference chapter Digital Output SO1~SO3 Multi-functions Output Terminals 5-12-2 Notes: the control signal must be grounded, please refer to chapter 3-4.
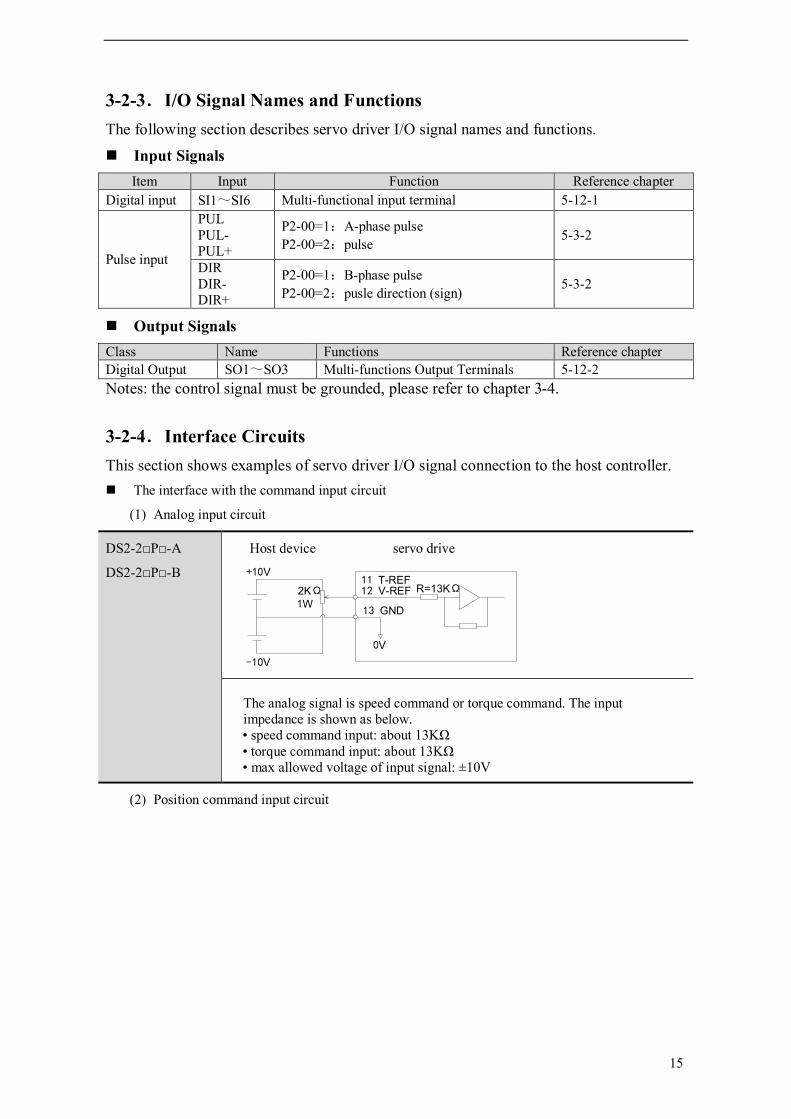
3-2-4.Interface Circuits This section shows examples of servo driver I/O signal connection to the host controller. The interface with the command input circuit
(1) Analog input circuit
DS2-2□P□-A
DS2-2□P□-B
Host device servo drive
The analog signal is speed command or torque command. The input impedance is shown as below. • speed command input: about 13KΩ • torque command input: about 13KΩ • max allowed voltage of input signal: ±10V
(2) Position command input circuit
+10V
-10V
11 T-REF12 V-REF
13 GND
0V
R=13KΩ2KΩ1W

16
DS2-20P2
DS2-20P4
DS2-20P7
DS2-21P5
Open collector output ( power supply is 24V)
Host device servo drive
DS2-2□P□-A
DS2-2□P□-B
Open collector output (power supply is 24V)
Host device servo drive
When the host device is open collector output, PUL+(2) and DIR+(5) must be vacant.
Differential output (power supply is 5V)
Host device servo drive
When the host device is 5V differential signal output, V1+(3) and V2+(6) must be vacant.
Shield layer
+24V
PULS
0V
+
COM1
Y1
COM0
Y0
0V
+24V
SIGN R=2.2K Ω
R=2.2KΩ
+24V
0V
Y0
COM0
Y1
COM1
+
0V
PUL-
PUL+
V1+
1
2
3
4
5
6
DIR-
DIR +V2+
R=2.2KΩ
R=2.2KΩShield layer
PUL-
PUL+
DIR- DIR+
Shield layerR=2.2KΩ
R=2.2K Ω
V2+
DIR +
DIR-
6
5
4
3
2
1
V1+
PUL+
PUL-
0V
17
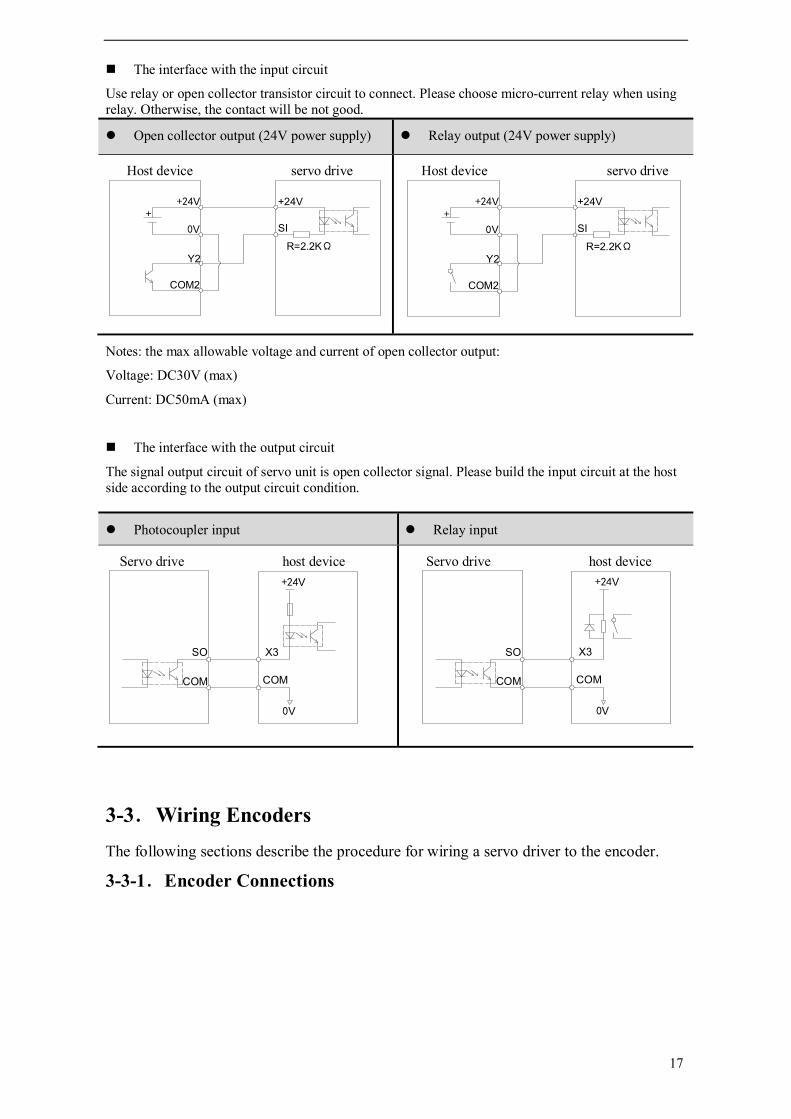
The interface with the input circuit
Use relay or open collector transistor circuit to connect. Please choose micro-current relay when using relay. Otherwise, the contact will be not good.
Open collector output (24V power supply) Relay output (24V power supply)
Host device servo drive
Host device servo drive
Notes: the max allowable voltage and current of open collector output:
Voltage: DC30V (max)
Current: DC50mA (max)
The interface with the output circuit
The signal output circuit of servo unit is open collector signal. Please build the input circuit at the host side according to the output circuit condition.
Photocoupler input Relay input
Servo drive host device
Servo drive host device
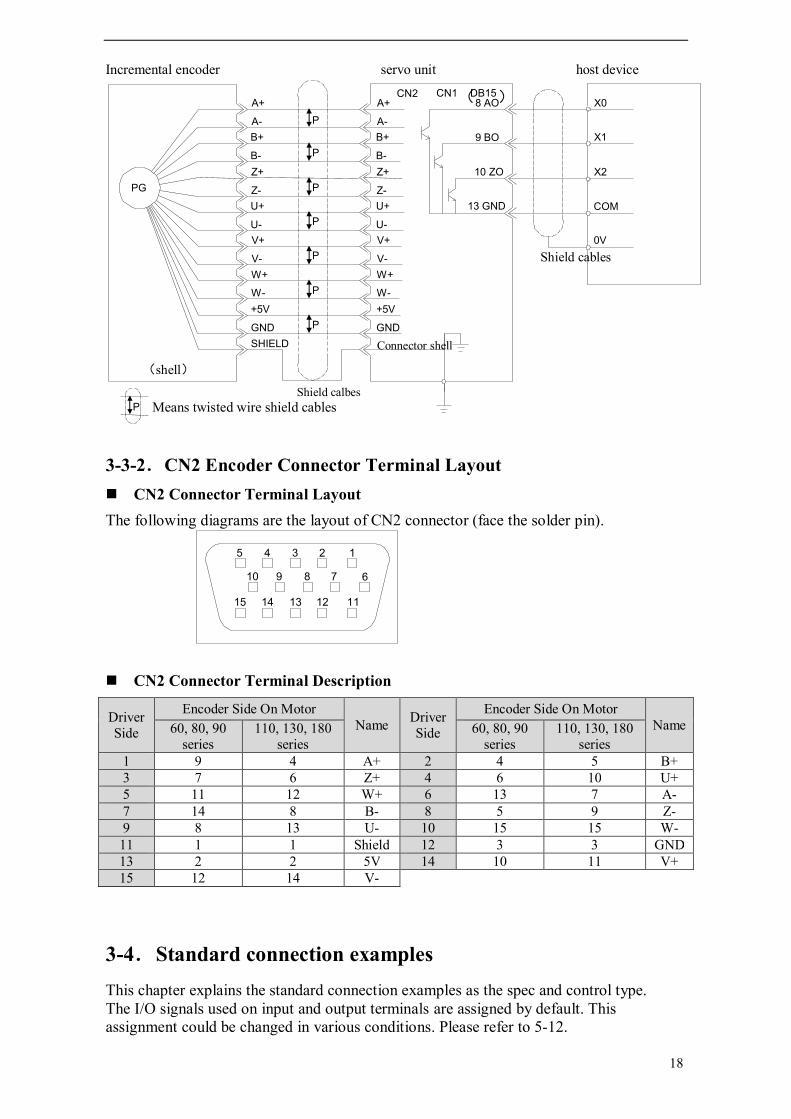
3-3.Wiring Encoders The following sections describe the procedure for wiring a servo driver to the encoder.
3-3-1.Encoder Connections
SI
+24V+
COM2
Y2
0V
+24V
R=2.2KΩ R=2.2KΩ
+24V
0V
Y2
COM2
++24V
SI
COM
SO X3
COM
0V
+24V +24V
0V
COM
X3SO
COM
18
Incremental encoder servo unit host device
3-3-2.CN2 Encoder Connector Terminal Layout CN2 Connector Terminal Layout The following diagrams are the layout of CN2 connector (face the solder pin).
CN2 Connector Terminal Description
Driver Side
Encoder Side On Motor Name Driver
Side
Encoder Side On Motor Name 60, 80, 90
series 110, 130, 180
series 60, 80, 90
series 110, 130, 180
series 1 9 4 A+ 2 4 5 B+ 3 7 6 Z+ 4 6 10 U+ 5 11 12 W+ 6 13 7 A- 7 14 8 B- 8 5 9 Z- 9 8 13 U- 10 15 15 W-
11 1 1 Shield 12 3 3 GND 13 2 2 5V 14 10 11 V+ 15 12 14 V-
3-4.Standard connection examples This chapter explains the standard connection examples as the spec and control type. The I/O signals used on input and output terminals are assigned by default. This assignment could be changed in various conditions. Please refer to 5-12.
910
15 14 13 12 11
12345
678
CN1(DB15)8 AO
9 BO
10 ZO
13 GND
X0
X1
X2
COM
0V
Shield cables
CN2A+
A-B+
B-
U-
U+Z- Z+
+5V
GNDSHIELD
W-
W+V-
V+ V+
V-W+
W-
Connector shellGND
+5V
Z+
Z- U+
U-
B- B+A- A+
(shell)
Shield calbes
PG
P
P
P
P
P
P
P
P Means twisted wire shield cables

19
Besides, the control signal wires must connect to the ground, the ground method is shown as below:
*single-ground the shield layer
3-4-1.Position Control Mode DS2-20P2, DS2-20P4 and DS2-20P7
7
6
5
4
33.3KΩ
Alarm output
Positioning finished/DIR
/PUL
/ALM-RST
+24VIN
/S-ON
PE
FIL
The outputs can be self-defined 10
9
8COIN
ALM
COM
NL
CN2
PE
Well operate with the shield wire
Single phase AC 220V (50/60Hz)
WVU
M
PG
UV W
A
B
1
2
P+
PB
Regenerative resistor
Shield layer connects to 0V at signal side, be vacant at drive side
CN1
PUL- PUL+ V1+
DIR- DIR+ V2+
SI1
SI2
+24V SO1
SO2
COM
Host device Servo
The shield method of control signal wires:

20
DS2-21P5
W VU
PG
MUVW
single-phase AC220V(50/60Hz)
be sure to properly operate the end of the shield wire
PE
CN2
12
LN
P+
PB
S-RDY
COM
ALM
COIN1
2
3
4
user defined
FIL
PE
/S-ON
+24VIN
/ALM-RST
/P-OT
/N-OT
/PUL
/SIGN positioning completed
alarm output
ready
3.3KΩ
1 2
4 5 6 7 8
5
6
Vcc +24VIN
3.3KΩ
3
regenerative resistor
CN0
CN1
B
A
Shield layer connects to 0V at signal side, be vacant at drive side

21
DS2-2□P□-A、DS2-2□P□-B
3-5.Communication Port
3-5-1.Serial Port 1(COM1) COM1 supports RS232, and is often used to connect with PC for debugging. DS2-20P2, DS2-20P4, DS2-20P7, DS2-2□P□-A, DS2-2□P□-B
(5-pin port)
Pin Name Explanation 1 TXD RS232 send 2 RXD RS232 receive 3 GND RS232 ground
1 5
PE
CN1-7
V2+
/DIR-/PUL-
CN0-3
CN0-4
CN1-13
CN1-8
CN1- -6
CN1-1
CN0- 9
CN0-8
COM
3.3KΩ
CN1-4
CN1-3
CN1-1
CN1-5
Speed selection
Speed selection
+24VIN
/ P-OT
/SPD-A
Reverse prohibitReverse prohibit when OFF
/SPD-B
CN0-9
Alarm resetClear the alarm when ON
CN1-9
Encoder signal output
GND
A O
COM
/ALM-RST
Vcc
CN0-12.2KΩ
3.3K Ω
WV
PG
M V
3-phase 220V AC (50/60Hz)
B O
CN2
L1
P+PB
S-RDY
ALM
COIN
FIL
The outputs can be Self-defined
Servo enable ON Servo enables when ON
CN0-5
CN0- 4/S-ON
+24VIN
U U
PEW
Regenerative resistor
CN1-10 ZO
L2L3
CN1-2/ N-OT
Forward prohibit Forward prohibit when OFF
Well operate with the shield wire
Shield layer connects to 0V at signal side, be vacant at drive side

22
Note: 1, Please use the cable provided by Xinje company. 2, the types in the table cannot use RS232 (COM1) and RS485 (COM2) at the same time. The communication parameters of COM1 and COM2 will be changed at the same time. DS2-21P5
8-pin DB port
3-5-2.Serial Port 2(COM2) Communication parameters of COM2 can be set via P0-04. It supports Modbus-RTU communication. Parameter Number
Name Default Setting Range
P0-04.0 Baud rate 6 0: 300 1: 600 2: 1200 3: 2400 4: 4800 5: 9600 6: 19200 7: 38400 8: 57600 9: 115200
P0-04.1 Data Bits 0 0: 8 bits P0-04.2 Stop Bits 2 0: 2 bits. 2: 1 bit P0-04.3 Parity 2 0: No Parity. 1: Odd Parity. 2: Even Parity
Modbus station number can be set freely, depending on the following parameter. Parameter Number Name Unit Default Setting Range
P0-03 Modbus Station Number - 1 1~255
Note: Parameters above will take effect after repower on. COM2 of all the types:
Type COM2 Standard Remark DS2-20P2 DS2-20P4 DS2-20P7
A(CN1-1) B(CN1-2)
RS485 The communication port on CN1 cannot be used with 5-pin ladder port at the same time.
DS2-21P5 A(CN0-5) B(CN0-6)
RS485
DS2-2□P□-A DS2-2□P□-B
A(CN1-14) B(CN1-15) RS485 The communication port on CN1 cannot be used with
5-pin ladder port at the same time.
3-6.Regenerative Resistor When the servo motor operates in generator mode, power is returned to the servo driver side. This is called regenerative power. The regenerative power is absorbed by charging the smoothing capacitor, but when the capacitor’s charging limit is exceeded, the
123456
78Number Name Description
2 UPGRADE Self Upgrade 4 RXD RS232 receive 5 TXD RS232 send 8 GND RS232 ground
23
regenerative power needs to be reduced by the regenerative resistor. The servomotor is driven in regeneration (generator) mode in the following conditions:
While decelerating to a stop during acceleration/deceleration operation. With a load on the vertical axis. During continuous operation with the servomotor driven from the load side (negative
load).
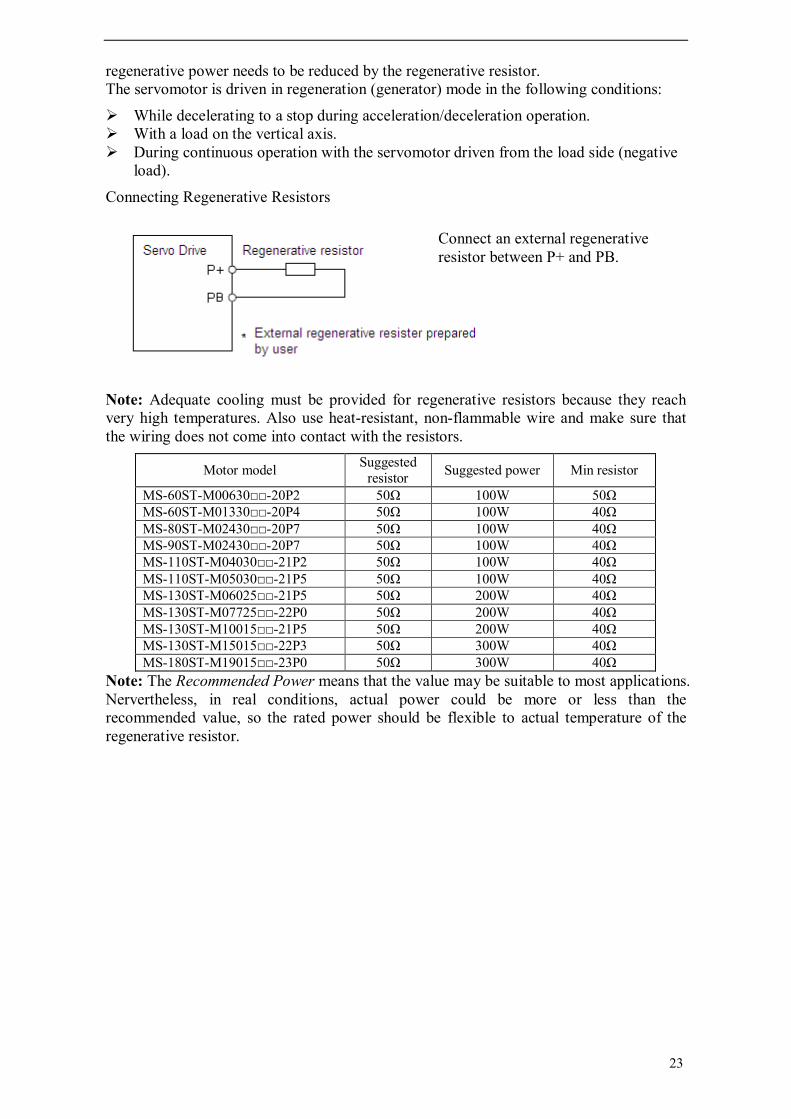
Connecting Regenerative Resistors
Note: Adequate cooling must be provided for regenerative resistors because they reach very high temperatures. Also use heat-resistant, non-flammable wire and make sure that the wiring does not come into contact with the resistors.
Motor model Suggested resistor Suggested power Min resistor
MS-60ST-M00630□□-20P2 50Ω 100W 50Ω MS-60ST-M01330□□-20P4 50Ω 100W 40Ω MS-80ST-M02430□□-20P7 50Ω 100W 40Ω MS-90ST-M02430□□-20P7 50Ω 100W 40Ω MS-110ST-M04030□□-21P2 50Ω 100W 40Ω MS-110ST-M05030□□-21P5 50Ω 100W 40Ω MS-130ST-M06025□□-21P5 50Ω 200W 40Ω MS-130ST-M07725□□-22P0 50Ω 200W 40Ω MS-130ST-M10015□□-21P5 50Ω 200W 40Ω MS-130ST-M15015□□-22P3 50Ω 300W 40Ω MS-180ST-M19015□□-23P0 50Ω 300W 40Ω
Note: The Recommended Power means that the value may be suitable to most applications. Nervertheless, in real conditions, actual power could be more or less than the recommended value, so the rated power should be flexible to actual temperature of the regenerative resistor.
Connect an external regenerative resistor between P+ and PB.

24
4 Use the operate panel
This chapter describes the basic operation of the operate panel and the features it offers. All parameter settings and motor operations can be executed by simple, convenient operations.
4-1.Basic Operation This section provides information on the basic operation of the operate panel for setting operating conditions.
4-1-1. Functions of operate panel The operate panel can be used for parameter settings, operating references, and status displays. 5-bit LED: Displaying parameter settings, status or alarm. Power LED POWER: The LED is on when the servo driver is powered on. Charge LED CHARGE: The LED is on when the main circiut is powered on. When
the power of main circiut is off, electric charges remain in the capacitors, and at this time DO NOT touch the servo.
This section provides information on the keys and their functions available from the initial displays.
Key Name Function STATUS/ESC Press: Status switch, status return INC Press: Increase the value; Press and hold: Increase the value continuously DEC Press: Decrease the value; Press and hold: Decrease the value continuously ENTER Press: Shift the editing digit; Press and hold: Enter a status, Enter
4-1-2. Basic Mode Switching The operate panel can display the status, set parameter and run the command by switching the basic mode. The running status, auxiliary function, parameter setting, and monitoring are the basic modes. The modes switch as the below diagram by pressing STATUS/ESC.

25
Display mode: Monitor Function U- XX: XX means the number of the monitor function. Auxiliary Function FX-XX: The first X means group No., the last two X means the
member No. in the group. Parameter Setting PX-XX: The first X means group No., the last two X means the
member No. in the group. Alarm E-XXX: XXX means the alarm code.
4-2.Running status mode In running status mode, bit data and codes indicate the status of the servo driver.
Select the running status mode The servo will enter running status when power on. If not, press STATUS/ESC to enter.
The display content of running status mode The display contents are different in speed, torque, position control mode.
Speed and Torque Control Mode
A. Bit contents:
Bit Data Description
Speed Coincidence (/V-CMP)
Light when the motor actual speed and command speed is the same. Speed coincidence signal checking width: P5-03 (unit: rpm)
Torque Limit (/CLT) Light when actual torque exceeds preset value. Forward Torque Limit: P4-02 Reverse Torque Limit: P4-03
Rotation Detection Light when the motor speed exeeds the rotation detection speed.
Auxiliary function
Monitoring
Parameter setting
Running status
Power ON

26
(/TGON) Rotation Detection Speed Level: P5-02(Unit: rpm) Zero Clamp (/ZCLAMP) Light when zero clamp signal is ON.
Speed Limit (/VLT) Light when actual speed exceeds preset value. Speed Limit during Torque Control: P4-07
B. The code contents: Code Descrption
Standby Servo OFF (motor power OFF)
Run Servo ON (motor power ON)
Forward Run Prohibited P-OT is OFF. Please refer to 5-2-3 “Overtravel Limit”
Reverse Run Prohibited N-OT is OFF. Please refer to 5-2-3 “Overtravel Limit”
Position Control Mode
A. The bit contents:
Bit Data Description
Positioning Completed (/COIN)
Light when set position and actual position is the same. Positioning accomplishment width: P5-00 (unit: command pulse)
Near (/NEAR) Light when set position and actual position is the same. Near signal width: P5-04
Rotation Detection (/TGON)
Light when the motor speed exeeds the rotation detection speed. Rotation detection speed: P5-02(unit: rpm)
B. The code contents: Code Descrption
Standby Servo OFF (motor power OFF)
Run Servo ON (motor power ON)
Forward Run Prohibited P-OT is OFF. Please refer to 5-2-3 “Overtravel Limit”
Reverse Run Prohibited N-OT is OFF. Please refer to 5-2-3 “Overtravel Limit”
4-3.Monitoring Mode The Monitoring Mode can be used to monitor the reference values, I/O signal status, and servo driver internal status. The monitor mode can be set when the motor is running.

27
Using the Monitor Mode Now we take the monitor code U-16 as an example. 1. Press the STATUS/ESC key to select the monitoring mode.
2. Press the INC or DEC key to select the monitor number U-16, and then press and hold ENTER to enter the monitor mode.
3. The value 0 is now displayed.
4. Press STATUS/ESC key to return to the monitoring number switching state.
Display contents of Monitoring Mode Number Monitor Display Unit
U-00 Actual speed of motor Rpm U-01 Input speed command Rpm U-02 Internal torque command % U-03 Rotate angle (mechenism angle) 0.1° U-04 Rotate angle (electrical angle) 0.1° U-05 Bus voltage V U-06 Module temperature 0.1℃ U-07 Input command pulse speed Rpm U-08 Pulse value of shift
command (0000~9999)*1 Command
pulse U-09 (0000~9999)*10000 U-10 Rotate angle (encoder
value) (0000~9999)*1 encoder pulse U-11 (0000~9999)*10000
U-12 Pulse value of input command
(0000~9999)*1 Pulse command U-13 (0000~9999)*10000
U-14 Pulse value of feedback command
(0000~9999)*1 Pulse command U-15 (0000~9999)*10000
U-16 Current position (Accumulated)
(0000~9999)*1 encoder pulse U-17 (0000~9999)*10000 U-18 Current, 1-bit decimal 0.1A U-19 Analog input V-REF 0.01V U-20 Analog input T-REF 0.01V U-21 I/O signals status U-22 I/O terminals status
U-21 displays I/O signals status The following diagram describes the input and output signals status displayed in U-21.
Diagram 1 Diagram 2
In diagram 1, LED4 and LED5 stand for input signals status, and LED1 and LED2 stand for output signals status. In diagram 2 there shows the segment No. of each LED.
Input signals status
Segment Description Segment Description
LED4_0 /SPD-A internal set speed selection LED5_0 /S-ON servo signal

28
LED4_1 /SPD-B internal set speed selection LED5_1 /P-CON proportion action command LED4_2 /C-SEL control mode selection LED5_2 /P-OT forward prohibit LED4_3 /ZCLAMP zero clamp LED5_3 /N-OT reverse prohibit LED4_4 /INHIBIT prohibit pulse command LED5_4 /ALM-RST clear the alarm
LED4_5 /G-SEL switch the gain LED5_5 /P-CL external torque limit at forward side
LED4_6 /CLR clear the pulse LED5_6 /N-CL external torque limit at reverse side
LED4_7 /CHGSTP change the step LED5_7 /SPD-D internal set speed selection
Output signals status Segment Description Segment Description LED1_0 /NEAR near LED2_0 /COIN positioning completed
LED1_1 /ALM alarm output LED2_1 /V-CMP speed synchronization checking
LED1_2 /Z encoder Z phase output LED2_2 /TGON rotate checking LED2_3 /S-RDY ready LED2_4 /CLT torque limit LED2_5 /VLT speed limit checking LED2_6 /BK brake lock LED2_7 /WARN warn
U-22 displays I/O terminals status The following diagram describes the input and output terminals status:
Diagram 1 Diagram 2 In diagram 1, LED5 stands for input signals status, and LED2 stands for output signals status. In diagram 2 there shows the segment No. of each LED.
Input terminals Output terminals Segment Description Segment Description LED5_0 Input status of SI1 LED2_0 Output status of SO1 LED5_1 Input status of SI2 LED2_1 Output status of SO2 LED5_2 Input status of SI3 LED2_2 Output status of SO3 LED5_3 Input status of SI4 LED5_4 Input status of SI5 LED5_5 Input status of SI6
4-4.Auxiliary Function Use the operate panel to do application in auxiliary function mode.
Group No. Content F0-** Check system information, display the system code and data F1-** Auxiliary run mode, display the auxiliary run command and result F2-** Set the motor code F3-** Check the alarm information, clear the alarm F4-00 Reset parameters to default F5-00 External communication monitoring
29
4-4-1.Check System Infomation Press STATUS/ESC to switch to the auxiliary function mode. Set the group No. to 0 to check system information. Press INC or DEC key to select different No., and press and hold ENTER key to check current information. Press STATUS/ESC key to return. The following table describes the meaning of each No. Function No. Description Function No. Description F0-00 Motor Code F0-01 Servo Series F0-02 Servo Model F0-03 Produce Date: Year F0-04 Produce Date: Month F0-05 Produce Date: Day F0-06 Software Version F0-07 Hardware Version
4-4-2. Auxiliary Run Mode Press the STATUS/ESC key to select the auxiliary function mode. Set the group No. to 1. Press INC or DEC key to select different No., and press and hold ENTER key to use current function. Press STATUS/ESC key to return.
1. Jog (F1-00)
Make sure that the motor shaft is not connected to the machine before jogging! Press ENTER to power on the motor (servo on). Press INC for forward jogging, press DEC for reverse jogging. Press STATUS/ESC key to power off the motor (servo off), and press STATUS/ESC key again to return.
4 different states of jogging: State Panel Display State Panel Display
Idle
Forward Jogging
Servo ON
Reverse Jogging
Set the related parameters:
P3-04 JOG speed Unit Default Setting range Suitable mode Change Effective Rpm 100 0~500 JOG Servo OFF Immediately
2. Trial Operation (F1-01)
Make sure that the motor shaft is not connected to the machine before trial operation! When servo driver is connected with non-original encoder line or power line, trial operation must be run first to ensure that the encoder line or power line is connected correctly. Set the display value to 1, and press and hold ENTER key to enter trial operation mode. The operate panel displays:

30
If correctly wired, the motor would rotate in 5 seconds in forward direction (fixed to counter-clockwise), otherwise the motor would shock or viberate, raising an alarm for worse. In this case the power must be switched off immedietely and check the wiring again. Press STATUS/ESC key to return.
3. Current Offset Auto-Adjustment (F1-02) After the servo driver is updated to latest software version, or the motor does not revolve smoothly for long time, the current offset auto-adjustment is recommended. Select F1-02 and enter current offset auto-adjustment function, and the panel displays “rEF”. Press ENTER key to start current offset auto-adjustment, and the panel displays blinking “rEF”. About 5 seconds later auto-adjustment is finished, and the panel displays “donE” to inform that the function is already finished. Press STATUS/ESC key to return.
4. Speed command offset auto-adjustment (F1-03) Select F1-03 and enter speed command offset auto-adjustment function, and the panel displays “rEF_o”. Press ENTER key to start speed command offset auto-adjustment, and the panel displays blinking “rEF_o”. About 1 second later, auto-adjustment is finished, and the panel displays “donE” to inform that the function is already finished. Press STATUS/ESC key to return.
5. Torque command offset Auto-Adjustment (F1-04) Select F1-04 and enter torque command offset auto-adjustment function, and the panel displays “rEF_o”. Press ENTER key to start torque command offset auto-adjustment, and the panel displays blinking “rEF_o”. About 1 second later, auto-adjustment is finished, and the panel displays “donE” to inform that the function is already finished. Press STATUS/ESC key to return.
6. Forced Servo enables (F1-05) 0: Cancel forced servo enables 1: Forced servo enables
4-4-3. Change the motor type Set the group No. to 2 in auxiliary function mode. The servo drive can match multi-servo-motor with close power classes printed on the nameplate of each motor. When user needs to change a motor, please refer to the Quick Guide to ensure the motor match the driver. The following steps are how to change motor type. 1. Press STATUS/ESC key to select Auxiliary Function mode. 2. Press INC or DEC key to set group No. to 2, and press ENTER to confirm. 3. Press and hold ENTER key to display current motor type. 4. Press INC, DEC or ENTER key to show the motor type and press and hold ENTER key to confirm.

31
5. Repower on the servo drive to make this function effective.
4-4-4.Check Alarm Information Set group No. to 2 in auxiliary function mode and enter checking alarm information mode. The following steps show how to check alarm information. 1. Press STATUS/ESC key to select Auxiliary Function mode. 2. Press INC or DEC key to set group No. to 3, and press ENTER key. 3. Press INC, DEC or ENTER key to modify the alarm No. 4. Press and hold ENTER key to display corresponding alarm information. Member No. Description Unit F3-00 Current alarm code ※1 F3-01 Current warn code ※2 F3-02 Alarm/warn code 1 when alarm F3-03 U phase current when alarm A F3-04 V phase current when alarm A F3-05 DC bus-voltage when alarm V F3-06 IGBT module temperature when alarm ℃ F3-07 Speed when alarm rpm F3-08 Internal torque command when alarm % F3-09 V-REF value when alarm V F3-10 T-REF value when alarm V F3-11 Alarm/warn code 2 when alarm F3-12 Alarm/warn code 3 when alarm F3-13 Alarm/warn code 4 when alarm F3-14 Alarm/warn code 5 when alarm F3-15 Alarm/warn code 6 when alarm F3-16 Alarm/warn code 7 when alarm ※1: F3-00=0 indicates that there is no alarm. ※2: F3-01=0 indicates that there is no warn.
4-4-5.Reset Parameters to Default The following steps show how to reset parameters to default. 1. Press STATUS/ESC key to select Auxiliary Function. 2. Press INC or DEC key to set group No. to 4, and press ENTER key. 3. Press and hold ENTER key, and the panel displays “0” and is blinking. 4. Set the value to 1. Press and hold ENTER key to confirm. 5. Repower on the drive and the parameters are all reset to default.
4-4-6. External monitoring Select F5-00 in auxiliary function, the panel displays “C-OUT” which means external monitoring mode, COM1 is effective, operate panel is ineffective. At this time user can debug the servo via PC. Press STATUS/ESC to return.
4-5.Parameter Setting
Select or adjust the functions via parameter setting. Please refer to appendix 1 for parameters list. The following steps show how to change a parameter. Check the permitted range of the parameters in appendix 1.

32
The example below shows how to change parameter P3-09 from 2000 to 3000. 1. Press the STATUS/ESC key to select the parameter setting mode.
2. At this time the second LED is blinking, and press INC or DEC key to set the group No. to 3. Press ENTER key to confirm.
3. At this time the last LED is blinking, and press INC or DEC key to set the member No. to 9. Press and hold ENTER key to confirm.
4. At this time the panel displays the value in P3-09, and the last decimal “0” is blinking. Press ENTER to left shift the blinking decimal. Press INC, DEC or ENTER key to modify the value to 3000, and press and hold ENTER to confirm.
The parameter in P3-09 in changed from 2000 to 3000. Repeat steps 2 to 4 to change the parameter again. 5. Press STATUS/ESC key to return.
4-6.Alarm Alarm code will pop up (E-XXX) if there is error in servo. The alarm state is invisible when there is no error in servo. Press ENTER to reset the alarm. It is no need to reset the alarm when the servo is OFF because of error. Notes: when there is alarm, please clear the alarm reasons, then reset the alarm.
33
5 Run the servo system
This chapter describes the basic function and using method of DS2 series servo.
5-1.Control mode selection DS2 series servo has one main mode and two sub modes. Sub mode 1 and 2 can be switched to each other via /C-SEL signal.
Parameter Control mode Reference
P0-00 0 Testing mode, users cannot change!
P0-01 Sub mode1
0 Idle mode The motor will not power on even if the servo drive enables.
1 Torque control (internal setting) Control the output torque of servo motor via operating panel or communication.
5-9
2 Torque control (analog voltage command) Control the output torque of servo motor via analog voltage command. It is mostly used to close-loop torque control with upper device, such as tension control. (If servo drive doesn’t have analog input port, it cannot use this mode.)
5-8
3 Speed control (internal speed setting) Use /SPD-D, /SPD-A, /SPD-B to select the speed which is set in the servo drive. The servo drive can set 3 speeds.
5-6
4 Speed control (analog voltage command) Control the speed of servo motor via analog voltage command. It is mostly used to close-loop speed control with upper device.
5-5
5 Position control (internal position command) Control the position via internal position command; it can set pulse quantity and torque.
5-4
6 (default value)
Position control (external pulse command) Control the position of servo motor via pulse command. Control the position via pulse quantity; control the speed via pulse frequency.
5-3
7 Speed control (pulse frequency command) Control the speed of servo motor via pulse frequency, but not control the position.
5-7
P0-02 Sub mode2
Same as sub mode 1
The servo will enter sub mode2 when /C-SEL signal is effective. 5-10
5-2.Basic function setting Parameter Name Reference
P5-10 Servo ON setting /S-ON 5-2-1 P0-05 Switch the motor rotate direction 5-2-2 P0-06 Motor stop mode setting 5-2-3 P4-06 Servo immediately stop torque 5-2-3 P5-12 Prohibit forward running /P-OT 5-2-4 P5-13 Prohibit reverse running /N-OT 5-2-4 P5-34 Power-loss brake /BK 5-2-5

34
5-2-1. Servo ON setting When servo ON signal is ineffective, the servo motor cannot run. Parameter Signal Setting Explanation Change Effective
P5-10 /S-0N n.0001 (default value)
When SI1 is ON, servo motor powers on and enables to run.
Any Repower on
n.0010 Always effective, no need to wiring.
/S-ON signal can be set to other input via parameter P5-10, please refer to chapter 5-12-1.
5-2-2. Switch the motor rotate direction Change the motor rotate direction without changing the motor wiring. The standard forward rotate direction is “CCW rotate” look at the load side. “Reverse mode” will change the motor rotate direction.
Mode Forward rotate Reverse rotate
Standard setting: CCW is forward rotate
Reverse mode: CW is forward rotate
Set the rotate direction Parameter Setting Explanation Change Effective P0-05 0 (default) Standard setting (CCW is forward) Servo stop Repower
on 1 Reverse mode (CW is forward) After changing the direction, the servo received signal is negated, but it will not affect the direction of P-OT and N-OT.
5-2-3. Overtravel Limit (P-OT & N-OT) The limit switch can prevent the moving part on the machine out of the setting range. When the limit switch is connected to the servo and enabled, the servo will forced stop. (1) Use the overtravel signal Please connect P-OT and N-OT to the limit switch. Make sure to wiring as the following diagram when linear driving to avoid machine damagement.
Reverse side
Forward side
limitswitch
limitswitch
N-OT
P-OT servo drive
Servo motor
CCW
CCW CW
CW

35
(2) Set the overtravel signal
Parameter Signal Setting Explanation Modify Effective P5-12 /P-OT n.0013 SI3=ON, prohibit the forward running Any Repower on
n.0003 (default value)
SI3=OFF,prohibit the forward running
n.0010 Always prohibit the forward running n.0000 Do not use forward overtravel signal
P5-13 /N-OT Default value is n.0004, input signal from SI4 terminal. The setting method is the same as P-OT.
Any Repower on
1. /P-OT, /N-OT can be changed to other terminal input via parameter P5-12 and P5-13. Please refer to chapter 5-12-1. 2. In position control, there is position offset pulse when stop the motor via overtravel signal. Please
input clear signal /CLR to clear the offset. 3. In position control, if the servo still can receive pulse when stop the motor via overtravel signal,
these pulses will accumulate until the servo alarm. Notes: below is the default setting of P-OT and N-OT for each type.
(3) Motor stop mode when use overtravel signal
When use overtravel signal, please set the motor stop mode as the below table: Parameter Function Setting
range Default value Modify Effective
P0-06.H Motor stop mode when use overtravel signal
0~3 2 Servo OFF
Repower on
P0-06.H value Explanation
0~1 Inertia stop. Keep on inertia motion after stop.
2 Decelerate stop. Change to zero clamp state after stop. Torque setting: P4-06 urgent stop torque
3 Decelerate stop. Change to inertia motion state after stop. Torque setting: P4-06 urgent stop torque.
Notes: (1) P0-06.H=0,1, servo enable signal will be forced OFF when overtravel signal arrives. P0-06.H=3, servo enable signal will be forced OFF after motor stop when overtravel signal arrives. P0-06.H=2, servo enable signal will not be forced OFF as long as the servo enable signal is always effective.
(2) stop condition depends on rotate checking speed P5-02, unit rpm.
Related parameter settings:
P4-06 Urgent stop torque Unit Default value Range Suitable
mode Modify Effective
1% rated torque 300 0~300 All the Servo Immediately
Servo type Parameter Default setting
DS2-20P4 DS2-20P4-B DS2-20P7 DS2-20P7-B DS2-21P5-B
P5-12 n.0000
P5-13 n.0000
DS2-20P4-A DS2-20P7-A DS2-21P5 DS2-21P5-A
P5-12 n.0003
P5-13 n.0004
As the output terminals are different from each type, the default setting will be different.

36
modes OFF Notes: if this parameter set too small, the motor will stop slowly.
5-2-4. Motor stop mode when servo OFF DS2 series servo drive will close the servo enable as the following condition: The power is on, input signal is OFF (/S-ON) An alarm occurs (/ALM) Power is OFF.
Parameter Description Unit Setting Range Default Setting
P0-06.L Motor stop mode when servo OFF - 0~2 2
P0-06.L range Explanation
0~2 Inertia stops. After stop, keep on inertia motion state.
Notes: DS2 series servo drive doesn’t have built-in DB brake. So no matter what value P0-06.L is, servo will keep on inertia motion after stop.
5-2-5. Power-off Brake (BK) It is used when servo drive controls the vertical shaft. The function of power-off brake is the moveable part will not shift when servo is OFF.
(1) Wiring Example
The ON/OFF circuit of brake includes sequence signal /BK and brake power. The following diagram shows a standard wiring example.
Power-off brake Prevent the part moving as gravity when servo is OFF
Servo motor The brake built into the MS series servomotor
with brakes is a de-energization brake, which is used only to hold and cannot be used for braking. Use the holding brake only to hold a stopped motor. Brake torque is about 120% of the rated motor torque.

37
Note: the working voltage of brake is DC 24V, current is about 0.6A. In above diagram, BK signal is output from SO1, set parameter P5-34 to n.0011.
(2) Brake signal The signal controls the brake. Do not have to connect the signal if the motor without brake.
(3) Servo OFF delay time (after servo motor stop) If the machine moves slightly due to gravity because of the brake has action delay time. Please adjust the time as below parameter. P5-06 Servo OFF delay time (brake command)
Unit Default Range Suitable mode Modify Effective 1ms 0 0~500 All the modes Servo OFF Immediately
This parameter is used to set the output time from the brake control signal /BK to the servo OFF operation (servomotor output stop).
With the standard setting, the servo will be OFF when the /BK signal (brake operation) output. However, depending on machine configuration and brake characteristics, there is a period from /BK signal output to brake action. During the time, motor will not output torque, brake doesn’t brake, the machine may move slightly due to gravity. Now, we use
Parameter Signal Type Default Explanation Modify Effective P5-34 /BK Output n.0000 Need to distribute Any Re-power
on /BK signal can output from output terminal via setting parameter P5-34, please refer to chapter 5-12-2.
/S-ON input
/BK output
Servo OFFServo ON
Brake OFF Brake ON
Servo action (Motor power on)
Servo OFFDelay time
Motor Power ON
Motor power OFF
L
N
UVW
PE
SO1
COM
UVW
PE
M
PGCN2
BK
1
2
3
AC DC
Power supply
for brake
Servo drive
BK-RY
+24V
L1 L2
BK-RY
Power
Servo motor with brake

38
parameter P5-06 to delay the servo OFF, make sure the servo isn’t OFF until the brake action in order to delete the machine moving. Note: this parameter is the time when motor stop and TGON is invalid.
(4) Brake ON parameter (When servo motor is rotating) The brake action setting during the motor is rotating: parameter P5-07, P5-08. Notes: the motor will power OFF when alarm occurs. The machine will move as gravity until the brake action. Set below parameters in order to use brake when motor speed decreases to setting value or waiting time ends.
Set the brake time when servo OFF caused by /S-ON signal or alarm.
The brake is used to protect the position. The brake must be effective at suitable time when servo motor stop. Users can adjust the parameters according to the machine action. The /BK signal from ON to OFF under either of the following conditions: 1. Motor speed drops below the value of P5-07 after servo OFF. 2. over the time of P5-08 after servo OFF.
The real speed is max speed (P3-09) even set the speed higher than max in P5-07.
5-3.Position mode (external pulse command) Below parameters are used in position mode with pulse.
Basic parameter Parameter Name Reference
P0-01 Control mode selection 5-3-1 P2-00 Pulse command mode 5-3-2 P2-02 Electronic gear ratio (numerator) 5-3-3 P2-03 Electronic gear ratio (denominator) P5-10 Servo ON signal /S-ON 5-2-1
Other available parameters
Key words Parameter
Name Reference
Command filter P2-01 Position command filter selection 5-3-4 Clear error pulse P5-24 Pulse error clear 5-3-5
P5-07 Brake command output speed Unit Default Range Suitable mode Modify Effective rpm 100 0~5000 All the modes Servo OFF Immediately
P5-08 Brake command waiting time Unit Default Range Suitable mode Modify Effective 1ms 500 10~1000 All the modes Servo OFF Immediately
/S-ON input or alarm Occurs power off
Motor speed (rpm)
/BK output P5-07
Servo ON Servo OFF
Brake ONBrake OFF
P5-08
DB stopFree stop

39
Positioning finish P5-28 Positioning finish signal output /COIN 5-3-6 P5-00 Positioning finish width
Positioning near P5-36 Positioning near signal outpu /NEAR 5-3-7 P5-04 Positioning near signal width
Prohibit pulse P5-22 Command pulse prohibition /INHIBIT 5-3-8
5-3-1. Control mode selection Parameter Setting
value Meaning Modify Effective
P0-01 6 Position control (external pulse) Servo OFF Immediately Function: control the position by the external pulse command
5-3-2. Pulse command 5-3-2-1. Pulse mode selection Parameter Setting
value Command mode Suitable
mode Modify Effective
P2-00 0 CW, CCW mode 6, 7 Servo OFF
Re-power on 2 Pulse+direction
Note: DS2 series (hardware version 3.2) cannot support AB phase pulse.
5-3-2-2. Explanation of command pulse Command pulse mode Electrical specification Remark
Direction+pulse (DIR+PUL signal) Max frequency: Bus drive is 500kbps. Transistor open circuit is 200kbps.
t1,t2 ≤ 0.1μs t3,t7 ≤ 0.1μs t4,t5,t6 > 3μs τ≥ 2.5μs (τ/T) × 100 = 40% ~ 60%
Direction (DIR) 1= forward command 0= reverse command
CW, CCW mode Max frequency: Bus drive is 500kbps. Transistor open circuit is 200kbps.
t1, t2 ≤ 0.1μs τ≥ 2.5μs (τ/T) × 100 = 40% ~ 60%
CW: PUL=pulses DIR=0 CCW: PUL=0 DIR=pulses
PUL
DIR
Forward run Reverse run
t1 t2
τT
t2 t3
t4 T τ
t5 t6
t7
Forward command
Reverse command
DIR
PUL
t1
40
5-3-2-3. Signal connection The signal connection please refer to chapter 3-2-4.
5-3-3. Electronic gear ratio The electronic gear function is set any value for motor moving quantity corresponding to input pulse command. The host device which sends command doesn’t need to consider the machine deceleration ratio and encoder pulse quantity. Not use electronic gear
Use electronic gear
5-3-3-1. Parameter P2-02 Electronic gear (numerator)
Unit Default Range Suitable mode Modify Effective — 1 1~65535 6 Any Immediately
P2-03 Electronic gear (denominator) Unit Default Range Suitable mode Modify Effective — 1 1~65535 6 Any Immediately
5-3-3-2. Set the electronic gear Calculate the electronic gear ratio (B/A) using the following steps:
Step Content Explanation 1 Confirm the machine
specification Confirm the deceleration ratio, ball screw distance, pulley diameter
2 Confirm the encoder pulse
Confirm the servo motor encoder pulses
3 Set the reference unit Set the actual distance or angle corresponding to 1 pulse of the command controller
Workpiece
Ball screw pitch: 6mm Encoder pulse: 2500
Define the machine condition and command unit by electronic gear
The workpiece moves 10mm Command unit is 1 µm 10mm1µm =10000 pulse
Command unit: 1µm
Encoder pulse: 2500 Ball screw pitch: 6mm
Workpiece
The workpiece moves 10mm One rotation is 6mm 10÷ 6=1.66662500×4 pulse finishes one rotationCommand input 16666 pulsesCalculate these values in the host controller

41
4 Calculate the moving
value the load shaft rotates 1 circle
Calculate the actual unit value the load shaft rotates 1 circle based on reference unit
5 Calculate the electronic gear ratio
Calculate the electronic gear ratio based on the formula (B/A)
6 Set the parameters Set the result as the electronic gear ratio 1. Formula:
Suppose the machine deceleration ratio of motor shaft and load shaft is m/n, calculate the electronic gear ratio as the below formula:
(when servo motor shaft rotates m circles, load shaft rotates n circles)
If it exceeds the setting range, please reducible the molecular and denominator in the setting range. The reducible will not affect the using.
2. Reference unit doesn’t mean the precision Refine the reference unit based on machine precision can improve the servo positioning precision. For example: in the application of screw, the machine precision can up to 0.01mm, so the reference unit 0.01mm is more accurate than 0.1mm.
5-3-3-3. Example of setting the electronic gear The example for different loads:
Step Ball screw Round table Belt + pulley
1 Ball screw pitch: 6mm Machine deceleration ratio: 1/1
1-circle rotate angle: 360° Deceleration ratio: 3/1
Pulley diameter: 100mm Deceleration ratio: 2/1
2 2500P/R 2500P/R 2500P/R 3 1 reference unit: 0.001mm 1 reference unit: 0.1° 1 reference unit: 0.02mm 4 6mm/0.001mm =6000 360/0.1=3600 314mm/0.02mm =15700 5 2500 4B 1
A 6000 1
2500 4 3B
A 3600 1
2500 4B 2
A 15700 1
6 P2-02 10000 5
P2-03 6000 3= =
P2-02 30000 25P2-03 3600 3= =
P2-02 20000 200P2-03 15700 157= =
5-3-4. Position command filter The servo can filter the command pulse at certain frequency. Filter mode selection: select the filter as the following parameters
P2-01 Select the position command filter Unit Default Range Suitable mode Modify Effective — 0 0~1 6, 7 Servo OFF Re-power on
Load shaft
D: pulley diameter 1rotate =
Reference unitπD
Load shaft
Reference unit 1 rotate =
360 ° P: pitch
P
1rotate =Reference unit
P
Load shaft
Electronic gear ratio = AB = P2-03
= unit value of load shaft rotates 1 circleEncoder pulses × 4 ×
m n
P2-02
πD

42
Select 1-time delay feature or moving average filter. P2-01 Content
0 First-order inertia filter 1 Smooth filter
Set the filter time:
5-3-5. Pulse error clear (/CLR) Pulse error: the difference between command pulse of controller (such as PLC) and feedback pulse of servo in position mode. Its unit is 1 reference unit; it is related to the reference unit of electronic gear ratio. Parameter Signal Default Meaning Suitable
mode Modify Effective
P5-24 /CLR n.0000 Need distribution 5, 6 Any Re-power on
Notes: 1. /CLR can be used as input terminal, please refer to chapter 5-12-1. 2. Monitor the pulse error via U-08.
Function: after set on /CLR signal, the error counter is set to 0, position-loop given position is set to current position. Clear the pulse error at the rising edge of /CLR signal.
1
/CLR signal 0
Clear once here
So after the /CLR signal is ON, the error will accumulate if the servo still receive pulses.
5-3-6. Positioning complete (/COIN) Use the signal when the controller needs to confirm the completion of positioning. Parameter Signal Default Meaning Suitable
mode Modify Effective
P5-28 /COIN n.0001 Output positioning complete signal from SO1
5, 6 Any Re-power on
Note: /COIN can be output from other terminals, please refer to chapter 5-12-3. P5-00 Width of positioning complete
P2-04 Position command filter time parameters Unit Default Range Suitable mode Modify Effective ms 0 0~100 6, 7 Servo OFF Re-power on
Addition: The comparison of P2-04 in First-order inertia filter and smooth filter mode:
First-order inertia filter Smooth filter
100%
63.2%
t
36.8%
P2-04P2-04
滤波后
滤波前
P2-04 P2-04
100%
t
Before filter After filter
43
Unit Default Range Suitable mode Modify Effective 1 reference unit 7 0~250 5, 6 Servo OFF Immediately
Function: when the pulse error value is lower than P5-00, output /COIN signal. Monitor the pulse error value via U-08.
1
0
/COIN
信号状态
偏移脉冲(U-08) P5-00
5-3-7. Positioning near (/NEAR) Positioning near signal means the servo motor is near the positioning complete. It prompts the device to prepare the next operation.
5-3-8. Command pulse prohibition (/INHIBIT) To stop the commnad pulse counts in position control mode. When /INHIBIT signal is ON, the command pulse stop counting.
Parameter Signal Default Meaning Suitable mode
Modify Effective
P5-36 /NEAR n.0000 Need to distribute 5, 6 Any Re-power on
Note: /NEAR can be output from terminal by setting P5-36, please see chapter 5-12-3. P5-04 Width of positioning near signal
Unit Default Range Suitable mode Modify Effective 1 reference
unit 50 0~10000 5, 6 Servo OFF Immediately
Function: when the pulse error signal is lower than P5-04, output /NEAR signal. Set the parameter wider than positioning complete signal. Monitor the pulse error value via U-08.
5-045-00
/NEAR信号状态0
1
1
0
/COIN信号状态
偏移脉冲(U-08)
Note: here is signal state, but not terminal state.
Error pulse (U-08)
/COIN signal
Error pulse (U-08)
/NEAR signal state
/COIN signal state

44
Input signal setting:
5-4.Position mode (internal position mode) Parameter
Parameter Name Reference P0-01 Control mode selection 5-4-1 P2-10 Internal position given mode 5-4-2
P2-11~P2-90 Internal 1~16 segment position parameters 5-4-3 P5-25 Change the step signal /CHGSTP 5-4-4 P5-22 Pause current signal /INHIBIT 5-4-5 P5-21 Skip current signal /Z-CLAMP 5-4-6 P5-10 Servo ON signal /S-ON 5-2-1
Other parameters Key words Parameter Name Reference
Find the origin P2-94 The quantity pass through the Z phase signal after leaving the limit switch
5-4-7
P2-95 The speed near the limit switch P2-96 The speed leave the limit switch P5-17 /SPD-D: define the origin in position mode P5-18 /SPD-A: find the reference origin at forward side
in position mode P5-19 /SPD-B: find the reference origin at reverse side
in position mode Pulse error clear P5-24 Pulse error clear 5-3-5 Positioning complete
P5-28 Positioning complete signal output /COIN 5-3-6 P5-00 Positioning complete width
Positioning near P5-36 Positioning near signal output /NEAR 5-3-7 P5-04 Positioning near signal width
5-4-1. Control mode selection Parameter Default Meaning Modify Effective
P0-01 5 Internal position mode control Servo OFF Immediately Function: control the position with the value in servo internal register
5-4-2. Internal position given mode Parameter Content Unit Default Suitable
mode Modify Effective
P2-10 Internal position mode setting
— n.0000 5 Servo OFF
Re-power on
Parameter setting Function Default Range n.□xxx No meaning n.x□xx Wait mode 0 0~1 n.xx□x Change step
mode 0 0~2
Parameter Signal Default Meaning Suitable mode
Modify Effective
P5-22 /INHIBIT n.0000 Need to distribute 5, 6 Any Re-power on
Note: /INHIBIT can be input from input terminal by setting P5-22. Please refer to chapter 5-12-1
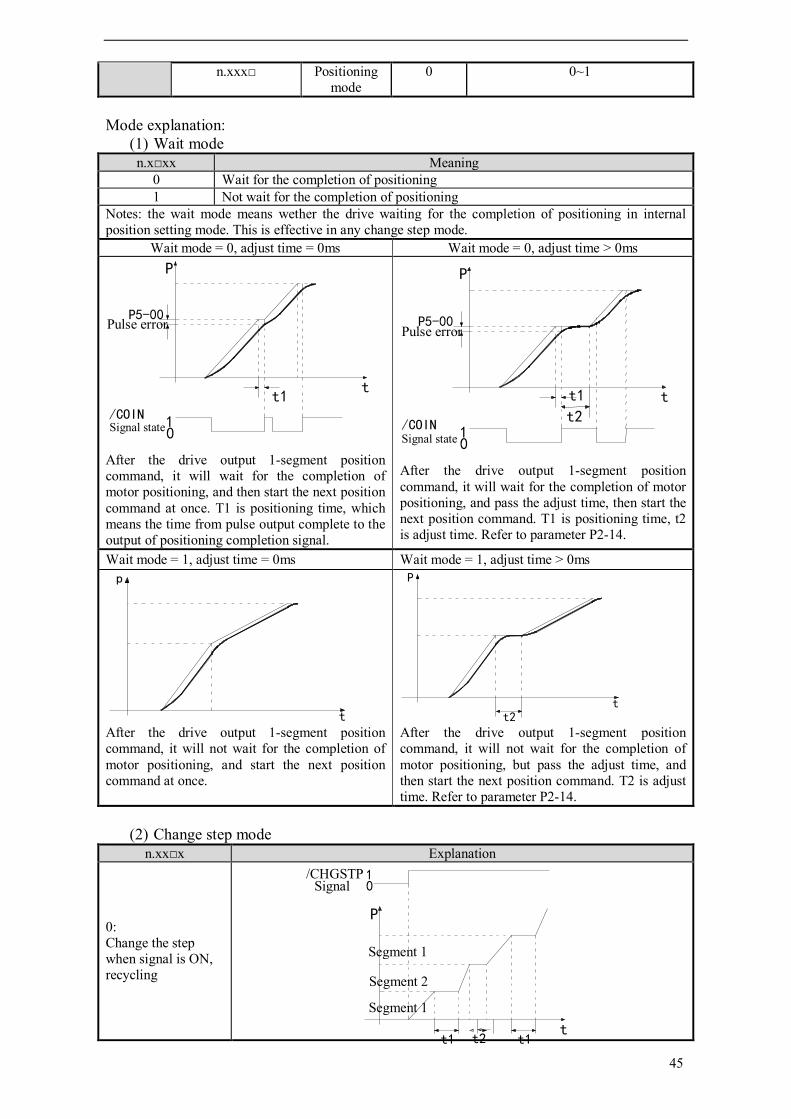
45
n.xxx□ Positioning mode
0 0~1
Mode explanation:
(1) Wait mode n.x□xx Meaning
0 Wait for the completion of positioning 1 Not wait for the completion of positioning
Notes: the wait mode means wether the drive waiting for the completion of positioning in internal position setting mode. This is effective in any change step mode.
Wait mode = 0, adjust time = 0ms Wait mode = 0, adjust time > 0ms
After the drive output 1-segment position command, it will wait for the completion of motor positioning, and then start the next position command at once. T1 is positioning time, which means the time from pulse output complete to the output of positioning completion signal.
After the drive output 1-segment position command, it will wait for the completion of motor positioning, and pass the adjust time, then start the next position command. T1 is positioning time, t2 is adjust time. Refer to parameter P2-14.
Wait mode = 1, adjust time = 0ms Wait mode = 1, adjust time > 0ms
After the drive output 1-segment position command, it will not wait for the completion of motor positioning, and start the next position command at once.
After the drive output 1-segment position command, it will not wait for the completion of motor positioning, but pass the adjust time, and then start the next position command. T2 is adjust time. Refer to parameter P2-14.
(2) Change step mode
n.xx□x Explanation
0: Change the step when signal is ON, recycling
t
p P
tt2
t
P5-00 Pulse error
10
/COIN Signal state
P
t1
t2t1
P
/COIN Signal state0
1
Pulse error
P5-00
t
t2 t1
Segment 1
Segment 2
Segment 1
P
t
/CHGSTP Signal
10
t1

46
t1=P2-14, t2=P2-19 1. If /CHGSTP is ON, servo will run segment 1 and 2. 2. If /CHGSTP is OFF in one segment, servo will finish this segment and stop
running the next segment.
1: Change the step at the rising edge of the signal, single-step run
Suppose there are 2 segments. t1=P2-14 In this mode, the adjust time is ineffective. The servo will run the next command once the current pulse is finished.
2: Start at the rising edge of the signal, sequential run all, not recycling
Suppose there are 2 segments. t1=P2-14 /CHGSTP signal is ineffective when one cycle has not been finished, such as the second /CHNGSTP signal in the diagram.
(3) Positioning mode n.xxx□ Meaning
0 Relative positioning 1 Absolute positioning
0: relative positioning 1: absolute positioning (take the accumulate position origin as the absolute positioning origin)
Segment 2
Segment 1
t
pp
t
Segment 1
Segment 2
01/CHGSTP
Signal
t
P
t1
t1
P
t
/CHGSTPSignal
10

47
5-4-3. Position parameters from segment 1 to 16 P2-5(n+1)+1 Pulse number (low bit)
Unit Default Range Suitable mode Modify Effective
1 pulse 0 -9999~9999 5 Servo OFF Immediately P2-5(n+1)+2 Pulse number (high bit)
Unit Default Range Suitable mode Modify Effective
10000 pulses 0 -9999~9999 5 Servo OFF Immediately
P2-5(n+1)+3 Speed
Unit Default Range Suitable mode Modify Effective
0.1rpm 0 0~50000 5 Servo OFF Immediately P2-5(n+1)+4 Adjust time
Unit Default Range Suitable mode Modify Effective
1ms 0 0~65535 5 Servo OFF Immediately P2-5(n+1)+5 Filter time
Unit Default Range Suitable mode Modify Effective
0.1ms 0 0~65535 5 Servo OFF Immediately Notes: 1. Set pulse number = pulse number (high bit) ×10000 + pulse number (low bit). 2. In formula P2-5(n+1) + 1, n is the segment no. of internal position; the range is 1~16. 3. If one of the segment speed is zero, servo will skip this segment and run the next segment. 4. In relative positioning mode, if one segment speed is not zero but the pulse number is zero, the motor will not run, but the wait mode is effective. The servo will run the next segment when the adjust time is out. 5. In absolute positioning mode, if one segment speed is not zero but the pulse number is zero, the motor will return to the reference origin with the speed of this segment. 6. In absolute positioning mode, if 2 consecutive segments speed are not zero, but the pulse number is the same, the servo motor will not run but the wait mode is effective.
5-4-4. Change step (/CHGSTP) Parameter Signal Type Default Meaning Suitable
mode Modify Effective
P5-25 /CHGSTP Input n.0000 Need distribute
5 Any Re-power on
Note: /CHGSTP can be distributed to other input terminal by setting the parameter P5-25. Refer to chapter 5-12-1.
5-4-5. Pause current signal (/INHIBIT) When /INHIBIT signal is ON, the internal position pulse will stop in internal position mode. When /INHIBIT signal is OFF, the motor will continue running this stage. Input signal setting:
Parameter Signal Default setting
Meaning Suitable mode
Modify Effect
P5-22 /INHIBIT n.0000 Need to distribute 5, 6 Any Repower on
1./INHIBIT signal is distributed to I/O terminal via P5-22, refer to chapter 5-12-1.

48
5-4-6. Skip current signal (/ZCLAMP) When /ZCLAMP signal is triggered in internal position mode, cancel the current stage running, enter the next stage as different conditions of change step mode. /Z-CLAMP signal Change step mode Execution
0 Cancel current stage, execute the next stage at once 1 Cancel current stage, execute the next stage when the
change step signal is ON 2 Cancel current stage, execute the next stage at once
Input signal setting:
5-4-7. Reference origin
(1) Find the reference origin To find out the physical origin of working table and make it as the coordinates origin of point position control. Users can select finding reference origin at forward or reverse side. Function setting:
P2-94 n.xx□x
Unit Default Range Suitable mode Modify Effect - 0 0~1 5, 6 ServoOFF Re-power on
Note: P2-94=0, find reference origin function is invalid. P2-94=1, this function is valid. Signal setting:
Related parameter setting:
P2-94 The quantity pass the Z phase signal after leaving the limit switch
Unit Default Range Suitable mode Modify Effective
Number 2 1~F 5, 6 Servo OFF Immediately P2-95 The speed hitting the proximity switch
Unit Default Range Suitable mode Modify Effective
0.1rpm 600 0~50000 5, 6 Servo OFF Immediately P2-96 The speed leaving the proximity switch
Unit Default Range Suitable mode Modify Effective
0.1rpm 100 0~50000 5, 6 Servo OFF Immediately
Parameter Signal Type Default Meaning Suitable mode
Modify Effect
P5-21 /Z-CLAMP Input n.0000 Need to distribute
3, 4, 7 Any Re-power on
1./Z-CLAMP can be distributed to input terminal by P5-21. Refer to chapter 5-12-1. 2./Z-CLAMP is zero clamp function in speed mode.
Parameter Signal Type Default Meaning Suitable mode
Modify Effective
P5-18 /SPD-A Input n.0000 Need to distribute
3, 5, 6 Any Re-power on
P5-19 /SPD-B Input n.0000 Need to distribute
3, 5, 6 Any Re-power on
1. /SPD-A, /SPD-B can be distributed to the input terminal via parameter P5-18, P5-19, refer to chapter 5-12-1.
2. In position mode, /SPD-A can trigger the forward side to find the reference origin, /SPD-B can trigger the reverse side to find the reference origin.
3. In internal speed mode (mode 3), /SPD-A and /SPD-B auto-switch to internal speed selection signal.

49
Detailed explanation: Find reference origin diagram:
The timing diagram of finding reference origin of forward side:
Steps: 1. Install limit switch at forward and reverse side. At the rising edge of /SPD-A, motor runs forward at the speed of P2-95 to find the reference origin of forward side. 2. After the working table hit the limit switch, the motor stop as the mode set by parameter P0-06.H. 3. Motor leaves the limit switch at the speed of P2-96. After the working table left the limit switch, the motor run at the Z phase signal position of No.n optical encoder. This position is considered as the coordinates origin, n is decided by parameter P2-94.
(2) Define the reference origin Function: In external pulse command postion mode (mode 6) and internal position mode (mode 5), define the current position as the reference origin at the rising edge of /SPD-D. Signal setting:
/SPD-A
/P-OT
/Z
V
t
①
②
③
P2-96
P2-95 P2-94
Parameter Signal Type Default Meaning Suitable mode
Modify Effective
P5-17 /SPD-D Input n.0000 Need distribute
3, 5, 6 Any Re-power on
1. /SPD-D can be distributed to input terminal by P5-17. Refer to chapter 5-12-1. 2. In internal speed mode (mode 3), /SPD-D auto-switch to the direction select signal of internal speed.
/P-OT /N-OT
Speed P2-95 Direction CWStop mode
P0-06.H Speed P2-96
Direction CCW
P2-94
Speed P2-95 Direction CCW
Stop mode P0-06.H
Speed P2-96 Direction CW
P2-94
Reference origin of forward side
Reference origin of reverse side
Z signal quantity Z signal quantity
①
②
③
50
The reference origin defined by the two modes will be considered as the origin of absolute position control.
5-5.Speed control (analog voltage command) Note: only DS2-2□P□-A and DS2-2□P□-B support this mode.
Basic parameters Parameter Name Reference
P0-01 Select the control mode 5-5-1 P3-00 Analog value of rated speed 5-5-2 P5-10 Servo ON signal /S-ON 5-2-1
Other parameters
Key words Parameter Name Reference Zero drift
adjustment F1-03 Analog voltage speed command offset
auto-adjustment 5-5-3
Proportion action
P5-11 P-CON 5-5-4
Zero clamp P5-21 Zero clamp /ZCLAMP 5-5-5 P5-01 Zero clamp speed
Speed coincidence
checking
P5-29 /V-CMP speed coincidence checking 5-5-6 P5-03 Coincidence speed signal checking
width/V-CMP Torque limit P4-02 Forward torque limit 5-5-7
P4-03 Reverse torque limit P0-07 T-REF distribution P4-04 Forward external torque limit P4-05 Reverse external torque limit P5-15 Forward external torque limit /P-CL P5-16 Reverse external torque limit /N-CL P5-32 Output when torque reaches limit value
/CLT Soft start P3-05 Soft start acceleration time 5-5-8
P3-06 Soft start deceleration time Filter P3-07 Speed command filter time 5-5-9
P3-08 Speed feedback filter time Death area P3-10 Speed command death area input voltage 5-5-10
5-5-1. Control mode selection
5-5-2. Analog value of rated speed
Analog command input please refers to chapter 3-2-4.
Parameter Set value Meaning Modify Effective P0-01 4 Analog voltage command speed control Servo OFF Immediately
Function: control the speed by the signal (analog voltage command) input from V-REF terminal
P3-00 Analog value of rated speed Unit Default Range Suitable
mode Modify Effective
0.01V/rated speed 1000 150~3000 4 Servo OFF Immediately Function: the speed command voltage (V-REF) to run the servo motor at rated speed. Such as: P3-00=500 means the motor run at rated speed when analog input voltage = 5.00V P3-00=800 means the motor run at rated speed when analog input voltage = 8.00V.
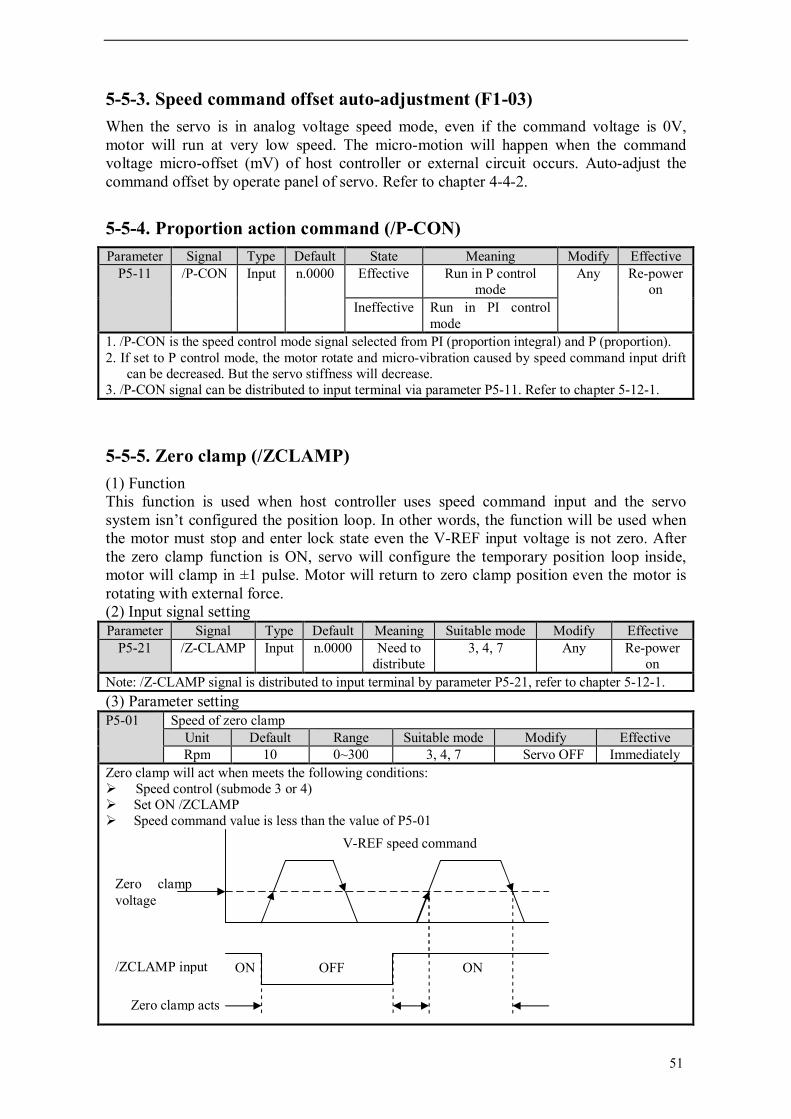
51
5-5-3. Speed command offset auto-adjustment (F1-03) When the servo is in analog voltage speed mode, even if the command voltage is 0V, motor will run at very low speed. The micro-motion will happen when the command voltage micro-offset (mV) of host controller or external circuit occurs. Auto-adjust the command offset by operate panel of servo. Refer to chapter 4-4-2.
5-5-4. Proportion action command (/P-CON) Parameter Signal Type Default State Meaning Modify Effective
P5-11 /P-CON Input n.0000 Effective Run in P control mode
Any Re-power on
Ineffective Run in PI control mode
1. /P-CON is the speed control mode signal selected from PI (proportion integral) and P (proportion). 2. If set to P control mode, the motor rotate and micro-vibration caused by speed command input drift
can be decreased. But the servo stiffness will decrease. 3. /P-CON signal can be distributed to input terminal via parameter P5-11. Refer to chapter 5-12-1.
5-5-5. Zero clamp (/ZCLAMP) (1) Function This function is used when host controller uses speed command input and the servo system isn’t configured the position loop. In other words, the function will be used when the motor must stop and enter lock state even the V-REF input voltage is not zero. After the zero clamp function is ON, servo will configure the temporary position loop inside, motor will clamp in ±1 pulse. Motor will return to zero clamp position even the motor is rotating with external force. (2) Input signal setting
(3) Parameter setting
Parameter Signal Type Default Meaning Suitable mode Modify Effective P5-21 /Z-CLAMP Input n.0000 Need to
distribute 3, 4, 7 Any Re-power
on Note: /Z-CLAMP signal is distributed to input terminal by parameter P5-21, refer to chapter 5-12-1.
P5-01 Speed of zero clamp Unit Default Range Suitable mode Modify Effective Rpm 10 0~300 3, 4, 7 Servo OFF Immediately
Zero clamp will act when meets the following conditions: Speed control (submode 3 or 4) Set ON /ZCLAMP Speed command value is less than the value of P5-01
Zero clamp voltage
V-REF speed command
ON ON OFF
Zero clamp acts
/ZCLAMP input

52
5-5-6. Speed coincidence checking (/V-CMP) When motor speed is equal to the command speed, servo outputs speed coincidence signal (V-CMP). Parameter Signal Type Default Meaning Suitable mode Modify Effective
P5-29 /V-CMP Output n.0000 Need to distribute
3, 4, 7 Any Re-power on
Note: /V-CMP signal can be distributed to output terminal by parameter P5-29. Refer to chapter 5-12-3.
5-5-7. Torque limit 5-5-7-1. Internal torque limit (output torque max value limit) The function is to limit the max output torque by parameters. P4-02 Forward torque limit
Unit Default Range Suitable mode Modify Effective 1% 300 0~300 All modes Servo OFF Immediately
P4-03 Reverse torque limit Unit Default Range Suitable mode Modify Effective 1% 300 0~300 All modes Servo OFF Immediately
1. This parameter is always effective, if this parameter value is less than external torque limit value, the final limit value is this parameter.
2. The unit is percent of the motor rated torque; the default value is 300%. The real output torque is different for each type.
5-5-7-2. External torque limit (via input signal) This function is used in machine motion or timing torque limit. For example: press stop action or robot workpiece protection. The torque limit value will be effective when the input signal is ON. P4-04 Forward external torque limit
Unit Default Range Suitable mode Modify Effective 1% 100 0~300 All modes Servo OFF Immediately
P4-05 Reverse external limit Unit Default Range Suitable mode Modify Effective 1% 100 0~300 All modes Servo OFF Immediately
The unit is the percent of motor rated torque; the default value is 100%. Parameter Signal Type Default Meaning Suitable
mode Modify Effective
P5-15 /P-CL Input n.0000 Need to distribute
All modes Any Re-power on
P5-16 /N-CL Input n.0000 Need to distribute
All modes Any Re-power on
Notes: /P-CL, /N-CL can be distributed to input terminal by parameter P5-15, P5-16. Refer to chapter 5-12-1.
Function realization:
P5-03 Speed coincidence signal width Unit Default Range Suitable mode Modify Effective rpm 10 1~250 3, 4, 7 Servo OFF Immediately
If the difference between motor speed and command speed is less than the value of P5-03, servo outputs /V-CMP signal.

53
5-5-7-3. External torque limit (via analog voltage command) T-REF terminal is used as analog voltage command terminal. Please note in external analog torque control mode, this function cannot be used. Parameter Function Set value Meaning Modify Effective
P0-07 Distribute function to T-REF
1 Make T-REF as external torque limit input
Servo OFF
Re-power on
1. For analog voltage command input of torque limit. Get the absolute value of the voltage, the torque limit value based on the absolute value is suitable for forward and reverse direction.
2. When it is used as torque limit, the value is related to voltage command and P4-00. For example, P4-00=1000, T-REF voltage command is 5.0V, the torque limit value is 50% of rated torque.
5-5-7-4. External torque limit (via external input + analog voltage) External torque limit via external input and analog voltage can be used together. Input analog voltage signal from T-REF. the torque limit function cannot be used when servo is in analog command torque control mode. Use /P-CL and /N-CL signal when limit torque via external input. (1) Parameters Parameter Function Set value Meaning Modify Effective
P0-07 T-REF function distribution
3 When P-CL, N-CL is ON, make T-REF as external
torque limit input.
Servo OFF
Re-power on
(2) Input signal setting
(3) Function realization
Signal State Meaning Effective limit value /P-CL 0 Forward external torque limit OFF P4-02
1 Forward external torque limit ON Min value between P4-02 and P4-04 /N-CL 0 Reverse external torque limit OFF P4-03
1 Reverse external torque limit ON Min value between P4-03 and P4-05
P4-04 Forward external torque limit Unit Default Range Suitable mode Modify Effective 1% 100 0~300 All modes Servo OFF Immediately
P4-05 Reverse external torque limit Unit Default Range Suitable mode Modify Effective 1% 100 0~300 All modes Servo OFF Immediately
Note: the unit is the percent of motor rated torque, the default value if 100%.
Parameter Signal Type Default Meaning Suitable mode Modify Effective P5-15 /P-CL Input n.0000 Need to
distribute All modes Any Re-power
on P5-16 /N-CL Input n.0000 Need to
distribute All modes Any Re-power
on Note: /P-CL, /N-CL signal can be distributed to input terminal by parameter P5-15, P5-16. Refer to
chapter 5-12-1.
Signal State Meaning Limit value /P-CL 0 Forward external torque
limit OFF P4-02
1 Forward external torque limit ON
The min value among P4-02, P4-04 and analog voltage command

54
5-5-7-5. Output torque up to limit value signal The signal means the motor output torque reaches limit value. Parameter Signal Type Default Meaning Suitable
mode Modify Effective
P5-32 /CLT Output n.0000 Need to distribute
All modes Any Re-power on
Note: /CLT signal can be distributed to output terminal by parameter P5-32. Refer to chapter 5-12-3.
5-5-8. Soft start Soft start can transform the step speed command to command with acceleration/deceleration.
P3-05 Soft start acceleration time Unit Default Range Suitable mode Modify Effective 1ms 0 0~65535 3, 4, 7 Servo OFF Immediately
P3-06 Soft start deceleration time Unit Default Range Suitable mode Modify Effective 1ms 0 0~65535 3, 4, 7 Servo OFF Immediately
1. Enable to do smooth speed control when input step speed command or choose internal speed. Other cases please set to 0.
2. accerlation/deceleration time is from stop state to rated speed but not from current speed to target speed.
P3-05: the time from stop state to rated speed. P3-06: the time from rated speed to stop state.
5-5-9. Filter P3-07 speed command filter time
Unit Default Range Suitable mode Modify Effective 0.01ms 0 0~65535 3, 4, 5, 6, 7 Servo OFF Immediately
The speed command passes the 1-time delay filter and become smooth speed command. If set it too large, the reponse will be slow. P3-08 speed feedback filter time
/N-CL 0 Reverse external torque limit OFF
P4-03
1 Reverse external torque limit ON
The min value among P4-03, P4-05 and analog voltage command
P3-06: set the time
P3-05: set the time
Speed command
Internal speed command
Soft start Rated speed
Rated speed

55
Unit Default Range Suitable mode Modify Effective 0.01ms 0 0~65535 3, 4, 5, 6, 7 Servo OFF Immediately
Smooth filter the speed feedback. If set it too large, the speed feedback will distort and affect the control result.
5-5-10. Speed command input dead voltage
5-6.Speed control (internal speed) Basic parameter
Parameter Name Reference P0-01 Control mode selection 5-6-1 P5-10 Servo ON signal /S-ON 5-2-1 P3-01 Internal speed 1 5-6-2 P3-02 Internal speed 2 P3-03 Internal speed 3 P5-17 /SPD-D internal speed direction selection 5-6-3 P5-18 /SPD-A internal speed selection P5-19 /SPD-B internal speed selection
Other parameters Key word Parameter Name Reference Proportion
action P5-11 Proportion action command /P-CON 5-5-4
Zero clamp P5-21 Zero clamp /ZCLAMP 5-5-5 P5-01 Zero clamp speed
Speed coincidence
checking
P5-29 /V-CMP speed coincidence checking 5-5-6 P5-03 speed coincidence checking signal width
/V-CMP Torque limit P4-02 forward torque limit 5-5-7
P4-03 reverse torque limit P1-07 T-REF distribution P4-04 Forward external torque limit P4-05 Reverse external torque limit P5-15 Forward external torque limit /P-CL P5-16 Reverse external torque limit /N-CL P5-32 Torque up to limit value output /CLT
Soft start P3-05 soft start acceleration time 5-5-8 P3-06 soft start deceleration time
Filter P3-07 Speed command filter time 5-5-9 P3-08 Speed feedback filter time
P3-10 Speed command input dead voltage Unit Default Range Suitable mode Modify Effective
0.01V 0 0~100 4 Servo OFF Immediately Note: if the input speed command voltage is in the range of this parameter, the input voltage is considered to be 0.

56
5-6-1. Control mode selection
5-6-2. Internal speed setting P3-01 Internal speed 1
Unit Default Range Suitable mode Modify Effective 1rpm 100 -5000 ~ +5000 3 Any Immediately
P3-02 Internal speed 2 Unit Default Range Suitable mode Modify Effective 1rpm 200 -5000 ~ +5000 3 Any Immediately
P3-03 Internal speed 3 Unit Default Range Suitable mode Modify Effective 1rpm 200 -5000 ~ +5000 3 Any Immediately
5-6-3. Input signal setting Switch the running speed by below input signal:
(1) Function realization
Parameter Set value Meaning Modify Effective P0-01 3 Speed control: internal speed selection Servo OFF Immediately
Function: internal speed selection will set 3 motor speeds and select the speed by external signal. It is not need to configure external speed generator or pulse generator.
Parameter Signal Type Default Meaning Suitable mode
Modify Effective
P5-17 /SPD-D Input n.0000 Need to distribute 3, 5, 6 Any Re-power on P5-18 /SPD-A Input n.0000 Need to distribute 3, 5, 6 Any Re-power on P5-19 /SPD-B Input n.0000 Need to distribute 3, 5, 6 Any Re-power on
1. /SPD-D, /SPD-A, /SPD-B can be distributed to input signal by parameter P5-17, P5-18, P5-19. Refer to chapter 5-12-1.
2. When the running mode is 5, 6, /SPD-D auto-switch to origin setting; /SPD-A auto-switch to forward finding reference origin; /SPD-B auto-switch to reverse finding reference origin.
Input signal Direction Running speed /SPD-D SPD-A SPD-B
0 0 0 Forward Internal speed is zero 0 1 P3-01: SPEED1 1 1 P3-02: SPEED2 1 0 P3-03: SPEED3
1 0 0 Reverse Internal speed is zero 0 1 P3-01: SPEED1 1 1 P3-02: SPEED2
M
Servo motor
Run the motor at set speed
Servo unit
Speed selection
SPEED1 P3-01
SPEED2 P3-02
SPEED3 P3-03
User parameter
/SPD-D
/SPD-A
/SPD-B
Input
No need external speed or pulse generator

57
(2) Running example
5-7.Speed control (pulse frequency command) Basic parameter
Parameter Name Reference P0-01 Control mode selection 5-7-1 P5-10 Servo ON signal /S-ON 5-2-1 P2-00 Pulse command form 5-3-2 P2-06 Command pulse frequency at rated speed 5-7-3 P2-07 Speed command pulse filter time 5-7-4
Other parameters Key words Parameter Name Reference Proportion P5-11 Proportion action command /P-CON 5-5-4 Zero clamp P5-21 Zero clamp /ZCLAMP 5-5-5
P5-01 Zero clamp speed Speed
coincidence checking
P5-29 Speed coincidence checking /V-CMP 5-5-6 P5-03 Coincidence speed checking signal width
/V-CMP Torque limit P4-02 Forward torque limit 5-5-7
P4-03 Reverse torque limit P1-07 T-REF distribution P4-04 Forward external torque limit
1 0 P3-03: SPEED3 Note: 1. SPEED1—SPEED2—SPEED3 switch as 01—11—10 but not 01—10—11. This can avoid the
speed become zero at the space time of signal switching. 2. Please differ the signal state from terminal state.
+SPEED3
0
+SPEED2
+SPEED1
-SPEED1
-SPEED2
-SPEED3
SPD-A
SPD-B
SPD-D
OFF OFF ON ON
ON ON
ON ON
ON ON
ON ON ON ON
OFF OFF OFF
OFF OFF OFF
OFF OFF
OFF OFF OFF OFF OFF
Stop
Speed 1
Speed 2
Speed 3
Stop
Speed 1
Speed 2
Stop
Speed switching will be excuted by P3-05, P3-06 (soft start time).
Speed 3
58
P4-05 Reverse external torque limit P5-15 Forward external torque limit /P-CL P5-16 Reverse external torque limit /N-CL P5-32 Torque up to limit value output /CLT
Filter P3-08 Speed feedback filter time 5-5-9
5-7-1. Control mode selection
5-7-2. Pulse frequency command Pulse frequency command is the same as external pulse command position control (mode 6), refer to chapter 5-3-2.
5-7-3. Command pulse frequency at rated speed P2-06 command pulse frequency at rated speed
Unit Default Range Suitable mode Modify Effective 100Hz 5000 1~10000 7 Servo OFF Immediately
Note: the unit is 100Hz. Example: P2-06=1000, command pulse frequency at rated speed=100kHz; P2-06=300, command pulse frequency at rated speed= 30kHz.
5-7-4. Speed command pulse filter time P2-07 speed command pulse filter time
Unit Default Range Suitable mode Modify Effective 0.1ms 20 0~1000 7 Servo OFF Immediately
When the command pulse frequency is low, setting a suitable value for this parameter can decrease the speed fluctuation.
5-8.Torque control (analog voltage command) Only DS2-2□P□-A and DS2-2□P□-B support this mode.
Parameter Name Reference P0-01 Control mode selection 5-8-1 P4-00 The analog value of rated torque 5-8-2
Parameter Set value Meaning Modify Effective
P0-01 7 Speed control: pulse frequency speed command Servo OFF Immediately
Function: speed command is decided by external pulse frequency, but not related to pulse quantity. The wiring is the same as position command. Select CW, CCW mode or direction + pulse mode.
Parameter

59
P5-10 Servo ON signal /S-ON 5-2-1
Other parameters Key words Parameter Name Reference Zero drift
adjustment F1-04 Torque command offset auto-adjustment 5-8-3
Filter P4-01 Torque command filter time 5-8-4 Speed limit P4-07 internal speed limit in torque control mode 5-8-5
P3-09 Max speed control (MAX speed) P0-08 V-REF function distribution P5-33 Speed up to limit value output
Dead area P4-10 Torque command input dead area voltage 5-8-6
5-8-1. Control mode selection
5-8-2. The analog value of rated torque P4-00 The analog value of rated torque
Unit Default Range Suitable mode Modify Effective 0.01V/rated torque 1000 150~3000 2 Servo OFF Immediately
Function: set the speed command voltage (T-REF) to run the servo motor at rated speed Example: P4-00=500, motor run at rated torque when analog input voltage is 5.00V P4-00=800, motor run at rated torque when analog input voltage is 8.00V Refer to chapter 3-2-4 for analog torque command input.
5-8-3. Torque command offset autoadjustment (F1-04) The motor will run at microspeed even the command voltage is 0V in analog voltage torque mode. This situation will happen when host controller or the command voltage of external circuit has micro-offset (mV). Use the operate panel to auto-adjust the offset. Refer to chapter 4-4-2.
5-8-4. Torque command filter time P4-01 torque command filter time
Unit Default Range Suitable mode Modify Effective 0.01ms 0 0~65535 1, 3, 4, 5, 6, 7 Servo stop Immediately
1-time delay filter will smooth the torque command. If set the value too large, the reponse will be decreased.
Parameter Set Function Modify Effective P0-01 2 Torque control: analog voltage command Servo OFF Immediately
Function: Control the torque by the analog voltage signal input from T-REF terminal.

60
5-8-5. Torque limit 5-8-5-1. Internal speed limit Limit the speed of torque control by setting below parameters:
5-8-5-2. External speed limit Limit the speed output of torque control mode by the analog voltage command input from V-REF terminal. Parameter Function Set value Meaning Modify Effective
P0-08 V-REF function distribution
1 Make V-REF as external speed limit input
Servo stop Immediately
1. The analog voltage has no polarity. The absolute value of the voltage is suitable for forward and reverse direction.
2. The parameter value is related to voltage command and P3-00 when it is used as speed limit value. For example: P3-00=500 (voltage of rated speed is 5.0V), T-REF voltage command is 1.0V, the speed limit is 20% of rated speed.
3. P0-08=1, the actual limit value is the smaller value among V-REF speed limit input and P4-07.
5-8-5-3. Speed up to limit value output Parameter Signal Type Default Meaning Suitable
mode Modify Effective
P5-33 /VLT Output n.0000 Need to distribute
1, 2 Any Re-power on
1 if the motor speed is up to speed limit value in torque control mode, it will output /VLT signal. 2 /VLT can be distributed to output terminal via parameter P5-33. Refer to chapter 5-12-3.
5-8-6. Torque command input dead area voltage
P4-07 internal speed limit in torque control mode Unit Default Range Suitable mode Modify Effective 1rpm 2000 0~5000 1, 2 Servo OFF Immediately
Note: the actual speed is max speed even this parameter speed is larger than the max speed.
P3-09 max speed limit Unit Default Range Suitable mode Modify Effective 1rpm 1500:2000
2500:3000 3000:4000
0~5000 All modes Servo OFF Immediately
Note: 1. P3-09 is effective in all modes. 2. Default setting is different for each type. For example: max speed is 2000 for rated speed 1500 motor, max speed is 4000 for rated speed 3000 motor. 3. This parameter is related to E-008 and E-010. If motor speed is larger than max speed+200, servo will show E-008 over-speed. If the pulse frequency converts to motor speed, the speed is larger than max speed; but the actual motor speed is max speed. Then the pulse offset will accumulate, servo will show E-010 alarm.
P4-10 Torque command input dead area voltage Unit Default Range Suitable mode Modify Effective
0.01V 0 0~100 2 Servo OFF Immediately Note: if the input torque command voltage is smaller than this parameter, the torque command is 0.

61
5-9.Torque control (internal setting) Basic parameter
Parameter Name Reference P0-01 Control mode selection 5-9-1 P5-10 Servo ON signal /S-ON 5-2-1 P4-09 Internal torque command 5-9-2
Other parameters
Key words Parameter Name Reference Filter P4-01 Torque command filter time 5-8-4
Speed limit P4-07 Internal speed limit of torque control 5-8-5 P3-09 Max speed limit (max speed) P0-08 V-REF function distribution P5-33 Speed up to limit value output
5-9-1. Control mode selection
5-9-2. Internal torque command
5-10.Switch the control mode Servo can switch between submode 1 and 2 by external input signal. (1) Switch signal
(2) Function realization
Signal State Control mode /C-SEL 0 P0-01: submode 1
1 P0-02: submode 2
Parameter Set value Function Modify Effective P0-01 1 Torque control: internal setting Servo OFF Immediately
Function: Control the torque by internal torque command.
P4-09 Internal torque command Unit Default Range Suitable mode Modify Effective
1% rated torque 0 -300~+300 1 Servo OFF Immediately The unit of this parameter is 1% of the rated torque. For example: P4-09=50, motor forward run with 50% of the rated torque; P4-09=-20, motor reverse run with 20% of the rated torque.
Parameter Signal Type Default Meaning Suitable mode Modify Effective P5-20 /C-SEL Input n.0000 Need to
distribute All modes Running Re-power
on Note: /C-SEL can be distributed to input terminal via parameter P5-20, refer to chapter 5-12-1.

62
5-11.Other output signals
5-11-1. /ALM and /ALM-RST Servo alarm output /ALM
Alarm reset /ALM-RST
5-11-2. /WARN
5-11-3. Rotation checking (/TGON) (1) Signal setting
(2) Parameter setting
5-11-4. Servo ready (/S-RDY)
Parameter Signal Type Default Meaning Effective P5-37 /ALM Output n.0002 Output always open signal from SO2 Re-power on
1. The servo unit is force OFF when alarming, the motor will move with external force (including gravity). If it is need to hold the motor, please use power-loss brake (contracting brake) and /BK signal. Refer to chapter 5-2-5.
2. /ALM can be distributed to output terminal via parameter P5-37, refer to chapter 5-12-3.
Parameter Signal Type Default Meaning Effective P5-14 /ALM-RST Input n.0002 Input always open signal from SI2 Re-power on
1. Find the alarm reason and fix it, then clear the alarm via this signal. 2. /ALM-RST can be distributed to input terminal via this parameter. As the alarm signal is related to
the safe running of servo, /ALM-RST signal cannot be set to always effective. (n.0010); 3. The alarm related to encoder such as E-013, E-014 cannot be reset via /ALM-RST. 4. /ALM-RST can be distributed to input terminal via parameter P5-14, refer to chapter 5-12-1.
Parameter Signal Type Default Meaning Effective P5-35 /WARN Output n.0000 Need to distribute Re-power on
When the warning happens, servo will not be force OFF but output the warning.
Parameter Signal Type Default Meaning Effective P5-30 /TGON Output n.0000 Need to distribute Re-power on
1. The servo will be considered in the rotation when the servo motor speed is higher than P5-02. 2. The application function related to /TGON is /BK power-off brake. 3. /TGON can be distributed to output terminal via parameter P5-30, refer to chapter 5-12-3.
P5-02 Internal torque command setting Unit Default Range Suitable mode Modify Effective 1rpm 20 1~1000 All modes Servo OFF Immediately
Set the range of rotation checking output. If servo motor speed is up to P5-02, the servo motor is considered to be running and output rotation checking signal (/TGON).
Parameter Signal Type Default Meaning Effective P5-31 /S-RDY Output n.0000 Need to distribute Re-power on
1. The servo is ready to receive S-ON signal, servo motor can power on. S-RDY will output when the main circuit is ON and no alarm.
2. /S-RDY signal can be distributed to output terminal via parameter P5-31. Refer to chapter 5-12-3.

63
5-11-5. Encoder Z phase output (/Z) DS2 series servo supports encoder (Z phase) signal output. Parameter Signal Type Default Meaning Effective
P5-38 /Z Output n.0000 Need to distribute Re-power on 1. /Z can be distributed to output terminal via parameter P5-38, refer to chapter 5-12-3. 2. Z phase signal is single pulse output mode. Pulse width is about 1.5ms and not related to motor rotation speed.
5-11-6. AB phase feedback signal of encoder DS2-2□P□-A supports open collector output AB phase feedback signal. Please see the following wiring diagram of DS2-21P5-A and Xinje PLC XC3-32RT-E. Drive CN1(DB15) PLC
AB phase feedback signal doesn’t have parameters to set; it is motor encoder 1:1 output. Note: DS2-2□P□-B only supports AB phase feedback signal in differential signal mode.
5-12. I/O signal distribution
5-12-1. Input signal distribution Parameter Set
value Meaning Terminal
voltage Terminal
state Signal state
n.00 y x 00: no meaning
y: 0 always open 1 always close
x: input terminal no.
n.0000 Not distribute to terminal input
- - 0
n.000x Input always open signal from SIx
H Disconnect to 0V
0
L Connect to 0V
1
8 AO
9 BO
13 GND
X1
X0
COM
Encoder Z phase signal
P5-38=n.0001, SO1 signal
P5-38=n.0011, SO1 signal
1ms~2ms Typical value1.5ms
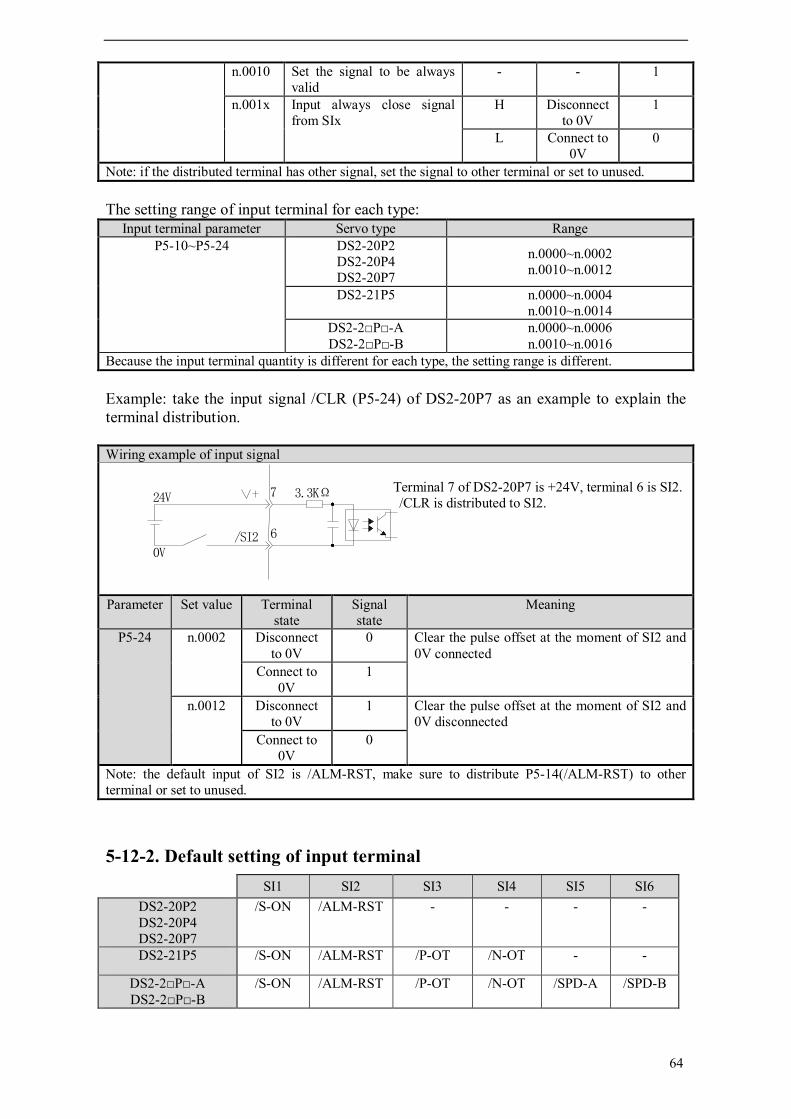
64
n.0010 Set the signal to be always valid
- - 1
n.001x Input always close signal from SIx
H Disconnect to 0V
1
L Connect to 0V
0
Note: if the distributed terminal has other signal, set the signal to other terminal or set to unused. The setting range of input terminal for each type:
Input terminal parameter Servo type Range P5-10~P5-24 DS2-20P2
DS2-20P4 DS2-20P7
n.0000~n.0002 n.0010~n.0012
DS2-21P5 n.0000~n.0004 n.0010~n.0014
DS2-2□P□-A DS2-2□P□-B
n.0000~n.0006 n.0010~n.0016
Because the input terminal quantity is different for each type, the setting range is different. Example: take the input signal /CLR (P5-24) of DS2-20P7 as an example to explain the terminal distribution.
5-12-2. Default setting of input terminal SI1 SI2 SI3 SI4 SI5 SI6
DS2-20P2 DS2-20P4 DS2-20P7
/S-ON /ALM-RST - - - -
DS2-21P5 /S-ON /ALM-RST /P-OT /N-OT - -
DS2-2□P□-A DS2-2□P□-B
/S-ON /ALM-RST /P-OT /N-OT /SPD-A /SPD-B
Wiring example of input signal Terminal 7 of DS2-20P7 is +24V, terminal 6 is SI2. /CLR is distributed to SI2.
Parameter Set value Terminal state
Signal state
Meaning
P5-24 n.0002 Disconnect to 0V
0 Clear the pulse offset at the moment of SI2 and 0V connected
Connect to 0V
1
n.0012 Disconnect to 0V
1 Clear the pulse offset at the moment of SI2 and 0V disconnected
Connect to 0V
0
Note: the default input of SI2 is /ALM-RST, make sure to distribute P5-14(/ALM-RST) to other terminal or set to unused.
0V
24V 7
6
3.3KΩ
/SI2
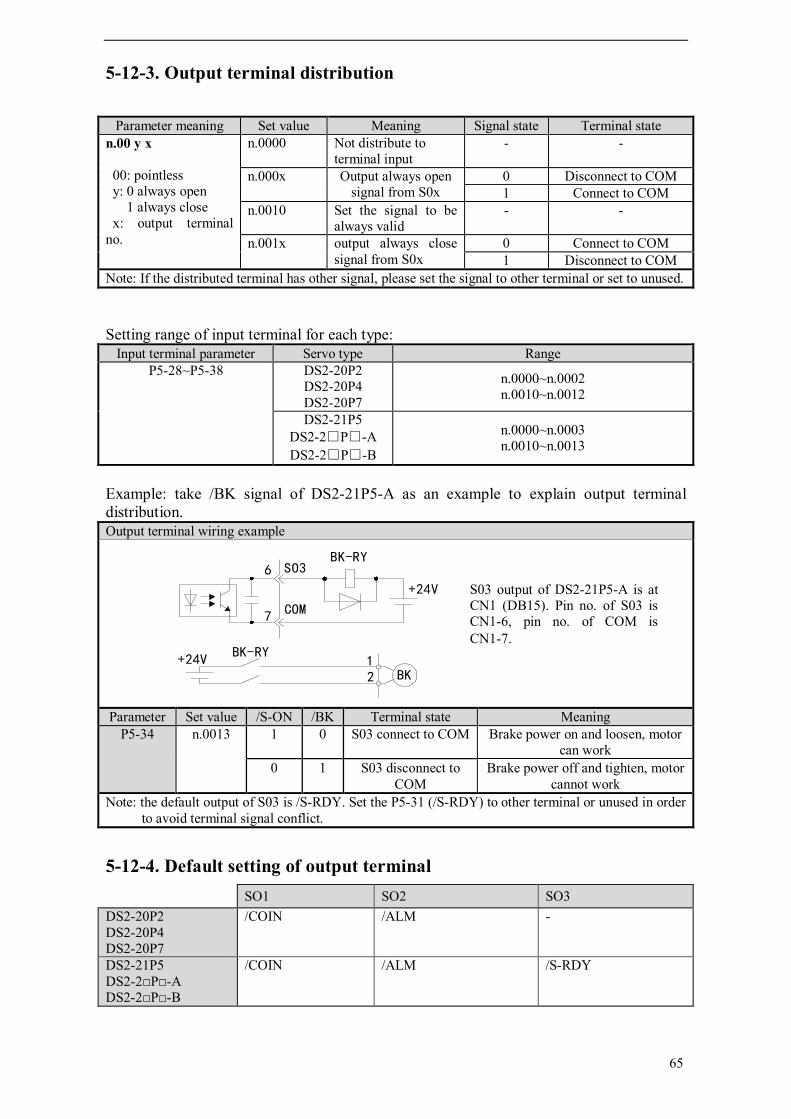
65
5-12-3. Output terminal distribution
Parameter meaning Set value Meaning Signal state Terminal state n.00 y x
00: pointless y: 0 always open
1 always close x: output terminal
no.
n.0000 Not distribute to terminal input
- -
n.000x Output always open signal from S0x
0 Disconnect to COM 1 Connect to COM
n.0010 Set the signal to be always valid
- -
n.001x output always close signal from S0x
0 Connect to COM 1 Disconnect to COM
Note: If the distributed terminal has other signal, please set the signal to other terminal or set to unused. Setting range of input terminal for each type:
Input terminal parameter Servo type Range P5-28~P5-38 DS2-20P2
DS2-20P4 DS2-20P7
n.0000~n.0002 n.0010~n.0012
DS2-21P5 DS2-2□P□-A DS2-2□P□-B
n.0000~n.0003 n.0010~n.0013
Example: take /BK signal of DS2-21P5-A as an example to explain output terminal distribution. Output terminal wiring example
21
BK+24V
BK-RY
+24V
BK-RY
COM
SO36
7
Parameter Set value /S-ON /BK Terminal state Meaning
P5-34 n.0013 1 0 S03 connect to COM Brake power on and loosen, motor can work
0 1 S03 disconnect to COM
Brake power off and tighten, motor cannot work
Note: the default output of S03 is /S-RDY. Set the P5-31 (/S-RDY) to other terminal or unused in order to avoid terminal signal conflict.
5-12-4. Default setting of output terminal SO1 SO2 SO3 DS2-20P2 DS2-20P4 DS2-20P7
/COIN /ALM -
DS2-21P5 DS2-2□P□-A DS2-2□P□-B
/COIN /ALM /S-RDY
S03 output of DS2-21P5-A is at CN1 (DB15). Pin no. of S03 is CN1-6, pin no. of COM is CN1-7.

66
6 Servo gain adjustment
This chapter will introduce some skills about servo gain adjustment.
6-1.Servo gain setting
6-1-1.Gain setting of speed loop Gain parameters about speed loop: P1-00 Speed loop gain (Kp)
Unit Default Range Suitable mode Modify Effective 1Hz 100 1~5000 3, 4, 5, 6, 7 Any Immediately
P1-01 Speed loop integral time constant (Ki) Unit Default Range Suitable mode Modify Effective
0.1ms 400 1~5000 3, 4, 5, 6, 7 Any Immediately
To set the speed loop gain larger and the speed integral time constant smaller can realize high response speed controlling. But servo will restrict by machine performance.
6-1-2.Gain setting of position loop
6-1-2-1.Position loop proportion gain Gain parameter about position loop:
In position control mode, the servo will alarm when the offset pulse over the limit value. The value is offset pulse limit parameter: P5-05 Offset pulse limit
Unit Default Range Suitable mode Modify Effective 256*command
pulse 1000 0~65535 5, 6 Servo
OFF Immediately
P1-02 Position loop gain(Kp) Unit Default Range Suitable mode Modify Effective 1/s 100 1~2000 5, 6 Any Immediately
To do position control with high response and less offset needs to set the position loop gain larger. But servo will restrict by machine performance.
Position command
+
-
Position feedback
Position loop gain
Kp
Speed command Kp(1+ )
1
KiS
+
-
Speed feedback
Speed loop gain
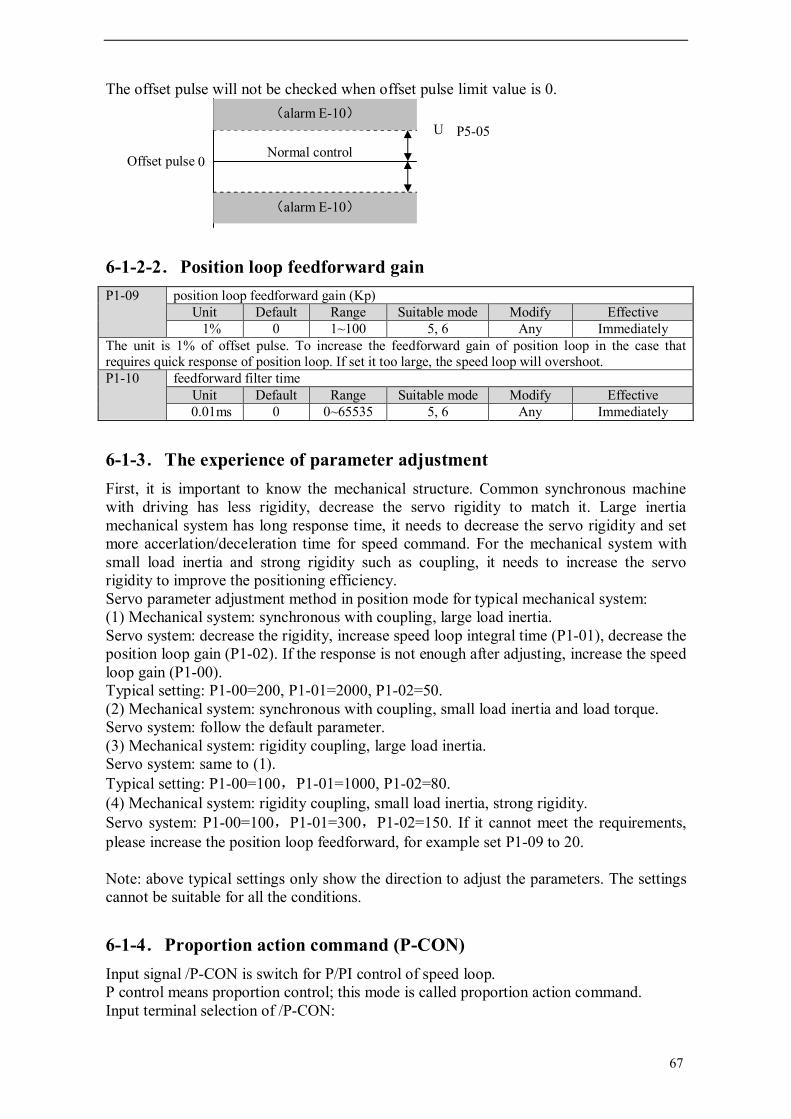
67
The offset pulse will not be checked when offset pulse limit value is 0.
6-1-2-2.Position loop feedforward gain
6-1-3.The experience of parameter adjustment First, it is important to know the mechanical structure. Common synchronous machine with driving has less rigidity, decrease the servo rigidity to match it. Large inertia mechanical system has long response time, it needs to decrease the servo rigidity and set more accerlation/deceleration time for speed command. For the mechanical system with small load inertia and strong rigidity such as coupling, it needs to increase the servo rigidity to improve the positioning efficiency. Servo parameter adjustment method in position mode for typical mechanical system: (1) Mechanical system: synchronous with coupling, large load inertia. Servo system: decrease the rigidity, increase speed loop integral time (P1-01), decrease the position loop gain (P1-02). If the response is not enough after adjusting, increase the speed loop gain (P1-00). Typical setting: P1-00=200, P1-01=2000, P1-02=50. (2) Mechanical system: synchronous with coupling, small load inertia and load torque. Servo system: follow the default parameter. (3) Mechanical system: rigidity coupling, large load inertia. Servo system: same to (1). Typical setting: P1-00=100,P1-01=1000, P1-02=80. (4) Mechanical system: rigidity coupling, small load inertia, strong rigidity. Servo system: P1-00=100,P1-01=300,P1-02=150. If it cannot meet the requirements, please increase the position loop feedforward, for example set P1-09 to 20. Note: above typical settings only show the direction to adjust the parameters. The settings cannot be suitable for all the conditions.
6-1-4.Proportion action command (P-CON) Input signal /P-CON is switch for P/PI control of speed loop. P control means proportion control; this mode is called proportion action command. Input terminal selection of /P-CON:
P1-09 position loop feedforward gain (Kp) Unit Default Range Suitable mode Modify Effective
1% 0 1~100 5, 6 Any Immediately The unit is 1% of offset pulse. To increase the feedforward gain of position loop in the case that requires quick response of position loop. If set it too large, the speed loop will overshoot. P1-10 feedforward filter time
Unit Default Range Suitable mode Modify Effective 0.01ms 0 0~65535 5, 6 Any Immediately
(alarm E-10)
Normal control
(alarm E-10)
Offset pulse 0
U
P5-05

68
Parameter Signal Type Default State Meaning Modify Effective
P5-11 /P-CON Input n.0000 1 Run in P control mode Any Re-power on 0 Run in PI control mode
/P-CON can be distributed to input terminal via parameter P5-11. Refer to chapter 5-12-1. This command is suitable for the following cases: (1) When the host device sends speed command to the servo and runs with it at the same time, it only selects P mode running under special conditions. The overrange can be deleted by this method and the adjustment time can be shortened. (2) When there is command offset in speed controlling, servo will not stop and run at low speed even getting zero speed command in PI control mode. If select P control mode, the servo will stop.
6-1-5.Gain switch (G-SEL) This function can switch the gain online. For example, set different first and second gain by the external signal when the motor is running or stop. Select the input terminal for /G-SEL signal:
Function realization:
Parameter Signal Type Default Meaning Suitable mode Modify Effective P5-23 /G-SEL Input n.0000 Need to
distribute 3, 4, 5, 6, 7 Any Re-power
on /G-SEL can be distributed to input terminal via parameter P5-23. Refer to chapter 5-12-1.
Input signal Signal state Gain group /G-SEL 0 P1-00, P1-01, P1-02
1 P1-04, P1-05, P1-06 Note: the 0, 1 is signal state but not terminal state.

69
7 Specification and dimension
This chapter will introduce the specification and dimension of MS series servo motor and DS2 series servo drive.
7-1.Servo motor
7-1-1.Servo motor specification Please refer to this chapter when selecting the servo drive. Voltage level 220V
Motor type MS-
60ST- 80ST- 90ST- 110ST-
M00630 M01330 M02430 M02430 M04030 M05030
□□-20P2 □□-20P4 □□-20P7 □□-21P2 □□-21P5
Motor code 0003 0004 0011 0021 0031 0032
Rated power (KW) 0.2 0.4 0.75 0.75 1.5 1.5
Rated current (A) 1.5 2.5 3.0 3.0 5.0 6.0
Rated speed (rpm) 3000 3000 3000 3000 3000 3000
Max speed(rpm) 4000 4000 4000 4000 3500 3500
Rated torque(N·m) 0.637 1.27 2.39 2.4 4 5
Peak torque(N·m) 1.91 3.8 7.1 7.1 12 15
Back EMF constat(V/krpm) 28 28 48 51 54 62
Torque coefficient(N·m/A) 0.42 0.5 0.8 0.8 0.8 0.83
Rotor inertia(Kg·m2) 0.17×10⁻⁴ 0.438×10⁻⁴ 0.24×10⁻³ 0.24×10⁻³ 0.54×10⁻³ 0.63×10⁻³
Winding resistor(Ω) 11.6 3.49 2.88 3.2 1.09 1.03
Winding inductance(mH) 22 8.47 6.4 7.0 3.3 3.43
Electrical time constant(ms) 1.9 2.4 2.22 2.2 3.0 3.33
Weight(Kg) 1.11 1.78 2.86 3.4 5.5 6.7
Encoder ppr(PPR) 2500
Pole pairs 4
Motor insulation level Class B (130℃)
Protection level IP64 IP65
Ambient Temperature -20℃ ~ +50℃
Humidity Relative humidity <90% (no condensation)
Voltage level 220
Motor type MS-
130ST- 180ST-
M06025 M10015 M15015 M19015
□□-21P5 □□-21P5 □□-22P3 □□-23P0
Motor code 0042 0044 0046 0052
Rated power(KW) 1.5 1.5 2.3 3.0
Rated current(A) 6.0 6.0 9.5 12.0
Rated speed(rpm) 2500 1500 1500 1500

70
Max speed(rpm) 3000 2000 2000 2000
Rated torque(N·m) 6 10 15 19
Peak torque(N·m) 18 25 30 47
Back EMF constat (V/krpm) 65 103 114 97
Torque coefficien(N·m/A) 1.0 1.67 1.58 1.58
Rotor inertia(Kg·m2) 1.26×10⁻³ 1.94×10⁻³ 2.77×10⁻³ 3.8×10⁻³
Winding resistor(Ω) 1.01 1.34 1.1 0.4
Winding inductance(mH) 2.94 5.07 4.45 2.42
Electrical time constant(ms) 3.8 3.78 4.05 6
Weight(Kg) 10 11.5 14.4 20.5
Encoder ppr(PPR) 2500
Pole pairs 4
Motor insulation level Class B (130℃)
Protection level IP65
Ambient Temperature -20℃ ~ +50℃
Humidity Relative humidity <90% (no condensation)
60, 80 and 90 series servomotors winding connector
Motor Winding connector
Winding Name U V W PE Connector 1 3 2 4
60, 80 and 90 series servo motor encoder connector Signal 5V 0V B+ Z- U+ Z+ U- A+ V+ W+ V- A- B- W- PE Connector 2 3 4 5 6 7 8 9 10 11 12 13 14 15 1
110, 130, 180 series servo motor winding connector
Motor Winding connector
Winding Name U V W PE Connector 2 3 4 1
110, 130, 180 series servo motor encoder connector Signal 5V 0V A+ B+ Z+ A- B- Z- U+ V+ W+ U- V- W- PE Connector 2 3 4 5 6 7 8 9 10 11 12 13 14 15 1

71
7-1-2.Torque-Speed Feature A: continuous use area B: repeated use area MS-60ST-M01330□□-20P4 MS-80ST-M02430□□-20P7
MS-90ST-M02430□□-20P7
MS-110ST-M04030□□-21P2 MS-110ST-M05030□□-21P5
MS-130ST-M06025□□-21P5 MS-130ST-M10015□□-21P5

72
7-1-3.Servo motor dimensions Dimensions of 60 series servo motors (unit: mm)
Type LA
Normal Band-type brake
MS-60ST-M00630□□-20P2 102 145 MS-60ST-M01330□□-20P4 146 189 Dimensions of 80 series servo motors (unit: mm)

73
Type LA
Normal Band-type brake
MS-80ST-M02430□□-20P7 150 191
Dimensions of 90 series servo motors (unit: mm)
Type LA
Normal Band-type brake
MS-90ST-M02430□□-20P7 149 194
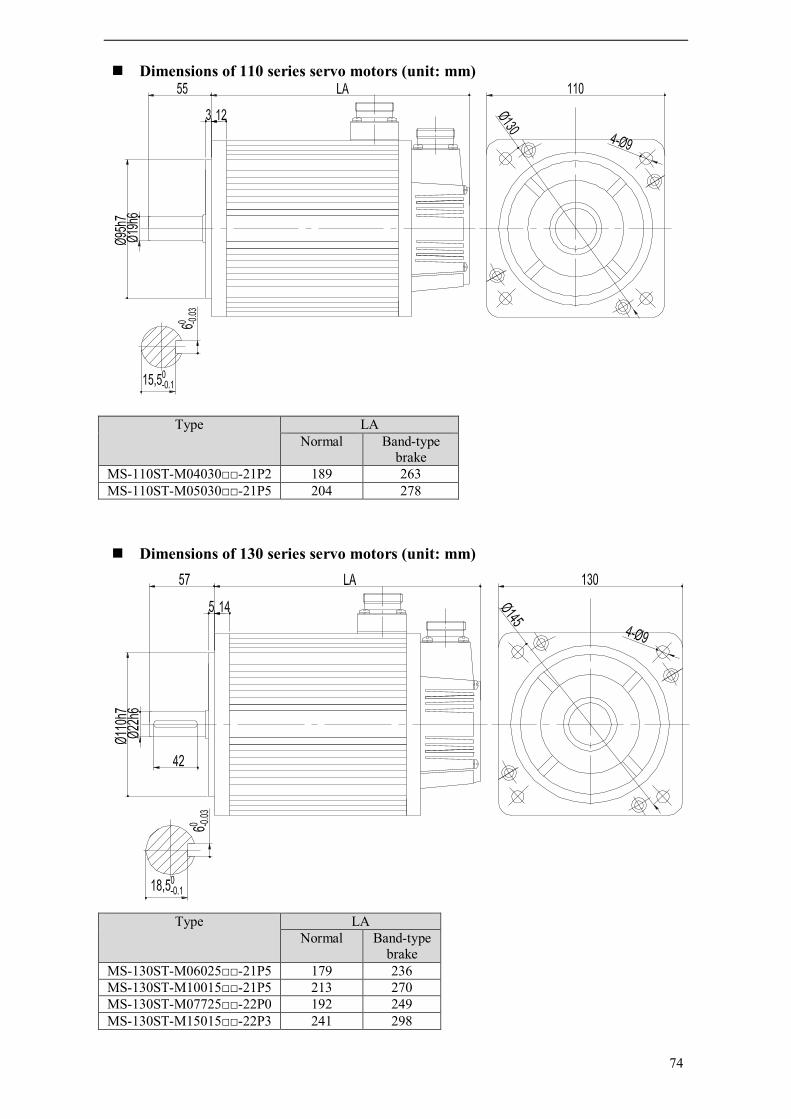
74
Dimensions of 110 series servo motors (unit: mm)
Type LA Normal Band-type
brake MS-110ST-M04030□□-21P2 189 263 MS-110ST-M05030□□-21P5 204 278
Dimensions of 130 series servo motors (unit: mm)
Type LA
Normal Band-type brake
MS-130ST-M06025□□-21P5 179 236 MS-130ST-M10015□□-21P5 213 270 MS-130ST-M07725□□-22P0 192 249 MS-130ST-M15015□□-22P3 241 298

75
Dimensions of 180 series servo motors (unit: mm)
Type LA Normal Band-type
brake MS-180ST-M19015□□-23P0 232 289
7-2.Servo drivers This section introduces the specification and dimension of servo drive.
7-2-1.General specification Servo unit DS2 series 220V servo drive Encoder Incremental encoder (2500 ppr)
Input power DS2-2□P□: single phase AC200~240V, 50/60Hz DS2-2□P□-A: 3-phase AC200~240V, 50/60Hz DS2-2□P□-B: 3-phase AC200~240V, 50/60Hz
Control mode 3-phase full-wave rectifier control IPM PWM sine-wave current dirve
Using
Temperature 0 ~ +50 ℃/-20 ~ +85 ℃ Humidity Below 90% RH (no condensation)
Vibration /impact resistance 4.9m/s2 / 19.6m/s2
Structure Base installation

76
7-2-2.Performance specification
Servo drive type DS2-20P2 DS2-20P4DS2-20P7 DS2-21P5 DS2-2□P□-A DS2-2□P□-B
Speed torque control mode
Performance
Speed control range 1: 4000 (the lower limit of speed control range, not stop at rated load torque)
Speed change
rate
Load change rate 0~100% load: below ±0.01% (rated speed)
Voltage change rate Rated voltage ±10% : 0% (rated speed)
Temperature change rate 20±25℃: below ±0.1% (rated speed)
Frequency feature 250Hz (JL≤JM) Soft start time 0~65535ms (set acceleration, deceleration individually)
Input signal RS485
Position control mode
Performance
Feedforward compensation 0~100% (resolution is 1%)
Positioning finished width 0~250 command unit (resolution is 1 command unit)
Input signal
Com
mand pulse
Input pulse type Sign+pulse, CW, CCW mode
Input pulse state Collector (+24V), DS2-2□P□-A and DS2-2□P□-B support differential signal
Input pulse
frequency
Open collector input: 200kbps Differential input: 500kbps
Control signal Clear signal (/CLR)
I/O signal
Position output DS2-2□P□-A: open collector output DS2-2□P□-B: differential output (other types don’t support this function)
Input signal
External input 2 2 4 6 6 Changeable
signal distribution
/S-ON, /P-CON, /P-OT, /N-OT, /ALM-RST, /PCL, /NCL, /SPD-D, /SPD-A, /SPD-B, /C-SEL, /ZCLAMP, /CLR, /G-SEL, /CHGSTP
Output signal
External output 2 2 3 3 3
Changeable signal
distribution
/COIN, /V-CMP, /TGON, /S-RDY, /CLT, /VLT, /BK, /WARN, /NEAR, /ALM, /Z
Built-in function
Dynamic brake (DB) No Regeneration Built-in regeneration unit, external regenerative resistor
Over range(OT)protection For P-OT, N-OT action, deceleration stop or inertia stop Electronic gear 0.01≤ B/A≤100
Protection
Program error, parameter error, overvoltage, undervoltage, regeneration error, overtemperature, overcurrent, overspeed, analog input error, position offset overflow, output shorting, current error, encoder cut, encoder error, overload, power off when running, write parameter error…
LED display Charge, power supply, 7-segment LED ×5 (built-in digital operate)
communication
COM1
Connector RS232, connect to PC Serial
parameter Baud rate 19200; data bit 8; stop bit 1; communication protocol: ModubsRTU slave; Modbus station No.1
Function Debug online
COM2
Connector RS485, connect to PLC, HMI, PC and other devices Serial
parameter Serial parameter can be set; communication protocol: ModbusRTU slave; Modbus station No. can be set
Function State display, user constant setting, monitor display, alarm display, alarm display, special control, online debug

77
7-2-3.Servo driver dimensions DS2-20P2, DS2-20P4, DS2-20P7 (unit:mm)
DS2-21P5 (unit:mm)
165.0
50.0137±0.03
165.0
7.55.0
5.07.5
137.0
75
186
67
178
180,5
+1+2
RS
TU
VW
PB
P+
POWER CHARGE
STA/ESC INC DEC ENTER
180,
5
2-Φ5.0

78
DS2-2□P□-A, DS2-2□P□-B (unit:mm)
190
212,54
202,54
83
4169
161,3
POWER
CHARGE
STA/ESC INC DEC ENTER
PUL-
P+
PB
L1
L2
L3
PE
U
V
W
PUL+
V1+
DIR-
DIR+
V2+
SI1
SI2
+24V
SO1
SO2
COM
CN1
CN2
21

79
8 Alarm Information
This chapter describes the alarm information of DS2 series servo drivers.
Alarm Code
Description Reason Solution
E-001 Program damage program self-test failed Re-download the program or contact Xinje or an authorized distributor
E-002 Parameter damage Parameter self-test failed
Restart the drive to reset the parameters. If it occurs for many times please contact Xinje or an authorized distributor
E-003 Bus over-voltage
Power grid is over votage or need a regenerative resistor; the regenerative resistor damage or its value is too large
Check the power grid; connect and check the regenerative resistor
E-004 Bus under voltage
Power grid is under votage Check the power grid
E-005 Regenerative resistor error
Regenerative resistor is ineffective
Check the connection of regenerative resistor
E-006 Module over temperature
Run with large load for long time
Reduce the load, and enhance the cooling system, or check if the fan is revolving when motor is ON; cool down the ambient temperature
E-007 Over current UVW of drive is short circiut or the motor is error
Replace the damaged motor; check the UVW wiring.
E-008 Over speed Motor speed is too fast, motor UVW connection is error
Check if there is other device that make motor revolve too fast; check the UVW wiring.
E-009 Analog input error Input voltage error when 2-channe analog zero calibrating
Input correct voltage when zero calibration for analog
E-010 Position offset too large
The difference between set position and actual position exceeds the limit value
Check if the motor stalled, decrease the set position speed, increase offset pulse limit value P5-05
E-011 Motor UVW is short circiut
External is short circuit when fist self-test
Check the UVW wiring of motor, or replace the damaged motor
E-012 Motor UVW current error
Current collection circuit error
Check the UVW wiring of motor, or replace the damaged drive
E-013 Encoder UVW wire break
Encoder wiring error, encoder broken, encoder is not connected
Check the wiring of encoder, and re-connect the encoder after power-off, or replace the damaged encoder

80
E-014 Encoder ABZ wire break
Encoder wiring error, encoder broken, encoder is not connected
Check the wiring of encoder, and re-connect the encoder after power-off, or replace the damaged encoder
E-015 Speed changes too fast (encoder feedback error)
The encoder wiring is error, or the encoder has interference
Check the wiring of encoder, or add shield layer for the encoder wire
E-016 Overload Run overload for long time
Reduce the overload running time, change a motor with larger rated power
E-017 Power off when running
Bus voltage is too low when running
Re-power on after the bus voltage is normal
E-018 Erase parameter error
Voltage is too low when power on,cannot erase the parameter
Check the power supply and re-power on
E-031 Motor code error Motor code cannot match to drive type Set the motor code in F2-00 again
E-032 Initialization error System chip is damaged
Contact Xinje or an authorized distributor

Appendix 1 Parameter list ○ means the parameter can be modified when the servo is OFF, and effective when servo is ON. ● means the parameter can be modified any time, and effective when re-power on the servo. √ means the parameter can be modified any time, and effective immediately. Adding “n.” before the parameter means the value is hex. Parameter: PX-XX= n.×× ×× PX-XX. H PX-XX.L P0: function selection Modbus address: 0000~00FF P0- Function Unit Default Range Effective Chapter 00 Main mode - 0 0 5-1 01 Submode 1
0: idle 1: torque (command) 2: torque (analog) 3: speed (command) 4: speed (analog) 5: position (internal) 6: position (pulse) 7: speed (pulse)
- 6 0~7 ○ 5-1
02 Submode 2 0~7: same as submode 1
- 0 0~7 ○ 5-1
03 Modbus station of serial port 2 - 1 1~255
● 3-5-2
04 Parameter of serial port 2 - n.2206 n.0000~
n.2209
● 3-5-2
05 Rotation direction selection - 0 0, 1 ● 5-2-2 06 06.L: stop mode when servo OFF or alarm.
DS2 series default is inertia stop. Keep the inertia motion after stop.
- 2 0~2 ● 5-2-4
06.H: over range (OT) stop mode 0~1: inertia stop. Keep inertia motion after stop. 2: deceleration stop. Change to zero clamp after stop. Torque: P4-06 urgent stop torque. 3: deceleration stop. Change to inertia motion after stop. Torque: P4-06 urgent stop torque.
- 2 0~3 ● 5-2-3
07 T-REF distribution 0: undefined. 1: make T-REF as external torque limit input 2: undefined. 3: when P-CL, N-CL is ON, make T-REF as external torque limit input.
- 0 0~3 ○ 5-5-7
08 V-REF distribution 0: - 1: make V-REF as external speed limit input.
- 0 0, 1 ○ 5-8-5

P1: control parameters Modbus address: 0100~01FF P1- Name Unit Default Range Effective Chapter 00 The gain of speed loop 1Hz 100 1~5000 √ 6-1-1 01 Speed loop integral time 0.1ms 400 1~50000 √ 6-1-1 02 The gain of position loop 1/s 100 1~2000 √ 6-1-2 03 Reserved 04 The gain of second speed loop 1Hz 250 1~5000 √ 6-1-5 05 Integral time of second speed
loop 0.1ms 10000 1~50000 √ 6-1-5
06 The gain of second position loop 1/s 250 1~2000 √ 6-1-5 07 Reserved 08 Reserved 09 The gain of position loop
feedforward 1% 0 0~100 √ 6-1-2
10 Feedforward filter time 0.01ms 0 0~65535 √ P2: position control Modbus address: 0200~02FF P2- Function Unit Default Range Effective Chapter 00 Command pulse state - 2 1, 2 ● 5-3-2 01 Position command filter
selection - 0 0, 1 ● 5-3-4
02 Electronic gear ratio (molecular) - 1 1~65535 ○ 5-3-3 03 Electronic gear ratio
(denominator) - 1 1~65535 ○ 5-3-3
04 Position command filter time 1ms 0 0~100 ● 5-3-4 05 Reserved 06 Command pulse frequency at
rated speed 100Hz 5000 1~10000 ○ 5-7-3
07 Speed command pulse filter time 0.1ms 20 0~1000 √ 5-7-4 08 Reserved 09 Reserved 10 Internal position mode setting - n.0000 ● 5-4-2 11 First segment pulse (low bit) 1 0 -9999~+9999 ○ 5-4-3 12 First segment pulse (high bit) 1 0 -9999~+9999 ○ 5-4-3 13 First segment speed 0.1rpm 0 0~50000 ○ 5-4-3 14 First segment adjustment time 1ms 0 0~65535 ○ 5-4-3 15 First segment command filter
time 0.1ms 0 0~65535 ○ 5-4-3
P2-16~P2-90 are 2~16 segments parameter setting.
94. xx□x
Find the original point 0: invalid 1: valid
- 0 0~1 ● 5-4-7
94. xxx□
The signal quantity pass the Z phase signal at the direction of leaving the limit switch
A 2 1~F(Hex) ● 5-4-7
95 The speed of closing the proximity switch
0.1rpm 600 0~50000 ○ 5-4-7
96 The speed of leaving the proximity switch
0.1rpm 100 0~50000 ○ 5-4-7

P3: speed control Modbus address: 0300~03FF P3- Name Unit Default Range Effective Chapter 00 Analog value of rated
speed 0.01V 1000 150~3000 ○ 5-5-2
01 Internal setting speed 1 rpm 100 -5000~+5000 √ 5-6-2 02 Internal setting speed 2 rpm 200 -5000~+5000 √ 5-6-2 03 Internal setting speed 3 rpm 300 -5000~+5000 √ 5-6-2 04 JOG speed rpm 100 0~1000 √ 4-4-2 05 Soft start acceleration time 1ms 0 0~65535 ○ 5-5-8 06 Soft start deceleration time 1ms 0 0~65535 ○ 5-5-8 07 Speed command filter
time 0.01ms 0 0~65535 ○ 5-5-9
08 Speed feedback filter time 0.01ms 20 0~65535 ○ 5-5-9 09 Max speed limit (MAX
speed) rpm Different for
each type 0~5000 ● 5-8-5
10 Speed command input dead area voltage
0.01V 0 0~100 ○ 5-5-10
P4: torque control Modbus address: 0400~04FF P4- Name Unit Default Range Effective Chapter 00 Analog value of rated torque 0.01V 1000 150~3000 ○ 5-8-2 01 Torque command filter time 0.01ms 0 0~65535 ○ 5-8-4 02 Forward torque limit 1% 300 0~300 √ 5-5-7 03 Reverse torque limit 1% 300 0~300 √ 5-5-7 04 Forward external torque limit 1% 100 0~300 √ 5-5-7 05 Reverse external torque limit 1% 100 0~300 √ 5-5-7 06 Urgent stop torque 1% 300 0~300 ○ 5-2-3 07 Internal speed limit when
torque controlling rpm 2000 0~5000 ○ 5-8-5
08 Reserved 09 Internal torque command
setting 1% 0 -300~300 √ 5-9-2
10 Torque command input dead area voltage
0.01V 0 0~100 ○ 5-8-6
P5: signal parameter setting Modbus address: 0500~05FF P5- Name Unit Default Range Effective Chapter 00 Positioning finished width /COIN Command
pulse 7 0~250 ○ 5-3-6
01 Zero clamp speed /ZCLAMP rpm 10 0~300 ○ 5-5-5 02 Rotation checking speed /TGON rpm 20 1~1000 ○ 5-11-3 03 Coincide speed checking signal width
/V-CMP rpm 10 1~250 ○ 5-5-6
04 Near output signal width /NEAR Command pulse
50 0~10000 ○ 5-3-7
05 Offset pulse limit value 256* command
pulse
1000 0~65535 ○ 6-1-2
06 Servo OFF delay time (brake command)
1ms 0 0~500 ○ 5-2-5
07 Brake command output speed rpm 100 0~5000 ○ 5-2-5 08 Brake command wait time 1ms 500 10~1000 ○ 5-2-5

09 Input filter time 5ms 0 0~100 √ 10 /S-ON servo signal
0000: signal is always ineffective 0001: input positive signal to SI1 0002: input positive signal to SI2 0003: input positive signal to SI3 0004: input positive signal to SI4 0005: input positive signal to SI5 0006: input positive signal to SI6 0010: signal is always effective 0011: input negative signal to SI1 0012: input negative signal to SI2 0013: input negative signal to SI3 0014: input negative signal to SI4 0015: input negative signal to SI5 0016: input negative signal to SI6
- ※1 ※3 ● 5-2-1
11 /P-CON proportion action command ditto
- ※1 ※3 ● 5-5-4
12 /P-OT forward drive prohibition ditto
- ※1 ※3 ● 5-2-3
13 /N-OT reverse drive prohibition ditto
- ※1 ※3 ● 5-2-3
14 /ALM-RST alarm reset ditto
- ※1 ※3 ● 5-11-1
15 /P-CL forward external torque limit ditto
- ※1 ※3 ● 5-5-7-2
16 /N-CL reverse external torque limit ditto
- ※1 ※3 ● 5-5-7-2
17 /SPD-D internal speed selection ditto
- ※1 ※3 ● 5-6-3
18 /SPD-A internal speed selection Same to above
- ※1 ※3 ● 5-6-3
19 /SPD-B internal speed selection ditto
- ※1 ※3 ● 5-6-3
20 /C-SEL control mode selection ditto
- ※1 ※3 ● 5-10
21 /ZCLAMP zero clamp ditto
- ※1 ※3 ● 5-5-5
22 /INHIBIT command pulse prohibition ditto
※1 ※3 ● 5-3-8
23 /G-SEL gain switch ditto
- ※1 ※3 ● 6-1-5
24 /CLR clear pulse offset ditto
- ※1 ※3 ● 5-3-5
25 /CHGSTP step change signal ditto
- ※1 ※3 ● 5-4-4
26 Reserved 27 Reserved 28 /COIN positioning finished
0000: not output to the terminal 0001: output positive signal from SO1 0002: output positive signal from SO2 0003: output positive signal from SO3 0011: output negative signal from SO1 0012: output negative signal from SO2 0013: output negative signal from SO3
- ※2 ※4 ● 5-3-6
29 /V-CMP speed coincide checking ditto
- ※2 ※4 ● 5-5-6
30 /TGON rotation checking - ※2 ※4 ● 5-11-3

ditto 31 /S-RDY ready
ditto - ※2 ※4 ● 5-11-4
32 /CLT torque limit ditto
- ※2 ※4 ● 5-5-7-5
33 /VLT speed limit checking ditto
- ※2 ※4 ● 5-8-5-3
34 /BK brake lock ditto
- ※2 ※4 ● 5-2-5
35 /WARN warn ditto
- ※2 ※4 ● 5-11-2
36 /NEAR near ditto
- ※2 ※4 ● 5-3-7
37 /ALM alarm ditto
- ※2 ※4 ● 5-11-1
38 /Z encoder Z signal ditto
※2 ※4 ● 5-11-5
※1 servo drives input terminal default value: refer to chapter 5-12-2. ※2 servo drive output terminal default value: refer to chapter 5-12-4. ※3 servo drive input terminal distribution: refer to chapter 5-12-1. ※4 servo drive output terminal distribution: refer to chapter 5-12-3. Modbus address (Hex) Parameter address Parameter Modbus
address Parameter Modbus
address Parameter Modbus
address Parameter Modbus
address P0-00 0x0000 P1-00 0x0100 P2-00 0x0200 P3-00 0x0300 P0-01 0x0001 P1-01 0x0101 P2-01 0x0201 P3-01 0x0301 P0-02 0x0002 P1-02 0x0102 P2-02 0x0202 P3-02 0x0302 P0-03 0x0003 P1-03 0x0103 P2-03 0x0203 P3-03 0x0303 P0-04 0x0004 P1-04 0x0104 P2-04 0x0204 P3-04 0x0304 P0-05 0x0005 P1-05 0x0105 P2-05 0x0205 P3-05 0x0305 P0-06 0x0006 P1-06 0x0106 P2-06 0x0206 P3-06 0x0306 P0-07 0x0007 P1-07 0x0107 P2-07 0x0207 P3-07 0x0307 P0-08 0x0008 P1-08 0x0108 P3-08 0x0308
P1-09 0x0109 P3-09 0x0309 P1-10 0x010A P3-10 0x030A
Parameter Modbus address
Parameter Modbus address
Parameter Modbus address
Parameter Modbus address
P4-00 0x0400 P5-00 0x0500 P5-13 0x050D P5-26 0x051A P4-01 0x0401 P5-01 0x0501 P5-14 0x050E P5-27 0x051B P4-02 0x0402 P5-02 0x0502 P5-15 0x050F P5-28 0x051C P4-03 0x0403 P5-03 0x0503 P5-16 0x0510 P5-29 0x051D P4-04 0x0404 P5-04 0x0504 P5-17 0x0511 P5-30 0x051E P4-05 0x0405 P5-05 0x0505 P5-18 0x0512 P5-31 0x051F P4-06 0x0406 P5-06 0x0506 P5-19 0x0513 P5-32 0x0520 P4-07 0x0407 P5-07 0x0507 P5-20 0x0514 P5-33 0x0521 P4-08 0x0408 P5-08 0x0508 P5-21 0x0515 P5-34 0x0522 P4-09 0x0409 P5-09 0x0509 P5-22 0x0516 P5-35 0x0523 P4-10 0x040A P5-10 0x050A P5-23 0x0517 P5-36 0x0524
P5-11 0x050B P5-24 0x0518 P5-37 0x0525 P5-12 0x050C P5-25 0x0519 P5-38 0x0526
Monitor state address
Item Modbus address Item Modbus
address Motor speed 0x0700 current alarm code 0x0716 Speed command 0x0701 Current warn code 0x0717

Internal torque command 0x0702 Alarm/warn code 1 0x0718 Rotation angle (physical angle) 0x0703 U phase current when alarming 0x0719 Rotation angle (electricity angle) 0x0704 V phase current when alarming 0x071A Bus voltage 0x0705 DC bus voltage when alarming 0x071B Module temperature 0x0706 IGBT temperature when alarming 0x071C Input command pulse speed 0x0707 The speed when alarming 0x071D
Offset pulse value (low 16 bits) 0x0708 Internal torque command when alarming 0x071E
Offset pulse value (high 16 bits) 0x0709 V-REF value when alarming 0x071F Rotation angle (low 16 bits) 0x070A T-REF value when alarming 0x0720 Rotation angle (high 16 bits) 0x070B Alarm/warn code 2 0x0728 Input command pulse (low 16 bits) 0x070C Alarm/warn code 3 0x0729
Input command pulse (high 16 bits) 0x070D Alarm/warn code 4 0x072A
Feedback pulse (low 16 bits) 0x070E Alarm/warn code 5 0x072B Feedback pulse (high 16 bits) 0x070F Alarm/warn code 6 0x072C Current accumulated position (low 16 bits) 0x0710 Alarm/warn code 7 0x072D
Current accumulated position (high 16 bits) 0x0711
Present current 0x0712 Analog input (speed) 0x0713 Analog input (torque) 0x0714
Input signal state
Item Modbus address Item Modbus
address /S-ON servo signal 0x0800 /SPD-A internal speed selection 0x0808 /P-CON proportion action command 0x0801 /SPD-B internal speed selection 0x0809 /P-OT forward drive prohibition 0x0802 /C-SEL control mode selection 0x080A /N-OT reverse drive prohibition 0x0803 /ZCLAMP zero clamp 0x080B
/ALM-RST reset alarm 0x0804 /INHIBIT command pulse prohibition 0x080C
/P-CL forward external torque limit 0x0805 /G-SEL gain switch 0x080D /N-CL reverse external torque limit 0x0806 /CLR pulse clear 0x080E /SPD-D internal speed selection 0x0807 /CHGSTP change step 0x080F
Output state signal
Item Modbus address Item Modbus
address Positioning finished (/COIN) 0x0812 Brake lock ( /BK) 0x0818 Coincidence speed checking (/V-CMP) 0x0813 Warn (/WARN) 0x0819
Rotation checking (/TGON) 0x0814 Near (/NEAR) 0x081A Ready (/S-RDY) 0x0815 Alarm output (/ALM) 0x081B Torque limit (/CLT) 0x0816 Encoder Z signal (/Z) 0x081C Speed limit checking (/VLT) 0x0817
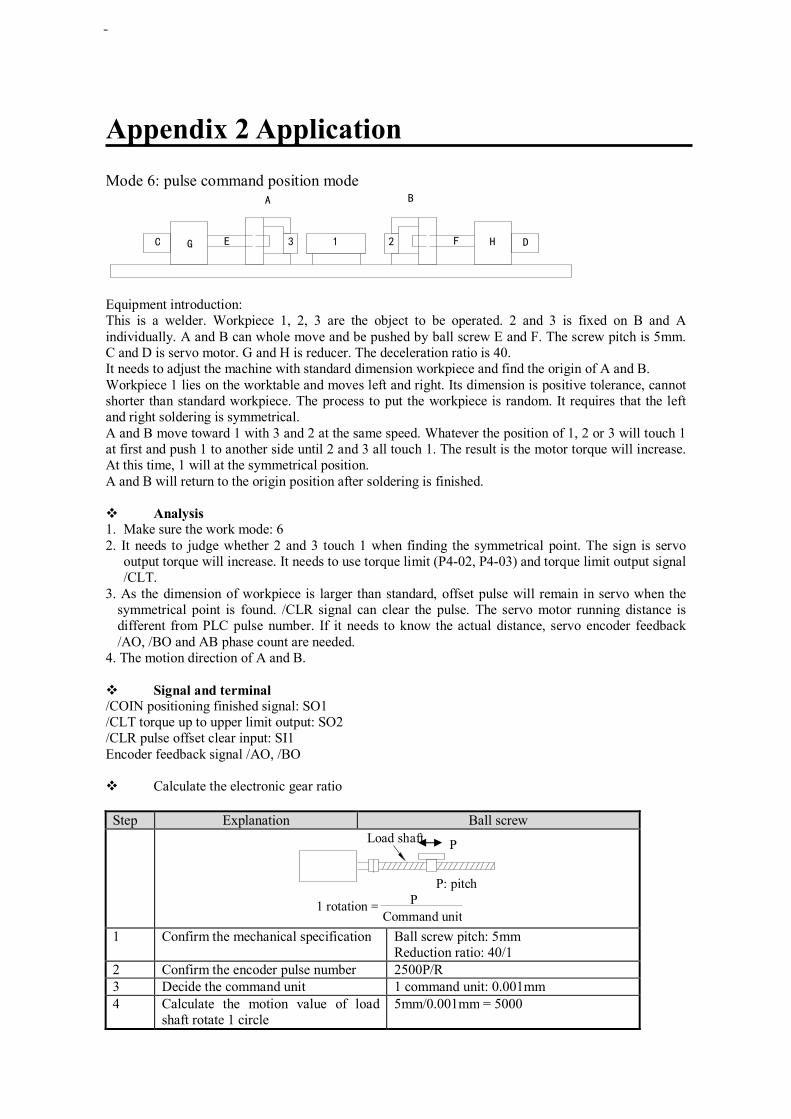
Appendix 2 Application Mode 6: pulse command position mode
Equipment introduction: This is a welder. Workpiece 1, 2, 3 are the object to be operated. 2 and 3 is fixed on B and A individually. A and B can whole move and be pushed by ball screw E and F. The screw pitch is 5mm. C and D is servo motor. G and H is reducer. The deceleration ratio is 40. It needs to adjust the machine with standard dimension workpiece and find the origin of A and B. Workpiece 1 lies on the worktable and moves left and right. Its dimension is positive tolerance, cannot shorter than standard workpiece. The process to put the workpiece is random. It requires that the left and right soldering is symmetrical. A and B move toward 1 with 3 and 2 at the same speed. Whatever the position of 1, 2 or 3 will touch 1 at first and push 1 to another side until 2 and 3 all touch 1. The result is the motor torque will increase. At this time, 1 will at the symmetrical position. A and B will return to the origin position after soldering is finished. Analysis 1. Make sure the work mode: 6 2. It needs to judge whether 2 and 3 touch 1 when finding the symmetrical point. The sign is servo
output torque will increase. It needs to use torque limit (P4-02, P4-03) and torque limit output signal /CLT.
3. As the dimension of workpiece is larger than standard, offset pulse will remain in servo when the symmetrical point is found. /CLR signal can clear the pulse. The servo motor running distance is different from PLC pulse number. If it needs to know the actual distance, servo encoder feedback /AO, /BO and AB phase count are needed.
4. The motion direction of A and B. Signal and terminal /COIN positioning finished signal: SO1 /CLT torque up to upper limit output: SO2 /CLR pulse offset clear input: SI1 Encoder feedback signal /AO, /BO Calculate the electronic gear ratio
Step Explanation Ball screw
1 Confirm the mechanical specification Ball screw pitch: 5mm
Reduction ratio: 40/1 2 Confirm the encoder pulse number 2500P/R 3 Decide the command unit 1 command unit: 0.001mm 4 Calculate the motion value of load
shaft rotate 1 circle 5mm/0.001mm = 5000
1 23
A B
E FG H DC
P: pitch
P
1 rotation =Command unit
P
Load shaft

5 Calculate the electronic gear ratio B 2500 4 40 80A 5000 1 1
6 Set the user parameters P2-02=80 P2-03=1 Parameter setting Running mode: P0-01=6 Pulse command state: P2-00=2 Electronic gear ratio: P2-02=80 P2-03=1 Forward torque limit: P4-02=150 Reverse torque limit: P4-03=150 Positioning finished width: P5-00=7 /S-ON: P5-10=0010 /CLR: P5-24=0001 /COIN: P5-28=0001 /CLT: P5-32=0002, P5-37=0000 Debug 1. Initial debug (a) Connect the cables correctly. Connect U, V, W, PE one-to-one, don’t cross them. (b) open-loop test-running: power on, set F1-01=1, check if the motor can work normally. If yes, enter F1-00. If not, check the cables. (c) Jog test-running: enter F1-00. Press ENTER to enable the motor. Press INC for forward jog, press DEC for reverse jog. Press STATUS/ESC to quit the jog running. 4 states when jogging:
State Panel display State Panel display
Idle
Forward run
Enable
Reverse run
(d) Current check offset auto-adjustment Enter F1-02, it shows rEF. Press ENTER, it shows rEF and flickers. After 5s the auto-adjustment finished, it shows donE. Press STATUS/ESC to exit.
2. Debug the motor with machine (a) Check the motor rotation direction, if it is reverse from the actual needs, set F1-05 to 0 (servo force OFF). Then set P0-05 to 1, re-power on the servo. (b) Check the servo stability and response, adjust the servo gain.

Xinje Electronic Co., Ltd.
4th Floor Building 7,Originality Industry park, Liyuan Development Zone, Wuxi City, Jiangsu Province 214072
Tel: (510) 85166657
Fax: (510) 85111290
www.xinje.com