separate calling party number and billing number in sip · separatecallingpartynumberandbilling...
TRANSCRIPT

Separate Calling Party Number and BillingNumber in SIP
• External Presentation Name and Number Overview, on page 1• Call Processing, on page 2• Directory Number Overview, on page 4• SIP Profile Overview, on page 8• SIP Trunk Overview, on page 10• Intercluster SME Call Flows, on page 14
External Presentation Name and Number OverviewCisco Unified Communications Manager Administration can be configured to contain separate calling partyand presentation number.
In previous releases, Cisco Unified Communications Manager cannot be configured on a per line basis tohave a different number sent to the PSTN in the FROM and PAID header. If a group of users is configuredto present the same Calling Line Identification Number to PSTN users, which is a nongeographic E.164number and cannot be used for billing. Therefore, the users actual DDI must be sent in a different field thanthe presentation number. With this release, Cisco Unified Communications Manager supports ExternalPresentation Name andNumber that is different from existing IdentificationName andNumber. The configuredPresentation Name and Number are for display purpose on the following devices:
• SIP
• SCCP
• Single Number Reach Destination (SNRD)
• CTIRD
• SparkRD
Configuration OverviewYou can configure the external presentation name and number feature on the following pages:
• Directory Number Configuration
Separate Calling Party Number and Billing Number in SIP1

• SIP Profile Configuration
• Trunk Configuration
• When you configure the External Presentation Information on the SIP Profile Configuration page, thevalue of External Presentation Number and External Presentation Name on the SIP ProfileConfiguration page is used, overriding the settings configured on the Directory Number page.
• When you configure the Presentation Information on the Trunk Configuration page, the value ofPresentation Number and Presentation Name on the Trunk Configuration page is used, overriding thesettings configured on the SIP Profile Configuration and Directory Number Configuration pages.
Note
Call ProcessingThis section describes the incoming and outgoing call behavior when you configure the external presentationname and number feature.
Incoming Call ProcessCisco Unified Communications Manager looks for FROM and PAID header information when there is a callinitiated from the PSTN network. The FROM header contains the external presentation name and number (ifconfigured). However, this is not the real identity of a user, it is used only for display purpose. The PAIDheader contains the identity (original DN or DDI) of the user.
If FROM and PAID headers have different numbers and Enable External Presentation Name and Numberoption is enabled in the SIP Profile Configuration page and Display External Presentation Name andNumber service parameter value is set to True, then Cisco Unified Communications Manager displays theFROMheader information (configured external presentation name and number) on the called device. Similarly,if an option is disabled, Cisco Unified Communications Manager displays PAID header information (user'soriginal DN or DDI) on the called device.
• By default, Enable External Presentation Name and Number field is unchecked.
• Default value of a service parameter Display External Presentation Name and Number is False.
Note
Invite Received from the PSTN Network
From: "Customer Care" <sip:[email protected]>;To: <sip:[email protected]>P-Asserted-Identity: "Your personal adviser <sip:[email protected]>Remote-Party-ID: "Your personal adviser <sip:[email protected]>
In the preceding example, FROM header contains a number different from the PAID header. If youcheck Enable External Presentation Name and Number check box and set Display External
Separate Calling Party Number and Billing Number in SIP2
Separate Calling Party Number and Billing Number in SIPCall Processing

Presentation Name and Number value to True, Cisco Unified CommunicationsManager displaysCustomer Care / 1800000 on the called device.
If you uncheck theEnable External Presentation Name and Number check box or set the DisplayExternal Presentation Name and Number toFalse, then CiscoUnified CommunicationsManagerdisplays Your personal adviser / [email protected] on the called device.
Outgoing Call ProcessLet us assume, a user configured with External Presentation Name and Number initiates a call to a PSTNnetwork through the SIP trunk with Enable External Presentation Name and Number configured in itsSIP Profile. Then, Cisco Unified Communications Manager sends the configured External PresentationInformation in the FROM header of the outgoing SIP message and displays on the called device.
If Enable External Presentation Name and Number option is disabled or External Presentation Numberand External Presentation Name fields are not configured, the Cisco Unified Communications Managersends the directory number information in the FROM and PAID headers and displays on the called device.
External Presentation Number Mask OperationCisco Unified CommunicationsManager allows you to mask the external presentation number, to be displayedon the called device. You can mask the presentation number on the Directory Number Configuration, SIPProfile Configuration, and Trunk Configuration pages.
When you enter the digits in the External Presentation Number field with trailing X, the value of X isreplaced with the directory number information starting from right to left.
Mask Operation on Directory Number Configuration
If you mask External Presentation Number as 180011XXXX on Directory Number Configuration page fora Directory Number 5551234, then Cisco Unified CommunicationsManager displays the presentation numberas 1800111234 on the called device.
Mask Operation on SIP Profile Configuration
Let us assume External Presentation Number on Directory Number page is 180011XXXX and if you maskExternal Presentation Number on SIP Profile Configuration page as 180022XXXX for a Directory Number5551234, then Cisco Unified Communications Manager displays the presentation number as 1800221234on the called device.
Mask Operation on Trunk Configuration
Let us assume External Presentation Number on Directory Number page is 180011XXXX and on SIPProfile Configuration page is 180022XXXX. If you mask Presentation Number on Trunk Configurationpage as 180033XXXX for a Directory Number 5551234, then Cisco Unified Communications Managerdisplays the presentation number as 1800331234 on the called device.
Separate Calling Party Number and Billing Number in SIP3
Separate Calling Party Number and Billing Number in SIPOutgoing Call Process
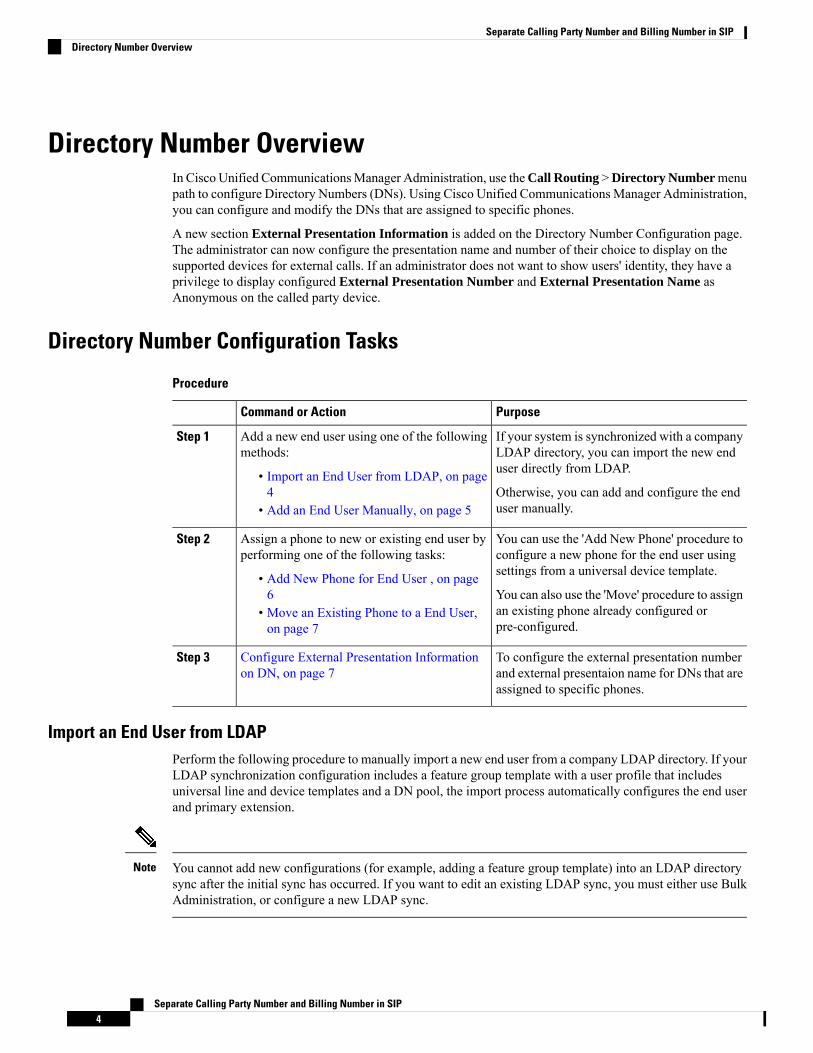
Directory Number OverviewIn Cisco Unified CommunicationsManager Administration, use theCall Routing >Directory Numbermenupath to configure Directory Numbers (DNs). Using Cisco Unified Communications Manager Administration,you can configure and modify the DNs that are assigned to specific phones.
A new section External Presentation Information is added on the Directory Number Configuration page.The administrator can now configure the presentation name and number of their choice to display on thesupported devices for external calls. If an administrator does not want to show users' identity, they have aprivilege to display configured External Presentation Number and External Presentation Name asAnonymous on the called party device.
Directory Number Configuration Tasks
Procedure
PurposeCommand or Action
If your system is synchronized with a companyLDAP directory, you can import the new enduser directly from LDAP.
Add a new end user using one of the followingmethods:
Step 1
• Import an End User from LDAP, on page4 Otherwise, you can add and configure the end
user manually.• Add an End User Manually, on page 5
You can use the 'Add New Phone' procedure toconfigure a new phone for the end user usingsettings from a universal device template.
Assign a phone to new or existing end user byperforming one of the following tasks:
Step 2
• Add New Phone for End User , on page6 You can also use the 'Move' procedure to assign
an existing phone already configured orpre-configured.
• Move an Existing Phone to a End User,on page 7
To configure the external presentation numberand external presentaion name for DNs that areassigned to specific phones.
Configure External Presentation Informationon DN, on page 7
Step 3
Import an End User from LDAPPerform the following procedure to manually import a new end user from a company LDAP directory. If yourLDAP synchronization configuration includes a feature group template with a user profile that includesuniversal line and device templates and a DN pool, the import process automatically configures the end userand primary extension.
You cannot add new configurations (for example, adding a feature group template) into an LDAP directorysync after the initial sync has occurred. If you want to edit an existing LDAP sync, you must either use BulkAdministration, or configure a new LDAP sync.
Note
Separate Calling Party Number and Billing Number in SIP4
Separate Calling Party Number and Billing Number in SIPDirectory Number Overview

Before you begin
Before you begin this procedure make sure that you have already synchronized Cisco Unified CommunicationsManager with a company LDAP directory. The LDAP synchronization must include a feature group templatewith universal line and device templates.
Procedure
Step 1 In Cisco Unified CM Administration, choose System > LDAP > LDAP Directory.Step 2 Click Find and select the LDAP directory to which the user is added.Step 3 Click Perform Full Sync.
Cisco Unified Communications Manager synchronizes with the external LDAP directory. Any new end usersin the LDAP directory are imported into the Cisco Unified Communications Manager database.
What to do next
If the user is enabled for self-provisioning, the end user can use the Self-Provisioning Interactive VoiceResponse (IVR) to provision a new phone. Otherwise, perform one of the following tasks to assign a phoneto the end user:
• Add New Phone for End User , on page 6
• Move an Existing Phone to a End User, on page 7
Add an End User ManuallyPerform the following procedure to add new end user and configure them with an access control group anda primary line extension.
Before you begin
Verify that you have a user profile configured that includes a universal line template. If you need to configurea new extension, Cisco Unified Communications Manager uses the settings from the universal line templateto configure the primary extension.
Procedure
Step 1 In Cisco Unified CM Administration, choose User Management > User/Phone Add > Quick User/PhoneAdd.
Step 2 Enter the User ID and Last Name.Step 3 From the Feature Group Template drop-down list, select a feature group template.Step 4 Click Save.Step 5 From the User Profile drop-down list, verify that the selected user profile includes a universal line template.Step 6 From the Access Control Group Membership section, click the + icon.Step 7 From the User is a member of drop-down list, select an access control group.Step 8 Under Primary Extension, click the + icon.
Separate Calling Party Number and Billing Number in SIP5
Separate Calling Party Number and Billing Number in SIPAdd an End User Manually

Step 9 From the Extension drop-down list, select a DN that displays as (available).Step 10 If all line extensions display as (used), perform the following steps:
a) Click the New... button.The Add New Extension popup displays.
b) In the Directory Number field, enter a new line extension.c) From the Line Template drop-down list, select a universal line template.d) Click OK.
Cisco Unified Communications Manager configures the directory number with the settings from theuniversal line template.
Step 11 (Optional) Complete any additional fields in the Quick User/Phone Add Configuration window.Step 12 Click Save.
What to do next
Perform one of the following procedures to assign a phone to this end user:
• Add New Phone for End User , on page 6
• Move an Existing Phone to a End User, on page 7
Add New Phone for End UserPerform the following procedure to add a new phone for a new or existing end user. Make sure that the userprofile for the end user includes a universal device template. Cisco Unified Communications Manager usesthe universal device template settings to configure the phone.
Before you begin
Perform one of the following procedures to add an end user:
• Add an End User Manually, on page 5
• Import an End User from LDAP, on page 4
Procedure
Step 1 In Cisco Unified CM Administration, choose User Management > User/Phone Add > Quick/User PhoneAdd.
Step 2 Click Find and select the end user for whom you want to add a new phone.Step 3 Click the Manage Devices.
The Manage Devices window appears.Step 4 Click Add New Phone.
The Add Phone to User popup displays.Step 5 From the Product Type drop-down list, select the phone model.Step 6 From the Device Protocol drop-down list select SIP or SCCP as the protocol.Step 7 In the Device Name text box, enter the device MAC address.
Separate Calling Party Number and Billing Number in SIP6
Separate Calling Party Number and Billing Number in SIPAdd New Phone for End User

Step 8 From the Universal Device Template drop-down list, select a universal device template.Step 9 If the phone supports expansion modules, enter the number of expansion modules that you want to deploy.Step 10 If you want to use Extension Mobility to access the phone, check the In Extension Mobility check box.Step 11 Click Add Phone.
The Add New Phone popup closes. Cisco Unified Communications Manager adds the phone to the user anduses the universal device template to configure the phone.
Step 12 If you want to make additional edits to the phone configuration, click the corresponding Pencil icon to openthe phone in the Phone Configuration window.
Move an Existing Phone to a End UserPerform this procedure to move an existing phone to a new or existing end user.
Procedure
Step 1 In Cisco Unified CM Administration, choose User Management > User/Phone Add > Quick/User PhoneAdd.
Step 2 Click Find and select the user to whom you want to move an existing phone.Step 3 Click the Manage Devices button.Step 4 Click the Find a Phone to Move To This User button.Step 5 Select the phone that you want to move to this user.Step 6 Click Move Selected.
Configure External Presentation Information on DNPerform the following procedure to configure the external presentation information for DNs that are assignedto specific phones.
Before you begin
• Check theEnable External Presentation Name and Number check box on the SIP Profile Configurationpage.
• Perform one of the following procedures to add an end user:
• Add an End User Manually, on page 5
• Import an End User from LDAP, on page 4
• Assign a phone to a new or existing end user by performing one of the following tasks:
• Add New Phone for End User , on page 6
• Move an Existing Phone to a End User, on page 7
Separate Calling Party Number and Billing Number in SIP7
Separate Calling Party Number and Billing Number in SIPMove an Existing Phone to a End User

Procedure
Step 1 From Cisco Unified CM Administration, choose Call Routing > Directory Number.Step 2 From the Find and List Directory Numbers page, perform one of the following steps:
• To update a DN, click Find and select the Directory Number for which you want to display uniqueidentity.
• To create a new Directory Number, click Add New.
Step 3 In the External Presentation Information section, enter the name and number that you want to display onthe called device.
• External Presentation Number field accepts up to 32 digits and can contain the followingcharacters: [0-9, X, *, #, \, +].
• External Presentation Name field accepts up to 50 characters.
Note
Step 4 (Optional), if you want to show configured External Presentation Number and External PresentationName as anonymous, check the Anonymous External Presentation check box.
• By default, the Anonymous External Presentation field is unchecked.
• If you check the Anonymous External Presentation field:
External Presentation Number and External Presentation Name fields are noneditable.Also, the entries from these fields disappear.
Note
Step 5 Complete the remaining fields on the Directory Number Configuration page. For help with the fields andtheir settings, refer to the online help.
Step 6 Click Save.
SIP Profile OverviewA SIP profile is a template that comprises common SIP settings. You must assign a SIP profile for every SIPtrunk and SIP device in your network. When you configure a SIP profile and then assign that profile to a SIPtrunk, or a SIP device, the system applies the configured SIP settings to that trunk or device.
SIP Profile Configuration Tasks
Procedure
PurposeCommand or Action
Use this procedure to configure a SIP profile.Configure SIP Profiles, on page 9Step 1
To configure the external presentation numberand external presentation name for a SIP profile.
Configure External Presentation Informationon SIP Profile, on page 9
Step 2
Separate Calling Party Number and Billing Number in SIP8
Separate Calling Party Number and Billing Number in SIPSIP Profile Overview

Configure SIP ProfilesUse this procedure to configure a SIP profile with common SIP settings that you can assign to SIP devicesand trunks that use this profile.
Procedure
Step 1 From Cisco Unified CM Administration, choose Device > Device Settings > SIP Profile.Step 2 Perform one of the following steps:
• Click Find and select the SIP profile to edit an existing profile, .• Click Add New to create a new profile.
Step 3 If you want your SIP phones and trunks to support IPv4 and IPv6 stacks, check the Enable ANAT check box.Step 4 If you want to assign an SDP transparency profile to resolve SDP interoperability, from the SDP Transparency
Profile drop-down list.Step 5 If you want to assign a normalization or transparency script to resolve SIP interoperability issues, from the
Normalization Script drop-down list, select the script.Step 6 (Optional) Check the Send ILS Learned Destination Route String check box for Global Dial Plan Replication
deployments where you may need to route calls across a Cisco Unified Border Element.Step 7 Complete the remaining fields in the SIP Profile Configuration window. For more information on the fields
and their configuration options, see Online Help.Step 8 Click Save.
Configure External Presentation Information on SIP ProfileUse this procedure to configure the separate external presentation name and number on SIP ProfileConfiguration page.
Before you begin
• Check the Enable External Presentation Name and Number check box on the SIP ProfileConfiguration page.
• Set Display External Presentation Name and Number parameter value to True under ClusterwideParameters (Device-Phone) section on Service Parameter Configuration page.
Procedure
Step 1 From Cisco Unified CM Administration, choose Device > Device Settings > SIP Profile.Step 2 Perform one of the following steps:
• To edit an existing profile, click Find and select the SIP profile.• To create a new profile, click Add New.
Step 3 In the External Presentation Information section, enter the name and number that you want to display onthe called device.
Separate Calling Party Number and Billing Number in SIP9
Separate Calling Party Number and Billing Number in SIPConfigure SIP Profiles

• External Presentation Number field accepts up to 32 digits and can contain the followingcharacters: [0-9, X, *, #, \, +].
• External Presentation Name field accepts a maximum of 50 characters.
Note
Step 4 (Optional), if you want to show configured External Presentation Number and External PresentationName as anonymous, check the Anonymous External Presentation check box.
• By default, the Anonymous External Presentation field is unchecked.
• If you check the Anonymous External Presentation field:
External Presentation Number and External Presentation Name fields are noneditable.Also, the entries from these fields disappear.
Note
Step 5 Complete the remaining fields in the SIP Profile Configuration page. For more information on the fieldsand their configuration options, see the system Online Help.
Step 6 Click Save.
SIP Trunk OverviewIf you are deploying SIP for call control signaling, configure SIP trunks that connect Cisco UnifiedCommunications Manager to external devices such as SIP gateways, SIP Proxy Servers, UnifiedCommunications applications, remote clusters, or a Session Management Edition.
Within the Cisco Unified CMAdministration, the SIP Trunk Configuration window contains the SIP signalingconfigurations that Cisco Unified Communications Manager uses to manage SIP calls.
SIP Trunk supports the separate presentation name and number that is different from existing Caller ID DNand Caller Name. A new check boxAnonymous Presentation is provided to show the configured presentationname and number as Anonymous on the called device.
Trunk Configuration Tasks
Procedure
PurposeCommand or Action
Configure SIP trunk security profiles with anysecurity settings that you want to apply to your
Configure SIP Trunk Security Profile, on page11
Step 1
SIP trunks. For example, you can configuredigest authentication, device security mode, andTLS encryption for SIP signaling.
If you don't configure SIP trunk securityprofiles, by default, Cisco UnifiedCommunications Manager applies a nonsecuresip trunk security profile.
Separate Calling Party Number and Billing Number in SIP10
Separate Calling Party Number and Billing Number in SIPSIP Trunk Overview

PurposeCommand or Action
Set up a CommonDevice Configuration for thetrunk. For dual-stack trunks, configure the IPaddressing preference.
Configure Common Device Configuration, onpage 12
Step 2
Configure the SIP trunks in your network. Inthe Trunk Configuration window, configure
Configure SIP Trunks, on page 12Step 3
the SIP settings for your trunks. Assign a SIPprofile, SIP trunk security profile, and aCommon Device Configuration to your SIPtrunk. In addition, assign any SIP normalizationor transparency scripts that your trunkconnection requires. For example, if your SIPtrunk connects to a Cisco TelePresence VCS,you must assign the vcs-interop script to theSIP trunk.
To configure the presentation name and numberon SIP Trunk page.
Configure Presentation Information on SIPTrunks, on page 13
Step 4
Configure SIP Trunk Security ProfileConfigure a SIP Trunk Security Profile with security settings such as digest authentication or TLS signalingencryption. When you assign the profile to a SIP trunk, the trunk takes on the settings of the security profile.
If you don't assign a SIP trunk security profile to your SIP trunks, Cisco Unified Communications Managerassigns a nonsecure profile by default.
Note
Procedure
Step 1 From Cisco Unified CM Administration, choose System > Security > SIP Trunk Security Profile.Step 2 Click Add New.Step 3 To enable SIP signaling encryption with TLS, perform the following:
a) From the Device Security Mode drop-down list, select Encrypted.b) From the Incoming Transport Type and Outgoing Transport Type drop-down lists, choose TLS.c) For device authentication, in theX.509 Subject Name field, enter the subject name of the X.509 certificate.d) In the Incoming Port field, enter the port on which you want to receive TLS requests. The default for
TLS is 5061.
Step 4 To enable digest authentication, do the followinga) Check the Enable Digest Authentication check boxb) Enter a Nonce Validity Timer value to indicate the number of seconds that must pass before the system
generates a new nonce. The default is 600 (10 minutes).c) To enable digest authentication for applications, check the Enable Application Level Authorization
check box.
Separate Calling Party Number and Billing Number in SIP11
Separate Calling Party Number and Billing Number in SIPConfigure SIP Trunk Security Profile

Step 5 Complete the additional fields in the SIP Trunk Security Profile Configurationwindow.For more informationon the fields and their configuration options, see Online Help.
Step 6 Click Save.
You must assign the profile to a trunk in the Trunk Configuration window so that the trunk canuses the settings.
Note
Configure Common Device ConfigurationA common device configuration comprises a set of optional set of user-specific feature attributes. If you aredeploying IPv6, you can use this configuration to assign IPv6 preferences for SIP trunks or SCCP phones.
Procedure
Step 1 FromCisco Unified CMAdministration, chooseDevice >Device Settings >Common Device Configuration.Step 2 Click Add New.Step 3 For SIP trunks, SIP Phones or SCCP phones, choose a value for the IP Addressing Mode drop-down list:
• IPv4 Only—The device uses only an IPv4 address for media and signaling.• IPv6 Only—The device uses only an IPv6 address for media and signaling.• IPv4 and IPv6 (Default)—The device is a dual-stack device and uses whichever IP address type isavailable. If both IP address types are configured on the device, for signaling the device uses the IPAddressing Mode Preference for Signaling setting and for media the device uses the IP AddressingMode Preference for Media enterprise parameter setting.
Step 4 If you configure IPv6 in your previous step, then configure an IP addressing preference for the IP AddressingMode for Signaling drop-down list:
• IPv4—The dual stack device prefers IPv4 address for signaling.• IPv6—The dual stack device prefers IPv6 address for signaling.• Use System Default—The device uses the setting for the IP Addressing Mode Preference for Signalingenterprise parameter.
Step 5 Configure the remaining fields in the Common Device Configuration window. For more information on thefields and their configuration options, see the system Online Help.
Step 6 Click Save.
Configure SIP TrunksUse this procedure to configure a SIP trunk. You can assign up to 16 destination addresses for a SIP trunk.
Procedure
Step 1 From Cisco Unified CM Administration, choose Device > Trunk.Step 2 Click Add New.
Separate Calling Party Number and Billing Number in SIP12
Separate Calling Party Number and Billing Number in SIPConfigure Common Device Configuration
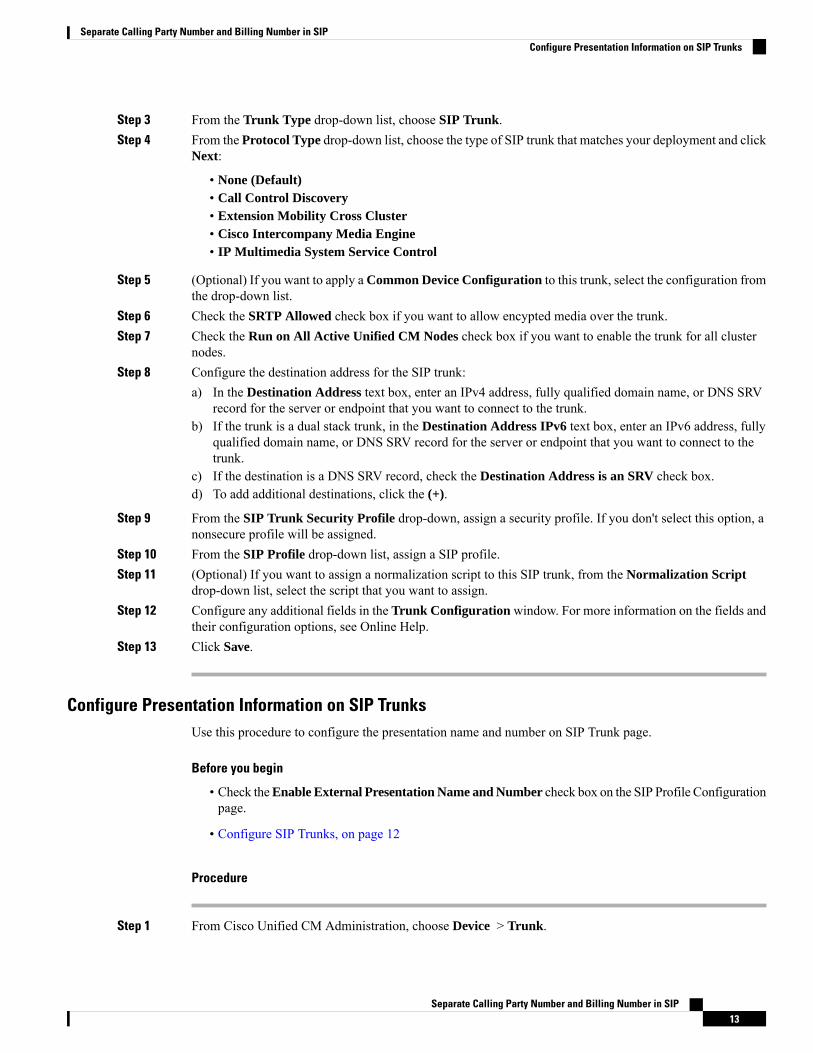
Step 3 From the Trunk Type drop-down list, choose SIP Trunk.Step 4 From the Protocol Type drop-down list, choose the type of SIP trunk that matches your deployment and click
Next:
• None (Default)• Call Control Discovery• Extension Mobility Cross Cluster• Cisco Intercompany Media Engine• IP Multimedia System Service Control
Step 5 (Optional) If you want to apply a Common Device Configuration to this trunk, select the configuration fromthe drop-down list.
Step 6 Check the SRTP Allowed check box if you want to allow encypted media over the trunk.Step 7 Check the Run on All Active Unified CM Nodes check box if you want to enable the trunk for all cluster
nodes.Step 8 Configure the destination address for the SIP trunk:
a) In the Destination Address text box, enter an IPv4 address, fully qualified domain name, or DNS SRVrecord for the server or endpoint that you want to connect to the trunk.
b) If the trunk is a dual stack trunk, in the Destination Address IPv6 text box, enter an IPv6 address, fullyqualified domain name, or DNS SRV record for the server or endpoint that you want to connect to thetrunk.
c) If the destination is a DNS SRV record, check the Destination Address is an SRV check box.d) To add additional destinations, click the (+).
Step 9 From the SIP Trunk Security Profile drop-down, assign a security profile. If you don't select this option, anonsecure profile will be assigned.
Step 10 From the SIP Profile drop-down list, assign a SIP profile.Step 11 (Optional) If you want to assign a normalization script to this SIP trunk, from the Normalization Script
drop-down list, select the script that you want to assign.Step 12 Configure any additional fields in the Trunk Configuration window. For more information on the fields and
their configuration options, see Online Help.Step 13 Click Save.
Configure Presentation Information on SIP TrunksUse this procedure to configure the presentation name and number on SIP Trunk page.
Before you begin
• Check theEnable External Presentation Name and Number check box on the SIP Profile Configurationpage.
• Configure SIP Trunks, on page 12
Procedure
Step 1 From Cisco Unified CM Administration, choose Device > Trunk.
Separate Calling Party Number and Billing Number in SIP13
Separate Calling Party Number and Billing Number in SIPConfigure Presentation Information on SIP Trunks

Step 2 Click Add New.Step 3 From the Trunk Type drop-down list, choose SIP Trunk.Step 4 From the Trunk Service Type drop-down list, choose the type of SIP trunk that you want to configure:
• None (Default): The trunk will not be used for Call Control Discovery, ExtensionMobility Cross-Cluster,Intercompany Media Engine, or IP Multimedia System Service Control.
• Call Control Discovery: The trunk supports the Call Control Discovery feature.• Extension Mobility Cross Cluster: The trunk supports Extension Mobility Cross Cluster.• Cisco Intercompany Media Engine: The trunk supports the Intercompany Media Engine (IME). Makesure that the IME server is installed before you configure this type of trunk.
• IP Multimedia System Service Control: Choose this option to enable the trunk with support for IPMultimedia System Service Control.
Step 5 Click Next.Step 6 In the Presentation Information section, enter the name and number that you want to display on the called
device.
• Presentation Number field accepts up to 32 digits and can contain the following characters:[0-9, X, *, #, \, +].
• Presentation Name field accepts a maximum of 50 characters.
Note
Step 7 (Optional) If you want to show the presentation name and number as anonymous, check the AnonymousPresentation check box.
• By default, the Anonymous Presentation field is unchecked.
• If you check the Anonymous External Presentation field:
Presentation Number and Presentation Name fields are noneditable. Also, the entries fromthese fields disappear.
Note
Step 8 (Optional) Check the Send Presentation Name and Number only in the FROM header and not in theother identity headers check box, if you want to send presentation information that is configured on the SIPTrunk only to FROM header.
Step 9 Configure any additional fields in the Trunk Configuration window.For more information on the fields andtheir configuration options, see Online Help.
Step 10 Click Save.
Intercluster SME Call FlowsThe Cisco Unified Communications Manager Session Management Edition software is same as the CiscoUnified Communications Manager used mainly for a call routing between clusters or various devices. Withthis release, Cisco Unified Communications Manager supports the intercluster SME calls.
Incoming Calls
Let us assume a user from a PSTN network initiates a call with Enable External Presentation Nameand Number enabled in its SIP profile. If Display External Presentation Name and Number service
Separate Calling Party Number and Billing Number in SIP14
Separate Calling Party Number and Billing Number in SIPIntercluster SME Call Flows

parameter is set to True, then Cisco Unified Communications Manager sends the presentation numberinformation to the X-Cisco-Presentation header and displays on the called device. The FROM and PAIDheaders contains the identity of the user that is the user's DN or DDI.
If Display External Presentation Name and Number service parameter is set to False, then CiscoUnified CommunicationsManager sends the presentation number information to the X-Cisco-Presentationheader. The FROM and PAID headers contains the user’s DN or DDI and displays on the called device.
Outgoing CallsA user who is configured with External Presentation Name and External Presentation Numberinitiates a call to a PSTN network through intercluster SIP trunks. If Enable External PresentationName and Number check box is disabled in its SIP profile, then, Cisco Unified CommunicationsManager sends the original directory number information in the FROM and PAID headers and displayson the called device and configured External Presentation Information in the X-Cisco-Presentation header.Similarly, if Enable External Presentation Name and Number check box is enabled in its SIP profile,Cisco Unified Communications Manager sends the configured External Presentation Information in theFROM header and displays on the called device and original Directory Number in the PAID header.
Separate Calling Party Number and Billing Number in SIP15
Separate Calling Party Number and Billing Number in SIPIntercluster SME Call Flows

Separate Calling Party Number and Billing Number in SIP16
Separate Calling Party Number and Billing Number in SIPIntercluster SME Call Flows