bulk administration of contact lists - cisco · bulkadministrationofcontactlists...
TRANSCRIPT
Bulk Administration of Contact Lists
• Bulk Administration Overview, on page 1• Bulk Administration Prerequisites, on page 1• Bulk Administration Task Flow, on page 2
Bulk Administration OverviewWith the IM and Presence Service Bulk Administration Tool, you can perform bulk transactions on many IMand Presence Service users, including:
• Rename User Contact IDs for use in the Microsoft migration process.
• Export the contact lists and non-presence contact lists, of users who belong to a particular node or presenceredundancy group, to a CSV data file.
Non-presence contacts are contacts who do not have an IM address and can onlybe exported using this procedure.
Note
• You can import user contacts lists and non-presence contact lists you had exported to another node orpresence redundancy group in a different cluster. Prepopulate contact lists for new users or add to existingcontact lists.
• These features facilitate the migration of users between clusters.
Bulk Administration PrerequisitesBefore importing your user contact lists:
1. Provision the users on Cisco Unified Communications Manager.
2. Ensure that the users are licensed on Cisco Unified Communications Manager for the IM and PresenceService.
Bulk Administration of Contact Lists1
The default contact list import rate is based on the virtual machine deployment hardware type. You can changethe contact list import rate by choosing Cisco Unified CM IM and Presence Administration > System >Service Parameters > Cisco Bulk Provisioning Service. However, if you increase the default import rate,this will result in higher CPU and memory usage on IM and Presence Service.
Note
Bulk Administration Task FlowProcedure
PurposeCommand or Action
Upload the CSV file and rename the contactIDs for a list of users.
Bulk Rename User Contact IDs, on page 2Step 1
Use this procedure to export your users' contactlists to a CSV file. You can then use Bulk
Bulk Export User Contact Lists andNon-Presence Contact Lists, on page 3
Step 2
Administration to move user contact lists toanother node or cluster.
Carry out these tasks to import your user contactlists into IM and Presence Service:
Step 3
• Verify Maximum Contact List Size, onpage 6
• Upload Input File, on page 6• Create New Bulk Administration Job, onpage 9
• Check Results of Bulk Administration Job,on page 9
Bulk Rename User Contact IDs
Bulk rename of contact IDs is used in the migration of users from a Microsoft server (for example Lync) toIM and Presence Service Service. See the Partitioned Intradomain Federation Guide on Cisco.com for detailedinstructions on how this tool should be used as part of the user migration process. Using this tool in any othercircumstances is not supported.
Caution
Upload the CSV file and rename the contact IDs for a list of users.
Procedure
Step 1 Upload the CSV file with the list of contact IDs that you want to rename in all contact lists:a) Go to the IM and Presence Service database publisher node.
Bulk Administration of Contact Lists2
Bulk Administration of Contact ListsBulk Administration Task Flow
b) In Cisco Unified CM IM and Presence Administration, choose Bulk Administration >Upload/Download Files..
c) Click Add New.d) ClickBrowse to locate and choose the CSV file. For more on the input file, see Bulk RenameUser Contact
IDs File Details, on page 3.e) Choose Contacts as the Target.f) Choose Rename Contacts – Custom File as the Transaction Type.g) Click Save to upload the file.
Step 2 InCiscoUnifiedCM IMandPresenceAdministration on the publisher node, chooseBulkAdministration >Contact List > Rename Contacts.
Step 3 In the File Name field, choose the file that you uploaded.Step 4 Choose one of the following actions:
• Click Run Immediately to execute the Bulk Administration job immediately.• ClickRun Later to schedule a time to execute the Bulk Administration job. For more information aboutscheduling jobs in the Bulk Administration Tool, see the Online Help in Cisco Unified CM IM andPresence Administration.
Step 5 Click Submit.
If you chose to run the job immediately, the job runs after you click Submit.
What to do next
Bulk Export User Contact Lists and Non-Presence Contact Lists, on page 3
Bulk Rename User Contact IDs File DetailsThe file that you upload before you can run this job must be a CSV file with the following format:
<Contact ID>, <New Contact ID>
where <Contact ID> is the existing contact ID and <New Contact ID> is the new format of the contact ID.
<Contact ID> is the user's IM address as it appears on the Presence Topology User Assignment window.
The following is a sample CSV file with one entry:Contact ID, New Contact [email protected], [email protected]
Bulk Export User Contact Lists and Non-Presence Contact ListsUse this procedure to export your users' contact lists to a CSV file. You can then use Bulk Administration tomove user contact lists to another node or cluster.
• Contact Lists—This list consists of IM and Presence contacts. Contacts whom do not have an IM addresswill not be exported (you must export a non-presence contact list).
• Non-presence Contact Lists—This list consists of contacts whom do not have an IM address.
Bulk Administration of Contact Lists3
Bulk Administration of Contact ListsBulk Rename User Contact IDs File Details
Procedure
Step 1 From Cisco Unified CM IM and Presence Administration, do either of the following:
• To export Contact Lists, choose Bulk Administration > Contact List > Export Contact List• To export Non-presence Contact Lists, choose Bulk Administration > Non-presence Contact List >Export Non-presence Contact List and skip the next step.
Step 2 Contact Lists only. Select the users for whom you will export contact lists:a) UnderExport Contact List Options, choose the category of users for whom you will export contact lists.
The default is to export contact lists for all users.b) Click Find to bring up the list of users and then click Next.
Step 3 In the File Name field, enter a name for the CSV file.Step 4 Under Job Information, configure when you want to run this job:
• Run Immediately—Check this button to export contact lists right away.• Run Later—Check this button if you want to schedule a time for the job. With this option, you will needto use the Job Scheduler page at Bulk Administration > Job Scheduler to schedule a time for this jobto run.
Step 5 Click Submit.If you choose Run Immediately, the export job runs right away.
Step 6 After the export file is created, download the exported file:a) From Cisco Unified CM IM and Presence Administration, choose Bulk Administration >
Upload/Download Files.b) Click Find and select the export file.c) Click Download Selected and download the file to a location you can access.
File Details for Export Contact ListsThe following is a sample CSV file entry:
userA,example.com,userB,example.com,buddyB,General
BAT allows you to find and choose the users whose contact lists you want to export. The user contact listsare exported to a CSV file with the following format:
<User ID>,<User Domain>,<Contact ID>,<Contact Domain>,<Nickname>,<Group Name>
The following table describes the parameters in the export file.
DescriptionParameter
The user ID of the IM and Presence Service user.
This value is the user portion of the user'sIM address.
Note
User ID
Bulk Administration of Contact Lists4
Bulk Administration of Contact ListsFile Details for Export Contact Lists
DescriptionParameter
The Presence domain of the IM and Presence Serviceuser.
This value is the domain portion of theuser's IM address.
Note
Example 1: [email protected]—bjones is theuser ID and example.com is the user domain.
Example 2:bjones@[email protected]—bjones@usa is the userID and example.com is the user domain.
User Domain
The user ID of the contact list entry.Contact ID
The Presence domain of the contact list entry.Contact Domain
The nickname of the contact list entry.
If the user has not specified a nickname for a contact,the Nickname parameter will be blank.
Nickname
The name of the group to which the contact list entryis to be added.
If a user’s contacts are not sorted into groups, thedefault group name will be specified in the GroupName field.
Group Name
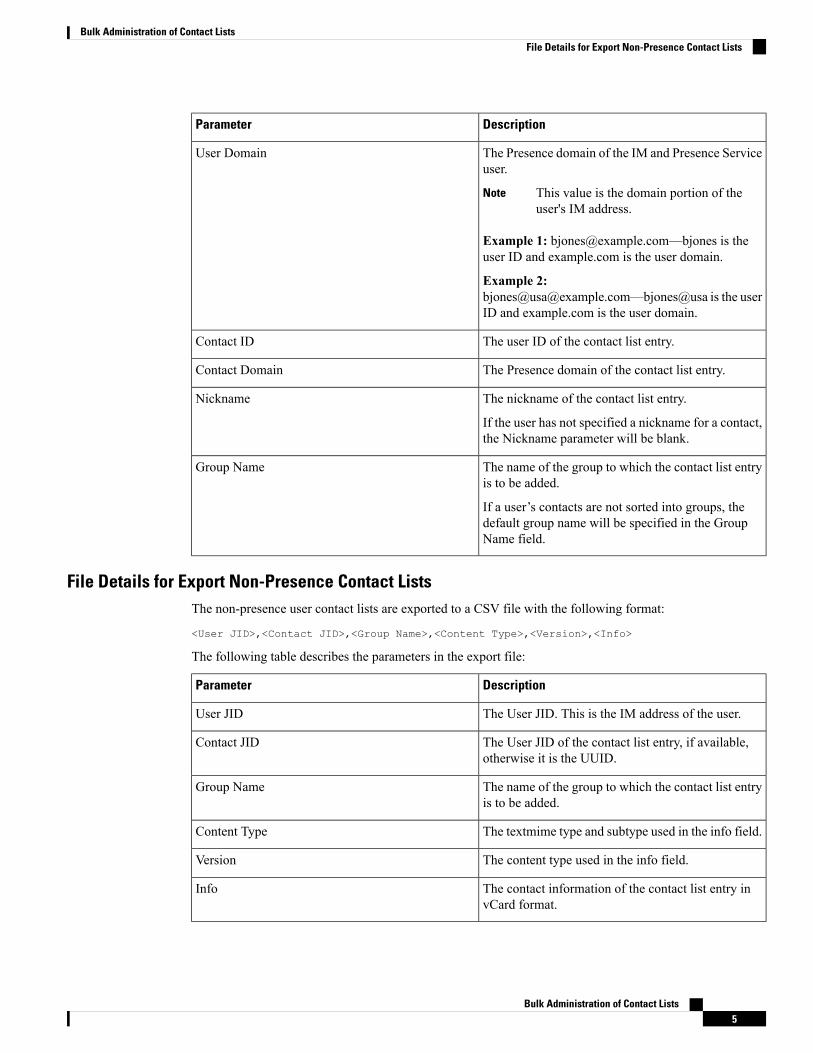
File Details for Export Non-Presence Contact ListsThe non-presence user contact lists are exported to a CSV file with the following format:
<User JID>,<Contact JID>,<Group Name>,<Content Type>,<Version>,<Info>
The following table describes the parameters in the export file:
DescriptionParameter
The User JID. This is the IM address of the user.User JID
The User JID of the contact list entry, if available,otherwise it is the UUID.
Contact JID
The name of the group to which the contact list entryis to be added.
Group Name
The textmime type and subtype used in the info field.Content Type
The content type used in the info field.Version
The contact information of the contact list entry invCard format.
Info
Bulk Administration of Contact Lists5
Bulk Administration of Contact ListsFile Details for Export Non-Presence Contact Lists

The following is a sample CSV file entry:[email protected],ce463d44-02c3-4975-a37f-d4553e3f17e1,group01,text/directory,3,BEGIN:VCARDADR;TYPE=WORK:ADR\;WORK:\;\;123 Dublin rd\,\;Oranmore\;Galway\;\;IrelandEMAIL;TYPE=X-CUSTOM1;X LABEL=Custom:[email protected] N:test;user;;; NICKNAME:pizzaguy01ORG:ABC TEL;TYPE=WORK,VOICE:5323534535 TITLE:QA VERSION:3.0 END:VCARD
Bulk Import Of User Contact Lists
Verify Maximum Contact List SizeCheck the Maximum Contact List Size and Maximum Watchers settings on IM and Presence Service. Thesystem default value is 200 for Maximum Contact List Size and 200 for Maximum Watchers.
Cisco recommends that you set theMaximumContact List Size andMaximumWatchers settings to Unlimitedwhile importing user contact lists. Even though o exceed the maximum contact list size without losing datawhen importing contact lists using BAT, this step ensures that each migrated user contact list is fully imported.After all users have migrated, you can reset the Maximum Contact List Size and MaximumWatchers settingsto the preferred values.
You only need to check the maximum contact list size on those clusters that contain users for whom you wishto import contacts. When you change Presence settings, the changes are applied to all nodes in the cluster;therefore you only need to change these settings on the IM and Presence database publisher node within thecluster.
What to do next
Upload Input File, on page 6
Upload Input FileThe following procedure describes how to upload the CSV input file using BAT for contact lists andnon-presence contact lists.
Before you begin
Verify Maximum Contact List Size, on page 6
Procedure
Step 1 InCisco Unified CM IMand Presence Administration, chooseBulk Administration >Upload/DownloadFiles.
Step 2 Click Add New.Step 3 Click Browse to locate and choose the CSV file.Step 4 For the Target setting:
• If you want to upload an input file for contact lists, choose Contact Lists. For more on user contact listinput files, see File Details for Import Contact Lists, on page 7.
• If you want to upload an input file for non-presence contact lists, choose Non-presence Contact Lists.For more on non-presence user contact list input files, see File Details for Import Non-Presence ContactLists, on page 8.
Bulk Administration of Contact Lists6
Bulk Administration of Contact ListsBulk Import Of User Contact Lists
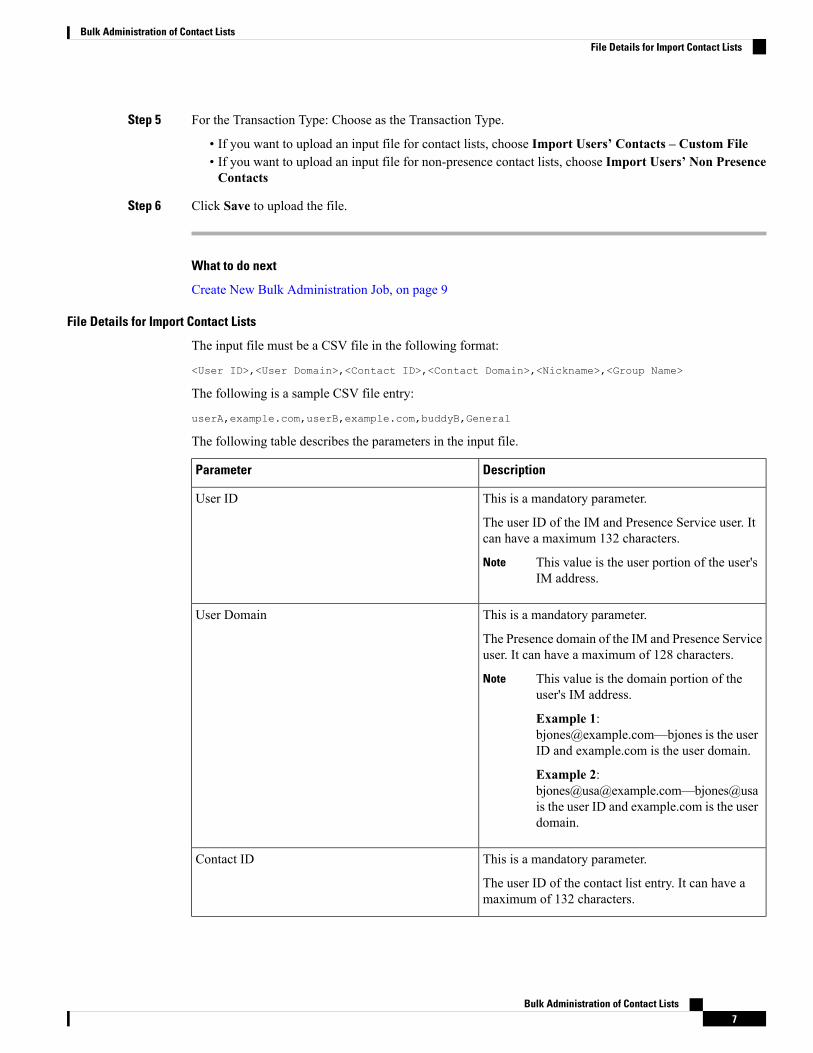
Step 5 For the Transaction Type: Choose as the Transaction Type.
• If you want to upload an input file for contact lists, choose Import Users’ Contacts – Custom File• If you want to upload an input file for non-presence contact lists, choose Import Users’ Non PresenceContacts
Step 6 Click Save to upload the file.
What to do next
Create New Bulk Administration Job, on page 9
File Details for Import Contact Lists
The input file must be a CSV file in the following format:
<User ID>,<User Domain>,<Contact ID>,<Contact Domain>,<Nickname>,<Group Name>
The following is a sample CSV file entry:
userA,example.com,userB,example.com,buddyB,General
The following table describes the parameters in the input file.
DescriptionParameter
This is a mandatory parameter.
The user ID of the IM and Presence Service user. Itcan have a maximum 132 characters.
This value is the user portion of the user'sIM address.
Note
User ID
This is a mandatory parameter.
The Presence domain of the IM and Presence Serviceuser. It can have a maximum of 128 characters.
This value is the domain portion of theuser's IM address.
Example 1:[email protected]—bjones is the userID and example.com is the user domain.
Example 2:bjones@[email protected]—bjones@usais the user ID and example.com is the userdomain.
Note
User Domain
This is a mandatory parameter.
The user ID of the contact list entry. It can have amaximum of 132 characters.
Contact ID
Bulk Administration of Contact Lists7
Bulk Administration of Contact ListsFile Details for Import Contact Lists
DescriptionParameter
This is a mandatory parameter.
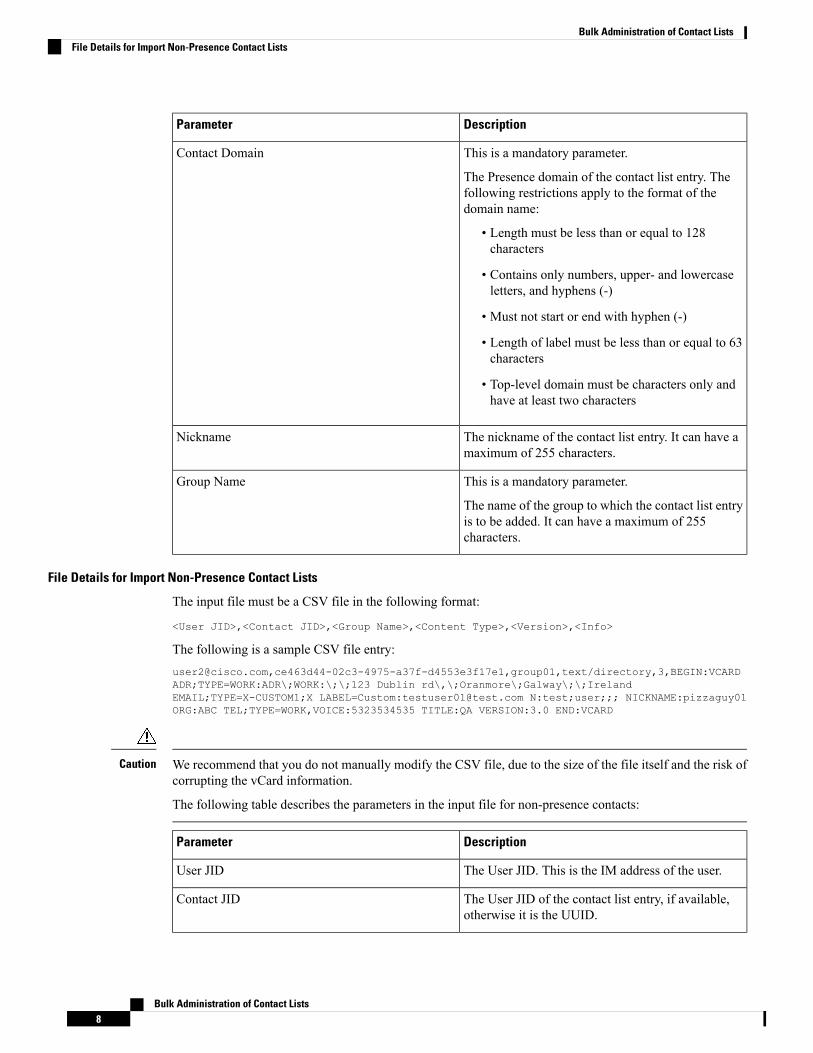
The Presence domain of the contact list entry. Thefollowing restrictions apply to the format of thedomain name:
• Length must be less than or equal to 128characters
• Contains only numbers, upper- and lowercaseletters, and hyphens (-)
• Must not start or end with hyphen (-)
• Length of label must be less than or equal to 63characters
• Top-level domain must be characters only andhave at least two characters
Contact Domain
The nickname of the contact list entry. It can have amaximum of 255 characters.
Nickname
This is a mandatory parameter.
The name of the group to which the contact list entryis to be added. It can have a maximum of 255characters.
Group Name
File Details for Import Non-Presence Contact Lists
The input file must be a CSV file in the following format:
<User JID>,<Contact JID>,<Group Name>,<Content Type>,<Version>,<Info>
The following is a sample CSV file entry:[email protected],ce463d44-02c3-4975-a37f-d4553e3f17e1,group01,text/directory,3,BEGIN:VCARDADR;TYPE=WORK:ADR\;WORK:\;\;123 Dublin rd\,\;Oranmore\;Galway\;\;IrelandEMAIL;TYPE=X-CUSTOM1;X LABEL=Custom:[email protected] N:test;user;;; NICKNAME:pizzaguy01ORG:ABC TEL;TYPE=WORK,VOICE:5323534535 TITLE:QA VERSION:3.0 END:VCARD
We recommend that you do not manually modify the CSV file, due to the size of the file itself and the risk ofcorrupting the vCard information.
The following table describes the parameters in the input file for non-presence contacts:
Caution
DescriptionParameter
The User JID. This is the IM address of the user.User JID
The User JID of the contact list entry, if available,otherwise it is the UUID.
Contact JID
Bulk Administration of Contact Lists8
Bulk Administration of Contact ListsFile Details for Import Non-Presence Contact Lists
DescriptionParameter
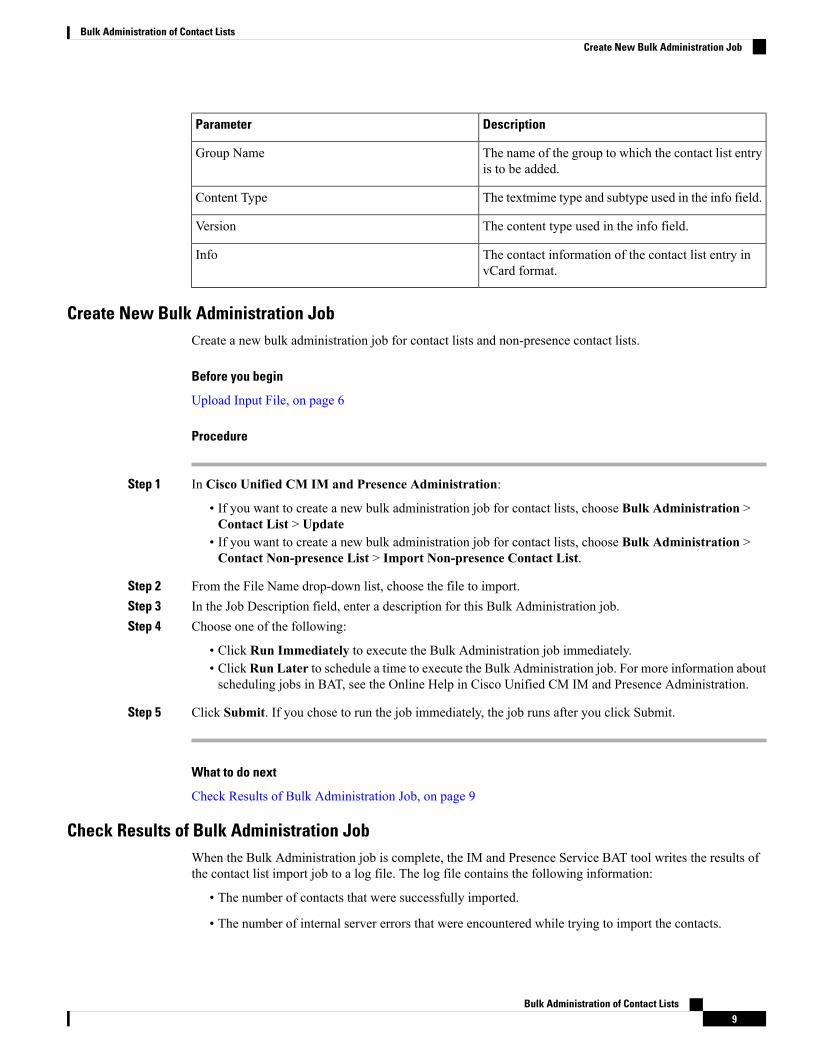
The name of the group to which the contact list entryis to be added.
Group Name
The textmime type and subtype used in the info field.Content Type
The content type used in the info field.Version
The contact information of the contact list entry invCard format.
Info
Create New Bulk Administration JobCreate a new bulk administration job for contact lists and non-presence contact lists.
Before you begin
Upload Input File, on page 6
Procedure
Step 1 In Cisco Unified CM IM and Presence Administration:
• If you want to create a new bulk administration job for contact lists, choose Bulk Administration >Contact List > Update
• If you want to create a new bulk administration job for contact lists, choose Bulk Administration >Contact Non-presence List > Import Non-presence Contact List.
Step 2 From the File Name drop-down list, choose the file to import.Step 3 In the Job Description field, enter a description for this Bulk Administration job.Step 4 Choose one of the following:
• Click Run Immediately to execute the Bulk Administration job immediately.• ClickRun Later to schedule a time to execute the Bulk Administration job. For more information aboutscheduling jobs in BAT, see the Online Help in Cisco Unified CM IM and Presence Administration.
Step 5 Click Submit. If you chose to run the job immediately, the job runs after you click Submit.
What to do next
Check Results of Bulk Administration Job, on page 9
Check Results of Bulk Administration JobWhen the Bulk Administration job is complete, the IM and Presence Service BAT tool writes the results ofthe contact list import job to a log file. The log file contains the following information:
• The number of contacts that were successfully imported.
• The number of internal server errors that were encountered while trying to import the contacts.
Bulk Administration of Contact Lists9
Bulk Administration of Contact ListsCreate New Bulk Administration Job
• The number of contacts that were not imported (ignored). The log file lists a reason for each ignoredcontact at the end of the log file. The following are the reasons for not importing a contact:
• Invalid format - invalid row format, for example, a required field is missing or empty
• Invalid contact domain - the contact domain is in an invalid format. See topics related to bulk importof user contact lists for the valid format of the contact domain
• Cannot add self as a contact - you cannot import a contact for a user if the contact is the user
• User’s contact list is over limit - the user has reached the maximum contact list size and no morecontacts can be imported for that user
• User is not assigned to local node - the user is not assigned to the local node
• The number of contacts in the CSV file that were unprocessed due to an error that caused the BAT jobto finish early. This error rarely occurs.
Complete the following procedure to access this log file.
Before you begin
Create New Bulk Administration Job, on page 9
Procedure
Step 1 In Cisco Unified CM IM and Presence Administration, choose Bulk Administration > Job Scheduler.Step 2 Click Find and choose the job ID of the contact list import job.Step 3 Click the Log File Name link to open the log.
Bulk Administration of Contact Lists10
Bulk Administration of Contact ListsCheck Results of Bulk Administration Job