senior design 4006c group g7 final report 1394b – receiver the new generation of firewire. luke...
TRANSCRIPT

Senior Design 4006CGroup G7Final Report
1394b – ReceiverThe new generation of FireWire.
Luke Starnes (gte874d) Aparna Trimurty (gt9794a)Jeff Schlipf (gte877e)

Background - 1394• 1986 – Apple started FireWire
• IEEE 1394-1995 accepted on December 12, 1995
• IEEE 1394a accepted in 2000
• Late 1996 work began on new standard – 1394b
• Draft for 1394b submitted to IEEE in 2001

1394 – Advantages over competition
• Versatility
• High Speed
• Isochronous
• Low Cost
• User Friendly
• Peer-to-Peer
• All Digital
• Includes power for device in cable

1394a – Specifications• Speeds up to 400Mbps
• 4.5 meter cable
1394b - improvements• Transmit Further (up to 100 meters)
• Faster (Speeds up to 1.6 Gbps)
• Cost Reduction.
• Smaller connector.

Project Goals
• Stage 1:
- Create working Gigabit 1394 module
• Stage 2:
- Use receiver/post-amp kits to replace OE module
• Stage 3:
- Design our own reciever/post amp board
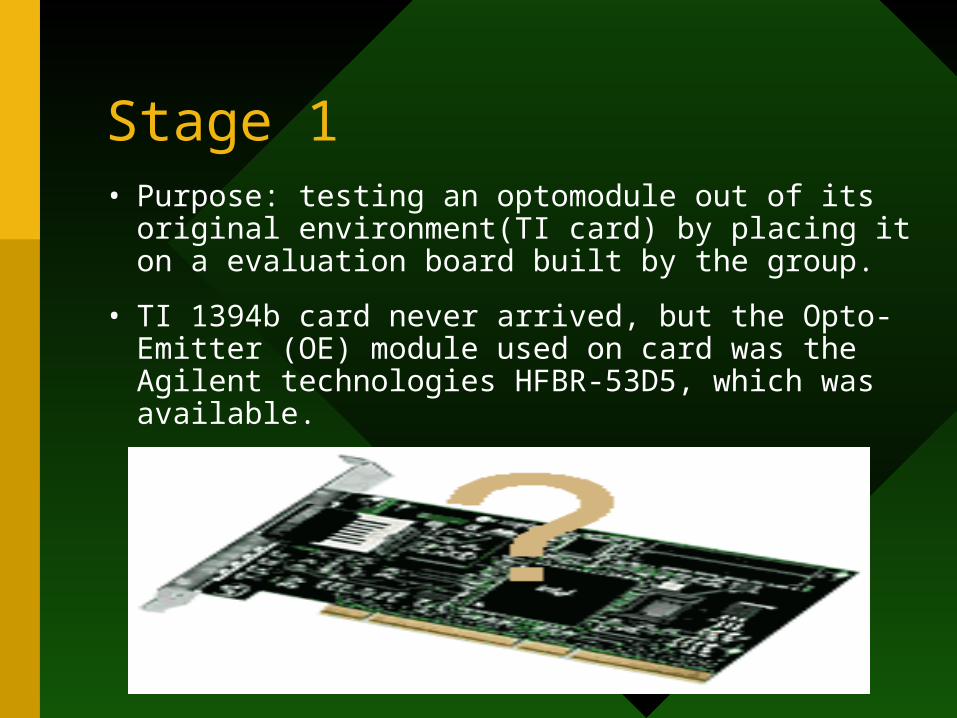
Stage 1• Purpose: testing an optomodule out of its original
environment(TI card) by placing it on a evaluation board built by the group.
• TI 1394b card never arrived, but the Opto-Emitter (OE) module used on card was the Agilent technologies HFBR-53D5, which was available.
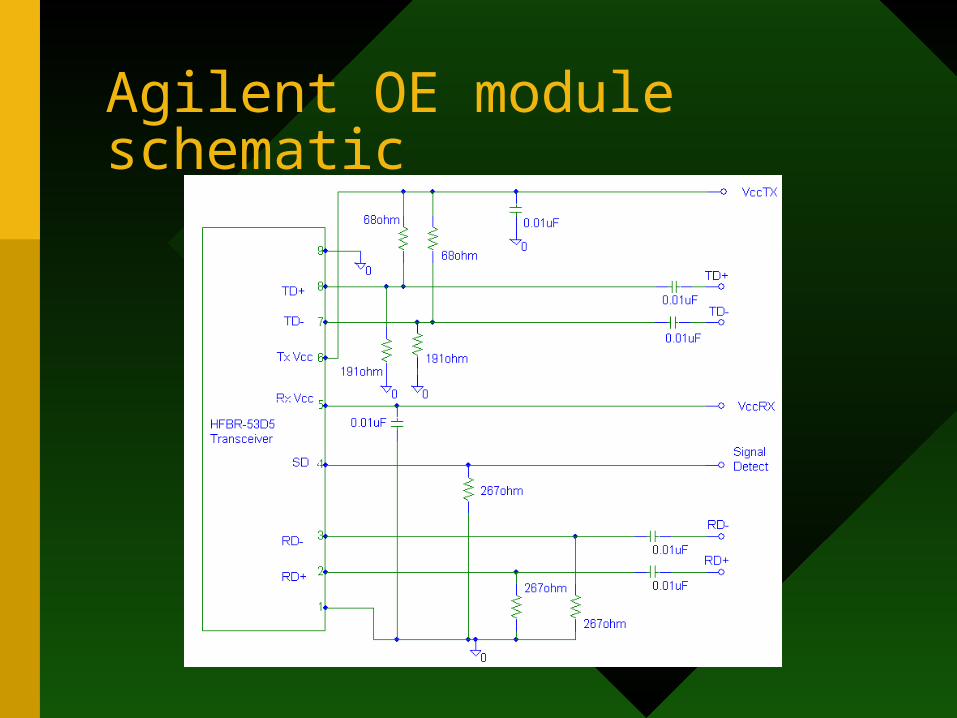
Agilent OE module schematic

Built OE Module Board

Loop Back Testing Procedures
• GTS 1250 GBIC test system pattern generator
•Textronic TDS 7154 Digital Phosphor Oscilloscope

Results using PRBS7 data pattern
•Eye diagram produces shows a slight scar, possibly from solder error

Results using K28.7 data pattern
•Less complicated data pattern produced perfect eye.
Stage 2
• Testing of the receiver MAXIM evaluation kits:
- MAX 3266 (Transimpedance Amplifier or TIA)
- MAX 3264 (Limiting Amplifier/Post Amp or LA)
• This step of the design process is to provide groups not only with an understanding of the boards but also a basis for stage 3, which is an original RX PCB design.

MAX3266 chip Layout

MAX3266 chip includes:• A TIA which converts an input current from the
PhotoDiode to an output voltage.
• A DC cancellation circuit which is used to center the signal around zero. This is done through low frequency feedback.
• Voltage amplifier which converts the single-ended signal into a differential one
• Output Filter which is a single pole low pass filter that is used to limit the circuit’s bandwidth and improve noise performance
• Output Buffer which is designed as a 100 differential load between OUT+ and OUT-

3266 Evaluation Kit
• Simply hook your Photodiode into J1 and your Limiting Amplifier into J2 and J3 and your ready to test
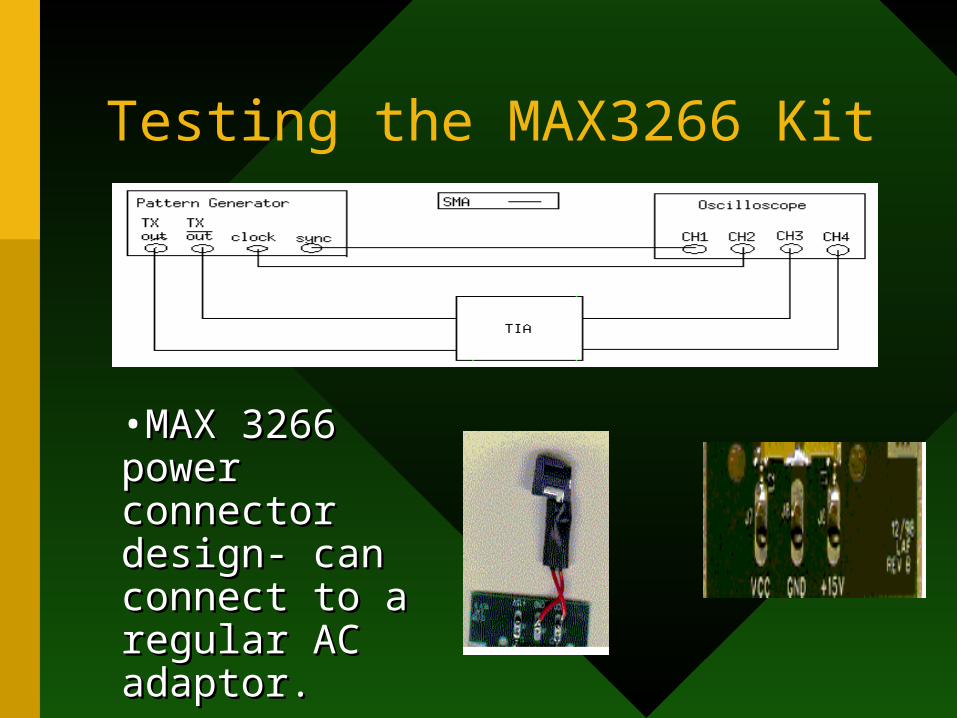
Testing the MAX3266 Kit
•MAX 3266 MAX 3266 power connector power connector design- can design- can connect to a connect to a regular AC regular AC adaptor.adaptor.

Result of Testing MAX3266 Kit
•Perfect Eye diagram for TIA using PRBS7 data pattern

Max3264 – Limiting Amplifier
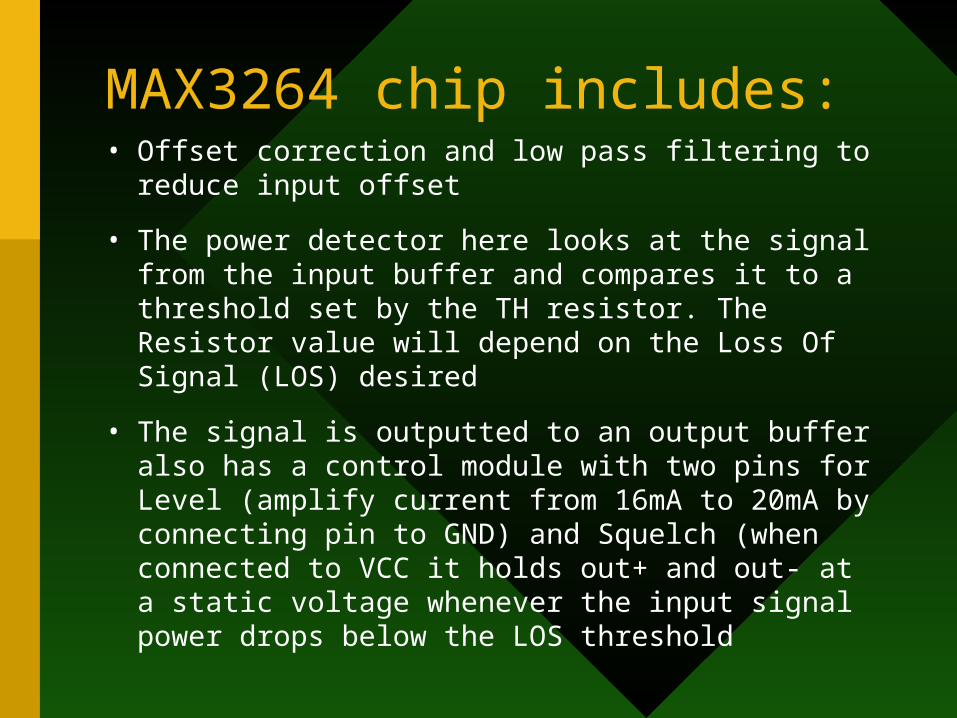
MAX3264 chip includes:• Offset correction and low pass filtering to reduce
input offset
• The power detector here looks at the signal from the input buffer and compares it to a threshold set by the TH resistor. The Resistor value will depend on the Loss Of Signal (LOS) desired
• The signal is outputted to an output buffer also has a control module with two pins for Level (amplify current from 16mA to 20mA by connecting pin to GND) and Squelch (when connected to VCC it holds out+ and out- at a static voltage whenever the input signal power drops below the LOS threshold

MAX3264 Evaluation Kit
•Simply connect your TIA to J4 and J5 and J2 and J3 to your output and your ready to go. LOS threshold programming also done here.

Testing the connected TIA and LA Kits
•MAX 3264- changed MAX 3264- changed connectors of ac connectors of ac adaptor to match adaptor to match board connector.board connector.
•Caused by a lack of Caused by a lack of accurate 5V power accurate 5V power supplies.supplies.

Result of connected TIA and LA Kits
• Perfect eye is received from TIA + LA test with the PRBS7 data pattern

Stage 3
• Purpose: the design and fabrication of a functional and cost effective receiver board based on the MAXIM board
• In allowing for varied applications many components are ineffective for each specified application of the chip. All redundant components are omitted to provide a cost effective solution for a 1394b RX board.

Old Design of TIA and LA from Evaluation Kits

Modifications• 1. The Level pin was grounded on the 3264 to maximize output
voltage.
• 2. The Squelch pin was grounded on the 3264 to disable squelch. It is important to see all signals in testing, no matter how small they may be.
• 3. The CAZ1 and CAZ2 pins on the 3264 are left open. In the specification sheet it is stated that for gigabit Ethernet these pins should be left open.
• 4. The Filter pin was left open on the 3266 to enable DC cancellation.
• 5. The Loss-of-Signal circuit was omitted to further simplify the board. This also allowed for the TH pin to be left open as this simply sets the threshold of the LOS circuit.

Modifications (cont.)
• 6. The power filtering inductors were omitted. This was possible based on the fact that three separate supplies will be used and long power cords will be used between the board and the power supplied.
• 7. A single 1nF capacitor is used for decoupling the power supplies. Based on the use of three separate supplies 1nF should suffice.
• 8. Decoupling capacitors for the input and output of the circuit as well as between the TIA and LA chips were left in to maintain a good signal.
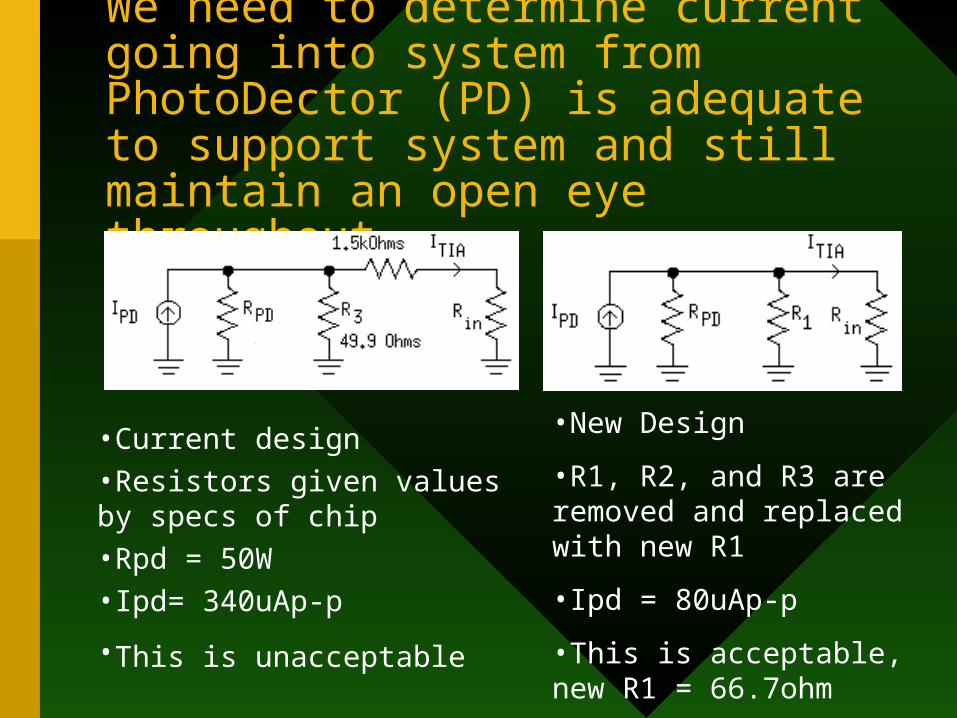
We need to determine current going into system from PhotoDector (PD) is adequate to support system and still maintain an open eye throughout
•Current design
•Resistors given values by specs of chip
•Rpd = 50W
•Ipd= 340uAp-p
•This is unacceptable
•New Design
•R1, R2, and R3 are removed and replaced with new R1
•Ipd = 80uAp-p
•This is acceptable, new R1 = 66.7ohm

New Modified Design

SuperPCB Software Layout
•This is the SuperPCB layout that produced the Gerber file given to Bob House for the new modified design

Parts needed:# Part Description Manufacturer Part
NumberPrice
(all)
To Obtain
4 .01uF capacitor – 0805
ECJ-2VB1H103K $.97 Order from Digikey
3 1nF capacitor – 0805 ECU-V1H102MEN $.97 Order from Digikey
1 .1uF capacitor – 0805 ECJ-2VF1E104Z $1.06 Order from Digikey
2 100 Ohm resistors –0805
ERJ-6GEYJ101V $.80 Order from Digikey
1 67 Ohm resistor –0805
ERJ-6GEYJ680V $.80 Order from Digikey
1 50 Ohm resistor –0805
ERJ-6ENF49R9V $.90 Order from Digikey
3 SWC Power Supply Connector
RAPC722 $3.12 Edgar ordered some
3 Jameco SMA connectors
901-143-6 N/a A bag in lab

Final Soldered Receiver PCB
Vcc
Gnd
•Bob House fabricated board with all components soldered

Testing the Board
•Initial testing revealed board had a high impedance mismatch and give skewed results
•Putting thumb over output appears to reduce this effect and outputs appear more normal
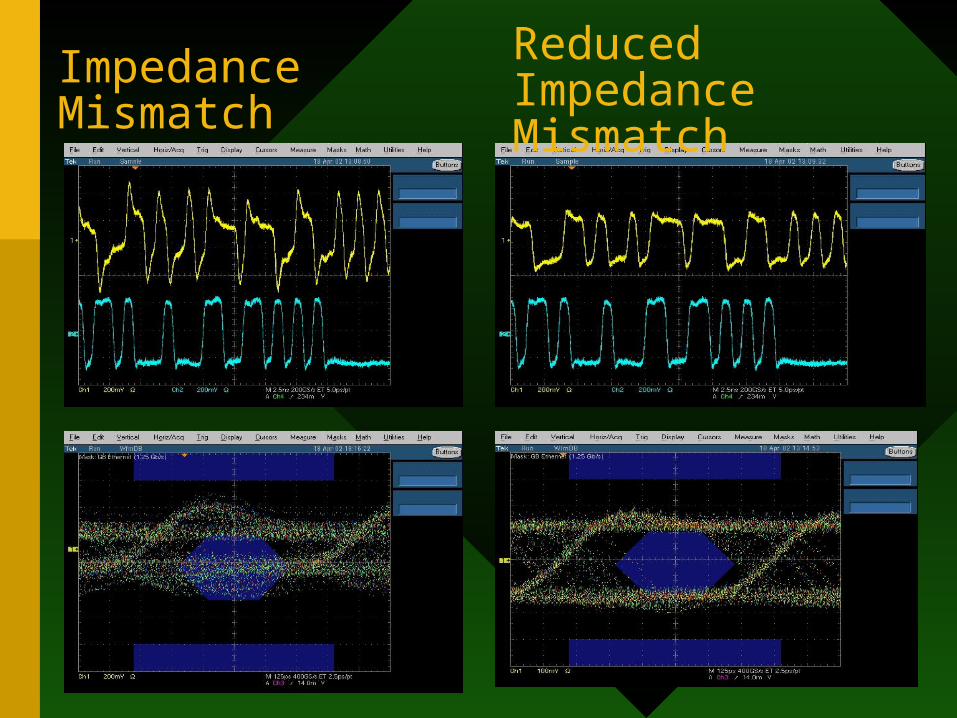
Impedance Mismatch
Reduced Impedance Mismatch

Future Considerations and Recommendations
• Separate the space between the SMA connectors on output by .25 inches in order to test both outputs at once.
• The ground of the output SMA’s needs to be tied to central ground.
• The 2 ground pins of the 3266 need to be tied to ground.• Create 2 separate input networks that can be chosen by a jumper
•We feel a new board should be fabricated perhaps perfessionally with the following improvements:
•Using a bit error rate tester to help in troubleshooting