section 4 erosion and sediment control measures -...
TRANSCRIPT

SECTION 4
Erosion and Sediment Control Measures


Erosion and Sediment Control 4.1 40. Check Dam
40. CHECK DAM When • To stabilize constructed and existing flow corridors when flow is anticipated
to exceed the erosive velocity. • To control sediment in a stream in conjunction with a sediment sump.
Why • To reduce water velocity minimizing erosion in flow corridors and channels. • To temporarily protect vegetation during early stages of growth or
permanently to reduce flow velocities.
Where • Within and across an existing or constructed flow corridor.
Scheduling • Year around.
How
1. Configure check dams to site specific conditions. Utilize an engineer as necessary to determine the notched center dimensions and spacing between check dams based on channel slope, flow length, discharge, flow velocity, and soil type. Permanent check dams should be designed to pass, at a minimum, a 10-year, 24-hour storm at non-erosive velocity.
2. Permanent check dams should be constructed of clean rock placed on geo-textile fabric which has been toed in a minimum of 3 inches. Ninety percent of the rock should range between 2 to 4 inches for slopes less than 2 percent and 3 to 12 inches for steeper grades. The rock size should be large enough to stay in place during anticipated flows. When larger rock is used, place smaller aggregate immediately upstream to filter sediment and improve efficiency.
3. Temporary check dams that will experience low flow conditions can utilize pea-stone or gravel filled bags instead of rock over geotextile fabric. New commercially available technologies include prefabricated check dams that are effective and sometimes reusable.
4. When not engineered but used in series, the toe of the upstream check dam should be set at the same elevation as lowest point in the top of the downstream check dam.
5. The side slopes of the check dam should be 2 horizontal to 1 vertical or flatter or equivalent to the existing streambank slopes.
6. The middle of the dam should be a minimum of 9 inches lower than the outer edges, allowing flow to go over the depression in the center as opposed to around the sides where it could erode the banks.
7. The outer edges should be keyed into adjacent banks and extend to an elevation above the anticipated flow depth to prevent washouts.
8. Sediment sumps should be used upstream of check dams when working in sandy soils when excessive amounts of sediment is expected to accumulate.
9. Riprap should be placed immediately below the check dam to help dissipate the energy of the water flowing over the dam. In areas of higher velocities energy dissipation may be needed downstream of the check dam to prevent undercutting.
10. Temporary check dams should be constructed to handle the anticipated flow and sediment load until the site is stabilized. Aggregate filled bags are easier to remove than a rock check dam and the aggregate can usually be spread along the channel bottom when the check dam is removed. Aggregate meeting the gradation requirements of 6A is recommended; use nothing finer than pea-stone.

Erosion and Sediment Control 4.2 40. Check Dam
Maintenance • Inspect check dams following each runoff event to ensure there is no piping under the structure or around the banks until the flow corridor has been stabilized.
• Initiate identified repair needs as soon as possible following inspection. • Remove and properly dispose of sediment when it accumulates to 1/2 the
check dam height. Spread sediment in an upland area and seed immediately.
• In some instances clogged stone must be cleaned to remain effective. • Inspect downstream structures to ensure they have not been damaged or
clogged with displaced rock or stone. • After flow corridor or channel has stabilized remove accumulated sediment
from behind the check dam. If check dam is temporary, remove check dam and then stabilize the area.
Limitations • Check dams greater than two feet in depth at the center may seriously impact the flow characteristics of the flow corridor or channel and should not be used.
• Removal of rock check dams is labor intensive and expensive. • Does not remove suspended clay and silt, therefore polymers may be
needed.

Source: Adapted from State of Michigan, Department of Management and Budget, SESC Guidebook
4.3Erosion and Sediment Control 40. Check Dam
Erosion and Sediment Control 4.4 41 Catch Basin
41. CATCH BASIN
When • To provide a stable inlet to an enclosed storm drain, open drain or stream.
Why • On enclosed drains to provide a stable inlet and to collect sediment. • On open drains with steep slopes or erodible soils to prevent erosion of the
inlet and to collect sediment.
Where • Where surface water accumulates and needs an outlet. • Within an enclosed drain system to provide a storm drain inlet and a sump. • Where an open drain discharges to a stream or drain at erosive velocities.
Scheduling • Year around.
How 1. Excavate to install catch basin with an adequate sump and a positive discharge to the storm system. Design considerations include inlet size, outlet pipe capacity, inlet and outlet elevations, pipe slope, and sump depth.
2. Backfill to grade, adding topsoil and seed, fertilize with a low or no phosphorus fertilizer if necessary.
3. Install soil erosion and sediment control measures to protect inlet.
Maintenance • Inspect routinely and following each precipitation event that results in runoff until disturbed areas are stabilized.
• Remove temporary control measures and clean sediment from sump after site is stabilized.
• Routinely remove sediment accumulation by hand or with a vacuum truck and haul to an upland site and stabilize. Contaminated sediments must be disposed of at an approved landfill.
• Repair structure as needed.
Limitations • Disposal cost.

Erosion and Sediment Control 4.5 42. Vegetated Buffer Strips
42. VEGETATED BUFFER STRIPS
When • Existing vegetation buffer strip can be maintained during a drain maintenance or improvement project.
• A permanent vegetated buffer strip is being established to stabilize an eroding bank or drain easement area.
Why • Reduces sheet flow velocities preventing rilling and gullying. • Filters sediment laden runoff and reduces the potential for wind erosion. • The vegetation roots hold and stabilize soils. • To protect waterbody from adjacent agriculture and urban development
impacts.
Where • Along stream and drain corridors, sensitive areas, and shorelines.
Scheduling • Maintain existing buffer strips whenever possible. • Establish new permanent vegetation during the growing season or when
dormant seeding can be used.
How 1. Where possible, maintain or establish at least a 20 foot wide buffer strip beyond the top of the slope. On steep slopes with highly erodible soils a wider buffer strip is required to attain full benefit of the buffer strip.
2. When reshaping and vegetating a slope, place a diversion ditch and dike at the top of the slope to prevent water from running over the graded area.
3. Follow the seeding, mulching, pre-vegetated erosion control blankets or other appropriate SESC measures when establishing temporary or permanent vegetation.
Maintenance • Reestablish vegetation in disturbed areas. Inspect routinely until disturbed areas are stabilized.
• If mowing will be used to prevent establishment of woody vegetation, mow annually no closer than 6 inches ideally between August 1 and August 20 to avoid peak nesting seasons and reduced winter cover for wildlife.
• Unwanted competing vegetation should be removed in the first year. Herbicides may be used to eliminate unwanted vegetation and to assist in the establishment of native species.
• When burning vegetated buffer strips avoid peak nesting seasons.
Limitations • Width of drain easements. • Plowing, tilling and construction activities can damage buffer strips. • Property owner’s cooperation.

Source: Adapted from Michigan Department of Transportation
42. Vegetated Buffer StripsErosion and Sediment Control 4.3

Erosion and Sediment Control 4.7 43. Diversion Dike
43. DIVERSION DIKE When • Runoff needs to be diverted around sensitive areas, unstable or easily
eroded soils, bare soils, away from steep banks, or around earth change activities.
Why • Temporarily to divert runoff around earth change activities while vegetation is being established.
• To divert runoff to a stable outlet or sediment control device. • To stabilize existing flow corridors and prevent bank blowouts, gullying, and
subsurface seepage failures.
Where • Just beyond top of bank. • Adjacent to in-channel construction area. • On the upgradient side of earth change activities. • Downgradient side of earth change activities to collect sediment laden
waters.
Scheduling • As part of construction activities as necessary. • During an emergency condition.
How 1. Evaluate existing topography and identify flow paths and potential diversion dike and stable outlet locations.
2. Permanent diversion dikes should be designed to divert a 10-year, 24-hour storm. Utilize an engineer when designing a diversion dike based on discharge volume, ditch slope, flow velocity and soil type.
3. Temporary dikes must be constructed with appropriate soils and compacted.4. Stabilize the diversion dike with vegetation or erosion control blankets prior
to use. 5. Provide a stable outlet using SESC control measures such as riprap,
vegetated spillway, armored spillway, sloped pipe spillway, or pipe drop spillway.
6. Stabilize all disturbed areas prior to removing diversion dikes that must be removed.
Maintenance • Inspect routinely and following each precipitation event that results in runoff until stabilized making any necessary repairs until all areas are stabilized.
Limitations • Must be stabilized prior to use. • May require additional temporary or permanent drain easements.
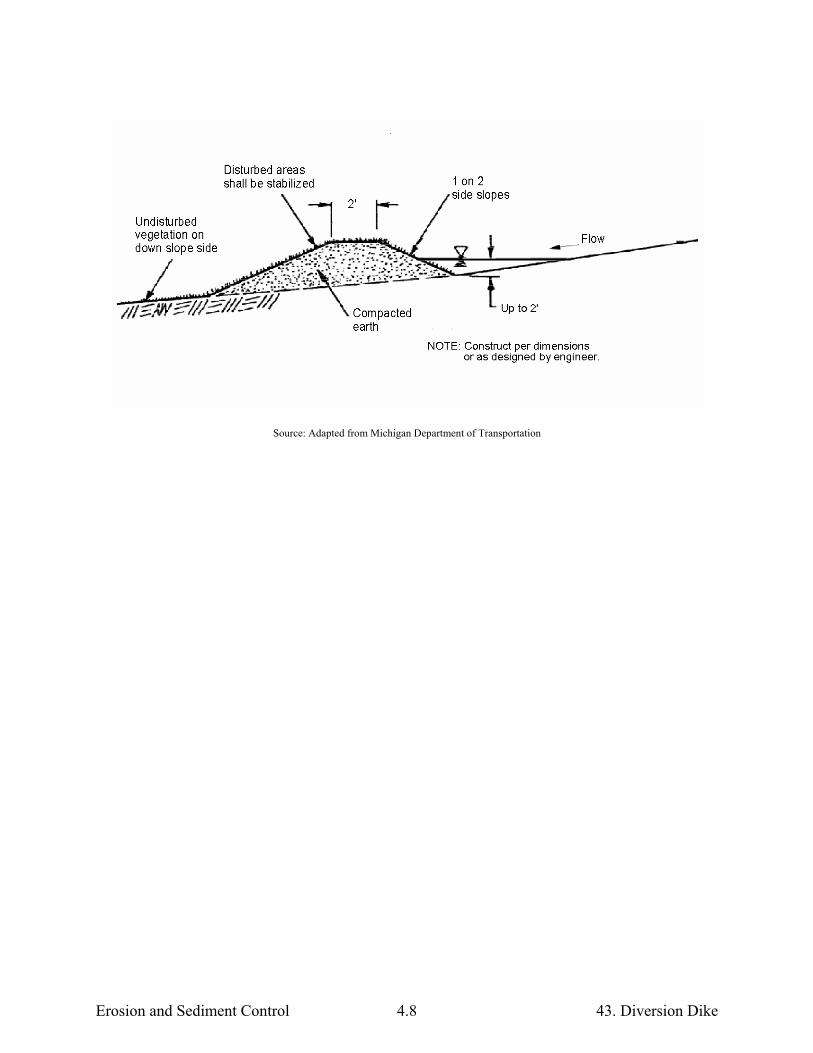
Erosion and Sediment Control 4.8 43. Diversion Dike
Source: Adapted from Michigan Department of Transportation

Erosion and Sediment Control 4.9 44. Diversion Ditch
44. DIVERSION DITCH When • Runoff needs to be intercepted and or diverted around sensitive areas,
unstable or easily eroded soils, bare soils, away from steep banks, or around earth change activities.
Why • Temporarily to divert runoff around earth change activities while vegetation is being established.
• To divert runoff to a stable outlet or sediment control device. • To stabilize existing flow corridors and prevent bank blowouts, gullying, and
subsurface seepage failures.
Where • Just beyond top of bank. • Adjacent to in-channel construction area. • On the upgradient side of earth change activities. • Downgradient side of earth change activities to collect sediment laden
waters.
Scheduling • As part of construction activities as necessary. • During an emergency condition.
How 1. Evaluate existing topography and identify flow paths and potential diversion ditch and stable outlet locations.
2. Permanent diversion ditches should be designed to convey a 10-year, 24-hour storm at non erosive velocity. Utilize an engineer when designing a diversion ditch based on discharge volume, ditch slope, flow velocity and soil type. Check dams may be necessary to reduce runoff velocity within the ditch.
3. Temporary diversion ditches can range from a shallow swale to a deeper constructed ditch.
4. Stabilize the diversion ditch with vegetation or erosion control blankets prior to use.
5. Provide a stable outlet using SESC control measures such as riprap, vegetated spillway, armored spillway, sloped pipe spillway, or pipe drop spillway.
6. Stabilize all disturbed areas prior to restoring diversion ditch areas that must be removed.
Maintenance • Inspect routinely and following each precipitation event that results in runoff until stabilized.
• Routinely remove debris and repair ditch as needed.
Limitations • Top of bank diversion ditches are limited to small flows and shallow ditch depths not exceeding 3 feet.
• Must be stabilized prior to use. • May require additional temporary or permanent drain easements.

Erosion and Sediment Control 4.10 44. Diversion Ditch
Source: Adapted from Michigan Department of Transportation
Erosion and Sediment Control 4.11 45. Diversion Ditch and Dike
45. DIVERSION DITCH AND DIKE When • Runoff needs to be diverted around sensitive areas, unstable or easily
eroded soils, bare soils, away from steep banks, or around earth change activities.
Why • To divert runoff around earth change activities while vegetation is being established.
• To divert runoff to prevent bank blowouts, gullying, and subsurface seepage failures.
• To stabilize existing flow corridors.
Where • Just beyond top of bank. • Adjacent to in-channel construction area. • On the upgradient side of earth change activities. • Downgradient side of earth change activities to collect sediment laden
waters.
Scheduling • As part of construction activities as necessary. • During an emergency condition.
How 1. Evaluate existing topography and identify flow paths and potential diversion ditch and/or dike, and stable outlet locations.
2. Permanent diversion ditches should be designed to convey a 10-year, 24-hour storm at non erosive velocity. Utilize an engineer when designing a diversion ditch and/or dike based on discharge volume, ditch slope, flow velocity and soil type. Check dams may be necessary to reduce runoff velocity within ditch.
3. Temporary diversion ditches can range from a shallow swale to a deeper constructed ditch. Temporary dikes must be constructed with appropriate soils and compacted.
4. Stabilize the diversion ditch and/or dikes with vegetation or erosion control blankets prior to use.
5. Provide a stable outlet using SESC control measures such as riprap, vegetated spillway, armored spillway, sloped pipe spillway, or pipe drop spillway.
6. Stabilize all disturbed areas prior to restoring diversion ditch and dike areas that must be removed.
Maintenance • Inspect routinely and following each precipitation event that results in runoff until stabilized.
• Routinely remove debris and repair ditch and dike as needed.
Limitations • Top of bank diversions are limited to small flows and shallow ditch depths not exceeding 3 feet.
• Must be stabilized prior to use. • May require additional temporary or permanent drain easements.

Erosion and Sediment Control 4.12 45. Diversion Ditch and Dike
Source: Adapted from Michigan Department of Transportation
Source: Adapted from Michigan Department of Transportation
Diversion Dike
Disturbed Soils
Undisturbed Vegetation
Stabilize all disturbed areas
Typical 3 horizontal to 1 vertical ditch slopes must be stabilized
18”
24”
Discharge must be at non-erosive velocities. If water contains sediment, discharge to sediment basin or use another sediment control measure.
Undisturbed Vegetation
NOTE: Dimensions are recommended or as approved by engineer
Diversion Dike
Disturbed Soils
Undisturbed Vegetation
Stabilize all disturbed areas
Typical 3 horizontal to 1 vertical ditch slopes must be stabilized
Flow
18”
24”
Discharge must be at non-erosive velocities. If water contains sediment, discharge to sediment basin or use another sediment control measure.
Undisturbed Vegetation
NOTE: Construct per dimensions or as designed by engineer.
Check dam and sediment trap may be required
If excavated soil is suitable, it may be placed and compacted on the downhill side of the ditch to create the dike.

Erosion and Sediment Control 4.13 46. Stone Filter Berm
46. STONE FILTER BERM When • Runoff from disturbed areas requires filtering before leaving a construction
site.
Why • To reduce the flow velocity and filter sediment from runoff.
Where • In areas where sheet flow or rill flow occurs from small drainage areas. • In drainage ways where intermittent concentrated flow will not exceed
2 feet per second. • Along a site perimeter. • Across construction site access roads. • Around temporary spoil areas. • Along segments of a stream or drain.
Scheduling • Year around.
How 1. Use 3/4 to 3 inch size stone in areas of sheet flow and 3 to 5 inch stone in areas with concentrated flow.
2. Construct a sump area large enough to detain runoff volume on the upslope side of the berm where runoff can pond and sediment can settle. If drainage area is large a sediment basin may be needed.
3. Allow ample room in to allow equipment access for sediment removal and maintenance of the berm.
Maintenance • Inspect routinely and following each precipitation event that results in runoff, to assure filter berm has not plugged. Remove accumulated sediment and repair and replace gravel as needed to maintain adequate filtering and prevent berm overtopping and ultimate failure.
Limitations • Should not be used in place of a check dam in a flowing ditch because they are unable to withstand velocities in excess of 2 feet per second.
• Not for use in concentrated, continuous flow areas. • Not for use in areas intended for mowing.

Erosion and Sediment Control 4.14 47. Sand Fence
47. SAND FENCE
When • In areas susceptible to wind erosion, particularly where soil has not yet been stabilized through other means.
Why • To reduce wind velocities, reducing erosion. • To trap blowing sand, reducing off-site sedimentation. • To assist in stabilizing or re-building a slope.
Where • Along coastal dunes, open areas subject to frequent wind, along roads, work areas, and adjacent to agricultural fields.
Scheduling • Year around.
How 1. Sand fences are generally made from wooden slats spaced approximately 1.5 inches apart or consist of plastic web material.
2. Place sand fence perpendicular to the prevailing wind direction. 3. Anchor fence with sturdy posts at least 6 feet long. Drive posts into the
ground approximately 2 feet. 4. Space the posts approximately 13 feet apart. Spacing may be altered to
ensure posts are placed at low points. 5. Securely attach sand fence to posts on the windward side. Tying or nailing
fence material to each post is often the method used. 6. The bottom of the fence must be set securely into the ground. 7. To continue effectiveness when needed, add another row of fence when
the first row has accumulated sand up to 2/3 its height. 8. When sand fence is used to re-build a slope, plant vegetation to stabilize
the sand when sand accumulation has slowed significantly. 9. When sand fence is used to reduce wind erosion, remove fence after
disturbed areas have stabilized.
Maintenance • Inspect routinely and add or maintain fence until all disturbed areas are stabilized.
Limitations • Removal of fence may disturb established vegetation in stabilized areas unless adequate equipment access routes are planned.
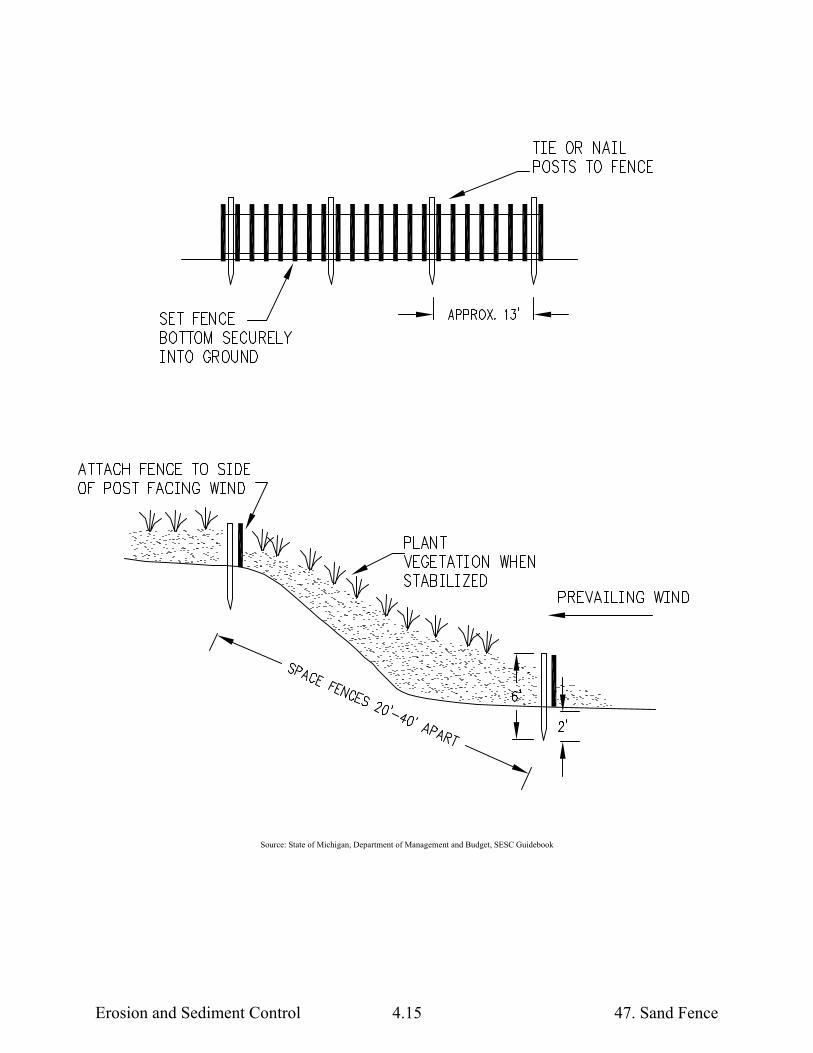
Source: State of Michigan, Department of Management and Budget, SESC Guidebook
Erosion and Sediment Control 4.15 47. Sand Fence

Erosion and Sediment Control 4.16 48. Dewatering
48. DEWATERING
When • Construction activities are limited by the presence of water and a dry work area is required.
• Maintenance activities require lower water levels. • Accumulated stormwater must be discharged.
Why • To remove groundwater or surface water to facilitate construction activities.
Where • A high groundwater table limits construction activities. • Within or adjacent to a stream or drain. • In stormwater basins.
Scheduling • Year around.
How 1. Utilize an engineer to design a dewatering system with sufficient size and capacity to maintain a dry condition without delays during construction or maintenance operations and to provide an adequate sediment basin when needed.
2. Design and stabilize dewatering system discharge point to prevent scouring of the receiving waters.
3. If sediment filtration is required, water should be filtered through a stone filter near dewatering pump inlet or released through a filter, designed for this purpose, prior to discharge.
4. Sediment accumulated with a filtering system must be either spread and stabilized within the drain easement or properly disposed of off site.
Maintenance • Maintain sediment controls and filters in good working order. • Inspect dewatering discharge points daily for signs of scour and erosion. • Repair any problems immediately.
Limitations • Does not provide filtration of contaminated water. • Requires adequate sediment settling area or filtration system to remove
sediment. • Freezing temperature may limit the use of filter bags.
Source: Dandy Bag ®

Erosion and Sediment Control 4.17 48. Dewatering
Source: Adapted from Michigan Department of Transportation
Inlet from pump Bag may be fabricated using geotextile blanket.
Water seeps out of bag from all sides and is most efficient when placed on flat ground.
New construction or repair area
Gravel Filter Berm (optional)
Stabilize to prevent erosion
Filter Bag or Sediment Basin
Hose
Dewatering Pump
Area to be dewatered
Cofferdam or construction dam
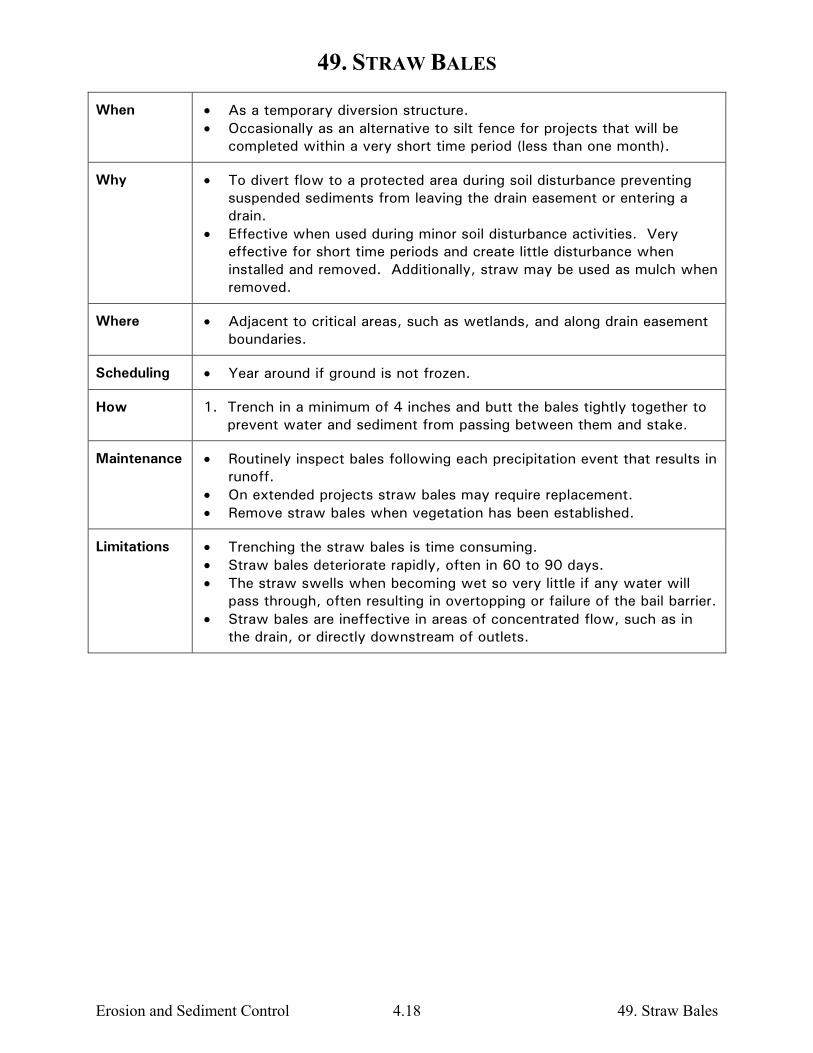
Erosion and Sediment Control 4.18 49. Straw Bales
49. STRAW BALES
When • As a temporary diversion structure. • Occasionally as an alternative to silt fence for projects that will be
completed within a very short time period (less than one month).
Why • To divert flow to a protected area during soil disturbance preventing suspended sediments from leaving the drain easement or entering a drain.
• Effective when used during minor soil disturbance activities. Very effective for short time periods and create little disturbance when installed and removed. Additionally, straw may be used as mulch when removed.
Where • Adjacent to critical areas, such as wetlands, and along drain easement boundaries.
Scheduling • Year around if ground is not frozen.
How 1. Trench in a minimum of 4 inches and butt the bales tightly together to prevent water and sediment from passing between them and stake.
Maintenance • Routinely inspect bales following each precipitation event that results in runoff.
• On extended projects straw bales may require replacement. • Remove straw bales when vegetation has been established.
Limitations • Trenching the straw bales is time consuming. • Straw bales deteriorate rapidly, often in 60 to 90 days. • The straw swells when becoming wet so very little if any water will
pass through, often resulting in overtopping or failure of the bail barrier. • Straw bales are ineffective in areas of concentrated flow, such as in
the drain, or directly downstream of outlets.