seat - online booking user guide quick start general
TRANSCRIPT

Page 1 of 29 © OE Connection Europe 2018 Updated 29/01/2018 - MM
SEAT - Online Booking User Guide
Quick Start
General Settings Version 4.3

Page 2 of 29 © OE Connection Europe 2018 Updated 29/01/2018 - MM
Contents Page
1 Introduction ............................................................................................ 3
2 Quick Start Guide ................................................................................... 4
2.1 First Use – Creating a bookmark to the Dealer Console ........................................................................... 4
2.2 First Use - Obtaining your password ......................................................................................................... 4
2.3 First Use - Logging In................................................................................................................................. 5
2.4 Checking/Amending Dealer Contact details .............................................................................................. 5
3 Pricing for Service & Repair Jobs ......................................................... 7
3.1 Viewing Prices ........................................................................................................................................... 7
3.2 Over-riding Prices at Dealer level .......................................................................................................... 8
4 Opening Hours & Diary Availability....................................................... 9
4.1 Receiving New Bookings ......................................................................................................................... 10
4.2 The BMI (Book Me In) Module ................................................................................................................. 10
4.3 Confirming the Booking............................................................................................................................ 13
5 General Settings ................................................................................... 14
5.1 Changing your Password ......................................................................................................................... 14
5.2 Forgotten your password? ....................................................................................................................... 14
5.3 User Accounts - Adding / Amending / Deleting ....................................................................................... 14
5.4 Auto Email Booking Reminder ................................................................................................................. 16
5.5 Transport Options .................................................................................................................................. 17
5.6 Tyre Brand Exclusions ............................................................................................................................. 18
5.7 Bank Holidays - Closing & reducing Technicians .................................................................................... 19
5.8 The Diary ................................................................................................................................................. 22
6 How do I get Online Booking onto my local Dealer website? ........... 22
6.1 Fully Responsive Design ......................................................................................................................... 22
6.2 Embedding OLB into your Dealer Website .............................................................................................. 23
7 The customer booking process ........................................................... 24
8 Frequently Asked Questions ............................................................... 26
9 Support.................................................................................................. 29
NEW NEW
NEW NEW

Page 3 of 29 © OE Connection Europe 2018 Updated 29/01/2018 - MM
1 Introduction
Welcome to SEAT Online Booking. Online Booking (OLB) provides you and your customers with a simple, quick and user friendly way to place Service and Maintenance, Accessory and Tyre bookings with your workshop directly from www.seat.co.uk. Participating Dealers can benefit from bookings, where customers can select from a variety of jobs at nationally agreed prices for vehicles 0-15 years old.
Everything required to deploy Online Booking onto the National SEAT website has been completed on your behalf already. However, there are settings in the system you may wish to update. E.g.
Workshop opening hours
Diary Availability
User Accounts This guide will take you through every step required to ensure Online Booking is set up, how to handle bookings and how to add Online Booking to your own website. All settings can be accessed by Dealer personnel with a User Account via the Dealer Console. To be able to log in to the Dealer Console, the following stages must have been completed:
SEAT must have passed a setup request to Clifford Thames containing full address and contact information for the first user at your location (E.g. the Service Manager)
Clifford Thames must have created at least one user account (supplied by SEAT) With these in place, the requested User may log in and access the rest of the settings. This guide is split into two parts.
The first is the Quick Start Guide. o This covers all of the basics required to get you up and running quickly.
The second is General Settings. o This covers all other aspects of the system and settings.

Page 4 of 29 © OE Connection Europe 2018 Updated 29/01/2018 - MM
2 Quick Start Guide
Follow these steps to ensure that the basic settings in Online Booking are correctly configured for your workshop. All settings are configured in the Dealer Console.
2.1 First Use – Creating a bookmark to the Dealer Console
First, you will need to navigate to and bookmark the web link to the Dealer Console, to do so:
Open your internet browser and navigate to this web page:
https://seat.onlineservicebooking.com/OlsbConsole?Country=GB&Brand=Seat
IMPORTANT: DO NOT USE your browser’s “Add to Favourites” button found at the top of your screen to save a shortcut to the console
THIS WILL NOT WORK CORRECTLY !
To navigate to the Console in the future you must first “Bookmark” the page using the following instructions:
Click the “Bookmark this page” link and in the dialogue box which appears save the bookmark somewhere you will easily find it in the future (E.g. Bookmarks bar) By using this method it will store the correct address details for the Console.
If the “Bookmark this page” link is not visible, you may have entered the wrong address, please copy and paste it or type it in and try again.
2.2 First Use - Obtaining your password SEAT provided Clifford Thames with a list of users for each Dealer for launch. These have been pre-loaded for you.
Additional users may be added (see sectionAdding New Users 5.3.1 Adding New Users)
When a User accesses Online Booking for the first time, they will need to request a password from the system, to do so:
Open the OLB Dealer Console (using the bookmark you created in section 2.1 First Use – Creating a bookmark to the Dealer Console
Click “Request Password”
Enter your Dealer Number and email address (NB your email address must have been provided by SEAT or added as a user account by your local Admin user) and click “Request Password”
If it still fails to work it will be because the user account has not been created (correctly). Ask your local OLB system Admin Account holder to create your account (see section 5.3.1 Adding New Users) Alternatively, if you are the first user for OLB in your Dealer, please email the support team [email protected] with your details and they will set up your account
Please open your emails and retrieve the password (check Junk/Spam folders if you cannot find it and alert your IT department to add an Exception to the Spam Filter to ensure future emails are accepted)
X

Page 5 of 29 © OE Connection Europe 2018 Updated 29/01/2018 - MM
2.3 First Use - Logging In
After requesting and receiving your password, you may log in, to do so:
Open your email software (E.g. Microsoft Outlook etc)
Open the “Password” email sent to you from OLB (the name of the sender will be [email protected])
Highlight and copy (or make a note of) the password in the email
Open the OLB Dealer Console, to do so, see section 2.1 First Use – Creating a bookmark to the Dealer Console
Enter your Dealer number, email address and paste or type in your received password (case sensitive) and then press “Log In”
2.4 Checking/Amending Dealer Contact details
The Dealer name your customers will see, the contact details they will receive in emails and the employees who will receive notification emails of new bookings, are set in the Business Profile menu. Please note, only Admin level users may make changes to the Business Profile.
Select “Business Profile” from the “Profile” menu
Click “Change” to unlock the fields
Update the fields as required
Click “Update” to save the changes
Business Profile definitions: Brand: Set by Clifford Thames, you may not edit this field Code: Set by Clifford Thames, you may not edit this field, if it requires
changing, please contact Customer Support [email protected]
Name: Enter the name your customers know your Dealer as E.g. “Cardiff
SEAT”, this will be displayed in the email the customer receives and in the “Select Dealer” screen when placing their booking
Main Phone: Enter the number you wish to be displayed in the confirmation email
the customer will receive for them to use if they need to call your workshop
Alternative Phone: Not currently used/required Notification Email Addresses: Enter all the email addresses for all of the personnel you wish to
receive the notification emails for new bookings, you may enter as many email addresses as required, separating each with a comma and a space E.g.
[email protected], [email protected] Email Reply Address: Enter the email address (one only) you wish to be displayed in the
confirmation email the customer will receive for them to use if they need to contact your workshop. This is the ONLY email address your customers will actually see
Website: Not currently used/required Address: Enter your workshop address Continued on next page…
Page 6 of 29 © OE Connection Europe 2018 Updated 29/01/2018 - MM
Business Profile definitions (continued): Town: Enter the town your workshop is in, this will be displayed in the email
the customer receives and in the “Select Dealer” screen when placing their booking
County: Enter the county your workshop is in, this will be displayed in the email
the customer receives and in the “Select Dealer” screen when placing their booking
Postcode: Enter the postcode for your workshop, this will be displayed in the
email the customer receives and in the “Select Dealer” screen when placing their booking.
(Please note that if your business moves premises, updating the Postcode will automatically update the Online Booking system with your new “Distance” from the customer’s postcode, however, there may be a slight delay (of up to 2-3 hours) for these distances to be updated on screen. If you think there is an issue, please contact the support team)

Page 7 of 29 © OE Connection Europe 2018 Updated 29/01/2018 - MM
3 Pricing for Service & Repair Jobs
Prices for standard Service and Repair Jobs for all models are created by SEAT and set nationally, however, those displayed without the padlock icon beside them can be overridden at dealer level, only Admin level users may make changes to the pricing.
3.1 Viewing Prices The prices are displayed in either “By Model” or “By Job” layouts. Both views show the same
information, either based on the selected model or job. You can edit the prices in either view, the following instructions show how to change prices using
“Pricing by Model”
ACTIVE Dates the job will be displayed Empty = Always displayed
FEATURES Specific model applicability “All Models” means it will display for all models If engine, gearbox, fuel or age restrictions apply, each will be shown but will not appear if “all” applies E.g. “Automatic” = Auto gearboxes only But blank means all gearbox types
DEALER OVERRIDE Prices set at Dealer level
NATIONAL Prices set at National level Prices set at £0.00 will be displayed as FOC to the customer
LOCKED PRICES Prices with a padlock cannot be overridden at dealer level

Page 8 of 29 © OE Connection Europe 2018 Updated 29/01/2018 - MM
3.2 Over-riding Prices at Dealer level
Select “Pricing by Model” from the “Workshop” menu
Click the National price for the job you wish to edit
Edit the job price and click OK
The price will now appear under “Dealer Override”
To edit it, click the “Dealer Override” price
To remove the override, click the bin icon

Page 9 of 29 © OE Connection Europe 2018 Updated 29/01/2018 - MM
4 Opening Hours & Diary Availability
OLB requires you to set up the number of hours you want to allow it to book each day. Default Settings have been applied to enable you to begin using OLB immediately, however you may edit these at any time. Please review and update these settings as appropriate. Please note, the Opening Hours should be for your Workshop, not your Sales Showroom To change the default settings please log in and select “Diary Settings” from the “Workshop” menu
Click “Change” to enable you to edit the contents
The Parameters:
Opening & Closing Times - (24hr clock format, leave as 12:00 – 12:00 if closed), these should be the times between which technicians actively work.
Please note, the min/hour separator must be a colon : and times before midday should have a leading zero (E.g. 08:00)
Number of Technicians available - Enter the number of techs you wish to allow OLB to accept bookings for each day, the system multiplies this by the “Available time per technician (mins)” to calculate the available time in the diary each day you will offer to your customers. Best practise would be to include all of your technicians to help maximise potential bookings in your workshop.
Booking Interval - Set the time increments that the customer will see when selecting their “Drop Off Time” to be either only on the hour, or every 30 minutes
(E.g. every hour = 08:00, 09:00,10:00 etc, every 30 mins = 08:00, 08:30, 09:00, 09:30 etc)
Max bookings per technician – Set this to limit the maximum number of bookings the system will allow for each technician each day. Zero (0) overrides this function, which is recommended
Available time per technician (mins) - Set this to the number of hours you wish to make available for each technician each day via OLB (E.g. 300mins = 5hrs per tech, per day)
Contingency time (mins) - This is an optional “bolt-on” time which is added to each booking to allow you enough time to valet, process paperwork etc
Maximum per booking - This prevents a customer booking excessive amounts of work (set in minutes) for a single day. Zero (0) overrides this function, which is recommended
Minimum days in advance – Set your Lead Time in days (default = 3)
Maximum days in advance - Set the maximum days in advance you want to allow your customers to book work for (we recommend no more than 60 days to avoid confusion in the event that some job price offers may be time limited)

Page 10 of 29 © OE Connection Europe 2018 Updated 29/01/2018 - MM
4.1 Receiving New Bookings It is vitally important that as soon as every new booking arrives, your Service Advisors open the Dealer Console and Process the booking. They will be notified of each new booking by email or by the BMI (Book Me In) Module if they have it installed.
4.1.1 Automatic Emails
When a customer places a booking with your workshop, the email addresses listed in the Notification Email Address field (in the Business Profile (see section 2.4 Checking/Amending Dealer Contact details)) and the customer will instantly receive an e-mail confirming the booking details. The general wording of these emails is standard for all Dealers and cannot be edited, only the details of the booking will vary each time.
4.2 The BMI (Book Me In) Module
When a customer places a booking with your workshop, the BMI module can immediately* notify you of any new bookings ( * it refreshes around every 30 mins). It is designed to be installed directly on your computer and will pop up a notification window in front of any other programs you currently have running, to ensure that you don’t miss the booking.
4.2.1 Installing the BMI Module
Please note, the module will work on PCs only, Windows Vista or later version required
Open the Dealer Console and log in (see section 2.3 First Use - Logging In)
Click the installation link (you may install it on as many PCs as required)
Click “Run” when the dialogue box pops up. It is safe to install, please accept it.
If you receive a warning stating that the publisher could not be verified, please click “Run”
Click “Next” then “Install” on the installation screens, then click “Finish” to launch the module
You will then need to log in, using the same credentials you used to log in to the dealer console itself. That’s it! Every time you start your PC, the module will automatically start up and begin notifying you of new bookings

Page 11 of 29 © OE Connection Europe 2018 Updated 29/01/2018 - MM
4.2.2 Using the BMI Module
The module will scan for new bookings every 30 mins (approx.) and will pop up to alert you when any bookings exist which are waiting to be “confirmed”. It lists how many bookings are waiting and is colour coded based on how long the oldest booking has been waiting and / or how soon the next booking is due. Oldest Booking placed Or Soonest Booking Due in Green Less than 24 hrs ago Over 96 hours from now Amber Over 24 less than 48 hours ago Over 72 less than 96 from now Red Over 48 hours ago Less than 72 from now Example:
Clicking “Ignore” will hide the alert until the next scan, when it will reappear unless you or another team member has handled the booking(s) already. Clicking “Action” will open the Dealer Console and automatically log you in, allowing you to instantly handle the booking (s). You should then continue to process the booking as described in section 4.3 Confirming the Booking
4.2.3 Setting BMI Escalations
The module has two notification levels, to allow Standard users to receive all notifications and Managers to receive only the Red notifications, which are in danger of causing a customer concern. IMPORTANT The Service Manager, After-sales Manager and/or Dealer Principal should be set up to receive the “Escalation” notifications, if they are not currently set up as a user in Online Booking, please add them as described in section 5.3.1 Adding New Users To receive all booking notifications, select “Standard” To receive only “Red” notifications, select “Escalation”. To set / switch the setting:
Click the System Tray Icon near your clock
Right click on the BMI Icon
Select “Type”
Click “Standard” or “Escalation”
Bookings waiting
Longest waiting since
Soonest due on
System Tray Icon
BMI Icon

Page 12 of 29 © OE Connection Europe 2018 Updated 29/01/2018 - MM
4.2.4 Starting / Stopping the BMI Module
The module will automatically start and log in, every time you start up your PC. Stopping (WARNING: You will not receive notifications when the module is switched off) To switch off the module until the next restart:
Click the System Tray Icon near your clock
Right click on the BMI Icon
Click “Exit”
Starting To restart the module:
Click the “Start” menu
Click “All Programs”
Click the “Clifford Thames Ltd” folder Click “BMI Notifications”
Click “BMI”
4.2.5 BMI what to do if the installation is blocked…
Although unlikely, you may find that your system does not allow the installation because your “Systems Administrator” has blocked you from installing software on your PC. If this happens, please contact your Computer Systems Administrator and ask them to either “Whitelist” the program, or to come to your PC, log in as “Admin” and complete the installation. For further assistance, please contact the OLB Support Team see section 9 Support
System Tray Icon
BMI Icon

Page 13 of 29 © OE Connection Europe 2018 Updated 29/01/2018 - MM
4.3 Confirming the Booking
It is Extremely Important that the booking is “Confirmed” in the OLB system. The confirmation process exists for several reasons:
To prevent other users from accidentally duplicating the booking
Confirmed bookings “Block out” the diary, preventing overbooking
Email reminders will only be sent to a customer if the booking has been confirmed To confirm the booking, simply log in:
Any bookings awaiting Confirmation will be displayed on the Home Page
The bookings are displayed in the order they are due in your workshop (top to bottom)
Click the “Confirm Booking” icon
Transfer the booking to your Workshop Loading system, then press “Confirm”
Alternatively, if the date/time cannot be accommodated for the booking, contact the customer and agree a new booking time and click “Modify”
Enter the new date/time and click “Update”
Transfer the booking to your DMS/Workshop Loading/T-Cards etc using the same process for a booking received by phone
When complete, click “Confirm”
Or, if the customer changes their mind and wishes to cancel the booking, click “Cancel Booking” and then agree with the dialogue box when asked if you are sure you want to cancel the booking
Click “Home” to return to the home screen
The booking will no longer appear as awaiting confirmation
Repeat for all bookings awaiting confirmation
Please note, ALL bookings received, whether Confirmed, Cancelled or Provisional will all be available for you to review in the Diary, which can be found in the Workshop menu.

Page 14 of 29 © OE Connection Europe 2018 Updated 29/01/2018 - MM
5 General Settings The following chapters cover the rest of the settings in the system.
5.1 Changing your Password The password issued to you by the system is automatically generated and may not be easy to remember, therefore it is often simpler to replace it with one you commonly use
To change your password, once logged in, select “Change Password” from the “Security” menu, enter your current password, then enter your new password (twice) and then press “Update”
Passwords must be a minimum of 12 characters and contain both numeric and alphabetical characters (including at least 1 upper case and 1 lower case character)
OLB will ask you to change your password automatically every 90 days, however you may do so at any time
5.2 Forgotten your password?
If you ever forget your password, please DO NOT contact Clifford Thames. All passwords are encrypted and therefore cannot be read by anyone. You will need to reset your password, to do so, please request a password as described in the section 2.2 First Use - Obtaining your password.
5.3 User Accounts - Adding / Amending / Deleting
The first user accounts will have been created by Clifford Thames as “Admin” level accounts. These users may then log in and add as many additional users as required for the Dealer. User accounts can be managed in the “Contacts” menu. Please note, only Admin level users may make changes to user accounts.
Select “Contacts” from the “Profile” menu.
5.3.1 Adding New Users
Click “Create Contact”
Enter the email address for the user o Please note, every user account must have a unique email address. If several people
share a single email address, the system will only allow one user account per email address and therefore those users must also share a single OLB user account
Enter the user’s name
Enter a contact telephone number
Mobile phone number is optional
Select the “Role” (access level) the user is to be granted o Standard (Default) – For users who only have responsibility for handling new bookings,
these users are blocked from making changes to any system settings (RECOMMENDED) o Admin – For users who have responsibility for setting pricing, managing user access and
controlling diary availability
Click “Create” to complete the user account set up
The new user must request a system password before they can log in to the system, see section 2.2 First Use - Obtaining your password

Page 15 of 29 © OE Connection Europe 2018 Updated 29/01/2018 - MM
5.3.2 Amending User Accounts
To amend existing user accounts
Click the “Update contact details” icon on the line for the user to be amended
Amend the user’s details
Click “Update”
5.3.3 Deleting User Accounts To delete existing user accounts
Click the “Delete” icon (bin) on the line for the user to be deleted
In the dialogue warning box which appears click “Ok” to delete the user
Please Note o You may not delete your own user account o Deleting a user account will only disable the account for the Dealer Number you are logged
in at, if the user has access to multiple Dealer Numbers they will retain that access until they deleted from all Dealer Numbers
5.3.4 Adding a user to more than one Dealer
To give a user access to more than one Dealer’s Console, the user can be added locally by any user with an Admin level account. If the user already has a User Account with at least one other Dealer, all other Dealers can add the user by just entering the user’s email address in the “Create Contact” screen (see section 5.3.1 Adding New Users), the user’s other details (name, phone etc) will automatically be picked up by the system. When added as a user to more than one Dealer, the user DOES NOT require a new password. Each user account has only ONE password to access the system, no matter how many Dealers they have access to. To switch from one Dealer account to another, the user must log out and then log back in using the same email address and password, but must change the Dealer Number to the number for the Dealer they wish to log into. E.g.
Logged in as: [email protected] Password: Bananaskin1 Dealer code: SDealer123 If this user’s email address has been added as a user at Dealer code SDealer999 All the user needs to do to log into Dealer Code SDealer999 is, log OUT of the console completely, then log back in using all the same details EXCEPT the Dealer code, which should be changed as appropriate: Log back in as: [email protected] Password: Bananaskin1 Dealer code: SDealer999

Page 16 of 29 © OE Connection Europe 2018 Updated 29/01/2018 - MM
5.4 Auto Email Booking Reminder
You may set the system to automatically send an email to your customers a number of days before the booking is due, to remind them to bring their vehicle in to your workshop for the work they have booked. The Default setting is “Previous day”. To set the system to send email reminders automatically, select “Workshop Settings” from the “Workshop” menu:
Click “Change” to unlock the fields to allow editing
Select one of the following the options to suit your requirements
Not required o Sends no reminder emails
Previous Day - o a customer booked for Monday
would receive an email on Sunday (or +2 Sat, +3 Fri)
Previous Weekday - o a customer booked for Monday
would receive an email on Friday (or +2 Thur, +3 Wed)
Select the time for the email to be sent
To save your changes click “Update”
IMPORTANT:
Please note, email reminders will only be sent to the customer if you have “Confirmed” the booking in the Dealer Console application (displayed every time you log in, see section 4.3 Confirming the Booking

Page 17 of 29 © OE Connection Europe 2018 Updated 29/01/2018 - MM
5.5 Transport Options
The alternative Transport Options allow you to set which options you support and which parameters to apply that best suit your market place locally.
Which options appear and can be edited at Dealer level is controlled by your OEM.
Below is an overview of what each parameter does and, if applicable, how you can amend it, but please understand that this image may not reflect the current list in your Console.
Select “Workshop Settings” from the “Workshop” menu
Click “Change” to display the editing window
You will see that some options have been “Greyed out”, these are not editable at Dealer level
Update your parameters and press “Update” to make your changes live. The Parameters
Active: Offer the option by Ticking the box
Override: Replace the Default Values with your local settings
Mon-Fri: Offer the option between Monday and Friday
Sat-Sun: Offer the option on Saturday and Sunday (if open)
Lead Time: Override your Diary Setting “Minimum Days in Advance” for this option
Charge: Set the value to charge for this option
Max Distance: Set the max distance you wish to offer this option up to
Note, this is only used to make the customer aware, it is not used to validate if the option should be displayed
Max Drive Time:Set the max drive time you wish to offer this option up to
Note, this is only used to make the customer aware, it is not used to validate if the option should be displayed
Please note, not all functions will be available for all Transport Options, this is set at national Level by your OEM.

Page 18 of 29 © OE Connection Europe 2018 Updated 29/01/2018 - MM
5.6 Tyre Brand Exclusions
Dealers not signed up to the National Tyre Programme, but still presenting the Tyres option within OLB may need to set the system to automatically ignore specific tyre brands if they are not available from their chosen supplier to prevent OLB from offering tyre brands you are unable to supply. To do so:
Select “Workshop Settings” from “Workshop” menu
Click “Change” to unlock the fields to allow editing
Either “Double-Click” a brand in the “Available” box to move it to the “Excluded” box, or click a single brand to highlight it and press the “Exclude >>” button to move it to the “Excluded” box
Reverse the process, or use the “<< Include” button to move brands back to the “Available” box
Press “Update” to save your changes
All Brands listed in the “Excluded” box will NOT be offered to your customers when choosing tyres
You may update this at any time
Page 19 of 29 © OE Connection Europe 2018 Updated 29/01/2018 - MM
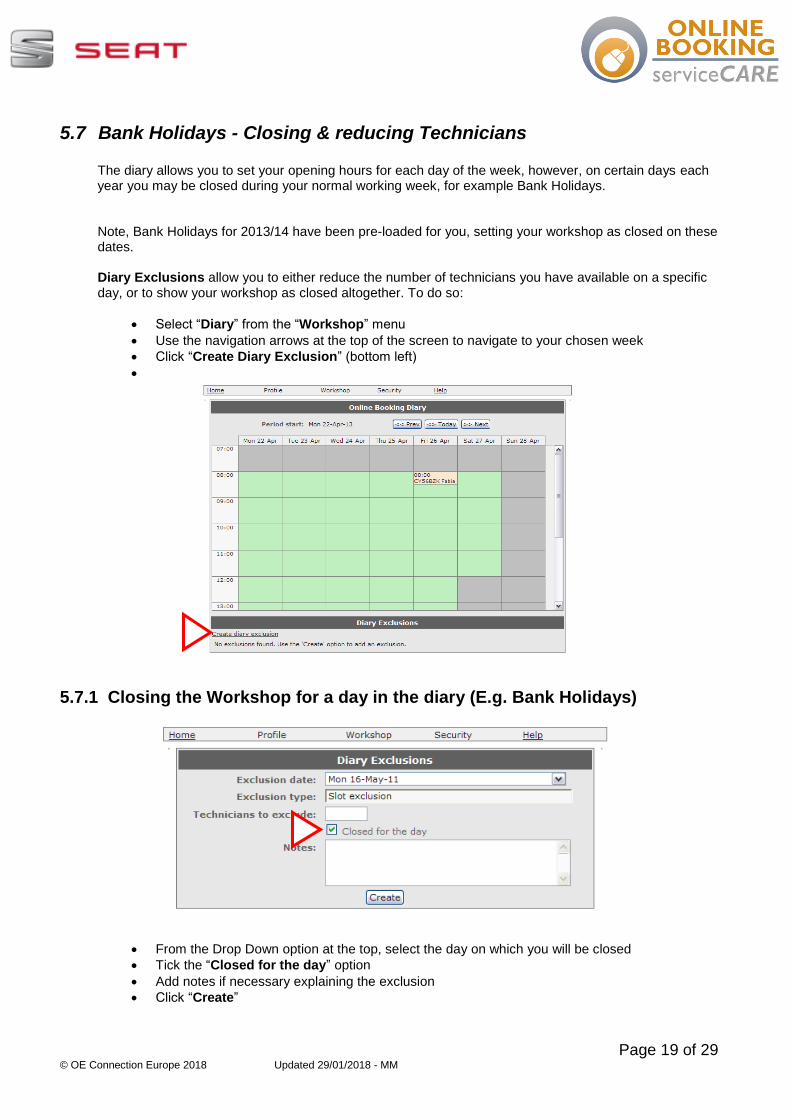
5.7 Bank Holidays - Closing & reducing Technicians
The diary allows you to set your opening hours for each day of the week, however, on certain days each year you may be closed during your normal working week, for example Bank Holidays. Note, Bank Holidays for 2013/14 have been pre-loaded for you, setting your workshop as closed on these dates. Diary Exclusions allow you to either reduce the number of technicians you have available on a specific day, or to show your workshop as closed altogether. To do so:
Select “Diary” from the “Workshop” menu
Use the navigation arrows at the top of the screen to navigate to your chosen week
Click “Create Diary Exclusion” (bottom left)
5.7.1 Closing the Workshop for a day in the diary (E.g. Bank Holidays)
From the Drop Down option at the top, select the day on which you will be closed
Tick the “Closed for the day” option
Add notes if necessary explaining the exclusion
Click “Create”

Page 20 of 29 © OE Connection Europe 2018 Updated 29/01/2018 - MM
5.7.2 Excluding Technicians from the diary (E.g. reduced cover during holidays)
Select “Diary” from the “Workshop” menu
Use the navigation arrows at the top of the screen to navigate to your chosen week
Click “Create Diary Exclusion” (bottom left)
From the Drop Down option at the top, select the day you wish to reduce the number of technicians on
Enter the number technicians you would like to remove on the day
Add notes if necessary explaining the exclusion
Click “Create”

Page 21 of 29 © OE Connection Europe 2018 Updated 29/01/2018 - MM
5.7.3 Editing/deleting diary exclusions
To make changes to an existing exclusion
Select “Diary” from the “Workshop” menu
Use the navigation arrows at the top of the screen to navigate to your chosen week
Your existing exclusions for that week are displayed below the diary
Click the “Amend” icon for the exclusion you wish to edit, or the “Delete” (bin) icon to delete
Make the required changes to the exclusion and click “Update”

Page 22 of 29 © OE Connection Europe 2018 Updated 29/01/2018 - MM
5.8 The Diary
Bookings, once confirmed or cancelled will disappear from the home page to ensure they are not duplicated within your workshop loading system. You can find them again, in the Diary.
5.8.1 Finding Bookings in the Diary
This can be achieved two ways:
Click the “Diary” icon of any Booking Awaiting Confirmation on the home page (assuming you have one or more waiting), see section 4.3 Confirming the Booking or
Select “Diary” from the “Workshop” menu
With the diary open, you can navigate back and forth using the buttons on screen. Each booking will be displayed on the relevant day and selected timeslot regardless of its status:
White Bookings - Confirmed
Yellow Bookings - Provisional
Pink Bookings - Cancelled Click on a booking to view it.
5.8.2 Changing the Date of a Confirmed Booking
If a customer requires you to change the date of a booking you have already confirmed, you may do so, providing that the booking is not in the past. If it is in the past, there is no need to amend it, as it will not affect anyone attempting to make a booking.
To edit the date, select “Diary” from the “Workshop” menu
Navigate to the week of the booking with the Prev and Next buttons
Click on the booking
Edit the booking following the instructions in section 4.1 Receiving New Bookings
6 How do I get Online Booking onto my local Dealer website?
As OLB is a simple web application and hosted by Clifford Thames it can be embedded into any dealer websites.
6.1 Fully Responsive Design It is important to understand that Online Booking is a Fully Responsive Web Application, which identifies the device being used to view it and adapts its design and layout to optimise the device’s display, therefore the user can view it on any device (from a large screen desk top PC to a small smartphone) and experience similar yet optimised versions, without the need to be directed to separate web pages.

Page 23 of 29 © OE Connection Europe 2018 Updated 29/01/2018 - MM
6.2 Embedding OLB into your Dealer Website
Most deployments favour an embedded iFrame (so that it appears as “part of your website” within a page on your website, recommended if your website is also Fully Responsive), but a pop up or new window may also be used (recommended if your website is NOT Fully Responsive). The URL to be used will be provided by OLB Support at no additional cost to existing OLB dealers. Set Up Steps
1. Contact OLB Support to request/confirm your URL 2. Pass the URL to your website provider (they may charge to insert OLB into your site) 3. Ask them to implement OLB using the URL as either an embedded iFrame or as a Pop up /
New Window and whether to add it to your local Mobile Website (if separate from your main website)
Window size If you are embedding it as an iFrame, you should ensure that the height of the frame is either dynamic (adjusts itself to height of the Online Booking system automatically), or use the reference height below. As Online Booking is Fully Responsive, the width of the page is not critical, as it will adjust itself automatically to fit, however, there is a screen width at which the system will automatically convert to displaying as if it is being viewed on a mobile device, see below: • Minimum Width to display as Desktop variant: 800 pixels wide • Minimum Height to display without vertical scrollbars 780 pixels high We suggest that you apply these sizes and then test on the main browsers (IE, Firefox & Chrome). As the navigation buttons for the application appear at the bottom, it is important to ensure the full window displays cleanly.

Page 24 of 29 © OE Connection Europe 2018 Updated 29/01/2018 - MM
7 The customer booking process When your customer lands on the Online Booking page of www.seat.co.uk , this is the process they will go through. If your dealer has OLB embedded in your website locally and is part of a group with other dealers also on SEAT OLB, your customers will follow the same process as those visiting www.seat.co.uk with the exception being that only dealers WITHIN YOUR GROUP will be offered to the customer to choose from. If you are a standalone SEAT dealer, when you deploy OLB to your website, the “Select Dealer” Step will automatically be removed and any bookings customers place will automatically be sent to your dealership. Desktop View Mobile Device View

Page 25 of 29 © OE Connection Europe 2018 Updated 29/01/2018 - MM
Your Car (Step 1 of 6) Customer enters VRN and mileage, the system finds their vehicle details or the customer can manually select them if not found or wrong Select Dealer (Step 2 of 6) This page is only displayed on www.seat.co.uk or on your local website when you are configured as a “Group”. If you have OLB on your local website and are “Standalone” as a SEAT dealer, this step is removed entirely. The customer can enter a Postcode, Town or City name and search, or they can “Use Location” which will use their GPS on a mobile device on 3G/4G, or their IP address if from a desktop/laptop/mobile device if on LAN/WIFI. The nearest 3 dealers are displayed for selection, offering contact details, opening hours and customer satisfaction scores. They select a dealer to proceed. Select Work (Step 3 of 6) This is where your customer selects the work they want you to carry out. They can choose from Services, Accessories and Tyres as applicable to your dealer. If your customer needs work which is not listed, they can type it into the box, which will be included in the notification email you receive to allow you to contact the customer and discuss the details. Select Date (Step 4 of 6) Your customer is asked to select the date they would like to bring their vehicle to you. Only dates you have made available in your Diary Settings will appear. Their selected date is shown in red. They can then select their preferred drop off and pick up time and whether they need alternative transportation. Your Details (Step 5 of 6) It’s now where we need to know who and where they are so that you can book them into your workshop loading system. Only the bare essentials are asked for, plus they have the option to opt in or out of marketing. Confirm (Step 6 of 6) The system now displays a summary of the booking. The customer can amend any part of the booking by clicking the Amend links. When they are happy it is correct, they simply press the “Confirm Booking” button and they will immediately receive an email confirming the booking.

Page 26 of 29 © OE Connection Europe 2018 Updated 29/01/2018 - MM
8 Frequently Asked Questions Q: Why can’t I request my password? A:
Some Dealers have experienced issues obtaining their password from OLB or logging in. In every case this has been because the user has missed the User Guide’s first instruction on how to navigate to the OLB Dealer Console.
PLEASE, be sure to follow the instructions set out in section 2.1 First Use – Creating a bookmark to the Dealer Console precisely!
Q: Why can’t I log in? A:
Do you have a User Account? If not ask your local Admin User to add your account then follow the instructions in section 2.2 First Use - Obtaining your password
Confirm that you are entering the correct Dealer Number, email address and password
Confirm that you are using the correct link as explained section 2.1 First Use – Creating a bookmark to the Dealer Console
If not, navigate to the correct link (remember you must follow these instructions to save the link as a favourite)
If all of the above are correct, then it is possible that your “Session” has expired. If so, simply re-navigate back to the Dealer Console page and start again.
If you still cannot log in, request a new password as described in section 2.2 First Use - Obtaining your password. If you receive a password, your account is active and you should now be able to log in, if not, contact the support team: [email protected]
Q: Why did I not receive my Password email? A:
It may have been blocked by Spam/Junk Mail filters, either on your machine locally, or by your email system centrally. Please check with your Email Administrator first. If this is proven not to be the case, please contact the Online Booking support team.
Q: Why are the prices in the customer screens appearing with $ rather than £ currency symbols?
A: OLB checks which Regional Settings you have in Windows and displays your chosen currency. If they appear as Dollar symbols then you have your PC set as English USA. Please go to the “Control Panel” in Windows, select “Regional and Language Settings” and ensure that all are set to English UK.
Q: Why do my customers not receive reminder emails? A: Check that your Email Reminder is set to be sent,
see section 5.4 Auto Email Booking Reminder Reminder emails are only sent to bookings which have been “Confirmed”, please ensure that all bookings are confirmed as described in section 4.1 Receiving New Bookings

Page 27 of 29 © OE Connection Europe 2018 Updated 29/01/2018 - MM
Q: Customers cannot make a booking because no days appear available in the diary, why?
A: Check the following details in “Diary Settings”
Check that you have set your opening times correctly
Check that you have the correct number of technicians available each day
Check that your “Available time per technician” has been set using minutes rather than hours (E.g. it should be 300 minutes, not 5 hours), see section 3 Pricing for
Service & Repair Jobs
Prices for standard Service and Repair Jobs for all models are created by SEAT and set nationally, however, those displayed without the padlock icon beside them can be overridden at dealer level, only Admin level users may make changes to the pricing.
8.1 Viewing Prices The prices are displayed in either “By Model” or “By Job” layouts. Both views show the same
information, either based on the selected model or job. You can edit the prices in either view, the following instructions show how to change prices using
“Pricing by Model”

Page 28 of 29 © OE Connection Europe 2018 Updated 29/01/2018 - MM
8.2 Over-riding Prices at Dealer level
Select “Pricing by Model” from the “Workshop” menu
Click the National price for the job you wish to edit
Edit the job price and click OK
The price will now appear under “Dealer Override”
To edit it, click the “Dealer Override” price
To remove the override, click the bin icon
Page 29 of 29 © OE Connection Europe 2018 Updated 29/01/2018 - MM
Opening Hours & Diary Availability
9 Support For Online Booking support, please contact:
OEC Europe Springfield Lyons House Springfield Lyons Approach Chelmsford Business Park Chelmsford Essex CM2 5TH
Email: [email protected] Tel: 0845 300 1823 (Mon-Fri 08:00 – 17:00, excluding Bank Holidays)