season extension for gardening - a plain language guide from the new entry sustainable farming...
TRANSCRIPT

SEASON EXTENSION
A Plain Language Guide from the New Entry Sustainable Farming Project
The benefits and costs of extending the growing season
Simple methods of season extensionMaterials and costs for
season extension
In thIs GuIde, You WIll learn about:
Season Extension
Authored by Jeff HakeReviewed by Jennifer Hashley, New Entry Director
Graphic Design by Zoe Harris
www.nesfp.org
November 2010
Boston Office: New Entry Sustainable Farming ProjectAgriculture, Food and Environment ProgramGerald J. and Dorothy R. Friedman School of Nutrition and Science PolicyTufts University75 Kneeland StreetBoston, MA 02111(617) 636-3793
Lowell Office:New Entry Sustainable Farming Project155 Merrimack Street, 3rd FloorLowell, MA 01852(978) 654-6745
For additional information regarding this document, please email: [email protected], or call (978) 654-6745. This document is available in electronic format or as a printed copy. The latter may be obtained by contacting NESFP at the above locations. Please contact New Entry for permission to use any part of this document for educational purposes.
Production of this document was supported by USDA Risk Management Agency (RMA Partnership Agreement No. 06IE08310159).
“In accordance with Federal law and US Department of Agriculture policy, this institution is prohibited from discriminating on the basis of race, color, national origin, sex, age, or disability. To file a complaint of discrimination, write USDA, Director, Office of Civil Rights, Room 326-W, Whitten Building, 1400 Independence Ave SW, Washington, DC 20250-9410. Or call (202) 720-5964. USDA is an equal opportunity employer.”
New Entry Sustainable Farming ProjectWorld PEAS Cooperative

Winter Harvesting
Who should read this guide?
This guide is written for people who want to know how to extend their growing season into the winter. Season extension can be difficult and is not right for everyone. There are extra considerations in the beginning, and more land, materials and labor are usually needed. Also, many farmers use the winter months to rest and to plan for the next sea-son. This guide will help you figure out if you are able and willing to extend your grow-ing season, how to begin the process, and how to enjoy the benefits.
This guide is intended for those who:• have been farming for a long time and want to increase their vegetable production• have experience with season extension and want to learn new methods.• are getting started farming and you would like to incorporate year-round growing into your
new farm.
It may be helpful for you to use this workbook with someone who can guide you to more farming information, such as an experienced farmer, staff member of a farm service organization, or other service provider. A list of useful terms can be found in the Glossary at the back of this guide. Words in quotation marks (“ ”) are defined there.
What is Plain Language?
This guide is presented in a format called Plain Language. Plain Language provides clear, simple, and accessible text for readers in order to reduce misunderstandings, errors, and lack of comprehension. It also helps guide you through action steps to do what you learn and gives examples of other people practicing the information. We pres-ent this guide in Plain Language in order to make it accessible to everyone.
Purpose of this Guide

Winter Harvesting
Season Extension1
Introduction..................................................................................................................2
Understanding Season Extension.............................................................................4
Season Extension Tecnhiques....................................................................................7
Row Covers.....................................................................................................7
One Grower’s Story: Row Covers...........................................................11
High Tunnels...................................................................................................12
One Grower’s Story: High Tunnels...........................................................24
Glossary.......................................................................................................................25
Appendix A: Suppliers...............................................................................................27
Appendix B: Published Resources..........................................................................28
Appendix C: Building a Hoophouse......................................................................29
Contents
Replace this photo (this one is used in other guides)

2 Season Extension
Introduction “Season extension” is a combination of techniques that extends the amount of time in a year that a farmer can grow vegetables. When it is done carefully and with planning, it can be very profitable.
Season extension does not use materials or methods that an experienced farmer has never used before. It is a combination of familiar ideas. The wintertime farmer must simply choose plants, planting locations, and planting times more carefully, and use different materials to create “microclimates.”
Note: Farmers who are very ambitious, experienced, and have access to ample resources can grow any vegetables they want all year-round using permanent greenhouses and other techniques. This guide does not contain information on permanent, heated structures.
Plant Choice The simplest way to extend your harvest season is to choose “cold-hardy vegetables.” This includes many leafy green vegetables, several root vegetables, and others. These vegetables can tolerate some freezing temperatures, unlike more tender plants, such as tomatoes and cucumbers.
Your property probably has areas that stay a little warmer or colder than the rest of the property. Areas like this are called “microclimates”. If you know where to find them, you can take advantage of the microclimates that stay warmer for longer in the season.
This is a concept that any farmer is familiar with. Different crops get planted at different times. However, in season extension, vegetables are planted later in the fall and earlier in the spring in combination with other season extension methods.
This method requires more planning and is the most difficult and costly part of season extension. However, it is also the most important, effective and rewarding part. It can be as simple as plastic mulches and as complex as heated greenhouses. It is almost always used in combination with the previous three methods.
Location
Time
Creating Microclimates

Season Extension3
Season extension is not right for everyone. You should ask yourself some questions before you begin making season extension plans. Do you have the resources to begin extending your season? Are you willing to commit the time to farming for longer in the year? Is your property suitable for season extension? This guide will help you begin to answer these questions.
Before you begin reading, think about the following list of advantages and disadvantages of season extension. They should help you decide if you are ready to be a wintertime farmer:
Advantages of season extension include:• You can start with small changes that require almost no additional resources
and then do more as you can gain experience and knowledge.• Fresh, local vegetables grown during the winter receive much higher prices.• Protecting vegetables from bad weather, pests, and other problems creates
high-value produce.• You can grow “specialty crops” in the summertime.• It creates opportunities for employees to work in bad weather.• It creates year-round work positions.• It allows you to be creative with your space.• It increases the value of your farm.
Disadvantages of season extension include:Start-up costs are low, but extra planning and labor are required in the beginning.
• Labor costs, including skilled labor, will increase and will take more time to dedicate to farming during the year.
• Additional storage and growing space must be available for any new structures and materials.
• The off-season will become shorter and more of it will be used for planning.• Marketing for your winter vegetables will be different from your summer
vegetables and will require more planning.

4 Season Extension
UNDERSTANDING SEASON EXTENSION
Microclimates“Microclimate” is the word used to describe the climate of a small area. For example, an area on the north side of a building facing an open field will be several degrees colder than a protected slope facing towards the south. They are in the same general climate, but they are different microclimates.
It was said before that you can take advantage of these microclimates. Notice in the picture that the garden is placed at the top of a slope in a location that receives full sun all day and has a line of trees to block cold winds.
This is a very simple picture but areas like this probably exist on your property. You can take advantage of these microclimates and extend your season by a week or two at both the end of the fall and the beginning of the spring.
Season extension is a combination of a few familiar ideas. This section of the guide will explain how that combination works.

Season Extension5
How do you find natural microclimates?
Low-lying areasIt is generally a good idea to avoid growing plants on the lowest parts of your property. Often these areas have naturally good soil and easy access to water, but cold air and moisture both collect there. This will keep the soil colder for longer in the spring. Also, there will usually be less air movement in those areas, which will promote diseases, keep cold air on top of the plants, and allow air pollutants to settle around the plants.
High, exposed areasIt is also a good idea to avoid growing plants in high areas that are exposed to a lot of wind. Strong wind can cause physical damage to plants by breaking stems, burning leaves, and causing fruit to fall. It also causes early cooling in those areas, and can erode soil.
A good way to reduce the impact of wind is to create “windbreaks.” Windbreaks are large objects, like trees or fences, that reduce the speed of wind. You can take advantage of natural windbreaks, including existing trees, fences, and small hills, or install them yourself. These new objects on your property can be used for multiple purposes. For instance, a fence can support vining crops like peas and cucumbers, and you can select fruit trees for your windbreaks. However, sunlight is one of the most important factors to consider, so make sure that the windbreaks you install do not cast shade on your fields.
SlopesGradual slopes that face towards the south or the west should be used to your advantage. They can be great areas to gain a few weeks in your growing season. Here in the northern United States, slopes that face towards the south warm up sooner in the spring, meaning you can plant in those areas sooner. Slopes that face towards the southwest are generally better than slopes that face towards the southeast. It is also important that the slope is not too steep or have soil that will erode easily. See Appendix B for contact information for the local soil conservation service, an organization that can help you with this.
Example of trees used as a windbreak
6 Season Extension
Key Points: Understanding Season Extension• Microclimates are small areas that have a different climate from the
surrounding area.• Low-lying areas are usually cooler and wetter than the surrounding area.• High, exposed areas are usually drier and windier than the surrounding
area.• Windbreaks can be used to reduce the impact of wind.• Slopes can be used to your advantage if they are facing towards the
south, especially the southwest. However, they cannot be used if they are too steep.
• You can create microclimates by insulating the air around plants, reducing wind flow, and keeping the soil warm.
• Passive climate modification is a reliable way of extending your harvest season.
Creating microclimates The creation of microclimates, or “climate modification,” is the most important way that farmers are able to extend their harvest season. Microclimates are created by capturing solar energy, insulating the air around plants, reducing the flow of cold and damaging wind around the plants, and keeping the soil warm.
Adding heat to create microclimates can be much more complicated and expensive than “passive climate modification.” Passive climate modification is the creation of warm microclimates without adding heat artificially. However, passive climate modification does not create temperatures that are similar to summer temperatures. It simply creates temperatures that are warmer than outside temperatures, allowing plants to survive the coldest temperatures of the winter. If you carefully combine climate modification with good plant selection and planting time, then you can be a successful four-season farmer.
Season Extension7
Row coversYou may be familiar with “row covers” already. Many farmers use row covers to protect their crops from insects, birds, strong winds and cold temperatures. Row covers can raise temperatures by 2 to 6 degrees F in the spring, and even more in the fall because the soil is warmer.
Row covers are sheets of plastic that run the length of each row, over the tops of your plants. Row covers are often used in combination with “plastic mulch”. The plastic mulch is necessary because the row covers are difficult to remove for weeding. However, sometimes a plastic mulch is not appropriate for seeding certain plants. In that situation, the cover must be removed to weed underneath.
There are two types of row covers: “slitted row covers” and “floating row covers.” These are discussed in the following section.
SEASON EXTENSION Techniques
If you are ready to begin extending your season, this section will help you choose methods and begin planning.

8 Season Extension
Slitted row covers• Made from “polyethylene plastic.”• Held to the ground by wire, boards, rocks, or soil.• Plastic has numerous slits in it for ventilation when temperatures are high.• Can still become very hot on warm, sunny days. This makes them suitable for early
plantings of hot-season plants like tomatoes and melons.• Slits reduce the plants’ frost protection a little. However, ventilation is very
important. Without the slits in the plastic, it would become too hot for the plants underneath.
• Held above the tops of the plants by wire hoops that are staked into the ground just beyond the edge of the plastic mulch.
• The hoops are placed four to five feet apart. • The plastic covers are usually very thin, 1.5-2 millimeters thick.• Usually sold in rolls that are 6 feet wide and 1000 feet long.• 6 x 1000 foot rolls cost approximately $130.• Gauge wire hoops to support 1000 feet of plastic costs approximately $250.

Season Extension9
Floating row covers• Made from “spun-bonded plastic” cloth. • Held to the ground by wire, board, rocks, or soil.• Lets less light through to plants, but it is also a mesh material to allow air and water
through without needing slits. • Maintain higher temperatures and handle wind better than slitted row covers.
light material and do not require wire hoops. Plants underneath lift the cloth as they grow.
• Some growers still use the hoops to maximize growth. If you have the resources to do this, using the hoops with spun-bonded plastic covers is an option.
• Spun-bonded plastic tears less easily than polyethylene plastic.• With care and proper storage, can often be used again in the fall and for a second
year. • They can be used on large areas and not just for single rows.• For single rows, an 83 inch (almost 7 feet) by 1000 foot roll costs approximately
$150.• For wider areas, 20 foot wide rolls cost approximately $430, and 30 foot wide rolls
cost approximately $630.• If you choose to use them, gauge wire hoops to support 1000 feet of plastic costs
approximately $250.• Many growers prefer floating covers over slitted row covers.

10 Season Extension
Dubois
Slitted row coverFloating row coverWire hoopsMechani-cal plastic spreader
Row cover sample budgetsThe chart below will help you think about the costs of investing in row covers.
Season Extension11
Key Points: Row Covers• Row covers are sheets of plastic that run the length of each row, over
the tops of your plants. • Many farmers use row covers to protect their crops from insects, birds,
strong winds and cold temperatures. • Slitted row covers are from clear polyethylene plastic with slits in it for
ventilation. They are usually held up by wire hoops.• Floating row covers are made from spun-bonded plastic, a material that
allows both air and light to flow through. They are held up by hoops or allowed rest on top of the plants.
• Many farmers prefer floating row covers over slitted row covers.
Row Covers: Things to Consider• Planting time: Choosing when to plant under your row covers depends on
what you want to grow and how much risk you are willing to take. Row covers raise temperatures by 2 to 6 degrees F, so choosing cold-hardy vegetables is a safer idea. However, you can also get an early start with tomato, eggplant, and other tender transplants. The risk is that a late, hard frost will occur and the row covers will not be enough to protect them.
• Hardening off: It is important to “harden off” plants that are under the protection of your row covers, particularly your more tender crops. They will be used to growing with protection and may be unprepared for increased wind, changes in temperature, and more sun exposure.
It is recommended that you begin the hardening-off process by removing your row covers for just a few hours a week before you plan to fully remove them. Choose a time of day that is not too windy, rainy, or sunny. The next day, remove the row covers for a few more hours. Increase the time per day for up to a week and then remove the row covers altogether.

12 Season Extension
Row Covers Jonas is a small-scale farmer in central Massachusetts. He grows a
variety of vegetables such as spinach, lettuce, and mesclun greens, as well as tomatoes, cucumbers, winter and summer squash, and peppers. He sells these at his roadside stand and at farmers markets twice a week in the nearby city of Worcester. Recently, a winter farmers market opened in Worcester, and there is plenty of space at the market for more sellers. Jonas knows that he can make more money from selling vegetables during the winter. However, he does not know how to extend his season to take advantage of this market, and does not have a lot of extra money to get started. He talks to a neighbor who has high tunnels on his property. His neighbor tells Jonas that, because he cannot afford to do a lot and is new to season extension, he should start with using low tunnels. This way, he can learn when and how to plant for season extension without spending as much time and energy on high tunnels. Jonas learns from his neighbor that it is easy to extend the season for his mesclun greens. This is because they are frost-tolerant and less risky. Taking his neighbor’s advice, Jonas finds a company that sells spun-bonded plastic for making row covers. It’s late September, so he plants six rows to mesclun greens. In late October, the first light frosts begin, so Jonas and his crew work pairs to put wire hoops over the rows, pull the plastic over the tops of the hoops, and push dirt over the edges to hold it in place. The plants grow until mid-November, when it becomes too cold for them to keep growing. However, they are still alive, and Jonas and his workers are able to harvest until early December. Then, the ground becomes too frozen to move the plastic for harvesting and the plants go dormant for the rest of the winter. Because he does not have a lot to sell this first year, Jonas joins up with another farmer at the winter farmers market to share his stand. He is able to increase his prices on bags of fresh mesclun greens and begin to recover the costs of the plastic and hoops. Jonas isn’t able to harvest from early December until mid-March but as the ground softens with warmer days, he is able to again harvest and sell at the winter farmers market with higher prices. Also, he plants his first spring crop of greens and prepares for an earlier start to the growing season.
One Grower’s Story
Season Extension13
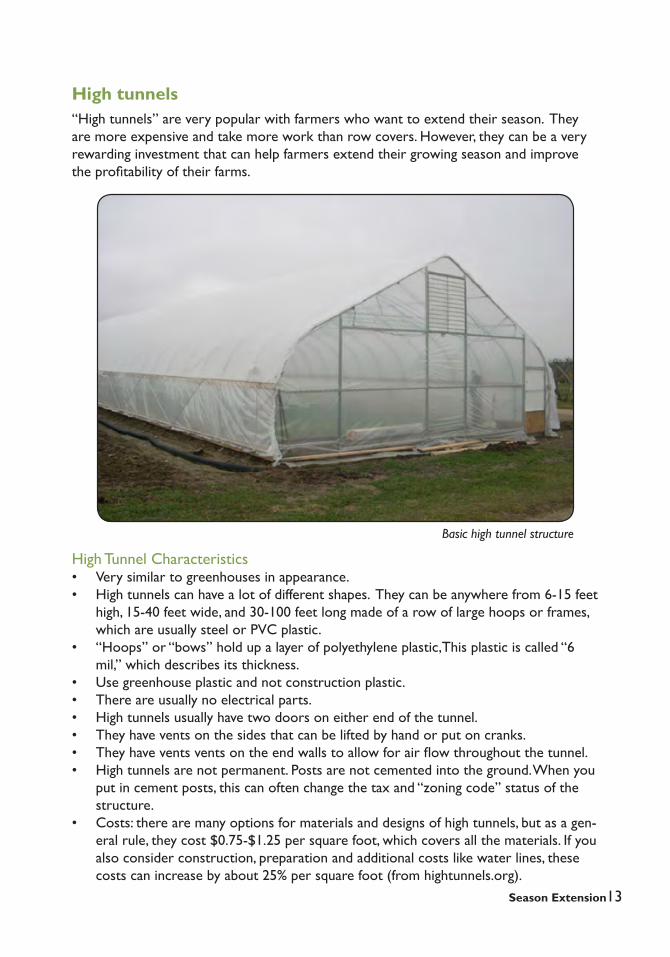
High tunnels“High tunnels” are very popular with farmers who want to extend their season. They are more expensive and take more work than row covers. However, they can be a very rewarding investment that can help farmers extend their growing season and improve the profitability of their farms.
High Tunnel Characteristics• Very similar to greenhouses in appearance. • High tunnels can have a lot of different shapes. They can be anywhere from 6-15 feet
high, 15-40 feet wide, and 30-100 feet long made of a row of large hoops or frames, which are usually steel or PVC plastic.
• “Hoops” or “bows” hold up a layer of polyethylene plastic,This plastic is called “6 mil,” which describes its thickness.
• Use greenhouse plastic and not construction plastic. • There are usually no electrical parts.• High tunnels usually have two doors on either end of the tunnel.• They have vents on the sides that can be lifted by hand or put on cranks.• They have vents vents on the end walls to allow for air flow throughout the tunnel.• High tunnels are not permanent. Posts are not cemented into the ground. When you
put in cement posts, this can often change the tax and “zoning code” status of the structure.
• Costs: there are many options for materials and designs of high tunnels, but as a gen-eral rule, they cost $0.75-$1.25 per square foot, which covers all the materials. If you also consider construction, preparation and additional costs like water lines, these costs can increase by about 25% per square foot (from hightunnels.org).
Basic high tunnel structure

14 Season Extension
Basic parts of a high tunnelMost high tunnels have the same basic parts. The diagram below should help you become familiar with the names of some of the basic parts that you may encounter when building a high tunnel. If there is more than one name for a part, this means that it is sometimes called different things by different people, or that the design of your greenhouse affects the name of the part.
A) Rib, Hoop, Arch, Bow B) Purlin , Ridgepole C) End Wall D) Hip Board E) Side Wall F) Baseboard

Season Extension15
How to choose a site for a high tunnelThere are quite a few important things to think about when you are choosing a site for a high tunnel. You must consider where to place them on your farm in relation to roads and water, and how to position them in regards to wind and sunlight. The following is a list of the most important things to consider when choosing a site for a high tunnel:
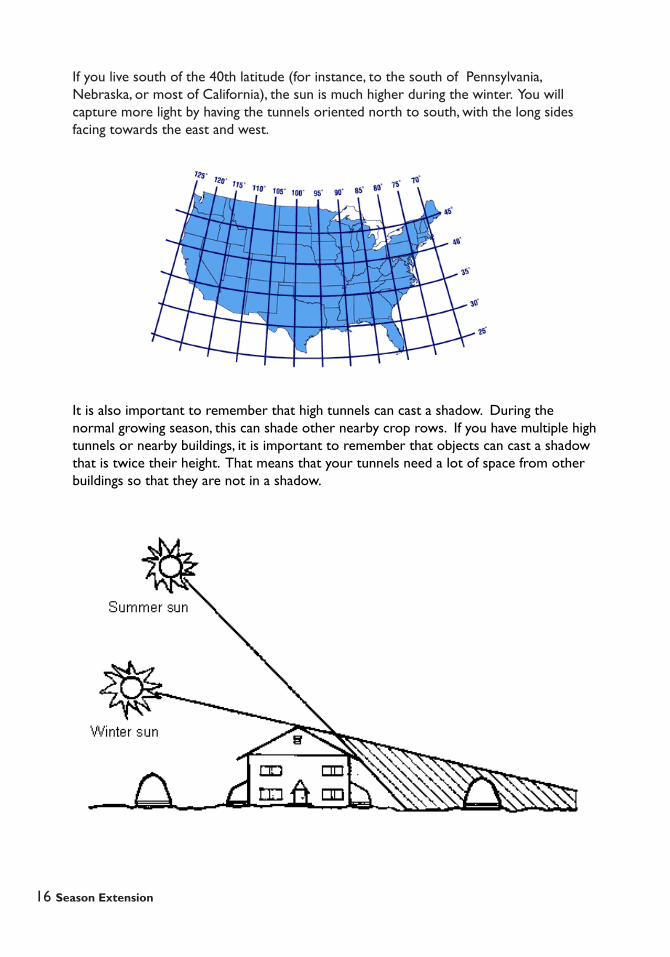
LightYou want your high tunnel to receive as much light as possible. If you live north of the 40th latitude, sunlight comes strongly from the south during the winter. This means that you should position your high tunnel so that one of its long sides faces towards the south. In this position, the ends will be facing towards the east and the west. If you cannot face the tunnel completely south, it does not matter if it is facing more towards the east or the west.
For a fun way to see how the angle of the sun changes throughout the year, check out: http://cwx.prenhall.com/bookbind/pubbooks/lutgens3/medialib/earthsun/earthsun.html
16 Season Extension
If you live south of the 40th latitude (for instance, to the south of Pennsylvania, Nebraska, or most of California), the sun is much higher during the winter. You will capture more light by having the tunnels oriented north to south, with the long sides facing towards the east and west.
It is also important to remember that high tunnels can cast a shadow. During the normal growing season, this can shade other nearby crop rows. If you have multiple high tunnels or nearby buildings, it is important to remember that objects can cast a shadow that is twice their height. That means that your tunnels need a lot of space from other buildings so that they are not in a shadow.

Season Extension17
Wind and air flowIt will be important in the summertime to provide ventilation in your high tunnels. Otherwise, it can become too hot, even for the tomatoes and specialty crops you may be growing. The vents on one end of your tunnel should face towards the direction of the “prevailing wind.” When the vents are open, this should allow fresh air to flow through your tunnel consistently.
If you live in an area that is particularly windy, such as near large bodies of water, it will also be a good idea to construct your high tunnel in the area that has the least wind. Otherwise, the wind can strain or damage it. See “Constructing a high tunnel” for information on how to build a strong tunnel that can handle high wind.
Access to water Year-round water access is key to winter harvesting. Even though your tunnel crops will be mostly dormant during the winter, they still need water. This means that you will need to have water lines that are buried below the frost line. This can be up to 48 inches deep in northern areas.
You will also need a frost-free hydrant outside of the greenhouse. Check out Appendix B for resources on how to bury lines and install frost-free hydrants.
If you have to choose between getting maximum light into your high tunnel and placing your tunnel for maximum wind flow, light is more important, especially for winter growing and harvesting.

18 Season Extension
Water drainageBe careful to set up your high tunnel with proper drainage. It can be difficult to fix a drainage problem inside your high tunnel after it has already been constructed. Avoid low-lying areas of your property where water will flow from higher areas into the tunnel, Create a raised soil bed inside your high tunnel. See “Preparing the site” for information on how to prepare the soil for your tunnel.
Road accessYou may find it important to place your high tunnels near a road on your property. High tunnels require a lot of equipment, especially during construction. Also, high tunnels require more frequent attention than regular fields, so you will want to have easy access to them.
However, be careful not to place your high tunnel too close to a road. A passing vehicle that is not being driven carefully could tear the plastic on the tunnel or break its supports, causing expensive damage.
Also, you may want the tunnel to be accessible to the public, for picking their own fruits and vegetables or as a roadside stand on rainy days, for instance. This means that you will want the high tunnel to be easily reached from a public road. Be careful that it is not within 50 feet of a public road, though, so that air pollution from cars and trucks does not contaminate your crops.

Season Extension19
Key Points: High tunnel basics and choosing a site• High tunnels are very similar to greenhouses in appearance. However, no
heat is added.• They are covered in greenhouse-grade plastic.• They are usually not permanent.• You want your high tunnel to receive as much light as possible. In
northern latitudes, the most winter sunlight comes in from the south.• High tunnels should be positioned for maximum air flow through the
tunnel. However, when choosing a site, light should take precedence over airflow.
• Access to water will be important to set up before you build your high tunnel. A frost-free hydrant is deal.
• It is very important to establish good water drainage before you build your high tunnel. Attempting to fix drainage problems after you build will be expensive and difficult.
• Road access might be important to you. Building and maintaining high tunnels can sometimes require machinery, and if you plan to use your high tunnel for sales, it will be helpful to have it near a public road.

20 Season Extension
Planning to build a high tunnelHigh tunnels can be built with many different materials, designs, dimensions, and features. These choices are affected by your location, your budget, and your plans for the tunnel. The following is a general list of the decisions you will have to make. However, it is important to keep in mind that many of these choices can be made easier by using standard high tunnel kits, rather than custom-building your own tunnel. Resources for how to buy high tunnel materials and kits can be found in Appendix A.
This section will guide you through critical planning decisions before you begin construction of a high tunnel. A basic construction guide for a steel-pipe high tunnel can be found in Appendix C at the back of this guide. It is from The Hoophouse Handbook, part of the Growing for Market series, edited by Lynn Byczynski. See Appendix B for more useful construction resources.
Materials
FrameThe first decision you have to make about materials is what you will use for the “bows”, “purlins”, “trusses”, and “braces” for the tunnel. The two most popular materials are “PVC” and steel pipes. Steel pipes are a lot more expensive and are trickier to work with. However, they are much sturdier and will be able to tolerate a lot more wind and snow. If there is any chance that you will operate machinery inside the high tunnel, sturdier steel pipes are also a good idea in case the machinery hits one of the supports. In general, PVC is used only for small high tunnels or by farmers on a strict budget.
Baseboards and hipboardsMost farmers use lumber for making the “baseboards” and “hipboards” of their high tunnels. It is best to use lumber that is resistant to rot, such as cedar, locust, oak, or hemlock, or that has been “treated”. However, be careful what kind of treated lumber you choose. Lumber treated with arsenic can “leach” harmful chemicals into your soil, water, and crops, and “arsenic-treated lumber” is prohibited on certified organic farms.
“Borate-treated lumber” is a better option for farmers that are concerned about worker and customer safety. The best option is to treat your desired wood with sodium tetraborate or sodium octaborate. Check with your local chemical suppliers or hardware stores, and, if you are an organic farmer, also make sure that the chemical with which you choose to treat your lumber meets organic standards.
Why not to use PVCIn addition to its limited use in framing high tunnels, PVC is considered an unsustainable plastic. The chemicals that are used to make it can be highly toxic to both humans and animals, it has a shorter lifespan than metal and is more difficult to recycle.

Season Extension21
Endwalls“Endwalls” can be made from a few different materials. The simplest and cheapest option is to use more of the same polyethylene film that is covering the rest of the high tunnels. Another option is plywood, which will provide more insulation but also does not transmit any light. A better but more expensive option is “twinwall polycarbonate”, a solid plastic sheet made of two thin sheets of durable plastic with space in between. Twinwall polycarbonate is excellent for insulation and “light transmission,” is easily cut, placed, and attached, and is a strong material that provides extra support.
The frame for endwalls is usually constructed from lumber. This wood should follow the same rules as for baseboards and hipboards.
Doors and ventsDoors and events are both vital components of your endwalls. Without doors, you have no access to your high tunnels, and without vents, you will not be able to provide good air flow for your crop. Normally, each endwall will have one vent each that can be opened and closed. This is to hold heat in the winter and let air flow in the summer. What sort of door you choose will determine what you can do inside your tunnel. A normal small door will allow you to only bring in supplies and tools by hands. A large door will allow you to move tractors and other large equipment in and also give you more opportunities for ventilation if you are farming in a particularly hot area.

22 Season Extension
Tunnel coveringIt is very important that you use quality plastic to cover your tunnel. You should be sure to use greenhouse-grade plastic and not construction plastic or other cheaper types of polyethylene covering. Other plastics do not have UV inhibitors. UV inhibitors protect the plastic from sun damage, meaning that you can typically use the plastic for up to 4 years. Most other plastic will last one year or less.
There are other features that you can consider for your plastic as well. Some greenhouse plastic is treated with “anti-condensate additives”. This helps prevent water from collecting on the inside of the plastic. Water collecting on the plastic can block light, and water dripping onto plants can cause disease. Other are treated to prevent nighttime heat loss or reduce scalding in extreme heat and sun exposure. Choosing the right kind of plastic is another decision you have to make based on your needs.
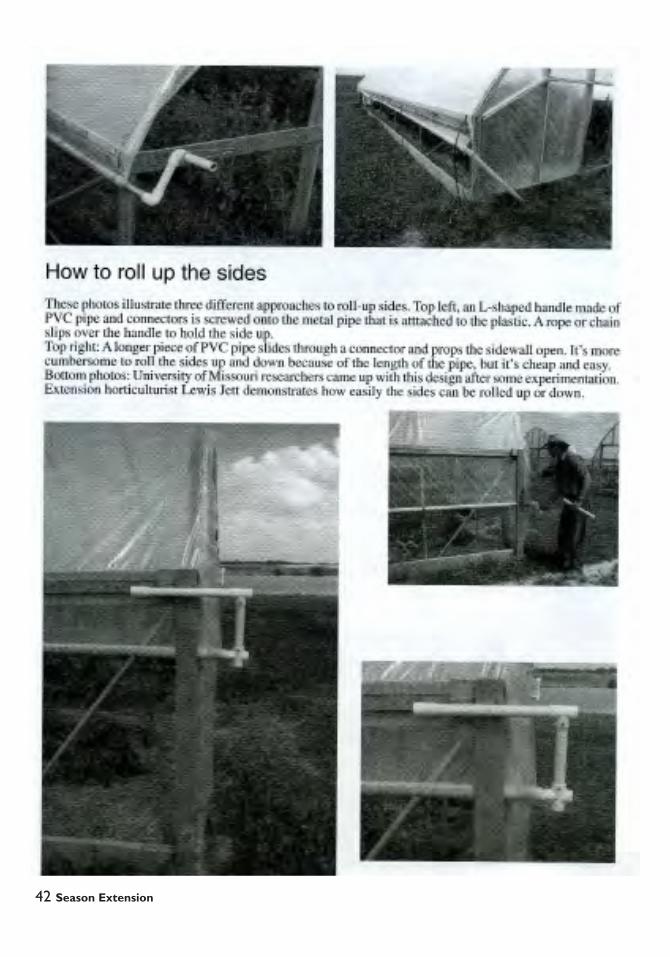
It will also be important to be able to pick up the plastic sides of your high tunnels for ventilation as the season heats up. This is called “rolling up the sides”. The ends of the plastic covering on your tunnel will be secured with a long metal rod that runs the entire length of the tunnel. This will make a total of four ends, one at each end of the tunnel. At those ends, you can attach a crank that will allow you to roll up the sides as necessary. See the end of Appendix C for some possibilities of how to roll up the sides of your high tunnel.

Season Extension23
Designs High tunnels can take a lot of different shapes, as you can see in the picture below. However, the most popular are the Quonset and Gothic styles. Choosing a design is based on a number of factors.
The first thing to think about is what materials you are using (see “Materials” on the previous pages). If you are using PVC pipes for your bows, you will be bending the pipes to create the roof of your tunnel. Therefore, the only choice you have is the rounded Quonset style. However, if you are using metal pipes, you have many more, and often better, options for the design.
Gothic styles are popular in areas with heavy snowfall in the wintertime. The roof of the Gothic design allows snow to easily slide off the sides. The Quonset rounded roof is more likely to hold snow. The steeper, flat sides of the Gothic style can also be built to face the sun. This lets the maximum amount of light, or “solar gain”, into the high tunnel. The Quonset style is not able to do this because its roof has no angles. Finally, Gothic style roofs are preferred because they offer more room for working and growing inside the tunnel.

24 Season Extension
DimensionsChoosing the length, width, and height of your high tunnel requires you to ask yourself a number of questions. How much money do you have to put into the materials for the tunnel? How much time and energy do you have to construct and maintain the tunnel? How much are you hoping to grow? Are you planning on growing just vegetables in your tunnel, or are you going to try to grow fruit trees? Do you need to get a tractor inside the tunnel? How big is the tractor?
The answers to these questions are unique to each farm and cannot be easily answered by this guide. However, there are a few general rules for choosing the dimensions of your tunnel:
First, narrower tunnels will lose more heat than wider tunnels. This is because the growing space inside the tunnel is where heat is stored, and the perimeter on the outside of the tunnel is where heat is lost. So, the more perimeter you have and the less growing space you have, the more heat you are going to lose.
For instance, a tunnel that is 10 feet wide and 90 feet long has a perimeter of 200 feet and 900 square feet of growing area. However, a tunnel that is 30 feet wide and 70 feet long still has a perimeter of 200 feet but has a growing area of 2100 square feet. This means that you will have 1200 square feet more for holding heat, but the same amount of perimeter area to lose heat (from High Tunnels by Ted Blomgren and Tracy Frisch).
Second, a 30 feet by 96 feet tunnel that is planted with multiple crops can add 10 hours of labor to the work week. This can be a useful rule for estimating how much time a high tunnel is going to take from your schedule.
Third, wider tunnels tend to have better ventilation and circulation. This is because they are generally taller and have more room for vents on the sidewalls.

Season Extension25
Preparing the siteIt is important that the site for your high tunnel be as level as possible, so that one edge is not higher or lower than the others. However, you can guarantee proper drainage for your high tunnel by creating a slightly mounded soil base for your tunnel. The soil level should be highest in the center of the tunnel and then slope slowly downwards to the edges. This will result in a slight mound where the center is about six inches higher than the edges. The edges should be at the same height all around the base so that the tunnel is level.
You can also create an elevated base for your high tunnel. The base should be three feet wider than the tunnel on all sides, and one foot higher. This base will then be mounded as described above. This step is not necessary but it can help increase drainage.
Constructing the high tunnelThe authors of this guide have chosen not to repeat the work of many other high tunnel experts. A basic guide to constructing a steel-pipe high tunnel can be found in Appendix C at the back of this guide. It is found in The Hoophouse Handbook, part of the Growing for Market series, edited by Lynn Byczynski. Hightunnels.org and Adam Montri’s Hoophouse Blog found at http://hoophouse.msu.edu/blog/index.php also contain a lot of helpful information on constructing high tunnels.

26 Season Extension
Key Points: Preparing to build a high tunnel• Choosing materials is an important decision when you are preparing to
build a high tunnel. • Tunnel frames can be built out of PVC, but steel pipes are more popular;
baseboards, hipboards and endwalls are usually made from rot-resistant wood; and doors and vents are placed at both ends of the tunnel. The tunnel cover is greenhouse-grade plastic.
• The tunnel design you choose will be decided on your location (for instance, heavy snowfall) and the materials you have chosen to build with (for instance, steel pipe).
• Choosing the dimensions of your high tunnel will depend on what you plan to use the tunnel for, how you manage heat and airflow in the tunnel, and how much labor and money you have available,
• Site preparation is very important for building a good high tunnel. The site should be as flat as possible or sloped from the center down to its edges.

Season Extension27
This guide has already covered the basics of the most important season extension techniques that are used by small farmers. Finding and planting in natural microclimates on your farm can help extend your growing season by one to two weeks. Row covers and plastic mulch can add up to a month on each end of your harvest calendar. High tunnels can make you able to harvest hardy crops almost the entire year. This section will discuss how to make the most of these techniques throughout the year.
Interior plastic mulch, row covers and “cold frames”Farmers will often combine high tunnels with other materials to increase season extension for their crops. The double layers of insulation can create microclimates that are even warmer than single layers of plastic or glass. Small farmers can use row covers, plastic mulch, or “cold frames” for this purpose.
MAKING THE MOST OF SEASON EXTENSION
What are cold frames?Cold frames are another option for season extension. They are wooden frames topped with glass. The glass is angled towards the sun for maximum solar gain and can be opened on a hinge for venting on very sunny days.
Cold frames are popular with home gardeners because they are easy to build and are long-lasting. However, farmers do not usually use cold frames. This is because they are not economical to produce in large quantities and are not easily moved like plastic tunnels. Still, small farmers may find them useful inside their high tunnels.

28 Season Extension
At his farm in Maine, Eliot Coleman has recorded the difference that double insulation can make in his high tunnels. He did this by recording temperatures outside the tunnel, inside the tunnel, and inside the cold frame that was inside the tunnel. His results are below.
You can see that even on very cold nights, temperatures under double insulation will stay warm enough to keep cold-hardy vegetables alive and harvestable. In warmer areas, double insulation can keep cold-hardy vegetables healthy and growing during the winter.

Season Extension29
Double layers of plastic and blowersCreating additional air space as a way to provide more insulation similar to the previous idea. However, instead of using row covers or cold frames, a second layer of plastic is installed over your tunnels. In order for the second layer to be effective, there needs to be “air space” between them. This air is what holds extra heat. In order to create space between the layers, you attach a “blower” which will push air between the layers and keep them separated. This will increase the amount of heat your high tunnel can hold. However, this usually requires adding electricity.
Compost piles inside the high tunnelIf you make and use compost on your farm, you can use some of this to heat your high tunnel. This works well if you are good at maintaining a quick, hot compost pile. However, the effects are limited. If your tunnel is more than 30 feet long, then you will have to maintain several piles in order for this to be effective.
Skids and railsBuilding your high tunnels on skids or rails will allow you to move your high tunnels around your farm much more easily. This will help you rotate your high tunnel crops and use your tunnels in new ways. Eliot Coleman’s Four-Season Harvest provides a lot of information on moving high tunnels.
30 Season Extension
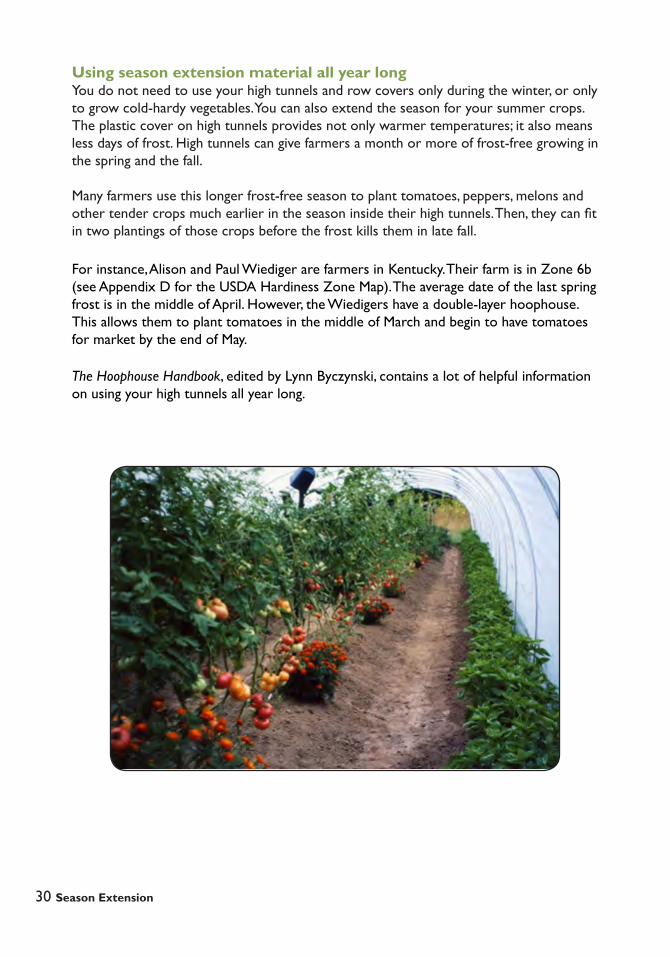
Using season extension material all year longYou do not need to use your high tunnels and row covers only during the winter, or only to grow cold-hardy vegetables. You can also extend the season for your summer crops. The plastic cover on high tunnels provides not only warmer temperatures; it also means less days of frost. High tunnels can give farmers a month or more of frost-free growing in the spring and the fall.
Many farmers use this longer frost-free season to plant tomatoes, peppers, melons and other tender crops much earlier in the season inside their high tunnels. Then, they can fit in two plantings of those crops before the frost kills them in late fall.
For instance, Alison and Paul Wiediger are farmers in Kentucky. Their farm is in Zone 6b (see Appendix D for the USDA Hardiness Zone Map). The average date of the last spring frost is in the middle of April. However, the Wiedigers have a double-layer hoophouse. This allows them to plant tomatoes in the middle of March and begin to have tomatoes for market by the end of May.
The Hoophouse Handbook, edited by Lynn Byczynski, contains a lot of helpful information on using your high tunnels all year long.
Season Extension31
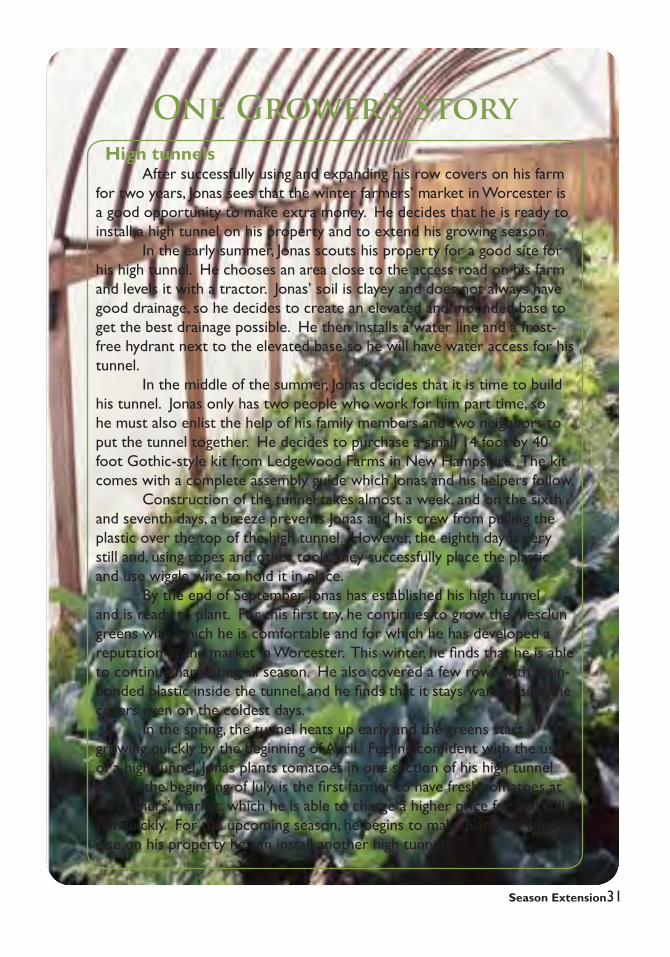
High tunnels After successfully using and expanding his row covers on his farm for two years, Jonas sees that the winter farmers’ market in Worcester is a good opportunity to make extra money. He decides that he is ready to install a high tunnel on his property and to extend his growing season. In the early summer, Jonas scouts his property for a good site for his high tunnel. He chooses an area close to the access road on his farm and levels it with a tractor. Jonas’ soil is clayey and does not always have good drainage, so he decides to create an elevated and mounded base to get the best drainage possible. He then installs a water line and a frost-free hydrant next to the elevated base so he will have water access for his tunnel. In the middle of the summer, Jonas decides that it is time to build his tunnel. Jonas only has two people who work for him part time, so he must also enlist the help of his family members and two neighbors to put the tunnel together. He decides to purchase a small 14 foot by 40 foot Gothic-style kit from Ledgewood Farms in New Hampshire. The kit comes with a complete assembly guide which Jonas and his helpers follow. Construction of the tunnel takes almost a week, and on the sixth and seventh days, a breeze prevents Jonas and his crew from pulling the plastic over the top of the high tunnel. However, the eighth day is very still and, using ropes and other tools, they successfully place the plastic and use wiggle wire to hold it in place. By the end of September, Jonas has established his high tunnel and is ready to plant. For this first try, he continues to grow the mesclun greens with which he is comfortable and for which he has developed a reputation at the market in Worcester. This winter, he finds that he is able to continue harvesting all season. He also covered a few rows with spun-bonded plastic inside the tunnel, and he finds that it stays warm inside the covers even on the coldest days. In the spring, the tunnel heats up early and the greens start growing quickly by the beginning of April. Feeling confident with the use of a high tunnel, Jonas plants tomatoes in one section of his high tunnel and, by the beginning of July, is the first farmer to have fresh tomatoes at his farmers’ market, which he is able to charge a higher price for and still sell quickly. For the upcoming season, he begins to make plans for where else on his property he can install another high tunnel.
One Grower’s Story

32 Season Extension
Glossaryair space: the space between two layers of plastic that can effectively hold heat
arsenic-treated lumber: a kind of lumber that is treated with arsenic so that it is resistant to rot; arsenic is toxic to humans and animals
baseboard: a board that runs along the entire base of the high tunnel for attaching the plastic covering and hoops
blower: a small air pump used to separate double layers on high tunnels
borate-treated lumber: a kind of lumber that is treated with borate compounds so that it is resistant to rot; generally a safer alternative to arsenic-treated lumber
bows: (see hoop)
braces: the pieces of materials that increase stability between trusses and hoops
climate modification: the use of various techniques to create microclimates suitable for growing crops
cold frame: wooden frames topped with glass. The glass can be opened on a hinge and is angled towards the sun for maximum solar gain.
endwall: the walls that make up the flat end of a high tunnel
Gothic: a high tunnel or greenhouse design featuring a pointed roof and rounded edges
harden off: the process of gradually exposing protected plants to unprotected conditions
high tunnel: an unheated plastic-covered greenhouse, in which production typically is done in the ground (Dr. Marvin Pritts, Cornell University)
hipboard: a board that runs along the middle of the sidewalls of the tunnel for atttaching the plastic covering and hoops and increase stability of the structure
hoop: the bent steel or PVC that creates the basic frame of a high tunnel
leaching: a process by which water and chemicals move through an environment, particularly in the soil
light transmission: how light moves through a material, such as plastic
microclimate: term used to define the specific climatic conditions in a small area (from Four-Season Harvest by Eliot Coleman)

Season Extension33
Glossarypolyethylene plastic: a thin, multi-functional sheet plastic that is commonly used in season extension 6-mil: a typical thickness of polyethylene plastic
prevailing wind: the direction from which the wind usually comes in a specific location
purlin: the piece of material (usually metal or PVC) that runs down the center of the roof of a high tunnel, to which the covering and hoops are attached
PVC: a strong, flexible plastic that is often used to make tubes for plumbing and construction
Quonset: a completely rounded building design; common in high tunnels and greenhouses
row cover: plastic material that is placed over the top of a row of plants to protect them from a number of environmental conditions slitted row cover: a polyethylene plastic sheet with numerous ventilation slits, suspended over the top of a row of plants using wire hoops floating row cover: a spun-bonded plastic sheet that is laid on top of a row of plants
ridgepole: (see purlin)
season extension: the use of various techniques to grow and harvest crops beyond the limits of the frosts in spring and fall
solar gain: the increase in heat in a structure as a result of solar radiation
specialty crops: fruits and vegetables that are rare or that require special growing practices
spun-bonded plastic: a cotton-like, fibrous plastic mesh that is popular for use as a row cover
twinwall polycarbonate: a solid plastic sheet made of two thin sheets of plastic with space in between for increased rigidity and insulation
trusses: the pieces of materials often found in high tunnels that provide stability to each side of the bent hoops
windbreak: large objects that reduce the speed of wind
zoning code: the set of regulations that determine land use and building construction

34 Season Extension
APPENDIX A: SUPPLIERSHightunnels.org
A great general resource for all things related to high tunnels. Their website has a list of over 30 suppliers of high tunnels kits and materials from around the world. Choose the one that is most local and appropriate to your needs.http://www.hightunnels.org/resources.htm
Mechanical Transplanter Co.
Carries row cover supplies.1150 Central Ave. Holland, MI 49423(800) 757-5268 http://www.mechanicaltransplanter.com/
Johnny’s Selected Seeds
Carries row cover supplies.The Research Farm:184 Foss Hill Road. Albion, MaineMain office and retail store: 955 Benton Ave. Winslow, Maine(877) 564-6697 http://www.johnnyseeds.com/default.aspx

Season Extension35
APPENDIX B: Published ResourcesHigh Tunnels: Using Low-Cost Technology to Increase Yields, Improve Quality and Extend the Season
This guide contains complete case studies of farms that are using high tunnels around the country, plus a substantial guide to building, maintaining, and using them. A very helpful resource that can be found at www.uvm.edu/sustainableagriculture. A DVD was produced along with this guide that is very helpful for getting a visual idea of what high tunnels look like and how they can be used.
The Hoophouse Handbook: Growing Produce and Flowers In Hoophouse and High Tunnels
Part of the Growing for Market series edited by Lynn Byczynski, The Hoophouse Handbook is a collection of articles that give you an idea of the possibilities and challenges that come with high tunnels. It has very helpful instructions on building high tunnels and information on specialty crops and is a great resource to have available. It can be ordered at http://www.growingformarket.com/store/products/8.
Low-Cost Passive Solar Greenhouses: A Design and Construction Guide
This is a very thorough book that describes everything you need to know about building a small high tunnel, or passive solar greenhouse. The book focuses more on tunnels that you can attach to a building, but the design information could be valuable to anyone interested in high tunnels. Published by the National Center for Appropriate Technology.
The New Organic Grower, Four-Season Harvest, and the Winter Harvest Manual
These three books by Eliot Coleman are books that every small-scale farmer and home gardener should have. His information on construction and crop rotations are particularly useful. Coleman is an expert in the field and is constantly experimenting with season extension. He updates The New Organic Grower and Four-Season Harvest every few years, and the Winter Harvest Manual is updated even more often to keep growers up-to-date on his latest discoveries on his farm in Maine. The Winter Harvest Manual can be ordered for a price of $15.00 by writing to Four Season Farm, 609 Weir Cove Road, Harborside, ME 04642 and the other books are available on-line.

36 Season Extension
APPENDIX B: Published ResourcesHightunnels.org
An extremely helpful website that is made for anyone who is getting started on using high tunnels. It provides all the best information and resources available on the topic.
The Hoophouse Blog
This blog is written by Adam Montri, an outreach specialist at Michigan State University who is an expert on the construction and uses of high tunnels. The blog contains hislatest discoveries and projects, news and information related to high tunnels. Also look Adam up on youtube.com for some very informative videos in which he walks you through the construction of a high tunnel on his property in Michigan.http://hoophouse.msu.edu/blog/index.php
The New Entry Sustainable Farming Project
The New Entry Sustainable Farming Project, a program of the Friedman School at Tufts University that trains new and immigrant farmers, has put together some useful resources and videos about constructing high tunnels.
Their video, Building a Greenhouse, can be found at http://vimeo.com/channels/nesfp#8741675.
A high tunnel workshop led by Adam Montri (mentioned above) for the farmers in the New Entry program can be found at http://www.dogooder.tv/Orgs/NESFP/default.aspx.

Season Extension37
APPENDIX C: Building a Hoophouse
This Appendix is derived from The Hoophouse Handbook, part of the Growing for Market series. More information about The Hoophouse Handbook can be found in Appendix B.

38 Season Extension

Season Extension39

40 Season Extension

Season Extension41
42 Season Extension

Season Extension43

44 Season Extension
APPENDIX D: USDA Hardiness Zone Map