scheduling weights via volumes in revit · scheduling weights via volumes in revit calculating the...
TRANSCRIPT

White Paper Reference: [lo-170714 July 2014
Guide by Liam O Connor
01784 419 922 www.cadline.co.uk [email protected]
Page 1 of 9
Scheduling Weights via Volumes in Revit
Calculating the Weight of any Material by a Volume parameter
Autodesk Revit Structure has many great functions and ways to model. It is also great at scheduling all the elements that make
up the model and once this is done you can simply export this data out to excel. One of the great benefits of having all the
information in one place is to create a far better estimate of the materials needed at site long before your project is built.
By using a simple formula and the density of a material you can in effect calculate the weight of pretty much any
material/element in your project. We will be using the OOTB Structural families from both the column and framing (Beams)
category’s and by using these you can provide quite a detailed quantity of the steel weight used.
Working with a schedule is just a different way of looking at your model and is in fact still technically a working view.
By the end of this paper you will be able to:
Create a schedule
Understand how to sort/group and format
Create a Calculated parameter
Creating a Schedule
Open a Revit Structural template and create a simple Frame containing both Structural columns and Framing (beams) families

White Paper Reference: [lo-170714 July 2014
Guide by Liam O Connor
01784 419 922 www.cadline.co.uk [email protected]
Page 2 of 9
Navigate to the view tab via the Ribbon and in the Create Panel select the drop for Schedules as shown below
From the drop down menu select Material Takeoff (MTF)
For this exercise we will use a Multi-Category Material Takeoff. You can select specific Category’s but this is not in the scope of
this exercise.
Click OK

White Paper Reference: [lo-170714 July 2014
Guide by Liam O Connor
01784 419 922 www.cadline.co.uk [email protected]
Page 3 of 9
Next you are presented with the Material takeoff properties Dialog box
On the left hand side under Available fields are all the parameters which can be used in this schedule. Select the following and
then click OK
Category
Type
Material – Name
Material – Volume
White Paper Reference: [lo-170714 July 2014
Guide by Liam O Connor
01784 419 922 www.cadline.co.uk [email protected]
Page 4 of 9
With the Schedule open stretch the columns apart to see the information in the cells.
All this information is great but looks a little hectic and is quite hard to read. Next we’ll use the sorting and grouping along with
formatting to help organise the data in to a much more user friendly format.
Sort/Group and Formatting
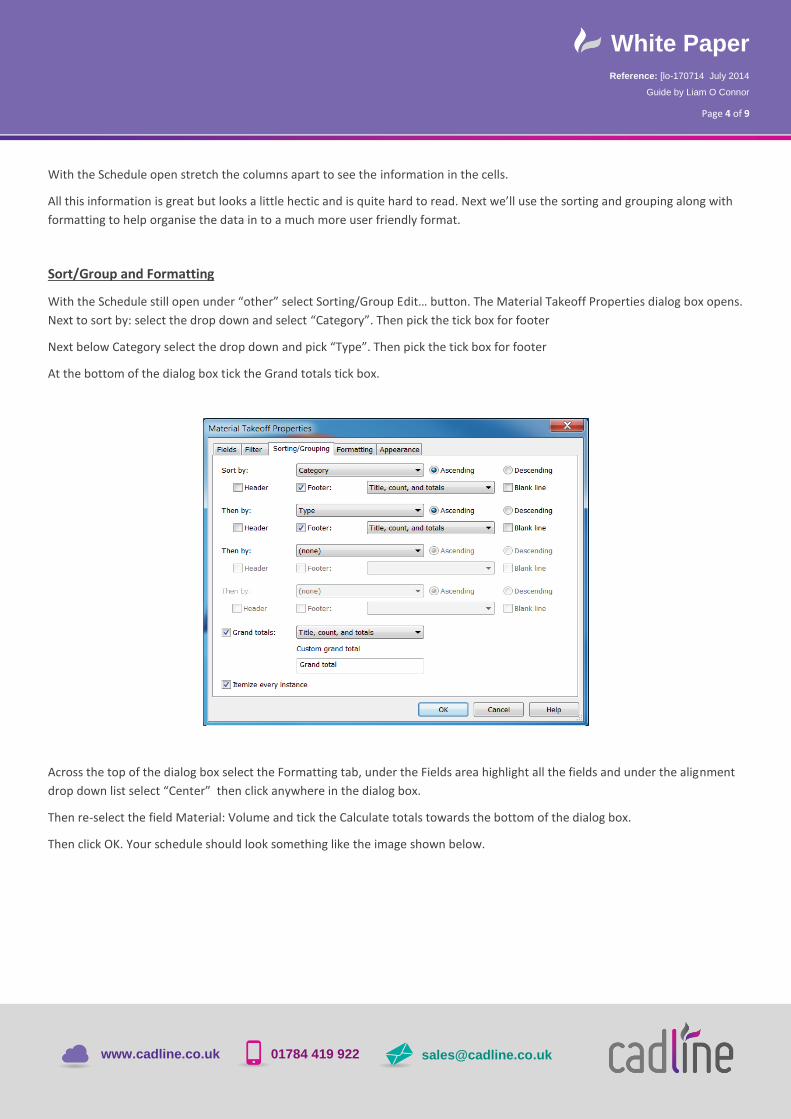
With the Schedule still open under “other” select Sorting/Group Edit… button. The Material Takeoff Properties dialog box opens.
Next to sort by: select the drop down and select “Category”. Then pick the tick box for footer
Next below Category select the drop down and pick “Type”. Then pick the tick box for footer
At the bottom of the dialog box tick the Grand totals tick box.
Across the top of the dialog box select the Formatting tab, under the Fields area highlight all the fields and under the alignment
drop down list select “Center” then click anywhere in the dialog box.
Then re-select the field Material: Volume and tick the Calculate totals towards the bottom of the dialog box.
Then click OK. Your schedule should look something like the image shown below.

White Paper Reference: [lo-170714 July 2014
Guide by Liam O Connor
01784 419 922 www.cadline.co.uk [email protected]
Page 5 of 9
Revit likes to keep it simple and has rounded up Material Volume m³. Using the formatting function we will decrease the
rounding to 4 decimal places. This is done independent of the overall project unit settings and will only change this parameter.
With the Schedule still open under “other” select Formatting Edit… button. With the Material Takeoff Properties open under
fields select Material: Volume.
Now the select the Field Format… button to open the Format dialog box. Uncheck Use project settings and now under Rounding
select the drop down list and select Custom and add two extra zeroes as shown below. Then click OK twice

White Paper Reference: [lo-170714 July 2014
Guide by Liam O Connor
01784 419 922 www.cadline.co.uk [email protected]
Page 6 of 9
Creating a Calculated Parameter
Using the power of Revit and existing parameters built in to the families we can calculated the weight of all the Steel being used
in the project.
So you can now model away and at any given point see the weight being used. As the project goes through the evitable changes
the schedule is always being up dated. If you delete out a beam it goes from the schedule, add columns in and it’s added to the
schedule.
With the schedule still open under “other” select Fields Edit… button. And select Calculated Value… Button.
The Calculated Value dialog box opens as shown below.

White Paper Reference: [lo-170714 July 2014
Guide by Liam O Connor
01784 419 922 www.cadline.co.uk [email protected]
Page 7 of 9
In the Name field type “Weight Kg”. Next at the bottom of the dialog box select the button across from Formula to add a
formula statement.
A dialog box appears called Fields select Material: Volume and click OK. Back in the Calculated Value dialog box click into the
Formula bar and add the following expression: - /1*7850 (7850kg is the typical weight for 1m³ of Steel)
Click OK twice to close the Material dialog box
The new Value is added to the schedule in Column E
Using the same technique as early change the rounding formatting for Weight Kg. For the units change it to “fixed” and then the
Rounding to zero places. Click OK
With “Weight kg” still highlighted click in the tick box for Calculate totals.

White Paper Reference: [lo-170714 July 2014
Guide by Liam O Connor
01784 419 922 www.cadline.co.uk [email protected]
Page 8 of 9
Next select column D containing Material: Volume and on the Ribbon in the Columns panel select “Hide” to hide the selected
column.
Finally your schedule is finished ready to be export to excel. The units in the “Weight kg” column are in kgs and are shown as the
weight per elements drawn and sorted in to the type of section used with totals for each category and a grand total for
everything.
Conclusion
The first reason for the use of the Material Takeoff schedule in this example was to highlight that the Material: Volume
parameter is more accurate than its equivalent Volume parameter used in the Schedule/Quantity.
The drawback to this is that the Material Volume parameter uses the medium level of detail in the OOTB families and so misses
off the root radii of the section but still provides a reasonable quantitative measurement and is more accurate the Volume
parameter used in the Schedule/Quantity schedule.
The second reason for using MTF schedule was to show that by using the formula above and changing the value to a known
kg/m³ for the material you can create material estimate schedule for anything based by its volume, this may be useful when
using compound steel section families, using Aluminium sections or maybe bespoke concrete families. The “W” parameter in the
all of the OOTB steel sections is added manually and would not change should you change the material.

White Paper Reference: [lo-170714 July 2014
Guide by Liam O Connor
01784 419 922 www.cadline.co.uk [email protected]
Page 9 of 9