sas 9.1.3 management consolesupport.sas.com/documentation/onlinedoc/91pdf/sasdoc_913/mgmt... ·...
TRANSCRIPT

SAS Publishing
SAS® 9.1.3 Management ConsoleUser’s Guide

The correct bibliographic citation for this manual is as follows: SAS Institute Inc. 2006.SAS ® 9.1.3 Management Console: User’s Guide. Cary, NC: SAS Institute Inc.
SAS® 9.1.3 Management Console: User’s GuideCopyright © 2002–2006, SAS Institute Inc., Cary, NC, USAISBN-13: 978-1-59047-110-4ISBN-10: 1-59047-110-5All rights reserved. Produced in the United States of America.For a hard-copy book: No part of this publication may be reproduced, stored in aretrieval system, or transmitted, in any form or by any means, electronic, mechanical,photocopying, or otherwise, without the prior written permission of the publisher, SASInstitute Inc.For a Web download or e-book: Your use of this publication shall be governed by theterms established by the vendor at the time you acquire this publication.U.S. Government Restricted Rights Notice. Use, duplication, or disclosure of thissoftware and related documentation by the U.S. government is subject to the Agreementwith SAS Institute and the restrictions set forth in FAR 52.227-19 Commercial ComputerSoftware-Restricted Rights (June 1987).SAS Institute Inc., SAS Campus Drive, Cary, North Carolina 27513.e-book, November 20051st printing, March 20062nd printing, October 2006SAS® Publishing provides a complete selection of books and electronic products to helpcustomers use SAS software to its fullest potential. For more information about oure-books, e-learning products, CDs, and hard-copy books, visit the SAS Publishing Web siteat support.sas.com/pubs or call 1-800-727-3228.SAS® and all other SAS Institute Inc. product or service names are registered trademarksor trademarks of SAS Institute Inc. in the USA and other countries. ® indicates USAregistration.Other brand and product names are registered trademarks or trademarks of theirrespective companies.

Contents
What’s New v
Overview v
Details vi
Chapter 1 � Introduction to SAS Management Console 1What Is SAS Management Console? 1
How SAS Management Console Works 2
Introduction to SAS Management Console Plug-ins 5
Working with the User Interface 5
Using User Assistance 7
Chapter 2 � Setting up SAS Management Console 9Setting Up a SAS Metadata Server 9
Starting SAS Management Console 10
Creating a Metadata Profile 11
Connecting to the Metadata Server 14
Using the Error Log 15
Chapter 3 � Managing Metadata 17What Is the Metadata Manager? 17
Working with Metadata Repositories 18
Managing Resource Templates 38
Replicating and Promoting Metadata 41
Upgrading Repository Metadata 44
Chapter 4 � Managing Users 45What Is the User Manager? 45
Planning for Users and Groups 45
Defining a User 46
Defining a Group 53
Chapter 5 � Managing Servers 59What Is the Server Manager? 59
Managing SAS Servers 60
Managing Database Servers 81
Managing Enterprise Application Servers 83
Chapter 6 � Managing Libraries 87What Is the Data Library Manager? 87
Defining SAS Libraries 88
Managing Database Schemas 93
Managing Database Libraries 94
Managing Generic Libraries 98

iv
Managing Pre-Assigned Libraries 100
Editing a Library Definition 102
Reviewing the LIBNAME Statement 103
Editing a Schema Definition 104
Chapter 7 � Managing Authorizations 105What Is the Authorization Manager? 105
Locating Resources 107
Controlling Access to Resources 113
Working with Access Control Templates 118
Controlling Access to a Repository 125
Managing Permissions 126
Chapter 8 � Managing SAS Licenses 131
What Is the License Manager? 131
Setting Up the License Manager 131
Viewing Machine Information 132
Viewing License Information 133
Viewing Component Information 136
Chapter 9 � Managing Job Schedules 139What Is the Schedule Manager? 139
Setting Up Job Scheduling 139
Creating a Job Flow 145
Specifying Dependencies 146
Scheduling Flows 150
Viewing Job Flow Properties 151
Adding Jobs to a Job Flow 151
Chapter 10 � Managing XMLMaps 153What Is the XMLMap Manager? 153
Importing an XMLMap 153
Creating an XMLMap 154
Managing XMLMaps 155
Appendix 1 � Replication and Promotion Macros 157Modifying Replication and Promotion Macros 157
Appendix 2 � Recommended Reading 159Recommended Reading 159
Glossary 161
Index 167
v
What’s New
OverviewSAS Management Console is a Java application that provides a single point of
control for managing resources that are used throughout the SAS Intelligence Platform.Instead of using a separate administrative interface for each application in yourcomputing environment, you can use the single interface in SAS Management Consoleto perform the administrative tasks that are required for creating and maintaining anintegrated environment across multiple platforms. SAS Management Console enablesyou to manage the following resources:
� server definitions� library definitions� user definitions� resource access controls
� metadata repositories� SAS licenses� job schedules� XML maps.
SAS Management Console works by creating and maintaining metadata definitionsfor each computing resource or control. These metadata definitions are stored in arepository on a SAS Metadata Server, which makes them available for use by otherapplications.
The 9.1.3 release of SAS Management Console provides support for the SAS ScalablePerformance Data (SPD) Server, enables you to import data tables into a library,enables you to schedule flows using operating system scheduling servers, providessupport for grid computing, and updates resource templates.

vi What’s New
DetailsSAS Management Console now contains the following enhancements:� Support is added for the SAS Scalable Performance Data Server by enabling you
to define SAS SPD Server libraries, servers, and schemas. You must run theUpgrade Metadata function to add support for the SAS SPD Server.
� You can import data tables to SAS Management Console libraries by using theImport Tables wizard. The wizard lets you register existing SAS data sets in themetadata repository.
� Resource templates for server, library, and schema definitions have been changed.Use the Upgrade Metadata function to apply the new resource templates to yourmetadata server. If you are upgrading a metadata server from SAS 9.1 to SAS9.1.3, the resource template changes in SAS 9.1.2 are applied before the SAS 9.1.3changes are applied.
� Flows can be scheduled using operating system scheduling services. You define anoperating system scheduling server in SAS Management Console, then use theSchedule Manager plug-in to submit flows to the server. The server uses operatingsystem commands to schedule and run the flows.
� Support is added for a grid computing configuration. Resource templates havebeen added for the SAS Grid Server and the Grid Monitoring Server to enable youto create a grid computing environment. A resource template has been added forthe Process Manager server, which is used to schedule jobs in a grid computingenvironment. The SAS Grid Manager plug-in has been added to enable you tomonitor the performance of a grid and to cancel jobs.

1
C H A P T E R
1Introduction to SASManagement Console
What Is SAS Management Console? 1How SAS Management Console Works 2
Introduction to SAS Management Console Plug-ins 5
Working with the User Interface 5
Using the Navigation Tree 5
Using the Display Area 6Using the Context Bar 6
Using the Status Line 6
Using the Menu Bar 6
Using the Toolbar 7
Using User Assistance 7
What Is SAS Management Console?
SAS Management Console is a Java application that provides a single point ofcontrol for managing resources that are used throughout the Intelligence Value Chain.Rather than using a separate administrative interface for each application in yourenterprise intelligence environment, you can use SAS Management Console’s singleinterface to perform the administrative tasks required to create and maintain anintegrated environment. Although SAS Management Console runs on your desktopcomputer, you can use it to manage resources on all platforms supported by SAS. Youcan use SAS Management Console to manage
� server definitions
� library definitions
� user definitions
� resource access controls
� metadata repositories
� SAS licenses
� job schedules
� XMLMaps.
SAS Management Console manages these resources and controls by creating andmaintaining metadata definitions for each resource or control. The metadata definitionsyou can create in SAS Management Console are stored in a repository on a SASMetadata Server, where they are available for other applications to use. For example,you can use SAS Management Console to create a metadata definition for a SAS librarythat specifies information such as the libref, path, and engine type. After SASManagement Console stores the metadata definition for the library in the repository on

2 How SAS Management Console Works � Chapter 1
the metadata server, any other application can access the definition to access thespecified library.
Figure 1.1 SAS Management Console Overview
library
SAS Metadata ServerSAS Metadata Repository
librarydefinition
SASManagement Console
librarydefinition
Application
library
The SAS Management Console application is actually just a framework. Themetadata definitions are created using plug-ins, which are application modulesdesigned to create metadata for a specific type of resource. For example, the ServerManager plug-in creates metadata to define SAS servers and application servers.Although a set of basic plug-ins is provided with SAS Management Console, you caninstall other plug-ins to meet specific needs or develop your own plug-in.
How SAS Management Console WorksSAS Management Console works in conjunction with SAS Metadata Servers. You
must set up and start a metadata server before you start working with SAS

Introduction to SAS Management Console � How SAS Management Console Works 3
Management Console. When you run SAS Management Console, you specify ametadata profile when you start the application. The metadata profile specifies themetadata server to which you will be writing metadata definitions, the active metadatarepository, and information required to connect to the metadata server.
Figure 1.2 Connections to SAS Metadata Servers
SAS MetadataRepository
"Main_repos"
SAS Management Console
Metadata Profile
Metadata server: Data_serverMetadata repository: Main_reposUser ID: myuser
SAS Metadata Server "Data_server"
SAS Metadata Server "Devserver"
After you open the metadata profile to connect to the metadata server, you can beginusing the SAS Management Console to create metadata definitions. As you createdefinitions, they are stored in the active repository on the metadata server. In order touse the definitions you create, other SAS applications must connect to the metadataserver and repository you are using.
Each metadata server can contain multiple repositories, and you can use SASManagement Console to store definitions in any of the repositories. The repository thatis currently selected and is receiving metadata definitions from the application is theactive repository. You can use SAS Management Console to set up a hierarchy ofrepositories on the metadata server, consisting of these three repository types:
Foundationrepository
specifies the parent repository for all other repositories on theserver. This repository contains resource definitions that are usedthroughout the server (such as user definitions).
Customrepositories
specifies repositories that are dependent on the foundation repositoryor other custom repositories. A repository that is dependent onanother repository accesses and uses resources from the parent.
Projectrepositories
specifies dependent repositories that are intended to isolatedevelopment changes from a production environment.
You can use the three types of repositories to create a metadata environment wheredefinitions that are widely used are stored in a foundation repository, while resources

4 How SAS Management Console Works � Chapter 1
that are only needed for specialized areas are contained in custom repositories. See“Working with Metadata Repositories” on page 18 for more information about repositorytypes.
The following figure illustrates how an organization could use each of the repositorytypes. Global metadata (such as user definitions) is stored in the foundation repository.Each major organizational division stores division-specific metadata in the division’scustom repository, and project repositories are used for making changes to thefoundation and custom repositories.
Figure 1.3 Sample Repository Structure
Finance
Organization
Marketing
North AmericanMarketing
ProjectFinanceproject
Custom Custom
Project
Project
Project
Custom
Foundation
N. Amer Mktproject
Marketingproject
Organization project
Some SAS resources, such as servers and libraries, have many different types. Tomake defining these resources easier, SAS Management Console uses resourcetemplates for the definitions. A resource template is an XML file that specifies theinformation required to create a metadata definition for a particular resource. Forexample, if you wanted to define a SAS workspace server, you must first load theresource template for the SAS workspace sever. A complete set of all available resourcetemplates is loaded automatically when you create a foundation metadata repository.

Introduction to SAS Management Console � Using the Navigation Tree 5
Introduction to SAS Management Console Plug-insWhen installed, SAS Management Console includes a standard set of plug-ins. Other
plug-ins can be installed to access and manage other SAS or third-party applications, orcan be created at your site.
The plug-ins provided with SAS Management Console are
AuthorizationManager
defines access rules to control how users and groups can accessmetadata definitions.
Data LibraryManager
creates definitions for SAS libraries and database schemas.
MetadataManager
provides functions for defining metadata repositories on the activeserver, managing resource templates, and creating jobs to promoteor replicate a metadata repository.
ScheduleManager
allows you to create schedules for running jobs created in SAS DataIntegration Studio.
Server Manager creates definitions for servers, including SAS application servers,database servers, and enterprise servers.
User Manager creates definitions for users and user groups.
LicenseManager
allows you to view information about the SAS licenses installed on amachine, as well as details about the machine.
XMLMapManager
allows you to import and create XMLMaps, which are XML files thatdescribe how the SAS XML LIBNAME engine should interpret XMLmarkup.
Working with the User InterfaceThe SAS Management Console user interface consists of six major parts:1 Menu bar2 Toolbar3 Context bar4 Navigation tree5 Display area6 Status line
Using the Navigation TreeThe navigation tree displays an organized list of all of the installed plug-ins and the
objects and folders that are associated with each plug-in. The plug-ins are organizedinto two main categories:
EnvironmentManagement
contains plug-ins for defining metadata that applies to the overallSAS environment (such as servers, libraries, and metadatarepositories).
ApplicationManagement
contains plug-ins for defining metadata that applies to specificapplications, such as third-party or custom-designed applications.

6 Using the Display Area � Chapter 1
Selecting a plug-in icon in the navigation tree activates the plug-in and displaysfolders or metadata definitions for that plug-in in the display area. To display theobjects associated with the plug-in in the navigation tree, click the plus sign next to theplug-in icon to expand its contents (not all plug-ins are expandable). When you expanda plug-in, the navigation tree displays metadata definitions created by the plug-in orfolders that contain sub-categories of definitions.
Using the Display AreaThe display area is used to display detailed information about objects selected in the
navigation tree. The information displayed depends not only on the object selected inthe navigation tree, but also on the plug-in that is active. Some plug-ins (such as theUser Manager) use the display area for entering information about metadata definitions.
If you select an object (plug-in or other object) in the navigation tree that containssub-folders, the display area lists the folders.
If you select a folder in the navigation tree, the display area lists the objects that arecontained in the folder.
If you select an object in the navigation tree that does not contain any sub-folders,the display area displays any metadata definitions that are associated with that object.For example, if you select a server definition in the navigation tree, the display arealists all of the connections that have been defined for the server.
Using the Context BarThe context bar identifies the active repository, which is the metadata repository to
which you are storing metadata definitions. You can select the repository that you wantto access from the Repository drop-down list.
Using the Status LineThe status line, at the bottom of the SAS Management Console window, displays the
following information:
number ofobjects selected
displays the number of objects selected or the number of objectscontained in the currently selected folder or plug-in.
current login forthe metadataprofile
specifies the domain and user ID defined in the metadata profileused to log on to the active metadata server.
machine andport
specifies the machine and port number of the active metadata server.
Using the Menu BarThe menu bar provides six standard menus and one that is controlled by the selected
plug-in:
File provides selections for opening objects, changing or closing thecurrent metadata profile, and viewing properties for an object.
Edit provides selections for copying, pasting, and deleting.
View provides selections for refreshing the information displayed in theapplication and for moving up a level in the navigation tree.

Introduction to SAS Management Console � Using User Assistance 7
Actions provides selections that are valid only for the current plug-in. If noplug-in is selected, the Actions menu is not present. The Actionsmenu items are different for each plug-in.
Tools provides access to an experimental metadata utility.
CAUTION:Only experienced administrators should use this utility. Metadataerrors could occur if this utility is used incorrectly. �
Roadmaps provides access to roadmaps, which are user assistance documentsdesigned to guide you through SAS Management Console tasks.
Help provides options for selecting help for SAS Management Console orfor the current plug-in. Help for a specific plug-in is only availablewhen the plug-in is selected in the navigation tree.
Using the ToolbarThe toolbar provides a set of five standard tools for� moving up one level in the navigation tree� opening the selected object� copying� pasting� deleting.
In addition, plug-ins can also add tools to the toolbar. The tools that are specific to aplug-in are only available when the plug-in is selected in the navigation tree. Theplug-in can also provide different tools depending on the object that is selected underthe plug-in. Refer to the Help or the chapters on each of the plug-ins for moreinformation about plug–in tools.
Using User AssistanceSAS Management Console provides online user assistance through product Help and
roadmaps. You can access help by selecting the Help menu or the Help button in SASManagement Console windows.
The help that is available from the Help menu depends on the plug-in that is active.If a plug-in is selected, the Help menu contains selections for SAS Management ConsoleHelp as well as Help for the currently active plug-in. Help for a plug-in is onlyavailable when the plug-in is selected.
Roadmaps are guides that provide the steps and brief explanations to lead youthrough tasks in SAS Management Console. The roadmaps are stored as XML files inthe /roadmaps directory of your SAS Management Console installation. A defaultroadmap is provided with SAS Management Console, but new roadmaps to explainspecific tasks can be created and installed by SAS or your organization.

8

9
C H A P T E R
2Setting up SAS ManagementConsole
Setting Up a SAS Metadata Server 9Starting SAS Management Console 10
Specifying Java Options 10
Specifying the Plug-In Location 10
Specifying the Error Log Location 11
Specifying Message Logging 11Creating a Metadata Profile 11
Connecting to the Metadata Server 14
Using the Error Log 15
Setting Up a SAS Metadata ServerThe metadata definitions that SAS Management Console creates are stored in a
metadata repository on a SAS Metadata Server so that other applications and users canaccess them. Because of this, the first step in setting up SAS Management Consolemust be to define and start a metadata server. The information here is only a basicdescription of the process of setting up a metadata server. For detailed instructionsabout setting up a metadata server, see SAS Intelligence Platform: Installation Guide.
To set up a metadata server:
1 Determine which machine will host the metadata server. The machine must haveSAS 9 or later and SAS Integration Technologies installed.
2 Create directories for the SAS Metadata Server, the repository manager, and arepository:
a First create the server directory.b After you create a directory for the server, create a directory for the
repository manager. This directory must be named rposmgr and must belocated within the server directory.
c Create a directory for the repository. Although this directory can be in anylocation, you may want to create it within the server directory to simplify theprocess of setting permissions.
3 Set access permissions to the server and server directories. Only the serverinvoker and user responsible for backing up the server should have access to theserver directories. Some platforms require the server invoker and server accessorsto have special user rights. See SAS Intelligence Platform: Installation Guide forinformation about the specific server permissions.

10 Starting SAS Management Console � Chapter 2
4 Start the metadata server. In the server directory, create a file calledstartsrv.bat with the following contents:
‘‘SAS_installed_directory\sas.exe’’ -nosplash -noterminal-objectserver -objectserverparms ‘‘protocol=bridge port=XXXX instantiateclassfactory=2887E7D7-4780-11D4--879F--00C04F38F0DB’’
Replace SAS_installed_directory with the directory where SAS is installed onthe server machine. Replace XXXX with an unused port number from 0 to 64,000.You will need the port number when you create a metadata profile in SASManagement Console to connect to this server.
Run the startsrv.bat file to start the SAS Metadata Server.
Starting SAS Management Console
On Windows, you can start SAS Management Console by selecting Start �Programs � SAS � SAS Management ConsoleYou can also start the application froma command line. Navigate to the SAS Management Console installation directory andissue the command for your platform, as listed in the following table.
Table 2.1 SAS Management Console Startup Commands
Platform Command
Windows sasmc.exe
64-bit enabled Solaris ./sasmc
64-bit enabled AIX ./sasmc
If you do not specify any options, SAS Management Console uses the parametersspecified in the sasmc.ini file. The following sections contain information about optionsyou can specify on the command line or add to the sasmc.ini file.
Specifying Java Options
To specify Java options when you start SAS Management Console, use the--javaopts option and enclose the java options in single quotation marks. Forexample, the following command starts SAS Management Console on Windows andcontains Java options that specify the locale as Japanese.
sasmc -javaopts ’-Duser.language=ja --Duser.country=JP’
Specifying the Plug-In Location
By default, SAS Management Console looks for plug-ins in a plugins directoryunder the directory in which the application was installed. If you are starting SASManagement Console from another location, you must specify the location of the plug-indirectory by using the --pluginsDir option. The syntax of the option is
sasmc -pluginsdir <plugin path>

Setting up SAS Management Console � Creating a Metadata Profile 11
Specifying the Error Log LocationSAS Management Console writes error information to a file named errorlog.txt in the
working directory. Because each SAS Management Console session overwrites this log,you might want to specify a different name or location for the log file. Use the followingoption to change the error logging location.
sasmc -logfile ‘‘<filepath/filename>’’
where filepath is a relative path from the SAS Management Console user directory.
Specifying Message LoggingYou can specify the status messages that are displayed in a SAS Management
Console session by using the --MessageLevel level_value option. Valid values forlevel_value are
ALL all messages are logged.
CONFIG static configuration messages are logged.
FINE basic tracing information is logged.
FINER more detailed tracing information is logged.
FINEST highly detailed tracing information is logged. Specify this option todebug problems with SAS server connections.
INFO informational messages are logged.
OFF no messages are logged.
SEVERE messages indicating a severe failure are logged.
WARNING messages indicating a potential problem are logged.
Creating a Metadata ProfileAfter you define and start a metadata server, you can start SAS Management
Console. When the application starts for the first time, you must create a metadataprofile. A metadata profile defines the connection between SAS Management Consoleand a metadata server. SAS Management Console uses the metadata profile todetermine where to store the metadata definitions created in the application. You cancreate more than one metadata a profile to connect to different metadata servers orrepositories, although only one profile can be active at a time.
To create a metadata profile:1 Start SAS Management Console.
The Open a Metadata Profile window appears automatically if you are startingSAS Management Console for the first time.

12 Creating a Metadata Profile � Chapter 2
Display 2.1 Open a Metadata Profile Window
If you have already created a metadata profile, you can display this window byselecting File � Change Metadata Profile
2 Select Create a new metadata profile and click OK .
3 The Metadata Profile Wizard starts. The first window explains the function of thewizard. Click Next to continue.
4 In the Metadata Profile window, specify a name for the profile and indicatewhether SAS Management Console should use the profile automatically each timethe application starts.
Display 2.2 Metadata Profile Wizard – Name Window
Click Next to continue.
5 In the Connection Information window, specify the information required to connectto the machine on which the server runs.

Setting up SAS Management Console � Creating a Metadata Profile 13
Display 2.3 Metadata Profile Wizard – Connection Information Window
Specify the machine name and the port to connect to the server, and the username and password to identify the credentials that will be used to connect to themachine. The port you specify must be the same port number you specified in thestartsrv.bat file used to start the metadata server (see “Setting Up a SASMetadata Server” on page 9). The user ID you specify must be one that yougranted access permissions when you created the metadata server.
Specify whether the user ID and password should be stored with the metadataprofile. If this option is not selected, SAS Management Console will prompt for auser ID and password each time the metadata profile is started. By not storing thelogon information with the metadata profile, you can control access to therepository to only users with access rights to the repository directory. Click Nextto continue.
6 The Repository Selection window lets you choose a default repository for themetadata profile. The repository you choose will be the active repository when youconnect using the profile, although you can switch to a different repository afteryou are connected to the server.

14 Connecting to the Metadata Server � Chapter 2
Display 2.4 Metadata Profile Wizard – Repository Selection Window
If you are creating a metadata profile for the first time, there are no repositorieslisted in this window. Click Add Repository to start the New Repository Wizard,which you can use to define a default repository. When creating the firstrepository, select Foundation as the repository type and use the directory that youcreated when you set up your server (see “Setting Up a SAS Metadata Server” onpage 9). For details about creating repositories, see “Creating a MetadataRepository” on page 21.
If you are creating a profile on a server for which you have already definedrepositories in SAS Management Console, select one of the defined repositories touse as the default for this profile.
Click Next to continue.7 The Finish window presents a review of the information you specified in the
Metadata Profile Wizard. If any of the information is incorrect, click Back toreturn to the appropriate window to make changes. When all of the information iscorrect, click Finish to create the profile.
When you complete the New Repository Wizard and the Metadata Profile Wizard,SAS Management Console connects to the metadata server. You can now use theapplication to create metadata definitions. The server to which you are connected isreferred to as the active server.
Connecting to the Metadata ServerWhen you start SAS Management Console, the application either runs the default
metadata profile (if you specified a default profile) or displays the Open a MetadataProfile window to allow you to choose the profile to use.

Setting up SAS Management Console � Using the Error Log 15
Display 2.5 Open a Metadata Profile Window
After you select a profile to open, SAS Management Console is connected to thespecified SAS Metadata Server. You can begin to create metadata definitions that willbe stored in the specified repository.
The status line at the bottom of the SAS Management Console window displays theuser ID, machine, and port number of the active server.
The context bar, at the top of the window, displays the repository currently in use. Ifmore than one repository is defined on the current server, you can select anotherrepository from the drop-down list to designate as the active repository.
Using the Error Log
Whenever SAS Management Console encounters an error, it writes the informationto the error log file. This file is named errorlog.txt, and is located by default in the SASManagement Console directory.

16

17
C H A P T E R
3Managing Metadata
What Is the Metadata Manager? 17Working with Metadata Repositories 18
Types of Metadata Repositories 18
Creating a Metadata Repository 21
Importing Metadata 25
Exporting Metadata 31Changing Repository Dependencies 35
Maintaining the Active Server 36
Unregistering and Re-registering Repositories 37
Managing Resource Templates 38
Adding Resource Templates 39
Replicating and Promoting Metadata 41Promoting Dependent Repositories 43
Working With User Macros 44
Running Replication and Promotion Jobs 44
Upgrading Repository Metadata 44
What Is the Metadata Manager?The Metadata Manager is a SAS Management Console plug-in that enables you to
manage metadata definitions by performing the following associated tasks:
metadatarepositories
Add new repositories to the active server, import and exportmetadata from a repository, change the dependencies for arepository, and perform initialization and cleanup tasks.
metadataservers
View a list of metadata servers created in the Server Managerplug-in. Note that you cannot use the Metadata Manager plug-in tocreate new metadata servers.
resourcetemplates
Add new or updated resource templates to the metadata repositoryor delete templates that have already been loaded.
job definitions Create job definitions to replicate (duplicate without changes) orpromote (duplicate with changes) metadata repositories.

18 Working with Metadata Repositories � Chapter 3
Working with Metadata RepositoriesThe Metadata Manager plug-in lets you work with metadata repositories on the
active server. The active server is the metadata server to which SAS ManagementConsole is currently connected and receiving metadata. To manage repositories on adifferent metadata server, you must disconnect from the active server and use ametadata profile to connect to another server.
Types of Metadata RepositoriesYou can use the Metadata Manager to create three types of metadata repositories:
Foundation specifies a stand-alone repository that does not depend on any otherrepository.
Project specifies a repository that is dependent on another repository and isused to isolate changes from a production environment.
Custom specifies a repository that must be dependent on a foundation orcustom repository.
Repositories can be associated with one another by dependency relationships. Arepository that is dependent upon another repository inherits metadata from therepository on which it is dependent. For example, if Repository B is dependent onRepository A, then Repository B is able to use and access the metadata definitions inRepository A. This capability lets you create a distributed metadata environment, inwhich all repositories on a server have access to the metadata definitions on therepositories on which they depend.
For example, see the repository configuration in the following figure.

Managing Metadata � Types of Metadata Repositories 19
Figure 3.1 Repository Dependency Example
Finance
Organization
Marketing
North AmericanMarketing
ProjectFinanceproject
Custom Custom
Project
Project
Project
Custom
Foundation
N. Amer Mktproject
Marketingproject
Organization project
Note: Although the Metadata Manager provides the flexibility for you to set uprepositories in a manner appropriate for your business needs, the following is anoverview of the repository structure in a typical distributed metadata environment. �
In Figure 3.1 on page 19, the repository named Organization is a foundationrepository on the metadata server. This repository stores global metadata, which is themetadata definitions and resource templates that are used throughout the metadataserver. The other repositories that you define on this server will be dependent on thefoundation repository, which means that they will use the resource templates, userdefinitions, and permissions and groups that are on the foundation repository, ratherthan defining their own. Storing this global metadata on a single foundation repositoryimproves metadata integrity and eases maintenance. All changes to the globalmetadata can be made at a single location, and all dependent repositories are assuredof accessing the same global metadata definitions. In this case, the metadata definitionsstored in the Organization repository are used throughout the company.
Next, you might define one or more custom repositories that are dependent on thefoundation repository. In this example, these are identified as Finance, Marketing, andNorth American Marketing. These repositories have access to the definitions in thefoundation repository but can also contain their own definitions. For example, theFinance repository would contain definitions that are unique to the Finance division. If

20 Types of Metadata Repositories � Chapter 3
you want the definitions in each custom repository to be accessible from the othercustom repositories, you must create dependencies between the custom repositories aswell. However, you cannot create circular dependencies (for example, Custom Adepends on Custom B and Custom B depends on Custom A). In this example, the NorthAmerican Marketing repository needs to access the definitions in the Marketingrepository, so there is a dependency relationship between the repositories.
Finally, you would define a project repository for each foundation and customrepository you defined. In this example, the project repositories are OrganizationProject, Finance Project, Marketing Project, and North American Project. The projectrepositories are development environments, and are meant to provide an area whereyou can make and test metadata changes before pushing them to the parent repository.For clarity in the example, the dependencies between the project repositories and theOrganization foundation repository are not shown.
Another example of a repository configuration is shown in the following figure.
Figure 3.2 Repository Organization in a Solutions Environment
SAS
ProjectSAS DemandIntelligenceproject
Foundation
Solutions
Custom
SAS DemandIntelligence
Custom
SAS FinancialManagement
Custom
SAS ProcessIntelligence
Custom
ProjectSAS FinancialManagementproject
ProjectSAS ProcessIntelligenceproject

Managing Metadata � Creating a Metadata Repository 21
In Figure 3.2 on page 20, the foundation repository contains metadata definitions forall SAS applications. A custom repository named Solutions contains definitions that arecommon to all installed SAS solutions. Below the Solutions repository are individualcustom repositories for each installed SAS solution, each containing definitions that areunique to that solution. Because the repository for each individual solution isdependent on the Solutions repository as well as the SAS repository, each solution hasaccess to the definitions that are applicable to all solutions and to all SAS applications.Finally, a project repository is defined for each solution repository to provide anenvironment for making changes to the metadata. You could also define projectrepositories for the SAS and Solutions repositories.
Note: Before you define an environment that uses dependent repositories, you mustmake sure that the application for which you are creating the environment supportsdependent repositories. �
Creating a Metadata RepositoryTo create a new metadata repository on the active server using the New Repository
Wizard:1 From the navigation tree, select and expand the Metadata Manager, and then
select the active server object.2 From the menu bar, selectActions � Add Repository You can also select the
option from the pop-up menu or from the toolbar.The Select Repository Type window of the New Repository Wizard appears.
3 In the Select Repository Type window, choose the type of repository you want tocreate. The three choices are Foundation, Project, and Custom.
A foundation repository is a repository that is not dependent on any otherrepository. A project repository is dependent upon a foundation or customrepository, and is used to isolate development work. In practice, the projectrepository uses the metadata definitions from the parent repository, with userschecking out definitions required for project work. A custom repository must alsobe defined as a dependent repository, but cannot be assigned an owner, as can bedone with project repositories.
The first repository you create on a metadata server must be a foundationrepository. If no repositories are present on a server, only the Foundation radiobutton is available.

22 Creating a Metadata Repository � Chapter 3
Display 3.1 New Repository Wizard – Select Repository Type Window
Click Next to continue.4 In the General Information window, enter a name and, optionally, a description for
the repository. Names for foundation and custom repositories can be up to 60characters in length. However, names for project repositories can only be up to 52characters in length, because the string “Project:” automatically precedes thename you supply. Click Next to continue.
Display 3.2 New Repository Wizard – General Information Window
5 In the Definition of Data Source window, select the engine for the server, whichspecifies the database engine used to access the metadata in the repository. If theserver uses SAS, select Base for the engine.

Managing Metadata � Creating a Metadata Repository 23
Display 3.3 New Repository Wizard – Definition of Data Source Window
If you select Base in the Engine field, you must also specify the path for therepository in the Path field. If SAS Management Console is running on the samemachine where the metadata server is running, you can click Browse to choosethe path interactively. You must have full access to the system for the repositorydirectory. For more information about setting system permissions, see SASIntelligence Platform: Installation Guide. Specify other SAS options in theOptions field (up to 200 characters).
If you select DB2 or Oracle in the Engine field, the Options field contains a setof default options for each engine.
Specify whether the repository is to be managed by the Change ManagementFacility. If the repository is under change management, the metadata is subject tocheck-in and check-out controls and may be updated only by authorized users.
Click Next to continue.6 If you selected project or custom as the repository type, use the Define Repository
Dependencies window to select the repositories on which the new repository willbe dependent. Use the arrow controls to move repositories from the Allrepositories list to the Repository will depend on list.

24 Creating a Metadata Repository � Chapter 3
Display 3.4 New Repository Wizard – Define Repository Dependencies Window
After a dependency is created, the new repository inherits the initializationinformation from the source of the dependency. A dependency also permits themetadata objects in the new repository to refer to objects in the repository that itis depended upon.
If you are creating a project or custom repository, you must specify a dependencyto one existing repository. A custom repository cannot be dependent on a projectrepository, and a project repository cannot be dependent on another projectrepository. If the repository to which you create a dependency is itself dependent onanother repository, the new repository is dependent on both repositories. However,if you select to create direct dependencies, a direct dependency is established toboth the selected parent repository and any parents of the selected repository.
Click Next to continue.7 If you selected project as the repository type, use the Choose Repository Owner
window to select the user or group for which the repository is to be created. Thelist of possible owners is taken from the users and groups defined for therepository upon which the new repository is dependent.
Click Next to continue.

Managing Metadata � Importing Metadata 25
Display 3.5 New Repository Wizard – Choose Repository Owner Window
8 Use the Current Settings window to review the information you provided in thewizard. If you need to make changes, click Back to return to the appropriatewindow. Click Finish to close the wizard and create the repository.
Importing MetadataIf your site has already existing metadata, you can import that metadata into a SAS
Metadata Repository using SAS Management Console. The basic SAS ManagementConsole install supports importing from the Common Warehouse Metamodel (CWM)format. You can add additional import formats by installing the SAS Metadata Bridges.To obtain the SAS Metadata Bridges, go to http://support.sas.com/metabridges orcontact your SAS Account Executive. If you installed the SAS Metadata Bridges formetadata export, the formats are already available for the import function.
You can only import relational data (for example, from a SAS library or a DBMSschema). The import process ignores any non-relational data. The following table liststhe object types that are imported.
Table 3.1 Imported Object Types
Object type Description
CWMRDB.Schema Database schema
CWMRDB.Table
CWMRDB.View
Physical table
CWMRDB.Column Column
CWMRDB:SQLDistinctType
CWMRDB:SQLSimpleType
UniqueKey
CWMRDB:PrimaryKey
CWMRDBUniqueConstant
UniqueKey

26 Importing Metadata � Chapter 3
Object type Description
CWMRDB:ForeignKey ForeignKey (and associated KeyAssociation)
CWMRDB:SQLIndex Index
To import metadata:
1 From the navigation tree, select the Metadata Manager and then the active server.Select the repository into which you want to import the metadata and selectActions � Import Metadata from the menu bar to open the Metadata ImportWizard.
2 If you have not installed the import and export formats provided by the SASMetadata Bridges, a message appears to remind you where you can obtain thesoftware. You can choose to not display the message again. Click OK to continue.
3 In the Select an Import Format window, select the format of the metadata to beimported. If you have not installed the SAS Metadata Bridges, only CWM Importis available. Click Show Details to view detailed information about the selectedformat type, which includes information such as procedures for generating the fileto be imported in the source application, information about the file type required,and answers to frequently asked questions. Click Next to continue.
Display 3.6 Metadata Import Wizard – Select an Import Format Window
4 In the Select External File window, specify the path and filename of the file thatcontains the metadata to be imported. Click Browse to choose the locationinteractively. Click Next to continue.

Managing Metadata � Importing Metadata 27
Display 3.7 Metadata Import Wizard – Select External File Window
5 If you selected a SAS Metadata Bridges import format type, the Select BridgeOptions window might appear. The window does not appear for all import formattypes. The window lists all of the valid options for the import format and thedefault values. To change a value, select the value you want to change, thenspecify the new value. You select values from a drop-down list for some options andtype in the desired values for other options. To view Help for an option, positionthe mouse pointer over the option name to display a brief option description.
If you are importing data that contains double-byte character set data, youmust set the Encoding option to UTF8 in this window. If the format you selecteddoes not include an encoding option, you must either select a different format oruse other methods to convert the data you want to import to CWM format andthen use the Metadata Import Wizard to import the CWM file.
Click Next to continue.
28 Importing Metadata � Chapter 3
Display 3.8 Metadata Import Wizard – Select Bridge Options Window
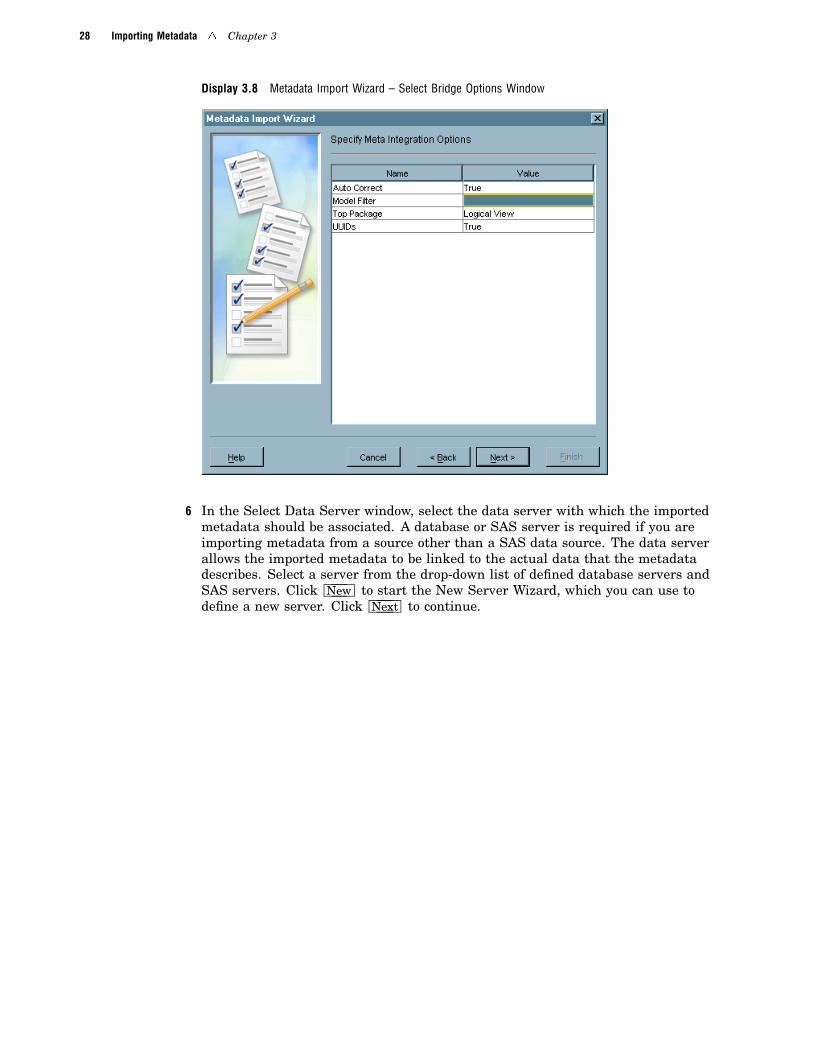
6 In the Select Data Server window, select the data server with which the importedmetadata should be associated. A database or SAS server is required if you areimporting metadata from a source other than a SAS data source. The data serverallows the imported metadata to be linked to the actual data that the metadatadescribes. Select a server from the drop-down list of defined database servers andSAS servers. Click New to start the New Server Wizard, which you can use todefine a new server. Click Next to continue.

Managing Metadata � Importing Metadata 29
Display 3.9 Metadata Import Wizard – Select Data Server Window
7 If you selected a SAS server or a SAS/SHARE server from the Select Data Serverwindow, the Select SAS Library window appears. Use this window to specify aSAS library that is used to access the imported metadata. Use the SAS Librarydrop-down list to choose from the SAS libraries defined for the selected SASserver. Click New to start the New Library Wizard, which you can use to define anew library. The Libref and Path fields specify the location of the library. Tochange these values, click Edit , which displays the properties window for theselected library. Click Next to continue.

30 Importing Metadata � Chapter 3
Display 3.10 Metadata Import Wizard – Select SAS Library Window
8 If you selected a database server in the Select Data Server window, the Select SASServer window appears. The server that you select will be used to access theimported metadata. Select a server from the list of all defined SAS servers. ClickNext to continue.
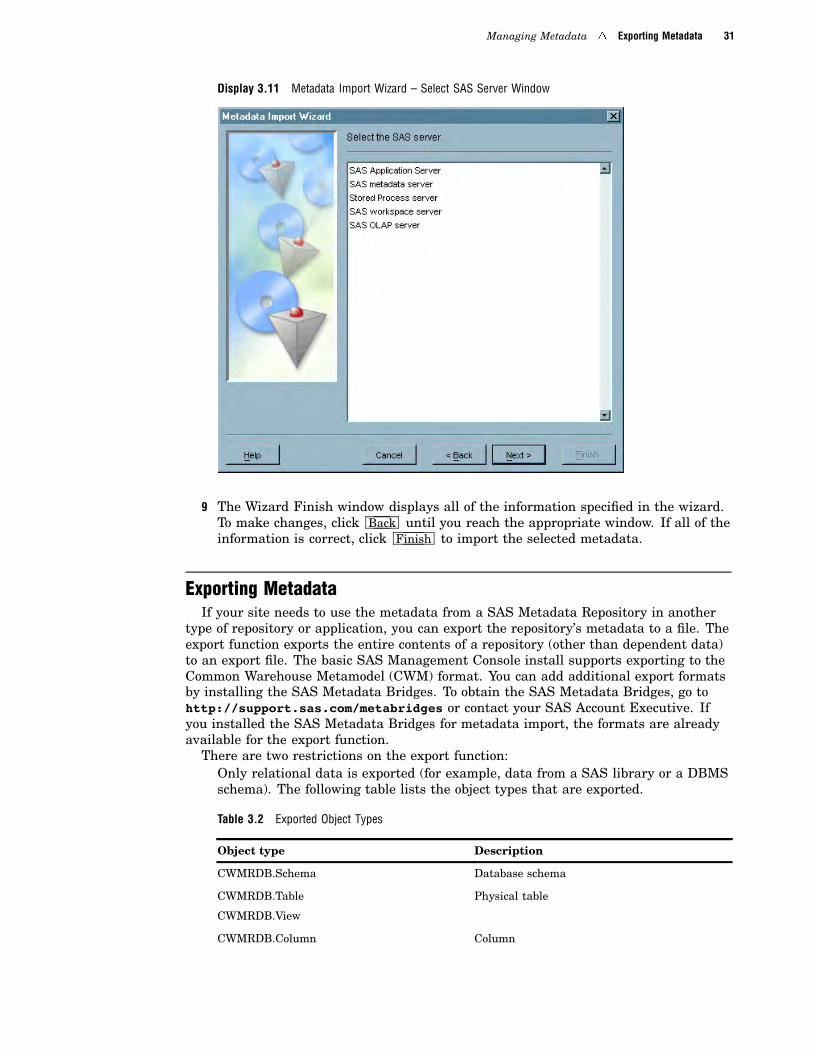
Managing Metadata � Exporting Metadata 31
Display 3.11 Metadata Import Wizard – Select SAS Server Window
9 The Wizard Finish window displays all of the information specified in the wizard.To make changes, click Back until you reach the appropriate window. If all of theinformation is correct, click Finish to import the selected metadata.
Exporting MetadataIf your site needs to use the metadata from a SAS Metadata Repository in another
type of repository or application, you can export the repository’s metadata to a file. Theexport function exports the entire contents of a repository (other than dependent data)to an export file. The basic SAS Management Console install supports exporting to theCommon Warehouse Metamodel (CWM) format. You can add additional export formatsby installing the SAS Metadata Bridges. To obtain the SAS Metadata Bridges, go tohttp://support.sas.com/metabridges or contact your SAS Account Executive. Ifyou installed the SAS Metadata Bridges for metadata import, the formats are alreadyavailable for the export function.
There are two restrictions on the export function:� Only relational data is exported (for example, data from a SAS library or a DBMS
schema). The following table lists the object types that are exported.
Table 3.2 Exported Object Types
Object type Description
CWMRDB.Schema Database schema
CWMRDB.Table
CWMRDB.View
Physical table
CWMRDB.Column Column

32 Exporting Metadata � Chapter 3
Object type Description
CWMRDB:SQLDistinctType
CWMRDB:SQLSimpleType
UniqueKey
CWMRDB:PrimaryKey
CWMRDBUniqueConstant
UniqueKey
CWMRDB:ForeignKey ForeignKey (and associated KeyAssociation)
CWMRDB:SQLIndex Index
� If you are exporting metadata from a dependent repository, metadata is notretrieved from the parents of the repository. For example, only tables that uselibrary definitions in the exported repository are exported. Tables that use librarydefinitions in a parent repository are not exported.
To export metadata:1 From the navigation tree, select the Metadata Manager and then the active server.
Select the repository whose metadata you want to export, and select Actions �Export Metadata from the menu bar to open the Metadata Export Wizard.
2 If you have not installed the import and export formats provided by the MetaIntegration Model Bridge software, a message appears to remind you where youcan obtain the software. You can choose to not display the message again. ClickOK to continue.
3 In the Select an Export Format window, select the format in which the metadatais to be exported. If you have not installed the SAS Metadata Bridges, only CWMExport is available. Click Show Details to view detailed information about theselected format type, which includes information such as procedures for loadingthe exported file into the target application, information about the file typegenerated, and answers to frequently asked questions. Click Next to continue.

Managing Metadata � Exporting Metadata 33
Display 3.12 Metadata Export Wizard – Select an Export Format Window
4 In the Select File for Metadata Export window, specify the path and filename ofthe file into which the metadata should be exported. Click Browse to choose thelocation interactively. Click Next to continue.

34 Exporting Metadata � Chapter 3
Display 3.13 Metadata Export Wizard – Select File for Metadata Export Window
5 If you selected a SAS Metadata Bridges export format type, the Select BridgeOptions window might appear. The window does not appear for all export formattypes. The window lists all of the valid options for the export format and thedefault values. To change a value, select the value you want to change, then specifythe new value. You select values from a drop–down list for some options and typein the desired values for other options. To view Help for an option, position themouse pointer over the option name to display a brief option description.
If you are exporting data that contains double-byte character set data, you mustset the Encoding option to UTF8 in this window. If the format you selected doesnot include an encoding option, you must either select a different format or exportthe data to a CWM file and then convert the data using other methods.
Click Next to continue.

Managing Metadata � Changing Repository Dependencies 35
Display 3.14 Metadata Export Wizard – Bridge Options Window
6 The Wizard Finish window displays all of the information specified in the wizard.To make changes, click Back until you reach the appropriate window. If all of theinformation is correct, click Finish to export the selected metadata.
Changing Repository DependenciesAfter you create a repository, you can change or add to the list of repositories upon
which the new repository is dependent.To change repository dependencies:1 In the navigation tree, select the Metadata Manager plug-in and the active server.2 In the navigation tree or display area, select the repository whose dependencies
you want to change and select Actions � Edit Dependencies from the menu bar.The Edit Dependencies window appears.

36 Maintaining the Active Server � Chapter 3
Display 3.15 Edit Dependencies Window
3 The window contains two lists. Repositories that are defined on the active serverand that can establish a valid dependency with the selected server are listed in theAll repositories list. For example, if you are changing the dependencies for aproject repository, the All repositories list contains the foundation repositoryand any change managed custom repositories. The repositories upon which theselected repository is dependent are listed in the Depends on list.
To add a dependency to a repository, select the repository in the Allrepositories list and use the arrow control to move the repository to theDepends on list.
To remove a dependency, select the repository in the Depends on list and usethe arrow control to move the repository to the All repositories list.
4 When you create a dependency, you also create a dependency to all of the parentsof the selected repository unless you deselect the create direct dependencies option.For example, if you specify that repository A should be dependent on repository B,and repository B is already dependent on repositories C and D, then repository Ais dependent on repositories B, C, and D.
5 Click OK to close the window and create the dependencies.
Maintaining the Active ServerThe Metadata Manager plug-in provides several functions for maintaining the active
server and the repositories on the server. The functions available are the following:
Delete deletes the selected repository, the repository contents, and allmetadata that defines the repository. To select this function, selectthe repository you want to delete under the active server and selectDelete from the pop-up menu.
Unregister deletes the metadata that defines the selected repository, but leavesthe repository contents intact. You cannot access an unregistered

Managing Metadata � Unregistering and Re-registering Repositories 37
repository from the current metadata server until you register therepository again. To select this function, select the repository youwant to unregister under the active server and select Unregisterfrom the pop-up menu or the Actions menu.
Purge permanently removes all metadata items that have been marked fordeletion in the selected repository. To select this function, select therepository whose contents you want to purge under the active serverand select Purge from the pop-up menu or the Actions menu.
Format formats the selected repository, which removes all metadatacurrently in the repository. To select this function, select therepository you want to format under the active server and selectFormat from the pop-up menu or the Actions menu.
Truncate deletes all of the metadata objects in the selected repository, butdoes not delete the object containers or remove the repositoryregistration. To select this function, select the repository you wantto truncate under the active server and select Truncate from thepop-up menu or the Actions menu.
InitializeRepository
redefines initial settings for the repository, including user groupsand permissions, access control templates, and installed resourcetemplates. To select this function, select the repository you want toinitialize under the active server and select InitializeRepository from the pop-up menu or the Actions menu.
If you format and then initialize a change–managed repository,the change management will no longer be applied. To restore changemanagement, you must unregister and re-register the repository. Inthe process of re-registering the repository, you can activate changemanagement in the New Repository Wizard. See “Unregistering andRe-registering Repositories” on page 37 for more information.
This function is not available for project repositories.
Stop stops the active server. To select this function, select the activeserver and select Stop from the pop-up menu or from the Actionsmenu.
Pause pauses all repositories on the active server. To select this function,select the active server and select Pause from the pop-up menu orfrom the Actions menu.
Resume resumes operation for a paused server. To select this function, selectthe active server and select Resume from the pop-up menu or fromthe Actions menu.
Unregistering and Re-registering RepositoriesUnregistering a repository is the process of removing metadata that describes the
repository without altering the contents of the repository itself. An unregisteredrepository is invisible to the metadata server. Re-registering a repository is the processof defining a repository while specifying the same metadata that was removed, makingthe repository visible to the metadata server.
When performing this procedure, it is important that you make careful note of all ofthe repository’s attributes before you unregister it. When you use the New RepositoryWizard to re-register the repository, you must specify all options exactly as they were.The repository path must be identical in order for the repository to access any existing

38 Managing Resource Templates � Chapter 3
metadata objects. If the repository type is different, the repository is initialized uponcreation, and any existing metadata definitions may be lost. For example, if theunregistered repository was a foundation repository, re-register it as a foundationrepository; if it was a custom repository, re-register it as a custom repository.
To unregister a repository:
1 From the Metadata Manager in the navigation tree, expand the Active Server andselect the repository you want to unregister.
2 Select Properties from the pop-up menu or the File menu. In the Propertieswindow, select the Registration tab and make note of the path specified in theLocation field and the engine type specified in the Engine field. You must havethis information in order to re-register the repository. If you do not specify thesame path and engine type, the repository is created as a new repository, ratherthan a re-registered repository. Close the Properties window.
3 With the repository still selected, select Unregister from the pop-up menu or theActions menu.
4 A confirmation dialog appears. Click OK to unregister the repository.
To re-register a repository:
1 From the Metadata Manager in the navigation tree, select the Active Server andselect Add Repository from the pop-up menu, the Actions menu, or the toolbar.
2 The New Repository Wizard starts and guides you through the process of creatinga new repository.
3 When specifying the repository type, verify that the type you specify is identical tothe type of the repository you want to re-register. If the repository types do notmatch, the repository will be initialized when it is created and all metadatadefinitions in the repository might be lost.
4 Verify that the engine type and the path for the repository are the same as therepository you unregistered. The path must be identical in order for there-registered repository to contain any existing metadata definitions.
5 Finish entering all information in the New Repository Wizard, then use theRepository drop-down list to specify the re-registered repository as the activerepository. Verify that the metadata definitions are intact.
Managing Resource Templates
Resource templates are XML files that define how SAS Management Console definesa particular type of metadata object. The template for a specific object (for example, aSAS workspace server) specifies the specific information that SAS Management Consolerequests when defining the object and the information that is displayed for the object’sproperties. Because each metadata object uses a separate definition, you only have toload an updated resource template to change the information needed to define aparticular object.
A full set of resource templates is loaded whenever you create a foundation metadatarepository, and it is strongly recommended that you do not load resource templates intoany other type of repository on a metadata server. Any project or custom repositoriesthat are dependent on the foundation repository are able to access the foundationrepository’s resource templates.
To delete a resource template, select the Resource Templates folder under theMetadata Manager in the navigation tree, select the template you want to delete in thedisplay area, and select Delete from the pop-up menu, the Edit menu, or the toolbar.

Managing Metadata � Adding Resource Templates 39
Adding Resource TemplatesAlthough a full set of resource templates is loaded into foundation metadata
repositories upon repository creation, there might be instances where you need to loadnew or updated resource templates. For example, if support is added for a new servertype, that server’s resource template must be added to the existing set. If theinformation required to define a particular server changes, then the old template mustbe deleted and the new one added.
To load resource templates:
1 Ensure that the currently selected repository is a foundation repository. Ifnecessary, select the foundation repository for the active metadata server from theRepository drop-down list.
2 From the navigation tree, select the Metadata Manager plug-in and then select theResource Templates folder.
3 Select Add Resource Templates from the Actions menu, the pop-up menu, orthe toolbar. The Add Resource Template Wizard starts.
4 In the Installation Type window, specify what kind of installation you want toperform.
Display 3.16 Add Resource Template Wizard - Installation Type Window
Select Typical to load resource templates from the standard location in theSAS Management Console installation directory. Use this option to reload one ormore of the default resource templates.
Select Custom to install specific resource template files from a specified location.Use this option to load specially created or modified resource templates.
Click Next to continue.
5 If you selected Typical as the installation type, the Template Selection windowappears. The resource templates are organized into folders and subfolders based

40 Adding Resource Templates � Chapter 3
on the type of metadata object each one defines. Open the appropriate folders andselect the templates you want to add. Click Select All to select all of the resourcetemplates in all of the folders. Click Next to continue.
Display 3.17 Add Resource Template Wizard - Template Selection Window
6 If you selected Custom as the installation type, the Template Location windowappears.
Display 3.18 Add Resource Template Wizard - Template Location Window

Managing Metadata � Replicating and Promoting Metadata 41
To specify the location of a resource template XML file, click Add and use the filebrowser that appears to locate the file. To remove a template file from the list inthe Template Location window, select the filename and click Remove . Click Nextto continue.
7 If you selected Typical as the installation type, the Locale window appears. Thelocale specifies the language in which the resource template appears.
Display 3.19 Add Resource Template Wizard - Locale Window
Use the arrow buttons to move locales from the Available locales list to theSelected locales list. Templates for the English locale are automaticallyinstalled. Click Next to continue.
8 The Finish window displays all of the information specified in the wizard. To makechanges, click Back until you reach the appropriate window. If all of theinformation is correct, click Finish to load the selected resource templates. If thecurrently selected repository is not a foundation repository, a warning messageappears to confirm that you want to add the resource templates to a dependentrepository.
Replicating and Promoting Metadata
SAS Management Console provides the ability to copy the contents of a metadatarepository to another repository. If the contents are copied without any changes, theprocess is referred to as replication. If the copying process includes the ability to changemetadata values, the process is called promotion. SAS Management Console also letsyou save the promotion or replication process you define as a job, which lets you rerunthe process at any time without having to redefine the process parameters. However,the substitutions in a promotion job are not dynamic, so if you make any changes to arepository that has been promoted, you must create a new job definition.

42 Replicating and Promoting Metadata � Chapter 3
Promotion and replication must be between servers running on the same platform.For example, promotion between two Windows servers is allowed, but promotionbetween a UNIX server and a Windows server is not allowed.
You should only promote or replicate foundation and custom repositories. Projectrepositories should not be promoted or replicated.
As an example of using the promotion and replication functions, consider theenvironment shown in the following figure.
Figure 3.3 Development, Testing, and Production Environment
Development Testing Production
In this example, an organization has created three metadata servers andcorresponding repositories to provide a development area, testing area, and productionarea, as shown in Figure 3.3 on page 42. System administrators use the developmentserver to create new metadata definitions and verify their function in the developmentenvironment. Prior to making the development changes, a replication job is created andrun to copy the current metadata on the Production server to the Testing server andanother replication job is created and run to copy the metadata from the Testing serverto the Development server (Figure 3.4 on page 42). These jobs ensure that all threeservers are using the same environment. Note that the replication process createsrepositories with identical names on the target servers. A new replication or promotionjob will not run if the target server already contains a repository with the same nameas the repository being promoted or replicated.
Figure 3.4 Production to Testing Replication
Development Testing Production
Replication from Production to Testing
Next, a promotion job is created and run to copy the development metadata to thetesting environment, as shown in Figure 3.5 on page 43.

Managing Metadata � Promoting Dependent Repositories 43
Figure 3.5 Development to Testing Promotion
Development Testing Production
Promotion from Development to Testing
The promotion job changes the parameters in the development metadata such asserver names and port numbers in order to make it applicable for the testingenvironment. Because the promotion job is saved, it can easily be run whenevermetadata needs to be promoted from development to testing.
After the definitions are tested, another promotion job is run to promote the testedmetadata back to the production server, as shown in Figure 3.6 on page 43.
Figure 3.6 Testing to Production Promotion
Promoting Dependent RepositoriesIf you are promoting a dependent repository, the set of parent repositories must be
present on both the source and the target servers. The promotion process uses thepermissions that are defined in the server’s foundation repository and inherited by thedependent repository.
To promote a dependent repository:
1 Replicate all parent repositories of the dependent repository from the source serverto the target server.
2 Replicate the dependent repository that you want to promote.

44 Working With User Macros � Chapter 3
3 On the target server, define the dependency relationship between the dependentrepository and its parents. The repository and dependency structure should nowbe identical between the source server and target server.
4 Promote the dependent repository from the source to the target server.
You must follow this procedure before you promote a dependent repository for thefirst time. The dependency relationships remain in place for subsequent promotion jobs.However, if the dependency structure changes on the source server, you must follow theprocedure again to establish an equivalent dependency structure on the target server.
Working With User MacrosDuring the running of a promotion or replication job, several user macros are called
and processed if they have been defined. These macros enable you to perform additionalprocessing during the promotion or replication process. See Appendix 1, “Replicationand Promotion Macros,” on page 157 for a list of the macros that you can specify.
Running Replication and Promotion JobsIn order to create and run replication and promotion jobs, you must first configure
the these environments:� a source environment� a target environment� an administration environment
To configure each environment, you must define a metadata server, a metadatarepository, and other specific servers and users. After you have configured the requiredenvironments, you can use the Replication Wizard and Promotion Wizard to create andrun replication and promotion jobs.
For detailed information on configuring the replication and promotion environmentsand defining and running jobs, see SAS Intelligence Platform: System AdministrationGuide.
Upgrading Repository MetadataThe Upgrade Metadata function enables you to apply changes to the metadata
repositories required by new releases of SAS. Because the changes are applied to allrepositories on the active server, you must be an unrestricted user in order to run theutility.
To update the repositories on the active server, follow these steps:1 In the navigation tree, select the active server.2 Select Upgrade Metadata from the pop-up menu.
If the user is not specifically defined as an unrestricted user, an error messageappears and the repositories are not updated.
3 If the user is defined as an unrestricted user, the updates are applied to allrepositories on the active server.
If the repositories have already been upgraded, the message “All repositoriesup-to-date" appears.
When the process is complete, the message "The metadata server has beensuccessfully updated" appears.

45
C H A P T E R
4Managing Users
What Is the User Manager? 45Planning for Users and Groups 45
Defining a User 46
Defining a Group 53
What Is the User Manager?The User Manager is a SAS Management Console plug-in that provides functions to
manage metadata definitions for users and groups of users. Each user and group thataccesses secure resources on a SAS Metadata Server must be represented by anidentity on the server. Individual users are represented by Person objects, and groupsare represented by IdentityGroup objects. You must also create user definitions forlogins needed when creating object spawner definitions or setting up load balancing.
Planning for Users and GroupsBefore you begin defining users and groups, you must formulate a strategy for
deciding which groups will be created, which users will belong to those groups, andwhich individual users will need to be defined. Refer to SAS Intelligence Platform:Security Administration Guide for information about planning for users and groups.
The user definitions you will need to create are either individual users withspecialized access requirements (most of whom will be organized into groups) orspecialized functional logins (such as for operator connections to spawners or forspawner-to-spawner connections in load balancing).
For ease of maintenance, you should minimize the user definitions that are not ingroups. For example, assume that your site has three administrator IDs that haveidentical access requirements. If you define the administrators as individual users, youmust give each administrator authorization to access each metadata object individually.Later, if you need to add another administrator, you must go back to each object andauthorize the new administrator to access each definition. However, if you begin bycreating an administrator group that is made up of the administrator user definitions,you only need to create a user definition for the new administrator and add thedefinition to the administrator group in order to give the new administrator the sameaccess.

46 Defining a User � Chapter 4
When planning for groups, you must consider grouping users that need to accessrestricted metadata. SAS Management Console uses two general groups for users forwhich you do not have to specify members:
PUBLIC implicitly contains all users who can authenticate to the metadataserver. The access rules you define for the PUBLIC group apply toall users that are not members of a group (although you canoverride these rules).
SASUSERS represents all users that are specifically defined in the UserManager with a definition that includes a login.
When planning for groups, first evaluate which resources require restricted access,then ensure that a group exists or is created for the users that need to access eachrestricted resource. For example, you might want to create a group of users with readand write access to servers and libraries containing salary information. All other users(represented by the PUBLIC group) are denied read and write access to these resources.See SAS Intelligence Platform: Security Administration Guide for information aboutplanning for users and groups.
It is strongly suggested that you create all user definitions in the foundationrepository of a metadata server, rather than in any dependent repositories. Userdefinitions created in the foundation repository are accessible to all other repositoriesthat are dependent on the foundation repository. Storing user definitions in thefoundation repository also keeps the user metadata centralized, rather than spread overmultiple repositories. Using centralized metadata simplifies the process of locating andmaintaining metadata definitions.
Defining a UserDefining a user involves specifying identifying information about the user and
identifying the user’s login IDs and authentication domains. A user can only accessresources in authentication domains on which the user or a group to which the userbelongs has a valid login.
To define a user:1 Select the User Manager plug-in in the navigation tree and select New �
Userfrom the pop-up menu or the Actions menu, or select the New User tool fromthe toolbar. The New User Properties window appears.

Managing Users � Defining a User 47
Display 4.1 New User Properties Window – General Tab
2 The New User Properties window opens with the General tab displayed. Use thistab to specify a name for the user and supply identifying information. Select theGroups tab when you are finished.
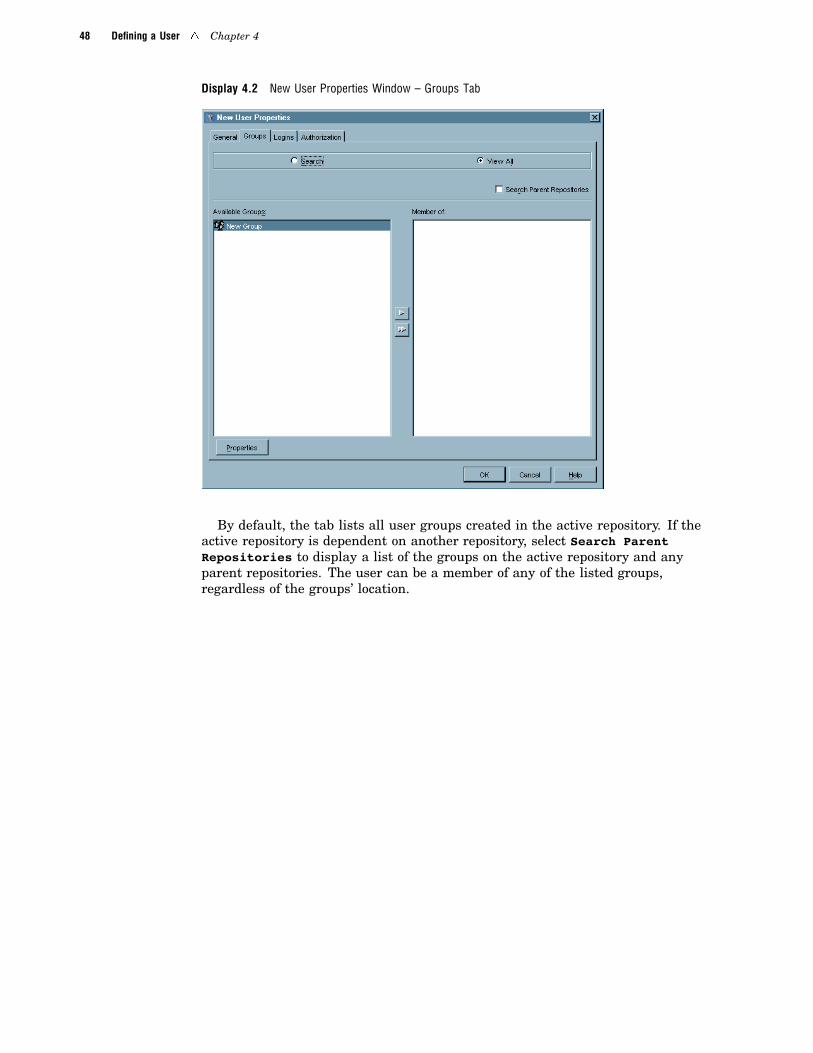
3 The Groups tab lets you assign the user to a user group. If you have created anyuser groups, they are listed in the Available Groups list. Select the groups towhich the user should belong in the Available Groups list, then use the arrowcontrol to move them to the Member of list. You can also assign users to groupsafter the users have been created.
48 Defining a User � Chapter 4
Display 4.2 New User Properties Window – Groups Tab
By default, the tab lists all user groups created in the active repository. If theactive repository is dependent on another repository, select Search ParentRepositories to display a list of the groups on the active repository and anyparent repositories. The user can be a member of any of the listed groups,regardless of the groups’ location.
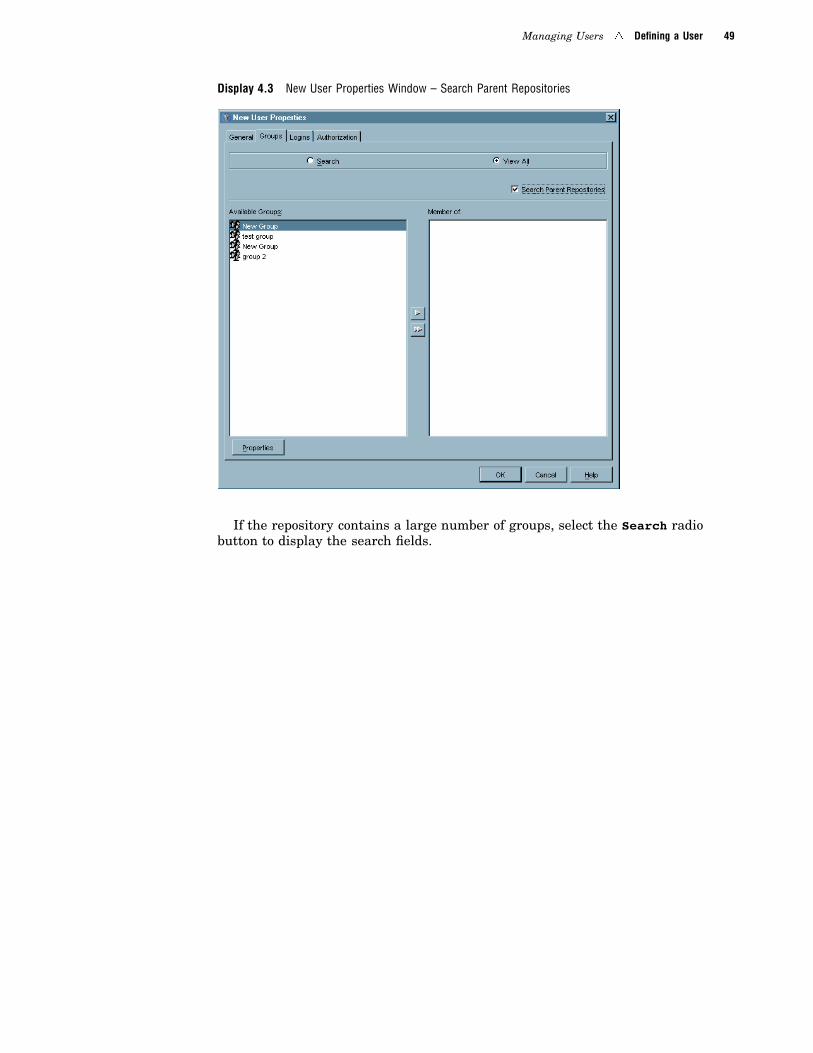
Managing Users � Defining a User 49
Display 4.3 New User Properties Window – Search Parent Repositories
If the repository contains a large number of groups, select the Search radiobutton to display the search fields.

50 Defining a User � Chapter 4
Display 4.4 New User Properties Window – Search for Users
By default, you can search for the name or description of a group. ClickAdvanced to search using a user ID.
When you have finished selecting groups for the user, select the Logins tab.4 The Logins tab allows you to specify all of the login IDs associated with the user.

Managing Users � Defining a User 51
Display 4.5 New User Properties Window – Logins Tab
To add a login to the list, click New . You must specify at least one login for theuser in order to create a valid metadata identity.
See SAS Intelligence Platform: Security Administration Guide for a detailedexplanation of the relationships between logins, authentication domains, andusers, as well as information about how a SAS Metadata Server uses logins.
In the New Login Properties window, specify the user ID, password (which youmust enter twice for confirmation), and authentication domain for the user’s login.You must select the authentication domain that is associated with the server towhich the login provides access.

52 Defining a User � Chapter 4
Display 4.6 New Login Properties Window
Click New to specify a new authentication domain if the correct authenticationdomain is not listed. If you are specifying a login on a Microsoft Windows system,specify the user ID as domain\userid. Click OK to return to the Logins tab.
To change or delete a login, select the login and click Modify or Remove .Make sure you define all possible logins on all authentication domains for the
user or a group to which the user belongs.Although logins can be added after the user has been defined, by default only
the administrative user and the person represented by this Person object can addlogins. You must grant WriteMetadata permission to a user in order for that userto be able to add logins to his or her Person object.
When you have finished defining all logins for the user, select the Authorizationtab.
5 The Authorization tab specifies the users or groups that are granted or deniedpermission to perform specified actions on the user definition. Click Add to add auser or group to the list of those having specified permissions for the userdefinition.

Managing Users � Defining a Group 53
Display 4.7 New User Properties Window – Authorization Tab
In this example, the Administrator user has been granted permission to readmetadata, checkin metadata, administer, read and write, and has been deniedpermission to delete. All of these permissions are for the access to the userdefinition, not to the resources accessed by the user.
Unless users are specifically granted WriteMetadata permission for the userdefinition, only the administrative user and the person represented by the Personobject can modify the definition after it has been created.
For a detailed explanation about defining authorization, see Chapter 7,“Managing Authorizations,” on page 105.
Note: The Authorization tab for a user definition does not display anyinherited permissions. �
6 Click OK to close the New User Properties window and define the user.
Defining a GroupIn your organization, you might have resources that you only want to be accessible to
certain users. For example, you do not want a server that contains salary informationto be accessible to all users, but only to a select group. To implement this type ofcontrol, SAS Management Console lets you define groups of users with common accessrequirements, then specify the access rules that apply to all members of the group.
When a group member attempts to access a restricted resource, the group’spermissions for the resource are evaluated. If the group has authorization to access theresource, then the group members also have authorization. Authorization only has to bedefined for the group, rather than for each user in the group.

54 Defining a Group � Chapter 4
To define a group:1 From the navigation tree, select the User Manager plug-in and select New �
Groupfrom the pop-up menu or the Actions menu, or select the New Group toolfrom the toolbar. The New Group Properties window appears.
Display 4.8 New Group Properties Window – General Tab
2 The New Group Properties window appears with the General tab displayed. Entera name, a description, and the users that have owner and administratorresponsibilities for the group. The responsibilities are for information purposesonly. Access controls for the group are controlled on the Authorization tab. Tospecify a new responsibility, click New , then select from the defined users in theName column and the responsibility types in the Role column. Select the Memberstab when you are finished.
3 The Members tab lets you specify the members of the group.

Managing Users � Defining a Group 55
Display 4.9 New User Properties Window – Members Tab
To add individual users or groups to the group being defined, select the users orgroups in the Available Members list and use the arrow controls to move theentries to the Current Members list. Select the Show Groups or Show Userscheck boxes to control the entries that are displayed in the Available Memberslist. Select View All to see a list of all defined users and groups or select Searchto find a particular user or group. Select a user or group and click Properties toview detailed information about the selected user or group.
You must be careful when creating groups that contain other groups, because ofthe potential for creating authorization conflicts.
When you have finished adding group members, select the Logins tab.4 The Logins tab lets you define shared logins that group members can use to
authenticate to servers in other authentication domains. Defining logins for agroup is optional.

56 Defining a Group � Chapter 4
Display 4.10 New User Properties Window – Logins Tab
To add a new login for the group, click New .
In the New Login Properties window, specify the user ID, password (which youmust enter twice for confirmation), and authentication domain for the group login.
Display 4.11 New Login Properties Window

Managing Users � Defining a Group 57
Click New to specify a new authentication domain if the correct authenticationdomain is not listed. If you are specifying a login on a Microsoft Windows system,specify the user ID as domain\userid. Click OK to return to the Logins tab.
Make sure you define all possible logins on all domains for the group.
Although logins can be added after the group has been defined, only usersgranted WriteMetadata permission for the IdentityGroup and Login objects canadd logins. You must grant WriteMetadata permission to a user in order for thatuser to be able to add logins to this IdentityGroup object.
When you have finished defining all logins for the group, select theAuthorization tab.
5 The Authorization tab specifies the users or groups that are granted or deniedpermission to perform specified actions on the group definition. Click Add to adda user or group to the list of those having specified permissions for the groupdefinition.
Display 4.12 New User Properties Window – Authorization Tab
In this example, the user New User has been granted permission to readmetadata, checkin metadata, read and write, and has been denied permission toadminister and delete. All of these permissions are for the access to the groupdefinition, not to the resources accessed by the group.
For a detailed explanation about defining authorization, see Chapter 7,“Managing Authorizations,” on page 105.
6 Click OK to close the New Group Properties window and define the group.

58

59
C H A P T E R
5Managing Servers
What Is the Server Manager? 59Managing SAS Servers 60
Defining a Basic SAS Server 61
Defining a SAS V8.2 Server 64
Adding to the SAS Server 66
Adding a SAS Server Component 66Adding a Physical Server 68
Adding a Server Connection 69
Defining a SAS Spawner 71
Setting Up Load Balancing 76
Setting Up Pooling 78
Managing Database Servers 81Managing Enterprise Application Servers 83
What Is the Server Manager?
The Server Manager is a SAS Management Console plug-in that provides the abilityto define and manage metadata definitions for servers. The specific types of serversthat the plug-in can define are determined by the resource templates that are loaded.Resource templates are XML files that define the information that the plug-in requestsfor each type of metadata definition. You can specify the servers that your site caninstall by controlling the server resource templates that are loaded.
You can use the Server Manager to define these types of servers:
content servers servers that provide content for a Web application (such as the SASInformation Delivery Portal).
database servers servers that are used to store data that is used by other applicationsand is stored in a format usable by the applications.
enterpriseapplicationservers
servers that are used to run database or analytics applications otherthan SAS. Users can send requests to the application running on anenterprise application server and have the results returned to them.
SAS servers servers that are used to run SAS sessions. Users can send requeststo the SAS session on the server and receive the results. SASManagement Console supports several types of SAS servers,including metadata servers, workspace servers, stored processservers, and OLAP servers.
spawners SAS sessions that listen for client requests for server sessions andpass the requests to a SAS server.

60 Managing SAS Servers � Chapter 5
schedulingservers
servers needed to support scheduling of jobs from SAS DataIntegration Studio or other applications.
Managing SAS Servers
Before you start defining SAS servers, you should understand how SAS serverdefinitions are organized by the SAS metadata model and presented by SASManagement Console.
Figure 5.1 Organization of SAS Server Definitions
Workspace logical server
Workspace server 1
Workspace server 2
Workspace server 3
OLAP logical server OLAP server
Stored process logical server
Stored process server 1
Stored process server 2
Stored process server 3
Metadata logical server Metadata server
SAS ApplicationServer

Managing Servers � Defining a Basic SAS Server 61
The highest-level server (also known as a server context) is a container for physicalservers that should share resources (such as libraries). Within each server are one ormore logical servers. A logical server is a grouping of one or more physical servers, orserver components. This organization helps in sharing resources. For example, whenyou define a SAS library in the Data Library Manager, you can assign the library to theserver and all of the physical servers within the server will have access to the library.The logical server grouping also makes it easier to set up load balancing or pooling.Each server can only have one logical server of each type.
Defining a Basic SAS ServerTo create a new SAS server definition:1 From the navigation tree, select the Server Manager plug-in. Then select New
Server from the pop-up menu, toolbar, or Actions menu. The New Server Wizardstarts.
2 Use the Server Type window to select the server you are defining.
Display 5.1 New Server Wizard – Server Type Window
Locate the SAS Servers folder and select SAS Application Server. Click Nextto continue.
3 In the Name and Description window, specify a name and a description (optional).The name you provide will be the displayed name of the server.

62 Defining a Basic SAS Server � Chapter 5
Display 5.2 New Server Wizard – Name and Description Window
Click Next to continue.4 The Server Options window lists information about the vendor and version of the
server software. Click Next to continue.5 The SAS Server Type window lists the types of SAS application servers you can
define.
Display 5.3 New Server Wizard – SAS Server Type Window
The type you choose will become the first logical server and the first servercomponent in the server. For example, if you select metadata server as the server

Managing Servers � Defining a Basic SAS Server 63
type, the server will contain a logical metadata server which in turn contains ametadata server. Click Next to continue.
6 Use the SAS Server Configuration window to specify how clients will connect tothe server (this window does not appear if you are defining a batch server).
Display 5.4 New Server Wizard – SAS Server Configuration Window
The Basic option lets you quickly define an Integrated Object Model (IOM) Bridgeconnection for the server, using defaults for all connection parameters not listed onthis window. Select Basic and specify these items:
AuthenticationDomain
specifies the domain used to authenticate logins to the server.Click New to define a new domain.
Host Name specifies the host machine on which the server runs.
Port Number specifies the port on the host used for connections between theserver and clients.
The Custom option lets you define all aspects of an IOM Bridge connection ordefine a Component Object Model (COM) connection (this type of connection is notavailable for SAS/CONNECT or batch servers). If you are creating a definition fora server that uses SAS V8.2, you must select Custom. See “Defining a SAS V8.2Server” on page 64 for more information.
Click Next to continue. The Finish window displays all of the information youentered in the wizard. If you need to make any changes, click Back to return tothe appropriate window. If all of the information is correct, click Finish to definethe server.
7 Open the Server Manager in the navigation tree to see the server you defined.
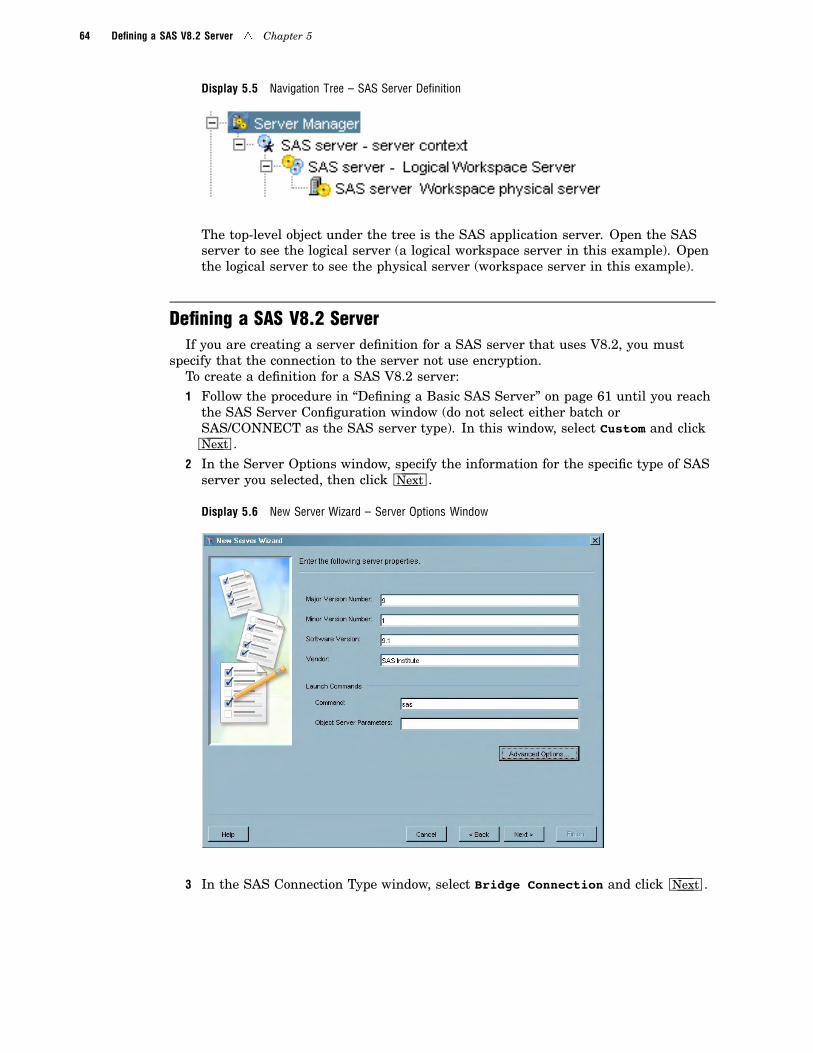
64 Defining a SAS V8.2 Server � Chapter 5
Display 5.5 Navigation Tree – SAS Server Definition
The top-level object under the tree is the SAS application server. Open the SASserver to see the logical server (a logical workspace server in this example). Openthe logical server to see the physical server (workspace server in this example).
Defining a SAS V8.2 ServerIf you are creating a server definition for a SAS server that uses V8.2, you must
specify that the connection to the server not use encryption.To create a definition for a SAS V8.2 server:1 Follow the procedure in “Defining a Basic SAS Server” on page 61 until you reach
the SAS Server Configuration window (do not select either batch orSAS/CONNECT as the SAS server type). In this window, select Custom and clickNext .
2 In the Server Options window, specify the information for the specific type of SASserver you selected, then click Next .
Display 5.6 New Server Wizard – Server Options Window
3 In the SAS Connection Type window, select Bridge Connection and click Next .

Managing Servers � Defining a SAS V8.2 Server 65
Display 5.7 New Server Wizard – SAS Connection Type Window
4 In the Connection Options window, specify the requested information, then clickAdvanced Options.
Display 5.8 New Server Wizard – Connection Options Window
5 In the Advanced Options window, select the Encryption tab.
6 On the Encryption tab, select a value of None from the Required Encryption Leveldrop-down list.

66 Adding to the SAS Server � Chapter 5
Display 5.9 Bridge Connection Advanced Options Window
7 Click OK in the Advanced Options window, then click Next in the ConnectionOptions window to go to the Finish window and complete the server definition.
Adding to the SAS ServerAfter you have created a SAS server, including the logical server, you can add the
following to the server definitions:
servercomponent
Within the server, you can add a different type of SAS server, alongwith its corresponding logical server.
server Within a logical server, you can add a new physical server of thesame type. For example, within a logical workspace server, you canadd new workspace servers. Metadata and OLAP logical servers canonly contain a single server.
connection For a physical server, you can add another connection of a differenttype. For example, if you defined an IOM Bridge connection to aserver, you can add a COM connection.
Adding a SAS Server ComponentAdding server components is the process of adding additional types of SAS servers
(consisting of a logical server and a corresponding physical server) to a server. All of theserver components in a server can share resources and definitions for objects such aslibraries and database schemas. You can only add server components that are notalready present in a SAS application server. For example, if an application servercontains a workspace logical server and a metadata logical server, you cannot addanother workspace logical server.
To add a server component:
1 From the navigation tree, select the SAS server and select Add ApplicationServer Component from the pop-up menu, the Actions menu, or the toolbar. TheNew Server Component Wizard starts.
2 Use the SAS Server Type window to specify what kind of SAS server you want toadd to the server.

Managing Servers � Adding to the SAS Server 67
Display 5.10 New Server Component Wizard – SAS Server Type Window
The server types available are those that are not already present in the server. Inthis example, the server already contained a workspace server, so that type is notlisted. Select the server type and click Next to continue.
3 The SAS Server Configuration window lets you choose the type of client connectionfor the server.
Display 5.11 New Server Component Wizard – SAS Server Configuration Window
Select Basic to define an IOM Bridge connection using default values for alloptions not listed on this window. Select Custom to define an IOM Bridge

68 Adding to the SAS Server � Chapter 5
connection that does not use default values or to define a COM connection. Forthis example, we will select Basic.
4 The Finish window lists all of the information you specified in the wizard. If anyof the information is incorrect, click Back to return to the appropriate window tomake the correction. If all of the information is correct, click Finish to define thenew server component.
5 In the navigation tree, open the SAS server to view the server component youadded.
Display 5.12 Navigation Tree – SAS Server Component Added
The server contains the new logical server and corresponding physical server.
Adding a Physical ServerAfter logical servers are defined for a server, you can add additional physical servers
to a selected logical server. Adding additional physical servers permits multiple serversof the same type to share resources and metadata definitions. Adding servers also letsyou implement server pooling and load balancing. You must verify that the server typesupports multiple servers in a logical server (for example, metadata and OLAP logicalservers cannot contain more than one physical server).
To add a physical server:1 Under the Server Manager in the navigation tree, open the SAS server and select
the logical server to which you want to add a physical server. Select Add Serverfrom the pop-up menu, the Actions menu, or the toolbar. The New Server Wizardstarts.
2 Use the Name and Description window to provide a name for the new serverdefinition.

Managing Servers � Adding to the SAS Server 69
Display 5.13 New Server Wizard – Name and Description Window
Click Next to continue.
3 Verify the server software in the Server Options window. Click Advanced Optionsto specify options such as file navigation options. Click Next to continue.
4 In the SAS Connection Type window, specify whether the server will use theBridge protocol or the COM protocol to connect with clients.
5 If you selected Bridge as the connection protocol, use the Connection Optionswindow to specify details about the connection. Click Next to view the Finishwindow.
If you specified COM as the connection protocol, use the COM Connection Optionswindow to specify the server host name. Click Next to view the Finish window.
6 Use the Finish window to review the information you specified in the wizard. Ifyou need to make changes, click Back to return to the appropriate window. If theinformation is correct, click Finish to create the server definition.
7 The new server is visible under the appropriate logical server in the navigationtree.
Display 5.14 Navigation Tree – Physical Server Added
Adding a Server ConnectionIf a server supports both COM and IOM Bridge protocols for connections between the
server and clients, you can define a second connection method for a server. Forexample, if you initially defined the server to use an IOM Bridge connection, you canalso define a COM connection.

70 Adding to the SAS Server � Chapter 5
To define a new connection for a server:1 From the navigation tree, select the server for which you want to define a
connection and select Add Connection from the pop-up menu, the Actions menu,or the toolbar. The New Connection Wizard starts.
2 The SAS Connection Type window lets you specify the connection to add to theserver.
Display 5.15 New Connection Wizard – SAS Connection Type Window
If a connection type has already been defined for the server, that type isunavailable in this window. Select the connection type and click Next to continue.
3 Complete the wizard for the connection type you selected.4 When the definition is complete, select the server in the navigation tree to view
the defined server connections in the display area.
Display 5.16 New Connections List

Managing Servers � Defining a SAS Spawner 71
Defining a SAS SpawnerIf you are defining a SAS server that uses IOM Bridge protocol for connections to
remote clients, you must use a spawner to set up connections between the server andclients. A spawner is a type of SAS server that runs on a remote machine and listensfor requests from clients who want to use a server.
Figure 5.2 Object Spawner Operation
Client
Server 1
Server 2
Server 3
Spawner1
4
3
2
The spawner operates using this procedure:1 The spawner receives a request for a SAS server session on the spawner’s listening
port.2 The spawner passes the request to a server.3 The server starts a SAS session.4 The server responds to the client, and all further communications are between the
client and server.
By using a spawner, you can define multiple servers on a single machine and have allrequests from clients sent to the same port (the spawner listening port).
To set up a spawner environment:1 Plan the object spawner environment by determining this information:
� the machine on which the servers and spawners run

72 Defining a SAS Spawner � Chapter 5
� the port that the spawner will use to listen for requests from clients� the login ID that will be used to start the spawner session� the login ID that will be used to log on to the spawner machine to perform
queries and maintenance� the relevant information (such as name, port number, and type) for the
servers that will be started by the spawner.
2 Use the User Manager plug-in to define the login IDs for starting the spawner andfor logging on to the spawner to perform maintenance. Define the IDs as newusers, and specify the machine on which the spawner runs as the domain value forthe users. See “Defining a User” on page 46 for details about defining a new user.
3 Use the Server Manager plug-in to define the SAS servers that will be started bythe object spawner. This step is optional at this point, because you can also definethe SAS servers during the process of defining the spawner.
4 Select the Server Manager plug-in, and select New Server from the pop-up menu,the Actions menu, or the toolbar.
5 In the Server Type window, locate the SAS Servers folder and the Spawnerssubfolder, then select Object Spawner as the server type.
Display 5.17 New Server Wizard – Object Spawner Selected
Click Next to continue.6 In the Name and Description window, provide a name for the spawner and click
Next .7 In the Server Options window, verify the software details and specify the listed
details.

Managing Servers � Defining a SAS Spawner 73
Display 5.18 New Server Wizard – Server Options Window
In the Associated Machine field, specify the machine on which the spawnerruns. The spawner must run on the same machine as the servers that thespawner will be starting. Click Next to continue.
8 In the Spawner Initialization window, select a login that will be used to start thespawner session.
Display 5.19 New Server Wizard – Spawner Initialization Window
Select a login ID that has been defined for the spawner’s domain from theOperator Login drop-down list. See “Defining a User” on page 46 for information

74 Defining a SAS Spawner � Chapter 5
about defining a login ID. Specify the path and name of the spawner log file andselect the Verbose check box if you want the file to include detailed messages.Click Next to continue.
9 In the Spawned Servers window, choose the SAS servers that the spawner shouldstart.
Display 5.20 New Server Wizard – Spawned Servers Window
The window lists all servers that have been defined to run on the machine specifiedin the Associated Machine field on the Server Options window. Because a servercan only be associated with a single spawner, only servers that have not alreadybeen associated with a spawner are listed. If no servers are listed, click New tostart the New Server Wizard and define a new server. Click Next to continue.
10 The Spawner Connection Type window lets you specify the special-use connectionsfor the spawner.

Managing Servers � Defining a SAS Spawner 75
Display 5.21 New Server Wizard – Spawner Connection Type Window
Because an operator connection to the spawner is required, the OperatorConnection radio button is the only option available when first defining thespawner. An administrator uses an operator connection to log on to the spawner toperform maintenance or queries. After you have defined the spawner, you can usethe Add Connection option to add a UUID connection or a load-balanceconnection. Click Next to continue.
11 In the Connection Options window, specify the details for the operator connectionto the spawner.
Display 5.22 New Server Wizard – Connection Options Window

76 Setting Up Load Balancing � Chapter 5
The value for the Host Name field is set to the host for the spawner, and cannot bechanged. In the Port field, specify the port that the operator or administrator willuse to log on to the spawner machine to perform maintenance. Click Next tocontinue.
12 The Finish window lists all of the information you specified in the wizard. ClickBack to correct any incorrect information; otherwise, click Finish to define thespawner.
Setting Up Load BalancingLoad balancing spreads out client requests across several server processes, with new
servers being automatically started based on demand. You can only use load balancingwith IOM Bridge connections, not COM connections. Load balancing is most useful forapplications that require a server for a short period of time. For detailed informationabout load balancing, see SAS Intelligence Platform: Application Server AdministrationGuide.
To implement load balancing, you must convert a logical server to a load-balancedserver, then set up the individual servers for load balancing. You can convert workspaceor stored process logical servers to load-balanced servers. You must also define an objectspawner to start the load-balancing servers, and define a load-balancing connection forthe spawner.
To implement load balancing:1 Use the User Manager plug-in to define a login that will be used for
spawner-to-spawner connections.2 In the Server Manager plug-in, open a server and select the logical server you
want to convert to a load-balanced server. SelectConvert To � Load Balancingfrom the pop-up menu or the Actions menu. A message appears asking you toconfirm that you want to convert the server. Click OK to continue.
3 Use the Load Balancing Options window to set up the load balancing parameters.
Display 5.23 Load Balancing Options Window
Currently, cost is the only available balancing algorithm. In the Cost Per Clientfield, specify the weight that each client connection carries. The cost is added tothe total cost of the server when the client connects, and subtracted when theclient disconnects. In the Logins field, specify a login to use for spawner-tospawner connections. Click OK to convert the logical server to a load-balancing
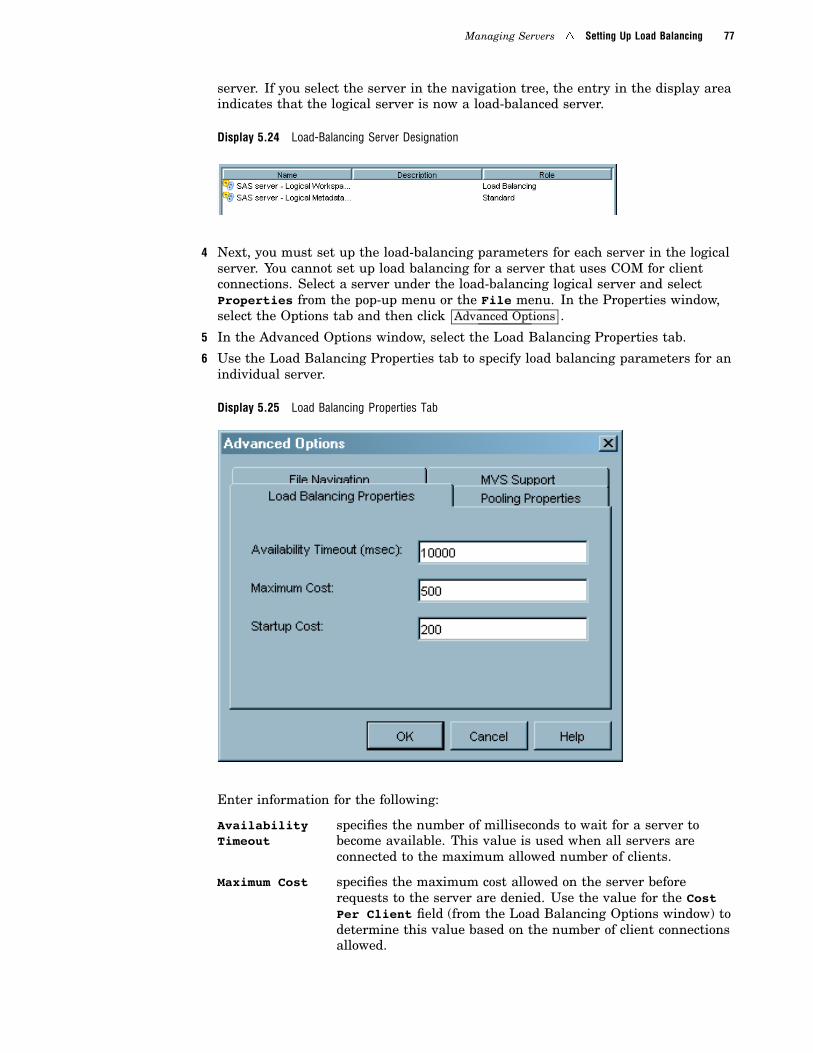
Managing Servers � Setting Up Load Balancing 77
server. If you select the server in the navigation tree, the entry in the display areaindicates that the logical server is now a load-balanced server.
Display 5.24 Load-Balancing Server Designation
4 Next, you must set up the load-balancing parameters for each server in the logicalserver. You cannot set up load balancing for a server that uses COM for clientconnections. Select a server under the load-balancing logical server and selectProperties from the pop-up menu or the File menu. In the Properties window,select the Options tab and then click Advanced Options .
5 In the Advanced Options window, select the Load Balancing Properties tab.
6 Use the Load Balancing Properties tab to specify load balancing parameters for anindividual server.
Display 5.25 Load Balancing Properties Tab
Enter information for the following:
AvailabilityTimeout
specifies the number of milliseconds to wait for a server tobecome available. This value is used when all servers areconnected to the maximum allowed number of clients.
Maximum Cost specifies the maximum cost allowed on the server beforerequests to the server are denied. Use the value for the CostPer Client field (from the Load Balancing Options window) todetermine this value based on the number of client connectionsallowed.

78 Setting Up Pooling � Chapter 5
Startup Cost specifies the startup cost for the server. If the startup cost isless than the cost per client, each client will connect to adifferent server. If the startup cost is greater than or equal tothe maximum cost, client connections first go to the sameserver.
Click OK in the open windows for the server. When you close the Propertieswindow, the load-balancing options are applied to the server.
7 Set load-balancing options for each server under the logical server.8 From the Server Manager plug-in, start the New Server Wizard to create an object
spawner definition. Select the servers that are participating in load balancing asthe servers that the spawner should start. See “Defining a SAS Spawner” on page71 for details about defining a spawner.
9 After the spawner definition is complete, add a load balance connection to thespawner definition. See “Adding a Server Connection” on page 69 for details aboutadding a connection.
Setting Up PoolingPooling lets you set up a pool of connections to a group of servers. When a client
requests a server connection, the connection is allocated from the pool, then releasedback to the pool when no longer needed. Without pooling, client connections remainactive and use resources even if the connection is not active.
The connection pool consists of one or more puddles, each of which connects to aserver using a specified user name and password. You can use puddles to enableconnections over multiple domains or to customize server permissions for specific userclasses.
For detailed information about pooling, see SAS Intelligence Platform: ApplicationServer Administration Guide.
To set up pooling:1 Use the User Manager plug-in to create login IDs to access each puddle in the
pool. Every puddle must have a unique login ID.2 In the Server Manager plug-in, open a server and select the logical server you
want to convert to a pooling server. SelectConvert To � Pooling from the pop-upmenu or the Actions menu. A message appears asking you to confirm that youwant to convert the server. Click OK to continue.
3 The Pooling Options window lets you select the puddles that should be in the pool.

Managing Servers � Setting Up Pooling 79
Display 5.26 Pooling Options Window
If you are setting up pooling for the first time, no puddles are listed in theAvailable items list. Click New to define a new puddle.
4 Use the New Puddle window to define the puddle parameters.
Display 5.27 New Puddle Window
Specify the following information:
Name specifies the name of the puddle.
MinimumAvailableServers
specifies the minimum number of idle server connections thatshould always be available.
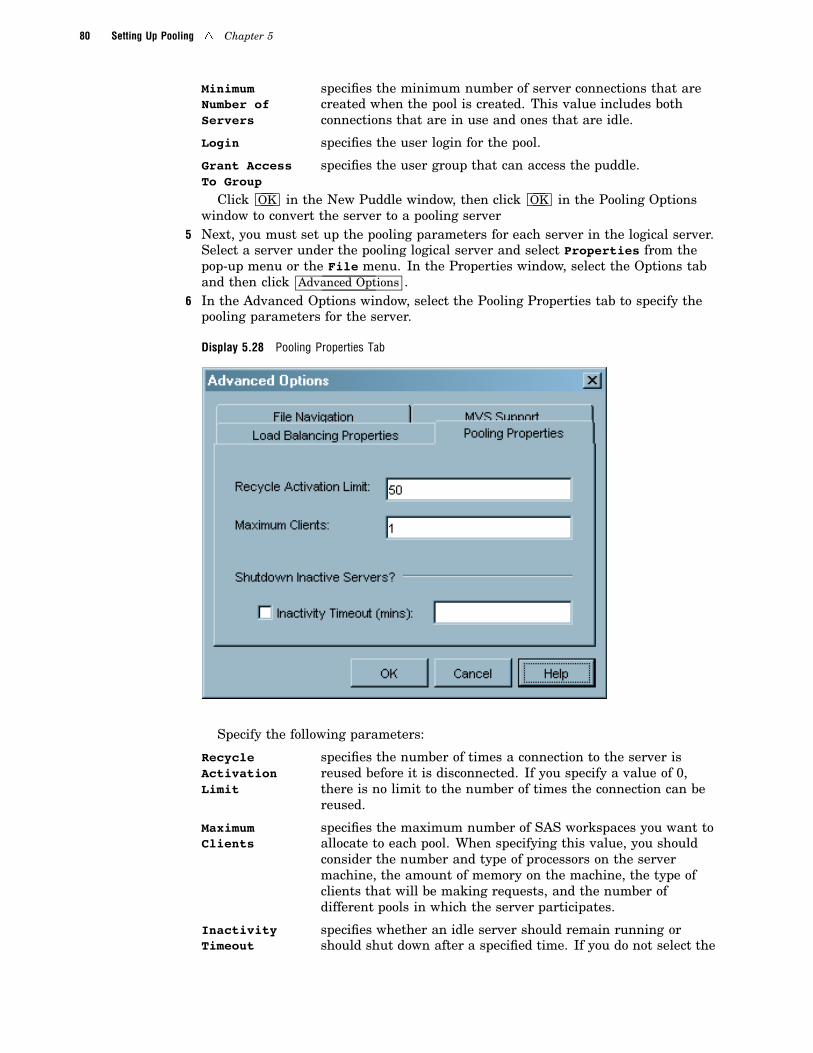
80 Setting Up Pooling � Chapter 5
MinimumNumber ofServers
specifies the minimum number of server connections that arecreated when the pool is created. This value includes bothconnections that are in use and ones that are idle.
Login specifies the user login for the pool.
Grant AccessTo Group
specifies the user group that can access the puddle.
Click OK in the New Puddle window, then click OK in the Pooling Optionswindow to convert the server to a pooling server
5 Next, you must set up the pooling parameters for each server in the logical server.Select a server under the pooling logical server and select Properties from thepop-up menu or the File menu. In the Properties window, select the Options taband then click Advanced Options .
6 In the Advanced Options window, select the Pooling Properties tab to specify thepooling parameters for the server.
Display 5.28 Pooling Properties Tab
Specify the following parameters:
RecycleActivationLimit
specifies the number of times a connection to the server isreused before it is disconnected. If you specify a value of 0,there is no limit to the number of times the connection can bereused.
MaximumClients
specifies the maximum number of SAS workspaces you want toallocate to each pool. When specifying this value, you shouldconsider the number and type of processors on the servermachine, the amount of memory on the machine, the type ofclients that will be making requests, and the number ofdifferent pools in which the server participates.
InactivityTimeout
specifies whether an idle server should remain running orshould shut down after a specified time. If you do not select the

Managing Servers � Managing Database Servers 81
check box, then idle servers remain running. If you select thecheck box, servers run for the number of minutes you specify inthe Inactivity Timeout field.
Click OK in the open windows for the server. When you close the Propertieswindow, the pooling options are applied to the server.
7 Repeat these steps to set up pooling options for each server under the logical server.
Managing Database ServersA database server is a machine that contains data from a program other than SAS.
You can use SAS Management Console to create definitions for database serverscontaining data from many different applications, enabling other applications to accessthe data.
Because each type of application data is accessed differently, the process of defining adatabase server is slightly different for each type of database server. However, the basicinformation that is required is the same for all database server types:
� server name� machine on which the server runs� location of the data� credentials for logging on to the server
To define a database server:1 From the navigation tree, select the Server Manager plug-in and then select New
Server from the pop-up menu, toolbar, or Actions menu. The New Server Wizardstarts.
2 Use the Server Type window to select the server you are defining.
Display 5.29 New Server Wizard – Selecting a Database Server Type
Locate the Database Servers folder and select the server for the type of data youwant to access. For this example, select Informix Server and click Next tocontinue.

82 Managing Database Servers � Chapter 5
3 In the Name and Description window, specify a name and (optionally) adescription for the server. Click Next to continue.
4 In the Server Options window, verify that the server software information iscorrect and select the machine on which the server runs.
Display 5.30 New Server Wizard – Server Options Window
If the machine is not included in the Associated Machine drop-down list, clickNew to specify a new machine name.
If you are defining an OLE/DB or ODBC database server, you must also specifythe type of OLE/DB or ODBC data contained on the server. Refer to the Help forthe Server Options window for details.
Click Next to continue.5 In the Connection Options window, specify the location of the data on the server
and the information needed to access the data.

Managing Servers � Managing Enterprise Application Servers 83
Display 5.31 New Server Wizard – Connection Options for Informix Server
For this example, you must specify the Informix database you want to access andthe Informix server on which the database resides. You must also specify thedomain that will be used to authenticate login attempts to the server.
The connection properties are different for each type of database server. ClickHelp for detailed information about the fields for the specific type of server youare defining. Click Next to continue.
6 The Finish window lists all of the information you specified in the wizard. ClickBack to correct any incorrect information; otherwise click Finish to define thedatabase server.
Managing Enterprise Application ServersAn enterprise application server is a machine that is used to run a data analysis or
access application other than SAS. Enterprise application servers let SAS applicationssuch as SAS Data Integration Studio and SAS Data Surveyors navigate and locateinformation in applications such as SAP, Siebel, Oracle Applications, and PeopleSoft.
As with database servers, the definition process for each enterprise application serveris different. In general, you must name the server and identify a database server forthe enterprise application.
To define an enterprise application server:1 From the navigation tree, select the Server Manager plug-in and then select New
Server from the pop-up menu, toolbar, or Actions menu. The New Server Wizardstarts.
2 Use the Server Type window to select the server you are defining.

84 Managing Enterprise Application Servers � Chapter 5
Display 5.32 New Server Wizard – Selecting an Enterprise Application Server
Locate the Enterprise Applications Servers folder and select the server for the typeof data you want to access. Click Next to continue.
3 In the Name and Description window, specify a name and (optionally) adescription for the server. Click Next to continue.
4 In the Server Options window, verify that the server software information iscorrect and select the database server for the enterprise application.
Display 5.33 New Server Wizard – Server Options Window

Managing Servers � Managing Enterprise Application Servers 85
If the server you want to use is not listed in the Database Servers drop-downlist, click New to start a new instance of the New Server Wizard to define a newdatabase server. See “Managing Database Servers” on page 81 for informationabout defining a database server.
If you are defining an SAP application server, you do not need to specify adatabase server.
Click Next to continue. For Oracle Applications, Siebel, and PeopleSoftapplication servers, clicking Next takes you to the Finish window.
5 If you are defining an SAP application server, you must specify how clients willconnect to the SAP server.
Display 5.34 New Server wizard – SAP Connection Options Window
In addition to specifying the connection information, such as authenticationdomain, RFC server host, and RFC server port, you must also select a connectiontype. Scroll to the bottom of the window and select one of the connection typeslisted, then click Options for the selected type and specify the requiredinformation. Click Help for detailed information about the options in this window.
Click Next to continue.
6 The Finish window lists all of the information you specified in the wizard. ClickBack to correct any incorrect information; otherwise click Finish to define theapplication server.

86

87
C H A P T E R
6Managing Libraries
What Is the Data Library Manager? 87Defining SAS Libraries 88
Managing SAS/SHARE Remote Engine Libraries 91
Managing Database Schemas 93
Managing Database Libraries 94
Managing Generic Libraries 98Managing Pre-Assigned Libraries 100
Editing a Library Definition 102
Reviewing the LIBNAME Statement 103
Editing a Schema Definition 104
What Is the Data Library Manager?
The Data Library Manager is a SAS Management Console plug-in used to createmetadata definitions for data libraries and database schemas. The definitions arestored in the SAS Metadata Repository and are then available for other applications touse. You can use the plug-in to manage SAS data libraries, libraries containing datafrom other applications, and libraries used directly by other applications. You can alsocreate definitions for database schemas, which are existing maps of the data structureof a database.
The plug-in provides support for a wide variety of library types through the use ofresource templates. A resource template is an XML file that specifies the informationrequired to define a certain type of resource (such as a library). See “ManagingResource Templates” on page 38 for more information about resource templates. Manyof the library types available correspond to the engine types specified on the SASLIBNAME statement, with the options available for the library definition correspondingto the LIBNAME options for the engine. In addition, library types are available for ageneric library (a definition without an engine name already supplied) and apre-assigned library (a definition for a library assigned by SAS during initialization,such as SASUSER or WORK).
The information specified for each library definition corresponds to options on theLIBNAME statement. Refer to the Help for each window in the Data Library Managerfor information about the correlation between fields in the plug-in and LIBNAMEoptions.
Before you can begin creating definitions in the Data Library Manager plug-in, youmust perform these tasks:
� For SAS libraries, determine the libref and path for the SAS library and,optionally, decide to which SAS servers the library will be assigned.

88 Defining SAS Libraries � Chapter 6
� For database libraries, define a database server and database schema of the sametype as the database library. You can also define these from within the NewLibrary wizard.
� For database schemas, define a database server and determine the name of theexisting data schema. You can also define the server from within the New LibraryWizard.
Defining SAS LibrariesThe Data Library Manager provides resource templates for several types of SAS
libraries. The procedure for defining and editing each of these libraries (except forSAS/SHARE libraries) is identical. However, the Advanced Options window containsfields that are specific to each library type. See “Managing SAS/SHARE Remote EngineLibraries” on page 91 for specific information about SAS/SHARE libraries.
To define a SAS library:1 From the navigation tree, open the Library Manager plug-in and then select the
SAS Libraries folder. Select New Library from the pop-up menu, the toolbar, orthe Actions menu. The New Library Wizard starts.
2 Use the Library Type window to select the type of library you are defining.
Display 6.1 New Library Wizard – Library Type Window
Open the SAS Libraries folder and select a SAS library type. This example usesthe SAS Base Engine Library. Click Next to continue.
3 In the Name window, specify a name for the library definition and a description(optional). The name you specify in this window is the name that will be used toidentify the definition in SAS Management Console; it is not the LIBREF libraryname as specified on a LIBNAME statement.

Managing Libraries � Defining SAS Libraries 89
Display 6.2 New Library Wizard – Name Window
Click Next to continue.
4 Use the Library Options window to specify the SAS libref, engine, and path for thelibrary.
Display 6.3 New Library Wizard – Library Options Window
The Path Specification field specifies the path for the library on the server.Any paths that have already been specified for libraries are listed in theAvailable items list. Use the arrow controls to move a path from the Availableitems list to the Selected items list. You can also click New to display the New

90 Defining SAS Libraries � Chapter 6
Path Specification window in order to specify a path. Note that the Browse buttonon the New Path Specification window can only be used to select a directory on thelocal machine, not on the server.
5 Click Advanced Options to display the Advanced Options window.
Display 6.4 New Library Wizard – Advanced Options Window
This window lets you pre-assign a library, specify library options for any host, andspecify host-specific options. See “Managing Pre-Assigned Libraries” on page 100for information about pre-assigned libraries. All options on this windowcorrespond to SAS LIBNAME options. The tabs and fields in this window aredifferent for each type of SAS library. For information about a specific option, clickHelp from any tab. Click OK to close the Advanced Options window and returnto the Library Options window. Click Next to continue.
6 Use the SAS Server window to optionally specify the SAS servers that will haveaccess to the library.
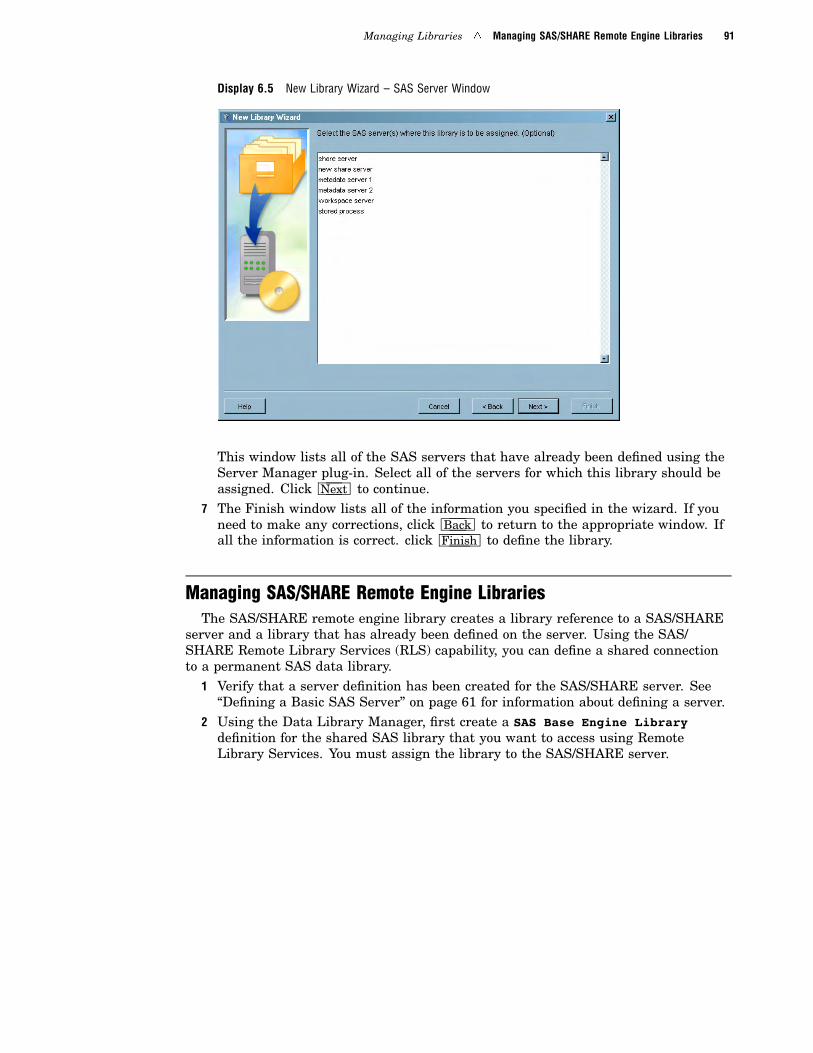
Managing Libraries � Managing SAS/SHARE Remote Engine Libraries 91
Display 6.5 New Library Wizard – SAS Server Window
This window lists all of the SAS servers that have already been defined using theServer Manager plug-in. Select all of the servers for which this library should beassigned. Click Next to continue.
7 The Finish window lists all of the information you specified in the wizard. If youneed to make any corrections, click Back to return to the appropriate window. Ifall the information is correct. click Finish to define the library.
Managing SAS/SHARE Remote Engine LibrariesThe SAS/SHARE remote engine library creates a library reference to a SAS/SHARE
server and a library that has already been defined on the server. Using the SAS/SHARE Remote Library Services (RLS) capability, you can define a shared connectionto a permanent SAS data library.
1 Verify that a server definition has been created for the SAS/SHARE server. See“Defining a Basic SAS Server” on page 61 for information about defining a server.
2 Using the Data Library Manager, first create a SAS Base Engine Librarydefinition for the shared SAS library that you want to access using RemoteLibrary Services. You must assign the library to the SAS/SHARE server.

92 Managing SAS/SHARE Remote Engine Libraries � Chapter 6
Display 6.6 Assign a Library to a SAS/SHARE Server
3 After creating the shared SAS library, use the Data Library Manager to create adefinition for a SAS/SHARE Remote Engine Library. After you select the librarytype, use the wizard to specify the definition name, libref, and advanced options (ifnecessary).
4 Use the SAS/SHARE Server window to specify the SAS/SHARE server and sharedlibrary to which the remote engine library should point.
Display 6.7 New Server Wizard – SAS/SHARE Server Window

Managing Libraries � Managing Database Schemas 93
Select the server you defined in step 1 from the SHARE Server drop-down list. Ifyou did not previously define a server, you can click New to start the New ServerWizard, which you can use to define a SAS/SHARE server.
After you select the server, select the shared library you defined in step 2 fromthe Remote Library drop-down list. The library you select is the library that theremote engine library will access. If you have not defined a library, you can clickNew to start another instance of the New Library Wizard, which you can use todefine the shared SAS library.
Specify the default ID that will be used to make connections to the SAS/SHAREserver. Click Next to continue with the rest of the New Library Wizard and definethe library.
Managing Database SchemasA database schema definition is a pointer to an already-existing schema, which is a
map or model of the structure of a database. You must create a definition for a type ofdatabase schema before you can define a database library of that same type. Forexample, you must create a definition for an ODBC schema before you can define anODBC database library.
To define a database schema:
1 Use the Server Manager plug-in to create a database server definition thatmatches the type of schema you want to define. For example, you must define aTeradata database server before you can define a Teradata schema. See “ManagingDatabase Servers” on page 81 for information about defining a database server.
2 From the navigation tree, select the Data Library Manager plug-in and then selectthe Database Schemas folder. Select New Database Schema from the pop-upmenu, the Actions menu, or the toolbar. The New Database Schema Wizardstarts.
3 Use the Type window to select the type of schema you want to define.
Display 6.8 New Database Schema Wizard – Type Window

94 Managing Database Libraries � Chapter 6
Open the Database Schemas folder and select a schema type from those listed. Ifthe schema type you want to define is not listed, make sure the schema’s resourcetemplate has been loaded. See “Managing Resource Templates” on page 38 formore information. Click Next to continue.
4 In the Name window, specify a name and description for the schema. The nameyou specify in this window is the name that will be used to identify the definitionin SAS Management Console; it is not the schema name as specified on aLIBNAME statement. Click Next to continue.
5 In the Database Schema Options window, specify the schema name and the serverfor which the schema is valid.
Display 6.9 New Database Schema Wizard – Database Schema Options Window
The name specified on this window is the name as specified on the LIBNAMEstatement.
Select a database server from the Server drop-down list. Only server types thatmatch the schema type you are defining are listed. For example, if you aredefining an OLE DB schema, only OLE DB database servers are listed. If theserver you need is not listed, click New to start the New Server Wizard anddefine a database server. See “Managing Database Servers” on page 81 for moreinformation about defining a server. Click Next to continue.
6 The Finish window contains a summary of the information you specified in thewizard. If you need to make any changes, click Back to return to the appropriatewindow. If everything is correct, click Finish to define the schema.
Managing Database LibrariesThe Data Library Manager plug-in allows you to define SAS libraries that point to
data from other databases or data analysis applications. The library definitions thatyou create perform the same function as a SAS/ACCESS LIBNAME statement in SAS.The information you enter in the New Library Wizard for a database library correlates

Managing Libraries � Managing Database Libraries 95
to SAS/ACCESS LIBNAME options. Click Help from any window in the New LibraryWizard or the library properties window for more information.
To create a database library:1 Use the Server Manager plug-in to create a server definition for the database
server. The database server is the server that contains the data you want toaccess. For information about creating a server definition, see “ManagingDatabase Servers” on page 81.
2 Use the Data Library Manager to create a schema definition that specifies themodel of the database for which you are creating a library definition. For example,if you are creating a Teradata library definition, you must create a definition forthe schema of the Teradata database.
3 From the navigation tree, select the Data Library Manager plug-in and then selectthe SAS Libraries folder. Select New Library from the pop-up menu, the Actionsmenu, or the toolbar. The New Library Wizard starts.
4 Use the Library Type window to select the type of database library you want todefine.
Display 6.10 New Library Wizard – Library Type Window
Open the Database Libraries folder or the Enterprise Applications Libraries folderand select a library type from those listed. If the library type you want to define isnot listed, make sure the library’s resource template has been loaded. See“Managing Resource Templates” on page 38 for more information. Click Next tocontinue.
5 In the Name window, specify a name and description for the library definition.The name you specify in this window is the name that will be used to identify thedefinition in SAS Management Console; it is not the libref as specified on aLIBNAME statement. Click Next to continue.
6 In the Library Options window, specify the libref for the database library.

96 Managing Database Libraries � Chapter 6
Display 6.11 New Library Wizard – Library Options Window
The Engine field already contains the correct library engine type, based on thelibrary type you selected.
Click Advanced Options to specify the remainder of the options for the databaselibrary.
Display 6.12 New Library Wizard – Database Library Advanced Options Window

Managing Libraries � Managing Database Libraries 97
The tabs in this window and the fields displayed on each tab differ according tothe type of library you are defining. The options in the Advanced Options windowall correspond to options on the SAS/ACCESS LIBNAME statement for the type oflibrary you are defining. Click Help on any tab for detailed information about theoptions on the tab. Click OK to close the Advanced Options window and return tothe New Library Wizard. Click Next to continue.
7 The Database Server window lets you specify the server that contains the library’sdata.
Display 6.13 New Library Wizard – Database Server Window
Select a defined server that matches the library type from the Database Serverdrop-down list. For example, if you are defining an OLE DB library, the DatabaseServer field lists the OLE DB servers that you have defined. If the server youneed is not listed, click New to start the New Server Wizard and create the serverdefinition.
Select a defined schema that matches the library type from the DatabaseSchema drop-down list. If you have not defined a schema, click New to start theNew Database Schema wizard for the appropriate schema type. See “ManagingDatabase Schemas” on page 93 for more information.
Click Next to continue.8 The SAS Server window lets you specify which SAS servers will have access to the
database library.

98 Managing Generic Libraries � Chapter 6
Display 6.14 New Server Wizard – SAS Server Window
Select one or more of the defined servers from the list. This step is optional. ClickNext to continue.
9 The Finish window contains a summary of the information you specified in thewizard. If you need to make any changes to the definition, click Back to return tothe appropriate window in the wizard. If everything is correct, click Finish todefine the library.
Managing Generic LibrariesThe generic library type lets you manually define a library. When you select any
other library type, the Data Library Manager automatically sets the library engine andthe library options to those valid for the chosen type. When you select the GenericLibrary type, the plug-in does not set the engine and does not display a list of validoptions. Using the generic library lets you create a library definition using an enginefor which there is not a library type and lets you specify LIBNAME options that are notincluded in the existing library types. The generic library is also useful if you are anexperienced user who wants to quickly define libraries based on your knowledge of theLIBNAME statement.
To define a generic library:1 From the Data Library Manager plug-in, select the SAS Libraries folder and select
New Library from the pop-up menu, the Actions menu, or the toolbar. The NewLibrary Wizard starts.
2 In the Library Type window, select Generic Library as the library type.

Managing Libraries � Managing Generic Libraries 99
Display 6.15 New Library Wizard – Generic Library Selected
Click Next to continue.3 In the Name window, specify a name and description for the library definition.
The name you specify in this window is the name that will be used to identify thedefinition in SAS Management Console; it is not the libref as specified on aLIBNAME statement. Click Next to continue.
4 The Library Options window provides the basic fields you need to define a library.
Display 6.16 New Library Wizard – Library Options Window for Generic Library
You must specify the libref and a valid LIBNAME engine for the library. You canspecify any valid LIBNAME options in the Options field. Because the wizard does

100 Managing Pre-Assigned Libraries � Chapter 6
not perform any error checking on the field, you must ensure that the options arespecified correctly and that they are valid for the engine you specified.
Click Advanced Options to display the Advanced Options window, which you canuse to pre-assign the library. Click Next to continue.
5 The SAS Server window lets you specify which SAS servers will have access to thelibrary.
Display 6.17 New Library Wizard – SAS Server Window
Select one or more of the defined servers from the list. This step is optional. ClickNext to continue.
6 The Finish window contains a summary of the information you specified in thewizard. If you need to make any changes to the definition, click Back to return tothe appropriate window in the wizard. If everything is correct, click Finish todefine the library.
Managing Pre-Assigned Libraries
The Data Library Manager plug-in allows you to define two types of pre-assignedlibraries:
� a library definition that is automatically assigned whenever the server to which itis assigned is started
� a library definition that refers to a library that is pre-assigned by SAS (such asSASUSER, SASHELP, or WORK)
To specify a library as pre-assigned for a server, select the Library isPre-Assigned check box in the library’s Advanced Options window. This window isaccessible from the Library Options window of the New Library Wizard or from theOptions tab of the Properties window (for an already-defined library). After you specifythat the library is preassigned, ensure that the library is assigned to the correct SAS
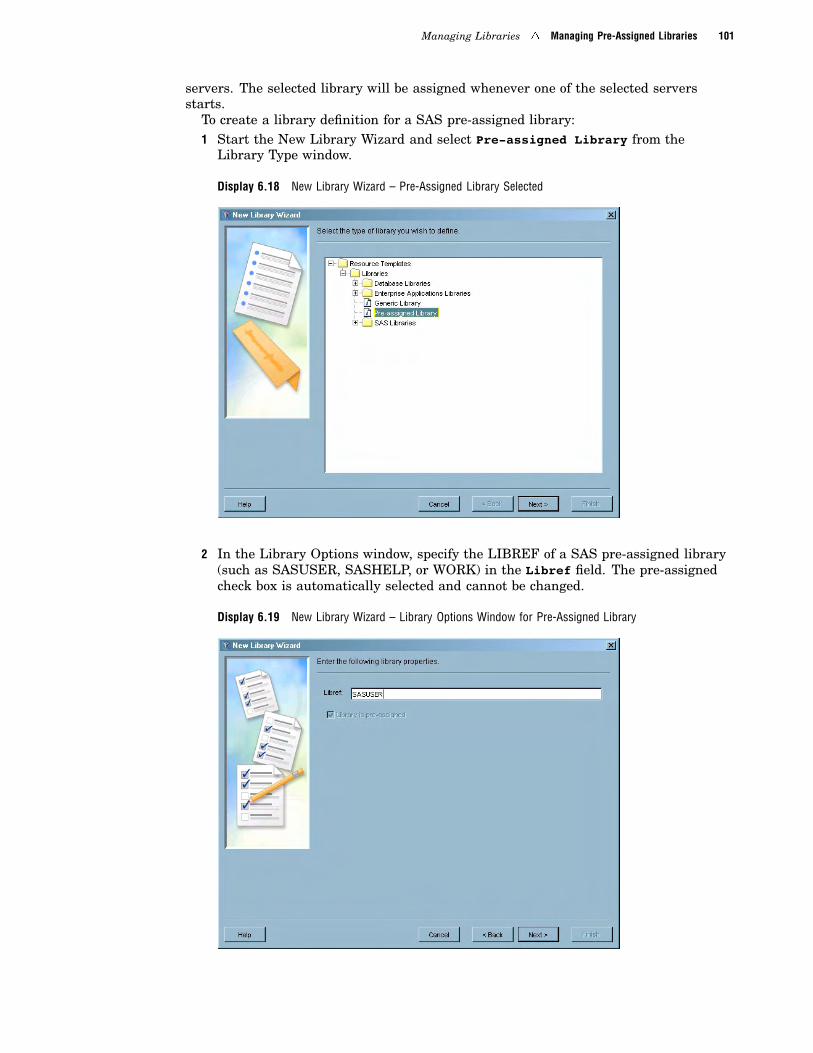
Managing Libraries � Managing Pre-Assigned Libraries 101
servers. The selected library will be assigned whenever one of the selected serversstarts.
To create a library definition for a SAS pre-assigned library:1 Start the New Library Wizard and select Pre-assigned Library from the
Library Type window.
Display 6.18 New Library Wizard – Pre-Assigned Library Selected
2 In the Library Options window, specify the LIBREF of a SAS pre-assigned library(such as SASUSER, SASHELP, or WORK) in the Libref field. The pre-assignedcheck box is automatically selected and cannot be changed.
Display 6.19 New Library Wizard – Library Options Window for Pre-Assigned Library

102 Editing a Library Definition � Chapter 6
3 Finish the library definition by optionally assigning the library to one or more SASservers and verifying all of the definition information.
Editing a Library DefinitionAfter you have defined a SAS library, you can modify any of the properties specified
when the library was defined. To view a library’s properties, open the SAS Librariesfolder under the Data Library Manager plug-in, select a library, and select Propertiesfrom the pop-up menu or the File menu.
The Properties window contains all of the fields displayed in the New Library Wizard.
Display 6.20 Library Properties Window
You can also assign roles for the definition, associate notes and documents, applyextended attributes, and specify authorization permissions for the definition.
If you only want to change the SAS servers to which the library is assigned, you canselect the library under the SAS Libraries folder and select Edit Assignments fromthe pop-up menu or the Actions menu.
The Edit Assignments window lists all of the defined SAS servers and highlights theservers to which the library is assigned.
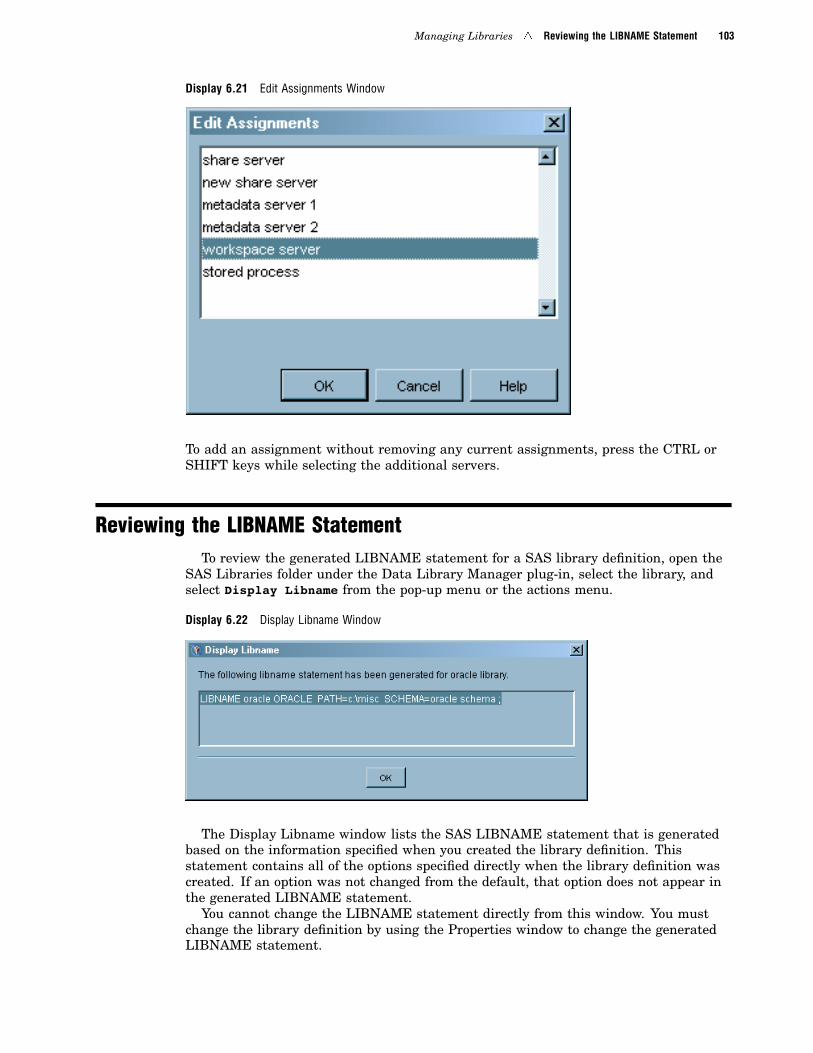
Managing Libraries � Reviewing the LIBNAME Statement 103
Display 6.21 Edit Assignments Window
To add an assignment without removing any current assignments, press the CTRL orSHIFT keys while selecting the additional servers.
Reviewing the LIBNAME StatementTo review the generated LIBNAME statement for a SAS library definition, open the
SAS Libraries folder under the Data Library Manager plug-in, select the library, andselect Display Libname from the pop-up menu or the actions menu.
Display 6.22 Display Libname Window
The Display Libname window lists the SAS LIBNAME statement that is generatedbased on the information specified when you created the library definition. Thisstatement contains all of the options specified directly when the library definition wascreated. If an option was not changed from the default, that option does not appear inthe generated LIBNAME statement.
You cannot change the LIBNAME statement directly from this window. You mustchange the library definition by using the Properties window to change the generatedLIBNAME statement.

104 Editing a Schema Definition � Chapter 6
Editing a Schema DefinitionAfter you have created a schema definition, you can modify any of the properties
specified when the schema was defined. To view a schema’s properties, open theDatabase Schemas folder under the Data Library Manager plug-in, select a schema,and select Properties from the pop-up menu or the File menu.
The Properties window contains all of the fields displayed in the New DatabaseSchema Wizard.
Display 6.23 Schema Properties Window
You can also assign roles for the definition, associate notes and documents, applyextended attributes, and specify authorization permissions for the schema definition.

105
C H A P T E R
7Managing Authorizations
What Is the Authorization Manager? 105Authorization Manager Functions 106
Planning an Authorization Strategy 106
Understanding Default Permissions 106
Locating Resources 107
Locating Resources Using Plug-ins 108Locating Resources by Application 108
Locating Resources by Location 109
Locating Resources by Type 111
Controlling Access to Resources 113
Understanding the Authorization Tab 114
Specifying Access Controls 115Working with Access Control Templates 118
Creating an Access Control Template 118
Applying an ACT to a Metadata Object 122
Controlling Access to a Repository 125
Modifying the Repository ACT 125Designating a Different Repository ACT 126
Managing Permissions 126
Creating a User-Defined Permission 126
Modifying a Permission 127
What Is the Authorization Manager?The Authorization Manager is a SAS Management Console plug-in that lets you
create metadata definitions that control access to metadata repositories, metadatadefinitions within repositories, and SAS resources represented by metadata definitions.Together with the User Manager plug-in, the Authorization Manager provides aninterface to the authorization facility in the SAS Metadata Server. This facility makesdecisions about whether a user or group can perform a specified action on a SASresource.
When a user tries to perform an action (such as reading or altering) on a SASresource or its associated metadata definition, the SAS Metadata Server’s authorizationfacility has to determine whether the user has been granted or denied permission toperform the action. The authorization facility makes this determination by using theuser and group definitions created by the User Manager together with the accesscontrols created by the Authorization Manager. The process includes checking theaccess controls for the resource definition as they apply to the user and any groups towhich the user belongs, checking the default access permissions for the repository, andchecking the access controls for all of the resource’s parent definitions. See SAS

106 Authorization Manager Functions � Chapter 7
Intelligence Platform: Security Administration Guide for detailed information about theauthorization facility.
Authorization Manager FunctionsThe Authorization Manager lets you� manage the repository access control template, which establishes the default
access controls for a metadata repository� specify access controls for a metadata object, which define the permissions that
users or groups are granted or denied for the object� create access control templates, which are named identity/permission patterns
that can be applied to multiple metadata objects� manage permissions, which represent actions that users can perform on metadata
objects or the computing resources represented by the objects.
Planning an Authorization StrategyThe access controls provided by the Authorization Manager are only a part of the
overall security strategy necessary in a business intelligence environment. You use theAuthorization Manager to implement parts of your security strategy, rather than todesign a strategy. See SAS Intelligence Platform: Security Administration Guide fordetailed information about designing and implementing a security strategy.
In general, you need to perform these tasks to implement authorization using SASManagement Console:
1 Understand the default access permissions that are provided.2 Create definitions for users and user groups through the User Manager plug-in.
Before you can define specific access controls for a user, you must establish ametadata identity for the user. See Chapter 4, “Managing Users,” on page 45 formore information.
3 Configure the repository access control template (ACT), to define default accesssettings for all definitions in the repository.
4 Locate metadata objects to which you want to apply specialized access controls.5 Apply access controls to individual objects.
Understanding Default PermissionsSAS Management Console manages definitions for permissions, each of which
specifies a type of action that can be performed on a metadata definition or the SASresource represented by the definitions. When you define an access control for ametadata definition or create an access control template, you specify whether a user orgroup is allowed or denied each of these permissions for a metadata definition.
A set of default permission definitions is automatically created when you create afoundation repository. You should understand the function of each of these permissionsbefore you begin the process of implementing access controls. These definitions cannotbe modified.
The default permissions are as follows:

Managing Authorizations � Locating Resources 107
Table 7.1 Metadata Permissions
Permission Description Enforced by
ReadMetadata Reading a metadata definition metadata server
WriteMetadata Creating, updating, or deleting a metadata definition metadata server
CheckinMetadata Checking metadata in and out between a custom orfoundation repository and a project repository
metadata server
Create Adding data to a SAS resource described by a metadatadefinition
application
Delete Deleting data from a SAS resource described by ametadata definition
application
Read Reading data from a SAS resource described by ametadata definition
application
Write Updating data in a SAS resource described by ametadata definition
application
Administer Accessing administrative functions of SAS servers application
Note: Not all applications enforce all permissions. �
You can also create and modify your own permission definitions if you are using anapplication that implements authorization based on the permission. See “ManagingPermissions” on page 126 for information about creating and modifying permissiondefinitions.
Locating Resources
On a SAS Metadata Server, computing resources are represented by metadataobjects. Some of these objects correspond to the metadata definitions created in SASManagement Console (such as libraries and servers), some objects are created by otherapplications that use the metadata server (such as SAS Data Integration Studio), andsome objects are created as a component of a larger metadata definition (such as themachine associated with a server). If you want to apply access controls to a metadataobject, you must be able to locate the object in SAS Management Console. See“Specifying Access Controls” on page 115 for information about applying access controlsto an object.
Several methods of locating objects are available, depending on the object type
SASManagementConsole plug-in
enables you to locate objects created by the plug-in.
By Application enables you to locate objects created by an application that storesmetadata in the metadata repository (for example, SAS DataIntegration Studio).
By Location enables you to locate objects that are associated with a server orlibrary definition.
By Type enables you to locate all objects stored in the metadata repository.

108 Locating Resources Using Plug-ins � Chapter 7
Locating Resources Using Plug-insMetadata objects or definitions that are created by SAS Management Console
plug-ins are displayed within the plug-in’s navigation tree. Examples of objects that arecreated by plug-ins are
� SAS libraries and database schemas (Data Library Manager)� servers and server connections (Server Manager)� users and user groups (User Manager)
To display a list of metadata objects defined by a plug-in, open the plug-in in the SASManagement Console navigation tree, then select or open any appropriate sub-foldersunder the plug-in. If you select the folder, the objects are displayed in the display area;if you open the folder, the objects are displayed in the navigation tree.
To manage the authorization for an object, select the object in the navigation tree ordisplay area and select Properties from the pop-up menu or the File menu. In theProperties window, select the Authorization tab. See “Specifying Access Controls” onpage 115 for information about setting authorizations from the Authorization tab.
Note: Not all objects defined by plug-ins have a corresponding Properties window. �
Locating Resources by ApplicationSome metadata objects are defined and stored in the metadata server by applications
other than SAS Management Console. You can use the Authorization Manager to locateand set the access controls for these objects. Examples of applications that storemetadata objects on the metadata server are SAS Data Integration Studio, SAS XMLLIBNAME Engine, and SAS Integration Technologies.
To locate resources associated with an application:1 Verify that you are connected to the same metadata server that the application
used when creating the metadata objects.2 From the navigation tree, select the Authorization Manager plug-in and then the
Resource Management folder.3 Under the Resource Management folder, open the By Application folder.
The By Application folder contains entries for all installed applications orapplication groups that write metadata to the SAS Metadata Server.
Display 7.1 Resource Listing by Application
4 Click the plus sign (+) next to an application to view the subfolders and objectsassociated with the application.

Managing Authorizations � Locating Resources by Location 109
Display 7.2 Resource Listing for ID Portal Local Services
The organization in the By Application folder reflects the object hierarchy andinheritance. Objects that are associated with an application or another object willalso inherit the access controls of the parent. For example, in the precedingdisplay, the access controls for the object “BIP Stored Process Service” by defaultare the same as the controls on the object “ID Portal Local Services”. You canchange the access controls on an object to override the defaults.
5 Select the object for which you want to set access controls and select Propertiesfrom the pop-up menu or the File menu. In the Properties window, select theAuthorization tab. See “Specifying Access Controls” on page 115 for informationabout setting access controls using the Authorization tab.
CAUTION:Use extreme caution when making any changes to these resources. Changing thepermissions on a resource could make the resource unavailable to applications andusers. �
6 After you have set the access controls, click OK to close the Properties window.
Locating Resources by LocationSome metadata objects that are created in SAS Management Console or in other
applications are associated with metadata locations. These locations are metadataobjects to which other objects can be associated. For example, a SAS library definitioncan be associated with a SAS server definition, and a database schema can beassociated with a database server. Although these objects are accessible through SASManagement Console plug-ins, the By Location function assists you in locating andmanaging resources that have a common association.
To locate resources by location:1 From the navigation tree, select the Authorization Manager plug-in and then the
Resource Management folder.2 Under the Resource Management folder, open the By Location folder.3 The By Location folder contains entries for all defined metadata objects to which
other objects can be associated.
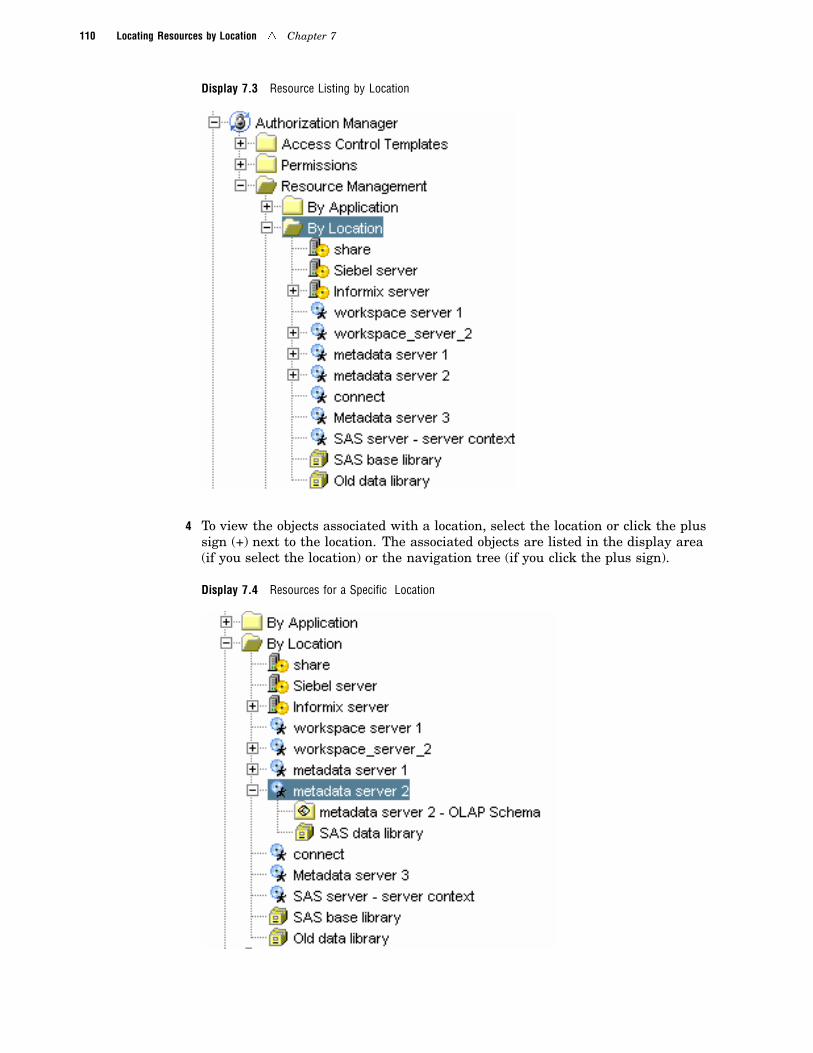
110 Locating Resources by Location � Chapter 7
Display 7.3 Resource Listing by Location
4 To view the objects associated with a location, select the location or click the plussign (+) next to the location. The associated objects are listed in the display area(if you select the location) or the navigation tree (if you click the plus sign).
Display 7.4 Resources for a Specific Location

Managing Authorizations � Locating Resources by Type 111
5 The organization in the By Location folder generally reflects the object hierarchyand inheritance. Objects that are associated with a location will also inherit theaccess controls of the location. For example, in the preceding display, the accesscontrols for the object “SAS data library” by default are the same as the controlson the object “metadata server 2”. You can change the access controls on an objectto override the defaults.
6 Select an object for which you want to set access controls and select Propertiesfrom the pop-up menu or the File menu. In the Properties window, selectAuthorization. See “Specifying Access Controls” on page 115 for information aboutsetting access controls using the Authorization tab.
CAUTION:Use extreme caution when making any changes to these resources. Changing thepermissions on a resource could make the resource unavailable to applications andusers. �
7 After you have set the access controls, click OK to close the Properties window.
Locating Resources by TypeTo gain access to every metadata object stored on the metadata server, whether
created by SAS Management Console or other applications, you must use theAuthorization Manager’s By Type function. This function lets you locate and viewproperties for every metadata object in the repository, whether it is an object that isaccessible through other methods (such as a server definition) or one that is onlyaccessible through the By Type function (such as a user login).
To locate resources by type:1 From the navigation tree, select the Authorization Manager plug-in and then the
Resource Management folder.2 Under the Resource Management folder, open the By Type folder.3 The By Type folder contains a folder for each type of metadata object that can be
stored on the metadata server.

112 Locating Resources by Type � Chapter 7
Display 7.5 Resources Listed by Type
4 To view the objects of a selected type, click the plus sign (+) or select the typefolder. The objects are listed in the navigation tree (if you clicked the plus sign) orthe display area (if you selected the folder). Depending on the contents of themetadata server, some of the folders might not contain objects.

Managing Authorizations � Controlling Access to Resources 113
Display 7.6 Resources Listed for a Specific Type
5 Select an object for which you want to set access controls and select Propertiesfrom the pop-up menu or the File menu. In the Properties window, select theAuthorization tab. See “Specifying Access Controls” on page 115 for informationabout setting access controls from the Authorization tab.
CAUTION:Use extreme caution when making any changes to these resources. Changing thepermissions on a resource could make the resource unavailable to applications andusers. �
6 After you have set the access controls, click OK to close the Properties window.
Controlling Access to ResourcesAfter you have located the metadata objects that represent the resources for which
you want to control access, you can use the controls provided by the AuthorizationManager to implement the access controls. Access controls for a metadata object arespecified using any of these methods:
� specifying the access controls directly on the Authorization tab of the object’sProperties window
� applying an access control template (ACT), which is a named set of access controlsthat can be applied to multiple objects
� using access controls that are inherited from parent objects or that are set throughthe repository ACT, which specifies the default access controls for all objects in arepository.

114 Understanding the Authorization Tab � Chapter 7
Understanding the Authorization TabThe Authorization tab in the Properties window for a metadata object specifies the
access controls that are in place for the object. The controls can be set directly from thetab, inherited, or set through an ACT. A typical Authorization tab for an object follows:
Display 7.7 Authorization Tab
The Names list contains the users and groups for who access controls have beenspecified for the object. In the preceding display, the groups SASUSERS, PUBLIC, andAdmin Group have access controls listed on the tab that specify how each group can usethe object.
The Permissions list contains the permissions that are specified for the user orgroup that is currently selected in the Names list. The Permissions list displays eachtype of permission and specifies whether the permission is granted or denied for theselected user or group. In the preceding display, the SASUSERS group is grantedReadMetadata and Read permissions, and denied all other permissions.
The color of the background on each permission indicates whether the permissionhas been directly specified for the object, inherited from a parent object, or inheritedfrom the repository ACT. The background colors and their meanings are as follows:
Graybackgroundcolor
specifies that the permission was either set in the repository ACT orin a parent object.
Greenbackgroundcolor
specifies that the permission was set by an ACT that has beenassociated with the metadata object.

Managing Authorizations � Specifying Access Controls 115
No backgroundcolor
specifies that the permission was set by an access control specifiedfor the object and the selected user or group.
Specifying Access ControlsTo apply access controls to an object for a user or group:1 Select a metadata definition in the navigation tree or the display area and select
Properties from the pop-up menu or File menu. In the Properties window,select the Authorization tab.
Display 7.8 Blank Authorization Tab
In this example, no permissions are defined for the object. However, in mostcases, the Authorization tab displays the controls defined in the repository ACT.
2 To create an access control for a user or group, click Add to display the Add Usersand/or Groups window.

116 Specifying Access Controls � Chapter 7
Display 7.9 Add Users and/or Groups Window
3 Select the user or group for whom you want to specify an access control from theAvailable Identities list, then use the arrow controls to move that user orgroup to the Selected Identities list. Click OK to return to the Authorizationtab.
Display 7.10 Add Users and/or Groups Window – User Selected
4 The Authorization tab now displays the default permission settings for theselected user or group. The settings from the repository ACT (if one has beendesignated) are displayed.

Managing Authorizations � Specifying Access Controls 117
Display 7.11 Authorization Tab – Default Permission Settings for a User
5 To change the value for a permission, click the value (Grant or Deny) that youwant to set. Values you set while creating the access control take precedence overother permissions that apply to the user or group, whether inherited or setthrough an ACT.

118 Working with Access Control Templates � Chapter 7
Display 7.12 Authorization Tab – User Permissions Set
6 When you have finished specifying access controls for the metadata object, clickOK to close the Properties window and apply the authorization settings.
Working with Access Control TemplatesIf you have access controls that you want to apply to users or groups for many
different metadata objects, you can create an access control template (ACT). An ACT isa named set of authorization settings for a specified set of users that you can re–use formultiple resources. ACTs let you save often-used authorization settings for users anduser groups, then apply the settings to a metadata resource by specifying the ACT.
Creating an Access Control TemplateTo create an access control template:1 From the navigation tree, select the Authorization Manager plug-in and select the
Access Control Templates folder. Select New Access Control Template from thepop-up menu, the toolbar, or the Actions menu. The New Access ControlTemplate Properties window appears.

Managing Authorizations � Creating an Access Control Template 119
Display 7.13 New Access Control Template Properties Window
2 Specify the name of the ACT in the Name field and (optionally) a description. TheResponsibilities list allows you to specify descriptive information about usersthat have specific roles for the template (such as administrator). Select the Usersand Permissions tab.

120 Creating an Access Control Template � Chapter 7
Display 7.14 New Access Control Template Properties Window – Users and Permissions Tab
3 The Users and Permissions tab displays the users and groups to which this ACTapplies and the permissions that are in effect for each user or group. The list ofusers and list of permissions are both initially empty when you are creating a newACT. To add a user or group to the list, click Add to display the Add Users and/orGroups window.

Managing Authorizations � Creating an Access Control Template 121
Display 7.15 Add Users and/or Groups Window
4 Select all of the users and groups to which the ACT should apply in the AvailableIdentities list and use the arrow controls to move them to the SelectedIdentities list. The users and groups you select will all have a set of permissionsspecified in the ACT, but they are not required to have the same set of permissions.
Select the View All and Search Parent Repositories check box (selected bydefault) to find users and groups in all parent repositories for the currentrepositories. All users and groups should be defined in the foundation repository.You can use the Show Groups and Show Users check boxes to limit the displayedentries, or you can select the Search radio button to find a particular user orgroup. When you have selected all the identities to which the ACT should apply,click OK to return to the Users and Permissions tab.
5 Select an identity in the Names list.

122 Applying an ACT to a Metadata Object � Chapter 7
Display 7.16 Users and Permissions Window – User Selected
The Permissions list specifies the permissions for the selected identity in theACT. Select the Grant or Deny check box for the permissions to specify whetherthe user should be allowed or denied the ability to perform the selected action.
Set the permissions for each user or group in the Names list. When you arefinished, select the Authorization tab.
6 The Authorization tab specifies the permissions that users and groups have for thecurrent ACT. Permissions listed on the Authorization tab apply to the ACT, not toany other resource. See “Specifying Access Controls” on page 115 for informationabout specifying permissions from the Authorization tab.
7 Click OK to define the access control template.
Applying an ACT to a Metadata ObjectAfter you create one or more ACTs, you can apply them to metadata objects in the
repository. If you designate a template as a repository ACT, those controls will beautomatically applied to all objects in the repository. Other ACTs are only applied toobjects that you choose.
To apply an access control template to a metadata object:1 Locate the object to which you want to apply the ACT (see “Locating Resources” on
page 107 for more information). Select the object, then select Properties from thepop-up menu or the File menu. In the Properties window, select theAuthorization tab.

Managing Authorizations � Applying an ACT to a Metadata Object 123
2 The Authorization tab lists any access controls that have already been specified forthe object, whether directly or through the repository ACT.
Display 7.17 Authorization Tab For a Defined Object
3 Click Access Control Templates to display the Add/Remove Access ControlTemplates window.

124 Applying an ACT to a Metadata Object � Chapter 7
Display 7.18 Add/Remove Access Control Templates Window
4 The window lists all of the ACTs that have been defined (in the Available list) andthe templates that have been applied to the object (in the Currently Using list).
Note that the Currently Using list only contains ACTs that have beenspecifically assigned to this object. Although the object uses the settings from therepository ACT (ReposACT in this example), it is not listed in the CurrentlyUsing list because it was not directly applied to the current object.
Select a template and click Properties to view information about the accesscontrols specified in the ACT.
5 Select the ACT you want to use in the Available list and use the arrow controlsto move the template to the Currently Using list. You can select more than onetemplate.

Managing Authorizations � Modifying the Repository ACT 125
Display 7.19 Add/Remove Access Control Templates Window – Template Selected
6 Click OK to apply the ACTs to the object.
Controlling Access to a Repository
Modifying the Repository ACTWhen you create a metadata repository, a repository ACT is automatically created
that specifies default access controls for all objects in the repository. You can modify thepermission settings on the repository ACT to provide default settings that meet yoursecurity needs.
To modify the repository ACT:
1 From the navigation tree, select the Authorization Manager plug-in, then selectthe Access Control Templates folder.
2 The folder contains all ACTs that have been defined. The repository ACT is
identified by the repository ACT icon ( ).
3 Select the ACT, then select Properties from the pop-up menu or the File menu.
4 Use the Properties window to make changes to the repository ACT. Rememberthat the permission settings you choose for the repository ACT will be applied bydefault to all resources in the repository.
5 Click OK to close the Properties window and apply the changes.

126 Designating a Different Repository ACT � Chapter 7
Designating a Different Repository ACTRather than modifying the repository ACT, you can designate a different ACT to
serve as the repository ACT.To designate a repository ACT:
1 Select the Authorization Manager plug-in in the navigation tree, and then selectthe Access Control Templates folder.
2 In the display area, select the ACT that you want to apply to the repository andselect Repository ACT from the pop-up menu or the Actions menu. You can alsoopen the Access Control Templates folder in the navigation tree and select theACT in the navigation tree.
3 After you designate the repository ACT, the icon for the ACT changes to a bluecolor. When you display the pop-up menu or Actions menu with the repositoryACT selected, the Repository ACT menu item is selected.
Display 7.20 Repository ACT Menu Designation
Managing PermissionsAlthough you cannot change any of the default permissions, you can create and
manage your own user–defined permissions. After they have been created, user–definedpermissions function identically to default permissions and can be set through ACTsand ACEs. User-defined permissions are only used if you are using an application thatrequires the permission value to enforce authorization decisions. You must be anadministrative user or an unrestricted user to manage permissions.
Creating a User-Defined PermissionTo create a user-defined permission:1 From the navigation tree, select the Permissions folder under the Authorization
Manager plug-in.2 Select New Permission from the pop-up menu, the Actions menu, or the toolbar.

Managing Authorizations � Modifying a Permission 127
Display 7.21 New Permission Window
3 In the New Permission window, enter a name and (optionally) a description for thepermission. Because a user-defined permission only works with applications thathave been specifically created to use the permission, you must make sure tospecify the permission exactly as the using application expects.
4 Click OK to define the permission. The permission will now be listed with thedefault permissions when defining ACTs and ACEs.
Modifying a PermissionYou can only modify a permission if you are an unrestricted user or if you have been
directly granted WriteMetadata permission for the permission object. You can onlymodify user-defined permissions, not default permissions.
CAUTION:Each permission can be used by thousands of access controls. Modifying or deleting apermission is likely to have serious consequences for authorization. �
To modify a permission:
1 From the navigation tree, select the Authorization Manager plug-in and thenselect the Permissions folder.

128 Modifying a Permission � Chapter 7
2 The navigation tree and display area list the defined permissions, including anyuser-created permissions.
Display 7.22 Permissions Navigation Tree
3 To modify a permission, select the permission and select Properties from thepop-up menu or the File menu.
Display 7.23 Permission Properties Window

Managing Authorizations � Modifying a Permission 129
4 You can use the General tab to change the name, description, or responsibility listfor the permission. You can also use the Authorization tab to specify the accesscontrols for the permission. Click OK to apply the changes.

130

131
C H A P T E R
8Managing SAS Licenses
What Is the License Manager? 131Setting Up the License Manager 131
Viewing Machine Information 132
Viewing License Information 133
Viewing Component Information 136
What Is the License Manager?
The License Manager is a SAS Management Console plug-in that provides functionsfor you to view information about SAS software installed on computers in yourorganization. When SAS software is installed on these computers, they store metadataabout the installation on a SAS Metadata Server, and the License Manager can accessand display that metadata.
Using the License Manager, you can
� view information about all SAS installations on a machine (including the version,expiration date, and the name of the installer)
� view information about the SAS components that are included in a selected SASinstallation
� view a history of installation activity for a selected machine.
Setting Up the License Manager
In order for the License Manager to be able to access installation information, youmust set up an installation metadata server, which is used to store the installationmetadata. You can then use SAS Management Console to connect to the server and theLicense Manager to read the metadata
For Windows installations, you can set up the installation metadata server in twoways:
� Using the SAS Configuration Wizard. This wizard, which is run from the SASSoftware Navigator, automatically sets up the install metadata server.
� Using the SAS Configuration Wizard. This wizard prompts you for the followinginformation:
� server
� port
� protocol
� repository

132 Viewing Machine Information � Chapter 8
� user ID� password.
The wizard uses this information to create the metasys.xml file. Each time aSAS installation is performed, the installation process uses the metasys.xml file todetermine the location of the installation metadata server.
For UNIX and VMS installations, the SAS Configuration Wizard provides an optionof integrating installation information with a SAS metadata server (installationmetadata is not stored by default). After you specify that the installation should beintegrated, you must provide the following information:
� server� port� repository� user ID� password.
As with Windows installations, this information is saved to a file which theinstallation process uses to determine the location of the installation metadata server.
Viewing Machine InformationThe License Manager lets you view information about the individual machines on
which SAS has been installed as well as providing an installation history.To view machine information:1 Connect to the installation metadata server. See “Setting Up the License
Manager” on page 131 for more information.2 From the navigation tree, select the Maintenance folder and then the License
Manager plug-in to view a list of machines.3 Select a machine and select Properties from the pop-up menu or the File menu.
The Machine Properties window appears, with the General tab selected.
Display 8.1 Machine Properties Window – General Tab

Managing SAS Licenses � Viewing License Information 133
The General tab displays the machine name and lists when the installationinformation was created and modified. The Created field specifies the first timeSAS was installed on the machine. The Modified field specifies the date and timeof the most recent SAS installation.
4 Select the History tab to view details about the installation activity for themachine.
Display 8.2 Machine Properties Window – History Tab
5 Click OK to close the window.
Viewing License InformationTo view information about SAS licenses on machines in your organization:1 Connect to the installation metadata server. See “Setting Up the License
Manager” on page 131 for more information.2 From the navigation tree, select the Maintenance folder and then the License
Manager plug-in. The navigation tree lists the machines that have writteninstallation information to the metadata server.

134 Viewing License Information � Chapter 8
Display 8.3 License Manager Navigation Tree
3 To view information about the SAS licenses on a particular machine, either selectthe machine in the navigation tree or click the plus sign beside the machine.
4 If you select the machine in the navigation tree, the display area containsinformation about the SAS licenses installed on the machine.
Display 8.4 License Information For Selected Machine
If you click the plus sign next to the machine in the navigation tree, the licensesfor that machine appear below the machine in the tree.
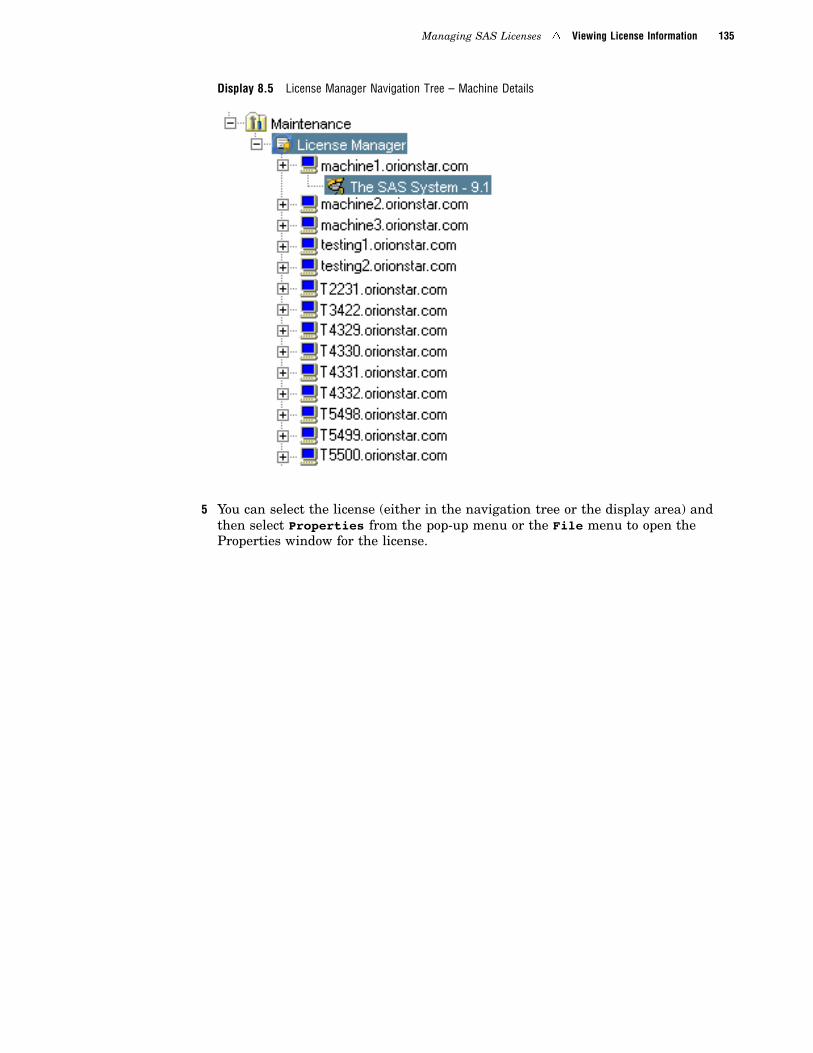
Managing SAS Licenses � Viewing License Information 135
Display 8.5 License Manager Navigation Tree – Machine Details
5 You can select the license (either in the navigation tree or the display area) andthen select Properties from the pop-up menu or the File menu to open theProperties window for the license.

136 Viewing Component Information � Chapter 8
Display 8.6 License Properties Window
The window displays information about the installation and the expiration ofthe selected license. Click OK to close the window.
Viewing Component InformationYou can choose to view information about the individual SAS components that are
licensed and installed on a specified machine.To view component information:1 Connect to the installation metadata server. See “Setting Up the License
Manager” on page 131 for more information.2 From the navigation tree, select the Maintenance folder and then select the
License Manager plug-in.3 Select Options from the pop-up menu or the Actions menu. The Options window
appears.

Managing SAS Licenses � Viewing Component Information 137
Display 8.7 License Manager Options Window
4 In the Options window, select Component View and click OK .5 In the navigation tree, click the plus sign next to a machine name to display the
list of SAS installations for the machine. Select a SAS installation in thenavigation tree whose components you want to view.
6 The display area lists all of the SAS components that are licensed for the selectedmachine, their location (if they are currently installed), and the installation date.
Display 8.8 Licensed SAS Components

138

139
C H A P T E R
9Managing Job Schedules
What Is the Schedule Manager? 139Setting Up Job Scheduling 139
Creating Scheduling Server Definitions 140
Installing Load Sharing Facility and Process Manager Servers 143
Installing Flow Manager and Calendar Editor 143
Specifying Metadata for an LSF Scheduling Server 143Defining an Operating System Scheduling Server 144
Deploying Jobs for Scheduling 144
Deploying DATA Step Programs for Scheduling 145
Creating a Job Flow 145
Specifying Dependencies 146
Scheduling Flows 150Viewing Job Flow Properties 151
Adding Jobs to a Job Flow 151
What Is the Schedule Manager?
The Schedule Manager is a SAS Management Console plug-in that schedules jobscreated in other applications (such as SAS Data Integration Studio) or SAS data step orprocedure programs stored on a processing server. The jobs can be scheduled either byusing Platform Computing’s Load Sharing Facility (LSF) or by using the schedulingcapabilities of a server’s operating system. Using the Schedule Manager, you can
� create job flows, which contain one or more jobs for scheduling.
� create dependencies for jobs in the flow, which are criteria that must be met inorder for the job to run. Dependencies can be based on time, other jobs, or files.
� schedule a flow to run based on specified conditions (run once, run manually, orrun whenever a dependency is met).
The scheduled flows are run either on a defined scheduling server under the controlof the Flow Manager (part of the LSF software) or on a operating system schedulingserver.
Setting Up Job Scheduling
Before you can use the Schedule Manager to schedule jobs and job flows, you mustcomplete several tasks to set up the job scheduling environment and prepare jobs forscheduling.

140 Creating Scheduling Server Definitions � Chapter 9
To set up job scheduling using LSF scheduling:1 In SAS Management Console, create a definition for a SAS server (which includes
a workspace server and a batch server) on which scheduled jobs must be run.2 Install Platform Computing’s Load Sharing Facility (LSF) and Process Manager
servers.3 Install Platform Computing’s Flow Manager and Calendar Editor.4 In SAS Management Console, create a metadata definition for an LSF scheduling
server.5 Deploy jobs for scheduling.
To set up job scheduling using operating system scheduling:1 Create a definition for a SAS server on which scheduled jobs must be run.2 In SAS Management Console, create a definition for an operating system
scheduling server.3 Deploy jobs for scheduling.
See SAS Intelligence Platform: System Administration Guide for details about eachof these setup tasks.
Creating Scheduling Server DefinitionsJob flows that are scheduled in the Schedule Manager are sent to a server that
controls the scheduling and runs the application. You must use the SAS ManagementConsole Server Manager plug-in to create definitions for the servers required to performscheduling.
To create the scheduling server definitions:1 Use the Server Manager plug-in to define a SAS workspace server. See “Defining a
Basic SAS Server” on page 61 for details about creating a new SAS serverdefinition.
From the navigation tree, select the Server Manager plug-in and select NewServer from the pop-up menu, the Actions menu, or the toolbar to start the NewServer Wizard.
In the Server Type window in the wizard, select SAS Application Server asthe server type.

Managing Job Schedules � Creating Scheduling Server Definitions 141
Display 9.1 Server Type Window
In the SAS Server Type window, select Workspace Server as the SAS servertype.
Display 9.2 SAS Server Type Window – Workspace Server Selected
Complete the New Server Wizard to define the SAS workspace server.
2 Use the Server Manager to add an application server component to the server youjust defined. See “Adding a SAS Server Component” on page 66 for details.

142 Creating Scheduling Server Definitions � Chapter 9
In the navigation tree, select the SAS application server you just defined, thenselect Add Application Server Component from the pop-up menu, the toolbar,or the Actions menu. The New Server Wizard starts.
In the SAS Server Type window, select one of the SAS batch servers as the typeof component you want to add. depending on the type of jobs you want to schedule.You can select SAS Data Step Batch Server (for scheduling SAS DATA stepprograms), SAS Java Batch Server (for scheduling java programs), or SASGeneric Batch Server (for all other scheduling applications.
Complete the wizard to add the SAS batch server to the application server.
After you have defined the workspace server and batch server, you must specify adirectory that will store the code for the jobs deployed for scheduling. This directorymust be available to the SAS workspace server.
To define the scheduling directory:1 From the navigation tree, select the Schedule Manager plug-in, then select
Deployment Directories from the Actions menu or the pop–up menu. TheDeployment Directories window appears.
Display 9.3 Deployment Directories Window
2 Select the workspace server that will be used for scheduling from theApplication Server drop-down list.
3 Click New to display the New Directory window. Specify the name and path for thedeployment directory.
Display 9.4 New Directory Window
4 Click OK to close the New Directory window, then click OK to close the DeploymentDirectories window.

Managing Job Schedules � Specifying Metadata for an LSF Scheduling Server 143
Installing Load Sharing Facility and Process Manager ServersAfter you have created definitions for the workspace server and batch server, you
must install Platform Computing’s Load Sharing Facility and the Process Managerserver. See SAS Intelligence Platform: System Administration Guide for installationinformation.
Installing Flow Manager and Calendar EditorYou must install the Flow Manager and the Calendar Editor on the machine where
SAS Management Console is installed. The Flow Manager is a Platform Computingscheduling client that manages the status of flows that are submitted to an LSF server.The Calendar Editor is a Platform Computing scheduling client that enables you tocreate custom calendars that are used to create time dependencies for jobs.
See SAS Intelligence Platform: System Administration Guide for installationinformation.
Specifying Metadata for an LSF Scheduling ServerAfter installing and starting the Process Manager server, you must create a
metadata definition in SAS Management Console to identify the server.To create the Process Manager server definition:1 From the navigation tree, select the Server Manager plug-in, then select New
Server from the pop-up menu, the Actions menu, or the toolbar. The New ServerWizard starts.
2 In the Server Type window, select Platform Process Manager Server as theserver type you want to define.
3 Follow the windows in the New Server Wizard to define the server. In theConnection Options window, specify the authentication domain, host and portnumber for the Process Manager server you previously installed and started (see“Installing Load Sharing Facility and Process Manager Servers” on page 143).

144 Defining an Operating System Scheduling Server � Chapter 9
Display 9.5 Connection Options Window for Process Manager Server
4 Complete the New Server Wizard to create a definition for the Process Managerserver.
Defining an Operating System Scheduling ServerIf you are going to use operating system scheduling capabilities to schedule jobs, you
must define one or more servers that will be used to run the scheduled jobs. To definean operating system scheduling server, follow these steps:
1 From the navigation tree, select the Server Manager plug-in, then select NewServer from the pop-up menu, the Actions menu, or the toolbar. The New ServerWizard starts.
2 In the Server Type page of the wizard, select Operating System Services as theserver type.
3 Follow the prompts in the wizard to define the server.
Deploying Jobs for SchedulingAfter you have installed the required software and started and defined the necessary
servers, you can begin preparing jobs to be scheduled. The Schedule Manager onlyschedules jobs from other applications that have been deployed (prepared forscheduling).
To deploy a job for scheduling in an application such as SAS Data Integration Studio:
1 Select the job to be scheduled.
2 Select the appropriate option in the application to display the Deploy forScheduling window.
3 Specify the scheduling server as the server to which the job should be deployed,then specify the other information requested by the window.
Managing Job Schedules � Creating a Job Flow 145
4 The scheduling server generates SAS code for the job, and metadata for thedeployed job is stored in the current metadata repository. The job is now availableto be scheduled using the Schedule Manager.
For detailed information about deploying jobs from a specific application, see theonline Help for the application.
Deploying DATA Step Programs for SchedulingYou can also deploy for scheduling DATA step or procedure programs that are stored
on a SAS DATA step batch server. Once you have deployed a DATA step program, youcan add the program to a flow and define dependencies just as you would for jobsdeployed by other SAS applications.
To deploy a DATA step or procedure program for scheduling:1 If you have not already done so, use the Server Manager to define a SAS DATA
step batch server. The program you want to deploy must be stored on the DATAstep batch server machine.
2 From the navigation tree, select the Schedule Manager plug-in, then selectDeploy SAS Data Step Program from the pop-up menu.
3 In the Deploy SAS Data Step Program dialog box, select the SAS DATA step batchserver that contains the program you want to deploy.
4 In the Deployment Directory field, select or define the directory that containsthe program to be deployed.
5 Select the DATA step program in the File field and the name you want to use forthe job in the Deployed Job Name field.
6 When you click OK, the metadata for the deployed job is stored in the metadatarepository. The job is now available to be scheduled using the Schedule Manager.
Creating a Job FlowIn order to schedule a job, you must first add it to a job flow or create a new job flow.
A job flow is a group of jobs and their dependencies.To create a job flow:1 From the navigation tree, select the Schedule Manager plug-in, then select New
Flow from the Actions menu, the pop-up menu, or the toolbar. The New Job Flowwindow appears.

146 Specifying Dependencies � Chapter 9
Display 9.6 New Job Flow Window
2 In the New Job Flow window, provide a name for the job flow, then select thescheduling server and the jobs that the flow should contain. The drop-down list forthe Scheduling Server field lists all of the defined Process Manager andoperating system scheduling servers (see “Specifying Metadata for an LSFScheduling Server” on page 143). Select the server that you want to use to run thecurrent job flow.
The Available Jobs field lists all of the jobs that have been defined anddeployed for scheduling (see “Deploying Jobs for Scheduling” on page 144). Selecta job and use the arrow controls to move the job to the Selected Jobs list toinclude it in the job flow.
3 Click OK to close the window and create the job flow.
Specifying DependenciesAfter you have created a job flow, you can specify dependencies for the job flow.
Without dependencies, all of the jobs in the job flow run immediately andsimultaneously. Dependencies let you specify the conditions that must be met before ajob in a job flow runs.
To create a dependency for a job flow:

Managing Job Schedules � Specifying Dependencies 147
1 From the navigation tree, select the Schedule Manager plug-in and select the jobflow whose dependencies you want to create. Click the plus sign next to the jobflow to display the jobs that are contained in the job flow. Select a job for whichyou want to specify dependencies and select Dependencies from the pop–upmenu, the Actions menu, or the toolbar. The Dependencies window appears.
Display 9.7 Dependencies Window
2 The Dependencies window lets you specify time dependencies (the job runs at aspecified time or day), job dependencies (the job runs based on another job), andfile dependencies (the job runs based on conditions associated with a specified file).You can also specify whether the job runs only when certain dependencies are met,or if all dependencies must be met.
3 Click New next to the Time dependencies list to define a new time dependency.A time dependency specifies that the job runs on a specified day at a specified time.

148 Specifying Dependencies � Chapter 9
Display 9.8 New Time Dependency Window – Process Manager Scheduling
If you are defining a job to run on a Process Manager server, you must firstselect the calendar from the Calendar name drop-down list. The calendaridentifies the days for the dependency. Several sample calendars are supplied withthe LSF Scheduler software, and you can also create your own calendars. Refer tothe online Help for the Schedule Manager plug–in for more information.
For a job running on a Process Manager server, after you specify the calendar,use the Hours and Minutes fields to specify the time at which the job runs.Specify how long the job should run in the Duration of event field. Click OKwhen you have finished defining the dependency.
If you are defining a job to run on an operating system scheduling server, youmust specify the start date and recurrence pattern for the dependency. Somerecurrence patterns are not supported on all operating systems. Refer to the onlineHelp for the Schedule Manager for specific restrictions for your operating system.
4 Click New next to the Job dependencies list to define a job dependency. A jobdependency specifies that the current job runs if a specified event occurs withanother job. For example, you can specify that the current job runs when Job Acompletes successfully, or you can specify that it runs when Job A ends with aspecified exit code.

Managing Job Schedules � Specifying Dependencies 149
Display 9.9 New Job Dependency Window
In the New Job Dependency window, select the job that the current job isdependent on from the Jobs drop-down list, then select the event that is part ofthe dependency from the Event Type drop-down list (such as successfulcompletion, ending with a specified exit code, or failing to start). Some event typesrequire you to specify additional information (such as an exit code or a run time)that is part of the dependency. Click OK when you have finished defining thedependency.
5 Click New next to the File dependencies list to define a file dependency. A filedependency specifies that the current job runs if a condition is met on a specifiedfile. For example, you can specify that the current job runs whenever File B iscreated, or that it runs when File B becomes larger than a specified size.
Display 9.10 New File Dependency Window
In the New File Dependency window, specify the file upon which the job isdependent in the File name field and the file state that must exist in the

150 Scheduling Flows � Chapter 9
Condition field (such as that the file exists, that the file is a specified size, or thatthe file is beyond a certain age). Click OK when you have finished defining thedependency.
6 When you have finished defining dependencies for the selected job, click OK inthe Dependencies window.
Scheduling Flows
After you have created a job flow and (optionally) defined dependencies for the jobs inthe job flow, you can schedule the flow to run. Scheduled job flows are sent to thescheduling server, where the dependencies are evaluated. You can specify that aselected job flow is scheduled to run according to a specified trigger.
To schedule a job flow:
1 From the navigation tree, select the Schedule Manager and select the job flowyou want to schedule. Select Schedule Flow from the pop-up menu, the toolbar,or the Actions menu. The Schedule Flow window appears.
Display 9.11 Schedule Flow Window
2 Select the condition under which the flow should run from the Trigger drop-downlist. Valid values are
Run Once specifies that the flow is sent to the scheduling server, whichevaluates any dependencies and runs the jobs in the job flowone time only.
Manually inSchedulingServer
specifies that the flow is sent to the scheduling server, whichevaluates any dependencies but does not run the jobs in the jobflow. The job flow is held until someone uses the Flow Managerapplication (part of the LSF Scheduler software) to manuallyrun the jobs.
<selecteddependency>
specifies that a defined dependency is a trigger for the job flow.A job flow that uses a dependency as a trigger runs each timethe conditions for the dependency are met.
3 After you have scheduled a flow on a Process Manager server, you can use theFlow Manager application to view the history of a job flow or job, rerun a job flowor job, or stop a job flow from running. If you scheduled the flow on an operatingsystem scheduling server, you can use operating system commands to view thestatus of a flow or manually stop the flow from running. See the Help for theSchedule Manager plug-in or the Flow Manager application for information.
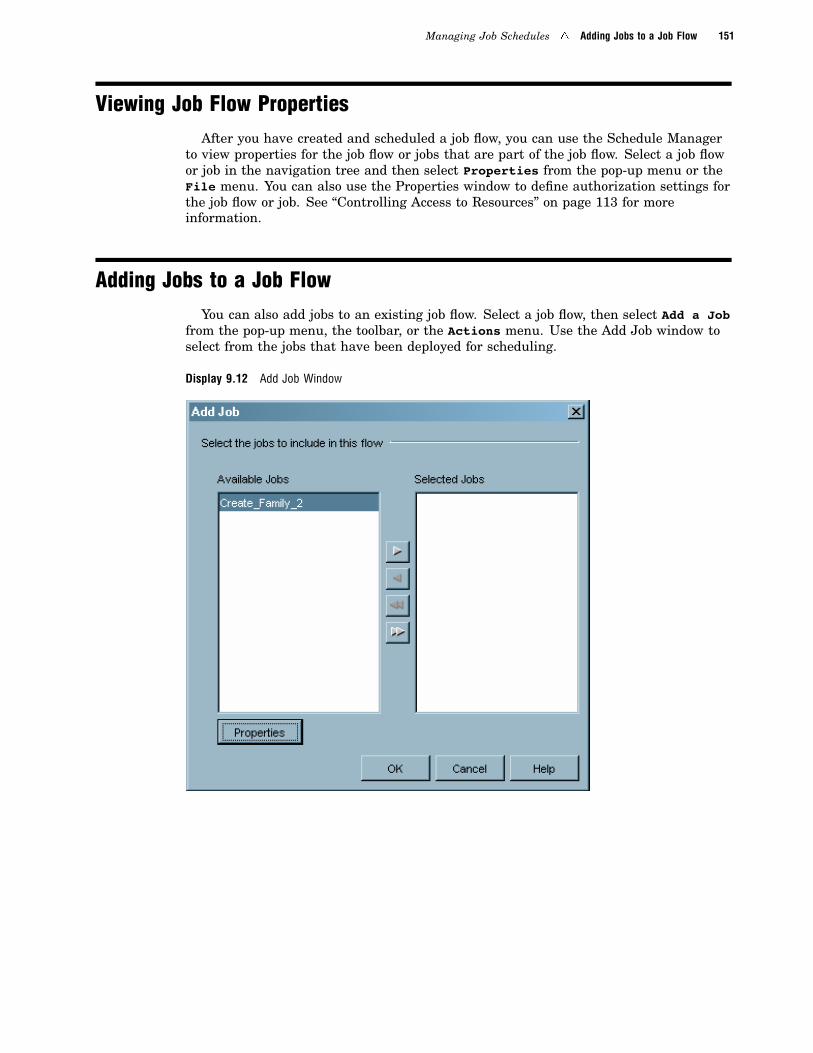
Managing Job Schedules � Adding Jobs to a Job Flow 151
Viewing Job Flow PropertiesAfter you have created and scheduled a job flow, you can use the Schedule Manager
to view properties for the job flow or jobs that are part of the job flow. Select a job flowor job in the navigation tree and then select Properties from the pop-up menu or theFile menu. You can also use the Properties window to define authorization settings forthe job flow or job. See “Controlling Access to Resources” on page 113 for moreinformation.
Adding Jobs to a Job FlowYou can also add jobs to an existing job flow. Select a job flow, then select Add a Job
from the pop-up menu, the toolbar, or the Actions menu. Use the Add Job window toselect from the jobs that have been deployed for scheduling.
Display 9.12 Add Job Window

152

153
C H A P T E R
10Managing XMLMaps
What Is the XMLMap Manager? 153Importing an XMLMap 153
Creating an XMLMap 154
Managing XMLMaps 155
What Is the XMLMap Manager?The XMLMap Manager is a SAS Management Console plug-in that allows you to
create, import, and manage XMLMaps. An XMLMap is an XML file that tells the SASXML LIBNAME engine (SXLE) how to interpret XML markup as SAS data sets,columns, and rows.
Using the XMLMap Manager, you can� import an existing XMLMap� create a new XMLMap� manage XMLMaps (including renaming and deleting).
Importing an XMLMapIf you have an existing XMLMap, can use the XMLMap Manager to import the file
into the metadata server.To import an XMLMap:1 From the navigation tree, select the XMLMap Manager, then select Import
XMLMap from the pop-up menu or the Actions menu.2 In the Open window, select the XMLMap you want to import and click Open .
Display 10.1 Open Window

154 Creating an XMLMap � Chapter 10
3 The imported XMLMap is listed in the navigation tree underneath the XMLMapManager plug-in.
Display 10.2 XMLMap Manager Navigation Tree
The name of the imported XMLMap is set to the value of the name= attributeon the SXLE element tag. The name must be unique within the metadatarepository, and cannot be SXLEMAP or XMLMAP.
4 Selecting a table name contained in the XMLMap from the navigation treedisplays the column names and attributes in the display area.
Display 10.3 XMLMap Column Names and Attributes
Creating an XMLMapTo create an XMLMap:1 From the navigation tree, select the XMLMap Manager plug-in, then select
Create XMLMap from the pop-up menu or the Actions menu. The XML Mapperapplication starts.
Display 10.4 XML Mapper Application Window

Managing XMLMaps � Managing XMLMaps 155
2 Create an XMLMap file in the XML Mapper application by opening the XML filewhose data you want to map, and then using the XML attributes to define therequired mapping. For information about using the XML Mapper application,refer to the application’s Help.
3 When you save the new XMLMap and close the XML Mapper application, the newXMLMap is listed under the XMLMap Manager plug-in.
Managing XMLMapsYou can use the XMLMap Manager to rename or delete an XMLMap.To rename an XMLMap, select the XMLMap in the navigation tree or the display
area and select Rename XMLMap from the pop-up menu or the Actions menu.
Display 10.5 Rename XMLMap Window
Specify a new name for the XMLMap in the Rename window and click OK . EachXMLMap name must be unique within the metadata repository, and you cannot use thenames SXLEMAP or XMLMAP.
To delete an XMLMap, select the XMLMap in the navigation tree or the display areaand select Delete XMLMap from the pop-up menu or the Actions menu. Theapplication asks you to confirm the deletion.

156

157
A P P E N D I X
1Replication and PromotionMacros
Modifying Replication and Promotion Macros 157
Modifying Replication and Promotion MacrosDuring the process of running a replication or promotion job, a series of user-defined
macros are called. These macros allow you to define additional processing that shouldtake place as part of the replication or promotion job.
The following table lists the macros that you can define or modify.
Table A1.1 Replication and Promotion User Macros
Macro name Function
mduval.sas Stores any user-defined validation code.
mdpresrc.sas Stores user-defined code to run before the sourcerepository is copied to the work directory on thesource server.
mdpstsrc.sas Stores user-defined code to run after the sourcerepository has been copied to the work directoryon the source server.
mdcptrg.sas Specifies the method by which data sets arecopied (the default is PROC UPLOAD). Changethis value to use a different method.
mdpretg.sas Stores user-defined code to run before therepository is copied from the work directory tothe target repository.
mdpsttrg.sas Stores user-defined code to run after therepository is copied from the work directory tothe target repository.

158

159
A P P E N D I X
2Recommended Reading
Recommended Reading 159
Recommended Reading
Here is the recommended reading list for this title:� Getting Started with the SAS Open Metadata Interface� SAS Data Integration Studio: User’s Guide
� SAS Intelligence Platform: Application Server Administration Guide� SAS Intelligence Platform: Installation Guide� SAS Intelligence Platform: Security Administration Guide� SAS Intelligence Platform: System Administration Guide
� SAS Language Reference: Dictionary� SAS Open Metadata Interface: Reference� SAS Open Metadata Interface: User’s Guide
� SAS XML LIBNAME Engine User’s Guide� SAS/ACCESS for Relational Databases: Reference
For a complete list of SAS publications, see the current SAS Publishing Catalog. Toorder the most current publications or to receive a free copy of the catalog, contact aSAS representative at
SAS Publishing SalesSAS Campus DriveCary, NC 27513Telephone: (800) 727-3228*Fax: (919) 677-8166E-mail: [email protected] address: support.sas.com/pubs* For other SAS Institute business, call (919) 677-8000.
Customers outside the United States should contact their local SAS office.

160

161
Glossary
access control templatea reusable named authorization pattern that you can apply to multiple resources. Anaccess control template (ACT) consists of a list of users and groups and indicates, foreach user or group, whether permissions are granted or denied.
administrative usera special user of the metadata server who can create and delete user definitions andlogins. An administrative user can also perform administrative tasks such asstarting, stopping, pausing, and refreshing the metadata server. Unlike anunrestricted user, an administrative user does not have unrestricted access to themetadata. You are an administrative user if your user ID is listed in theadminUsers.txt file or if you connect to the metadata server using the same user IDthat was used to start the metadata server.
application servera server that is used for storing applications. Users can access and use these serverapplications instead of loading the applications on their client machines. Theapplication that the client runs is stored on the client. Requests are sent to theserver for processing, and the results are returned to the client. In this way, littleinformation is processed by the client, and nearly everything is done by the server.
authenticationthe process of verifying the identity of a person or process within the guidelines of aspecific security policy.
authentication domaina set of computing resources that use the same authentication process. An individualuses the same user ID and password for all of the resources in a particularauthentication domain. Authentication domains provide logical groupings forresources and logins in a metadata repository. For example, when an applicationneeds to locate credentials that enable a particular user to access a particular server,the application searches the metadata for logins that are associated with theauthentication domain in which the target server is registered.
authorizationthe process of evaluating rules to determine which users have which permissions forwhich resources. For example, an authorization rule can specify that a particularuser has read and write permissions for a specific database table.

162 Glossary
change managementin the SAS Open Metadata Architecture, a facility for metadata source control,metadata promotion, and metadata replication. See also metadata source control,metadata promotion, metadata replication, SAS Open Metadata Architecture.
change-managed repositoryin the SAS Open Metadata Architecture, a metadata repository that is undermetadata source control. See also change management, metadata source control,metadata repository.
custom repositoryin the SAS Open Metadata Architecture, a metadata repository with dependencies. Acustom repository is often used to specify resources that are unique to a particulardata collection. A custom repository often depends on (inherits metadata from) afoundation repository. For example, a custom repository could define sources andtargets that are unique to a particular data warehouse in a test environment. Thecustom repository could inherit most server metadata from a foundation repository inthe test environment. See also foundation repository, source, target, metadatarepository, SAS Open Metadata Architecture.
database management system (DBMS)a software application that enables you to create and manipulate data that is storedin the form of databases. See also hierarchical structure, relational databasemanagement system.
default access control templatethe access control template (ACT) that controls access to a particular repository andto resources for which definitive access controls are not specified. You can designateone default ACT for each metadata repository. The default ACT is also called therepository ACT.
foundation repositoryin the SAS Open Metadata Architecture, a metadata repository that does not dependon other repositories. A foundation repository is often used to specify metadata forglobal resources. For example, a foundation repository could define most of theservers that are used in several data warehouses in a test environment. See alsoSAS Open Metadata Architecture, metadata repository, global resources.
groupa collection of users who are registered in a SAS metadata environment. A group cancontain other groups as well as individual users. In a SAS metadata environment, auser group is represented by an IdentityGroup object.
hierarchical structurein SYSTEM 2000 software, an arrangement of data in which records occur at distinctlevels with different types of information at each level. Records are related to otherrecords as ancestors, descendants, siblings, and so on.
identityan individual user or a group of users that is registered in a SAS metadataenvironment. Each individual and group that accesses secured resources on a SASMetadata Server should be represented by a unique identity within that server.
joba metadata object that specifies processes that create output.
job flowa group of jobs and their dependencies - including dependencies on other jobs, onfiles, or on specified dates and times. See also job.

Glossary 163
logina combination of a user ID, a password, and an authentication domain. Each loginprovides access to a particular set of computing resources. In a SAS metadataenvironment, each login can belong to only one individual or group. However, eachindividual or group can own multiple logins.
metadataa description or definition of data or information.
metadata profilea client-side definition of where a metadata server is located. The definition includesa host name, a port number, and a list of one or more metadata repositories. Inaddition, the metadata profile can contain a user’s login information and instructionsfor connecting to the metadata server automatically.
metadata promotionin the SAS Open Metadata Architecture, a feature that enables you to copy thecontents of a metadata repository to another repository – and to specify changes inthe metadata that will be stored in the target repository. For example, you can usethis feature to move metadata from a development environment to a testingenvironment. In such a scenario, you would probably have to change some ports,hosts, and/or schema names as the metadata moved from one environment to another.See also metadata repository, change management, SAS Open Metadata Architecture.
metadata replicationin the SAS Open Metadata Architecture, a feature that enables you to copy thecontents of a metadata repository to another repository. Use replication to make anexact copy of a metadata repository in a new location: to back up a repository, forexample. See also metadata repository, change management, SAS Open MetadataArchitecture.
metadata repositorya collection of related metadata objects, such as the metadata for a set of tables andcolumns that are maintained by an application. A SAS Metadata Repository is anexample.
metadata servera server that provides metadata management services to one or more clientapplications. A SAS Metadata Server is an example.
metadata source controlin the SAS Open Metadata Architecture, a feature that enables multiple users towork with the same metadata repository at the same time – without overwritingeach other’s changes. See also metadata repository, change management, SAS OpenMetadata Architecture.
ownerthe person who formulates policy for an object such as a table or a library. See alsoadministrator.
permissionthe type of access that a user or group has to a resource. The permission defineswhat the user or group can do with the resource. Examples of permissions areReadMetadata and WriteMetadata.
permission conditiona constraint on the explicitly granted permissions for a particular resource. You canuse a permission condition to grant access to a specific portion, or slice, of datawithin a resource. For example, if an OLAP cube has an EmployeeInfo dimension

164 Glossary
that includes a Salary level, you could give a particular user access to data for onlythose employees who have salaries that are less than $50,000 per year.
plug-ina file that modifies, enhances, or extends the capabilities of an application program.The application program must be designed to accept plug-ins, and the plug-ins mustmeet design criteria specified by the developers of the application program. In SASManagement Console, a plug-in is a JAR file that is installed in the SASManagement Console directory to provide a specific administrative function. Theplug-ins enable users to customize SAS Management Console to include only thefunctions that are needed.
project repositoryin the SAS Open Metadata Architecture, a metadata repository that enables aspecified person to add or update metadata in a change-managed repository. See alsoSAS Open Metadata Architecture, metadata repository, change-managed repository.
promotionThe process of copying a metadata repository to another location while makingchanges to values of metadata attributes. See also replication.
relational database management systema database management system that organizes and accesses data according torelationships between data items. The main characteristic of a relational databasemanagement system is the two-dimensional table. Examples of relational databasemanagement systems are DB2, Oracle, SYBASE, and Microsoft SQL Server.
replicationThe process of copying a metadata repository to another location without making anychanges to values of metadata attributes. See also promotion.
repository access control templatethe access control template (ACT) that controls access to a particular repository andto resources for which definitive access controls are not specified. You can designateone default ACT for each metadata repository. The repository ACT is also called thedefault ACT.
repository dependencyin the SAS Open Metadata Architecture, a relationship between metadatarepositories in which one repository inherits metadata from another repository. Thisrelationship can be defined in the wizard that is used to add or update metadatarepositories, or it can be defined in the Metadata Manager in SAS ManagementConsole. See also SAS Open Metadata Architecture, metadata repository.
resourceany object that is registered in a metadata repository. For example, a resource can bean application, a data store, a dimension in an OLAP cube, a metadata item, anaccess control template, or a password.
resource templateA XML file that specifies the information required to create a metadata definition fora SAS resource.
SAS application servera server that provides SAS services to a client. In the SAS Open MetadataArchitecture, the metadata for a SAS application server specifies one or more servercomponents that provide SAS services to a client. See also server, server component.
SAS batch serverin general, a SAS application server that is running in batch mode. In the SAS OpenMetadata Architecture, the metadata for a SAS batch server specifies the network

Glossary 165
address of a SAS Workspace Server, and a SAS start command that will run jobs inbatch mode on the SAS Workspace Server. See also SAS Open MetadataArchitecture, SAS Workspace Server.
SAS Management Consolea Java application that provides a single user interface for performing SASadministrative tasks.
SAS Metadata Servera multi-user server that enables users to read metadata from or write metadata toone or more SAS Metadata Repositories. The SAS Metadata Server uses theIntegrated Object Model (IOM), which is provided with SAS Integration Technologies,to communicate with clients and with other servers.
SAS Open Metadata Architecturea general-purpose metadata management facility that provides metadata services toSAS applications. The SAS Open Metadata Architecture enables applications toexchange metadata, which makes it easier for these applications to work together.
SAS Workspace Servera SAS IOM server that is launched in order to fulfill client requests for IOMworkspaces. See also IOM server, workspace.
SAS/ACCESS LIBNAME statementa statement that specifies a SAS/ACCESS engine that enables you to access thecorresponding database management system as if it were a SAS library. See alsoSAS/ACCESS software.
SAS/ACCESS softwarea group of software interfaces, each of which makes data from a particular externaldatabase management system (DBMS) directly available to SAS, as well as makingSAS data directly available to the DBMS.
schemaa map or model of the overall data structure of a database. A schema consists ofschema records that are organized in a hierarchical tree structure. Schema recordscontain schema items.
servera computer system that provides data or services to multiple users on a network.The term ’server’ sometimes refers to the computer system’s hardware and software,but it often refers only to the software that provides the data or services. In anetwork, users might log on to a file server (to store and retrieve data files), a printserver (to use centrally located printers), or a database server (to query or updatedatabases). In a client/server implementation, a server is a program that waits forand fulfills requests from client programs for data or services. The client programsmight be running on the same computer or on other computers. See also service, Webserver, application server, SAS Metadata Server.
server componentin SAS Management Console, a metadata object that specifies connection informationto a particular kind of SAS server on a particular machine. See also SASManagement Console, metadata object, server context, logical server.
serviceone or more application components that an authorized user or application can call atany time to provide results that conform to a published specification. For example,network services transmit data or provide conversion of data in a network, databaseservices provide for the storage and retrieval of data in a database, and Web services

166 Glossary
interact with each other on the World Wide Web. See also Web services, SASFoundation Services.
sourcein SAS ETL Studio, a table, a view, or a file from which you will extract information.Sources can be in any format that SAS can access, on any supported hardwareplatform. The metadata for a source is an input to a job. See also metadata, job.
targetin SAS ETL Studio, a table, a view, or a file that contains information that has beenextracted from a source. Targets can be in any format that SAS can access, on anysupported hardware platform. A target is an output of a job. See also source, job.
unrestricted usera special user of the metadata server who can access all metadata on the server(except for passwords, which an unrestricted user can overwrite but cannot read). Anunrestricted user can also perform administrative tasks such as starting, stopping,pausing, and refreshing the metadata server. You are an unrestricted user if youruser ID is listed in the adminUsers.txt file and is preceded by an asterisk.
usera person who is registered in a SAS metadata environment.
Web servera server machine and software that enable organizations to share informationthrough intranets and through the Internet.

167
Index
Aaccess control templates (ACTs) 118
applying to metadata objects 122creating 118designating different repository ACTs 126modifying repository ACTs 125
access controls 115active server 18
maintaining 36pausing repositories on 37resuming paused server 37stopping 37
ACTsSee access control templates (ACTs)
application management plug-ins 5applications
locating resources by 108Authorization Manager 5, 105
access control templates 118access to repositories 125access to resources 113default permissions 106functions of 106locating resources 107permissions management 126planning an authorization strategy 106
authorization strategy 106Authorization tab 114
CCalendar Editor 143component information 136content servers 59context bar 6custom repositories 3, 18
DData Library Manager 5, 87
database libraries 94database schemas 93defining SAS libraries 88editing library definitions 102editing schema definitions 104generic libraries 98LIBNAME statement and 103pre-assigned libraries 100
database schemas 93database servers 59, 81default permissions 106display area 6
Eenterprise application servers 59, 83environment management plug-ins 5error log 15
specifying location 11export formats 31exporting metadata 31
FFlow Manager 143foundation repository 3, 18
resource templates and 38
Ggeneric libraries 98group definitions 53groups
planning for 45
HHelp 7
Iimport formats 25importing metadata 25importing XMLMaps 153
JJava options
specifying 10job flow
adding jobs to 151creating 145dependencies for 146scheduling 150viewing properties 151
Job Scheduler server 143

168 Index
job scheduling 139creating scheduling server definitions 140deploying jobs for scheduling 144installing Calendar Editor 143installing Flow Manager 143installing servers 143metadata for LSF scheduling server 143setting up 139
jobsadding to job flow 151deploying for scheduling 144
LLIBNAME statement 103libraries
database libraries 94defining 88generic libraries 98pre-assigned 100SAS/SHARE remote engine libraries 91
library definitionsediting 102
license information 133License Manager 5, 131
setting up 131viewing component information 136viewing license information 133viewing machine information 132
load balancing 76Load Sharing Facility server 143
specifying metadata for 143
Mmachine information 132macros
replication and promotion macros 44, 157menu bar 6message logging
specifying 11Meta Integration software 25, 31metadata
exporting 31for LSF scheduling server 143importing 25promoting 41purging 37replicating 41upgrading 44
Metadata Manager 5, 17metadata objects
applying ACTs to 122deleting 37
metadata permissions 106Metadata Profile Wizard 12metadata profiles
creating 11metadata repositories 18
changing dependencies 35context bar for 6controlling access to 125creating 21custom repositories 3, 18deleting 36dependency relationships 18
exporting metadata 31formatting 37foundation repository 3, 18importing metadata 25initializing 37New Repository Wizard 14, 21pausing 37project repositories 3, 18promoting dependent repositories 43purging metadata 37re-registering 37resuming when paused 37structure of 4, 19truncating 37types of 18unregistering 36, 37upgrading 44
metadata serversconnecting to 14defining connections to 11setting up 9
Model Bridge software 25, 31
Nnavigation tree 5New Repository Wizard 14, 21
re-registering repositories 37
Oobjects
deleting metadata objects 37display area for 6resource templates for 38
Ppermissions
default 106managing 126modifying 127user-defined 126
physical servers 68plug-ins 5
application management plug-ins 5environment management plug-ins 5locating resources with 108navigation tree for 5specifying location 10
pooling 78pre-assigned libraries 100project repositories 3, 18promoting metadata 41
dependent repositories 43environment setup 44
promotion environment 44promotion macros 44, 157PUBLIC users 46
Rremote engine libraries 91replicating metadata 41
environment setup 44replication environment 44

Index 169
replication macros 44, 157repositories
See metadata repositoriesrepository ACTs
designating a different ACT 126modifying 125
resource templates 4, 38adding 39deleting 38foundation repository and 38
resourcescontrolling access to 113
resources, locating 107by application 108by location 109by type 111plug-ins for 108
roadmaps 7
SSAS Management Console 1
how it works 2plug-ins 5starting 10user assistance 7user interface 5
SAS servers 59adding physical server 68adding server components 66adding server connection 69defining basic servers 61defining SAS spawners 71defining SAS V8.2 server 64load balancing 76managing 60pooling 78
SAS/SHARE remote engine libraries 91SAS spawner 71SAS V8.2 server 64SASUSERS 46Schedule Manager 5, 139
adding jobs to a job flow 151creating job flow 145scheduling flows 150setting up job scheduling 139specifying dependencies 146viewing job flow properties 151
scheduling server definitions 140scheduling servers 60
schema definitions
editing 104
schemas
database schemas 93
Server Manager 5, 59
database servers 81
enterprise application servers 83
SAS servers 60spawners 59
starting SAS Management Console 10
status line 6
Ttoolbar 7
Uupgrading metadata repositories 44
user assistance 7
user-defined permissions 126user definitions 46
user interface 5
context bar 6
display area 6
menu bar 6
navigation tree 5
status line 6toolbar 7
User Manager 5, 45
users
planning for 45
VV8.2 server 64
XXMLMap Manager 5, 153
creating XMLMaps 154
deleting XMLMaps 155importing XMLMaps 153
renaming XMLMaps 155
XMLMaps
creating 154
deleting 155
importing 153
renaming 155


Your Turn
If you have comments or suggestions about SAS 9.1.3® Management Console: User’sGuide, please send them to us on a photocopy of this page, or send us electronic mail.
For comments about this book, please return the photocopy to
SAS PublishingSAS Campus DriveCary, NC 27513E-mail: [email protected]
For suggestions about the software, please return the photocopy to
SAS Institute Inc.Technical Support DivisionSAS Campus DriveCary, NC 27513E-mail: [email protected]


SAS and all other SAS Institute Inc. product or service names are registered trademarks or trademarks of SAS Institute Inc. in the USA and other countries. ® indicates USA registration. Other brand and product names are trademarks of their respective companies. © 2006 SAS Institute Inc. All rights reserved. 403726US.0806
SAS® Publishing gives you the tools to flourish in any environment with SAS®!
Whether you are new to the workforce or an experienced professional, you need to distinguish yourself in this rapidly changing and competitive job market. SAS® Publishing provides you with a wide range of resources— including publications, online training, and software —to help you set yourself apart.
Expand Your Knowledge with Books from SAS® PublishingSAS® Press offers user-friendly books for all skill levels, covering such topics as univariate and multivariate statistics, linear models, mixed models, fi xed effects regression, and more. View our complete catalog and get free access to the latest reference documentation by visiting us online.
s u p p o r t . s a s . c o m / p u b s
SAS® Self-Paced e-Learning Puts Training at Your FingertipsYou are in complete control of your learning environment with SAS Self-Paced e-Learning! Gain immediate 24/7 access to SAS training directly from your desktop, using only a standard Web browser. If you do not have SAS installed, you can use SAS® Learning Edition for all Base SAS e-learning.
s u p p o r t . s a s . c o m / s e l f p a c e d
Build Your SAS Skills with SAS® Learning EditionSAS skills are in demand, and hands-on knowledge is vital. SAS users at all levels, from novice to advanced, will appreciate this inexpensive, intuitive, and easy-to-use personal learning version of SAS. With SAS Learning Edition, you have a unique opportunity to gain SAS software experience and propel your career in new and exciting directions.
s u p p o r t . s a s . c o m / L E
